

Page 1
7″ TFT Portable DVD Player
Portabel DVD-spelare med 7″ TFT-skärm
Portabel DVD-spiller med 7″ TFT-skjerm
Kannettava dvd-soitin, jossa 7″:n TFT-näyttö
EnglishSvenskaNorskSuomi
Art.no Model
18-8262 PDVD-196-UK
18-8263 PDVD-196-UK
18-8264 PDVD-196-UK
38-4551 PDVD-196
38-4552 PDVD-196
38-4553 PDVD-196
Ver. 201107
Page 2

2
Page 3

7″ TFT Portable DVD Player
Art.no 18-8262 Model PDVD-196-UK
18-8263 PDVD-196-UK
18-8264 PDVD-196-UK
38-4551 PDVD-196
38-4552 PDVD-196
38-4553 PDVD-196
Please read theentire instruction manual before use and save it for future reference.
Wereserve theright for any errors in text or images and for making any necessary
technical changes to this document. Ifyou should have any questions concerning
technical problems please contact our Customer Services.
1. Safety
• The product should only be repaired by qualified service personnel.
• The product should not be taken apart or modified.
• The product is designed for indoor use only.
• Never expose thedevice to high temperatures, blows, dampness or moisture.
• Do not place theproduct where it could fall into water or other type of liquid. Donot
place any objects containing liquid on theproduct, e.g. flower vases or soft drinks.
• Do not place thedevice in adamp, dusty environment or where there are
heavyvibrations.
• Shut off thestandby function and pull out theplug at night, or if you plan to be
away for an extended period.
• Never expose thebattery to high temperatures.
• Prolonged exposure to high volume from theheadphones can cause hearing damage.
• Place thedevice on ahorizontal surface.
• Only use thesupplied car charger.
English
CLASS 1 LASER PRODUCT
Warning! Donot open thecasing. Theproduct contains invisible laser beams which
can cause eye damage. Do not look directly into thelaser beam or look directly at it
using an optical instrument.
2. Packagecontents
• DVD player with TFT screen
• Remote control
• Car adaptor
• Charger
• Headphones
• Adaptor cable (3x RCA till 3.5 mm stereo)
3
Page 4

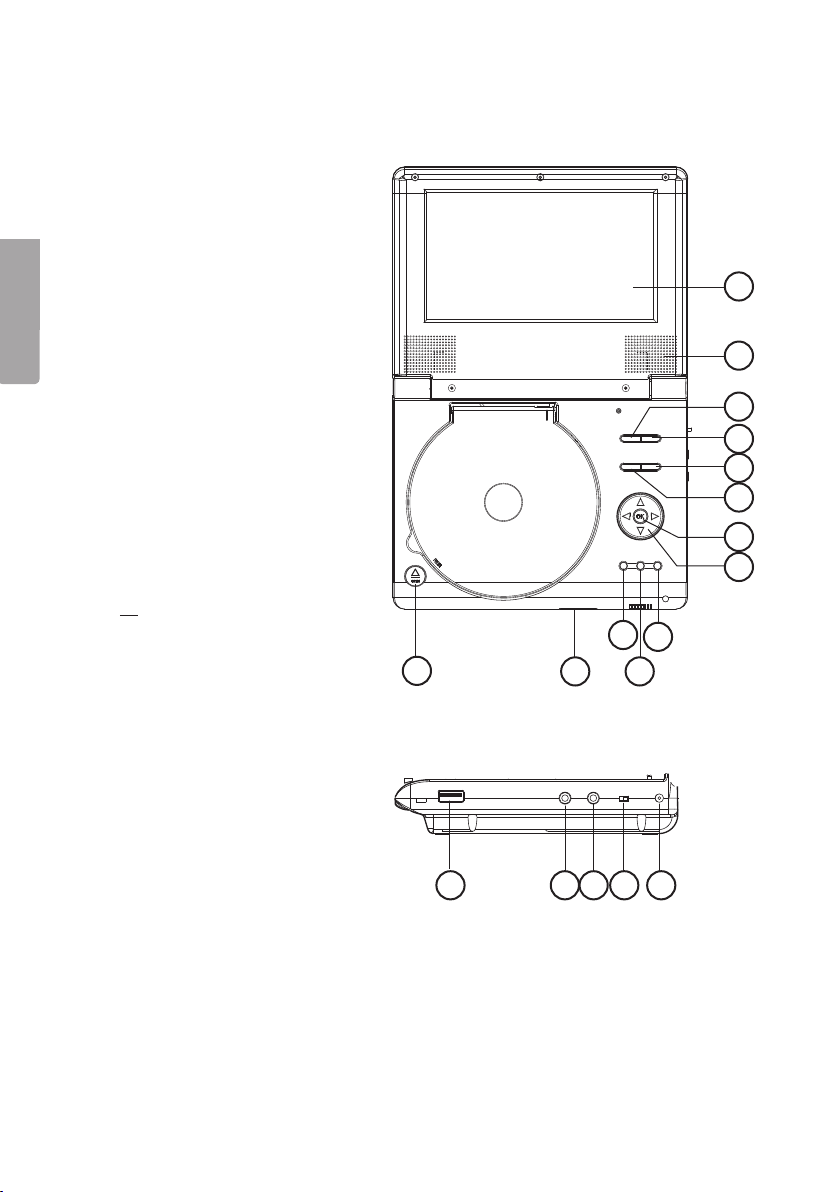
3. Buttonsand functions
DVD Player
English
1. TFT screen
2. Speaker
3. [ MENU ] – Displays disc menu
4. [ SOURCE ] – Selects source:
DISC
CARD (memory card)
USB (USB device)
5. [ VOL + ] - Increases volume
6. [ VOL – ] – Decreases volume
7. [ OK ] – Confirm
8. [ ◄▲►▼ ] – Direction buttons
9. [ SETUP ] – Opens main menu
10. [ ■ ] – Stops playback
11. [ ►II ] – Starts or pauses
playback
12. SD/MS/MMC –
Memory card slot
13. [ ▲ ] – Opens thedisc drawer
14. USB port
15. Stereoheadphone connection
(3.5 mm)
16. AV OUT – AV output
17. ON/OFF – Power switch
18. DC IN – AC/DC adaptor
connection
13
12
11
1
2
3
4
5
6
7
8
9
10
14 15 16 17 18
4
Page 5

Remote controller
19. [ MUTE ] – Mutes volume.
20. [ SOURCE ] – Selects audio source: DISC (DVD, CD), CARD (memory card), USB
(USB device).
21. [ 0–9 ] – Numerical buttons.
22. [ DISPLAY ] – Displays disc playback time and status information.
23. [ 10+ ] – Numerical button for tens, e.g. for 32, enter = [ 10+ ] [ 10+ ] [ 10+ ] [ 2 ].
24. [ MENU/PBC ] – Opens theDVD’s root menu (DVD). PBC ON/OFF (VCD).
25. [ AUDIO ] – Press therequired number of times to select thedesired language
(DVD) Press therequired number of times to choose audio channel: Left, Right,
Mix or Stereo (MP3, CD VCD).
26. [ ►II ] – Starts or pauses playback.
27. [ ■ ] – Stops playback Press once to resume playback from theplace it was
stopped. Presstwice to start from thebeginning again.
28. [ MODE ] – Display setup: Brightness, Contrast, Saturation.
29. [ VOL +/- ] – Increases/decreases volume.
30. [ ►►I ] – Next section.
31. [ I◄◄ ] – Previous section.
32. [ ►► ] – Fast forward: X2, X4, X8, X16, X32 or Normal.
33. [ ◄◄ ] – Fast rewind: X2, X4, X8, X16, X32 or Normal.
34. [ SEARCH ] – Searches for time, title or chapter.
35. [ STEP ] – Displays one frame at atime.
36. [ SUBTITLE ] – Changes subtitle language.
37. [ ANGLE ] – Changes thepicture angle (if supported by theDVD).
38. [ TITLE ] – Returns to theDVD menu.
39. [ ◄▲►▼ ] – Direction buttons.
40. [ ENTER ] – Confirm.
41. [ SETUP ] – Opens/closes themain menu.
42. [ REPEAT ] – Repetition.
Chapter/title/off (in DVD mode).
Repeat single (repeat once), all, off (in VCD mode).
Repeat single (repeat once), folder, off (in MP3/CD mode).
43. [ SLOW ] – Reduces playback speed.
44. [ PROGRAM ] – Opens programme mode The programme menu will be displayed.
Selectthedesired file using thedirection buttons (23): Press [ ►II ] to start
playback. Tocancel: Press [ PROGRAM ] and select Clear program and then
press [ PROGRAM ].
45. [ ZOOM ] – Changes thezoom setting: 2X, 3X, 4X, 1/2X, 1/3X, 1/4X or Normal.
English
5
Page 6

34
19
35
English
STEP
MUTE
SOURCE
20
37
39
41
43
45
36
38
40
42
44
1 2
5
9 0
SUBTITLE
TITLE
REPEAT
3
6 7 8
10+
AUDIO
ENTER
SLOW
ZOOM
4
DISPLAY
MENU
/PBC
MODE
VOL+VOL-
21
22
23
24
25
26
27
28
29
30
31
32
33
Battery
Open thebattery cover and insert 1x CR2025 battery according to thepolarity marking.
6
Page 7
4. Operation
1. Connecttheadaptor to apower point and theDC plug to DC IN (18).
2. Setthepower switch (17) to theON position.
3. Openthedisc tray by pressing [ ▲ ](13) and press adisc securely onto thespindle
(or connect aUSB stick or SD memory card).
4. Press[ SOURCE ] (20) and select DISC, CARD, or USB using [ ▲ ] [ ▼ ].
5. Confirmby pressing [ ENTER ] (40).
6. Selectthedesired folder/file using [ ▲ ] [ ▼ ].
7. Press[ ►II ] (26) to start playback of theselected folder/file. Pushagain to pause.
8. Stopplayback by pressing [ ■ ] (27).
4.1 Settings
Note: All menus are not displayed if adisc is inserted in thedevice.
1. Press[ SETUP ] (41) to open themain menu: GENERAL SETUP PAGE (main
menu), ANALOG AUDIO SETUP (sound settings), VIDEO SETUP (picture settings),
PREFERENCE (standard settings), PASSWORD (password).
2. Use [ ▲▼◄► ] to select menu.
3. Confirmby pressing [ ENTER ] (40).
4. Exitthemain menu by pressing [ SETUP ] (41).
GENERAL SETUP (main menu for thedisc)
English
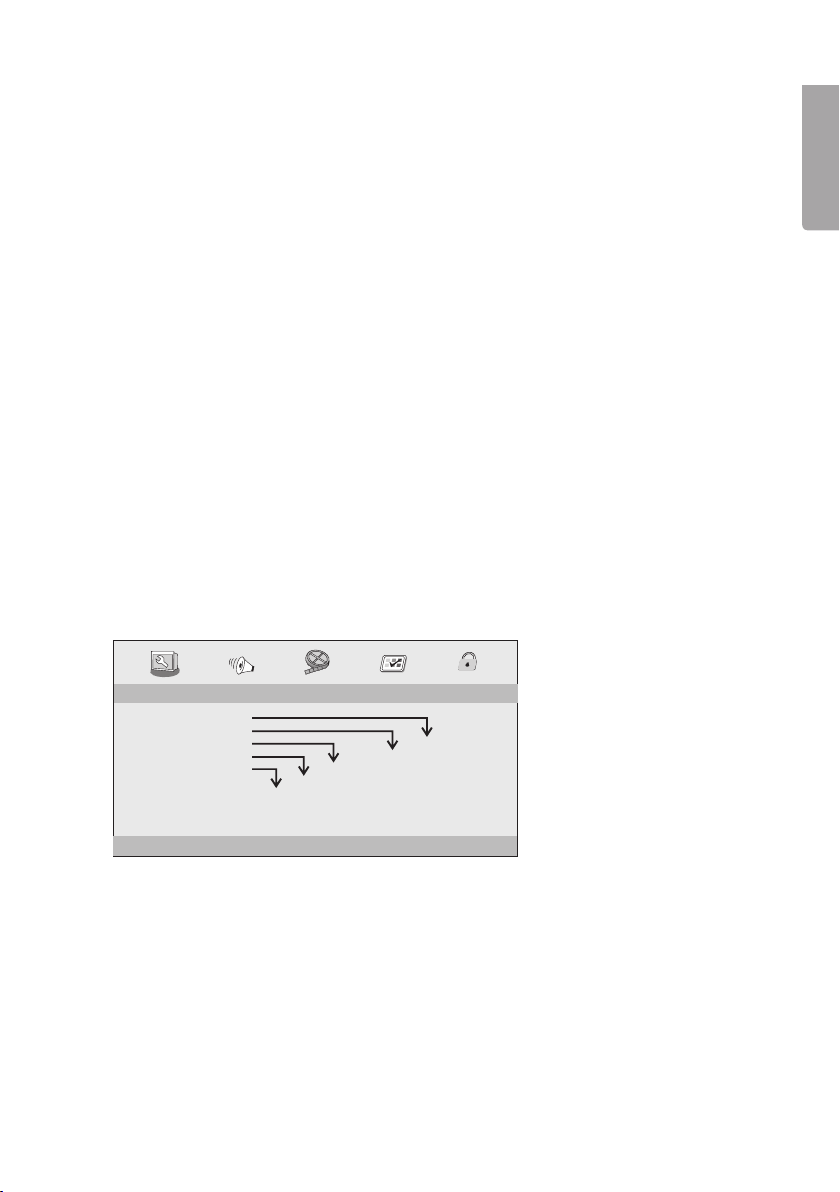
- - GENERAL SETUP P AGE - -
TV DISPLAY WIDE
ANGLE MARK ON
OSD LANGUAGE ENG
CLOSED CAPTIONS ON
SCREEN SAVER ON
GOTO GENERAL SETUP PAGE
ON
OFF
ON
OFF
ENGLISH
SWEDISH
FINNISH
NORWEGIAN
ON
OFF
4:3 PANSCAN
4:3 LETTERBOX
16:9
WIDE SQUEEZE
• TV DISPLAY – Set thepicture format: 4:3 Panscan, 4:3 Letterbox, 16:9 or Wide
Squeeze (4:3).
• ANGLE MARK – Show/do not show current angle on theleft side of thescreen
(only if feature is available on thedisc).
• OSD LANGUAGE – Select menu language: ENGLISH, SWEDISH, FINNISH or
NORWEGIAN.
• CLOSED CAPTIONS – Show/do not show hidden program information. Check
before you activate this feature that it is supported by both thedisc and theTV.
• SCREEN SAVER – Show/do not show screen saver.
7
Page 8
ANALOGUE AUDIO SETUP
-- --
English
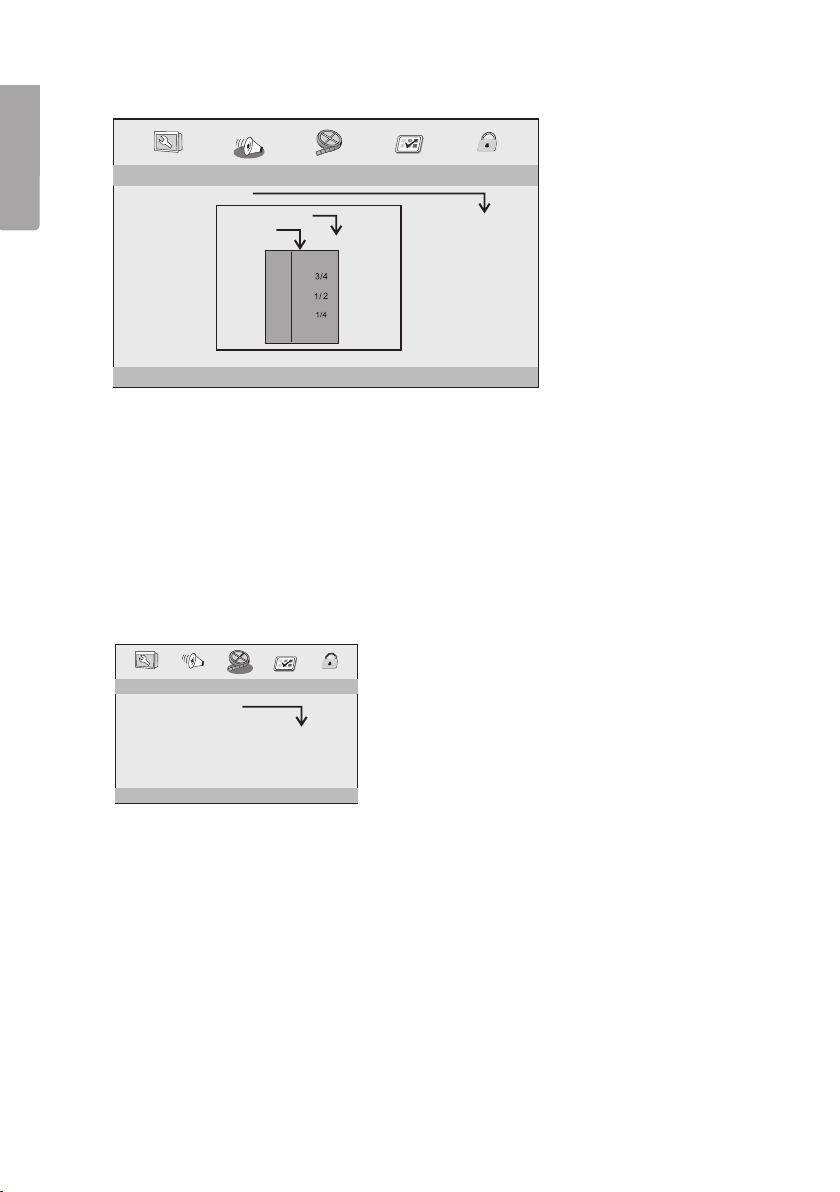
- - - -AUDIO SETUP P AGE
DOWNMIX
DOLBY DIGITAL
GO TO AUDIO SETUP PAGE
• DOWNMIX – Choose analogue stereo output. LT/RT choose this when connecting to
Dolby Prologic decoder, STEREO choose this for sound from thebuilt-in speakers.
• DOLBY DIGITAL – Choose digital sound output: DUAL MONO left mono sound
to left speaker and right mono sound to right speaker. L-MONO left mono sound
to left/right speaker. R-MONO right mono sound to left/right speaker. MIX-MONO
right/left mono sound mixed to left/right speaker.
• DYNAMIC – Dynamic compression, from OFF to FULL.
STR
DUAL MONO
DYNAMIC
LT/RT
STR
STR
L-MONO
R-MONO
FULL
-
-
-
-
-
-
-
-
-
-
MIX-MONO
-
-
-
-
-
-
-
-
OFF
-
STEREO
VIDEO SETUP
- - VIDEO SETUP PAGE - -
SHARPNESS MID
BRIGHTNESS 00
CONTRAST 00
HUE 00
SATURATION 00
GOTO VIDEO SETUP PAGE
• SHARPNESS: High, Medium or Low.
• BRIGHTNESS: -16 to +16.
• CONTRAST: -16 to +16.
• HUE: -9 to +9.
• SATURATION: -9 to +9.
HIGH
MEDIUM
LOW
8
Page 9
PREFERENCE (standard settings)
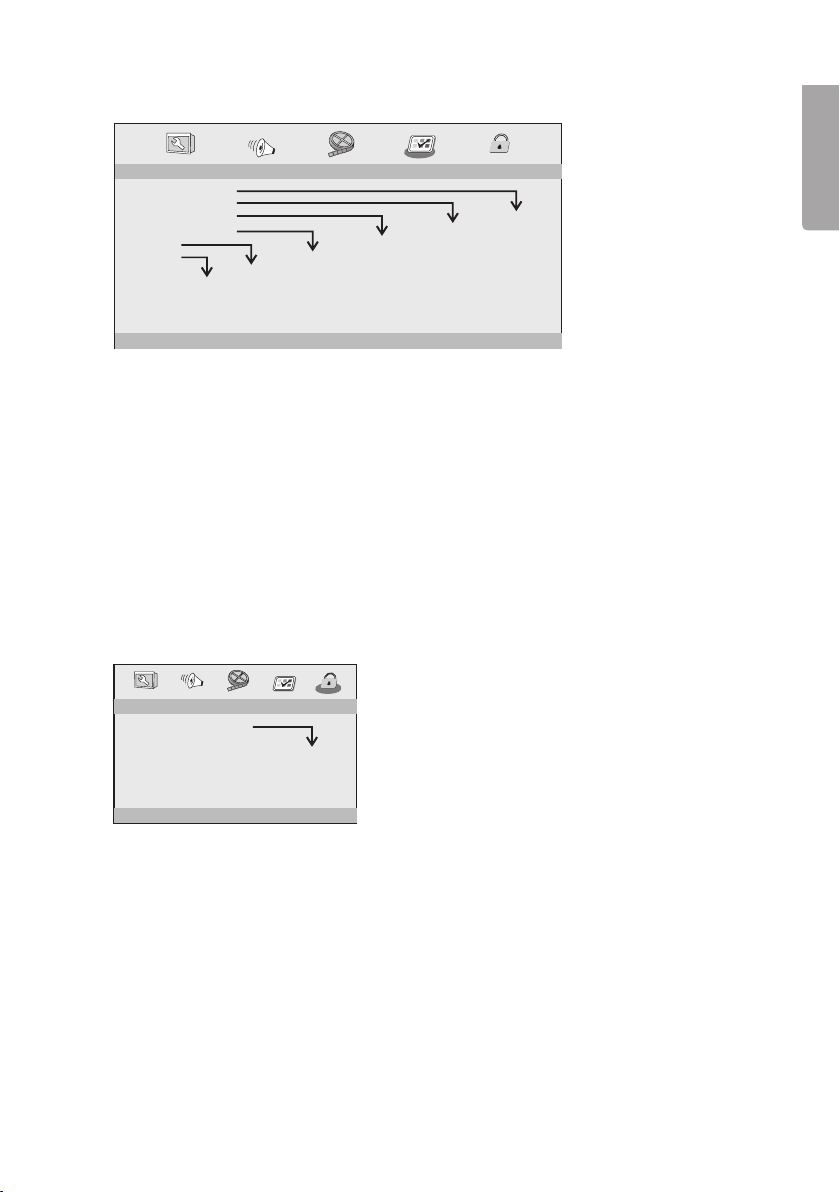
- - PREFERENCE SETUP PAGE - -
TV TYPE NTSC
AUDIO ENG
SUBTITLE ENG
DISC MENU ENG
PARENTAL
DEFAULT
GOTO PREFERENCE PAGE
RESET
1 KID SAF
2 G
3 PG
4 PG13
5 PGR
6 R
7 NC17
8 ADULT
ENGLISH
SWEDISH
NORWEGIAN
FINNISH
OTHERS
ENGLISH
SWEDISH
NORWEGIAN
FINNISH
OTHERS
OFF
ENGLISH
SWEDISH
NORWEGIAN
FINNISH
OTHERS
PAL
AUTO
NTSC
• TV TYPE – Choose TV-system, PAL, AUTO or NTSC. Mostcommon in Europe is PAL.
• AUDIO – Choose language ENGLISH, SWEDISH, FINNISH, NORWEGIAN
orOTHERS.
• SUBTITLE – Choose text language.
• DISC MENU – Choose menu language for thedisc.
• PARENTAL – Set restriction for ”adult content”, 1 is “suitable for children” to
8“adult content”. A password is required to adjust thesettings. Thepreset factory
password is 1369.
• DEFAULT – Reset to manufacturer’s settings.
PASSWORD
- - PASSWORD SETUP PAGE - -
PASSWORD MODE ON
PASSWORD
ON
OFF
English
GOTO PASSWORD SETUP PAGE
• PASSWORD MODE – Activate/deactivate use with password.
• PASSWORD – Change password (preset factory password is 1369). Firsttype
current password. Then enter thenew password (4 digits) once, type thesame
password again to confirm. Highlight OK and press [ ENTER ].
9
Page 10

4.3 Playback
1. Press[ SOURCE ] (20) and select DISC or USB using [ ▲ ] [ ▼ ].
2. Confirmby pressing [ ENTER ] (40).
English
3. Selectthedesired folder/file using [ ▲ ] [ ▼ ].
4. Press[ ENTER ] (40) to start playback of theselected folder/file.
Playback settings
1. Press[ SOURCE ] (20) and select DISC or USB using [ ▲ ] [ ▼ ].
2. Confirmby pressing [ ENTER ] (40).
3. Opensub-menus using [ ► ] (Filter, Repeat, Mode, Edit mode, Program view or
Add to program).
4. Selectthedesired sub-menu using [ ▲]/[▼ ].
5. Press[ ENTER ] (40) therequired number of times to select thedesired function.
6. Savesettings and exit themain menu by using [ ◄ ].
5. Careand maintenance
Cleaning
• Always unplug theadaptor from thewall socket before cleaning.
• Make sure that no liquids penetrate theDVD player.
• Use only alightly moistened cloth when cleaning theexterior.
• Never use solvents or strong detergents.
Disc care
• Hold thedisc by thehole and edge when handling in order to avoid fingerprints
and dirt from contaminating thesurface.
• Do not bend thedisc or expose it to direct sunlight or heat.
• Clean thediscs with asoft dry cleaning cloth starting from thecentre and working
outwards. Neveruse solvents or strong detergents.
• Store thediscs in their cases.
10
Page 11

6. Troubleshooting
Problem Suggested remedy
The product does
not turn on or
turns off by itself.
The product
does not react
to theremote’s
commands.
No picture
orsound.
Poor sound
orpicture.
• Make sure thebattery is fully charged.
• Check that theadaptor is connected correctly.
• Start thedevice by turning it on and off with theswitch.
• Check that theremote control’s battery is placed correctly in
thebattery compartment.
• Insert new batteries.
• Make sure theremote is aimed at thesensor on thefront of
theDVD player.
• Make sure that no objects are blocking signals from theremote.
• Make sure that all audio and video leads are correctly connected.
• Make sure that thedisc is one of thefollowing: DVD, DVD-R,
DVD-RW or CD.
• Make sure that thedisc is whole, scratch-free and correctly
in place with thelabel facing upwards.
• Make sure theDVD player’s laser pickup is not dirty.
ContactCustomer Services if this is thecase.
• Make sure that any connected TV is set to thecorrect
channel (VIDEO, AV, etc.).
• Check thedisc. Useaclean and scratch free disc.
English
7. Disposal
Follow local ordinances when disposing of this product.
If you are unsure how to proceed, contact your local authority.
11
Page 12

8. Specifications
Input voltage Primary 100–240 V AC 50/60 Hz
Sec. 9 V, 1 A (+ centre)
English
Power consumption < 10 W
Weight 0.73 kg
Size 200 x 157 x 41 mm (L x W x H )
Screen 7″ TFT (169)
Outputs Video output 1.0 V (p-p) / 75Ω
Audio output 1,4 V rms (1 kHz, 0 dB)
Output power 2 x 1 W
Operating environment Humidity 5 % - 90 %
Remote control 1 x CR 2025-battery
System
Laser Semiconductor laser
Signal system PAL / NTSC
Frequency response 20 Hz to 20 kHz (1 dB)
SNR More than 80 dB (analogue output)
Dynamic More than 85 dB (DVD/CD)
Battery
Terminal voltage 7.4 V
Charging time 3–4 hours
Operating time 2 hours
Storage and use
Storage Temperature Humidity
6 months -20 °C ~ +45 °C 65 ± 20 %
1 week -20 °C ~ +65 °C 65 ± 20 %
Operation Temperature Humidity
Standard charging 0 °C ~ + 45 °C 65 ± 20 %
Standard discharging -20 °C ~ +65 °C 65 ± 20 %
12
Page 13

Portabel DVD-spelare
med 7″ TFT-skärm
Art.nr 18-8262 Modell PDVD-196-UK
18-8263 PDVD-196-UK
18-8264 PDVD-196-UK
38-4551 PDVD-196
38-4552 PDVD-196
38-4553 PDVD-196
Läs igenom hela bruksanvisningen före användning och spara den sedan för
framtida bruk. Vireserverar oss för ev. text- och bildfel samt ändringar av tekniska
data. Vidtekniska problem eller andra frågor, kontakta vår kundtjänst (se adressuppgifter på baksidan).
1. Säkerhet
• Produkten får endast repareras av kvalificerad servicepersonal.
• Produkten får inte demonteras eller ändras.
• Produkten är avsedd endast för inomhusbruk.
• Utsätt aldrig apparaten för höga temperaturer, stötar, fukt eller väta.
• Placera inte produkten så att den kan falla ner ivatten eller annan vätska. Ställinte
heller några föremål som innehåller vätska på produkten, t.ex. blomvas eller dryck.
• Placera inte apparaten ifuktig, dammig miljö eller där det förekommer
starka vibrationer.
• Stäng av eventuell standby-funktion och dra ur nätadaptern från vägguttaget
under natten eller när du reser bort.
• Utsätt aldrig batteriet för höga temperaturer.
• Långvarig exponering av hög ljudvolym från hörlurar kan orsaka hörselskador.
• Placera enheten på enhorisontell yta under användning.
• Använd endast den bifogade biladaptern.
Svenska
KLASS 1 LASERAPPARAT
Varning! Öppnainte höljet! Osynliglaserstrålning som kan orsaka ögonskador.
Rikta inte blicken in mot strålen och titta inte direkt på den genom optiska instrument.
2. Förpackningsinnehåll
• DVD-spelare med TFT-skärm
• Fjärrkontroll
• Biladapter
• Laddare
• Hörlurar
• Adapter (3x RCA till 3,5 mm stereo)
13
Page 14
3. Knapparoch funktioner
DVD-spelare
1. TFT-skärm
2. Högtalare
3. [ MENU ] – Visa skivmeny
4. [ SOURCE ] – Välj källa:
DISC (skiva)
CARD (minneskort)
USB (USB-enhet)
Svenska
5. [ VOL + ] – Öka volymen
6. [ VOL – ] – Sänk volymen
7. [ OK ] – Bekräfta
8. [ ◄▲►▼ ] – Navigationsknappar
9. [ SETUP ] – Visa huvudmeny
10. [ ■ ] – Stoppa uppspelning
11. [ ►II ] – Start eller paus av
uppspelning
12. SD/MS/MMC – Anslutning för
minneskort
13. [ ▲ ] – Öppna skivluckan
14. USB-anslutning
15. Anslutningför stereohörlurar
(Ø 3,5 mm)
16. AV OUT – AV-utgång
17. ON/OFF – Strömbrytare
18. DC IN – Anslutning för
batterieliminator
13
12
11
9
10
1
2
3
4
5
6
7
8
14 15 16 17 18
14
Page 15

Fjärrkontroll
19. [ MUTE ] – Stäng av ljudet tillfälligt.
20. [ SOURCE ] – Välj ljudkälla: DISC (skiva), CARD (minneskort) eller USB (USB-enhet).
21. [ 0–9 ] – Sifferknappar.
22. [ DISPLAY ] – Visa speltid och statusinformation.
23. [ 10+ ] – Sifferknapp för tiotal, t.ex. skriv 32 = [ 10+ ] [ 10+ ] [ 10+ ] [ 2 ].
24. [ MENU/PBC ] – Gå till DVD-skivans rotmeny (DVD). PBC ON/OFF (VCD).
25. [ AUDIO ] – Tryck flera gånger for att välja språk (DVD). Tryckflera gånger för att
välja lyssningskanal: Left, Right, Mix eller Stereo (MP3, CD, VCD).
26. [ ►II ] – Start eller paus av uppspelningen.
27. [ ■ ] – Stoppa uppspelningen. Tryckengång för att återuppta uppspelningen från
den plats där den avbröts. Trycktvå gånger för att starta om från början.
28. [ MODE ] – Ställ in displayvisning: Brightness (ljus), Contrast (kontrast),
Saturation(färgmattnad).
29. [ VOL +/- ] – Volym öka/minska.
30. [ ►►I ] – Nästa avsnitt.
31. [ I◄◄ ] – Föregående avsnitt.
32. [ ►► ] – Snabbspola framåt: X2, X4, X8, X16, X32 eller Normal.
33. [ ◄◄ ] – Snabbspola bakåt: X2, X4, X8, X16, X32 eller Normal.
34. [ SEARCH ] – Sök tid, titel eller kapitel.
35. [ STEP ] – Visa enbildruta itaget.
36. [ SUBTITLE ] – Tryck flera gånger för att byta språk.
37. [ ANGLE ] – Ändra bildvinkel (om filmen stöder den funktionen).
38. [ TITLE ] – Gå till DVD-meny.
39. [ ◄▲►▼ ] – Navigationsknappar.
40. [ ENTER ] – Bekräfta.
41. [ SETUP ] – Öppna/stäng huvudmeny.
42. [ REPEAT ] – Repetition.
Chapter (kapitel)/title (titel)/off (avstängd) i DVD-läge.
Repeat single (repetera engång), all (alla), off (avstängd) i VCD-läge.
Repeat single (repetera engång), folder (mapp), off (avstängd) i MP3/CD-läge.
43. [ SLOW ] – Tryck flera gånger för att visa uppspelningen långsammare.
44. [ PROGRAM ] – Tryck för att öppna programmeringsläge. Programmenynvisas på
displayen. Väljönskade filer med sifferknapparna (23). Tryckpå [ ►II ] för att starta
uppspelning. Avbrytså här: Tryck på [ PROGRAM ] och välj Clear program och
tryck på [ PROGRAM ].
45. [ ZOOM ] – Ändra zoominställning: 2X, 3X, 4X, 1/2X, 1/3X, 1/4X eller Normal.
Svenska
15
Page 16

35
STEP
34
MUTE
SOURCE
19
20
1 2
3
4
21
5
Svenska
36
9 0
SUBTITLE
37
38
TITLE
39
40
41
42
REPEAT
43
44
45
6 7 8
10+
AUDIO
ENTER
SLOW
ZOOM
DISPLAY
MENU
/PBC
MODE
VOL+VOL-
22
23
24
25
26
27
28
29
30
31
32
33
Batteri
Öppna batterifacket och sätt i1 x CR2025-batteri enligt märkningen.
16
Page 17

4. Användning
1. Anslutbatterieliminatorn till etteluttag och dess DC-propp till DC IN (18).
2. Ställströmbrytaren (17) iläge ON.
3. Öppnaskivfacket med [ ▲ ] (13) och tryck fast enskiva på spindeln (eller anslut
ettUSB- eller SD-minne).
4. Tryckpå [ SOURCE] (20) och välj DISC (skiva), CARD (minneskort) eller USB
med[ ▲ ] [ ▼ ].
5. Bekräftamed [ ENTER ] (40).
6. Väljönskad mapp/fil med [ ▲ ] [ ▼ ].
7. Tryckpå [ ►II ] (26) för att starta uppspelning av den valda mappen/filen.
Tryckigen för att göra paus.
8. Stängav uppspelningen med [ ■ ] (27).
4.1 Inställningar
Obs! Allamenyerna visas inte om enskiva sitter ispelaren.
1. Tryckpå [ SETUP ] (41) för att öppna huvudmenyn: GENERAL SETUP PAGE
(huvudmeny), ANALOG AUDIO SETUP (ljudinställningar), VIDEO SETUP
(bildinställningar), PREFERENCE (grundinställningar), PASSWORD (lösenord).
2. Användnavigationsknapparna [ ▲▼◄► ] för att välja meny.
3. Bekräftagenom att trycka på [ ENTER ] (40).
4. Gåur huvudmenyn genom att trycka på [ SETUP ] (41).
GENERAL SETUP (huvudmeny för skivan)
Svenska
- - GENERAL SETUP P AGE - -
TV DISPLAY WIDE
ANGLE MARK ON
OSD LANGUAGE ENG
CLOSED CAPTIONS ON
SCREEN SAVER ON
GOTO GENERAL SETUP PAGE
ON
OFF
ON
OFF
ENGLISH
SWEDISH
FINNISH
NORWEGIAN
ON
OFF
4:3 PANSCAN
4:3 LETTERBOX
16:9
WIDE SQUEEZE
• TV DISPLAY – Ställ in det bildformat som skärmen har: 4:3 Panscan, 4:3 Letterbox,
16:9 eller Wide Squeeze (4:3).
• ANGLE MARK – Visa/visa inte aktuell bildvinkel på vänstra sidan av skärmen
(endast om funktionen finns på skivan).
• OSD LANGUAGE – Välj menyspråk: ENGLISH, SWEDISH, FINNISH eller NORWEGIAN.
• CLOSED CAPTIONS – Visa/visa inte gömd programinformation. Kontrollerainnan
du aktiverar denna funktion att den stöds av både skivan och TV-apparaten.
• SCREEN SAVER – Visa/visa inte skärmsläckare.
17
Page 18

ANALOG AUDIO SETUP
-- --
- - - -AUDIO SETUP P AGE
DOWNMIX
DOLBY DIGITAL
Svenska
GO TO AUDIO SETUP PAGE
• DOWNMIX – Välj analog stereoutgång: LT/RT väljs för anslutning till Dolby Prologic
dekoder. STEREO väljs för ljud endast från de inbyggda högtalarna.
• DOLBY DIGITAL – Välj digital ljudutgång: DUAL MONO väljs för vänster monoljud
till vänster högtalare och höger monoljud till höger högtalare. L-MONO väljs för
vänster monoljud till vänster/höger högtalare. R-MONO väljs för höger monoljud
till vänster/höger högtalare. MIX-MONO väljs för höger/vänster monoljud mixat till
vänster/höger högtalare.
• DYNAMIC – Dynamisk kompression, från OFF (avstängd) till FULL (högsta).
STR
DUAL MONO
DYNAMIC
LT/RT
STR
STR
L-MONO
R-MONO
FULL
-
-
-
-
-
-
-
-
-
-
MIX-MONO
-
-
-
-
-
-
-
-
OFF
-
STEREO
VIDEO SETUP
- - VIDEO SETUP PAGE - -
SHARPNESS MID
BRIGHTNESS 00
CONTRAST 00
HUE 00
SATURATION 00
GOTO VIDEO SETUP PAGE
• SHARPNESS (skärpa): High, Medium eller Low.
• BRIGHTNESS (ljus): -16 till +16.
• CONTRAST (kontrast): -16 till +16.
• HUE (nyans): -9 till +9.
• SATURATION (färgmättnad): -9 till +9.
HIGH
MEDIUM
LOW
18
Page 19

PREFERENCE (grundinställningar)
- - PREFERENCE SETUP PAGE - -
TV TYPE NTSC
AUDIO ENG
SUBTITLE ENG
DISC MENU ENG
PARENTAL
DEFAULT
GOTO PREFERENCE PAGE
RESET
1 KID SAF
2 G
3 PG
4 PG13
5 PGR
6 R
7 NC17
8 ADULT
ENGLISH
SWEDISH
NORWEGIAN
FINNISH
OTHERS
ENGLISH
SWEDISH
NORWEGIAN
FINNISH
OTHERS
OFF
ENGLISH
SWEDISH
NORWEGIAN
FINNISH
OTHERS
PAL
AUTO
NTSC
• TV TYPE –Välj TV-system, PAL, AUTO eller NTSC. VanligastiEuropa är PAL.
• AUDIO – Välj språk ENGLISH, SWEDISH, FINNISH, NORWEGIAN eller OTHERS.
• SUBTITLE – Välj textspråk.
• DISC MENU – Välj menyspråk för skivan.
• PARENTAL – Ställ in begränsning för ”barnförbjudet material”, 1 ”barntillåtet” till
8”barnförbjudet”. Lösenordkrävs innan inställning, fabriksinställt lösenord är 1369.
• DEFAULT – Återgå till fabriksinställningar.
PASSWORD (lösenord)
- - PASSWORD SETUP PAGE - -
PASSWORD MODE ON
PASSWORD
ON
OFF
Svenska
GOTO PASSWORD SETUP PAGE
• PASSWORD MODE – Aktivera/avaktivera användning med lösenord.
• PASSWORD – Ändra lösenord (fabriksinställt lösenord är 1369). Skrivförst in
gällande lösenord. Skrivsedan in det nya lösenordet (4 siffror) engång, skriv
samma lösenord igen för att bekräfta. Markerasedan OK och tryck på [ ENTER ].
19
Page 20

4.3 Uppspelning
1. Tryckpå [ SOURCE] (20) och välj DISC (skiva) eller USB med [ ▲ ]/[ ▼ ].
2. Bekräftamed [ ENTER ] (40).
3. Väljönskad mapp/fil med [ ▲ ]/[ ▼ ].
4. Tryckpå [ ENTER ] (40) för att starta uppspelning av den valda mappen/filen.
Inställningar för uppspelning
1. Tryckpå [ SOURCE ] (20) och välj DISC (skiva) eller USB med [ ▲ ]/[ ▼ ].
2. Bekräftamed [ ENTER ] (40).
Svenska
3. Öppnaundermenyer med [ ► ] (Filter, Repeat, Mode, Edit mode, Program view
eller Add to program).
4. Väljönskad inställning (undermeny) med [ ▲ ]/[ ▼ ].
5. Tryckpå [ ENTER ] (40) flera gånger för att välja önskad funktion.
6. Sparainställning och gå ur undermeny med [ ◄ ].
5. Skötseloch underhåll
Rengöring
• Dra alltid ur nätadapterns stickpropp före rengöring.
• Se till att ingen vätska kommer in iDVD-spelaren.
• Använd endast enlätt fuktad trasa vid rengöring av höljet.
• Använd aldrig lösningsmedel eller starka rengöringsmedel.
Vårda skivorna
• Håll skivan ihålet och kanten när den hanteras för att undvika fingeravtryck och
smuts på skivan.
• Böj inte skivan och utsatt den inte för direkt solljus eller annan värmekälla.
• Rengör endast skivorna med entorr mjuk trasa från centrum och utåt, använd
aldrig rengöringsmedel eller starka lösningsmedel.
• Förvara skivorna isina fodral.
20
Page 21

6. Felsökning
Problem Förslag till åtgärd
Enheten startar ej
eller slår plötsligt
av sig själv.
Enheten reagerar
inte på fjärrkontrollens knappar.
Ingen bild eller
inget ljud.
Dåligt ljud och/
eller dålig bild.
• Se till att batteriet är laddat.
• Kontrollera att bil- eller nätadaptern är korrekt ansluten.
• Starta om enheten genom att slå av och på strömbrytaren.
• Kontrollera att fjärrkontrollens batteri är rätt placerat
ibatterifacket.
• Sätt inya batterier.
• Se till att fjärrkontrollen är riktad mot sensorn på
DVD-spelarens framsida.
• Se till att inget föremål skymmer fjärrkontrollens signaler.
• Kontrollera att eventuella ljud- och bildkablar är
korrekt anslutna.
• Kontrollera att skivan som används är av typ DVD, DVD-R,
DVD-RW eller CD.
• Se till att skivan är hel och repfri och är korrekt placerad med
etiketten vänd uppåt.
• Kontrollera att DVD-spelarens laserpickup inte är
nedsmutsad. Kontaktakundtjänst om så är fallet.
• Kontrollera att ev. ansluten TV-apparat är inställd på rätt
kanal (VIDEO, AV etc.).
• Kontrollera skivan. Användenren och repfri skiva.
Svenska
7. Avfallshantering
När du ska göra dig av med produkten ska detta ske enligt lokala föreskrifter.
Är du osäker på hur du ska gå tillväga, kontakta din kommun.
21
Page 22

8. Specifikationer
Drivspänning Prim. 100–240 V AC 50/60 Hz
Sec. 9 V, 1 A (+ icentrum)
Effektförbrukning < 10 W
Vikt 0,73 kg
Mått 200 x 157 x 41 mm (L x B x H )
Skärm 7″ TFT (169 mm)
Utgångar Videoutgång 1,0 V (p-p) / 75 Ω
Audioutgång 1,4 V rms (1 kHz, 0 dB)
Svenska
Uteffekt 2 x 1 W
Användningsmiljö Luftfuktighet 5–90 %
Fjärrkontroll 1 x CR 2025-batteri
System
Laser Halvledarlaser
Signalsystem PAL / NTSC
Frekvensomfång 20 Hz till 20 kHz (1 dB)
S/N-nivå Bättre än 80 dB (analog utgång)
Dynamik Bättre än 85 dB (DVD/CD)
Batteri
Polspänning 7,4 V
Laddningstid 3–4 timmar
Drifttid 2 timmar
Lagring och användning
Lagring Temperatur Luftfuktighet
6 månader -20 °C ~ +45 °C 65 ± 20 %
1 vecka -20 °C ~ +65 °C 65 ± 20 %
Användning Temperatur Luftfuktighet
Standardladdning 0 °C ~ +45 °C 65 ± 20 %
Standardurladdning -20 °C ~ +65 °C 65 ± 20 %
22
Page 23

Portabel DVD-spiller med 7″ TFT-skjerm
Art.nr. 18-8262 Modell PDVD-196-UK
18-8263 PDVD-196-UK
18-8264 PDVD-196-UK
38-4551 PDVD-196
38-4552 PDVD-196
38-4553 PDVD-196
Les nøye igjennom hele bruksanvisningen og ta vare på den til senere bruk.
Vireserverer oss mot ev. tekst- og bildefeil, samt forandringer av tekniske data.
Vedtekniske problemer eller andre spørsmål, ta kontakt med vårt kundesenter
(se opplysninger på baksiden).
1. Sikkerhet
• Produktet må kun repareres av kvalifisert servicepersonell.
• Produktet må ikke demonteres eller endres.
• Produktet er kun beregnet for innendørs bruk.
• Utsett aldri produktet for høye temperaturer, støt eller fuktighet.
• Plasser aldri produktet i nærheten av gjenstander, som kan forårsake at vann eller
annen væske skylles over produktet. Dette gjelder f.eks. blomstervase eller leskedrikk.
• Plasser ikke apparatet i et fuktig, støvete miljø eller der det kan forekomme
sterkevibrasjoner.
• Skru av eventuell standby-funksjon og trekk ut støpselet om natten og når du
reiser bort.
• Utsett aldri batteriet for høye temperaturer.
• Langvarig eksponering av høyt volum kan føre til hørselsskader.
• Ved bruk plasseres produktet på en horisontal flate.
• Bruk kun den medfølgende biladapteren.
Norsk
KLASSE 1 LASERAPPARAT
Advarsel! Dekselet må ikke åpnes. Usynlig laserstråler som kan føre til øyeskader.
Vend ikke blikket mot strålen, og se ikke rett på den gjennom optiske instrumenter.
2. Forpakningen innholder:
• Dvd-spiller med TFT-skjerm
• Fjernkontroll
• Biladapter
• Lader
• Headset
• Adapter (3x RCA til 3,5 mm stereo)
23
Page 24

3. Knapper og funksjoner
DVD-spiller
1. TFT-skjerm
2. Høyttaler
3. [ MENU ] – Vise meny
4. [ SOURCE ] – Velg kilde:
DISC(plate)
CARD (minnekort) eller
USB (USB-enhet)
5. [ VOL + ] – Heve volumet
6. [ VOL - ] – Senke volumet
7. [ OK ] – Bekrefte
8. [ ◄▲►▼ ] –
Navigasjonsknapper
Norsk
9. [ SETUP ] – Åpner
hovedmenyen
10. [ ■ ] – Stopp avspilling
11. [ ►II ] – Start eller ta pause i
avspilling
12. MS/SD/MMC – Åpning for
minnekort
13. [ ▲ ] – Åpne cd-lokket
14. Usb-tilkobling
15. Tilkobling for stereohøretelefoner (Ø 3,5 mm plugg)
16. AV OUT – AV-utgang
17. [ ON/OFF ] – Strømbryter
18. DC IN – Kontakt for
batterieliminator
13
12
11
9
10
1
2
3
4
5
6
7
8
14 15 16 17 18
24
Page 25

Fjernkontroll
19. [ MUTE ] – Stenge lyden midlertidig.
20. [ SOURCE ] – Velg en av følgende lydkilder: DISC (plate), CARD (minnekort) eller
USB (usb-enhet).
21. [ 0–9 ] – Talltaster.
22. [ DISPLAY ] – Vise spilletid og statusinformasjon.
23. [ 10+ ] – Talltast for titall eks. for å skrive 32, plott inn [ 10+ ] [ 10+ ] [ 10+] [2 ].
24. [ MENU/PBC ] – Gå til dvd-platens rotmeny (DVD). PBC ON/OFF (VCD).
25. [ AUDIO ] – Trykk flere ganger for å velge språk (DVD). Trykk gjentatte ganger for å
velge kanal: Kanal Left, Right, Mix eller Stereo (mp3, cd, vcd).
26. [ ►II ] – Start eller ta pause i avspilling.
27. [ ■ ] – Stoppe avspilling Trykk en gang til for å gjenoppta avspillingen fra det stedet
avspillingen ble brutt. Trykk to ganger for å starte fra begynnelsen.
28. [ MODE ] – Still inn skjermvisning: Brightness (lys), Contrast (kontrast),
Saturation(fargemetting).
29. [ VOL +/- ] – Volumkontroll, heve/senke.
30. [ ►►I ] – Neste avsnitt.
31. [ I◄◄ ] – Foregående avsnitt.
32. [ ►► ] – Hurtigspole framover: X2, X4, X8, X16, X32 eller Normal.
33. [ ◄◄ ] – Hurtigspole bakover: X2, X4, X8, X16, X32 eller Normal.
34. [ SEARCH ] – Søke klokkeslett, tittel eller kapittel.
35. [ STEP ] – Vise en bilderute av gangen.
36. [ SUBTITLE ] – Trykk flere ganger for å velge språk.
37. [ ANGLE ] – Endre bildevinkel (dersom filmen støtter denne funksjonen).
38. [ TITLE ] – Gå til DVD-meny.
39. [ ◄▲►▼ ] – Navigasjonsknapper.
40. [ ENTER ] – Bekrefte.
41. [ SETUP ] – Åpne/lukke hovedmenyen.
42. [ REPEAT ] – Repetisjon.
Chapter (kapitel)/title (tittel)/off (stengt) (i DVD-modus).
Repeat single (repeter en gang), all (alle), off (avstengt) (i VCD-modus).
Repeat single (repeter en gang), folder (mappe), off (avstengt) (i MP3/CD-modus).
43. [ SLOW ] – Trykk flere ganger for å spille av i sakte tempo.
44. [ PROGRAM ] – Trykk for å åpne programmeringsmodus. Programmenyen
vises på skjermen. Velg ønsket fil med talltastene. Trykk på [ ►II ] for å starte
avspillingsrekkefølge. Avbryt slik: Trykk på [ PROGRAM ] og velg Clear program og
trykk på [ PROGRAM ].
45. [ ZOOM ] – Endre zoomeinnstilling: 2X, 3X, 4X, 1/2X, 1/3X, 1/4X eller Normal.
Norsk
25
Page 26

35
STEP
34
MUTE
SOURCE
19
20
1 2
3
4
21
5
9 0
36
SUBTITLE
37
38
Norsk
39
TITLE
40
41
42
REPEAT
43
44
45
6 7 8
10+
AUDIO
ENTER
SLOW
ZOOM
DISPLAY
MENU
/PBC
MODE
VOL+VOL-
22
23
24
25
26
27
28
29
30
31
32
33
Batteri
Åpne batterilokket og sett inn ett batteri av typen CR2025. Følg merkingen.
26
Page 27

4. Bruk
1. Batterieliminatorens støpsel kobles til et strømuttak og DC-pluggen ti DC IN.
2. Still strømbryteren (17) i posisjon ON.
3. Plateskuffen åpnes med [ ▲ ] (13) og platen festes på spindelen. (Alt. Usb- eller
SD-minne kobles til).
4. Trykk på [ SOURCE ] (20) og velg DISC (plate), CARD (minnekort) eller USB med
[ ▲ ] eller [ ▼ ].
5. Bekrefte med [ ENTER ] (40).
6. Velg ønsket mappe/fil med [ ▲ ] eller [ ▼ ].
7. Trykk på [ ►II ] (26) for å starte innspilling av den valgte filen/mappen. Trykk en
gang til for å ta pause.
8. Steng avspillingen med [ ■ ] (27).
4.1 Innstillinger
Obs! Hvis det sitter en plate i spilleren vil ikke alle innstillingene i menyen komme opp.
1. Trykk [ SETUP ] (41) for å åpne hovedmenyene: GENERAL SETUP PAGE
(hovedmeny), ANALOG AUDIO SETUP (lydinnstillinger), VIDEO SETUP
(bildeinnstillinger), PREFERENCE (grunninnstillinger), PASSWORD (passord).
2. Bruk [ ▲▼◄► ] for å velge meny.
3. Bekreft ved å trykke på [ ENTER ] (40).
4. Gå ut av hovedmenyen ved å trykke på [ SETUP ] (41).
GENERAL SETUP (hovedmeny for plater)
Norsk
- - GENERAL SETUP P AGE - -
TV DISPLAY WIDE
ANGLE MARK ON
OSD LANGUAGE ENG
CLOSED CAPTIONS ON
SCREEN SAVER ON
GOTO GENERAL SETUP PAGE
ON
OFF
ON
OFF
ENGLISH
SWEDISH
FINNISH
NORWEGIAN
ON
OFF
4:3 PANSCAN
4:3 LETTERBOX
16:9
WIDE SQUEEZE
• TV DISPLAY – Still inn det bildeformatet som skjermen har: 4:3 Panscan,
4:3Letterbox, 16:9 eller Wide Squeeze (4:3).
• ANGLE MARK – Vise/ikke vise aktuell bildevinkel på venstre side av skjermen
(kunhvis funksjonen finnes på platen).
• OSD LANGUAGE – Velg menyspråk: ENGLISH, SWEDISH, FINNISH eller NORWEGIAN.
• CLOSED CAPTIONS – Vis/ikke vis gjemt programinformasjon. Før denne
funksjonen aktiveres må det sjekkes at både plate og tv støtter denne funksjonen.
• SCREEN SAVER – Vis/ikke vis skjermspareren.
27
Page 28

ANALOG AUDIO SETUP
-- --
- - - -AUDIO SETUP P AGE
DOWNMIX
DOLBY DIGITAL
GO TO AUDIO SETUP PAGE
• DOWNMIX – Velg analog stereoutgang: LT/RT velg dette ved kobling til Dolby
Prologic dekoder, STEREO velg dette for lyd kun fra de innebygde høyttalerne.
Norsk
• DOLBY DIGITAL – Velg digital lydutgang: DUAL MONO venstre monolyd til
venstre høytaler og høyer monolyd til høyer høyttaler. L-MONO venstre monolyd
til venstre/høyer høytaler. L-MONO høyre monolyd til venstre/høyer høytaler. MIXMONO høyre/venstre monolyd mikset til venstre/høyre høyttaler.
• DYNAMIC – Dynamisk kompresjon, fra OFF (avstengt) til FULL (høyest).
STR
DUAL MONO
DYNAMIC
LT/RT
STR
STR
L-MONO
R-MONO
FULL
-
-
-
-
-
-
-
-
-
-
MIX-MONO
-
-
-
-
-
-
-
-
OFF
-
STEREO
VIDEO SETUP
- - VIDEO SETUP PAGE - -
SHARPNESS MID
BRIGHTNESS 00
CONTRAST 00
HUE 00
SATURATION 00
GOTO VIDEO SETUP PAGE
• SHARPNESS (skarphet): High, Medium eller Low.
• BRIGHTNESS (lys): -16 til +16.
• CONTRAST (kontrast): -16 til +16.
• HUE (nyanse): -9 til +9.
• SATURATION (fargemetting): -9 til +9.
HIGH
MEDIUM
LOW
28
Page 29

PREFERENCE (grunninnstillinger)
- - PREFERENCE SETUP PAGE - -
TV TYPE NTSC
AUDIO ENG
SUBTITLE ENG
DISC MENU ENG
PARENTAL
DEFAULT
GOTO PREFERENCE PAGE
RESET
1 KID SAF
2 G
3 PG
4 PG13
5 PGR
6 R
7 NC17
8 ADULT
ENGLISH
SWEDISH
NORWEGIAN
FINNISH
OTHERS
ENGLISH
SWEDISH
NORWEGIAN
FINNISH
OTHERS
OFF
ENGLISH
SWEDISH
NORWEGIAN
FINNISH
OTHERS
PAL
AUTO
NTSC
• TV TYPE – Velg TV-system, PAL, AUTO eller NTSC. Vanligst i Europa er PAL.
• AUDIO – Velg språk ENGLISH, SWEDISH, FINNISH, NORWEGIAN eller OTHERS.
• SUBTITLE – Velg tekstspråk.
• DISC MENU – Velg menyspråk for plater.
• PARENTAL – Still inn begrensninger for barn, 1 «tillatt for barn» til 8 «forbudt for».
Det kreves passord før innstilling. Fabrikkinnstilt passord er 1369.
• DEFAULT – Tilbakestille til fabrikkinnstillinger.
PASSWORD (passord)
- - PASSWORD SETUP PAGE - -
PASSWORD MODE ON
PASSWORD
ON
OFF
Norsk
GOTO PASSWORD SETUP PAGE
• PASSWORD MODE – Aktivere/avaktivere bruk med passord.
• PASSWORD – Forandre passord (fabrikkinnstilt passord er: 1369). Skriv først inn
det nåværende passordet. Skriv deretter det nye passordet (4 sifre) én gang og
gjenta for å bekrefte. Marker deretter OK og trykk på [ ENTER ].
29
Page 30

4.3 Avspilling
1. Trykk på [ SOURCE ] (20) og velg DISC (plate) eller USB med [ ▲ ] eller [ ▼ ].
2. Bekrefte med [ ENTER ] (40).
3. Velg ønsket mappe/fil med [ ▲ ] eller [ ▼ ].
4. Trykk på [ ENTER ] (40) for å starte avspillingen av valgte fil/mappe.
Innstillinger for avspilling
1. Trykk på [ SOURCE ] (20) og velg DISC (plate) eller USB med [ ▲ ] eller [ ▼ ].
2. Bekrefte med [ ENTER ] (40).
3. Undermenyene åpnes med [ ► ] (30) (Filter, Repeat, Mode, Edit mode, Program
view eller Add to program).
4. Velg ønsket undermeny med [ ▲ ] eller [ ▼ ].
5. Trykk på [ ENTER ] (40) flere ganger for å velge ønsket funksjon.
6. Lagre innstilling og gå til undermeny med [ ◄ ].
Norsk
5. Stell og vedlikehold
Rengjøring
• Trekk alltid ut strømledningen før rengjøring.
• Påse at det ikke kommer væske inn i dvd-spilleren.
• Bruk kun en lett fuktet klut ved rengjøring av dekselet.
• Bruk aldri løsemidler eller sterke rengjøringsmidler.
Stell av plater
• Hold platen i hullet og på kanten når du håndterer den, så det ikke kommer
fingeravtrykk på selve platen.
• Platen må ikke utsettes for direkte sollys eller annen varme.
• Platene skal kun rengjøres med en tørr myk klut. Stryk fra sentrum av platen
ogutover. Bruk aldri rengjøringsmidler eller sterke løsemidler.
• Oppbevar platene stående i sine futteraler.
30
Page 31

6. Feilsøking
Feil Forslag til tiltak
Enheten starter
ikke, eller
den skrur seg
plutselig av
Produktet
reagerer ikke på
fjernkontrollens
knapper
Ikke noe bilde
eller lyd
Dårlig lyd og/
eller bilde
• Påse at batteriet er ladet opp.
• Påse at bil- eller nettadapteren er riktig koblet til.
• Start enheten på nytt ved først å slå av for så å skru
påstrømbryteren igjen.
• Kontroller at batteriene til fjernkontrollen er riktig plassert
ibatteriholderen.
• Sett i nye batterier.
• Påse at fjernkontrollen er rettet mot sensoren på dvdspillerens framside.
• Påse at ingen andre gjenstander forstyrrer fjernkontrollens
signaler.
• Kontroller at ev. lyd- og bildekabler er riktig koblet til.
• Kontroller at platen er av en av følgende typer: dvd, dvd-r,
dvd-rw eller cd.
• Sjekk at platen er hel og fri for riper, og at den er riktig
plassert, med etiketten vendt oppover.
• Kontroller at spillerens laserpickup ikke er skitten. Hvis det er
tilfelle, ta kontakt med kundetjenesten.
• Kontroller at ev. tilkoblet tv-apparat er innstilt på riktig kanal
(VIDEO, AV, etc.).
• Kontroller platen. Bruk en ren og ripefri plate.
Norsk
7. Avfallshåndtering
Når produktet skal kasseres, må det skje i henhold til lokale forskrifter.
Ved usikkerhet, ta kontakt med lokale myndigheter.
31
Page 32

8. Spesifikasjoner
Spenning Prim. 100–240 V AC, 50/60 Hz
Sec. 9 V DC, 1 A (+ i sentrum)
Effektforbruk < 10 W
Vekt 0,73 kg
Dimensjon 200 x 157 x 41 mm (l x b x h)
Skjerm 7″ TFT (169 mm)
Utganger Videoutgang 1.0 V(p-p) / 75 Ω
Audioutgang 1,4 V rms (1 kHz, 0 dB)
Uteffekt 2 x 1 W
Bruksmiljø Luftfuktighet 5–90 %
Fjernkontroll 1 x CR 2025-batteri
System
Norsk
Laser Halvlederlaser
Signalsystem NTSC / PAL
Frekvensomfang 20 Hz til 20 kHz (+ 1 dB)
S/N-nivå Bedre enn 80 dB (analog utgang)
Dynamikk Bedre enn 85 dB (dvd/cd)
Batteri
Polspenning 7,4 V
Ladetid 3–4 timer
Driftstid 2 timer
Lagring og bruk
Lagring Temperatur Luftfuktighet
6 måneder -20 °C ~ +45 °C 65 ± 20 %
1 uke -20 °C ~ +65 °C 65 ± 20 %
Bruk Temperatur Luftfuktighet
Standard lading 0 °C - +45 °C 65 ± 20 %
Standard utlading -20 °C ~ +65 °C 65 ± 20 %
32
Page 33

Kannettava dvd-soitin,
jossa 7″:n TFT-näyttö
Tuotenro 18-8262 Malli PDVD-196-UK
18-8263 PDVD-196-UK
18-8264 PDVD-196-UK
38-4551 PDVD-196
38-4552 PDVD-196
38-4553 PDVD-196
Lue käyttöohjeet ennen tuotteen käyttöönottoa ja säilytä ne tulevaa tarvetta varten.
Pidätämmeoikeuden teknisten tietojen muutoksiin. Emmevastaa mahdollisista tekstitai kuvavirheistä. Joslaitteeseen tulee teknisiä ongelmia, ota yhteys myymälään tai
asiakaspalveluun (yhteystiedot käyttöohjeen lopussa).
1. Turvallisuus
• Laitteen saa korjata vain valtuutettu huoltoliike.
• Älä pura tai muuta laitetta.
• Laite on tarkoitettu vain sisäkäyttöön.
• Älä altista laitetta korkeille lämpötiloille, iskuille, kosteudelle tai vedelle.
• Älä sijoita laitetta sellaiseen paikkaan, josta se voi tippua veteen tai muuhun
nesteeseen. Äläpane laitteen päälle nesteitä sisältäviä esineitä, kuten maljakoita
tailimsapulloja.
• Älä sijoita laitetta kosteisiin tai pölyisiin tiloihin tai paikkoihin, joissa siihen kohdistuu
voimakasta värähtelyä.
• Sammuta mahdollinen valmiustila ja irrota pistoke pistorasiasta yön ajaksi ja kun
poistut kotoa.
• Älä altista akkua korkeille lämpötiloille.
• Älä kuuntele kuulokkeista kovaäänistä musiikkia pitkäkestoisesti, se voi
vahingoittaa kuuloasi.
• Sijoita laite käytön ajaksi vaakatasossa olevalle pinnalle.
• Käytä vain mukana toimitettua autosovitinta.
Suomi
LUOKAN 1 LASERLAITE
Varoitus! Äläavaa laitteen koteloa! Näkymätönlasersäde voi aiheuttaa silmävaurioita.
Älä katso säteeseen edes optisten instrumenttien läpi.
2. Pakkauksensisältö
• Dvd-soitin, jossa TFT-näyttö
• Kaukosäädin
• Autosovitin
• Laturi
• Kuulokkeet
• Adapteri (3 kpl RCA 3,5 mm:n stereoliitäntään)
33
Page 34

3. Painikkeetja toiminnot
Dvd-soitin
1. TFT-näyttö
2. Kaiutin
3. [ MENU ] – Levyvalikon
näyttäminen
4. [ SOURCE ] –
Äänilähteen valitseminen:
DISC (levy)
CARD (muistikortti)
USB (USB-yksikkö)
5. [ VOL+ ] – Äänenvoimakkuuden
lisääminen
6. [ VOL– ] – Äänenvoimakkuuden
vähentäminen
7. [ OK ] – Valinnan vahvistaminen
8. [ ◄▲►▼ ] –
Navigointipainikkeet
9. [ SETUP ] – Päävalikon
näyttäminen
10. [ ■ ] – Toiston pysäyttäminen
11
Suomi
11. [ ►II ] – Toiston aloittaminen tai
keskeyttäminen
12. SD/MS/MMC –
Muistikorttiliitäntä
13. [ ▲ ] – Levylokeron avaaminen
14. USB-liitäntä
15. Stereokuulokeliitäntä
(Ø 3,5mm)
16. AV OUT – AV-ulostulo
17. ON/OFF – Virtakytkin
18. DC IN – Muuntajan liitäntä
13
12
14 15 16 17 18
9
10
1
2
3
4
5
6
7
8
34
Page 35

Kaukosäädin
19. [ MUTE ] – Äänen tilapäinen mykistys.
20. [ SOURCE ] – Äänilähteen valitseminen: DISC (levy), CARD (muistikortti) tai
USB(USB-yksikkö).
21. [ 0–9 ] – Numeropainikkeet.
22. [ DISPLAY ] – Soittoajan ja tietojen näyttäminen.
23. [ 10+ ] – Numeropainike kymmenluvuille, esim. 32 = [ 10+ ] [ 10+ ] [ 10+ ] [ 2 ].
24. [ MENU/PBC ] – Siirtyminen dvd-levyn valikon juureen (dvd). PBC ON/OFF (vcd).
25. [ AUDIO ] – Valitse kieli painamalla painiketta useita kertoja (dvd).
Valitsekuuntelukanava painamalla painiketta useita kertoja: Left, Right, Mix
taiStereo (mp3, cd vcd).
26. [ ►II ] – Toiston aloittaminen tai keskeyttäminen.
27. [ ■ ] – Toiston pysäyttäminen. Jatkatoistoa pysäytetystä kohdasta painamalla
painiketta kerran. Aloitatoisto alusta painamalla painiketta kaksi kertaa.
28. [ MODE ] – Näytön asetukset: Brightness (kirkkaus), Contrast (kontrasti),
Saturation (värikylläisyys).
29. [ VOL +/- ] – Äänenvoimakkuuden lisääminen/vähentäminen.
30. [ ►►I ] – Seuraava kappale.
31. [ I◄◄ ] – Edellinen kappale.
32. [ ►► ] – Pikakelaus eteenpäin: X2, X4, X8, X16, X32 tai Normaali.
33. [ ◄◄ ] – Pikakelaus taaksepäin: X2, X4, X8, X16, X32 tai Normaali.
34. [ SEARCH ] – Ajan, nimikkeen tai kappaleen haku.
35. [ STEP ] – Yhden kuvaruudun näyttäminen kerrallaan.
36. [ SUBTITLE ] – Vaihda kieltä painamalla painiketta useita kertoja.
37. [ ANGLE ] – Kuvakulman vaihtaminen (jos elokuva tukee toimintoa).
38. [ TITLE ] – Siirtyminen dvd-valikkoon.
39. [ ◄▲►▼ ] – Navigointipainikkeet.
40. [ ENTER ] – Valinnan vahvistaminen.
41. [ SETUP ] – Päävalikon avaaminen/sulkeminen.
42. [ REPEAT ] – Uudelleentoisto.
Chapter (kappale)/title (nimike)/off (pois päältä) (dvd-tilassa).
Repeat single (uudelleentoistaa kerran), all (kaikki), off (pois päältä) (vcd-tilassa).
Repeat single (uudelleentoistaa kerran), folder (kansio), off (pois päältä) (mp3/cd-tilassa).
43. [ SLOW ] – Hidasta toistoa painamalla painiketta useita kertoja.
44. [ PROGRAM ] – Ohjelmointitilan avaaminen. Ohjelmavalikkoilmestyy näytölle.
Valitsehaluamasi tiedostot numeropainikkeilla (23). Aloitatoisto painamalla [ ►II ].
Toistonkeskeyttäminen: paina [ PROGRAM ], valitse Clear program ja paina
[ PROGRAM ].
45. [ ZOOM ] – Zoomauksen muuttaminen: 2X, 3X, 4X, 1/2X, 1/3X, 1/4X tai Normaali.
Suomi
35
Page 36

35
STEP
34
MUTE
SOURCE
19
20
1 2
3
4
21
5
9 0
36
SUBTITLE
37
38
TITLE
39
40
41
42
Suomi
43
44
REPEAT
45
6 7 8
10+
AUDIO
ENTER
SLOW
ZOOM
DISPLAY
MENU
/PBC
MODE
VOL+VOL-
22
23
24
25
26
27
28
29
30
31
32
33
Paristo
Avaa paristolokeron kansi ja aseta paristo (1 kpl CR2025) lokeroon
merkintöjenmukaisesti.
36
Page 37

4. Käyttö
1. Liitämuuntaja pistorasiaan ja DC-pistoke DC IN -liitäntään (18).
2. Asetavirtakytkin (17) asentoon ON.
3. Avaalevylokero painamalla [ ▲ ] (13) ja paina levy paikoilleen (tai liitä laitteeseen
USB- tai SD-muisti).
4. Paina[ SOURCE ] (20) ja valitse DISC (levy), CARD (muistikortti) tai USB
painikkeilla[ ▲ ] [ ▼ ].
5. Vahvistapainamalla [ ENTER ] (40).
6. Valitsehaluamasi kansio/tiedosto painikkeilla [ ▲ ] [ ▼ ].
7. Aloitatoisto valitsemastasi kansiosta/tiedostosta painamalla [ ►II ] (26).
Keskeytätoisto painamalla painiketta uudelleen.
8. Lopetatoisto painamalla [ ■ ] (27).
4.1 Asetukset
Huom.! Kaikkivalikot eivät näy, jos soittimessa on levy.
1. Avaapäävalikko painamalla [ SETUP ] (41): GENERAL SETUP PAGE (päävalikko),
ANALOG AUDIO SETUP (ääniasetukset), VIDEO SETUP (kuva-asetukset),
PREFERENCE (perusasetukset), PASSWORD (salasana).
2. Valitsevalikko navigointipainikkeilla [ ▲▼◄► ].
3. Vahvistavalinta painamalla [ ENTER ] (40).
4. Poistupäävalikosta painamalla [ SETUP ] (41).
GENERAL SETUP (levyn päävalikko)
- - GENERAL SETUP P AGE - -
TV DISPLAY WIDE
ANGLE MARK ON
OSD LANGUAGE ENG
CLOSED CAPTIONS ON
SCREEN SAVER ON
GOTO GENERAL SETUP PAGE
ON
OFF
ON
OFF
ENGLISH
SWEDISH
FINNISH
NORWEGIAN
• TV DISPLAY – Aseta kuvaformaatti näytön mukaan: 4:3 Panscan, 4:3 Letterbox,
16:9 tai Wide Squeeze (4:3).
• ANGLE MARK – Näytä/älä näytä käytössä oleva kuvakulma näytön vasemmalla
puolella (vain jos levyllä on kyseinen toiminto).
• OSD LANGUAGE – Valitse valikkokieli: ENGLISH, SWEDISH, FINNISH tai NORWEGIAN.
• CLOSED CAPTIONS – Näytä/älä näytä piilotetut ohjelmatiedot. Varmistaennen
tämän toiminnon aktivointia, että sekä levy että televisio tukevat tätä toimintoa.
• SCREEN SAVER – Näytä/älä näytä näytönsäästäjä.
ON
OFF
37
4:3 PANSCAN
4:3 LETTERBOX
16:9
WIDE SQUEEZE
Suomi
Page 38

ANALOG AUDIO SETUP
-- --
- - - -AUDIO SETUP P AGE
DOWNMIX
DOLBY DIGITAL
GO TO AUDIO SETUP PAGE
• DOWNMIX – Analogisen stereolähdön valitseminen: LT/RT, kun liität Dolby
Prologic -dekooderiin, STEREO vain kiinteiden kaiuttimien äänelle.
• DOLBY DIGITAL – Digitaalisen äänilähdön valitseminen: DUAL MONO vasen
monoääni vasemmanpuoleiseen kaiuttimeen ja oikea monoääni oikeanpuoleiseen
kaiuttimeen. L-MONO vasen monoääni vasemman-/oikeanpuoleiseen kaiuttimeen.
R-MONO oikea monoääni vasemman-/oikeanpuoleiseen kaiuttimeen. MIX-MONO
oikea/vasen monoääni miksattuna vasemman-/oikeanpuoleiseen kaiuttimeen.
• DYNAMIC – Dynaaminen kompressio: OFF (pois päältä), FULL (korkein).
STR
DUAL MONO
DYNAMIC
LT/RT
STR
STR
L-MONO
R-MONO
FULL
-
-
-
-
-
-
-
-
-
-
MIX-MONO
-
-
-
-
-
-
-
-
OFF
-
STEREO
Suomi
VIDEO SETUP
- - VIDEO SETUP PAGE - -
SHARPNESS MID
BRIGHTNESS 00
CONTRAST 00
HUE 00
SATURATION 00
GOTO VIDEO SETUP PAGE
• SHARPNESS (terävyys): High, Medium tai Low.
• BRIGHTNESS (kirkkaus): -16 … +16.
• CONTRAST (kontrasti): -16 … +16.
• HUE (sävy): -9 … +9.
• SATURATION (värikylläisyys): -9 … +9.
HIGH
MEDIUM
LOW
38
Page 39

PREFERENCE (perusasetukset)
- - PREFERENCE SETUP PAGE - -
TV TYPE NTSC
AUDIO ENG
SUBTITLE ENG
DISC MENU ENG
PARENTAL
DEFAULT
GOTO PREFERENCE PAGE
RESET
1 KID SAF
2 G
3 PG
4 PG13
5 PGR
6 R
7 NC17
8 ADULT
ENGLISH
SWEDISH
NORWEGIAN
FINNISH
OTHERS
ENGLISH
SWEDISH
NORWEGIAN
FINNISH
OTHERS
OFF
ENGLISH
SWEDISH
NORWEGIAN
FINNISH
OTHERS
PAL
AUTO
NTSC
• TV TYPE – TV-järjestelmän valinta: PAL, AUTO tai NTSC. PAL on yleisin Euroopassa.
• AUDIO – Kielen valinta: ENGLISH, SWEDISH, FINNISH, NORWEGIAN tai OTHERS.
• SUBTITLE – Tekstityskielen valinta.
• DISC MENU – Levyn valikkokielen valinta.
• PARENTAL – Katselurajoitusten asetukset: 1 ”sallittu lapsille” – 8 ”kielletty lapsilta”.
Salasanatulee syöttää ennen asetusten muuttamista. Salasanantehdasasetus
on1369.
• DEFAULT – Tehdasasetusten palautus.
PASSWORD (salasana)
Suomi
- - PASSWORD SETUP PAGE - -
PASSWORD MODE ON
PASSWORD
GOTO PASSWORD SETUP PAGE
ON
OFF
• PASSWORD MODE – Ota salasana käyttöön / poista salasana käytöstä.
• PASSWORD – Salasanan muuttaminen (salasanan tehdasasetus on 1369).
Syötäensin voimassa oleva salasana. Syötäsitten uusi salasana (4 numeroa) ja
vahvista syöttämällä sama salasana uudelleen. ValitseOK ja paina [ ENTER ].
39
Page 40

4.3 Toisto
1. Paina[ SOURCE ] (20) ja valitse DISC (levy) tai USB painikkeilla [ ▲ ]/[ ▼ ].
2. Vahvistapainamalla [ ENTER ] (40).
3. Valitsehaluamasi kansio/tiedosto painikkeilla [ ▲ ]/[ ▼ ].
4. Aloitatoisto valitsemastasi kansiosta/tiedostosta painamalla [ ENTER ] (40).
Toiston asetukset
1. Paina[ SOURCE ] (20) ja valitse DISC (levy) tai USB painikkeilla [ ▲ ]/[ ▼ ].
2. Vahvistapainamalla [ ENTER ] (40).
3. Avaaalavalikkoja painamalla [ ► ] (Filter, Repeat, Mode, Edit mode, Program view
tai Add to program).
4. Valitsehaluamasi asetus (alavalikko) painikkeilla [ ▲ ]/[ ▼ ].
5. Valitsehaluamasi toiminto painamalla useita kertoja [ ENTER ] (40).
6. Tallennaasetukset ja poistu alavalikosta painamalla [ ◄ ].
5. Huoltoja ylläpito
Puhdistus
• Irrota aina muuntajan pistoke verkkovirrasta ennen laitteen puhdistusta.
Suomi
• Varmista, että laitteeseen ei pääse kosteutta tai nesteitä.
• Puhdista laitteen kotelo kevyesti kostutetulla liinalla.
• Älä käytä liuottimia tai voimakkaita puhdistusaineita.
Käsittele levyjä oikein
• Pitele levyä reiästä ja reunasta. Näinvältät sormenjälkien ja lian kertymisen
levynpintaan.
• Älä taivuta levyä äläkä altista sitä suoralle auringonvalolle tai muulle
lämmönlähteelle.
• Puhdista levyt kuivalla ja pehmeällä liinalla keskeltä ulospäin. Äläkäytä
puhdistusaineita tai vahvoja liuottimia.
• Säilytä levyjä koteloissa.
40
Page 41

6. Vianetsintä
Vika Toimenpide
Soitin ei
käynnisty
tai kytkeytyy
pois päältä.
Soitin ei
reagoi
kaukosäätimeen.
Ei kuvaa tai
ei ääntä.
Huono kuva
ja/tai huono
ääni.
• Varmista, että akku on ladattu.
• Varmista, että autosovitin tai muuntaja on liitetty oikein.
• Käynnistä laite uudelleen painamalla se pois päältä ja takaisin
päälle virtakytkimestä.
• Varmista, että kaukosäätimen paristo on asetettu oikein.
• Vaihda vanhan pariston tilalle uusi.
• Varmista, että suuntaat kaukosäätimen dvd-soittimen etupuolen
tunnistinta kohti.
• Varmista, ettei kaukosäätimen signaalia estä mikään esine.
• Varmista, että ääni- ja kuvakaapelit on liitetty oikein.
• Varmista, että toistettava levy on tyyppiä dvd, dvd-r, dvd-rw tai cd.
• Varmista, että levy on ehjä eikä siinä ole naarmuja. Varmistamyös,
että se on asetettu lokeroon etikettipuoli ylöspäin.
• Varmista, ettei soittimen laserlukupää ole likainen. Josse on
likainen, ota yhteyttä asiakaspalveluun.
• Varmista, että televisio on asetettu oikealle kanavalle (video, av tms.)
• Tarkasta levyn kunto. Käytäehjää ja naarmutonta levyä.
7. Kierrätys
Kierrätä tuote asianmukaisesti, kun poistat sen käytöstä.
Tarkempia kierrätysohjeita saat kuntasi jäteneuvonnasta.
Suomi
41
Page 42

8. Teknisettiedot
Käyttöjännite Prim. 100–240 V AC 50/60 Hz
Sek. 9 V, 1 A (+ keskellä)
Tehonkulutus < 10 W
Paino 0,73 kg
Mitat 200 x 157 x 41 mm (P x L x K)
Näyttö 7″ TFT (16:9)
Ulostuloliitännät Video 1.0 V (p-p) / 75 Ω
Audio 1,4 V rms (1 kHz, 0 dB)
Antoteho 2 x 1 W
Käyttöympäristö Ilmankosteus 5–90 %
Kaukosäädin CR2025-paristo
Järjestelmä
Laser Puolijohdelaser
Signaalijärjestelmä PAL / NTSC
Taajuusalue 20 Hz – 20 kHz (1 dB)
Taajuusvaste Parempi kuin 80 dB (analoginen ulostulo)
Dynamiikka Parempi kuin 85 dB (dvd/cd)
Suomi
Akku
Napajännite 7,4 V
Latausaika 3–4 tuntia
Käyttöaika 2 tuntia
Säilytys- ja käyttöolosuhteet
Säilytys Lämpötila Ilmankosteus
6 kuukautta –20…+45 °C 65 ± 20 %
1 viikko –20…+65 °C 65 ± 20 %
Käyttö Lämpötila Ilmankosteus
Normaali lataus 0...+45 °C 65 ± 20 %
Normaali purkaus –20…+65 °C 65 ± 20 %
42
Page 43

43
Page 44

Sverige
Kundtjänst Tel: 0247/445 00
Fax: 0247/445 09
E-post: kundtjanst@clasohlson.se
Internet www.clasohlson.se
Post Clas Ohlson AB, 793 85 INSJÖN
Norge
Kundesenter Tlf.: 23 21 40 00
Faks: 23 21 40 80
E-post: kundesenter@clasohlson.no
Internett www.clasohlson.no
Post Clas Ohlson AS, Postboks 485 Sentrum, 0105 OSLO
Suomi
Asiakaspalvelu Puh.: 020 111 2222
Sähköposti: info@clasohlson.fi
Internet www.clasohlson.fi
Osoite Clas Ohlson Oy, Annankatu 34–36 A, 00100 HELSINKI
Great Britain
For consumer contact, please visit
www.clasohlson.co.uk and click on
customer service.
Internet www.clasohlson.co.uk
 Loading...