

Page 1
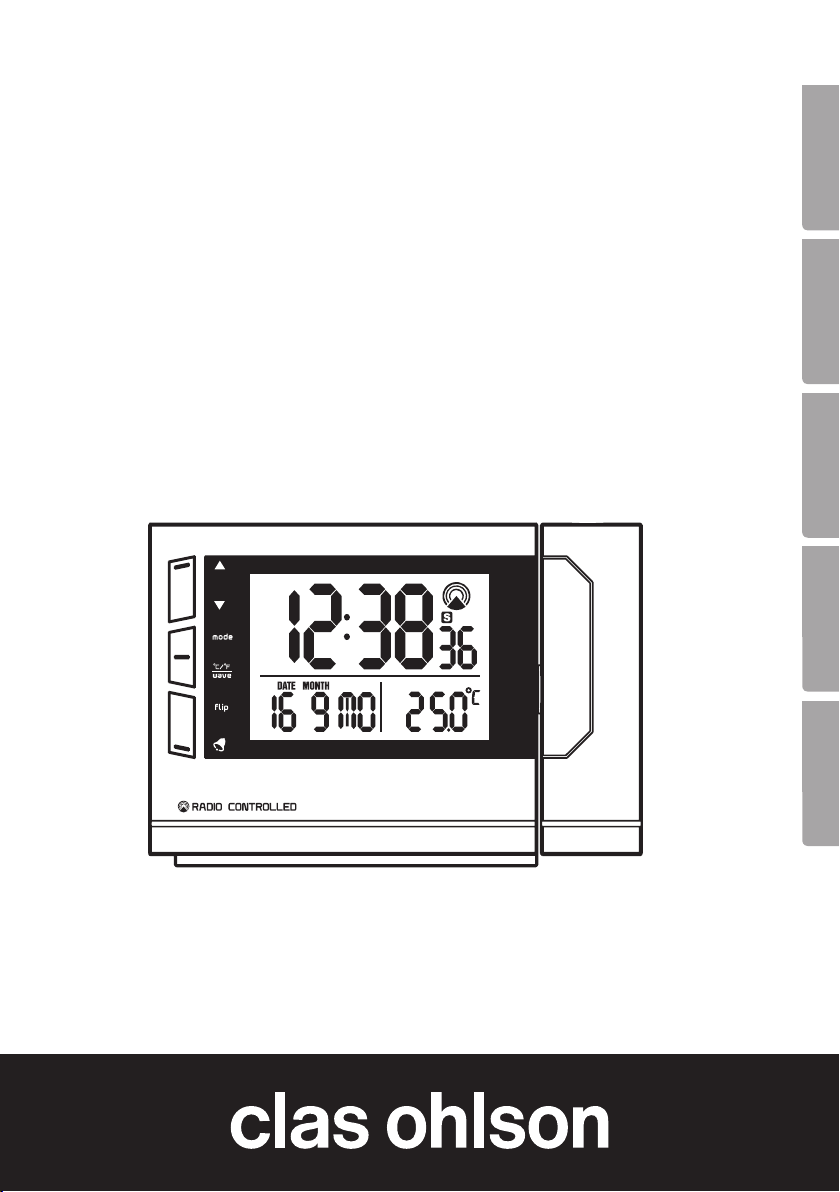
Radio Controlled
Projection Clock
Radiokontrollerad projektorklocka
Radiokontrollert projektorklokke
Radio-ohjattu projektorikello
Funk-Projektionswecker
EnglishSvenskaNorskSuomiDeutsch
Art.no Model
36-5338 pcr156
Ver. 20140416
Page 2

Radio Controlled Projection Clock
Art.no 36-5338 Model pcr156
English
Please read theentire instruction manual before using theproduct and save it
for future reference. We reserve theright for any errors in text or images and any
necessary changes made to technical data. If you have any questions regarding
technical problems please contact our Customer Services.
Things to consider:
• Other wireless equipment using thesame frequency can reduce thetransmission range.
• The range of all wireless equipment depends on thetype of obstacles located
between thetransmitter and thereceiver (e.g. aconcrete wall will interfere with
thesignal more than aplasterboard wall).
If you experience problems, try thefollowing:
• Turn off any other existing wireless equipment and check if this is thecause of
the problem.
• Move any other existing wireless equipment. Shorten thedistance between
thesending and receiving devices and reduce thenumber of obstacles (walls,
furniture, etc.) between them.
What is aradio controlled clock?
A radio controlled clock is extremely accurate timekeeping device. The time is controlled
by theatomic clock in Braunschweig, Germany (accuracy ±1 second per 1 million
years). The clock has and built -in radio receiver that decodes theincoming atomic
clock signal (long wave 77.5 kHz). The product also has anprecisely calibrated quartz
clock movement with afrequency of 32 kHz that keeps it running. The transmitter in
Germany has anofficial range of 2,000 km. This means that the UK and Ireland should
be well within range.
Safety
• The projector clock must only be repaired by qualified service technicians.
• The projector clock is for indoor use only.
• Do not position the product where it is exposed to moisture or splashing water.
• Do not place theproduct where there is arisk of it falling into water or other liquid.
• Do not place theclock in damp, dusty environments or where there is
anoccurrence of strong vibrations.
• Do not expose theprojector clock to extreme high or low temperature shifts.
Do not expose theproduct to direct sunlight.
• Never try to open, change or modify theproduct in any way.
• Always remove thebatteries if theprojector clock is not to be used for along period.
• Make sure that the wall socket into which the mains lead is plugged is accessible,
since the mains lead is used to disconnect the product from the supply.
2
Page 3
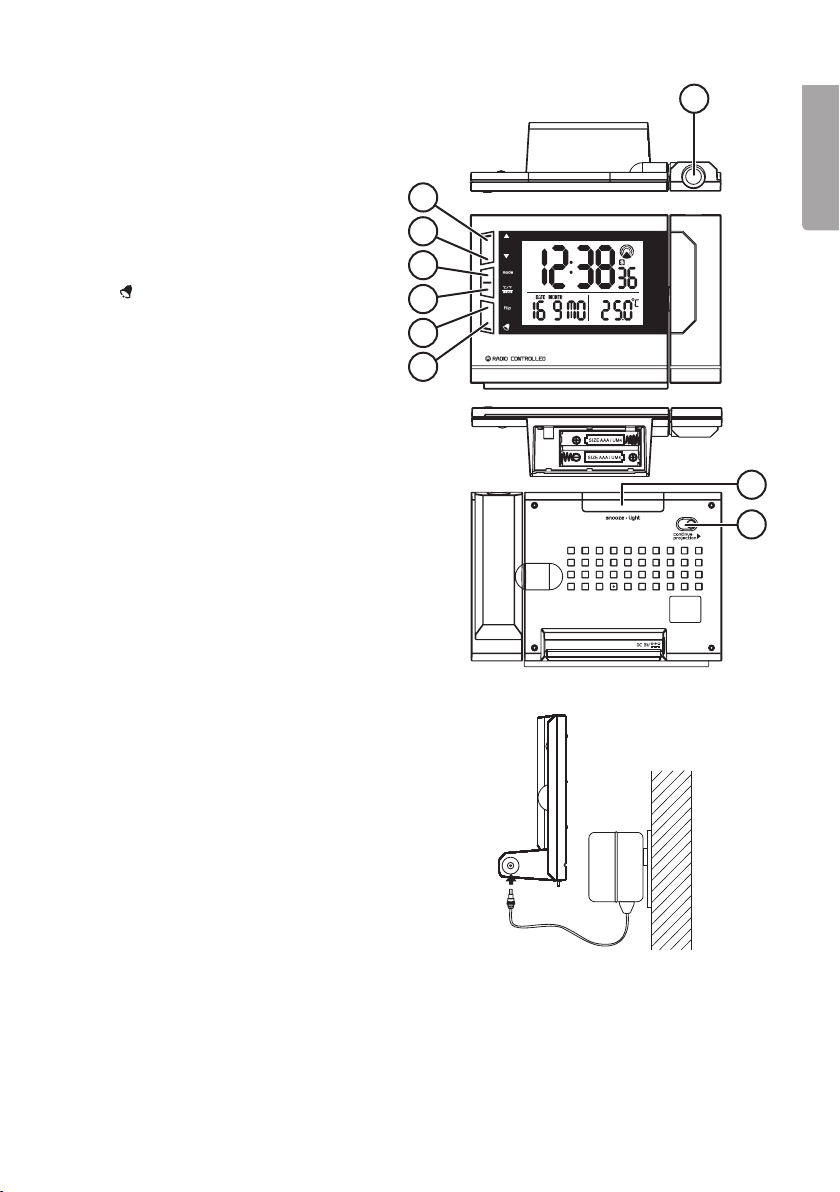
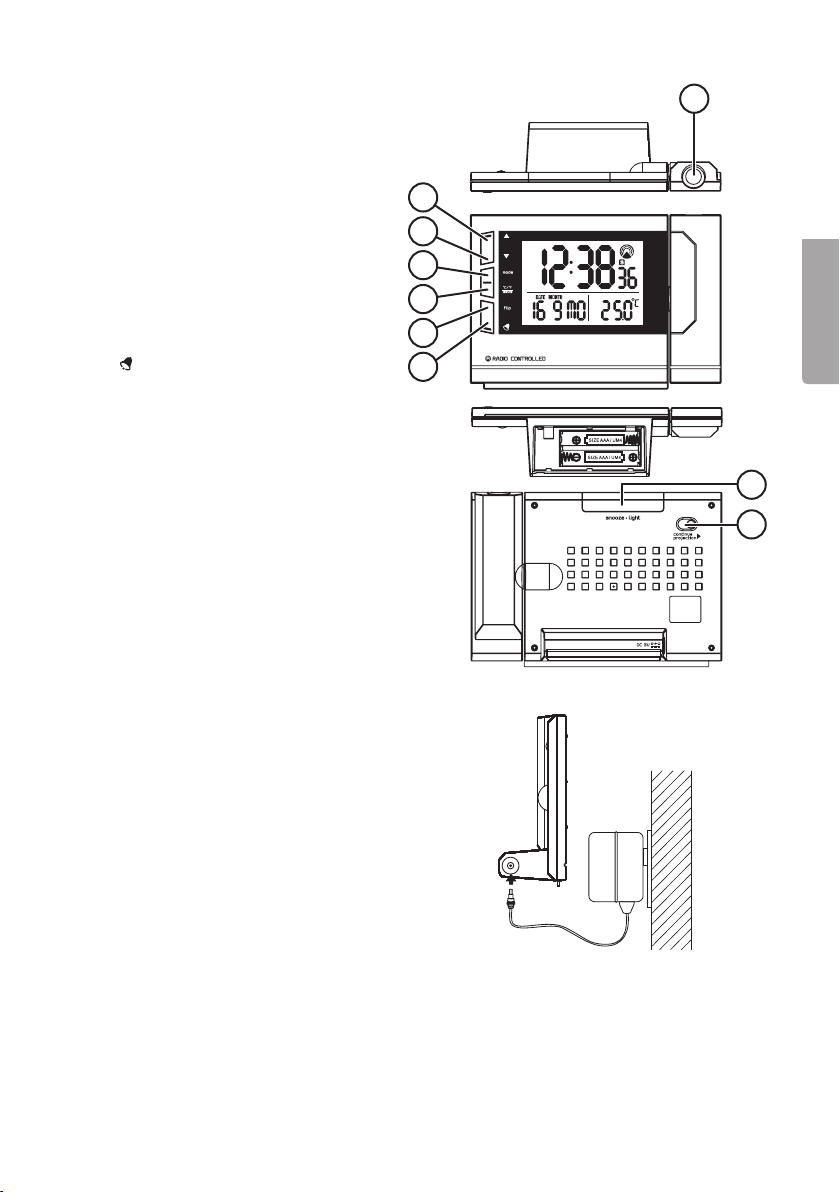
Buttons and functions
1. [ ▲ ] Increases time and alarm settings
2. [ ▼ ] Decreases time and alarm settings
3. [ mode ] Functions and settings
4. [ ºC/ºF, wave ] Time signal scan,
Temp display selector
5. [ flip ] 180º projector rotation
] Alarm
6. [
7. Projector lens
8. [ snooze • light ] Snooze/backlight
9. Continuous projection on/off
7
1
English
2
3
4
5
6
8
9
Battery and mains operation
Note: The clock runs off thebatteries
and theprojector is mains driven. If
you don’t use theprojector then you
you can run theclock solely from
thebatteries.
1. Open thebattery cover at
thebottom of theclock by sliding
thecover outwards.
2. Insert 2 x AAA/LR03 batteries.
3. Plug themains adaptor both into
apower point and theclock’s power
socket.
3
Page 4
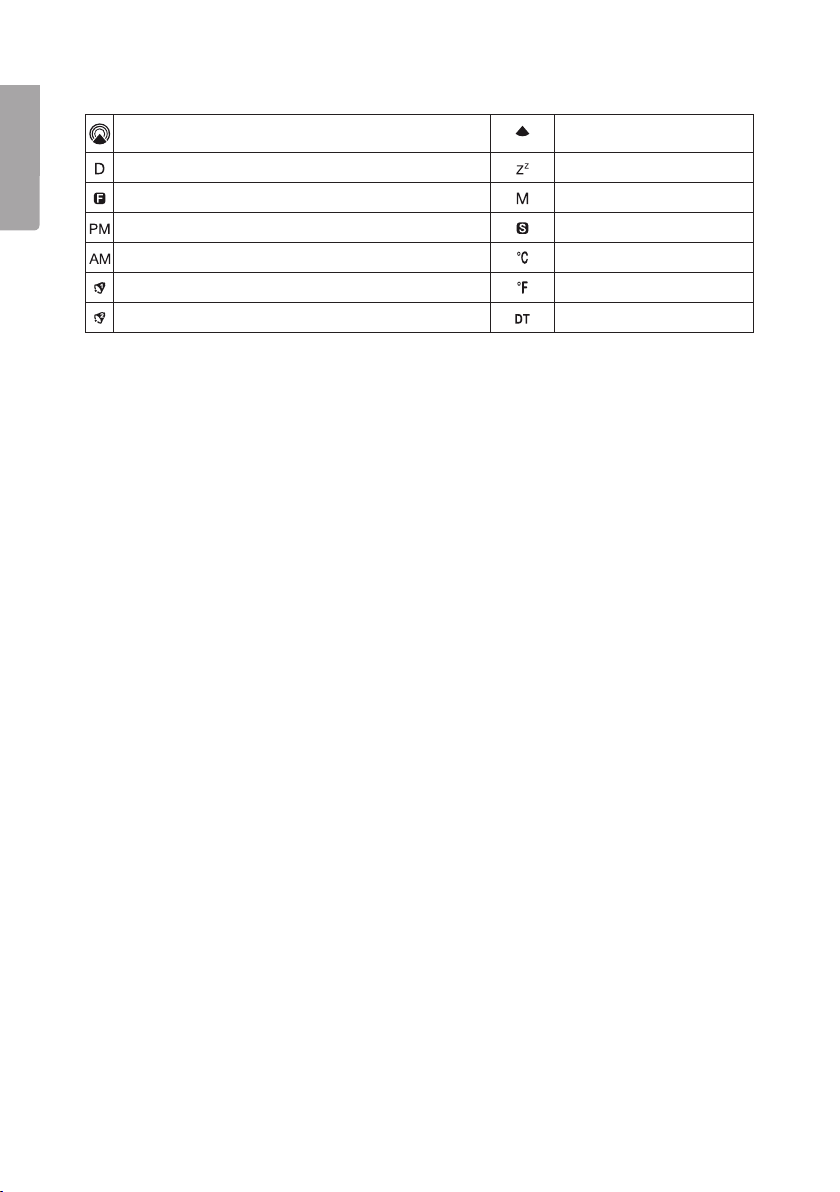
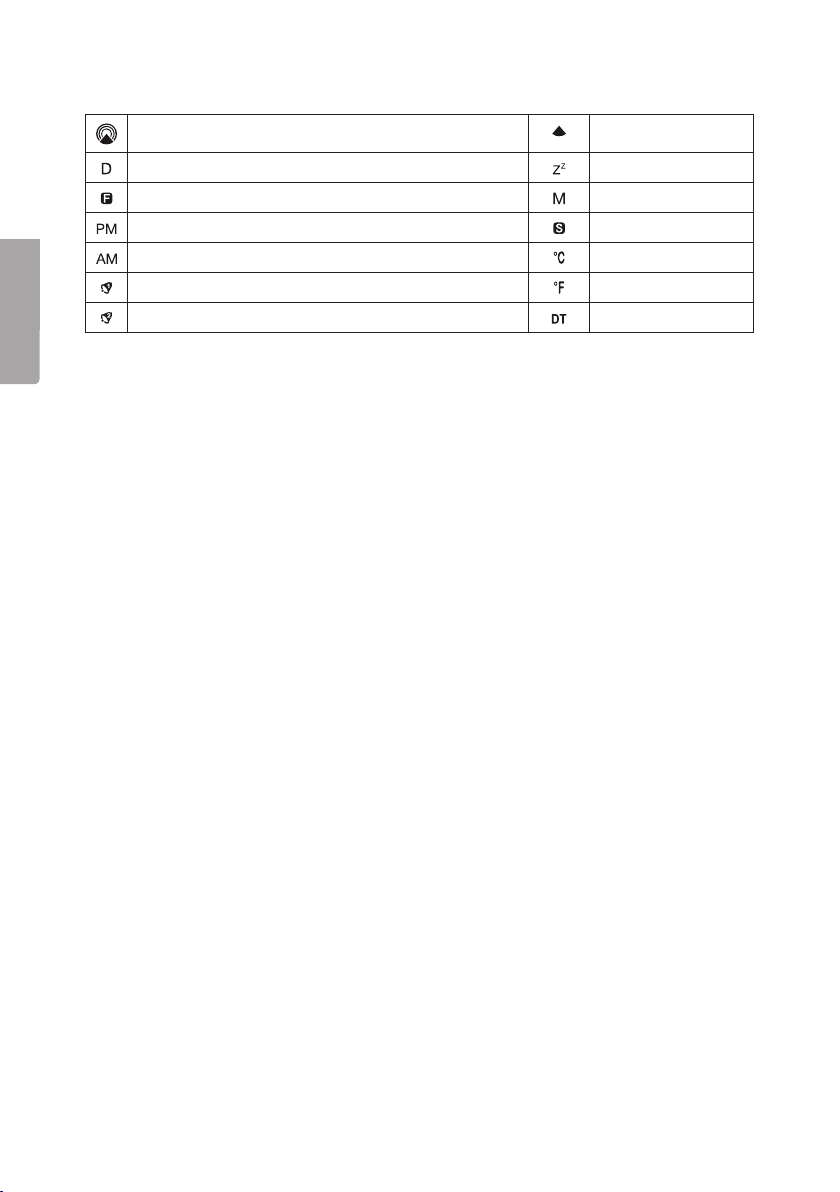
Display icons
Full-strength time signal Weak time signal
English
Date Snooze
Dual time zone Month
PM (shown only for the12-hour clock display) Summer time
AM (shown only for the12-hour clock display) Celsius
Alarm 1 Fahrenheit
Alarm 2 Dual time display
Operating instructions
• Whenever batteries are inserted anaudible signal will be heard, indicating that
thetime signal scan has begun.
• If asignal has been received, both thetime and date will be set automatically.
• If thetime signal can not be received thetime signal icon will disappear.
In such cases both time and date must be set manually.
• As abackup, theclock is set to anhourly automatic time scan.
Manual time setting
There are four display modes. Pressing [ mode ] browses through thefour display
modes: Alarm 1 “AL1” – alarm 2 “AL2” – dual time “DT” – temperature.
1. For manual time setting, you must be in temperature mode for thesettings to
be entered. Press [ mode ] until temperature mode is reached.
2. Hold in [ mode ] for 3 seconds until theyear display flashes.
3. Press [ ▲ ] or [ ▼ ] to set theyear. Press and hold in to accelerate thevalues
quicker in either direction.
4. Press [ mode ] again, until themonth display begins to flash.
5. Press [ ▲ ] or [ ▼ ] to set themonths. Press and hold in to accelerate thevalues
quicker in either direction.
6. Pressing [ mode ] again will advance you to theremaining settings for date, hours
and minutes. Follow theabove procedures for inputting theremaining settings.
7. Press [ mode ] after inputting all settings to return to normal time display.
Interrupting thesettings procedure for more than 30 seconds will require you to repeat
theprocedure.
Weekday or week
Press [ ▼ ] to select between weekday or week display.
4
Page 5

Language
1. Press and hold in [ ▼ ] until therolling language menu appears: “EN” (English),
“GE” (German), “FR” (French), “IT” (Italian), “SP” (Spanish).
2. Release [ ▼ ] when thedesired language appears to select thedesired language.
12/24 hour display
Press [ ▲ ] to select either a12 or 24 hour clock display. “AM” and “PM” will be displayed if
the12-hour clock has been chosen.
Setting thealarm
Alarm 1
1. Press [ mode ] until alarm 1 “AL1” appears in thelower right-hand corner.
2. Hold in [ mode ] until thehours display begins to flash.
3. Press or hold in [ ▲ ] or [ ▼ ] to set thehours.
4. Press [ mode ] again until theminutes display begins to flash.
5. Press or hold in [ ▲ ] or [ ▼ ] to set theminutes.
6. Press [ mode ] again. Both alarm time and thealarm 1 icon will be shown.
Alarm 2
1. Press [ mode ] until alarm 2 “AL2” appears in thelower right-hand corner.
2. Use thesame procedures used for setting alarm 1.
Alarm activation/deactivation
• When thealarm sounds, its respective icon will also flash. Press [ ] to turn off
thealarm for theday. The alarm will then sound again after 24 hours.
• Press [ ] repeatedly in order to turn off alarm 1, alarm 2 or both permanently.
• If you are not successful in turning off thealarm by pressing [ ] thealarm will
continue to sound for thenext 4 minutes before finally shutting off automatically.
English
Snooze
Hold in [ snooze • light ] when thealarm sounds. The alarm will mute and thedisplay’s
backlight will be lit for 5 sec. The alarm will sound again after 4 min and will continue
with this pattern until thealarm is turned off permanently.
5
Page 6

English
Dual time setting
Setting adual time zone:
1. Hold in [ ▲ ] until
2. Make sure that thetemperature is displayed in thelower right-hand corner. If not,
then press [ mode ] until thetemperature is displayed.
3. Hold in [ mode ] until thehours display begins to flash.
4. Press or hold in [ ▲ ] or [ ▼ ] to set thehours.
Note: Minutes cannot be set for dual time zones. Time zones are only shown in
hour differences.
5. Push [ mode ] to save your settings.
6. Hold in [ ▲ ] to switch between dual time zone or normal clock display.
appears in thedisplay.
Dual time display
The display can be configured for dual time display.
1. Press [ mode ] until
2. Hold in [ mode ] until thehours display begins to flash.
3. Press or hold in [ ▲ ] or [ ▼ ] to set thehours.
4. Press [ mode ] again until theminutes display begins to flash.
5. Press or hold in [ ▲ ] or [ ▼ ] to set theminutes.
6. Push [ mode ] to save your settings.
appears in thelower right-hand corner.
Display backlight
Press [ snooze • light ] to turn on thebacklight. The backlight has a5 sec duration time.
Time projection
Note: The clock must be connected to themains for theprojector clock to work.
1. Press [ snooze • light ] to turn theprojector on. The projector has a5 sec duration time.
2. To turn on time projection permanently, slide theswitch (9) forward in thedirection
of thearrow.
3. Press [ flip ] to flip theprojection 180º.
4. To turn off permanent time projection, slide theswitch back.
Temperature unit selection ºC/ºF
Press[ ºC/ºF, wave ] to select thetemperature unit to be shown.
Manual time signal scan
Press [ ºC/ºF, wave ] until begins to flash.
Care and maintenance
Clean theproduct using alightly moistened cloth. Only use mild cleaning agents,
never solvents or corrosive chemicals.
6
Page 7

Troubleshooting guide
The clock is not working. • Check that thebatteries are not flat.
• Check for correct battery insertion.
Time projection does not work. • Make sure themains adaptor is properly con-
nected both to theclock and thepower point.
• Check that thewall socket is live.
• Make sure that theadaptor and its lead are
whole and undamaged.
Disposal
This product should be disposed of in accordance with local regulations.
If you are unsure how to proceed, contact your local authority.
Specifications
Batteries 2 x AAA/LR03
AC/DC adaptor In 230 V, 50 Hz, 30 mA
Out 3 V, 100 mA, 0.3 VA
Size 153 x 103 x 12 mm
English
7
Page 8

Radiokontrollerad projektorklocka
Art.nr 36-5338 Modell pcr156
Läs igenom hela bruksanvisningen före användning och spara den sedan för framtida
bruk. Vi reserverar oss för ev. text- och bildfel samt ändringar av tekniska data.
Vid tekniska problem eller andra frågor, kontakta vår kundtjänst (se adressuppgifter
på baksidan).
Tänk på att:
• Annan befintlig trådlös utrustning på samma frekvensband kan påverka räckvidden
Svenska
• Räckvidden på all trådlös utrustning påverkas av vilka hinder som finns mellan
Vid funktionsproblem, prova följande lösningar:
• Stäng av övriga befintliga trådlösa utrustningar för att kontrollera om de kan vara
• Flytta den trådlösa utrustningen, förkorta avståndet elller minska antalet hinder
Vad innebär det att en klocka är radiokontrollerad?
En radiokontrollerad klocka ger dig mycket exakt tid. Tiden styrs av atomuret i
Braunschweig i Tyskland (gångnoggrannhet ± 1 sekund på 1 miljon år). Urverken i de
radiokontrollerade klockorna innehåller en radiomottagare som avkodar tidssignalen
(långvåg 77,5 kHz). Urverken har också ett noggrant kalibrerat kvartsverk med 32 kHz
svängningar som sköter driften. Sändaren i Tyskland har en räckvidd på ca 200 mil.
För Sveriges del betyder det att signalen inte är tillförlitlig norr om Umeå.
negativt.
sändaren och mottagaren (t.ex. dämpar en betongvägg signalen avsevärt mer än
en gipsvägg).
orsaken till problemet.
(väggar, möbler etc.) mellan sändaren och mottagaren.
Säkerhet
• Projektorklockan får endast repareras av kvalificerad servicepersonal.
• Projektorklockan är endast avsedd för inomhusbruk.
• Placera inte projektorklockan så att den utsätts för fukt eller stänkande vatten.
• Placera inte projektorklockan så att den kan falla ner i vatten eller annan vätska.
• Placera inte projektorklockan i fuktig eller dammig miljö eller där det förekommer
starka vibrationer.
• Utsätt inte projektorklockan för extremt höga eller låga temperaturer. Utsätt den
inte heller för ihållande, direkt solljus.
• Försök aldrig öppna höljet eller ändra/modifiera projektorklockan på något sätt.
• Ta alltid ut batterierna ur projektorklockan om den inte ska användas under en
längre period.
• Se till att vägguttaget där batterieliminatorn ansluts är lättillgängligt eftersom
batterieliminatorn används som frånkopplingsanordning från elnätet.
8
Page 9
Knappar och funktioner
1. [ ▲ ] Stega uppåt vid tidsinställning
och inställning av alarm
2. [ ▼ ] Stega nedåt vid tidsinställning
och inställning av alarm
3. [ mode ] Val av funktioner och
inställningar
4. [ ºC/ºF, wave ] Sökning efter tidssignal,
val av temperaturvisning
5. [ flip ] Rotera den projicerade tiden 180º
] Alarm
6. [
7. Projektorlins
8. [ snooze • light ] Snooze/displaybelysning
9. Kontinuerlig projicering på/av
7
1
2
3
4
5
Svenska
6
8
9
Batterier och nätanslutning
Obs! Klockan drivs av batterierna och
projiceringen av batterieliminatorn. Om
du inte behöver projicera kan klockan
användas utan batterieliminator.
1. Öppna batteriluckan på projektorklockans undersida genom att skjuta
den utåt.
2. Sätt i 2 x AAA/LR03-batterier.
3. Anslut batterieliminatorn till ett
vägguttag och till anslutningen
på klockan.
9
Page 10
Displayens ikoner
Svenska
Användning
• När batterierna sätts i avger klockan en ljudsignal och börjar söka efter tidssignal.
• Om tidssignalen tas emot ställs datum och tid in automatiskt.
• Om tidssignalen inte kan tas emot kommer ikonen för tidssignal att slockna.
• Sökning efter tidssignal kommer att ske automatiskt varje timme.
Manuell tidsinställning
Displayen har fyra visningslägen. Tryck [ mode ] för att i displayens nedre högra hörn
välja att visa: alarm 1 ”AL1” – alarm 2 ”AL2” – alternativ tid ”DT” – temperatur.
1. Välj att visa temperaturen i displayens nedre högra hörn.
2. Håll in [ mode ] i 3 sekunder tills årtalet blinkar.
3. Tryck [ ▲ ] eller [ ▼ ] för att ställa in årtalet. Håll in för att stega snabbare.
4. Tryck [ mode ] kort, månaderna blinkar.
5. Tryck [ ▲ ] eller [ ▼ ] för att ställa in månaderna. Håll in för att stega snabbare.
6. Tryck [ mode ] igen för datum, timmar och minuter. Ställ in på samma sätt som ovan.
7. Tryck [ mode ] när inställningarna är klara för att återgå till normal tidvisning.
• Om tidsinställningen påbörjas och sedan avbryts i 30 sekunder måste inställningen
Fullgod tidssignal Svag tidssignal
Datum Snooze
Alternativ tid Månad
PM (visas endast om 12-timmars tidvisning valts) Sommartid
AM (visas endast om 12-timmars tidvisning valts) Grader Celsius
Alarm 1 Grader Fahrenheit
Alarm 2 Dubbel tid
Tid och datum måste då ställas in manuellt.
påbörjas på nytt.
Visa veckodag eller veckonummer
Tryck när som helst [ ▼ ] för att välja mellan visning av veckodag och veckonummer.
Välj språk för veckodag
1. Håll in [ ▼ ] tills displayen visar språkvalen rullande i följande ordning ”EN” (engelska),
”GE” (tyska), ”FR” (franska), ”IT” (italienska), ”SP” (spanska).
2. Släpp upp [ ▼ ] när det språk som önskas visas.
10
Page 11

Välj 12- eller 24-timmarsvisning
Tryck [ ▲ ] för att välja 12- eller 24-timmarsvisning. ”AM” respektive ”PM” visas
i displayen när 12-timmarsvisning valts.
Alarminställning
Alarm 1
1. Tryck [ mode ] tills tiden för alarm 1 ”AL1” visas i displayens nedre högra hörn.
2. Håll in [ mode ] tills timmarna blinkar.
3. Tryck eller håll in [ ▲ ] eller [ ▼ ] för att ställa in timmarna.
4. Tryck [ mode ] igen, minuterna blinkar.
5. Tryck eller håll in [ ▲ ] eller [ ▼ ] för att ställa in minuterna.
6. Tryck [ mode ] igen, alarmtiden och ikonen för alarm 1 visas.
Alarm 2
1. Tryck [ mode ] tills tiden för alarm 2 ”AL2” visas i displayens nedre högra hörn.
2. Ställ in på samma sätt som alarm 1.
Slå på/av alarm
• När alarmet ljuder blinkar respektive ikon i displayen, tryck [ ] för att stänga av.
Alarmet kommer att ljuda igen om 24 timmar.
• Tryck [
eller båda.
• Om alarmet inte stängs av genom att [ ] trycks in kommer det att ljuda i 4 minuter
och sedan automatiskt stängas av.
] upprepade gånger för att permanent slå på eller av alarm 1, alarm 2
Svenska
Snoozefunktion
Tryck in [ snooze • light ] när alarmet ljuder. Alarmet tystnar och displaybelysningen
tänds i 5 sekunder. Alarmet ljuder igen efter 4 minuter och fortsätter på detta sätt tills
det stängs av permanent.
Inställning av alternativ tid
Du kan ställa in en alternativ tid (t.ex. tiden på en ort i en annan tidszon).
1. Håll in [ ▲ ] tills
2. Se till att temperaturen visas i displayens nedre högra hörn, tryck [ mode ] för att
välja temperatur om något annat visas.
3. Håll in [ mode ] tills timmarna blinkar.
4. Tryck eller håll in [ ▲ ] eller [ ▼ ] för att ställa in timmarna.
Obs! Minuterna kan inte ställas in eftersom tidszonerna skiljer sig från varandra
i hela timmar.
5. Tryck [ mode ] för att spara inställningen.
6. Håll när som helst in [ ▲ ] för att växla mellan alternativ och normal tidvisning.
visas i displayen.
11
Page 12

Dubbel tid
Du kan välja att visa ytterligare en tid i displayens nedre högra hörn.
1. Tryck [ mode ] tills
2. Håll in [ mode ] tills timmarna blinkar.
3. Tryck eller håll in [ ▲ ] eller [ ▼ ] för att ställa in timmarna.
4. Tryck [ mode ] igen, minuterna blinkar.
5. Tryck eller håll in [ ▲ ] eller [ ▼ ] för att ställa in minuterna.
6. Tryck [ mode ] för att spara inställningen.
Displaybelysning
Svenska
Tryck när som helst in [ snooze • light ] för att tända displaybelysningen i 5 sekunder.
Projicering av tid
Obs! Batterieliminatorn måste vara ansluten till ett vägguttag och till klockan för att
projiceringen ska fungera.
1. Tryck när som helst in [ snooze • light ] för att tända displaybelysning och
2. Skjut reglaget för kontinuerlig projicering (9) i pilens riktning för att slå på
3. Tryck [ flip ] för att rotera den projicerade tiden 180º.
4. Skjut tillbaka reglaget för att slå av projiceringen.
Välja tidvisning ºC eller ºF
Tryck [ ºC/ºF, wave ] för att välja om temperaturen ska visas i ºC eller ºF.
visas i displayens nedre högra hörn.
projicering i 5 sekunder.
projiceringen.
Manuell sökning efter tidssignal
Du kan när som helst söka efter tidssignalen genom att hålla in [ ºC/ºF, wave ] tills
blinkar i displayen.
Skötsel och underhåll
Rengör klockan med en lätt fuktad trasa. Använd ett milt rengöringsmedel, aldrig
lösningsmedel eller frätande kemikalier.
12
Page 13

Felsökningsschema
Klockan fungerar inte. • Kontrollera att batterierna inte är förbrukade.
• Är batterierna korrekt monterade?
Projiceringen av tid
fungerar inte.
• Kontrollera att batterieliminatorn är korrekt ansluten till
vägguttaget och till klockan.
• Finns det ström i vägguttaget?
• Kontrollera att batterieliminatorn och kabeln är hela
och oskadade.
Avfallshantering
När du ska göra dig av med projektorklockan ska detta ske enligt lokala föreskrifter.
Är du osäker på hur du ska gå tillväga, kontakta din kommun.
Specifikationer
Batterier 2 x AAA/LR03
Batterieliminator In 230 V, 50 Hz, 30 mA
Ut 3 V 100 mA, 0,3 VA
Mått 153 x 103 x 12 mm
Svenska
13
Page 14

Norsk
Radiokontrollert projektorklokke
Art. nr. 36-5338 Modell pcr156
Les brukerveiledningen grundig før produktet tas i bruk og ta vare på den for framtidig
bruk. Vi reserverer oss mot ev. feil i tekst og bilde, samt forandringer av tekniske data.
Ved tekniske problemer eller spørsmål, ta kontakt med vårt kundesenter.
(Se opplysninger om kundesenteret i denne bruksanvisningen).
Husk:
• Annet trådløst utstyr som er innstilt på samme frekvens, kan på kan påvirke
rekkevidden negativt.
• Hindringer mellom sender og mottaker kan påvirke kontakten (rekkevidden)
mellom disse. En betongvegg kan f.eks. redusere signalene dramatisk i forhold
til hva en gipsvegg gjør.
Ved problemer, prøv følgende:
• Skru av øvrig trådløst utstyr for å kontrollere hvor årsak til problemene ligger.
• Flytt det trådløse utstyret eller reduser avstanden mellom sender og mottaker.
Forsøk også å redusere antall hindringer mellom sender og mottaker (vegger,
møbler etc.).
Hva innebærer det at en klokke er radiokontrollert?
En radiokontrollert klokke gir en svært nøyaktig tid. Tiden styres av atomuret i Braunschweig
i Tyskland (nøyaktigheten er ± 1 sekunder på 1 million år). Urverket i de radiokontrollerte
klokkene inneholder en radiomottaker, som lastes ned og avkoder tidssignaler (langbølge
77,5 kHz). Uret har også et nøyaktig kalibrert kvartsurverk med 32 kHz svingninger, som
tar seg av driften. Senderen i Tyskland har en rekkevidde på ca. 200 mil. I Norge betyr
dette at alt nord for Steinkjer ikke kan ta imot disse signalene.
Sikkerhet
• Produktet må kun repareres av kvalifisert servicepersonell.
• Produktet er kun beregnet for innendørs bruk.
• Plasser ikke produktet slik at det kan utsettes for fuktighet eller vannsprut.
• Plasser ikke produktet slik at det kan komme i kontakt med vann eller annen væske.
• Plasser ikke produktet i fuktig, støvete miljø, eller på plasser med sterke vibrasjoner.
• Utsett ikke produktet for ekstremt høye eller lave temperaturer. Utsett det heller
ikke for vedvarende, direkte sollys.
• Dekselet må ikke åpnes, repareres eller endres på.
• Ta ut batteriene dersom klokken ikke skal brukes på en stund.
• Påse at strømuttaket som produktet kobles til er lett tilgjengelig, da dette er den
eneste frakoblingsanordningen for å koble produktet fra strøm.
14
Page 15

Knapper og funksjoner
1. [ ▲ ] Gå oppover ved tidsinnstilling
og innstilling av alarm
2. [ ▲ ] Gå nedover ved tidsinnstilling
og innstilling av alarm
3. [ mode ] Valg av funksjoner og
innstillinger
4. [ ºC/ºF, wave ] Søk etter tidssignal,
valg av temperaturvising
5. [ flip ] Rotere den projiserede tiden 180º
] Alarm
6. [
7. Projektorlinse
8. [ snooze • light ] Snooze/displaybelysning
9. Kontinuerlig projisering på/av
7
1
2
3
4
5
6
Batterier eller strøm fra strømnettet
Obs! Klokken drives av batteriene og
projiseringen av strøm via batterieliminatoren. Hvis klokken ikke skal projisere
kan den brukes uten batterieliminator.
1. Batterilokket på projektorklokkens
underside åpnes ved at den skyves
utover.
2. Sett i 2 x AAA/LR03-batterier.
3. Batterieliminatoren kobles til et
strømuttak og til uttaket på klokken.
8
Norsk
9
15
Page 16

Norsk
Ikonene på displayet
Fullgodt tidssignal Svakt tidssignal
Dato Snooze
Alternativ tid Måned
PM (vises kun hvis 12-timers tidsvising er valgt) Sommertid
AM (vises kun hvis 12-timers tidsvising er valgt) Grader Celsius
Alarm 1 Grader Fahrenheit
Alarm 2 Dobbel tid
Bruk
• Når batteriene settes på plass vil klokken avgi et lydsignal og starte søket
etter tidssignaler.
• Hvis tidssignalene tas imot vil dato og tid stilles inn automatisk.
• Hvis tidssignalene ikke kan tas imot vil ikonet for tidssignal slukkes.
Tid og dato må da stilles inn manuelt.
• Søking etter tidssignal vil foregå automatisk hver time.
Manuell tidsinnstilling
Displayet har fire visingsmoduser. Trykk [ mode ] for å velge å vise følgende i displayets
nedre høyre hjørne: alarm 1 «AL1» – alarm 2 «AL2» – alternativ tid «DT» – temperatur.
1. Velg å vise temperaturen i displayets nedre høyre hjørne.
2. Hold [ mode ] inne i 3 sekunder til årstallet blinker.
3. Trykk [ ▲ ] eller [ ▼ ] for å stille inn årstall. Holdes inne for å gå raskere.
4. Trykk kort på [ mode ], måneder blinker.
5. Trykk [ ▲ ] eller [ ▼ ] for å stille inn måned. Holdes inne for å gå raskere.
6. Trykk på [ mode ] igjen for dato, timer og minutter. Disse stilles inn på samme måte
som ovenfor.
7. Trykk [ mode ] for å gå tilbake til normal tidsvising når innstillingene er fullført.
• Hvis tidsinnstillingene er startet, men avbrytes i 30 sekunder, må innstillingen
startes på nytt.
Vise ukedag og ukenummer
Trykk på [ ▼ ] for å velge mellom vising av ukedag og ukenummer.
Velge språk på ukedager
1. Hold [ ▼ ] inne til displayet viser språkvalget fortløpende i følgende rekkefølge
«EN» (engelsk), «GE» (tysk), «FR» (fransk), «IT» (italiensk), «SP» (spansk).
2. Slipp [ ▼ ] opp når ønsket språk kommer opp.
16
Page 17

Velge mellom 12- eller 24-timers visning
Trykk på [ ▲ ] for å skifte mellom 12- eller 24-timersvisning. «AM» eller «PM» vises
i displayet når 12-timersvisingen er valgt.
Alarminnstilling
Alarm 1
1. Trykk inn [ mode ] til tiden for alarm 1 «AL1» vises i displayets nedre høyre hjørne.
2. Hold [ mode ] inne til timene blinker.
3. Trykk inn [ ▲ ] eller [ ▼ ] eller hold inne for å stille inn timene.
4. Trykk [ mode ] igjen og feltet for minuttangivelse blinker.
5. Trykk inn [ ▲ ] eller [ ▼ ] eller hold inne for å stille inn minuttene.
6. Trykk [ mode ] igjen, og alarmtiden og ikonet for alarm 1 vises.
Alarm 2
1. Trykk inn [ mode ] til tiden for alarm 2 «AL2» vises i displayets nedre høyre hjørne.
2. Stilles inn på samme måte som alarm 1.
Slå på/av alarmen
• Når alarmen varsler blinker respektive ikon i displayet. Trykk [ ] for å skru av.
Alarmen vil ringe igjen etter 24 timer.
• Trykk [
• Hvis alarmen ikke stenges ved å trykke på [
for deretter å skru seg av automatisk.
] gjentatte ganger for å skru på/av alarm 1, alarm 2 eller begge, permanent.
] vil den varsle igjen etter 4 minutter
Snoozefunksjon
Når alarmen går trykkes [ snooze • light ] inn. Alarmen stilner og belysningen i displayet
tennes i 5 sekunder. Alarmen starter igjen etter 4 minutter og fortsetter slik til den
stenges permanent.
Innstilling av alternativ tid
En alternativ tid kan stilles inn, som f.eks. klokkeslettet i en annen tidssone.
1. Hold [ ▲ ] inne til
2. Pass på at temperaturen vises på displayets nedre høyre hjørne. Trykk inn [ mode ]
for å velge temperatur hvis det vises noe annet.
3. Hold [ mode ] inne til timene blinker.
4. Trykk inn [ ▲ ] eller [ ▼ ] eller hold inne for å stille inn timene.
Obs! Minuttene kan ikke stilles inn fordi forskjellige tidssoner skiller seg fra
hverandre med hele timer.
5. Trykk på [ mode ] for å lagre innstillingen.
6. Ved å trykke inn [ ▲ ] kan man, når det er ønskelig, skifte mellom normal og alter-
nativ vising av tid.
vises i displayet.
Norsk
17
Page 18

Norsk
Dobbelt tid
Man kan velge å vise nok en tid i displayets nedre høyre hjørne.
1. Trykk på [ mode ] til
2. Hold [ mode ] inne til timene blinker.
3. Trykk inn [ ▲ ] eller [ ▼ ] eller hold inne for å stille inn timene.
4. Trykk [ mode ] igjen og feltet for minuttangivelse blinker.
5. Trykk inn [ ▲ ] eller [ ▼ ] eller hold inne for å stille inn minuttene.
6. Trykk på [ mode ] for å lagre innstillingen.
vises i displayets nedre høyre hjørne.
Displaybelysning
Trykk inn [ snooze • light ] når du måtte ønske det for å tenne displaybelysningen i 5 sekunder.
Projisering av klokkeslett
Obs! Klokken må være koblet til strømnettet via batterieliminatoren for at projiseringen
skal fungere.
1. Trykk inn [ snooze • light ] når du måtte ønske det for å tenne displaybelysning og
projisering i 5 sekunder.
2. Skyv bryteren for kontinuerlig projisering i pilens retning for å skru på projiseringen.
3. Trykk [ flip ] for å rotere den projiserte tiden 180º.
4. Skyv bryteren tilbake når projiseringen skal skrus av.
Velg temperaturvising ºC eller ºF
Trykk [ ºC/ºF, wave ] for å velge om temperaturen skal vises i ºC eller ºF.
Manuelt søk etter tidssignal
Du kan søke etter tidssignal ved å holde [ ºC/ºF, wave ] til blinker i displayet.
Stell og vedlikehold
Rengjør klokken med en lett fuktet klut. Bruk et mildt rengjøringsmiddel,
aldri løsningsmidler eller etsende kjemikalier.
18
Page 19

Feilsøking
Klokken fungerer ikke. • Kontroller batteriene.
• Er batteriene riktig satt inn?
Projiseringen av tid fungerer ikke. • Kontroller at batterieliminatoren er riktig
koblet til strømuttaket og klokken.
• Er det strøm i strømuttaket?
• Kontroller at batterieliminatoren og kablene
er hele og ikke skadet.
Avfallshåndtering
Når produktet skal kasseres, må dette skje i henhold til lokale forskrifter.
Ved usikkerhet, ta kontakt med lokale myndigheter.
Spesifikasjoner
Batterier 2 x AAA/LR03
Batterieliminator Inn 230 V, 50 Hz, 30 mA
Ut 3 V, 100 mA, 0,3 VA
Mål 153 x 103 x 12 mm
Norsk
19
Page 20

Suomi
Radio-ohjattu projektorikello
Tuotenumero 36-5338 Malli pcr156
Lue käyttöohjeet ennen tuotteen käyttöönottoa ja säilytä ne tulevaa tarvetta varten.
Pidätämme oikeuden teknisten tietojen muutoksiin. Emme vastaa mahdollisista tekstitai kuvavirheistä. Jos laitteeseen tulee teknisiä ongelmia, ota yhteys myymälään tai
asiakaspalveluun (yhteystiedot käyttöohjeen lopussa).
Ota huomioon seuraavat asiat:
• Muut samalla taajuudella toimivat langattomat laitteet voivat heikentää kantamaa.
• Lähettimen ja vastaanottimen väliset esteet vaikuttavat kaikkien langattomien
laitteiden kantamaan (esim. betoniseinä heikentää signaalia huomattavasti
kipsiseinää enemmän).
Kokeile ongelmatilanteessa seuraavia keinoja:
• Selvitä, aiheuttavatko muut langattomat laitteet ongelmia sammuttamalla ne.
• Siirrä langattomia laitteita, lyhennä laitteiden välistä etäisyyttä ja siirrä lähettimen
ja vastaanottimen välisiä esteitä, kuten huonekaluja.
Mitä kellon radio-ohjattavuus tarkoittaa?
Radio-ohjattu kello näyttää tarkan ajan. Se ohjautuu Saksan Braunschweigissa
sijaitsevan atomikellon lähettämän signaalin mukaan. Kellon tarkkuus on ± 1 sekunti
miljoonassa vuodessa. Kellossa on radiovastaanotin, joka lukee aikasignaalia (77,5 kHz)
ja säätää kelloa signaalin mukaan. Kellossa on myös tarkasti kalibroitu kvartsikoneisto
(taajuus 32 kHz), joka huolehtii kellon toiminnasta. Saksan lähettimen kantama on noin
2000 kilometriä, eli kello toimii luotettavasti Kokkolan eteläpuolella.
Turvallisuus
• Projektorikellon saa korjata vain valtuutettu huoltoliike.
• Projektorikello on tarkoitettu ainoastaan sisäkäyttöön.
• Älä aseta laitetta paikkoihin, joissa se saattaa altistua kosteudelle tai vesiroiskeille.
• Älä sijoita projektorikelloa sellaiseen paikkaan, josta se voi pudota veteen tai
muuhun nesteeseen.
• Älä käytä projektorikelloa kosteissa tai pölyisissä tiloissa tai paikoissa, joissa siihen
kohdistuu voimakasta tärinää.
• Älä altista projektorikelloa erittäin korkeille tai erittäin matalille lämpötiloille.
Älä altista projektorikelloa pitkäkestoisesti suoralle auringonvalolle.
• Älä yritä avata projektorikellon koteloa tai muuttaa kelloa millään tavalla.
• Poista paristot, jos projektorikello on pitkään käyttämättä.
• Varmista, että pistorasia on helpossa paikassa, sillä laite erotetaan verkkovirrasta
irrottamalla virtajohto pistorasiasta.
20
Page 21

Painikkeet ja toiminnot
1. [ ▲ ] Siirtyminen eteenpäin
asetettaessa aikaa tai herätystä
2. [ ▲ ] Siirtyminen taaksepäin
asetettaessa aikaa tai herätystä
3. [ mode ] Toiminnot ja asetukset
4. [ ºC/ºF, wave ] Aikasignaalin haku,
lämpötilan näyttötavan valitseminen
5. [ flip ] Heijastetun ajan kääntäminen 180º
] Hälytys
6. [
7. Projektorin linssi
8. [ snooze • light ] Torkkutoiminto/
näytön taustavalo
9. Heijastuksen käynnistäminen/
sammuttaminen
7
1
2
3
4
5
6
8
9
Suomi
Paristot ja verkkoliitäntä
Huom.! Kello toimii paristoilla, ja heijastus
toimii verkkovirralla muuntajan kautta.
Jos heijastusta ei käytetä, kelloa voidaan
käyttää ilman muuntajaa.
1. Avaa projektorikellon pohjassa oleva
paristolokeron kansi työntämällä sitä
ulospäin.
2. Aseta lokeroon kaksi AAA/LR03-paristoa.
3. Liitä muuntaja pistorasiaan ja kellon
liitäntään.
21
Page 22

Suomi
Näytön kuvakkeet
Vahva aikasignaali Heikko aikasignaali
Päivämäärä Torkkutoiminto
Vaihtoehtoinen aika Kuukausi
PM (näkyy vain silloin, kun 12 tunnin
ajannäyttö on valittuna)
AM (näkyy vain silloin, kun 12 tunnin
ajannäyttö on valittuna)
Herätys 1 Fahrenheitasteet
Herätys 2 Kahden kellonajan näyttö
Kesäaika
Celsiusasteet
Käyttö
• Kun paristot asetetaan paristolokeroon, kello antaa äänimerkin ja aikasignaalin
haku käynnistyy.
• Jos aikasignaalin vastaanotto onnistuu, kello asettaa päivämäärän ja kellonajan
automaattisesti.
• Jos aikasignaalin vastaanotto epäonnistuu, aikasignaalin kuvake sammuu.
Aika ja päivämäärä tulee asettaa manuaalisesti.
• Kello hakee aikasignaalia automaattisesti tunnin välein.
Kellonajan asettaminen manuaalisesti
Näytössä on neljä näyttötilaa. Näytön oikean alakulman kuvakkeista voidaan valita
herätys 1 ”AL1”, herätys 2 ”AL2”, vaihtoehtoinen aika ”DT” tai lämpötila painikkeella
[ mode ].
1. Valitse näytön oikean alakulman kuvakkeista lämpötila.
2. Paina painiketta [ mode ] kolmen sekunnin ajan, kunnes vuosiluku vilkkuu.
3. Aseta vuosiluku painikkeilla [ ▲ ] ja [ ▼ ]. Luvut vaihtuvat nopeammin, kun painat
painiketta pitkään.
4. Paina painiketta [ mode ] lyhyesti. Kuukaudet vilkkuvat.
5. Aseta kuukausi painikkeilla [ ▲ ] ja [ ▼ ]. Luvut vaihtuvat nopeammin, kun painat
painiketta pitkään.
6. Aseta päivämäärä, tunnit ja minuutit painikkeella [ mode ]. Aseta ajat samalla tavalla
kuin edellä.
7. Kun asetukset ovat valmiit, palaa ajan näyttöön painikkeella [ mode ].
• Jos ajan asetus aloitetaan ja keskeytetään 30 sekunnin ajaksi, asetus on aloitettava
uudelleen.
Viikonpäivän tai viikkonumeron näyttö
Voit siirtyä viikonpäivän näytöstä viikkonumeron näyttöön milloin tahansa painikkeella [ ▼ ].
22
Page 23

Viikonpäivän kielen vaihtaminen
1. Paina painiketta [ ▼ ], kunnes näytöllä näkyvät kielivalinnat seuraavassa järjes-
tyksessä: ”EN” (englanti), ”GE” (saksa), ”FR” (ranska), ”IT” (italia), ”SP” (espanja).
2. Vapauta painike [ ▼ ], kun haluttu kieli näkyy näytöllä.
12 tunnin tai 24 tunnin ajannäyttö
Valitse 12 tai 24 tunnin ajannäyttö painikkeella [ ▲ ]. Kun 12 tunnin ajannäyttö on
valittu, näytöllä näkyvät kuvakkeet AM ja PM.
Herätyksen asettaminen
Herätys 1
1. Paina painiketta [ mode ], kunnes herätyksen 1 ”AL1” aika näkyy näytön oikeassa
alakulmassa.
2. Paina painiketta [ mode ], kunnes tunnit vilkkuvat.
3. Aseta tunnit painikkeilla [ ▲ ] ja [ ▼ ].
4. Paina uudelleen painiketta [ mode ], minuutit vilkkuvat.
5. Aseta minuutit painikkeilla [ ▲ ] ja [ ▼ ].
6. Paina uudelleen painiketta [ mode ], herätysaika ja herätyksen kuvake 1 vilkkuvat.
Herätys 2
1. Paina painiketta [ mode ], kunnes herätyksen 2 ”AL2” aika näkyy näytön oikeassa
alakulmassa.
2. Aseta aika samalla tavalla kuin edellä.
Herätyksen käynnistäminen ja sammuttaminen
• Herätyksen käynnistyessä näytöllä vilkkuu herätyksen kuvake. Sammuta herätys
painikkeella [ ]. Kello herättää uudelleen 24 tunnin kuluttua.
• Käynnistä tai sammuta herätys 1, herätys 2 tai molemmat pysyvästi painamalla
painiketta [ ] useita kertoja.
• Jos herätystä ei sammuteta painikkeella [ ], herätys hälyttää 4 minuutin ajan ja
sammuu automaattisesti sen jälkeen.
Suomi
Torkkutoiminto
Kun herätys käynnistyy, paina painiketta [ snooze • light ]. Herätysääni sammuu ja
näytön taustavalo syttyy 5 sekunnin ajaksi. Herätys käynnistyy uudelleen 4 minuutin
kuluttua. Tämä toistuu, kunnes herätys sammutetaan pysyvästi.
23
Page 24

Suomi
Vaihtoehtoisen ajan asettaminen
Voit asettaa kelloon vaihtoehtoisen ajan, kuten toisen paikkakunnan tai aikavyöhykkeen ajan.
1. Paina painiketta [ ▲ ], kunnes näytöllä näkyy
2. Varmista, että lämpötila näkyy näytön oikeassa alakulmassa, tai valitse lämpötila
painikkeella [ mode ].
3. Paina painiketta [ mode ], kunnes tunnit vilkkuvat.
4. Aseta tunnit painikkeilla [ ▲ ] ja [ ▼ ].
Huom.! Minuutteja ei voida asettaa, koska aikavyöhykkeiden kellonajat poikkeavat
toisistaan kokonaisina tunteina.
5. Tallenna asetukset painikkeella [ mode ].
6. Voit koska tahansa siirtyä vaihtoehtoisen ajan näytöstä ajan perusnäyttöön
painikkeella [ ▲ ].
.
Kahden kellonajan näyttö
1. Voit asettaa vielä yhden kellonajan näytön oikeaan alakulmaan.
2. Paina painiketta [ mode ], kunnes näytön oikeassa alakulmassa näkyy
3. Paina painiketta [ mode ], kunnes tunnit vilkkuvat.
4. Aseta tunnit painikkeilla [ ▲ ] ja [ ▼ ].
5. Paina uudelleen painiketta [ mode ], minuutit vilkkuvat.
6. Aseta minuutit painikkeilla [ ▲ ] ja [ ▼ ].
7. Tallenna asetukset painikkeella [ mode ].
.
Näytön taustavalo
Voit sytyttää näytön taustavalon koska tahansa 5 sekunnin ajaksi painikkeella [ snooze • light ].
Kellonajan heijastaminen
Huom.! Heijastus toimii vain, kun muuntaja on liitettynä pistorasiaan ja kelloon.
1. Voit sytyttää näytön taustavalon ja käynnistää heijastuksen koska tahansa 5 sekunnin
ajaksi painikkeella [ snooze • light ].
2. Käynnistä heijastus siirtämällä jatkuvan heijastuksen säädintä (9) nuolen osoittamaan suuntaan.
3. Käännä heijastettua kellonaikaa 180º painikkeella [ flip ].
4. Sammuta heijastus kääntämällä säädin takaisin.
Lämpötilan näyttö ºC tai ºF
Valitse lämpötilan näyttö celsius- tai fahrenheitasteina painikkeella [ ºC/ºF, wave ].
Aikasignaalin hakeminen manuaalisesti
Voit hakea aikasignaalia koska tahansa painamalla painiketta [ ºC/ºF, wave ], kunnes
näytöllä vilkkuu kuvake
.
24
Page 25

Puhdistaminen
Puhdista kello kevyesti kostutetulla liinalla. Käytä mietoa puhdistusainetta.
Älä käytä liuotusaineita tai syövyttäviä kemikaaleja.
Vianhakutaulukko
Kello ei toimi. • Varmista, että paristot eivät ole lopussa.
• Varmista, että paristot ovat oikein paikoillaan.
Kellonajan heijastus ei toimi. • Varmista, että muuntaja on liitetty pistorasiaan ja
kelloon oikein.
• Varmista, että pistorasiassa on virtaa.
• Varmista, että muuntaja ja virtajohto ovat ehjät.
Kierrättäminen
Kierrätä tuote asianmukaisesti, kun poistat sen käytöstä.
Tarkempia kierrätysohjeita saat kuntasi jäteneuvonnasta.
Tekniset tiedot
Paristot 2 kpl AAA/LR03
Muuntaja Tulojännite 230 V, 50 Hz, 30 mA U
Muuntaja Lähtöjännite 3 V, 100 mA, 0,3 VA
Mitat 153 x 103 x 12 mm
Suomi
25
Page 26

Funk-Projektionswecker
Art.Nr. 36-5338 Modell pcr156
Vor Inbetriebnahme diekomplette Bedienungsanleitung durchlesen und aufbewahren.
Irrtümer, Abweichungen und Änderungen behalten wir uns vor. Bei technischen Problemen
oder anderen Fragen freut sich unser Kundenservice über eine Kontaktaufnahme
(Kontakt siehe Rückseite).
Bitte beachten:
• Andere Funkausrüstung, dieauf dergleichen Frequenz sendet, kann
dieReichweite beeinträchtigen.
• Die Reichweite jeder Funkausrüstung wird durch Hindernisse zwischen Sender und
Empfänger beeinträchtigt (beispielsweise wird dasSignal durch eine Betonwand
deutlich stärker gedämpft als durch eine Gipswand).
Bei Funktionsproblemen bitte folgende Lösungen testen:
• Sonstige Funkausrüstung abschalten, um zu prüfen, ob sie dieProblemursache ist.
• Die Funkausrüstung versetzen und/oder den Abstand verringern. Außerdem
dieZahl derHindernisse (Wände, Möbel) zwischen Sender und Empfänger
verringern.
Was ist ein Funk-Wecker?
Ein Funk-Wecker zeigt immer diegenaue Zeit. Die Zeit wird automatisch von derAtomuhr
in Braunschweig gesendet (Genauigkeit ± 1 Sekunde in 1 Million Jahren). Das Uhrwerk des
Funk-Weckers hat einen Empfänger, derdas Zeitsignal empfängt (Langwelle 77,5 kHz).
Es handelt sich hierbei außerdem um eine Präzisions-Quarzuhr mit 32 kHz-Oszillationen.
Der Sender in Braunschweig hat eine Reichweite von ca. 2000 km.
Sicherheitshinweise
Deutsch
• Reparaturen unbedingt qualifizierten Servicetechnikern überlassen.
• Das Gerät ist nur zur Verwendung in Innenräumen geeignet.
• Das Produkt vor Feuchtigkeit oder Wasserspritzern geschützt platzieren.
• Das Gerät immer so aufstellen, dass es nicht in Wasser oder andere Flüssigkeiten
• Das Gerät nicht in feuchten oder staubigen Umgebungen oder anOrten mit starken
• Das Gerät vor extrem hohen und niedrigen Temperaturen oder andauernder
• Niemals versuchen, dasGerät zu öffnen, zu reparieren oder anderweitig
• Bei längerer Nichtbenutzung dieBatterien entnehmen.
• Sicherstellen, dass die Steckdose, an die das Netzteil angeschlossen ist,
fallen kann.
Vibrationen verwenden oder aufbewahren.
direkter Sonneneinstrahlung schützen.
Änderungen vorzunehmen.
leicht zugänglich ist, da der Lautsprecher über das Netzteil vom Stromnetz
getrennt wird.
26
Page 27

Tasten und Funktionen
1. [ ▲ ] Hoch (bei Einstellung von
Uhrzeit oder Weckzeit)
2. [ ▼ ] Runter (bei Einstellung von
Uhrzeit oder Weckzeit)
3. [ mode ] Auswahl derFunktionen
und Einstellungen
4. [ ºC/ºF, wave ] Zeitsignalsuche,
Auswahl für Temperaturanzeige
5. [ flip ] Die projizierte Zeit um
180º drehen
] Alarm
6. [
7. Projektorlinse
8. [ snooze • light ] Snooze/
Hintergrundbeleuchtung
9. Dauerhafte Projektion an/aus
7
1
2
3
4
5
6
8
9
Batterien und Netzanschluss
Hinweis: Die Uhr wird über dieBatterien
betrieben. Der Projektor wird über
dasNetzteil betrieben. Sollte keine
Projektion gewünscht werden, kann
derWecker auch ohne Netzteil betrieben werden.
1. Die Batterieabdeckung ander
Unterseite des Timers nach außen
schieben.
2. 2 x AAA/LR03-Batterien einlegen.
3. Das Netzteil erst anden Anschluss
des Gerätes und dann aneine
Steckdose anschließen.
27
Deutsch
Page 28

Displaysymbole
Bedienung
• Nach Einsetzen derBatterien gibt dasGerät ein Tonsignal von sich und sucht
• Kann ein Zeitsignal empfangen werden, stellen sich Zeit und Datum automatisch ein.
• Kann dasZeitsignal nicht empfangen werden, erlischt dieAnzeige für
• Der Wecker sucht automatisch einmal pro Stunde nach dem Zeitsignal.
Manuelle Zeiteinstellung
Das Display besitzt vier Anzeigemodi. Auf [ mode ] drücken, um in derunteren rechten Ecke
folgendes anzuzeigen: Alarm 1 „AL1“ – Alarm 2 „AL2“ – Alternative Zeit „DT“ – Temperatur.
1. Anzeige derTemperatur in derunteren rechten Ecke auf dem Display auswählen.
2. [ mode ] für 3 Sekunden gedrückt halten, bis dasJahr blinkt.
3. Auf [ ▲ ] oder [ ▼ ] drücken (bzw. gedrückt halten), um dasJahr einzustellen.
4. Kurz auf [ mode ] drücken: derMonat blinkt.
5. Auf [ ▲ ] oder [ ▼ ] drücken (bzw. gedrückt halten), um den Monat einzustellen.
6. Für Tag, Stunden und Minuten nochmals auf [ mode ] drücken. Auf diegleiche
7. Wenn alle Einstellungen vorgenommen worden sind, auf [ mode ] drücken um zur
Deutsch
• Sollte während derZeiteinstellung für 30 Sekunden keine Eingabe erfolgen, muss
Starkes Zeitsignal Schwaches Zeitsignal
Datum Snooze
Alternative Zeit Monat
PM (Bei 12 Stunden-Zeitanzeige) Sommerzeit
AM (Bei 12 Stunden-Zeitanzeige) Grad Celsius
Alarm 1 Grad Fahrenheit
Alarm 2 Doppelte Zeit
automatisch nach dem Zeitsignal.
dasZeitsignal. Zeit und Datum müssen in diesem Fall manuell eingestellt werden.
Weise wie bei den anderen Parametern einstellen.
normalen Zeitanzeige zurückzukehren.
dieZeiteinstellung erneut initiiert werden.
Wochentag oder Kalenderwoche anzeigen
Jederzeit auf [ ▼ ] drücken, um zwischen Anzeige des Wochentags oder derKalenderwoche
zu wechseln.
Spracheinstellungen für den Wochentag
1. [ ▼ ] gedrückt halten, bis auf dem Display folgende Spracheinstellungen hinterei-
nander anzeigt werden: ”EN” (Englisch), ”GE” (Deutsch), ”FR” (Französisch),
”IT” (Italienisch), ”SP” (Spanisch).
2. Die Taste [ ▼ ] wieder loslassen, wenn diegewünschte Sprache angezeigt wird.
28
Page 29

Auswahl zwischen 12- oder 24-Stunden-Anzeige
Auf [ ▲ ] drücken um zwischen 12- oder 24 Stunden-Anzeige zu wechseln.
Bei 12-Stunden-Anzeige wird „AM“, bzw. „PM“ auf dem Display angezeigt.
Einstellen derWeckzeit
Alarm 1
1. Auf [ mode ] drücken, bis dieZeit für den ersten Alarm „AL1“ in derunteren rechten
Ecke des Displays angezeigt wird.
2. [ mode ] gedrückt halten, bis dieStunden anfangen zu blinken.
3. Auf [ ▲ ] oder [ ▼ ] drücken, um dieStunden einzustellen.
4. Nochmals auf [ mode ] drücken: dieMinuten blinken.
5. Auf [ ▲ ] oder [ ▼ ] drücken, um dieMinuten einzustellen.
6. Nochmals auf [ mode ] drücken: Die Weckzeit und dasSymbol für Alarm 1 werden
angezeigt.
Alarm 2
1. Auf [ mode ] drücken, bis dieZeit für den zweiten Alarm „AL2“ in derunteren
rechten Ecke des Displays angezeigt wird.
2. Auf diegleiche Weise wie den ersten Alarm einstellen.
Alarm ein-/ausschalten
• Wenn derAlarm zu hören ist, blinkt dasjeweilige Symbol auf dem Display. Zum
Ausschalten auf [
• Mehrmals auf [
einzuschalten.
• Sollte derAlarm nicht mit [
und schaltet sich danach automatisch ab.
] Drücken. Der Alarm ertönt wieder in 24 Stunden.
] drücken um den jeweiligen Alarm komplett abzustellen oder
] ausgeschaltet werden ist er für 4 Minuten zu hören
Snooze-Funktion.
Während des Alarmsignals auf [ snooze • light ] drücken. Das Alarmsignal wird abgestellt und
dieHintergrundbeleuchtung wird für 5 Sekunden eingeschaltet. Nach 4 Minuten ertönt
dasAlarmsignal erneut. Dieser Prozess kann wiederholt werden, bis dasAlarmsignal
permanent abgeschaltet wird.
Alternative Uhrzeit einstellen
Es kann eine alternative Uhrzeit eingestellt werden (z. B. für einen Ort in einer anderen
Zeitzone).
1. [ ▲ ] gedrückt halten, bis
2. Sicherstellen, dass in derunteren rechten Ecke des Displays dieTemperatur angezeigt wird. Sollte dies nicht derFall sein, auf [ mode ] drücken, bis dieTemperatur
angezeigt wird.
auf dem Display angezeigt wird.
29
Deutsch
Page 30

3. [ mode ] gedrückt halten, bis dieStunden anfangen zu blinken.
4. Auf [ ▲ ] oder [ ▼ ] drücken, um dieStunden einzustellen.
Hinweis: Die Minuten können nicht verändert werden, da sich dieZeitzonen in
ganzen Stunden unterscheiden.
5. Zum Speichern derEinstellungen auf [ mode ] drücken.
6. Zum Wechseln zwischen normaler und alternativer Zeit kann jederzeit kann auf
Doppelte Zeit
Eine weitere Zeit kann in derunteren rechten Ecke auf dem Display angezeigt werden.
1. [ mode ] gedrückt halten bis
2. [ mode ] gedrückt halten, bis dieStunden anfangen zu blinken.
3. Auf [ ▲ ] oder [ ▼ ] drücken, um dieStunden einzustellen.
4. Nochmals auf [ mode ] drücken: dieMinuten blinken.
5. Auf [ ▲ ] oder [ ▼ ] drücken, um dieMinuten einzustellen.
6. Zum Speichern derEinstellungen auf [ mode ] drücken.
Hintergrundbeleuchtung
Um dieHintergrundbeleuchtung für 5 Sekunden einzuschalten jederzeit auf
[ snooze • light ] drücken.
Projezieren derZeit
Hinweis: Für dieProjektions-Funktion muss dasNetzteil sowohl anden Wecker, als
auch aneine Steckdose angeschlossen sein.
1. Um dieHintergrundbeleuchtung und dieProjektion für 5 Sekunden einzuschalten
2. Um diepermanente Projektion einzuschalten, den Regler (9) in Pfeilrichtung schieben.
3. Auf [ flip ] drücken, um dieprojizierte Zeit um 180º zu drehen
4. Den Regler wieder zurückschieben, um diepermanente Projektion abzuschalten.
Deutsch
Wahl derTemperaturanzeige ºC oder ºF
Auf [ ºC/ºF, wave ] drücken, um zwischen ºC oder ºF zu wechseln.
[ ▲ ] gedrückt werden.
in derunteren rechten Ecke des Displays
angezeigt wird.
jederzeit auf [ snooze • light ] drücken.
Manuelle Suche des Funksignals
Durch Gedrückthalten von [ ºC/ºF, wave ] bis anfängt zu blinken, kann jederzeit nach
dem Funksignal gesucht werden.
Pflege und Wartung
Das Gerät mit einem leicht befeuchteten Tuch reinigen. Ein sanftes Reinigungsmittel
verwenden, keine scharfen Chemikalien oder Reinigungslösungen.
30
Page 31

Fehlersuche
Der Wecker funktioniert
nicht.
Die Zeit-Projektion
funktioniert nicht.
• Sicherstellen, dass dieBatterien nicht verbraucht sind.
• Sind dieBatterien korrekt eingelegt?
• Sicherstellen, dass dasNetzteil korrekt zwischen
Steckdose und Wecker angeschlossen ist.
• Kommt Strom aus derSteckdose?
• Sicherstellen, dass Netzteil und Kabel unbeschädigt sind.
Hinweise zur Entsorgung
Bitte dasProdukt entsprechend den lokalen Bestimmungen entsorgen. Weitere
Informationen sind von derGemeinde oder den kommunalen Entsorgungsbetrieben
erhältlich.
Technische Daten
Batterien 2 x AAA/LR03
Netzteil In 230 V, 50 Hz, 30 mA
Out 3 V, 100 mA, 0,3 VA
Abmessungen 153 x 103 x 12 mm
31
Deutsch
Page 32

Sverige
Kundtjänst tel: 0247/445 00
fax: 0247/445 09
e-post: kundservice@clasohlson.se
Internet www.clasohlson.se
Post Clas Ohlson AB, 793 85 INSJÖN
Norge
Kundesenter tlf.: 23 21 40 00
faks: 23 21 40 80
e-post: kundesenter@clasohlson.no
Internett www.clasohlson.no
Post Clas Ohlson AS, Postboks 485 Sentrum, 0105 OSLO
Suomi
Asiakaspalvelu puh.: 020 111 2222
sähköposti: asiakaspalvelu@clasohlson.fi
Internet www.clasohlson.fi
Osoite Clas Ohlson Oy, Maistraatinportti 4 A, 00240 HELSINKI
Great Britain
Customer Service contact number: 0845 300 9799
e-mail: customerservice@clasohlson.co.uk
Internet www.clasohlson.com/uk
Postal 10 – 13 Market Place
Kingston Upon Thames
Surrey
KT1 1JZ
Deutschland
Kundenservice Unsere Homepage www.clasohlson.de besuchen und
auf Kundenservice klicken.
 Loading...