

Page 1
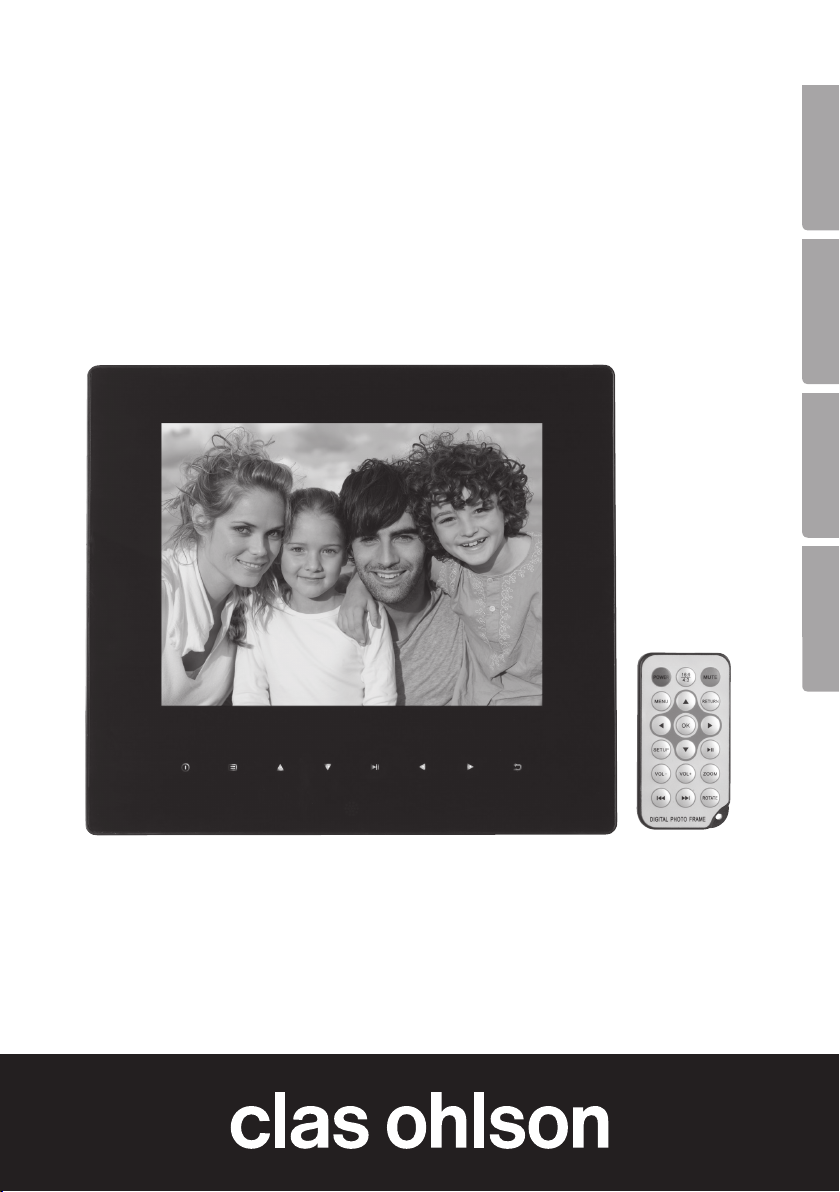
8˝ Slim Digital Photo Frame
Digital fotoram 8˝ slim
Digital fotoramme 8˝ slim
Digitaalinen valokuvakehys 8˝ slim
EnglishSvenskaNorskSuomi
Art.no Model
38-3797 KD0805
Ver. 201005
Page 2

2
Page 3

8˝ Slim Digital Photo Frame
Art.no 38-3797 Model KD0805
Please read the entire instruction manual before using the product and save it for future reference. We reserve the right for any errors in text or images and any necessary
changes made to technical data. If you have any questions regarding technical problems please contact Customer Services.
Safety
• Warning! Do not open the casing! Certain components within the product’s casing
carry dangerous currents. Contact with these may give you an electric shock.
• The product should only be repaired by qualified service technicians.
• The product should not be taken apart or modified.
• Do not place the product where there is a risk of it falling into water or other liquid.
Do not place any objects containing liquid on the product, e.g. flower vases or soft
drinks.
• Do not cover the ventilation openings. Do not place the product close to heat
sources such as on top of the radiator or TV, or on e.g. the sofa where the
ventilation holes are blocked.
• Always unplug the adaptor from the electrical outlet if the product is not be used
for an extended period.
• The product is designed for 8 – 10 hours of continuous operation. Avoid any
prolonged use. Allow the product to rest for a while before using it again.
• The product is intended for indoor use only.
• Do not expose the product to direct sunlight for prolonged periods.
• Do not use the product in damp, dusty, or dirty environments.
• Only use a lightly moistened soft cloth with a little washing up liquid to clean
the screen.
• Do not disconnect the mains adaptor while the frame is in use. The attached
memory storage device may be damaged. Neither should the connected memory
storage device be removed when the frame is in use.
English
3
Page 4

Product description
• Digital photo frame with 8-inch (4:3) colour display screen
• Displays your digital photos without the need for a computer
English
• USB memory and memory card slots (SD/SDHC)
• Supports audio (MP3) and video (MPEG4) playback
• Built-in speakers
• Comes with remote control and mains adaptor
Contents
• Digital Photo Frame
• Instruction manual
• Mains adaptor
• Remote control
• Short USB lead for connecting USB devices
Connecting the frame
1. Attach the stand to the frame by clicking it onto the
base. The frame can also be mounted on a wall.
2. Plug one end of the mains lead into a wall socket
and the other end into the DC 5 V socket on the
photo frame.
3. Remove the protective film from the photo frame.
4. Press POWER on the remote control to turn the
photo frame on.
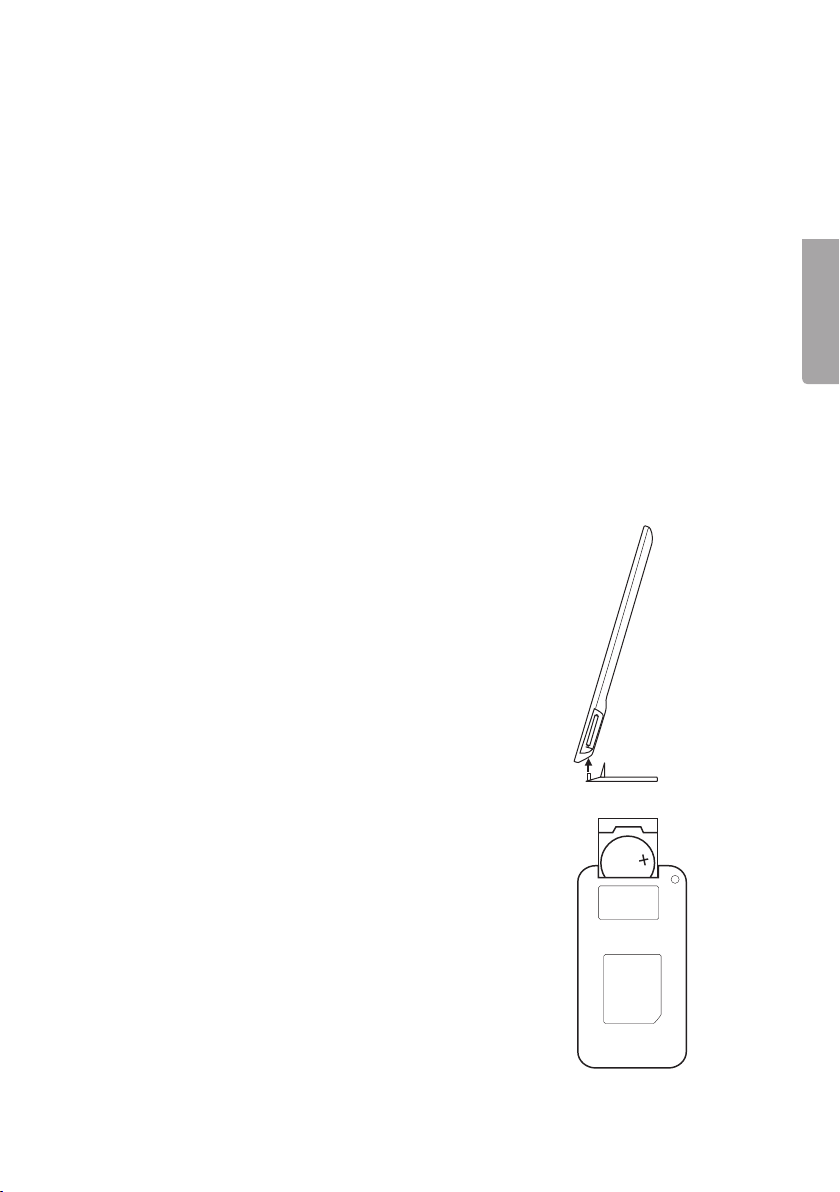
Inserting the battery
1. Turn the remote control upside down.
2. Put your finger into the notch and lift off
the battery cover.
3. Remove the protective film from inside the battery
compartment.
4. Insert one CR2025 battery with the + symbol
facing upwards.
5. Slide the battery cover back into place.
4
3V
Lithium C
CR2025
Page 5
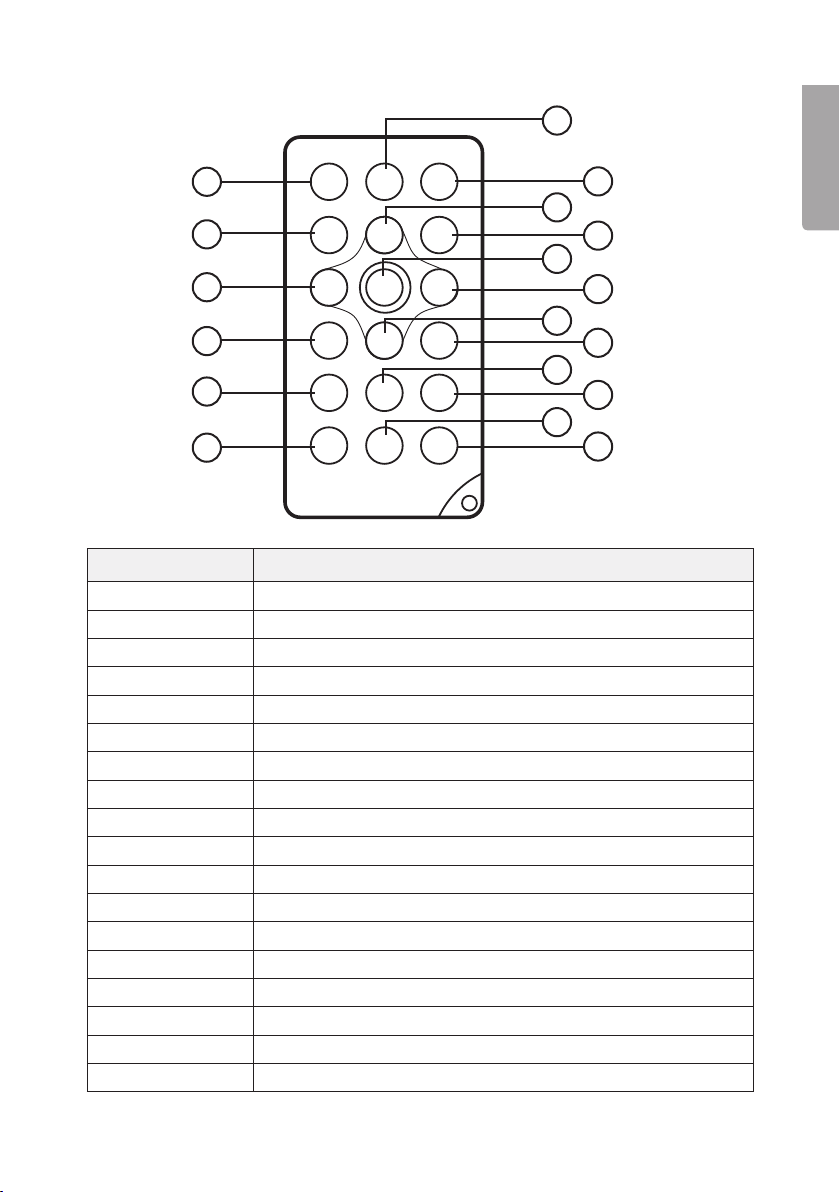
Remote control
2
BGMOKMUTE
1
4
7
10
14
17
POWER
MENU
◄
SETUP
VOL-
I◄◄
▲
▼
VOL+
►►I
RETUR
►
►II
ZOOM
ROTATE
Button Function
1. POWER Turns the device on/off
2. BGM Turn slide show and background music on
3. MUTE Turns the sound off completely
4. MENU Enter copy and delete menu
5. ▲
Scrolls up the menus/previous photo/track/video
6. RETURN Returns to previous page
7. ◄
8. ►
9. ▼
Scrolls left in menus
Scrolls right in menus
Scrolls down in the menus
10. SETUP Opens/exits the settings menu
11. PLAY/PAUSE One press pauses playback, two presses resumes playback
12. OK Confirms/Starts or pauses playback
13. ZOOM Enlarges image when pressed in pause mode
14. VOL+ Increases the volume
15. VOL- Decreases the volume
16. ROTATE Rotates the image 90˚ clockwise when pressed in pause mode
17. I◄◄
18. ►►I
Returns to previous track (music/film)
Advances to next track (music/film)
3
5
6
12
8
9
11
15
13
18
16
English
5
Page 6
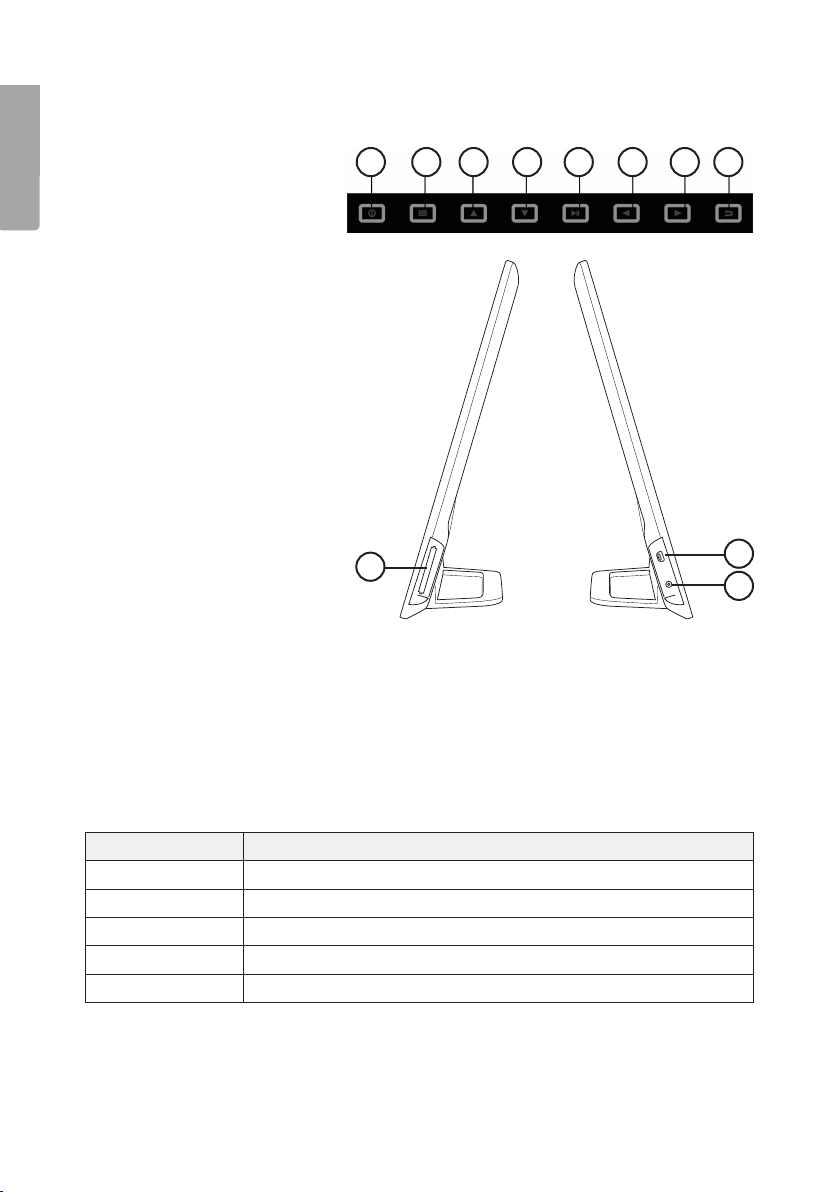
Buttons and functions
Display buttons:
1. Power
English
2. Menu
3. Up
4. Down
5. Play/Pause/OK
6. Left
7. Right
8. Return
On the right hand side of
the photo frame:
9. SD/SDHC/MS/MMC
On the left hand side of
the photo frame:
10. DC 5 V
11. Mini USB
1 2 3 4 5 6 7 8
9
11
10
Use
Main menu key
When the photo frame has been turned on the start page will appear, press MENU
to select a memory device.
Icon Function
USB Shown when USB memory is connected
SD/MMC Shown when an SD or MMC memory card is connected
MS Shown when an MS memory card is connected.
SETUP Changes settings.
CALENDAR Opens the calendar
6
Page 7

The instructions below describe usage of the remote control’s buttons.
• Use ◄ and ► to navigate in the main menu. Confirm your choice with OK.
• Push RETURN to go back to the previous or push MENU to resume to
the main menu.
• When a card has been inserted the slideshow will automatically start to play.
Press RETURN twice to return to the go back to the selection of music, video,
file, calendar and setup.
• Note that if there are any music files they will automatically be played as
background music.
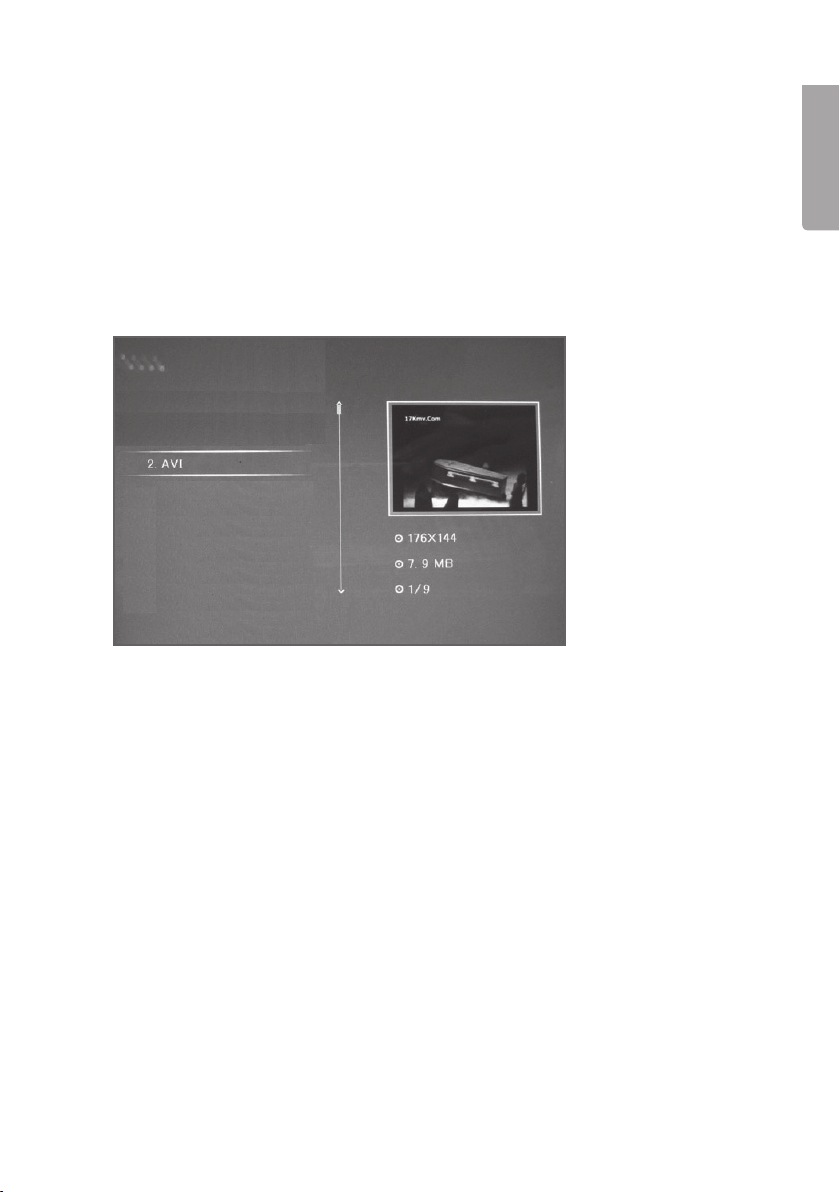
The frame displays images in JPEG format
1. Connect a USB memory or a memory card containing JPG/JPEG image files.
2. Highlight the memory in the main menu, e.g. “USB” and press OK.
3. Select PHOTO and confirm with OK.
4. The images in the memory are displayed in thumbnail view:
English
5. Select the desired image to be displayed with ◄, ►, ▲ or ▼.
Press OK to open the selected image.
7
Page 8
Watching a slideshow
The slideshow displays all images in jpeg format that are stored on the connected
memory and shows these in a slideshow. If the memory also contains music files these
English
are played simultaneously with the slideshow.
1. Connect a USB memory or a memory card containing JPG/JPEG image files.
2. Highlight the memory that you wish to display images from and then press OK.
3. Go to PHOTO and press OK (12).
4. Image files stored on the connected memory will be displayed in thumbnail format.
5. Press OK (12) to select the desired image.
6. When the desired image is shown in full size, press OK (12) to start the slideshow.
7. In the main menu you can press SETUP to change the slideshow settings.
8. Use ▲ or ▼and confirm with OK.
9. Press RETURN to stop slide show, press RETURN again to return
to the main menu.
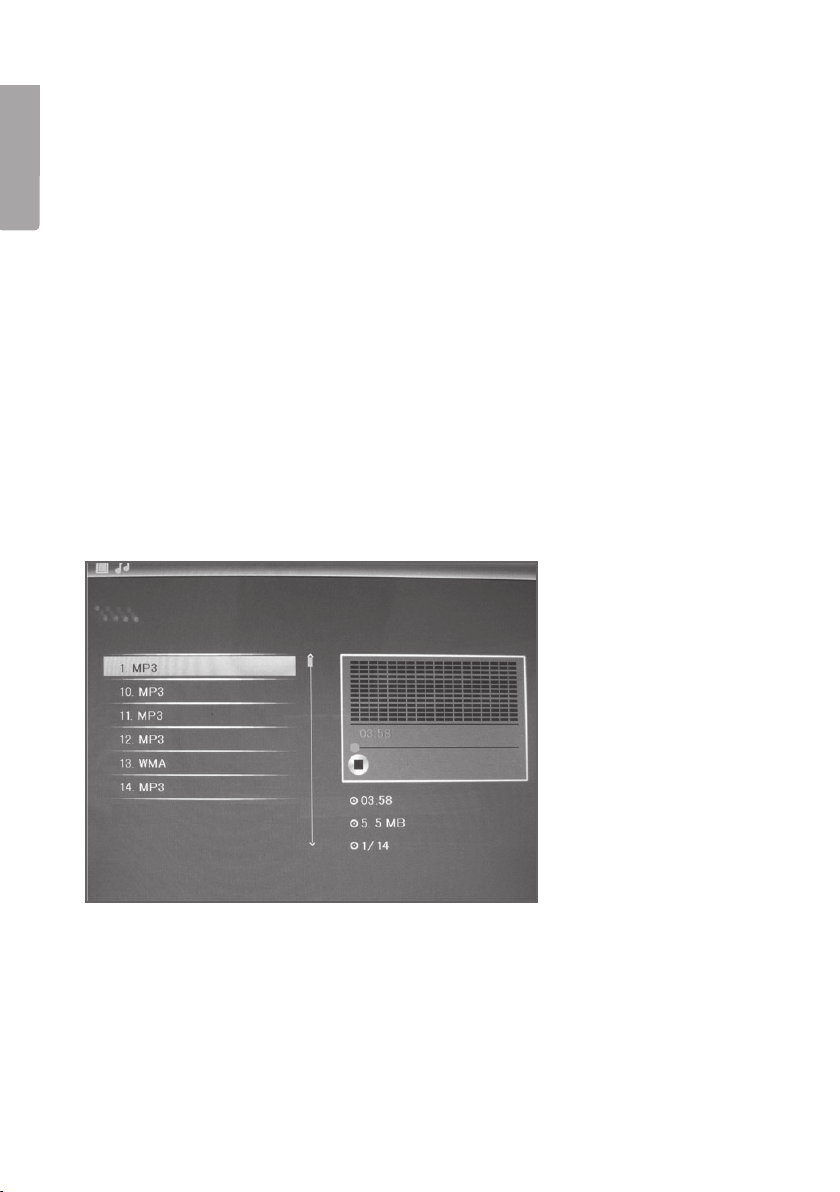
Listening to music
The music player can play music files in MP3 format.
1. Connect a USB memory or a memory card containing audio files in MP3 format.
2. Highlight the memory in the main menu, e.g. “SD/MMC” and press OK.
3. Select MUSIC and confirm with OK.
4. A list of the available music files will appear on the screen.
5. Highlight the desired music file with ▲ or ▼.
6. Press OK to start playback.
8
Page 9
Controls:
OK – Pauses playback. Press again to restart playback.
VOL+ / VOL- – Adjusts the volume.
◄◄ / ►► – Selects previous or next track.
7. Press RETURN, to return to the main menu.
Watching films (Movie)
The device can play MPEG-4 video files.
English
1. Connect a USB memory/memory card containing MPEG-4 video files.
2. Highlight the memory in the main menu, e.g. “SD/MMC” and press OK.
3. Select MOVIE and confirm with OK.
4. A list of the available video files is displayed on the screen.
5. Highlight the desired video file with ▲ or ▼.
6. Press OK to start playback.
Controls:
OK – Pauses playback. Press again to restart playback.
VOL+ / VOL- – Adjusts the volume.
◄◄ / ►► - Selects previous or next video.
7. Stop playback by pressing RETURN, press again to return to the main menu.
9
Page 10
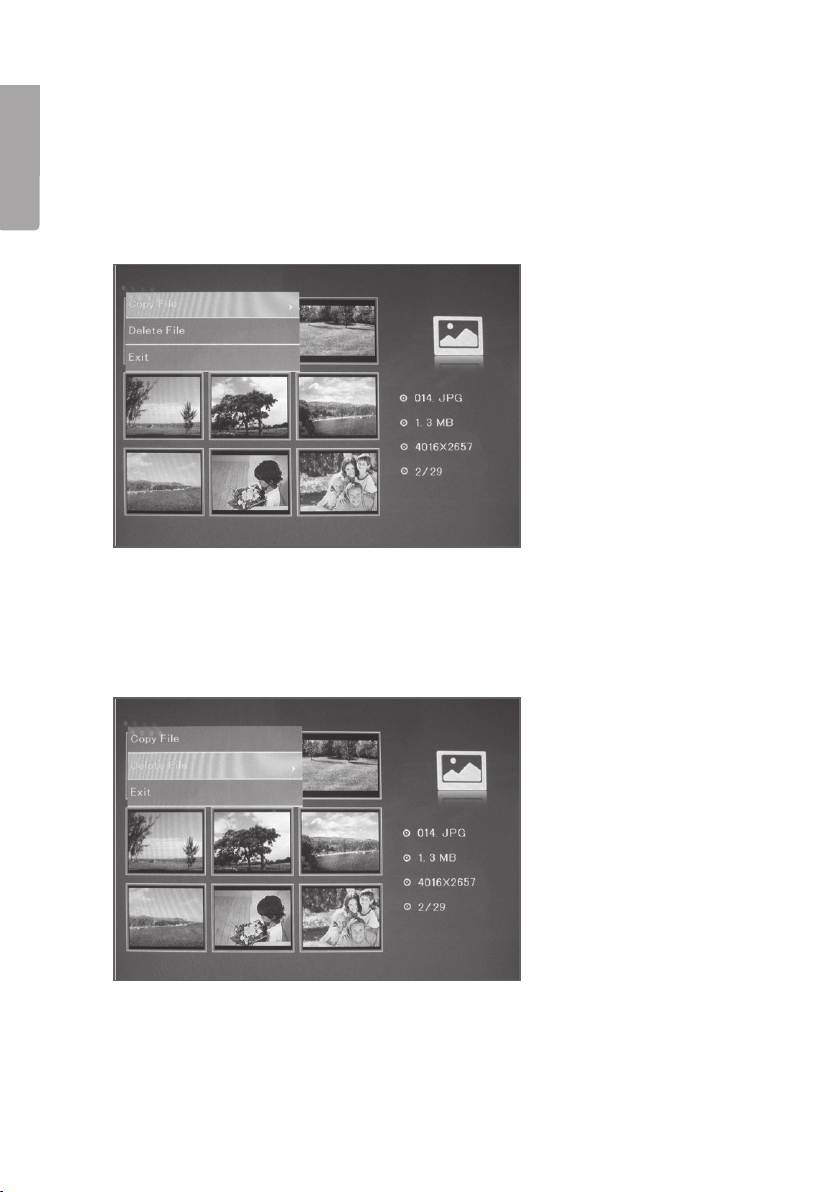
In the file mode you can see the available files on all connected memory devices. You can also copy files between the connected memory devices.
English
Copying files to the built-in memory
To copy files you must have a memory device connected to the photo frame, such as
a USB memory stick or a memory card.
1. Choose the file you wish to copy with ◄ or ►.
2. Press MENU and select COPY FILE and then OK.
Deleting files
1. Select the file you wish to delete with ◄ or ►.
2. Press MENU and select DELETE FILE.
3. Press OK to confirm.
10
Page 11
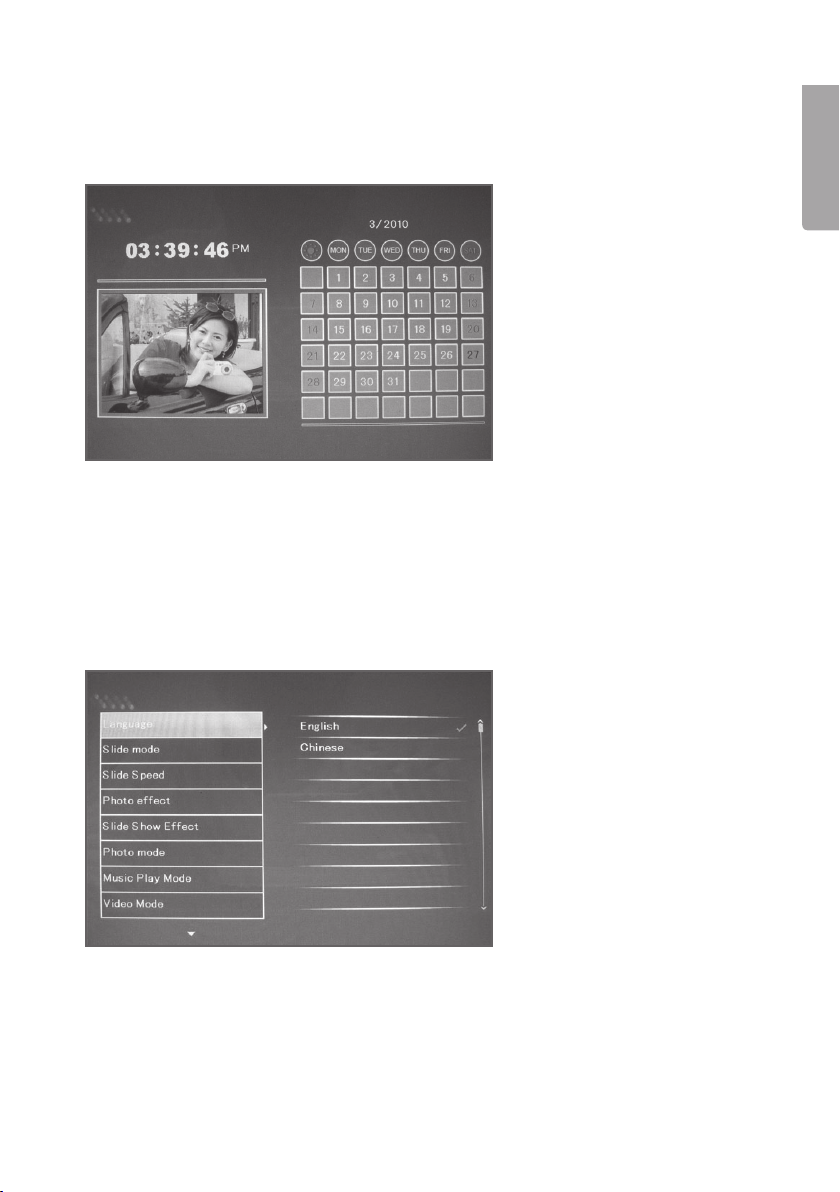
Displaying the calendar
The calendar shows the current time, date, and month. If a USB memory or memory
card is connected, a slideshow of any images on the memory will be shown instead.
1. Highlight CALENDAR in the main menu and press OK. The calendar is displayed
and any photos on the connected memory are shown as a slideshow to the side.
2. Browse the calendar using ◄,►,▲ or ▼.
3. Press RETURN to return to the main menu.
Setup
English
1. Enter the main menu and press SETUP on the remote control.
2. Use ▲ and ▼ to highlight the desired setting from the list below.
3. Confirm with OK.
4. Press RETURN to return to setup.
11
Page 12
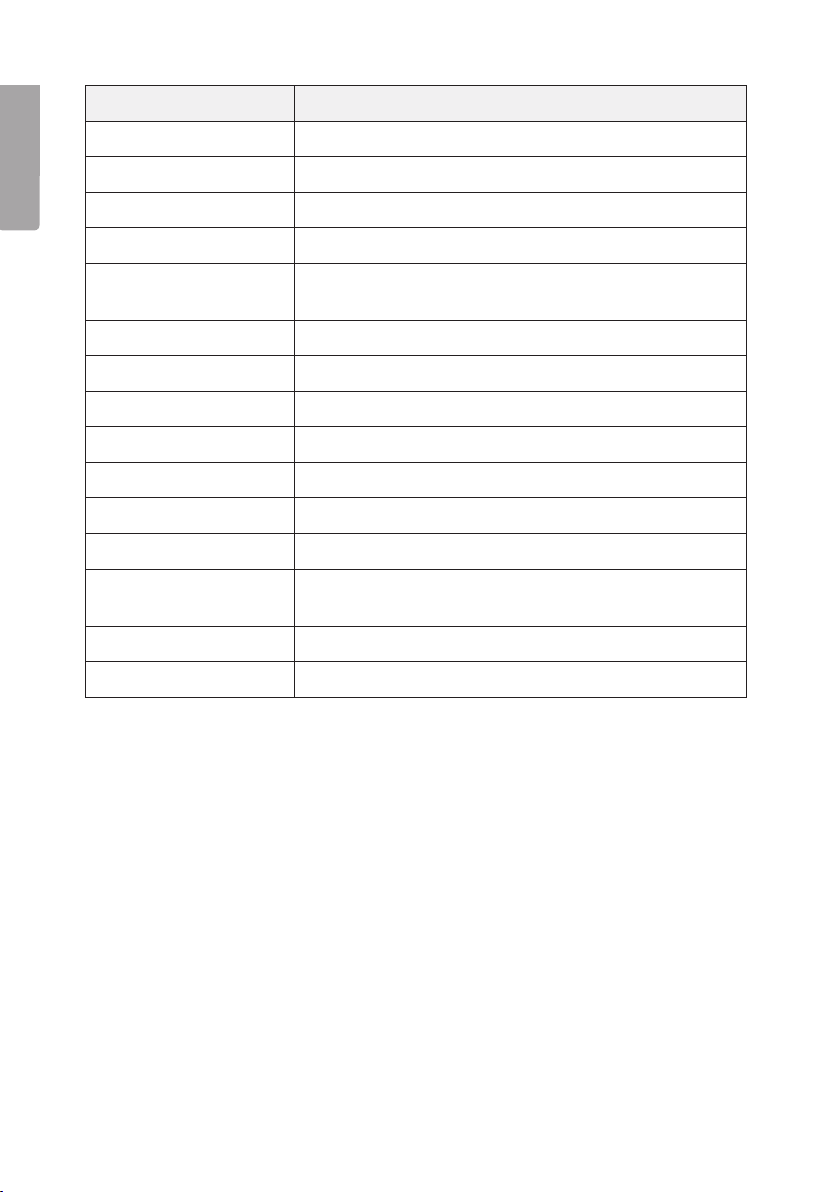
Setting Function
Language Changes the desired menu language.
English
Slide Mode Changes the number of displayed images.
Slide Speed Sets the time the slideshow image is displayed.
Photo Effect Changes from colour to black & white.
Slide Effect Changes the type of transition from one slideshow
image to the next.
Photo Mode Changes image format.
Music Play Mode Repeats music etc.
Video Mode Changes image format
Display Changes contrast, light and colour, etc.
Set time/date Sets time and date.
Set time format Change between 12 and 24 hour display.
Alarm Sets the alarm time.
Format built-in
memory
Reset setting Restores the photo frame to its default factory settings.
Exit Finish.
Note that certain settings can only be changed when in the correct mode from the
menu. For example it is only possible to rotate one image file. If you have selected
MUSIC, the ROTATE option will be grey and can not be selected.
Formats the built-in memory.
Care and maintenance
Wipe the surface clean using a soft damp cloth. Never use solvents or strong
detergents.
12
Page 13
Troubleshooting guide
Problem Solution
The device does not start/
no photo is shown.
Check that the mains adaptor is correctly connected.
English
The device automatically
switches to standby mode.
The remote control
doesn’t work.
The memory card cannot
be read.
Some photos are uploaded
quicker than others.
Disconnect the mains adaptor and then reconnect it.
Check the battery and replace it if necessary. Point
the remote control towards the sensor. Shorten the
distance to the photo frame. Check that there are no
obstacles between the remote and sensor.
Make sure that the files on the memory card are
supported by the device. See Specifications.
Images with high resolution take longer to load.
Use images with lower resolution for quicker display.
The recommended resolution is 800x600 pixels.
Disposal
Follow local ordinances when disposing of this product. If you are unsure of how to
dispose of this product, please contact your local authority.
Specifications
Display screen 8˝ colour TFT LCD
Resolution 800 (h) x 600 (v)
Operating voltage 5 V DC, 1 A via the supplied mains adaptor
(100-240 V AC, 50/60 Hz)
Remote control batteries 1 x CR2025 (3 V lithium)
USB port 2.0 (support for USB memory, MP3 player etc.)
Memory card slot SD (Secure Digital), MMC (Multimedia Card),
MS (Memory Stick), SDHC.
Built-in memory 512 MB
Picture format JPEG
Audio format MP3, 32-320 Kbps bit rate (CBR, VBR)
Video format MPEG-4
Speakers Built-in
Operating temperature 0-40 °C
13
Page 14

Digital fotoram 8˝ slim
Art.nr 38-3797 Modell KD0805
Läs igenom hela bruksanvisningen före användning och spara den sedan för framtida
bruk. Vi reserverar oss för ev. text- och bildfel samt ändringar av tekniska data.
Vid tekniska problem eller andra frågor, kontakta vår kundtjänst (se adressuppgifter
på baksidan).
Säkerhet
Svenska
• Varning! Öppna inte höljet! Farlig spänning finns oskyddat på vissa komponenter
inuti produktens hölje, kontakt med dessa kan ge elektrisk chock.
• Produkten får endast repareras av kvalificerad servicepersonal.
• Produkten får inte demonteras eller ändras.
• Placera inte produkten så att den kan falla ner i vatten eller annan vätska. Ställ inte
några föremål som innehåller vätska på produkten, t.ex. blomvas eller dryck.
• Täck inte för ventilationsöppningarna. Placera inte heller produkten i närheten av
varma ställen som ovanför element, ovanpå en teve eller i t.ex. i en soffa där ventilationsöppningarna blockeras.
• Ta alltid ur nätadaptern från eluttaget om inte produkten ska användas under en
längre tid.
• Produkten är konstruerad för 8 till 10 timmars kontinuerlig drift, undvik att använda
den under längre tid än så. Låt produkten vila en stund innan den används igen.
• Produkten är endast avsedd för inomhusbruk.
• Undvik att utsätta produkten för direkt solljus under längre tid.
• Använd inte produkten i fuktiga, dammiga eller smutsiga miljöer.
• Använd endast en mjuk tvättduk som är svagt fuktad med vatten och milt
diskmedel vid rengöring av skärmen.
• Koppla inte ifrån nätadaptern samtidigt som uppspelningen pågår. Risk finns för
att det anslutna minnet skadas. Ta inte heller bort det anslutna minnet när uppspelning pågår.
14
Page 15
Produktbeskrivning
• Digital fotoram med 8˝ (4:3) färgskärm
• Visar dina digitala bilder utan en dator
• Anslutning för usb-minne eller minneskort (SD/SDHC)
• Stöd för musiklyssning (MP3) samt visning av film (MPEG4)
• Inbyggda högtalare
• Lev. med fjärrkontroll och nätadapter
Förpackningen innehåller
• Digital fotoram
• Instruktionsmanual
• Nätadapter
• Fjärrkontroll
• Kort USB-kabel för anslutning av USB-enhet
Anslut
1. Sätt fast fästet i fotoramen genom att klicka fast
det i bottendelen. Det går även att hänga fotoramen
på väggen.
2. Anslut sedan nätsladden till ett vägguttag och koppla
den andra änden till DC 5 V-uttaget på fotoramen.
3. Ta bort skyddsfilmen på fotoramen.
4. Tryck på POWER på fjärrkontrollen för att starta
fotoramen.
Sätta i batteriet
1. Vänd fjärrkontrollen upp och ned.
2. Ta tag i skåran med fingret och dra mot dig för
att ta bort batteriluckan .
3. Ta bort skyddsplasten i fjärrkontrollens batterifack.
4. Placera ett CR2025-batteri på batteriluckan
med ”+” riktat mot dig.
5. Skjut tillbaka batteriluckan.
3V
Lithium C
CR2025
Svenska
15
Page 16

Fjärrkontrollen
2
BGMOKMUTE
1
4
7
Svenska
10
14
17
POWER
MENU
◄
SETUP
VOL-
I◄◄
▲
▼
VOL+
►►I
RETUR
►
►II
ZOOM
ROTATE
Knapp Funktion
1. POWER Slå på eller av enheten
2. BGM Tryck för att spela upp bakgrundsmusik
3. MUTE Tryck för att tysta ljudet helt
4. MENU Öppna kopiering och raderingsmenyn
5. ▲
Förflytta dig uppåt i menyer/Föregående bild/spår/film
6. RETURN Tryck för att gå tillbaka
7. ◄
8. ►
9. ▼
Förflytta dig till vänster i menyer
Förflytta dig till höger i menyer
Förflytta dig nedåt i menyer
10. SETUP Öppna/gå ur inställningsmenyn
11. PLAY/PAUSE Tryck för att pausa uppspelning, tryck igen för att återuppta
12. OK Bekräfta/Starta eller pausa uppspelningen
13. ZOOM I pausläge, tryck för att zooma in bilden
14. VOL+ Höj ljudvolymen
15. VOL- Sänk ljudvolymen
16. ROTATE I pausläge, tryck för att rotera bilden 90° motsols
17. I◄◄
18. ►►I
Föregående spår (musik/film)
Nästa spår (musik/film)
3
5
6
12
8
9
11
15
13
18
16
16
Page 17

Knappar och funktioner
Tryckknappar på displayen:
1. Power
2. Meny
3. Upp
4. Ned
5. Play/Pause/OK
6. Vänster
7. Höger
8. Gå tillbaka
På högersidan av fotoraman:
9. SD/SDHC/MS/MMC
På vänstersidan av fotoramen:
10. DC 5 V
11. Mini-USB
1 2 3 4 5 6 7 8
9
Användning
Förklaring av huvudmenyn
Efter att fotoramen är påslagen visas startbilden, tryck på MENU för att välja
minnesenhet.
Svenska
11
10
Ikon Funktion
USB Visas när ett USB-minne anslutits.
SD/MMC Visas när ett SD- eller MMC-minneskort anslutits.
MS Visas när ett MS-minneskort anslutits.
SETUP Ändrar inställningar.
CALENDAR Öppnar kalendern.
17
Page 18

Instruktionerna nedan beskriver användning med fjärrkontrollens knappar.
• Använd ◄ och ► för att navigera i huvudmenyn. Bekräfta ditt val med OK.
• Tryck på RETURN för att backa till föregående meny eller tryck MENU för att
återgå till huvudmenyn.
• Efter att du har satt in ett kort så spelas bildspelet upp automatiskt. Tryck på
RETURN två gånger för att komma tillbaka till val av musik, video, fil,
kalender och setup.
• Observera att om det finns musikfiler så spelas de upp automatiskt som
bakgrundsmusik.
Svenska
Bildvisaren kan visa bilder i jpeg-format
1. Anslut ett USB-minne eller ett minneskort innehållande bildfiler med
filformatet jpg/jpeg.
2. Markera det anslutna minnet i huvudmenyn, t.ex. ”USB” och tryck OK.
3. Välj Photo och bekräfta med OK.
4. Bilderna på minnet visas som miniatyrer:
5. Välj önskad bild att visa med ◄, ►, ▲ eller ▼. Tryck OK om du vill öppna
den valda bilden.
18
Page 19

Bildspel (Slideshow)
Bildspelet visar alla bilder i jpeg-format som finns lagrade på det anslutna minnet och
visar dessa i ett bildspel. Innehåller minnet även musikfiler spelas dessa upp samtidigt
som bildspelet visas.
1. Anslut ett USB-minne eller ett minneskort innehållande bildfiler
med filformatet JPG/JPEG.
2. Markera det minne du vill visa bilder från och tryck sedan på OK.
3. Gå till PHOTO och tryck på OK (12).
4. Enheten visar bildfilerna på det anslutna minnet som miniatyrer.
5. Tryck på OK (12) för att välja önskad bild.
6. När den önskade bilden visas i full storlek, tryck på OK (12) för att starta bildspelet.
7. I huvudmenyn kan du trycka på SETUP för att göra inställningar för bildspelet.
8. Använd ▲ eller ▼ och bekräfta med OK.
9. Tryck på RETURN för att stoppa bildspelet. Tryck på RETURN igen
för att gå till huvudmenyn.
Spela upp musik (Music)
Musikspelaren kan spela upp musikfiler i mp3-format.
Svenska
1. Anslut ett USB-minne eller ett minneskort innehållande ljudfiler med filformatet mp3.
2. Markera det anslutna minnet i huvudmenyn, t.ex. ”SD/MMC” och tryck OK.
3. Välj MUSIC och bekräfta med OK.
4. Tillgängliga musikfiler visas i en lista.
5. Markera önskad musikfil med ▲ eller ▼.
6. Tryck OK för att starta uppspelningen.
19
Page 20

Kontroller:
OK - Pausar uppspelningen. Tryck en gång till för att starta uppspelningen igen.
VOL+ / VOL- – Justerar ljudvolymen.
◄◄ / ►► - Väljer föregående eller nästa spår.
7. Tryck på RETURN för att återgå till huvudmenyn.
Visa film (Movie)
Enheten kan spela upp videofiler i formaten mpeg-4.
Svenska
1. Anslut ett USB-minne eller ett minneskort innehållande videofiler med
filformatet mpeg-4.
2. Markera det anslutna minnet i huvudmenyn, t.ex. ”SD/MMC” och tryck OK.
3. Välj Movie och bekräfta med OK.
4. Tillgängliga videofiler visas i en lista.
5. Markera önskad videofil med ▲ eller ▼.
6. Tryck OK för att starta uppspelningen.
Kontroller:
OK - Pausar uppspelningen. Tryck en gång till för att starta uppspelningen igen.
VOL+ / VOL- – Justerar ljudvolymen.
◄◄ / ►► - Väljer föregående eller nästa video.
7. Stoppa uppspelningen genom att trycka på RETURN, tryck igen för att återgå
till huvudmenyn.
20
Page 21

Filhanteraren visar tillgängliga filer på anslutna minnen. Du kan även kopiera filer
mellan anslutna minnen.
Kopiera filer
För att kopiera filer måste du ha ett minne anslutet till fotoramen, t.ex. ett USB-minne
eller ett minneskort.
1. Välj den fil du vill kopiera fil med ◄ eller ►.
2. Tryck på MENU och välj COPY FILE och sedan OK.
Radera filer
Svenska
1. Välj den fil du vill radera med ◄ eller ►.
2. Tryck på MENU och välj DELETE FILE.
3. Tryck på OK för att bekräfta.
21
Page 22

Visa kalender (Calendar)
Kalendern visar aktuellt klockslag, datum samt månad. Om ett USB-minne eller minneskort är anslutet visas ett bildspel för de bilder som finns på det anslutna minnet.
Svenska
1. Markera CALENDAR i huvudmenyn och tryck OK. Kalendern visas och bilderna
på det anslutna minnet visas i ett bildspel.
2. Använd ▲, ▼,◄ eller ► för att bläddra i kalendern.
3. Tryck på RETURN för att återgå till huvudmenyn.
Inställningar
1. Tryck på SETUP på fjärrkontrollen i huvudmenyn.
2. Använd ▲ och ▼ för att markera önskad inställning enligt nedan lista.
3. Bekräfta med OK.
4. Tryck på RETURN för att återgå till inställningar.
22
Page 23

Inställning Alternativ
Language Ändrar menyernas språk.
Slide Mode Ändrar antal visade bilder.
Slide Speed Tid mellan bilder.
Photo Effect Ändrar mellan färg och svartvitt
Slide Effect Ändrar övergångar i bildspel.
Photo Mode Ändrar bildformat.
Music Play Mode Repeterar låt etc.
Video Mode Ändrar bildformat.
Display Ändrar kontrast, ljus och färg etc.
Set time/date Ställer in tid och datum.
Set time format Ändrar mellan 12 och 24-timmarsvisning.
Alarm Ställer in tid för alarm.
Svenska
Format built-in
memory
Reset setting Återställning av fotoramen till fabriksinställningar.
Exit Avsluta
Observera att vissa inställningar bara går att ändras i rätt valt läge från menyn.
Exempelvis kan enbart en bildfil roteras. Om du valt MUSIC är då ROTATE gråfärgat
och kan inte ändras.
Formaterar inbyggt minne.
Skötsel och underhåll
Torka av med en mjuk lätt fuktad trasa. Använd inga lösningsmedel eller starka
rengöringsmedel.
23
Page 24

Felsökningsschema
Symptom Åtgärd
Enheten startar ej/Ingen
bild visas.
Kontrollera att nätadaptern är korrekt ansluten.
Enheten ställs automatiskt om till standbyläge.
Fjärrkontrollen
Svenska
fungerar inte.
Det går inte att läsa från
minneskortet.
Vissa bilder laddas
fortare än andra.
Koppla ifrån nätadaptern och anslut den sedan igen.
Kontrollera batteriet i fjärrkontrollen och byt det vid
behov. Rikta fjärrkontrollen rakt mot sensorn. Minska
avståndet till fotoramen. Kontrollera att inga hinder finns
mellan fjärrkontroll och sensor.
Kontrollera att filerna på minneskortet stöds av enheten.
Se Specifikationer.
Bilder med hög upplösning tar längre tid att ladda.
Använd bilder med lägre upplösning för snabbare visning.
Rekommenderad upplösning är 800x600 bildpunkter.
Avfallshantering
När du ska göra dig av med produkten ska detta ske enligt lokala föreskrifter.
Är du osäker på hur du ska gå tillväga, kontakta din kommun.
Specifikationer
Skärm 8˝ färg TFT LCD
Upplösning 800 (h) x 600 (v)
Drivspänning 5 V DC, 1 A via medföljande nätadapter
(100-240 V AC, 50/60 Hz)
Batterityp, fjärrkontroll 1 x CR2025 (3 V litium)
USB-anslutning 2.0 (stöd för USB-minne, mp3-spelare)
Minneskortanslutning SD (Secure Digital), MMC (Multimedia Card), MS
(Memory Stick), SDHC.
Inbyggt mine 512 MB
Bildformat JPEG
Ljudformat MP3, 32-320 Kbps bit rate (CBR, VBR)
Videoformat MPEG-4
Högtalare Inbyggd
Användningstemperatur 0 °C ~ 40 °C
24
Page 25

Digital fotoramme 8˝ slim
Art.nr. 38-3797 Modell KD0805
Les bruksanvisningen nøye før produktet tas i bruk, og ta vare på den for framtidig
bruk. Vi reserverer oss mot ev. tekst- og bildefeil, samt forandringer av tekniske data.
Ved tekniske problemer eller spørsmål, ta kontakt med vårt kundesenter.
(Se opplysninger om kundesenteret i denne bruksanvisningen).
Sikkerhet
• Advarsel! Dekselet må ikke åpnes. Farlig spenning finnes ubeskyttet på visse
komponenter inne i produktet. Kontakt med disse kan gi elektrisk støt.
• Produktet må kun repareres av kyndig servicepersonell.
• Produktet må ikke demonteres eller endres på.
• Plasser ikke produktet slik at det kan komme i kontakt med vann eller annen
væske. Plasser aldri produktet nær gjenstander, som kan forårsake at vann eller
annen væske skylles over produktet. Dette gjelder f.eks. blomstervase
eller leskedrikk.
• Ventilasjonsåpningene må ikke tildekkes. Plasser heller ikke produktet i nærheten
av varme steder som like ovenfor et varmeelement, oppå tv eller f.eks. i en sofa
hvor ventilasjonsåpningene blokkeres.
• Strømadapteren må kobles fra strømuttaket dersom produktet ikke skal brukes
på en stund.
• Produktet er konstruert for 8 til 10 timers kontinuerlig drift. Unngå å bruke den
i lengre tid i strekk enn dette. La produktet hvile en stund før det brukes igjen.
• Produktet er kun beregnet for innendørs bruk.
• Unngå å utsette produktet for direkte sollys over lengre tid.
• Bruk aldri dette produktet i støvete, fuktige eller skitne miljøer.
• Benytt kun en myk, lett fuktet klut og mildt vaskemiddel ved rengjøring
av skjermen.
• Nettadapter må ikke kobles fra, mens spilling pågår. Det er fare for at det tilkoblede
minnet skades. Ta heller ikke bort det tilkoblede minnet mens spilling pågår.
Norsk
25
Page 26

Produktbeskrivelse
• Digital fotoramme med 8” (4:3) fargeskjerm
• Viser dine digitale bilder uten pc
• Tilkobling for usb-minne eller minnekort (SD/SDHC)
• Støtte for å lytte til musikk (Mp3) samt vising av film (mpeg4)
• Innebygde høyttalere
• Leveres med fjernkontroll og transformator
Forpakningen inneholder
• Digital fotoramme
• Brukermanual
• Strømadapter
• Fjernkontroll
Norsk
• Kort usb-kabel for tilkobling av usb-enhet
Tilkobling
1. Festet festes til fotorammen ved å klikke det fast
i bunn-delen. Fotorammen kan også henges på veggen.
2. Støpselet plugges så til et strømuttak og den andre
enden til DC5 V-uttaket på fotorammen.
3. Fjern beskyttelsesfilmen på fotorammen.
4. Trykk på POWER på fjernkontrollen for å starte
fotorammen.
Sette i batteri
1. Vend fjernkontrollen opp-ned.
2. Ta tak i sporet med fingrene og trekk mot deg for
å ta av batterilokket.
3. Fjern beskyttelsesplasten fra fjernkontrollens
batteriholder.
4. Plasser et CR2025-batteri i holderen med ”+” mot deg.
5. Sett på plass batterilokket igjen.
26
3V
Lithium C
CR2025
Page 27

Fjernkontrollen
2
BGMOKMUTE
1
4
7
10
14
17
POWER
MENU
◄
SETUP
VOL-
I◄◄
▲
▼
VOL+
►►I
RETUR
►
►II
ZOOM
ROTATE
Knapp Funksjon
1. POWER Slå på eller av enheten
2. BGM Trykk for å spille bakgrunnsmusikk
3. MUTE Trykk for å skru av lyden
4. MENY Åpne menyen for kopiering og sletting.
5. ▲
Forflytting oppover i menyen/Foregående bilde/spor/film
6. RETURN Trykk for å gå tilbake
7. ◄
8. ►
9. ▼
Forflytt deg mot venstre i menyene
Forflytt deg mot høyre i menyene
Forflytte deg nedover i menyene
10. SETUP Aktivere/gå ut av innstillingsmenyen
11. PLAY/PAUSE
Trykk for å ta pause i avspillingen – trykk en gang til
for å starte igjen
12. OK Bekrefte/starte eller ta pause i avspillingen
13. ZOOM I pausemodus, trykk for å zoome i bildet
14. VOL + Heve volumet
15. VOL - Senke volumet
16. ROTATE Trykk for å rotere bildet 90° motsols, i pausemodus
17. I◄◄
18. ►►I
Foregående spor (musikk/film)
Neste spor (musikk/film)
3
5
6
12
8
9
11
15
13
18
16
Norsk
27
Page 28

Knapper og funksjoner
Knappene på displayet:
1. Power
2. Meny
3. Opp
4. Ned
5. Play/Pause/OK
6. Venstre
7. Høyre
8. Gå tilbake
På fotorammens høyre side:
9. SD/SDHC/MS/MMC
1 2 3 4 5 6 7 8
Norsk
På fotorammens venstre side:
10. 5 V DC
11. Mini-USB
9
11
10
Bruk
Forklaring av hovedmenyen
Når fotorammen skrus på kommer et startbilde opp. Trykk på MENU for å velge
minneenhet.
Ikon Funksjon
USB Vises når et USB-minne er koblet til.
SD/MMC Vises når et SD- eller MMC-minnekort er koblet til.
MS Vises når et MS-minne er koblet til.
SETUP Endrer innstillinger.
CALENDAR Åpner kalenderen.
28
Page 29

Instrukskjonene nedenfor beskriver bruken med fjernkontrollens knapper.
• Bruk ◄ og ► for å navigere i hovedmenyen. Bekreft ditt valg med OK.
• Trykk RETURN for å gå tilbake til foregående meny eller MENU for å gå tilbake
til hovedmenyen.
• Etter at kortet er satt inn vil bildeframvisningen starte automatisk. Trykk på
RETURN to ganger for å komme tilbake til valg av musikk, video, fil,
kalender og setup.
• Vær klar over at dersom det er musikkfiler så vil disse spilles automatisk
som bakgrunnsmusikk.
Bildeframviseren kan vise bilder i jpeg-format
1. Koble til et USB-minne eller et minnekort som inneholder bildefiler med
filformatene jpg/jpeg.
2. Marker minnet som er koblet til i hovedmenyen, f.eks. ”USB” og trykk OK.
3. Velg PHOTO og bekreft med OK.
4. Bildene i minnet vises som miniatyrer:
Norsk
5. Velg ønsket bilde som skal vises med ◄, ►, ▲ eller ▼. Trykk OK hvis
du vil åpne det valgte bildet.
29
Page 30

Bildevisning (Slideshow)
Bildeframviseren viser alle bilder i jpeg-format som er lagret på det tilkoblede minnet.
Disse blir vist som en lysbildeframvising. Dersom minnet også inneholder musikkfiler
vil disse også spilles av samtidig som bildene vises.
1. Koble til et usb-minne eller et minnekort som inneholder bildefiler
med filformatene jpg/jpeg.
2. Marker det minnet som bildene skal vises fra og trykk OK.
3. Gå til PHOTO og trykk på OK (12).
4. Enheten viser bildefilene på det tilkoblede minnet som miniatyrer.
5. Trykk på OK (12) for å velge ønsket bilde.
6. Når det ønskede bildet vises i full størrelse, trykk på OK (12) for å starte
bildframvisningen.
7. I hovedmenyen kan man trykke på SETUP for å foreta innstillinger
for bildeframvisning.
8. Benytt ▲ eller ▼ og bekreft med OK.
Norsk
9. Trykk på RETURN for å stoppe bildeframvisningen. Trykk på RETURN
igjen for å gå til hovedmenyen.
Spille musikk (Music)
Musikkspilleren kan spille av musikkfiler i Mp3-format.
1. Koble til et USB-minne eller et minnekort som inneholder musikkfiler med
filformatet mp3.
2. Marker minnet som er koblet til i hovedmenyen, f.eks. ”SD/MMC” og trykk OK.
3. Velg MUSIC og bekreft med OK.
4. Tilgjengelige musikkfiler vises i en liste.
5. Marker ønsket musikkfil med ▲ eller ▼.
6. Trykk på OK for å starte avspillingen.
30
Page 31

Kontroller:
OK – Pause i spillingen. Trykk en gang til for å starte spillingen igjen.
VOL+ / VOL- – Justerer volumet opp/ned.
◄◄ / ►► – Velger foregående eller neste spor.
7. Trykk på RETURN for å gå til hovedmenyen.
Vise film (Movie)
Enheten kan spille videofilmer i formatet mpeg-4.
Norsk
1. Koble til et USB-minne eller et minnekort som inneholder videofilmer med
filformatet mpeg-4.
2. Marker minnet som er koblet til i hovedmenyen, f.eks. ”SD/MMC” og trykk OK.
3. Velg Movie og bekreft med OK.
4. Tilgjengelige videofiler vises i en liste.
5. Marker ønsket videofil med ▲ eller ▼.
6. Trykk på OK for å starte avspillingen.
Kontroller:
OK – Pause i spillingen. Trykk en gang til for å starte spillingen igjen.
VOL+ / VOL- – Justerer volumet opp/ned.
◄◄ / ►►- Velger foregående eller neste video.
7. Stopp spillingen ved å trykke på RETURN. Trykk en gang til for å gå til
hovedmenyen.
31
Page 32

Filhåndtereren viser tilgjengelige filer på det minnet som er koblet til. Du kan
også kopiere filer mellom tilkoblede minner.
Kopiere filer til det innebygde minnet
For å kopiere filer må du ha et minne koblet til fotorammen, f.eks.
et usb-minne og et minnekort.
Norsk
1. Velg den filen du vil kopiere med ◄ eller ►.
2. Trykk på MENU og velg COPY FILE og deretter OK.
Slette filer
1. Velg den filen du vil kopiere med ◄ eller ►.
2. Trykk på MENU og velg DELETE FILE.
3. Trykk på OK for å bekrefte.
32
Page 33

Vis kalender (Calendar)
Kalenderen viser aktuelt klokkeslett, dato og måned. Dersom et USB-minne eller
minnekort er koblet til vil det vises en bildeframvisning av de bildene som er på det
tilkoblete minnet.
1. Marker CALENDAR i hovedmenyen og trykk OK. Kalenderen kommer opp
og bildene på det tilkoblede minnet vises i bildeframvisingen.
2. Bruk ◄, ►,▲ eller ▼ for å bla i kalenderen.
3. Trykk en RETURN for å gå tilbake til hovedmenyen.
Innstillinger
Norsk
1. Trykk på SETUP på fjernkontrollen i hovedmenyen.
2. Bruk ▲ og ▼ for å markere den ønskede innstilling i henhold til listen nedenfor.
3. Bekreft med OK.
4. Trykk en RETURN for å gå tilbake til innstillinger.
33
Page 34

Innstilling Alternativ
Language Endrer menyenes språk
Slide Mode Endrer antall viste bilder
Slide Speed Tid mellom bilder
Photo Effect Endrer mellom sort/hvit- og fargebilder
Slide Effect Endrer overganger i bildeframvisningen
Photo Mode Endrer bildeformat
Music Play Mode Repeterer låt etc.
Video Mode Endrer bildeformat
Display Endrer kontrast, lys och farge etc.
Set time/date Stiller inn tid og dato
Norsk
Set time format Endrer mellom12 og 24-timersvisning
Alarm Stiller inn tid for alarm
Format built-in memory Formaterer det innebygde minnet
Reset setting Tilbakestilling til fabrikkinnstillinger
Exit Avslutt
Vær oppmerksom på at enkelte innstillingen kun kan endres i riktig valgt modus fra
menyen. Det er for eksempel kun bildefil som kan roteres. Hvis du velger MUSIC vil
ROTATE være gråfarget og kan ikke velges.
Stell og vedlikehold
Rengjør med en myk og lett fuktet klut. Bruk aldri løsemidler eller sterke rengjøringsmidler.
34
Page 35

Feilsøking
Symptom Tiltak
Enheten starter ikke/Det kommer
ikke opp noe bilde på skjermen.
Produktet skrur seg automatisk
til standby-posisjon.
Fjernkontrollen fungerer ikke.
Kontroller at strømledningen er riktig satt i.
Koble fra strømledning og koble den på igjen
senere.
Kontroller batteriet og bytt det ved behov.
Rett fjernkontrollen mot sensoren. Reduser
avstanden mellom fjernkontroll og fotorammen.
Kontroller at ingen hinder finnes mellom
fjernkontroll og sensor.
Minnekortet kan ikke leses.
Enkelte bilder lades fortere
enn andre.
Kontroller at filene på minnekortet støttes av
bilderammen. Se Spesifikasjoner.
Bilder med høy oppløsning tar lengre tid å laste
ned. Bruk bilder med lavere oppløsning for
raskere vising.
Anbefalt oppløsning er 800 x 600 bildepunkter.
Avfallshåndtering
Når produktet skal kasseres, må det skje i henhold til lokale forskrifter. Ved usikkerhet,
ta kontakt med lokale myndigheter.
Spesifikasjoner
Skjerm: 8˝ farge TFT/LCD
Oppløsning: 800 x 600 (h x v)
Spenning: 5 V DC, 1 A via medfølgende batterieliminator
(100-240 V AC), 50/60 Hz)
Batteritype, fjernkontroll: 1 x CR2025 (3 V litium)
Usb-tilkobling: 2.0 (støtte for usb-minne, mp3-spiller)
Minnekorttilkobling: SD (Secure Digital), MMC (Multimedia Card), MS
(Memory Stick), SDHC.
Innebygd mine: 512 MB
Bildeformat: JPEG
Lydformat: MP3, 32-320 Kbps bit rate (CBR, VBR)
Videoformat: MPEG-4
Høyttaler: Innebygd
Brukstemperatur: 0 °C – +45 °C
Norsk
35
Page 36

Digitaalinen valokuvakehys 8˝
Tuotenumero 38-3797 Malli KD0805
Lue käyttöohje ennen tuotteen käyttöönottoa ja säilytä se tulevaa tarvetta varten.
Pidätämme oikeuden teknisten tietojen muutoksiin. Emme vastaa mahdollisista tekstitai kuvavirheistä. Jos laitteeseen tulee teknisiä ongelmia, ota yhteys myymälään tai
asiakaspalveluun (yhteystiedot käyttöohjeen lopussa).
Turvallisuus
• Varoitus! Älä avaa laitteen koteloa. Kotelon sisällä on vaarallista jännitettä sisältäviä
suojaamattomia komponentteja, jotka voivat aiheuttaa sähköiskun.
• Laitteen saa korjata vain alan ammattilainen.
• Älä pura tai muuta laitetta.
• Älä sijoita laitetta sellaiseen paikkaan, josta se voi tippua veteen tai muuhun
nesteeseen. Älä laita laitteen päälle nesteitä sisältäviä esineitä, kuten maljakoita
tai limsapulloja.
• Älä peitä ilmastointiaukkoja. Älä aseta tuotetta lämpimien paikkojen läheisyyteen,
esim. lämmittimen tai tv:n päälle tai sohvalle, jossa ilmastointiaukot ovat
vaarassa peittyä.
• Irrota pistoke pistorasiasta, jos et käytä tuotetta pitkään aikaan.
• Tuote on suunniteltu 8–10 tunnin jatkuvaan käyttöön, vältä käyttämästä sitä
Suomi
pidempään yhtäjaksoisesti. Anna laitteen levähtää hetki, ennen kuin käytät
sitä uudestaan.
• Tuote on tarkoitettu vain sisäkäyttöön.
• Älä altista laitetta suoralle auringonvalolle pitkäksi aikaa.
• Älä käytä laitetta kosteissa, pölyisissä tai likaisissa paikoissa.
• Puhdista näyttö ainoastaan miedolla tiskiaineliuoksella kostutetulla pehmeällä liinalla.
• Älä kytke muuntajaa pois toiston aikana. Tämä voi vahingoittaa kehykseen liitettyä
muistia. Älä myöskään poista liitettyä muistia toiston aikana.
36
Page 37

Tuotekuvaus
• Digitaalinen valokuvakehys, 8”:n (4:3) värinäyttö
• Katsele digikuviasi ilman tietokonetta
• Liitäntä usb-muistille tai muistikortille (SD/SDHC)
• Tukee musiikin kuuntelua (mp3) sekä filmien katsomista (mpeg4)
• Sisäiset kaiuttimet
• Mukana kaukosäädin ja muuntaja
Pakkauksen sisältö
• Digitaalinen valokuvakehys
• Käyttöohje
• Muuntaja
• Kaukosäädin
• Lyhyt usb-kaapeli usb-yksikön liittämiseen
Liitäntä
1. Kiinnitä valokuvakehyksen kiinnike napsauttamalla
se pohjaan kiinni. Valokuvakehyksen voi myös
ripustaa seinälle.
2. Liitä pistoke pistorasiaan ja johdon toinen pää
kehyksen DC 5 V-liitäntään.
3. Poista valokuvakehyksen suojakalvo.
4. Käynnistä kehys painamalla kaukosäätimen
POWER-painiketta.
Suomi
Pariston asettaminen
1. Käännä kaukosäädin ylösalaisin.
2. Laita sormi loveen ja vedä paristolokeron kantta
itseäsi kohden siten, että se aukeaa.
3. Poista suojamuovi kaukosäätimen paristolokerosta.
4. Aseta lokeroon yksi CR2025-paristo siten, että
”+”-puoli on näkyvissä.
5. Laita paristolokeron kansi takaisin paikalleen.
37
3V
Lithium C
CR2025
Page 38

Kaukosäädin
2
BGMOKMUTE
1
4
7
10
14
17
POWER
MENU
◄
SETUP
VOL-
I◄◄
▲
▼
VOL+
►►I
RETUR
►
►II
ZOOM
ROTATE
Painike Toiminto
1. POWER Päälle/pois päältä
2. BGM Käynnistä taustamusiikki
Suomi
3. MUTE Äänetön
4. MENU Avaa valikko kopiointia ja poistamista varten
5. ▲
Siirry ylöspäin valikossa / Edellinen kuva/raita/filmi
6. RETURN Palaa takaisin
7. ◄
8. ►
9. ▼
Siirry vasemmalle valikossa
Siirry oikealle valikossa
Siirry alaspäin valikossa
10. SETUP Avaa/poistu asetusvalikosta
11.PLAY/PAUSE Pidä tauko esityksessä. Paina uudelleen, kun haluat jatkaa.
12. OK Vahvista / Aloita tai keskeytä toisto
13. ZOOM Suurenna kuvaa (taukotilassa)
14. VOL + Lisää äänenvoimakkuutta
15. VOL- Vähennä äänenvoimakkuutta
16. ROTATE Käännä kuvaa 90˚ vastapäivään (taukotilassa)
17. I◄◄
18. ►►I
Edellinen raita (musiikki/filmi)
Seuraava raita (musiikki/filmi)
3
5
6
12
8
9
11
15
13
18
16
38
Page 39

Painikkeiden kuvaus
Näytön painikkeet:
1. Power
2. Valikko
3. Ylös
4. Alas
5. Play/Pause/OK
6. Vasemmalle
7. Oikealle
8. Palaa takaisin
Valokuvakehyksen oikealla puolella:
9. SD/SDHC/MS/MMC
Valokuvakehyksen vasemmalla puolella:
10. DC 5 V
11. Mini-usb
1 2 3 4 5 6 7 8
9
Käyttö
Päävalikon toiminnot
Kun valokuvakehys on päällä, tulee aloituskuva näkyviin. Valitse muisti painamalla
MENU.
Kuvake Toiminto
USB Näkyy, kun usb-muisti on liitettynä.
SD/MMC Näkyy, kun SD- tai MMC-muistikortti on liitettynä.
MS Näkyy, kun MS-muistikortti on liitettynä.
SETUP Asetusten muuttaminen.
CALENDAR Avaa kalenterin.
39
11
10
Suomi
Page 40

Alla olevat ohjeet kuvaavat kaukosäätimen painikkeiden käyttöä.
• Liiku päävalikossa ◄ ja ► -painikkeilla. Vahvista valinta painamalla OK.
• Palaa takaisin edelliseen valikkoon painamalla RETURN tai palaa päävalikkoon
painamalla MENU.
• Kun olet liittänyt kortin, alkaa kuvaesitys automaattisesti. Kun painat RETURN
kaksi kertaa, pääset takaisin valitsemaan seuraavia: musiikki, video, tiedosto,
kalenteri ja setup.
• Huomioi, että mikäli musiikkitiedostoja on, ne soivat automaattisesti taustalla.
Kuvia voi katsella myös jpeg-muodossa
1. Liitä laitteeseen usb-muisti tai muistikortti, joka sisältää kuvatiedostoja
jpg/jpeg-muodossa.
2. Valitse liittämäsi muisti päävalikosta, esim. ”USB” ja paina OK.
3. Valitse PHOTO ja hyväksy painamalla OK.
4. Muistilla olevat kuvat näkyvät pieninä kuvakkeina:
Suomi
5. Valitse haluamasi kuva ◄-, ►-, ▲- tai ▼-painikkeella. Paina OK, jos haluat
näyttää kuvan.
40
Page 41

6. Kuvaesitys (Slideshow)
Kuvaesitys näyttää kuvaesityksenä kaikki liitetyssä muistissa olevat jpeg-muotoiset
kuvat. Jos muistissa on myös musiikkitiedostoja, toistetaan nämä samalla kun kuvaesitys on käynnissä.
1. Liitä laitteeseen usb-muisti tai muistikortti, joka sisältää kuvatiedostoja
jpg/jpeg-muodossa.
2. Valitse muisti, jolta haluat näyttää kuvat ja paina OK.
3. Mene kohtaan PHOTO ja paina OK (12).
4. Yksikkö näyttää liitetyn muistin kuvatiedostot pieninä kuvakkeina.
5. Valitse kuva painamalla OK (12).
6. Kun kuva näkyy suurena voit aloittaa kuvaesityksen painamalla OK (12).
7. Päävalikossa voit muuttaa kuvaesityksen asetuksia painamalla SETUP-painiketta.
8. Paina ▲ tai ▼ ja vahvista painamalla OK.
9. Keskeytä kuvaesitys painamalla RETURN-painiketta. Palaa päävalikkoon
painamalla uudelleen RETURN-painiketta.
Musiikin kuuntelu (Music)
Laite toistaa musiikkitiedostoja, jotka ovat mp3-muodossa.
Suomi
1. Liitä laitteeseen usb-muisti tai muistikortti, joka sisältää äänitiedostoja
mp3-muodossa.
2. Valitse liitetty muisti päävalikosta, esim. ”SD/MMC” ja paina OK.
3. Valitse MUSIC ja hyväksy painamalla OK.
4. Saatavilla olevat musiikkitiedostot näkyvät listassa.
5. Valitse haluttu musiikkitiedosto ▲- tai ▼-painikkeella.
6. Aloita toisto painamalla OK.
41
Page 42

Toiminnot:
OK - Keskeyttää toiston väliaikaisesti. Jatka toistoa painamalla painiketta uudelleen.
VOL+ / VOL- – Äänenvoimakkuuden säätö.
◄◄ / ►► – Valitse edellinen tai seuraava raita.
7. Lopeta toisto painamalla RETURN. Paina uudestaan palataksesi päävalikkoon.
Filmien katselu (Movie)
Laite toistaa mpeg-4 -videotiedostoja.
Suomi
1. Liitä mpeg-4 -muodossa olevia videotiedostoja sisältävä usb-muisti tai
muistikortti kehykseen.
2. Valitse liitetty muisti päävalikosta, esim. ”SD/MMC” ja paina OK.
3. Valitse MOVIE ja hyväksy painamalla OK.
4. Saatavilla olevat videotiedostot näkyvät listassa.
5. Valitse haluttu videotiedosto ▲- tai ▼-painikkeella.
6. Aloita toisto painamalla OK.
Toiminnot:
OK - Keskeyttää toiston väliaikaisesti. Jatka toistoa painamalla painiketta uudelleen.
VOL+ / VOL- – Äänenvoimakkuuden säätö.
◄◄ / ►► – Valitse edellinen tai seuraava video.
7. Lopeta toisto painamalla RETURN. Palaa päävalikkoon painamalla
painiketta uudelleen.
42
Page 43

Tiedostonhallinta näyttää liitetyn muistin saatavilla olevat tiedostot. Voit myös
kopioida tiedostoja liitetystä muistista toiseen.
Tiedostojen kopioiminen kiinteään muistiin
Jos haluat kopioida tiedostoja, liitä kehykseen muisti, esim. usb-muisti tai muistikortti.
1. Valitse kopioitava tiedosto ▲- tai ▼-painikkeella.
2. Paina MENU ja valitse COPY FILE, jonka jälkeen OK.
Tiedostojen poisto
3. Valitse poistettava tiedosto ▲- tai ▼-painikkeella.
4. Paina MENU ja valitse DELETE FILE.
5. Vahvista painamalla OK.
43
Suomi
Page 44

Kalenteri (Calendar)
Kalenteri näyttää kellonajan, päivän sekä kuukauden. Jos kehykseen on liitettynä usbmuisti tai muistikortti, näyttää kalenterin kuvaesitys liitetyssä muistissa olevia kuvia.
1. Valitse päävalikosta CALENDAR ja paina OK. Kalenteri ilmestyy näkyviin
ja liitetyn muistin kuvat näkyvät kuvaesityksenä.
2. Selaa kalenteria ◄-, ►-, ▲- ja ▼-painikkeilla.
3. Palaa päävalikkoon RETURN-painikkeella.
Suomi
Asetukset
1. Paina kaukosäätimen SETUP-painiketta päävalikossa.
2. Valitse haluamasi asetus alla olevan listan asetuksista ▲- ja ▼-painikkeilla.
3. Vahvista painamalla OK.
4. Palaa asetuksiin painamalla RETURN-painiketta.
44
Page 45

Asetus Vaihtoehdot
Language Muuta valikkokieltä
Slide Mode Muuta katseltavien kuvien määrää.
Slide Speed Kuvien vaihtumisaika.
Photo Effect Valitse väri- tai mustavalkonäyttö.
Slide Effect Muuta kuvan vaihtotapaa kuvaesityksessä.
Photo Mode Muuta kuvakokoa.
Music play mode Toista esim. raitaa.
Video Mode Muuta kuvakokoa.
Display Muuta kontrastia, valoa, väriä jne.
Set time/date Aseta kellonaika ja päivämäärä.
Set time format Valitse 12 tai 24 tunnin ajannäyttö.
Alarm Aseta hälytysaika.
Format built-in
memory
Reset setting Palauta valokuvakehyksen tehdasasetukset.
Exit Lopeta
Huomioi, että tiettyjä asetuksia voi muuttaa vain oikeassa tilassa. Voit esimerkiksi
kääntää vain yhtä kuvatiedostoa. Jos olet valinnut MUSIC:in, on ROTATE harmaa, ja
sitä ei voi muuttaa.
Formatoi kiinteä muisti.
Huolto ja ylläpito
Pyyhi kevyesti kostutetulla liinalla. Älä käytä voimakkaita puhdistusaineita tai liuottimia.
45
Suomi
Page 46

Vianhakutaulukko
Vika Toimenpiteet
Laite ei mene päälle. /
Laitteessa ei näy kuvaa.
Laite menee automaat-
tisesti valmiustilaan.
Kaukosäädin ei toimi.
Muistikortilta lukeminen
ei onnistu.
Kuvat latautuvat eri
tahtiin.
Varmista, että muuntaja on liitetty oikein.
Irrota muuntaja ja liitä se sitten takaisin.
Tarkista kaukosäätimen paristo ja vaihda tarvittaessa.
Suuntaa kaukosäädin suoraan tunnistinta kohti. Ohjaa
kaukosäädintä lähempänä laitetta. Varmista, että
kaukosäätimen ja tunnistimen välissä ei ole esteitä.
Varmista, että laite tukee muistikortin tiedostoja.
Ks. Tekniset tiedot.
Erottelukyvyltään korkeiden kuvien latautuminen
kestää kauemmin. Matalaerottelukykyisten kuvien
näyttäminen on nopeampaa.
Suositeltava erottelukyky on 800x600 kuvapistettä.
Kierrätys
Kierrätä tuote asianmukaisesti, kun poistat sen käytöstä. Tarkempia kierrätysohjeita
saat kuntasi jäteneuvonnasta.
Suomi
Tekniset tiedot
Näyttö 8˝ :n väri-TFT LCD-näyttö
Erottelukyky 800 (H) x 600 (V)
Käyttöjännite 5 V DC, 1 A muuntajan kautta (100–240 V AC, 50/60 Hz)
Kaukosäätimen paristot 1 x CR2025 (3 V litiumi)
Usb-liitäntä 2.0 (liitäntä usb-muistille / mp3-soittimelle)
Muistikortin liitäntä SD (Secure Digital), MMC (Multimedia Card), MS
(Memory Stick), SDHC
Kiinteä muisti 512 Mt
Kuvaformaatti JPEG
Ääniformaatti Mp3, 32-320 Kbps bit rate (CBR, VBR)
Videoformaatti MPEG-4
Kaiuttimet Kiinteät
Käyttölämpötila 0–40 °C
46
Page 47

47
Page 48

Sverige
Kundtjänst Tel: 0247/445 00
Fax: 0247/445 09
E-post: kundtjanst@clasohlson.se
Internet www.clasohlson.se
Post Clas Ohlson AB, 793 85 INSJÖN
Norge
Kundesenter Tlf.: 23 21 40 00
Faks: 23 21 40 80
E-post: kundesenter@clasohlson.no
Internett www.clasohlson.no
Post Clas Ohlson AS, Postboks 485 Sentrum, 0105 OSLO
Suomi
Asiakaspalvelu Puh.: 020 111 2222
Sähköposti: info@clasohlson.fi
Internet www.clasohlson.fi
Osoite Clas Ohlson Oy, Annankatu 34–36 A, 00100 HELSINKI
Great Britain
For consumer contact, please visit
www.clasohlson.co.uk and click on
customer service.
Internet www.clasohlson.co.uk
 Loading...