

Page 1
EnglishSvenskaNorskSuomi
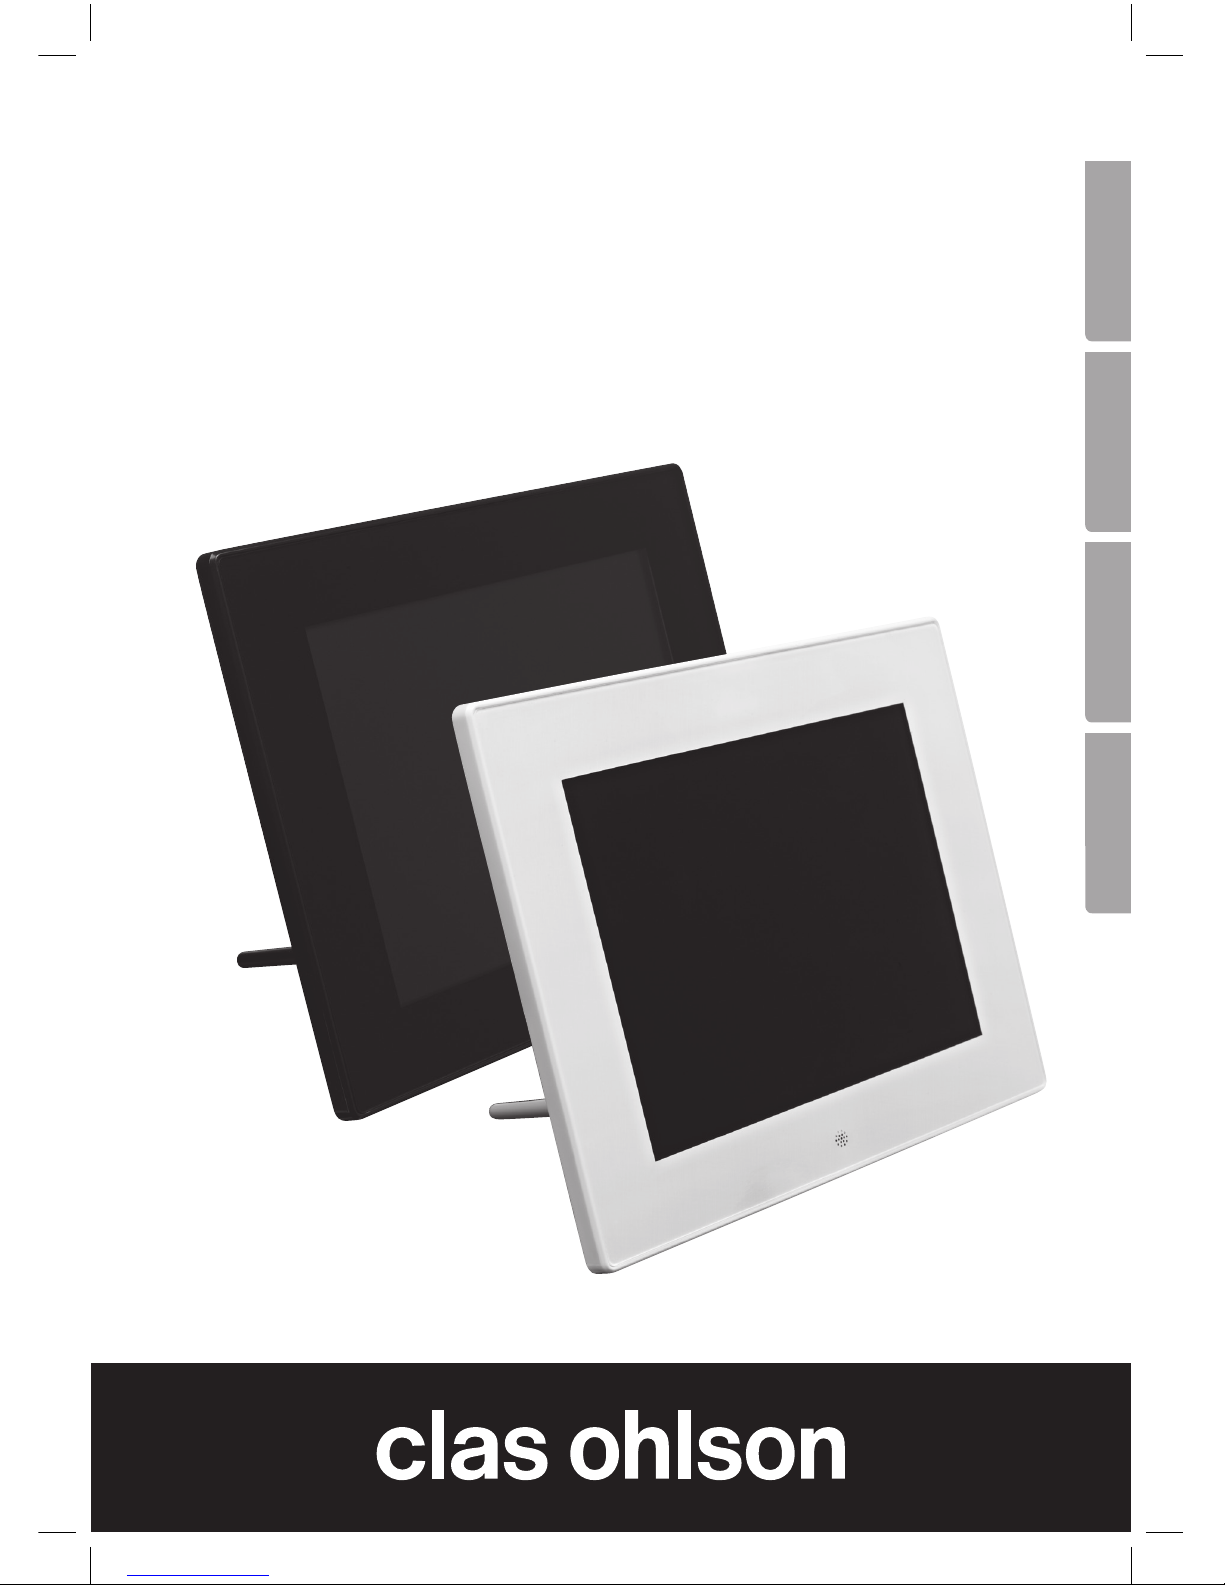
8″ Digital Photo Frame
Digital fotoram 8″
Digital fotoramme 8″
Digitaalinen valokuvakehys 8″
Art.no Model
38-5196 KD0804-A15
38-5197 KD0804-A15
Ver. 201108
Page 2

2
Page 3

3
English
8″ Digital Photo Frame
Art. no 38-5196 KD0804-A15
38-5197 KD0804-A15
Please read the entire instruction manual before using the product and save it
for future reference. We reserve the right for any errors in text or images and any
necessary changes made to technical data. If you have any questions regarding
technical problems please contact Customer Services.
1. Product description
• 8-inch digital photo frame for displaying your digital JPEG images.
• USB memory and memory card slots (SD/SDHC/MMC).
• Comes with mains adaptor and remote control.
• Displays time and calendar.
• Slideshow with 10 different transition options.
2. Contents
• Digital photo frame
• Instruction manual
• Mains adaptor
• Remote control
• Stand
Page 4

4
English
3. Safety
• Warning! Do not open the casing. Certain components within the product’s casing
carry dangerous currents. Contact with these may give you an electric shock.
• The product should only be repaired by qualified service technicians.
• The product should not be taken apart or modified.
• Do not place the product where there is a risk of it falling into water or other liquid.
Do not place any objects containing liquid on the product, e.g. flower vases or
soft drinks.
• Do not cover the ventilation openings. Do not place the product close to heat
sources such as on top of the radiator or TV, or on e.g. the sofa which will block
the ventilation openings.
• Always unplug the adaptor from the electrical outlet if the product is not be used
for an extended period.
• The product is designed for 8 – 10 hours of continuous operation. Avoid any
prolonged use. Allow the product to rest for a while before using it again.
• The product is intended for indoor use only.
• Do not expose the product to direct sunlight for prolonged periods.
• Do not use the product in damp, dusty, or dirty environments.
• Only use a lightly moistened soft cloth with a little washing up liquid to clean
the screen.
• Do not disconnect the mains adaptor while the frame is in use. The attached
memory storage device may be damaged. Neither should the connected memory
storage device be removed when the frame is in use.
Page 5
5
English
1
2
3
4
5
6
7
8
9
10
11
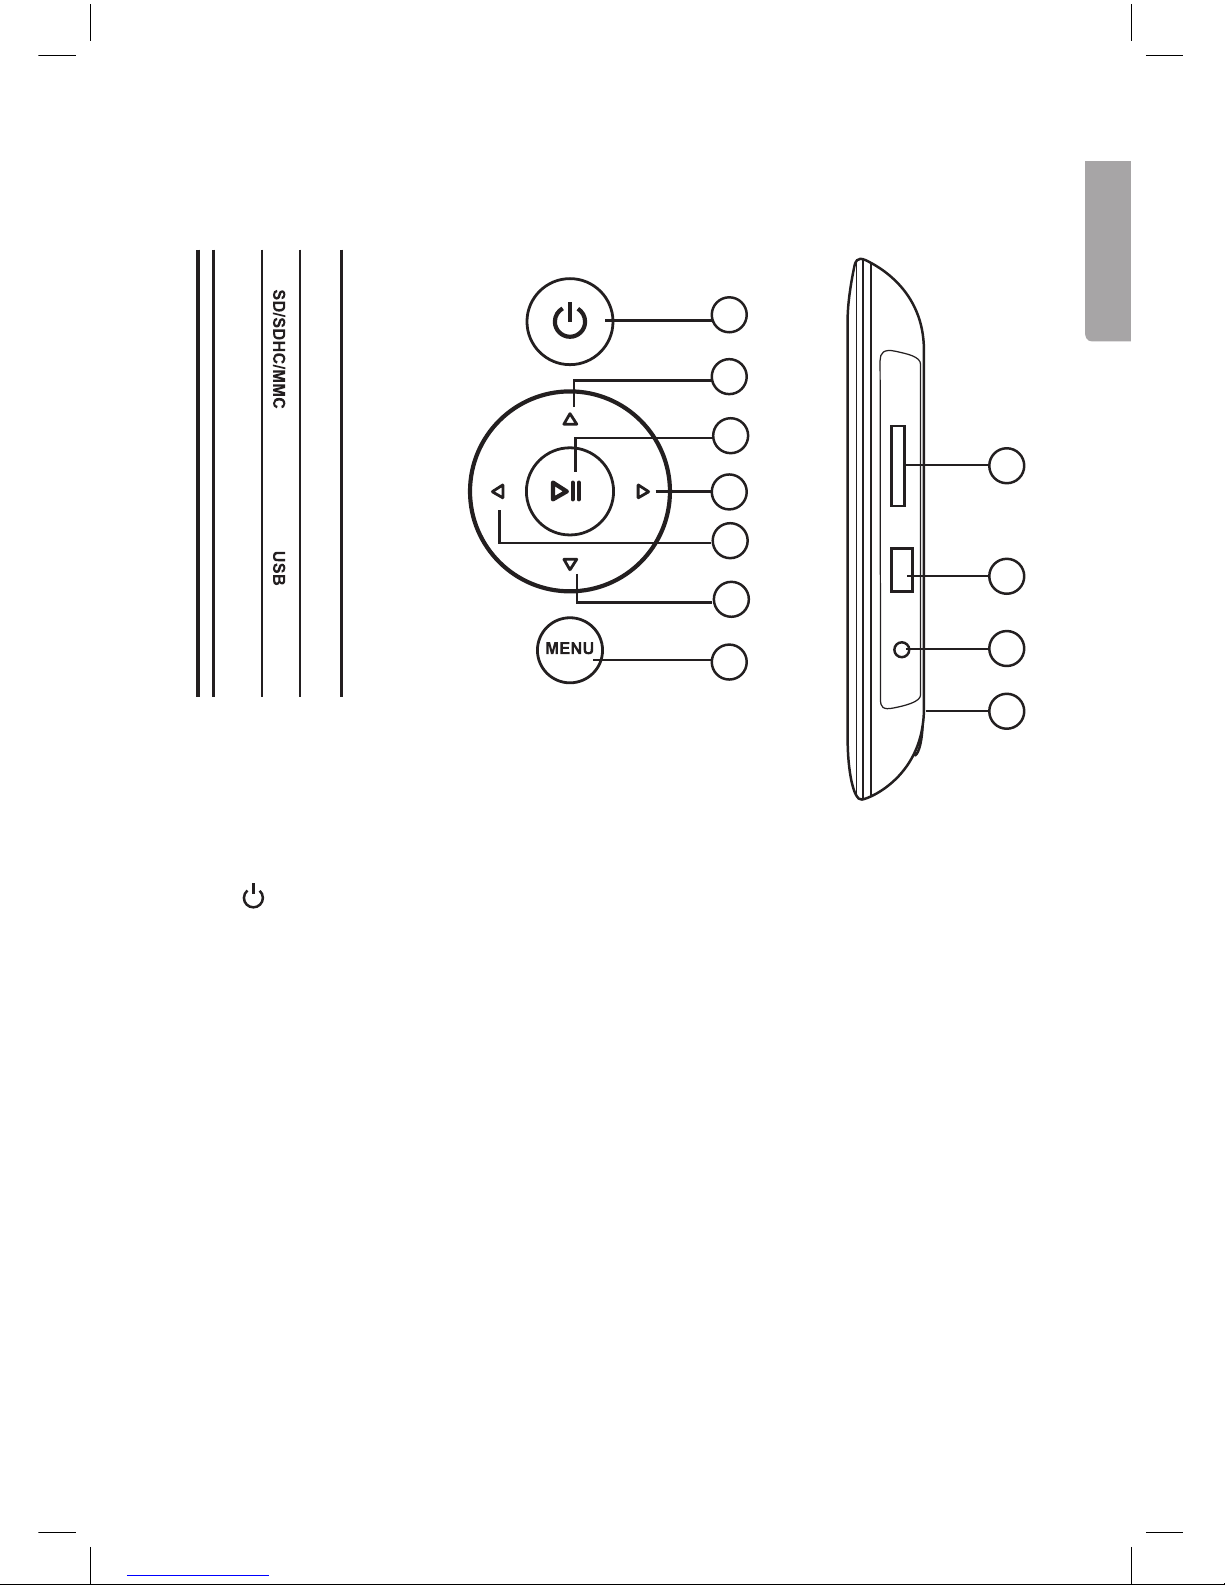
4. Buttons and functions
Rear buttons
1. [ ] Power on/off.
2. [▲] Move cursor up.
3. [►II] Start slideshow, pause or confirm.
4. [►] Move cursor right.
5. [◄] Move cursor left.
6. [▼] Move cursor down.
7. [MENU] Return to main menu, or open file processing (copy/delete file).
On the right hand side of the photo frame
8. Memory card slot: SD/SDHC/MS/MMC
9. USB port
10. DC 5 V
11. Stand attachment point
Page 6

6
English
12
14
17
20
POWER
OK
SLIDE
SHOW
SETUP
ZOOM
ROTATE
◄
▼
▲
►
EXIT
13
16
19
22
21
15
18
Remote control
12. ON/OFF switch.
13. [SETUP] Copy or delete images.
14. [ROTATE] Rotate image (in pause mode during single image display).
Rotates image 90˚ anticlockwise each time it is pressed.
15. [▲] Move cursor up
16. [ZOOM] Change image size (in pause mode during single image display).
17. [◄] Move cursor left
18. [OK] Start slideshow, pause or confirm selection.
19. [►] Move cursor right.
20. [SLIDE SHOW] Start slideshow straight away.
21. [▼] Move cursor down.
22. [EXIT] Return to main menu, or return to previous menu.
Changing batteries in the remote control
1. Remove the battery holder.
2. Insert the battery according to the markings (+ up).
3. Reinsert the battery holder.
CR2025
Lithium C
3V
Page 7
7
English
5. Use
This photo frame is intended for tabletop use.
1. Screw the stand onto the back (11).
2. Remove the plastic film from the display and from the battery in the remote control.
3. Plug the mains adaptor into a wall socket and then plug the DC connector into
the DC 5 V socket on the photo frame.
4. Connect a SD/SDHC/MMC memory card or USB memory to the photo frame.
5. Press [
] (1) or (12) to turn the photo frame on.
6. The slideshow will start automatically if a memory card or USB memory stick
(containing images) is inserted.
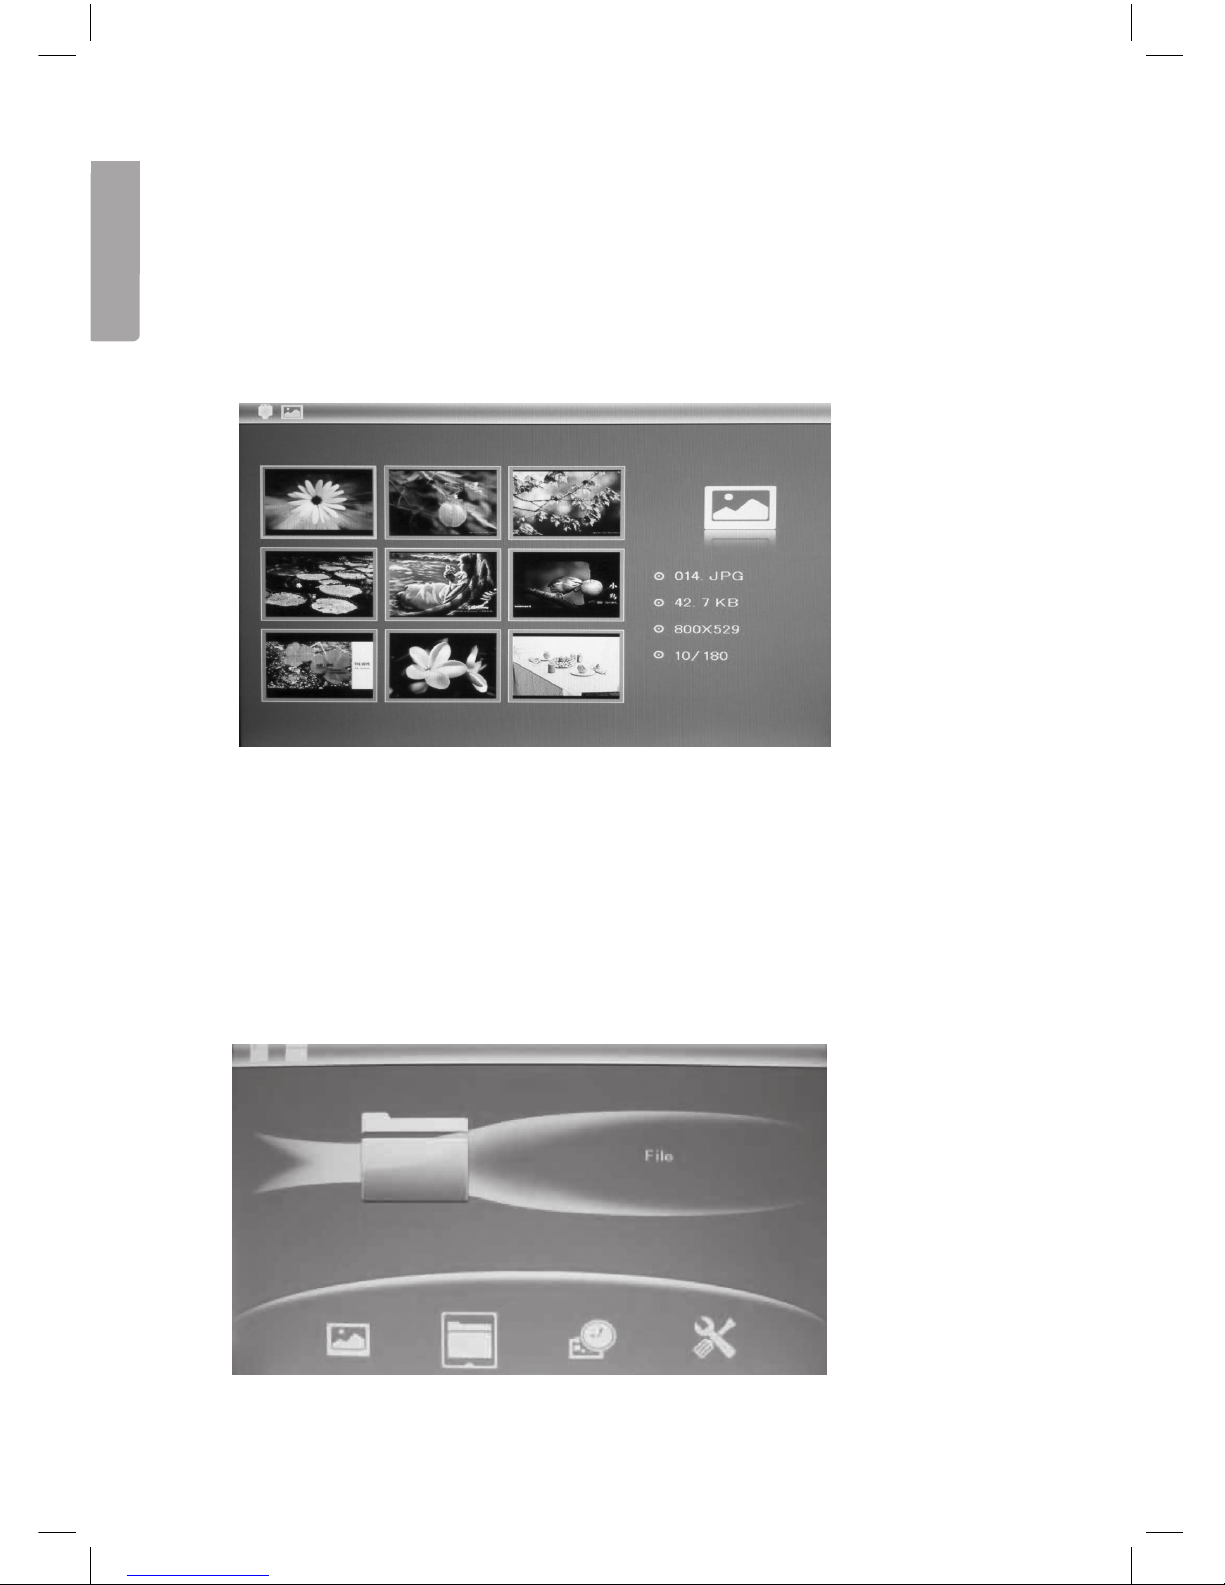
7. Press [MENU] (7) twice to display the main menu: Photo (images), File (displays
list of images/folders in memory), Calendar (time and date) or Setup (settings).
8. If you highlight Photo, the start page will appear.
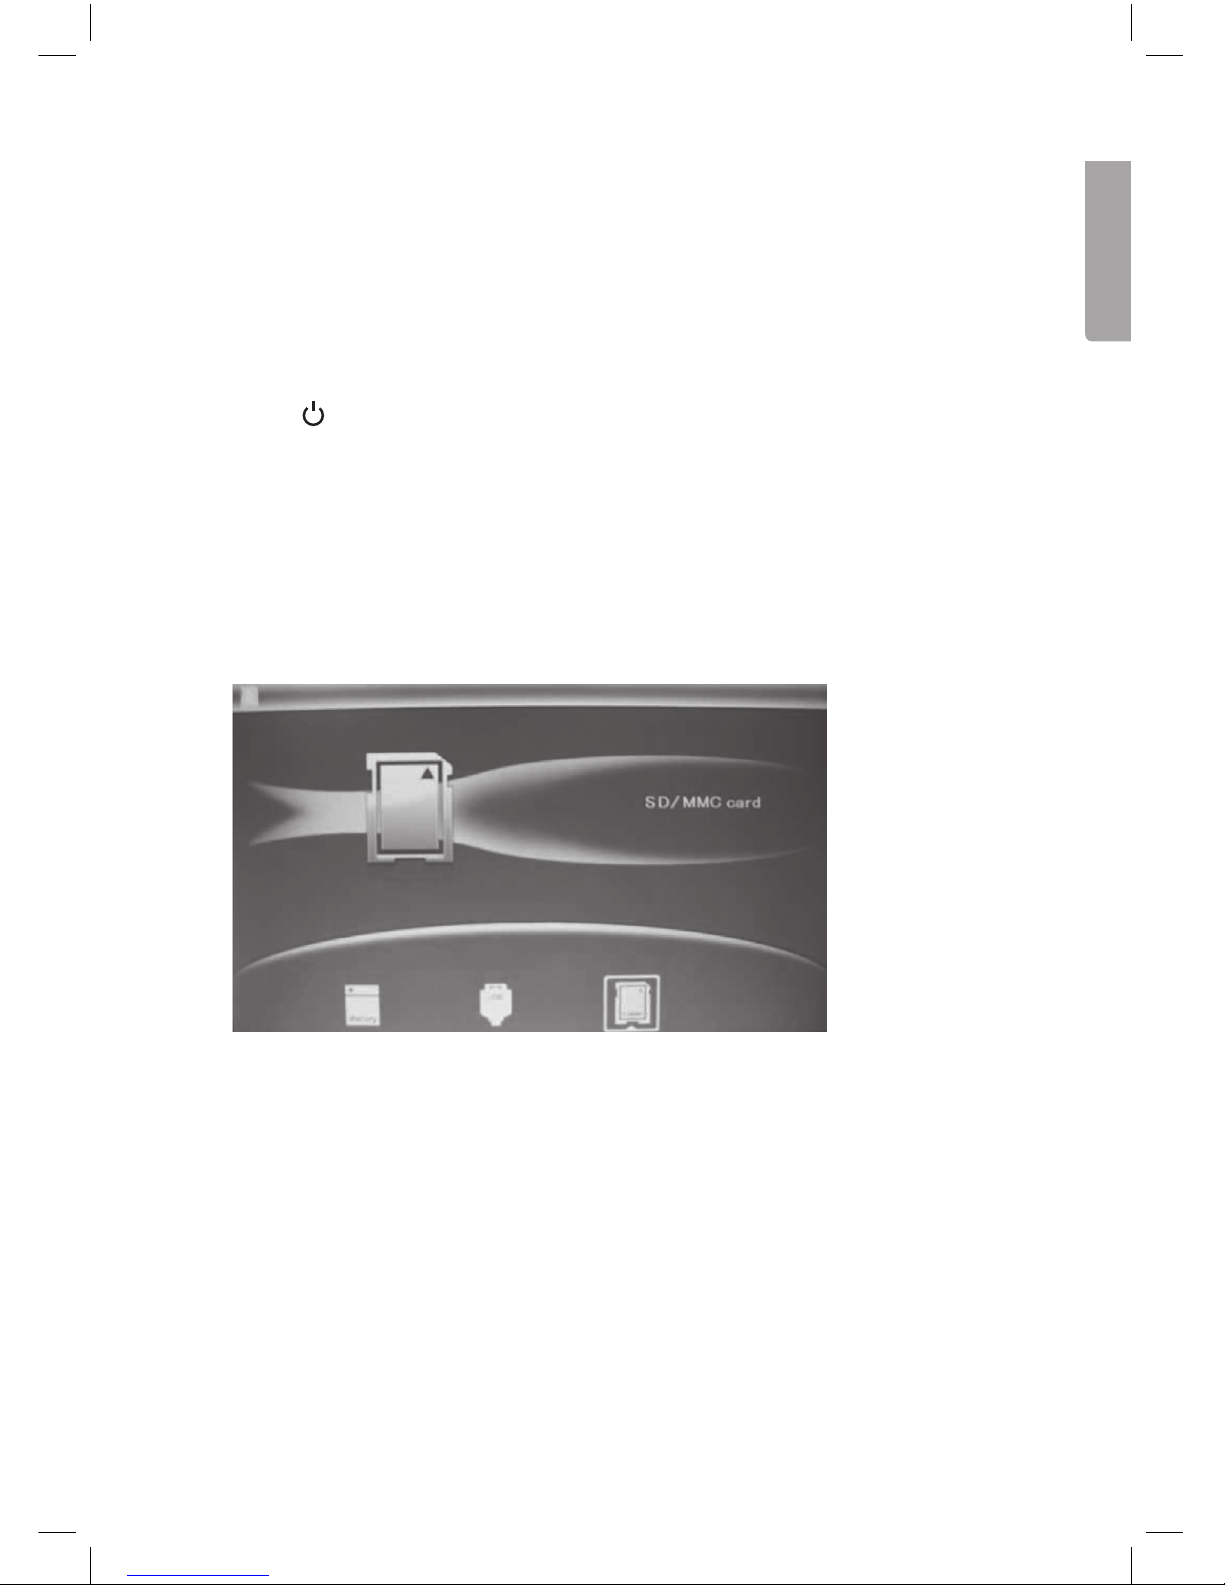
9. Symbols representing the connected memory devices will appear on the display.
Highlight the desired memory and press [OK] (18) to start viewing images.
6. Main menu
6.1 Photo – display of images in thumbnail size
The slideshow starts as soon as a memory card is connected.
1. Press [EXIT] (22) twice to display the main menu.
2. Highlight the Photo symbol (on the far left) using the arrow keys (17) (19).
3. Press [SETUP] (13).
4. Highlight the memory card containing the images.
5. Press [SLIDE SHOW] (20) to start the slideshow.
Page 8
8
English
6. Press [EXIT] (22) to display the images in thumbnail size.
7. Highlight the desired image using the arrow keys (2) (4) (5) (6).
8. Information about the highlighted image will be displayed: File name, file size,
image size and image number plus the total number of images on the memory
device.
9. Press [EXIT] (22) to return to the main menu or press [OK] (18) to start
the slideshow from the highlighted image.
6.2 File – display of files and folder on the selected memory device
1. Highlight the desired memory device using the arrow keys (17) (19) and
then press [OK] (18).
2. Information about the files and folders on the memory device will be displayed.
3. You can display JPEG images by pressing [►II].
Page 9

9
English
6.3 Calendar - display of time and date
1. Press [EXIT] (22) twice to display the main menu.
2. Move to the Calendar symbol using the arrow keys (17) (19). Press [OK] (18)
to confirm.
Setting the time and date:
a. Go back to the main menu and enter Setup, then press [OK] (18).
b. Highlight Set time/date using the arrow keys (15) (21). Press [OK] (18) to confirm.
c. The year will be highlighted, press [OK] (18) to confirm. Adjust the year, if
necessary, using the arrow keys (17) (19). (In setup mode the highlighted text
is red). Press [OK] (18) to confirm.
d. Set the month, day, hour, minute and seconds in the same way.
e. Advance to Save Time using the arrow keys (15) (21) to save your settings.
Press [OK] (18) to confirm. Exit the menu by pressing [EXIT] (22).
Setting the time format:
a. Advance to Set Time Format.
b. Press [OK] (18) to confirm.
c. Select a 12 or 24 hour display.
d. Press [OK] (18) to confirm. Exit the menu by pressing [EXIT] (22).
Page 10
10
English
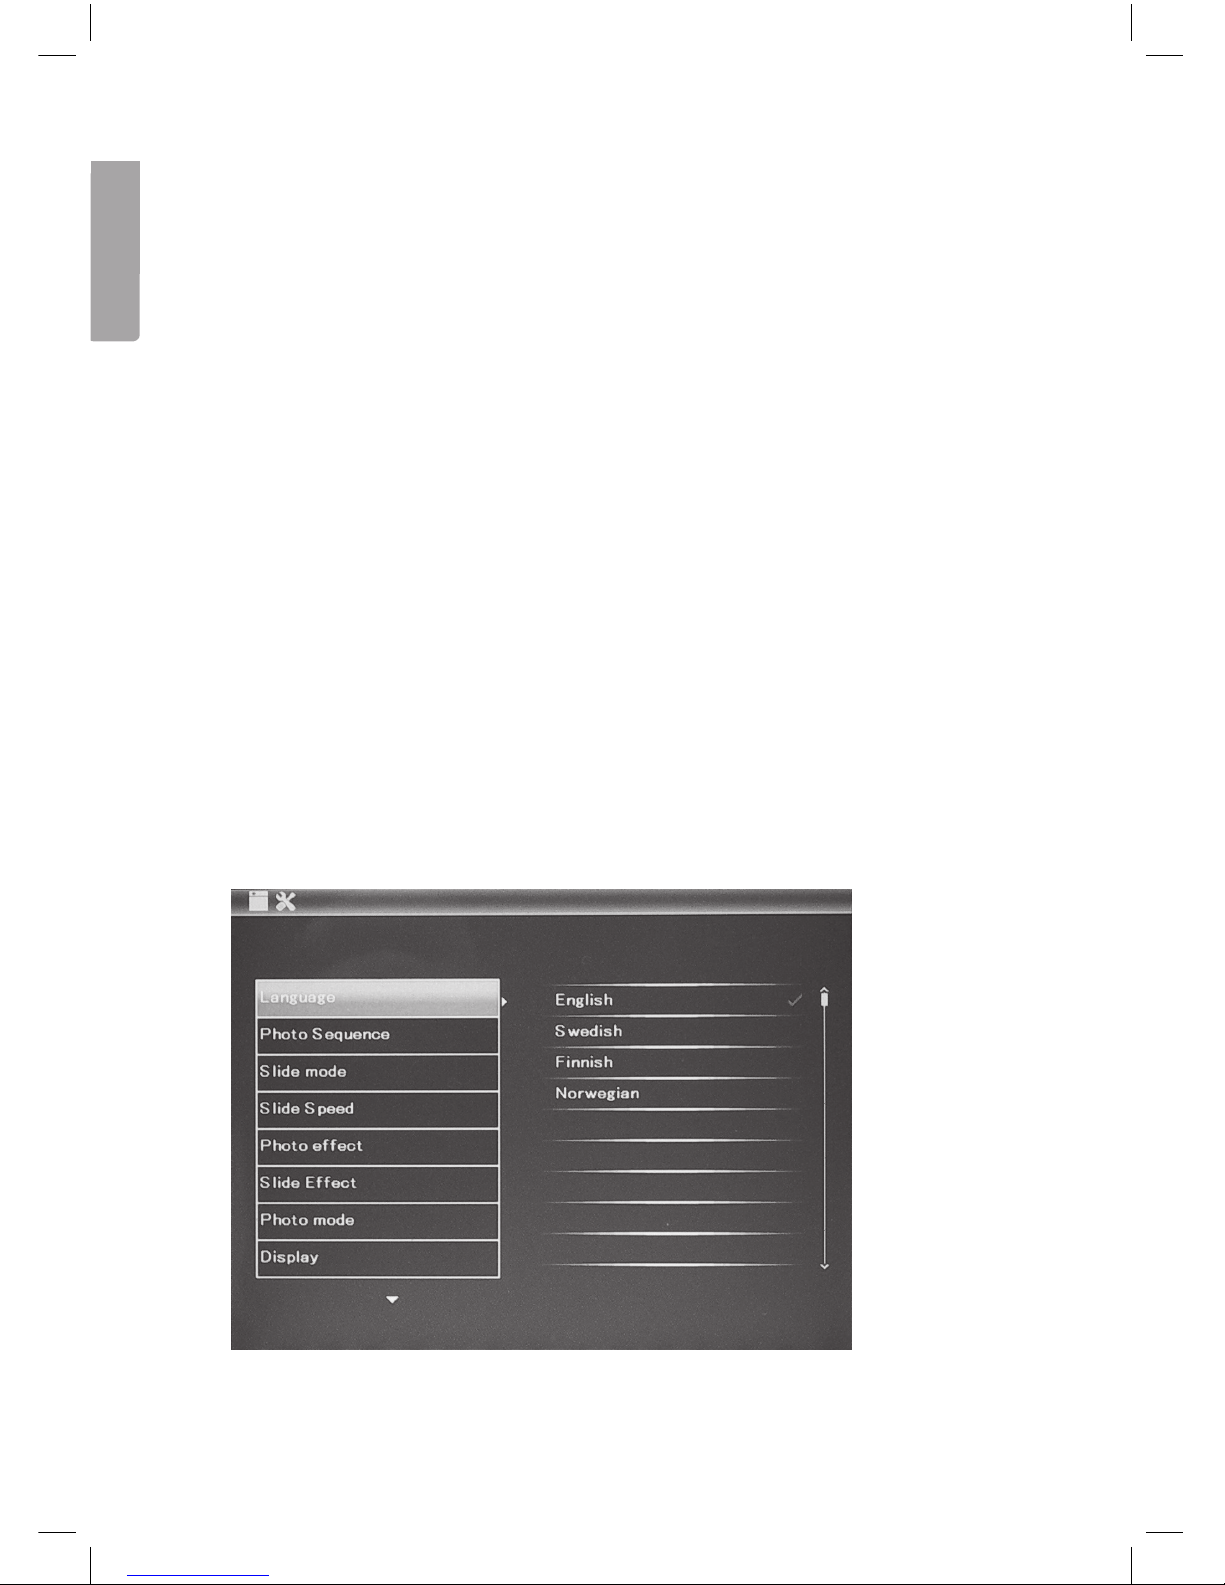
6.4 Setup
1. Press [EXIT] (22) twice to display the main menu.
2. Move to the Setup symbol using the arrow key [►] (19).
3. Press [OK] (18) to confirm.
4. Press [EXIT] (22) to return to normal display mode when you have
finished your settings.
The main menu has settings for:
a. Language – English, Swedish, Finnish or Norwegian
b. Photo Sequence – Sequential or random display.
c. Slide mode – 1 image, 4 images or 3 images.
d. Slide speed – from 3 seconds to 1 hour.
e. Photo effect – Colour, Monochrome (black&white), Sepia (sepia-toned)
f. Slide effect (transition effect) – Random, Split horizontal in, etc.
g. Photo mode (display size) – Auto fit, Optimal or Full.
h. Display – Contrast, Brightness, Saturation and Tint.
i. Set time/date (see section 6.3 Calendar).
j. Set time format (display in 12 or 24 hour clock format).
k. Format built-in memory.
l. Reset setting (return to default factory settings).
m. Exit (finish and return to normal display mode).
Page 11
11
English
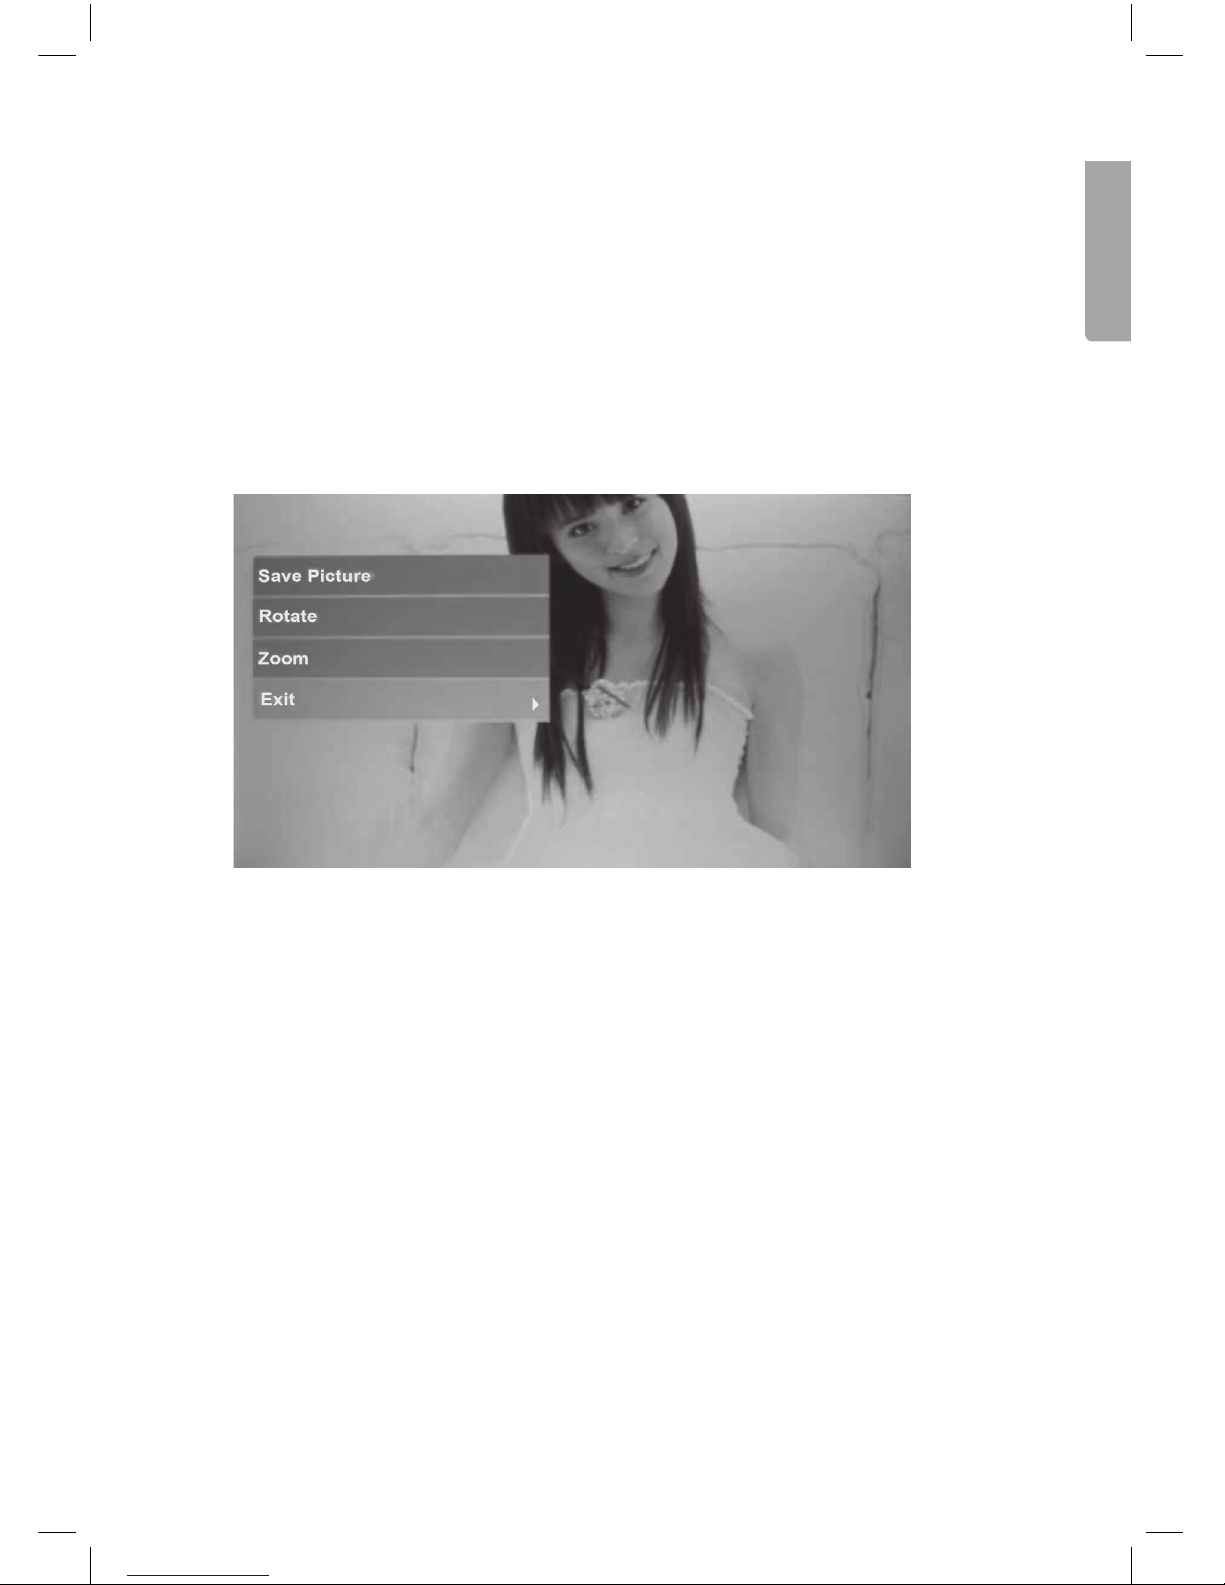
6.5 Copy, rotate or zoom images
1. Highlight the Photo symbol (on the far left) using the arrow keys (17) (19).
2. Highlight the desired image using the arrow keys (15) (17) (19) (21).
3. Press [OK] (18) to display the entire image.
4. Push [SETUP] (13) to enter the setup mode.
5. You have now accessed the settings. Highlight a function: Rotate or Zoom.
6. Adjust the settings by pressing several times on [OK] (18) until the image is correct.
7. Highlight Save Picture and press [OK] (18) to save the image you have changed.
8. Press [EXIT] (22) to return to normal display mode.
6.6 Deleting images
1. Highlight the Photo symbol (on the far left) using the arrow keys (17) (19).
2. Highlight the image to be deleted using the arrow keys (15)(17)(19)(21).
3. Push [SETUP] (13) to enter the setup mode.
4. You have now accessed the settings. Highlight a function: Delete File or Exit.
5. Press [OK] (18) to confirm.
Page 12

12
English
7. Care and maintenance
Wipe the surface clean using a soft, damp cloth. Never use solvents or strong
detergents.
8. Troubleshooting guide
Problem Solution
The device does not
start/no photo is shown.
Check that the mains adaptor is correctly connected.
The remote control does
not work.
• Check the battery.
• Point the remote control directly at the photo
frame without any obstructions in between.
The memory card cannot
be read.
Make sure that the files on the memory card are
supported by the device. See Specifications.
Some photos are uploaded quicker than others.
Images with high resolution take longer to load.
Use images with lower resolution for quicker display.
The recommended resolution is 800 x 600 pixels.
9. Disposal
Follow local ordinances when disposing of this product. If you are unsure of how to
dispose of this product, please contact your local authority.
10. Specifications
Screen 8″colour TFT LCD (4x3)
Resolution 800 (h) x 600 (v)
Viewing angle 60º (left/right/vertically), 40º (horizontally)
Contrast 500:1
Light intensity 250 cd/m²
Response time 20 ms
Input voltage 5 V DC, 1 A via the supplied mains adaptor
(100-240 V AC, 50/60 Hz)
USB port USB 2.0
Memory card slot SD (Secure Digital), MMC (Multimedia Card),
SDHC (Secure Digital High Capacity)
Internal memory 8 MB
Picture format JPEG
Operating temperature 0 °C to 40 °C (at humidity level of 10-85 % RH)
Size 221 x 177 x 22 mm
Page 13

13
Svenska
Digital fotoram 8″
Art. nr 38-5196 KD0804-A15
38-5197 KD0804-A15
Läs igenom hela bruksanvisningen före användning och spara den sedan för framtida
bruk. Vi reserverar oss för ev. text- och bildfel samt ändringar av tekniska data.
Vid tekniska problem eller andra frågor, kontakta vår kundtjänst (se adressuppgifter
på baksidan).
1. Produktbeskrivning
• 8” digital fotoram som visar dina digitala jpeg-bilder.
• Anslutning för USB-minne eller minneskort (SD/SDHC/MMC).
• Nätadapter och fjärrkontroll medföljer.
• Visar tid och kalender.
• Bildspel med 10 olika typer av bildövergång.
2. Förpackningen innehåller
• Digital fotoram
• Bruksanvisning
• Nätadapter
• Fjärrkontroll
• Stöd
Page 14

14
Svenska
3. Säkerhet
• Varning! Öppna inte höljet! Farlig spänning finns oskyddat på vissa komponenter
inuti produktens hölje, kontakt med dessa kan ge elektrisk chock.
• Produkten får endast repareras av kvalificerad servicepersonal.
• Produkten får inte demonteras eller ändras.
• Placera inte produkten så att den kan falla ner i vatten eller annan vätska. Ställ
inte några föremål som innehåller vätska på produkten, t.ex. blomvas eller dryck.
• Täck inte för ventilationsöppningarna. Placera inte heller produkten i närheten
av varma ställen som ovanför element, ovanpå en teve eller i t.ex. en soffa där
ventilationsöppningarna blockeras.
• Ta alltid ur nätadaptern från eluttaget om inte produkten ska användas under
en längre tid.
• Produkten är konstruerad för 8 till 10 timmars kontinuerlig drift. Undvik att använda
den under längre tid än så. Låt produkten vila en stund innan den används igen.
• Produkten är endast avsedd för inomhusbruk.
• Undvik att utsätta produkten för direkt solljus under längre tid.
• Använd inte produkten i fuktiga, dammiga eller smutsiga miljöer.
• Använd endast en mjuk tvättduk som är svagt fuktad med vatten och milt
diskmedel vid rengöring av skärmen.
• Koppla inte ifrån nätadaptern samtidigt som uppspelningen pågår. Risk finns
för att det anslutna minnet skadas. Ta inte heller bort det anslutna minnet när
uppspelning pågår.
Page 15

15
Svenska
4. Knappar och funktioner
Tryckknappar på baksidan
1. [ ] Strömbrytare av/på.
2. [▲] Flytta markören uppåt.
3. [►II] Tryck för att starta bildspel, göra paus eller tryck för att bekräfta val.
4. [►] Flytta markören åt höger.
5. [◄] Flytta markören åt vänster.
6. [▼] Flytta markören neråt.
7. [MENU] Tryck för att återgå till huvudmeny, eller öppna filhantering
(kopiera/radera filer).
På högersidan av fotoramen
8. Anslutning för minneskort: SD/SDHC/MS/MMC
9. USB-anslutning
10. DC 5 V
11. Infästning för stödet
1
2
3
4
5
6
7
8
9
10
11
Page 16

16
Svenska
12
14
17
20
POWER
OK
SLIDE
SHOW
SETUP
ZOOM
ROTATE
◄
▼
▲
►
EXIT
13
16
19
22
21
15
18
Fjärrkontroll
12. Strömbrytare av/på.
13. [SETUP] Kopiera eller radera bilder.
14. [ROTATE] Rotera bild (i pausläge vid enbildsvisning).
Tryck för att rotera bilden 90º motsols ett steg varje gång.
15. [▲] Flytta markören uppåt.
16. [ZOOM] Ändra bildstorlek (i pausläge vid enbildsvisning).
17. [◄] Flytta markören åt vänster.
18. [OK] Starta bildspel, gör paus eller bekräfta val.
19. [►] Flytta markören åt höger.
20. [SLIDE SHOW] Starta bildspel direkt.
21. [▼] Flytta markören neråt.
22. [EXIT] Återgå till huvudmeny, eller återgå till tidigare meny.
Byt batteri i fjärrkontrollen
1. Dra ut batterihållaren.
2. Lägg i batteriet enligt märkningen med (+) uppåt.
3. Tryck in batterihållaren.
CR2025
Lithium C
3V
Page 17

17
Svenska
8. Om du markerar Photo visas startbilden.
9. Symboler för anslutna minnen visas på displayen. Markera önskat minne och
tryck [OK] (18) för att starta bildvisning.
6. Huvudmenyn
6.1 Photo – visar bilder som miniatyrer
Bildspelet startar genast när du ansluter ett minneskort.
1. Tryck [EXIT] (22) två gånger för att öppna huvudmenyn.
2. Markera Photo-ikonen (längst till vänster) med riktningsknapparna (17)(19).
3. Tryck på [SETUP] (13).
5. Användning
Fotoramen är avsedd för att ställas på ett bord eller liknande.
1. Skruva dit stödet på baksidan (11).
2. Ta bort skyddsfilmen från displayen och ta bort plastremsan från
fjärrkontrollens batteri.
3. Anslut nätadaptern till ett vägguttag och koppla DC-proppen till DC 5 V-uttaget
på fotoramen.
4. Anslut ett minneskort SD/SDHC/MS/MMC eller USB-minne till fotoramen.
5. Tryck på [
] (1) eller (12) för att slå på fotoramen.
6. Bildspelet startar automatiskt om minneskort eller USB-minne (som innehåller
bilder) är anslutet.
7. Tryck två gånger på [MENU] (7) för att öppna huvudmeny: Photo (bilder),
File (visar minnets innehåll av bilder/mappar), Calendar (visa kalender och tid)
eller Setup (inställningar).
Page 18

18
Svenska
4. Markera minneskortet där bilderna finns.
5. Tryck på [SLIDE SHOW] (20) för att starta bildspel.
6. Tryck på [EXIT] (22) för att visa bilderna som miniatyrer.
7. Markera önskad bild med riktningsknapparna (2)(4)(5)(6).
8. Information om den markerade bilden visas: Filnamn, filstorlek, bildstorlek
och bildnummer samt totala antalet bilder på minneskortet/USB-minnet.
9. Tryck på [EXIT] (22) för att återgå till huvudmenyn eller tryck på [OK] (18)
för att starta bildspel från den markerade bilden.
6.2 File – visar filer och mappar som finns på minnet
1. Markera anslutet minneskort med riktningsknapparna (17)(19) och tryck [OK] (18).
2. Information om minnets innehåll av filer och mappar visas.
3. Du kan visa JPEG-bilder genom att trycka på [►II].
Page 19

19
Svenska
6.3 Calendar – visar kalender och tid
1. Tryck två gånger på [EXIT] (22) för att öppna huvudmenyn.
2. Stega till Calender-ikonen med riktningsknapparna (17)(19). Tryck på [OK] (18)
för att bekräfta.
Ställ in kalender och tid så här:
a. Gå tillbaka till huvudmenyn och öppna Setup (inställningar) och tryck [OK] (18).
b. Markera Set time/date med riktningsknapparna (15)(21). Tryck på [OK] (18)
för att bekräfta.
c. Year (år) markeras, tryck på [OK] (18) för att bekräfta. Ställ in rätt år med med
riktningsknapparna (17)(19) (I inställningsläge blir den markerade texten röd).
Tryck på [OK] (18) för att bekräfta.
d. Fortsätt lika med månad, dag, timme, minut och sekund.
e. Stega till Save Time med med riktningsknapparna (15)(21) för att spara inställning.
Tryck på [OK] (18) för att bekräfta. Gå ur menyn med [EXIT] (22).
Ställ in visningsformat för tid så här:
a. Stega ner till Set Time Format.
b. Tryck på [OK] (18) för att bekräfta.
c. Välj 12- eller 24- timmarsvisning.
d. Tryck på [OK] (18) för att bekräfta. Gå ur menyn med [EXIT] (22).
Page 20

20
Svenska
6.4 Setup (inställningar)
1. Tryck två gånger på [EXIT] (22) för att öppna huvudmenyn.
2. Stega till Setup-ikonen med riktningsknappen [►] (19).
3. Tryck på [OK] (18) för att bekräfta.
4. Tryck på [EXIT] (22) för att återgå till normal bildvisning när du är klar med
inställningarna.
Huvudmenyn har inställningar för:
a. Language (menyspråk) English, Swedish, Finnish eller Norwegian.
b. Photo Sequence (bildvisning) Visa i följd eller slumpmässigt.
c. Slide mode (bildvisningsläge) 1 bild, 3 bilder eller 4 bilder visas.
d. Slide speed (tidsfördröjning mellan bilderna) Från 3 sekunder till 1 timme.
e. Photo effect (bildeffekt) Color (färg), Mono (svart/vit) Sepia (sepiatonad).
f. Slide effect (olika effekter vid bildövergång) Random, Split horisontal in etc.
g. Photo mode (bildstorlek) Auto fit, Optimal eller Full.
h. Display Contrast (kontrast) Brightness (ljusstyrka) Saturation (färgmättnad)
och Tint (toning).
i. Set time/date (inställning av tid och datum) (se avsnitt 6.3 Calendar).
j. Set time format (visning i 12- eller 24-timmars format).
k. Format built-in memory (formatera det inbyggda minnet)
l. Reset setting (återställ fabriksinställningar)
m. Exit (avsluta och återgå till normalvisning)
Page 21

21
Svenska
6.5 Kopiera, rotera eller zooma bilder
1. Markera Photo-ikonen (längst till vänster) med riktningsknapparna (17) (19).
2. Markera önskad bild med riktningsknapparna (15)(17)(19)(21).
3. Tryck på [OK] (18) för att visa hela bilden.
4. Tryck på [SETUP] (13) så att inställningsrutan öppnas.
5. Inställningarna öppnas. Markera önskad funktion: Rotate (rotera) eller
Zoom (förstora bild).
6. Gör önskade inställningar genom att trycka flera gånger på [OK] (18) tills
bilden blir rätt.
7. Markera Save Picture och tryck på [OK] (18) för att spara bilden som
du har ändrat.
8. Tryck på [EXIT] (22) för att återgå till normal bildvisning.
6.6 Radera bilder
1. Markera Photo-ikonen (längst till vänster) med riktningsknapparna (17) (19).
2. Markera bilden som ska raderas med riktningsknapparna (15)(17)(19)(21).
3. Tryck på [SETUP] (13) så att inställningsrutan öppnas.
4. Inställningarna öppnas. Markera önskad funktion: Delete File (radera markerad fil)
eller Exit (avbryt).
5. Tryck på [OK] (18) för att bekräfta.
Page 22

22
Svenska
7. Skötsel och underhåll
Torka av med en mjuk, lätt fuktad trasa. Använd inga lösningsmedel eller starka
rengöringsmedel.
8. Felsökningsschema
Symptom Åtgärd
Enheten startar ej/
Ingen bild visas.
Kontrollera att nätadaptern är korrekt ansluten.
Fjärrkontrollen
fungerar ej.
• Kontrollera batteriet.
• Rikta fjärrkontrollen mot fotoramen utan skymmande
hinder mellan fotoram och fjärrkontroll.
Det går inte att läsa
från minneskortet.
Kontrollera att filerna på minneskortet stöds av enheten.
Se Specifikationer.
Vissa bilder laddas
fortare än andra.
Bilder med hög upplösning tar längre tid att ladda.
Använd bilder med lägre upplösning för snabbare visning.
Rekommenderad upplösning är 800x600 bildpunkter.
9. Avfallshantering
När du ska göra dig av med produkten ska detta ske enligt lokala föreskrifter.
Är du osäker på hur du ska gå tillväga, kontakta din kommun.
10. Specifikationer
Skärm 8″ färg TFT LCD (4x3)
Upplösning 800 (h) x 600 (v)
Betraktingsvinkel 60º (vänster/höger/vertikalt), 40º (horisontellt)
Kontrast 500:1
Ljusstyrka 250 cd/m²
Responstid 20 ms
Drivspänning 5 V DC, 1 A via medföljande nätadapter
(100-240 V AC, 50/60 Hz)
USB-anslutning USB 2.0
Minneskortsanslutning SD (Secure Digital), MMC (Multimedia Card),
SDHC (Secure Digital High Capacity)
Internt minne 8 MB
Bildformat JPEG
Användningstemperatur 0 °C ~ 40 °C (vid luftfuktighet 10 ~ 85 % RH)
Storlek 221 x 177 x 22 mm
Page 23

23
Norsk
Digital fotoramme 8″
Art.nr. 38-5196 KD0804-A15
38-5197 KD0804-A15
Les bruksanvisningen nøye før produktet tas i bruk, og ta vare på den for framtidig
bruk. Vi reserverer oss mot ev. tekst- og bildefeil, samt forandringer av tekniske data.
Ved tekniske problemer eller spørsmål, ta kontakt med vårt kundesenter. (Se opplysninger om kundesenteret i denne bruksanvisningen).
1. Produktbeskrivelse
• 8” digital fotoramme for visning av digitale jpeg-bilder.
• Tilkobling for usb-minne eller minnekort (SD/MMC/SDHC).
• Strømadapter og fjernkontroll medfølger.
• Viser klokkeslett og dato.
• Automatisk bildeframvisning med 10 forskjellige bildeoverganger.
2. Forpakningen inneholder
• Digital fotoramme
• Bruksanvisning
• Strømadapter
• Fjernkontroll
• Støtte
Page 24

24
Norsk
3. Sikkerhet
• Advarsel! Dekselet må ikke åpnes. Farlig spenning finnes ubeskyttet på visse
komponenter inne i produktet. Kontakt med disse kan gi elektrisk støt.
• Produktet må kun repareres av kyndig servicepersonell.
• Produktet må ikke demonteres eller endres på.
• Plasser ikke produktet slik at det kan komme i kontakt med vann eller annen
væske. Plasser aldri produktet i nærheten av gjenstander, som kan forårsake at
vann eller annen væske skylles over produktet. Dette gjelder f.eks. blomstervase
eller leskedrikk.
• Ventilasjonsåpningene må ikke tildekkes. Plasser heller ikke produktet i nærheten
av varme steder, som f.eks. like over et varmeelement, oppå tv eller i en sofa hvor
ventilasjonsåpningene blokkeres.
• Strømadapteren må kobles fra strømuttaket dersom produktet ikke skal brukes
på en stund.
• Produktet er konstruert for 8 til 10 timers kontinuerlig drift. Unngå å bruke det
i lengre tid i strekk enn dette. La produktet hvile en stund før det brukes igjen.
• Produktet er kun beregnet for innendørs bruk.
• Unngå å utsette produktet for direkte sollys over lang tid.
• Bruk aldri dette produktet i støvete, fuktige eller skitne miljøer.
• Benytt kun en myk, lett fuktet klut og mildt vaskemiddel ved rengjøring av skjermen.
• Nettadapter må ikke kobles fra, mens spilling pågår. Det er fare for at det tilkoblede
minnet skades. Ta heller ikke bort det tilkoblede minnet mens spilling pågår.
Page 25

25
Norsk
1
2
3
4
5
6
7
8
9
10
11
4. Knapper og funksjoner
Taster på baksiden
1. [ ] Strømbryter av/på.
2. [▲] Flytte markøren oppover.
3. [►II] Trykk for å starte bildeframvisningen, ta pause eller for å bekrefte et valg.
4. [►] Flytte markøren til høyre.
5. [◄] Flytte markøren til venstre.
6. [▼] Flytte markøren nedover.
7. [MENU] Trykk for å gå tilbake til hovedmenyen eller åpne filhåndteringen
(kopiere/slette filer)
På fotorammens høyre side
8. Tilkobling for minnekort: SD/SDHC/MS/MMC
9. Usb-tilkobling
10. 5 V DC
11. Innfesting av støtte
Page 26

26
Norsk
12
14
17
20
POWER
OK
SLIDE
SHOW
SETUP
ZOOM
ROTATE
◄
▼
▲
►
EXIT
13
16
19
22
21
15
18
Fjernkontroll
12. Strømbryter på/av.
13. [SETUP] Kopiere eller slette bilder.
14. [ROTATE] Rotere bilde (i pausemodus ved enkeltbildevisning).
Trykk for å rotere bildet 90º motsols, ett trinn av gangen.
15. [▲] Flytte markøren oppover.
16. [ZOOM] Endre bildestørrelse (i pausemodus ved enkeltbildevisning).
17. [◄] Flytte markøren til venstre.
18. [OK] Starte bildeframvisning, ta pause eller bekrefte valg.
19. [►] Flytte markøren til høyre.
20. [SLIDE SHOW] Starte bildeframvisningen direkte.
21. [▼] Flytte markøren nedover.
22. [EXIT] Gå tilbake til hovedmenyen eller gå til tidligere menyer.
Skifte batteri i fjernkontrollen
1. Trekk batteriholderen ut.
2. Legg batteriet i. Følg merkingen for å plassere det riktig.
3. Skyv holderen inn igjen.
CR2025
Lithium C
3V
Page 27

27
Norsk
5. Bruk
Fotorammen er beregnet for å stå på et bord eller liknende.
1. Skru fast støtten på baksiden (11).
2. Fjern beskyttelsesfilmen fra displayet og plastremsen fra batteriet i fjernkontrollen.
3. Støpselet plugges så til et strømuttak og et DC5 V-uttaket på fotorammen.
4. Et minnekort av typen SD/SDHC/MMC/MS eller usb kobles til fotorammen.
5. Trykk på [
] (1) eller (12) for å slå på fotorammen.
6. Bildeframvisningen starter automatisk hvis minnekort eller usb-minne (med bilde)
er koblet til.
7. Trykk to ganger på [MENU] (7) for å åpne hovedmenyen: Photo (bilder), File
(viser minnets innhold av bilder/mapper), Calendar (viser kalender og tid)
eller Setup (innstillinger).
8. Hvis man markerer Photo vil startbildet vises.
9. Symboler for tilkoblet minne vises på skjermen. Merk ønsket minne og trykk [OK]
for å starte bildeframvisningen.
6. Hovedmenyen
6.1 Photo - Her vises bilder som miniatyrer
Bildeframvisningen starter straks når man kobler til et minnekort.
1. Trykk to ganger på [EXIT] (22) for å åpne hovedmenyen.
2. Marker Photo-ikonet (plassert lengst til venstre) med retningstastene (17) eller (19).
3. Trykk på [SETUP] (13).
4. Merk minnekortet der bildene er lagret.
5. Trykk på [SLIDE SHOW] (20) for å starte framvisningen.
Page 28

28
Norsk
6. Trykk på [EXIT] (22) for å vise bildene som miniatyrer.
7. Merk ønsket bilde med retningstastene (2)(4)(5) eller (6).
8. Informasjon om det merkede bildet vises: Filnavn, filstørrelse, bildestørrelse
og bildenummer samt det totale antall bilder på minnekortet/usb-minnet.
9. Trykk på [EXIT] (22) for å gå tilbake til hovedmenyen eller på [OK] (18) for
å starte framvisningen fra det merkede bildet.
6.2 File – Her vises filer og mapper som er på minnet
1. Merk ønsket minnekort med retningstastene (17)(19) og trykk [OK] (18).
2. Informasjon om minnets innhold av filer og mapper vises.
3. Du kan vise JPEG-bilder ved å trykke på [►II].
Page 29

29
Norsk
6.3 Calendar – Her vises kalender og tid
1. Trykk to ganger på [EXIT] (22) for å åpne hovedmenyen.
2. Gå til kalenderikonet med retningstastene (17) eller (19). Trykk på [OK] (18)
for å bekrefte.
Klokkeslett og dato stilles inn slik:
a. Gå tilbake til hovedmenyen for å åpne Setup (innstillinger) og trykk [OK] (18).
b. Merk Set time/date med retningsknappene (15) eller (21). Trykk på [OK] (18)
for å bekrefte.
c. Merk Year (år) og trykk på [OK] (18) for å bekrefte. Still inn riktig årstall med
retningstastene (17) eller (19) (I innstillingsmodus blir den merkede teksten rød).
Trykk på [OK] (18) for å bekrefte.
d. Fortsett på samme måten med måned, dag, time, minutt og sekund.
e. Gå til Save Time med retningstastene (15) eller (21) for å lagre innstillingen.
Trykk på [OK] (18) for å bekrefte. Gå ut av menyen med [EXIT] (22).
Visningsformat for tid stilles inn slik:
a. Gå ned til Set Time Format.
b. Trykk på [OK] (18) for å bekrefte.
c. Velg mellom 12- eller 24-timers visning.
d. Trykk på [OK] (18) for å bekrefte. Gå ut av menyen med [EXIT] (22).
Page 30

30
Norsk
6.4 Setup (innstillinger)
1. Trykk to ganger på [EXIT] (22) for å åpne hovedmenyen.
2. Gå til Setup-ikonet med retningstastene [►] (19).
3. Trykk på [OK] (18) for å bekrefte.
4. Trykk på [EXIT] (22) for å gå tilbake til normal bildevisning når du er ferdig
med innstillingene.
Hovedmenyen har innstillinger for:
a. Language (språk) English, Swedish, Finnish eller Norwegian.
b. Photo Sequence (bildevising) Vise i riktig rekkefølge eller tilfeldig.
c. Slide mode (bildeframvisningsmodus) 1 bilde, 3 bilder eller 4 bilder vises.
d. Slide speed (tidsintervallet mellom bildeskiftet). Fra 3 sekunder til 1 time.
e. Photo effect (bildeeffekt) Color (farge), Mono (svart/hvit) Sepia (sepiatonet).
f. Slide effect (effekt ved bildeovergang) Random, Split horisontal in etc.
g. Photo mode (bildestørrelse) Auto fit, Optimal eller Full.
h. Display Contrast (kontrast) Brightness (lysstyrke) Saturation (fargemetting)
og Tint (nyanse).
i. Set time/date (innstilling av klokkeslett og dato) (se avsnitt 6.3 Calendar).
j. Set time format (visning i 12- eller 24-timers format).
k. Format built-in memory (formatere det innebygde minnet).
l. Reset setting (stille tilbake til fabrikkinnstillingene).
m. Exit (avslutte og gå tilbake til normalvisning).
Page 31

31
Norsk
6.5 Kopiere, rotere eller zoome
1. Marker Photo-ikonet (plassert lengst til venstre) med retningstastene (17) eller (19).
2. Merk ønsket bilde med retningstastene (15)(17)(19) eller (21).
3. Trykk på [OK] (18) for å vise hele bildet.
4. Trykk på [SETUP] (13) slik at innstillingsruten åpnes.
5. Innstillingene åpnes. Merk ønsket funksjon: Rotate (rotere) eller
Zoom (forstørre bilde).
6. Innstillingene foretas ved å trykke flere ganger på [OK] (18) til bildet blir riktig.
7. Merk Save Picture og trykk på [OK] for å lagre bildet som du har endret.
8. Trykk på [EXIT] (22) for å gå tilbake til normal bildevisning.
6.6 Slette bilder
1. Marker Photo-ikonet (plassert lengst til venstre) med retningstastene (17) eller (19).
2. Bildet som skal slettes merkes med knappene (15)(17)(19) eller (21).
3. Trykk på [SETUP] (13) slik at innstillingsruten åpnes.
4. Innstillingene åpnes. Merk ønsket funksjon: Delete File (slette merket fil) eller
Exit (avbryt).
5. Trykk på [OK] (18) for å bekrefte.
Page 32

32
Norsk
7. Stell og vedlikehold
Rengjør med en myk og lett fuktet klut. Bruk aldri løsningsmiddel eller sterke
rengjøringsmidler.
8. Feilsøking
Symptom Tiltak
Enheten starter ikke / Det kommer
ikke opp noe bilde på skjermen.
Kontroller at strømledningen er riktig satt i.
Fjernkontrollen fungerer ikke • Kontroller batteriet.
• Vend fjernkontrollen mot fotorammen
og påse at det ikke er hindringer mellom
fotorammen og fjernkontrollen.
Minnekortet kan ikke leses. Kontroller at filene på minnekortet støttes av
bilderammen. Se Spesifikasjoner.
Enkelte bilder lades fortere
enn andre.
Bilder med høy oppløsning tar lengre tid
å laste ned. Bruk bilder med lavere oppløsning for raskere vising.
Anbefalt oppløsning er 800 x 600 punkter.
9. Avfallshåndtering
Når produktet skal kasseres, må det skje i henhold til lokale forskrifter. Ved usikkerhet,
ta kontakt med lokale myndigheter.
10. Spesifikasjoner
Skjerm 8″ farge TFT-LCD (4x3)
Oppløsning 800 (h) x 600 (v)
Betraktingsvinkel 60º (venstre/høyre/vertikalt), 40º (horisontalt)
Kontrast 500:1
Lysstyrke 250 cd/m²
Responstid 20 ms
Spenning 5 V DC, 1 A via medfølgende batterieliminator
(100–240 V AC, 50/60 Hz)
Usb-tilkobling USB 2.0
Minnekort SD (Secure Digital), MMC (Multimedia Card),
SDHC (Secure Digital High Capacity)
Internminne 8 MB
Bildeformat JPEG
Brukstemperatur 0 °C ~ 40 °C (ved luftfuktighet mellom 10 og 85 % RH)
Størrelse 221 x 177 x 22 mm
Page 33

33
Suomi
Digitaalinen valokuvakehys 8″
Tuotenumero 38-5196 KD0804-A15
38-5197 KD0804-A15
Lue käyttöohje ennen tuotteen käyttöönottoa ja säilytä se tulevaa tarvetta varten.
Pidätämme oikeuden teknisten tietojen muutoksiin. Emme vastaa mahdollisista tekstitai kuvavirheistä. Jos laitteeseen tulee teknisiä ongelmia, ota yhteys myymälään tai
asiakaspalveluun (yhteystiedot käyttöohjeen lopussa).
1. Tuotekuvaus
• 8”:n digitaalinen valokuvakehys, joka näyttää digitaaliset jpeg-kuvat.
• Liitäntä usb-muistille tai muistikortille (SD/SDHC/MMC).
• Mukana muuntaja ja kaukosäädin.
• Näyttää kellonajan ja kalenterin.
• Kuvaesitys ja 10 eri kuvanvaihtotapaa.
2. Pakkauksen sisältö
• Digitaalinen valokuvakehys
• Käyttöohje
• Muuntaja
• Kaukosäädin
• Tuki
Page 34

34
Suomi
3. Turvallisuus
• Varoitus! Älä avaa laitteen koteloa. Kotelon sisällä on vaarallista jännitettä
sisältäviä suojaamattomia komponentteja, jotka voivat aiheuttaa sähköiskun.
• Laitteen saa korjata vain alan ammattilainen.
• Älä pura tai muuta laitetta.
• Älä sijoita laitetta sellaiseen paikkaan, josta se voi tippua veteen tai muuhun
nesteeseen. Älä laita laitteen päälle nesteitä sisältäviä esineitä, kuten maljakoita
tai limsapulloja.
• Älä peitä ilmanvaihtoaukkoja. Älä myöskään aseta tuotetta lämpimien paikkojen
läheisyyteen, esim. lämmittimen tai tv:n päälle tai sohvalle, jossa ilmanvaihtoaukot
ovat vaarassa peittyä.
• Irrota muuntaja pistorasiasta, jos et käytä tuotetta pidempään aikaan.
• Tuote on suunniteltu 8–10 tunnin jatkuvaan käyttöön. Vältä käyttämästä sitä
pidempään yhtäjaksoisesti. Anna laitteen levähtää hetki, ennen kuin käytät
sitä uudestaan.
• Tuote on tarkoitettu vain sisäkäyttöön.
• Älä altista laitetta pitkiä aikoja suoralle auringonpaisteelle.
• Älä käytä laitetta kosteissa, pölyisissä tai likaisissa paikoissa.
• Puhdista näyttö tarvittaessa pehmeällä liinalla, joka on kostutettu miedolla
tiskiaineliuoksella.
• Älä irrota muuntajaa toiston aikana. Tämä voi vahingoittaa kehykseen liitettyä
muistia. Älä myöskään poista liitettyä muistia toiston aikana.
Page 35

35
Suomi
1
2
3
4
5
6
7
8
9
10
11
4. Painikkeet ja toiminnot
Taustapuolen painikkeet
1. [ ] Virtakytkin.
2. [▲] Siirtää osoitinta ylöspäin.
3. [►II] Aloittaa/keskeyttää kuvaesityksen tai vahvistaa valinnan.
4. [►] Siirtää osoitinta oikealle.
5. [◄] Siirtää osoitinta vasemmalle.
6. [▼] Siirtää osoitinta alaspäin.
7. [MENU] Palaa päävalikkoon tai avaa tiedostonhallinta (kopioi/poista tiedostoja).
Valokuvakehyksen oikealla sivulla
8. Liitäntä muistikortille: SD/SDHC/MS/MMC
9. Usb-liitäntä
10. DC 5 V
11. Tuen kiinnityskohta
Page 36

36
Suomi
12
14
17
20
POWER
OK
SLIDE
SHOW
SETUP
ZOOM
ROTATE
◄
▼
▲
►
EXIT
13
16
19
22
21
15
18
Kaukosäädin
12. Virtakytkin.
13. [SETUP] Kopioi tai poistaa kuvia.
14. [ROTATE] Kiertää kuvaa (pysäytystilassa, kun näytöllä yksi kuva).
Kuva kääntyy 90˚ vastapäivään joka painalluksella.
15. [▲] Siirtää osoitinta ylöspäin.
16. [ZOOM] Vaihtaa kuvakokoa (pysäytystilassa, kun näytöllä yksi kuva).
17. [◄] Siirtää osoitinta vasemmalle.
18. [OK] Aloittaa/keskeyttää kuvaesityksen tai vahvistaa valinnan.
19. [►] Siirtää osoitinta oikealle.
20. [SLIDE SHOW] Aloittaa kuvaesityksen välittömästi.
21. [▼] Siirtää osoitinta alaspäin.
22. [EXIT] Palaa päävalikkoon tai edelliseen valikkoon.
Kaukosäätimen pariston vaihtaminen
1. Vedä ulos paristonpidike.
2. Aseta paristo lokeroon merkintöjen mukaisesti siten, että
(+)-puoli näyttää ylöspäin.
3. Työnnä paristolokero takaisin paikoilleen.
CR2025
Lithium C
3V
Page 37

37
Suomi
5. Käyttö
Valokuvakehyksen voi asettaa pöydälle tai muulle vastaavalle pinnalle.
1. Ruuvaa tuki takaosaan(11).
2. Poista näytön suojakalvo ja irrota muoviliuska kaukosäätimen paristosta.
3. Kytke muuntaja seinäpistorasiaan ja liitä DC-pistoke kehyksen DC 5 V -liitäntään.
4. Liitä valokuvakehykseen muistikortti (SD/SDHC/MC/MMC) tai usb-muisti.
5. Käynnistä valokuvakehys painamalla [
] (1) tai (12).
6. Kuvaesitys alkaa automaattisesti, mikäli laitteessa on muistikortti tai usb-muisti
(joka sisältää kuvia).
7. Avaa päävalikko painamalla kaksi kertaa [EXIT] (7): Photo (kuvat), File (muistin
sisältämät kuvat/kansiot), Calendar (kalenteri ja aika) tai Setup (asetukset).
8. Mikäli valitset Photo, saat näkyviin aloituskuvan.
9. Näytöllä näkyy liitettyjä muisteja ilmaisevat kuvakkeet. Aloita kuvien katselu
valitsemalla haluamasi muisti ja painamalla [OK] (18).
6. Päävalikko
6.1 Photo (Kuvien katseleminen pienoiskoossa)
Kuvaesitys alkaa välittömästi, kun liität laitteeseen muistikortin.
1. Avaa päävalikko painamalla kaksi kertaa [EXIT] (22).
2. Valitse Photo-kuvake (vasemmanpuoleisin) nuolipainikkeilla (17) ja (19).
3. Paina [SETUP] (13).
4. Valitse muistikortti, jossa kuvat ovat.
5. Aloita kuvaesitys painamalla [SLIDE SHOW] (20).
Page 38

38
Suomi
6. Jos haluat katsoa kuvia pienoiskoossa, paina [EXIT] (22).
7. Valitse haluamasi kuva nuolipainikkeilla (2) (4) (5) (6).
8. Näet valitun kuvan tiedot: tiedostonimen, tiedoston koon, kuvan koon ja kuvan
numeron sekä muistikortilla/usb-muistissa olevien kuvien kokonaismäärän.
9. Palaa päävalikkoon painamalla [EXIT] (22) tai aloita kuvaesitys valitsemastasi
kuvasta painamalla [OK] (18).
6.2 File (Muistissa olevien tiedostojen ja kansioiden tarkastelu)
1. Valitse liitetty muistikortti nuolipainikkeilla (17) ja (19) ja paina [OK] (18).
2. Näet muistin tiedostoja ja kansioita koskevat tiedot.
3. Voit katsella JPEG-kuvia painamalla [►II].
Page 39

39
Suomi
6.3 Calendar (Kalenteri ja aika)
a. Avaa päävalikko painamalla kaksi kertaa [EXIT] (22).
b. Siirry Calendar-kuvakkeen kohdalle nuolipainikkeilla (17) ja (19). Vahvista valinta
painamalla [OK] (18).
Aseta kalenteri ja aika seuraavalla tavalla:
a. Palaa päävalikkoon ja avaa Setup (asetukset) ja paina [OK] (18).
b. Valitse Set time/date nuolipainikkeilla (15) ja (21). Vahvista valinta painamalla
[OK] (18).
c. Merkittynä on Year (vuosi). Vahvista valinta painamalla [OK] (18). Aseta vuosi
nuolipainikkeilla (17) ja (19) (asetustilassa valittu teksti näkyy punaisena).
Vahvista valinta painamalla [OK] (18).
d. Aseta samalla tavoin kuukausi, päivä, tunnit, minuutit ja sekunnit.
e. Tallenna asetus siirtymällä kohtaan Save Time nuolipainikkeilla (15) ja (21).
Vahvista valinta painamalla [OK] (18). Poistu valikosta painamalla [EXIT] (22).
Aseta ajan näyttötapa seuraavalla tavalla:
a. Siirry kohtaan Set Time Format.
b. Vahvista valinta painamalla [OK] (18).
c. Valitse 12 tai 24 tunnin näyttötapa.
d. Vahvista valinta painamalla [OK] (18). Poistu valikosta painamalla [EXIT] (22).
Page 40

40
Suomi
6.4 Setup (Asetukset)
1. Avaa päävalikko painamalla kaksi kertaa [EXIT] (22).
2. Siirry Setup-kuvakkeen kohdalle nuolipainikkeella [►] (19).
3. Vahvista valinta painamalla [OK] (18).
4. Palaa normaaliin kuvannäyttöön tehtyäsi asetukset painamalla [EXIT] (22).
Päävalikon asetukset:
a. Language (kieli): English (enlanti), Swedish (ruotsi), Finnish (suomi) ja
Norwegian (norja).
b. Photo Sequence (kuvaesitys): Näytä kuvat järjestyksessä tai satunnaisessa
järjestyksessä.
c. Slide mode (kuvannäyttötila): 1, 3 tai 4 kuvaa.
d. Slide speed (aikaviive kuvien vaihdossa): 3 sekuntia–1 tunti.
e. Photo effect (kuvaefekti): Color (väri), Monocrom (mustavalkoinen) tai
Sepia (seepia).
f. Slide effect (kuvien vaihtotapa): Random, Split horisontal in jne.
g. Photo mode (kuvakoko): Auto fit, Optimal tai Full.
h. Display Contrast (kontrasti): Brightness (kirkkaus) Saturation (värikylläisyys) ja
Tint (sävy).
i. Set time/date (ajan ja päivämäärän asetus): ks. kohta 6.3 Calendar.
j. Set time format (ajan näyttötapa 12 tai 24 tuntia)
k. Format built-in memory (kiinteän muistin formatointi)
l. Reset setting (tehdasasetusten palauttaminen)
m. Exit (lopetus ja normaalinäyttöön paluu)
Page 41

41
Suomi
6.5 Kuvien kopioiminen, kiertäminen tai suurentaminen
1. Valitse Photo-kuvake (vasemmanpuoleisin) nuolipainikkeilla (17) ja (19).
2. Valitse haluamasi kuva nuolipainikkeilla (15) (17) (19) (21).
3. Paina [OK] (18), kun haluat nähdä koko kuvan.
4. Avaa asetusvalikko painamalla [SETUP] (13).
5. Valitse toiminto: Rotate (kierrä) tai Zoom (suurenna kuvaa).
6. Valitse haluamasi asetukset painamalla useita kertoja [OK]-painiketta (18).
7. Valitse Save Picture ja tallenna muutokset painamalla [OK] (18).
8. Palaa normaaliin kuvien katseluun painamalla [EXIT] (22).
6.6 Kuvien poistaminen
1. Valitse Photo-kuvake (vasemmanpuoleisin) nuolipainikkeilla (17) ja (19).
2. Valitse poistettava kuva nuolipainikkeilla (15) (17) (19) (21).
3. Avaa asetusvalikko painamalla [SETUP] (13).
4. Valitse toiminto: Delete File (poista merkitty tiedosto) tai Exit (keskeytä).
5. Vahvista valinta painamalla [OK] (18).
Page 42

42
Suomi
7. Huolto ja ylläpito
Pyyhi pehmeällä, kevyesti kostutetulla liinalla. Älä käytä voimakkaita puhdistusaineita
tai liuottimia.
8. Vianhakutaulukko
Vika Toimenpiteet
Laite ei käynnisty. /
Laitteessa ei näy kuvaa.
Varmista, että muuntaja on liitetty oikein.
Kaukosäädin ei toimi. • Tarkista paristo.
• Suuntaa kaukosäädin valokuvakehystä kohti siten,
ettei kaukosäätimen ja kehyksen välissä ole esteitä.
Muistikortilta lukeminen
ei onnistu.
Varmista, että laite tukee muistikortin tiedostoja.
Ks. Tekniset tiedot.
Kuvat latautuvat
eri tahtiin.
Erottelukyvyltään korkeiden kuvien latautuminen kestää
kauemmin. Matalaerottelukykyisten kuvien näyttäminen
on nopeampaa.
Suositeltu erottelukyky on 800x600 kuvapistettä.
9. Kierrätys
Kierrätä tuote asianmukaisesti, kun poistat sen käytöstä. Tarkempia kierrätysohjeita
saat kuntasi jäteneuvonnasta.
10. Tekniset tiedot
Näyttö 8″:n väri-TFT LCD (4x3)
Erottelukyky 800 (H) x 600 (V)
Tarkastelukulma 60º (vasen/oikea/vertikaalinen), 40º (horisontaalinen)
Kontrasti 500:1
Kirkkaus 250 cd/m²
Reaktioaika 20 ms
Käyttöjännite 5 V DC, 1 A muuntajan kautta (100–240 V AC, 50/60 Hz)
Usb-liitäntä USB 2.0
Muistikortin liitäntä SD (Secure Digital), MMC (Multimedia Card),
SDHC (Secure Digital High Capacity)
Kiinteä muisti 8 Mt
Kuvaformaatti JPEG
Käyttölämpötila 0–40 °C (kun ilmankosteus 10–85 % RH)
Mitat 221 x 177 x 22 mm
Page 43

43
Suomi
Page 44

Sverige
Kundtjänst Tel: 0247/445 00
Fax: 0247/445 09
E-post: kundservice@clasohlson.se
Internet www.clasohlson.se
Post Clas Ohlson AB, 793 85 INSJÖN
Norge
Kundesenter Tlf.: 23 21 40 00
Faks: 23 21 40 80
E-post: kundesenter@clasohlson.no
Internett www.clasohlson.no
Post Clas Ohlson AS, Postboks 485 Sentrum, 0105 OSLO
Suomi
Asiakaspalvelu Puh.: 020 111 2222
Sähköposti: info@clasohlson.fi
Internet www.clasohlson.fi
Osoite Clas Ohlson Oy, Annankatu 34–36 A, 00100 HELSINKI
Great Britain
Customer Service Contact number: 08545 300 9799
E-mail: customerservice@clasohlson.co.uk
Internet www.clasohlson.com/uk
Postal 10 – 13 Market Place
Kingston Upon Thames
Surrey
KT1 1JZ
 Loading...