

Page 1
MP3 Player
withRadio
Art. no. 38-4176 Model KA10
Read through the whole of the user guide before using the
player and save the guide for future reference. We cannot
accept responsibility for any errors in the text or pictures and
reserve the right to make changes to technical data. If you have
technical problems or questions, contact our customer service.
1. Safety
• Lengthy exposure to high sound volume from earphones
may damage your hearing.
• Never expose the product to direct sunlight, heat sources,
moisture or rain.
• Never subject the product to severe blows or impacts.
• Never place the product on magnets, such as a loudspeaker component.
• Never keep the player in a pocket together with other
objects such as keys.
2. Description of the product
2.1 System requirements
• Pentium 200 MHz or higher
• Windows 98SE/2000/ME/XP/VISTA
• At least 120 MB free hard disk space
• USB port
• CD reader
3. Keys and functions
3
RESET
1
2
1. Reset
2. [ ] ON/OFF switch (press and hold for 5 seconds)
3. Display
4. [ ] Back to the previous menu
5. [ ] Left/previous (hold for fast rewind)
6. [ ] Play/Pause/Confirm Press and hold to reach the main
menu. Hold down the key to deactivate the key lock.
7. Earphone socket (3.5 mm stereo)
8. [ ] Increase volume, up in a menu
9. [ ] Open function menu for each mode
10. [ ] Right/next (hold down the key for fast forward)
11. [ ] Reduce volume, down in a menu
12. MIC (microphone socket)
13. Mini-USB socket
4
5
6
10
11
12
7
MIC
13
4. Getting started
4.1 Connecting to a computer
The player can be connected and disconnected without
shutting down the computer. It is automatically assigned
a drive letter by the computer. There is no need to start
the player before file transfer.
The following installation instructions are for Windows XP
with Service Pack 2 later installed.
4.1.1 Installation/connection under Windows
XP and later
1. No extra drivers are needed.
2. Connect the USB cable supplied to a spare USB port on
the computer and then to the USB socket (13) on the player.
3. The computer automatically detects the player as
a “Removable disk” and it is displayed with its own
drive letter in “My Computer” or “Computer”.
4.1.2 Transferring files
When a connection has been established, image, music and
video files can be transferred to the player.
1. On the hard disk of the computer, select the files you want
to transfer. Right-click and choose Copy.
2. Double-click the icon for the player (e.g. drive “F”). The drive
letter may be different depending on the configuration of
the computer.
3. Right-click in the field with the player’s files and choose Paste.
Tip!
• You can also use the “drag-and-drop” function to copy or
move files between the computer and the player.
Sorting files
8
9
• The player can sort the files in alphabetical order and play
the files in that order unless some other order (e.g. random
playback) has been chosen.
4.1.3 Disconnecting the player
1. Double-click the Safely remove hardware icon in
the status tray.
4.2 Charging the battery
The player has a built-in rechargeable battery. The battery
symbol in the top right corner shows the status of the battery.
When the symbol shows empty, the battery needs to be
charged. Use the USB cable supplied. The recommended
charging temperature is 0 °C to 35 °C.
1. Connect the USB cable supplied to a spare USB port on
the computer and then to the USB socket on the player.
2. When the battery symbol is filled with white squares,
the battery is fully charged.
Fully charged Discharged
Important:
• Fully charge the battery before using the player for
the first time.
• It takes about four hours to charge the battery fully.
• Charge the battery immediately when the display
shows “Low Battery”.
• Disconnect the USB cable when the battery is fully charged.
Overcharging the battery shortens its life.
• The battery may become discharged if the player is not
used for a long period (more than three months). Charge
the battery fully every three months to make sure that it
does not become discharged.
5. Basic instructions for use
5.1 Switching the player on and off
Switch on – Press and hold [ ] (2) for about five seconds.
Switch off – Press and hold [ ] for about five seconds.
Note:
• If the player is being switched on for the first time after
a reset, you need to choose the display language with
[ ] (8) and [ ] (11), then press [ ] (6) to confirm.
• When the player is connected to the computer, the player
can be switched off by pressing and holding [ ] (2).
5.2 Adjusting the volume
Press [ ] (8) to increase the volume and [ ] (11) to reduce it.
5.3 Preparations
• Transfer the files you want as described in
4.1.2 Transferring files.
• Check that the battery is charged and that the earphones
are connected to one of the earphone sockets.
• If the player is off, press and hold [ ] (2) for 5 secondsto
power it on.
6. Use
Main menu options:
1. Press and hold [ ] (6) to go the main menu from
an application.
2. Use [ ] (8) and [ ] (11), to scroll through the menu
options: music, video, FM radio, photo, e-book, voice,
file browse and setup.
3. Press [ ] (6) to confirm and choose the selected function.
4. To exit, press and hold [ ] (2).
1. Music: Play music.
2. Video: Play a video.
3. FM Radio: Listen to and record from radio.
4. Photo: Show photos.
5. E-Book: Text file reader.
6. Voice: Record and play back voices.
7. File Browse: View all files.
8. Setup: Settings.
6.1 Music
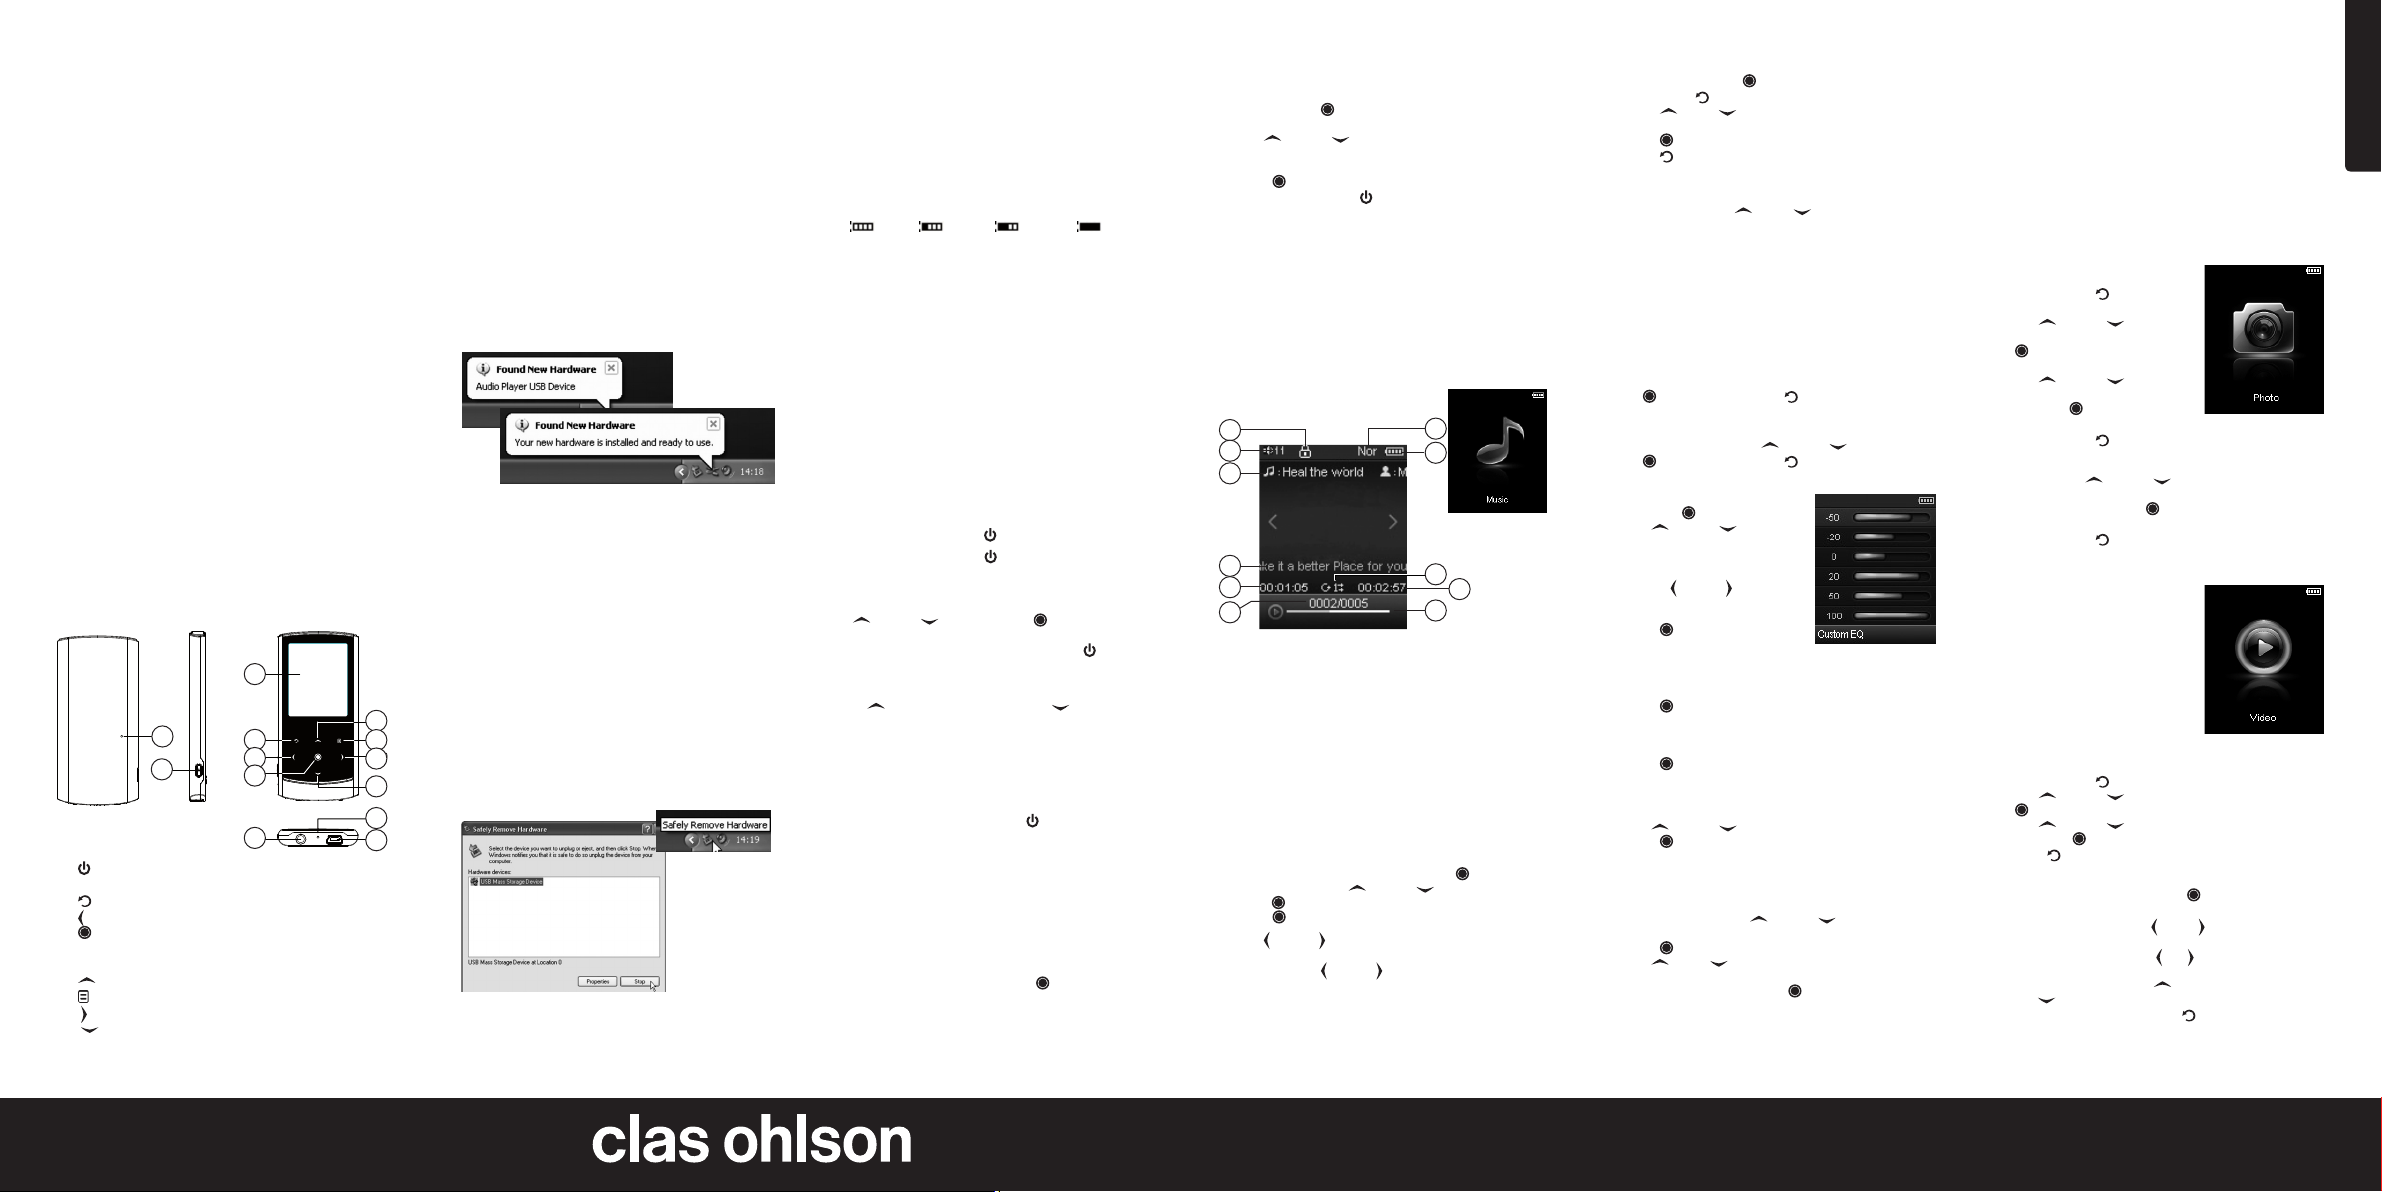
6.1.1 Explanation of the display
1
2
3
4
5
6
1. Key lock activated
2. Volume indicator
3. Function/file information for the current track
(file name/ID3 tag).
4. Title
5. Played time
6. Current track number/total number of tracks
7. Equalizer
8. Battery level
9. Repeat mode
10. Total time
11. Progress indicator
7
8
9
10
11
6.1.2 Playback
2. Select USB mass storage unit and click Stop.
3. The player can now be removed from the USB port.
NOTE: Do not unplug the player from the USB port while data
is being written to or from the memory as this might damage
the built-in flash memory.
5.4 Key lock
The key lock prevents any unwanted pressing of the keys.
The key lock is activated automatically after three minutes.
The key lock activation time can be set manually at: Setup/
Hold Time – choose an activation time between 10 seconds
and five minutes.
NOTE: If you press a key when the key lock is active,
“Key Locked” is displayed. Hold down [ ] (6) to deactivate
the key lock.
5.5 Resetting
If the player needs resetting, insert a pointed object in
the reset hole (1).
1. Go to the main menu and press and hold [ ] (6).
2. Choose MUSIC with [ ] (8) and [ ] (11) and
press [ ] (6) to confirm.
3. Press [ ] to start or pause playback.
• Use [ ] (5) and [ ] (10) to choose the track
you want.
• Press and hold [ ] (5) and [ ] (10) for fast forward
or fast rewind.
6.1.3 Opening the function menu
1. In music mode: Press [ ] (6) once to open the function
menu. Press [ ] (4) to exit the function menu.
2. Press [ ] (8) or [ ] (11) to choose Repeat Mode,
Equalizer, 3D, Play Rate, File Browse or Classification.
3. Press [ ] to confirm your choice.
4. Press [ ] (4) to quit and return to the previous menu.
Explanation of the function the menu:
REPEAT MODE – to repeat one track, all tracks or a folder.
Random playback. Use [ ] (8) or [ ] (11)
to choose between:
• No Repeat (play all tracks in the correct order
without repeats).
• Repeat One (repeat the current track).
• Repeat All
• Shuffle All (repeat all tracks in random order).
• Folder Normal (play all tracks in the folder in
the correct order).
• Folder All Repeat (repeat all tracks in the folder).
• Folder Shuffle All (repeat all tracks in the folder
in random order).
Press [ ] (6) to confirm or press [ ] (4) to go back.
EQUALIZER – Choose from six preset sound profiles:
Normal, Pop, Rock, Classic, Bass or Custom EQ (configure
your own sound profile). Use [ ] (8) and [ ] (11) to choose.
Press [ ] (6) to confirm or press [ ] (4) to go back.
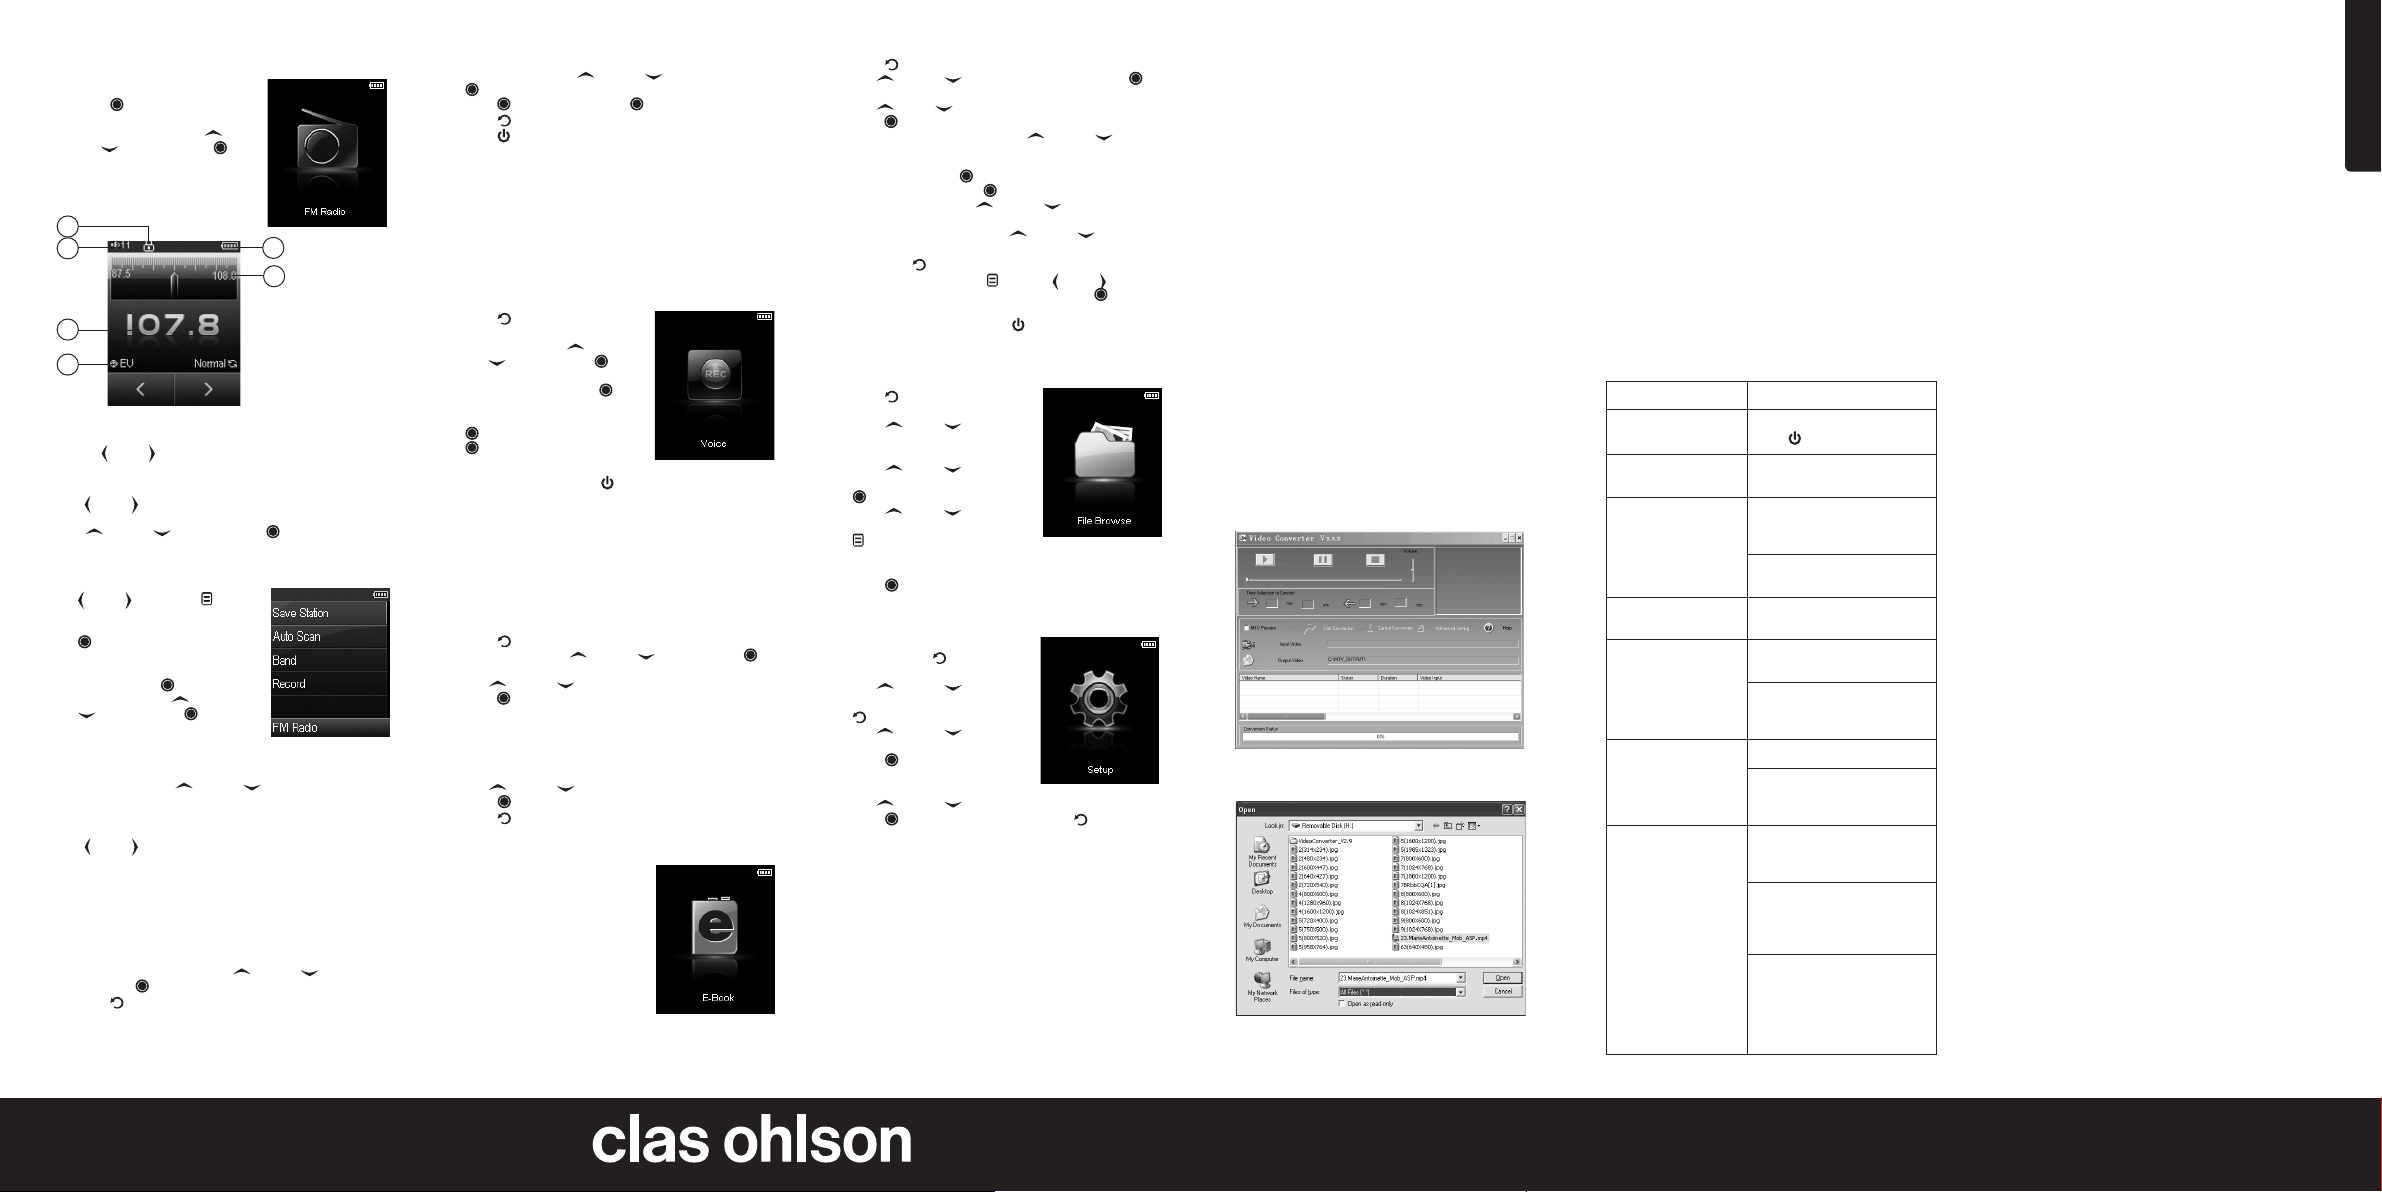
Configuring your own sound profile (Custom EQ):
1. Choose the Custom EQ option
and press [ ] to confirm.
2. Use [ ] (8) and [ ] (11) to
select the bar (frequency range)
you want to change.
3. Change the value of the bar
with the [ ] (5) and [ ] (10) keys.
4. Follow the same procedure to
set the other bars.
5. Press [ ] (6) to save
your settings.
3D – 3D effect (gives the sound a feeling of space)
1. Choose Off or On.
2. Press [ ] (6) to save your settings.
PLAY RATE – Choose play rate
1. Choose 1.00X – 1.14X – 1.33X – 0.67X – 0.80X
2. Press [ ] to save your settings.
NOTE: Play Rate does not work with WMA format.
FILE BROWSE
1. Use [ ] (8) and [ ] (11) to choose the file you want.
2. Press [ ] (6) to play the chosen file.
CLASSIFICATION – Classify songs by genre, artist, album,
and title.
1. If you are using this function for the first time, choose
Classification and use [ ] (8) and [ ] (11)
to select Yes. Then choose Refresh.
2. Press [ ] (6) to confirm and open the settings.
3. Use [ ] (8) or [ ] (11) to select the classification
method you want: Genre, Artist, Album and Title.
4. When you have finished, press [ ] to save your settings.
6.2 Lyrics
This player supports the display of lyrics during playback. Only
lyrics in LRC format can be displayed. Add lyrics as follows:
1. Download associated lyrics in “.lrc” format from the internet.
2. Makes sure that the lyrics have the same name as
the music file.
3. Copy both files to the same folder on the player.
4. The lyrics appear on the display when the track is played.
6.3 Photo viewer
The photo viewer can display images in the following formats:
jpg or bmp.
6.3.1 Viewing
1. Press and hold [ ] (4) to reach
the main menu.
2. Use [ ] (8) and [ ] (11)
to choose Photo, then press
[ ] (6). A list of the photo files
appears on the screen.
3. Use [ ] (8) and [ ] (11)
to choose a folder or an image
and press [ ] to view
the image.
4. Press and hold [ ] (4) to return to the main menu.
While viewing images you can:
• Scroll: Press [ ] (8) and [ ] (11) to go to the previous
or next image.
• Play a slideshow. Press [ ] (6) to view the images
as a slideshow.
• Press and hold [ ] (4) to return to the previous menu.
6.4 Video
The built-in video player can
play back video files in MTV
format. Video files can be
converted to MTV format with
the conversion software on
the CD supplied.
See Section 7. Converting
video files.
6.4.1 Playback
1. Press and hold [ ] (4) to reach the main menu.
2. Use [ ] (8) and [ ] (11) to choose VIDEO, then press
[ ] (6). The list of videos appears on the screen.
3. Use [ ] (8) and [ ] (11) to choose a folder or a video,
then press [ ] to open the folder or play the file.
4. Press [ ] (4) to go back.
While playing a video you can:
• Pause/resume playback: Press [ ] (6) to pause playback.
Press again to resume playback.
• Change the video: Press [ ] (5) or [ ] (10) to go to
the previous/next video.
• Fast wind: Press and hold [ ] or [ ] to fast-forward or
fast-rewind a video.
• Adjust the volume: Press [ ] (8) to increase the volume
and [ ] (11) to reduce it.
• Stop playback: Press and hold [ ] (4) to return to the list
in the menu.
English
Ver. 201106
GREAT BRITAI N •
for consu mer conta ct, please visit www. clasohlso n.co.uk and click on customer s ervice.
Page 2
6.5 FM Radio
6.5.1 Listening to the radio
1. Press [ ] (6) to go to
the main menu.
2. Choose FM RADIO with [ ] (8)
and [ ] (11), then press [ ].
6.5.2 Explanation of
the display
1
2
3
4
6.5.3 Manual channel search
• Use [ ] (5) or [ ] (10) to search for channels manually.
6.5.4 Radio functions
Use [ ] (5) or [ ] (10) to choose functions (in radio mode):
Save Station, Auto Scan, Band, Record. Choose a function
with [ ] (8) and [ ] (11), then press [ ] (6) to confirm.
SAVE STATION (to save a manually set station)
1. Go to the frequency you want with
[ ] (5) or [ ] (10). Press [ ] (9)
to open the submenu.
2. Choose Save Station and press
[ ] to confirm. Saved stations
are displayed.
3. Go to the program number you
want and press [ ] (6) to confirm.
4. Choose YES with [ ] (8) and
[ ] (11) and press [ ] (6)
to confirm.
AUTO SCAN (automatic channel search)
Go to Auto Scan with [ ] (8) and [ ] (11). An automatic
search for the strongest signals starts. The display shows
“Searching…” during the scan.
Up to 20 stations are saved automatically as CH01 – CH20.
Use [ ] (5) or [ ] (10) to scroll through them.
BAND (frequency range/region)
You will need to choose the correct frequency range/region,
depending on where the player is being used:
US (87.5-108.0 MHz)
Europe (87.5-108.0 MHz)
Japan (76.0-90.0 MHz)
1. Go to the relevant region with [ ] (8) and [ ] (11),
then press [ ] (6) to confirm.
2. Press [ ] (4) to go back.
5
6
1. Key lock indicator
2. Volume
3. The set frequency
4. FM region
5. Battery status
6. Frequency display
Record (from radio)
1. Choose Record with [ ] (8) and [ ] (11), then press
[ ] (6) to confirm.
2. Press [ ] to pause, then press [ ] again to start recording.
3. Press [ ] (4) to go return to recording.
4. Press [ ] (2) to save the recording and resume listening
to the radio.
NOTE:
• The recorded files are saved as WAV files in the player’s
FM folder and can be played back in VOICE mode.
• FM recording stops automatically if the memory is full or
if the battery is too low. The date is saved automatically.
• Volume control is not available during recording.
6.6 Voice recording
To record a voice
1. Press [ ] (4) to go to
the main menu.
2. Choose Voice with [ ] (8)
and [ ] (11) and press [ ] (6)
to confirm.
3. Go to Record, and press [ ]
to start recording.
• Pause/resume recording: Press
[ ] to pause recording. Press
[ ] again to resume recording.
• Save the recording: Press [ ] (2) to save the recording and
go back to voice recording mode.
Note:
• The recorded voice files are saved as WAV files in the player’s
VOICE folder (format: MIC00001.WAV, MIC00002.WAV…).
• Recording stops immediately when the memory is full or
when the battery is too low. Already recorded data and
dates are saved automatically.
Setting playback quality (Record Setting)
1. Press [ ] (4) to go to the main menu.
2. Choose Setup with [ ] (8) and [ ] (11) and press [ ]
(6) to confirm. The SETUP menu appears on the screen.
3. Use [ ] (8) and [ ] (11) to choose Record Setting and
press [ ] (6) to confirm.
The follow options are displayed:
• Long Time: Uses least memory, normal quality.
• Normal Quality: Uses less memory, better quality.
• High Quality: Uses lots of memory, best quality.
4. Use [ ] (8) and [ ] (11) to choose an option.
5. Press [ ] to confirm your choice.
6. Press [ ] to return to the main menu.
6.7 E-Book (text display )
The player can display files in text
format (.txt). Other formats must
be converted to text format before
you transfer them to the player.
NOTE:
When you close the E-Book
function, the player remembers
which page you were on and
opens that page the next time
you choose E-Book.
1. Press [ ] (4) to go to the main menu.
2. Use [ ] (8) and [ ] (11) to choose E-Book. Press [ ]
(6) to confirm.
3. Use [ ] (8) or [ ] (11) to choose a folder and a file, then
press [ ] to open the folder and see the chosen files.
4. To return to the main menu press [ ] (8) and [ ] (11).
When you are reading and E-Book you can use:
• Auto Paging: Press [ ] (6) to start automatic page turning
every six seconds. Press [ ] again to stop the function.
• Page Up/Down: Press [ ] (8) and [ ] (11) to change
the page.
• Fast Browse: Press and hold [ ] (8) and [ ] (11)
for fast forward or back.
• Exit: Press [ ] (4) to go back.
• E-Book Function Menu: [ ] (9). Use [ ] (5) or [ ] (10) to
choose a percentage (of the book), then press [ ].
The player shows the page that corresponds to the specified
percentage of the book. Press [ ] (2) to quit and return to
the previous menu.
6.8 File Browse
1. Press [ ] to go to the main
menu.
2. Press [ ] (8) or [ ] (11) and
choose File Browse. The file list
appears on the display.
3. Press [ ] (8) or [ ] (11) and
choose the file you want. Press
[ ] (6) to open the file.
4. Press [ ] (8) or [ ] (11) and
select the file you want. Press
[ ] (9) to delete the file.
5. Delete: choose YES (to delete the file) or NO (to quit
without deleting).
6. Press [ ] to confirm your choice.
6.9 SETUP
1. In standby or playback mode,
press and hold [ ] (4) to reach
the main menu.
2. Use [ ] (8) and [ ] (11)
to choose SETUP, then press
[ ] (4).
3. Use [ ] (8) and [ ] (11)
to choose a SETUP option.
4. Press [ ] (6) to open the
submenu.
5. Use [ ] (8) and [ ] (11) to adjust.
6. Press [ ] to confirm your choice or press [ ] to go back
without confirming.
Description of settings
POWER (specify when the player should shut down automatically if inactive). Choose from Auto Off: 15, 30, 60, 90 and 120
minutes and Always On.
LANGUAGE (specify menu language). Choose a language for
the display. English is the default.
DISPLAY
Brightness: Low, Medium, High or Maximum.
Backlight: 15, 30 seconds, 1 minute or Close = always on.
RECORD SETTING (set recording quality): Long Time (lowest
quality), Normal Quality or High Quality).
SYSTEM TOOLS
• Delete: Delete a file
• Format: Format memory (this deletes all files)
• Reset: restore factory settings
• System Info: Show firmware version of the player
and free memory
• Refresh: update playlist
• File Sort: sort all files
NOTE: Before formatting the player’s memory, back up the files
to a computer, DVD etc., since the formatting process deletes
all files on the player.
7. Converting video files
The built-in video player can play back video files in MTV format.
The file formats AVI, WMV, MEPG1, Quick Time, MPEG2,
RealMedia, MPEG4 and 3GP can be converted using
the conversion software provided.
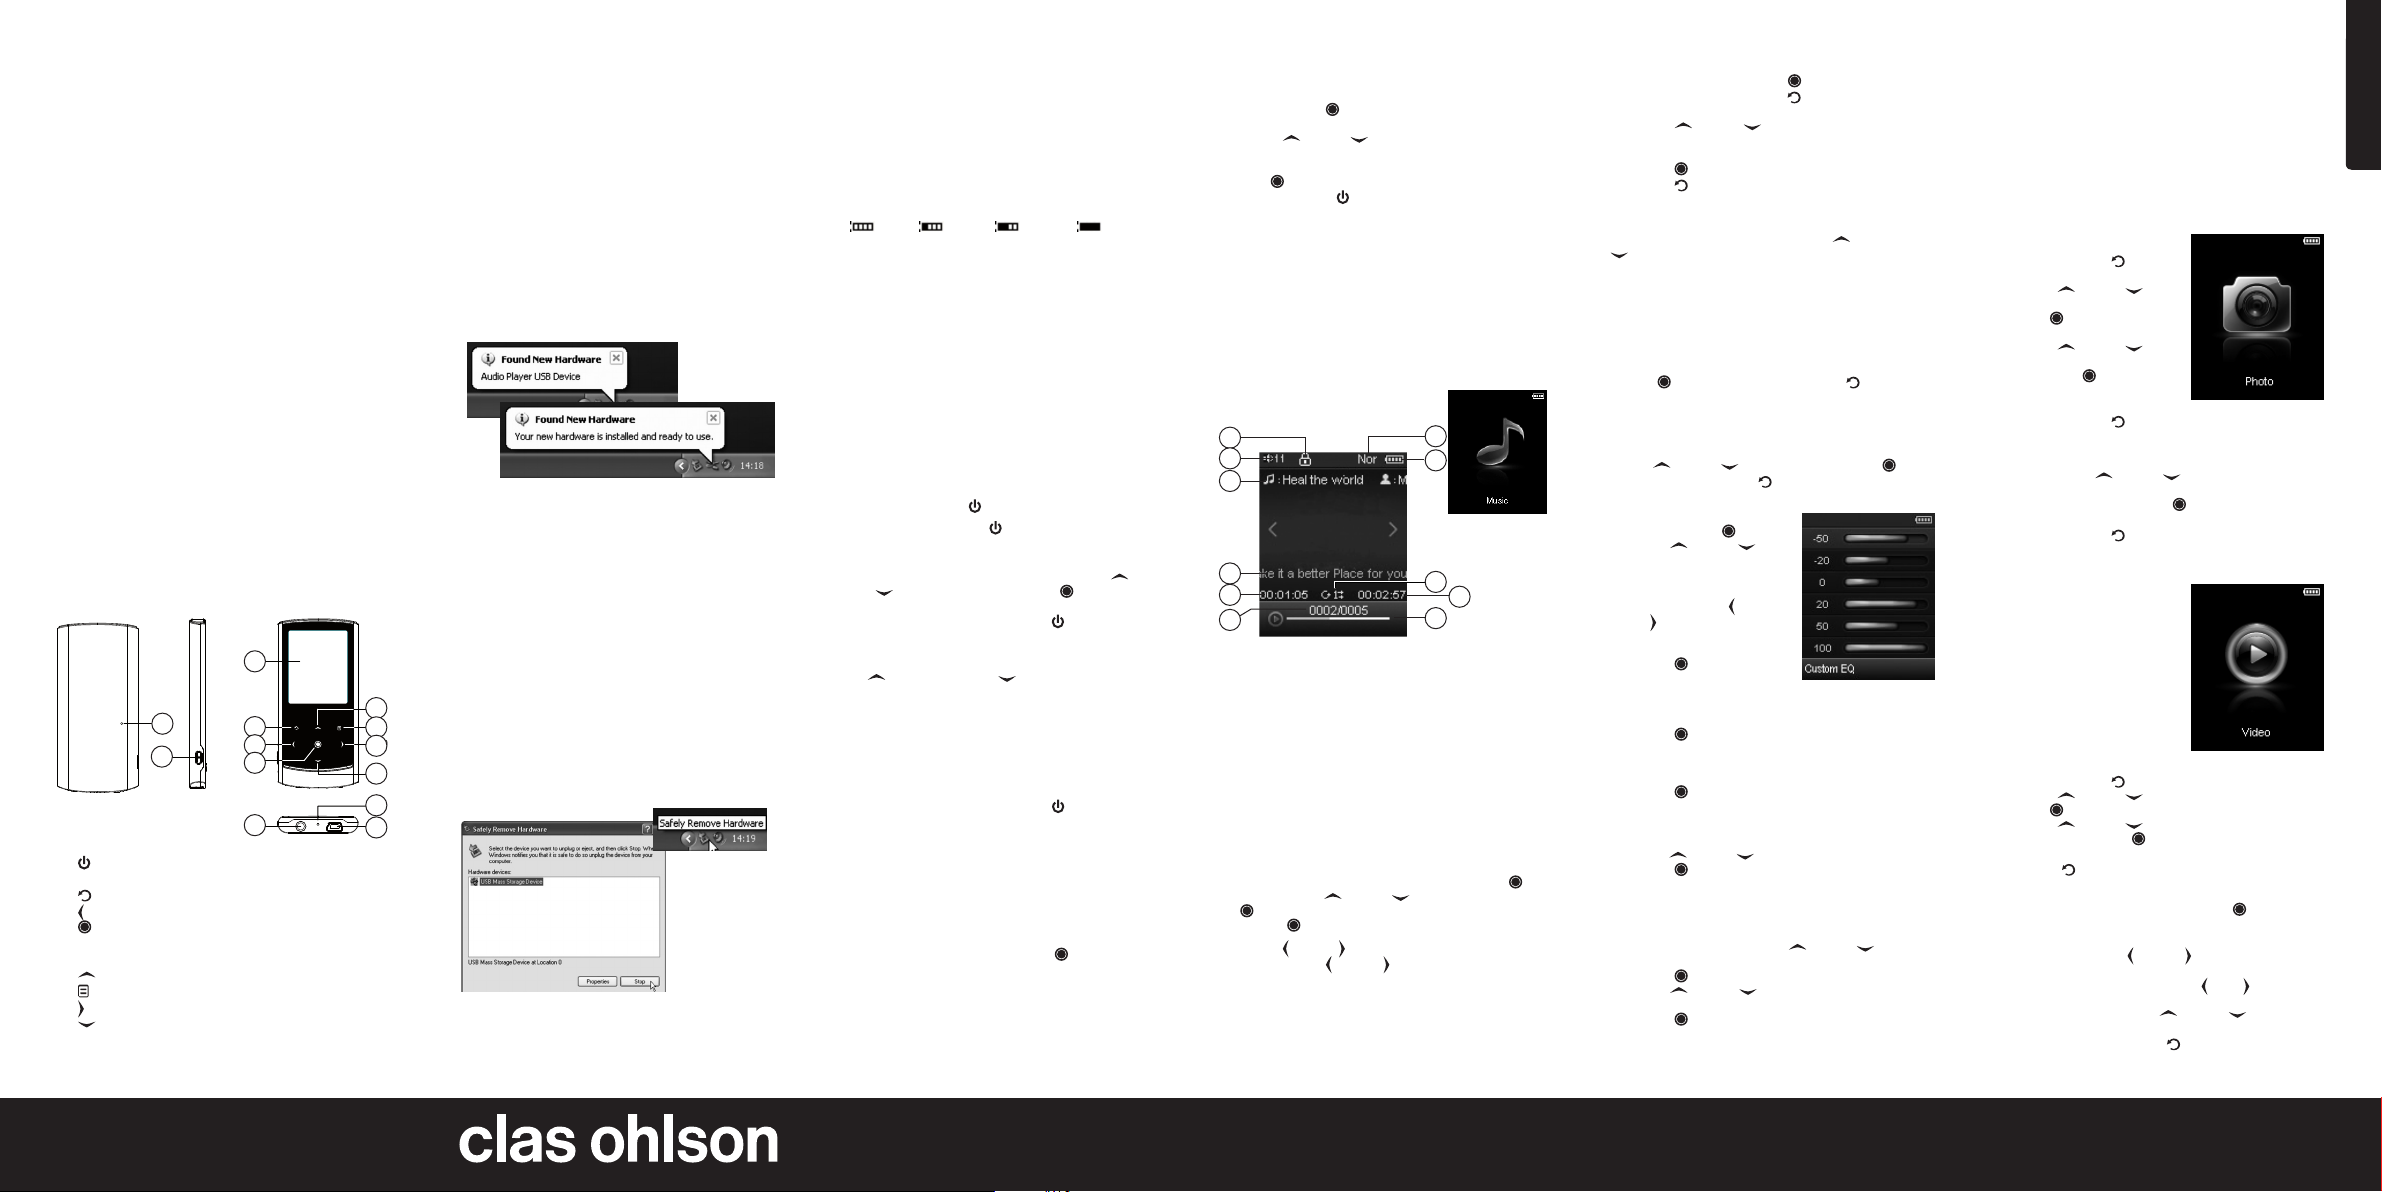
7.1 Starting the conversion program
1. Insert the CD supplied in the CD reader of the computer.
2. Double-click VideoConvert.exe in the MTV Video Converter
folder on the CD. The conversion window appears.
7.2 Converting a video clip
1. Start the program as described above.
2. Click on Input Video and choose files from the list.
NOTE: To add MP4 files, choose All Files (*.*) in the “Files of
type” box. MP4 files are then also displayed in the Open box.
Conversion
Open box
3. Click on Output Video and choose a folder in which
the files will be saved.
4. Click on Advanced Setting. Choose 160 x 128 in
the Output Frame Size box and choose MTV in
the Output Format box.
5. Click on Start Conversion.
For detailed instructions click Help.
NOTE:
To make your video playable you must choose 160 x 128 or
smaller in the Output Frame Size box (Advanced Setting),
otherwise the “Device Not Supported” message will appear on
the screen when you play the file.
NOTE: You must install the relevant codecs before you can run
“VideoConvert.exe”, otherwise the system will display “Load
Video Failed!” when you attempt to convert files. Click OK and
download the codecs from the internet.
• Codecs are not supplied.
8. Troubleshooting
Problem Solution
The player will not start. Charge the battery.
You can’t transfer files
to the player.
No sound in the
earphones.
You can’t record from
radio or microphone.
The text on the display
is not displayed
correctly.
The keys do not work. The key lock is active.
Radio reception poor. Check that the earphones are
Hold [ ] (2) for at least 5 seconds.
Check the connection between
the player and the computer.
Check the volume setting and
make sure that the earphones
are properly connected.
Check that the audio format is
supported by the player.
Check that there is sufficient
free memory.
Check that you have chosen
the right language.
Reset the player by using an
object such as the end of a paperclip to press the RESET button.
Reset the player by using an object such as the end of a paperclip to press the RESET button.
properly connected. The earphone lead acts as a radio aerial.
Adjust the position of the player
and the earphones. Move to
a different location where the
reception is better.
Electrical appliances close to the
player may affect radio reception. Switch off any appliances
that are causing interference
or move further away from the
source of the interference.
9. Care and maintenance
Wipe with a soft, damp cloth. Do not use solvents or
cleaning agents.
10. Waste management
When the time comes to dispose of the product, do so in
accordance with local regulations. If you are unsure how to
proceed, ask your local authority.
11. Specifications
Display 1.44″, CSTN Colour
Resolution 160 x 128
Music formats MP3/WAV/WMA
Image formats JPG/BMP
Video format MTV
MP3 bit rate 8–320 kbps
WMA bit rate 5–320 kbps
Recording format WAV
Frequency range 20 Hz – 20 kHz
S/N level > 80 dB (30K filter)
Distortion < 0.2 %
Dynamics 15 mA
Storage Air humidity < 90 %
Temperature -20 to +60 °C
Use Air humidity < 85 %
Temperature -10 to +40 °C
EQ Normal/Pop/Rock/Classic/Jazz/Bass/
Custom EQ/3D
Power supply Built-in rechargeable battery, 170 mAh
(up to nine hours music playback or
three hours video)
Memory 4 GB
Size 84 x 40 x 8 mm
Weight approx 24.2 g (without accessories)
English
Ver. 201106
GREAT BRITAI N •
for consu mer conta ct, please visit www. clasohlso n.co.uk and click on customer s ervice.
Page 3
MP3-spelare
med radio
Art. nr 38-4176 Modell KA10
Läs igenom hela bruksanvisningen före användning och spara
den sedan för framtida bruk. Vi reserverar oss för ev. text- och
bildfel samt ändringar av tekniska data. Vid tekniska problem
eller andra frågor, kontakta vår kundtjänst.
1. Säkerhet
• Långvarig exponering av hög ljudvolym från hörlurar kan
orsaka skador på din hörsel.
• Utsätt aldrig produkten för direkt solljus, värmekällor,
fukt eller regn.
• Utsätt aldrig produkten för hårda stötar eller slag.
• Placera aldrig produkten på magneter, t.ex. ett
högtalarelement.
• Förvara ej spelaren i fickan tillsammans med
andra föremål, t.ex. nycklar.
2. Produktbeskrivning
2.1 Systemkrav
• Pentium 200 MHz eller högre
• Windows 98SE/2000/ME/XP/VISTA
• Minst 120 MB ledigt diskutrymme
• USB-port
• CD-läsare
3. Knappar och funktioner
3
RESET
1
2
1. Reset (återställning)
2. [ ] Strömbrytare ON/OFF (tryck och håll in i 5 sekunder).
3. Display
4. [ ] Återgå till föregående meny.
5. [ ] Vänster/föregående (håll in för att snabbspolning bakåt).
6. [ ] Play/Paus/Bekräfta. Tryck och håll in för att komma till
huvudmenyn. Håll in knappen för att avaktivera knapplåset.
7. Anslutning för hörlurar (3,5 mm stereo).
8. [ ] Höjer volymen, uppåt i menyn.
9. [ ] Öppna funktionsmeny för varje läge.
10. [ ] Höger/nästa (håll in knappen för snabbspolning framåt).
11. [ ] Sänker volym, neråt i menyn.
12. MIC (mikrofonanslutning)
13. Mini-USB-anslutning
4
5
6
7
MIC
4. Komma igång
4.1 Anslutning till dator
Spelaren kan anslutas och kopplas ifrån utan att stänga av
datorn. Den tilldelas automatiskt en enhetsbokstav av datorn.
Spelaren behöver inte startas innan filöverföring.
Följande installationsanvisning gäller för Windows XP med
servicepack 2 och senare installerat.
4.1.1 Installation/anslutning under Windows
XP och senare
1. Inga extra drivrutiner behövs.
2. Anslut medföljande USB-kabel till en ledig USB-port på
datorn och sedan till USB-anslutningen (13) på spelaren.
3. Datorn känner automatiskt av spelaren som en ”Flyttbar
disk” och den visas med egen enhetsbokstav
i ”Den här datorn”.
4.1.2 Överföring av filer
När en anslutning gjorts kan bild-, musik- och videofiler
överföras till spelaren.
1. Markera önskade filer som finns på datorns hårddisk.
Högerklicka och välj Kopiera.
2. Dubbelklicka på ikonen för spelaren (t.ex. ”F”). Enhetsbeteckningen kan skilja beroende på datorns konfigurering.
3. Högerklicka i fältet med enhetens filer och välj Klistra in.
Tips!
• Du kan även använda drag och släpp-funktionen för att
kopiera eller flytta filer mellan dator och spelare.
Sortering av filer
8
9
10
11
12
13
• Spelaren kan sortera filerna i bokstavsordning och spelar
upp filerna i denna ordning om ingen annan spelordning
valts (slumpmässig uppspelning).
4.1.3 Koppla ifrån spelaren
1. Dubbelklicka på ikonen Säker borttagning av maskinvara
i statusfältet.
2. Markera USB-masslagringsenhet och klicka sedan på Stop.
3. Spelaren kan nu avlägsnas från USB-porten.
Obs! Ta inte bort spelaren från USB-porten när skrivning pågår
till eller från minnet, det inbyggda flashminnet kan skadas.
4.2 Laddning av batteriet
Spelaren har ett inbyggt laddningsbart batteri. Batterisymbolen
i displayens högra hörn indikerar batteriets status. När symbolen visas som tom är det dags att ladda batteriet. Laddningen
sker via medföljande USB-kabel. Rekommenderad laddningstemperatur är 0 °C –35 °C.
1. Anslut USB-kabeln till en ledig USB-port på datorn och
sedan till USB-anslutningen på spelaren.
2. När batterisymbolen visas fylld med vita kvadrater är
batteriet fulladdat.
Fullt uppladdat Urladdat
Viktigt:
• Ladda batteriet fullt före första användning.
• Det tar cirka 4 timmar att ladda batteriet helt.
• Ladda spelaren omgående när meddelandet
”Low Battery” visas i displayen.
• Ta bort USB-kabeln när spelaren är fulladdad.
Överladdning av batteriet förkortar batteriets livslängd.
• Batteriet kan laddas ur om spelaren inte används under en
längre period (mer än 3 månader). För att undvika urladdning
bör spelaren laddas fullt varannan eller var
tredje månad.
5. Grundläggande användning
5.1 Slå på och stänga av spelaren
Slå på – Tryck och håll in [ ] (2) i ca fem sekunder.
Stänga av – Tryck och håll in [ ] i ca fem sekunder.
Observera:
• Om det är första gången spelaren slås på efter återställning
måste man välja displayspråk genom att använda [ ] (8)
och [ ] (11), och sedan bekräfta med [ ] (6).
• När spelaren är ansluten till datorn kan man också stänga av
spelaren genom att trycka och hålla in [ ] (2).
5.2 Justera ljudvolymen
Tryck [ ] (8) för att höja och [ ] (11) för att sänka
ljudvolymen.
5.3 Förberedelser
• För över önskade filer till spelaren enligt avsnitt
4.1.2 Överföring av filer.
• Kontrollera att batteriet är laddat och hörlurarna är
anslutna till någon av hörlursanslutningarna.
• Är spelaren avstängd, tryck och håll in [ ] (2) i fem
sekunder för att starta spelaren.
5.4 Knapplås
Knapplåset förhindrar oönskade knapptryckningar. Automatisk
aktivering av knapplås efter 3 minuter. Det går också att ställa
in aktiveringstiden för knapplåset manuellt i ”Setup/Hold Time”.
Välj aktiveringstid mellan 10 sekunder och 5 minuter.
Obs! När knapplåset är aktiverat visas ”Key Locked” om
du trycker på någon av knapparna. Håll in [ ] (6) för
att avaktivera knapplåset.
5.5 Återställning
Om spelaren behöver återställas, använd ett spetsigt föremål
och tryck in resetknappen (1).
6. Användning
Förklaring av de olika menyvalen i huvudmenyn:
1. Tryck och håll in [ ] (6) för gå till huvudmenyn från
en applikation.
2. Använd [ ] (8) och [ ] (11), för att bläddra bland
menyvalen: music, video, fm radio, photo, e-book, voice,
file browse och setup.
3. Tryck [ ] (6) för att bekräfta och välja markerad funktion.
4. Tryck och håll ned [ ] (2) för att gå ur.
1. Music: Uppspelning av musik
2. Video: Uppspelning av video
3. FM Radio: Lyssna på radio samt inspelning från radio
4. Photo: Visa bilder
5. E-Book: Läsare för textfiler
6. Voice: Uppspelning och inspelning av röster
7. File Browse: Se alla filer
8. Setup: Inställningar
6.1 Music (musik)
6.1.1 Förklaring av displayen
1
2
3
4
5
6
1. Knapplåset aktiverat
2. Volymindikator
3. Funktions-/filinformation för aktuellt spår
(filnamn/ID3-tag)
4. Titel
5. Uppspelad tid
6. Aktuellt spårnummer/totalt antal spår
7. Equalizer
8. Batterinivå
9. Repetitionsläge
10. Total tid
11. Förloppsindikator
6.1.2 Uppspelning
1. Gå in i huvudmenyn genom att trycka och hålla ned [ ] (6).
2. Välj Music med [ ] (8) och [ ] (11) och bekräfta med
[ ] (6).
3. Tryck på [ ] för att starta eller pausa uppspelning.
• Använd [ ] (5) och [ ] (10), för att välja önskat spår.
• Tryck och håll in [ ] (5) eller [ ] (10) för att snabbspola
bakåt eller framåt.
7
8
9
10
11
6.1.3 Öppna funktionsmenyn
1. I musikläget: Tryck en gång på [ ] (6) för att öppna
funktionsmenyn. Tryck igen på [ ] (4) om du vill gå
ur funktionsmenyn.
2. Tryck på [ ] (8) eller [ ] (11), för att välja mellan
Repeat Mode, Equalizer, 3D, Play Rate, File Browse
och Classification.
3. Tryck på [ ] för att bekräfta.
4. Tryck på [ ] (4) för att avsluta och återgå till förra menyn.
Förklaring av funktionsmenyn:
REPEAT MODE – Repetition av ett spår, alla spår eller en
mapp. Slumpmässig uppspelning. Använd [ ] (8) eller
[ ] (11), för att välja mellan:
• No Repeat (spela upp alla spår i rätt ordning utan repetition).
• Repeat One (repetera pågående spår).
• Repeat All (repetera alla).
• Shuffle All (repetera alla spår i slumpvis ordning).
• Folder Normal (spela upp alla spår i mappen i rätt ordning).
• Folder All Repeat (repetera alla spår i mappen).
• Folder Shuffle All (alla spår i mappen i slumpvis ordning).
Tryck på [ ] (6) för att bekräfta eller tryck på [ ] (4) för
att gå tillbaka.
EQUALIZER – Välj mellan 6 förinställda ljudscheman:
Normal, Pop, Rock, Classic, Bass eller Custom EQ
(konfigurera ett eget ljudschema).
Använd [ ] (8) och [ ] (11) för att välja. Tryck på [ ] (6)
för att bekräfta eller tryck på [ ] (4) för att gå tillbaka.
Konfigurera ett eget ljudschema, ”Custom EQ”:
1. Välj alternativ Custom EQ
och bekräfta med [ ].
2. Använd [ ] (8) och [ ]
(11) för att markera den stapel
(frekvensområde) du vill ändra.
3. Ändra stapelns värde med
hjälp av knapparna [ ] (5)
och [ ] (10).
4. Fortsätt på samma sätt för att
ställa in övriga staplar.
5. Tryck på [ ] (6) för att spara
inställningarna.
3D – 3D-effekt (ger ljudet rymdeffekt).
1. Välj Off (avstängd) eller On (aktiverad).
2. Tryck på [ ] (6) för att spara inställningarna.
PLAY RATE – Välj uppspelningshastighet
1. Välj 1,00x – 1,14x – 1,33x – 0,67x – 0,80x
2. Tryck på [ ] för att spara inställningarna.
Observera: Play Rate fungerar inte i WMA-format.
FILE BROWSE – Visa filer.
1. Använd [ ] (8) och [ ] (11) för att markera önskad fil.
2. Tryck på [ ] (6) för att spela upp den valda filen.
CLASSIFICATION – Klassificera låtar genom genre, artist,
album, och titel.
1. Om det är första gången som du använder denna funktion,
välj Classification och använd [ ] (8) och [ ] (11) för att
markera Yes. Välj sedan Refresh.
2. Tryck på [ ] (6) för att bekräfta och öppna inställningarna.
3. Använd [ ] (8) eller [ ] (11) för att markera önskad
klassificeringsmetod: Genre, Artist, Album och Titel.
4. Tryck på [ ] för att spara inställningarna när du är klar.
6.2 Lyrics (texter)
Denna spelare stödjer textvisning under uppspelning. Endast
texter i LRC-format kan visas. För att lägga till texter, gör så här:
1. Ladda ned tillhörande texter från internet av typen ”.lrc”.
2. Se till att texten har samma namn som musikfilen.
3. Kopiera båda filerna till samma mapp på spelaren.
4. Texten visas på displayen under uppspelning.
6.3 Photo (bildvisare)
Bildvisaren kan visa bilder med formaten: jpg eller bmp.
6.3.1 Visning
1. Tryck och håll ned [ ] (4) för
att komma till huvudmenyn.
2. Använd [ ] (8) och [ ] (11)
för att välja Photo och tryck
sedan [ ] (6). En lista på
fotofilerna visas på skärmen.
3. Använd [ ] (8) och [ ] (11)
för att välja en mapp eller bild
och tryck på [ ] för att visa
bilden.
4. Tryck och håll ned [ ] (4) för att komma tillbaka till
huvudmenyn.
Under tiden som du tittar på bilder kan du:
Bläddra: Tryck på [ ] (8) och [ ] (11) för att gå till före-
gående eller nästa bild.
Spela upp ett bildspel: Tryck på [ ] (6) för att visa bilderna
som ett bildspel.
• Tryck och håll ned [ ] (4) för att komma tillbaka till
föregående meny.
6.4 Video
Den inbyggda videospelaren
kan spela upp videofiler i MTVformat. Videofiler kan konverteras till MTV-format med hjälp
av konverteringsprogrammet på
medföljande CD-skiva.
Se avsnitt 7. Konvertera
videofiler.
6.4.1 Uppspelning
1. Tryck och håll ned [ ] (4) för att komma till huvudmenyn.
2. Använd [ ] (8) och [ ] (11) för att välja Video och tryck
sedan [ ] (6) . Videolistan visas i skärmen.
3. Använd [ ] (8) och [ ] (11) för att välja en mapp eller
video och tryck sedan [ ] för att öppna mappen eller
spela filen.
4. Tryck på [ ] (4) för att återgå.
Under tiden som du spelar en video kan du:
• Pausa/återuppta uppspelning: Tryck på [ ] (6) för
att pausa uppspelning. Tryck en gång till för att återuppta
uppspelningen.
• Byta video: Tryck på [ ] (5) eller [ ] (10) för att gå till
föregående/nästa video.
• Snabbspolning: Tryck och håll ned [ ] eller [ ] för att
snabb-spola bakåt eller framåt i en video.
• Justera volymen: Tryck på [ ] (8) eller [ ] (11) för att
höja eller sänka volymen.
• Stäng av: Tryck och håll ned [ ] (4) för att komma tillbaka
till listan i menyn.
Svenska
Ver. 201106
SVERIGE • kundtjänst tel. 0247 /445 00, fax 0247/44 5 09, e-p ost kundtja nst@claso hlson.se, i nternet www.clasohlson. se
Page 4

6.5 FM Radio
6.5.1 Lyssna till radion
1. Gå till huvudmenyn genom att
trycka på [ ] (6).
2. Välj FM Radio med [ ] (8) och
[ ] (11) och tryck sedan på [ ].
6.5.2 Förklaring av
displayen
1
2
3
4
6.5.3 Manuell kanalsökning
• Använd [ ] (5) eller [ ] (10) för att använda manuell
kanalsökning.
6.5.4 Radions funktioner
Använd [ ] (5) eller [ ] (10) för att välja mellan funktionerna
(i radioläge): Save Station (spara station), Auto Scan
(automatisk kanalsökning), Band (frekvensområde/region) och
Record (inspelning från radio). Stega med [ ] (8) och
[ ] (11) och bekräfta med [ ] (6).
SAVE STATION (spara manuellt inställd station):
Stega till önskad frekvens med [ ] (5)
eller [ ] (10). Tryck på [ ] (9) för att
öppna undermeny, välj Save Station
och bekräfta med [ ]. Sparade
stationer visas, stega till önskat programnummer och bekräfta med
[ ] (6). Välj YES med [ ] (8) och
[ ] (11) och bekräfta med [ ].
AUTO SCAN (automatisk kanalsökning):
Stega till Auto Scan med [ ] (8) och [ ] (11). Automatisk
sökning efter de starkaste signalerna startar. ”Searching…”
visas i displayen under tiden.
Max. 20 stationer sparas automatiskt som CH01 – CH20.
Stega mellan dem med [ ] (5) och [ ] (10).
BAND (frekvensområde/region):
Beroende på var spelaren används måste rätt frekvensområde/
region väljas:
US (USA) (87,5-108,0 MHz)
Europe (Europa) (87,5-108,0 MHz)
Japan (Japan) (76,0-90,0 MHz)
1. Stega till önskad region med [ ] (8) och [ ] (11) och
bekräfta med [ ] (6).
2. Tryck på [ ] (4) för att återgå.
5
6
1. Indikator för knapplås
2. Volymnivå
3. Visar inställd frekvens
4. FM-region
5. Batteristatus
6. Indikator för frekvens
RECORD (inspelning från radio):
1. Stega till Record med [ ] (8) och [ ] (11) och
bekräfta med [ ] (6).
2. Tryck på [ ] för att göra paus, tryck igen för
att starta inspelning.
3. Tryck på [ ] (4) för att återgå till inspelning.
4. Tryck på [ ] (2) för att spara inspelningen och återgå
till att lyssna på radio.
Obs:
– De inspelade filerna sparas i FM-mappen på spelaren som
WAV-filer och kan lyssnas på i VOICE-läget.
– FM-inspelning stoppas automatiskt om minnet inte räcker till,
eller om batteriet är för svagt. Datum sparas automatiskt.
– Volymkontroll är inte tillgängligt under inspelning.
6.6 Voice (röstinspelning)
Spela in en röst
1. Gå till huvudmenyn genom att
trycka på [ ] (4).
2. Välj Voice med [ ] (8) och
[ ] (11) och bekräfta sedan
med [ ] (6).
3. Stega till Record, tryck på [ ]
för att starta inspelning.
• Pausa/återuppta inspelning:
Tryck på [ ] för att pausa
inspelning. För att återuppta
inspelning, tryck igen på [ ].
• Spara inspelningen: Tryck på [ ] (2) för att spara inspelningen
och återgå till inspelningsläget.
Observera:
- De inspelade röstfilerna sparas i VOICE-mappen på spelaren
som WAV-filer (format: MIC00001.WAV, MIC00002.WAV).
- Inspelningen stoppas automatiskt när minnet är fullt eller när
batteriet börjar ta slut. Redan inspelad data
och datum sparas automatiskt.
Ställ in inspelningskvalitet
1. Gå till huvudmenyn genom att trycka på [ ] (4).
2. Välj Setup med [ ] (8) eller [ ] (11) och bekräfta sedan
med [ ] (6). SETUP-menyn visas i skärmen.
3. Använd [ ] (8) eller [ ] (11) för att välja Record Setting
och bekräfta sedan med [ ].
Följande valmöjligheter visas:
• Long Time: Belastar minst minne, normal kvalitet.
• Normal Quality: Belastar minnet normalt, bättre kvalitet.
• High Quality: Belastar mycket minne, bäst kvalitet.
4. Använd [ ] (8) och [ ] (11) för att göra ditt val.
5. Tryck på [ ] för att bekräfta.
6. Tryck på [ ] (4) för att återgå till huvudmenyn.
6.7 E-Book (textvisning )
Spelaren kan visa texter i textformat (.txt). Andra filformat måste
först konverteras till textformat
innan de överförs till spelaren.
Obs:
Vid avslut kommer spelaren ihåg
senast lästa sida och öppnar
denna sida nästa gång textvisaren
startas.
1. Gå till huvudmenyn genom att trycka på [ ] (4).
2. Använd [ ] (8) eller [ ] (11) för att välja E-Book.
Bekräfta med [ ] (6).
3. Använd [ ] (8) eller [ ] (11) för att välja mapp och fil och
tryck sedan [ ] för att öppna mappen och se valda filer.
4. Gå tillbaka till huvudmenyn genom att trycka på [ ] (8)
och [ ] (11).
När du läser en E-Book kan du välja:
• Auto Paging (automatiskt sidbyte): Tryck på [ ] (6) för
att starta automatiskt sidbyte var 6:e sekund. Tryck på
[ ] igen för att stänga av funktionen.
• Page Up/Down (sidbyte): Tryck på [ ] (8) och [ ] (11)
för att byta sida.
• Fast Browse (snabbspola): Tryck och håll ned [ ] (8) eller
[ ] (11) för att snabbspola.
• Exit (avsluta): Tryck på [ ] (4) för att gå tillbaka.
• E-Book Function Menu (funktionsmeny): Tryck på [ ] (9).
Använd [ ] (5) eller [ ] (10) för att välja procenttal (var i boken)
och tryck sedan på [ ]. Spelaren går då till ett visst sidnummer i enhet med procenten.
Tryck på [ ] (2) för att avbryta och återgå till föregående meny.
6.8 File Browse (visa filer)
1. Tryck på [ ] (4) för att komma
till huvudmenyn.
2. Tryck på [ ] (8) eller [ ] (11)
och välj File Browse. Fillistan
visas på displayen.
3. Tryck på [ ] (8) eller [ ] (11)
och välj önskad fil. Tryck sedan
på [ ] (6) för att öppna filen.
4. Tryck på [ ] (8) eller [ ] (11)
och markera önskad fil. Tryck
sedan på [ ] (9) för att radera
filen.
5. Delete (radera): välj YES för att radera filen eller NO
för att avbryta utan att radera.
6. Tryck på [ ] för att bekräfta.
6.9 SETUP (inställningar)
1. I standby eller uppspelningsläge,
tryck och håll ned [ ] (4) för att
komma till huvudmenyn.
2. Använd [ ] (8) och [ ] (11)
för att välja SETUP och tryck
sedan [ ] (4).
3. Använd [ ] (8) och [ ] (11)
för att välja något från SETUP.
4. Tryck sedan på [ ] (6) för att
komma in i undermenyn.
5. Använd [ ] (8) och [ ] (11)
för att justera.
6. Tryck på [ ] för att bekräfta. Eller tryck på [ ] för att backa
utan att bekräfta.
Inställningar - beskrivning
POWER (ställ in när spelaren automatiskt ska slås av vid
inaktivitet). Välj mellan Auto Off: 15, 30, 60, 90 och 120 minuter,
Always On = ständigt på.
LANGUAGE (ställ in menyspråk).
Välj språket i displayen. Engelska är förinställt.
DISPLAY (visning på displayen).
Brightness (ljus): Low (låg), Medium (medium), High (hög)
eller Maximum (max.)
Backlight (bakgrundsbelysning): 15, 30 sekunder, 1 minut eller
Close = ständigt på.
RECORD SETTING (ställ in inspelningskvalitet):
Long Time (lägsta kvalitet), Normal Quality (normal kvalitet) eller
High Quality (högsta kvalitet).
SYSTEM TOOLS (systeminställningar):
• Delete: Radera en fil.
• Format: Formatera minne (alla filer raderas).
• Reset: Återställning till fabriksinställningar.
• System Info: Visa firmware-version i spelaren samt ledigt minne.
• Refresh: Uppdatera spellista.
• File Sort: Sortera alla filer.
Obs: Gör backup av filer som ska sparas till en dator,
DVD-skiva etc. innan formatering. Alla filer raderas
vid formatering.
7. Konvertera videofiler
Den inbyggda videospelaren kan spela upp videofiler i MTVformat. Filformaten AVI, WMV, MEPG1, Quick Time, MPEG2,
RealMedia, MPEG4 och 3GP kan konverteras med hjälp av
medföljande konverteringsprogram.
7.1 Starta konverteringsprogrammet
1. Sätt i medföljande CD-skiva i datorns CD-läsare.
2. Dubbelklicka på VideoConvert.exe i mappen MTV Video
Converter på CD-skivan. Konverteringens fönster visas.
7.2 Konvertera ett videoklipp
1. Starta programmet enligt instruktionen ovan.
2. Klicka på Input Video och välj sedan filer från listan.
Obs: För att lägga in MP4-filer, välj All Files (*.*) i File of
type-rutan. Då visas även MP4-filer i Open-rutan.
Konvertering
Öppna-ruta
3. Klicka på Output Video och välj en mapp där filerna
ska sparas.
4. Klicka på Advanced Setting. Välj 160 x 128 i Output Frame
Size-rutan och välj MTV i Output Format-rutan.
5. Klicka på Start Conversion.
Klicka på Help för detaljerade instruktioner.
Obs!
För att göra din video spelbar, måste du välja 160 x 128 eller
mindre i Output Frame Size-rutan (Advanced Setting). Annars
visas meddelandet “Device Not Supported” på skärmen när du
spelar filen.
Obs! Du måste installera relevanta codecs innan du kan köra
“Video Converter.exe”. Annars visar systemet “Load Video Failed!”
när du försöker konvertera filer. Klicka på OK och ladda ned
codecs från internet.
• Codecs medföljer inte.
8. Felsökning
Problem Lösning
Spelaren startar inte. Ladda batteriet.
Det går inte att överföra
filer till spelaren.
Inget ljud i hörlurarna. Kontrollera ljudvolymen och att
Det går inte att spela in
från radio eller mikrofon.
Texten i displayen visas
inte korrekt.
Knapparna fungerar inte. Knapplåset är aktiverat.
Dålig radiomottagning. Kontrollera att hörlurarna är kor-
Håll in [ ] (2) i minst 5 sekunder.
Kontrollera anslutningen mellan
spelare och dator.
hörlurarna är korrekt anslutna.
Kontrollera att ljudformatet
stöds av spelaren.
Kontrollera att det finns tillräckligt med ledigt minne.
Se till att du valt rätt språk.
Återställ spelaren genom att
med hjälp av t.ex. änden på ett
gem trycka in reset-knappen.
Återställ spelaren genom att
med hjälp av t.ex. änden på ett
gem trycka in reset-knappen.
rekt anslutna. Hörlurarnas sladd
fungerar som radioantenn.
Justera spelarens och hörlurarnas position. Flytta dig till en
annan plats där radiomottagningen är bättre.
Elektriska enheter i spelarens
närhet kan störa radiomottagningen. Stäng av eventuella
enheter som stör eller flytta dig
till en annan position längre bort
från störningen.
9. Skötsel och underhåll
Torka av med en mjuk, lätt fuktad trasa. Använd inga lösningsmedel eller rengöringsmedel.
10. Avfallshantering
När du ska göra dig av med produkten ska detta ske enligt
lokala föreskrifter. Är du osäker på hur du ska gå tillväga,
kontakta din kommun.
11. Specifikationer
Display 1,44″, CSTN Colour
Upplösning 160 x 128
Musikformat MP3/WAV/WMA
Bildformat JPG/BMP
Videoformat MTV
MP3 bit rate 8–320 kbps
WMA bit rate 5–320 kbps
Inspelningsformat WAV
Frekvensomfång 20 Hz – 20 KHz
S/N nivå > 80 dB (30K filter)
Distorsion < 0,2 %
Dynamik 15 mA
Förvaring Luftfuktighet < 90 %
Temperatur -20 till 60 °C
Användning Luftfuktighet < 85 %
Temperatur -10 till 40 °C
EQ Normal/Pop/Rock/Classic/Jazz/Bass/
Custom EQ/3D
Strömförsörjning Inbyggt uppladdningsbart batteri, 170 mAh
(upp till 9 tim uppspelning musik eller
3 tim video)
Minne 4 GB
Storlek 84 x 40 x 8 mm
Vikt ca 24,2 g (utan tillbehör)
Svenska
Ver. 201106
SVERIGE • kundtjänst tel. 0247 /445 00, fax 0247/44 5 09, e-p ost kundtja nst@claso hlson.se, i nternet www.clasohlson. se
Page 5

Mp3-spiller med radio
Art.nr. 38-4176 Modell KA10
Les brukerveiledningen nøye før produktet tas i bruk, og ta vare
på den for framtidig bruk. Vi reserverer oss mot ev. tekst- og
bildefeil, samt forandringer av tekniske data. Ved tekniske
problemer eller spørsmål, ta kontakt med vårt kundesenter.
(Se opplysninger om kundesenteret i denne bruksanvisningen).
1. Sikkerhet
• Langvarig eksponering av høy lyd fra headset/
hodetelefoner, kan føre til kroniske hørselsskader.
• Utsett ikke produktet for direkte sollys, varmekilder,
fuktighet eller regn.
• Produktet må heller ikke utsettes for støt eller slag.
• Plasser aldri produktet på magneter, som f.eks.
et høyttalerelement.
• Spilleren bør ikke oppbevares i lommen sammen
med andre ting som kan skade den, som f.eks. nøkler.
2. Produktbeskrivelse
2.1 Systemkrav
• Pentium 200 MHz eller høyere
• Windows 98SE/2000/ME/XP/VISTA
• Min. 120 MB ledig lagringsplass
• Usb-port
• Cd-leser
3. Knapper og funksjoner
3
RESET
1
2
4
5
6
7
1. Reset (tilbakestilling).
2. [ ] Strømbryter ON/OFF (trykk og hold inne i fem sekunder).
3. Display
4. [ ] Gå tilbake til foregående meny.
5. [ ] Venstre/foregående (hold knappen inne
for hurtigspoling bakover).
6. [ ] Play/Pause/Bekrefte. Trykk og hold inne for å komme
til hovedmenyen. Hold knappen inne for å aktivere tastelåsen.
7. Tilkobling for hodetelefoner (3,5 mm stereoplugg).
8. [ ] Heve volumet, oppover i menyen.
9. [ ] Åpne funksjonsmeny for valg av modus.
10. [ ] Høyre/neste (hold knappen inne for
hurtigspoling framover).
11. [ ] Senke volumet, nedover i menyen.
12. MIC (mikrofontilkobling).
13. Mini-usb-tilkobling.
8
9
10
11
12
MIC
13
4. Kom i gang
4.1 Kobling til datamaskin
Spilleren kan kobles og fjernes uten å slå av datamaskinen.
Den tildeles automatisk en enhetsbokstav av datamaskinen.
Spilleren behøver ikke å startes før filoverføring.
Følgende installasjonsanvisning gjelder for Windows XP med
Servicepack 2 eller senere versjon.
4.1.1 Installasjon/tilkobling under Windows
XP eller seinere
1. Ingen ekstra drivere nødvendig.
2. Koble den medfølgende usb-kabelen til en ledig usb-port på
datamaskinen og deretter til spillerens usb-port.
3. Datamaskinen oppdager automatisk mp3-spilleren som
en ”Flyttbar disk” og vises med en egen enhetsbokstav
i ”Min Datamaskin”.
4.1.2 Overføring av filer
Når spilleren er koblet til, kan bilde-, musikk- og videofiler
overføres til spilleren.
1. Marker ønskede filer som finnes på datamaskinens harddisk.
Høyreklikk og velg Kopier.
2. Dobbelklikk på ikonet for spilleren (f.eks. ”F”).
Enhetsbetegnelsen kan variere avhengig av datamaskinens
konfigurering.
3. Høyreklikk i feltet med spillerens filer og velg Lim inn.
Tips!
Du kan også bruke ”dra og slipp”–funksjonen for å kopiere eller
flytte filer mellom pc og spiller.
Sortering av filer
Spilleren kan sortere filene etter bokstaver og spiller av filene
i denne rekkefølgen dersom ingen annen rekkefølge velges
(tilfeldig rekkefølge).
4.1.3 Koble fra spilleren
1. Dobbeltklikk på ikonet Sikker fjerning av maskinvare
i aktivitetsfeltet.
2. Marker USB-masselagringsenhet og klikk deretter på Stopp.
3. Spilleren kan nå kobles fra usb-porten.
Obs! Fjern ikke mp3-spilleren fra usb-porten mens skriving til eller fra minnet pågår, det kan skade det innebygde Flash-minnet.
4.2 Lading av batteriet
Spilleren har et innebygd ladbart batteri. Batterisymbolet i displayets høyre hjørne indikerer batteriets status. Når symbolet
vises som tomt er det på tide å lade batteriet. Lading skjer via
den medfølgende usb-kabelen. Anbefalt temperatur på omgivelsene ved lading er 0 °C til 35 °C.
1. Koble usb-kabelen til en ledig usb-port på datamaskinen
og deretter til spillerens usb-port.
2. Når batterisymbolet vises som fylt med hvite kvadrater
er batteriet fulladet.
Fullt oppladet Utladet
Viktig:
• Lad batteriet helt fullt første gangs bruk.
• Det tar ca. 4 timer å lade batteriet helt opp.
• Lad spilleren umiddelbart når beskjeden ”Low Battery”
kommer opp i displayet.
• Koble usb-kabelen fra når batteriet er fulladet.
Overlading av batteriet forkorter batteriets levetid.
• Batteriet kan lades ut hvis spilleren ikke brukes over en
lengre periode (mer enn 3 måneder). For å unngå utlading
bør spilleren lades helt full hver annen eller tredje måned.
5. Vanlig bruk
5.1 Slå på og av spilleren
Slå på – Trykk og hold inne [ ] i ca. fem sekunder.
Skru av – Trykk og hold inne [ ] i ca. fem sekunder.
Obs.
Dersom det er første gangen spilleren skrus på etter tilbakestilling, må displayspråk velges ved å bruke [
knappene. Bekreft valget med [ ].
Når spilleren er koblet til datamaskinen kan man også skru av
spilleren ved å trykke på og holde inne [ ].
5.2 Justere lydvolumet
Trykk [ ] (8) for å heve og [ ] (11) for å senke lydvolumet.
5.3 Forberedelser
Før over ønskede filer til spilleren som beskrevet i avsnittet
4.1.2 Overføring av filer. Kontroller at batteriet er ladet og head-
setet koblet til. Hvis spilleren er skrudd av, trykk inn og hold
[ ] i fem sekunder for å starte spilleren.
5.4 Tastelås
Tastelåsen forhindrer uønsket tasting på knappene. Tastelåsen
aktiveres automatisk etter 3 minutter. Tiden kan også aktiveres
manuelt i ”Setup/Hold Time” - velg aktiveringstid mellom 10
sekunder og 5 minutter.
Obs! Når tastelåsen er aktivert vises ”Key Locked” når knapper
trykkes inn. Hold [ ] (6) inne for å aktivere tastelåsen.
5.5 Tilbakestilling (reset)
Dersom det er behov for å stille inn på nytt, benytt en spiss
metallgjenstand og trykk inn resetknappen.
] eller [
]
6. Bruk
Forklaring på de forskjellige menyvalgene i hovedmenyen:
1. Trykk inn og hold [ ] for å gå til hovedmenyen fra
en applikasjon.
2. Bruk [ ] (8) og [ ] (11) til å bla i menyen mellom:
music, video, fm radio, photo, e-book, voice,
file browse og setup.
3. Trykk på [ ] for å bekrefte og velge markert funksjon.
4. Trykk inn og hold [ ] inne for å gå ut.
1. Music: Avspilling av musikk
2. Video: Avspilling av video
3. FM Radio: Lytte til radio og innspilling fra radio
4. Photo: Vise bilder
5. E-Book: Leser for tekstfiler
6. Voice: Avspilling og innspilling av stemmer
7. File browse: Se alle filer
8. Setup: Innstillinger
6.1 Music (musikk)
6.1.1 Forklaring av displayet
1
2
3
4
5
6
1. Tastelås aktivert
2. Volumindikator
3. Funksjons- og filinformasjon for aktuelt spor (filnamn/ID3-tag)
4. Tittel
5. Avspilt tid
6. Aktuelt spornummer / Totalt antall spor
7. Equalizer
8. Batterinivå
9. Repetisjonsmodus
10. Total tid
11. Forløpsindikator
6.1.2 Avspilling
1. Gå inn i hovedmenyen ved å trykke på og holde inne [ ].
2. Velg Music med [ ] (8) og [ ] (11) og bekreft
med [ ] (6).
3. Trykk på [ ] for å starte eller ta pause i avspillingen.
• Bruk [ ] (5) eller [ ] (10) til å velge ønsket spor.
• Trykk og hold inne [ ] (5) eller [ ] (10) for å spole
raskt bakover eller framover.
7
8
9
10
11
6.1.3 Åpne funksjonsmenyen
1. I musikkmodus: Trykk en gang på [ ] (6) for å åpne
funksjonsmenyen. Trykk en gang til på [ ] (4) når du
vil ut av funksjonsmenyen.
2. Trykk på [ ] (8) eller [ ] (11) for å velge mellom
Repeat Mode, Equalizer, 3D, Play Rate, File Browse
og Classification.
3. Trykk på [ ] for å bekrefte.
4. Trykk på [ ] (4) for å avslutte og å gå tilbake til
den forrige menyen.
Forklaring av funksjonsmenyen:
REPEAT MODE – Repetisjon av ett spor, alle spor eller
en katalog/mappe. Tilfeldig avspillingsrekkefølge.
Bruk [ ] (8) eller [ ] (11) til å velge mellom:
• No Repeat (spille av alle spor i riktig rekkefølge
uten repetisjon).
• Repeat One (repetere pågående spor).
• Repeat All (Repeterer alle spor).
• Shuffle All (repetere alle spor i tilfeldig rekkefølge).
• Folder Normal (spille av alle spor i mappen i riktig
rekkefølge).
• Folder All Repeat (repetere alle spor i mappen).
• Folder Shuffle All (alle spor i mappen i tilfeldig rekkefølge).
Trykk på [ ] (6) for å bekrefte eller trykk på [ ] (4) for
å gå tilbake.
EQUALIZER – Velg mellom 6 forhåndsinnstilte lydbilder:
Normal, Pop, Rock, Classic, Bass eller Custom EQ (konfigu-
rer et eget lydbilde). Bruk [ ] (8) og [ ] (11) til å velge. Trykk
på [ ] (6) for å bekrefte eller trykk på [ ] (4) for å gå tilbake.
Konfigurering av eget lydbilde, Custom EQ:
1. Velg alternativ Custom EQ
og bekreft med [ ].
2. Bruk [ ] (8) og [ ] (11)
til å markere den stabel (det
frekvensområde) du ønsker
å forandre.
3. Forandre stablenes verdi med
hjelp av [ ] (5) og [ ] (10).
4. Fortsett på samme måte for
å stille inn øvrige stabler.
5. Trykk på [ ] (6) for å lagre
innstillingene.
3D – 3D-effekt (gir lyden romeffekt)
1. Velg Off (avstengt) eller On (aktivert).
2. Trykk på [ ] (6) for å lagre innstillingene.
PLAY RATE – Velg avspillingshastighet
1. Velg 1.00X – 1,14X – 1,33X – 0,67X – 0,80X.
2. Trykk på [ ] for å lagre innstillingene.
Obs.: Play Rate fungerer ikke i WMA-format.
FILE BROWSE – Vise filer.
1. Bruk [ ] (8) og [ ] (11) til å markere ønsket fil.
2. Trykk på [ ] (6) for å spille av den valgte filen.
CLASSIFICATION – Klassifisere låter etter genre, artist,
album, og tittel.
1. Hvis det er første gangen du bruker denne funksjonen
– velg Classification og bruk [ ] (8) og [ ] (11)
for å markere Yes. Velg deretter Refresh.
2. Trykk på [ ] (6) for å bekrefte og å åpne innstillingene.
3. Bruk [ ] (8) og [ ] (11) til å markere ønsket
klassifiseringsmetode: Genre, Artist, Album og Tittel.
4. Trykk på [ ] for å lagre innstillingene når du er ferdig.
6.2 Lyrics (tester)
Denne spilleren støtter tekstvising under avspilling. Det er
kun tekster i LRC-format som kan vises. Gjør slik for å legge
til tekste:
1. Last ned tilhørende tekster fra internett. Tekster av typen ”.lrc”.
2. Påse at teksten har samme navn som musikkfilen.
3. Kopier begge filene til samme mappe på spilleren.
4. Teksten vises på skjermen under avspilling.
6.3 Photo (bildeframvising)
Bilder kan vises i følgende format: jpg eller bmp.
6.3.1 Visning
1. Trykk på [ ] (4) og hold inne
for å komme til hovedmenyen.
2. Bruk [ ] (8) og [ ] (11) til å
velge Photo og trykk deretter
[ ] (6) . En liste over fotofilene
kommer opp på skjermen.
3. Bruk [ ] (8) og [ ] (11) til å
velge mappe eller bilde og trykk
deretter [ ] (6) for å vise bilder.
4. Trykk på [ ] (4) og hold inne for
å komme tilbake til hovedmenyen.
Når du ser på bilder kan du:
• Bla: Trykk på [ ] (8) og [ ] (11) for å gå til foregående
eller neste bilde.
• Spille av en bildeframvisning. Trykk på [ ] (6) for
å vise bildene som bildeframvisning.
• Trykk på [ ] (4) og hold inne for å komme tilbake
til hovedmenyen.
6.4 Video (Video)
Den innebygde videospilleren kan
spille av videofilmer i MTV-format.
Videofiler kan konverteres til
MTV-format ved hjelp av konverteringsprogrammet som er på den
medfølgende cd-platen.
Se avsnitt 7. Konvertere videofiler.
6.4.1 Avspilling
1. Trykk på [ ] (4) og hold inne for å komme til hovedmenyen.
2. Bruk [ ] (8) og [ ] (11) til å velge Video og trykk deretter
[ ] (6) . Listen over videoer vises på skjermen.
3. Bruk [ ] (8) og [ ] (11) til å velge mappe eller video og
trykk deretter [ ] (6) for å åpne mappen eller spille filen.
4. Trykk på [ ] (4) for å fortsette.
Når du ser på video kan du:
• Ta pause/gjenoppta avspillingen: Trykk på [ ] (6) for
å ta pause i avspillingen. Trykk en gang til for å starte
avspillingen igjen.
• Skifte video: Trykk på [ ] (5) eller [ ] (10) for å gå til
foregående/neste video.
• Hurtigspoling: Trykk og hold [ ] eller [ ] inne for raskt
å spole bakover eller framover.
• Justere volumet: Trykk [ ] (8) for å heve og [ ] (11)
for å senke volumet.
• Skru av: Trykk på [ ] (4) og hold inne for å komme tilbake
til listen i menyen.
Norsk
Ver. 201106
NORGE • k undesente r tel. 23 21 40 00, fax 23 21 40 80, e-post kundesenter@clasohlson.no, internett www.clasohlson.no
Page 6

6.5 Radio (FM)
6.5.1 Høre på radioen
1. Gå ut av hovedmenyen ved
å trykke på [ ] (6).
2. Velg FM Radio med [ ] (8) og
[ ] (11) og trykk deretter på [ ].
6.5.2 Forklaring av
displayet
1
2
3
4
6.5.3 Manuell kanalsøking
Benytt [ ] (5) eller [ ] (10) for manuell kanalsøking.
6.5.4 Radions funksjoner
Benytt [ ] (5) eller [ ] (10) for å velge mellom funksjonene
(i radiomodus): Save Station (lagre stasjon), Auto Scan (automatisk kanalsøk), Band (frekvensområde/region), Record
(innspilling fra radio). Forflytt deg med [ ] (8) og [ ] (11)
og bekreft med [ ] (6).
SAVE STATION (manuell lagring av
innstilt stasjon):
1. Still inn ønsket frekvens
med [ ] (5) eller [ ] (10).
2. Trykk på [ ] (9) for å åpne
undermeny, velg Save Station
og bekreft med [ ].
3. Lagrede stasjoner vises, gå til
ønsket programnummer og
bekreft med [ ] (6).
4. Velg YES med [ ] (8) og [ ]
(11) og bekreft med [ ].
AUTO SCAN (autosøking)
Gå til Auto Scan med [ ] (8) og [ ] (11). Automatisk søking
etter de sterkeste signalene starter. ”Searching…” vises på
skjermen mens søket pågår. Maks. 20 stasjoner kan lagres,
CH01 – CH20. Flytt deg mellom dem med [ ] (5) eller [ ] (10).
BAND (frekvensområde/region)
Spilleren må brukes på riktig frekvensområde/region avhengig
av hvor den brukes.
US (USA) (87,5-108,0 MHz)
Europe (Europa) (87,5-108,0 MHz)
Japan (Japan) (76,0-90,0 MHz)
1. Forflytt deg til ønsket region med [ ] (8) og [ ] (11)
og bekreft med [ ] (6).
2. Trykk på [ ] (4) for å fortsette.
5
6
1. Indikator for tastelås
2. Volumnivå
3. Viser innstilt frekvens
4. FM-region
5. Batteristatus
6. Indikator for frekvens
RECORD (innspilling fra radio)
1. Forflytt deg til Record med [ ] (8) og [ ] (11) og bekreft
med [ ] (6).
2. Trykk på [ ] for å ta pause. Trykk en gang til for å starte
innspillingen.
3. Trykk på [ ] (4) for å gå tilbake til innspilling.
4. Trykk på [ ] (2) for å lagre innspillingen og å gå tilbake
til å lytte på radioen.
Obs:
- De innspilte filene lagres i FM-mappen som WAV-filer
og kan lyttes til i VOICE-modus.
- FM-innspillingen stoppes automatisk hvis det ikke er
nok plass på minnet eller hvis batteriene er for svake.
Dato lagres automatisk.
- Lydvolumet er ikke regulerbart under innspilling.
6.6 Voice (stemmeinnspilling)
Spille inn en stemme
1. Gå til hovedmenyen ved å
trykke på [ ] (4).
2. Velg Voice med [ ] (8) og
[ ] (11) og bekreft med
[ ] (6).
3. Gå til Record, trykk på [ ] for
å starte innspillingen.
• Ta pause/gjenoppta avspillingen: Trykk på [ ] for å pause
innspilling. For å gå tilbake til
innspilling, trykk på [ ] igjen.
• Lagre innspillingen: Trykk på [ ] (2) for å lagre innspillingen
og å gå tilbake til innspillingsmodus.
Obs.:
• De innspilte stemmefilene lagres i VOICE-mappen på
spilleren som WAV-filer (format: MIC00001.WAV,
MIC00002.WAV).
• Innspillingen stoppes automatisk når minnet er fullt eller når
batteriet begynner å bli svakt. Innspilt data og dato lagres
automatisk.
Stille inn innspillingskvaliteten
1. Gå til hovedmenyen ved å trykke på [ ] (4).
2. Velg SETUP med [ ] (8) eller [ ] (11) og bekreft
med [ ] (6). SETUP-menyen vises på skjermen.
3. Bruk [ ] (8) eller [ ] (11) til å velge Record Setting
og bekreft med [ ].
Følgende valgmuligheter vises:
• Long Time: Belaster minnet minst – normal kvalitet.
• Normal Quality: Belaster minnet en del – bedre kvalitet.
• High Quality: Belaster minnet mye – best kvalitet.
4. Bruk [ ] (8) og [ ] (11) til å velge.
5. Trykk på [ ] for å bekrefte.
6. Trykk på [ ] for å gå tilbake til hovedmenyen.
6.7 e-book (tekstvisning)
Spilleren kan vise tekster i tekstfomat (.txt). Andre filformater må først
konverteres til dette tekstformatet før
de kan overføres til spilleren.
Obs:
Til slutt vil spilleren ”huske” den sist
leste siden og åpne denne neste gang
tekstviseren starter.
1. Gå til hovedmenyen ved å trykke på [ ] (4).
2. Bruk [ ] (8) eller [ ] (11) til å velge e-book: Bekrefte
med [ ] (6).
3. Bruk [ ] (8) og [ ] (11) til å velge mappe eller fil og
trykk deretter [ ] (6) for å åpne mappen og se valgte filer.
4. Gå tilbake til hovedmenyen ved å trykke på [ ] (8)
og [ ] (11).
Når du leser en e-book kan du:
• Auto Paging (automatisk bla i boken): Trykk på [ ] (6)
for å starte automatisk sideskifte for hvert 6. sekund.
Trykk på [ ] en gang til for å deaktivere funksjonen.
• Page Up/Down (sideskifte): Trykk på [ ] (8) og
[ ] (11) til å skifte side.
• Fast Browse (hurtigspole): Trykk og hold [ ] (8) inne
eller [ ] (11) for å spole raskt bakover eller framover.
• Exit (avslutte): Trykk [ ] (4) for å gå tilbake.
• E-Book Function Menu (funksjonsmeny): Trykk på [ ] (9).
Benytt [ ] (5) eller [ ] (10) for å velge prosenttall (hvor
i boken) og trykk deretter på [ ]. Spilleren går da til
en bestemt side i enheten med prosenten.
Trykk på [ ] (2) for å avbryte og å gå tilbake til
foregående meny.
6.8 File Browse (vise filer)
1. Trykk på [ ] (4) for å komme til
hovedmenyen.
2. Trykk på [ ] (8) og [ ] (11)
og velg File Browse.
Displayet viser fillisten.
3. Trykk på [ ] (8) og [ ] (11)
og velg ønsket fil.
Trykk deretter på [ ] (6) for å
åpne filen.
4. Trykk på [ ] (8) og [ ] (11)
og merk ønsket fil.
Trykk deretter på [ ] (9) for å slette filen.
5. Delete (slette) velg Yes (for å slette filen) eller No (for å avbryte
prosessen med sletting).
6. Trykk på [ ] for å bekrefte.
6.9 SETUP (innstillinger)
1. Trykk på [ ] (4) og hold inne
i standbymodus for å komme
til hovedmenyen.
2. Bruk [ ] (8) og [ ] (11)
til å velge SETUP og trykk
deretter [ ] (6) .
3. Bruk [ ] (8) og [ ] (11) til
å velge fra SETUP-menyen.
4. Trykk deretter på [ ] (6) for
å komme inn i undermenyen.
5. Bruk [ ] (8) og [ ] (11) for
å justere.
6. Trykk på [ ] for å bekrefte. Eller trykk på [ ] for å gå
tilbake uten å bekrefte.
Innstillinger - beskrivelse
POWER (still inn når spilleren automatisk skal slås av
ved inaktivitet). Velg mellom Auto Off: 15, 30, 60, 90 og
120 minutter, Always On = kontinuerlig på.
LANGUAGE (still inn menyspråk). Velg språket fra skjermen.
Det forhåndsinnstilte språket er engelsk.
DISPLAY (visning på skjermen). Brightness (lys): Low (lav),
Medium (medium), High (høy) eller Maximum (maks.)
Backlight (Bakgrunnslys): 15, 30 sekunder, 1 minutt eller
Close = på hele tiden.
RECORD SETTING (still inn innspillingskvalitet): Long Time
(lavest kvalitet), Normal Quality (normal kvalitet) eller High
Quality (høyest kvalitet).
SYSTEM TOOLS (systeminnstillinger)
• Delete Slette en fil.
• Format: Formatere minnet (alle filer slettes).
• Reset: Tilbakestill til fabrikkinnstillinger.
• System Info: Vise firmwareversjonen i spilleren
og ledig minne.
• Refresh: oppdatere spilleliste.
• File Sort: Sortere alle filer.
Obs: Ta backup av filer som skal lagres til en datamaskin, dvdplate etc. før formatering, fordi alle filer slettes ved formatering.
7. Konvertere videofiler
Den innebygde videospilleren kan spille av videofilmer i MTVformat. Filformatene AVI, WMV, MEPG1, Quick Time, MPEG2,
RealMedia, MPEG4 och 3GP kan konverteres med hjelp av
medfølgende konverteringsprogram.
7.1 Starte konverteringsprogrammet
1. Sett den vedlagte cd-platen i maskinens cd-rom.
2. Dobbelklikk på VideoConvert.exe i mappen MTV Video
Converter på CD-platen. Konverteringens vindu vises.
7.2 Konvertere et videoklipp
1. Start programmet som beskrevet ovenfor.
2. Klikk på Input Video og velg deretter filer fra listen.
Obs: For å legge inn MP4-filer, velg All Files (*.*) i File
of type-ruten. Da vises også MP4-filer i Open-ruten.
Konvertering
Åpne rute
3. Klikk på Output Video og velg en mappe hvor filene
skal lagres.
4. Klikk på Advanced Setting. Velg 160 x 128 i Output Frame
Size-ruten og velg MTV i Output Format-ruten.
5. Klikk på Start Conversion.
Klikk på Help for detaljerte instruksjoner.
Obs!
For å gjøre videoen spillbar må du velge 160 x 128 eller mindre
i Output Frame Size-ruten (Advanced Setting). Hvis ikke vil
beskjeden “Device Not Supported” komme opp på skjermen
når du spiller filen.
Obs! Du må installere relevante kodeks før du kan kjøre “Video
Converter.exe”. Hvis ikke vil systemet vise “Load Video Failed!”
når du prøver å konvertere filer. Klikk på OK og last ned kodeks
fra internett.
• Codecs/kodeks medfølger ikke.
8. Feilsøking
Problem Lösning
Spilleren starter ikke. Lad batteriet.
Det går ikke å overføre
filer til spilleren.
Ingen lyd i hodetelefonene.
Det går ikke å spille inn
fra radio eller mikrofon.
Teksten i displayet
vises ikke riktig.
Knappene
fungerer ikke.
Dårlige mottaksforhold
for radio.
Hold [ ] (2) inne i minst 5 sekunder.
Kontroller tilkoblingen mellom
spiller og datamaskin.
Kontroller lydvolumet og at
headsetes er korrekt riktig.
Kontroller at lydformatet støttes
av spilleren.
Kontroller at det er tilstrekkelig
med ledig plass i minnet.
Pass på å velg riktig språk.
Still spilleren tilbake ved hjelp
av å bruke enden på en spiss
gjenstand (f.eks. en binders) og
trykk inn RESET-knappen.
Tastelåsen er aktivert.
Still spilleren tilbake ved å bruke
enden på en spiss gjenstand
(f.eks. en binders) og trykk inn
RESET-knappen.
Kontroller at headsetet er riktig
satt i. Headsetets ledning fungerer som radioantenne.
Juster spillerens og headsetets
posisjon. Flytt deg til et annet
sted hvor forholdene for mottak
er bedre.
Elektriske enheter i spillerens
nærhet kan virke forstyrrende.
Skru av ev. enheter som kan
forstyrre eller flytt deg til et
annet sted
9. Stell og vedlikehold
Rengjør med en myk og lett fuktet klut. Bruk aldri rengjøringsmiddel eller sterke løsemiddel.
10. Avfallshåndtering
Når produktet skal kasseres, må det skje i henhold til lokale
forskrifter. Er du usikker på hvordan du går fram, ta kontakt
med lokale myndigheter.
11. Spesifikasjoner
Display 1,44″, CSTN Colour
Oppløsning 160 x 128
Musikkformat Mp3/WAV/WMA
Bildeformat JPG/BMP
Videoformat MTV
MP3 bit rate 8–320 Kbps
WMA bit rate 5–320 Kbps
Innspillingsformat WAV
Frekvensomfang 20 Hz – 20 kHz
S/N-nivå > 80 dB (30K filter)
Distortion < 0,2 %
Dynamikk 15 mA
Oppbevaring Luftfuktighet < 90 %,
Temperatur - 20~60 °C
Bruk Luftfuktighet < 85 %,
Temperatur - 10~40 °C
Eq Normal/Pop/Rock/Classic/Jazz/Bass/
Custom EQ/3D
Strømforsyning Innebygd ladbart batteri, 170 mAh
(inntil 9 timer avspilling av musikk
eller 3 timer video)
Minne 4 GB
Størrelse 84 x 40 x 8 mm
Vekt Ca. 24,2 g (uten tilbehør)
Norsk
Ver. 201106
NORGE • k undesente r tel. 23 21 40 00, fax 23 21 40 80, e-post kundesenter@clasohlson.no, internett www.clasohlson.no
Page 7

Mp3-soitin ja radio
Tuotenro 38-4176 Malli KA10
Lue käyttöohjeet ennen tuotteen käyttöönottoa ja säilytä ne
tulevaa tarvetta varten. Pidätämme oikeuden teknisten tietojen
muutoksiin. Emme vastaa mahdollisista teksti- tai kuvavirheistä.
Jos laitteeseen tulee teknisiä ongelmia, ota yhteys myymälään
tai asiakaspalveluun (yhteystiedot käyttöohjeen lopussa).
1. Turvallisuus
• Älä kuuntele kuulokkeista kovaäänistä musiikkia
pitkäkestoisesti, se voi vahingoittaa kuuloasi.
• Älä altista soitinta suoralle auringonvalolle, kuumuudelle,
pölylle tai kosteudelle.
• Älä altista tuotetta koville iskuille tai tärähdyksille.
• Älä koskaan aseta soitinta magneettien päälle, esim.
kaiuttimien päälle.
• Älä laita soitinta samaan taskuun esim. avainten tai muiden
esineiden kanssa.
2. Tuotekuvaus
2.1 Järjestelmävaatimukset
• Pentium 200 MHz tai parempi
• Windows 98SE, 2000, ME, XP ja VISTA
• Vapaata levytilaa vähintään 120 Mt
• USB-portti
• Cd-asema
3. Painikkeet ja toiminnot
3
RESET
1
2
4
5
6
7
1. Reset (palautus).
2. [ ] Virtakytkin ON/OFF (paina vähintään 5 sekuntia).
3. Näyttö
4. [ ] Palaa edelliseen valikkoon.
5. [ ] Vasen/edellinen (pidä pohjassa pikakelataksesi taaksepäin).
6. [ ] Play/Pause/Vahvista. Siirry päävalikkoon painamalla painike
pohjaan. Aktivoi näppäinlukitus painamalla painiketta.
7. Kuulokeliitäntä (3,5 mm:n, stereo).
8. [ ] Äänenvoimakkuuden lisääminen, siirry ylöspäin valikossa.
9. [ ] Kunkin tilan toimintovalikon avaaminen.
10. [ ] Oikea/seuraava (pikakelaa eteenpäin pitämällä
painiketta pohjassa).
11. [ ] Äänenvoimakkuuden alentaminen, siirry alaspäin valikossa.
12. MIC (mikrofoniliitäntä).
13. Mini-USB-liitäntä.
8
9
10
11
12
MIC
13
4. Käytön aloittaminen
4.1 Liittäminen tietokoneeseen
Mp3-soitin voidaan liittää tietokoneeseen ja poistaa ilman, että
tietokonetta sammutetaan. Mp3-soitin saa tietokoneella asemakirjaimen automaattisesti. Soitinta ei tarvitse käynnistää ennen
tiedonsiirron aloittamista.
Seuraavat asennusohjeet koskevat käyttöjärjestelmää Windows
XP, jossa Servicepack 2 tai uudempi.
4.1.1 Asennus/liittäminen Windows XP
-käyttöjärjestelmään ja uudempiin
1. Erillisiä ajureita ei tarvita.
2. Liitä pakkauksen USB-kaapeli ensin tietokoneessa olevaan
vapaaseen USB-porttiin ja seuraavaksi soittimen USBporttiin (13).
3. Tietokone tunnistaa mp3-soittimen automaattisesti, ja
”Omaan tietokoneeseen” ilmestyy uusi ”Siirrettävä levy”.
4.1.2 Tiedostojen siirtäminen
Luotuasi yhteyden voit siirtää kuva-, ääni- ja videotiedostoja
mp3-soittimelle.
1. Valitse siirrettävät tiedostot tietokoneen kovalevyltä.
Napsauta oikealla hiirinäppäimellä ja valitse Kopioi.
2. Kaksoisnapsauta soittimen kuvaketta (esim. ”F”). Yksikön
tunnus saattaa vaihdella tietokoneen asetuksista riippuen.
3. Napsauta oikealla hiirinäppäimellä yksikön tiedostoja ja
valitse Paste.
Huom.
• Voit myös kopioida tai siirtää tiedostoja tietokoneen ja
soittimen välillä ”vetämällä ja pudottamalla”.
Tiedostojen järjestäminen
• Soitin voi lajitella tiedostot aakkosjärjestykseen ja soittaa
tiedostot siinä järjestyksessä, ellei muuta järjestystä
(satunnaistoisto) ole valittu.
4.1.3 Soittimen irrottaminen tietokoneesta
1. Kaksoisnapsauta tehtäväpalkin kuvaketta Poista laite
turvallisesti.
2. Valitse USB-massamuistilaite ja napsauta Sammuta.
3. Nyt voit poistaa laitteen USB-portista.
Huom.! Älä irrota laitetta usb-portista, jos tietokone käyttää
laitetta. Sisäänrakennettu Flash-muisti saattaa vaurioitua.
4.2 Akun lataaminen
Soittimessa on sisäänrakennettu ladattava akku. Akkukuvake
näytön oikeassa kulmassa kertoo akun tilan. Kun kuvake on
tyhjä, on aika ladata akku. Soitin ladataan pakkauksen usbkaapelin avulla. Suositeltu latauslämpötila on 0…+35 °C.
1. Liitä usb-kaapeli ensin tietokoneessa olevaan vapaaseen
usb-porttiin, ja seuraavaksi mp3-soittimen usb-porttiin.
2. Akku on täysi silloin, kun kuvake näyttää täyden akun kuvaa.
Täynnä Tyhjä
Tärkeää:
• Lataa akku täyteen ennen ensimmäistä käyttökertaa.
• Akun lataaminen täyteen kestää noin neljä tuntia.
• Lataa akku välittömästi, kun näytölle ilmestyy viesti
”Low Battery”.
• Irrota usb-kaapeli, kun akku on ladattu täyteen.
Akun liiallinen lataaminen lyhentää sen käyttöikää.
• Akku saattaa purkautua, jos soitin on käyttämättömänä
pitkään (yli 3 kuukautta). Jotta akun purkautumiselta
vältyttäisiin, tulee soitin ladata joka toinen tai joka
kolmas kuukausi.
5. Perustoiminnot
5.1 Soittimen laittaminen päälle ja
pois päältä
Päälle – Pidä [ ] -painiketta (2) pohjassa noin viisi sekuntia.
Pois päältä – Pidä [ ] -painiketta pohjassa noin viisi sekuntia.
Huom.!
• Jos käynnistät soittimen ensimmäistä kertaa asetusten
palautusten jälkeen, valitse näytön kieli [ ] ] (8) ja [ ]
-painikkeilla (11). Vahvista valinta painamalla [ ] (6).
• Kun soitin on liitettynä tietokoneeseen, voit myös sammuttaa
sen pitämällä painiketta [ ] (2) pohjassa viiden sekunnin ajan.
5.2 Äänenvoimakkuuden säätäminen
Lisää äänenvoimakkuutta painamalla [ ] (8) ja alenna äänenvoimakkuutta painamalla [ ] (11).
5.3 Esivalmistelut
• Siirrä haluamiasi tiedostoja soittimeen kohdan 4.1.2
Tiedostojen siirtäminen mukaisesti.
• Varmista, että akku on ladattu ja kuulokkeet on liitetty
toiseen kuulokeliitännöistä.
• Jos soitin on pois päältä, käynnistä soitin painamalla [ ] (2).
5.4 Näppäinlukko
Näppäinlukko estää vahinkopainallukset. Näppäinlukko aktivoituu automaattisesti kolmen minuutin kuluttua. Aktivointiajan voi
myös asettaa manuaalisesti kohdassa: Setup/Hold Time –
aktivointiajan voi valita 10 sekunnin ja 5 minuutin väliltä.
Huom.! Kun näppäinlukitus on aktivoitu, näytöllä lukee
”Key Locked”, kun painikkeita painetaan. Poista näppäinlukitus
pitämällä [ ] (6) pohjassa.
5.5 Asetusten palautus
Palauta soittimen asetukset painamalla terävä metalliesine
reset-aukkoon (1).
6. Käyttö
Päävalikon vaihtoehtojen selitykset:
1. Paina [ ] (6) pohjaan siirtyäksesi sovelluksesta päävalikkoon.
2. Paina [ ] (8) ja [ ] (11) siirtyäksesi valikossa seuraavasti:
music, video, FM radio, photo, e-book, voice, file
browse ja setup.
3. Vahvista ja valitse merkitty toiminto painamalla [ ] (6).
4. Poistu pitämällä painiketta [ ] (2) pohjassa.
1. Music: Musiikin kuuntelu
2. Video: Videoiden katselu
3. FM Radio: Radio ja tallennus radiosta
4. Photo: Kuvien katselu
5. E-Book: Tekstitiedostojen lukeminen
6. Voice: Äänen toisto ja tallennus
7. File browse: Kaikkien tiedostojen selaus
8. Setup: Asetukset
6.1 Music (Musiikki)
6.1.1 Näytön kuvakkeiden selitykset
1
2
3
4
5
6
1. Näppäinlukitus on aktivoitu
2. Äänenvoimakkuuden näyttö
3. Toistettavan raidan toiminta-/tiedostotiedot
(tiedostonimi/ID3-tagi)
4. Otsikko
5. Toiston aika
6. Toistettavan raidan numero/Raitojen kokonaismäärä
7. Taajuuskorjain
8. Akun varaustaso
9. Uudelleentoistotila
10. Kokonaisaika
11. Etenemispalkki
6.1.2 Toisto
1. Siirry päävalikkoon painamalla [ ] (6) pohjaan.
2. Valitse Music painamalla [ ] (8) ja [ ] (11) ja
vahvista painamalla [ ] (6).
3. Aloita tai keskeytä toisto painamalla [ ].
• Valitse raita painamalla [ ] (5) ja [ ] (10).
• Pikakelaa eteen- tai taaksepäin painamalla pohjaan
[ ] (5) tai [ ] (10).
7
8
9
10
11
6.1.3. Toimintovalikon avaaminen
1. Musiikkitilassa: Avaa toimintovalikko painamalla kerran
[ ] (6). Paina uudelleen [ ] (4), kun haluat poistua
toimintovalikosta.
2. Paina [ ] (8) tai [ ] (11) valitaksesi Repeat Mode,
Equalizer, 3D, Play Rate, File Browse ja Classification.
3. Vahvista painamalla [ ].
4. Lopeta ja palaa edelliseen valikkoon painamalla [ ] (4).
Toimintovalikon selitykset:
REPEAT MODE – Yhden raidan, kaikkien raitojen tai kokonai-
sen kansion uudelleentoisto. Satunnainen toisto. Paina [ ] (8)
tai [ ] (11) valitaksesi seuraavista:
• No Repeat (kaikkien raitojen toisto oikeassa järjestyksessä
ilman uudelleentoistoa).
• Repeat One (senhetkisen raidan uudelleentoisto).
• Repeat All (kaikkien uudelleentoisto).
• Shuffle All (kaikkien raitojen satunnainen uudelleentoisto).
• Folder Normal (kansion kaikkien raitojen uudelleentoisto
oikeassa järjestyksessä).
• Folder All Repeat (kansion kaikkien raitojen uudelleentoisto).
• Folder Shuffle All (kansion kaikkien raitojen uudelleentoisto
satunnaisessa järjestyksessä).
Vahvista painamalla [ ] (6) tai palaa takaisin painamalla [ ] (4).
EQUALIZER – Valitse seuraavista kuudesta ääniasetuksista:
Normal, Pop, Rock, Classic, Bass tai Custom EQ (konfiguroi
oma ääniasetus).
Valitse painamalla [ ] (8) ja [ ] (11). Vahvista [ ] (6) tai
palaa takaisin painamalla [ ] (4).
Oman ääniasetuksen asettaminen Custom EQ:
1. Valitse Custom EQ ja vahvista
painamalla [ ].
2. Merkitse se palkki (taajuusalue),
jonka haluat muuttaa painamalla
[ ] (8) ja [ ] (11) -painikkeilla.
3. Muuta palkin arvoa painamalla
[ ] (5) ja [ ] (10).
4. Jatka samalla tavalla muuttaaksesi
muiden palkkien asetukset.
5. Tallenna asetukset painamalla
[ ] (6).
3D - 3D-tehoste (antaa äänelle tilavaikutelman).
1. Off (pois päältä) tai On (päällä).
2. Tallenna asetukset painamalla [ ] (6).
PLAY RATE – Valitse toistonopeus.
1. Valitse 1.00X – 1,14X – 1,33X – 0,67X – 0,80X.
2. Tallenna asetukset painamalla [ ].
Huom.! Play rate ei toimi WMA-formaatissa.
FILE BROWSE – Katso tiedostot.
1. Valitse haluamasi raita painamalla [ ] (8) ja [ ] (11).
2. Toista valittu raita painamalla [ ] (6).
CLASSIFICATION – Kappaleiden luokittelu lajityypin, artistin,
levyn ja nimen perusteella.
1. Jos käytät toimintoa ensimmäistä kertaa, valitse
Classification ja valitse Yes painamalla [ ] (8) ja [ ]
(11). Valitse seuraavaksi Refresh.
2. Hyväksy ja avaa asetukset painamalla [ ] (6).
3. Paina [ ] (8) tai [ ] (11) valitaksesi luokittelutavan:
Lajityyppi, esittäjä, albumi ja raita.
4. Tallenna asetukset painamalla [ ].
6.2 Lyrics (sanat)
Soitin tukee tekstinäyttöä toiston aikana. Soitin näyttää ainoastaan LRC-formaatin tekstejä. Lisää tekstejä seuraavalla tavalla:
1. Lataa internetistä ”.Irc”-tyyppisiä tekstejä.
2. Varmista, että tekstillä on sama nimi kuin musiikkitiedostolla.
3. Tallenna molemmat tiedostot soittimen samaan kansioon.
4. Teksti näkyy näytöllä toiston aikana.
6.3 Photo (kuvien katselu)
Soittimella voidaan katsella kuvia, jotka ovat jpg- tai
bmp-muodossa.
6.3.1 Kuvien katselu
1. Siirry päävalikkoon painamalla
pohjaan [ ] (4) .
2. Valitse Photo painamalla
[ ] (8) ja [ ] (11) ja paina sen
jälkeen [ ] (6). Näytöllä näkyy
lista valokuvatiedostoista.
3. Valitse kansio tai kuva painamalla
[ ] (8) ja [ ] (11) ja katso kuva
painamalla [ ].
4. Siirry päävalikkoon painamalla pohjaan [ ] (4).
Samalla kun katsot kuvia, voit:
• Selata: Palaa edelliseen kuvaan painamalla (8) tai siirry
seuraavan kuvaan painamalla (11).
• Aloittaa kuvaesityksen. Aloita kuvaesitys painamalla [ ] (6).
• Palaa edelliseen valikkoon painamalla pohjaan [ ] (4).
6.4 Video (Video)
Sisäänrakennettu videosoitin toistaa
videotiedostoja, jotka ovat MTVmuodossa. Videotiedostot voidaan
muuttaa MTV-muotoon pakkauksen
cd-levyllä olevan ohjelman avulla.
Katso kohta 7. Videotiedostojen
muuttaminen.
6.4.1 Toisto
1. Siirry päävalikkoon painamalla pohjaan [ ] (4).
2. Valitse Video painamalla [ ] (8) ja [ ] (11) ja paina sen
jälkeen [ ] (6). Videolista näkyy näytöllä.
3. Valitse kansio tai video painamalla [ ] (8) ja [ ] (11) ja
avaa kansio tai toista tiedosto painamalla [ ].
4. Palaa takaisin painamalla [ ] (4).
Videon toiston aikana voit:
• Pitää tauon ja jatkaa toistoa: Keskeytä toisto painamalla
[ ] (6). Jatka toistoa painamalla painiketta uudestaan.
• Vaihtaa videota: Siirry edelliseen tai seuraavaan videoon
painamalla [ ] (5) tai [ ] (10).
• Pikakelaa: Pikakelaa videota taakse- tai eteenpäin
painamalla pohjaan [ ] tai [ ].
• Säätää äänenvoimakkuutta: Säädä äänenvoimakkuutta
painamalla [ ] (8) tai [ ] (11) .
• Sammuttaa laitteen: Palaa takaisin valikon listaan
painamalla pohjaan [ ] (4).
Suomi
Ver. 201106
SUOMI • a siakaspal velu puh. 0 20 111 22 22, sähköpo sti info@ clasohlson. fi, kotis ivu www.cl asohlson.fi
Page 8

6.5 FM Radio (radio)
6.5.1 Radion kuunteleminen
1. Palaa päävalikkoon painamalla
[ ] (6).
2. Valitse FM Radio painamalla
[ ] (8) ja [ ] (11) ja paina
sen jälkeen [ ].
6.5.2 Näytön kuvakkeiden
selitykset
1
2
3
4
6.5.3 Manuaalinen kanavahaku
• Käytä manuaalista kanavahakua painamalla
[ ] (5) tai [ ] (10).
6.5.4 Radion toiminnot
Paina [ ] (5) tai [ ] (10) (radiotilassa) valitaksesi seuraavista
toiminnoista: Save Station (tallenna asema), Auto Scan
(automaattinen kanavahaku), Band (taajuusalue/alue), Record
(tallennus radiosta). Siirry painamalla [ ] (8) ja [ ] (11) ja
vahvista painamalla [ ] (6).
SAVE STATION (valitun aseman
manuaalinen tallentaminen)
Siirry haluamaasi taajuuteen painamalla [ ] (5) tai [ ] (10). Avaa alavalikko painamalla [ ] (9), valitse Save
Station ja vahvista painamalla [ ].
Tallennetut asemat näkyvät näytöllä,
siirry haluamaasi ohjelmanumeroon
ja vahvista painamalla [ ] (6). Valitse
Yes painamalla [ ] (8) ja [ ] (11)
ja vahvista painamalla [ ].
AUTO SCAN (automaattinen kanavahaku)
Siirry Auto Scan -hakuun painamalla [ ] (8) ja [ ] (11).
Soitin hakee automaattisesti vahvimmat signaalit. Näytöllä
lukee haun aikana ”Searching…”. Soittimeen voi tallentaa
maks. 20 asemaa kanavapaikoille CH01 – CH20.
Siirry kanavien välillä painamalla [ ] (5) tai [ ] (10).
BAND (taajuusalue/alue)
Valitse oikea taajuusalue/alue sen mukaan, missä
soitinta käytetään.
US (USA) (87,5-108,0 MHz)
Europe (Eurooppa) (87,5-108,0 MHz)
Japan (Japani) (76,0-90,0 MHz)
1. Siirry haluamaasi alueeseen painamalla [ ] (8) ja [ ] (11)
ja vahvista painamalla [ ] (6).
2. Palaa takaisin painamalla [ ] (4).
5
6
1. Näppäinlukon kuvake
2. Äänenvoimakkuus
3. Valittu taajuus
4. FM-alue
5. Akun varaustaso
6. Taajuuden merkintä
RECORD (tallennus radiosta)
1. Siirry kohtaan Record painamalla [ ] (8) ja [ ] (11)
ja vahvista painamalla [ ] (6).
2. Pidä tauko tallennuksessa painamalla [ ], jatka soittoa
painamalla uudelleen.
3. Palaa tallennukseen painamalla [ ] (4).
4. Tallenna nauhoitus ja palaa radion kuunteluun
painamalla [ ] (2).
Huom.!
• Tallennetut tiedostot tallentuvat soittimen FM-kansioon WAVtiedostoina ja niitä voidaan kuunnella VOICE-tilassa.
• FM-nauhoitus pysähtyy automaattisesti, jos muistin tila ei
riitä, tai jos akun varaustaso on heikko. Päivämäärä tallentuu
automaattisesti.
• Äänenvoimakkuutta ei voida säätää nauhoitettaessa.
6.6 Voice (puheen tallennus)
Puheen tallentaminen
1. Siirry päävalikkoon painamalla
[ ] (4).
2. Valitse Voice painamalla [ ] (8)
ja [ ] (11) ja vahvista painamalla
[ ] (6).
3. Siirry kohtaan Record ja aloita
tallennus painamalla [ ].
• Tauko ja tallennuksen jatkaminen:
Keskeytä tallennus painamalla
[ ]. Jatka tallennusta painamalla
uudestaan [ ].
• Tallennuksen aloittaminen: Tallenna nauhoitus painamalla
ja palaa tallennustilaan painamalla [ ] (2).
Huom.!
• Nauhoitetut äänitiedostot tallennetaan soittimen VOICEkansioon WAW-tiedostoina (formaatti: MIC00001.WAV,
MIC00002. WAV).
• Nauhoitus keskeytyy automaattisesti, kun muisti on
täynnä tai akku on liian tyhjä. Jo nauhoitettu ääni tallentuu
automaattisesti päivämäärän kanssa.
Tallennuslaadun asettaminen
1. Siirry päävalikkoon painamalla [ ] (4).
2. Valitse Setup painamalla [ ] (8) ja [ ] (11) ja vahvista
painamalla [ ] (6). SETUP-valikko näkyy näytöllä.
3. Valitse Record Setting painamalla [ ] (8) tai [ ] (11) ja
vahvista painamalla [ ].
Näytöllä on seuraavat vaihtoehdot:
• Long Time: Kuluttaa vähiten muistia, normaali laatu.
• Normal Quality: Kuluttaa vähemmän muistia, parempi laatu.
• High Quality: Kuluttaa eniten muistia, paras laatu.
4. Valitse painamalla [ ] (8) ja [ ] (11).
5. Vahvista painamalla [ ].
6. Palaa päävalikkoon painamalla [ ].
6.7 E-Book (tekstin näyttö)
Soitin voi näyttää tekstiä tekstiformaatissa (.txt). Muut tiedostoformaatit
tulee ensin muuntaa tekstiformaattiin,
ennen kuin ne siirretään soittimeen.
Huom.!
Kun lopetat lukemisen, soitin muistaa
viimeksi luetun sivun ja avaa tekstin
tältä sivulta, kun tekstiohjelma avataan
seuraavan kerran.
1. Siirry päävalikkoon painamalla [ ] (4).
2. Valitse E-Book painamalla [ ] (8) tai [ ] (11). Vahvista
painamalla [ ] (6).
3. Valitse kansio ja tiedosto painamalla [ ] (8) tai [ ] (11) ja
avaa kansio ja katso valittuja tiedostoja painamalla [ ].
4. Palaa takaisin päävalikkoon painamalla [ ] (8) ja [ ] (11).
Lukiessasi E-Book-kirjaa käytössäsi on seuraavat toiminnot:
• Auto Paging (automaattinen sivunvaihto): Käynnistä
automaattinen sivunvaihto 6 sekunnin välein painamalla
[ ] (6). Sammuta toiminto painamalla uudelleen [ ].
• Page Up/Down (sivunvaihto): Vaihda sivua painamalla
[ ] (8) ja [ ] (11).
• Fast Browse (pikakelaus): Pikakelaa painamalla pohjaan
[ ] (8) ja [ ] (11) .
• Exit (lopeta): Palaa takaisin painamalla [ ] (4).
• E-Book Function Menu (toimintovalikko): Paina [ ] (9).
Valitse prosenttiluku (kirjan kohta) painamalla [ ] (5) tai
[ ] (10) ja paina sen jälkeen [ ]. Soitin siirtyy prosenttiluvun mukaiselle sivulle.
• Keskeytä ja siirry edelliseen valikkoon painamalla [ ] (2).
6.8 File Browse (tiedostojen
katseleminen)
1. Palaa päävalikkoon painamalla
[ ] (4).
2. Paina [ ] (8) tai [ ] (11) ja
valitse File Browse. Näytöllä näkyy
tiedostolista.
3. Paina [ ] (8) tai [ ] (11) ja
valitse haluamasi tiedosto.
Avaa tiedosto painamalla [ ] (6).
4. Paina [ ] (8) tai [ ] (11) ja
valitse haluamasi tiedosto.
Poista tiedosto painamalla [ ] (9).
5. Delete (poista): valitse Yes (poistaaksesi tiedoston) tai
No (keskeyttääksesi poiston).
6. Vahvista painamalla [ ].
6.9 SETUP (asetukset)
1. Siirry päävalikkoon standby- tai
toistotilassa painamalla pohjaan
[ ] (4).
2. Valitse Setup painamalla [ ] (8)
ja [ ] (11) ja paina sen jälkeen
[ ] (6).
3. Valitse Setup-asetuksista
painamalla [ ] (8) ja [ ] (11).
4. Siirry alavalikkoon painamalla
[ ] (6).
5. Säädä painamalla [ ] (8) ja
[ ] (11).
6. Vahvista painamalla [ ]. Palaa vahvistamatta painamalla [ ].
Asetusten selitykset
POWER (valitse, jos haluat, että soitin sammuu automaattisesti,
kun sitä ei käytetä). Vaihtoehtoina Auto Off: 15, 30, 60, 90 ja
120 minuuttia, Always On = aina päällä.
LANGUAGE (valikkokielen asettaminen). Valitse kielen näyttö.
Esiasetuksena on englanti.
DISPLAY(näyttö)
Brightness (kirkkaus): Low (alhainen), Medium (keskikirkas),
High (korkea) tai Maximum (erittäin kirkas).
Backlight (taustavalo): Valitse seuraavista: 15 tai 30 sekuntia,
1 minuutti tai Close = aina päällä.
RECORD SETTING (tallennuslaadun valinta): Long Time
(heikoin laatu), Normal Quality (normaali laatu) tai High Quality
(korkein laatu).
SYSTEM TOOLS (järjestelmäasetukset)
• Delete: Tiedoston poisto.
• Format: Muistin alustaminen (kaikki tiedostot poistetaan).
• Reset: Tehdasasetusten palauttaminen.
• System Info: näyttää soittimen firmware-version ja
vapaan muistin.
• Refresh: soittolistan päivittäminen.
• File Sort: kaikkien tiedostojen järjestäminen.
Huom.! Tee varmuuskopio kaikista tallennettavista tiedostoista
tietokoneelle, dvd-levylle tms. ennen alustusta, sillä kaikki
tiedostot häviävät alustuksessa.
7. Videotiedostojen
muuttaminen
Sisäänrakennettu videosoitin toistaa videotiedostoja, jotka ovat
MTV-muodossa. Tiedostomuodot AVI, WMV, MEPG1, Quick
Time, MPEG2, RealMedia, MPEG4 ja 3GP voidaan muuttaa
pakkauksen muunto-ohjelmalla.
7.1 Muuntamisohjelman
käynnistäminen
1. Aseta mukana tuleva cd-levy tietokoneen cd-asemaan.
2. Kaksoisnapsauta cd-levyn kansiossa MTV Video Converter
kohtaa VideoConvert.exe. Muuntamisen ikkuna näkyy näytöllä.
7.2 Videokuvan muuntaminen
1. Käynnistä ohjelma yllä olevien ohjeiden mukaisesti.
2. Napsauta Input Video ja valitse tiedostoja listalta.
Muuntaminen
Avaa-ruutu
Huom.! Lisää mp4-tiedostoja valitsemalla All Files (*.*)
ruudussa File of type. Tällöin myös mp4-tiedostot näkyvät
Open-ruudussa.
3. Napsauta Output Video ja valitse kansio, johon tiedostot
tallennetaan.
4. Napsauta Advanced Setting. Valitse 160 x 128 ruudussa
Output Frame Size ja valitse MTV ruudussa Output Format.
5. Napsauta Start Conversion.
Katso lisäohjeita napsauttamalla Help.
Huom.! Jotta videon voisi toistaa, valitse 160 x 128 tai
pienempi Output Frame Size -ruudussa (Advanced Setting).
Muuten ruudulla näkyy tiedostoa toistettaessa viesti ”Device
Not Supported”.
Huom.! Sinun tulee asentaa oikeat kodekit ennen kuin voit
käyttää Video Converter.exeä.
Muussa tapauksessa näytöllä lukee “Load Video Failed!”, kun
yrität konvertoida tiedostoja. Napsauta OK ja lataa kodekit
Internetistä.
• Kodekit eivät kuulu pakkaukseen.
8. Vianetsintä
Ongelma Ratkaisu
Soitin ei käynnisty.
Soittimelle ei voi
siirtää tiedostoja.
Kuulokkeista ei
kuulu mitään.
Tallentaminen
radiosta tai mikrofonilla ei onnistu.
Näytön teksti ei
näy oikein.
Näppäimet
eivät toimi.
Radiovastaanotto
on huono.
Lataa akku. Paina virtakytkintä [ ]
vähintään viiden sekunnin ajan.
Varmista soittimen ja tietokoneen
väliset liitännät.
Tarkista äänenvoimakkuus ja että
kuulokkeet on liitetty oikein.
Varmista, että soitin tukee kyseistä
ääniformaattia.
Varmista, että soittimessa on
tarpeeksi vapaata muistitilaa.
Varmista, että olet valinnut
oikean kielen.
Palauta soittimen tehdasasetukset
painamalla RESET-painiketta esim.
paperiliittimen päällä.
Näppäinlukitus on aktivoitu.
Palauta soittimen tehdasasetukset
painamalla RESET-painiketta esim.
paperiliittimen päällä.
Varmista, että kuulokkeet on liitetty
oikein. Kuulokkeiden johto toimii
radioantennina.
Säädä soittimen ja kuulokkeiden
asentoa. Siirry paikkaan, jossa
radiovastaanotto on parempi.
Soittimen läheisyydessä olevat
sähkölaitteet saattavat häiritä radiovastaanottoa. Sulje mahdollisesti
häiriötä aiheuttavat laitteet tai siirry
pois niiden läheisyydestä.
9. Huolto ja ylläpito
Pyyhi kevyesti kostutetulla liinalla. Älä käytä voimakkaita
puhdistusaineita tai liuottimia.
10. Kierrätys
Kierrätä tuote asianmukaisesti, kun poistat sen käytöstä.
Tarkempia kierrätysohjeita saat kuntasi jäteneuvonnasta.
11. Tekniset tiedot
Näyttö 1,44″ CSTN Colour
Erotuskyky 160 x 128
Musiikkitiedoston formaatit MP3/WAV/WMA
Kuvaformaatit JPG/BMP
Videoformaatti MTV
MP3 bit rate 8-320 Kbps
WMA bit rate 5-320 Kbps
Tallennusformaatti WAV
Taajuusalue 20 Hz – 20 KHz
S/N-taso > 80 dB (30K filter)
Vääristymä < 0,2 %
Dynamiikka 15 mA
Säilytys Ilmankosteus < 90 %,
Lämpötila -20... 60 °C
Käyttö Ilmankosteus < 85 %,
Lämpötila -10... 40 °C
EQ Normal/Pop/Rock/Classic/Jazz/
Bass/Custom EQ/3D
Virtalähde Sisäinen ladattava akku, 170 mAh
(kuuntelet 9 tuntia musiikkia tai
katsot 3 tuntia videoita)
Muisti 4 Gt
Mitat 84 x 40 x 8 mm
Paino n. 24 g (ilman lisätarvikkeita)
Suomi
Ver. 201106
SUOMI • a siakaspal velu puh. 0 20 111 22 22, sähköpo sti info@ clasohlson. fi, kotis ivu www.cl asohlson.fi
 Loading...