

Page 1
Bluetooth Speaker Dock
for iPhone/iPad/iPod
Bluetooth-högtalare för iPad/iPod/iPhone
Bluetooth-høyttaler for iPad/iPod/iPhone
Bluetooth-kaiutin iPadille/iPodille/iPhonelle
Bluetooth-Lautsprecher für iPad/iPod/iPhone
EnglishSvenskaNorskSuomi EnglishSvenskaNorskSuomiDeutsch
Art.no Model
38-5040 iWood 55 BT STAND
Ver. 20130705
Page 2

2
Page 3

Bluetooth Speaker Dock for
iPhone/iPad/iPod
Art.no 38-5040 Model iWood 55 BT
Please read the entire instruction manual before using the product and save it for
future reference. We reserve the right for any errors in text or images and any necessary
changes made to technical data. If you have any questions regarding technical problems
please contact our Customer Services.
Safety
• Follow all the instructions in the instruction manual and heed all warnings.
• Do not place the product where there is a risk of it falling into water or other liquid.
Do not place any objects which contain liquid onto the product such as vases,
drinks, etc.
• The ventilation ports must not be blocked in any way. Make sure that there is
adequate air circulation to prevent overheating. Make sure that the product is
placed in a location that there is adequate surrounding air circulation and that no
sources of heat are in near proximity.
• This product should only be repaired by a qualified service technician.
• The product should not be taken apart or modified. Certain exposed parts inside
the casing carry dangerous current. Touching these can lead to fire or electric shock.
• The product is designed for indoor use only.
• Never subject the product to high temperature, dust, heavy vibration, impacts,
humidity or moisture.
• The mains lead should be checked regularly. Never use the product if the mains
lead or its plug is damaged or if the product is not functioning properly.
• The mains lead must be changed if damaged. This is to prevent the risk of electric
shock or fire and should only be carried out by the manufacturer, qualified service
facility or qualified technician.
• Never lay the mains lead over hot surfaces or pull it round sharp edges or corners.
Place the mains lead out of the way of all foot traffic.
• Only use the stand that is included with this product. Place the product on steady
level surface to prevent the risk of it tipping over.
• Unplug the product from the wall socket during thunder storms or if it is not to be
used for a long time. The product’s plug should always be easily accessible.
English
3
Page 4
English
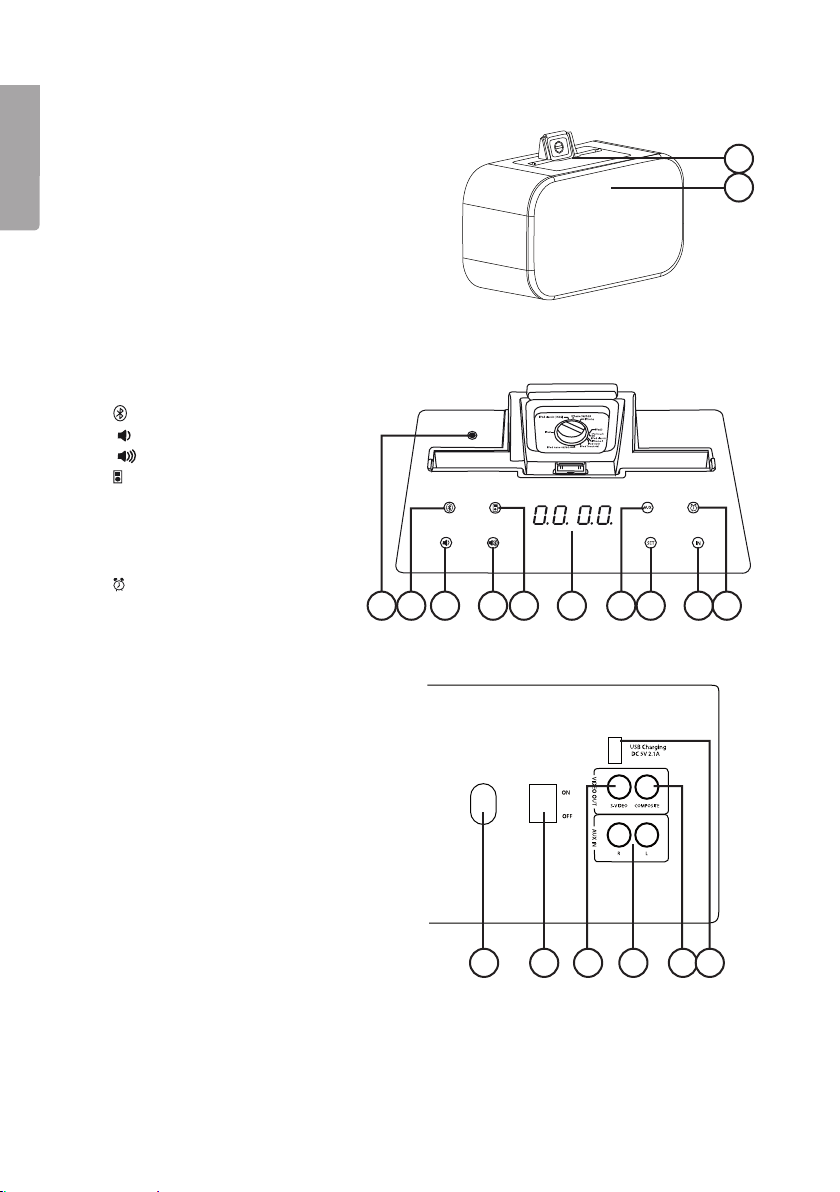
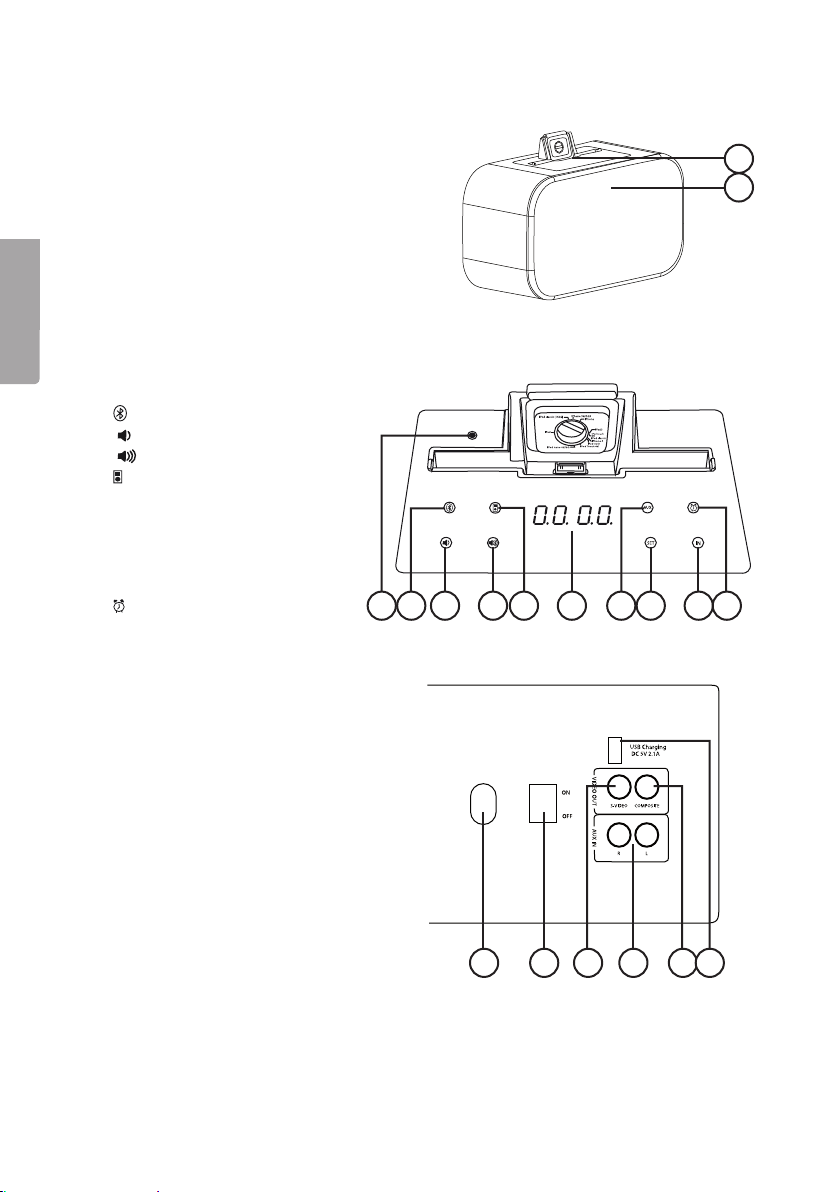
Buttons and functions
1. iPad/iPod/iPhone
docking station
2. Remote control’s IR sensor
3. 3.5 mm AUX input socket
4.
Bluetooth indicator
5. [ ] Decrease volume
6. [ ] Increase volume
7. iPhone/iPad/iPod indicator
8. LED display
9. AUX indicator
10. [SET] Settings
11. [IN] Input selector
12. Alarm indicator
1
2
3 4 5 6 7 8 9 10 11 12
13. AC input socket
14. On/off switch
15. S-Video output socket
16. RCA audio input socket
17. Composite video output
18. USB port (charging only)
13 14 15 17 18
4
16
Page 5
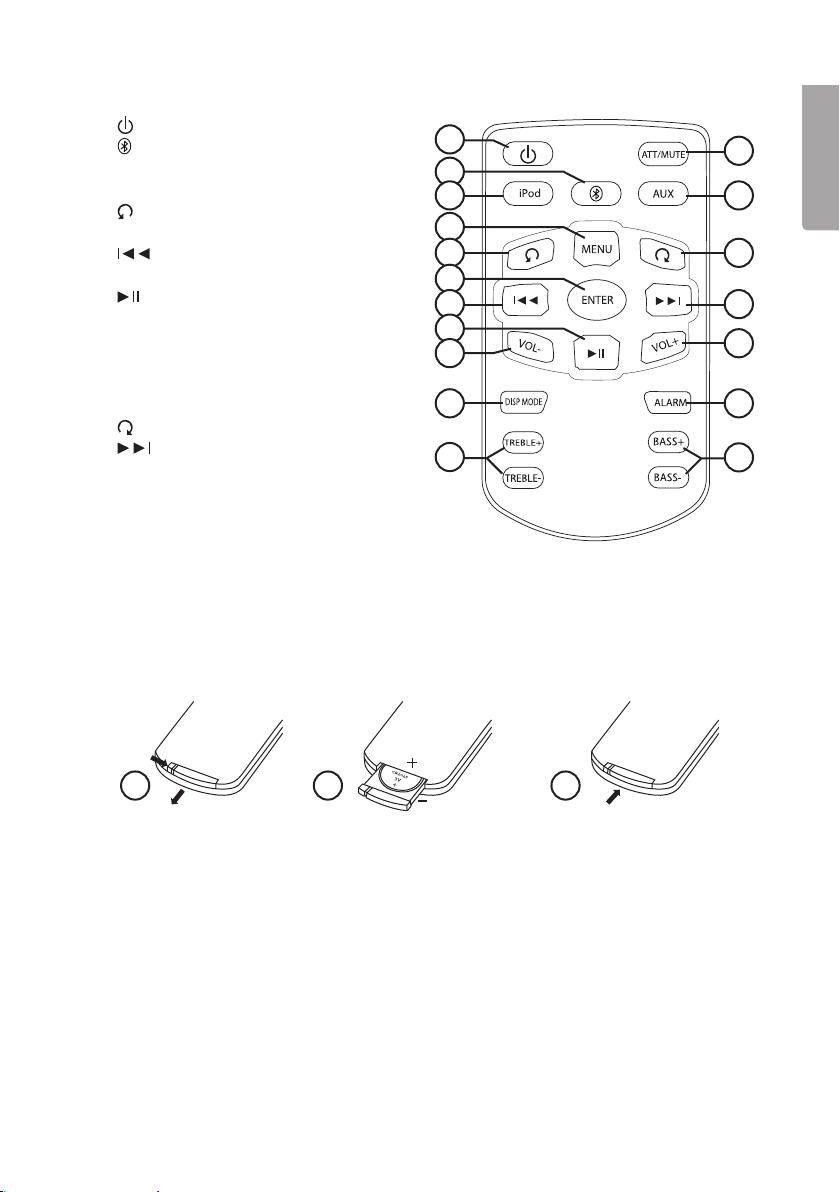
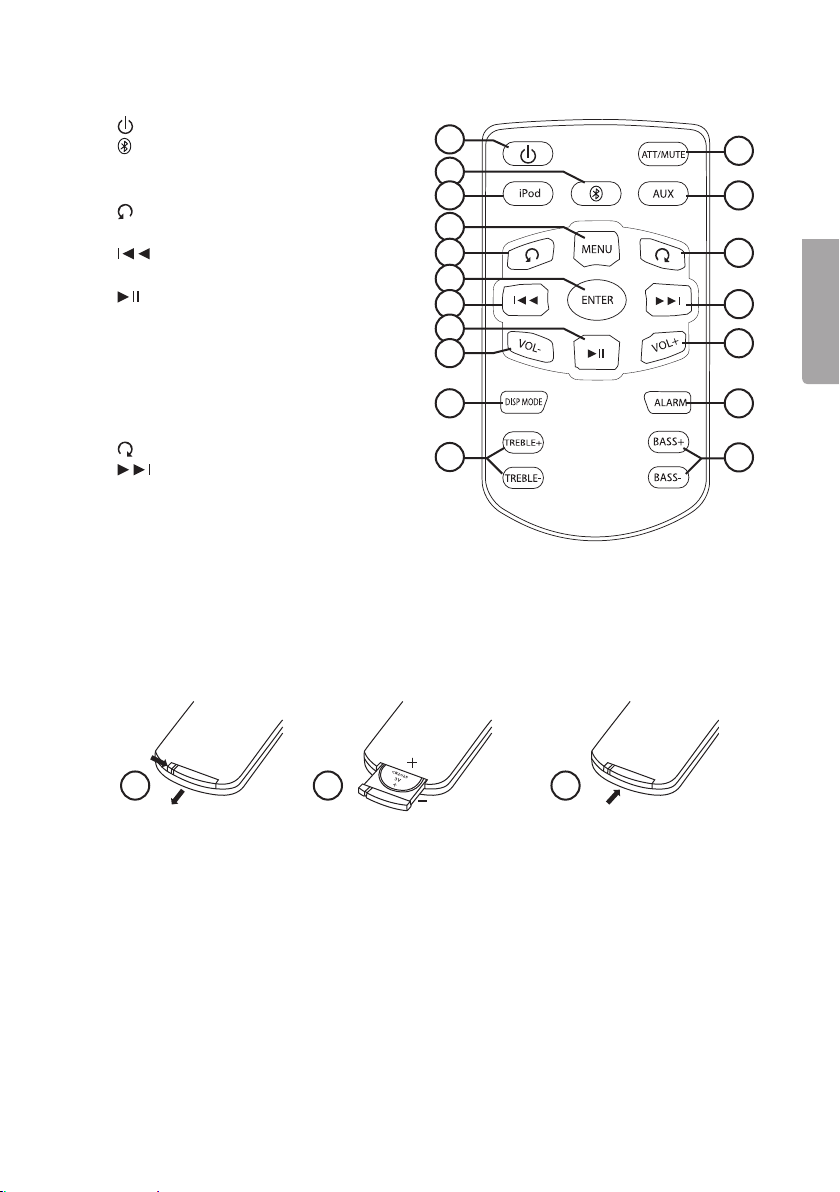
Remote control
19. [ ] Standby
20. [
] Bluetooth
21. [iPod] iPod selector
22. [MENU] Menu
] Menu up
23. [
24. [ENTER] Confirm
25. [ ] Previous track/fast rewind/
time settings
26. [
] Play/pause
27. [VOL -] Decrease volume
28. [DISP MODE] Backlight control
29. [TREBLE] Treble control
30. [ATT/MUTE] Lowers and mutes audio
31. [AUX] External audio source
] Menu down
32. [
33. [ ] Next track/fast forward/
time settings
34. [VOL +] Increase volume
35. [ALARM] Alarm settings
36. [BASS] Bass control
19
20
21
22
23
24
25
26
27
28
29
Inserting batteries into the remote control
30
31
32
33
34
35
36
English
1 2 3
1. Press in the latch on the side of the remote control and slide the battery holder out.
2. Insert a CR2025 battery according to the markings in the battery compartment.
3. Reinsert the battery holder.
Note:
• Use only the size and type of battery specified and ensure correct insertion.
• Never subject the remote control to knocks or blows.
• Remove the batteries if the remote control is not to be used for a long period.
5
Page 6
English
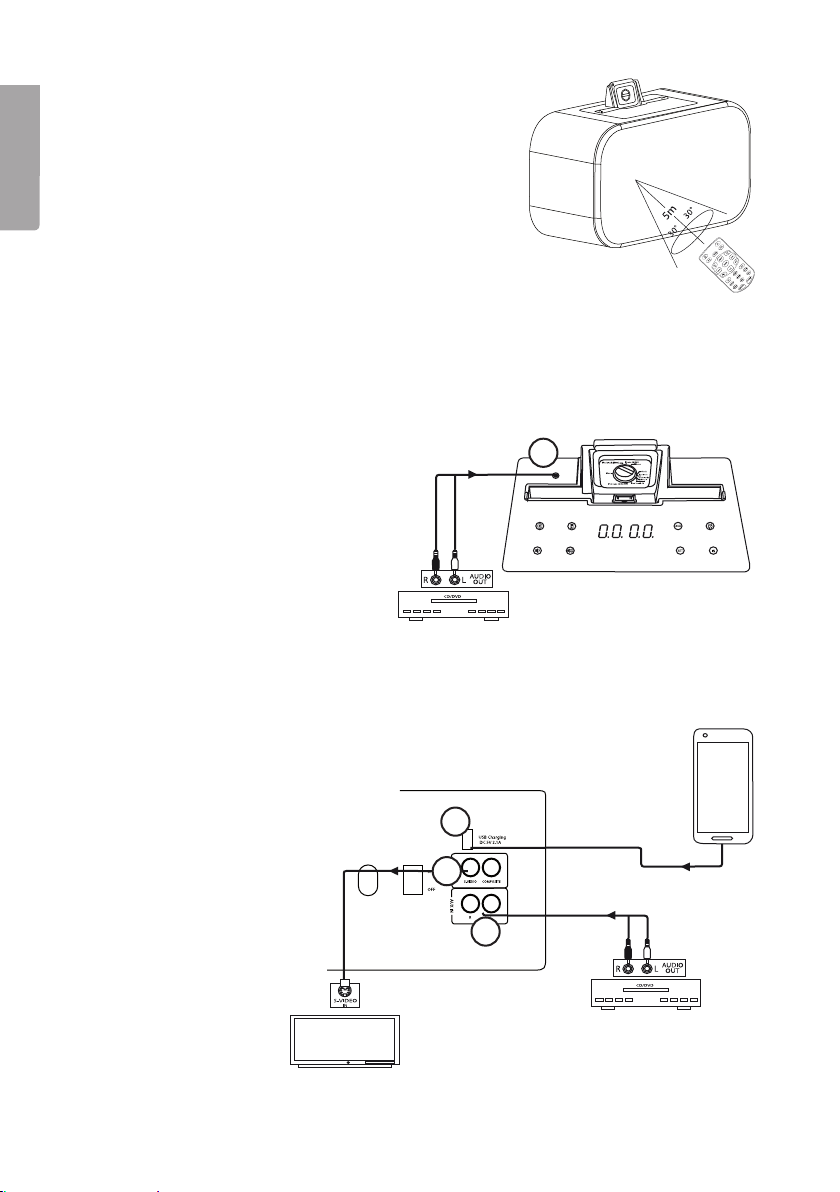
Using the remote control
Aim the remote control towards the top of
the speaker. Range: 5 metres within a max
angle of 30°.
Causes of interference:
• Intense lighting
• Obstacles between the remote and IR sensor.
• Simultaneous use of other remotes.
• Weak batteries.
Connections
Connections on top of speaker dock
Aux input for external audio sources
(3) such as CD/DVD players.
Note: When an external audio source
is connected to this 3.5mm AUX-IN
socket, the audio from any docked
iPad / iPhone / iPod will be muted.
Connections on the back or the speaker dock
• USB port (18) (charging only)
• Aux input for external audio
sources (16) such as
CD/DVD players.
• Output video (in iPod/
iPhone/iPad only) to an
external display such as
TV (15).
18
15
16
3
6
Page 7
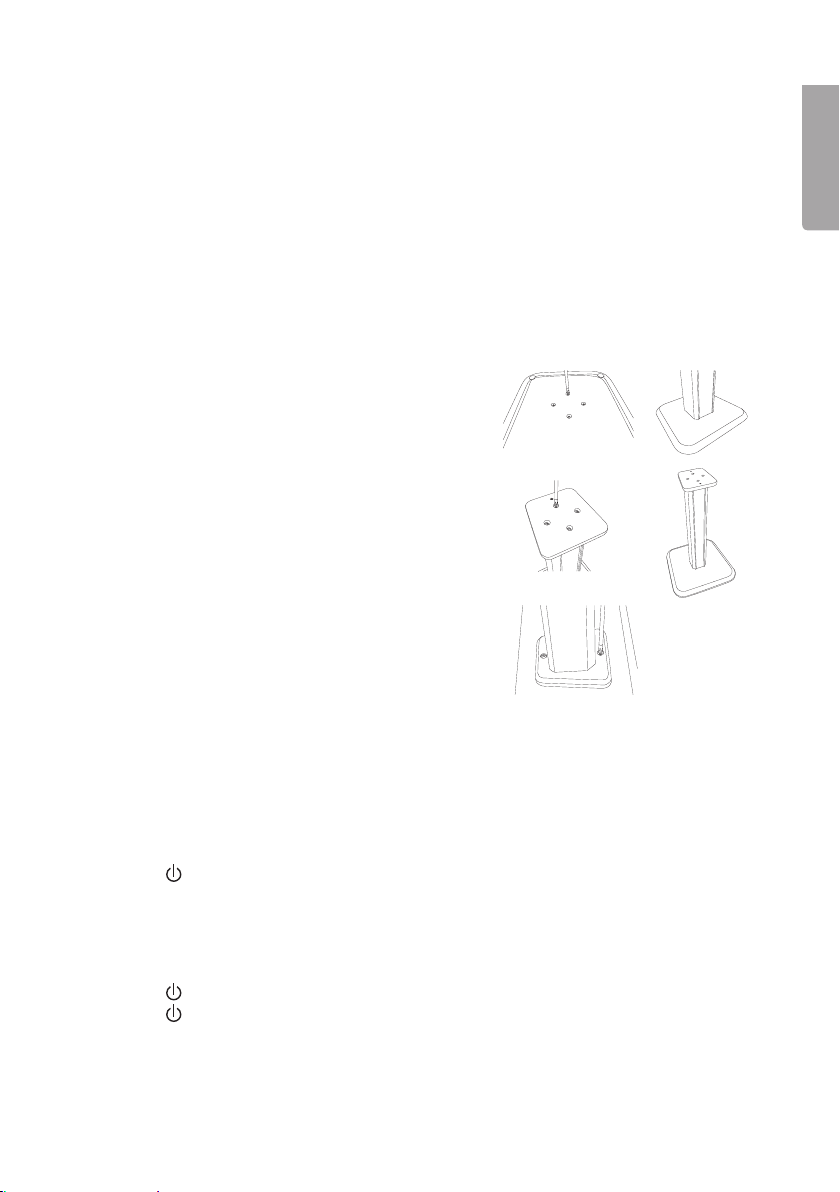
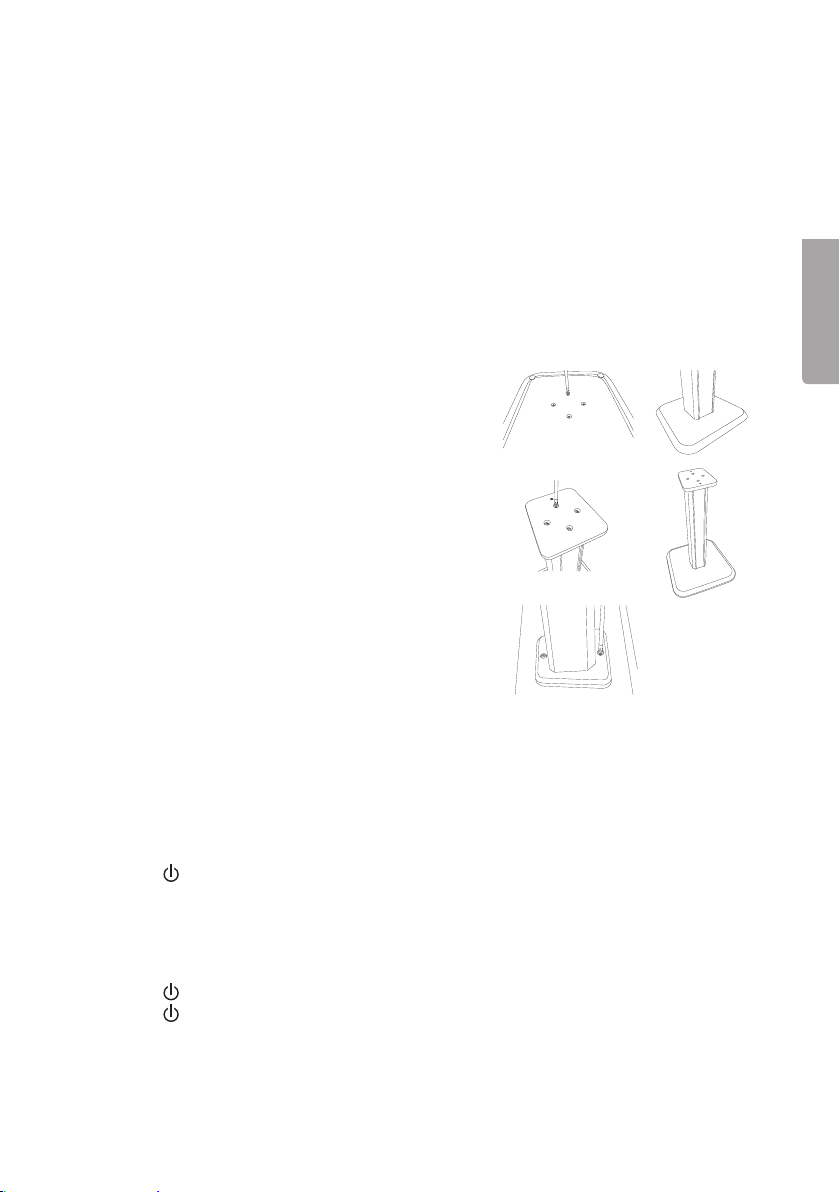
Assembly
The speakers can be used with or without the foot.
Use without the foot
Rubber feet are pre-mounted onto the speaker to protect underlying surfaces if you
choose not to use the foot.
1. Place the speaker on an even and stable surface and ensure that the surface can
support the speaker’s weight.
2. Make sure that the speaker is secure and cannot fall or be jarred from its position.
Use with foot
1. Line up the foot’s base with the pre-drilled
screw holes in the base and secure the base
to the foot using the included screws.
Note: Do not use a mechanised screwdriver. Use
a manual screwdriver and do not over-tighten.
2. Line up the foot’s base with the pre-drilled
screw holes in the base and secure the base to
the foot using the included screws.
Note: Do not use a mechanised screwdriver. Use
a manual screwdriver and do not over-tighten.
3. Fit the foot’s base between the speaker’s
rubber feet and secure the base with the included screw. Note: Do not use a mechanised
screwdriver. Use a manual screwdriver and do
not over-tighten.
English
Operating instructions
Switching the speaker dock on
1. Turn the speaker on using the on/off switch. The speaker will come on in standby
mode and the display will show the time.
2. Press [ ] on the remote control or [VOL+] or [VOL-] on the touchpanel.
3. The buttons on the touch panel will illuminate and the name of the audio/video
source which was used last will be displayed.
Standby
1. Press [ ] on the remote control. The light on the touch panel buttons will go out.
2. Press [ ] on the remote control again to turn the device back on.
The indicator will show the audio source.
3. The device can also be switched to standby mode by pressing the [VOL-] and
[VOL+] buttons simultaneously.
4. Pressing either [VOL-] or [VOL+] will turn the device back on.
7
Page 8

English
Att/Mute
If the sound level is higher than 10 dB:
• Press [ATT/MUTE] once to lower the volume down to 10 dB.
• Press again to mute.
• Press a third time to return to original volume level.
If the sound level is already 10 dB or below:
• Press [ATT/MUTE] once to mute.
• Press again to return to the original volume level.
Input
• Press [IN] on the touch penel to toggle between the various audio sources:
AUX → iPod → BT
Or alternatively:
• Press [iPod], [AUX] or [
The selected audio source will show on the display.
] on the remote control to select the audio source.
Volume
• Press [ ] or [ ] on the touch panel to raise or lower the volume.
Or alternatively:
• Press [VOL+] or [VOL-] on the remote control to raise or lower the volume.
The volume level will show on the display.
Treble
• Press [TREBLE +] or [TREBLE -] on the remote control. Adjustment range: ± 14 dB.
• The set treble level will show on the display.
Bass
• Press [BASS+] or [BASS-] on the remote control. Adjustment range: ± 14 dB.
• The set bass level will show on the display.
Setting the time
Using the touch panel
1. Press [SET].
2. Use [VOL+] or [VOL-] to set the hours.
3. Press [SET] again.
4. Use [VOL+] or [VOL-] to set the minutes.
5. Press [SET] to confirm.
8
Page 9

Using the remote control
1. Press the [ALARM] button on the remote control. “TIME” will show on
the display. Press [ENTER].
2. The hour digits will begin flashing. Set the hours using [ ] and [ ].
Press [ENTER] to confirm.
3. The minute digits will begin flashing. Set the minutes using the [ ] and [ ] buttons.
Press [ENTER] to confirm. Note: The clock only has a 24-hour display format.
4. The set time will be displayed.
Sleep (automatic shut-off)
Using the touch panel
1. Press [SET] twice. ”SL00 is shown on the display.
2. Set the shut-off timer to the desired time using [VOL+] or [VOL-].
Select one of the set times (0–90 minutes).
3. Press ”SET” to confirm.
Using the remote control
1. Press [ALARM] twice.“SL00” is shown on the display.
2. Set the shut-off timer to the desired time using [ ] or [ ]: Select one of
the set times (0–90 minutes)
3. Press [ENTER] to confirm.
Alarm
Using the touch panel
1. Press [SET] three times.
2. Use [VOL+] or [VOL-] to switch between ON and OFF.
3. Confirm with [SET].
4. Use [VOL+] or [VOL-] to set the hours.
5. Confirm with [SET].
6. Use [VOL+] or [VOL-] to set the minutes.
7. Confirm with [SET].
English
9
Page 10

English
Using the remote control
1. Press [ALARM] three times. “ALM” will begin flashing. Press [ENTER] to confirm.
2. Toggle to ON using [ ] or [ ]. Press [ENTER] to confirm.
3. The hour digits will begin to flash. Set the hours using [ ] or [ ].
Note: The clock only has a 24-hour display format. Press [ENTER] to confirm.
4. The minute digits will begin to flash. Set the minutes using [ ] or [ ].
Press [ENTER] to confirm.
5. Once the alarm time has been set, you can set the type of alarm. Toggle between
the various setting using [ ] or [ ]. BUZZ → iPod/iPad/iPhone. Press [ENTER]
to confirm.
6. If iPod/iPhone/iPad is chosed for alarm, the volume level for iPod/iPhone/iPad
alarm will flash, set the desired alarm volume level using [ ] or [ ].
7. Turning off the alarm:
- Press [ ] on the remote control to turn off the alarm directly.
- Press any button on the touch panel or remote twice to turn off the alarm.
- Press [ ] once after the alarm has been turned off to turn the speaker back on.
Snooze
Press any button on the touch panel or remote control except for [ ] to activate
the snooze function. The alarm will sound again after nine minutes.
Alarm deactivation
Deactivate the alarm as follows: Follow alarm setting steps 1 and 2 and then press
[ ] on the remote control to turn the alarm on/off.
Time display
• Press [DISP MODE] to select whether or not the time will be displayed while the
speaker is in standby mode. The display will then show ”ON” or ”OFF” depending
on the mode it was last set to.
• Press[DISP MODE] to select the desired mode.
ON: The time will be displayed while the speaker is in standby mode.
OFF:The time will not be displayed while the speaker is in standby mode.
iPod/iPhone/iPad connection
Use the settings dial to select the correct
device. Connect your iPod/iPhone/iPad
device. Make sure that the speaker is
correctly set by pressing [iPod] on the
remote control or [IN] on the display.
10
Page 11

iPod/iPhone/iPad controls
The controls on the remote control work just like
the click-wheel on your Apple iOS device (refer to
your iOS device manual for details).
Note: When an external audio source is connected
to the 3.5 mm AUX-IN socket, the audio from any
docked iPad/iPod/iPhone will be muted.
Bluetooth
Please read the instruction manual of the device you wish to connect before beginning.
Using the remote control
1. Press [ ] to activate Bluetooth.
2. Hold down [ ] until the speaker switches to scan mode (scans for available Bluetooth
devices). The Bluetooth indicator will flash quickly and “SCAN” will be displayed.
3. Connect your Bluetooth device, such as mobile phone, to the speaker dock. Refer
to the instruction manual of the device you wish to connect for further instructions.
4. When the Bluetooth indicator flashes slowly, the connection has been successful.
You should now be able to hear the audio from the connected device through
the speaker.
Note: If you are asked for an activation code, enter 0000.
Using the touch panel
1. Press [IN] until “BT” is shown to activate Bluetooth.
2. Press [IN] and [SET] simultaneously until the speaker switches to scan mode
(scans for available Bluetooth devices). The Bluetooth indicator will flash quickly
and “SCAN” will be displayed.
3. Connect your Bluetooth device, such as a mobile phone, to the speaker dock. Refer
to the instruction manual of the device you wish to connect for further instructions.
4. When the Bluetooth indicator flashes slowly, the connection has been successful. You
should now be able to hear the audio from the connected device through the speaker.
English
AUX-IN
Connecting an external audio source to the top of the speaker dock
1. Plug an external audio source into the 3.5 mm socket on the top of the speaker
dock using a the 3.5 mm audio lead. It will switch to iPod mode automatically.
If the external audio source is already playing, it will also output
the audio signal automatically.
2. Press [iPod] on the remote control or [IN] on the speaker dock to change to iPod mode.
3. Start playback on the external audio source.
Note: When an external audio source is connected to the 3.5 mm AUX-IN socket,
the audio from any docked iPad/iPod/iPhone will be muted.
11
Page 12

English
Connecting an external audio source to the back of the speaker dock
1. Plug an external audio source into the RCA AUX socket on the back of
the speaker dock using an RCA audio lead (sold separately).
2. Press [AUX] on the remote control or [IN] on top of the speaker dock until
the display shows ”AUX”
3. Start playback on the external audio source.
USB charging
1. Connect a USB type A cable to the USB port on the back of the speaker dock.
2. Connect the other end of the cable to the device to be charged.
3. Please note that when an iPod/iPad/iPhone is connected to the speaker dock,
the USB charging function will disabled.
Care and maintenance
• Unplug the mains lead before cleaning the product.
• Clean the product using a soft, moist cloth. Use a mild detergent and never use
solvents or strong, abrasive cleaning agents.
Disposal
This product should be disposed of in accordance with local regulations.
If you are unsure how to proceed, contact your local authority.
Specifications
Power supply 230 V AC, 50 Hz
Power consumption 80 W
Standby power consumption ≤ 0.5 W
Output power L/R CH (nominal): 12 W + 12 W THD = 10 %
Frequency response L/R CH 60 Hz – 20 kHz
Sensitivity L/R: 650 mV
Channel separation ≥ 55 dB
S/N ≥ 70 dB
Remote control range 5 metres at a maximum angle of 30°
Dimensions 390 × 182 × 320 mm
12
Page 13

Bluetooth-högtalare för
iPad/iPod/iPhone
Art.nr 38-5040 Modell iWood 55 BT STAND
Läs igenom hela bruksanvisningen före användning och spara den sedan för framtida bruk.
Vi reserverar oss för ev. text- och bildfel samt ändringar av tekniska data. Vid tekniska
problem eller andra frågor, kontakta vår kundtjänst (se adressuppgifter på baksidan).
Säkerhet
• Följ instruktionerna i bruksanvisningen och beakta alla varningar.
• Placera inte produkten så att den kan falla ner i vatten eller annan vätska.
Ställ inte heller några föremål som innehåller vätska på produkten, t.ex. en blomvas
eller dryck.
• Ventilationsöppningarna får inte blockeras. Säkerställ tillräcklig luftcirkulation för
att förhindra överhettning. Se till att produkten placeras så att luften obehindrat kan
cirkulera runt den och att inte värmeelement eller liknande som avger värme, finns
i närheten.
• Produkten får endast repareras av kvalificerad servicepersonal.
• Produkten får inte demonteras eller ändras. Farlig spänning finns oskyddat på
komponenter inuti produktens hölje. Kontakt med dessa kan leda till brand eller
ge elektriska stötar.
• Produkten är avsedd endast för inomhusbruk.
• Utsätt aldrig produkten för höga temperaturer, dammig miljö, starka vibrationer,
stötar, fukt eller väta.
• Nätsladden bör regelbundet kontrolleras. Använd aldrig produkten om nätsladden
eller stickproppen är skadade eller när den inte fungerar normalt.
• Om nätsladden skadats får den, för att undvika risk för elektrisk chock eller brand,
endast bytas av tillverkaren, dess serviceställe eller av kvalificerad servicepersonal.
• Placera aldrig nätsladden över heta ytor eller över skarpa kanter och hörn. Se till
att nätsladden placeras så att man inte går eller trampar på den.
• Använd endast stativet som medföljer. Placera produkten så att den inte riskerar
att falla omkull.
• Bryt strömmen till produkten genom att dra stickproppen ur vägguttaget vid
åskväder och när den inte ska användas under en tid. Produktens stickpropp
måste vara lättåtkomlig.
Svenska
13
Page 14
Knappar och funktioner
1. Dockningsstation för
2. IR-mottagare
Svenska
3. 3,5 mm AUX-ingång
4.
5. [ ] Sänk volymen
6. [ ] Öka volymen
7. Indikator för
8. LED-display
9. AUX-indikator
10. [SET] Inställningar
11. [IN] Ingångsväljare
12. Alarmindikator
iPad/iPod/iPhone
(till fjärrkontroll)
Bluetooth-indikator
iPad/iPod/iPhone
1
2
3 4 5 6 7 8 9 10 11 12
13. AC in
14. Strömbrytare
15. S-videoutgång
16. RCA
17. Kompositvideoutgång
18. USB-uttag (endast laddning)
14
13 14 15 17 18
16
Page 15
Fjärrkontroll
19. [ ] Standby
20. [
] Bluetooth
21. [iPod] iPodväljare
22. [MENU] Meny
] Uppåt i menyn
23. [
24. [ENTER] Bekräfta
25. [ ] Föregående spår/
snabbspola bakåt/tidsinställning
26. [
] Play/pause
27. [VOL -] Sänka volymen
28. [DISP MODE] Slå på/stäng av
displaybelysning
29. [TREBLE] Diskantinställning
30. [ATT/MUTE] Stäng av/dämpa ljudet
31. [AUX] Extern ljudkälla
] Neråt i menyn
32. [
33. [ ] Nästa spår/
snabbspola framåt/tidsinställning
34. [VOL +] Öka volymen
35. [ALARM] Alarminställning
36. [BASS] Basinställning
Sätt i batterier i fjärrkontrollen
19
20
21
22
23
24
25
26
27
28
29
30
31
32
33
34
35
36
Svenska
1 2 3
1. Tryck in spärren på sidan av fjärrkontrollen och dra ut batterihållaren.
2. Sätt i 1×CR2025-batteri enligt märkningen i batterihållaren.
3. Tryck in batterihållaren.
Obs!
• Använd endast rätt typ av batteri och vänd det rätt.
• Utsätt inte fjärrkontrollen för slag eller stötar.
• Ta ur batterierna om fjärrkontrollen inte ska användas under en längre period.
15
Page 16

Användning av fjärrkontrollen
Rikta fjärrkontrollen mot den övre delen
av högtalaren. Räckvidd 5 meter inom
max 30° vinkel.
Fjärrkontrollens räckvidd försämras av:
• Stark belysning.
• Hinder mellan fjärrkontroll och IR-sensor.
• Om andra fjärrkontroller används samtidigt.
• Dåligt batteri i fjärrkontrollen.
Svenska
Anslutningar
Anslutningar på ovansidan
Ingång för extern ljudkälla (3) t.ex.
CD- eller DVD-spelare.
Obs! När en extern ljudkälla är
ansluten till 3,5 mm AUX-IN uttaget
kommer ljudet från den dockade
iPod/iPhone/iPad-enheten att tystna.
Anslutningar på baksidan
• USB-uttag (18) (enbart laddning).
• Ingång för extern ljudkälla (16)
t.ex. CD- eller DVD-spelare.
• Video-ut (från iPod/iPhone
/iPad) till en extern skärm,
t.ex. TV (15).
3
18
15
16
16
Page 17
Montering
Högtalaren kan användas med eller utan fot.
Användning utan fot
Gummifötter finns monterade för att skydda bord- eller bänkskiva där
högtalaren placeras.
1. Placera högtalaren på ett plant och stabilt underlag och försäkra dig om att
underlaget kan bära högtalarens tyngd.
2. Se till att högtalaren inte kan falla ner eller på annat sätt bringas ur sitt läge.
Användning med fot
1. Passa in fotens golvplatta mot de förborrade
hålen i foten och fäst plattan med de medföljande
skruvarna. Obs! Använd inte skruvdragare,
skruvarna ska dras för hand och inte för hårt.
Överdra inte!
2. Passa in fotens högtalarplatta mot de förborrade
hålen i foten och fäst plattan med de medföljande
skruvarna. Obs! Använd inte skruvdragare,
skruvarna ska dras för hand och inte för hårt.
Överdra inte!
3. Passa in fotens högtalarplatta mellan
högtalarens gummifötter och fäst foten med
den medföljande skruven. Obs! Använd inte
skruvdragare, skruven ska dras för hand och
inte för hårt. Överdra inte!
Användning
Slå på högtalaren
1. Slå på högtalaren med strömbrytaren. Högtalaren startar i standbyläge och
displayen visar klockan.
2. Tryck [ ] på fjärrkontrollen eller [VOL+] eller [VOL-] på touchpanelen.
3. Knapparna på touchpanelen tänds och displayen visar benämningen på den
senast använda ljudkällan.
Svenska
Standbyläge
1. Tryck [ ] på fjärrkontrollen. Touchpanelens släcks.
2. Tryck [ ] på fjärrkontrollen igen och enheten slås på. Indikatorn visar ljudkällan.
3. Det går även att trycka [VOL-] och [VOL+] samtidigt för att ställa enheten
i standbyläge.
4. Tryck på någon av [VOL-] eller [VOL+] på touchpanelen för att slå på enheten igen.
17
Page 18

Stäng av/dämpa ljudet
Om ljudnivån är högre än 10 dB:
• Tryck [ATT/MUTE] en gång för att sänka ljudnivån till 10 dB.
• Tryck en gång till för att helt stänga av ljudet.
• Tryck en tredje gång för att återgå till föregående ljudvolym.
Om ljudnivån är 10 dB eller lägre:
• Tryck [ATT/MUTE] en gång för att helt stänga av ljudet.
• Tryck en gång till för att slå på ljudet igen.
Välj extern ljudkälla
Svenska
• Tryck [IN] på touchpanelen för att stega mellan de olika inställningarna:
Alternativt:
• Tryck [iPod], [AUX] eller [
Ställ in volym
• Tryck [ ] eller [ ] på touchpanelen för att justera volymen.
Alternativt:
• Tryck [VOL +] eller [VOL -] på fjärrkontrollen för att justera volymen.
Ställ in diskant
• Tryck [TREBLE +] eller [TREBLE -] på fjärrkontrollen. (Justeringsområde ± 14 dB.)
• Inställd diskant visas grafiskt på displayen.
AUX → iPod → BT
] på fjärrkontrollen för att välja ljudkälla.
AUX → iPod → BT. Vald ljudkälla visas grafiskt på displayen.
Inställd volym visas grafiskt på displayen.
Ställ in bas
• Tryck [BASS+] eller [BASS-] på fjärrkontrollen. (Justeringsområde ± 14 dB.)
• Inställd bas visas grafiskt på displayen.
Ställ in klockan
Använd touchpanelen
1. Tryck [SET[
2. Använd [VOL+] eller [VOL-] för att ställa in timmarna.
3. Tryck [SET] igen.
4. Använd [VOL+] eller [VOL-] för att ställa in minuterna.
5. Avsluta med [SET].
18
Page 19

Använd fjärrkontrollen
1. Tryck [ALARM]. ”TIME” visas på displayen. Tryck [ENTER].
2. Timmar visas på displayen. Ställ in rätt timme med [ ] eller [ ].
Tryck [ENTER] för att bekräfta.
3. Minuter visas på displayen. Ställ in rätt minut med [ ] eller [ ].
Tryck [ENTER] för att bekräfta. Klockan har 24-timmarsvisning.
4. Inställd tid visas på displayen.
Ställ in tid för sleepfunktion (automatisk avstängning)
Använd touchpanelen
1. Tryck [SET] 2 gånger. ”SL00” visas i displayen.
2. Ställ in önskad tid till automatisk avstängning med [VOL+] eller [VOL-].
Stega mellan de olika inställningarna (0–90 minuter).
3. Tryck [SET] för att bekräfta.
Använd fjärrkontrollen
1. Tryck [ALARM] 2 gånger. ”SL00” visas i displayen.
2. Tryck på [ENTER] för att bekräfta.
3. Ställ in önskad tid till automatisk avstängning med [ ] eller [ ].
Stega mellan de olika inställningarna (0–90 minuter).
4. Tryck [ENTER] för att bekräfta.
Ställ in alarm
Använd touchpanelen
1. Tryck 3 gånger på [SET].
2. Använd [VOL+] eller [VOL-] för att växla mellan ON och OFF.
3. Tryck [SET] för att bekräfta.
4. Använd [VOL+] eller [VOL-] för att ställa in timmarna.
5. Tryck [SET] för att bekräfta.
6. Använd [VOL+] eller [VOL-] för att ställa in minuterna.
7. Tryck [SET] för att bekräfta.
Svenska
19
Page 20

Använd fjärrkontrollen
1. Tryck 3 gånger på [ALARM]. ”ALM” blinkar. Tryck [ENTER] för att bekräfta.
2. Växla till ON på displayen med [ ] eller [ ]. Tryck [ENTER] för att bekräfta.
3. När du har bekräftat, kommer inställningar för timmar att blinka på displayen.
4. Inställningar för minuter blinkar på displayen. Ställ in rätt minuter med
5. När tiden är inställd och bekräftad, ska du välja alarmljud. Stega mellan de olika
Svenska
6. Om iPod/iPhone/iPad är vald vid alarm kommer volymen för iPod/iPhone/iPad
7. När alarmet ljuder, stäng av så här:
Snooze
Vidrör någon av knapparna på touchpanelen eller fjärrkontrollen förutom [ ] för att
stänga av alarmet tillfälligt. Alarmet ljuder igen efter 9 minuter.
Avaktivera inställt alarm
Avaktivera alarm så här: Följ steg 1 och 2 och tryck [ ] på fjärrkontrollen för att
slå på/av alarmet.
Ställ in rätt timme med [ ] eller [ ]. Klockan har 24-timmarsvisning.
Tryck [ENTER] för att bekräfta.
[ ] eller [ ]. Tryck [ENTER] för att bekräfta.
inställningarna med [ ] eller [ ]: BUZZ → iPod/iPad/iPhone. Tryck [ENTER]
för att bekräfta.
alarm att blinka. Ställ in önskad volym med [ ] eller [ ].
- Tryck [ ] på fjärrkontrollen för att stänga av alarmet direkt.
- Vidrör någon av knapparna på touchpanelen eller fjärrkontrollen 2 gånger
för att stänga av alarmet.
- Tryck [ ] en gång för att slå på högtalaren igen när alarmet har stängts av.
Tidsvisning
• Tryck [DISP MODE] för att välja om klockan ska visas eller inte visas i displayen
när högtalaren står i standbyläge. Displayen visar ”ON” eller ”OFF” beroende på
tidigare inställning.
• Tryck [DISP MODE] för att välja läge.
ON: Klockan visas i displayen när högtalaren står i standbyläge.
OFF: Klockan visas inte i displayen när högtalaren står i standbyläge.
Anslutning av iPad/iPod/iPhone
Ställ in reglaget på rätt produkt. Anslut din
iPod/iPhone/iPad när du har ställt in vilken
produkt du har. Kontrollera att högtalaren är
rätt inställd genom att trycka på [iPod] på
fjärrkontrollen eller [IN] på displayen.
20
Page 21

iPad-/iPod-/iPhonekontroller
Kontrollerna på fjärrkontrollen fungerar lika som
klickhjulet på din enhet (se manualen för
din iPod etc.).
Obs! När en extern ljudkälla är ansluten via 3,5 mmingången tystas ljudet från din iPad/iPod/iPhone.
Bluetooth
Läs först bruksanvisningen för den enhet som du vill ansluta till högtalaren.
Använd fjärrkontrollen
1. Tryck [ ] för att aktivera Bluetooth-läge.
2. Håll in [ ] tills högtalaren övergår till sökläge (sökning efter andra Bluetooth-enheter).
Bluetooth-indikatorn blinkar snabbt och ”SCAN” visas på displayen.
3. Anslut din Bluetooth-enhet, till exempel en mobiltelefon, till högtalaren.
Se din instruktionsmanual för mobiltelefonen för utförligare instruktioner.
4. När Bluetooth-indikatorn blinkar långsamt är anslutningen klar. Nu går det
att lyssna till ljudet från den anslutna enheten genom högtalaren.
Obs! Om en kod efterfrågas för aktivering, slå in ”0000”.
Använd touchpanelen på högtalaren
1. Tryck [IN] till ”BT” visas på displayen för att aktivera Bluetooth-läge.
2. Tryck [IN] och [SET] samtidigt, högtalaren övergår till sökläge (sökning efter andra
Bluetooth-enheter). Bluetooth-indikatorn blinkar snabbt och ”SCAN” visas på displayen.
3. Anslut din Bluetooth-enhet, till exempel en mobiltelefon till högtalaren. Se din
instruktionsmanual för mobiltelefonen för utförligare instruktioner.
4. När Bluetooth-indikatorn blinkar långsamt är anslutningen klar. Nu går det
att lyssna till ljudet från den anslutna enheten genom högtalaren.
Svenska
Använd en extern ljudkälla via AUX-IN
På ovansidan av högtalaren
1. Anslut en extern ljudkälla till 3,5 mm-ingången på ovansidan av högtalaren.
Använd den medföjande kabeln. Högtalaren kommer att byta till iPodläge automatiskt. Om den externa ljudkällan redan spelar musik kommer ljudet automatiskt att höras från högtalaren.
2. Tryck [iPod] på fjärrkontrollen eller [IN] på högtalaren för att byta till iPod-läge.
3. Starta uppspelning från den externa ljudkällan.
Obs! När en extern ljudkälla är ansluten via 3,5 mm-ingången tystas ljudet från din
iPad/iPod/iPhone.
21
Page 22

På baksidan av högtalaren
1. Anslut den externa ljudkällan till [RCA AUX ] på baksidan av högtalaren med en
2. Tryck [AUX] på fjärrkontrollen eller [IN] på ovansidan av högtalaren tills ”AUX” visas
3. Starta uppspelning från den externa ljudkällan.
USB-laddning
1. Anslut en USB-kabel av typ A till USB-uttaget på baksidan av högtalaren.
2. Anslut den andra änden till enheten som ska laddas.
Svenska
3. Observera att när en iPod/iPad/iPhone är ansluten till högtalaren fungerar inte
Skötsel och underhåll
• Dra ur stickproppen innan rengöring.
• Torka av produkten med en lätt fuktad, mjuk trasa. Använd ett milt rengöringsmedel,
Avfallshantering
När du ska göra dig av med produkten ska detta ske enligt lokala föreskrifter.
Är du osäker på hur du ska gå tillväga, kontakta din kommun.
Specifikationer
Strömförsörjning 230 V AC, 50 Hz
Effektförbrukning 80 W
Effektförbrukning (i standbyläge) ≤ 0,5 W
Uteffekt L/R CH (nominellt): 12 W + 12 W THD = 10 %
Frekvensområde L/R CH 60 Hz – 20 KHz
Känslighet L/R: 650 mV
Kanalseparation ≥ 55 dB
S/N ≥ 70 dB
Fjärrkontroll, räckvidd 5 meter vid max 30° vinkel
Mått 390×182×320 mm
RCA-kabel (säljs separat).
i displayen.
USB-laddning.
aldrig lösningsmedel eller starka, slipande rengöringsmedel.
22
Page 23

Bluetooth-høyttaler for
iPad/iPod/iPhone
Art.nr. 38-5040 Modell iWood 55 BT STAND
Les brukerveiledningen nøye før produktet tas i bruk, og ta vare på den for framtidig bruk.
Vi reserverer oss mot ev. feil i tekst og bilde, samt forandringer av tekniske data.
Ved tekniske problemer eller spørsmål, ta kontakt med vårt kundesenter.
(Se opplysninger om kundesenteret i denne bruksanvisningen).
Sikkerhet
• Følg bruksanvisningen og vær spesielt oppmerksom på alle advarsler.
• Plasser ikke produktet slik at det kan komme i kontakt med vann eller annen væske.
Plasser aldri produktet nær gjenstander som kan føre til at væske skylles over det.
• Ventilasjonsåpningene må ikke tildekkes. Sørg for god luftsirkulasjon rundt produktet.
Dette for å hindre overoppheting. Pass på at produktet plasseres slik at luften kan
sirkulere uhindret rundt det og at det ikke står for nær varmeovner eller liknende.
• Produktet må kun repareres av kyndig servicepersonell.
• Produktet må ikke demonteres eller forandres på. Farlig spenning ligger ubeskyttet
på visse komponenter under produktets deksel. Kontakt med disse kan føre til
brann eller gi elektriske støt.
• Produktet er kun beregnet for innendørs bruk.
• Utsett aldri produktet for høye temperaturer, fuktighet, støvete omgivelser,
sterke vibrasjoner eller støt.
• Strømledningen bør kontrolleres regelmessig. Produktet må ikke tas i bruk hvis
strømledning, støpsel eller annet er skadet eller ikke fungerer som det skal.
• Dersom strømledningen er skadet skal den, for å unngå elektrisk støt eller brann,
skiftes av produsenten, på et serviceverksted eller av annen kyndig serviceperson.
• Sørg for at strømledningen aldri kommer i kontakt med varme flater eller skarpe
kanter eller hjørner. Påse at strømledningen plasseres slik at man ikke går eller
tramper på den.
• Bruk kun det stativet som følger med produktet. Plasser produktet slik at det ikke
kan falle ned.
• Bryt strømmen til produktet ved å trekke støpselet ut av strømuttaket ved
tordenvær eller når det ikke skal brukes på en stund. Apparatets støpsel må være
lett tilgjengelig.
Norsk
23
Page 24

Norsk
Knapper og funksjoner
1. Dokkingsstasjon for
iPod/iPhone/iPad
2. IR-mottaker for fjernkontroll
3. AUX-inngang, 3,5 mm
4.
Bluetooth-indikator
5. [ ] Senke volumet
6. [ ] Heve volumet
7. Indikator for
iPad/iPod/iPhone
8. LED-display
9. AUX-indikator
10. [SET] Innstillinger
11. [IN] Inngangsvelger
12. Alarmindikator
1
2
3 4 5 6 7 8 9 10 11 12
13. AC inn
14. Strømbryter
15. S-Videoutgang
16. RCA
17. Komposittvideoutgang
18. USB-utgang (kun lading)
24
13 14 15 17 18
16
Page 25

Fjernkontroll
19. [ ] Standby
20. [
] Bluetooth
21. [iPod] iPodvelger
22. [MENU] Meny
] Oppover i menyen
23. [
24. [ENTER] Bekrefte
25. [ ] Foregående spor/
hurtigspole bakover/tidsinnstilling
26. [
] Play/pause
27. [VOL-] Senke volumet
28. [DISP MODE] Slå på/stenge
displaybelysning
29. [Treble] Diskantinnstilling
30. [ATT/ MUTE ] Steng/demp lyden
31. [AUX] Ekstern lydkilde
] Nedover i menyen
32. [
33. [ ] Neste spor/hurtigspole
framover/tidsinnstilling
34. [ VOL + ] Heve volumet
35. [ALARM] Alarminnstilling
36. [BASS] Innstilling av bass
Sett batteriet i fjernkontrollen
19
20
21
22
23
24
25
26
27
28
29
30
31
32
33
34
35
36
Norsk
1 2 3
1. Trykk inn sperren som sitter på siden av fjernkontrollen og trekk holderen ut.
2. Plasser ett CR2025-batteri i holderen. Følg merkingen for riktig plassering av poler.
3. Skyv holderen inn igjen.
Obs!
• Bruk den type batterier som er beskrevet i brukerveiledningen og
plasser dem riktig i holderen.
• Utsett ikke fjernkontrollen for slag eller støt.
• Ta ut batteriene dersom produktet ikke skal brukes over tid.
25
Page 26

Bruk av fjernkontrollen
Vend fjernkontrollen mot den øvre delen av
høyttaleren. Rekkevidden er 5 meter innen
maks vinkel på 30°.
Fjernkontrollens rekkevidde kan forstyrres av:
• Sterk belysning.
• Hindringer mellom fjernkontroll og IR-sensor.
• Andre fjernkontroller som brukes samtidig
med denne.
• Dårlig batteri i fjernkontrollen.
Tilkoblinger
Uttak på oversiden
Norsk
Inngang for ekstern lydkilde (3) f.eks.
CD- eller DVD-spiller.
Obs! Når en ekstern lydkilde er
tilkoblet 3,5 mm AUX-IN uttaket
kommer lyden fra den dockede iPod/
iPhone/iPad-enheten til å opphøre.
Uttak på baksiden
• USB-uttak (18) (kun lading).
• Inngang for ekstern lydkilde (16)
f.eks. CD- eller DVD-spiller.
• Video-ut (fra iPod/iPhone/
iPad) til en ekstern skjerm,
f.eks. TV (15).
3
18
15
16
26
Page 27

Montering
Høyttaleren kan brukes med eller uten fot.
Bruk uten fot
Det er montert gummiføtter på høyttaleren for å beskytte bord og benkeplater.
1. Plasser høyttaleren på et plant og stabilt underlag. Sjekk ut at underlaget tåler
tyngden av høyttaleren.
2. Pass på at ikke høyttaleren kan falle ned eller på annen måte flytte på seg.
Bruk med fot
1. Fest gulvplaten til foten med de medfølgende
skruene. Benytt de forborede hullene.
Obs! Skruene må ikke trekkes for hardt til
og de må trekkes til for hånd (ikke bruk
strutrekker). Ikke trekk til for mye!
2. Fest foten med de medfølgende skruene.
Benytt de forborede hullene. Obs! Skruene må
ikke trekkes for hardt til og de må trekkes til
for hånd (ikke bruk strutrekker). Ikke trekk
til for mye!
3. Tilpass fotens høyttalerplate mellom
høyttalerens gummiføtter og fest foten med
medfølgende skrue. Obs! Skruene må ikke
trekkes for hardt til og de må trekkes til for hånd
(ikke bruk strutrekker). Ikke trekk til for mye!
Norsk
Bruk
Slå på høyttaleren
1. Skru på høyttaleren med strømbryteren. Høyttaleren starter i standbymodus og
displayet viser klokken.
2. Trykk på [ ] på fjernkontrollen eller [VOL+] eller [VOL-] på touch-panelet.
3. Knappene på touch-panelet tennes og displayet viser benevningen på lydkilden
som ble brukt sist.
Standbymodus
1. Trykk på [ ] på fjernkontrollen. Lyset på touch-panelet slukkes.
2. Trykk på [ ] på fjernkontrollen igjen og enheten slås på. Indikatoren viser valgt lydkilde.
3. Man kan også trykke på [VOL-] og [VOL+] samtidig for å stille enheten i standbymodus.
4. Trykk på en av følgende: [VOL-] eller [VOL+] på touch-panelet for å
slå på enheten igjen.
27
Page 28

Skru av lyden midlertidig
Om lydnivået er høyere enn 10 dB:
• Trykk [ATT/MUTE] en gang for å senke lydnivået til 10 dB.
• Trykk en gang til for å stenge av lyden helt.
• Trykk en tredje gang for å gå tilbake til foregående lydvolum.
Om lydnivået er 10 dB eller lavere:
• Trykk [ATT/MUTE] en gang for å stenge av lyden helt.
• Trykk en gang til for å slå på lyden igjen.
Velg ekstern lydkilde
• Trykk på [IN] på touch-panelet for å bevege deg mellom de forskjellige innstillingene:
AUX → iPod → BT
Eller:
• Trykk på [iPod], [AUX] eller [
vises grafisk på displayet.
] på fjernkontrollen for å velge lydkilde. Valgt lydkilde
Norsk
Still inn volumet
• Trykk på [ ] eller [ ] på touch-panelet for å heve eller senke volumet.
Eller:
• Trykk på [VOL+] eller [VOL-] på fjernkontrollen for å heve eller senke volumet.
Innstilt volum vises grafisk på displayet.
Still inn diskanten
• Trykk på [TREBLE +] eller [TREBLE -] på fjernkontrollen. Justeringsområde ± 14 dB.
• Innstilt diskant vises grafisk på displayet.
Stille inn bassen
• Trykk på [BASS +] eller [BASS -] på fjernkontrollen. Justeringsområde ± 14 dB.
• Innstilt bass vises grafisk på displayet.
Stille klokken
Bruk touch-panelet
5. Trykk på [SET[
6. Bruk [VOL+] eller [VOL-] for å stille inn timene.
7. Trykk på [SET] igjen.
8. Bruk [VOL+] eller [VOL-] for å stille inn minuttene.
9. Avslutt med [SET].
28
Page 29

Bruk fjernkontrollen
1. Trykk på [ALARM]. «TIME» vises på displayet. Trykk [ENTER].
2. Timer kommer opp i displayet. Still inn riktig time med knappene [ ] eller [ ].
Trykk på [ENTER] for å bekrefte.
3. Minutter kommer opp i displayet. Still inn riktig minutt med knappene
[ ] eller [ ].Trykk på [ENTER] for å bekrefte. Klokken har 24-timers vising.
4. Innstilt tid vises på displayet.
Still inn tid for sleepfunksjon (automatisk avstenging)
Bruk touch-panelet
1. Trykk [SET] to ganger. Displayet viser ”SL00”.
2. Still inn ønsket tid til automatisk avstengning med [VOL+] eller [VOL-].
Velg mellom de ulike innstillingene (0–90 minutter)
3. Trykk [SET] for å bekrefte.
Bruk fjernkontrollen
1. Trykk [ALARM] to ganger. Displayet viser «SL00».
2. Still inn ønsket tid for automatisk avstenging med [ ] eller [ ].
Man kan veksle mellom de forskjellige innstillingene (0–90 minutter):
3. Trykk [ENTER] for å bekrefte.
Still inn alarm
Bruk touch-panelet
1. Trykk 3 ganger på [SET].
2. Bruk [VOL+] eller [VOL-] for å veksle mellom ON og OFF.
3. Bekreft med [SET].
4. Bruk [VOL+] eller [VOL-] for å stille inn timene.
5. Trykk på [SET] for å bekrefte.
6. Bruk [VOL+] eller [VOL-] for å stille inn minuttene.
7. Tryck på [SET] för att bekräfta.
Norsk
29
Page 30

Norsk
Bruk fjernkontrollen
1. Trykk 3 ganger på [ALARM]. «ALM» blinker. Trykk på [ENTER] for å bekrefte.
2. Skift til ON på displayet med [ ] eller [ ]. Trykk på [ENTER] for å bekrefte.
3. Når du bekrefter vil innstillingene for timer blinke på displayet. Still inn riktig time
med knappene [ ] eller [ ]. Klokken har 24-timers vising. Trykk på [ENTER]
for å bekrefte.
4. Innstillinger for minutter blinker i displayet. Still inn riktig minutt med
knappene [ ] eller [ ]. Trykk på [ENTER] for å bekrefte.
5. Når tiden er innstilt og bekreftet, skal alarmlyden stilles inn. Forflytting mellom
innstillingene med [ ] eller [ ]: BUZZ → iPod/iPad/iPhone. Trykk på [ENTER]
for å bekrefte.
6. Om iPod/iPhone/iPad er valgt ved alarm vil volumet for iPod/iPhone/iPad alarm
blinke. Still inn ønsket volum med [ ] eller [ ].
7. Når alarmen varsler skrues den av slik:
- Trykk på [ ] på fjernkontrollen for å skru alarmen direkte.
- Trykk på en av knappene på touch-panelet eller fjernkontrollen 2 ganger for
å skru av alarmen.
- Trykk på [ ] en gang for å skru på høyttaleren igjen etter at alarmen er stengt.
Snooze
Trykk på en av knappene på touch-panelet eller fjernkontrollen og [ ] for å skru av
alarmen midlertidig. Alarmen vil varsle igjen etter 9 minutter.
Aktivere innstilt alarm
Alarmen aktiveres slik: Følg trinnene 1 og 2 og trykk på [ ] på fjernkontrollen for
å aktivere/deaktivere alarmen.
Tidsvisning
• Trykk [DISP MODE] for å velge om klokken skal vises eller icke vises i displayet når
høyttaleren står i standbymodus. Displayet viser ”ON” eller ”OFF” avhengig av
tidligere innstilling.
• Trykk [DISP MODE] for å velge modus.
ON: Klokken vises i displayet når høyttaleren står i standbymodus.
OFF: Klokken vises ikke i displayet når høyttaleren står i standbymodus.
Uttak for iPad/iPod/iPhone
Still inn bryteren på riktig produkt. iPod/iPhone/
iPad kobles til når du har stilt inn hvilket produkt
du har. Kontroller at høyttaleren er riktig innstilt
ved å trykke på [iPod] på fjernkontrollen eller
[IN] på skjermen.
30
Page 31

iPad/iPod/iPhone kontroller
Kontrollene på fjernkontrollen fungerer akkurat
som klikkehjulet på apparatet ditt (se brukermanualen til iPoden din).
Obs! Når man kobler til en ekstern lydkilde via
3,5 mm-kabelen kommer det ikke lenger lyd fra
selve iPaden/iPoden/iPhonen.
Bluetooth
Les bruksanvisningen til det produktet som skal kobles til høyttaleren.
Bruk fjernkontrollen
1. Trykk på [ ] for å aktivere Bluetooth-modus.
2. Hold [ ] inne til høyttaleren går over til søkemodus (søke etter andre Bluetoothenheter). Bluetooth-indikatoren blinker raskt og «SCAN» vises på displayet.
3. Bluetooth-enheten kobles til, for eksempel en mobiltelefon til høyttaleren.
Se i brukerveiledningen for mobiltelefonen for mer informasjon.
4. Når Bluetooth-indikatoren blinker sakte er oppkoblingen fullført.
Nå kan man lytte til lyden fra den tilkoblede enheten gjennom høyttaleren.
Obs! Hvis det spørres om en kode for å kunne aktivere slås «0000» inn.
Bruk touch-panelet på høyttaleren
1. Trykk på [IN] til «BT» vises på displayet for å aktivere Bluetooth-modus.
2. Trykk [IN] og [SET] samtidig. Høyttaleren går da over til søkemodus (søking etter
andre Bluetoothenheter). Bluetooth-indikatoren blinker raskt og «SCAN» vises på
displayet.
3. Bluetooth-enheten kobles til, for eksempel en mobiltelefon til høyttaleren.
Se i brukerveiledningen for mobiltelefonen for mer informasjon.
4. Når Bluetooth-indikatoren blinker sakte er oppkoblingen fullført. Nå kan man lytte
til lyden fra den tilkoblede enheten gjennom høyttaleren.
Norsk
Bruk av ekstern lydkilde via AUX-IN
På høyttalerens overside
1. En ekstern lydkilde kobles til 3,5 mm-inngangen på oversiden av høyttaleren med
3,5 mm-kabel. Høyttaleren vil bytte til iPodmodus automatisk. Om den eksterne
lydkilden allerede spiller musikk vil lyden automatisk høres fra høyttaleren.
2. Trykk på [IN] på høyttaleren eller [iPod] på fjernkontrollen for å gå til iPod-modus.
3. Start avspillingen fra den eksterne lydkilden.
Obs! Når man kobler til en ekstern lydkilde via 3,5 mm-kabelen kommer det ikke
lenger lyd fra selve iPaden/iPoden/iPhonen.
31
Page 32

Norsk
På høyttalerens bakside
1. Den eksterne lydkilden kobles til [RCA AUX] på høyttalerens bakside med en
RCA-kabel (selges separat).
2. Trykk på [AUX] på fjernkontrollen eller [IN] på oversiden av høyttaleren til ”AUX”
vises i displayet.
3. Start avspillingen fra den eksterne lydkilden.
USB-lading
1. En USB-kabel av typen A kobles til USB-uttaket på høyttalerens bakside.
2. Den andre enden kobles til apparatet som skal lades.
3. Det er viktig å være klar over at når iPoden/iPaden/iPhonen er koblet til høyttaleren
vil ikke USB-ladingen fungere.
Stell og vedlikehold
• Trekk alltid ut støpselet før rengjøring.
• Rengjør produktet med en myk og lett fuktet klut. Bruk et mildt rengjøringsmiddel
ved behov. Unngå å bruke løsemidler og slipende rengjøringsmidler.
Avfallshåndtering
Når produktet skal kasseres, må det skje i henhold til lokale forskrifter.
Ved usikkerhet, ta kontakt med lokale myndigheter.
Spesifikasjoner
Strømforsyning 230 V AC, 50 Hz
Effektforbruk 80 W
Effektforbruk (i standbymodus) ≤ 0,5 W
Effekt ut L/R CH (nominelt): 12 W + 12 W THD = 10 %
Frekvensområde L/R CH 60 Hz – 20 kHz
Følsomhet L/R: 650 mV
Kanalseparasjon ≥ 55 dB
S/N ≥ 70 dB
Fjernkontroll, rekkevidde 5 meter ved vinkel på maks 30°
Mål 390×182×320 mm
32
Page 33

Bluetooth-kaiutin
iPadille/iPodille/iPhonelle
Tuotenro 38-5040 Malli iWood 55 BT STAND
Lue käyttöohje ennen tuotteen käyttöönottoa ja säilytä se tulevaa tarvetta varten.
Pidätämme oikeuden teknisten tietojen muutoksiin. Emme vastaa mahdollisista tekstitai kuvavirheistä. Jos laitteeseen tulee teknisiä ongelmia, ota yhteys myymälään tai
asiakaspalveluun (yhteystiedot käyttöohjeen lopussa).
Turvallisuus
• Noudata käyttöohjetta ja kaikkia varoituksia.
• Älä sijoita laitetta sellaiseen paikkaan, josta se voi tippua veteen tai muuhun nesteeseen.
Älä pane laitteen päälle nesteitä sisältäviä esineitä, kuten maljakoita tai limsapulloja.
• Älä peitä tuuletusaukkoja. Varmista riittävä ilmankierto, ettei tuote pääse ylikuumenemaan. Sijoita tuote siten, että ilma pääsee kiertämään vapaasti sen ympärillä ja
ettei sen lähellä ole lämpöä tuottavia esineitä, kuten lämpöpattereita.
• Laitteen saa korjata vain valtuutettu huoltoliike.
• Älä pura tai muuta laitetta. Tuotteen rungon sisällä on vaarallista jännitettä
sisältäviä suojaamattomia komponentteja. Niiden koskettaminen voi johtaa
tulipaloon tai sähköiskuun.
• Tuote on tarkoitettu vain sisäkäyttöön.
• Älä altista tuotetta liian korkeille lämpötiloille, pölylle, tärinälle, iskuille, kosteudelle
tai vedelle.
• Tarkasta virtajohdon kunto säännöllisesti. Älä käytä tuotetta, jos virtajohto tai
pistoke on vaurioitunut tai jos tuote ei toimi normaalisti.
• Vioittuneen johdon saa vaihtaa ainoastaan valmistaja, sen määräämä huoltopiste tai valtuutettu ammattilainen. Näin vähennetään sähköiskujen ja tulipalojen
mahdollisuutta.
• Älä sijoita johtoa kuumien pintojen tai terävien kulmien päälle. Sijoita virtajohto
siten, ettei sen päälle voi astua tai ettei siihen voi kompastua.
• Käytä ainoastaan pakkauksen telinettä. Sijoita tuote siten, ettei se pääse kaatumaan.
• Katkaise laitteesta virta irrottamalla pistoke pistorasiasta ukkosella, tai jos et käytä
sitä pitkään aikaan. Pistokkeen tulee olla sellaisessa paikassa, johon on helppo
päästä.
Suomi
33
Page 34

Suomi
Painikkeet ja toiminnot
1. Telakointiasema iPadille/
iPodille/iPhonelle
2. IR-vastaanotin (kaukosäädintä varten)
3. 3,5 mm:n AUX-tulo
4.
Bluetooth-merkkivalo
5. [ ] Vähennä
äänenvoimakkuutta
6. [ ] Lisää äänenvoimakkuutta
7. iPad/iPod/iPhone-merkkivalo
8. LED-näyttö
9. AUX-osoitin
10. [SET] Asetukset
11. [IN] Äänilähteen valinta
12. Hälytyksen merkkivalo
1
2
3 4 5 6 7 8 9 10 11 12
13. AC IN
14. Virtakytkin
15. S-videolähtö
16. RCA
17. Komposiittivideolähtö
18. USB-lähtö (vain lataus)
34
13 14 15 17 18
16
Page 35

Kaukosäädin
19. [ ] Valmiustila
20. [
] Bluetooth
21. [iPod] iPod
22. [MENU] Valikko
] Siirry valikossa ylöspäin
23. [
24. [ENTER] Vahvista
25. [ ] Siirry edelliseen raitaan/
pikakelaa taaksepäin/aseta aika
26. [
] Toisto/tauko
27. [VOL -] Vähennä äänenvoimakkuutta
28. [DISP MODE] Kytke näytön valo
päälle/pois päältä.
29. [TREBLE] Diskanttiasetukset
30. [ATT/MUTE] Sammuta/mykistä
ääni tilapäisesti
31. [AUX] Ulkoinen äänilähde
] Siirry valikossa alaspäin
32. [
33. [
34. [VOL +] Lisää äänenvoimakkuutta
35. [ALARM] Hälytyksen asetukset
36. [BASS] Basson asetukset
] Siirry seuraavaan raitaan/
pikakelaa eteenpäin/aseta aika
19
20
21
22
23
24
25
26
27
28
29
Pariston asettaminen kaukosäätimeen
30
31
32
33
34
35
36
Suomi
1 2 3
1. Paina paristolokeron sivulla olevaa lukitsinta ja vedä paristolokero ulos.
2. Aseta lokeroon yksi CR2025-paristo paristolokeron merkintöjen mukaisesti.
3. Työnnä paristolokero paikalleen.
Huom.!
• Käytä oikeantyyppistä paristoa ja varmista, että asetat sen oikein päin.
• Älä altista kaukosäädintä iskuille.
• Poista paristo, jos kaukosäädin on pitkään käyttämättä.
35
Page 36

Kaukosäätimen käyttö
Suuntaa kaukosäädin kaiuttimen yläosaa kohti.
Kantama on 5 metriä enintään 30°:n kulmassa.
Kaukosäätimen kantamaa heikentäviä tekijöitä
• Vahva valaistus.
• Esteet kaukosäätimen ja infrapunasensorin välillä.
• Muiden kaukosäädinten samanaikainen käyttö.
• Kaukosäätimen heikko paristo.
Liitännät
Yläosan liitännät
Suomi
Ulkoisen äänilähteen liitäntä (3)
(esim. CD- tai DVD-soitin).
Huom.! Ulkoisen äänilähteen ollessa
liitettynä 3,5 mm:n AUX-IN-liitäntään
telakkaan liitetyn iPodin/iPhonen/
iPadin ääni hiljenee.
Takaosan liitännät
• USB-liitäntä (18) (vain lataus)
• 3. Ulkoisen äänilähteen liitäntä
(16) (esim. CD- tai DVD-soitin).
• Videolähtö (iPodista/iPhonesta/
iPadista) ulkoiseen näyttöön,
esim. televisio (15).
3
18
15
16
36
Page 37

Asennus
Kaiutinta voi käyttää jalustalla ja ilman jalustaa.
Käyttö ilman jalustaa
Kaiuttimessa on kumitassut, jotka suojaavat pöytätasoa.
1. Aseta kaiutin tasaiselle ja vakaalle alustalle ja varmista, että alusta kestää
kaiuttimen painon.
2. Varmista, että kaiutin ei putoa veteen, ja että se on vakaasti paikoillaan.
Käyttö jalustan kanssa
1. Aseta jalustan lattialevy jalustan esiporattuihin
reikiin ja kiinnitä levy mukana tulevilla ruuveilla.
Huom! Älä käytä ruuvinväännintä. Ruuvit tulee
kiristää käsin, eikä niitä saa kiristää liikaa.
Älä kiristä liikaa!
2. Aseta jalustan kaiutinlevy jalustan esiporattuihin
reikiin ja kiinnitä levy mukana tulevilla ruuveilla.
Huom! Älä käytä ruuvinväännintä. Ruuvit tulee
kiristää käsin, eikä niitä saa kiristää liikaa.
Älä kiristä liikaa!
3. Sovita jalustan kaiutinlevy kaiuttimen kumijalkojen väliin ja kiinnitä jalusta mukana tulevalla
ruuvilla. Huom! Älä käytä ruuvinväännintä.
Ruuvi tulee kiristää käsin, eikä sitä saa kiristää
liikaa. Älä kiristä liikaa!
Suomi
Käyttö
Kaiuttimen kytkeminen päälle
1. Laita kaiutin päälle virtakytkimellä. Kautin on valmiustilassa ja näytöllä näkyy kellonaika.
2. Paina kaukosäätimen painiketta [ ] tai kosketuspaneelin painiketta [VOL+] tai [VOL-].
3. Etupaneelin painikkeet syttyvät ja näytöllä näkyy viimeksi käytetty äänilähde.
Valmiustila
1. Paina kaukosäätimen [ ]-painiketta. Näytön valo sammuu.
2. Paina kaukosäätimen [ ]-painiketta uudestaan. Laite käynnistyy.
Merkkivalo näyttää äänilähteen.
3. Voit siirtyä valmiustilaan myös painamalla yhtä aikaa [VOL-] tai [VOL+].
4. Käynnistä laite uudestaan painamalla jotakin kosketuspaneelin
äänenvoimakkuuspainikkeista.
37
Page 38

Suomi
Äänen mykistys (mute)
Jos äänenvoimakkuuden taso on suurempi kuin 10 dB:
• Laske äänenvoimakkuuden taso 10 dB:in painamalla painiketta [ATT/MUTE]
yhden kerran.
• Sammuta ääni kokonaan painamalla kerran uudelleen.
• Voit palauttaa edellisen äänenvoimakkuuden tason painamalla painiketta
kolmannen kerran.
Jos äänenvoimakkuuden taso on 10 dB tai matalampi:
• Sammuta ääni kokonaan painamalla painiketta [ATT/MUTE] yhden kerran.
• Uusi painallus käynnistää äänen uudelleen.
Ulkoisen äänilähteen valinta
• Siirry eri vaihtoehtojen välillä painamalla etupaneelin [IN]-painiketta.
AUX → iPod → BT
Tai vaihtoehtoisesti:
• Valitse äänilähde painamalla kaukosäätimestä [iPod], [AUX] tai [
Valittu äänilähde esitetään graafisesti näytöllä.
].
Äänenvoimakkuuden säätäminen
• Säädä äänenvoimakkuutta painamalla etupaneelin [ ] tai [ ]-painiketta.
Tai vaihtoehtoisesti:
• Säädä äänenvoimakkuutta painamalla kaukosäätimen [VOL +]- tai [VOL -]-painiketta.
Äänenvoimakkuus esitetään graafisesti näytöllä.
Diskantin säätäminen
• Säädä diskanttia kaukosäätimen [TREBLE +]- tai [TREBLE -]-painikkeella.
Säätöalue ± 14 dB.
• Diskanttisäätö esitetään graafisesti näytöllä.
Basson säätäminen
• Säädä bassoa kaukosäätimen [BASS+]- tai [BASS-]-painikkeella. Säätöalue ± 14 dB.
• Bassonsäätö esitetään graafisesti näytöllä.
Kellonajan asetus
Käytä kosketuspaneelia
1. Paina [SET].
2. Aseta tunnit painikkeilla [VOL+] tai [VOL-].
3. Paina uudelleen [SET].
4. Aseta minuutit painikkeilla [VOL+] tai [VOL-].
5. Lopeta painamalla [SET].
38
Page 39

Käytä kaukosäädintä
1. Paina [ALARM]. Näytöllä lukee ”TIME”. Paina [ENTER].
2. Tunnit näkyvät näytöllä. Säädä oikeat tunnit painikkeilla [ ] tai [ ].
Vahvista tunnit painamalla [ENTER].
3. Minuutit näkyvät näytöllä. Säädä oikeat minuutit painikkeilla [ ] tai [ ].
Vahvista minuutit painamalla [ENTER]. Kellossa on 24 tunnin näyttötapa.
4. Asetettu kellonaika näkyy näytöllä.
Automaattisen sammutuksen asettaminen
Käytä kosketuspaneelia
1. Paina kahdesti painiketta [SET]. Näytöllä lukee ”SL00”.
2. Aseta automaattiselle sammutukselle haluamasi aika painikkeilla [VOL+] tai [VOL-]
(siirry eri aika-asetusten välillä, 0–90 minuuttia).
3. Vahvista painamalla painiketta [SET].
Käytä kaukosäädintä
1. Paina [ALARM] kaksi kertaa. Näytöllä lukee ”SL00”.
2. Aseta haluamasi aika, jonka jälkeen laite sammuu automaattisesti, painikkeilla
[ ] tai [ ]. Siirry vaihtoehtojen välillä (0–90 minuuttia).
3. Vahvista painamalla painiketta [ENTER].
Herätysajan asettaminen
Käytä kosketuspaneelia
1. Paina 3 kertaa [SET].
2. Vaihda ON- ja OFF- tilojen välillä painikkeilla [VOL+] tai [VOL-].
3. Vahvista painamalla [SET].
4. Aseta tunnit painikkeilla [VOL+] tai [VOL-].
5. Vahvista painamalla [SET].
6. Aseta minuutit painikkeilla [VOL+] tai [VOL-].
7. Vahvista painamalla [SET].
Suomi
39
Page 40

Suomi
Käytä kaukosäädintä
1. Paina [ALARM] kolme kertaa. ”ALM” vilkkuu. Vahvista painamalla [ENTER].
2. Valitse näytölle teksti ON painikkeilla [ ] tai [ ]. Vahvista painamalla [ENTER].
3. Kun olet vahvistanut valinnan, tunnit vilkkuvat näytöllä. Säädä oikeat tunnit painikkeilla
[ ] tai [ ]. Kellossa on 24 tunnin näyttötapa. Vahvista painamalla [ENTER].
4. Minuutit vilkkuvat näytöllä. Aseta oikeat minuutit painikkeilla [ ] tai [ ].
Vahvista painamalla [ENTER].
5. Kun aika on säädetty ja vahvistettu, valitse hälytysääni. Siirry vaihtoehtojen välillä
painikkeilla [ ] tai [ ]: BUZZ → iPod/iPad/iPhone. Vahvista painamalla [ENTER].
6. Jos herätystavaksi on valittu iPod/iPhone/iPad, iPodin/iPhonen/iPadin herätysvoimakkuus vilkkuu. Aseta sopiva äänenvoimakkuus painikkeilla [ ] tai [ ].
7. Sammuta herätysääni seuraavalla tavalla:
- Paina kaukosäätimen [ ]-painiketta.
- Paina jotakin etupaneelin tai kaukosäätimen painikkeista kaksi kertaa.
- Kytke kaiutin päälle, kun herätys on sammutettu, painamalla kerran
[ ]-painiketta.
Torkkutoiminto
Sammuta herätysääni tilapäisesti painamalla jotakin etupaneelin tai kaukosäätimen painikkeista, ei kuitenkaan [ ]-painiketta. Herätysääni kuuluu uudelleen 9 minuutin kuluttua.
Asetetun herätyksen poistaminen
Poista herätys seuraavalla tavalla: Noudata kohtia 1 ja 2 ja paina kaukosäätimen
[ ]-painiketta, niin herätys menee pois päältä/päälle.
Ajannäyttö
• Voit valita, näkyykö kellonaika näytöllä vai ei kaiuttimen ollessa valmiustilassa painamalla painiketta [DISP MODE]. Näytöllä lukee ”ON” tai ”OFF” aiemmin valitusta
asetuksesta riippuen.
• Valitse tila painamalla painiketta [DISP MODE].
ON: Näytöllä näkyy kellonaika, kun kaiutin on valmiustilassa.
OFF: Kellonaika ei näy näytöllä, kun kaiutin on valmiustilassa.
iPadin/iPodin/iPhonen liittäminen
Aseta säädin oikean laitteen kohdalle. Liitä laite
(iPod/iPhone/iPad). Varmista, että kaiuttimen
asetus on oikea painamalla kaukosäätimen
[iPod]-painiketta tai näytön [IN]-painiketta.
40
Page 41

iPad/iPod/iPhone-ohjaimet
Kaukosäätimen ohjaimet toimivat samalla tavalla
kuin liitetyn laitteen kosketuspyörä (katso laitteen
käyttöohjeesta lisätietoja).
Huom.! Jos kaiuttimeen on liitetty ulkoinen
äänilähde 3,5 mm:n johdolla, iPadin/iPodin/
iPhonen ääni hiljenee.
Bluetooth
Lue ensin sen laitteen käyttöohje, jonka haluat liittää kaiuttimeen.
Käytä kaukosäädintä
1. Aktivoi Bluetooth-tila painamalla [ ].
2. Paina [ ], kunnes kaiutin siirtyy hakutilaan (hakee muita Bluetooth-laitteita).
Bluetooth-merkkivalo vilkkuu nopeasti ja näytöllä lukee ”SCAN”.
3. Liitä Bluetooth-laite (esim. matkapuhelin) kaiuttimeen. Katso tarkempia ohjeita
matkapuhelimen käyttöohjeesta.
4. Kun Bluetooth-merkkivalo vilkkuu hitaasti, liitäntä on valmis. Nyt voit kuunnella
liitettyä laitetta kaiuttimen kautta.
Huom.! Jos sinulta kysytään aktivointikoodia, koodi on ”0000”.
Käytä kaiuttimen etupaneelia
1. Aktivoi Bluetooth-tila painamalla [IN], kunnes näytöllä lukee ”BT”.
2. Paina yhtä aikaa [IN] ja [SET]. Kaiutin siirtyy hakutilaan (hakee muita Bluetooth-laitteita).
Bluetooth-merkkivalo vilkkuu nopeasti ja näytöllä lukee ”SCAN”.
3. Liitä Bluetooth-laite (esim. matkapuhelin) kaiuttimeen. Katso tarkempia ohjeita
matkapuhelimen käyttöohjeesta.
4. Kun Bluetooth-merkkivalo vilkkuu hitaasti, liitäntä on valmis. Nyt voit kuunnella
liitettyä laitetta kaiuttimen kautta.
Suomi
Ulkoisen äänilähteen käyttäminen AUX-IN-liitännän kautta
Kaiuttimen yläosasta
1. Liitä ulkoinen äänilähde kaiuttimen yläpuolella olevaan 3,5 mm:n liitäntään 3,5 mm:n
johdolla. Kaiutin vaihtaa automaattisesti iPod-tilaan. Jos ulkoinen äänilähde toistaa jo
musiikkia, ääni kuuluu automaattisesti kaiuttimesta.
2. Vaihda iPod-tilaan painamalla kaukosäätimen [iPod]-painiketta tai kaiuttimen
[IN]-painiketta.
3. Aloita toisto ulkoisesta äänilähteestä.
Huom.! Jos kaiuttimeen on liitetty ulkoinen äänilähde 3,5 mm:n johdolla,
iPadin/iPodin/iPhonen ääni hiljenee.
41
Page 42

Suomi
Kaiuttimen takaosasta
1. Liitä ulkoinen äänilähde kaiuttimen takapuolella olevaan [RCA AUX]-liitäntään
RCA-kaapelilla (myydään erikseen).
2. Paina kaukosäätimen painiketta [AUX] tai kaiuttimen päällä olevaa painiketta [IN],
kunnes näytöllä näkyy ”AUX”.
3. Aloita toisto ulkoisesta äänilähteestä.
USB-lataus
1. Liitä A-tyypin USB-kaapeli kaiuttimen takapuolella olevaan USB-liitäntään.
2. Liitä kaapelin toinen pää ladattavaan laitteeseen.
3. Huom.! Kun iPod/iPad/iPhone on liitetty kaiuttimeen, USB-lataus ei toimi.
Huolto ja ylläpito
• Irrota pistoke verkkovirrasta ennen puhdistusta.
• Pyyhi kaiutin kevyesti kostutetulla pehmeällä liinalla. Käytä mietoja puhdistusaineita.
Älä käytä hankausnestettä tai liuotinaineita.
Kierrätys
Kierrätä tuote asianmukaisesti, kun poistat sen käytöstä. Tarkempia kierrätysohjeita
saat kuntasi jäteneuvonnasta.
Tekniset tiedot
Virtalähde 230 V AC, 50 Hz
Tehonkulutus 80 W
Tehonkulutus (valmiustilassa) ≤ 0,5 W
Antoteho L/R CH (nimellinen):12 W + 12 W THD = 10 %
Taajuusalue L/R CH 60 Hz – 20 KHz
Herkkyys L/R: 650 mV
Kanavaerotus ≥ 55 dB
S/N-arvo ≥ 70 dB
Kaukosäätimen kantama 5 metriä kulma enintään 30°
Mitat 390 × 182 × 320 mm
42
Page 43

Bluetooth-Lautsprecher für
iPad/iPod/iPhone
Art.Nr. 38-5040 Modell iWood 55 BT STAND
Vor Inbetriebnahme die komplette Bedienungsanleitung durchlesen und aufbewahren.
Irrtümer, Abweichungen und Änderungen behalten wir uns vor. Bei technischen
Problemen oder anderen Fragen freut sich unser Kundenservice über
eine Kontaktaufnahme (Kontakt siehe Rückseite).
Sicherheit
• Die Anweisungen in der Bedienungsanleitung befolgen und alle Warnungen beachten.
• Das Gerät immer so aufstellen, dass es nicht in Wasser oder andere Flüssigkeiten
fallen kann. Niemals Gegenstände mit Flüssigkeiten (z. B. Blumenvasen oder
Getränke) auf das Produkt stellen.
• Niemals die Lüftungsöffnungen blockieren. Für ausreichende Luftzirkulation sorgen,
um Überhitzung zu vermeiden. Das Produkt so aufstellen, dass für ausreichende
Belüftung gesorgt ist. In der Nähe dürfen sich keine Heizungen oder andere
Wärmequellen befinden.
• Reparaturen unbedingt qualifizierten Servicetechnikern überlassen.
• Das Gerät darf nicht demontiert oder anderweitig verändert werden.
Im Inneren des Produktes befinden sich nicht isolierte Komponenten mit
gefährlicher Stromspannung. Bei Kontakt können diese zu Bränden oder
Stromschlägen führen.
• Das Gerät ist nur zur Verwendung im Innenbereich geeignet.
• Das Gerät niemals hohen Temperaturen, staubiger Umgebung oder starken
Erschütterungen aussetzen.
• Regelmäßig das Netzkabel kontrollieren. Das Produkt niemals benutzen,
wenn das Netzkabel oder der Netzstecker beschädigt ist oder das Produkt
nicht normal funktioniert.
• Um Stromschläge oder Feuer zu vermeiden, darf das Netzkabel bei Beschädigung
nur vom Hersteller, seinem Kundendienst oder qualifiziertem Fachpersonal
ausgetauscht werden.
• Das Netzkabel niemals über heiße Flächen oder scharfe Kanten führen.
Das Netzkabel so verlegen, dass man nicht unabsichtlich darauf treten bzw.
darüber stolpern kann.
• Ausschließlich das mitgelieferte Stativ verwenden. Das Produkt so aufstellen,
dass es nicht umfallen kann.
• Während eines Gewitters oder einer längeren Zeitspanne, in der das Gerät nicht
verwendet wird, das Gerät von der Stromversorgung trennen. Der Stecker muss
immer leicht zugänglich sein.
Svenska
43
Page 44

Tasten und Funktionen
1. Dockingstation für
2. IR-Empfänger
Svenska
3. 3,5 mm AUX-Eingang
4.
5. [ ] Lautstärke senken
6. [ ] Lautstärke erhöhen
7. Anzeigelampe für
8. LCD-Display
9. AUX-Anzeige
10. [SET] Einstellungen
11. [IN] Wahlschalter Eingang
12. Weckeranzeige
iPad/iPod/iPhone
(für Fernbedienung)
Indikatorlampe
iPad/iPod/iPhone
1
2
3 4 5 6 7 8 9 10 11 12
13. Eingang Netzstrom
14. Ein-/Ausschalter
15. S-Videoausgang
16. Cinch
17. Composite-Videoausgang
18. USB-Buchse (nur Laden)
44
13 14 15 17 18
16
Page 45

Fernbedienung
19. [ ] Standby
20. [
] Bluetooth
21. [iPod] iPod-Wahl
22. [MENU] Menü
] Im Menü aufwärts
23. [
24. [ENTER] Bestätigen
25. [ ] Vorheriger Titel/
Zurückspulen/Zeiteinstellung
26. [
] Wiedergabe/Pause
27. [VOL -] Lautstärke senken
28. [DISP MODE]
Displaybeleuchtung Ein/Aus
29. [TREBLE] Höheneinstellung
30. [ATT/MUTE] Ton abschalten/dämpfen
31. [AUX] Externe Tonquelle
] Im Menü abwärts
32. [
33. [ ] Nächster Titel/
Vorspulen/Zeiteinstellung
34. [VOL +] Lautstärke höher
35. [ALARM] Weckereinstellung
36. [BASS] Basseinstellung
19
20
21
22
23
24
25
26
27
28
29
Batterien in Fernbedienung einsetzen
30
31
32
33
34
35
36
Svenska
1 2 3
1. Die Sperre an der Seite der Fernbedienung eindrücken und Batteriehalter
herausziehen.
2. 1×CR2025-Batterie gemäß Markierung im Batteriehalter einlegen.
3. Batteriehalter eindrücken.
Hinweis:
• Ausschließlich den vorgeschriebenen Batterietyp verwenden. Batterie immer richtig
herum einsetzen.
• Fernbedienung vor Stößen und Erschütterungen schützen.
• Bei längerer Nichtbenutzung der Fernbedienung die Batterie entnehmen.
45
Page 46

Betrieb mit Fernbedienung
Fernsteuerung auf den oberen Teil des
Lautsprechers richten. Reichweite 5 m
innerhalb von max. 30°.
Die Reichweite der Fernbedienung sinkt durch:
• Starke Beleuchtung.
• Hindernisse zwischen Fernbedienung
• Gleichzeitigen Gebrauch anderer
Svenska
• Schwache Batterie in der Fernbedienung.
Anschlüsse
Anschlüsse an der Oberseite
und IR-Empfänger.
Fernbedienungen.
Eingang für externe Tonquelle (3)
wie CD- oder DVD-Player.
Hinweis: Ist eine externe Tonquelle
an den 3,5 mm AUX-IN-Eingang
angeschlossen, ist der Ton des
angedockten iPods/iPhones/iPads
nicht mehr zu hören.
Anschlüsse an der Rückseite
• USB-Anschluss (18) (nur Laden).
• Eingang für externe Tonquelle
(16) wie CD- oder DVD-Player.
• Video-out (von iPod/iPhone/
iPad) an einen externen
Bildschirm, z. B. Fernsehgerät (15).
3
18
15
16
46
Page 47

Montage
Der Lautsprecher kann mit oder ohne Fuß verwendet werden.
Betrieb ohne Fuß
Zum Schutz des Tischs o. Ä., auf den der Lautsprecher gestellt wird, sind an
der Unterseite Gummifüße angebracht.
1. Den Lautsprecher auf einer ebenen und stabilen Unterlage aufstellen und
sicherstellen, dass sich die Unterlage für das Gewicht des Lautsprechers eignet.
2. Sicherstellen, dass der Lautsprecher nicht auf den Boden fallen oder auf andere
Weise aus seiner Position gebracht werden kann.
Betrieb mit Fuß
1. Die Standplatte des Fußes entsprechend
den Bohrungen in den Fuß einsetzen und
mit den mitgelieferten Schrauben befestigen.
Hinweis: Keinen Schraubenzieher verwenden,
sondern die Schrauben von Hand und nicht zu
fest eindrehen. Nicht überdrehen.
2. Die Lautsprecherplatte des Fußes entsprechend
den Bohrungen in den Fuß einsetzen und
mit den mitgelieferten Schrauben befestigen.
Hinweis: Keinen Schraubenzieher verwenden,
sondern die Schrauben von Hand und nicht zu
fest eindrehen. Nicht überdrehen.
3. Die Lautsprecherplatte des Fußes zwischen den
Gummifüßen des Lautsprechers ansetzen und
mit den mitgelieferten Schrauben befestigen.
Hinweis: Keinen Schraubenzieher verwenden,
sondern die Schraube von Hand und nicht zu fest eindrehen. Nicht überdrehen.
Svenska
Betrieb
Einschalten des Lautsprechers
1. Lautsprecher am Ein-/Ausschalter einschalten. Der Lautsprecher startet im
Standby-Betrieb, das Display zeigt die Uhrzeit an.
2. An der Fernbedienung auf [ ] bzw. am Touch-Panel auf [VOL+] oder [VOL-] drücken.
3. Die Tasten am Touch-Panel leuchten auf, und das Display zeigt die zuletzt
verwendete Tonquelle an.
Standby
1. An der Fernbedienung auf [ ] drücken. Das Touch-Panel erlischt.
2. Erneut an der Fernbedienung auf [ ] drücken. Das Gerät wird eingeschaltet.
Der Anzeiger zeigt die aktuelle Tonquelle an.
3. Es ist auch möglich, das Gerät durch gleichzeitiges Drücken von [VOL-] und
[VOL+] in den Standby-Betrieb zu versetzen.
4. Mit einer der Tasten [VOL-] oder [VOL+] auf dem Touch-Panel das Gerät
wieder einschalten.
47
Page 48

Ton abschalten/dämpfen
Bei Schallpegel über 10 dB:
• Durch einmaliges Drücken von [ATT/MUTE] den Schallpegel auf 10 dB senken.
• Die Taste erneut drücken, um den Ton ganz auszuschalten.
• Die Taste ein drittes Mal drücken, um zur vorherigen Lautstärke zurückzukehren.
Bei Schallpegel von 10 dB oder weniger:
• Die Taste [ATT/MUTE] drücken, um den Ton ganz auszuschalten.
• Um den Ton wieder einzuschalten, erneut [ATT/MUTE] drücken.
Externe Tonquelle auswählen
Svenska
• Mit der Taste [IN] am Touch-Panel zwischen den verschiedenen Einstellungen
Oder zum Wählen der Tonquelle an der Fernbedienung [iPod], [AUX] oder [
AUX → iPod → BT. Die Tonquelle wird im Display grafisch angezeigt.
Lautstärke einstellen
• Zur Einstellung der Lautstärke am Touch-Panel [ ] oder [ ] drücken.
Oder die Lautstärke mit den Tasten [VOL+] und [VOL -] an der Fernbedienung einstellen.
Die eingestellte Lautstärke wird im Display grafisch angezeigt.
Höhen einstellen
• Einstellung mit den Tasten [TREBLE+] und [TREBLE-] auf der Fernbedienung
• Höheneinstellung wird im Display grafisch angezeigt.
wechseln: AUX → iPod → BT
] drücken.
anpassen. (Einstellbereich ± 14 dB.)
Bässe einstellen
• Einstellung mit den Tasten [BASS+] und [BASS-] auf der Fernbedienung anpassen.
(Einstellbereich ± 14 dB.)
• Die Basseinstellung wird im Display grafisch angezeigt.
Uhr stellen
Touch-Panel benutzen
1. [SET] drücken.
2. Mit [VOL+] und [VOL -] die Stunden einstellen.
3. Erneut auf [SET] drücken.
4. Mit [VOL+] und [VOL -] die Minuten einstellen.
5. Mit [SET] beenden.
48
Page 49

Fernbedienung benutzen
1. [ALARM] drücken. Im Display wird „TIME“ angezeigt. [ENTER] drücken.
2. Im Display werden die Stunden angezeigt. Mit [ ] und [ ] die richtige
Stunde einstellen. Mit [ENTER] bestätigen.
3. Im Display werden die Minuten angezeigt. Mit [ ] und [ ] die richtige
Minute einstellen. Mit [ENTER] bestätigen. Die Uhr hat 24-Stunden-Zählung.
4. Die eingestellte Uhrzeit wird im Display angezeigt.
Zeit für Sleep-Funktion (automatische Abschaltung) einstellen
Touch-Panel benutzen
1. Zweimal [SET] drücken. Im Display wird „SL00“ angezeigt.
2. Mit den Tasten [VOL+] die [VOL -] die gewünschte Abschaltzeit einstellen.
Zwischen den verschiedenen Einstellwerten (0–90 Minuten) wechseln.
3. Mit [SET] bestätigen.
Fernbedienung benutzen
1. Zweimal [ALARM] drücken. Im Display wird „SL00“ angezeigt.
2. Mit [ENTER] bestätigen.
3. Mit den Tasten [ ] und [ ] die gewünschte Abschaltzeit einstellen.
Zwischen den verschiedenen Einstellwerten (0–90 Minuten) wechseln.
4. Mit [ENTER] bestätigen.
Wecker stellen
Touch-Panel benutzen
1. Dreimal [SET] drücken.
2. Mit [VOL+] und [VOL -] zwischen ON und OFF wechseln.
3. Mit [SET] bestätigen.
4. Mit [VOL+] und [VOL -] die Stunden einstellen.
5. Mit [SET] bestätigen.
6. Mit [VOL+] und [VOL -] die Minuten einstellen.
7. Mit [SET] bestätigen.
Svenska
49
Page 50

Fernbedienung benutzen
1. Dreimal [ALARM] drücken. „ALM“ blinkt. Mit [ENTER] bestätigen.
2. Mit [ ] oder [ ] auf dem Display zu ON wechseln. Mit [ENTER] bestätigen.
3. Nach dem Bestätigen blinkt die für Stundeneinstellung im Display. Mit [ ] und
4. Die Minuteneinstellung im Display blinkt. Mit [ ] und [ ] die richtige
5. Nach dem Einstellen der Uhrzeit ist das Wecksignal auszuwählen. Mit [
Svenska
6. Ist bei der Weckfunktion iPod/iPhone/iPad gewählt, blinkt die Lautstärke für iPod/
7. Abschalten des ertönenden Wecksignals:
Snooze
Zum vorübergehenden Abschalten des Weckers (Schlummern) einmal irgendeine
der Tasten auf dem Touch-Panel oder auf der Fernbedienung drücken,
ausgenommen die Taste [ ]. Der Weckton ertönt erneut nach 9 Minuten.
Eingestellten Wecker deaktivieren
Deaktivieren des Weckers: Zum Abschalten des Weckers Schritt 1 und 2 ausführen
und an der Fernbedienung [ ] drücken.
] die richtige Stunde einstellen. Die Uhr hat 24-Stunden-Zählung.
[
Mit [ENTER] bestätigen.
Minute einstellen. Mit [ENTER] bestätigen.
] oder
] zwischen den Einstellungen wechseln: BUZZ → iPod/iPad/iPhone.
[
Mit [ENTER] bestätigen.
iPhone/iPad-Wecker. Die gewünschte Lautstärke mit [
- Mit [ ] auf der Fernbedienung kann das Wecksignal direkt abgeschaltet werden.
- Oder zum Abschalten zweimal irgendeine der Tasten im Touch-Panel oder auf
der Fernbedienung drücken.
- Durch einfaches Drücken der Taste [ ] den Lautsprecher nach
dem Abschalten des Alarms wieder einschalten.
] oder [ ] einstellen.
Zeitanzeige
• Mit [DISP MODE] einstellen, ob die Uhr im Display angezeigt werden soll,
wenn sich der Lautsprecher im Standby-Betrieb befindet. Je nach bisheriger
Einstellung zeigt das Display „ON“ oder „OFF“ an.
• Für die gewünschte Einstellung [DISP MODE] drücken.
ON: Die Uhr wird angezeigt, wenn sich der Lautsprecher im Standby-Betrieb befindet.
OFF: Die Uhr wird nicht angezeigt, wenn sich der Lautsprecher im Standby-Betrieb befindet.
Anschluss von iPad/iPod/iPhone
Den Wahlschalter auf das betreffende Produkt
stellen. Nach der Einstellung des Produkts
den iPod/iPhone/iPad anschließen. Durch
Drücken von [iPod] an der Fernbedienung
oder [IN] im Display kontrollieren, dass der
Lautsprecher korrekt eingestellt ist.
50
Page 51

iPad/iPod/iPhone-Steuerungen
Die Steuerungstasten an der Fernbedienung
funktionieren wie das Click Wheel des iPods
(siehe Handbuch des iPods).
Hinweis: Ist über den 3,5 mm Eingang eine
externe Tonquelle angeschlossen, ist der Ton
des iPads/iPods/iPhones stumm.
Bluetooth
Zuerst die Bedienungsanleitung für das anzuschließende Gerät lesen.
Fernbedienung benutzen
1. Zum Starten von Bluetooth die Taste [ ] drücken.
2. Die Taste [ ] gedrückt halten, bis der Lautsprecher mit der Suche beginnt
(Suche nach anderen Bluetooth-Geräten). Die Bluetooth-Anzeige blinkt schnell,
und im Display wird „SCAN“ angezeigt.
3. Das Bluetooth-Gerät, z. B. ein Mobiltelefon, an den Lautsprecher anschließen.
Zu näheren Anweisungen die Anleitung des Mobiltelefons zu Rate ziehen.
4. Wenn die Bluetooth-Anzeige langsam blinkt, sind die Geräte miteinander verbunden.
Jetzt kann Musik von dem angeschlossenen Gerät über den Lautsprecher wiedergegeben werden.
Hinweis: Falls eine PIN abgefragt wird, „0000“ eingeben.
Touch-Panel des Lautsprechers benutzen
1. Zum Starten von Bluetooth die Taste [IN] drücken, bis im Display „BT“ angezeigt wird.
2. Gleichzeitig die Tasten [IN] und [SET] drücken, bis der Lautsprecher mit der Suche
beginnt (Suche nach anderen Bluetooth-Geräten). Die Bluetooth-Anzeige blinkt
schnell, und im Display wird „SCAN“ angezeigt.
3. Das Bluetooth-Gerät, z. B. ein Mobiltelefon, an den Lautsprecher anschließen. Zu
näheren Anweisungen die Anleitung des Mobiltelefons zu Rate ziehen.
4. Wenn die Bluetooth-Anzeige langsam blinkt, sind die Geräte miteinander verbunden. Jetzt kann Musik von dem angeschlossenen Gerät über den Lautsprecher
wiedergegeben werden.
Externe Tonquelle über AUX-IN verwenden
An der Oberseite des Lautsprechers
1. Eine externe Tonquelle an den 3,5 mm-Eingang an der Oberseite des
Lautsprechers anschließen. Dazu das mitgelieferte Kabel benutzen. Der
Lautsprecher geht automatisch in iPod-Betrieb. Gibt die externe Tonquelle schon
Musik wieder, ist diese automatisch über den Lautsprecher zu hören.
2. Um in iPod-Betrieb zu wechseln, entweder an der Fernbedienung [iPod] oder am
Lautsprechers [IN] drücken.
3. Wiedergabe von Musik von der externen Tonquelle starten.
Hinweis: Ist über den 3,5 mm Eingang eine externe Tonquelle angeschlossen,
ist der Ton des iPads/iPods/iPhones stumm.
Svenska
51
Page 52

An der Rückseite des Lautsprechers
1. Die externe Tonquelle mit einem Cinch-Kabel (separat erhältlich) an den Eingang
2. [AUX] an der Fernbedienung bzw. [IN] an der Oberseite des Lautsprechers
3. Wiedergabe von Musik von der externen Tonquelle starten.
Laden über USB
1. An die USB-Buchse an der Rückseite des Lautsprechers ein USB-Kabel
Svenska
2. Das andere Ende des Kabels an das aufzuladende Gerät anschließen.
3. Wichtig: Ist ein iPod/iPad/iPhone an den Lautsprecher angeschlossen,
Pflege und Wartung
• Vor dem Reinigen den Netzstecker ziehen.
• Das Produkt mit einem weichen, leicht befeuchteten Tuch reinigen.
Hinweise zur Entsorgung
Bitte das Produkt entsprechend den lokalen Bestimmungen entsorgen.
Weitere Informationen sind von der Gemeinde oder den kommunalen
Entsorgungsbetrieben erhältlich.
[RCA AUX] an der Rückseite des Lautsprechers anschließen.
drücken, bis im Display „AUX“ angezeigt wird.
Typ A anschließen.
funktioniert der USB-Ladevorgang nicht.
Keine scharfen Chemikalien, Reinigungslösungen oder starken
Reinigungsmittel verwenden.
Technische Daten
Stromversorgung 230 V AC, 50 Hz
Leistungsaufnahme 80 W
Leistungsaufnahme (Standby) ≤ 0,5 W
Ausgangsleistung L/R CH (nominell): 12 W + 12 W THD = 10 %
Frequenzbereich L/R CH 60 Hz – 20 kHz
Empfindlichkeit L/R: 650 mV
Kanaltrennung ≥ 55 dB
S/N ≥ 70 dB
Fernbedienung, Reichweite 5 Meter bei max. 30° Winkel
Abmessungen 390×182×320 mm
52
Page 53

Declaration of Conformity
Hereby, Clas Ohlson AB, declares that this iPod/iPhone/iPad Bluetooth speaker
Art. no: 38-5040
Model: iWood 55 BT STAND Speaker
is in compliance with the essential requirements and
other relevant provisions of Directive 1999/5/EC
Article 3.1a (Health): EMF/SAR 99/519/EC Council
Recommendation
Article 3.1a (Safety): EN 60065
Article 3.1b (EMC): EN 301489-1
EN 301489-17
Article 3.2 (Radio): EN 300328
0168
Insjön, Sweden, July 2012
Klas Balkow
President
Clas Ohlson, 793 85 Insjön, Sweden
53
Page 54

54
Page 55

55
Page 56

Sverige
Kundtjänst tel: 0247/445 00
fax: 0247/445 09
e-post: kundservice@clasohlson.se
Internet www.clasohlson.se
Post Clas Ohlson AB, 793 85 INSJÖN
Norge
Kundesenter tlf.: 23 21 40 00
faks: 23 21 40 80
e-post: kundesenter@clasohlson.no
Internett www.clasohlson.no
Post Clas Ohlson AS, Postboks 485 Sentrum, 0105 OSLO
Suomi
Asiakaspalvelu puh.: 020 111 2222
sähköposti: asiakaspalvelu@clasohlson.fi
Internet www.clasohlson.fi
Osoite Clas Ohlson Oy, Maistraatinportti 4 A, 00240 HELSINKI
Great Britain
Customer Service contact number: 08545 300 9799
e-mail: customerservice@clasohlson.co.uk
Internet www.clasohlson.com/uk
Postal 10 – 13 Market Place
Kingston Upon Thames
Surrey
KT1 1JZ
Deutschland
Kundenservice Unsere Homepage www.clasohlson.de besuchen und
auf Kundenservice klicken.
 Loading...