

Page 1

English
Wireless weather station
Art. no. 36-4440 Model IW003N / TW003
Read through the entire instructions before use
and keep them for future use. We disclaim all
responsibility for any errors in texts, pictures and
diagrams, or modifications of technical data.
For technical problems or other questions please
contact our Customer Service.
Safety
• The indoor unit should never be
exposed to rain and moisture.
• Never expose the outdoor sensor to
temperatures beyond the specified levels,
to prolonged sunlight or to rain.
• Never use old and new batteries, or alkaline
and rechargeable batteries together.
• Remove batteries if the device will not be used
for a long period of time. Old batteries can begin
to leak and damage the device.
• Always remember to place the batteries in the
direction of the arrows. The wrong polarity (+/-)
can damage the device.
• Damage due to tampering is not covered
by the guarantee.
• Do not modify the device in any way.
Product description
A wireless weather station with display of outdoor/
indoor temperature, humidity, and other simple
weather forecasts.
Specifications
Battery type 3 x AA/LR6 batteries and
2 x AAA/LR03 batteries
(not included)
Size of receiver 170x125x55 mm
Measurement range
Indoors -10 °C till +50 °C
(20 - 95 % RH)
Outdoors -50 °C till + 70 °C
(20 - 95 % RH)
Resolution, temperature 0.1 °C
Resolution, relative humidity 1 % (RH)
Updating interval 30 sec.
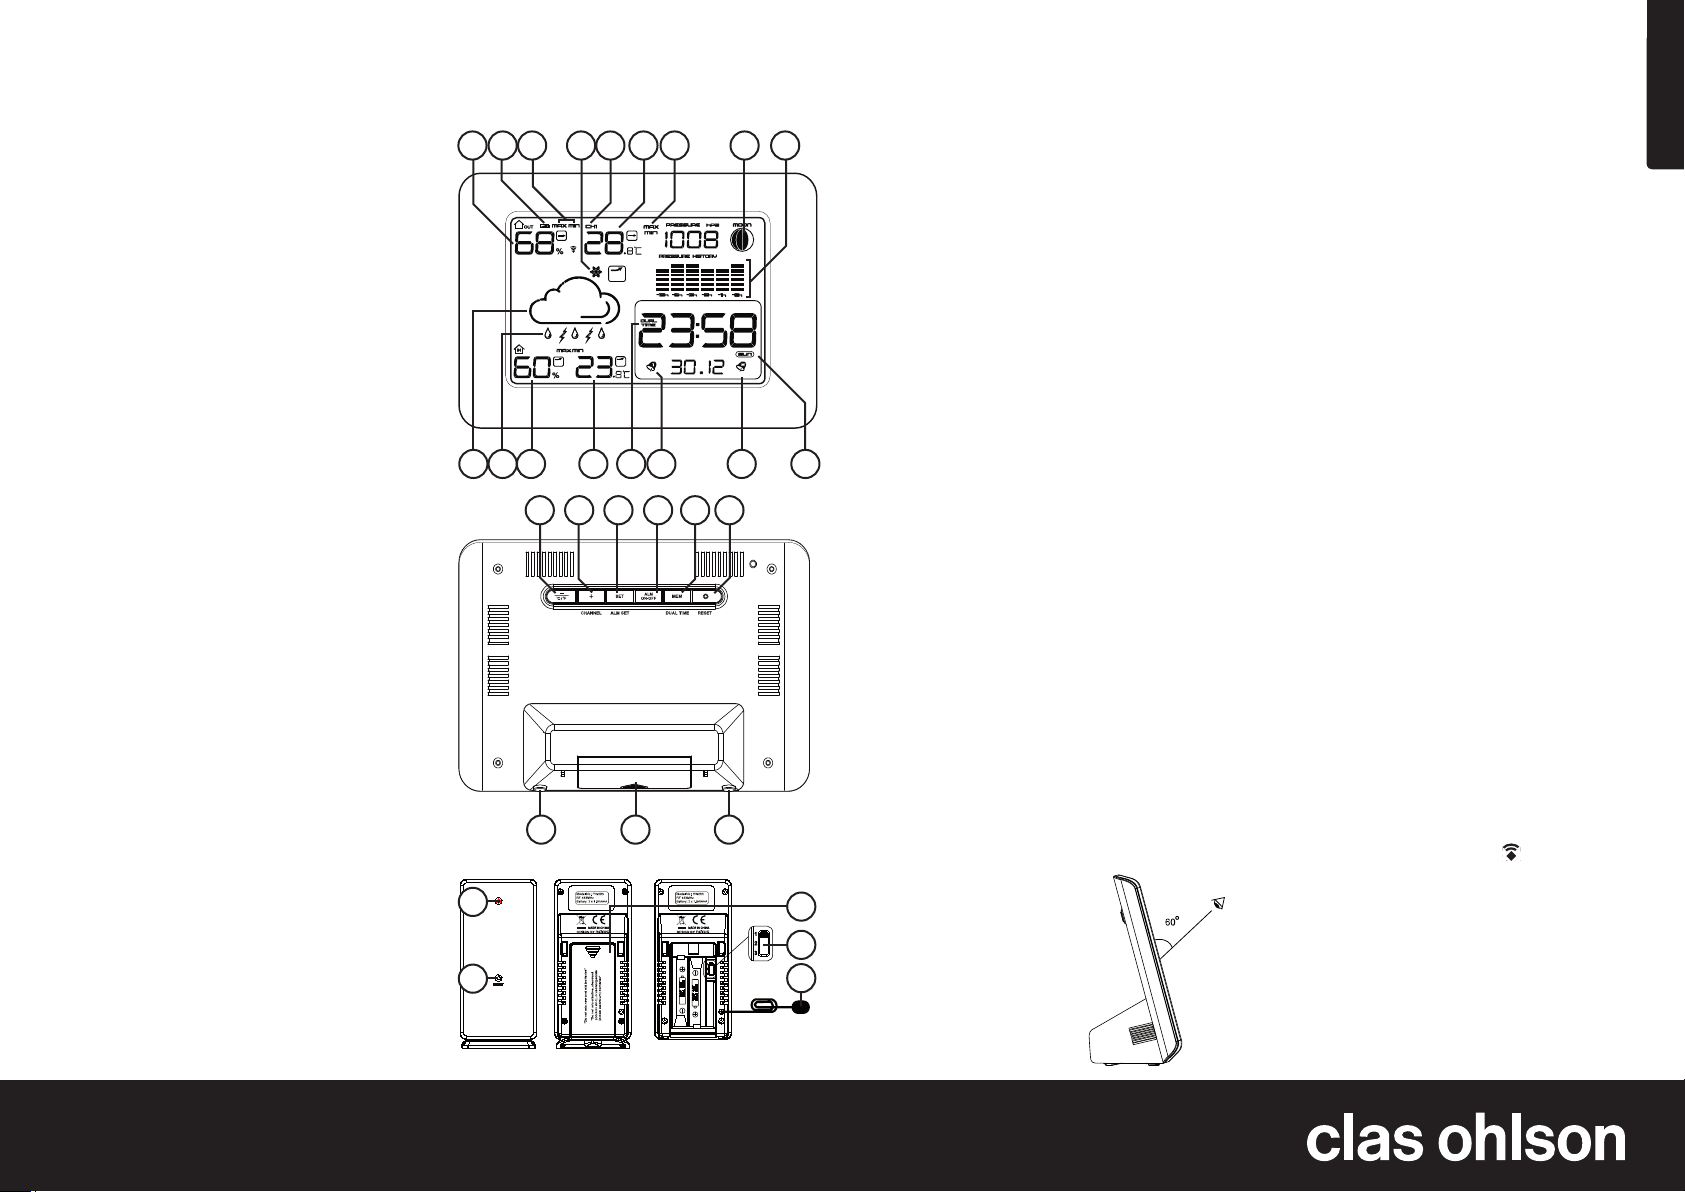
Buttons and functions
1 2 3 4 5 6 7 8 9
10 11 12 13 14 15 16 17
18 19 20 21 22 23
24 25 26
27
28
29
30
31
Weather station
1. Outdoor humidity
2. Outdoor sensor low battery icon
3. Outdoor max-min record
4. Frost alarm icon
5. Outdoor sensor channel 1/2/3
6. Outdoor temperature
7. Max-min record of air pressure
8. Moon phase
9. 12-hour air pressure history
10. Weather forecast
11. Storm alarm icon
12. Indoor humidity
13. Indoor temperature
14. 2nd time zone
15. Alarm 1 icon
16. Alarm 2 icon
17. Day of week
18. – / °C/°F
19. + / CHANNEL
20. SET / ALM SET
21. ALM ON/OFF
22. MEM / DUAL TIME
23. RESET
24. SNOOZE / LIGHT
25. Battery cover
26. SNOOZE / LIGHT
Sensor
27. LED
28. Reset
29. Battery cover
30. Channel selector
31. Outdoor sensor cable
Display viewing angle
The weather station
display is designed to
be best viewed at a
60-degree angle as in the
Figure. Hence the display
may appear dim when
viewed from straight on.
Getting started
Insert batteries
Weather station (receiver)
Remove the battery cover by pushing it outwards in
direction of the arrow and insert 3 AA/LR6-batteries.
Make sure you insert the batteries with correct
polarity (+/-) as marked in the battery compartment.
Sensor
Remove battery by pushing it downward in direction
of arrow and insert 2 x AAA/LR03 batteries. Ensure
batteries are inserted with correct polarity (+/-) as
marked in battery compartment.
Replacing batteries
If the batteries are exposed to very low or very high
temperatures for a prolonged period of time they can
become less effective, which will reduce the range
between sensor and receiver.
• When the display luminance has weakened it is
time to replace the batteries in the receiver.
• If the symbol for a weak battery appears in the display it is time to change the batteries in the sensor.
Synchronisation of weather station
and sensor
The accompanying outdoor sensor is preset to
the weather station’s channel 1 (CH 1). Press + /
CHANNEL one or more times on the weather station
to select channel 1 (CH1).
As soon as you insert the batteries, the synchronisation of sensor and receiver starts automatically. The
units should therefore be placed near to one another
to ensure that synchronisation succeeds (If the outdoor temperature appears on the display synchronisation has succeeded). Once synchronised, the
sensor and receiver can be placed in their intended
locations within functional range.
1. Synchronising an additional sensor: Press
+ / CHANNEL one or more times on the weather
station to select channel 2 (CH2).
2. Hold in +/CHANNEL until starts to flash;
the weather station will now start to search
for a sensor on channel 2.
3. Remove the battery cover of the second sensor,
set the selector to position 2 and then insert
two batteries according to the polarity markings.
Replace the battery cover.
4. The temperature and humidity readings from
sensor 2 will now be shown at the same time
as the CH2 symbol. If no readings are shown
on channel 2, you must reset and repeat the
synchronisation procedure: Press RESET on the
front of sensor 2 once.
5. Repeat the above procedure for sensor 3 if required.
Ver. 201007
GREAT BRITAIN •
for consu mer conta ct, please visit www. clasohlso n.co.uk and click on customer s ervice.
Page 2
English
Set time and date
1. Press and hold SET / ALM SET for ca.
2seconds. The year flashes and the symbol “Yr”
appears. Press + and – to insert year.
2. Press SET/ALM SET: the month flashes on the
display. Press + and – to insert month.
3. Press SET/ALM SET: the computer network
flashes. Press + and – to set date.
4. Press SET/ALM SET: “00” flashes. Press +
and – to set time or to set time zone (see
section World time).
• “00” = Local time.
• “01” = +1 h from local time.
• “-01” = -1 h from local time.
5. Press SET/ALM SET: “24hr” flashes. Press + or –
to select 12- or 24-hour clock display.
6. Press SET/ALM SET: time flashes. Press + or –
to set time.
7. Press SET/ALM SET: minute flashes. Press + or
– to set minutes.
8. Press SET/ALM SET: again or wait ca 10
seconds to return to normal conditions.
Using your weather station
Using alarm
Set alarm time
The world station has dual alarm time, A1 and A2,
which can be set separately.
1. Press SET/ALM SET once. The alarm time and
”A1” appear on the display (to set alarm time 2,
press SET/ALM SET again until ”A2” appears
and then continue to step 2).
2. Press and hold SET/ALM for ca. 2 seconds until
the time flashes. Press + or – to set the hour.
3. Press SET/ALM SET: the minute display flashes.
Press + or – to set minute.
4. Press SET/ALM SET again: the symbol for days
flashes. Press + or – to select the days the alarm
should sound.
• MON, TUE, WED, THU, FRI, SAT, SUN –
Alarm every day
• MON, TUE, WED, THU, FRI – Alarm only
Monday to Friday.
• SAT, SUN – Alarm only Saturday and Sunday.
5. Press SET/ALM SET again or wait ca 10
seconds to return normal situation.
Activate the alarm
Press ALM ON-OFF one or more times to activate
or shut off Alarm 1 and Alarm 2. A symbol appears
when one or the other alarm is activated.
1 = Alarm 1
2 = Alarm 2
Shutting off alarm/Repeated waking
1. When the alarm time comes the alarm sounds at
the same time as the alarm symbol flashes.
2. Press the top edge of the weather station
(SNOOZE/LIGHT) to shut off the alarm temporarily
(repeated waking). The alarm symbol continues to
flash and the alarm sounds again after 5 minutes.
3. To shut off the alarm permanently press ALM
ON-OFF once. The alarm symbol stops flashing
and begins to glow steadily; the alarm is now set
to sound again the next day.
Using the backlight
The display’s backlighting is turned on by pressing
the top edge of the weather station. The lighting
goes off automatically after a few seconds.
Changing the temperature unit (°C/°F)
Press – (°C/°F) to change the temperature unit.
World time
1. If a world time (secondary time) is given it can be
displayed by pressing and holding MEM/DUAL
TIME for ca 2 seconds. The secondary time
appears and the symbol DUAL TIME lights up.
2. Press MEM/DUAL TIME again and hold to return to
local time. The symbol DUAL TIME is extinguished.
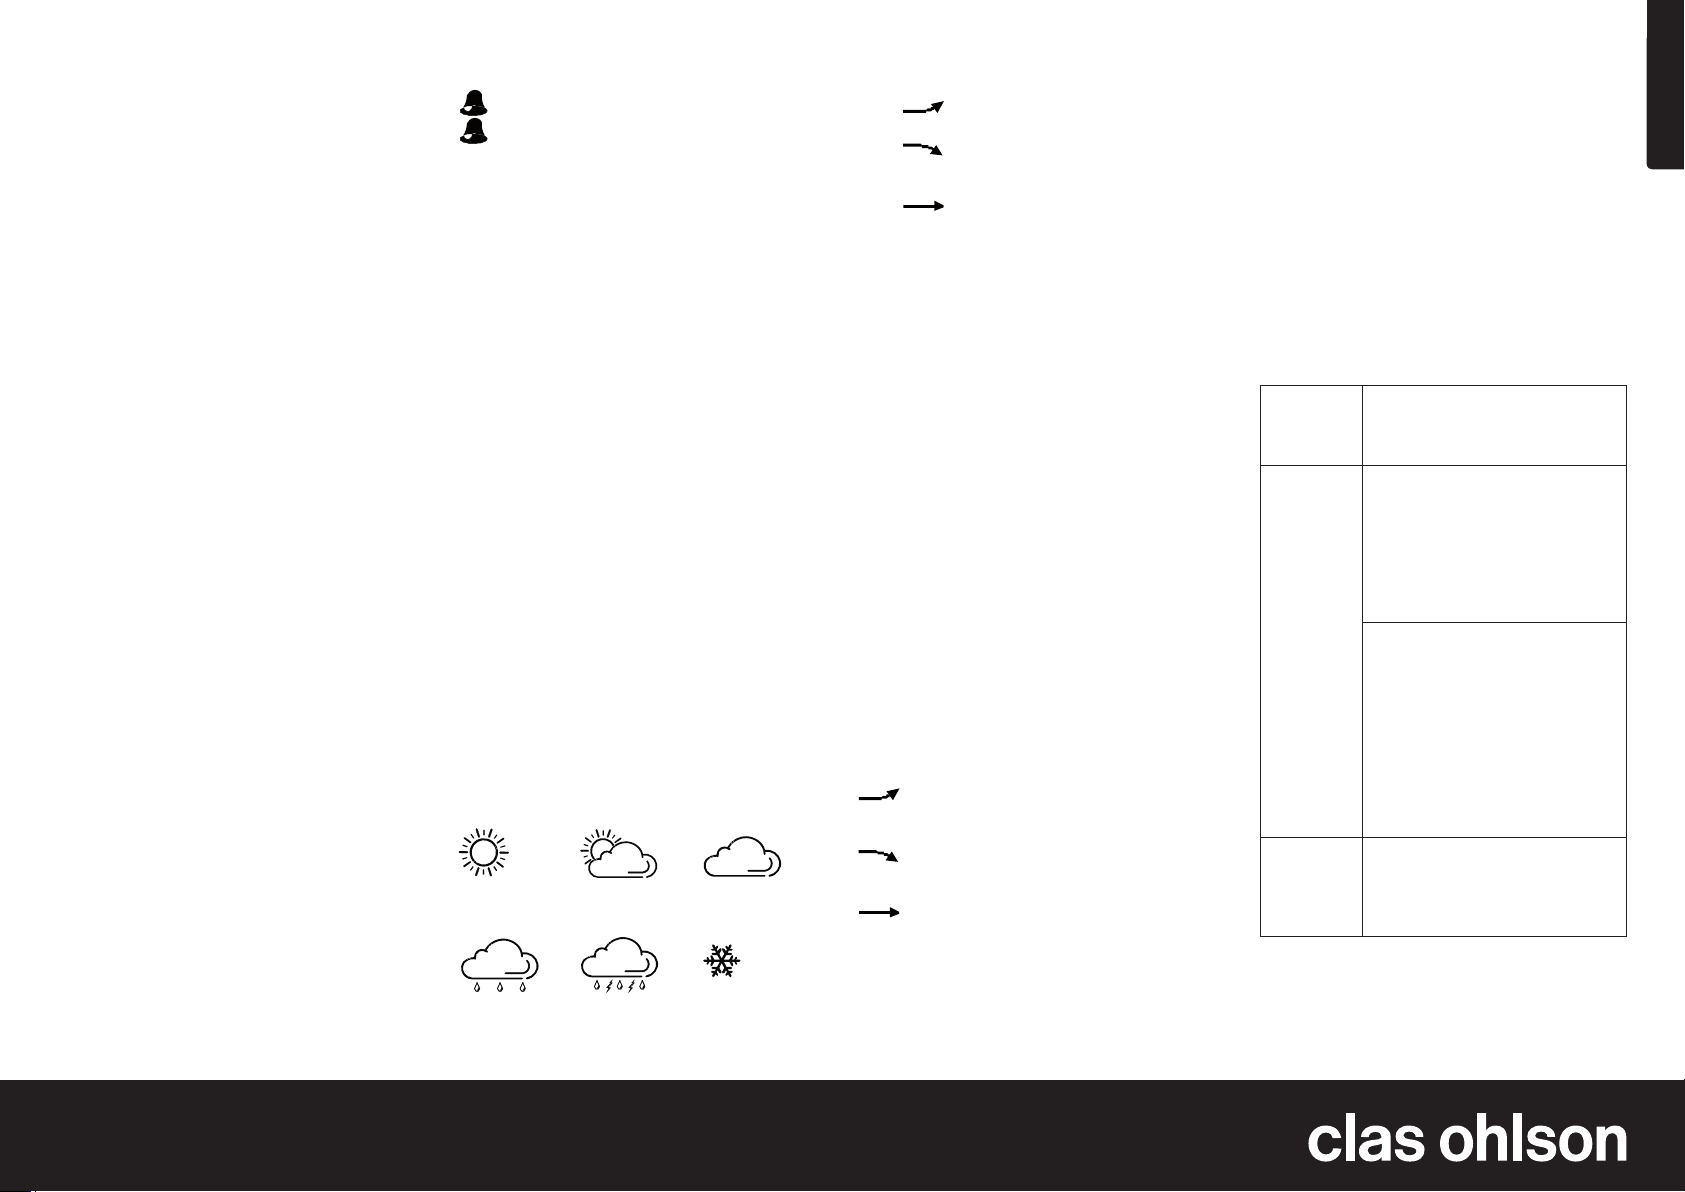
Weather forecasting and trend
The weather station can sense variations in atmospheric pressure and hence is able to forecast the
weather 12-24 hours ahead within a radius of
30-50 km from the receiver.
Sun
Rain clouds Thunder
Shifting
cloudiness
showers
Overcast
Frost warning
Trend
When
rising and the weather is expected to improve.
When
falling and the weather is expected to take a turn
for the worse.
When
pressure are stable.
Atmospheric pressure history
The curve shows the atmospheric pressure trend
over the past 12 hours.
Notes:
• When the weather station has been newly installed
• Absolute precision cannot be guaranteed. The
• If the weather station is moved to a location
appears the atmospheric pressure is
appears the atmospheric pressure is
appears variations in atmospheric
you should disregard its weather forecasts for the
first 12-24 hours as it needs some time in a new
location before it can give reliable forecasts.
weather forecasting function has a reliability of
75% because it has been designed for use in
many different types of environment.
with a notably different height above sea level
compared to its original location, remove the
batteries and re-insert them after ca. 20 seconds.
Doing this prevents the weather station from
sensing differences in the atmospheric pressure
and thereby giving a wrong forecast. Disregard
weather forecasts the first 24 hours after changing
batteries. By doing this the weather station is not
tricked into sensing difference in pressure and
thus give an incorrect forecast.
Temperature and humidity trend
The trend arrows appear to the right of the temperature and humidity readings.
Appears when the most recent temperature or
humidity measurements are 1 °C or 5 % higher than
the preceding temperature or humidity readings.
Appears when the most recent temperature or
humidity measurements are 1 °C or 5 % lower than
the preceding temperature or humidity readings.
Appears when the most recent temperature or
humidity measurements are within +/- 1 °C or +/- 5 %
of the preceding temperature or humidity readings.
Reading max. and min. temperatures
1. Press MEM/DUAL TIME to read the highest
temperature, humidity and pressure readings.
“MAX” appears in the display.
2. Press MEM/DUAL TIME again to read the lowest
temperature, humidity and pressure readings.
“MIN” appears in the display.
Resetting max. and min.
When the max. - and min. temperature appear press
and hold MEM/DUAL TIME to reset the highest and
lowest temperature readings.
Care and maintenance
Wipe off the device with a dry rag. Never use
solvents or abrasive cleaning agents.
Troubleshooting
The display
is blank.
The temperature and
humidity
from the outdoor sensors
do not appear on the
display.
Temperature,
humidity or
pressure is
incorrect.
• Press once the RESET button at
the back of the receiver.
• Check and replace the
receiver batteries.
• Check that the correct channel
is set on the receiver. Press +/
CHANNEL one or more times
to select the channel.
• Check and replace the
sensor batteries.
• Try moving the sensor and
receiver closer to one another.
The receiver and the sensor must be
synchronised anew.
1. Press +/CHANNEL on the
receiver to select the desired
channel for the sensor.
2. Press and hold +/CHANNEL on
the receiver to start the search.
3. Next press RESET on the sensor.
4. When the sensor’s temperature
appears on the display
synchronisation has succeeded.
• Press once the RESET on the
back of the receiver.
• Check that the sensor or receiver
are not exposed to external heat
sources or cooling units.
Recycling
Make sure you comply with local regulations when
discarding the device. If you are not sure what to do,
contact your local authorities.
Ver. 201007
GREAT BRITAIN •
for consu mer conta ct, please visit www. clasohlso n.co.uk and click on customer s ervice.
Page 3
Svenska
Trådlös väderstation
Art.nr 36-4440 Modell IW003N / TW003
Läs igenom hela bruksanvisningen före användning
och spara den sedan för framtida bruk. Vi reserverar
oss för ev. text- och bildfel samt ändringar av tekniska data. Vid tekniska problem eller andra frågor,
kontakta vår kundtjänst.
Säkerhet
• Inomhusenheten får inte utsättas för regn och fukt.
• Utsätt aldrig utomhusgivaren för temperaturer
utanför specificerade värden, långvarigt solljus
eller regn.
• Blanda aldrig gamla och nya batterier eller
alkaliska och laddningsbara batterier.
• Ta ur batterierna när produkten inte ska
användas under en längre period. Gamla
batterier kan börja läcka och skada produkten.
• Tänk på att alltid vända batterierna
enligt märkningen. Fel polaritet (+/-)
kan skada produkten.
• Skada som uppkommit genom yttre
åverkan ersätts inte av garantin.
• Produkten får inte ändras.
Produktbeskrivning
Trådlös väderstation med visning av inom-/
utomhustemperatur, luftfuktighet, tid och
datum samt enkel väderprognos.
Specifikationer
Batterityp 3 x AA/LR6-batterier och
2 x AAA/LR03-batterier
(medföljer ej)
Storlek mottagare 170x125x55 mm
Mätområde
Inomhus -10 °C till +50 °C
(20-95 % luftfuktighet)
Utomhus -50 °C till + 70 °C
(20-95 % luftfuktighet)
Upplösning, temperatur 0,1 °C
Upplösning, luftfuktighet 1 % (RH)
Uppdateringsintervall 30 sek.
Knappar och funktioner
1 2 3 4 5 6 7 8 9
10 11 12 13 14 15 16 17
18 19 20 21 22 23
24 25 26
27
28
29
30
31
Väderstation
1. Luftfuktighet utomhus
2. Låg batterispänning för utomhusgivare
3. Högsta/lägsta temperatur utomhus
4. Frostvarnare
5. Kanal för utomhusgivare
6. Utomhustemperatur
7. Högsta/lägsta lufttryck
8. Månfas
9. Lufttryckshistorik senaste 12 timmar
10. Väderprognos
11. Stormvarningssymbol
12. Luftfuktighet inomhus
13. Inomhustemperatur
14. 2:a tidzon
15. Alarm 1
16. Alarm 2
17. Veckodag
18. – / °C/°F
19. + / CHANNEL
20. SET / ALM SET
21. ALM ON/OFF
22. MEM / DUAL TIME
23. RESET
24. SNOOZE / LIGHT
25. Batterilucka
26. SNOOZE / LIGHT
Givare
27. LED-indikator
28. Reset
29. Batterilucka
30. Kanalväljare
31. Givare
Displayens betraktningsvinkel
Väderstationens display är
konstruerad så att den ses
bäst i60 graders vinkel
enligt figuren. Displayen
kan därför upplevas som
svag när den betraktas
rakt framifrån.
Att komma igång
Sätta ibatterierna
Väderstation (mottagare)
Ta bort batteriluckan genom att skjuta den utåt
ipilens riktning och sätt i3 st. AA/LR6-batterier.
Se till att placera batterierna med rätt polaritet (+/-)
enligt märkningen ibatterifacket.
Givare
Ta bort batteriluckan genom att skjuta den nedåt
ipilens riktning och sätt i2 x AAA/LR03-batterier.
Se till att placera batterierna med rätt polaritet (+/-)
enligt märkningen ibatterifacket.
Byte av batterier
Om batterierna utsätts för mycket låga eller mycket
höga temperaturer under en längre tid kan batterierna förlora effekten, vilket gör att räckvidden mellan
givare och mottagare minskar.
• När displayens intensitet bli försvagad är det
dags att byta batterier imottagaren.
• Om symbolen för svagt batteri visas idisplayen
är det dags att byta batterier igivaren.
Synkronisering av väderstation och givare
Medföljande utomhusgivare är förinställd för väderstationens kanal 1 (CH1). Tryck en eller flera gånger
på + / CHANNEL på väderstationen för att välja
kanal1 (CH1).
När du sätter i batterierna startar synkroniseringen av
givaren och mottagaren automatiskt. Placera därför
enheterna nära varandra för att försäkra dig om att
synkroniseringen lyckas (när utomhustemperaturen
visas i displayen har synkroniseringen lyckats). Placera därefter givare och sändare på dess tänkta platser
inom funktionsområdet.
1. Synkronisering med ytterligare en givare: Tryck
en eller flera gånger på + / CHANNEL på
väderstationen för att välja kanal 2 (CH2).
2. Håll in +/CHANNEL tills ikonen blinkar,
väderstationen kommer nu att söka efter en
givare på kanal 2.
3. Öppna batterilocket på givare 2 och ställ
omkopplaren i läge 2 och sätt i två batterier enligt
märkningen. Sätt tillbaka batterilocket.
4. Temperatur och luftfuktighet från givare 2
kommer snart att visas samtidigt som CH2
symbolen. Om inte några mätdata för kanal 2
visas måste du nollställa och göra om: Tryck en
gång på RESET på framsidan av givare 2.
5. Gör lika för givare 3.
Ver. 201007
SVERIGE • kundtjänst tel. 0247 /445 00, fax 0247/44 5 09, e-p ost kundtja nst@claso hlson.se, internet www.clasohlson. se
Page 4

Svenska
Ställa in tid och datum
1. Tryck och håll in SET / ALM SET ica 2 sekunder.
Årtalet blinkar och symbolen ”Yr” visas. Tryck +
och – för att ange årtal.
2. Tryck SET/ALM SET, månadsangivelsen blinkar
idisplayen. Tryck + och – för att ange månad.
3. Tryck SET/ALM SET, datumet blinkar. Tryck +
och – för att ange datum.
4. Tryck SET/ALM SET, ”00” blinkar. Tryck + och –
för att ställa in tidzon (se avsnitt Världstid).
• ”00” = Lokal tid.
• ”01” = +1 h från lokal tid.
• ”-01” = -1 h från lokal tid.
5. Tryck SET/ALM SET, ”24hr” blinkar. Tryck + eller
– för att välja 12- eller 24-timmarsvisning.
6. Tryck SET/ALM SET, timangivelsen blinkar.
Tryck + eller – för att ange timme.
7. Tryck SET/ALM SET, minutangivelsen blinkar.
Tryck + eller – för att ange minut.
8. Tryck igen på SET/ALM SET eller vänta ca
10sekunder för att återgå till normalläget.
Användning
Använda alarmet
Ställa in alarmtiden
Väderstationen har dubbla alarmtider, A1 och A2,
som kan ställas in separat.
1. Tryck en gång på SET/ALM SET. Alarmtiden och
”A1” visas idisplayen (för att ställa in Alarmtid 2,
tryck igen på SET/ALM SET till ”A2” visas och
fortsätt sedan till steg 2).
2. Tryck och håll in SET/ALM SET ica
2 sekunder, timangivelsen blinkar.
Tryck + eller – för att ange timme.
3. Tryck SET/ALM SET, minutangivelsen blinkar.
Tryck + eller – för att ange minut.
4. Tryck igen på SET/ALM SET, symbolerna för
dagar blinkar. Tryck + eller – för att välja vilka
dagar alarmet skall ljuda.
• MON, TUE, WED, THU, FRI, SAT, SUN –
Alarm alla dagar
• MON, TUE, WED, THU, FRI – Alarm endast
måndag till fredag
• SAT, SUN – Alarm endast lördag och söndag
5. Tryck igen på SET/ALM SET eller vänta ca 10
sekunder för att återgå till normalläget.
Använda alarmet
Aktivera alarmet
Tryck en eller flera gånger på ALM ON-OFF för att
aktivera eller stänga av Alarm 1 och Alarm 2.
En symbol visas när respektive alarm är aktiverat:
1 = Alarm 1
2 = Alarm 2
Stänga av alarmet/Repeterad väckning
1. När alarmtiden inträffar ljuder alarmet samtidigt
som respektive alarmsymbol blinkar.
2. Tryck iöverkant på väderstationen (SNOOZE/
LIGHT) för att tillfälligt stänga av alarmet
(repeterad väckning). Alarmsymbolen fortsätter
att blinka och alarmet ljuder igen efter 5 minuter.
3. För att helt stänga av alarmet, tryck en gång på
ALM ON-OFF. Alarmsymbolen övergår ifast sken
och larmet kommer att ljuda igen nästa dag.
Använda bakgrundsbelysningen
Displayens bakgrundsbelysning tänds genom att
trycka på väderstationens ovankant. Belysningen
slocknar automatiskt efter några sekunder.
Ändra temperaturenhet (°C/°F)
Tryck – (°C/°F) för att ändra temperaturenhet.
Världstid
1. Om en världstid (sekundär tid) är angiven kan
denna visas genom att trycka och hålla in MEM/
DUAL TIME ica 2 sekunder. Den sekundära
tiden visas och symbolen DUAL TIME tänds.
2. Tryck igen och håll in MEM/DUAL TIME för att
återgå till lokal tid. Symbolen DUAL TIME släcks.
Väderprognos och trend
Väderstationen kan känna av förändringar ilufttrycket, och därmed förutspå vädret 12-24 timmar framåt
iett område på 30-50 km från mottagaren.
Sol
Växlande
molnighet
Mulet
Trend
När
förväntas bli bättre.
När
förväntas bli sämre.
När
Lufttryckshistorik
Grafiken visar lufttryckets trend de senaste 12 timmarna.
Anmärkningar:
• När väderstationen installeras ska du bortse från
• Absolut exakthet kan inte garanteras.
• Om väderstationen flyttas till ett ställe med
visas stiger lufttrycket och vädret
visas sjunker lufttrycket och vädret
visas är lufttrycksförändringarna stabila.
dess väderprognoser de första 12-24 timmarna
eftersom den behöver en viss tid på ett nytt ställe
innan den kan ge pålitliga prognoser.
Väderprognosfunktionen har en säkerhet på ca
75 %, beroende på att den är konstruerad för att
användas imånga olika typer av områden.
avsevärd skillnad på höjd över havet jämfört med
ursprungsplatsen ska du ta ur batterierna och
sedan sätta idem igen efter ca 20 sekunder.
Genom att göra detta luras inte väderstationen
att känna skillnad ilufttryck och därmed ge en
felaktig prognos. Bortse från väderprognoserna
de första 24 timmarna efter batteribytet.
Trend för temperatur och luftfuktighet
Trendpilarna visas till höger om angivelserna för temperatur- och luftfuktighet.
Visas när senast uppmätta temperatur/luftfuktighet är 1 °C eller 5 % högre än föregående avlästa
temperatur/luftfuktighet.
Visas när senast uppmätta temperatur/luftfuktighet är 1 °C eller 5 % lägre än föregående avlästa
temperatur/luftfuktighet.
Visas när senast uppmätta temperatur/luftfuktighet är inom +/- 1 °C eller +/- 5 % än avläst temperatur/luftfuktighet den senaste timmen.
Avläsning av max.- och min.-temperatur
1. Tryck MEM/DUAL TIME för att avläsa högsta
uppmätta temperatur, luftfuktighet och lufttryck.
”MAX” visas idisplayen.
2. Tryck igen på MEM/DUAL TIME för att avläsa
lägsta uppmätta temperatur, luftfuktighet och
lufttryck. ”MIN” visas idisplayen.
Återställning av max.- och min.-värden
När max.- och min.-temperaturen visas, tryck och
håll in MEM/DUAL TIME för att återställa högsta och
lägsta uppmätta värden.
Skötsel och underhåll
Torka av produkten med en lätt fuktad trasa. Använd
aldrig lösningsmedel eller slipande rengöringsmedel.
Felsökningsschema
Displayen
visar inga
tecken.
Temperatur
och luftfuktighet från
utomhusgivaren visas
ej idisplayen.
Temperatur,
luftfuktighet eller
lufttryck är
felaktiskt.
• Tryck en gång på RESET-knappen
på mottagarens baksida.
• Kontrollera och byt ut
mottagarens batterier.
• Kontrollera att rätt kanal är inställd
på mottagaren. Tryck en eller flera
gånger på +/CHANNEL för att
välja kanal.
• Kontrollera och byt ut
givarens batterier.
• Prova att flytta givare och
mottagare närmare varandra.
Mottagaren och givaren måste
synkroniseras på nytt.
1. Tryck +/CHANNEL på mottagaren
för att välja önskad kanal för givaren.
2. Tryck och håll in +/CHANNEL på
mottagaren för att starta sökningen.
3. Tryck därefter in RESET på givaren.
4. När givarens temperatur
visas idisplayen har
synkroniseringen lyckats.
• Tryck en gång på RESET-knappen
på mottagarens baksida.
• Se till att givaren/mottagaren inte
är utsatta för externa värmekällor
eller kylaggregat.
Avfallshantering
När du ska göra dig av med produkten ska detta ske
enligt lokala föreskrifter. Är du osäker på hur du ska
gå tillväga, kontakta din kommun.
Ver. 201007
Regnskurar Åskskurar Frostvarning
SVERIGE • kundtjänst tel. 0247 /445 00, fax 0247/44 5 09, e-p ost kundtja nst@claso hlson.se, internet www.clasohlson. se
Page 5

Norsk
Trådløs værstasjon
Art.nr. 36-4440 Modell IW003N / TW003
Les bruksanvisningen nøye før produktet tas ibruk,
og ta vare på den for framtidig bruk. Vi reserverer oss
mot ev. tekst- og bildefeil, samt forandringer av tekniske data. Ved tekniske problemer eller spørsmål, ta
kontakt med vårt kundesenter.
Sikkerhet
• Innendørsenheten må ikke utsettes
for regn eller fuktighet.
• Utendørsenheten må ikke utsettes for
temperaturer utenfor den spesifiserte
området, langvarig sollys eller regn.
• Bland aldri gamle og nye batterier eller
alkaliske og ladbare batterier.
• Ta ut batteriene dersom produktet ikke skal
brukes over tid. Gamle batterier kan begynne
ålekke og skade produktet.
• Husk at batteriene alltid skal ligge den veien som
markeringen viser. Feil polaritet (+/-) kan skade
værstasjonen.
• Garantien gjelder ikke for skader som oppstår
ved ytre påvirkninger.
• Produktet må ikke endres på.
Produktbeskrivelse
Trådløs værstasjon med vising av inne-/utetemperatur,
luftfuktighet, tid og dato, samt en enkel værprognose.
Spesifikasjoner
Batteritype: 3 stk. AA/LR6-batterier og
2 stk. AAA/LR03-batterier
(medfølger ikke)
Størrelse mottaker: 170 x 125 x 55 mm
Måleområde
Innendørs: -10 °C til +50 °C
(20 % -95 % luftfuktighet)
Utendørs: -50 °C til + 70 °C
(20 % -95 % luftfuktighet)
Oppløsning, temperatur: 0,1 °C
Oppløsning, luftfuktighet: 1 % (RH)
Oppdateringsintervall: 30 sekunder
Knapper og funksjoner
1 2 3 4 5 6 7 8 9
10 11 12 13 14 15 16 17
18 19 20 21 22 23
24 25 26
27
28
29
30
31
Værstasjon
1. Luftfuktighet ute
2. Lavt batterinivå utegiver
3. Høyeste/laveste ute temp.
4. Frostvarsel
5. Kanal for utendørsgiver
6. Temperatur ute
7. Høyeste/laveste lufttrykk
8. Månefase
9. Historikk for lufttrykk siste 12 timer
10. Værprognose
11. Stormvarsel
12. Luftfuktighet inne
13. Temperatur inne
14. 2. tidssone
15. Alarm 1
16. Alarm 2
17. Ukedag
18. – / °C/°F
19. + / CHANNEL
20. SET / ALM SET
21. ALM ON/OFF
22. MEM / DUAL TIME
23. RESET
24. SNOOZE / LIGHT
25. Batterilokk
26. SNOOZE / LIGHT
Giver
27. LED-indikator
28. Reset
29. Batterilokk
30. Kanalvelger
31. Giver
Displayets synsvinkel
Værstasjonens display er
konstruert slik at det kan
leses best ien 60 graders
vinkel, se fig. Displayet kan
derfor oppleves som svakt
når det sees på rett forfra.
Kom igang
Sette ibatterier
Værstasjon (mottaker)
Batterilokket åpnes ved å skyves ipilens retning.
Sett inn 3 stk. AA/LR6-batterier. Påse at batteriene
ligger riktig vei og følg merkingen ibatteriholderen.
Giver
Batterilokket åpnes ved å skyves nedover
i pilens retning. Sett inn 2 stk. AAA/LR03-batterier.
Påse at batteriene ligger riktig vei og følg
merkingen ibatteriholderen.
Skifte av batterier
Dersom batteriene utsettes for veldig lave eller veldig
høye temperaturer over lengre tid kan batteriene
miste effekten. Dette kan føre til at rekkevidden
mellom giver og mottaker svekkes.
• Når intensiteten idisplayet blir for svakt er
det på tide å skifte batterier imottakeren.
• Hvis symbolet for svakt batteri vises idisplayet
er det på tide å skifte batterier igiveren.
Synkronisering av værstasjon og giver
Medfølgende utendørsgiver er forhåndsinnstilt på
værstasjonens kanal 1 (CH 1). Trykk en eller flere
ganger på + / CHANNEL på værstasjonen for å velge
kanal 1 (CH 1).
Når batteriene settes i starter synkroniseringen av
giver og mottaker automatisk. Plasser derfor enhetene nær hverandre for å forsikre deg om at synkroniseringen skal lykkes (når utendørstemperaturen
vises idisplayet er synkroniseringen vellykket). Plasser deretter giver og sender på de tiltenkte plassene
innen rekkevidde av hverandre.
1. Synkronisering med ytterligere en giver: Trykk
en eller flere ganger på + / CHANNEL på
værstasjonen for å velge kanal 2 (CH 1).
2. Hold +/CHANNEL inne til ikonet blinker. Nå vil
værstasjonen søke etter en giver på kanal 2.
3. Batterilokket på giver nummer 2 åpnes og
omkobleren stilles inn i posisjon 2. Sett inn to
batterier. Plasser polene på batteriene som
merket. Sett batterilokket tilbake på plass igjen.
4. Temperatur og luftfuktighet fra giver 2 vil nå snart
vises sammen med CH2-symbolet. Hvis det ikke
kommer opp noen måledata for kanal 2, må man
nullstille giveren og gjenta operasjonen. Trykk da
en gang på RESET, som er plassert på framsiden
på giveren.
5. Ved flere givere, gjenta ovennevnte
arbeidsoperasjoner.
Ver. 201007
NORGE • kundesente r tel. 23 21 40 00, fax 23 21 40 80, e-post kundesenter@clasohlson.no, internett www.clasohlson.no
Page 6

Norsk
Still inn tid og dato
1. Trykk og hold inne SET / ALM SET ica.
2sekunder. Årstallet blinker og symbolet ”Yr”
vises. Trykk + og – for å angi årstall.
2. Trykk SET/ALM SET, månedsangivelsen blinker
idisplayet. Trykk + og – for å stille inn måned.
3. Trykk SET/ALM SET, datofeltet blinker. Trykk +
og – for å stille inn dato.
4. Trykk SET/ALM SET, ”00” blinker. Trykk + og –
for å stille inn tidssone (se avsnitt Verdenstid).
• ”00” = Lokal tid.
• ”01” = +1 h fra lokal tid.
• ”-01” = -1 h fra lokal tid.
5. Trykk SET/ALM SET, ”24hr” blinker. Trykk
på + eller – for å skifte mellom 12- eller
24-timersvisning.
6. Trykk SET/ALM SET, timefeltet blinker.
Trykk + og – for å stille inn timer.
7. Trykk SET/ALM SET, minuttfeltet blinker.
Trykk + og – for å stille inn minutter.
8. Trykk igjen på SET/ALM SET eller vent ica.
10sekunder for å gå tilbake til normalmodus.
Bruk
Bruk av alarmen
Stille inn alarmtiden
Værstasjonen har doble alarmtider, A1 og A2, som
kan stilles inn separat.
1. Trykk en gang på SET/ALM SET. Alarmtiden og
”A1” vises idisplayet (for å stille inn Alarmtid 2,
trykk igjen på SET/ALM SET til ”A2” vises og
fortsett deretter til trinn 2).
2. Trykk og hold inne SET / ALM SET ica.
2sekunder, til timefeltet blinker. Trykk + og –
for å stille inn timer.
3. Trykk SET/ALM SET, minuttfeltet blinker.
Trykk + og – for å stille inn minutter.
4. Trykk igjen på SET/ALM SET, symbolene for
dager blinker. Trykk + eller – for å velge hvilke
dager alarmen skal varsle.
• MON, TUE, WED, THU, FRI, SAT, SUN –
Alarm alle dager
• MON, TUE, WED, THU, FRI – Alarm kun
mandag til fredag
• SAT, SUN – Alarm kun lørdag og søndag
5. Trykk igjen på SET/ALM SET eller vent ica.
10sekunder for å gå tilbake til normalmodus.
Bruk av alarmen
Aktivere alarmen
Trykk en eller flere ganger på ALM ON-OFF for å aktivere eller deaktivere Alarm 1 og Alarm 2. Et symbol
vises når respektive alarm er aktivert:
1 = Alarm 1
2 = Alarm 2
Deaktiver alarmen/Repetert vekking
1. Når alarmtiden inntreffer vil alarmen varsle
samtidig som respektive alarmsymbol blinker.
2. Trykk ioverkant på værstasjonen (SNOOZE/
LIGHT) for å skru av alarmen midlertidig (repetert
vekking). Alarmsymbolet fortsetter å blinke og
alarmen varsler igjen etter 5 minutter.
3. For å skru alarmen helt av, trykk en gang på ALM
ON-OFF. Alarmsymbolet går over til fast skinn og
alarmen kommer til å varsle igjen neste dag.
Bruk av bakgrunnsbelysning
Bakgrunnsbelysningen tennes ved å trykke på værstasjonens overkant. Belysningen slokner automatisk
etter noen sekunder.
Temperaturenhet (C/F)
Trykk – (°C/°F) for å endre temperaturenhet.
Verdenstid
1. Hvis en verdenstid (sekundærtid) er gitt, kan
denne vises ved å trykke inn og holde inne MEM/
DUAL TIME ica. 2 sekunder. Den sekundære
tiden vises og symbolet DUAL TIME tennes.
2. Trykk inn MEM/DUAL TIME igjen og hold den
inne for å gå tilbake til din lokale tid. Symbolet
DUAL TIME slokkes.
Værprognose og trend
Denne værstasjonen kan registrere forandringer ilufttrykket, og kan dermed forutse været 12 – 24 timer
framover iet område på 30 – 50 km fra mottakeren.
Sol
Spredt regn Torden og regn Frostvarsel
Vekslende
skydekke
Overskyet
Trend
Når
været forventes å bli bedre.
Når
været forventes å bli værre.
Når
dermed også været stabilt.
Lufttrykkshistorikk
Grafikken viser lufttrykkets trend de siste 12 timene.
Anmerkninger:
• Når værstasjonen installeres skal du se bort fra
• Det kan ikke garanteres av prognosene stemmer
• Hvis værstasjonen flyttes til et sted med stor
vises stiger lufttrykket og
vises synker lufttrykket og
vises er lufttrykket og
værprognosene de første 12 – 24 timene fordi
den trenger en viss tid på seg på det nye stedet.
eksakt. Værprognosefunksjonen har en sikkerhet
på ca. 75 %, avhengig av om den er konstruert
for å brukes imange forskjellige typer områder.
forskjell på høyden over havet iforhold til
utgangsplassen, skal du ta ut batteriene og
deretter sette dem inn igjen etter ca. 20 sekunder.
Ved å gjøre dette lures ikke værstasjonen til å gi
gale værprognoser. Se bort fra værprognosene de
første 24 timene etter skifte av batteri.
Trendvisning for temperatur
og luftfuktighet
Trendpilene vises til høyre for angivelsene for temperatur- og luftfuktighet.
Vises når siste målte temperatur/luftfuktighet
var 1 °C eller 5 % høyre enn forrige avleste temperatur/luftfuktighet.
Vises når siste målte temperatur/luftfuktighet
var 1 °C eller 5 % lavere enn forrige avleste temperatur/luftfuktighet.
Vises når siste målte temperatur/luftfuktighet
var innenfor +/- 1 °C eller +/- 5 % av forrige avleste
temperatur/luftfuktighet den seneste timen.
Avlesing av maks.- og min.-temperatur
1. Trykk MEM/DUAL TIME for å lese av høyeste
målte temperatur, luftfuktighet og lufttrykk.
”MAX” vises idisplayet.
2. Trykk MEM/DUAL TIME en gang til for å lese
av laveste målte temperatur, luftfuktighet og
lufttrykk. ”MIN” vises idisplayet.
Stille tilbake max.- og min.-verdiene
Når maks.- og min.-temperaturen vises, trykk og
hold inne MEM/DUAL TIME for å stille tilbake høyeste
og laveste målte verdier.
Stell og vedlikehold
Rengjør med en lett fuktet klut. Bruk aldri slipende
rengjøringsmidler eller sterke løsemidler.
Feilsøking
Displayet
viser ikke noe
Temperaturen og
luftfuktigheten fra utendørsgiveren
vises ikke
idisplayet.
Temperatur,
luftfuktighet
eller lufttrykk
er feil
• Trykk en gang på RESET-knappen.
• Kontroller og skift batterier
ved behov.
• Kontroller at riktig kanal er valgt
på mottaker. Trykk en eller flere
ganger på +/CHANNEL for
åvelge kanal.
• Kontroller og skift batterier
ved behov.
• Flytt giveren og mottakeren
nærmere hverandre.
Mottaker og giver må synkroniseres
på nytt.
1. Trykk +/CHANNEL på mottakeren
for å velge ønsket kanal for giveren.
2. Trykk og hold inne +/CHANNEL
på mottakeren for å starte søket.
3. Trykk deretter inn RESET på
utendørsgiveren.
4. Når utetemperaturen vises
idisplayet er synkroniseringen
vellykket.
• Trykk en gang på RESET-knappen.
• Påse at giver/mottaker ikke er
utsatt for eksterne varmekilder
eller kjøleaggregater.
Avfallshåndtering
Når produktet skal kasseres, må det skje ihenhold
til lokale forskrifter. Ved usikkerhet, ta kontakt med
lokale myndigheter.
Ver. 201007
NORGE • kundesente r tel. 23 21 40 00, fax 23 21 40 80, e-post kundesenter@clasohlson.no, internett www.clasohlson.no
Page 7

Suomi
Langaton sääasema
Tuotenro 36-4440 Malli IW003N / TW003
Lue käyttöohje ennen tuotteen käyttöönottoa
ja säilytä se tulevaa tarvetta varten. Pidätämme
oikeuden teknisten tietojen muutoksiin. Emme vastaa
mahdollisista teksti- tai kuvavirheistä. Jos laitteeseen
tulee teknisiä ongelmia, ota yhteys myymälään tai
asiakaspalveluun.
Turvallisuus
• Sisäyksikköä ei saa altistaa sateelle ja kosteudelle.
• Älä altista ulkoanturia määriteltyjä arvoja
korkeammille tai alhaisemmille lämpötiloille,
pitkäaikaiselle auringonvalolle tai sateelle.
• Älä sekoita vanhoja ja uusia paristoja äläkä
alkaliparistoja ja ladattavia akkuja keskenään.
• Poista paristot, jos laite on käyttämättä
pidemmän aikaa. Vanhat paristot voivat
vuotaa ja vioittaa laitetta.
• Aseta paristot napaisuusmerkintöjen mukaisesti.
Väärä napaisuus (+/-) saattaa vioittaa laitetta.
• Takuu ei kata ulkoisia vahinkoja.
• Tuotetta ei saa muuttaa.
Tuotekuvaus
Langaton sääasema näyttää sisä- ja
ulkolämpötilan, ilmankosteuden, kellonajan,
päiväyksen ja yksinkertaisen sääennusteen.
Tekniset tiedot
Paristo 3 kpl AA/LR6-paristoa ja
2 kpl AAA/LR03-paristoa
(myydään erikseen)
Vastaanottimen mitat 170x125x55 mm
Mittausalue
Sisällä –10 °C…+50 °C
(20–95 % ilmankosteus)
Ulkona –50 °C…+70 °C
(20–95 % ilmankosteus)
Lämpötilan tarkkuus 0,1 °C
Ilmankosteuden tarkkuus 1 % (RH)
Päivitysväli 30 sekuntia
Painikkeet ja toiminnot
1 2 3 4 5 6 7 8 9
10 11 12 13 14 15 16 17
18 19 20 21 22 23
24 25 26
27
28
29
30
31
Sääasema
1. Ulkoilman kosteus
2. Ulkoanturin paristojen matala varaustaso
3. Korkein/matalin ulkolämpötila
4. Pakkasvaroitin
5. Ulkolämpötila-anturin kanava
6. Ulkolämpötila
7. Korkein/matalin ilmanpaine
8. Kuunvaihe
9. Ilmanpaine viimeisten 12 tunnin ajalta
10. Sääennuste
11. Myrskyvaroitus
12. Sisäilman kosteus
13. Sisälämpötila
14. Toinen aikavyöhyke
15. Herätys 1
16. Herätys 2
17. Viikonpäivä
18. – / °C/°F
19. + / CHANNEL
20. SET / ALM SET
21. ALM ON/OFF
22. MEM / DUAL TIME
23. RESET
24. SNOOZE / LIGHT
25. Paristolokeron kansi
26. SNOOZE / LIGHT
Anturi
27. LED-merkkivalo
28. Reset
29. Paristolokeron kansi
30. Kanavanvalitsin
31. Anturi
Näytön katselukulma
Sääaseman näytön
tiedot näkyvät parhaiten
60 asteen kulmasta (ks.
kuva). Tiedot saattavat
näkyä huonosti, jos
näyttöä katsotaan
suoraan edestä.
Käytön aloittaminen
Paristojen asettaminen
Sääasema (vastaanotin)
Avaa paristolokeron luukku työntämällä sitä ulospäin
nuolen suuntaisesti ja aseta paristot (2 x AA/LR6)
lokeroon. Aseta paristot paristoluukun napaisuusmerkintöjen (+/–) mukaisesti.
Anturi
Avaa paristolokeron luukku työntämällä sitä alaspäin
nuolen suuntaisesti ja aseta paristot (2 x AAA/LR03)
lokeroon. Aseta paristot paristoluukun napaisuusmerkintöjen (+/-) mukaisesti.
Paristojen vaihto
Paristot saattavat menettää tehoaan, mikäli ne altistuvat erittäin alhaisille tai korkeille lämpötiloille pidemmän aikaa. Tämä taas vähentää anturin ja vastaanottimen välistä kantamaa.
• Vaihda vastaanottimen paristot, kun näytöllä
olevat tiedot himmenevät.
• Kun heikon pariston kuvake ilmestyy näytölle,
vaihda anturin paristot.
Sääaseman ja anturin synkronointi
Pakkauksen mukana tuleva ulkoanturi on esiasetettu
sääaseman kanavalle 1 (CH1). Valitse kanava 1 (CH1)
painamalla yhden tai useamman kerran sääaseman +
/ CHANNEL -painiketta.
Kun paristot on asennettu, sääaseman ja anturin
synkronointi alkaa automaattisesti. Sijoita yksiköt
lähekkäin taataksesi synkronoinnin onnistuminen.
Kun ulkolämpötila ilmestyy näytölle, synkronointi on
onnistunut. Sijoita anturi ja vastaanotin haluamiisi
paikkoihin toiminta-alueen sisällä.
1. Lisäanturin synkronointi: Valitse kanava 2
(CH2) painamalla yhden tai useamman kerran
sääaseman + / CHANNEL -painiketta.
2. Pidä +/CHANNEL painettuna, kunnes alkaa
vilkkua. Sääasema etsii nyt anturin kanavalle 2.
3. Avaa anturin 2 paristolokero, aseta
valitsin asentoon 2 ja aseta kaksi paristoa
paristolokeroon merkintöjen mukaisesti. Laita
paristolokeron kansi takaisin paikalleen.
4. Lämpötila ja ilmankosteus anturista 2 sekä symboli CH2 ilmestyvät pian näytölle. Jos et saa mittaustulosta kanavalle 2, nollaa anturi painamalla
yhden kerran anturin 2 etupuolella olevaa RESETpainiketta ja yritä synkronointia uudelleen.
5. Toimi samoin anturin 3 kanssa.
Ver. 201007
SUOMI • asiakaspal velu puh. 0 20 111 22 22, sähköposti info@ clasohlson. fi, kotis ivu www.cl asohlson.fi
Page 8

Suomi
Kellonajan ja päivämäärän asettaminen
1. Paina SET/ALM SET -painiketta noin kahden
sekunnin ajan. Vuosi vilkkuu ja näytölle ilmestyy
”Yr”. Aseta vuosi painamalla + ja –.
2. Paina SET/ALM SET, kuukausi vilkkuu näytöllä.
Aseta kuukausi painamalla + ja –.
3. Paina SET/ALM SET, päivämäärä vilkkuu.
Aseta päivämäärä painamalla + ja –.
4. Paina SET/ALM SET, ”00” vilkkuu. Aseta aikavyöhyke (ks. luku Maailmanaika) painamalla + ja –.
• ”00” = paikallinen aika.
• ”01” = paikallinen aika +1 h.
• ”–01” = paikallinen aika –1 h.
5. Paina SET/ALM SET, ”24hr” vilkkuu. Valitse 12
tai 24 tunnin näyttö painamalla + tai –.
6. Paina SET/ALM SET, tunnit vilkkuvat.
Aseta tunnit painamalla + tai –.
7. Paina SET/ALM SET, minuutit vilkkuvat.
Aseta minuutit painamalla + tai –.
8. Palaa normaalitilaan painamalla SET/ALM SET
tai odota 10 sekuntia.
Käyttö
Herätyksen käyttö
Herätysajan asettaminen
Sääasemaan voi asettaa kaksi erillistä herätysaikaa
(A1 ja A2).
1. Paina kerran SET/ALM SET. Herätysaika ja ”A1”
ilmestyvät näytölle. (Aseta toinen herätysaika
painamalla uudelleen SET/ALM SET, kunnes ”A2”
ilmestyy näytölle. Jatka seuraavaan kohtaan).
2. Paina SET/ALM SET noin kahden sekunnin ajan,
kunnes tunnit vilkkuvat näytöllä. Aseta tunnit
painamalla + tai –.
3. Paina SET/ALM SET, minuutit vilkkuvat.
Aseta minuutit painamalla + tai –.
4. Paina SET/ALM SET, päivämerkinnät vilkkuvat.
Valitse herätyspäivät painamalla + tai –.
• MON, TUE, WED, THU, FRI, SAT, SUN –
Herätys joka päivä
• MON, TUE, WED, THU, FRI – Herätys
maanantaista perjantaihin
• SAT, SUN – Herätys lauantaina ja sunnuntaina
5. Palaa normaalitilaan painamalla SET/ALM SET tai
odota 10 sekuntia.
Herätyksen käyttö
Herätyksen aktivointi
Aktivoi tai sammuta herätys 1 ja 2 painamalla yhden
tai useamman kerran ALM ON-OFF. Näytölle ilmestyy
kuva, kun herätys on aktivoitu:
1 = Herätys 1
2 = Herätys 2
Herätyksen sammuttaminen / torkkutoiminto
1. Kun on herätyksen aika, hälytysääni alkaa soida
ja herätyksen kuva alkaa vilkkua.
2. Sammuta hälytys väliaikaisesti (torkkutoiminto)
painamalla sääaseman yläosan SNOOZE/LIGHTpainiketta. Herätyksen kuva jatkaa vilkkumista ja
hälytys soi uudelleen viiden minuutin kuluttua.
3. Sammuta herätys kokonaan painamalla ALM
ON-OFF. Herätyksen kuva alkaa palaa koko ajan
ja hälytys herättää uudelleen seuraavana päivänä.
Taustavalo
Sytytä näytön taustavalo painamalla sääaseman
yläosasta. Valo sammuu automaattisesti muutaman
sekunnin kuluttua.
Lämpötilan yksikön vaihtaminen (°C/°F)
Vaihda lämpötilan yksikköä painamalla – (°C/°F).
Maailmanaika
• Jos maailmanaika (toissijainen aika) on asetettu,
saat sen näkyviin painamalla MEM/DUAL TIME
-painiketta noin kaksi sekuntia. Toissijainen aika
ilmestyy näytölle ja DUAL TIME alkaa vilkkua.
• Palaa normaaliaikaan pitämällä MEM/DUAL TIME
painettuna. DUAL TIME sammuu näytöltä.
Sääennuste ja kehitys
Sääasema tunnistaa ilmanpaineen muutokset ja
pystyy ennustamaan seuraavien 12–24 tunnin sään
30–50 km säteellä.
Aurinkoista
Puolipilvistä Pilvistä
Kehitys
Ilmanpaine nousee ja sää paranee
Ilmanpaine laskee ja sää huononee
Tasainen ilmanpaine
Ilmanpaineen historia
Kuvio näyttää ilmanpaineen kehityssuunnan
viimeisten 12 tunnin ajalta.
Huom.:
• Sääaseman tulee olla tietty aika uudessa
paikassa, jotta se voi antaa luotettavia
sääennustuksia. Tämän vuoksi ensimmäisen
vuorokauden ennustukseen ei tule luottaa.
• Ei takaa täydellistä tarkkuutta. Sääennustuksen
tarkkuus on noin 75 %, sillä se on valmistettu
toimimaan monissa erilaisissa ympäristöissä.
• Mikäli sääasema siirretään paikkaan, jonka
korkeus merenpinnan yläpuolelta eroaa selvästi
edellisestä paikasta, paristot tulee poistaa ja laittaa
takaisin paikoilleen noin 20 sekunnin kuluttua.
Muuten laite antaa virheellisen sääennustuksen.
Paristojen vaihdon jälkeen ei ensimmäisen
vuorokauden ennustukseen tule luottaa.
Lämpötilan ja ilmankosteuden kehitys
Nuolet näkyvät lämpötila- ja ilmankosteustietojen
oikealla puolella.
Viimeisin lämpötila/ilmankosteus on 1 °C tai
5% korkeampi kuin edellinen lämpötila/ilmankosteus.
Viimeisin lämpötila/ilmankosteus on 1 °C tai
5% matalampi kuin edellinen lämpötila/ilmankosteus.
Viimeisin lämpötila/ilmankosteus on +/– 1 °C
tai +/– 5 % verrattuna viimeisen tunnin
lämpötilaan/ilmankosteuteen.
Maksimi- ja minimilämpötilojen tarkastelu
1. Tarkastele korkeinta mitattua lämpötilaa,
ilmankosteutta ja ilmanpainetta painamalla
MEM/DUAL TIME. Näytölle ilmestyy ”MAX”.
2. Tarkastele matalinta mitattua lämpötilaa,
ilmankosteutta ja ilmanpainetta painamalla
MEM/DUAL TIME. Näytölle ilmestyy ”MIN”.
Maksimi- ja minimiarvojen nollaus
Kun näytöllä on maksimi- ja minimilämpötila,
pidä MEM/DUAL TIME painettuna nollataksesi
korkeimman ja matalimman mitatun arvon.
Huolto ja ylläpito
Pyyhi kevyesti kostutetulla liinalla. Älä käytä
voimakkaita puhdistusaineita tai liuottimia.
Vianhakutaulukko
Näytöllä ei
ole merkkejä.
Ulkoanturin
lämpötila ja
ilmankosteus
eivät näy
näytöllä.
Virheellinen
lämpötila,
ilmankosteus
tai ilmanpaine.
• Paina kerran vastaanottimen takapuolella olevaa RESET-painiketta.
• Tarkasta ja vaihda vastaanottimen
paristot.
• Varmista, että vastaanottajaan
on asetettu oikea kanava. Valitse
kanava painamalla yhden tai
useamman kerran +/CHANNEL.
• Tarkasta ja vaihda anturin paristot.
• Siirrä anturi ja vastaanotin
lähemmäs toisiaan.
Vastaanotin ja anturi pitää
synkronoida uudelleen.
1. Valitse anturille haluamasi kanava
painamalla vastaanottimen +/
CHANNEL-painiketta.
2. Aloita haku pitämällä
vastaanottimen +/CHANNELpainike painettuna.
3. Paina anturin RESET-painiketta.
4. Synkronointi on onnistunut, kun
anturin lämpötila ilmestyy näytölle.
• Paina kerran vastaanottimen takapuolella olevaa RESET-painiketta.
• Varmista, ettei anturi/
vastaanotin altistu äärimmäisille
lämpötiloille tai ole jäähdyttimen
läheisyydessä.
Kierrätys
Kierrätä tuote asianmukaisesti, kun poistat sen
käytöstä. Tarkempia kierrätysohjeita saat kuntasi
jäteneuvonnasta.
Ver. 201007
Sadekuuroja Ukkoskuuroja Pakkasvaroitus
SUOMI • asiakaspal velu puh. 0 20 111 22 22, sähköposti info@ clasohlson. fi, kotis ivu www.cl asohlson.fi
 Loading...