

Page 1
Internet Radio
Internetradio
Internettradio
Internetradio
EnglishSvenskaNorskSuomi
Art.no Model
18-8154 IRF4S-UK
38-3788 IRF4S
Ver. 201101
Page 2

2
Page 3

Internet Radio
Art.no 18-8154 Model IRF4S-UK
38-3788 IRF4S
Please read the entire instruction manual before use and save it for future reference.
We reserve the right for any errors in text or images and for making any necessary
technical changes to this document. If you should have any questions concerning
technical problems please contact our Customer Services.
Safety
• The product should only be repaired by qualified service technicians.
• The product should not be taken apart or modified.
• Do not place the product where there is a risk of it falling into water or other
liquid. Do not place any objects which contain liquid on the product such as
vases, drinks, etc.
• Do not cover the product. Adequate ventilation with a distance of at least 15 cm
between ventilation holes and the surrounding area is necessary to prevent the
device from becoming too warm.
• Do not place the device in damp, dusty environments or where there are
heavy vibrations.
• The standby switch on the front of the device does not disconnect the device
from the mains. To completely disconnect the device from the mains the plug
has to be removed from the socket.
• Use only the included or recommended mains adaptor.
• Prolonged exposure to high volume can damage your hearing.
English
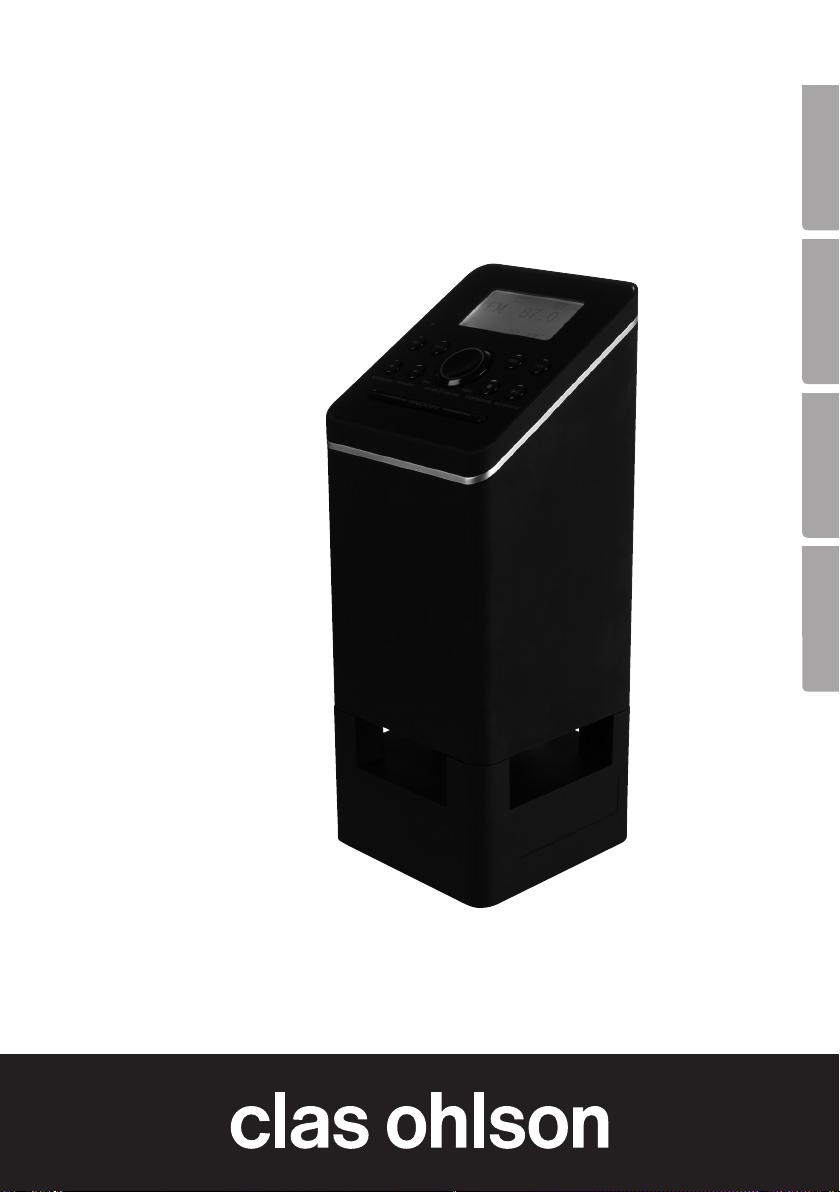
Product description
Internet Radio/Network Music Player with built-in speakers. Provides easy access
to your computer music library or the thousands of Internet radio channels via your
existing wireless/wired network. Headphone socket, clock with alarm and snooze.
Comes with remote control and mains adaptor.
3
Page 4
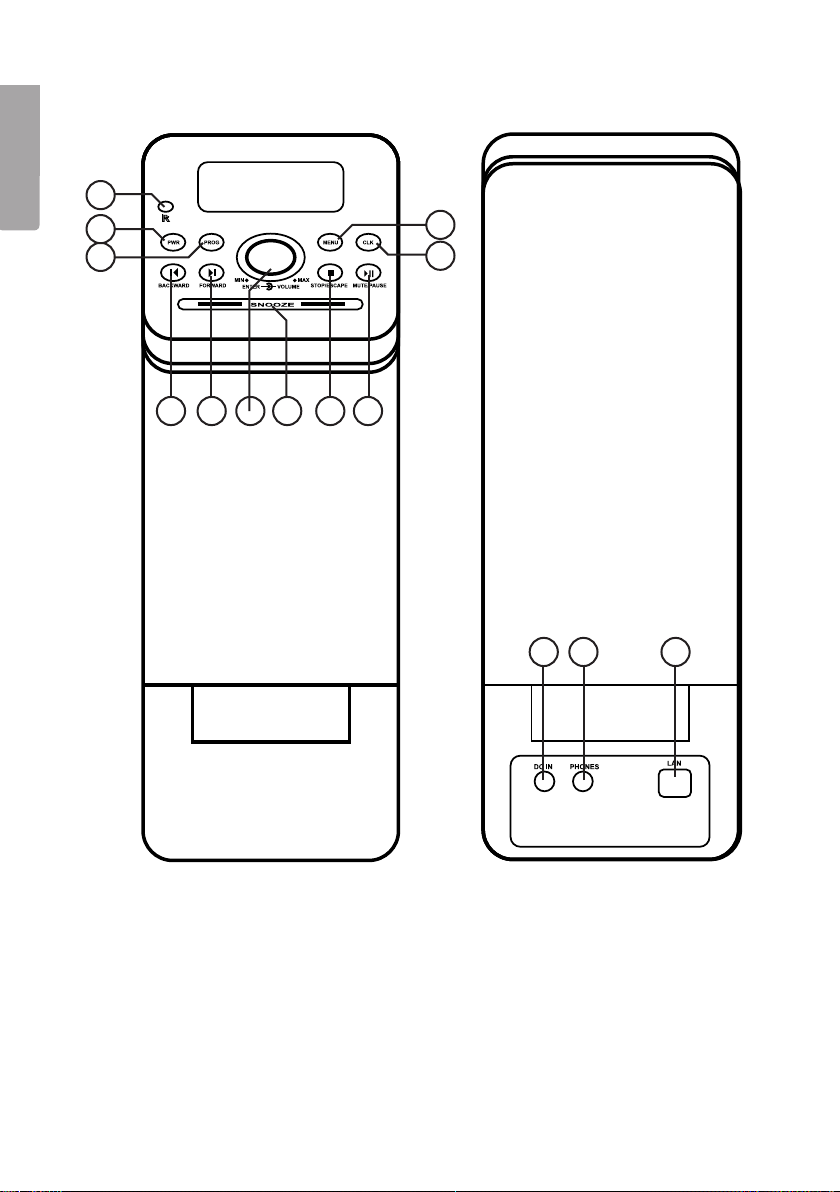
Buttons and functions
English
1
2
3
4
5
6 7 8 9 10 11
12 13 14
1. IR sensor
2. [PWR] – on/off switch
3. [PROG] – Programme
4. [MENU] – Menu
5. [CLK] – Clock
6. [BACKWARD] – Fast reverse
7. [FORWARD] – Fast forward
8. [ENTER] – Confirm
9. [SNOOZE] – Snooze alarm
10. [STOP/ESCAPE] – Stop/go back
11. [MUTE/PAUSE] – Sound off/pause
12. DC 12 V – Power input socket
13. PHONES – Headphone outlet
14. LAN – Network cable connection
4
Page 5
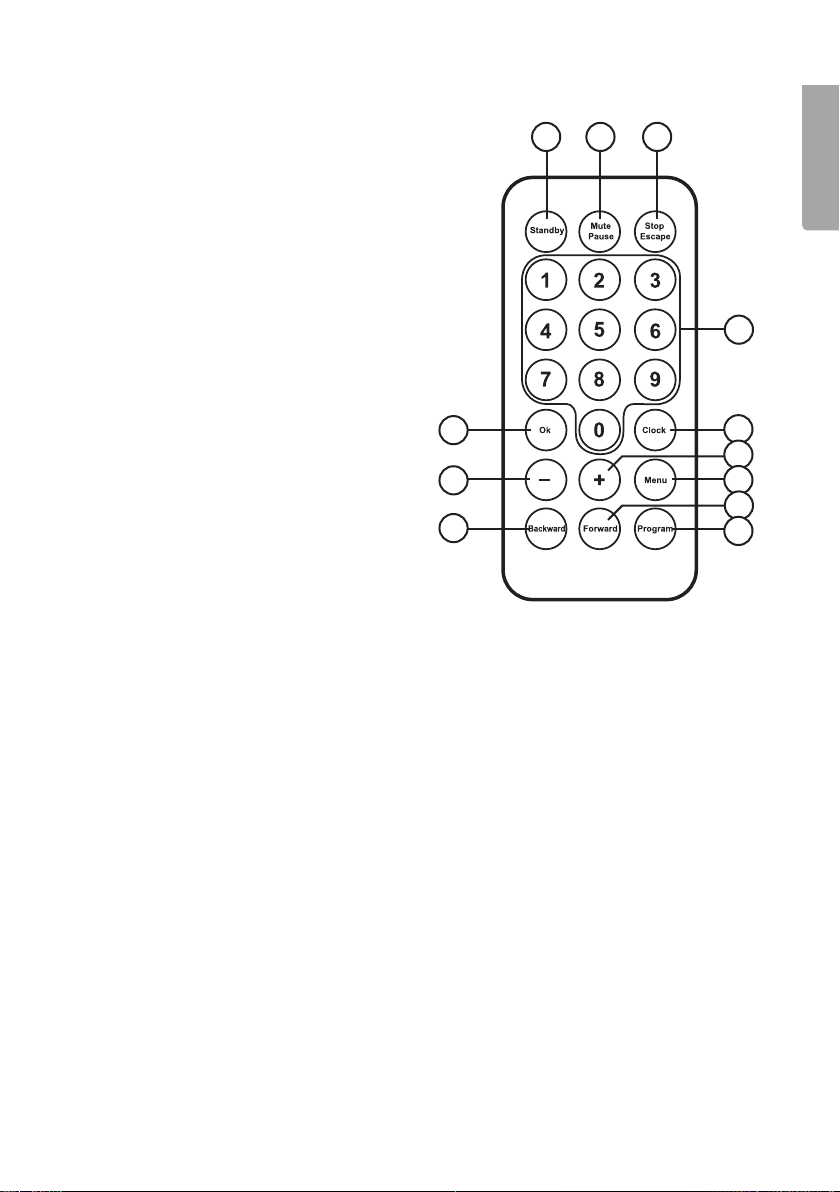
Remote control
15. [STANDBY] – off/on
16. [MUTE/PAUSE] – sound off/pause
17. [STOP/ESCAPE] – Stop/go back
18. Numerical buttons
19. [OK] – confirm
20. [CLOCK]
21. – Previous and volume down
22. + Next and volume up
23. [MENU] – menu
24. [BACKWARD] – fast reverse
25. [FORWARD] – fast forward
26. [PROGRAM] – programme
Getting started
19
21
24
15
16 17
English
18
20
22
23
25
26
You will need the following to get started
• Internet connection
• Router with DHCP function activated
• A PC with UPnP activated (if you wish to stream music from your computer)
Navigation
• Press [MENU] to return after making a selection.
Connections
1. If you wish to use a LAN cable, connect the cable to the router and then
to the internet radio’s LAN port.
2. Connect the internet radio’s mains adaptor to a wall socket.
3. Press and hold in [PWR] to turn the internet radio on.
5
Page 6

LAN cable network
1. It takes 25 seconds for the internet radio to connect to the Internet.
2. The main menu will appear with the internet radio highlighted. The unit is
English
preprogrammed with a few stations so you can listen straight away.
3. Press [ENTER] to come to “My Stations, Top 500, etc”
4. Press [ENTER] to select a station.
5. The music starts playing as soon as it has downloaded.
6. Adjust the volume as desired.
WiFi wireless network
1. Go to SETUP in the main menu and press [ENTER].
2. Go to NETWORK and press [ENTER].
3. Go to Wifi and press [ENTER].
4. Go to Wifi Setup and press [ENTER].
5. Go to Add Wifi AP and press [ENTER].
6. Go to Auto Scan and press [ENTER].
7. A list of networks is displayed.
8. Go to Router list and press [ENTER].
9. If the network does not require a code, the unit will be connected automatically.
Configure the internet radio
Network general
1. Select [MENU], SETUP, NETWORK, WIFI SETUP, ADD WIFI AP, AUTO SCAN
and then [ENTER].
2. A list of available networks is displayed.
3. Select the network you want and press [ENTER].
4. If your network is protected by WEP, WPA or WPA2 you will need to enter a
password. Use the volume button, [FORWARD], [BACKWARD] and [PROG].
WiFi setup - manually
1. Select [MENU], SETUP, NETWORK, WIFI SETUP, ADD WIFI AP, MANUAL ADD,
and [ENTER]. “SSID”, “SECURITY SPEC” and “ADD” are displayed.
2. Go to SSID and press [OK].
3. Go to SECURITY SPEC and press [ENTER]. Select one of either OPEN SYSTEM
or OPEN WEP or SHARED WEP or WPA or WPA2, then press [ENTER].
4. Enter your password.
WiFi setup - delete
1. [MENU], SETUP, NETWORK, WIFI SETUP, DELETE AP.
2. Saved access point (router) is displayed. Select the one you wish to delete
and press [ENTER].
6
Page 7

WiFi setup – see connection access point (router)
1. You can see which WiFi access point (router) the internet radio is connected to.
2. [MENU], SETUP, NETWORK, WIFI SETUP, VIEW CONNECTED AP.
WiFi setup – without DHCP
1. On rare occasions, an internet radio has a static IP address, and then you can
deactivate DHCP.
2. [MENU], SETUP, NETWORK, WIFI SETUP, DHCP, OFF and then [ENTER].
WiFi setup – with DHCP
1. [MENU], SETUP, NETWORK, WIFI SETUP, DHCP.
2. Press ON if you wish to use the router’s DHCP service and the internet radio will
get an IP address, Gateway and DNS from the router.
Cable setup – with DHCP
1. [MENU], SETUP, NETWORK, CABLE SETUP, DHCP.
2. Press ON if you wish to use the router’s DHCP service and the internet radio will
get an IP address, Gateway and DNS from the router.
Cable setup – without DHCP
1. If you choose not to use DHCP, you will have to use the advanced setup configuration.
2. [MENU], SETUP, NETWORK, CABLE SETUP, ADVANCED SETUP.
3. Enter your IP address and Gateway.
Network – DNS configuration
1. [MENU], SETUP, NETWORK, DNS CONFIG.
2. The internet radio can accept 2 DNS addresses. If you select DHCP, the DHCP
server will assign you a DNS address. It is possible to add another one by going to
ADD DNS and then entering the DNS address.
3. You can always change your DNS address and add another one.
English
Network – PPPoE configuration
1. Connect the LAN port on the internet radio to your modem.
2. [MENU], SETUP, NETWORK, PPPoE CONFIG, PPPoE & LINK.
3. Select YES and then [ENTER].
4. Go to PPPoE USER INFO and then press [ENTER].
5. Go to USER NAME and then press [ENTER]. Enter your username
and then press [ENTER].
6. Go to PASSWORD and then press [ENTER]. Enter your password
and then press [ENTER].
7. It might take a couple of minutes to register.
7
Page 8

Settings
Playback
English
There are 4 playback modes:
• Repeat one – repeats a chosen track
• Repeat all – repeats all tracks
• Shuffle – plays tracks in random order
• Sequential – plays all tracks sequentially without gaps or delays
Press [MENU], SETUP, PLAY MODE and then [ENTER] to enter playback mode.
Adjust the volume using the volume knob and then press [ENTER].
LANGUAGE
To change language:
[MENU], SETUP, LANGUAGE and then [ENTER].
CLOCK
To set the time, press:
[MENU], SETUP, CLOCK, CLOCK, SET THE TIME and then [ENTER].
To switch between 12 and 24 hour clock display, press:
TIME FORMAT and then [ENTER].
DATE
To set the date, press:
[MENU], SETUP, CLOCK, DATE, SET THE DATE and then [ENTER].
Using the same method as above, you can also set summer time, time zone,
date format and calibrate time.
BACKLIGHT
The backlight can be set to light for 20, 40 or 60 seconds or on all the time.
POWER ON VOLUME
The volume of the radio when it is turned on can be preset.
[MENU], SETUP, POWER ON VOLUME and then [ENTER].
Use the volume button to set the volume, confirm using [ENTER].
RESET TO DEFAULT
To reset the unit to its default factory settings, press:
[MENU], SETUP, RESET TO DEFAULT and then [ENTER].
8
Page 9

FIRMWARE UPGRADE
To upgrade the internet radio, press:
[MENU], SETUP, FIRMWARE UPGRADE and then [ENTER].
It takes about 3 minutes.
Use
• There are 3 internet radio channels: My Stations, Top 500 and iRadio168.com.
• You can save up to 255 stations.
• There are 10 categories for saving your favourite stations in.
• 5 stations are pre-programmed into the internet radio: Smooth Jazz, BBC News,
BBC Music, Voice of America and Voice of China.
• Press [MENU] to go back.
Choosing a channel
• [MENU], INTERNET RADIO, select a channel using the volume knob and then
press [ENTER].
• In Top 500, the stations are divided up into into countries. For example, if you wish
to select Germany, press: [MENU], INTERNET RADIO, TOP 500, GERMANY and
then [ENTER].
• In iRadio 168.com, there are over 10 000 stations from all over the world. They are
organised into REGION and GENRE. To select a station, press: [MENU], INTERNET RADIO, RADIO i168.com and then [ENTER].
The same selection procedure can be used for stations in Top 500.
English
Personal settings
You can save up to 256 stations on the internet radio. To make it easier
to find your stations, they can be divided up into 10 categories.
When you listen to a station on the internet radio, press [PROG] to come
to STATION GROUP.
Use the volume knob to select a suitable category to save your station in,
and then press [ENTER].
Alarm
To activate and set the alarm, press:
1. [MENU], SLEEP TIMER, SET/ON and then [ENTER].
2. Use [FORWARD] or [BACKWARD] to set the time and confirm by pressing
[ENTER].
3. To go back in playback mode, hold in the [PWR] button for 2 seconds.
4. You can even turn the alarm off before it sounds by pressing: [MENU], SLEEP
TIMER, OFF and then [ENTER].
9
Page 10

If you wish to activate a second alarm, repeat the same procedure but select ALARM 2.
The snooze time can be set from 5 to 15 minutes.
Press and hold in [SNOOZE] for 2 seconds to turn the alarm off. The alarm symbol
disappears from the display.
English
Streaming music from a PC (UPnP)
• UPnP (Universal Plug and Play) is an industry standard that enables one to stream
media in a local network based on Internet standards such as TCP/IP, UDP, http,
and XML.
• The UPnP function on both your PC and router must be activated in order for you
to be able to stream music.
WiFi AP/router
Make sure that your router supports UPnP and that the function is turned on.
Refer to your WiFi AP/ router instruction manual.
Media Player 11
A digital media server is needed to make the music accessible on your internet radio.
Windows Media Player 11 has an integrated digital media server.
Download and install Windows Media Player 11 if you have an earlier version.
Click on the arrow under the LIBRARY tab and then on MEDIA SHARING.
In MEDIA SHARING, select SHARE MY MEDIA and then click in the box.
In the list of available devices, select your internet radio and ALLOW.
File sharing
Media files must be saved in a folder before they can be displayed in Windows Media
Player 11. When the player is started, it automatically searches for media to store in its
library. To save media in the library, click on the arrow under LIBRARY and then click
on ADD TO LIBRARY. In the box, highlight the folders to be saved.
Playback of UPnP files
1. Go to [MENU], UPnP SHARING and then press [OK].
2. The available devices will be displayed.
3. Click on the folder/playlist and then press [OK].
4. Select the track you wish to play and then press [OK].
Administration via web interface
With the help of the radio’s IP address, you can make several advanced
settings in the web browser.
1. Find your internet radio IP address and enter it into the web browser.
2. You can then make your own settings.
10
Page 11

Troubleshooting guide
The message “Broadcast Signal Errors” is displayed on the internet
radio when a network cable is used
• Check that the cable is connected to both the radio and router.
I use WiFi and the broadcast is interrupted all the time
• Your network connection might be poor, change to another station.
• Surrounding objects might be interfering with the signal. Move the
router to another place.
Disposal
Follow local ordinances when disposing of this product. If you are unsure
of how to dispose of this product, please contact your local authority.
Specifications
Size 11 x 11 x 27.5 cm
Power supply 12 V DC, 1 A
Network type LAN/WLAN (WEP, WPA, WPA2)
Headphone socket 3.5 mm
English
Points worth bearing in mind!
• Other wireless equipment operating on the same frequency band may
reduce the range of the product.
• The range of all wireless equipment is affected by obstacles between
the transmitter and the receiver (a concrete wall reduces the signal far
more than a plasterboard partition, for example).
If you are having problems with the operation of the system,
try the following solutions
• Switch off any other wireless equipment to check whether it could be causing
the problem.
• Move the wireless equipment and/or reduce the distance, and reduce
thenumber of obstacles (walls, furniture, etc.) between the transmitter
andthe receiver.
11
Page 12

Internetradio
Art.nr 18-8154 Modell IRF4S-UK
38-3788 IRF4S
Läs igenom hela bruksanvisningen före användning och spara den sedan för framtida
bruk. Vi reserverar oss för ev. text- och bildfel samt ändringar av tekniska data. Vid tekniska problem eller andra frågor, kontakta vår kundtjänst (se adressuppgifter på baksidan).
Svenska
Säkerhet
• Produkten får endast repareras av kvalificerad servicepersonal.
• Produkten får inte demonteras eller ändras.
• Placera inte produkten så att den kan falla ner i vatten eller annan vätska.
Ställ inte heller några föremål som innehåller vätska på produkten, t.ex.
en blomvas eller dryck.
• Täck inte över anläggningen. Tillräcklig ventilation, med ett minsta avstånd
på ca 15 cm mellan ventilationshålen och omgivande ytor, är nödvändig
för att förhindra att anläggningen blir för varm.
• Placera inte apparaten i en fuktig, dammig miljö eller där det förekommer
starka vibrationer.
• Standbyomkopplaren på apparatens framsida skiljer inte apparaten från elnätet.
För att fullständigt skilja apparaten från elnätet måste apparatens stickpropp
tas ur vägguttaget.
• Använd endast medföljande eller rekommenderad nätadapter.
• Långvarig exponering av hög ljudvolym från hörlurar kan orsaka skador
på din hörsel.
Produktbeskrivning
Internetradio/nätverksspelare med inbyggd högtalare. Ger dig åtkomst till tusentals
internetradiokanaler och till ditt musikbibliotek på datorn via befintligt trådlöst eller
trådbundet nätverk. Uttag för stereohörlurar, klocka med alarm och snooze-funktion.
Fjärrkontroll och batterieliminator medföljer.
12
Page 13

Knappar och funktioner
1
2
3
6 7 8 9 10 11
4
5
Svenska
12 13 14
1. IR-sensor
2. [PWR] - strömbrytare
3. [PROG] – Programmera
4. [MENU] – Meny
5. [CLK] – Klocka
6. [BACKWARD] – Bakåt
7. [FORWARD] – Framåt
8. [ENTER] – Bekräfta
9. [SNOOZE] – Snooze alarm
10. [STOP/ESCAPE] – Stoppa/gå tillbaka
11. [MUTE/PAUSE] – Ljud av/paus
12. DC 12 V – Strömanslutning
13. PHONES – Uttag för hörlurar
14. LAN – Anslutning för nätverkskabel
13
Page 14

Fjärrkontrollen
15. [STANDBY] – av/på
16. [MUTE/PAUSE] – stänga av ljudet/
pausa
17. [STOP/ESCAPE] – stoppa
uppspelning/gå tillbaka
18. Sifferknappar
19. [OK] – bekräfta
Svenska
20. [CLOCK] – klocka
21. – Föregående och sänka volymen
22. + Nästa och höja volymen
23. [MENU] – meny
24. [BACKWARD] – bakåt
25. [FORWARD] – framåt
26. [PROGRAM] – program
19
21
24
15
16 17
18
20
22
23
25
26
Att komma igång
Du behöver följande innan användning
• Internet anslutning
• Router med DHCP-funktion aktiverad
• En PC med UPnP aktiverad (om du vill streama musik från datorn)
Navigering
• Tryck på [MENU] för att gå tillbaka efter val har gjorts.
Anslutning
1. Om du vill använda LAN-kabel, anslut kabeln till routern och
sen till internetradions LAN-port.
2. Anslut batterieliminatorn för internetradion till ett vägguttag.
3. Tryck och håll ned [PWR] för att starta internetradion.
14
Page 15

LAN kabelnätverk
1. Det tar ca 25 sekunder för internetradion att kunna ansluta till Internet.
2. Huvudmenyn visas med internetradio markerad. Apparaten är förprogrammerad
med några stationer för lyssning med en gång.
3. Tryck på [ENTER] för att komma till ”My Stations, Top 500 etc.”.
4. Tryck på [ENTER] för att välja vald station.
5. När laddningen är klar startar uppspelningen.
6. Justera volymen enligt eget önskemål.
Trådlöst nätverk Wifi
1. Gå till SETUP i huvudmenyn och tryck på [ENTER].
2. Gå till NETWORK och tryck [ENTER].
3. Gå till Wifi och tryck [ENTER].
4. Gå till Wifi Setup och tryck [ENTER].
5. Gå till Add Wifi AP och tryck [ENTER].
6. Gå till Auto Scan och tryck [ENTER].
7. En lista med nätverk visas.
8. Gå till Router list och tryck [ENTER].
9. Om nätverket inte kräver en kod ansluts apparaten automatiskt.
Konfigurera internetradion
Nätverk allmänt
1. Välj [MENU], SETUP, NETWORK, WIFI SETUP, ADD WIFI AP, AUTO SCAN och
sedan [ENTER].
2. En lista med tillgängliga nätverk visas.
3. Välj det nätverk du vill ha och tryck [ENTER].
4. Om ditt nätverk är skyddat med WEP, WPA eller WPA2 måste du lägga in
lösenordet. Använd volymknappen, [FORWARD], [BACKWARD] och [PROG].
Svenska
Wifi setup manuellt
1. Välj [MENU], SETUP, NETWORK, WIFI SETUP, ADD WIFI AP, MANUAL ADD, och
[ENTER]. ”SSID”, ”SECURITY SPEC” och ”ADD” visas.
2. Gå till SSID och tryck [OK].
3. Gå till SECURITY SPEC och tryck [ENTER]. Välj en av OPEN SYSTEM eller OPEN
WEP eller SHARED WEP eller WPA eller WPA2, tryck sedan [ENTER].
4. Skriv in lösenordet.
Wifi setup radera
1. [MENU], SETUP, NETWORK, WIFI SETUP, DELETE AP.
2. Sparad accesspunkt (router) visas. Välj den du vill radera och tryck [ENTER].
15
Page 16

Wifi setup – se ansluten accesspunkt (router)
1. Det går att se vilken Wifi accesspunkt (router) som internetradion är ansluten till.
2. [MENU], SETUP, NETWORK, WIFI SETUP, VIEW CONNECTED AP.
Wifi setup – utan DHCP
1. I sällsynta fall när din internetradio for en statisk IP-adress kan du avaktivera DHCP.
2. [MENU], SETUP, NETWORK, WIFI SETUP, DHCP, OFF och sedan [ENTER].
Wifi setup – med DHCP
Svenska
1. [MENU], SETUP, NETWORK, WIFI SETUP, DHCP.
2. Tryck ON om du vill använda DHCP-service från routern och internetradion får
nödvändig IP-adress, Gateway och DNS från routern.
Kabel setup – med DHCP
1. [MENU], SETUP, NETWORK, CABLE SETUP, DHCP.
2. Tryck ON om du vill använda DHCP-service från routern och internetradion får
nödvändig IP-adress, Gateway och DNS från routern.
Kabel setup – utan DHCP
1. Om du väljer att inte använda DHCP måste avancerade konfigurationer konfigureras.
2. [MENU], SETUP, NETWORK, CABLE SETUP, ADVANCED SETUP.
3. Skriv in IP-adress och Gateway.
Nätverk – DNS konfig
1. [MENU], SETUP, NETWORK, DNS CONFIG .
2. Internetradion kan acceptera 2 st. DNS-adresser. Om du väljer DHCP kommer
DHCP-servern att tilldela en DNS-adress. Det går att lägga till en till genom att gå
till ADD DNS och sedan lägga in DNS-adressen.
3. Du kan alltid ändra DNS-adressen och lägga in en ny.
Nätverk – PPPoE konfiguration
1. Anslut LAN-porten på internetradion till modemet.
2. [MENU], SETUP, NETWORK, PPPoE CONFIG, PPPoE & LINK.
3. Välj YES och sedan [ENTER].
4. Gå till PPPoE USER INFO och tryck sedan [ENTER].
5. Gå till USER NAME och tryck sedan [ENTER]. Lägg in användarnamnet
och sedan [ENTER].
6. Gå till PASSWORD och tryck sedan [ENTER]. Lägg in lösenordet och
sedan [ENTER].
7. Det kan ta några minuter innan det registreras.
16
Page 17

Inställningar
Uppspelning
Det finns 4 uppspelningslägen:
• Repeat one – repetera valt spår
• Releat all – repetera alla spår
• Shuffle – slumpmässig uppspelning
• Sequential – spela upp alla låtar i rad
Tryck på [MENU], SETUP, PLAY MODE och sedan [ENTER] för att komma till uppspelningsläge. Använd volymratten för att justera och tryck sedan [ENTER].
LANGUAGE (Språk)
För att byta språk tryck:
[MENU], SETUP, LANGUAGE och sedan [ENTER].
CLOCK (Klocka )
För att ställa in tiden tryck:
[MENU], SETUP, CLOCK, CLOCK, SET THE TIME och sedan [ENTER].
För att växla mellan 12 och 24-timmars visning tryck:
TIME FORMAT och sedan [ENTER].
DATE (Datum)
För att ställa in datum tryck:
[MENU], SETUP, CLOCK, DATE, SET THE DATE och sedan [ENTER].
Svenska
Under samma procedur som ovan kan man även ställa in sommartid,
tidszon, datumformat och kalibrera tid.
BACKLIGHT (Bakgrundsljus)
Bakgrundsljuset kan ställas in mellan 20, 40, 60 sekunder eller alltid på.
POWER ON VOLUME (Startvolym)
Det går att ställa in önskad volym när apparaten startas.
[MENU], SETUP, POWER ON VOLUME och sedan [ENTER].
Använd volymknappen och välj önskad volym, bekräfta med [ENTER].
RESET TO DEFAULT (Återställa helt)
För att återställa apparaten helt tryck:
[MENU], SETUP, RESET TO DEFAULT och sedan [ENTER].
17
Page 18

FIRMWARE UPGRADE (uppdatera mjukvara)
För att uppgradera internetradion tryck:
[MENU], SETUP, FIRMWARE UPGRADE och sedan [ENTER].
Det tar ca 3 minuter.
Användning
• Det finns 3 internetradio-sidor: My Stations, Top 500 och iRadio168.com.
• Det går att spara upp till 255 stationer.
• Det finns 10 olika kategorier du kan spara dina favoritstationer i.
Svenska
• 5 stationer är förprogrammerade i internetradion: Smooth Jazz, BBC News,
BBC Music, Voice of America och Voice of China.
• Tryck på [MENU] för att gå tillbaka.
För att gå till en kanal
• [MENU], INTERNET RADIO, gör ditt val genom att använda volymratten och tryck
sedan [ENTER].
• I Top 500 är stationerna indelade i länder. Vill du exempelvis välja Tyskland trycker
du: [MENU], INTERNET RADIO, TOP 500, GERMANY och sedan [ENTER].
• I iRadio 168.com finns det över 10000 st. stationer över hela världen. De organiseras i REGION och GENRE. För att exempelvis välja en kanal trycker du :
[MENU], INTERNET RADIO, RADIO i168.com och sedan [ENTER].
Gör sedan ditt val enligt samma princip som i Top 500.
Personliga inställningar
Det går att spara upp till 256 stationer på internetradion. För att göra det enklare att
hitta dina stationer kan de delas in i 10 st. kategorier.
När du lyssnar på en station i internetradion, tryck på [PROG] för att komma
till STATION GROUP.
Använd volymratten för att välja kategorin du vill spara stationen i, tryck sedan [ENTER].
Alarm
För att aktivera och ställa in larmet tryck:
1. [MENU], SLEEP TIMER, SET/ON och sedan [ENTER].
2. Använd [FORWARD] eller [BACKWARD] för att ställa in tiden och bekräfta med
[ENTER].
3. För att gå tillbaka till uppspelningsläge, håll in [PWR] i 2 sekunder.
4. Det går även att stänga av larmet innan det ljuder genom att trycka: [MENU],
SLEEP TIMER, OFF och sedan [ENTER].
18
Page 19

Om du vill aktivera ett andra alarm följ samma process som ovanför men välj ALARM 2.
Snooze kan ställas in mellan 5 till 15 minuter.
Tryck och håll ned [SNOOZE] i 2 sekunder för att stänga av alarmet.
Ikonen försvinner i displayen.
Streama musik från PC (UPnP)
• UPnP (Universal Plug and Play) är en industristandard som gör att man kan
streama media i ett lokalt nätverk baserat på Internetstandard som TCP/IP,
UDP, http, och XML.
• Man måste aktivera UPnP-funktionen på både PC och routern för att kunna
streama musik.
Wifi AP/router
Kontrollera att den stödjer UPnP och att funktionen är påslagen.
Se bruksanvisningen till din Wifi AP/router.
Media Player 11
En digital mediaserver krävs för att göra musiken tillgänglig till din internetradio.
Windows Media Player 11 har en integrerad digital mediaserver.
Ladda ned och installera Windows Media Player 11 om du har en tidigare version.
Klicka på pilen nedanför LIBRARY-fliken och sedan MEDIA SHARING.
I MEDIA SHARING välj SHARE MY MEDIA och klicka i den rutan.
I listan av tillgängliga enheter, välj din internetradio och ALLOW.
Dela filer
Mediafiler måste sparas i mappar innan de kan visas i Windows Media Player 11. När
spelaren spelaren startas söker den automatiskt efter media att lägga in i biblioteket.
För att lägga till media i biblioteket klicka på pilen under LIBRARY och klicka på ADD
TO LIBRARY. I rutan, markera mapparna som ska läggas upp.
Svenska
Uppspelning av UPnP-filer
1. Gå till [MENU], UPnP SHARING och tryck sedan [OK].
2. Tillgängliga enheter visas.
3. Klicka på mappen/spellistan och tryck [OK].
4. Välj låten du vill spela och tryck [OK].
Administration via webbgränssnitt
Genom att använda radions IP-adress kan man göra flera avancerade inställningar
iwebbrowsern.
1. Hitta internetradions IP-adress och skriv in den i webbrowsern.
2. Gör inställningar enligt eget önskemål.
19
Page 20

Felsökningsschema
Internetradion visar ”Broadcast Signal Errors” vid användning
av nätverkskabel
• Kontrollera att kabeln är inkopplad i både internetradion och routern.
Jag använder Wifi och sändningarna avbryts hela tiden
• Nätverksanslutningen kan vara dålig, byt till en annan station.
• Det kan även vara objekt som blockerar omgivningen. Flytta routern till en annan plats.
Svenska
Avfallshantering
När du ska göra dig av med produkten ska detta ske enligt lokala föreskrifter.
Är du osäker på hur du ska gå tillväga, kontakta din kommun.
Specifikationer
Storlek 11 x 11 x 27,5 cm
Strömförsörjning 12 V DC, 1 A
Nätverkstyp LAN/WLAN (WEP, WPA, WPA2)
Hörlursuttag 3,5 mm
Tänk på
• Att annan befintlig trådlös utrustning på samma frekvensband kan påverka
räckvidden negativt.
• Att räckvidden på all trådlös utrustning påverkas av vilka hinder som finns
mellan sändaren och mottagaren (t.ex. en betongvägg dämpar signalen
avsevärt mer än en gipsvägg).
Vid funktionsproblem, prova följande lösningar
• Stäng av övriga befintliga trådlösa utrustningar för att kontrollera om de kan
vara orsaken till problemet.
• Flytta den trådlösa utrustningen och/eller förkorta avståndet, samt minska
antalet hinder (väggar, möbler etc.) mellan sändaren och mottagaren.
20
Page 21

Internettradio
Art.nr. 18-8154 Modell IRF4S-UK
38-3788 IRF4S
Les nøye igjennom hele bruksanvisningen og ta vare på den til senere bruk.
Vi reserverer oss mot ev. tekst- og bildefeil, samt forandringer av tekniske data.
Ved tekniske problemer eller andre spørsmål, ta kontakt med vårt kundesenter
(se opplysninger på baksiden).
Sikkerhet
• Produktet må kun repareres av kyndig servicepersonell.
• Produktet må ikke demonteres eller endres på.
• Plasser ikke produktet slik at det kan komme i kontakt med vann eller annen væske. Plasser aldri produktet i nærheten av gjenstander som kan forårsake at vann
eller annen væske skylles over produktet.
• Produktet må ikke tildekkes. Tilstrekkelig ventilasjon, med en minsteavstand på ca.
15 cm mellom ventilasjonsrillene og omliggende flater er nødvendig, for å forhindre
at anlegget blir for varm.
• Plasser ikke apparatet i et fuktig eller støvete miljø eller på plasser med
sterke vibrasjoner.
• Standby-bryteren på apparatets framside kobler ikke apparatet fra strømnettet.
For å gjøre apparatet helt strømløst, må stikkontakten trekkes ut fra strømuttaket.
• Bruk kun medfølgende eller anbefalt batterieliminator.
• Langvarig eksponering av høy lyd fra headset/hodetelefoner, kan føre til
kroniske hørselsskader.
Norsk
Produktbeskrivelse
Internetradio/nettverksspiller med innebygd høyttaler. Gir tilgang til ett tusentalls
internettradiokanaler og til musikkbiblioteket på datamaskinen din via det trådløse
eller trådbundne nettverket. Uttak for stereoheadset, klokke med alarm og snoozefunksjon. Fjernkontroll og batterieliminator medfølger.
21
Page 22

Knapper og funksjoner
1
2
3
6 7 8 9 10 11
Norsk
4
5
12 13 14
1. IR-sensor
2. [PWR] - strømbryter
3. [PROG] – Programmere
4. [MENU] - Meny
5. [CLK] – Klokke
6. [BACKWARD] – Bakover
7. [FORWARD] – Framover
8. [ENTER] – Bekrefte
9. [SNOOZE] – Snooze alarm
10. [STOP/ESCAPE] – Stopp/gå tilbake
11. [MUTE/PAUSE] – Lyd av/pause
12. DC 12 V – Strøminngang
13. PHONES - Uttak for hodetelefoner
14. LAN – Tilkobling for nettverkskabel
22
Page 23

Fjernkontrollen
15. [STANDBY] – av/på
16. [MUTE/PAUSE] – skru av lyden/pause
17. [STOP/ESCAPE] – Stopp/gå tilbake
18. Talltaster
19. [OK] – Bekreft
20. [CLOCK] – klokke
21. – Foregående og senke volumet
22. + Neste og heve volumet
23. [MENU] – meny
24. [BACKWARD] – bakover
25. [FORWARD] – framover
26. [PROGRAM] – program
Kom i gang
19
21
24
15
16 17
18
20
22
23
25
26
Norsk
Før bruk trenger man følgende
• Internettilgang
• Router med DHCP-funksjon aktivert
• En PC med UPnP aktivert (dersom man skal streame musikk fra datamaskinen)
Navigering
• Trykk på [MENU] for å gå tilbake etter valg er tatt.
Spenning
1. Hvis man skal bruke LAN-kabel skal den kobles til routeren og deretter
til internettradioens LAN-port.
2. Plugg så radioens batterieliminator til et strømuttak.
3. Trykk inn og hold [PWR] inne for å starte radioen.
23
Page 24

LAN kabelnettverk
1. Det tar ca. 25 sekunder før internettradioen kobler seg opp til Internett.
2. Hovedmenyen kommer opp med internettradioen merket. Apparatet er
forhåndsprogrammert med noen stasjoner som man kan lytte til med en gang.
3. Trykk på [ENTER] for å komme til ”My Stations, Top 500 etc.”.
4. Trykk på [ENTER] for å bekrefte valget.
5. Når ladingen er fullført starter avspillingen.
6. Juster volumet til ønsket styrke.
Trådløst nettverk Wifi
1. Gå til SETUP i hovedmenyen og trykk på [ENTER].
2. Gå til NETWORK og trykk [ENTER].
3. Gå til Wifi og trykk [ENTER].
4. Gå til Wifi Setup og trykk [ENTER].
5. Gå til Add Wifi AP og trykk [ENTER].
6. Gå til Auot Scan og trykk [ENTER].
Norsk
7. En liste med nettverk vises.
8. Gå til Router list og trykk [ENTER].
9. Hvis nettverket ikke krever en kode vil apparatet kobles til automatisk.
Konfigurere Internettradioen
Nettverk generelt
1. Velg [MENU], SETUP, NETWORK, WIFI SETUP, ADD WIFI AP, AUTO SCAN
og deretter [ENTER].
2. En liste med tilgjengelige nettverk vises.
3. Velg ønsket nettverk og trykk [ENTER].
4. Hvis nettverket ditt er beskyttet med WEP, WPA eller WPA2 må du legge inn
passordet. Bruk volumknappen, [FORWARD], [BACKWARD] og [PROG].
Wifi Setup manuelt
1. Velg [MENU], SETUP, NETWORK, WIFI SETUP, ADD WIFI AP, AUTO SCAN
og deretter [ENTER]. ”SSID”, ”SECURITY SPEC” og ”ADD” vises.
2. Gå til SSID og trykk [OK].
3. Gå til SECURITY SPEC og trykk [ENTER]. Velg en av følgende: OPEN SYSTEM,
OPEN WEP, SHARED WEP, WPA eller WPA2, og trykk deretter [ENTER].
4. Skriv inn passordet.
Wifi Setup slette
1. [MENU], SETUP, NETWORK, WIFI SETUP, DELETE AP.
2. Lagret accesspunkt (router) vises. Velg det som skal slettes og trykk [ENTER].
24
Page 25

Wifi Setup – se tilkoblet accesspunkt (router)
1. Man kan se hvilken Wifi accesspunkt (router) som internettradioen er koblet til.
2. [MENU], SETUP, NETWORK, WIFI SETUP, VIEW CONNECTED AP.
Wifi Setup – uten DHCP
1. I enkelte tilfeller når internettradioen får en statisk IP-adresse kan DHCP deaktiveres.
2. [MENU], SETUP, NETWORK, WIFI SETUP, DHCP, OFF og deretter [ENTER].
Wifi Setup – med DHCP
1. [MENU], SETUP, NETWORK, WIFI SETUP, DHCP.
2. Trykk ON hvis du vil bruke DHCP-service fra router og internettradioen får
nødvendig IP-adresse, Gateway og DNS fra routeren.
Kabel setup – med DHCP
1. [MENU], SETUP, NETWORK, CABLE SETUP, DHCP.
2. Trykk ON hvis du vil bruke DHCP-service fra router og internettradioen får
nødvendig IP-adresse, Gateway og DNS fra routeren.
Kabel setup –uten DHCP
1. Dersom man velger å ikke bruke DHCP må avanserte konfigurasjoner konfigureres.
2. [MENU], SETUP, NETWORK, CABLE SETUP, ADVANCED SETUP.
3. Skriv inn IP-adresse og Gateway.
Nettverk – DNS konfig
1. [MENU], SETUP, NETWORK, DNS CONFIG .
2. Internettradioen kan akseptere 2 stk. DNS-adresser. Hvis man velger DHCP
kommer DHCP-serveren til å tildele en DNS-adresse. Man kan legge til en til ved
ågå til ADD DNS og deretter legge inn DNS-adressen.
3. Du kan alltid endre DNS-adressen og legge inn en ny.
Norsk
Nettverk – PPPoE konfigurasjon
1. LAN-porten på internettradioen kobles til modemet.
2. [MENU], SETUP, NETWORK, PPPoE CONFIG, PPPoE & LINK.
3. Velg YES og deretter [ENTER].
4. Gå til PPPoE USER INFO og trykk deretter [ENTER].
5. Gå til USER NAME og trykk deretter [ENTER]. Legg inn brukernavnet
og deretter [ENTER].
6. Gå til PASSWORD og trykk [ENTER]. Legg inn passord og deretter [ENTER].
7. Det kan ta noen minutter før det registreres.
25
Page 26

Innstillinger
Avspilling
Det er 4 avspillingsmoduser:
• Repeat One – Repeterer et bestemt spor
• Repeat All – Repeterer alle spor
• Shuffle – tilfeldig spillerekkefølge
• Sequential – spille av alle låter i rekkefølge
Trykk på [MENU], SETUP, PLAY MODE og deretter [ENTER] for å komme til
avspillingsmodus. Bruk volumrattet for å justere og trykk deretter [ENTER].
Language (språk)
For å skifte språk:
[MENU], SETUP, LANGUAGE og deretter [ENTER].
Norsk
CLOCK (Klokke )
For å stille inn tiden:
[MENU], SETUP, CLOCK, CLOCK, SET THE TIME og deretter [ENTER].
For å skifte mellom 12 og 24-timers visning trykk:
TIME FORMAT og deretter [ENTER].
DATE (Datum)
For å stille inn dato trykk:
[MENU], SETUP, CLOCK, DATE, SET THE DATE og deretter [ENTER].
For å stille inn sommertid, tidssone, datoformat og å kalibrere tiden
følger man prosedyren ovenfor.
BACKLIGHT (Bakgrunnslys)
Bakgrunnslyset kan stilles inn mellom på 20, 40 eller 60 sekunder eller alltid på.
POWER ON VOLUME (Startvolum)
Ønsket volum kan stilles slik:
[MENU], SETUP, POWER ON VOLUME og deretter [ENTER].
Bruk volumknappen og velg ønsket volum. Bekreft med [ENTER].
RESTE TO DEFAULT (Still tilbake til fabrikkingstillingene)
For å stille tilbake, trykk:
[MENU], SETUP, RESET TO DEFAULT og deretter [ENTER].
26
Page 27

FIRMWARE UPGRADE (oppdatere software)
For oppgradering av internettradioen, trykk:
[MENU], SETUP, FIRMWARE UPGRADE og deretter [ENTER].
Det tar ca. 3 minutter.
Bruk
• Det er 3 sider med internettradio: My Stations, Top 500 og iRadio168.com.
• Inntil 255 stasjoner kan lagres.
• Stasjonene kan lagres i 10 forskjellige kategorier.
• 5 stasjoner er forhåndsprogrammerte i radioen når du kjøper den: Smooth Jazz,
BBC News, BBC Music, Voice of America og Voice of China.
• Trykk på [MENU] for å gå tilbake.
For å gå til en kanal
• [MENU], INTERNET RADIO, utfør dine valg med volumrattet og trykk deretter [ENTER].
• I Top 500 er stasjonene inndelt i land. Hvis man f.eks. vil velge Tyskland, trykker
man: [MENU], INTERNET RADIO, TOP 500, GERMANY og deretter [ENTER].
• I iRadio 168.com er det over 10000 stk. stasjoner fra hele verden. De organiseres
i REGION og GENRE. Kanal velges slik: [MENU], INTERNET RADIO, RADIO i168.
com og deretter [ENTER].
Stasjoner i Top 500 velges etter det samme prinsippet.
Personlige innstillinger
Inntil 256 stasjoner kan lagres i radioens minne. For å gjøre det enklere å finne,
kan disse deles inn i 10 stk. kategorier.
Norsk
Når du lytter til en stasjon på internettradioen, trykk på [PROG] for å komme
til STATION GROUP.
Bruk volumrattet for å velge kategorien du vil lagre stasjonen under og trykk
deretter [ENTER].
Alarm
For å aktivere og å stille inn alarmen trykk:
1. [MENU], SLEEP TIMER, SET/ON og deretter [ENTER].
2. Bruk [FORWARD] eller [BACKWARD] for å stille inn tiden og bekreft med [ENTER].
3. For å gå tilbake til avspillingsmodus, hold [PWR] inne i 2 sekunder.
4. Det går også an å skru av alarmen før alarmen går ved å trykke: [MENU], SLEEP
TIMER, OFF og deretter [ENTER].
27
Page 28

Hvis du vil aktivere en annen alarm, følg samme prosessen som nevnt ovenfor men
velg ALARM 2.
Snooze kan stilles inn på mellom 5 og 15 minutter.
Trykk inn [SNOOZE] og hold den inne i 2 sekunder for å skru av alarmen. Ikonet vil da
forsvinne fra displayet.
Streame musikk fra PC (UPnP)
• UPnP (Universal Plug and Play) er en industristandard som gjør at man kan streame
media i et lokalt nettverk basert på Internettstandarder som TCP/IP, UDP, http og XML.
• Man må aktivere UPnP-funksjonen på både datamaskinen og routeren for å kunne
streame musikk.
Wifi AP/router
Kontroller at den støtter UPnP og at funksjonen er slått på. Se bruksanvisningen til din
Wifi AP/router.
Norsk
For å gjøre musikken tilgjengelig på din internettradio kreves det en mediaserver.
Windows Media Player 11 har en integrert digital mediaserver.
Last ned og installer Windows Media Player 11, dersom din nåværende versjon er eldre.
Klikk på pilen nedenfor LIBRARY-fliken og deretter MEDIA SHARING.
I MEDIA SHARING velg SHARE MY MEDIA og klikk i den ruten.
I listen over tilgjengelige enheter, velg din internettradio og ALLOW.
Dele filer
Media Player 11
Mediafiler må lagres i mapper før de kan vises i Windows Media Player 11. Når spilleren startes søker den automatisk etter media å legge inn i biblioteket. For å legge
til media i biblioteket, klikk på pilen under LIBRARY og klikk på ADD TO LIBRARY. I
ruten, merk mappene som skal legges inn.
Avspilling av UPnP-filer
1. Gå til [MENU], UPnP SHARING og trykk deretter [OK].
2. Tilgjengelige enheter vises.
3. Klikk på mappen/spillelisten og trykk [OK].
4. Velg låten du vil spille og trykk [OK].
Administrasjon via webgrensesnitt
Ved å bruke radioens IP-adresse kan man foreta flere avanserte innstillinger
i webbrowseren.
1. Finn internettradioens IP-adresse og skriv den inn i webbrowseren.
2. Foreta innstillinger etter eget ønske.
28
Page 29

Feilsøking
Internettradioen viser ”Broadcast Signal Errors” ved bruk av nettverkskabel
• Kontroller at kabelen er tilkoblet i både internettradioen og routeren.
Jeg bruker Wifi og sendingene brytes hele tiden
• Nettverkskoblingen kan være dårlig. Skift til en annen stasjon.
• Det kan også være objekter som blokkerer. Flytt routeren til en annen plass.
Avfallshåndtering
Når produktet skal kasseres, må det skje i henhold til lokale forskrifter.
Ved usikkerhet, ta kontakt med lokale myndigheter.
Spesifikasjoner
Størrelse 11 x 11 x 27,5 cm
Strømforsyning 12 V DC, 1 A
Nettverkstype LAN/WLAN (WEP, WPA, WPA2)
Hodetelefonuttak 3,5 mm
Husk følgende
• At annet trådløst utstyr som er innstilt på samme frekvens kan på kan påvirke
rekkevidden negativt.
• At rekkevidden på alt trådløst utstyr påvirkes av hindringer som er mellom
sender og mottaker (en betongvegg kan f.eks. dempe signalene dramatisk
iforhold til en gipsvegg).
Ved problemer, prøv følgende
• Skru av øvrig trådløst utstyr for å kontrollere om de er årsak til problemene.
• Flytt det trådløse utstyret og gjør avstanden mellom sender og mottaker
mindre. Forsøk også å redusere antall hindringer mellom sender og mottaker
(vegger, møbler etc.).
Norsk
29
Page 30

Internetradio
Tuotenro 18-8154 Malli IRF4S-UK
38-3788 IRF4S
Lue käyttöohjeet ennen tuotteen käyttöönottoa. Säilytä käyttöohjeet tulevaa tarvetta
varten. Pidätämme oikeuden teknisten tietojen muutoksiin. Emme vastaa mahdollisista
teksti- tai kuvavirheistä. Jos laitteeseen tulee teknisiä ongelmia, ota yhteys myymälään
tai asiakaspalveluun (yhteystiedot käyttöohjeen lopussa).
Turvallisuus
• Laitteen saa korjata vain valtuutettu huoltoliike.
• Älä pura tai muuta laitetta.
• Älä sijoita laitetta sellaiseen paikkaan, josta se voi tippua veteen tai muuhun
nesteeseen. Älä pane laitteen päälle nesteitä sisältäviä esineitä, kuten maljakoita
tai limsapulloja.
• Älä peitä laitetta. Riittävä ilmastointi (vähintään 15 cm ilmastointiaukon ja ympäröivän pinnan välillä) on välttämätön, jotta laitteen ylikuumeneminen estetään.
• Älä sijoita laitetta kosteisiin tai pölyisiin tiloihin tai paikkoihin, joissa siihen kohdistuu
voimakasta värähtelyä.
• Valmiustilan valintakytkimellä ei voi kytkeä laitetta verkkovirrasta. Irrota laite
kokonaan sähköverkosta irrottamalla laitteen pistoke pistorasiasta.
Suomi
• Käytä ainoastaan mukana tullutta tai suositeltua muuntajaa.
• Älä kuuntele musiikkia kuulokkeilla kovalla äänenvoimakkuudella pitkiä aikoja,
se voi vahingoittaa kuuloasi.
Tuotekuvaus
Internetradio/verkkosoitin, jossa on sisäinen kaiutin. Helppo tapa kuunnella tuhansia internetradiokanavia tai musiikkia tietokoneen musiikkikirjastosta langattoman tai
lankaverkon kautta. Kuulokeliitäntä ja kello, jossa herätys- ja torkkutoiminto. Mukana
kaukosäädin ja muuntaja.
30
Page 31

Painikkeiden kuvaus
1
2
3
6 7 8 9 10 11
4
5
1. Infrapuna-anturi
2. [PWR] – virtakytkin
3. [PROG] – Ohjelmointi
4. [MENU] – Valikko
5. [CLK] – Kello
6. [BACKWARD] – Taaksepäin
7. [FORWARD] – Eteenpäin
12 13 14
Suomi
8. [ENTER] – Vahvista valinta
9. [SNOOZE] – Torkkutoiminto
10. [STOP/ESCAPE] – Pysäytys/paluu
11. [MUTE/PAUSE] – Mykistys/keskeytys
12. DC 12 V – Virtaliitäntä
13. PHONES – Kuulokeliitäntä
14. LAN – Verkkokaapeliliitäntä
31
Page 32

Kaukosäädin
15. [STANDBY] – päälle / pois päältä
16. [MUTE/PAUSE] – Mykistys/keskeytys
17. [STOP/ESCAPE] – Pysäytys/paluu
18. Numeropainikkeet
19. [OK] – Vahvista valinta
20. [CLOCK] – Kello
21. – Edellinen / äänenvoimakkuuden
vähentäminen
22. + Seuraava / äänenvoimakkuuden
lisääminen
23. [MENU] – Valikko
24. [BACKWARD] – taaksepäin
25. [FORWARD] – Eteenpäin
26. [PROGRAM] – ohjelma
Suomi
19
21
24
15
16 17
18
20
22
23
25
26
Käytön aloittaminen
Ennen käytön aloittamista tarvitset
• Internetyhteyden
• Reitittimen, jonka DHCP-toiminto on aktivoitu
• Tietokoneen, jonka UPnP on aktivoitu (jos haluat streamata musiikkia tietokoneeltasi)
Navigointi
Kun olet tehnyt haluamasi asetukset, palaa painamalla [MENU]-painiketta.
Liitäntä
1. Jos haluat käyttää LAN-kaapelia, liitä kaapeli reitittimeen ja internetradion LAN-porttiin.
2. Liitä internetradion muuntajan pistoke verkkopistorasiaan.
3. Käynnistä internetradio pitämällä [PWR] painettuna.
32
Page 33

LAN-kaapeliverkko
1. Radion internetyhteyden muodostaminen kestää noin 25 sekuntia.
2. Kun yhteys on muodostettu, näytölle ilmestyy päävalikko, jossa internetradio
on valittuna. Laitteeseen on esiohjelmoitu muutamia asemia, joten radiota voi
kuunnella heti.
3. Paina [ENTER], jolloin näytölle ilmestyy Omat asemat, Top 500 jne.
4. Valitse kanava painamalla [ENTER].
5. Radio käynnistyy, kun lataus on valmis.
6. Säädä äänenvoimakkuus sopivaksi.
Langaton verkko WiFi
1. Valitse päävalikosta Asetukset ja paina [ENTER].
2. Valitse Verkko paina [ENTER].
3. Valitse WiFi ja paina [ENTER].
4. Valitse WiFi-asetukset ja paina [ENTER].
5. Valitse Lisää WiFi AP ja paina [ENTER].
6. Valitse Automaattinen skannaus ja paina [ENTER].
7. Näytölle ilmestyy lista verkoista.
8. Valitse Router list ja paina [ENTER].
9. Laite muodostaa yhteyden automaattisesti, jos verkko ei vaadi salasanaa.
Internetradion asetukset
Yleistä verkosta
1. Valitse [MENU], Asetukset, Verkko, WiFi-asetukset, Lisää WiFi AP, Automaattinen
skannaus ja paina [ENTER].
2. Näytölle ilmestyy lista saatavana olevista verkoista.
3. Valitse haluamasi verkko ja paina [ENTER].
4. Jos verkkosi on suojattu WEP:lla, WPA:lla tai WPA2:lla, sinun on syötettävä
salasana käyttämällä äänenvoimakkuusnuppia sekä painikkeita [FORWARD],
[BACKWARD] ja [PROG].
Suomi
Manuaaliset WiFi-asetukset
1. Valitse [MENU], Asetukset, Verkko, WiFi-asetukset, Lisää WiFi AP, Lisää
manuaalisesti ja paina [ENTER]. Näytölle ilmestyy ”SSID”, ”Security Spec” ja ”Lisää”.
2. Valitse SSID ja paina [OK].
3. Valitse Security Spec ja paina [ENTER]. Valitse yksi seuraavista: Avoin järjestelmä,
Avoin WEP, jaettu WEP, WPA, WPA2 ja paina [ENTER].
4. Kirjoita salasana.
WiFi-asetusten poistaminen
1. Valitse [MENU], Asetukset, Verkko, WiFi-asetukset, Poista AP.
2. Näytölle ilmestyy tallennettu yhteyspiste (reititin). Valitse se, jonka haluat poistaa,
ja paina [ENTER].
33
Page 34

WiFi-asetukset – katso liitetty yhteyspiste (reititin)
1. Täältä näet, mihin WiFi-yhteyspisteeseen (reititin) internetradio on liitetty.
2. [MENU], Asetukset, Verkko, WiFi-asetukset, Ks. liitetty AP.
WiFi-asetukset – ilman DHCP:tä
1. Niissä harvoissa tapauksissa, joissa internetradiollasi on pysyvä IP-osoite,
DHCP:n voi poistaa käytöstä.
2. Valitse [MENU], Asetukset, Verkko, WiFi-asetukset, DHCP, Pois päältä
ja paina [ENTER].
WiFi-asetukset – DHCP
1. Valitse [MENU], Asetukset, Verkko, WiFi-asetukset, DHCP.
2. Valitse Päällä, jos haluat käyttää reitittimen DHCP-palvelua ja internetradio saa
tarvittavan IP-osoitteen, Gatewayn ja DNS:n reitittimestä.
Kaapelin asennus – DHCP
1. Valitse [MENU], Asetukset, Verkko, Kaapelin asennus (Cable Setup), DHCP.
2. Valitse Päällä, jos haluat käyttää reitittimen DHCP-palvelua ja internetradio saa
tarvittavan IP-osoitteen, Gatewayn ja DNS:n reitittimestä.
Kaapelin asennus – ilman DHCP:tä
1. Jos et halua käyttää DHCP:tä, lisäasetuksia on tehtävä.
Suomi
2. Valitse [MENU], Asetukset, Verkko, Kaapelin asennus (Cable Setup), Lisäasetukset.
3. Kirjoita IP-osoite ja Gateway.
Verkko – DNS-asetukset
1. Valitse [MENU], Asetukset, Verkko, DNS-asetukset.
2. Internetradio hyväksyy kaksi DNS-osoitetta. Jos valitset DHCP:n, saat DHCPserveriltä DNS-osoitteen. Yhden ylimääräisen osoitteen voi lisätä kohdassa Lisää
DNS. Lisää DNS-osoite.
3. DNS-osoitetta voi aina muuttaa ja uuden osoitteen voi lisätä.
Verkko – PPPoE-asetukset
1. Liitä internetradion LAN-portti modeemiin.
2. Valitse [MENU], Asetukset, Verkko, PPPoE-asetukset, PPPoE ja linkki.
3. Valitse Kyllä ja paina [ENTER].
4. Valitse PPPoE:n käyttäjäinfo ja paina [ENTER].
5. Valitse Käyttäjätunnus ja paina [ENTER]. Kirjoita käyttäjätunnus ja paina [ENTER].
6. Mene kohtaan Salasana ja paina [ENTER]. Kirjoita salasana ja paina [ENTER].
7. Rekisteröityminen voi viedä muutaman minuutin.
34
Page 35

Asetukset
Toisto
Internetradiossa on neljä toistotapaa:
• Repeat one – Toistaa yhden raidan
• Releat all – Toistaa kaikki raidat
• Shuffle – Satunnainen toisto
• Sequential – Peräkkäinen toisto
Siirry toistotilaan painamalla [MENU], Asetukset, Toistotila ja paina [ENTER]. Säädä
äänenvoimakkuus sopivaksi ja paina [ENTER].
LANGUAGE (Kieli)
Kielen vaihtaminen:
Valitse [MENU], Asetukset, Kieli ja paina [ENTER].
CLOCK (Kello)
Kellonajan asettaminen:
Valitse [MENU], Asetukset, Kello, Kello, Aseta aika ja paina [ENTER].
Ajan täyttötavan valinta (12 tai 24 tuntia):
Valitse Ajan näyttötapa ja paina [ENTER].
DATE (Päivämäärä)
Päivämäärän asettaminen:
Valitse [MENU], Asetukset, Kello, Päivämäärä, Aseta päivämäärä ja paina [ENTER].
Vastaavalla tavalla asetetaan kesäaika, aikavyöhyke, päivämäärän näyttötapa
ja kalibroitu aika.
BACKLIGHT (Taustavalo)
Taustavalon voi ohjelmoida palamaan 20, 40, 60 sekuntia tai jatkuvasti.
POWER ON VOLUME (Asetettu äänenvoimakkuus)
Voit määritellä asetetun äänenvoimakkuuden, joka menee päälle aina,
kun laite käynnistetään.
Valitse [MENU], Asetukset, Asetettu äänenvoimakkuus ja paina [ENTER].
Valitse haluamasi äänenvoimakkuus äänenvoimakkuuspainikkeilla ja vahvista
painamalla [ENTER].
35
Suomi
Page 36

RESET TO DEFAULT (Palauta tehdasasetukset)
Tehdasasetusten palauttaminen:
Valitse [MENU], Asetukset, Palauta tehdasasetukset ja paina [ENTER].
FIRMWARE UPGRADE (Firmware-päivitys)
Internetradion päivitys:
Valitse [MENU], Asetukset, Firmware-päivitys ja paina [ENTER].
Päivitys kestää noin 3 minuuttia.
Käyttö
• Laitteessa on 3 internetradiosivua: Omat asemat, Top 500 ja iRadio168.com.
• Muistiin voi tallentaa jopa 255 asemaa.
• Voit tallentaa lempikanavasi 10 eri ryhmään.
• Internetradioon on esiohjelmoitu 5 kanavaa: Smooth Jazz, BBC News, BBC Music, Voice of America ja Voice of China.
• Palaa takaisin painamalla [MENU]-painiketta.
Kanavan valinta
• Valitse [MENU], Internet-radio äänenvoimakkuusnupilla ja paina [ENTER].
• Top 500 -kanavat on jaettu maittain. Jos esimerkiksi haluat kuunnella saksalaista
kanavaa, valitse [MENU], Internet-radio, Top 500, Saksa ja paina [ENTER].
Suomi
• iRadio168.comissa on yli 10000 kanavaa eri puolilta maailmaa. Kanavat on
järjestetty alueen ja genren mukaan. Voit valita kanavan esimerkiksi valitsemalla
[MENU], Internet-radio, Radioi168.com ja paina [ENTER].
Tee valinta samalla tavalla kuin kohdassa Top 500.
Omat asetukset
Internetradioon voi tallentaa jopa 256 kanavaa. Jotta kanavien löytäminen on helpompaa, ne voi jakaa 10 eri ryhmään.
Kun kuuntelet internetradion kanavaa, pääset kohtaan Asemaryhmä painamalla [PROG].
Valitse äänenvoimakkuusnupilla ryhmä, johon haluat tallentaa aseman, ja paina [ENTER].
Herätys
Herätyksen aktivointi ja asetus:
1. Valitse [MENU], Uniajastin, Muokkaa/päällä ja paina [ENTER].
2. Aseta aika painamalla painiketta [FORWARD] tai [BACKWARD] ja
vahvista painamalla [ENTER].
3. Palaa toistotilaan painamalla [PWR] kahden sekunnin ajan.
4. Poista herätys ennen herätyksen soimista valitsemalla [MENU], Uniajastin, Pois
päältä ja painamalla [ENTER].
36
Page 37

Jos haluat aktivoida toisen herätyksen, toimi yllä olevien ohjeiden mukaisesti,
mutta valitse Herätys 2.
Torkkutoiminnon voi asettaa 5–15 minuuttiin.
Sammuta herätys painamalla [SNOOZE]-painiketta kahden sekunnin ajan,
jolloin kuvake katoaa näytöltä.
Musiikin streamaus tietokoneelta (UPnP)
• UPnP:n (Universal Plug and Play) avulla voi streamata musiikkia paikallisverkossa,
joka tukee internetstandardia (esim. TCP/IP, UDP, http, tai XML).
• UPnP-toiminto on aktivoitava sekä tietokoneessa että reitittimessä, jotta musiikin
streamaus on mahdollista.
WiFi AP / reititin
Varmista, että laite tukee UPnP:tä ja että toiminto on käytössä. Lisätietoja saat Wifi
AP:n / reitittimen käyttöohjeesta.
Media Player 11
Jotta musiikki olisi käytettävissä internetradiossasi, tarvitaan digitaalinen mediaserveri.
Windows Media Player 11:ssä on integroitu digitaalinen mediaserveri.
Lataa ja asenna Windows Media Player 11, jos käytössäsi on vanhempi versio.
Napsauta LIBRARY-välilehden alla olevaa nuolta ja kohtaa MEDIA SHARING.
Kohdassa MEDIA SHARING valitse SHARE MY MEDIA ja napsauta kyseistä ruutua.
Valitse käytettävissä olevien yksiköiden listalta internetradiosi ja napsauta ALLOW.
Tiedostojen jakaminen
Mediatiedostot on tallennettava kansioihin, jotta ne näkyvät Windows Media Player
11:ssä. Kun soitin käynnistetään, se hakee automaattisesti mediakirjastoon siirrettäviä
tiedostoja. Jos haluat siirtää tiedostoja mediakirjastoon, napsauta kohdan LIBRARY
alla olevaa nuolta ja ADD TO LIBRARY. Valitse ruudusta ne kansiot, jotka haluat siirtää.
Suomi
UPnP-tiedostojen toisto
1. Valitse [MENU], Jaa UPnP ja paina [OK].
2. Käytettävissä olevat yksiköt näkyvät näytöllä.
3. Napsauta kansiota/soittolistaa ja paina [OK].
4. Valitse haluamasi raita ja paina [OK].
Hallinnointi käyttöliittymän kautta
Radion IP-osoitteen avulla voi tehdä lisäasetuksia internetselaimeen.
1. Etsi internetradion IP-osoite ja kirjoita se internetselaimeen.
2. Tee haluamasi asetukset.
37
Page 38

Vianhakutaulukko
Internetradion näytölle ilmestyy teksti Viallinen lähetyssignaali, kun
käytän verkkokaapelia
• Varmista, että kaapeli on liitetty sekä internetradioon että reitittimeen.
Käytän WiFiä ja lähetykset katkeilevat jatkuvasti
• Verkkoyhteys voi olla huono, vaihda kanavaa.
• Ympäristössä voi olla esteitä, jotka estävät yhteyden. Vaihda reitittimen paikkaa.
Kierrätys
Kierrätä tuote asianmukaisesti, kun poistat sen käytöstä.
Tarkempia kierrätysohjeita saat kuntasi jäteneuvonnasta.
Tekniset tiedot
Mitat 11 x 11 x 27,5 cm
Virtalähde 12 VDC, 1 A
Verkkotyyppi LAN/WLAN (WEP, WPA, WPA2)
Suomi
Kuulokeliitäntä 3,5 mm
Ota huomioon
• Muut samalla taajuudella toimivat langattomat laitteet voivat heikentää kantamaa.
• Lähettimen ja vastaanottimen väliset esteet vaikuttavat kaikkien langattomien
laitteiden kantamaan (esim. betoniseinä heikentää signaalia huomattavasti
kipsiseinää enemmän).
Ongelmatilanteissa voit kokeilla seuraavia keinoja
• Sammuta muut langattomat laitteet selvittääksesi aiheuttavatko ne ongelmia.
• Siirrä langattomia laitteita ja/tai lyhennä etäisyyttä ja poista lähettimen ja
vastaan ottimen väliset esteet (seinät, huonekalut tms.).
38
Page 39

Declaration of Conformity
Hereby, Clas Ohlson AB, declares that this wireless Internet radio,
38-3788 / 18-8154
IR-F4S
is in compliance with the essential requirements and other relevant
provisions of Directive 1999/5/EC.
Article 3.1a (Safety): EN 60950-1
EMF/SAR 99/519/EC Council
Recommendation
Article 3.1b (EMC): EN 301489-1
EN 301489-17
Article 3.2 (Radio): EN 300328
Insjön, Sweden, January 2011
Klas Balkow
President
Clas Ohlson, 793 85 Insjön, Sweden
39
Page 40

Sverige
Kundtjänst Tel: 0247/445 00
Fax: 0247/445 09
E-post: kundtjanst@clasohlson.se
Internet www.clasohlson.se
Post Clas Ohlson AB, 793 85 INSJÖN
Norge
Kundesenter Tlf.: 23 21 40 00
Faks: 23 21 40 80
E-post: kundesenter@clasohlson.no
Internett www.clasohlson.no
Post Clas Ohlson AS, Postboks 485 Sentrum, 0105 OSLO
Suomi
Asiakaspalvelu Puh.: 020 111 2222
Sähköposti: info@clasohlson.fi
Internet www.clasohlson.fi
Osoite Clas Ohlson Oy, Annankatu 34–36 A, 00100 HELSINKI
Great Britain
For consumer contact, please visit
www.clasohlson.co.uk and click on
customer service.
Internet www.clasohlson.co.uk
 Loading...