

Page 1
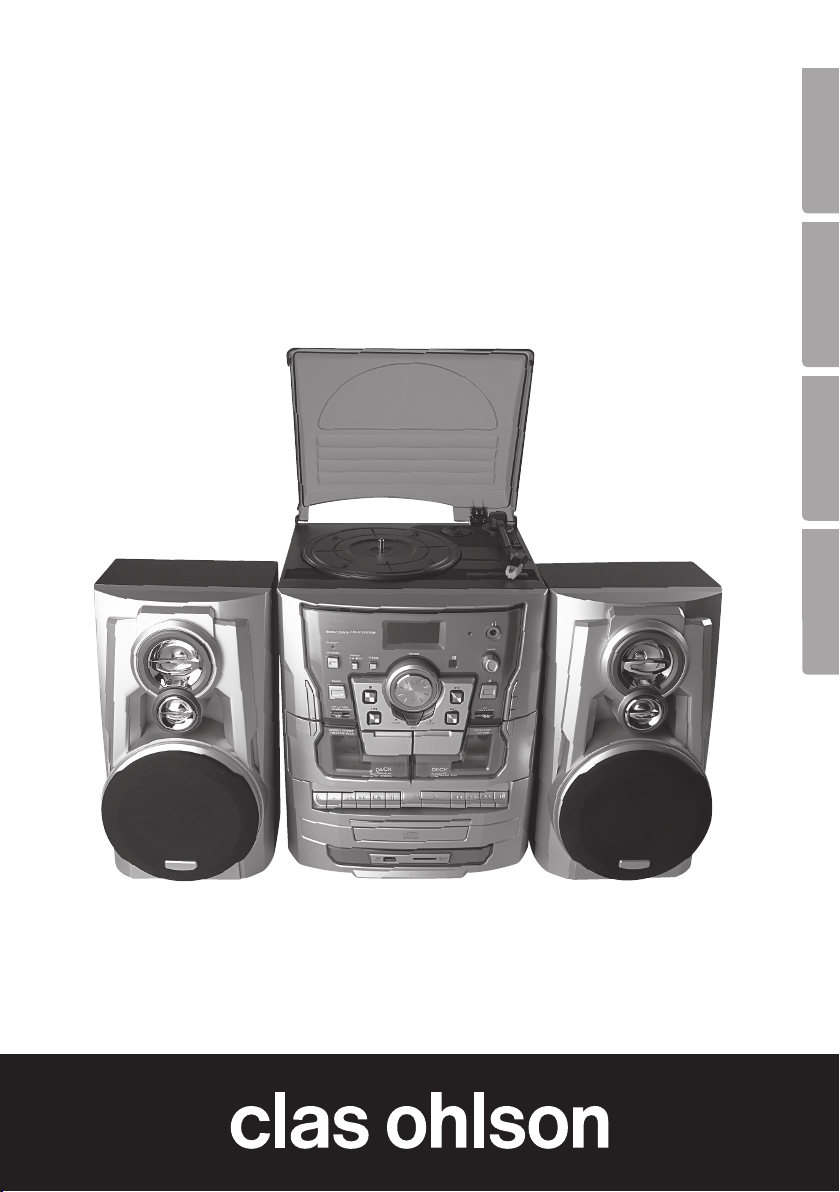
Stereo System
with Record Player
Musikanläggning med skivspelare
Musikkanlegg med platespiller
Ministereot ja levysoitin
EnglishSvenskaNorskSuomi
Art.no. Model
38-3407 HF-618AE
Ver. 200907
Page 2

English
2
Page 3
Stereo System with Record Player
Art. no 38-3407 Model HF-618AE
Please read the entire instruction manual before using the product and save it for future
reference. We reserve the right for any errors in text or images and any necessary changes
made to technical data. If you have any questions regarding technical problems please
contact Customer Services.
Safety
- The product should only be repaired by qualified service technicians.
- The product should not be taken apart or modified.
- Do not place the product where there is a risk of it falling into water or other types of
liquid. Do not place any objects which contain liquid on the product such as vases,
drinks, etc.
- Make sure that the electrical outlet the device is plugged into is easily accessible since
the plug is used to disconnect the device from the mains.
- Do not cover the product. Adequate ventilation with a distance of at least 15 cm
between ventilation holes and the surrounding area is necessary to prevent the device
from becoming too warm.
- Do not place the device in damp, dusty environments or where there are heavy vibrations.
- The standby switch on the front of the device does not disconnect the device from the
mains. To completely disconnect the device from the mains the plug has to be removed
from the socket.
- Prolonged exposure to high volume can damage your hearing.
English
Pay attention to these safety symbols
C AU T I O N
RISK OF ELECTRIC SHOCK
LASER PRODUCT
Caution: Do not open the casing! Invisible laser beams can cause eye damage.
Do not look directly into the laser beam or look directly at it using an optical instrument.
DO NOT OPEN
CLASS 1
Caution: Do not open the casing! Certain
unprotected components within the product’s
casing carry dangerous currents. Contact with
these can lead to fire or give electric shocks.
3
Page 4
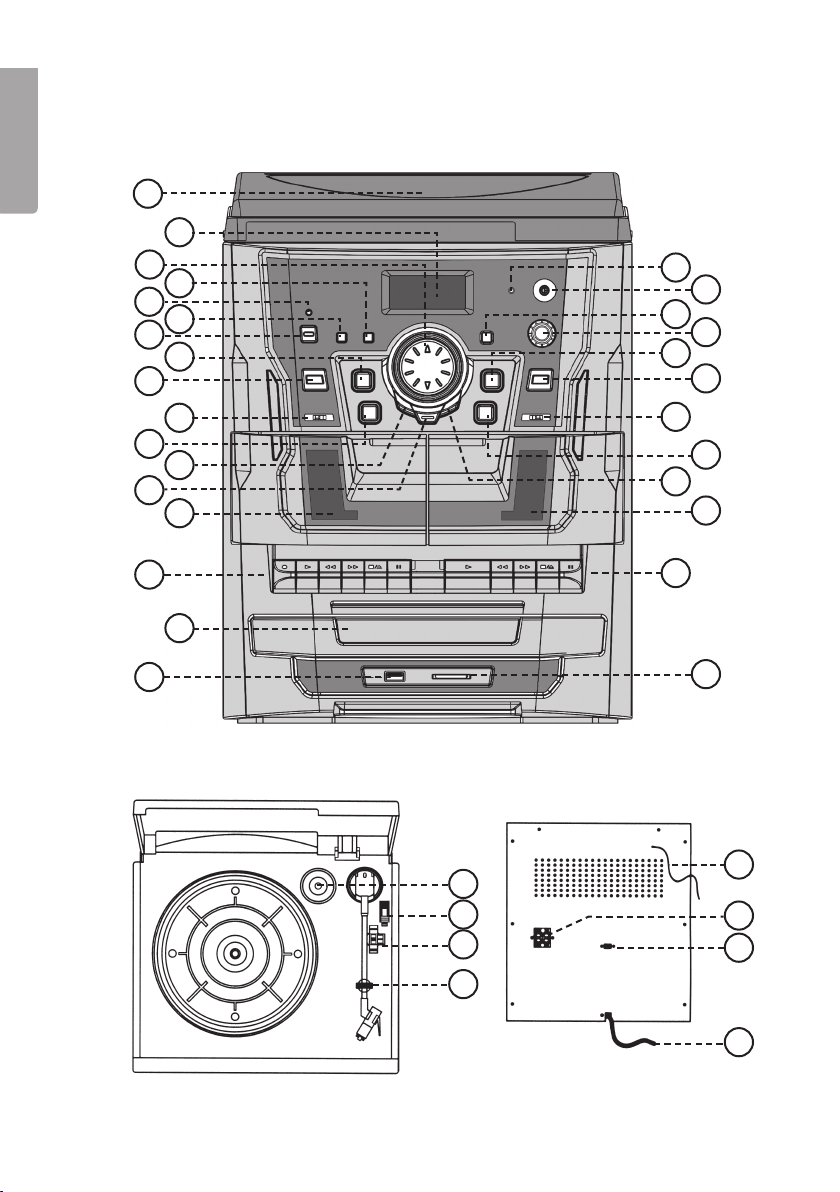
Product description
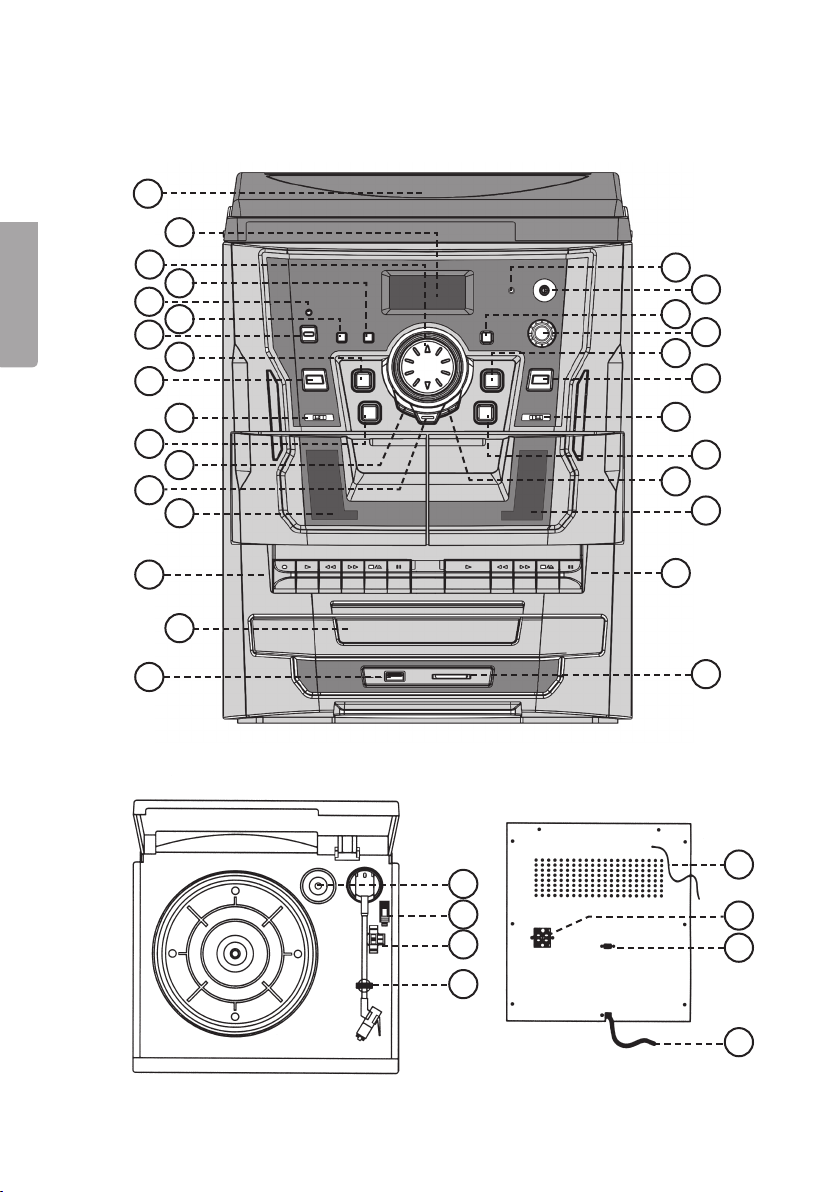
Main unit
English
1
2
3
4
5
6
7
8
9
18
19
20
21
22
23
11
13
15
17
10
12
14
16
30
31
32
33
24
25
26
27
28
29
34
35
36
37
4
Page 5

1. Lid
19. Headphone socket (3.5 mm stereo)
2. Display
3. Volume up/down
4. X-BASS – Extra bass reproduction
5. Standby indicator lamp
6. DUBBING – Speed selector for high
or normal speed cassette recording
7. ON/STANDBY – Standby switch
8. ■ – Stops CD/USB/SD playback
9. [SOURCE] – Selects audio
[SOURCE]: CD/USB/SD
10. CD/USB/SD, TAPE, TUNER,
PHONO – Function selector:
11. I◄◄ – Press once to skip back a
track, hold down to rewind
12. REP/INTRO/RAN – Repeat/Intro/
Random playback
13. ● REC – Record button for
CD/USB/SD
14. Cassette door
15. Deck 1 control keys
a. ● – Record key
b. ► – Playback key
c. ◄◄ / ►► – Fast rewind / fast
forward key
d. ■▲ – Stop/Eject key
e. II – Pause key
16. CD door
17. USB – USB memory stick socket
20. IR sensor for remote control
21. TUNING – Frequency adjusting knob
22. ►II – Starts/Pauses CD/USB/SD
playback
23. ▲ – Opens/closes CD door
24. AM/FM/FM-ST – Radio band selector
25. ►►I – Press once to skip to next track,
hold down to fast forward
26. FOLDER UP – Select MP3 catalogue/
folder
27. Cassette door
28. Deck 2 control keys
a. ► – Playback key
b. ◄◄ / ►► - Fast rewind / fast
forward key
c. ■▲ – Stop/Eject key
d. II – Pause key
29. Slot for SD/MMC memory card
30. Spindle adaptor
31. Tone arm lift lever
32. Speed control 33/45 rpm
33. Pickup needle holder
34. FM aerial
35. Speaker connection (right/left)
36. ”Auto stop” switch
37. Mains lead outlet
English
18. FM stereo indicator
5
Page 6
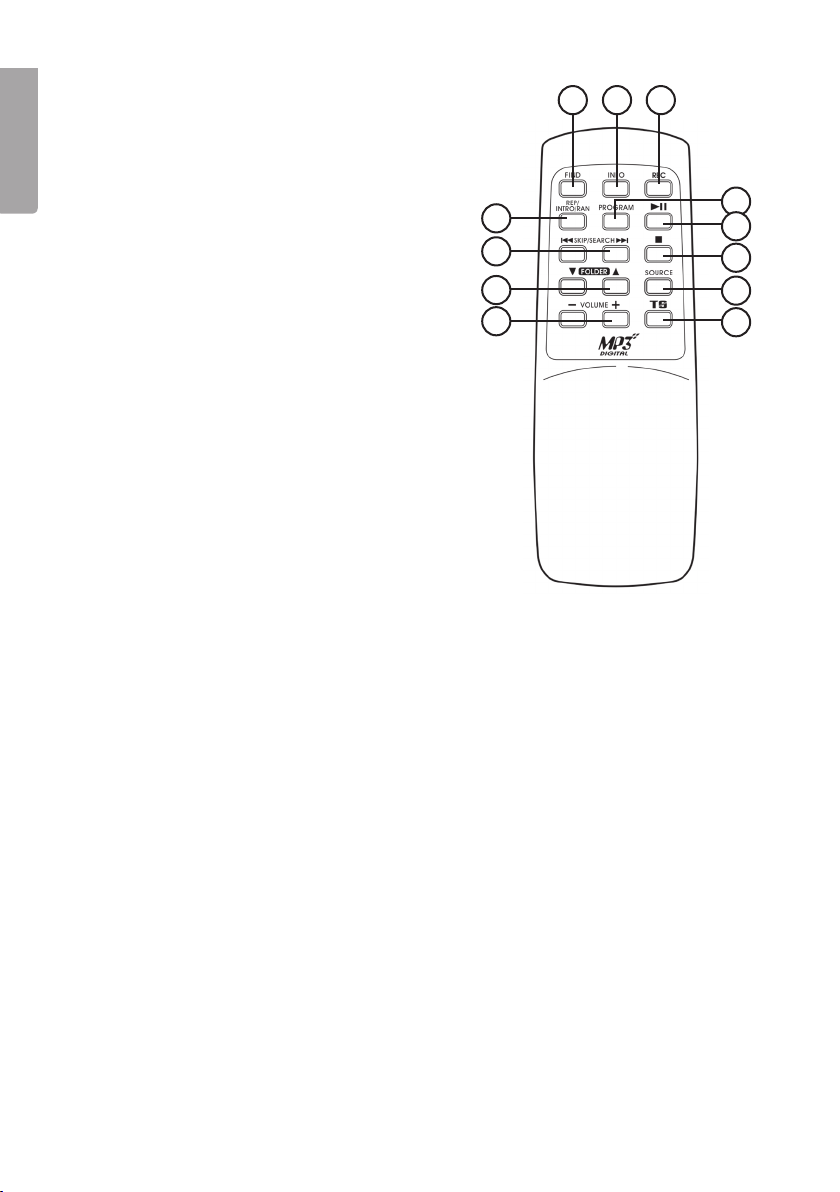
Remote control
1. FIND – Search function for track titles
and folders
English
2. INFO – Information about track titles
3. REC – Record button for CD/USB/SD
4. REP/INTRO/RAN – Repeat/Intro/
Random playback
5. PROGRAM – Programming button for
CD/USB/SD
6. ►II – Starts/Pauses CD/USB/SD playback
7. I◄◄ – Press once to skip back a track, hold
down to rewind.
►►I – Press once to skip to next track, hold
down to fast forward
8. ■ – Stops CD/USB/SD playback
9. FOLDER ▲/▼ – Navigates folders for USB/SD/
CD (with MP3 or WMA files)
10. [SOURCE] – Selects audio [SOURCE]:
CD/USB/SD
11. VOLUME +/- – Increases/Decreases the volume
12. TS (Track Separation) – Divides a recording into
several files
1 243
5
6
7
9
11
8
10
12
Connections
Connecting the speakers
- Connect the right and the left speakers to the right (R) and left (L) speaker outlets (35)
on the back panel.
Connecting to the mains
1. Connect the mains lead to a wall socket. Check that the voltage (V), on the rating plate
on back of the device corresponds to your local electrical network (230 V AC, 50 Hz).
Ask for advice from your retailer or a service centre if that is not the case.
2. To shut off power completely pull the plug from the wall socket. The device should also
be unplugged during heavy thunderstorms to protect the stereo.
6
Page 7
Operation
Listening to the radio
FM
1. Set the function selector (10) to the TUNER position.
2. Set the band selector to either the
3. Tune in the desired station using the tuning knob (21).
4. Position the aerial
5. Adjust the volume to the desired level with the volume control knob (3).
(34) until the best reception is received.
AM
1. Set the function selector (10) to the TUNER position.
2. Tune in the desired station using the tuning knob (21).
3. Adjust the volume to the desired level with the volume control knob (3).
Receiving the best reception
AM: The player has a built-in aerial for AM reception. Reception can be improved by
turning or moving the device.
FM: Position the wire aerial (34) in such a way that the best reception is received.
The aerial should be completely unravelled for the best reception.
FM (mono) or FM-ST (stereo) position.
English
Listening to records
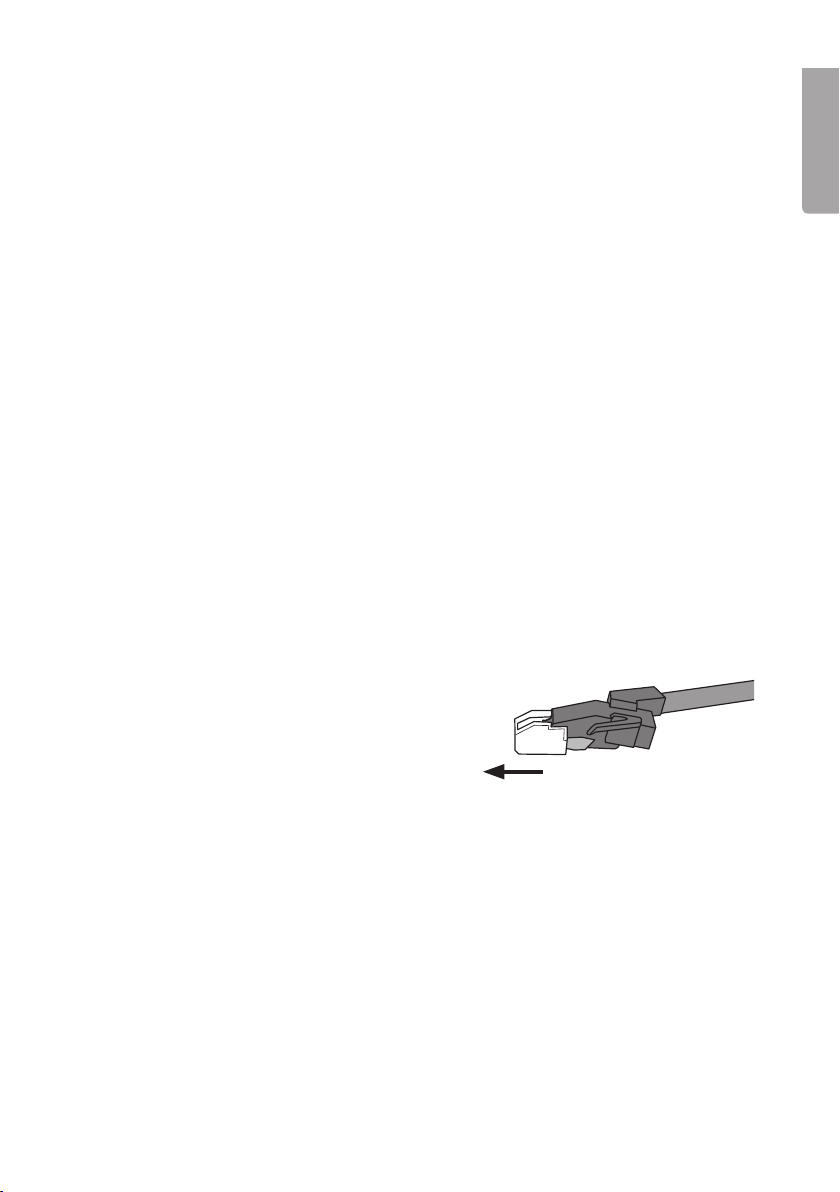
1. Remove the stylus cover from the tone arm by
sliding it forward as shown in the diagram.
2. Set the function selector (10) to the
position to turn the record player on.
3. Place a record on the turntable. Some 45 rpm records have larger spindle holes.
In this case you will need to use the spindle adaptor (30).
4. Choose the appropriate speed for the record with the speed control (32).
5. Lift and hold the tone arm over the record. The turntable should begin to spin.
6. Carefully lower the tone arm at the beginning of the desired track.
7. Playback should now begin. Adjust the volume to the desired level with the volume
control knob (3).
8. Return the tone arm to the pickup holder when playback has finished. The turntable
should stop spinning.
PHONO
7
Page 8

N.B.
Some records end outside of the record player’s “auto-stop” – range. This means that
some records may stop playing even before finishing the last track. This can be remedied
by switching “Auto stop” (36) to the OFF
English
N.B. The record will continue spinning even after the last track has been played. To stop the
record set the “Auto stop” switch (36) to the
any other position than
PHONO.
position.
ON position or set the function selector (10) to
Listening to a CD
1. Set the function selector (10) to the CD/USB/SD position.
2. Open the CD compartment by pressing [OPEN/CLOSE] (23).
3. Place a CD (Audio or CD-R/CD-RW containing MP3 files) with the label facing upwards
in the CD compartment.
4. Close the CD compartment by pressing
5. After a moment, the track total will be shown in the display. If the disc contains MP3
or WMA files, you can browse through the folders using the [FOLDER UP] button (26).
Use I◄◄ and ►►I to select a desired track in the chosen folder.
6. Press
7. Press ►II (22) again to temporarily stop playback. The current track number will flash in
8. To stop playback, press and hold
►II (22) to start playback. The first track should begin playback.
the display. Press ►II (22) again to resume playback.
[OPEN/CLOSE] (23).
■ (8).
Selecting a different track
During playback or in pause mode use I◄◄ or ►►I (11, 25) to select another track.
1. Press
2. Press quickly on
►►I once to reach the next track, or press repeatedly until the desired
track reached.
I◄◄ to return to the beginning of the current track. Press the required
number of times to return to a previous track.
Fast search
1. Press and hold I◄◄ or ►►I to search for a section in a track. The CD will play at high
speed and low volume.
2. Release the button when you have reached the desired section. Normal playback
should now resume.
N.B.
- The sound quality of MP3 files can vary depending on the quality of the CD or recording.
- The time it takes for the device to load an MP3 disc usually takes longer than for a
regular CD.
8
Page 9

Displaying titles (via the remote control)
- During playback of MP3 files, press the INFO button once on the remote to display
or hide the current track’s ID3 information.
- If no information is available for the track “NONE” or “UNKNOWN” will be shown
in the display.
Searching tracks by title (via the remote)
You can search for a track by title/name.
1. When stopped press the remote’s FIND button once.
2. Use
3. Press
I◄◄ and ►►| to browse the tracks by alphabetical order.
►II (22) to start playback of the selected track.
Searching by folder (via the remote control)
You can search for a folder by title/name.
1. With playback stopped, press the remote control
2. Use
3. Press
▼ and ▲ to browse the folders in alphabetical order.
►II (22) to start playback of the selected folder.
FIND button twice.
Repeated playback
- Press REP/INTRO/RAN (12) once or multiple times to repeat a track, album/folder
(only MP3) or an entire CD.
- The repeated playback symbol
is activated.
indicates which type of repeated playback
Random playback
- Press [REP/INTRO/RAN] once or repeatedly to activate random playback. “RAN” will
start to flash in the display when the function is activated.
- Press once more on [REP/INTRO/RAN] or
■ (STOP) to deactivate random playback.
English
Intro (plays the beginning of each track)
- To save time when searching for a track, the first 10 seconds of each track are played.
- Press
N.B. The display can only show characters from the English alphabet.
[REP/INTRO/RAN] once or repeatedly to start playback with the intro function.
“INTRO” appears in the display when the function is activated.
9
Page 10

Programmed playback (via the remote control)
Up to 32 tracks can be programmed in any chosen order.
1. Stop playback by pressing
English
2. Press once on
and track number will be shown in the display.
3. Use
4. Confirm by pressing [PROGRAM] once. The track number will flash in the display.
5. Repeat steps 3 and 4 to programme in more tracks.
6. Press
7. Press
I◄◄ or ►►I to select a track for playback on the programmed playlist.
►II (22) to start playing your list.
■ (STOP) to stop playback and clear the programme memory.
[PROGRAM] on the remote control. ”PROG”, both program number
■ (STOP).
Playing MP3 or WMA files from a USB memory stick or
memory card
The device can play MP3 and WMA files from a USB memory stick or SD/MMC
memory card.
1. Insert a USB memory stick/memory card
according to the figure. Make sure to insert the
USB memory stick/memory card the right way
round to ensure that the connectors are not
damaged. Always push the USB memory stick/
memory card straight in without twisting.
2. Set the function selector (10) to the
SD position and push [SOURCE](9) to select
the USB (USB memory stick) or CARD
(memory card). The display will show the
selected [SOURCE], audio format and total
number of tracks.
3. After a moment, the track total will be shown in the display.
4. Press [FOLDER] (26) once or repeatedly to select a folder for playback. The name of the
folder will be shown in the display.
5. Use
6. Press
7. Press
8. To stop playback, press and hold
I◄◄ and ►►I to select a desired track in the chosen folder.
►II (22) to start playback.
►II (22) again to temporarily stop playback. The current track number will flash in
the display. Press ►II (22) again to resume playback.
CD/USB/
■ (8).
10
Page 11

Using the cassette deck
1. Set the function selector (10) to the CD/USB/SD position.
2. Press
3. Insert a tape and close the cassette door.
4. Press
5. Press
6. By pressing
7. Press
Recording onto cassette
General recording information
- Recording is allowed as long as it does not break copyright law or other rights owned
- The stereo automatically adjusts to the optimum recording level. It is impossible
- In order to prevent a tape from being recorded over you can break one or both of the
■▲ (STOP/EJECT) to open the cassette door.
► (PLAY) to start playback.
II (PAUSE) if you want to stop the tape temporarily. Press II again to resume
playback.
◄◄ or ►►, you can fast forward or rewind the tape.
■▲ (STOP/EJECT) to stop playback. The buttons are released automatically
when the tape comes to an end, unless the II (PAUSE) button is pushed in.
by a third party.
to adjust an ongoing recording using the volume and X-BASS controls. The first
7 seconds and the last 7 seconds of the tape cannot be recorded on.
tape’s recording tabs on top of the cassette. The side on which the recording tab is
removed cannot be recorded onto. Taping over the recording tab holes restores the
cassette’s recording capabilities.
English
Recording from radio to cassette
1. Set the function selector (10) to the TUNER position.
2. Select
3. Press
4. Press both
5. Press II
6. Press
AM or FM using the radio band selector [24].
■▲ (STOP/EJECT) to open cassette deck 1, insert the cassette you wish to
record onto and close the door.
● (RECORD) and ► [PLAY] simultaneously to begin recording.
(PAUSE) if you wish to stop the recording temporarily.
Press II again to resume recording.
■▲ to finish recording.
11
Page 12

Recording from cassette to cassette
N.B. You can choose the recording speed using the [DUBBING] button [6].
1. Set the function selector (10) to the TAPE
English
2. Press
3. Press
4. Press
5. Press
6. Press
■▲ (STOP/EJECT) to open cassette deck 1, insert the cassette you wish to
record onto and close the door.
■▲ (STOP/EJECT) to open cassette deck 2, insert the cassette you wish to copy
and close the door.
► (PLAY) on cassette deck 2 and then press both ● (RECORD) and ► (PLAY)
simultaneously to begin the recording.
II (PAUSE) if you wish to stop the recording temporarily. Press II again
to resume recording.
■▲ to finish recording.
position.
Recording from CD/USB/memory card onto a cassette
1. Set the function selector (10) to the CD/USB/SD position.
2. Press
3. Start to play the audio [SOURCE] (CD/USB memory stick or memory card).
4. Press both
5. Press
6. Press ■▲ to finish recording.
■▲ (STOP/EJECT) to open cassette deck 1, insert the cassette you wish
to record onto and close the door.
● (RECORD) and ►(PLAY)simultaneously to begin recording.
II (PAUSE) if you wish to stop the recording temporarily.
Press II again to resume recording.
Recording from record player to cassette
1. Set the function selector (10) to the PHONO position.
2. Press
3. Start playing the record.
4. Press both
5. Press
6. Press
■▲ (STOP/EJECT) to open cassette deck 1, insert the cassette you wish
to record onto and close the door.
● (RECORD) and ► (PLAY) simultaneously to begin recording.
II (PAUSE) if you wish to stop the recording temporarily. Press II again
to resume recording.
■▲ to finish recording.
12
Page 13

Recording to MP3 on a USB memory stick/memory card
Recording from CD to MP3
Preparations
- Insert a USB memory stick in the USB port or a memory card in the memory card
N.B. If both a USB memory stick and a memory card are connected to the stereo
slot.
system at the same time, the USB memory stick will automatically be chosen as the
storage medium.
- Set the function switch (10) to the
Recording a single track
1. Start playback of the CD track you want to record.
2. Press [REC] (13) to start recording.
3. Recording automatically stops when the track finishes.
Recording an entire CD
1. Press
2. The recording stops when the entire CD has been played. The device automatically
Recording programmed tracks
1. Follow the instructions for programmed playback above.
2. Press
3. When playback has begun, press and hold in
4. Recording automatically stops when the programme finishes.
[REC] (13) to start recording.
organises the tracks onto the USB memory stick/memory card.
►II (22) to start playback.
Recording will now begin.
CD/USB/SD position and insert a CD to record from.
[REC] (13) for 2 seconds.
English
Recording from the record player to MP3
Preparations
- Insert a USB memory stick in the USB port or a memory card in the memory card slot.
- Set the function switch (15) to the
Recording a single track or an entire record
1. Start playback of the track or tracks on the record which are to be recorded onto the
USB memory stick/memory card.
2. Press REC (13) to start recording. All tracks will be saved as one MP3 file until the
recording is stopped manually.
PHONO position and put on a record to record from.
13
Page 14

3. To divide the recording into several files, do the following: Press [TS] (on the remote
control) once to insert a pause and create a new file where the next track should begin
recording. Use the same procedure for all tracks you wish to have as a separately
English
recorded file. Every time a new file is created, the “PHONO” symbol will flash on the
display. N.B. This must be done during the recording process.
4. When you have recorded the desired tracks, press and hold
[REC] (13) to stop recording.
Recording from cassette to MP3
Preparations
- Insert a USB memory stick into the USB port or a memory card in the memory card slot.
- Set the function selector (15) to the TAPE position and insert the cassette you wish to
record from.
Recording one song or an entire cassette
1. Start playback of the track or tracks on the cassette which are to be recorded onto the
USB memory stick/memory card.
2. Press
3. To divide the recording into several files, do the following: Press [TS] (on the remote
4. When you have recorded the desired tracks, press and hold
[REC] (13) to start recording. All tracks will be saved as one MP3 file until the
recording is stopped manually.
control) once to insert a pause and create a new file where the next track should begin
recording. Use the same procedure for all tracks you wish to have as a separately
recorded file. Every time a new file is created, the “PHONO” symbol will flash on the
N.B. This must be done during the recording process.
display.
[REC] (13) to stop recording.
Copying from a USB memory stick to a memory card or vice versa
N.B. It is only possible to copy an entire MP3 file / track. It is not possible to record part of
a track/file.
Preparations
- Insert a USB memory stick into the USB port or a memory card in the memory card slot.
- Set the function selector (10) to the CD/USB/SD
The example below describes recording from memory card to USB memory stick.
a) Recording one track
1. Start playback of the memory card track that you wish to record onto the
USB memory stick.
2. Press
3. When the track has been completely recorded, recording stops automatically.
[REC] (13) to start recording.
position.
14
Page 15

b) Recording all tracks
1. Set the [SOURCE] button to SD and insert the memory card that you wish to copy.
2. When all information on the card has been read, press
The
3. When the memory card has been completely recorded, recording stops automatically.
and symbols will appear on the display during the copying process.
[REC] (13) to start recording.
Setting the recording quality (via the remote control)
The recording quality for MP3s can be set between 32 and 256 Kbps. The highest quality
also produces a larger file.
1. Set the function selector (10) to the PHONO
2. Press the [INFO] button on the remote control. The display shows the current
recording quality.
3. Use
I◄◄ and ►►I to select the desired recording quality. Confirm by pressing [INFO].
position.
Deleting files
Deleting a single file
1. Set the function selector (10) to the CD/USB/SD position and select USB or SD using
the [SOURCE] button.
2. Hold in the
“DEL ---001”.
3. Use the
4. Press [REC] to select the file you wish to delete. The display will show “YES NO”.
5. Press
[INFO] button on the remote control for 3 seconds. The display shows
I◄◄ and ►►I buttons to browse the files.
I◄◄ or ►►I to choose “YES” or “NO” and then confirm the deletion using [REC].
English
Deleting all files
1. Set the function selector (10) to the CD/USB/SD position and select USB or SD using
the
[SOURCE] button.
2. Hold in the
“DEL ---001”.
3. Hold in
4. Press
[INFO] button on the remote control for 3 seconds. The display shows
[INFO] on the remote control again. The display will show “FORMAT? Y/N”.
I◄◄ or ►►I to choose “YES” or “NO” and then confirm the deletion using [REC].
15
Page 16

Care and maintenance
To dust the stereo system, first disconnect it from the mains by pulling out the plug and
then wipe it using a soft duster and a mild detergent. Never use abrasive cleaning agents
English
or solvents.
Disposal
Follow local ordinances when disposing of this product. If you are unsure of how to dispose
of this product, please contact your municipality.
Specifications
Power supply 230 V AC, 50 Hz
Remote control batteries 2 x AAA/R03
Turntable speed 33/45 RPM
Size, main unit 305 x 415 x 375 mm
Size, speakers 200 x 360 x 195 mm
16
Page 17
Musikanläggning med skivspelare
Art. nr 38-3407 Modell HF-618AE
Läs igenom hela bruksanvisningen före användning och spara den sedan för
framtida bruk. Vi reserverar oss för ev. text- och bildfel samt ändringar av
tekniska data. Vid tekniska problem eller andra frågor, kontakta vår kundtjänst
(se adressuppgifter på baksidan).
Säkerhet
- Produkten får endast repareras av kvalificerad servicepersonal.
- Produkten får inte demonteras eller ändras.
- Placera inte produkten så att den kan falla ner i vatten eller annan vätska.
Ställ inte heller några föremål som innehåller vätska på produkten, t.ex.
en blomvas eller dryck.
- Se till att vägguttaget som används sitter tillgängligt eftersom stickproppen på
apparatens nätsladd används som frånkopplingsanordning från nätet.
- Täck inte över anläggningen. Tillräcklig ventilation, med ett minsta avstånd på
ca 15 cm mellan ventilationshålen och omgivande ytor, är nödvändig för att förhindra att
anläggningen blir för varm.
- Placera inte apparaten i en fuktig, dammig miljö eller där det förekommer starka
vibrationer.
- Standbyomkopplaren på apparatens framsida skiljer inte apparaten från elnätet.
För att fullständigt skilja apparaten från elnätet måste apparatens stickpropp tas
ur vägguttaget.
- Långvarig exponering av hög ljudvolym från hörlurar kan orsaka skador på din hörsel.
Svenska
Lägg märke till dessa säkerhetssymboler
C AU T I O N
RISK OF ELECTRIC SHOCK
LASER PRODUCT
Varning! Öppna inte höljet! Osynlig laserstrålning som kan orsaka ögonskador.
Rikta inte blicken in mot strålen och titta inte direkt på den genom optiska instrument.
DO NOT OPEN
CLASS 1
KLASS 1 LASERAPPARAT
Varning! Öppna inte höljet! Farlig spänning
finns oskyddat på komponenter inuti
produktens hölje, kontakt med dessa kan leda
till brand eller ge elektriska stötar.
17
Page 18
Produktbeskrivning
Huvudenhet
1
2
3
4
5
Svenska
6
7
8
9
18
19
20
21
22
23
11
13
15
17
10
12
14
16
30
31
32
33
24
25
26
27
28
29
34
35
36
18
37
Page 19

1. Lock
19. Hörlursuttag (3,5 mm stereo)
2. Display
3. Volymknapp upp/ned
4. X-BASS – Extra kraftig basåtergivning
5. Indikatorlampa för standby
6. DUBBING – Hastighetsväljare för
inspelning på kassettbandspelaren
7. ON/STANDBY – Standbyomkopplare
8. ■ – Stoppar uppspelningen för
cd/usb/sd
9. [SOURCE] – Väljer musikkälla:
cd/usb/sd
10. CD/USB/SD, TAPE, TUNER, PHONO
– Funktionsväljare: cd/usb/sd,
kassettband, radio och LP-skiva
11. I◄◄ – Tryck för att gå till föregående
spår/håll in för snabbspolning bakåt
12. REP/INTRO/RAN – Repetition/intro/
slumpmässig uppspelning
13. ● REC – Inspelningsknapp för
cd/usb/sd
14. Kassettlucka
15. Kontroller för kassettdäck 1
a. ● – Startar inspelning
b. ► – Startar avspelningen
c. ◄◄ / ►► – Snabbspolning
bakåt/framåt
d. ■▲ – Stopp/Öppna kassettluckan
e. II – Pausar uppspelningen
16. Cd-lucka
17. USB - Anslutning för usb-minne
20. IR-sensor för fjärrkontroll
21. TUNING – Frekvensväljare
22. ►II – Startar/pausar uppspelningen
för cd/usb/sd
23. ▲ – Öppnar/stänger cd-facket
24. AM/FM/FM-ST – Bandväljare
för radio
25. ►►I – Tryck för att gå till nästa spår/
håll in för snabbspolning framåt
26. FOLDER UP – Väljer mapp vid
mp3-uppspelning
27. Kassettlucka
28. Kontroller för kassettdäck 2
a. ► – Startar avspelningen
b. ◄◄ / ►► – Snabbspolning
bakåt/framåt
c. ■▲ – Stopp/Öppna kassettluckan
d. II – Pausar uppspelningen
29. SD/MMC – Anslutning för minneskort
30. Skivpuck
31. Lyftspak för tonarm
32. Varvtalsomkopplare 33/45 v/min
33. Pickup-hållare
34. FM-antenn
35. Anslutning för högtalare
(höger/vänster)
36. Omkopplare för ”Auto stop”
37. Uttag för nätsladd
Svenska
18. Indikatorlampa för FM-stereo
19
Page 20

Fjärrkontroll
1. FIND – Sökfunktion för låttitlar och mappar.
2. INFO – Information om låttitel.
3. [REC] – Inspelningsknapp för cd/usb/sd.
4. REP/INTRO/RAN - Repetition/intro/
slumpmässig uppspelning.
5. PROGRAM – Programmeringsknapp för
cd/usb/sd.
6. ►II – Startar/pausar uppspelningen för
Svenska
cd/usb/sd.
7. I◄◄ – Tryck för att gå till föregående spår/håll
in för snabbspolning bakåt.
►►
8. ■ – Stoppar uppspelningen för cd/usb/sd.
9. FOLDER ▲/▼ – Väljer mapp för usb/sd/cd
10. [SOURCE] – Väljer musikkälla: cd/usb/sd.
11. VOLUME +/- – Höjer/sänker volymen.
12. TS (Track Separation) – Delar upp en
I – Tryck för att gå till nästa spår/håll in för
snabbspolning framåt.
(med mp3- eller wma-filer).
inspelning i flera filer.
11
1 243
5
6
7
9
8
10
12
Anslutningar
Anslutning av högtalare
- Anslut höger och vänster högtalare till höger (R) och vänster (L) högtalarutgång (35) på
apparatens baksida.
Anslutning till elnätet
1. Anslut nätsladden till ett vägguttag. Kontrollera att spänningen (V), som finns angiven
på märkskylten på baksidan av anläggningen är densamma som i ditt lokala elnät
(230 V AC, 50 Hz). Rådfråga återförsäljaren eller ett serviceställe om så inte är fallet.
2. För att helt stänga av strömmen, dra ur stickproppen ur vägguttaget. Dra även ur
stickproppen ur vägguttaget vid kraftiga åskväder för att skydda anläggningen.
20
Page 21

Användning
Lyssna på radio
FM
1. Sätt funktionsomkopplaren (10) i läge TUNER.
2. Sätt bandväljaren för radio i läge
3. Ställ in önskad frekvens med frekvensväljaren (21).
4. Placera trådantennen (34) på lämpligt sätt tills bästa mottagning erhålls.
5. Justera volymen till önskad nivå med volymknappen (3).
AM
1. Sätt funktionsomkopplaren (10) i läge TUNER.
2. Ställ in önskad frekvens med frekvensväljaren (21).
3. Justera volymen till önskad nivå med volymknappen (3).
Tips för bättre mottagning
AM: Apparaten har en inbyggd antenn för AM-mottagning. Mottagningen kan påverkas
genom att vrida eller flytta på apparaten.
FM: Placera trådantennen (34) på lämpligt sätt tills bästa möjliga mottagningen erhålls.
Antennen bör vara fullt utrullat och utsträckt för bäst mottagning.
Lyssna på LP-skiva
1. Avlägsna nålskyddet från tonarmen genom att
dra nålskyddet rakt ut enligt bilden.
2. Sätt funktionsomkopplaren (10) i läge
PHONO för att slå på skivspelaren.
3. Placera en skiva på skivtallriken. Vissa 45-varvsskivor har stort centrumhål och
behöver då skivpucken (30) för att kunna spelas.
4. Välj rätt hastighet för skivan med varvtalsomkopplaren (32).
5. Lyft och för tonarmen över skivan. Nu ska skivtallriken börja snurra.
6. Sänk försiktigt ner tonarmen vid början på önskat spår.
7. Avspelningen av skivan har nu börjat. Justera volymen till önskad nivå med
volymknappen (3).
8. Lyft tonarmen tillbaka till pickuphållaren när avspelningen är avslutad.
Tallriken slutar att snurra.
FM (mono) eller FM-ST (stereo).
Svenska
21
Page 22

Notera:
Vissa skivor har slutindikeringen utanför skivspelarens ”auto-stop” –område. Detta medför
att vissa skivor slutar spela redan innan skivans sista spår. Detta kan avhjälpas genom att
sätta omkopplaren ”Auto stop” (36) i läge
Obs! Skivan kommer att fortsätta snurra även när sista spåret har spelats. För att stoppa
skivan, sätt omkopplaren ”Auto stop” (36) i läge ON eller ställ funktionsomkopplaren (10)
i annat läge än PHONO.
OFF.
Lyssna på cd
1. Sätt funktionsomkopplaren (10) i läge CD/USB/SD.
Svenska
2. Öppna cd-facket genom att trycka på
3. Placera en cd-skiva (ljudskiva eller CD-R/CD-RW innehållande MP3-filer) med
etiketten vänd uppåt i cd-facket.
4. Stäng cd-facket genom att trycka på [OPEN/CLOSE] (23)
5. Efter en kort stund visar displayen det totala antalet spår på skivan. Om skivan
innehåller mp3- eller wma-filer kan du bläddra bland mapparna med [FOLDER UP]
[26]. Använd I◄◄ och ►►I för att välja önskat spår i den valda mappen.
6. Tryck på
7. För att tillfälligt stoppa uppspelningen, tryck igen på
blinkar i displayen. Tryck åter på ►II (22) för att fortsätta uppspelningen.
8. För att stoppa avspelningen, tryck och håll in
►II (22) för att starta uppspelningen. Det första spåret spelas upp.
[OPEN/CLOSE] 23.
►II (22). Aktuellt spårnummer
■ (8).
Välja ett annat spår
Under uppspelningen eller i pausläget kan du använda I◄◄ eller ►►I (11, 25) för att
välja ett annat spår.
1. Tryck en gång kort på
tills det önskade spårnumret visar i displayen.
2. Tryck en gång kort på
Tryck kort mer än en gång för att komma till tidigare spår.
►►I för att komma till nästa spår, eller tryck upprepade gånger
I◄◄ för att återgå till början på det spår som just spelas.
Finna ett avsnitt i ett spår
1. Tryck och håll in I◄◄ eller ►►I för att söka ett avsnitt i ett spår. Spåret spelas nu
med hög hastighet och låg volym.
2. Släpp knappen när du hör det avsnitt du söker. Den normala avspelningen fortsätter.
Anm.
- Ljudkvaliteten på MP3-filer kan variera beroende på skivans eller inspelningens kvalitet.
- Tiden för apparaten att läsa in en MP3-skiva tar vanligtvis längre tid än en vanlig skiva.
22
Page 23

Visa låtnamn (via fjärrkontrollen)
- Under uppspelning av MP3-filer, tryck en gång på knappen [INFO] på fjärrkontrollen
för att visa eller dölja ID3-informationen om det aktuella spåret.
- Finns ingen information tillgänglig för det aktuella spåret visas istället texten
”NOFILE” eller ”UNKNOWN” i displayen.
Sök låt efter titel (via fjärrkontrollen)
Du kan söka en låt efter dess titel/namn.
1. Vid stoppad uppspelning, tryck en gång på knappen [FIND] på fjärrkontrollen.
2. Använd
3. Tryck på
I◄◄ och ►►I för att bläddra bland låtarna i alfabetisk ordning.
►II (22) för att starta uppspelningen av den valda låten.
Sök mapp (via fjärrkontrollen)
Du kan söka en mapp efter dess titel/namn.
1. Vid stoppad uppspelning, tryck två gånger på knappen
2. Använd
3. Tryck på
▼ och ▲ för att bläddra bland mapparna i alfabetisk ordning.
►II (22) för att starta uppspelningen av låtarna i den valda mappen.
[FIND] på fjärrkontrollen.
Repeterad avspelning
- Tryck en eller upprepade gånger på [REP/INTRO/RAN] (12) för att repetera ett spår,
album/mapp (endast mp3) eller en hel skiva.
- En symbol för repeterad uppspelning
är aktiverad.
visar vilken typ av uppspelning som
Svenska
Slumpmässig avspelning
- Tryck en eller upprepade gånger på [REP/INTRO/RAN] för att aktivera slumpmässig
avspelning. ”RAN” blinkar i displayen när funktionen är aktiverad.
- Tryck åter på [REP/INTRO/RAN] eller på
avspelning.
■ STOP för att avaktivera slumpmässig
Intro (spela upp början på spår)
- För att spara tid när du söker en viss låt spelas de 10 första sekunderna upp i en följd.
- Tryck en eller upprepade gånger på [REP/INTRO/RAN] för att starta uppspelningen
med introfunktionen aktiverad. ”INTRO” visas i displayen när funktionen är aktiverad.
Anm. Displayen kan endast visa tecken ur det engelska alfabetet.
23
Page 24

Programmerad uppspelning (via fjärrkontrollen)
Upp till 32 spår kan programmeras i valfri ordning.
1. Stoppa uppspelningen genom att trycka på
2. Tryck en gång på PROGRAM på fjärrkontrollen. ”PROG”, programnummer samt
spårnummer visas i displayen.
3. Använd
4. Bekräfta genom att trycka en gång på [PROGRAM]. Spårnumret blinkar nu i displayen.
5. Repetera steg 3 och 4 för att programmera fler spår.
Svenska
6. Tryck på
7. Tryck på
I◄◄ och ►►I för att välja det spår som ska programmeras.
►II (22) för att starta avspelningen i den ordning du nyss programmerat.
■ STOP för att stoppa avspelningen och rensa programminnet.
■ (STOP).
Spela upp mp3- eller wma-filer från ett minneskort eller
usb-minne
Apparaten kan spela upp MP3- och WMA-filer från ett USB-minne eller ett minneskort
av typen SD eller MMC.
1. Sätt i ett USB-minne/minneskort i enligt
bilden. Se till att vända USB-minnet/
minneskortet rätt för att inte skada
kontakten. Skjut alltid USB-minnet/
minneskortet rakt in utan att böja det.
2. Sätt funktionsomkopplaren (10) i läge CD/
USB/SD och tryck sedan på [SOURCE] (9)
för att välja källa, USB (USB-minne) eller
CARD (minneskort). Displayen indikerar
vald källa, typ av ljudformat samt totala
antalet spår.
3. Efter en kort stund visar displayen det totala antalet låtar på skivan.
4. Tryck en eller flera gånger på [FOLDER] (26) för att välja den mapp du vill spela upp.
Mappnamnet visas i displayen.
5. Använd I◄◄ och ►►I för att välja önskat spår i den valda mappen.
6. Tryck på
7. För att tillfälligt stoppa uppspelningen, tryck igen på
blinkar i displayen. Tryck åter på ►II (22) för att fortsätta uppspelningen.
8. För att stoppa avspelningen, tryck och håll in
►II (22) för att starta uppspelningen.
►II (22). Aktuellt spårnummer
■ (8).
24
Page 25

Spela kassettband
1. Sätt funktionsomkopplaren (10) i läge CD/USB/SD.
2. Tryck på
3. Lägg i ett inspelat band och stäng kassettluckan.
4. Tryck på
5. Tryck på
Tryck igen på II för att fortsätta.
6. Genom att trycka på
7. Tryck på
när bandet är slut, om inte II (PAUSE) är intryckt.
Inspelning till kassettband
Allmän information om inspelning
- Inspelning är tillåten så länge den inte bryter mot upphovsrätten eller andra rättigheter
som innehas av tredje part.
- Den bästa nivån för inspelning ställs in automatiskt. Det går inte att påverka en
pågående inspelning med volym- och X-BASS -kontrollerna. Under 7 sekunder
alldeles i början och slutet av bandet, när ledarbandet passerar inspelningshuvudena
sker ingen inspelning.
- För att skydda ett band från att raderas av misstag kan du bryta av en eller båda
plastflikarna på undersidan av bandet. Det går nu inte att spela in på den sida där
fliken är avlägsnad. Om hålen som täcktes av flikarna tejpas över går det åter att spela
in på bandet.
■▲ (STOP/EJECT) för att öppna kassettluckan.
► PLAY för att starta avspelningen.
II PAUSE om du vill avbryta spelningen tillfälligt.
◄◄ eller ►► kan du snabbspola bandet i bakåt eller framåt.
■▲ ( (STOP/EJECT)) för att stanna bandet. Knapparna frigörs automatiskt
Svenska
Inspelning från radio till kassett
1. Sätt funktionsomkopplaren (10) i läge TUNER.
2. Välj AM eller FM med bandväljaren för radio (24).
3. Tryck på
spela in på och stäng kassettluckan
4. Tryck in både
5. Tryck på
för att fortsätta inspelningen.
6. Tryck på
■▲ (STOP/EJECT) för att öppna kassettlucka 1, lägg i den kassett du vill
● (RECORD) och ► (PLAY) samtidigt för att starta inspelningen.
II (PAUSE) om du vill göra ett tillfälligt avbrott i inspelningen. Tryck igen på II
■▲ för att avsluta inspelningen.
25
Page 26

Inspelning från kassett till kassett
OBS! Du kan välja inspelningshastighet genom att trycka på [DUBBING] [6].
1. Sätt funktionsomkopplaren (10) i läge
2. Tryck på
spela in på och stäng kassettluckan.
3. Tryck på
kopiera och stäng kassettluckan.
4. Tryck på
Svenska
► PLAY samtidigt för att starta inspelningen.
5. Tryck på II (PAUSE) om du vill göra ett tillfälligt avbrott i inspelningen.
Tryck igen på II för att fortsätta inspelningen.
6. Tryck på
■▲ (STOP/EJECT) för att öppna kassettlucka 1, lägg i den kassett du vill
■▲ (STOP/EJECT) för att öppna kassettlucka 2, lägg i den kassett du vill
► (PLAY) på kassettdäck 2 och tryck sedan in både ● (RECORD) och
■▲ för att avsluta inspelningen.
TAPE.
Inspelning från cd/usb/minneskort till kassett
1. Sätt funktionsomkopplaren (10) i läge CD/USB/SD.
2. Tryck på
spela in på och stäng kassettluckan.
3. Starta uppspelning från vald källa (cd, usb-minne eller minneskort).
4. Tryck in både
5. Tryck på II (PAUSE) om du vill göra ett tillfälligt avbrott i inspelningen.
Tryck igen på II för att fortsätta inspelningen.
6. Tryck på
■▲ (STOP/EJECT) för att öppna kassettlucka 1, lägg i den kassett du vill
● (RECORD) och ► PLAY samtidigt för att starta inspelningen.
■▲ för att avsluta inspelningen.
Inspelning från LP-skiva till kassett
1. Sätt funktionsomkopplaren (10) i läge PHONO.
2. Tryck på
spela in på och stäng kassettluckan.
3. Starta uppspelning från skivspelaren.
4. Tryck in både
5. Tryck på II (PAUSE) om du vill göra ett tillfälligt avbrott i inspelningen.
Tryck igen på II för att fortsätta inspelningen.
6. Tryck på
■▲ (STOP/EJECT) för att öppna kassettlucka 1, lägg i den kassett du vill
● (RECORD) och ► PLAY samtidigt för att starta inspelningen.
■▲ för att avsluta inspelningen.
26
Page 27

Spela in till MP3 på USB-minne eller minneskort
Spela in från cd till MP3
Förberedelser
- Sätt i ett USB-minne i USB-anslutningen eller ett minneskort i minneskortanslutningen.
OBS! Om det sitter både ett USB-minne och ett minneskort i musikanläggningen väljs
automatiskt USB-minnet som lagringsplats.
- Sätt funktionsomkopplaren (10) i läge
spela in från.
CD/USB/SD och lägg i den cd-skiva du vill
Spela in en låt
1. Starta uppspelningen av den låt på cd-skivan som du vill spela in.
2. Tryck därefter på [REC] (13) för att starta inspelningen.
3. Inspelningen stannar automatiskt när låten är slut.
Spela in en hel skiva
1. Tryck på [REC] (13) för att starta inspelningen.
2. Inspelningen stannar när hela skivan spelats. Apparaten delar automatiskt upp spåren
på USB-minnet/minneskortet.
Spela in programmerade låtar
1. Följ instruktionerna för programmerad uppspelning ovan.
2. Tryck på
3. Under uppspelning, tryck och håll in [REC] (13) i 2 sekunder. Inspelningen startar.
4. Inspelningen stannar automatiskt när programmet är slut.
►II (22) för att starta uppspelningen.
Spela in från skivspelaren till MP3
Förberedelser
- Sätt i ett USB-minne i USB-anslutningen eller ett minneskort i minneskortanslutningen.
- Sätt funktionsomkopplaren (15) i läge
in från.
PHONO och lägg på den skiva du vill spela
Svenska
Spela in en låt eller en hel skiva
1. Starta uppspelningen av det eller de spår på LP-skivan som du vill spela in på USBminnet/minneskortet.
2. Tryck därefter på [REC] (13) för att starta inspelningen. Samtliga spår sparas som en
hel MP3-fil tills inspelningen avbryts manuellt.
27
Page 28

3. För att dela upp en inspelning i flera filer, gör enligt följande: Tryck en gång på [TS] (på
fjärrkontrollen) för att infoga en paus och skapa en ny fil där den nästa spår kommer
att spelas in, gör lika på alla ställen där du vill dela upp inspelningen. Varje gång som
en ny fil skapas blinkar ”PHONO” en gång på displayen. Obs! Detta måste göras
under inspelningen.
4. När du spelat in önskade spår, tryck och håll in [REC] (13) för att stoppa inspelningen.
Spela in från kassettband till MP3
Förberedelser
- Sätt i ett USB-minne i USB-anslutningen eller ett minneskort i minneskortanslutningen.
Svenska
- Sätt funktionsomkopplaren (15) i läge
Spela in en spår eller en hel kassett
1. Starta uppspelningen av den eller de låtar på kassetten som du vill spela in på
USB-minnet/minneskortet.
2. Tryck därefter på [REC] (13) för att starta inspelningen. Samtliga spår sparas som en
hel MP3-fil tills inspelningen avbryts manuellt.
3. För att dela upp en inspelning i flera filer, gör enligt följande: Tryck en gång på [TS]
(på fjärrkontrollen) för att infoga en paus och skapa en ny fil där den nästa spår
kommer att spelas in, gör lika på alla ställen där du vill dela upp inspelningen.
Varje gång som en ny fil skapas blinkar ”PHONO” en gång på displayen.
Obs! Detta måste göras under inspelningen.
4. När du spelat in önskade spår, tryck och håll in [REC] (13) för att stoppa inspelningen.
TAPE och sätt i den kassett du vill spela in från.
Kopiering från USB-minne till minneskort och vice versa
Obs! Kopiering av mp3-filer fungerar endast om man kopierar hela filen (låten).
Det går alltså inte att spela in delar av en låt.
Förberedelser
- Sätt i ett USB-minne i USB-anslutningen och ett minneskort i minneskortanslutningen.
- Sätt funktionsomkopplaren (10) i läge
Exemplen nedan beskriver inspelning från minneskort till USB-minne:
a) Spela in en låt
1. Starta normal uppspelning av den låt på minneskortet som du vill spela in
på USB-minnet.
2. Tryck därefter på [REC] (13) för att starta inspelningen.
3. När låten är färdigkopierad avbryts uppspelningen automatiskt.
CD/USB/SD.
28
Page 29

b) Spela in alla låtar
1. Välj SD-läge med
2. När all information på kortet är inläst, tryck på [REC] (13) för att starta inspelningen.
Displayen visar
3. När minneskortet är färdigkopierat avbryts uppspelningen automatiskt.
[SOURCE]-knappen och sätt in det minneskort du vill kopiera.
och när kopieringen pågår.
Ställ inspelningskvalitet (via fjärrkontrollen)
Kvaliteten på inspelningen till MP3 kan ställas in mellan 32 och 256 Kbps.
Högre inspelningskvalitet innebär även större filstorlek.
1. Sätt funktionsomkopplaren (10) i läge PHONO.
2. Tryck knappen på [INFO] på fjärrkontrollen. Displayen visar inställd inspelningskvalitet.
3. Använd
på [INFO].
I◄◄ och ►►I för att välja inspelningskvalitet. Bekräfta med ett tryck
Radera filer
Radera enstaka fil
1. Sätt funktionsomkopplaren (10) i läge CD/USB/SD och välj USB eller SD med
[SOURCE]-knappen.
2. Håll in
3. Tryck på
4. Tryck på [REC] för att välja den fil du vill radera. Displayen visar ”YES NO”.
5. Tryck på
INFO på fjärrkontrollen i 3 sekunder. Displayen visar ”DEL ---001”.
I◄◄ och ►►I för att bläddra bland filerna.
I◄◄ och ►►I för att välja ”YES” eller ”NO” och bekräfta sedan raderingen
med [REC].
Svenska
Radera alla filer
1. Sätt funktionsomkopplaren (10) i läge CD/USB/SD och välj USB eller SD med
[SOURCE]-knappen.
2. Håll in [INFO] på fjärrkontrollen i 3 sekunder. Displayen visar ”DEL ---001”.
3. Håll in [INFO] på fjärrkontrollen igen. Displayen visar ”FORMAT? Y/N”.
4. Tryck på
med [REC].
I◄◄ och ►►I för att välja ”YES” eller ”NO” och bekräfta sedan raderingen
29
Page 30

Skötsel och underhåll
Vid behov, dra stickkontakten ur vägguttaget och torka sedan av apparaten med
en mjuk trasa och eventuellt ett milt rengöringsmedel. Använd aldrig slipande
rengöringsmedel eller lösningsmedel.
Avfallshantering
När du ska göra dig av med produkten ska detta ske enligt lokala föreskrifter.
Är du osäker på hur du ska gå tillväga, kontakta din kommun.
Svenska
Specifikationer
Strömförsörjning 230 V AC, 50 Hz
Batterier, fjärrkontroll 2 x AAA/R03
Varv/min, skivspelare 33/45 varv/min
Storlek, huvudenhet 305 x 415 x 375 mm
Storlek, högtalare 200 x 360 x 195 mm
30
Page 31

Musikkanlegg med platespiller
Art.nr. 38-3407 Modell HF-618AE
Les bruksanvisningen nøye før produktet tas i bruk, og ta vare på den for ev. framtidig bruk.
Vi reserverer oss mot ev. tekst- og bildefeil, samt forandringer av tekniske data. Ved tekniske problemer eller andre spørsmål, ta kontakt med vårt kundesenter. (Se opplysninger
om kundesenteret i denne bruksanvisningen).
Sikkerhet
- Produktet må kun repareres av kyndig servicepersonell.
- Produktet må ikke demonteres eller endres på.
- Plasser ikke produktet slik at det kan komme i kontakt med vann eller annen væske.
Plasser aldri produktet i nærheten av gjenstander som kan forårsake at vann eller annen
væske skylles over produktet.
- Koble anlegget til et lett tilgjengelig strømuttak. Anlegget gjøres helt strømløst ved
å trekke ut stikkontakten.
- Anlegget må ikke tildekkes. Tilstrekkelig ventilasjon, med en minsteavstand på ca.
15 cm mellom ventilasjonsrillene og omliggende flater er nødvendig, for å forhindre
at anlegget blir for varm.
- Plasser ikke apparatet i et fuktig, støvete miljø eller der det forekommer sterke
vibrasjoner.
- Standby-bryteren på apparatets framside kobler ikke apparatet fra strømnettet.
For å gjøre apparatet helt strømløst, må stikkontakten trekkes ut fra strømuttaket.
- Langvarig eksponering av høy lyd fra headset/hodetelefoner, kan føre til kroniske
hørselsskader.
Norsk
Legg merke til følgende sikkerhetssymboler
C AU T I O N
RISK OF ELECTRIC SHOCK
LASER PRODUCT
Advarsel! Dekselet må ikke åpnes. Usynlig laserstråler som kan føre til øyeskader.
Rett ikke blikket mot strålen, og se ikke rett på den gjennom optiske instrumenter.
DO NOT OPEN
CLASS 1
KLASSE 1 LASERAPPARAT
Advarsel! Dekselet må ikke åpnes. Farlig
spenning ligger ubeskyttet på komponenter
under produktets deksel, og kontakt med
disse kan føre til brann eller gi elektrisk støt.
31
Page 32

Produktbeskrivelse
Hovedenhet
1
2
3
4
5
6
7
8
9
18
19
20
21
22
23
10
11
Norsk
12
13
14
15
16
17
30
31
32
33
24
25
26
27
28
29
34
35
36
32
37
Page 33

1. Lokk
19. Hodetelefonuttak (3,5 mm, stereo)
2. Display
3. Volum opp/ned
4. X-BASS – Ekstra kraftig
bassforsterking
5. Indikatorlampe for standby
6. DUBBING – Hastighetsvelger for
innspilling på kassettbåndspilleren
7. ON/STANDBY – Standbybryter
8. ■ – Stopper avspilling av cd/usb/sd
9. SOURCE – Velger musikkilde:
cd/usb/sd
10. CD/USB/SD, TAPE, TUNER, PHONO
– Funksjonsvelger: cd/usb/sd,
kassettband, radio eller LP-plate
11. I◄◄ – Trykk inn for å gå til foregående
spor/side for hurtigkobling bakover
12. REP/INTRO/RAN – Repetisjon/intro/
tilfeldig spilling av spor
13. ● REC – Innspillingsknapp for
cd/usb/sd
14. Kassettlokk
15. Kontroller for kassettdekk 1
a. ● – Starter innspilling
b. ► – Starter avspillingen
c. ◄◄ / ►► – Hurtigspoling
bakover/framover
d. ■▲ – Stopp/Åpne kassettlokk
e. II – Pause i avspillingen
16. Cd-luke
17. USB – Tilkoblingspunkt for usb-minne
20. IR-mottaker for fjernkontroll
21. TUNING – Frekvensvelger
22. ►II – Stopp eller pause avspilling av
cd/usb/sd
23. ▲ – Åpner/stenger cd-spilleren
24. AM/FM/FM-ST – Valg av bånd for radio
25. ►►I – Trykk inn for å gå til neste spor/
side eller hurtigkobling framover
26. FOLDER UP – Velger mappe ved
mp3-avspilling
27. Kassettlokk
28. Kontroller for kassettdekk 2
a. ► - Starter avspillingen
b. ◄◄ / ►► – Hurtigspoling
bakover/framover
c. ■▲ – Stopp/Åpne kassettlokk
d. II – Pause i avspillingen
29. SD/MMC - Tilkoblingspunkt for
minnekort
30. Singeladapter
31. Løftespake for arm
32. Omdreiningsomkobler 33/45-o/min
33. Pickupholder
34. FM-antenne
35. Tilkobling for høyttaler (høyre/venstre)
36. Omkobler for ”Auto stop”
37. Uttak for strømledning
Norsk
18. Indikator for FM-stereo
33
Page 34

Fjernkontroll
1. FIND – Søkefunksjon for spor og mapper
2. INFO – Informasjon om spor.
3. REC – Innspillingsknapp for cd/usb/sd
4. REP/INTRO/RAN – Repetisjon/intro/
tilfeldig avspilling
5. PROGRAM – Programmeringsknapp for
cd/usb/sd
6. ►II – Stopp eller pause avspilling av
cd/usb/sd
7. I◄◄ – Trykk inn for å gå til foregående spor/
side for hurtigkobling bakover
►►
Norsk
8. ■ – Stopper avspilling av cd/usb/sd
9. FOLDER ▲/▼ - Velger mappe for usb/sd/cd
10. SOURCE – Velger musikkilde: cd/usb/sd
11. VOLUME +/- – Volumkontroll
12. TS (Track Separation) – Deler opp en
I – Trykk inn for å gå til neste spor/side
eller hurtigkobling framover
(med mp3- eller wma-filer)
innspelning i flere filer
11
1 243
5
6
7
9
8
10
12
Tilkoblinger
Tilkobling av høyttalere
- Koble høyre og venstre høyttaler til høyre (R) og venstre (L) høyttalerutgang (35) på
apparatets bakside.
Tilkobling til strømnettet
1. Koble strømledningen til et vegguttak. Kontroller at spenningen (V), som er angitt på
merkeskiltet på baksiden av anlegget, er den samme som i ditt lokale strømnett (230 V
AC, 50 Hz). Spør forhandleren eller ett serviceverksted hvis dette ikke er tilfelle.
2. For å skru strømmen helt av, dra kontakten ut av vegguttaket. Dra også ut støpselet fra
vegguttaket ved kraftig tordenvær, for å beskytte anlegget.
34
Page 35

Bruk
Høre på radio
FM
1. Sett funksjonsvelgeren (10) på TUNER.
2. Sett båndvelgeren på FM (mono) eller FM-ST
3. Still inn ønsket frekvens med frekvensvelgeren (21).
4. Plasser trådantennen (34) på passende sted, slik at best mulige forhold mottas.
5. Juster volumet til ønsket nivå med volumkontrollen (3).
AM
1. Sett funksjonsvelgeren (10) på TUNER.
2. Still inn ønsket frekvens med frekvensvelgeren (21).
3. Juster volumet til ønsket nivå med volumkontrollen (3).
Tips for beste mulige mottak
AM: Anlegget har en innebygd antenne for AM-mottak. Mottak kan påvirkes ved å flytte
på apparatet.
FM: Plasser trådantennen (34) på passende sted, slik at best mulige forhold mottas.
Antennen bør være helt utrullet og utstrekt for best mottak.
(stereo).
Norsk
Høre på LP-plate
1. Fjern beskyttelsen på stiften ved å trekke den
rett ut som vist på bildet.
2. Sett funksjonsvelgeren (10) på PHONO for
å slå på platespilleren.
3. Plasser en plate på platetallerkenen. Noen singler har stort senterhull. De trenger
singleadapteren (30) for å kunne spilles.
4. Velg riktig hastighet for platen med omdreiningsomkobleren (32).
5. Løft og før pickupen over platen. Nå skal platetallerkenen begynne å snurre rundt.
6. Senk pickupen forsiktig ned på begynnelsen av ønsket spor.
7. Avspillingen har nå begynt. Juster volumet til ønsket nivå med volumkontrollen (3).
8. Løft armen tilbake til pickupholderen når avspillingen er avsluttet. Tallerken slutter
å snurre rundt.
35
Page 36

NB!
Noen plater har sluttindikasjonen utenfor platespillerens ”auto stop” – område. Dette med
fører at noen plater slutter å spille allerede før platens siste spor. Dette kan hindres ved at
du setter omkobleren ”Auto stop” (36) i OFF-posisjon.
Obs! Platen vil fortsette å snurre selv når det siste sporet er ferdig. For å stoppe platen, sett
omkobleren ”Auto stop” (36) på ON eller still funksjonsvelgeren (10) på PHONO.
Lytte på cd-plater
1. Sett funksjonsvelgeren (10) på CD/USB/SD.
2. Cd-lokket åpnes ved å trykke på [OPEN/CLOSE] (23).
3. Plasser en cd-plate (lydplate eller CD-R/CD-RW som inneholder MP3-filer), med
etiketten vendt oppover, i cd-luken.
4. Cd-lokket stenges ved å trykke på [OPEN/CLOSE] (23).
5. Etter en kort stund viser displayet det totale antallet spor på platen. Hvis platen
Norsk
inneholder mp3- eller wma-filer, kan man bla i mappene med FOLDER UP (26).
Bruk I◄◄ og ►►I for å velge ønsket spor i den valgte mappen.
6. Trykk på
7. For å stoppe avspillingen midlertidig, trykk på
blinker i displayet. Trykk på ►/II (22) for å starte avspillingen igjen.
8. For å stoppe avspillingen, trykk på
►/II (22) for å starte avspillingen. Det første sporet spilles av.
►II (22) igjen. Aktuelt spornummer
■ (8) og hold den inne.
Velg et annet spor
Under spilling eller i pauseposisjon kan man bruke I◄◄ eller ►►I (11, 25) for å velge et
annet spor.
1. Trykk kort en gang på
til det ønskede spornummeret vises i displayet.
2. Trykk kort en gang på
har spilt. Trykk kort flere ganger for å komme til tidligere spor.
►►I for å komme til neste spor, eller trykk gjentatte ganger
I◄◄ for å gå tilbake til begynnelsen av det sporet du nettopp
-
Finn et avsnitt i et spor
1. Trykk og hold inne I◄◄ eller ►►I for å søke et avsnitt i et spor. Sporet spilles nå med
høy hastighet og lavt volum.
2. Slipp knappen når du hører det avsnittet du søker. Den normale avspillingen fortsetter.
Anm.
- Lydkvaliteten på mp3-filer kan variere avhengig av platens og innspillingens kvalitet.
- Vanligvis tar det litt lenger tid å lese av en mp3-plate for spilling enn det tar å lese en
vanlig cd-plate.
36
Page 37

Vise navn på låter via fjernkontrollen
- Under spilling av en mp3-fil kan du trykke en gang på knappen [INFO] på fjernkontrollen
for å vise eller skjule id3-informasjonen om det aktuelle sporet.
- Dersom det ikke finnes informasjon tilgjengelig for det aktuelle sporet, vil i stedet teksten
”NOFILE” eller ”UNKNOWN” komme opp på displayet.
Å søke låt etter tittel via fjernkontrollen
Du kan søke en låt etter dens tittel/navn.
1. Når spillingen er stoppet, trykk en gang på knappen [FIND] på fjernkontrollen.
2. Bruk
3. Trykk på
I◄◄ og ►►I for å bla blant låtene i alfabetisk rekkefølge.
►/II (22) for å starte avspillingen av den valgte låten.
Søk katalog via fjernkontrollen
Du kan søke en katalog etter dens tittel/navn.
1. Når spillingen er stoppet, trykk to ganger på knappen
2. Bruk
3. Trykk på
▼ eller ▲ for å bla i mappene i alfabetisk rekkefølge.
►/II (22) for å starte avspillingen av den valgte mappen.
[FIND] på fjernkontrollen.
Repetert avspilling
- Trykk en eller gjentatte ganger på [REP/INTRO/RAND] (12) for å repetere et spor,
album/mappe (kun mp3) eller en hel plate.
Norsk
- Et symbol for repetert avspilling viser
hvilken type avspilling som er aktivert.
Avspilling i tilfeldig rekkefølge
- Trykk en eller gjentatte ganger på [REP/INTRO/RAND] for å aktivere tilfeldig avspilling.
”RAN” blinker i displayet når denne funksjonen er aktivert.
- Trykk på
tilfeldig avspilling.
[REP/INTRO/RAND] igjen eller på [■ STOP] for å deaktivere funksjonen for
Intro (spille starten på spor)
- For å spare tid når du søker etter en spesiell låt, spilles de 10 første sekundene av
låtene av.
- Trykk en eller gjentatte ganger på
intro-funksjonen aktivert. ”INTRO” vises i displayet når funksjonen er aktivert.
Anm. Displayet kan kun vise tegn/bokstaver fra det engelske alfabetet.
[REP/INTRO/RAND] for å starte avspillingen med
37
Page 38

Programmert avspilling via fjernkontrollen
Inntil 32 spor kan programmeres i valgfri rekkefølge.
1. Stopp avspillingen ved å trykke på
2. Trykk en gang på [PROGRAM] på fjernkontrollen. ”PROG”, programnummer samt
spornummer vises i displayet.
3. Bruk I◄◄ og ►►I for å velge det sporet som skal programmeres.
4. Bekreft med ett trykk på [PROGRAM]. Spornummeret blinker nå i displayet.
5. Repeter trinn 3 og 4 for å programmere flere spor.
6. Trykk på
programmert.
7. Trykk på
Spille av mp3- eller wma-filer fra ett minnekort/usb-minne
Norsk
Apparatet kan spille av mp3- og wma-filer fra et usb-minne eller et minnekort av typen sd
eller MMC.
1. Sett i et usb-minne/minneskort som vist på
bildet. Påse at du plasserer usb-minnet/
minnekortet riktig, så ikke kontakten blir
skadet. Sett alltid usb-minnet/minnekortet rett
inn uten å bøye på det.
2. Sett funksjonsomkobleren (10) i posisjon
USB/SD og trykk deretter på SOURCE (9)
for å velge kilde, usb (usb-minne) eller CARD
(minnekort). Displayet vil nå indikere valgt kilde,
type lydformat og det totale antall spor.
3. Etter en kort stund viser displayet det totale antallet låter på platen.
4. Trykk en eller flere ganger på [FOLDER] (26) for å velge den mappen du vil spille fra.
Navnet på mappen vises i displayet.
5. Bruk I◄◄ eller ►►I for å velge ønsket spor i den valgte mappen.
6. Trykk på
7. For å stoppe avspillingen midlertidig, trykk på
blinker i displayet. Trykk på ►/II (22) for å starte avspillingen igjen.
8. For å stoppe avspillingen, trykk på
►II (22) for å starte avspillingen i den rekkefølgen du nettopp har
■ (STOP) for å stoppe avspillingen og å rense programminnet.
►/II (22) for å starte avspillingen.
■ (STOP).
CD/
►/II (22) igjen. Aktuelt spornummer
■ (8) og hold den inne.
38
Page 39

Spille kassett
1. Sett funksjonsvelgeren (10) på CD/USB/SD.
2. Trykk på
3. Sett inn en innspilt kassett og lukk kassettluken.
4. Trykk på
5. Trykk på
Trykk på II igjen for å fortsette.
6. Ved å trykke på
7. Trykk på
båndet er ferdigspilt, hvis ikke II (PAUSE)-knappen er inntrykt.
Innspilling til kassettbånd
Allmenn informasjon om innspilling
- Innspilling er tillatt så lenge den ikke bryter med opphavsretten eller andre rettigheter
som innehas av tredje part.
- Det beste nivået for innspilling stilles inn automatisk. Du kan ikke påvirke en pågående
innspilling med VOLUM- og X-BASS-kontrollene. I 7 sekunder helt i begynnelsen og
slutten av båndet, når lederbåndet passerer innspillingshodene, skjer ingen innspilling.
- For å beskytte et bånd fra å slettes ved en feiltakelse, kan du bryte av en eller begge
plastflikene på undersiden av båndet. Det er nå umulig å spille inn på den siden der
fliken er fjernet. Dersom hullene, som ble dekket av flikene teipes igjen, kan du igjen
spille inn på båndet.
■▲ (STOP/EJECT) for å åpne kassettluken.
► (PLAY) for å starte avspillingen.
II (PAUSE) dersom du vil avbryte spillingen midlertidig.
◄◄ eller ► kan du spole båndet raskt bak- eller framover.
■▲ (STOP/EJECT) for å stoppe båndet. Knappene frigjøres automatisk når
Norsk
Innspilling fra radio til kassett
1. Sett funksjonsvelgeren (10) på TUNER.
2. Velg AM eller FM med båndvelgeren for radio (24).
3. Trykk på
avspilles og steng luken.
4. Trykk inn både
5. Trykk på
Trykk på
6. Trykk på
■▲ (STOP/EJECT) for å åpne kassettluke 1, legg i den kassetten som skal
● (RECORD) og ► (PLAY) samtidig for å starte innspillingen.
II (PAUSE)hvis du ønsker å stoppe innspillingen midlertidig.
II (PAUSE) igjen for å fortsette innspillingen.
■▲ for å avslutte innspillingen.
39
Page 40

Innspilling av kassett til kassett
OBS! Du kan velge innspillingshastighet ved å trykke på [DUBBING] (6).
1. Sett funksjonsvelgeren (10) på
2. Trykk på
spilles inn på her og steng luken.
3. Trykk på
kopieres på her og steng luken.
4. Trykk på
► (PLAY) samtidig for å starte innspillingen.
5. Trykk på
Trykk på II (PAUSE) igjen for å fortsette innspillingen.
6. Trykk på
Innspilling fra cd/usb/minnekort til kassett
Norsk
1. Sett funksjonsvelgeren (10) på CD/USB/SD.
2. Trykk på
spilles inn på her og steng luken.
3. Start avspillingen fra den valgte kilden (cd, usb-minne eller minnekort).
4. Trykk inn både
5. Trykk på
Trykk på II (PAUSE) igjen for å fortsette innspillingen.
6. Trykk på
■▲ (STOP/EJECT) for å åpne kassettluke 1, legg i den kassetten som det skal
■▲ (STOP/EJECT) for å åpne kassettluke 2, legg i den kassetten som skal
► (PLAY) på kassettdekk 2 og trykk deretter inn både ● (RECORD) og
II (PAUSE) hvis du ønsker å stoppe innspillingen midlertidig.
■▲ for å avslutte innspillingen.
■▲ (STOP/EJECT) for å åpne kassettluke 1, legg i den kassetten som det skal
● (RECORD) og ►(PLAY) samtidig for å starte innspillingen.
II (PAUSE) hvis du ønsker å stoppe innspillingen midlertidig.
■▲ for å avslutte innspillingen.
TAPE.
Innspilling fra LP-plate til kassett
1. Sett funksjonsvelgeren (10) på PHONO.
2. Trykk på
spilles inn på her og steng luken.
3. Start avspilling fra platespilleren.
4. Trykk inn både
5. Trykk på
Trykk på II (PAUSE) igjen for å fortsette innspillingen.
6. Trykk på
■▲ (STOP/EJECT) for å åpne kassettluke 1, legg i den kassetten som det skal
● (RECORD) og ► (PLAY) samtidig for å starte innspillingen.
II (PAUSE) hvis du ønsker å stoppe innspillingen midlertidig.
■▲ for å avslutte innspillingen.
40
Page 41

Spille inn til mp3 på usb-minne eller minnekort
Spille inn fra CD til MP3
Forberedelser
- Plasser et usb-minne i usb-tilkoblingspunktet eller et minnekort i minnekorttilkoblingen.
OBS! Hvis det sitter både et usb-minne og et minnekort i musikkanlegget velges
automatisk usb-minnet som lagringsplass.
- Sett funksjonsomkobleren (10) i posisjon CD/USB/SD og legg i den cd-platen
du vil spille.
Spille inn en låt
1. Start avspillingen av det sporet på cd-platen, som du vil spille inn.
2. Trykk deretter på
3. Innspillingen stopper automatisk når sporet/låten er ferdig innspilt.
[REC] (13) for å starte innspillingen.
Spille inn en hel plate
1. Trykk på
2. Innspillingen stopper når hele platen er ferdig spilt. Apparatet deler automatisk opp
sporene på usb-minnet/minnekortet.
Spille inn programmerte låter
1. Følg instruksjonene for programmert avspilling ovenfor.
2. Trykk på
3. Under avspillingen, trykk og hold inne
4. Innspillingen stopper automatisk når programmet er ferdig innspilt.
[REC] (13) for å starte innspillingen.
►/II (22) for å starte avspillingen.
[REC] (13) i 2 sekunder. Innspillingen starter.
Spille inn fra platespilleren til mp3
Forberedelser
- Plasser et usb-minne i usb-tilkoblingspunktet eller et minnekort i minnekorttilkoblingen.
- Sett funksjonsomkobleren (15) i posisjon PHONO og legg på den platen du vil
spille inn fra.
Spille inn ett spor eller en hel plate
1. Start avspillingen av det eller de spor på LP-platen som du vil spille inn på usb-minnet/
minnekortet.
2. Trykk deretter på
mp3-fil til innspillingen avbrytes manuelt.
[REC] (13) for å starte innspillingen. Samtlige spor lagres om en hel
Norsk
41
Page 42

3. For å dele opp en innspilling i flere filer, gjør som følger: Trykk en gang på TS (på
fjernkontrollen) for å legge inn en pause og lag deretter en ny fil der det neste sporet
spilles inn. Gjør på samme måte på alle steder der du ønsker å dele opp innspillingen.
For hver gang en ny fil lages vil ”PHONO”blinke en gang på skjermen. Obs! Dette må
gjøres under innspillingen.
4. Når du har spilt inn ønsket spor, trykk og hold inne
[REC] (13) for å stoppe innspillingen.
Spille inn fra kassettbånd til mp3
Forberedelser
- Plasser et usb-minne i usb-tilkoblingspunktet eller et minnekort i minnekorttilkoblingen.
- Sett funksjonsomkobleren (15) i posisjon
Spille inn ett spor eller en hele kassetten
1. Start avspillingen av det eller de spor på LP-platen som du vil spille inn på usb-minnet/
Norsk
minnekortet.
2. Trykk deretter på
mp3-fil til innspillingen avbrytes manuelt.
3. For å dele opp en innspilling i flere filer, gjør som følger: Trykk en gang på TS (på
fjernkontrollen) for å legge inn en pause og lag deretter en ny fil der det neste sporet
spilles inn. Gjør på samme måte på alle steder der du ønsker å dele opp innspillingen.
For hver gang en ny fil lages vil ”PHONO” blinke en gang på skjermen. Obs! Dette må
gjøres under innspillingen.
4. Når du har spilt inn ønsket spor, trykk og hold inne
[REC] (13) for å starte innspillingen. Samtlige spor lagres om en hel
TAPE og legg på den platen du vil spille inn fra.
[REC] (13) for å stoppe innspillingen.
Kopiering fra usb-minne til minnekort og vice versa
Obs! Kopiering av mp3-filer fungerer kun hvis man kopierer hele filen (låten). Man kan altså
ikke spille inn deler av en låt.
Forberedelser
- Plasser et usb-minne i usb-tilkoblingspunktet eller et minnekort i minnekorttilkoblingen.
- Sett funksjonsvelgeren (10) på
Eksemplet nedenfor beskriver innspilling fra minnekort til usb-minne.
a) Spille inn en låt
1. Start avspillingen av det sporet på minnekortet, som du vil spille inn på usb-minnet.
2. Trykk deretter på
3. Når låten er ferdig kopiert avbrytes avspillingen automatisk.
[REC] (13) for å starte innspillingen.
CD/USB/SD.
42
Page 43

b) Spille inn alle låtene
1. Velg sd-modus med SOURCE-knappen og sett inn det minnekortet du ønsker
å kopiere.[REC] (13)
2. Når all informasjonen på kortet er innlest, trykk på [REC] (13) for å starte innspillingen.
Displayet viser
3. Når minnekortet er ferdig kopiert avbrytes innspillingen automatisk.
og når kopieringen pågår.
Still innspillingskvaliteten via fjernkontrollen
Kvaliteten på innspillingen til mp3 kan stilles inn på mellom 32 og 256 Kbps.
Høyere innspillingskvalitet innebærer også større filstørrelse.
1. Sett funksjonsvelgeren (10) på
2. Trykk knappen på
3. Bruk
I◄◄ og ►►I for å velge innspillingskvalitet. Bekreft med ett trykk på [INFO]
[INFO] på fjernkontrollen. Displayet viser innstilt innspillingskvalitet.
PHONO.
Slette filer
Slette en enkel fil
1. Sett funksjonsvelgeren (10) på CD/USB/SD og velg USB eller SD med
[SOURCE]-knappen.
2. Hold INFO inne på fjernkontrollen i ca. 3 sek. Displayet viser ”DEL --- 001”.
3. Bruk I◄◄ eller ►►I for å bla i filene.
4. Trykk på [REC] for å velge den filen du vil slette. Displayet viser ”YES NO”.
5. Trykk på
med REC.
I◄◄ eller ►►I for å velge ”YES” eller ”NO” og å bekreft deretter slettingen
Norsk
Slette alle filer
1. Sett funksjonsvelgeren (10) på CD/USB/SD og velg USB eller SD med [SOURCE]knappen.
2. Hold
3. Hold
4. Trykk på I
[INFO] inne på fjernkontrollen i ca. 3 sek. Displayet viser ”DEL --- 001”.
[INFO] på fjernkontrollen inne igjen. Displayet viser ”FORMAT? Y/N”.
◄◄ eller ►►I for å velge ”YES” eller ”NO” og å bekreft deretter slettingen
med [REC].
43
Page 44

Stell og vedlikehold
Trekk ut støpselet og tørk deretter apparatet med en myk klut og ev. et mildt rengjøringsmiddel, ved behov. Bruk aldri slipende rengjøringsmidler eller løsemidler.
Avfallshåndtering
Når produktet skal kasseres, må det skje i henhold til lokale forskrifter. Ved usikkerhet, ta
kontakt med de lokale myndighetene.
Spesifikasjoner
Strømforsyning 230 V AC, 50 Hz
Batteritype, fjernkontroll 2 x AAA/LR03
Omdrein./min. platespiller 33/45 o/min.
Størrelse, hovedenhet 305 x 415 x 375 mm
Norsk
Størrelse, høyttalere 200 x 360 x 195 mm
44
Page 45

Ministereot ja levysoitin
Tuotenumero 38-3407 Malli HF-618AE
Lue käyttöohjeet ennen tuotteen käyttöönottoa. Säilytä käyttöohjeet tulevaa tarvetta varten.
Pidätämme oikeuden teknisten tietojen muutoksiin. Emme vastaa mahdollisista teksti- tai
kuvavirheistä. Jos laitteeseen tulee teknisiä ongelmia, ota yhteys myymälään tai asiakaspalveluun (yhteystiedot käyttöohjeen lopussa).
Turvallisuus
- Laitteen saa korjata vain valtuutettu huoltoliike.
- Älä pura tai muuta laitetta.
- Älä sijoita laitetta sellaiseen paikkaan, josta se voi tippua veteen tai muuhun nesteeseen.
Älä pane laitteen päälle nesteitä sisältäviä esineitä, kuten maljakoita tai virvoitusjuomapulloja.
- Varmista, että se pistorasia, mihin laite on liitetty, on helposti ulottuvilla, koska laitteen
pistoketta käytetään liittämään ja irrottamaan laite verkkovirrasta.
- Älä peitä laitetta. Riittävä ilmastointi (vähintään 15 cm ilmastointiaukon ja ympäröivän
pinnan välillä) on välttämätön, jotta laitteen ylikuumeneminen estetään.
- Älä käytä laitetta kosteissa tai pölyisissä tiloissa tai paikoissa, joissa siihen kohdistuu
voimakasta värähtelyä.
- Valmiustilan valintakytkimellä ei voi erottaa laitetta verkkovirrasta. Irrota laite kokonaan
sähköverkosta irrottamalla laitteen verkkojohto pistorasiasta.
- Älä kuuntele kuulokkeista kovaäänistä musiikkia pitkäkestoisesti, se voi
vahingoittaa kuuloasi.
Suomi
Huomioi seuraavat turvallisuussymbolit
C AU T I O N
RISK OF ELECTRIC SHOCK
LASER PRODUCT
Varoitus! Älä avaa laitteen koteloa! Näkymätön lasersäde voi aiheuttaa silmävaurioita.
Älä katso säteeseen edes optisten instrumenttien läpi.
DO NOT OPEN
CLASS 1
LUOKAN 1 LASERLAITE
Varoitus! Älä avaa laitteen koteloa! Kotelon
sisällä on vaarallista jännitettä sisältäviä
suojaamattomia komponentteja, jotka voivat
aiheuttaa sähköiskun.
45
Page 46

Tuotekuvaus
Päälaite
1
2
3
4
5
6
7
8
9
18
19
20
21
22
23
10
11
12
13
14
15
Suomi
16
17
30
31
32
33
24
25
26
27
28
29
34
35
36
46
37
Page 47

1. Kansi
19. Kuulokeliitäntä (3,5 mm stereo)
2. Näyttö
3. Äänenvoimakkuuden lisäys/
vähennys
4. X-BASS – Lisäbasso
5. Standby-tilan merkkivalo
6. DUBBING – Kasettisoittimen
nauhoituksen nopeudenvalitsin
7. ON/STANDBY – Standby-valitsin
8. ■ – Cd/usb/sd:n toiston keskeytys
9. [SOURCE] – Äänilähteen valinta: cd/
usb/sd
10. CD/USB/SD, TAPE, TUNER, PHONO
– Toiminnonvalitsin: cd/usb/sd,
kasettisoitin, radio ja LP-levy
11. I◄◄ – Edellinen raita/pikakelaus
taaksepäin painamalla pitkään
12. REP/INTRO/RAN – Uudelleentoisto/
Intro/Satunnaistoisto
13. ● REC – Cd/usb/sd:n tallennuspainike
20. Infrapunatunnistin kaukosäädintä
varten
21. TUNING – Taajuuden valitsin
22. ►II – Cd/usb/sd:n toiston aloitus tai
keskeytys
23. ▲ – Cd-lokeron avaus/sulkeminen
24. AM/FM/FM-ST – Radion
taajuusaluevalitsin
25. ►►I – Seuraava raita/pikakelaus
eteenpäin painamalla painiketta pitkään
26. FOLDER UP – Kansion valinta
mp3-toiston aikana
27. Kasettilokero
28. Kasettipesän 2 toiminnot
a. ► – Toiston aloitus
b. ◄◄ / ►► – Pikakelaus taaksepäin/
eteenpäin
c. ■▲ – Pysäytys/Kasettilokeron avaus
d. II – Toiston keskeytys
29. SD/MMC – Muistikorttiliitäntä
Suomi
14. Kasettilokero
15. Kasettipesän 1 toiminnot
a. ● – Nauhoituksen aloitus
b. ► – Toiston aloitus
c. ◄◄ / ►► – Pikakelaus
taaksepäin/eteenpäin
d. ■▲ – Pysäytys/Kasettilokeron
avaus
e. II – Toiston keskeytys
16. Cd-lokero
17. USB – USB-muistiliitäntä
18. FM stereo -merkkivalo
30. Levysovitin
31. Äänivarren nostovipu
32. Kierroslukuvalitsin 33/45 kierr./min
33. Äänivarrenpidike
34. FM-antenni
35. Kaiutinliitännät (oikea/vasen)
36. ”Auto stop”-kytkin
37. Verkkojohdon liitäntä
47
Page 48

Kaukosäädin
1. FIND – Kappaleiden nimien ja kansioiden
hakutoiminto
2. INFO – Lisätietoja kappaleesta
3. REC – Cd/usb/sd:n tallennuspainike
4. REP/INTRO/RAN – Uudelleentoisto/Intro/
Satunnaistoisto
5. PROGRAM – Cd/usb/sd:n ohjelmointipainike
6. ►II – Cd/usb/sd:n toiston aloitus tai keskeytys
7. I◄◄ – Edellinen raita/pikakelaus taaksepäin
painamalla pitkään.
►►I – Seuraava raita/pikakelaus eteenpäin
painamalla pitkään
8. ■ – Cd/usb/sd:n toiston keskeytys
9. FOLDER
toistossa (mp3- tai wma-tiedostot)
10. [SOURCE] – Äänilähteen valinta: cd/usb/sd
11. VOLUME +/- – Äänenvoimakkuuden
lisääminen ja vähentäminen
Suomi
12. TS (Track Separation) – Tallennuksen
jakaminen useaan tiedostoon
▲/▼ - Kansion valinta usb/sd/cd-
11
1 243
5
6
7
9
8
10
12
Liitännät
Kaiuttimien asennus
- Liitä oikea ja vasen kaiutin oikeaan (R) ja vasempaan (L) ääniliitäntään (35)
laitteen takaosassa.
Sähköverkkoon liittäminen
1. Liitä virtajohdon pistoke verkkopistorasiaan. Varmista, että laitteen takaosan arvokilpeen
merkitty jännite (V) on sama, kuin sähköverkkosi jännite (230 V AC 50 Hz). Jos jännite
on eri, kysy neuvoa myyjältä tai alan ammattilaiselta.
2. Katkaise laitteesta virta kokonaan irrottamalla pistoke pistorasiasta. Irrota pistoke
pistorasiasta myös voimakkaalla ukonilmalla.
48
Page 49

Käyttö
Radion kuuntelu
FM
1. Aseta toimintovalitsin [10] asentoon TUNER.
2. Aseta radion taajuusaluevalitsin asentoon
3. Valitse taajuus taajuusvalitsimella (21).
4. Sijoita lanka-antenni (34) siten, että saavutat parhaan kuuluvuuden.
5. Säädä äänenvoimakkuus valitsimella (3).
AM
1. Aseta toimintovalitsin [10] asentoon TUNER.
2. Valitse taajuus taajuusvalitsimella (21).
3. Säädä äänenvoimakkuus valitsimella (3).
Vinkkejä hyvään vastaanottoon
AM: Laitteessa on sisäinen antenni AM-vastaanottoon. Vastaanottoa voidaan parantaa
laitetta siirtämällä.
FM: Sijoita lanka-antenni (34) siten, että saavutat parhaan kuuluvuuden. Antenni on oiottava
kokonaan, jotta kuuluvuus olisi paras mahdollinen.
FM (mono) tai FM-ST (stereo).
Suomi
LP-levyjen kuuntelu
1. Poista neulasuoja äänivarresta vetämällä
neulasuojaa suoraan ulospäin kuvan mukaisesti.
2. Laita levysoitin päälle asettamalla
toimintovalitsin (10) asentoon PHONO.
3. Aseta levy levylautaselle. Joissakin 45 kierroksen levyissä on suuri keskireikä, ja ne
tarvitsevat levysovittimen (30).
4. Valitse oikea soittonopeus valitsimella (32) levyn mukaan.
5. Nosta ja siirrä äänivarsi levyn päälle. Levylautanen alkaa pyöriä.
6. Laske äänivarsi varovasti halutun raidan alkuun.
7. Levyn toisto alkaa. Säädä äänenvoimakkuus valitsimella (3).
8. Sijoita äänivarsi telineeseen, kun haluat lopettaa toiston. Levylautanen
lopettaa pyörimisen.
49
Page 50

Huom.!
Joissakin levyissä on lopetusmerkki ennen ”auto stop”-aluetta. Tämä tarkoittaa, että jotkin
levyt lopettavat soittamisen ennen viimeistä kappaletta. Tämä voidaan estää kytkemällä
”Auto stop”-valitsin (36) asentoon
Huom.! Levysoitin jatkaa pyörimistä viimeisen kappaleen loppumisen jälkeenkin. Kytke
tällöin ”Auto stop”-valitsin (36) asentoon ON tai aseta toimintovalitsin (10) johonkin muuhun
asentoon kuin PHONO.
OFF.
Cd-levyjen kuuntelu
1. Aseta toimintovalitsin (10) asentoon CD/USB/SD.
2. Avaa cd-lokero painamalla [OPEN/CLOSE](23).
3. Aseta cd-levy (audiolevy tai MP3-tiedostoja sisältävä CD-R/CD-RW-levy) cd-lokeroon
kuvapuoli ylöspäin.
4. Sulje cd-lokero painamalla [OPEN/CLOSE] (23).
5. Näytölle ilmestyy pian levyn raitojen kokonaismäärä. Jos levy sisältää mp3- tai
wma-tiedostoja, voit selata kansioita painikkeella [FOLDER UP] [26]. Valitse kansiosta
toistettava raita painikkeilla I◄◄ tai ►►I.
6. Aloita toisto painamalla
7. Keskeytä toisto väliaikaisesti painamalla uudestaan
vilkkuu näytöllä. Jatka toistoa painamalla vielä kerran ►/II (22).
Suomi
8. Lopeta toisto kokonaan painamalla pitkään
►/II (22). Soitin aloittaa toiston ensimmäisestä raidasta.
►II (22). Pysäytetyn raidan numero
■ (8).
Raidan valitseminen
Toiston tai tauon aikana voit valita toisen raidan painamalla I◄◄ tai ►►I (11, 25).
1. Siirry seuraaviin raitoihin painamalla nopeasti
haluamasi raidan numero näkyy näytöllä.
2. Siirry toistettavan raidan alkuun painamalla nopeasti
painamalla painiketta nopeasti useita kertoja.
►►I kerran tai useammin, kunnes
I◄◄. Siirry edellisiin raitoihin
Raidan tietyn kohdan hakeminen
1. Etsi raidan kohta painamalla I◄◄ tai ►►I. Cd-levyä toistetaan nopeasti ja
äänenvoimakkuus on pieni.
2. Päästä painike, kun olet päässyt haluamaasi kohtaan. Normaali toisto jatkuu.
Huom.
- Mp3-tiedostojen äänen laatu saattaa vaihdella tallennuksen tai levyn laadusta riippuen.
- Tavallisesti laite tunnistaa mp3-tiedostoja sisältävän levyn hitaammin kuin tavallisen
cd-levyn.
50
Page 51

Kappaleen nimen näyttö (kaukosäätimellä)
- Näytä tai piilota mp3-raidan ID3-tiedot painamalla kaukosäätimen [INFO]-painiketta
toiston aikana.
- Jos raidan tietoja ei ole saatavilla, näytöllä lukee ”NOFILE” tai ”UNKNOWN”.
Haku raidan nimellä (kaukosäätimellä)
Voit hakea kappaleita nimen mukaan.
1. Paina pysäytystilassa kaukosäätimen
2. Selaa raitoja aakkosjärjestyksessä näppäimillä
3. Aloita valitun raidan toisto painamalla
[FIND]-painiketta kerran.
I◄◄ ja ►►I.
►II (22).
Haku kansion nimellä (kaukosäätimellä)
Voit hakea kansioita nimen mukaan.
1. Paina kaukosäätimen
2. Selaa kansioita aakkosjärjestyksessä näppäimillä
3. Aloita valitun kansion raitojen toisto painamalla
[FIND]-painiketta kaksi kertaa pysäytystilassa.
▼ ja ▲.
►II (22).
Jatkuva toisto
- Paina [REP/INTRO/RAND] (12) kerran tai useasti, kun haluat uudelleentoistaa raidan,
albumin/katalogin (mp3) tai koko levyn.
- Uudelleentoiston symboli
näyttää valitun toistotavan.
Suomi
Satunnainen toisto
- Aloita satunnaistoisto painamalla [REP/INTRO/RAN] kerran tai useasti.
Satunnaistoiston ollessa aktivoituna näytöllä vilkkuu ”RAN”.
- Lopeta satunnaistoisto painamalla [REP/INTRO/RAN] tai [
■ STOP].
Intro (jokaisen raidan alun toisto)
- Säästä aikaa ja kuuntele jokaisen raidan 10 ensimmäisen sekunnin toisto.
- Paina [REP/INTRO/RAND] kerran tai useasti, kun haluat aktivoida introtoiston.
Introtoiston ollessa aktivoituna näytöllä lukee ”INTRO”.
Huom. Näytöllä näkyvät vain englanninkieliset kirjainmerkit.
51
Page 52

Ohjelmoitu toisto (kaukosäätimellä)
Soitin voidaan ohjelmoida toistamaan jopa 32 raitaa halutussa järjestyksessä.
1. Lopeta toisto painamalla [
2. Paina kerran kaukosäätimen [PROGRAM]-painiketta. Näytöllä näkyy ”PROG”,
ohjelmanumero ja raidan numero.
3. Valitse ohjelmoitava raita painikkeilla
4. Vahvista painamalla kerran [PROGRAM]. Raidan numero vilkkuu näytöllä.
5. Toista kohdat 3 ja 4 muiden raitojen ohjelmoimiseksi.
6. Aloita ohjelmoitu toisto painamalla
7. Lopeta toisto ja poista ohjelmointi painamalla
■] STOP.
I◄◄ ja ►►I.
►II (22).
■ STOP.
Mp3- tai wma-tiedostojen toistaminen muistikortilta
tai usb-muistilta
Laite toistaa mp3- ja WMA-tiedostoja USB-muistilta tai SD-/MMC-muistikortilta.
1. Aseta usb-muisti/muistikortti laitteeseen
kuvan mukaisesti. Varmista, että usb-muisti/
muistikortti on oikein päin, jotta kontakti ei
vahingoitu. Työnnä usb-muisti/muistikortti
Suomi
suoraan ja taivuttamatta.
2. Säädä toimintovalitsin (10) CD/USB/SDtilaan ja paina [SOURCE] (9). Valitse USB
(USB-muisti) tai CARD (muistikortti). Näytöllä
näkyy valittu lähde, äänisuhde ja raitojen
kokonaismäärä.
3. Näytölle ilmestyy pian levyn raitojen kokonaismäärä.
4. Valitse haluamasi kansio painamalla [FOLDER] (26) kerran tai useasti.
Kansion nimi näkyy näytöllä.
5. Valitse toistettava raita painikkeilla
6. Aloita toisto painamalla
7. Keskeytä toisto väliaikaisesti painamalla uudestaan
vilkkuu näytöllä. Jatka toistoa painamalla vielä kerran ►/II (22).
8. Lopeta toisto kokonaan painamalla pitkään
►/II (22).
I◄◄ tai ►►I.
►II (22). Pysäytetyn raidan numero
■ (8).
52
Page 53

Kasettien soittaminen
1. Aseta toimintovalitsin (10) asentoon CD/USB/SD.
2. Avaa kasettilokero painamalla
3. Aseta lokeroon kasetti ja sulje lokero.
4. Aloita toisto painamalla
5. Keskeytä toisto tilapäisesti painamalla
■▲ (STOP/EJECT) -painiketta.
► (PLAY) -painiketta.
II (PAUSE). Jatka toistoa painamalla uudelleen II.
6. Painamalla
7. Pysäytä kasetti painamalla ■▲(STOP/EJECT)-painiketta. Painikkeet vapautuvat
automaattisesti nauhan loputtua, mikäli II (PAUSE) ei ole painettuna.
◄◄ tai ►► voit pikakelata kasettia eteen- ja taaksepäin.
Nauhoittaminen kasetille
Yleistä tietoa tallennuksesta
- Tallentaminen on sallittua, ellei se riko tekijänoikeuksia tai muita kolmannen
osapuolen oikeuksia.
- Äänenvoimakkuus on automaattisesti oikea tallennettaessa. Ääneen ei voi vaikuttaa
nauhoituksen aikana äänenvoimakkuus- ja X-BASS-näppäimillä. Nauhan alussa ja
lopussa on 7 sekunnin pätkä, jonka päälle ei voi nauhoittaa.
- Voit varmistaa, ettei kasetin päälle tallenneta vahingossa murtamalla toisen tai
molemmat muovikielekkeet kasetin alaosasta. Poistetun kielekkeen puolelle ei voi
tallentaa. Jos peität reiän teipillä, voit taas nauhoittaa kasetille.
Tallentaminen radiosta kasetille
1. Aseta toimintovalitsin [ 10 ] asentoon TUNER.
2. Valitse
3. Avaa kasettipesä 1 painamalla
4. Aloita tallennus painamalla
5. Keskeytä tallennus hetkeksi painamalla II
6. Lopeta tallennus painamalla
AM tai FM radion taajuusaluevalitsimella (24).
■▲ (STOP/EJECT). Aseta pesään kasetti, johon haluat
nauhoittaa, ja sulje luukku.
● (RECORD) ja ► (PLAY) yhtä aikaa.
(PAUSE) -painiketta. Jatka tallennusta
painamalla uudelleen II.
■▲.
Suomi
53
Page 54

Tallentaminen kasetilta toiselle
HUOM.! Voit vaihtaa tallennusnopeutta painamalla [DUBBING] [6].
1. Aseta toimintovalitsin [ 10 ] asentoon
2. Avaa kasettipesä 1 painamalla
nauhoittaa, ja sulje luukku.
3. Avaa kasettipesä 2 painamalla
kopioida, ja sulje luukku.
4. Paina kasettipesän 2
► (PLAY) , niin tallennus alkaa.
5. Keskeytä tallennus hetkeksi painamalla
painamalla uudelleen II.
6. Lopeta tallennus painamalla
► (PLAY) -painiketta ja paina sitten yhtä aikaa ● (RECORD) ja
■▲.
TAPE.
■▲ (STOP/EJECT). Aseta pesään kasetti, johon haluat
■▲ (STOP/EJECT). Aseta pesään kasetti, jonka haluat
II (PAUSE) -painiketta. Jatka tallennusta
Tallentaminen cd:ltä/usb:ltä/muistikortilta kasetille
1. Aseta toimintovalitsin (10) asentoon CD/USB/SD.
2. Avaa kasettipesä 1 painamalla
nauhoittaa, ja sulje luukku.
3. Aloita valitun äänilähteen (cd, usb-muisti, muistikortti) toisto.
4. Aloita tallennus painamalla
Suomi
5. Keskeytä tallennus hetkeksi painamalla
painamalla uudelleen II.
6. Lopeta tallennus painamalla
■▲ (STOP/EJECT). Aseta pesään kasetti, johon haluat
● (RECORD) ja ► (PLAY) yhtä aikaa.
II (PAUSE) -painiketta. Jatka tallennusta
■▲.
Tallennus LP-levyltä kasetille
1. Aseta toimintovalitsin (10) asentoon PHONO.
2. Avaa kasettipesä 1 painamalla
nauhoittaa, ja sulje luukku.
3. Aloita LP-levyn toisto.
4. Aloita tallennus painamalla
5. Keskeytä tallennus hetkeksi painamalla
painamalla uudelleen II.
6. Lopeta tallennus painamalla
■▲ (STOP/EJECT). Aseta pesään kasetti, johon haluat
● (RECORD) ja ► (PLAY) yhtä aikaa.
II (PAUSE) -painiketta. Jatka tallennusta
■▲.
54
Page 55

Mp3:n tallennus USB-muistille tai muistikortille
Tallennus cd-levyltä mp3-muotoon
Esivalmistelut
- Liitä usb-muisti usb-liitäntään tai muistikortti muistikorttiliitäntään.
stereoissa on yhtäaikaisesti usb-muisti ja muistikortti liitettynä, laite valitsee usb-muistin
automaattisesti tallennuspaikaksi.
- Aseta toimintovalitsin (10) asentoon
haluat tallentaa.
Yhden kappaleen tallennus
1. Aloita cd-levyltä tallennettavan raidan toisto.
2. Aloita tallennus painamalla
3. Tallennus lakkaa automaattisesti raidan lopussa.
Koko levyn tallennus
1. Aloita tallennus painamalla
2. Tallennus päättyy levyn lopussa. Laite muuttaa USB-muistiin/muistilevylle tallennetut
kappaleet automaattisesti erillisiksi tiedostoiksi.
Ohjelmoitujen kappaleiden tallennus
1. Noudata yllä olevia ohjeita ohjelmoidusta toistosta.
2. Aloita toisto painamalla
3. Paina toiston aikana
4. Tallennus lakkaa automaattisesti, kun ohjelmointi on lopussa.
[REC] (13).
[REC] (13).
►/II (22).
[REC] (13) kahden sekunnin ajan. Tallennus alkaa.
CD/USB/SD ja aseta cd-lokeroon cd-levy, jolta
HUOM.! Jos
Suomi
Tallennus levysoittimelta mp3-muotoon
Esivalmistelut
- Liitä usb-muisti usb-liitäntään tai muistikortti muistikorttiliitäntään.
- Aseta toimintovalitsin (15)
haluat tallentaa.
Yhden raidan tai koko levyn tallennus
1. Aloita usb-muistiin/muistikortille tallennettavan/tallennettavien LP-levyn raitojen toisto.
2. Aloita tallennus painamalla
kunnes keskeytät tallennuksen.
PHONO-asentoon ja aseta levylautaselle levy, jolta
[REC] (13). Kaikki raidat tallentuvat yhdeksi mp3-tiedostoksi,
55
Page 56

3. Jos haluat jakaa tallennetut raidat useammiksi tiedostoiksi, toimi seuraavasti: Syötä
tauko ja luo uusi tiedosto, johon seuraava raita tallentuu painamalla kerran [TS]
(kaukosäätimestä). Tee samalla tavalla kaikissa niissä kohdissa, joissa haluat luoda
uuden tiedoston. Joka kerta kun luot uuden tiedoston, vilkkuu teksti ”PHONO” kerran
näytöllä. Huom.! Raidat voi jakaa erillisiksi tiedostoiksi ainoastaan tallennuksen aikana.
4. Keskeytä tallennus painamalla [REC] (13), kun olet tallentanut haluamasi raidan tai raidat.
Tallennus kasetilta mp3-muotoon
Esivalmistelut
- Liitä usb-muisti usb-liitäntään tai muistikortti muistikorttiliitäntään.
- Aseta toimintovalitsin (15)
haluat tallentaa.
Yhden raidan tai koko kasetin tallennus
1. Aloita usb-muistiin/muistikortille tallennettavan/tallennettavien kasetin raitojen toisto.
2. Aloita tallennus painamalla
kunnes keskeytät tallennuksen.
3. Jos haluat jakaa tallennetut raidat useammiksi tiedostoiksi, toimi seuraavasti: Syötä
tauko ja luo uusi tiedosto, johon seuraava raita tallentuu painamalla kerran
(kaukosäätimestä). Tee samalla tavalla kaikissa niissä kohdissa, joissa haluat luoda
uuden tiedoston. Joka kerta kun luot uuden tiedoston, vilkkuu teksti ”PHONO” kerran
Suomi
näytöllä. Huom.! Raidat voi jakaa erillisiksi tiedostoiksi ainoastaan tallennuksen aikana.
4. Keskeytä tallennus painamalla
tai raidat.
TAPE-asentoon ja aseta kasettipesään kasetti, jolta
[REC] (13). Kaikki raidat tallentuvat yhdeksi mp3-tiedostoksi,
[REC] (13), kun olet tallentanut haluamasi raidan
[TS]
Tallennus usb-muistilta muistikortille ja päin vastoin
Huom.! Mp3-tiedostojen kopiointi toimii ainoastaan, jos kopioidaan koko tiedosto (kappale).
Kappaleesta ei siis voi tallentaa vain osia.
Esivalmistelut
- Liitä usb-muisti usb-liitäntään ja muistikortti muistikorttiliitäntään.
- Aseta toimintovalitsin (10) asentoon
Alla olevassa esimerkissä kuvaillaan tallennusta muistikortilta usb-muistiin.
a) Yhden kappaleen tallennus
1. Aloita muistikortille tallennettavan raidan toisto usb-muistilta.
2. Aloita tallennus painamalla [REC] (13).
3. Kun kappale on kopioitu, toisto pysähtyy automaattisesti.
CD/USB/SD.
56
Page 57

b) Kaikkien kappaleiden tallennus
1. Valitse [SOURCE]-painikkeella SD-tila, ja aseta kopioitava muistikortti stereoihin.
2. Kun kortin kaikki tiedot on luettu, aloita tallennus painamalla
ja kopioinnin ollessa käynnissä.
3. Kun muistikortti on kopioitu, toisto pysähtyy automaattisesti.
[REC] (13). Näytöllä näkyy
Äänityksen laadun valinta (kaukosäätimellä)
Mp3-tiedostojen äänityksen laatu voidaan säätää 32 ja 256 Kbps:n välille.
Korkealaatuinen äänitys merkitsee suurempia tiedostoja.
1. Aseta toimintovalitsin (10) asentoon
2. Paina kaukosäätimen
3. Valitse äänityksen laatu näppäimillä
[INFO]-painiketta. Näytöllä näkyy valittu äänityksen laatu.
PHONO.
I◄◄ ja ►►I. Vahvista valinta painamalla [INFO].
Tiedostojen poisto
Yksittäisen tiedoston poisto
1. Aseta toimintovalitsin (10) tilaan CD/USB/SD ja valitse USB tai SD [SOURCE]painikkeella.
2. Paina kaukosäätimen
3. Selaa tiedostoja painikkeella
4. Valitse poistettava tiedosto painamalla
5. Valitse YES tai NO painamalla
[INFO]-painiketta 3 sekunnin ajan. Näytöllä lukee ”DEL ---001”.
I◄◄ ja ►►I.
[REC]. Näytöllä lukee ”YES NO”.
I◄◄ tai ►►I. Vahvista valinta painamalla [REC].
Suomi
Kaikkien tiedostojen poisto
1. Aseta toimintovalitsin (10) tilaan CD/USB/SD ja valitse
painikkeella.
2. Paina kaukosäätimen
3. Paina kaukosäätimen
”FORMAT? Y/N”.
4. Valitse YES tai NO painamalla
[INFO]-painiketta 3 sekunnin ajan. Näytöllä lukee ”DEL ---001”.
[INFO]-painiketta pitkään uudestaan. Näytöllä lukee:
I◄◄ tai ►►I. Vahvista valinta painamalla [REC].
57
USB tai SD [SOURCE]-
Page 58

Huolto ja ylläpito
Irrota pistoke pistorasiasta ja pyyhi laite pehmeällä liinalla. Lisää liinaan tarvittaessa mietoa
puhdistusainetta. Älä käytä voimakkaita puhdistusaineita tai liuottimia.
Kierrätys
Kierrätä tuote asianmukaisesti, kun poistat sen käytöstä. Kysy tarkempia kierrätysohjeita
kuntasi jäteneuvonnasta.
Tekniset tiedot
Virtalähde 230 V AC, 50 Hz
Kaukosäätimen paristot 2 x AAA/R03
Kierr./min, levysoitin 33/45 kierr./min
Laitteen mitat 305 x 415 x 375 mm
Kaiutinten mitat 200 x 360 x 195 mm
Suomi
58
Page 59

59
Suomi
Page 60

Sverige
Kundtjänst Tel: 0247/445 00
Fax: 0247/445 09
E-post: kundtjanst@clasohlson.se
Internet www.clasohlson.se
Post Clas Ohlson AB, 793 85 INSJÖN
Norge
Kundesenter Tlf.: 23 21 40 00
Faks: 23 21 40 80
E-post: kundesenter@clasohlson.no
Internett www.clasohlson.no
Post Clas Ohlson AS, Postboks 485 Sentrum, 0105 OSLO
Suomi
Asiakaspalvelu Puh: 020 111 2222
Faksi: 020 111 2221
Sähköposti: info@clasohlson.fi
Internet www.clasohlson.fi
Osoite Clas Ohlson Oy, Yrjönkatu 23 A, 00100 HELSINKI
Great Britain
For consumer contact, please visit
www.clasohlson.co.uk and click on
customer service.
Internet www.clasohlson.co.uk
 Loading...