

Page 1
Wireless Network Card
Trådlöst nätverkskort
Trådløst nettverkskort
Langaton verkkokortti
Art.no. Model
38-3168 GN-WB31N-RH
Ver. 201101
EnglishSvenskaNorskSuomi
Page 2

Page 3
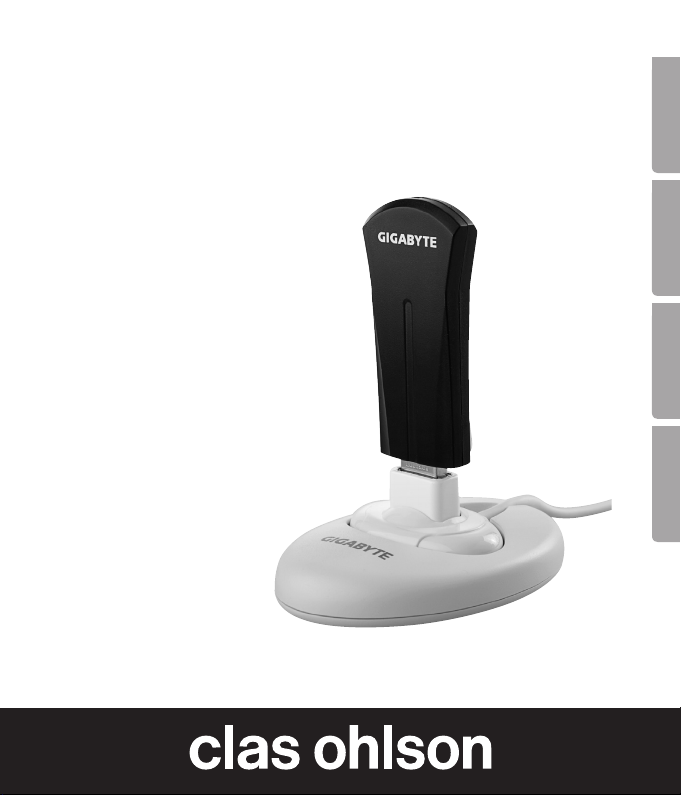
Wireless Network Card
Art.no 38-3168 Model GN-WB31N-RH
Please read theentire instruction manual before use and save it for future reference.
We reserve theright for any errors in text or images and for making any necessary
technical changes to this document. If you should have any questions concerning
technical problems please contact our Customer Services.
Installation
This is only aquick guide so that you can quickly get started with theproduct.
A complete operator’s manual in English is found on thesupplied CD.
Installation of drivers
The following installation instructions apply for Windows XP with
Service pack 2 installed.
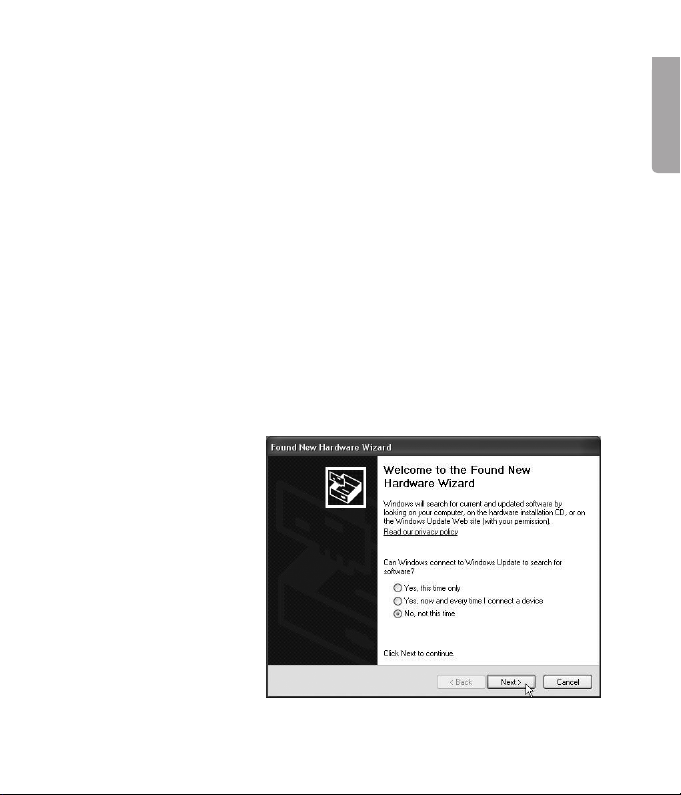
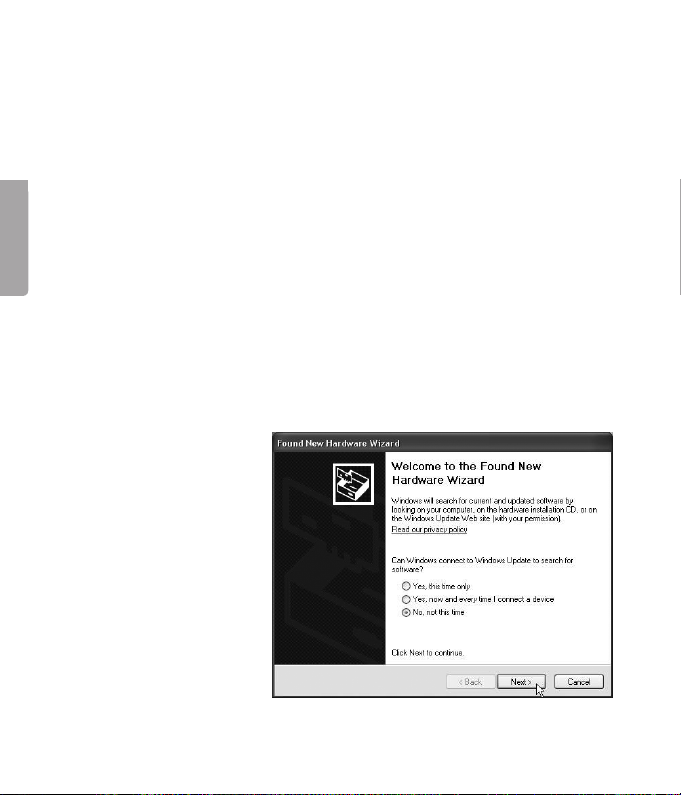
1. Start thecomputer and connect thenetwork card to afree USB port.
2. The computer will
recognise thenetwork
card and the“New
Hardware Found”
message appears
automatically. Insert
theincluded CD in
theCD ROM reader
and mark No, not this
time on thequestion if
thecomputer request to
search for drivers online.
Click Next.
English
3
Page 4
5
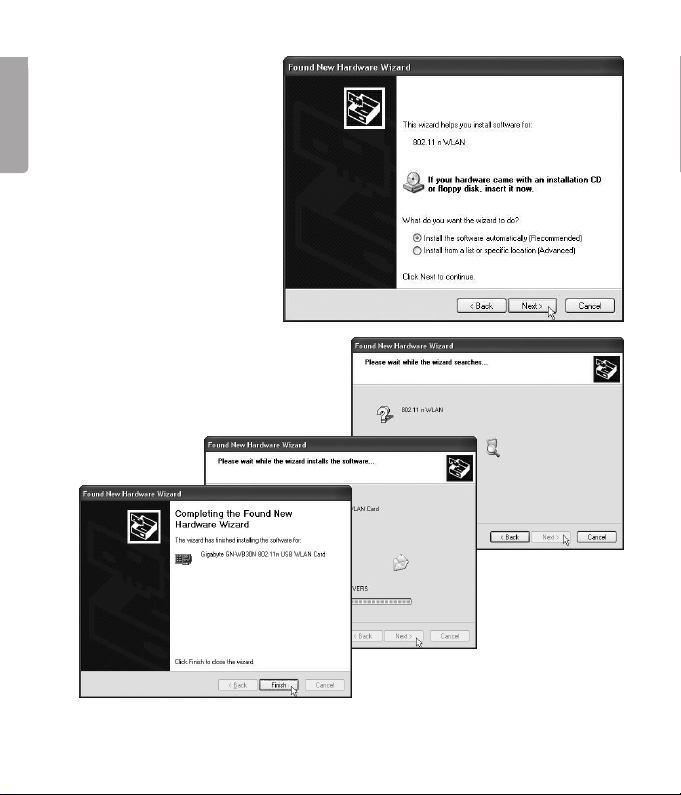
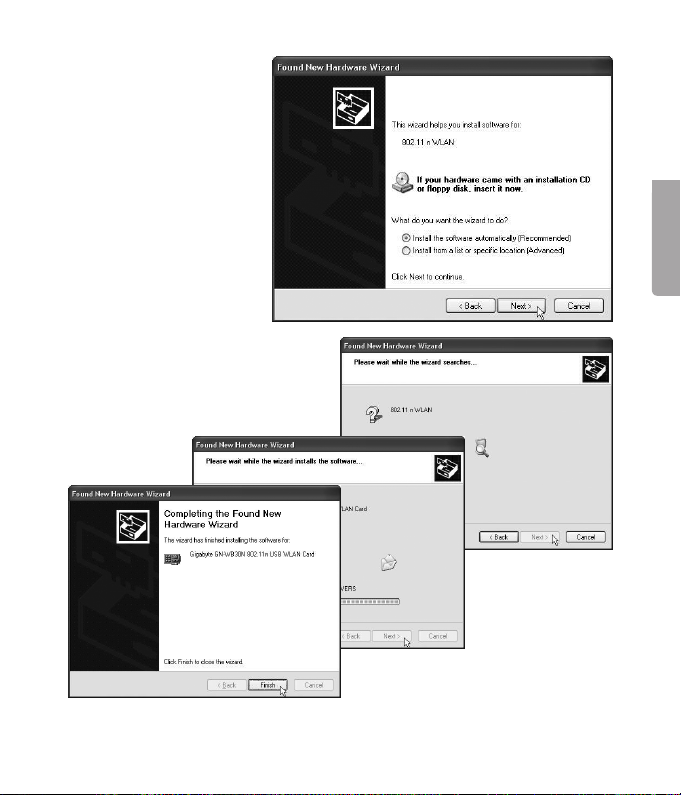
3. Select Install
thesoftware program
automatically and
English
click on Next.
4. The installation starts and stops
automatically. Press Finish to
complete theinstallation.
4
Page 5

Installation of software
To access all thenetwork card’s functions theinstallation of software from
theincluded CD is required.
The network card can also be used with some operating system’s software
(e.g. Windows 2000 SP4, Windows XP SP2 and Windows Vista). To take full
use of thenetwork card thefollowing software should be installed.
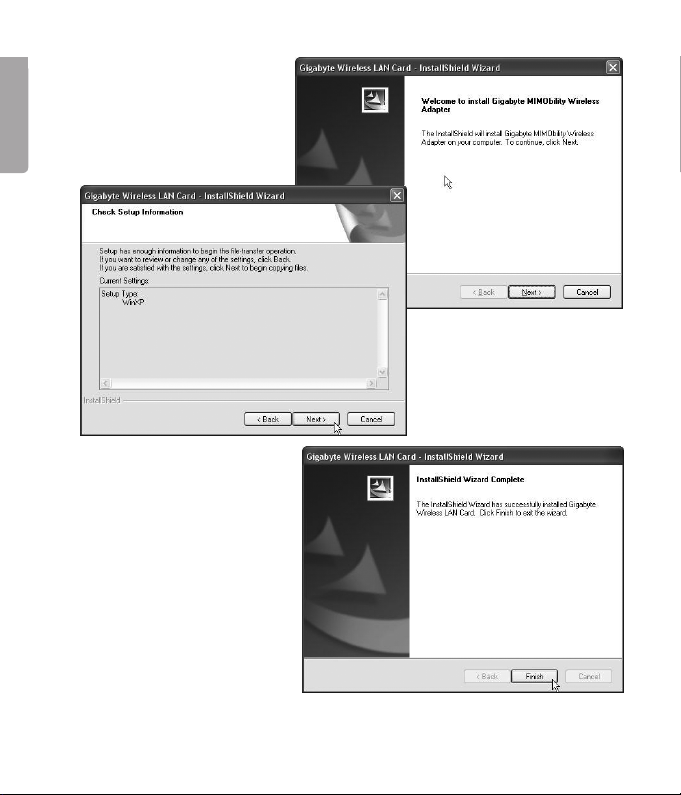
1. Insert thesupplied CD into thecomputer’s CD-ROM drive. The installation
guide automatically starts and thestart image is displayed.
If theinstallation
does not start
automatically, run
thefile LAUNCH.
EXE on theCD.
English
2. Click on Install Driver & Utlility and then thebutton N300 series to install
theconfiguration program.
5
Page 6
7
3. Click Next
to continue.
English
4. Click Next
to continue.
5. Click on Finish to finish
theguide.
6. When theinstallation
is completed
theconnection
guide starts. Follow
theinstruction
“Connect to
awireless network”.
6
Page 7
Use
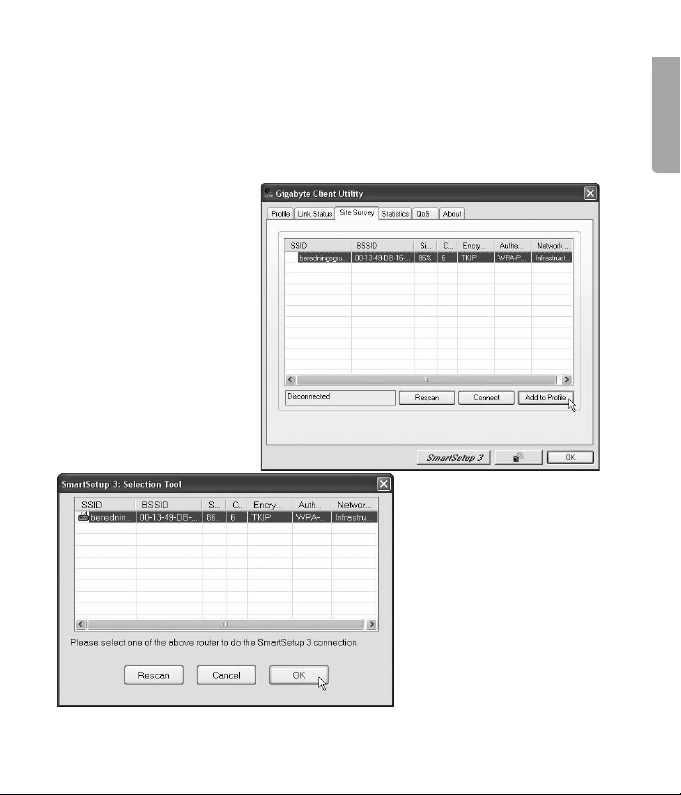
Connect to awireless network/use SmartSetup 3
1. When theinstallation is finished thedialogue box over accessible networks
is displayed.
2. Click thebutton
SmartSetup 3 to start
theconnection guide.
3. Highlight thedesired
network and
choose OK to add
thenetwork to thelist
of desired networks.
English
7
Page 8
9
4. Enter your wireless network’s key and thetype of security that is being
used, then click OK. Contact thenetwork administrator if you are unsure of
which information is needed.
English
5. The network is now
added to thelist of
networks. Choose
thetab Profile to see
thelist of available
networks. The following
menu is displayed.
6. Highlight thenetwork
you just added and
then click on Activate.
The computer now
automatically connects
thewireless network
when thecomputer is
started. Press OK to
confirm.
8
Page 9

Troubleshooting
Check theTCP/IP features
1. Go to Control panel and choose Network connections.
Right-click on theconnection to thenetwork card you wish
to configure and select Properties.
2. Mark theTCP/IP protocol that is connected to thenetwork card and
choose Properties.
3. Check that Obtain an IP address automatically and Obtain address to
theDNS server automatically are marked.
4. Click OK.
Check configuration
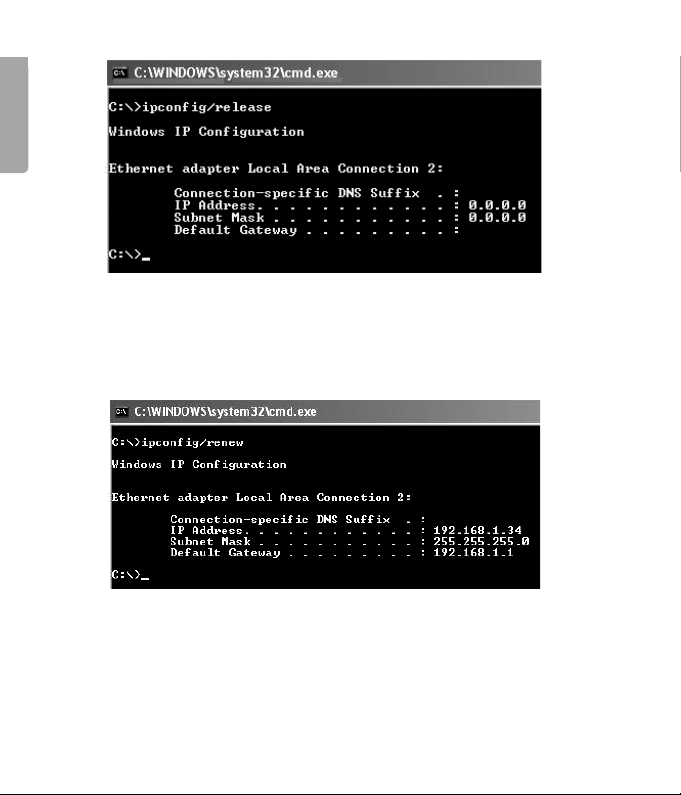
You can check that thecomputer has thecorrect IP address by:
1. Open Program/Accessories/Command prompt. Write ipconfig and
press [ENTER] to show IP-address, net mask and Gateway.
2. If thecomputer has received thecorrect IP address you don’t have to enter
any more settings. Write exit and press [ENTER] to return to Windows.
Update configuration
If thecomputer still has an old or incorrect IP address it can be renewed to
receive acorrect IP address. Do thefollowing:
1. Open Program/Accessories/Command prompt.
Write ipconfig/release and press [ENTER].
English
9
Page 10
English
11
2. Write ipconfig/renew and press [ENTER].
Your IP address is displayed, e.g. 192.168.1.34,
Standard-gateway: 192.168.1.1 and Net mask: 255.255.255.0.
3. Write exit and press [ENTER] to return to Windows.
10
Page 11
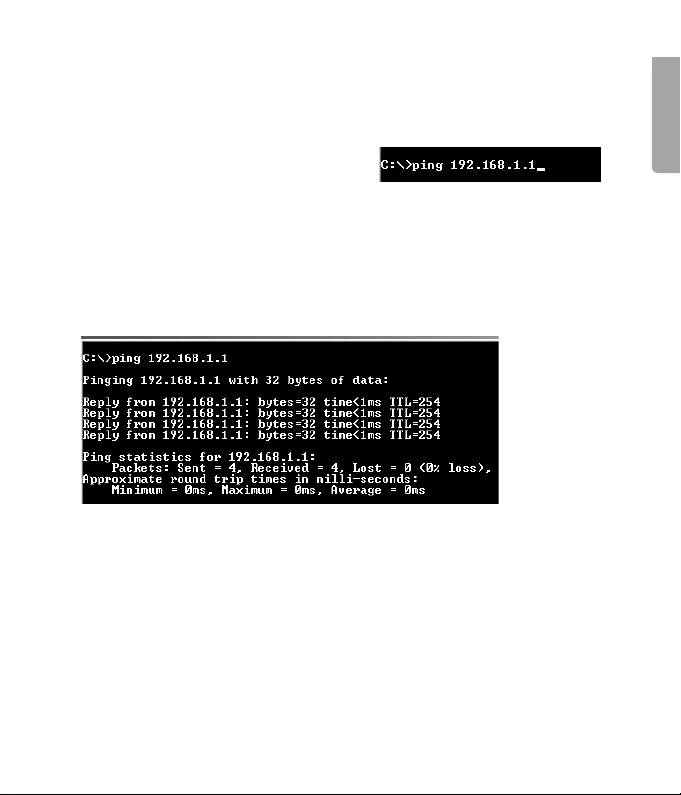
The PING function
With thePING function you can control which devices/computers that are
connected to thenetwork. The command PING is used in thecommand prompt.
1. Write thecommand ping at theprompt,
press [SPACE] and enter theIP address
or thecomputer name you want to ping
and press [ENTER].
2. “Reply from…” shows that theconnection works and thesearched
computer is turned on.
3. “Request timed out” shows that theconnection does not work
(that thecomputer is not turned on or correctly connected).
4. A working connection should look like this:
Here is contact with theIP-adress 192.168.1.1.
Poor quality data transfer/low signal strength
Possible solution
• Place thecomputer with thenetwork card in aspot where thewireless
radio communication is not disturbed by large metal objects, microwave
ovens, other wireless devices etc.
• Decrease thedistance between thenetwork card and thestation.
English
11
Page 12

13
Disposal
Follow local ordinances when disposing of this product. If you are unsure about
how to dispose of this product contact your municipality.
English
Specifications
Interface USB V2.0
Chip set Ralink MAC RT2870 / RT2820 (sender)
Operating Voltage 5 V +/- 5%
Power Consumption 480–495 mA (transmitting)
215–240 mA (reception)
Frequency range 2412–2,484 MHz
Modulation OFDM, DSSS, 64QAM, 16QAM, QPSK, BPSK,
Bit rate 300, 270, 243, 216, 162, 135, 121, 108, 81, 54, 48,
Power output, sender 15 to 18 dBm (depending on transfer rate)
Sensitivity, receiver -68 to -91 dBm (depending on transfer rate)
Temperature Range Use: 0–55 °C , Storing -20–65 °C
Humidity 10–85 % non condensation
Software Windows 2000/XP/Vista 32/64
Safety 64/128 bit WEP, 802.1x, WPA, WPA2
QoS (Quality of Service) WMM
Weight Approximately 21 g
Dimensions 90.7 x 34.9 x 12.5 mm
DBPSK, DQPSK, CCK
36, 24, 18, 12, 11, 9, 6, 5.5, 2, 1 Mbps (auto fallback)
12
Page 13

Points worth bearing in mind!
• Other wireless equipment operating on the same frequency band may
reduce the range of the product.
• The range of all wireless equipment is affected by obstacles between
the transmitter and the receiver (a concrete wall reduces the signal far
more than a plasterboard partition, for example).
If you are having problems with the operation of
the system, try the following solutions
• Switch off any other wireless equipment to check whether it could be
causing the problem.
• Move the wireless equipment and/or reduce the distance, and reduce
thenumber of obstacles (walls, furniture, etc.) between the transmitter
andthe receiver.
English
13
Page 14
15
Trådlöst nätverkskort
Art.nr 38-3168 Modell GN-WB31N-RH
Läs igenom hela bruksanvisningen före användning och spara den sedan
för framtida bruk. Vi reserverar oss för ev. text- och bildfel samt ändringar av
tekniska data. Vid tekniska problem eller andra frågor, kontakta vår kundtjänst
(se adressuppgifter på baksidan).
Installation
Svenska
Detta är endast en snabbguide för att du snabbt ska komma igång med
det trådlösa nätverkskortet. Fullständig manual på engelska finner du på
medföljande cd-skiva.
Installation av drivrutiner
Följande installationsanvisning gäller för Windows XP med
Servicepack 2 installerat.
1. Starta datorn och sätt
nätverkskortet ien ledig
USB-port.
2. Datorn identifierar
nätverkskortet och
”Guiden ny maskinvara”
visas. Sätt imedföljande
cd-skiva icd-läsaren
och markera Nej, inte
den här gången på
frågan om datorn ska
söka efter drivrutiner
på Internet. Klicka på
Nästa.
14
Page 15
3. Markera Installera
programvaran
automatiskt och
klicka på Nästa.
4. Installationen startar och
slutförs sedan automatiskt.
Tryck därefter på Slutför för
att stänga guiden.
Svenska
15
Page 16

17
Installation av programvara
För att få tillgång till nätverkskortets samtliga funktioner krävs att dess
programvara installeras från medföljande cd-skiva.
Nätverkskortet kan även användas med vissa operativsystems egna programvara (t.ex. Windows 2000 SP4, Windows XP SP2 samt Windows Vista). För att
utnyttja nätverkskortet fullt ut bör dock medföljande programvara installeras.
1. Sätt imedföljande cd-skiva icd-läsaren. Installationsprogrammet startar
automatiskt och startmenyn visas.
Svenska
Startar inte installationen automatiskt, kör
filen LAUNCH.EXE
som finns i roten på
cd-skivan.
2. Klicka på Install Driver & Utlility och sedan på knappen
N300 series för att installera konfigurationsprogrammet.
16
Page 17

3. Klicka på Nästa för
att fortsätta.
4. Klicka på Nästa för
att fortsätta.
5. Klicka på Slutför för att
slutföra installationen.
6. När installationen slutförts
startar anslutningsguiden.
Följ instruktionen ”Anslut
till ett trådlöst nätverk”.
Svenska
17
Page 18

19
Användning
Anslut till ett trådlöst nätverk / Använda SmartSetup 3
1. När installationen slutförts visas dialogrutan över tillgängliga trådlösa nätverk.
2. Klicka på knappen
SmartSetup3
Svenska
för att starta
anslutningsguiden.
3. Markera det önskade
trådlösa nätverket och
välj OK för att lägga till
nätverket i listan över
önskade nätverk.
18
Page 19

4. Ange ditt trådlösa nätverks nätverksnyckel samt typen av säkerhet som
används, klicka sedan på OK. Kontakta nätverksadministratören om du är
osäker på vilka uppgifter som ska anges.
5. Nätverket har nu lagts
till ilistan över önskade
nätverk. Välj fliken
Profile för att se listan
över önskade nätverk.
Följande bild visas.
6. Markera det nätverk
som du nyss
lagt till och klicka
sedan på Activate.
Datornansluter nu
automatiskt till det
trådlösa nätverket varje
gång datorn startas.
Klicka på OK för att
avsluta.
Svenska
19
Page 20

21
Felsökning
Kontrollera TCP/IP-egenskaperna
1. Gå till Kontrollpanelen och välj Nätverksanslutningar. Högerklicka på den
nätverksanslutning som tillhör nätverkskortet och välj Egenskaper.
2. Markera TCP/IP-protokollet som är kopplat till nätverkskortet och
välj Egenskaper.
3. Kontrollera att Erhåll en IP-adress automatiskt och Erhåll adress till
DNS-servern automatiskt är markerade.
4. Klicka på OK.
Svenska
Kontrollera konfigurering
Du kan på följande sätt kontrollera att datorn fått rätt IP-adress tilldelad:
1. Öppna Program/Tillbehör/Kommandotolken. Skriv ipconfig och tryck
[ENTER] för att visa IP-adress, nätmask och Gateway.
2. Om datorn har fått rätt IP-adress tilldelad behöver du inte göra några
flerinställningar.
3. Skriv exit och tryck [ENTER] för att återgå till Windows.
Uppdatera konfigurering
Om datorn fortfarande har en gammal eller felaktig IP-adress kan denna
förnyas för att erhålla rätt IP-adress.
Gör på följande sätt:
1. Öppna Program/Tillbehör/Kommandotolken.
Skriv ipconfig/release och tryck [ENTER].
20
Page 21

2. Skriv ipconfig/renew och tryck [ENTER].
Nu visas din tilldelade IP-adress, t.ex. 192.168.1.34,
Standard-gateway: 192.168.1.1 samt Nätmask: 255.255.255.0.
3. Skriv exit och tryck [ENTER] för att återgå till Windows.
21
Svenska
Page 22

23
Funktionen PING
Med funktionen PING kan man kontrollera vilka enheter/datorer som är
anslutna till nätverket. Kommandot PING används ikommandotolken.
4. Skriv kommandot ping vid prompten,
tryck [MELLANSLAG] och fyll på med den
IP-adress eller det datornamn som du vill
”pinga” och tryck [ENTER].
5. ”Svar från…” visar att anslutningen fungerar och att den sökta datorn
ärpåslagen.
6. ”Begäran gjorde timeout” visar däremot att anslutningen inte fungerar
Svenska
(att den sökta datorn inte är påslagen eller korrekt ansluten).
7. Har man en fungerande anslutning bör resultatet se ut ungefär så här:
Här är det kontakt med IP-adress 192.168.1.1
Dålig kvalitet på överföringen / Låg signalstyrka
Tänkbar lösning
• Placera datorn med nätverkskortet på en plats där inte den trådlösa
radiokommunikationen störs av stora metallföremål, mikrovågsugnar,
andra trådlösa enheter etc.
• Minska avståndet mellan nätverkskortet och basstationen.
22
Page 23

Avfallshantering
När du ska göra dig av med produkten ska detta ske enligt lokala föreskrifter.
Är du osäker på hur du ska gå tillväga, kontakta din kommun.
Specifikationer
Interface USB V2.0
Chipset Ralink MAC RT2870 / RT2820 (sändare)
Drivspänning 5 V +/- 5%
Strömförbrukning 480–495 mA (sändning)
215–240 mA (mottagning)
Frekvensområde 2412–2484 MHz
Modulation OFDM, DSSS, 64QAM, 16QAM, QPSK, BPSK,
DBPSK, DQPSK, CCK
Datahastighet 300, 270, 243, 216, 162, 135, 121, 108, 81, 54, 48,
36, 24, 18, 12, 11, 9, 6, 5.5, 2, 1 Mbps (auto fallback)
Uteffekt, sändare 15 till 18 dBm (beroende på överföringshastighet)
Känslighet, mottagare -68 till -91 dBm (beroende på överföringshastighet)
Temperaturområde Användning: 0–55 °C , Förvaring -20–65 °C
Luftfuktighet 10–85 % icke kondenserande
Mjukvarustöd Windows 2000/XP/Vista 32/64
Säkerhet 64/128 bit WEP, 802.1x, WPA, WPA2
QoS (Quality of Service) WMM
Vikt ca 21 g
Mått 90,7 x 34,9 x 12,5 mm
Svenska
23
Page 24

Tänk på
• Att annan befintlig trådlös utrustning på samma frekvensband kan påverka
räckvidden negativt.
• Att räckvidden på all trådlös utrustning påverkas av vilka hinder som finns
mellan sändaren och mottagaren (t.ex. en betongvägg dämpar signalen
avsevärt mer än en gipsvägg).
Vid funktionsproblem, prova följande lösningar
Svenska
• Stäng av övriga befintliga trådlösa utrustningar för att kontrollera om de kan
vara orsaken till problemet.
• Flytta den trådlösa utrustningen och/eller förkorta avståndet, samt minska
antalet hinder (väggar, möbler etc.) mellan sändaren och mottagaren.
24
Page 25

Trådløst nettverkskort
Art.nr. 38-3168 Modell GN-WB31N-RH
Les igjennom hele bruksanvisningen før bruk, og ta vare på den for framtidig bruk.
Vi reserverer oss mot ev. tekst- og bildefeil, samt forandringer av tekniske data.
Ved tekniske problemer eller andre spørsmål, ta kontakt med vårt kundesenter
(se opplysninger om kundesenteret her idenne bruksanvisningen).
Installasjon
Dette er kun en hurtigguide for åenkelt komme igang med utstyret.
Detaljert manual på engelsk finner du på den vedlagte CD-platen.
Installasjon av driver
Følgende installasjonsanvisning gjelder for Windows XP med
Servicepack 2 installert.
1. Start PC-en og sett det eksterne nettverkskortet ien ledig USB-port.
2. Maskinen finner
nettverkskortet
og ”Guiden ny
maskinvare” vises.
Sett imedfølgende
CD-plate iCD-leseren
og marker Nei, ikke
nå på spørsmål om
datamaskinen skal
søke etter drivere på
Internett. Klikk på
Neste.
Norsk
25
Page 26

27
3. Marker Installer
programvaren
automatisk og
klikk på Neste.
4. Installasjonen starter og
Norsk
fullføres deretter automatisk.
Trykk så på Fullfør for
ålukke guiden.
26
Page 27

Installasjon av programvare
For åfå tilgang til samtlige funksjoner på nettverkskortet kreves at
programvaren installeres fra den medfølgende CD-platen.
Nettverkskortet kan også brukes med visse operativsystems egne programvarer (f.eks. Windows 2000 SP4, Windows XP SP2 samt Windows Vista).
For åutnytte nettverkskortet fult ut bør medfølgende programvare installeres.
1. Sett den medfølgende CD-plate iCD-leseren. Installasjonsprogrammet
starter automatisk og startmenyen vises.
Starter ikke
installasjonen
automatisk, kjør filen
LAUNCH.EXE som
finnes på roten på
CD-platen.
Norsk
2. Klikk på Install Driver & Utlility og deretter på knappen N300 series for
åinstallere konfigurasjonsprogrammet.
27
Page 28

29
3. Klikk på Neste for
åfortsette.
4. Klikk på Neste for
åfortsette.
Norsk
5. Klikk på Fullfør for
åfullføre installasjonen.
6. Når installasjonen
er fullført, starter
tilkoblingsguiden.
Følg instruksjonen ”Koble
til et trådløst nettverk”.
28
Page 29

Bruk
Koble til et trådløst nettverk / Bruk SmartSetup 3
1. Når installasjonen er fullført, vises dialogruten over tilgjengelige
trådløse nettverk.
2. Klikk på knappen
SmartSetup 3
for åstarte
tilkoblingsguiden.
Norsk
3. Marker det ønskede
trådløse nettverket og
velg OK for ålegge til
nettverket i listen over
ønskede nettverk.
29
Page 30

31
4. Angi nettverksnøkkelen på ditt trådløse nettverk, samt typen sikkerhet som
brukes, klikk deretter på OK. Kontakt nettverksadministratoren hvis du er
usikker på hvilke opplysninger du skal angi.
5. Nettverket er nå
lagt til ilisten over
ønskede nettverk.
Velg fliken Profile
for åse listen over
ønskede nettverk.
Følgende bilde vises.
Norsk
6. Marker det nettverket
du nettopp har lagt
til og klikk deretter
på Activate.
Datamaskinen kobler
nå automatisk til dette
trådløse nettverket
hver gang maskinen
startes. Klikk på OK
for åavslutte.
30
Page 31

Feilsøking
Kontroller TCP/IP-egenskapene
1. Gå til Start/Innstillinger/Kontrollpanel og velg Nettverkstilkoblinger.
Høyreklikk på den nettverkstilkobling som tilhører nettverkskortet og
velgEgenskaper.
2. Marker TCP/IP-protokollen som er koblet til nettverkskortet og
velg Egenskaper.
3. Kontroller at Hent en IP-adresse automatisk og Hent adressen til
DNS-serveren automatisk er markert.
4. Klikk på OK.
Kontroller konfigurering
Du kan på følgende måte kontrollere at maskinen har fått tildelt riktig
IP-adresse:
1. Åpne Program/Tilbehør/Kommandotolken. Skriv ipconfig og trykk
[ENTER] for åvise IP-adressen, nettmark og Gateway.
2. Dersom datamaskinen har fått riktig IP-adresse tildelt, trenger du ikke
åforeta flere innstillinger. Skriv exit og trykk på [ENTER] for ågå tilbake
tilWindows.
Oppdatere konfigurering
Dersom datamaskinen fortsatt har en gammel eller en feil IP-adresse,
kan denne fornyes for åhente riktig IP-adresse. Gjør følgende:
1. Åpne Program/Tilbehør/Kommandotolken. Skriv ipconfig/release
og trykk [ENTER].
Norsk
31
Page 32

33
2. Skriv ipconfig/renew og trykk [ENTER].
Nå vil din tildelte IP-adresse vises, som f.eks. 192.168.1.34,
Norsk
Standard-gateway: 192.168.1.1 og Nettmask: 255.255.255.0
3. Skriv exit og trykk på [ENTER] for ågå tilbake til Windows.
32
Page 33

PING funksjonen
Med PING funksjonen kan man kontrollere hvilke enheter/PC-er som er koblet
til nettverket. PING brukes ikommandotolken.
1. Skriv kommandoen ping ved
prompten, trykk [MELLOMROM] og fyll
på med den IP-adresse eller navnet på
maskinen som du vil ”pinge” og trykk deretter [ENTER].
2. ”Svar fra…” viser at koblingen fungerer og at den søkte maskinen
er skrudd på.
3. ”Søket gjorde timeout” viser derimot at koblingen ikke fungerer
(at maskinen du søkte etter ikke er slått på eller at den er feil tilkoblet).
4. Har man en fungerende kobling bør resultatet se omtrent slik ut:
Her er det kontakt med IP-adresse 192.168.2.1
Dårlig kvalitet på overføringen / Lav signalstyrke
Mulig løsning:
• Plasser maskinen med nettverkskortet på et sted hvor den trådløse
radiokommunikasjonen ikke forstyrres av store metallgjenstander,
mikrobølgeovner eller andre trådløse enheter.
• Reduser avstanden mellom nettverkskortet og basestasjonen.
Norsk
33
Page 34

35
Avfallshåndtering
Når du skal kvitte deg med produktet, skal dette skje ihenhold til lokale forskrifter.
Er du usikker på hvordan du går fram, ta kontakt med lokale myndigheter.
Spesifikasjoner
Interface USB V2.0
Chipsen Ralink MAC RT2870 / RT2820 (sender)
Spenning 5 V +/- 5 %
Strømforbruk 480–495 mA (ved sending)
215–240 mA (ved mottaking)
Frekvensområde 2412–2484 MHz
Modulasjon OFDM, DSSS, 64QAM, 16QAM, QPSK, BPSK,
Norsk
Datahastighet 300, 270, 243, 216, 162, 135, 121, 108, 81, 54, 48,
Effekt ut, sender 15 til 18 dBm (avhengig av overføringshastigheten)
Følsomhet, mottaker -68 til -91 dBm (avhengig av overføringshastigheten)
Temperaturområde Bruk 0–55 °C, Oppbevaring -20–65 °C
Luftfuktighet 10–85 % (ikke kondenserende)
Softwearstøtte Windows 2000/XP/Vista 32/64
Sikkerhet 64/128 bit WEP, 802.1x, WPA, WPA2
QoS (Quality of Service) WMM
Vekt Ca. 21 g
Mål 90,7 x 34,9 x 12,5 mm
DBPSK, DQPSK, CCK
36, 24, 18, 12, 11, 9, 6, 5.5, 2, 1 Mbps (auto fallback)
34
Page 35

Husk følgende
• At annet trådløst utstyr som er innstilt på samme frekvens kan på kan
påvirke rekkevidden negativt.
• At rekkevidden på alt trådløst utstyr påvirkes av hindringer som er
mellom sender og mottaker (en betongvegg kan f.eks. dempe signalene
dramatisk iforhold til en gipsvegg).
Ved problemer, prøv følgende
• Skru av øvrig trådløst utstyr for å kontrollere om de er årsak til problemene.
• Flytt det trådløse utstyret og gjør avstanden mellom sender og mottaker
mindre. Forsøk også å redusere antall hindringer mellom sender og
mottaker (vegger, møbler etc.).
Norsk
35
Page 36

37
Langaton verkkokortti
Tuotenumero 38-3168 Malli GN-WB31N-RH
Lue käyttöohjeet ennen tuotteen käyttöönottoa ja säilytä ne tulevaa tarvetta
varten. Pidätämme oikeuden teknisten tietojen muutoksiin. Emme vastaa
mahdollisista teksti- tai kuvavirheistä. Jos laitteeseen tulee teknisiä ongelmia,
ota yhteys myymälään tai asiakaspalveluun (yhteystiedot käyttöohjeen lopussa).
Asennus
Tämä on pikaopas, jonka tarkoituksena on auttaa sinua laitteiston
käyttöönotossa. Pakkauksessa olevalla cd-levyllä on täydellinen
englanninkielinen käyttöohje.
Ajureiden asentaminen
Seuraavat asennusohjeet koskevat käyttöjärjestelmää Windows XP, jossa on
Servicepack 2.
1. Käynnistä tietokone ja liitä verkkokortti vapaaseen USB-porttiin.
2. Tietokone tunnistaa
verkkokortin ja ”Ohjattu
Suomi
uuden laitteen asennus”
näkyy näytöllä. Aseta
laitteen mukana tuleva
cd-levy cd-levyn lukijaan
ja valitse Ei tällä kertaa
koneen kysyessä,
hakeeko se ajureita
Internetistä. Napsauta
Seuraava.
36
Page 37

3. Valitse Asenna
ohjelma
automaattisesti ja
napsauta Seuraava.
4. Asennus alkaa ja
loppuu automaattisesti.
Sulje asennusohjelma
napsauttamalla Valmis.
Suomi
37
Page 38

39
Ohjelmiston asennus
Jotta voisit hyödyntää kaikkia verkkokortin toimintoja, tulee sinun asentaa
ohjelmisto mukana tulevalta cd-levyltä.
Verkkokorttia voidaan myös käyttää joidenkin käyttöjärjestelmien omalla
ohjelmistolla (esim. Windows 2000 SP4, Windows XP SP2 sekä Windows
Vista). Verkkokortin kokonaisvaltainen hyödyntäminen edellyttää kuitenkin
tässäkin tapauksessa mukana tulevan ohjelmiston asentamista.
1. Aseta mukana tuleva cd-levy tietokoneen cd-asemaan. Asennusohjelma
käynnistyy automaattisesti ja aloitusvalikko ilmestyy näytölle.
Jos asennus
ei käynnisty
automaattisesti,
käynnistä levyn
juuressa oleva
Launch.exe-tiedosto.
Suomi
2. Napsauta Install Driver & Utlility ja asenna asetusohjelma napsauttamalla
sitten painiketta N300 series.
38
Page 39

3. Jatka napsauttamalla
Seuraava.
4. Jatka napsauttamalla
Seuraava.
5. Viimeistele asennus
napsauttamalla Valmis.
6. Kun asennus on tehty
loppuun, käynnistyy
liittämisopas. Noudata
”Langattomaan verkkoon
liittyminen” -ohjeita.
Suomi
39
Page 40

41
Käyttö
Liitä langattomaan verkkoon/Käytä SmartSetup 3:sta
1. Kun asennus on valmis, näet valintaikkunassa saatavilla olevat
langattomatverkot.
2. Napsauta
SmartSetup3painiketta
käynnistääksesi
liittämisoppaan.
Suomi
3. Merkitse haluamasi
langaton verkko
ja lisää verkko
haluamiesi
verkkojen listaan
valitsemalla OK.
40
Page 41

4. Syötä langattoman verkon verkkosalasana sekä käytössä olevat
turvallisuustyyppi ja napsauta sitten OK. Ota yhteyttä verkon pääkäyttäjään,
jos olet epävarma siitä, mitä tietoja sinun tulisi antaa.
5. Verkko on nyt lisätty
haluamiesi verkkojen
listaan. Näet listan valitsemalla sivun Profile.
Seuraavanlainen kuva
ilmestyy näytölle.
6. Merkitse äsken
Suomi
lisäämäsi verkko
ja napsauta sitten
Activate. Tietokone
liittyy nyt aina
käynnistettäessä
automaattisesti
langattomaan verkkoon.
Napsauta OK ja lopeta
asentaminen.
41
Page 42

43
Vianetsintä
Tarkista TCP/IP-ominaisuudet
1. Valitse Ohjauspaneeli ja valitse Verkkoyhteydet. Napsauta oikealla
hiirinäppäimellä sitä verkkoyhteyttä, joka kuuluu verkkokortille ja valitse
Ominaisuudet.
2. Valitse verkkokortin TCP/IP-protokolla ja valitse Ominaisuudet.
3. Varmista, että Hae IP-osoite automaattisesti ja Hae osoite
DNS-palvelimeen automaattisesti on valittu.
4. Napsauta OK.
Konfiguroinnin tarkistaminen
Seuraavalla tavalla voit tarkistaa, onko tietokoneessa oikea IP-osoite:
1. Avaa Ohjelmat/Apuohjelmat/Komentojono. Kirjoita ipconfig ja paina
[ENTER], niin näet IP-osoitteen, verkon peitteen ja yhdyskäytävän.
2. Mikäli tietokoneessa on oikea IP-osoite, sinun ei tarvitse tehdä muita
asetuksia. Kirjoita exit ja paina [ENTER] palataksesi Windowsiin.
Konfiguroinnin päivittäminen
Mikäli tietokoneessa on yhä vanha tai väärä IP-osoite, sinun tulee hankkia uusi
IP-osoite. Toimi seuraavasti:
Suomi
1. Avaa Ohjelmat/Apuohjelmat/Komentojono.
Kirjoita ipconfig/release ja paina [ENTER].
42
Page 43

2. Kirjoita ipconfig/renew ja paina [ENTER].
Nyt näet IP-osoitteesi, esim. 192.168.1.34,
Standard Gateway: 192.168.1.1 ja verkon peite: 255.255.255.0.
3. Kirjoita exit ja paina [ENTER] palataksesi Windowsiin.
43
Suomi
Page 44

45
PING-toiminto
PING-toiminnolla voidaan tarkistaa, mitkä laitteet/tietokoneet on liitetty
verkkoon. PING toimii komentorivillä.
1. Kirjoita komento ping komentoriville,
jätä välilyönti ja syötä se IP-osoite tai
tietokoneen nimi, jota haluat etsiä.
Paina [ENTER].
2. ”Vastaus isännältä…” osoittaa, että liitäntä toimii ja että kohdetietokone
onpäällä.
3. ”Pyyntö aikakatkaistiin” on merkkinä siitä, että liitäntä ei toimi
(kohdetietokone ei ole päällä tai sitä ei ole kytketty oikein).
4. Mikäli liitäntä toimii, tulisi ping-haun näyttää tältä:
Suomi
Yllä on luotu yhteys IP-osoitteeseen 192.168.1.1.
Huonolaatuinen tiedonsiirto / Heikko signaalinvoimakkuus
Mahdollinen ratkaisu
• Sijoita tietokone sekä verkkokortti paikkaan, jossa metalliesineet, mikroaaltouuni tai muut langattomat laitteet eivät häiritse radioliikennettä.
• Pienennä verkkokortin ja keskusyksikön välistä etäisyyttä.
44
Page 45

Kierrätys
Kierrätä tuote asianmukaisesti, kun poistat sen käytöstä.
Ota yhteys kuntasi jäteneuvontaan, mikäli olet epävarma.
Tekniset tiedot
Liitäntä USB V2.0
Mikropiiri Ralink MAC RT2870 / RT2820 (lähetin)
Käyttöjännite 5 V +/- 5%
Virrankulutus 480–495 mA (lähetys)
215–240 mA (vastaanotto)
Taajuusalue 2412–2484 MHz
Modulaatio OFDM, DSSS, 64QAM, 16QAM, QPSK, BPSK,
DBPSK, DQPSK, CCK
Tiedonsiirtonopeus 300, 270, 243, 216, 162, 135, 121, 108, 81, 54, 48,
36, 24, 18, 12, 11, 9, 6, 5.5, 2, 1 Mbps (auto fallback)
Antoteho, lähetin 15…18 dBm (riippuen tiedonsiirtonopeudesta)
Herkkyys, vastaanotin -68…-91 dBm (riippuen tiedonsiirtonopeudesta)
Lämpötila-alueet Käyttö: 0–55 °C, Säilytys -20…65 °C
Ilmankosteus 10–85 % (suhteellinen ilmankosteus)
Ohjelmistotuki Windows 2000/XP/Vista 32/64
Turvallisuus 64/128 bittinen WEP, 802.1x, WPA, WPA2
QoS (Quality of Service) WMM
Paino noin 21 g
Mitat 90,7 x 34,9 x 12,5 mm
Suomi
45
Page 46

Ota huomioon
• Muut samalla taajuudella toimivat langattomat laitteet voivat heikentää
kantamaa.
• Lähettimen ja vastaanottimen väliset esteet vaikuttavat kaikkien
langattomien laitteiden kantamaan (esim. betoniseinä heikentää signaalia
huomattavasti kipsiseinää enemmän).
Ongelmatilanteissa voit kokeilla seuraavia keinoja
• Sammuta muut langattomat laitteet selvittääksesi aiheuttavatko
neongelmia.
• Siirrä langattomia laitteita ja/tai lyhennä etäisyyttä ja poista lähettimen
ja vastaan ottimen väliset esteet (seinät, huonekalut tms.).
Suomi
46
Page 47

Declaration of Conformity
Hereby, Clas Ohlson AB, declares that following product(s):
is in compliance with theessential requirements and
Article 3.1a (Safety): EN 60950–1
EMF/SAR 99/519/EC
Council Recommendation
Article 3.1b (EMC): EN 301489–1
EN 301489–17
Article 3.2 (Radio): EN 300328
This product’s intended usage is within thecountries of United Kingdom, Sweden, Norway and Finland
Wireless Desktop Adapter
other relevant provisions of Directive 1999/5/EC.
Insjön, Sweden, January 2011
Clas Ohlson, 793 85 Insjön, Sweden
38-3168
GN-WB31N-RH
0678
Klas Balkow
President
!
Page 48

Sverige
Kundtjänst Tel: 0247/445 00
Fax: 0247/445 09
E-post: kundtjanst@clasohlson.se
Internet www.clasohlson.se
Post Clas Ohlson AB, 793 85 INSJÖN
Norge
Kundesenter Tlf.: 23 21 40 00
Faks: 23 21 40 80
E-post: kundesenter@clasohlson.no
Internett www.clasohlson.no
Post Clas Ohlson AS, Postboks 485 Sentrum, 0105 OSLO
Suomi
Asiakaspalvelu Puh.: 020 111 2222
Sähköposti: info@clasohlson.fi
Internet www.clasohlson.fi
Osoite Clas Ohlson Oy, Annankatu 34 –36 A, 00100 HELSINKI
Great Britain
For consumer contact, please visit
www.clasohlson.co.uk and click on
customer service.
Internet www.clasohlson.co.uk
 Loading...