

Page 1
RJ45 RJ45
WAN LAN 1 LAN2 LAN3 LAN4 USB RF/WP3
+
Wireless Router
Trådlös router
Trådløs router
Langaton reititin
EnglishSvenskaNorskSuomi
WAN LAN 1 LAN2 LAN3 LAN4 USB RF/WP3
+
Art.no Model
18-8143 GN-BR33V-RH-UK
38-3727 GN-BR33V-RH
Ver. 201101
Page 2

2
Page 3

Wireless Router
Art. no: 18-8143 Model: GN-BR33V-RH-UK
38-3727 GN-BR33V-RH
Please read the entire instruction manual before using the product and save it
for future reference. We reserve the right for any errors in text or images and any
necessary changes made to technical data. If you have any questions regarding
technical problems please contact Customer Services.
1. Product description
• Wireless Router, 300 Mbps. Pre-N-technology. Backwards compatibility with
IEEE802.11b/g.
• Supports IEEE 802.11n specifications.
• High-speed wireless transfer rate, up to 300 Mbps
• 64/128-bit WEP encryption, 802.1x, WPA and WPA2.
• Supports dynamic and static routing. Up to 252 users can share the same
ADSL/cable modem connection.
• DHCP server for assigning IP addresses.
• Built-in firewall. Packet and protocol filtering. NAT and DHCP.
• Auto MDI/MDI-X (detects and automatically adjusts for straight or crossover cables).
• Integrated 4-port 10/100 Mbit switch for TP computer connections.
• Supports redirection (virtual server with port mapping) and DMZ.
• Comes with mains adaptor, cables and comprehensive instruction manual.
English
1.1 Contents
• GN-BR33V-RH wireless router
• Mains adaptor (5 V DC, 2 A)
• Instruction manual
• Mains lead
• CD with complete instruction manual
3
Page 4

RJ45 RJ45
WAN LAN 1 LAN2 LAN3 LAN4 USB RF/WP3
+
2. Buttons and functions
2.1 Buttons and connections
English
WAN LAN 1 LAN2 LAN3 LAN4 USB RF/WP3
+
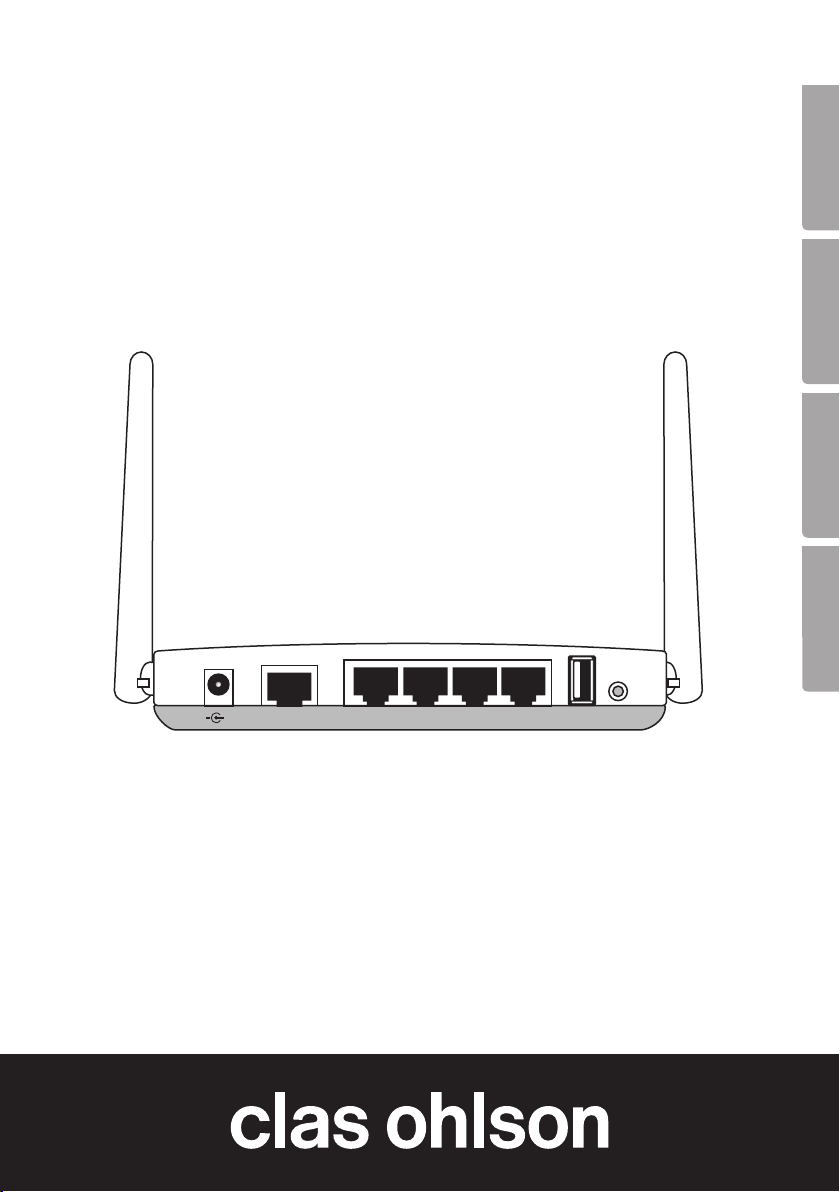
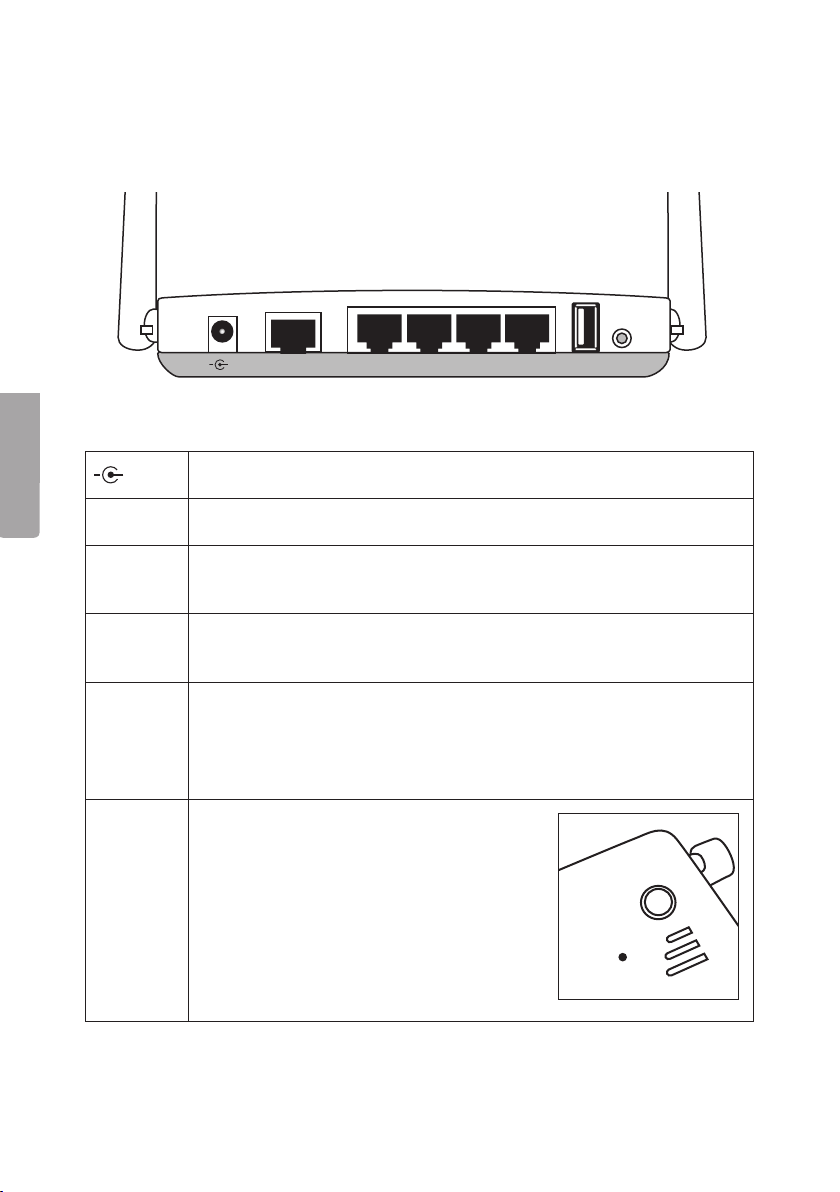
The connections are located on the back of the router. From left to right:
+
Mains adaptor socket (5 V, centre pin positive).
WAN
LAN (1–4)
USB
Socket for DSL/cable modem or Internet connection.
Sockets for network cables for 1–4 networked computers.
USB 2.0 port for connecting a USB device such as external hard
drive or USB memory (with FAT32 or EXT3 formatting).
RF/WPS
Enable/disable WPS (Wi-Fi Protected Setup).
A). Press once briefly to enable/disable WPS (Wi-Fi Protected Setup).
B). Press and hold in for 4 seconds to turn on/off the wireless
INIT
network (WLAN).
Reset button (on bottom of router).
Use a paper clip or similar to push in
and restart and reset the router’s
default factory settings.
See section 5.3 Resetting.
INIT
4
Page 5

2.2 LED Indicators
The LEDs on the front of the router indicate the status of various features.
From left to right:
LAN 1–4 Constant green light: Router is in contact with a network
10/100 Mbps.
Flashing green light: Data is being transferred via the LAN port.
WAN Constant green light: Router is in contact with a DSL or
cable modem.
Flashing green light: Data is being transferred via the WAN port.
WLAN/WPS Constant green light: Network is active but no data is
being transferred.
Flashing green light: Wireless data transfer.
Flashing red: WPS function enabled.
N.B. When the red light is flashing the green light is also
illuminated, which might be difficult to see. (If you hold in the
RF/WPS button for more than 4 seconds, the router will disable
the WPS function.)
English
PWR Lights when the adaptor is connected and is functioning.
Not lit when the mains adaptor is disconnected.
5
Page 6
3. Installation
N.B.
• Using 300 Mbps products from the same manufacturer gives the best results.
English
• The first time the router is used it is simplest to connect it to a computer via
a network cable, thus avoiding possible configuration problems associated with
wireless connections.
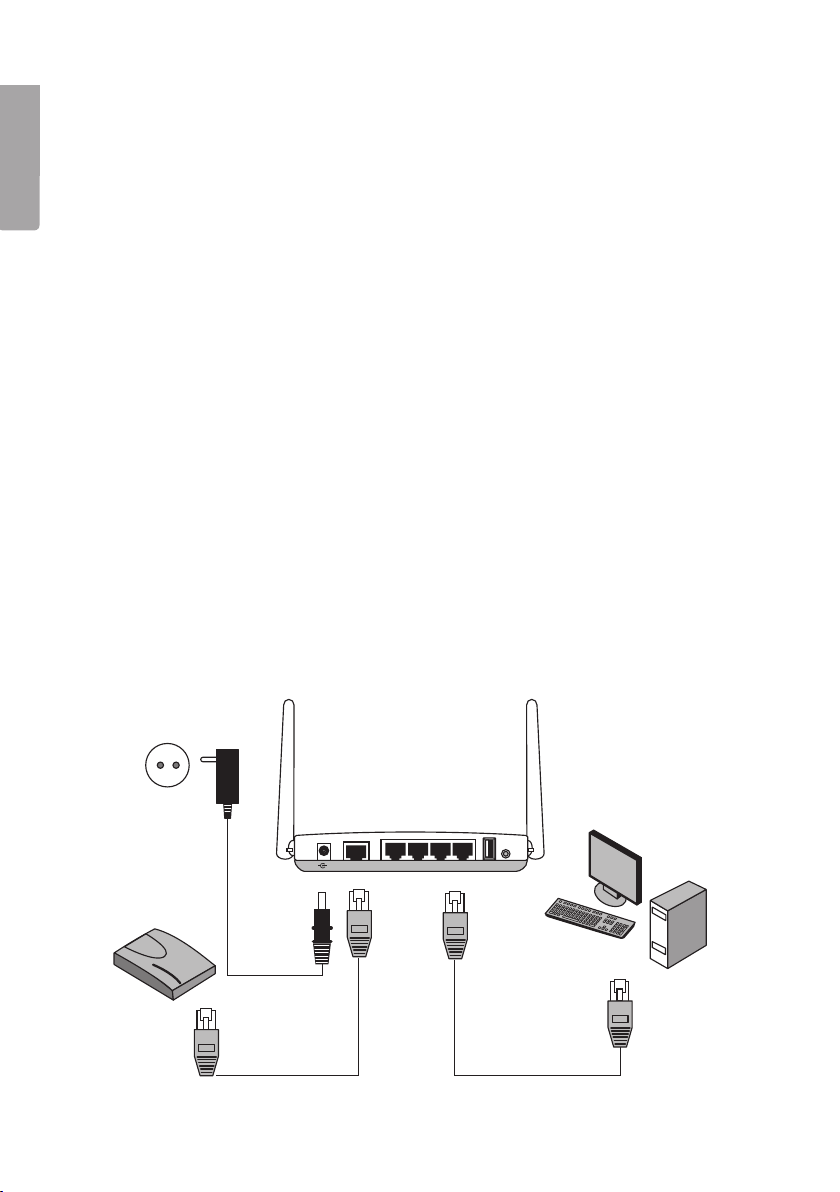
3.1 Modem and computer connections
1. Turn off all devices (including the router) to be connected before beginning installation.
2. Connect a network cable between the xDSL/cable modem and the WAN port
(WAN) on the router.
3. Connect a network cable between the computer network card and one of the
LAN ports on the router.
4. Plug the DC connector on the mains adaptor into the router’s DC socket (5 V DC)
and then plug the adaptor into an available wall socket.
5. Turn on the xDSL/cable modem.
6. When starting up, the router will conduct a power-on self-test which lasts about
5 seconds.
7. The green LEDs for PWR, LAN and WAN should all come on.
8. Restart all computers connected to the router via network cable. Angle the aerial
on the router so it is pointing straight up if you wish to use a wireless connection.
ADSL
WAN LAN 1 LAN2 LAN3 LAN4 USB RF/WP3
+
RJ45 RJ45
6
Page 7

4. Configuration
These are only brief instructions to help you get started. A complete user manual can
be found on the supplied CD.
N.B.
• The configuration instructions in this section require the computer to be connected
to the router via network cable.
• These instructions only apply to Windows XP/Vista.
4.1 Checking the broadband connection
Check with your broadband provider regarding your type of Internet connection.
Different Internet providers use different connection methods for connecting to the
Internet. The most common connection methods are:
A. PPPoE
PPPoE
Automatically assigns IP addresses via PPPoE. Enter the username and password
received from your ISP.
B. Dynamic IP Internet Connection
Automatically assigns IP addresses from a DHCP server. No user information
is required.
C. Static IP Internet Connection
Enter the details you have from your ISP.
Select “Internet Connection Type” or “WAN Type Select” (depending on configuration
method) in the router menu.
English
4.2 Checking possible firewalls
Ensure that all computers connected to the router do not have a firewall programme
enabled, e.g. Internet Security or Zone Alarm.
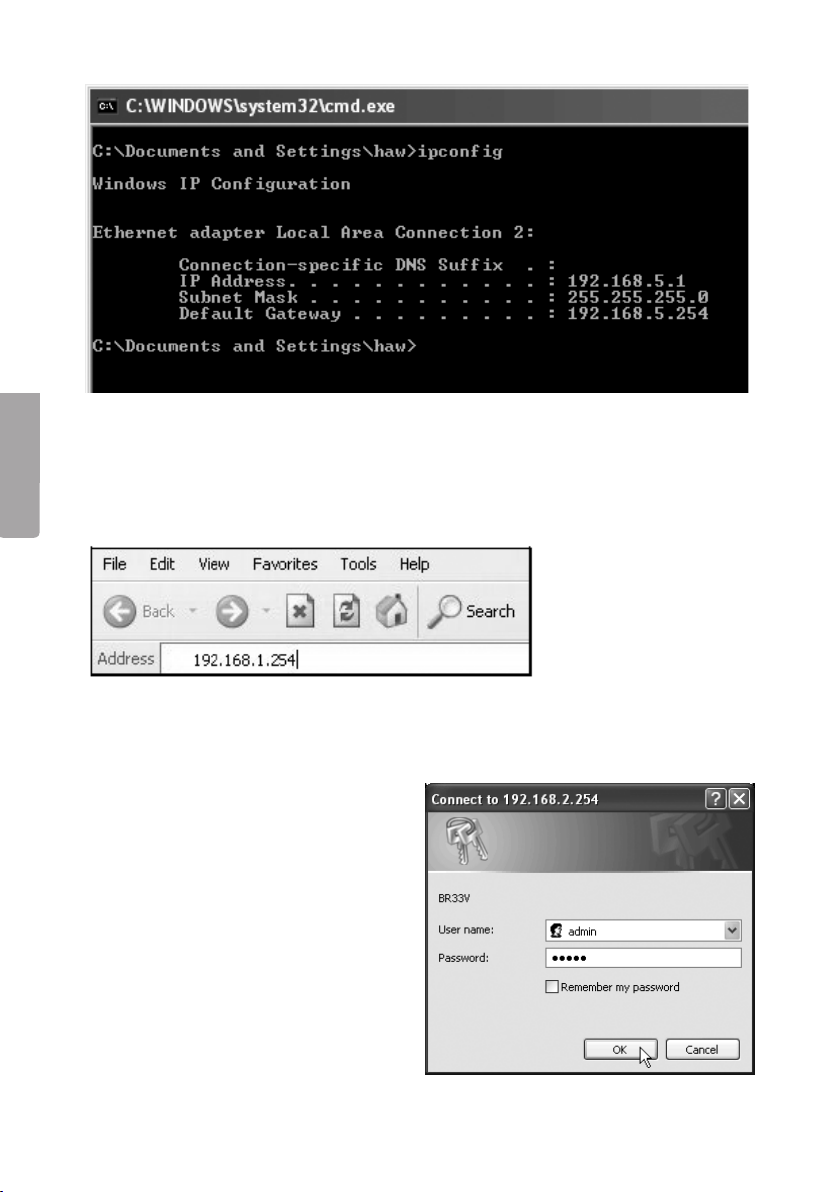
4.3 Checking the computer’s settings
Check that the computer is set to automatically receive an IP address and that the
computer has received a correct IP address from the router.
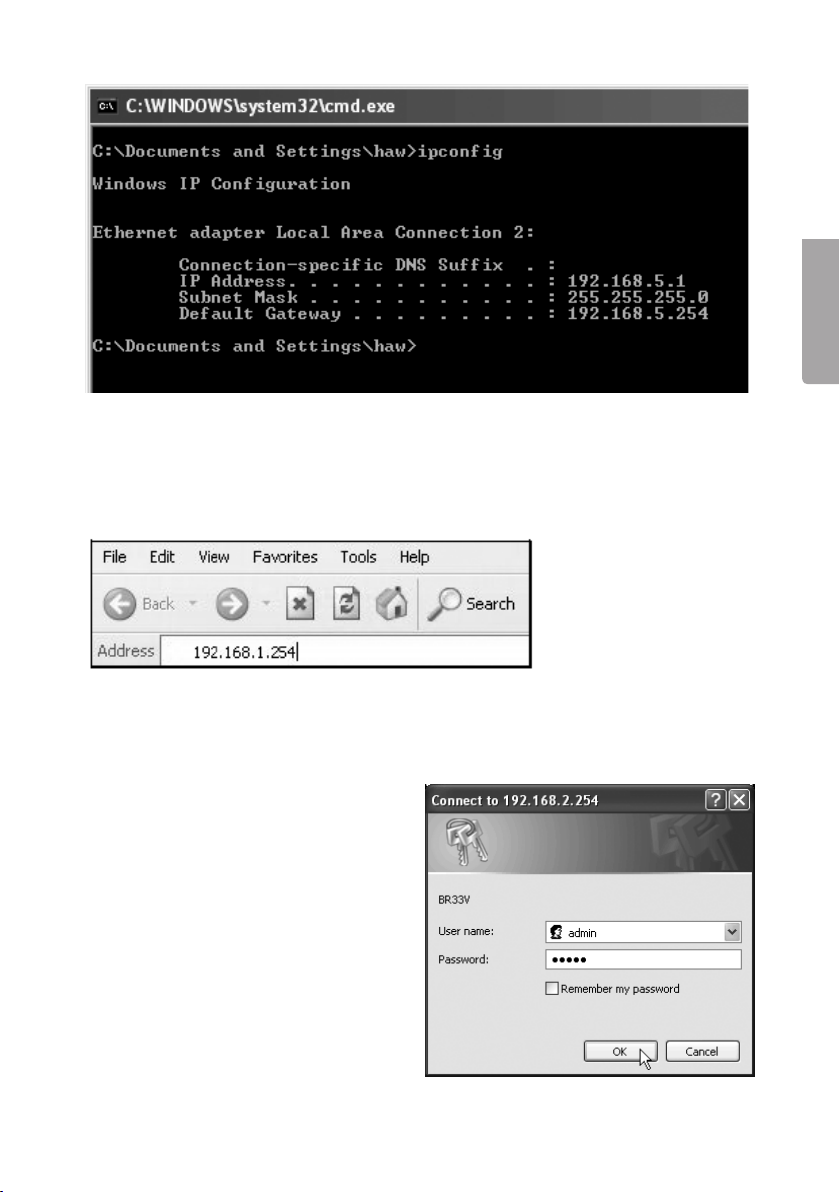
1a) In Windows XP: Click on Start and select Run….
1b) In Windows Vista and Windows 7: Click on the Windows icon, enter Cmd in the
search window and press [Enter].
2. Type Cmd and then click on OK.
3. Type ipconfig and check that the computer has received the correct IP address
(in this case 192.168.1.4) and gateway (in this case 192.168.1.254).
If the computer is not assigned an IP address, refer to the Troubleshooting guide.
7
Page 8

English
4.4 Opening the router configuration menu
Enter the router’s IP address (192.168.1.254) in the address field of your web browser
(e.g. Internet Explorer) and press [Enter] to connect to the wireless router.
N.B. If you are using a modem with a built-in router, GN-BR33V-RH will change IP
address automatically to avoid conflicts on the network (e.g. 192.168.2.254).
2. When the login box appears, enter
your User name and Password.
The default user name is
“admin”and the default password
is “admin”.
The password and username
can be changed by clicking on
the “Management Tool” tab in the
router’s menu.
8
Page 9

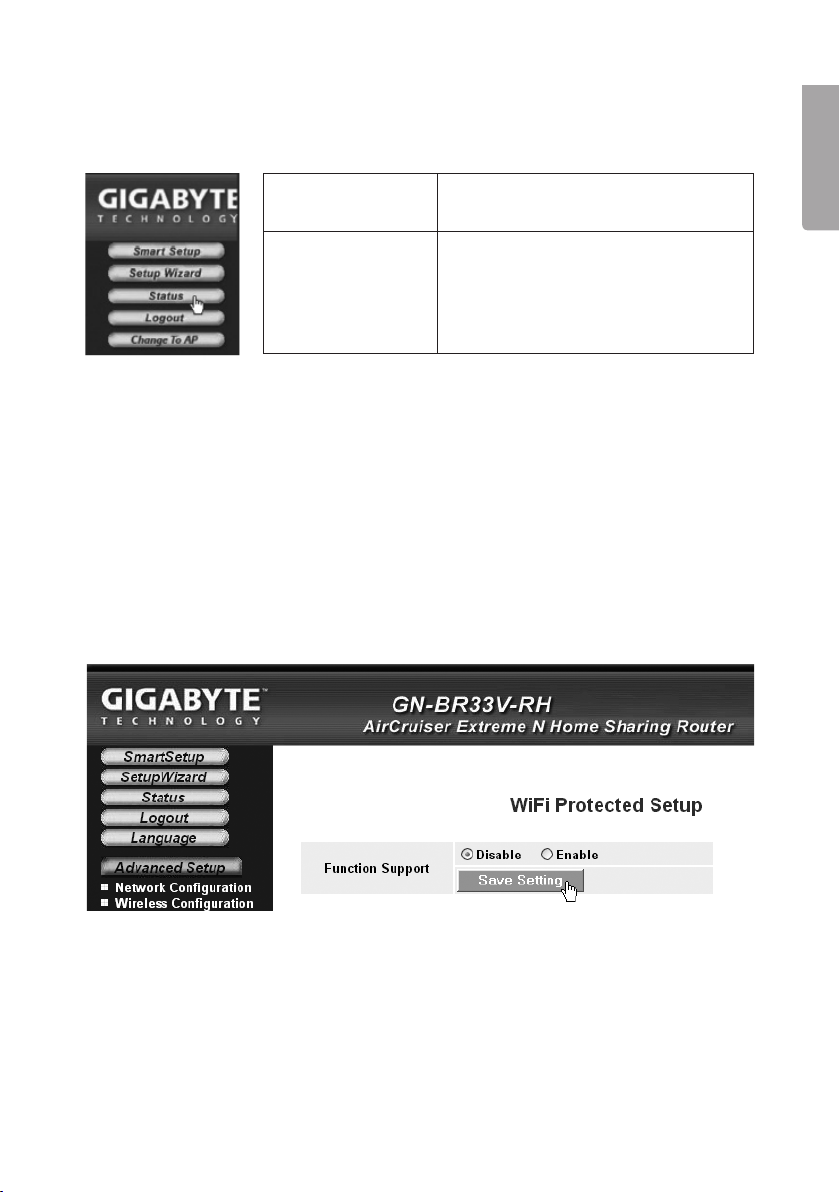
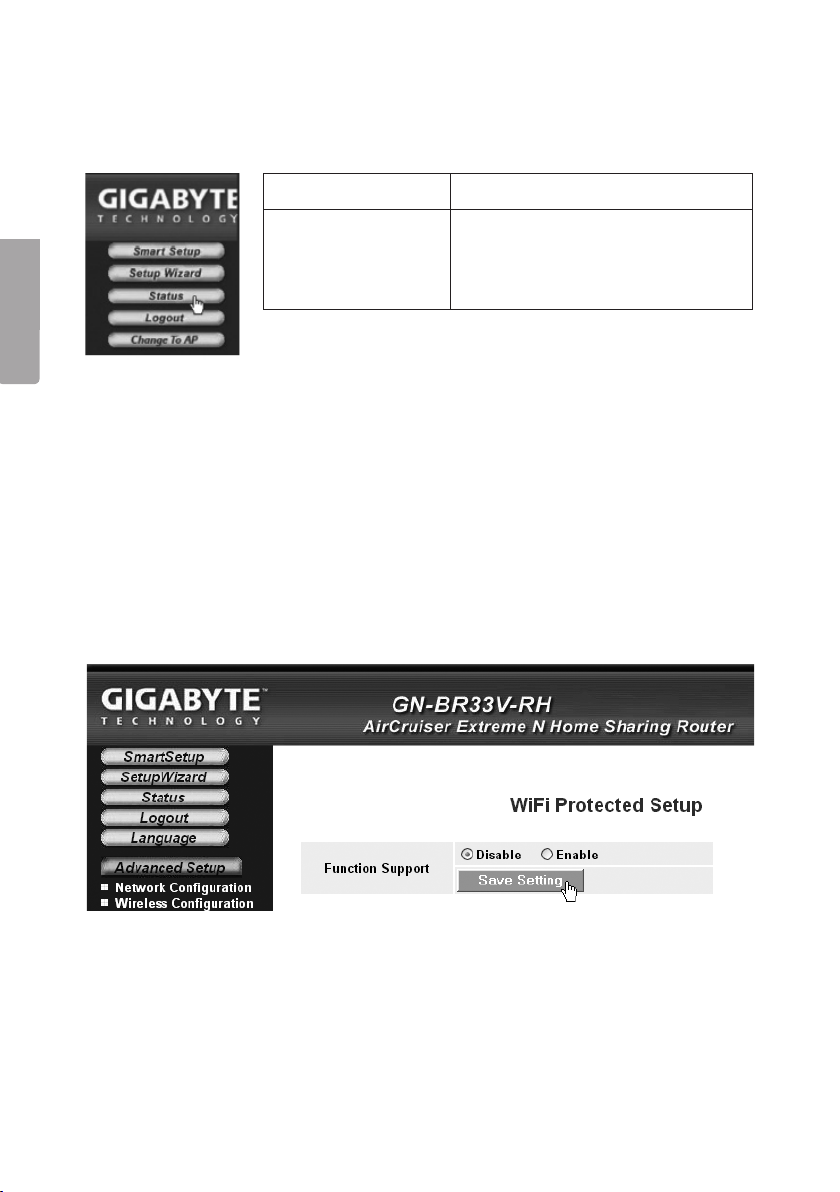
3. The router menu opens. Select desired submenu.
Smart Setup Automatic configuration (only with an Internet
connection via a WAN-port).
Setup Wizard Manual configuration.
Status Shows current status of LAN and WAN.
Advanced
configuration
Management Tool Setup and programs for the router such as password
Manual setup for network, wireless connection,
firewall, etc.
changing, router firmware upgrades, etc.
4.5 Smart Setup (automatic configuration) (recommended)
This type of configuration is recommended if the Internet connection is via a WAN
port. “Smart Setup” identifies which type of connection you have.
English
1. Click on Smart Setup for automatic
configuration.
2. The router will attempt to identify and
configure your Internet connection.
3. When the router has configured your
connection the router will restart.
4. Select if/how you wish to configure the router
manually:
5. Click on Logout when you wish to finish and
exit the router menu.
9
Page 10

4.6 Manual configuration
Setup Wizard
Check with your Internet provider regarding your type of Internet connection. Different
English
Internet providers use different connection methods for connecting to the Internet.
The most common connection methods are:
A) PPPoE
Automatically assigns IP addresses via PPPoE. Use the username and password
received from your Internet provider.
B) Dynamic
Automatically assigns IP addresses from a DHCP server. No user information
is required.
C) Static
Enter the details you have from your ISP.
1. Click on Network Configuration and then WAN Configuration.
2. Click on Edit on the top row.
3. Select type of connection according to the information received from your Internet
provider and click on Next.
4. Enter the desired name for the connection under “ISP Name”. If the gateway and
DNS addresses need to be changed enter them at this stage. Click on Finish.
5. Select the connection created in step 4 as the primary connection (Main Session).
• If you have created more than one connection you can select a secondary
connection at this stage if you are unable to connect with your primary connection.
6. Click on Submit to save settings and finish.
N.B.
• Some Internet providers require the modem to be turned off for 30–60 minutes
after inputting the router settings for the connection to work.
• Check that no firewall program is installed on your computer. If there is one,
disable it or reconfigure it for the internal network. GN-BR33V-RH has its own
built-in firewall.
10
Page 11
4.7 Checking the router’s connection
The router’s status and settings can be changed at any time by clicking on Status in
the menu.
LAN IP 1 Address Display’s the router’s internal
IP address.
WAN IP Address Display’s the router’s external
IP address. If “Unavailable” is
displayed the router has failed to
make an Internet connection.
Refer to “Troubleshooting”.
4.8 Activating/deactivating the wireless network
• Press and hold in the WPS button on the back of the router for approx. 5 seconds
to turn the wireless network on/off.
• The “WLAN” indicator displays the status of the wireless network:
Lit (green) – wireless network is enabled
Off – wireless network is turned off
Flashing red – WPS is enabled
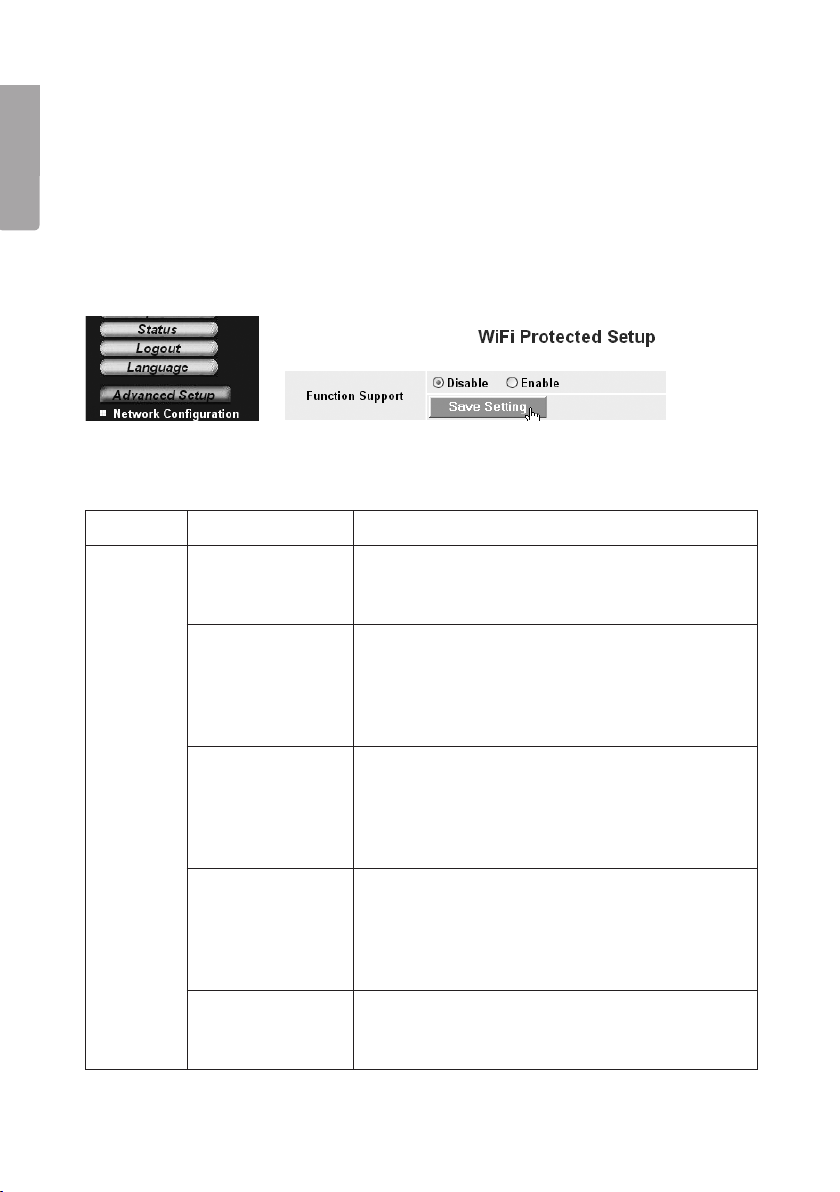
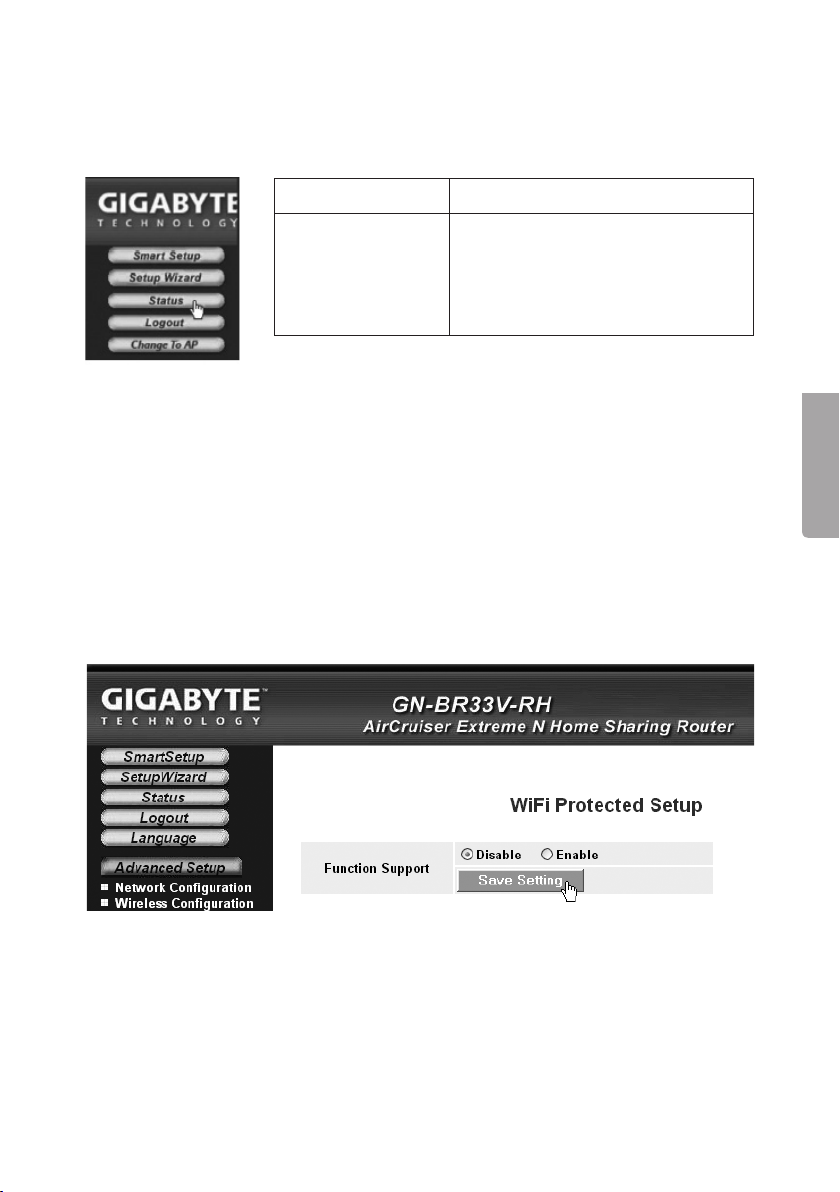
N.B. You can turn off/disable or activate/enable the WPS by going to the “Wireless
Configuration/WPS” tab in the menu and confirming by clicking on Save Setting.
English
11
Page 12
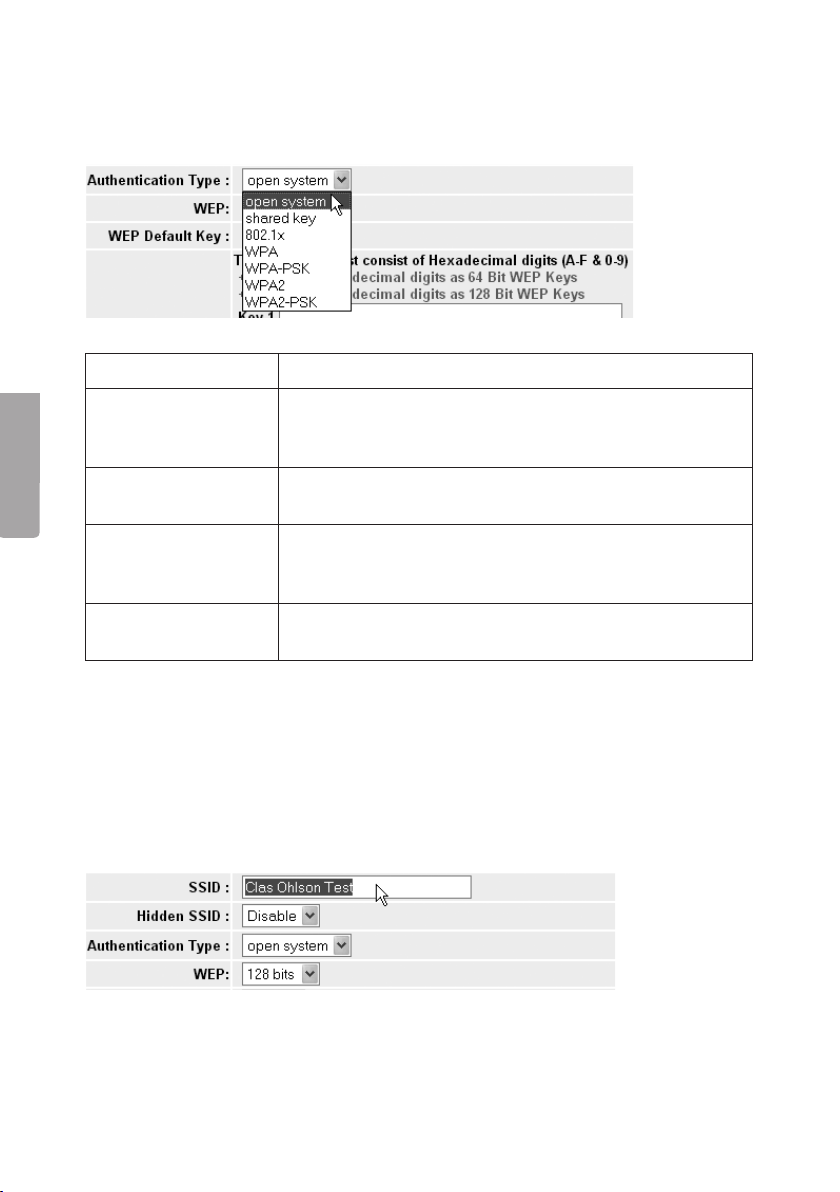
4.9 Wireless network security
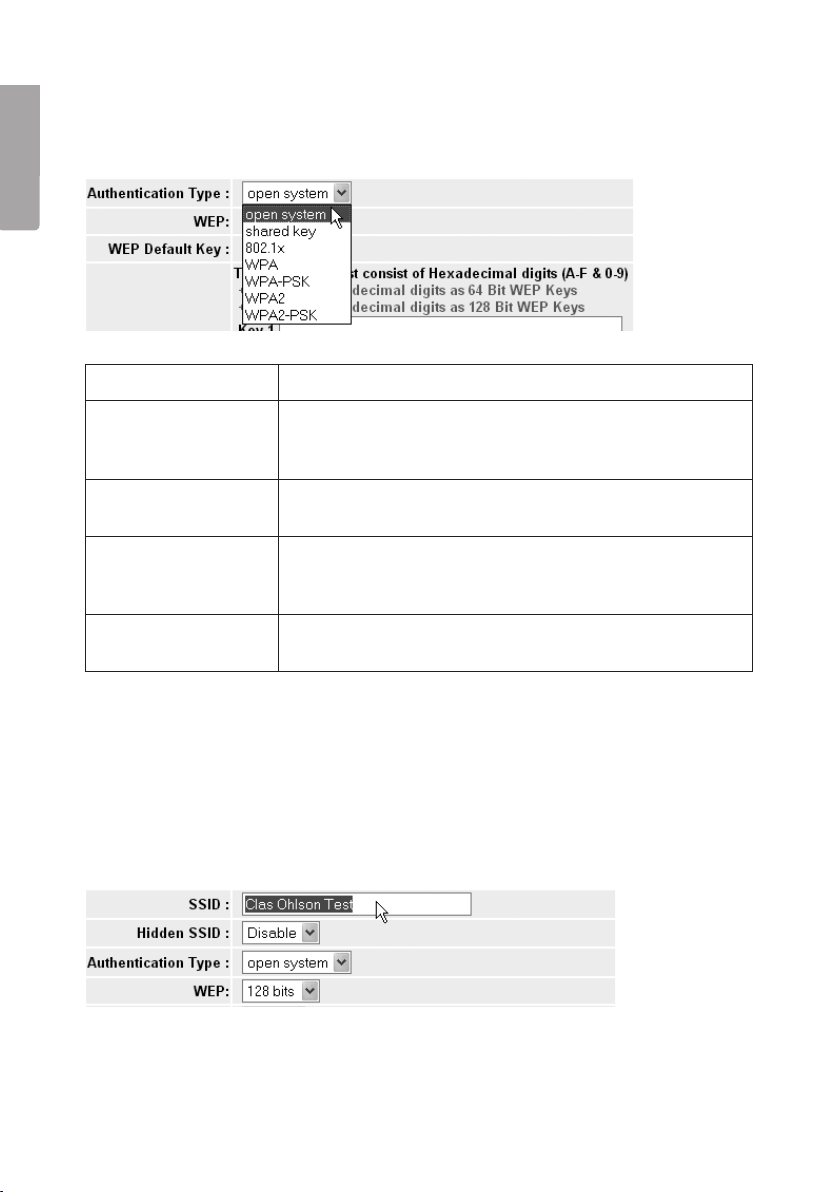
The router supports the following types of wireless network encryption
(Authentication Type):
English
Open system No encryption, the network is “open”.
Shared key (WEP)
(Wired Equivalent
Privacy)
WPA (WiFi Protected
Access)
WPA-PSK (WiFi
Protected Access &
Pre-shared key)
WPA2-PSK A development of WPA-PSK (at present only compatible
Consists of a security key that needs to be Entered into
both router and connected computers. When “Shared
key” is enabled WEP cannot be disabled.
Enables the user to authenticate himself/herself using
a RADIUS server.
Consists of a password chosen by the user that needs to
be entered into both router and connected computers.
with Vista/Windows 7).
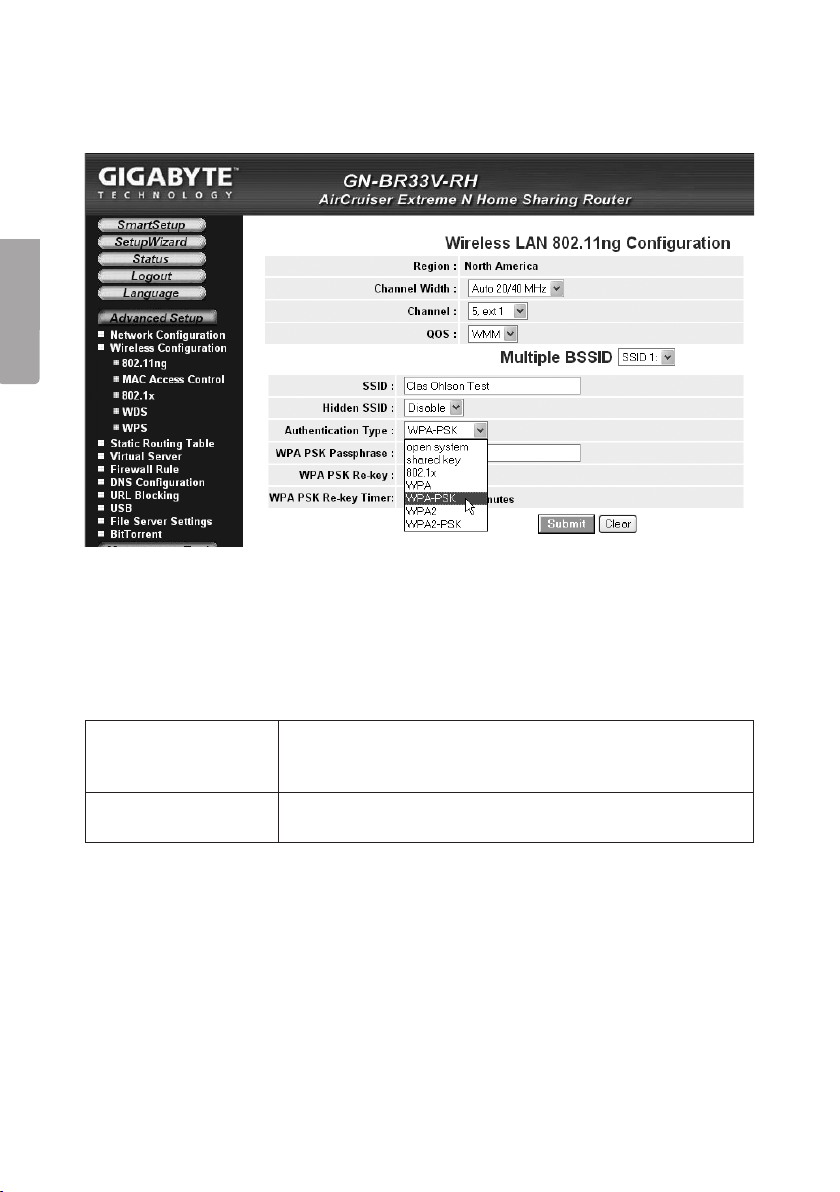
4.9.1 Configuring WPA-PSK encryption
Recommended for home networks.
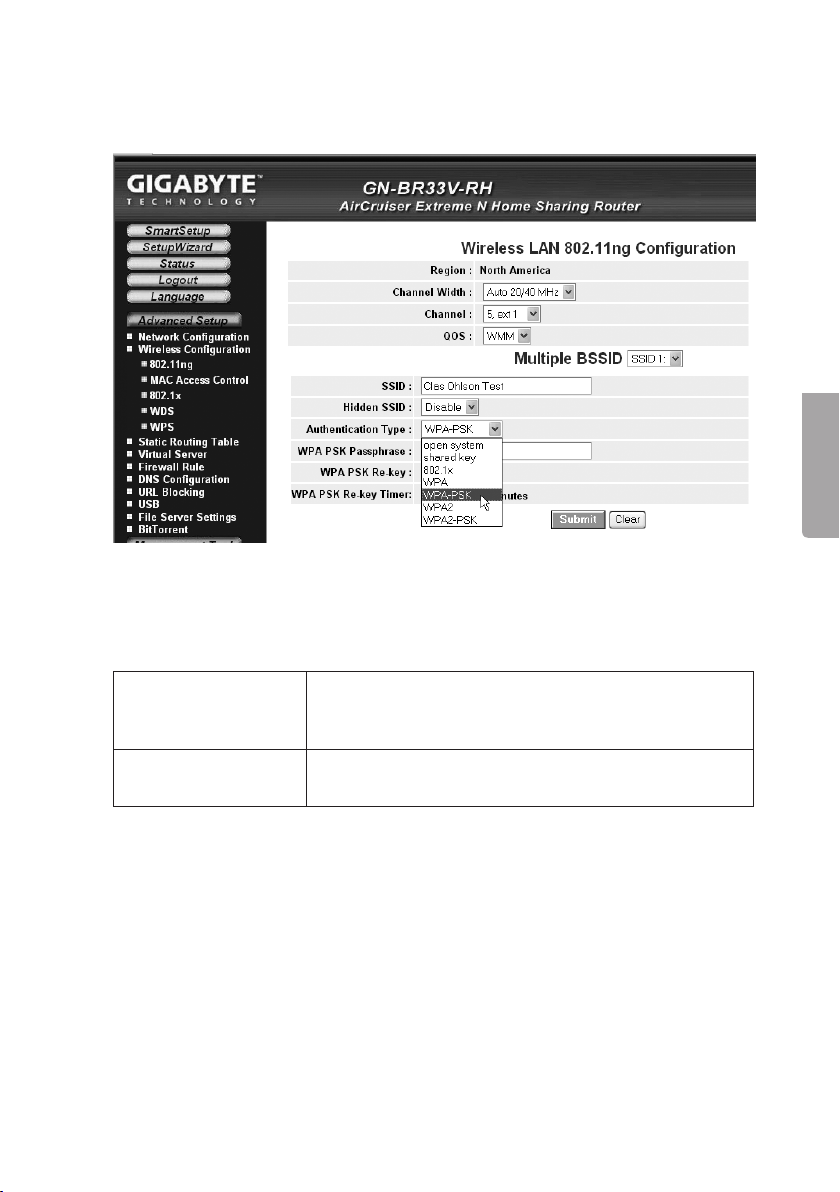
1. Click on Wireless Configuration in the menu and then on 802.11ng.
2. Enter the desired name for the wireless network under “SSID”. SSID is the
name the network transmits to computers searching for a connection to the
wireless network.
12
Page 13

3. Select WPA-PSK encryption (Authentication Type)*.
(WEP is an older, less secure form of encryption that is not recommended).
4. Enter a passphrase of between 8 and 63 characters long under WPA PSK
Passphrase. Use only accepted symbols. Longer pass phrases give a higher
degree of safety. GIGABYTE is the default passphrase, this can be changed.
5. Configure optional settings:
English
WPA-PSK Re-key Enable or disable this function which requires that
the passphrase must be re-entered. This function is
normally disabled.
WPA-PSK Re-key
Timer
This specifies a time window (in minutes) in which
a WPA passphrase needs to be Re-keyed.
6. Click on Submit to save your settings.
7. The router will restart with the new settings.
N.B.
When you have configured network encryption and saved your settings all connected
users will be disconnected. They must reconnect to the wireless network and enter
the same passphrase entered for the router.
* If you want to use use WPA2-PSK this must be entered at step 3.
13
Page 14
4.10. WPS (Wi-Fi Protected Setup)
WPS (Wi-Fi Protected Setup) is used mostly to connect other wireless devices which
support WPS.
English
When connecting with WPS the router automatically configures the security settings
in the network for the router and the connected wireless devices. See the complete
instruction manual for further information.
N.B. You can disable or enable the WPS by going to the “Wireless Configuration/
WPS” tab in the menu and confirming by clicking on Save Setting (it can also be
disabled/enabled using the RF/WPS button).
5. Troubleshooting
Fel Possible causes Possible solution
I am
having
trouble
con necting
to the
router.
The router is not
connected to the
adaptor.
No network
connection.
The computer
used lies in a different IP address
series than the
router.
Other firewalls or
anti-virus programs
with firewalls are
blocking the connection.
Check that the “PWR” lamp is lit, if not check the
adaptor and wall socket.
Check that you have a physical or wireless
connection between the PC and router; one or
several LAN indicators should be lit. Thenetwork
card’s LED will also indicate if theconnection is
working.
The IPCONFIG tool used in the command prompt
displays your settings: Type ipconfig and press
[Enter]. The computer’s network settings e.g. IP
address and net mask will beshown.
Standard-gateway is the router’s IP address. The
three first groups in the IP address (192.168.1.x)
should be the same for the router and connected
devices. The last group (x) is a network serial
number and should be different on all devices.
Check that no firewall programme is installed.
Ifpresent, deactivate or configure it for the internal
network. This router has a built-in firewall.
14
Page 15

I cannot
connect to
other devices
on the network:
The computer’s IP
settings are incorrectly configured.
Every computer should have a unique IP
address, check e.g. with the command
IPCONFIG. See the Checking the confi-
guration section about how to check and
update the configuration.
Normally, Obtain an IP address automa-
tically should be chosen (if you want to
use the router’s DHCP function).
Note! Any changes may require a restart
for them to take effect.
English
I can connect
to the router
but not to the
Internet:
The network cables
are incorrectly
connected.
The modem or
ADSL unit does
not work.
Cable error between
the WAN port on the
router and the modem or ADSL unit.
Wrong type of
connection is
used during Setup
(PPPoE, Dynamic
or Static).
Username and
password for the
Internet provider is
possibly wrong.
Try connecting using another
network cable.
Some Internet providers require the
modem to be turned off for 30–60 minutes
after inputting the router settings for the
connection to work.
Check that no firewall programme is
installed. If present, deactivate or configure
it for the internal network.
This router has a built-in firewall.
Check the cable connections.
Check the settings for your type of
connection.
Enter the correct username and password.
Differentiate between
capital letters and lower-case letters.
Always read through the instructions and
rules received from your Internet provider.
There may be certain restrictions regarding
the sharing of a connection.
15
Page 16

5.1 Troubleshooting for Windows XP
TCP/IP
1. Go to Start/Control panel and select Network connections. Right-click on
English
thenetwork card connection you wish to configure and select Properties.
2. Select the TCP/IP protocol associated with the network card and choose
Properties.
3. Check that Obtain an IP address automatically and Obtain DNS server
address automatically are chosen.
4. Click on OK.
Disable http-proxy
Make sure that the computer is not configured for a proxy server.
1. Open Internet Explorer and click on Tools and then select Internet options.
2. Select Connections and then LAN settings. Then remove all selections.
3. Press OK to close the windows.
Checking the configuration
You can check that the computer has a correct IP address by:
Checking that the computer is set to automatically receive an IP address and that
thecomputer has received a correct IP address from the router.
1. Windows XP: Click on Start and select Run….
Windows Vista: Click on the Windows icon, enter Cmd in the search window and
press [Enter].
2. Type Cmd and then click on OK.
3. Type ipconfig and check that the computer receives a correct IP address (in this
case 192.168.1.4) and gateway (192.168.1.254).
4. If the computer has received a correct IP address according the figure below, no
further settings will be required. Type exit and press [Enter] to return to Windows.
Updating the configuration
If the computer still has an old or incorrect IP address it can be renewed to receive
acorrect IP address. Proceed as follows:
1. Open Programs/Accessories/Command
Prompt type ipconfig/release and press
[Enter].
2. Type ipconfig/renew and press [Enter]. You
should now be assigned a new IP address.
3. Type exit and press [Enter] to return to
Windows.
16
Page 17

5.2 The PING function
The PING function controls which devices/computers are connected to the network.
The PING command is used at the command prompt*.
1. Type ping at the prompt, press [space] and enter the IP address or the computer
you want to “ping” and press [Enter].
2. “Request timed out” appears when the connection does not work (either because
the pinged computer is not turned on or correctly connected).
“Reply from…” appears when the connection works and the pinged computer is on.
A working connection should look like this: In this case the computer is connected
to a device with an IP address: 192.168.5.254.
* The PING tool can also be found in the router menu under the “Ping” tab.
English
5.3 Resetting
If you wish to start over from the beginning and return to default settings:
Alt. 1:
The reset button (INIT) on the bottom of the router resets it to the default factory
settings. Procedure:
• Switch the router on. Use a paper clip or similar and press [INIT] for 5–6 seconds
until the orange “PWR” light comes on. The router should now restart with defaultsettings.
Alt. 2:
• Click on Initialization in the menu and then on Initialize Router. The router should
now restart with default settings.
N.B. All personal settings will be erased when doing a reset!
17
Page 18

6. Care and maintenance
Always unplug the adaptor from the wall socket before cleaning. Wipe with a soft,
lightly moistened cloth. Do not use cleaning solutions or solvents.
English
7. Disposal
Follow local ordinances when disposing of this product.
If you are unsure of how to dispose of this product, please contact your local authority.
8. Specifications
General Specifications
Complies with the
following standards
Ports LAN: 10/100 Ethernet (auto-MDIX), RJ45 (4x) WAN:
Routing protocol Dynamic, Static Routing with TCP/IP, NAT, PPTP,
Security WPA, WPA2 (at present only compatible with Vista
Pre-programmed IP
address
Pre-programmed
username
Pre-programmed
password
Power supply 5 V DC, 2 A via included adaptor
Size 216 x 136 x 26 mm
Weight 238 g
IEEE802.3 (10Base-T), IEEE802.3u (100Base-TX)
IEEE802.11b/g/n (Wireless)
10/100 Ethernet, RJ45 (1x).
PPPoE, VPN Pass-Through (IPSec, L2TP) DHCP
(Client & Server).
och Windows 7)
Built-in firewall with SPI (Stateful Packet Inspection)
64/128-bit WEP encryption.
802.1x access control
192.168.1.254
admin
admin
18
Page 19
Wireless specifications
Frequency response 2412–2484 MHz (according to local regulations)
Modulation type DSSS, (DBPSK, DQPSK, CCK) OFDM (BPSK, QPSK,
16-QAM, 64-QAM).
Bit rate
(auto-fallback)
Output power Legacy-mode – 20 dBm @11b, 17 dBm @11g;
Sensitivity Legacy-mode – 90 dBm @11b, 74 dBm @11g;
Range Up to 100 metres (indoors)
Aerials 2 x (not detachable)
Certifications CE (Europe), FCC part 15 (USA)
802.11b – 1, 2, 5, 11 Mbps
802.11g – 6, 9, 12, 18, 24, 36, 48, 54 Mbps
802.11n – 81, 108, 121, 135, 162, 216, 243, 270,
300 Mbps
HT20-mode – 17 dBm @MCS7/15;
HT40-mode – 17 dBm @MCS7/15;
HT20-mode – 73 dBm @MCS7/15;
HT40-mode – 68 dBm @MCS7/15;
Operating environment
Temperature range 0–55 °C (operating temperature)
Humidity 10–85 % (non-condensing)
English
Points worth bearing in mind!
• Other wireless equipment operating on the same frequency band may
reduce the range of the product.
• The range of all wireless equipment is affected by obstacles between
the transmitter and the receiver (a concrete wall reduces the signal far
more than a plasterboard partition, for example).
If you are having problems with the operation of
the system, try the following solutions
• Switch off any other wireless equipment to check whether it could be causing
the problem.
• Move the wireless equipment and/or reduce the distance, and reduce thenumber
of obstacles (walls, furniture, etc.) between the transmitter andthe receiver.
19
Page 20

Trådlös router
Art. nr 18-8143 Modell GN-BR33V-RH-UK
38-3727 GN-BR33V-RH
Läs igenom hela bruksanvisningen före användning och spara den sedan för
framtida bruk. Vi reserverar oss för ev. text- och bildfel samt ändringar av tekniska
data. Vid tekniska problem eller andra frågor, kontakta vår kundtjänst (se adressuppgifter på baksidan).
Svenska
1. Produktbeskrivning
• Trådlös router, 300 Mbps med Pre-N-teknik samt bakåtkompatibel enl.
IEEE802.11b/g.
• Stöder IEEE 802.11n-specifikationen.
• Hög trådlös överföringshastighet, upp till 300 Mbps.
• 64/128-bitars WEP-kryptering, 802.1x, WPA och WPA2.
• Stöder dynamisk och statisk routing. Upp till 252 användare kan dela på samma
anslutning för ADSL-/kabelmodem.
• DHCP-server för utdelning av IP-adresser.
• Inbyggd brandvägg med paket- och protokollfiltrering samt NAT och DHCP.
• Auto MDI/MDI-X (känner av och korrigerar automatiskt korsade kablar).
• Inbyggd 4-ports 10/100 Mbit-switch för TP-anslutning av datorer.
• Möjlighet till re-direct (virtual server med portmapping) och DMZ.
• Lev. med batterieliminator, kablage och komplett bruksanvisning på engelska.
1.1 Förpackningen innehåller
• GN-BR33V-RH Trådlös router.
• Nätadapter (5 V DC, 2 A).
• Bruksanvisning.
• Nätverkskabel.
• Cd-skiva med fullständig bruksanvisning på engelska.
20
Page 21

2. Knappar och funktioner
RJ45 RJ45
WAN LAN 1 LAN2 LAN3 LAN4 USB RF/WP3
+
2.1 Knappar och anslutningar
WAN LAN 1 LAN2 LAN3 LAN4 USB RF/WP3
+
Anslutningarna är placerade på routerns baksida. Från vänster till höger:
+
WAN
LAN (1–4)
Anslutning för nätadapter (5 V, + i centrum).
Anslutning till DSL-/kabelmodem eller Internetanslutning.
Anslutning för nätverkskabel till 1–4 datorer (eller andra enheter)
i nätverket.
USB
USB 2.0-anslutning för USB-enhet t.ex. extern hårddisk eller USBminne (med FAT32- eller EXT3-formatering).
RF/WPS
Aktivera/stänga av WPS (Wi-Fi Protected Setup).
A). Tryck kort för att aktivera/stänga av WPS (Wi-Fi Protected Setup).
B). Tryck och håll in ca 4 sekunder för att slå på eller av trådlöst
nätverk (WLAN).
INIT
Återställningsknapp (på undersidan).
Tryck in med ett gem eller liknande
för att starta om och återställa routerns
fabriksinställningar.
Se avsnitt 5.3 Återställning.
Svenska
21
INIT
Page 22

2.2 Lysdiodernas visning
Lysdioderna är placerade på routerns framsida. Från vänster till höger:
Svenska
LAN 1–4 Grönt fast sken: Routern har kontakt med ett nätverk
10/100 Mbps.
Blinkande grönt: Data överförs via LAN-porten.
WAN Grönt fast sken: Routern har kontakt med ett DSL- eller
kabelmodem.
Blinkande grönt: Data överförs via WAN-porten.
WLAN/WPS Grönt fast sken: Trådlöst nätverk aktiverat men ingen data
överförs för tillfället.
Blinkande grönt: Data överförs trådlöst.
Blinkande rött sken: WPS-funktionen aktiverad.
Obs! När det blinkar rött lyser grönt samtidigt vilket kan göra det
svårt att se. (Om du håller in RF/WPS i mer än 4 sekunder kommer routern att stänga av WPS-funktionen).
PWR Lyser när nätadaptern är ansluten och fungerar.
Släckt när nätadaptern inte är ansluten.
22
Page 23

3. Installation
Obs!
• Tänk på att enbart använda 300 Mbps-produkter av samma fabrikat för
bästa funktion.
• Första gången som routern används är det enklast att ansluta routern till
en dator med en nätverkskabel, det undanröjer ev. konfigureringsproblem
med trådlös anslutning.
3.1 Anslutningar till modem och dator
1. Stäng av alla enheter (inklusive routern) som ska anslutas innan installationen
påbörjas.
2. Anslut en nätverkskabel mellan xDSL-/kabelmodemet och WAN-porten (WAN)
på routern.
3. Anslut en nätverkskabel mellan datorns nätverkskort och en av LAN-portarna
på routern.
4. Anslut nätadapterns DC-kontakt till anslutning
till ett vägguttag.
5. Slå på xDSL-/kabelmodemet.
6. Vid start kommer routern att göra ett självtest som tar ca 5 sekunder.
7. Lysdioderna PWR, LAN och WAN skall lysa grönt.
8. Starta den eller de datorerna som är anslutna till routern med nätverkskabel.
Vinkla antennerna på routern rakt uppåt om du ska använda trådlös anslutning.
+
på routern och sedan
Svenska
ADSL
WAN LAN 1 LAN2 LAN3 LAN4 USB RF/WP3
+
RJ45 RJ45
23
Page 24

4. Konfigurering
Detta är endast en kortfattad instruktion så att du kan komma igång.
Fullständig bruksanvisning på engelska finns på den medföljande cd-skivan.
Obs!
• Konfigurationen i detta avsnitt kräver att du anslutit datorn till routern via
nätverkskabel.
• Instruktionen gäller för Windows XP/Vista/7.
4.1 Kontrollera först din bredbandsanslutning.
Svenska
Kontrollera med din bredbandsleverantör om vilken typ av anslutning du har till
Internet. Bredbandsleverantörerna använder olika anslutningstyper för att ansluta
till Internet. De vanligaste anslutningstyperna är:
A. PPPoE
Automatisk tilldelning av IP-adress via PPPoE. Du behöver ange det användarnamn
och lösenord som du fått från din bredbandsleverantör.
B. Dynamic IP Internet Connection (dynamisk anslutning)
Automatisk tilldelning av IP-adress från en DHCP-server. Inga användaruppgifter
behöver anges.
C. Static IP Internet Connection (fast IP-adress)
Du behöver ange de uppgifter du fått från din bredbandsleverantör.
Denna inställning väljer du på sidan ”Internet Connection Type” eller ”WAN Type
Select” (beroende på konfigurationssätt) i routerns menyer.
4.2 Kontrollera eventuella brandväggar
Kontrollera att de datorer som ansluts till routern inte har en mjukvarubrandvägg
aktiverad, t.ex. ”Internet Security” eller ”Zone Alarm”.
4.3 Kontrollera datorns inställningar
Kontrollera att datorn är inställd på att automatiskt tilldelas en IP-adress och att datorn
har tilldelats rätt IP-adress från routern.
1a) I Windows XP: Klicka på Start och välj Run…. (Kör…).
1b) I Windows Vista och Windows 7: Klicka på Windows-ikonen, skriv Cmd i sökrutan
och tryck [Enter].
2. Skriv in Cmd och klicka sedan på OK.
3. Skriv ipconfig och kontrollera att datorn fått rätt IP-adress (i detta fall 192.168.5.1)
och Default gateway (i detta fall 192.168.5.254).
Om datorn inte erhåller en IP-adress, se felsökningsguiden.
24
Page 25
4.4 Öppna konfigurationsmenyn i routern
Skriv in routerns IP-adress (192.168.1.254) i adressfältet i din webbläsare
(t.ex. Internet Explorer) och tryck [Enter] för att ansluta till routern.
Obs! Om du använder ett modem som har egen inbyggd router kommer
GN-BR33V-RH automatiskt att byta IP-adress för att undvika konflikt på nätverket
(t.ex. 192.168.2.254).
2. När inloggningsrutan visas anger
du User name (användarnamn)
och Password (lösenord).
Fabriksinställt användarnamn är
admin och lösenord admin.
Lösenord och användarnamn
kan sedan ändras under routerns
menyflik ”Management Tool”.
Svenska
25
Page 26

3. Routerns meny öppnas. Välj önskad undermeny.
Smart Setup Automatisk konfiguration (om du har
en Internetförbindelse via WAN-porten).
Setup Wizard Manuell konfiguration.
Status Visa aktuell status för LAN och WAN.
Advanced
configuration
Management Tool Inställningar och program för routern som byte av
Svenska
Manuella inställningar för nätverk, trådlös anslutning,
brandvägg etc.
lösenord, uppgradera routerns firmware etc.
4.5 Smart Setup (Automatisk konfiguration) (rekommenderas)
Denna typ av konfigurering rekommenderas om du har en Internetförbindelse ansluten
till WAN-porten. ”Smart Setup” identifierar vilken typ av anslutning du har.
1. Klicka på Smart Setup för automatisk
konfiguration.
2. Routern försöker nu identifiera och
konfigurera din Internetanslutning.
3. När routern konfigurerat din anslutning
kommer routern att startas om.
4. Välj om/hur du vill konfigurera routern
manuellt.
5. Klicka på Logout när du vill avsluta och
gå ur routerns meny.
26
Page 27

4.6 Manuell konfigurering
Setup Wizard
Kontrollera med din Internetleverantör om vilken typ av anslutning du har till Internet.
Internetleverantörerna använder olika anslutningstyper för att ansluta till Internet.
Devanligaste anslutningstyperna är:
A) PPPoE
Automatisk tilldelning av IP-adress via PPPoE. Du behöver ange det användarnamn
och lösenord som du fått från din Internetleverantör.
B) Dynamic (dynamisk)
Automatisk tilldelning av IP-adress från en DHCP-server. Inga användaruppgifter
behöver anges.
C) Static (fast IP-adress)
Du behöver ange de uppgifter du fått från din Internetleverantör.
1. Klicka på Network Configuration och därefter på WAN Configuration.
2. Klicka på Edit på den översta raden.
3. Välj den typ av anslutning du har enligt uppgift från din Internetleverantör och
klicka på Next.
4. Skriv in önskat namn för anslutningen på raden ”ISP Name”. Behöver gatewayoch dns-addresser ändras anger du även dessa i detta steg. Klicka sedan
på Finish.
5. Välj den anslutning som du skapade i steg 4 som Main Session (primär anslutning).
• Om du skapat flera anslutningar kan du i detta steg välja en sekundär anslutning
att ansluta till om det för tillfället inte går att ansluta till den primära anslutningen.
6. Klicka på Submit för att spara inställningarna och avsluta.
Obs!
• Många Internetleverantörer kräver att modemet är avstängt i 30–60 minuter efter
att inställningarna i routern har gjorts, annars fungerar inte anslutningen.
• Kontrollera att ingen mjukvarubrandvägg finns installerad på datorn. Avaktivera
denna eller konfigurera om den för det interna nätverket. GN-BR33V-RH har en
egen inbyggd brandvägg.
Svenska
27
Page 28
4.7 Kontrollera routerns anslutning
Du kan när som helst kontrollera routerns status och inställningar genom att klicka på
Status i menyn.
LAN IP 1 Address Visar routerns interna IP-adress.
WAN IP Address Visar routerns externa IP-adress.
Visas ”Unavailable” så har routern
inte lyckats få en anslutning till
Internet. Se avsnitt ”Felsökning”.
Svenska
4.8 Aktivera och stäng av det trådlösa nätverket
• Tryck och håll in RF/WPS-knappen på routerns baksida i ca 5 sekunder
för att aktivera eller stänga av det trådlösa nätverket.
• ”WLAN”-indikatorn visar det trådlösa nätverkets status:
Tänd (grön) - det trådlösa nätverket är aktiverat.
Släckt - det trådlösa nätverket är avstängt.
Blinkar rött - WPS-funktionen är aktiverad.
Obs! Stäng av (disable) eller aktivera (enable) WPS i menyfliken
”Wireless Configuration/WPS”, bekräfta genom att klicka på Save Setting.
28
Page 29

4.9 Säkerhet för trådlöst nätverk
Routern stöder följande typer av kryptering för det trådlösa nätverket
(Authentication Type):
Open system Ingen kryptering, nätverket är ”öppet”.
Svenska
Shared key (WEP)
(Wired Equivalent
Privacy)
WPA (WiFi Protected
Access)
WPA-PSK (WiFi
Protected Access &
Pre-shared key)
WPA2-PSK En vidareutveckling av WPA-PSK (fungerar i dagsläget
Består av en säkerhetsnyckel som anges både i router och
anslutna datorer. Då ”Shared key” är aktiverad kan WEP
inte avaktiveras.
Låter användarna autentisera sig genom
en RADIUS-server.
Består av en egen vald lösenordsfras som anges i både
router och anslutna datorer.
endast med Vista/Windows 7).
4.9.1 Skapa ett skydd med WPA-PSK -kryptering
Rekommenderas för hemmanätverk.
1. Klicka på Wireless Configuration i menyn och sedan på 802.11ng.
2. Skriv in önskat namn för det trådlösa nätverket vid ”SSID”. SSID är det namn
som nätverket sänder ut och som därmed visas för datorer som söker efter ett
trådlöst nätverk.
29
Page 30
3. Välj WPA-PSK som kryptering (Authentication Type)*.
(WEP är en äldre osäker krypteringsform som inte rekommenderas).
Svenska
4. Skriv en lösenordsfras vid WPA PSK Passphrase på mellan 8 och 63 tecken.
(Ej å, ä eller ö). Längre lösenordsfras ger högre säkerhet. GIGABYTE är förinställt,
ändra det till önskad lösenordsfras.
5. Gör övriga inställningar:
WPA-PSK Re-key Aktiverar (Enable) eller stänger av (Disable) krav att på nytt
ange lösenordsfrasen. Normalt är denna funktion avstängd
(Disable).
WPA-PSK Re-key
Specificerar tiden (i minuter) för WPA Re-key.
Timer
6. Klicka på Submit för att spara dina inställningar.
7. Routern startar nu om med de nya inställningarna.
Obs!
När du skyddat ditt trådlösa nätverk med ett lösenord och sparat inställningarna
kopplas anslutna användare bort. Dessa måste ansluta till det trådlösa nätverket
på nytt och då ange samma lösenordsfras som du nu har angett för routern.
* Om man vill använda WPA2-PSK måste detta anges under steg 3.
30
Page 31

4.10. WPS (Wi-Fi Protected Setup)
WPS (Wi-Fi Protected Setup) används endast för ansluta andra trådlösa enheter som
stöder WPS.
Vid anslutning med WPS ställer routern automatiskt in säkerhetsinställningarna för
det trådlösa nätverket mellan routern och de trådlösa enheterna. Se den fullständiga
bruksanvisningen för mer information.
Obs! Stäng av (Disable) eller aktivera (Enable) WPS i menyfliken ”Wireless Configuration/WPS”, bekräfta genom att klicka på Save Setting (dessutom finns knappen RF/
WPS för att aktivera/stänga av).
5. Felsökning
Fel Möjlig orsak Tänkbar lösning
Svenska
Jag har
problem
med att
ansluta till
routern.
Produkten är
inte ansluten till
nätadaptern.
Ingen nätverksanslutning.
Datorn du använder har en IPadress i en annan
serie än routern.
Andra brandväggar eller antivirusprogram med
brandväggar
blockerar anslutningen.
Kontrollera att lampan ”PWR” lyser, om inte,
kontrollera nätadapter och vägguttag.
Kontrollera att du har en fysisk eller trådlös anslutning mellan PC och router, en eller flera ”LAN”lampa/-or skall lysa, lysdioden på nätverks kortet
visar också om anslutningen fungerar.
Verktyget ”IPCONFIG” som används i kommandotolken visar dina inställningar: Skriv ipconfig,
och tryck [Enter], då visas datorns nätverksinställningar t.ex. IP-adress och nätmask.
Standard-gateway är IP-adressen till routern.
De tre första grupperna i IP-adressen
(192.168.1.x) skall vara lika för router och övriga
anslutna enheter, den sista gruppen (x) är ett
löpnummer inom samma nät och skall vara olika
på alla enheter.
Kontrollera även att ingen mjukvarubrandvägg
finns installerad på datorn. Avaktivera denna eller
konfigurera den för det interna nätverket. Denna
router har en egen inbyggd brandvägg.
31
Page 32

Jag kan inte
ansluta till
andra enheter
på nätverket:
Datorernas
IP-inställningar är
felkonfigurerade.
Varje dator måste ha en unik IP-adress,
kontrollera t.ex. med kommandot
IPCONFIG. Se avsnittet ”Kontrollera
konfigurering” hur du kontrollerar och
uppdaterar konfigureringen.
Normalt skall ”Erhåll en IP-adress
automatiskt” vara ikryssat (om man vill
använda routerns DHCP-funktion).
Obs! En ändring kan kräva omstart för att
fungera.
Svenska
Jag kan
ansluta till
Nätverkskablarna är
fel anslutna.
Modem eller ADSL-
enhet fungerar inte.
routern,
men inte till
Internetanslutningen:
Prova anslutningen med an annan nätverkskabel.
Många Internetleverantörer kräver att
modemet är avstängt i 30–60 minuter
efter att inställningarna i routern har gjorts,
annars fungerar inte anslutningen.
Kontrollera att ingen mjukvarubrandvägg
finns installerad på datorn. Avaktivera
denna eller konfigurera den för det interna
nätverket. Denna router har en egen
inbyggd brandvägg.
Kabelfel mellan
Kontrollera kabelanslutningarna.
WAN-porten på
routern och modem
eller ADSL-enhet.
Fel typ av anslutning
är använd
Kontrollera inställningarna för din typ
av anslutning.
i Setup (PPPoE,
Dynamisk eller
Statisk).
Eventuellt användarnamn och lösenord
Skriv rätt användarnamn och lösenord.
Gör skillnad på versaler och gemener.
till Internetleverantören är felskrivet.
Läs alltid igenom anvisningar och regler
från din Internetleverantör, det kan
finnas regler om delning av samma
anslutning.
32
Page 33

5.1 Felsökning under Windows XP
TCP/IP
1. Gå till Start/Kontrollpanelen och välj Nätverksanslutningar. Högerklicka på den
nätverksanslutning som tillhör nätverkskortet och välj Egenskaper.
2. Markera TCP/IP-protokollet som är kopplat till nätverkskortet och välj Egenskaper.
3. Kontrollera att Erhåll en IP-adress automatiskt och Erhåll adress till DNS-
servern automatiskt är markerade.
4. Klicka på OK.
Avaktivera http-proxy
Kontrollera att datorn inte är konfigurerad för en Proxyserver.
1. Öppna Internet Explorer och klicka på Verktyg och välj sedan Internet-alternativ.
2. Välj Anslutningar och därefter LAN-inställningar. Avmarkera sedan alla
kryssrutor.
3. Klicka på OK för att stänga fönstren.
Kontrollera konfigurering
Du kan på följande sätt kontrollera att datorn fått rätt IP-adress tilldelad:
Kontrollera att datorn är inställd på att automatiskt erhålla en IP-adress och att datorn
fått rätt IP-adress från routern.
1. I Windows XP: Klicka på Start och välj Run…. (Kör…).
I Windows Vista: Klicka på Windows-ikonen, skriv Cmd i sökrutan
och tryck [Enter].
2. Skriv in Cmd och klicka sedan på OK.
3. Skriv ipconfig och kontrollera att datorn fått rätt IP-adress (i detta fall 192.168.1.4)
och Gateway (192.168.1.254).
4. Om datorn har fått rätt IP-adress tilldelad enligt bilden nedan behöver du inte göra
några fler inställningar. Skriv exit och tryck [Enter] för att återgå till Windows.
Svenska
Uppdatera konfigurering
Om datorn fortfarande har en gammal eller felaktig IP-adress kan denna förnyas för att
erhålla rätt IP-adress. Gör på följande sätt:
1. Öppna Program/Tillbehör/
Kommandotolken (Programs/
Accessories/Command Prompt)
Skriv ipconfig/release och tryck [Enter].
2. Skriv ipconfig/renew och tryck [Enter].
Du ska nu bli tilldelad en ny IP-adress.
3. Skriv exit och tryck [Enter] för att återgå
till Windows.
33
Page 34

5.2 Funktionen PING
Med funktionen PING kan man kontrollera vilka enheter/datorer som är anslutna till
nätverket. Kommandot PING används i kommandotolken*.
1. Skriv ping vid prompten, tryck [mellanslag] och fyll på med den IP-adress eller det
datornamn som du vill ”pinga” och tryck [Enter].
Svenska
2. ”Request timed out” visar att anslutningen inte fungerar (att den sökta datorn inte är
påslagen eller korrekt ansluten).
”Reply from…” visar att anslutningen fungerar och att den sökta datorn
är påslagen.
Har man en fungerande anslutning bör resultatet se ut ungefär så här:
Här har datorn kontakt med enhet med IP-adress: 192.168.5.254.
*Verktyget PING finns också i routerns meny under fliken ”Ping” i routerns meny.
5.3 Återställning (Reset).
Om du vill börja om från början och återgå till fabriksinställningarna.
Alt. 1:
På undersidan finns en återställningsknapp (INIT) som återställer routern till fabriksinställningarna. Gör så här:
• Routern skall vara tillslagen. Använd ett gem el. liknande och tryck in [INIT]
i 5–6 sekunder tills ”PWR” -lampan lyser orange och ta sedan bort gemet.
Routern kommer nu att starta om återställd till fabriksinställningarna.
Alt. 2:
• Klicka på Initialization i routerns meny och sedan på Initialize Router.
Routern startar nu om återställd till fabriksinställningarna.
Obs! Vid återställning försvinner alla dina egna inställningar!
34
Page 35

6. Skötsel och underhåll
Dra alltid ur nätadaptern ur vägguttaget före rengöring. Torka med en mjuk lätt fuktad
trasa. Använd inga lösningsmedel eller rengöringsmedel.
7. Avfallshantering
När du ska göra dig av med produkten ska detta ske enligt lokala föreskrifter.
Är du osäker på hur du ska gå tillväga, kontakta din kommun.
8. Specifikationer
Generella specifikationer
Kompatibel med
följande standarder
Portar LAN: 10/100 Ethernet (auto-MDIX), RJ45 (4x). WAN:
Routingprotokoll Dynamic, Static Routing med TCP/IP, NAT, PPTP, PPPoE,
Säkerhet WPA, WPA2 (fungerar i dagsläget endast med Vista och
Förvald IP-adress 192.168.1.254
Förvalt användarnamn
Förvalt lösenord admin
Strömförsörjning 5 V DC, 2 A via medföljande nätadapter
IEEE802.3 (10Base-T), IEEE802.3u (100Base-TX)
IEEE802.11b/g/n (Wireless).
10/100 Ethernet, RJ45 (1x).
VPN Pass-Through (IPSec, L2TP) DHCP (Client & Server).
Windows 7).
Integrerad brandvägg med SPI (Stateful Packet
Inspection) 64/128-bit WEP-kryptering
802.1x accesskontroll.
admin
Svenska
Storlek 216 x 136 x 26 mm
Vikt 238 g
35
Page 36

Trådlösa specifikationer
Frekvensområde 2412 ~ 2484 MHz (enligt lokala regler)
Modulationstyp DSSS, (DBPSK, DQPSK, CCK) OFDM (BPSK, QPSK,
16-QAM, 64-QAM)
Datahastighet
(auto-fallback)
Uteffekt Legacy-läge – 20 dBm @11b, 17 dBm @11g;
Svenska
Känslighet Legacy-läge – 90 dBm @11b, 74 dBm @11g;
Räckvidd Upp till 100 meter (inomhus).
Antenner 2 st. (ej löstagbara).
Godkännanden CE (Europa), FCC part 15 (USA).
802.11b – 1, 2, 5, 11 Mbps.
802.11g – 6, 9, 12, 18, 24, 36, 48, 54 Mbps.
802.11n – 81, 108, 121, 135, 162, 216, 243, 270, 300 Mbps.
HT20-läge – 17 dBm @MCS7/15;
HT40-läge – 17 dBm @MCS7/15;
HT20-läge – 73 dBm @MCS7/15;
HT40-läge – 68 dBm @MCS7/15;
Användningsmiljö
Temperaturområde
Luftfuktighet 10 % ~ 85 % (icke kondenserande).
0 till 55 °C (användningstemperatur).
Tänk på
• Att annan befintlig trådlös utrustning på samma frekvensband kan påverka
räckvidden negativt.
• Att räckvidden på all trådlös utrustning påverkas av vilka hinder som finns
mellan sändaren och mottagaren (t.ex. en betongvägg dämpar signalen
avsevärt mer än en gipsvägg).
Vid funktionsproblem, prova följande lösningar
• Stäng av övriga befintliga trådlösa utrustningar för att kontrollera om de kan
vara orsaken till problemet.
• Flytta den trådlösa utrustningen och/eller förkorta avståndet, samt minska
antalet hinder (väggar, möbler etc.) mellan sändaren och mottagaren.
36
Page 37

Trådløs router
Art. nr. 18-8143 Modell GN-BR33V-RH-UK
38-3727 GN-BR33V-RH
Les bruksanvisningen nøye før produktet tas i bruk, og ta vare på den for framtidig
bruk. Vi reserverer oss mot ev. tekst- og bildefeil, samt forandringer av tekniske data.
Ved tekniske problemer eller spørsmål, ta kontakt med vårt kundesenter. (Se opplysninger om kundesenteret i denne bruksanvisningen).
1. Produktbeskrivelse
• Trådløs router, 300 Mbps med Pre-N-teknikk og kompatibel ihht. IEEE802.11b/g.
• Støtter IEEE 802.11n-spesifikasjonen.
• Høy trådløs overføringshastighet på inntil 300 Mbps.
• 64/128 bits WEP-kryptering, 802.1x, WPA og WPA2.
• Støtter dynamisk og statisk routing. Inntil 252 brukere kan dele samme tilkobling
til ADSL/kabelmodemet.
• DHCP-server for tildeling av IP-adresser.
• Innebygd brannmur med pakke- og protokollfiltrering samt NAT og DHCP.
• Auto MDI/MDI-X (gjenkjenner og korrigerer automatisk kryssede kabler).
• Innebygd 4-ports 10/100 Mbit-switch for TP-tilkobling til datamaskiner.
• Mulighet for re-direct (virtual server med portmapping) og DMZ.
• Leveres med batterieliminator, kabler og komplett bruksanvisning på engelsk (Cd).
Norsk
1.1 Forpakningen inneholder
• GN-BR33V-RH Trådløs router
• Nettadapter (5 V DC, 2 A)
• Bruksanvisning
• Nettverkskabel
• Cd-plate med utfyllende bruksanvisning på engelsk
37
Page 38
RJ45 RJ45
WAN LAN 1 LAN2 LAN3 LAN4 USB RF/WP3
+
2. Knapper og funksjoner
2.1 Knapper og tilkoblinger
WAN LAN 1 LAN2 LAN3 LAN4 USB RF/WP3
+
Tilkoblingspunktene er plassert på routerens bakside. Fra venstre til høyre:
Norsk
+
WAN
Tilkobling for nettadapter (5 V, pluss i sentrum).
Tilkobling til DSL-/kabelmodem eller Internettilkobling.
LAN (1–4)
Kontakt for nettverkskabel for 1 til 4 maskiner (eller andre enheter)
i nettverket.
USB
USB 2.0-tilkobling for usb-enhet, som f.eks. ekstern harddisk
eller usb-minne (med FAT32- eller EXT3 formatering).
RF/WPS
Aktivere/deaktivere WPS (Wi-Fi Protected Setup).
A) Trykk kort for å aktivere/deaktivere WPS (Wi-Fi Protected Setup).
B) Trykk og hold inne i ca. 4 sek. for å slå på/av det trådløse
nettverket (WLAN).
INIT
Tilbakestillingsknapp (Reset) på undersiden.
Trykk inn med en spiss gjenstand for
å starte om og stille tilbake til fabrikkinnstillingene. Se avsnitt 5.3 Reset.
INIT
38
Page 39

2.2 Lysdiodenes vising
Lysdiodene er plassert på routerens framside. Fra venstre til høyre:
LAN 1–4 Grønt kontinuerlig lys: Routeren har kontakt med et nettverk
10/100 Mbps.
Blinkende grønt: Data overføres via LAN-porten.
WAN Grønt kontinuerlig lys: Routeren har kontakt med et DSL- eller
kabelmodem.
Blinkende grønt: Data overføres via WAN-porten.
WLAN/WPS Grønt kontinuerlig lys: Trådløst nettverk er aktivert, men ingen
dataoverføring.
Blinkende grønt: Data overføres trådløst.
Blinkende med rødt lys: WPS-funksjonen er aktivert.
Obs! Vær oppmerksom på at når det blinker rødt lys, lyser det
grønne samtidig. Dette kan gjøre at det er vanskelig å se det røde
lyset. (Hvis RF/WPS holdes inne i mer enn 4 sekunder, vil routeren
skru av WPS-funksjonen).
Norsk
PWR Lyser når adapteren er koblet til og fungerer som den skal.
Er ikke tent når strømforsyningen ikke er koblet til.
39
Page 40

3. Installasjon
Obs!
• Husk å kun benytte 300 Mbps-produkter av samme fabrikat, for best funksjon.
• Første gang routeren brukes er det enklest å koble den til en datamaskin via
ennettverkskabel. Da unngås ev. konfigurasjonsproblemer.
3.1 Tilkoblinger til modem og datamaskiner
1. Skru av alle enhetene (inkl. routeren) som skal kobles til, før installasjonen starter.
2. Monter en nettverkskabel mellom xDSL-/kabelmodemet og WAN-porten (WAN)
på routeren.
3. Bruk en nettverkskabel mellom datamaskinens nettverkskort og en av
LAN-portene på routeren.
4. Nettadapterens DC-kontakt kobles til
et strømuttak.
Norsk
5. Slå på xDSL-/kabelmodemet.
6. Ved oppstart vil routeren til å gjennomgå en egenkontroll som tar ca.
5 sekunder.
7. Lysdiodene PWR, LAN og WAN skal alle lyse grønt.
8. Start den eller de maskinene som er koblet til routeren med nettverkskabel.
Drei antennene på routeren rett oppover, hvis du skal bruke en trådløs tilkobling.
+
på routeren og deretter til
ADSL
WAN LAN 1 LAN2 LAN3 LAN4 USB RF/WP3
+
RJ45 RJ45
40
Page 41

4. Konfigurering
Dette er kun en kortversjon av bruksanvisningen. Detaljert bruksanvisning på engelsk
finner du på den vedlagte cd-platen.
Obs!
• Konfigurasjonen som er beskrevet i dette avsnittet krever at du har koblet
datamaskinen til routeren via nettverkskabelen.
• Instruksjonen gjelder for Windows XP/Vista/7.
4.1 Kontroller først din brebåndstilkobling
Kontroller med din bredbåndsleverandør hvilken type tilkobling du har til Internett.
Forskjellige bredbåndsleverandører bruker forskjellige tilkoblingstyper for Internettilkobling. De vanligste tilkoblingstypene er:
A. PPPoE
Automatisk tildeling av IP-adresse via PPPoE. Du må angi det brukernavnet og passordet som du har fått fra din bredbåndsleverandør (Gjelder kun Telenor i Norge.)
B. Dynamic IP Internet Connection (dynamisk tilkobling)
Automatisk tildeling av IP-adresse fra en DHCP-server. Du trenger ikke å oppgi noen
brukeropplysninger.
C. Static IP Internet Connection (fast IP-adresse)
Du må oppgi de opplysningene du har fått av din bredbåndsleverandør.
Denne innstillingen velger du på siden ”Internet Connection Type” eller ”WAN Type
Select” (avhenger av konfigurasjonsmåte) i routerens menyer.
Norsk
4.2 Kontroller eventuelle brannmurer
Forsikre deg om at de datamaskiner som er koblet til routeren ikke har en softwarebrannmur aktivert, f.eks. Internet Security eller Zone Alarm.
4.3 Kontroller datamaskinens innstillinger
Kontroller at datamaskinen er innstilt slik at den automatisk tildeles en IP-adresse
og at datamaskinen har fått riktig IP-adresse fra routeren.
1a) I Windows XP: Klikk på Start og velg RUN…. (Kjør...).
1b) I Windows Vista og Windows 7: Klikk på Windows-ikonen, skriv Cmd
i søkeruten og trykk [Enter].
2. Skriv inn Cmd og klikk deretter på OK.
3. Skriv ipconfig og kontroller at datamaskinen har fått riktig IP-adresse
(i dette tilfellet 192.168.5.1) og Default gateway (192.168.5.254).
Hvis datamaskinen ikke har en IP-adresse, se feilsøkingsguiden.
41
Page 42
Norsk
Skriv inn routerens IP-adresse (192.168.1.254) i adressefeltet på webbleseren din
(f.eks. Internet Explorer) og trykk [Enter] for å koble til den trådløse routeren.
Obs! Hvis du bruker et modem som har en egen innebygd router, vil denne routeren
automatisk skifte IP-adresse for å unngå konflikt på nettverket (f.eks. 192.168.2.254).
2. Når innloggingsruten vises oppgir
du User name (brukernavn) og
Password (passord).
Fabrikkinnstilt brukernavn er admin
og passord admin.
Brukerord og passord kan endres
i Management Tool.
4.4 Åpne konfigurasjonsmenyen i routern
42
Page 43

3. Routerens meny åpnes. Velg ønsket undermeny.
Smart Setup Automatisk konfigurasjon (dersom du har en Internett-
forbindelse via WAN-porten).
Setup Wizard Manuell konfigurasjon.
Status Vis aktuell status for LAN og WAN.
Advanced
configuration
Management Tool Innstillinger og program for skifte av passord,
Manuelle innstillinger for nettverk, trådløs tilkobling,
brannmur etc.
oppgradering av routerens programvare etc.
4.5 Smart Setup (Automatisk konfigurasjon) (anbefales)
Denne konfigurasjonsmåten anbefales dersom du har en Internettforbindelse som
er koblet til WAN-porten. Smart Setup identifiserer hvilken type tilkobling du har.
1. Klikk på Smart Setup for automatisk
konfigurasjon.
2. Routeren vil nå forsøke å identifisere og
å konfigurere din Internettilkobling.
3. Når routeren har konfigurert tilkoblingen vil
den skrus av og starte på nytt.
4. Velg om du vil konfigurere routeren manuelt.
5. Klikk på Logout når du ønsker å avslutte.
Norsk
43
Page 44

4.6 Manuell konfigurasjon
Setup Wizard
Kontroller med din Internettleverandør hvilken type tilkobling du har til Internett. Bredbåndsleverandører bruker forskjellige tilslutninger for Internettilkobling. De vanligste er:
A) PPPoE
Automatisk tildeling av IP-adresse via PPPoE. Du må angi det brukernavnet og passordet som du har fått fra din bredbåndsleverandør (Gjelder kun Telenor i Norge).
B) Dynamic (dynamisk)
Automatisk tildeling av IP-adresse fra en DHCP-server. Du trenger ikke å oppgi noen
brukeropplysninger.
C) Static (fast IP-adresse)
Du må oppgi de opplysningene du har fått av din bredbåndsleverandør.
1. Klikk på Network Configuration og deretter på WAN Configuration.
Norsk
2. Klikk på Edit på den øverste raden.
3. Velg den riktige tilkoblingen (som du har fått oppgitt av din bredbåndsleverandør)
og klikk på Next.
4. Skriv inn ønsket navn på tilkoblingen på raden ISP Name. Hvis det er behov for
åendre gateway- og dns-adresse, angis dette i følgende trinn: Klikk deretter
på Finish.
5. Velg den koblingen som du lagde i trinn 4 som Main Session (primær tilkobling).
• Dersom du har laget flere tilkoblinger, kan du, i dette trinnet, velge en sekundær
tilkobling til å koble til, hvis det skulle vise seg at det ikke går å koble til i det
primære uttaket.
6. Klikk på Submit for å lagre innstillingene og avslutt.
Obs!
• Enkelte Internettleverandører krever at modemet er frakoblet i 30–60 minutter etter
installering i router er utført. Hvis ikke vil den ikke fungere.
• Kontroller at ingen softwarebrannmur er installert på datamaskinen.
Deaktiver denne eller konfigurer den for det interne nettverket.
GN-BR33V-RH har en egen innebygd brannmur.
44
Page 45
4.7 Kontroller routerens tilkoblinger
Du kan når som helst kontrollere routerens status og innstillinger ved å klikke på
Status i menyen.
LAN IP 1 Address Viser routerens interne IP-adresse.
WAN IP Address Viser routerens eksterne IP-adresse.
Dersom ”Unavailable” kommer opp,
er det en indikasjon på at du ikke får
kontakt med Internett. Se avsnittet
om Feilsøking.
4.8 Slå på/av det trådløse nettverket
• Trykk og hold WPS-knappen på routerens bakside inne i ca. 5 sekunder når du
skal slå på/av det trådløse nettverket.
• WLAN-indikatoren viser statusen til det trådløse nettverket:
Grønt lys tent – det trådløse nettverket er aktivert.
Grønt lys slukket – det trådløse nettverket er deaktivert.
Blinkende rødt lys – WPS-funksjonen er aktivert.
Obs! Deaktiver (disable) eller aktiver (enable) WPS i menyen Wireless Confuguration/
WPS og bekreft ved å klikke på Save Setting.
Norsk
45
Page 46
4.9 Sikkerhet for trådløst nettverk
Routeren støtter følgende typer kryptering for det trådløse nettverket.
Open system Ingen kryptering, nettverket er ”åpent”.
Shared key (WEP)
(Wired Equivalent
Privacy)
Norsk
WPA (WiFi Protected
Access)
WPA-PSK (WiFi
Protected Access &
Pre-shared key)
WPA2-PSK En videreutvikling av WPA-PSK (fungerer kun med Vista/
Består av en sikkerhetsnøkkel som angis både i router og
tilkoblede datamaskiner. Når Shared key er aktivert kan
ikke WEP aktiveres.
Lar brukeren tilkjennegi seg gjennom en RADIUS-server.
Består av et eget passord som angis både i router
og tilkoblede datamaskiner.
Windows 7 per i dag).
4.9.1 Lag en beskyttelse med WPA-PSK -kryptering
Anbefales for privatnettverk.
1. Klikk på Wireless Configuration i menyen og deretter på 802.11ng.
2. Ved ”SSID” skriver du inn ønsket navn for det trådløse nettverket. SSID er det
navnet som nettverket sender ut. Det vises for maskiner som søker etter et
trådløst nettverk.
46
Page 47
3. Velg WPA-PSK som kryptering (Authentication Type)*.
(WEP er en eldre og ikke så sikker krypteringsform som ikke anbefales).
4. Skriv et passord ved WPA PSK Passphrase på mellom 8 og 63 tegn.
(Ikke bruk bokstavene æ, ø eller å). Jo lengre passord, desto større sikkerhet.
GIGABYTE er forhåndsinnstilt. Det må endres til ditt eget brukernavn.
5. Gjør deretter øvrige innstillinger:
Norsk
WPA-PSK Re-key Aktiver eller deaktiver kravet om ytterligere å oppgi
passord. Vanligvis er denne funksjonen avstengt
(disable).
WPA-PSK Re-key
Spesifiser tiden (i minutter) for WPA Re-key.
Timer
6. Klikk på Submit for å lagre dine innstillinger.
7. Routeren vil nå restarte med de nye innstillingene.
Obs!
Når du har beskyttet ditt trådløse nettverk med et passord og lagret innstillingene,
vil alle tilkoblede brukere kobles fra. Disse må da kobles til nettverket på nytt.
Oppgi da samme passord som du har endret til i routeren.
* Hvis man vil benytte WPA2-PSK, må dette oppgis under trinn 3.
47
Page 48

4.10. WPS (Wi-Fi Protected Setup)
WPS (Wi-Fi Protected Setup) brukes kun for å koble til andre trådløse enheter som
støtter WPS.
Ved tilkobling med WPS stiller routeren automatisk inn sikkerhetsinnstillingene for det
trådløse nettverket mellom routeren og de trådløse enhetene. Se den fullstendige
bruksanvisningen for mer informasjon.
Obs! Deaktiver (disable) eller aktiver (enable) WPS i menyen Wireless Confuguration/
WPS og bekreft ved å klikke på Save Setting. (Knappen RF/WPS kan også benyttes
for å aktivere/deaktivere).
Norsk
5. Feilsøking
Feil Mulig årsak Mulig løsning
Jeg har
problemer
med å koble
til Routeren.
Produktet er ikke koblet
til strømadapteren.
Ingen nettverkstilkobling.
Datamaskinen som du
bruker har en IP-adresse i en annen serie enn
routeren.
Andre brannmurer eller
antivirusprogram med
brannmurer blokkerer
tilkoblingen.
Kontroller at lampen ”PWR” lyser. Hvis ikke,
kontroller batterieliminator og vegguttak.
Kontroller at du har en fysisk eller trådløs
tilkobling mellom din PC og router, en eller
flere ”LAN” –lamper skal lyse, lysdioden på
nettverkskortet viser også om tilkoblingen
fungerer.
Verktøyet ”IPCONFIG” som brukes i kommandotolken viser dine innstillinger: Skriv
ipconfig, og trykk [ENTER]. Da vil maskinens nettverksinnstillinger vises f.eks.
IP-adresse og nettmark.
Standard-gateway er IP-adressen til routeren. De tre første gruppene i IP-adressen
(192.168.1.x), skal være like for router og
øvrige tilkoblede enheter, den siste gruppen
(x) er et løpenummer innenfor samme nett,
og skal være forskjellige på alle enheter.
Kontroller at ingen softwarebrannmur
er installert på datamaskinen. Deaktiver
denne eller konfigurer den for det interne
nettverket. Denne routeren har en egen
innebygd brannmur.
48
Page 49

Jeg kan ikke
koble andre
enheter på
nettverket.
IP-innstillingene
i datamaskinen er
feilkonfigurert.
Hver maskin skal ha sin egen IP-adresse.
Kontroller f.eks. med kommandoen
IPCONFIG. Se avsnittet ”Kontroller
konfigureringen” hvordan du kontrollerer og
oppdaterer konfigureringen.
Normalt skal Hent en IP-adresse auto-
matisk være avkrysset (hvis man vil bruke
Routerens DHCP-funksjon). OBS! En endring kan kreve omstart for å fungere.
Jeg kan koble
til routeren,
men ikke Internettilkoblingen.
Nettverkskablene
er feil koblet.
Modem eller ADSLenhet fungerer ikke.
Feil på kabel mellom
WAN-porten på routeren og modemet
eller ADSL-enheten.
Feil type tilkobling
er brukt i Setup
(PPPoE, Dynamisk
eller Statisk).
Eventuelt brukernavn og/eller passord er skrevet feil.
Prøv å koble med en annen
nettverkskabel.
Enkelte Internettleverandører krever at
modemet er dratt ut i 30–60 minutter etter
installering av router er utført. Hvis ikke vil
den ikke fungere.
Kontroller at ingen softwarebrannmur
er installert på datamaskinen. Deaktiver
denne eller konfigurer den for det interne
nettverket. Denne routeren har en egen
innebygd brannmur.
Kontroller koblingene.
Kontroller innstillinger for din type
tilkobling.
Skriv inn riktig brukernavn og passord.
Gjør forskjell på store og små bokstaver.
Les alltid gjennom anvisninger og regler, fra
din Internettleverandør, det kan være regler
om deling av samme tilkobling.
Norsk
49
Page 50

5.1 Feilsøking under Windows XP
TCP/IP
1. Gå til Start/Kontrollpanel og velg Nettverkstilkoblinger. Høyreklikk på den
nettverkstilkobling som tilhører nettverkskortet og velg Egenskaper.
2. Marker TCP/IP-protokollen som er koblet til nettverkskortet og velg Egenskaper.
3. Kontroller at Hent en IP-adresse automatisk og Hent adressen til DNS-
serveren automatisk er markert.
4. Klikk på OK.
Deaktiver http-proxy
Kontroller at datamaskinen ikke er konfigurert for en proxyserver.
1. Åpne Internett Explorer og klikk deretter på Verktøy og alternativet Internett-
alternativ.
2. Velg Tilkoblinger deretter LAN-innstillinger. Fjern markering i alle kryssrutene.
3. Klikk på OK for å stenge vinduet.
Norsk
Kontroller konfigurering
Du kan på følgende måte kontrollere at maskinen har fått tildelt riktig IP-adresse:
Kontroller at datamaskinen er innstilt på å automatisk hente en IP-adresse og at
datamaskinen har fått riktig IP-adresse fra routeren.
1. I Windows XP: Klikk på Start og velg RUN…. (Kjør...).
I Windows Vista: Klikk på Windows-ikonen, skriv Cmd i søkeruten og trykk [Enter].
2. Skriv inn Cmd og klikk deretter på OK.
3. Skriv ipconfig og kontroller at datamaskinen har fått riktig IP-adresse (i dette tilfellet
192.168.1.4) og gateway (192.168.1.254).
4. Dersom datamaskinen har fått riktig IP-adresse tildelt som på bildet under,
trenger du ikke å foreta flere innstillinger. Skriv exit og trykk på [Enter] for
å gå tilbake til Windows.
Oppdatere konfigurering
Dersom datamaskinen fortsatt har en gammel eller en feil IP-adresse, kan denne
fornyes for å hente riktig IP-adresse. Gjør følgende:
1. Åpne Program/Tilbehør/
Kommandotolken (Programs/
Accessories/Command Prompt).
Skriv ipconfig/release og trykk [Enter].
2. Skriv ipconfig/renew og trykk [Enter].
Du skal nå få tildelt en ny IP-adresse.
3. Skriv exit og trykk på [Enter] for å gå
tilbake til Windows.
50
Page 51

5.2 Funksjonen PING
Med PING funksjonen kan man kontrollere hvilke enheter/PC-er som er koblet til
nettverket. PING brukes i kommandotolken*.
1. Skriv kommandoen ping ved prompten, trykk mellomrom og fyll på med den
IP-adresse eller navnet på maskinen som du vil pinge. Trykk deretter [Enter].
2. ”Søket gjorde timeout” viser derimot at koblingen ikke fungerer (at maskinen du
søkte etter ikke er slått på eller at den er feil tilkoblet).
”Svar fra…” viser at koblingen fungerer og at den søkte maskinen er skrudd på.
Har man en fungerende kobling bør resultatet se omtrent slik ut: Her har
datamaskinen kontakt med enhet med IP-adresse: 192.168.5.254.
* PING finnes også i routerns meny under Ping.
Norsk
5.3 Tilbakestilling (reset)
Hvis du ønsker å starte helt på nytt igjen, gå tilbake til fabrikkinnstillingene.
Alt. 1:
På baksiden finnes en knapp for tilbakestilling (INIT). Gjør som følger:
• Routeren skal være skrudd på. Bruk en binders eller liknende og trykk inn INIT.
Hold inne i ca. 5–6 sekunder til PWR-lampen lyser oransje. Routeren skal nå
starte opp igjen, nå med fabrikkens forhåndsinnstillinger.
Alt. 2:
• Klikk på Initialization i menyen og deretter på Initialize Router. Routeren starter nå
med fabrikkens forhåndsinnstillinger.
Obs! Ved tilbakestilling vil alle dine innstillinger forsvinne!
51
Page 52

6. Stell og vedlikehold
Trekk alltid nettadapteren ut fra strømuttaket før rengjøring. Rengjør med en lett fuktet
klut. Bruk aldri rengjøringsmidler eller sterke løsemidler.
7. Avfallshåndtering
Når produktet skal kasseres, må det skje i henhold til lokale forskrifter.
Ved usikkerhet, ta kontakt med lokale myndigheter.
8. Spesifikasjoner
Generelle spesifikasjoner
Kompatibel med følgende standarder
Porter LAN: 10/100 Ethernet (auto-MDIX), RJ45 (4x)
Norsk
Routingprotokoll Dynamic, Static Routing med TCP/IP, NAT, PPTP,
Sikkerhet WPA, WPA2 (komertibel med Vista og Windows 7).
Forhåndsvalgt IP-adresse 192.168.1.254
Forhåndsvalgt
brukernavn
Forhåndsvalgt passord admin
Strømforsyning 5 V DC, 2 A via medfølgende batterieliminator
Størrelse 216 x 136 x 26 mm
Vekt 238 g
IEEE802.3 (10Base-T), IEEE802.3u (100Base-TX)
IEEE802.11b/g/n (Wireless).
WAN: 10/100 Ethernet, RJ45 (1x)
PPPoE, VPN Pass-Through (IPSec, L2TP) DHCP
(Client & Server).
Integrert brannmur med SPI (Stateful Packet
Inspection) 64/128-bit WEP-kryptering.
802.1x accesskontroll.
admin
52
Page 53

Trådløse spesifikasjoner
Frekvensområde 2412–2484 MHz
Modulasjonstype DSSS, (DBPSK, DQPSK, CCK) OFDM (BPSK, QPSK, 16-QAM,
64-QAM).
Datahastighet
(auto-fallback)
Uteffekt: Legacy-modus – 20 dBm @11b, 17 dBm @11g;
Følsomhet Legacy-modus – 90 dBm @11b, 74 dBm @11g;
Rekkevidde Inntil 100 meter
Antenner 2 stk. (faste)
Godkjennelser CE (Europa), FCC part 15 (USA)
802.11b – 1, 2, 5, 11 Mbps
802.11g – 6, 9, 12, 18, 24, 36, 48, 54 Mbps
802.11n – 81, 108, 121, 135, 162, 216, 243, 270, 300 Mbps
HT20-modus– 17 dBm @MCS7/15;
HT40-modus– 17 dBm @MCS7/15;
HT20-modus– 73 dBm @MCS7/15;
HT40-modus– 68 dBm @MCS7/15;
Bruksmiljø
Temperaturområde
Luftfuktighet 10 % - 85 % (ikke kondenserende)
0 til 55 °C (brukstemperatur)
Husk følgende
• At annet trådløst utstyr som er innstilt på samme frekvens kan på kan påvirke
rekkevidden negativt.
• At rekkevidden på alt trådløst utstyr påvirkes av hindringer som er mellom
sender og mottaker (en betongvegg kan f.eks. dempe signalene dramatisk
iforhold til en gipsvegg).
Norsk
Ved problemer, prøv følgende
• Skru av øvrig trådløst utstyr for å kontrollere om de er årsak til problemene.
• Flytt det trådløse utstyret og gjør avstanden mellom sender og mottaker
mindre. Forsøk også å redusere antall hindringer mellom sender og mottaker
(vegger, møbler etc.).
53
Page 54

Langaton reititin
Tuotenumero 18-8143 Malli GN-BR33V-RH-UK
38-3727 GN-BR33V-RH
Lue käyttöohje ennen tuotteen käyttöönottoa ja säilytä se tulevaa tarvetta varten.
Pidätämme oikeuden teknisten tietojen muutoksiin. Emme vastaa mahdollisista tekstitai kuvavirheistä. Jos laitteeseen tulee teknisiä ongelmia, ota yhteys myymälään tai
asiakaspalveluun (yhteystiedot käyttöohjeen lopussa).
1. Tuotekuvaus
• Langaton reititin, 300 Mbps, Pre-N-tekniikka. Alaspäin yhteensopiva standardin
IEEE802.11b/g mukaan.
• IEEE 802.11n -tuki
• Nopea langaton tiedonsiirto, jopa 300 Mbps.
• 64/128-bittinen WEP-salaus, 802.1x, WPA ja WPA2.
• Tukee dynaamista ja staattista reititystä. Jopa 252 käyttäjää voi jakaa saman
ADSL-/kaapelimodeemiliitännän.
• DHCP-palvelin jakaa IP-osoitteita.
Suomi
• Sisäänrakennettu palomuuri, jossa paketti- ja protokollasuodatus sekä
NAT ja DHCP.
• Auto MDI/MDI-X (tunnistaa ja korjaa automaattisesti ristiin kytketyt kaapelit).
• Sisäänrakennettu neliporttinen 10/100 Mbit-kytkin TP-liitännöillä.
• Osoitteiden jakaminen ja kääntö sekä DMZ.
• Pakkauksessa muuntaja, kaapelit ja käyttöohje.
1.1 Pakkauksen sisältö
• GN-BR33V-RH langaton reititin
• Muuntaja (5 V DC, 2 A)
• Käyttöohje
• Verkkokaapeli
• Cd-levyllä englanninkielinen käyttöohje
54
Page 55

2. Painikkeet ja toiminnot
RJ45 RJ45
WAN LAN 1 LAN2 LAN3 LAN4 USB RF/WP3
+
2.1 Painikkeet ja liitännät
WAN LAN 1 LAN2 LAN3 LAN4 USB RF/WP3
+
Liitännät ovat reitittimen takapuolella. Vasemmalta oikealle:
+
Muuntajan liitäntä (5 V, + keskellä)
WAN
LAN (1–4)
USB
Liitäntä DSL-/kaapelimodeemille tai internet-liitännälle.
Verkkokaapeliliitännät 1–4 tietokoneelle (tai muulle yksikölle).
Usb 2.0 -liitäntä usb-yksikölle, kuten ulkoiselle kovalevylle tai
usb-muistille (FAT32- tai EXT3-formatoinnilla).
RF/WPS
Aktivoi/sulje WPS (Wi-FI Protected Setup)
A. Aktivoi/sulje WPS (Wi-Fi Protected Setup) painamalla painiketta
lyhyesti.
B. Kytke langaton verkko (WLAN) päälle tai pois päältä painamalla
painiketta pohjaan noin neljän sekunnin ajan.
INIT
Palautuspainike (alapuolella).
Palauta tehdasasetukset ja käynnistä
uudelleen painamalla painike pohjaan
esim. paperiliittimellä. Katso kohta
5.3 Tehdasasetusten palautus.
Suomi
INIT
55
Page 56

2.2 Merkkivalot
Merkkivalot sijaitsevat reitittimen etupuolella. Vasemmalta oikealle:
LAN 1–4 Kiinteä vihreä valo: reititin on yhteydessä verkkoon 10/100 Mbps.
Vihreä vilkkuva valo: tiedonsiirto tapahtuu LAN-portin kautta.
WAN Kiinteä vihreä valo: reititin on yhteydessä DSL- tai kaapelimodeemiin.
Vihreä vilkkuva valo: tiedonsiirto tapahtuu WAN-portin kautta.
WLAN/WPS Kiinteä vihreä valo: langaton verkko on aktivoitu, mutta tällä
hetkellä ei tiedonsiirtoa.
Vihreä vilkkuva valo: tieto siirtyy langattomasti.
Vilkkuva punainen valo: WPS-toiminto on aktivoitu.
Huom.! Punaisen valon vilkkuessa vihreä valo palaa
Suomi
samanaikaisesti, minkä vuoksi valoa voi olla vaikea erottaa.
(Jos pidät RF/WPS-painiketta pohjassa yli 4 sekuntia,
sulkee reititin WPS-toiminnon).
PWR Palaa, kun muuntaja on liitetty ja toiminnassa.
Ei pala silloin, kun muuntaja ei ole liitetty.
56
Page 57

3. Asennus
Huom.!
• Varmistat parhaimman toiminnan käyttämällä saman valmistajan
300 Mbps:n laitteita.
• Kun käytät reititintä ensimmäistä kertaa, on helpointa liittää reititin tietokoneeseen
verkkokaapelin avulla. Näin vältät mahdolliset konfigurointiongelmat langattomassa
yhteydessä.
3.1 Modeemi- ja tietokoneliitännät
1. Sammuta kaikki liitettävät laitteet (myös reititin) ennen asennuksen aloittamista.
2. Liitä verkkokaapeli xDSL-/kaapelimodeemin ja reitittimen WAN-portin (WAN) välille.
3. Liitä verkkokaapeli tietokoneen verkkokortin ja reitittimen LAN-portin välille.
4. Liitä muuntajan DC-liitin reitittimen liitäntään
5. Käynnistä xDSL-/kaapelimodeemi.
6. Reititin suorittaa käynnistyessään itsetestauksen, joka kestää noin 5 sekuntia.
7. PWR-, LAN- ja WAN-merkkivalojen tulee palaa vihreinä.
8. Käynnistä tietokone(et), jo(t)ka on liitetty reitittimeen verkkokaapelilla.
Säädä reitittimen antennit suoraan ylöspäin, jos aiot käyttää langatonta yhteyttä.
+
ja seinäpistorasiaan.
Suomi
ADSL
WAN LAN 1 LAN2 LAN3 LAN4 USB RF/WP3
+
RJ45 RJ45
57
Page 58

4. Konfigurointi
Tämä on ainoastaan lyhyt käyttöohje, jonka tarkoituksena on auttaa sinua pääsemään
alkuun. Pakkauksessa olevalla cd-levyllä on täydellinen englanninkielinen käyttöohje.
Huom.!
• Tämän kappaleen asetusten tekemisen edellytyksenä on, että tietokone on liitetty
verkkokaapelilla reitittimeen.
• Ohjeet koskevat Windows XP:tä/Vistaa/7.
4.1 Tarkista ensin laajakaistayhteytesi
Tarkista laajakaistayhteyden tarjoajalta, minkä tyyppinen laajakaistayhteys sinulla on.
Eri laajakaistayhteyden tarjoajat käyttävät eri yhteystyyppejä. Näistä tavallisimmat ovat:
A. PPPoE
Automaattinen IP-osoitteen saaminen PPPoE:n kautta. Tarvitset laajakaistan tarjoajan
antaman käyttäjänimen ja salasanan.
B. Dynamic IP Internet Connection (dynaaminen yhteys).
Automaattinen IP-osoitteen saaminen DHCP-palvelimelta. Et tarvitse käyttäjätietoja.
C. Static IP Internet Connection (kiinteä IP-osoite).
Ilmoita laajakaistan tarjoajalta saamasi tiedot.
Nämä asetukset voit valita sivulla ”Internet Connection Type” tai ”WAN Type Select”
Suomi
(riippuen konfiguroinnista) reitittimen valikoista.
4.2 Mahdolliset palomuurit
Varmista, että reitittimeen liitetyissä tietokoneissa ei ole ohjelmistopalomuureja
asennettuna, esim. Internet Security tai Zone Alarm.
4.3 Tietokoneen asetukset
Varmista, että tietokoneen asetuksena on automaattisesti vastaanottaa IP-osoite ja
että tietokone on saanut oikean IP-osoitteen reitittimeltä.
1a) I Windows XP: Napsauta Start ja valitse Run…
1b) I Windows Vista ja Windows 7: Napsauta Windows-kuvaketta, kirjoita
hakuruutuun Cmd ja paina [Enter].
2. Kirjoita Cmd ja napsauta OK.
3. Kirjoita ipconfig ja varmista, että tietokone saa oikean IP-osoitteen (esimerkissä
192.168.5.1) ja yhdyskäytävän (esimerkissä 192.168.5.254).
Jos tietokone ei saa IP-osoitetta, lue ohjeet Vianhaku-osiosta.
58
Page 59
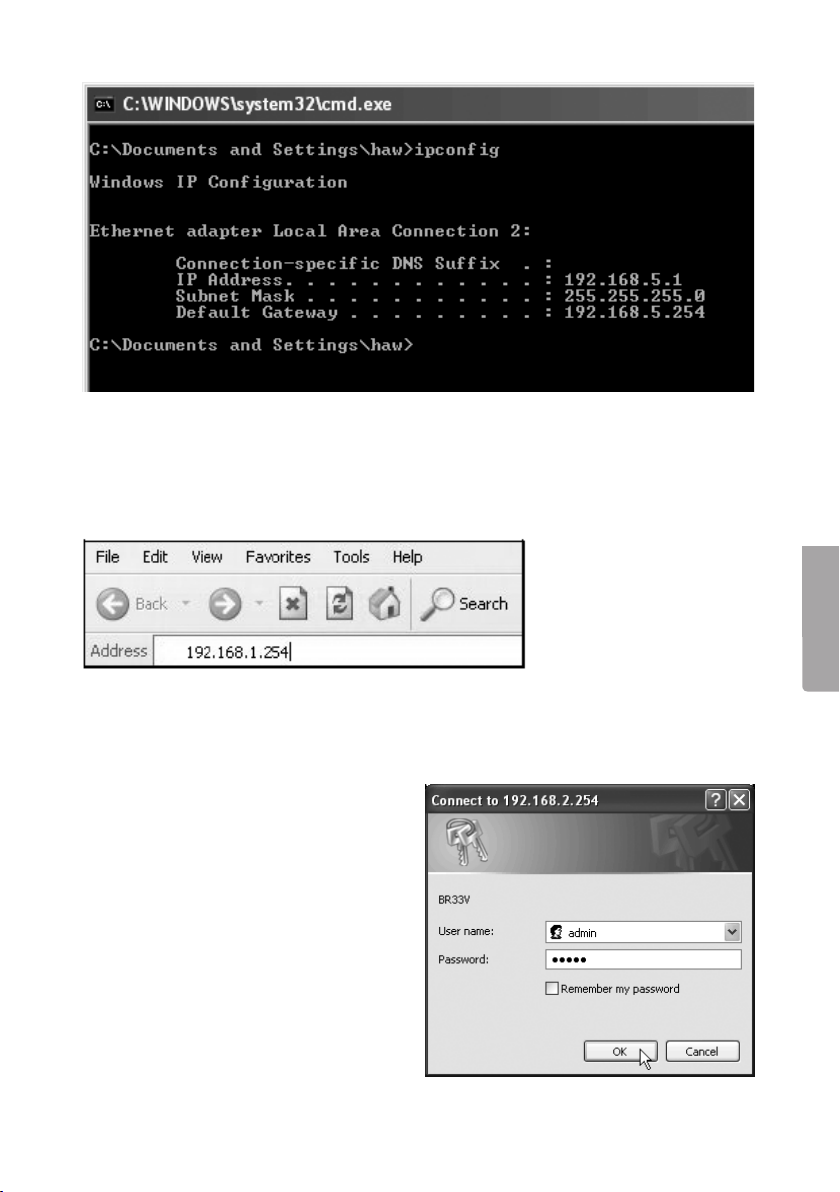
4.4 Reitittimen konfigurointivalikon avaaminen
Kirjoita reitittimen IP-osoite (192.168.1.254) internetselaimesi (esim. Internet Explorer)
osoitekenttään ja liitä langaton reititin painamalla [Enter].
Huom.! Jos käytät modeemia, jossa on oma sisäinen reititin, vaihtaa GN-BR33V-RH
automaattisesti IP-osoitetta välttääkseen konfliktin verkossa (esim.192.168.2.254).
2. Syötä sisäänkirjautumiskenttään
käyttäjätunnus (User name) ja
salasana (Password).
Tehtaalla asetettu käyttäjätunnus
on admin ja salasana admin.
Salasanan ja käyttäjätunnuksen
voi myöhemmin vaihtaa reitittimen
Management Tool -valikossa.
Suomi
59
Page 60
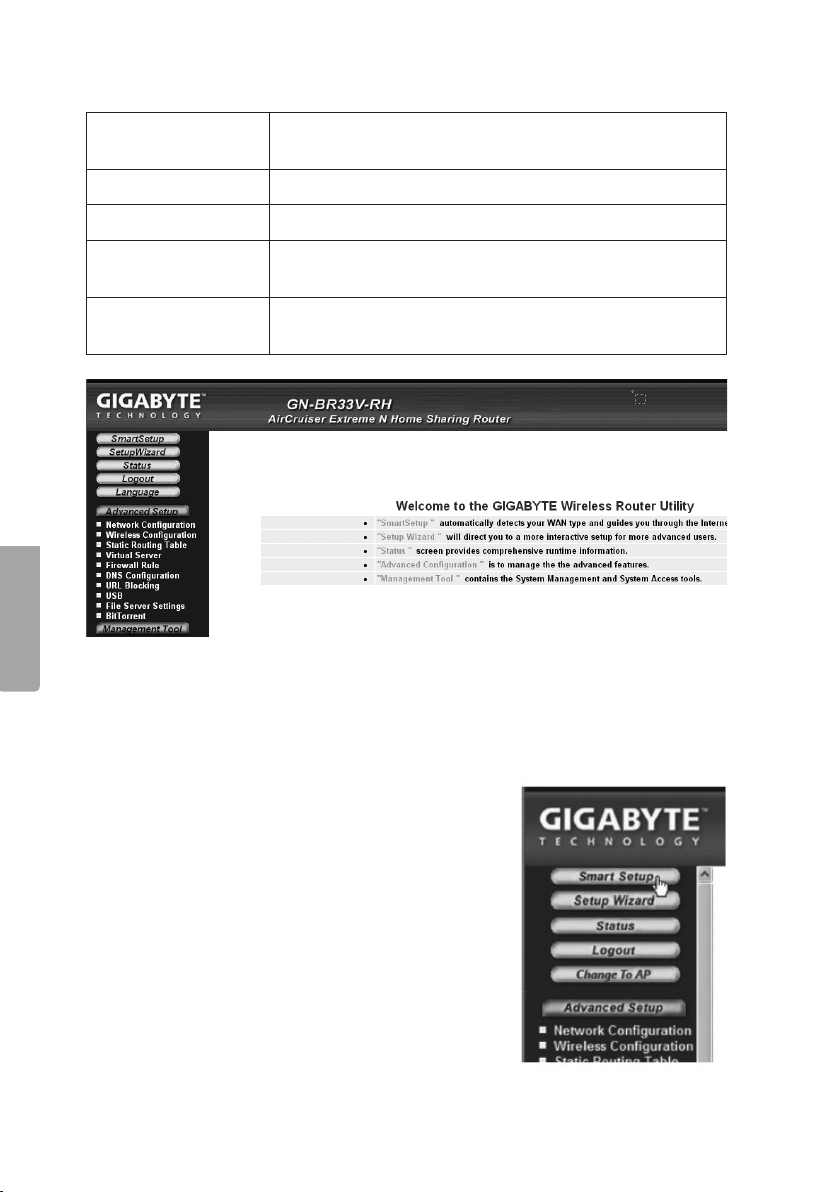
3. Reitittimen valikko avautuu. Valitse alavalikko.
Smart Setup Automaattinen konfigurointi (jos sinulla on internetyhteys
WAN-portin kautta).
Setup Wizard Manuaalinen konfigurointi.
Status Näyttää LAN:in ja WAN:in senhetkisen statuksen.
Advanced
configuration
Management Tool Reitittimen asetukset ja ohjelmat, kuten salasanan
Suomi
Verkoston, langattoman liitännän, palomuurin jne.
manuaaliset asetukset.
vaihto, reitittimen firmwaren päivittäminen jne.
4.5 Automaattinen konfigurointi (Smart Setup) (suositeltava)
Tämä konfigurointi on suositeltava, jos sinulla on internetyhteys WAN-portin kautta.
”Smart Setup” tunnistaa käytössäsi olevan yhteyden.
1. Valitse automaattinen konfigurointi
napsauttamalla Smart Setup.
2. Reititin yrittää nyt tunnistaa ja konfiguroida
internetyhteytesi.
3. Kun reititin on konfiguroinut yhteytesi,
käynnistyy reititin uudestaan.
4. Valitse jos/miten haluat konfiguroida reitittimen
manuaalisesti.
5. Napsauta Logout, kun haluat lopettaa ja
poistua reitittimen valikosta.
60
Page 61

4.6 Manuaalinen konfigurointi
Setup Wizard
Tarkista internet-palvelun tarjoajaltasi, minkä tyyppinen internet-yhteys sinulla on.
Eri internet-palvelun tarjoajat käyttävät eri yhteystyyppejä. Näistä tavallisimmat ovat:
A) PPPoE
Automaattinen IP-osoitteen saaminen PPPoE:n kautta. Tarvitset internet-palvelun
tarjoajan antaman käyttäjätunnuksen ja salasanan.
B) Dynamic (dynaaminen)
Automaattinen IP-osoitteen saaminen DHCP-palvelimelta. Et tarvitse käyttäjätietoja.
C) Static (kiinteä IP-osoite)
Ilmoita internet-palvelun tarjoalta saamasi tiedot.
1. Napsauta Network Configuration ja tämän jälkeen WAN Configuration.
2. Napsauta Edit ylimmällä rivillä.
3. Valitse se yhteystyyppi, joka sinulla internet-palvelun tarjoajan mukaan on ja
napsauta Next.
4. Kirjoita haluamasi yhteysnimi riville ”ISP Name”. Mikäli yhdyskäytävän ja dnsosoitteiden vaihto on tarpeen, tulee sinun ilmoittaa nekin tässä vaiheessa.
Napsauta sitten Finish.
5. Valitse se yhteys, jonka loit kohdassa 4 ensisijaiseksi yhteydeksi (Main Session).
• Jos olet luonut useita yhteyksiä, voit tässä vaiheessa valita toissijaisen yhteyden,
joka otetaan käyttöön, jos ensisijainen yhteys ei väliaikaisesti toimikaan.
6. Tallenna asetukset ja lopeta napsauttamalla Submit.
Suomi
Huom.!
• Tietyt internet-palvelun tarjoajat edellyttävät, että modeemi on pois päältä
30–60 minuutin ajan reitittimen asetusten tekemisen jälkeen, muuten liitäntä ei toimi.
• Varmista, ettei tietokoneella ole ohjelmistopalomuureja asennettuna.
Poista se käytöstä tai konfiguroi se sisäiseen verkkoon. GN-BR33V-RH:lla on
oma sisäinen palomuuri.
61
Page 62

4.7 Tarkista reitittimen yhteys
Voit koska tahansa tarkistaa reitittimen tilan ja asetukset napsauttamalla valikosta
kohtaa Status.
LAN IP 1 Address Kertoo reitittimen sisäisen
IP-osoitteen.
WAN IP Address Kertoo reitittimen ulkoisen
IP-osoitteen.
”Unavailable” tarkoittaa, että reititin
ei ole onnistunut muodostamaan
internet-yhteyttä. Katso kohta
”Vianhaku”.
4.8 Langattoman verkon aktivoiminen ja sulkeminen
• Aktivoi tai sulje langaton verkko painamalla ja pitämällä pohjassa reitittimen
takapuolella olevaa RF/WPS-painiketta noin 5 sekunnin ajan.
• ”WLAN”-merkkivalo kertoo langattoman verkon tilan:
Valo palaa (vihreänä) – langaton verkko on kytketty päälle
Valo ei pala – langaton verkko on pois päältä
Punainen valo vilkkuu – WPS-toiminto on aktivoitu
Huom.! Sulje (disable) tai aktivoi (enable) WPS valikossa ”Wireless Configuration/WPS”
Suomi
ja vahvista napsauttamalla Save Setting.
62
Page 63

4.9 Langattoman verkon turvallisuus
Reititin tukee seuraavia langattoman verkon salaustyyppejä (Authentication Type):
Open system Ei salausta, verkko on ”avoin”.
Shared key (WEP)
(Wired Equivalent
Privacy)
WPA (WiFi Protected
Access)
WPA-PSK (WiFi
Protected Access &
Pre-shared key)
WPA2-PSK Kehitelty versio WPA-PSK:sta (toimii tällä hetkellä
Koostuu turva-avaimesta, joka annetaan sekä reitittimelle
ja liitetyille tietokoneille. Kun “Shared key” on aktivoituna,
ei WEP:tä voi sammuttaa.
Käyttäjät voivat tunnistautua RADIUS-palvelimen kautta.
Koostuu itse valitusta salasanalauseesta, joka annetaan
sekä reitittimelle että liitetyille koneille.
ainoastaan Vistan/Windows 7:n kanssa).
4.9.1 Suojan luominen WPA-PSK -salauksella
Suositellaan kotiverkolle.
1. Napsauta Wireless Configuration valikossa ja sitten 802.11ng.
2. Kirjoita langattomalle verkolle haluamasi nimi kohtaan ”SSID”. SSID on se nimi,
joka näkyy koneilla, jotka hakevat langatonta verkkoa.
Suomi
63
Page 64

3. Valitse salaukseksi (Authentication Type)* WPA-PSK.
(WEP on vanhempi ja epävarmempi salausmuoto, jota ei suositella).
4. Kirjoita 8–63 merkin mittainen salasanalause kohtaan ”WPA PSK Passphrase”.
(Ei å-, ä- tai ö-kirjaimia). Mitä pidempi lause on, sitä turvallisempi se on.
Suomi
Esiasetuksena on GIGABYTE, ja se tulee muuttaa haluttuun salasanalauseeseen.
5. Tee loput asetukset:
WPA-PSK Re-key Aktivoi (Enable) tai sammuta (Disable) pyyntö syöttää
uudestaan salasanalause. Yleensä tämä toiminto on
sammutettu (Disable).
WPA-PSK Re-key
Muuta WPA Re-keyn aika (minuuteissa).
Timer
6. Tallenna asetukset napsauttamalla Submit.
7. Reititin käynnistyy uudestaan päivittääkseen uudet asetukset.
Huom.!
Kun olet suojannut langattoman verkkosi salasanalla ja tallentanut asetukset,
kytkeytyvät liitetyt käyttäjät pois. Ne on liitettävä langattomaan verkkoon uudestaan
jasamalla on syötettävä sama salasanalause kuin reitittimelle.
* Jos haluat käyttää WPA2-PSK:ta, täytyy se ilmoittaa kohdassa 3.
64
Page 65

4.10. WPS (Wi-Fi Protected Setup)
WPS:ää (Wi-Fi Protected Setup) käytetään ainoastaan muiden sitä tukevien
langattomien yksiköiden liittämiseen.
Kun liitäntä tapahtuu WPS:llä, määrittää reititin sen ja langattomien yksiköiden välisen
langattoman verkon turvallisuusasetukset. Katso laajempaa käyttöohjetta, jos tarvitset
tarkempaa ohjeistusta.
Huom.! Sulje (Disable) tai aktivoi (Enable) WPS valikossa ”Wireless Configuration/
WPS” ja vahvista napsauttamalla Save Setting (lisäksi painikeesta RF/WPS voi joko
aktivoida tai sulkea).
5. Vianetsintä
Vika Mahdollinen syy Mahdollinen ratkaisu
Minulla on
ongelmia
reitittimeen
liittymisen
kanssa.
Laitetta ei ole liitetty
muuntajaan.
Ei verkkoliittymää. Varmista, että PC:n ja reitittimen välillä on fyy-
Käyttämäsi tietokoneen IP-osoite
on eri sarjaa kuin
reitittimen.
Muut palomuurit
ja virustentorjuntaohjelmat estävät
liitännän.
Varmista, että ”PWR”-lamppu palaa.
Mikäli lamppu ei pala, tarkista muuntaja
jaseinäpistorasia.
sinen tai langaton liitäntä. Yhden tai useamman
LAN-lampun/lamppujen tulee palaa, verkkokortin lamppu osoittaa myös mikäli liitäntä toimii.
Asetukset näkyvät komentojonossa työkalulla
”IPCONFIG”: Kirjoita ipconfig, ja paina [Enter],
näytöllä näkyvät tietokoneen verkkoasetukset,
esim. IP-osoite ja verkon peite.
Standard-gateway on reitittimen
IP-osoite. IP-osoitteen (192.168.1.x) kolme
ensimmäistä numeroryhmää ovat identtiset
reitittimen ja muiden liitettyjen laitteiden välillä.
Viimeinen numeroryhmä (x) on juokseva
numero, jonka tulee olla kaikille laitteille eri.
Varmista, ettei tietokoneella ole ohjelmistopalomuureja asennettuna. Poista se käytöstä
tai konfiguroi se sisäiseen verkkoon. Tässä
reitittimessä on sisäinen palomuuri.
Suomi
65
Page 66

En voi liittyä
verkon muihin
yksiköihin:
Tietokoneen
IP-asetukset on
konfiguroitu väärin.
Jokaisessa tietokoneessa tulee
olla oma IP-osoite – varmista esim.
IPCONFIG-komennolla. Katso kohdasta
”Konfiguroinnin tarkastaminen”, kuinka
konfigurointi tarkastetaan ja päivitetään.
Hae IP-osoite automaattisesti tulee
tavallisesti olla valittuna (mikäli halutaan
käyttää reitittimen DHCP-toimintoa),
HUOM! Kone tulee käynnistää uudelleen
muutoksen jälkeen.
Verkkokaapelit on
Kokeile liitäntää toisella verkkokaapelilla.
kytketty väärin.
Liittyminen
reitittimeen
onnistuu,
muttei Internetliitäntään.
Modeemi tai ADSLlaite ei toimi.
Tietyt Internet-palveluntarjoajat vaativat,
että modeemi on pois päältä noin 30–60
minuutin ajan reitittimen asetusten tekemisen jälkeen, muuten liitäntä ei toimi.
Varmista, ettei tietokoneella ole ohjelmistopalomuureja asennettuna. Poista se käytöstä tai konfiguroi se sisäiseen verkkoon.
Tässä reitittimessä on sisäinen palomuuri.
Kaapelivika
Tarkista kaapeliliitännät.
reitittimen WANportin ja modeemin
Suomi
tai ADSL-laitteen
välillä.
Setupissa on
Varmista liitäntätyypin asetukset.
käytetty
vääräntyyppistä
liitäntää (PPPoE,
dynaaminen tai
staattinen).
Internet-yhteyden
tarjoajan mahdol-
Kirjoita oikea käyttäjänimi ja salasana.
Erota isot ja pienet kirjaimet.
linen käyttäjänimi ja
salasana on kirjoitettu väärin.
Lue Internet-palveluntarjoajan ohjeet ja
säännöt. Palveluntarjoajalla saattaa olla
sääntöjä saman liitännän jakamisesta.
66
Page 67

5.1 Vianetsintä, Windows XP
TCP/IP
1. Valitse Käynnistä/Ohjauspaneeli ja valitse Verkkoyhteydet.
Napsauta oikealla hiirinäppäimellä sitä verkkoyhteyttä, joka kuuluu
verkkokortille ja valitse Ominaisuudet.
2. Valitse verkkokortin TCP/IP-protokolla ja Ominaisuudet.
3. Varmista, että Hae IP-osoite automaattisesti ja Hae osoite DNS-palvelimeen
automaattisesti on valittu.
4. Napsauta OK.
Http-proxyn poistaminen käytöstä
Varmista, että tietokonetta ei ole konfiguroitu välityspalvelimelle.
1. Avaa Internet Explorer ja napsauta sitten Työkalut ja vaihtoehtoa
Internet-asetukset.
2. Valitse Yhteydet ja LAN-asetukset. Poista sen jälkeen valinnat kaikista
valintaruuduista.
3. Sulje ikkunat napsauttamalla OK.
Konfiguroinnin tarkistaminen
Seuraavalla tavalla voit tarkistaa, onko tietokoneessa oikea IP-osoite:
Varmista, että tietokone on säädetty ottamaan automaattisesti vastaan IP-osoite
ja että tietokone on saanut oikean IP-osoitteen reitittimeltä.
1. Windows XP: Napsauta Start ja valitse Run… .
Windows Vista: Napsauta Windows-kuvaketta, kirjoita hakuruutuun Cmd
ja paina [Enter].
2. Kirjoita Cmd ja napsauta OK.
3. Kirjoita ipconfig ja varmista, että tietokone saa oikean IP-osoitteen
(esimerkissä 192.168.1.4) ja yhdyskäytävän (esimerkissä 192.168.1.254).
4. Mikäli tietokoneessa on oikea IP-osoite alla olevan kuvan mukaisesti, sinun ei
tarvitse tehdä muita asetuksia. Kirjoita exit ja paina [Enter] palataksesi Windowsiin.
Suomi
Konfiguroinnin päivittäminen
Mikäli tietokoneessa on yhä vanha tai väärä IP-osoite, tulee sinun hankkia uusi
IP-osoite. Toimi seuraavasti:
1. Avaa Ohjelmat/Apuohjelmat/Komentojono
(Programs/Accessories/Command Prompt).
Kirjoita ipconfig/release ja paina [Enter].
2. Kirjoita ipconfig/renew ja paina [Enter].
Saat nyt uuden IP-osoitteen.
3. Palaa Windowsiin kirjoittamalla exit ja
painamalla [Enter].
67
Page 68

5.2 PING-toiminto
PING-toiminnolla voidaan tarkistaa, mitkä laitteet/tietokoneet on liitetty verkkoon.
PING toimii komentorivillä*.
1. Kirjoita komento ping komentoriville, jätä välilyönti ja syötä se IP-osoite tai
tietokoneen nimi, jonka haluat etsiä. Paina [Enter].
2. Jos saat ilmoituksen ”Pyyntö aikakatkaistiin” ei yhteys toimi (kohdetietokone ei ole
päällä tai sitä ei ole kytketty oikein).
”Vastaus isännältä…” tarkoittaa, että yhteys toimii ja että kohdetietokone on päällä.
Mikäli yhteys toimii, tulisi ping-haun näyttää tältä: Tässä tietokone on yhteydessä
yksikköön, jonka IP-osoite on seuraava: 192.168.5.254.
* Ping-työkalu löytyy myös reitittimen valikon kohdasta ”Ping”.
Suomi
5.3 Tehdasasetusten palautus (Reset)
Jos haluat aloittaa alusta ja palata tehdasasetuksiin, toimi seuraavasti:
Vaihtoehto 1:
Laitteen alla on palautuspainike (INIT), joka palauttaa reitittimen tehdasasetukset.
Toimi näin:
• Reitittimen tulee olla päällä. Paina INIT-painiketta paperiliittimellä tms. 5–6 sekuntia,
kunnes ”PWR”-lamppuun syttyy oranssi valo. Poista paperiliitin. Reititin käynnistyy
nyt uudestaan tehdasasetuksilla.
Vaihtoehto 2:
• Napsauta Initialization reitittimen valikossa, minkä jälkeen napsauta Initialize
Router. Reititin käynnistyy nyt uudestaan tehdasasetuksilla.
Huom.! Kun palautat tehdasasetukset, menetät kaikki tekemäsi asetukset!
68
Page 69
6. Huolto ja ylläpito
Irrota muuntaja pistorasiasta ennen laitteen puhdistamista. Puhdista kevyesti
kostutetulla liinalla. Älä käytä voimakkaita puhdistusaineita tai liuottimia.
7. Kierrätys
Kierrätä tuote asianmukaisesti, kun poistat sen käytöstä.
Tarkempia kierrätysohjeita saat kuntasi jäteneuvonnasta.
8. Tekniset tiedot
Yleiset tekniset tiedot
Yhteensopiva seuraavien
standardien kanssa
Portit LAN: 10/100 Ethernet (auto-MDIX), RJ45 (4x)
Reititysprotokolla Dynamic, Static Routing, jossa TCP/IP, NAT, PPTP,
Turvallisuus WPA, WPA2 (toimii tällä hetkellä ainoastaan Vistan/
Esiasettu IP-osoite 192.168.1.254
Esiasetettu
käyttäjätunnus
Esiasetettu salasana admin
Virtalähteet 5 V DC, 2 A muuntajalla (sisältyy)
Mitat 216 x 136 x 26 mm
Paino 238 g
IEEE802.3 (10Base-T), IEEE802.3u (100Base-TX),
IEEE802.11b/g/n (Wireless)
WAN: 10/100 Ethernet, RJ45 (1x)
PPPoE, VPN Pass-Through (IPSec, L2TP)
DHCP (Client & Server).
Windows 7:n kanssa).
Sisäinen palomuuri, jossa SPI (Stateful Packet
Inspection) 64/128-bittinen WEP-salaus.
802.1x liittymäkontrolli.
admin
Suomi
69
Page 70

Langattomat tiedot
Taajuusalue 2412 ~ 2484 MHz (paikallisten sääntöjen mukaisesti)
Modulaatiotyyppi DSSS, (DBPSK, DQPSK, CCK) OFDM (BPSK, QPSK,
16-QAM, 64-QAM)
Tiedonsiirtonopeus
(auto-fallback)
Antoteho Legacy-tila – 20 dBm @11b, 17 dBm @11g;
Herkkyys Legacy-tila – 90 dBm @11b, 74 dBm @11g;
Kantama jopa 100 metriä (sisätiloissa)
Antennit 2 kpl (ei irrotettavaa)
Hyväksynnät CE (Eurooppa), FCC part 15 (USA)
802.11b – 1, 2, 5, 11 Mbps
802.11g – 6, 9, 12, 18, 24, 36, 48, 54 Mbps
802.11n – 81, 108, 121, 135, 162, 216, 243, 270, 300 Mbps
HT20-tila – 17 dBm @MCS7/15;
HT40-tila – 17 dBm @MCS7/15;
HT20-tila – 73 dBm @MCS7/15;
HT40-tila – 68 dBm @MCS7/15;
Käyttöympäristö
Suomi
Lämpötila-alue 0–55 °C (käyttölämpötila)
Ilmankosteus 10 %…85 % (suhteellinen ilmankosteus)
Ota huomioon
• Muut samalla taajuudella toimivat langattomat laitteet voivat heikentää kantamaa.
• Lähettimen ja vastaanottimen väliset esteet vaikuttavat kaikkien langattomien
laitteiden kantamaan (esim. betoniseinä heikentää signaalia huomattavasti
kipsiseinää enemmän).
Ongelmatilanteissa voit kokeilla seuraavia keinoja
• Sammuta muut langattomat laitteet selvittääksesi aiheuttavatko ne ongelmia.
• Siirrä langattomia laitteita ja/tai lyhennä etäisyyttä ja poista lähettimen ja
vastaan ottimen väliset esteet (seinät, huonekalut tms.).
70
Page 71

Declaration of Conformity
Hereby, Clas Ohlson AB, declares this wireless Router,
18-8143 / 38-3727
GN-BR33V-RH
is in compliance with the essential requirements and
other relevant provisions of Directive 1999/5/EC.
Article 3.1a (Safety): EN 60950–1
EMF/SAR 99/519/EC
Council Recommendation
Article 3.1b (EMC): EN 301489–1
EN 301489–17
Article 3.2 (Radio): EN 300328
Suomi
0984
Insjön, Sweden, January 2011
Klas Balkow
President
Clas Ohlson, 793 85 Insjön, Sweden
This product intended usage is within the countries of Great Britain, Sweden, Norway and Finland
71
!
Page 72

Sverige
Kundtjänst Tel: 0247/445 00
Fax: 0247/445 09
E-post: kundtjanst@clasohlson.se
Internet www.clasohlson.se
Post Clas Ohlson AB, 793 85 INSJÖN
Norge
Kundes[Enter] Tlf.: 23 21 40 00
Faks: 23 21 40 80
E-post: kundes[Enter]@clasohlson.no
Internett www.clasohlson.no
Post Clas Ohlson AS, Postboks 485 Sentrum, 0105 OSLO
Suomi
Asiakaspalvelu Puh.: 020 111 2222
Sähköposti: info@clasohlson.fi
Internet www.clasohlson.fi
Osoite Clas Ohlson Oy, Annankatu 34–36 A, 00100 HELSINKI
Great Britain
For consumer contact, please visit
www.clasohlson.co.uk and click on
customer service.
Internet www.clasohlson.co.uk
 Loading...