

Page 1
Wireless mini keyboard
with mouse
Trådlöst minitangentbord och mus
Trådløst minitastatur og mus
Langaton mininäppäimistö ja hiiri
EnglishSvenskaNorskSuomi
Art.no Model
18-8029 GK-670MD
38-2844 GK-670MD
Ver. 201101
Page 2

Page 3

Wireless mini keyboard with mouse
Art.no 18-8029 Model GK-670MD
38-2844 GK-670MD
Please read the entire instruction manual before use and save it for future reference.
We reserve the right for any errors in text or images and for making any necessary
technical changes to this document. If you should have any questions concerning
technical problems please contact our Customer Services.
1. Description
• Wireless transmission (2.4 GHz)
• 16 channels and automatic channel changing allows thekeyboard and mouse
tobe used in thevicinity of other appliances on thesame frequency band
• Low power, 8 mA (mouse)
• Double-click button (mouse)
• Hot keys (keyboard)
• Supports Windows 2000/ME/XP and VISTA
2. Contents
• Wireless mini keyboard
• Wireless optical mouse
• USB wireless receiver
• Table stand for thereceiver
• Instruction manual
• CD-ROM software disc
English
Points worth bearing in mind!
• Other wireless equipment operating on thesame frequency band may
reduce therange of theproduct.
• The range of all wireless equipment is affected by obstacles between
the transmitter and thereceiver (a concrete wall reduces thesignal far
more than aplasterboard partition, for example).
If you are having problems with theoperation of thesystem,
try thefollowing solutions
• Switch off any other wireless equipment to check whether it could be causing
the problem.
• Move thewireless equipment and/or reduce thedistance, and reduce
thenumber of obstacles (walls, furniture, etc.) between thetransmitter
andthe receiver.
3
Page 4
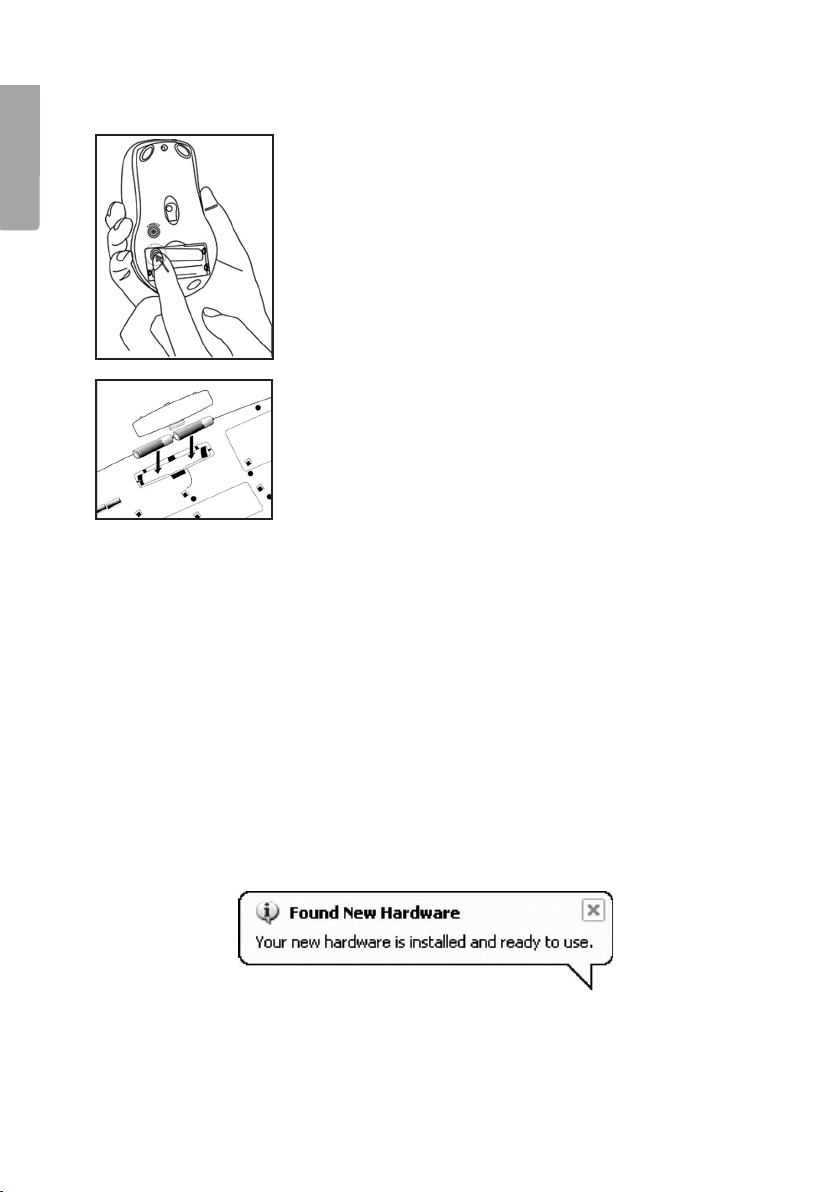
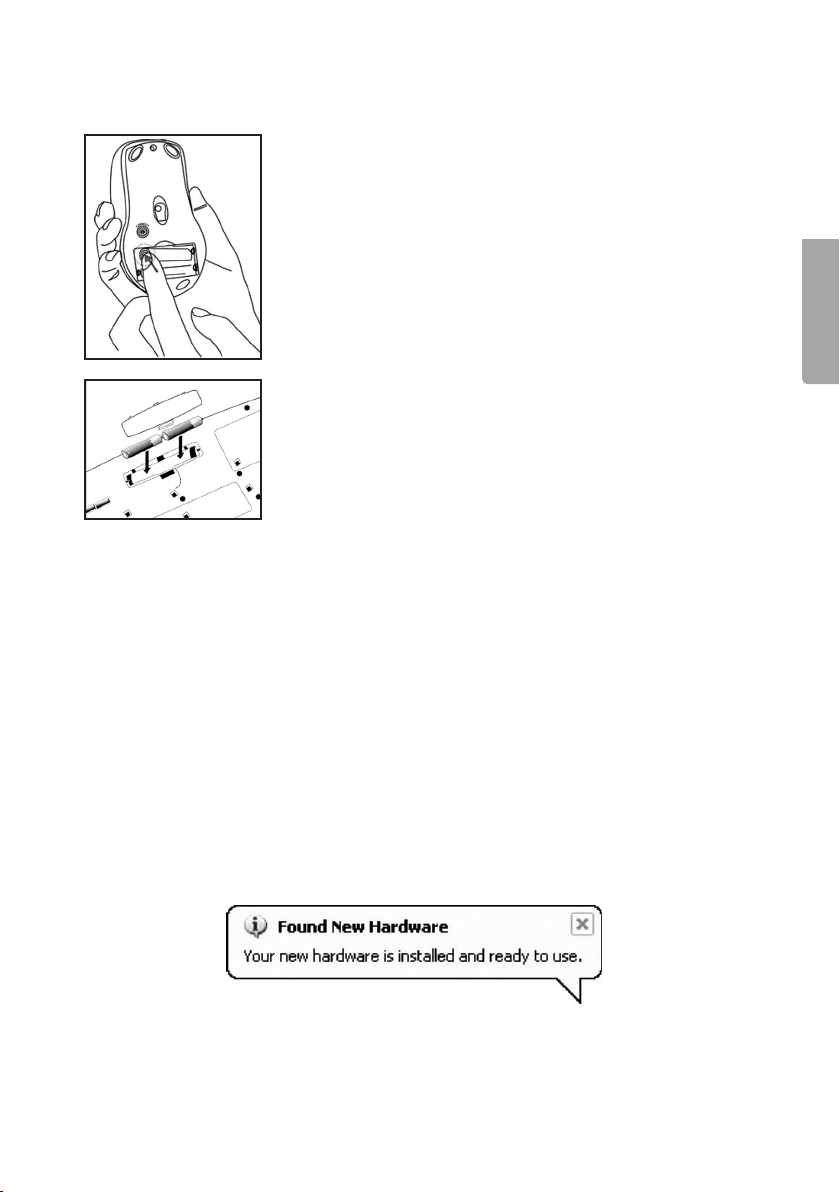
3. Inserting thebatteries
3.1 Mouse
English
Insert 2 LR03/AAA batteries, according to thepolarity
markings (+ and – ) in thebattery compartment.
3.2 Keyboard
Insert 2 LR03/AAA batteries, according to thepolarity
markings (+ and – ) in thebattery compartment.
4. Connecting to thecomputer
The following installation instructions apply for Windows XP with
Service Pack 2 installed.
4.1 Connect thereceiver
1. Connect thereceiver or its extension cable to avacant USB port on your laptop
or PC.
Tip! If there are no available USB ports, an external USB hub (not included) can
be used.
2. The computer will detect thereceiver and automatically install thenecessary
device drivers. For common functions for mouse and keyboard no drivers have to
be installed.
If advanced mouse functions are to be used, theaccompanying software needs
tobe installed by following theinstructions in thesection Installation of software for
advanced functions.
4
Page 5
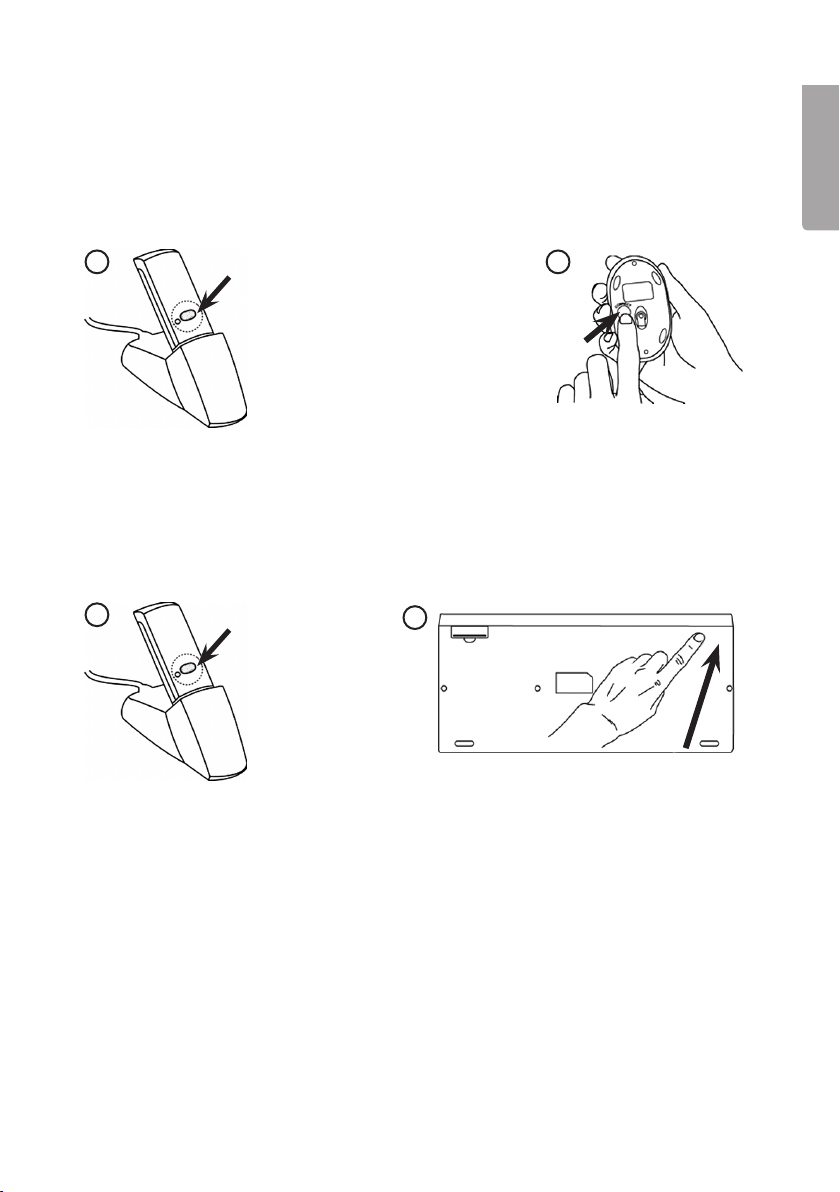
4.2 Connecting themouse
1. Push the[CONNECT] button on thereceiver to create alink to themouse.
The green LED on thereceiver should start to flash.
2. Press the[CONNECT] button on thebottom of themouse to complete
theconnection process, themouse is now ready for use.
English
1
2
4.3 Connecting thekeyboard
1. Push the[CONNECT] button on thereceiver to create alink to themouse.
The green LED on thereceiver should start to flash.
2. Then press the[CONNECT] button on thebottom of themouse to complete
the connection process, themouse is now ready for use.
1
N.B:
If thebatteries for thekeyboard or mouse are removed or need to be switched they
have to be connected again to thereceiver according to step 1–4 in theinstructions.
2
4.4 Troubleshooting
The mouse/keyboard does not work even though it has been connected
1. Remove thereceiver from theUSB port and insert it again.
Repeat theconnection process, following theinstructions above.
2. Try connecting thedevices to another USB port or another computer.
3. The optical sensor might not work as well on certain surfaces such as glass
ormirrors. The optical sensor does, however, work on most surfaces.
5
Page 6
5. Installation of software
5.1 Installation of software for advanced functions
This installation is not necessary if only thestandard mouse and keyboard functions
English
are to be used without extra functions.
1. First, make sure that any previously installed mouse/keyboard driver software has
been uninstalled before installing thenew software.
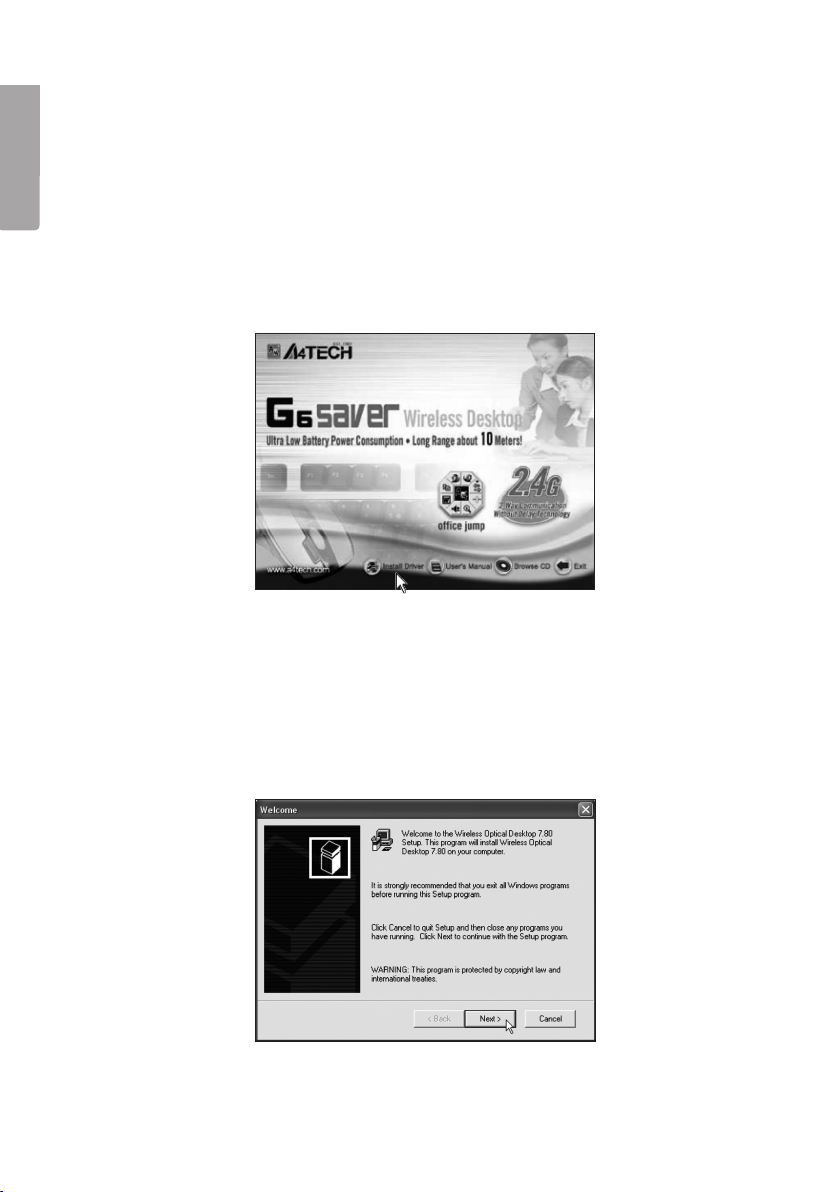
2. Insert thesupplied CD into thecomputer’s CD-ROM drive.
3. The installation guide automatically starts and thestart image is displayed.
Click on Install Driver to begin theinstallation.
If thesoftware is not installed automatically, start theinstallation by running
theSetup.exe file on theCD-ROM.
4. Follow theinstructions:
a. Make sure that any open programmes have been closed and then click on Next
to begin theinstallation.
6
Page 7
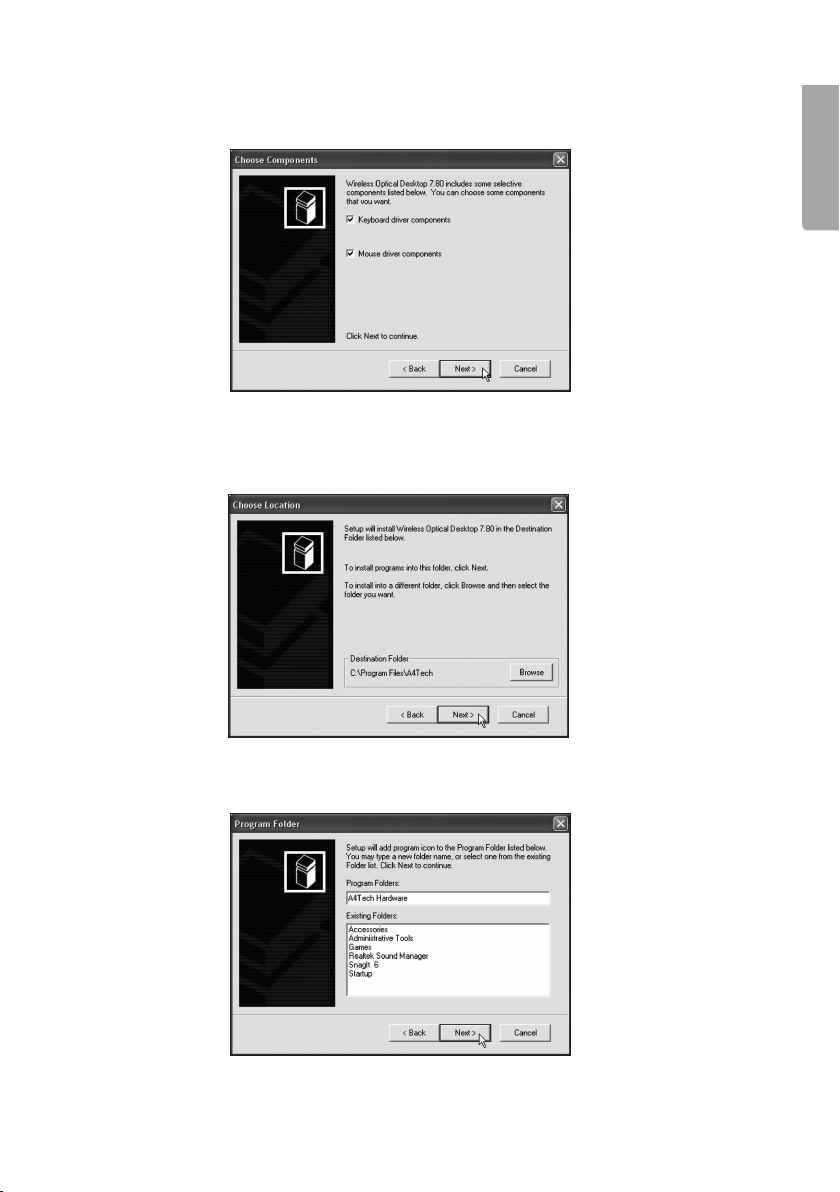
b. Mark both alternatives to install drivers for both themouse and thekeyboard.
Then click Next.
c. Click on Next to install theprogramme in thesuggested folder or Browse to
chose another folder for theinstallation.
English
d. Click on Next to continue.
7
Page 8
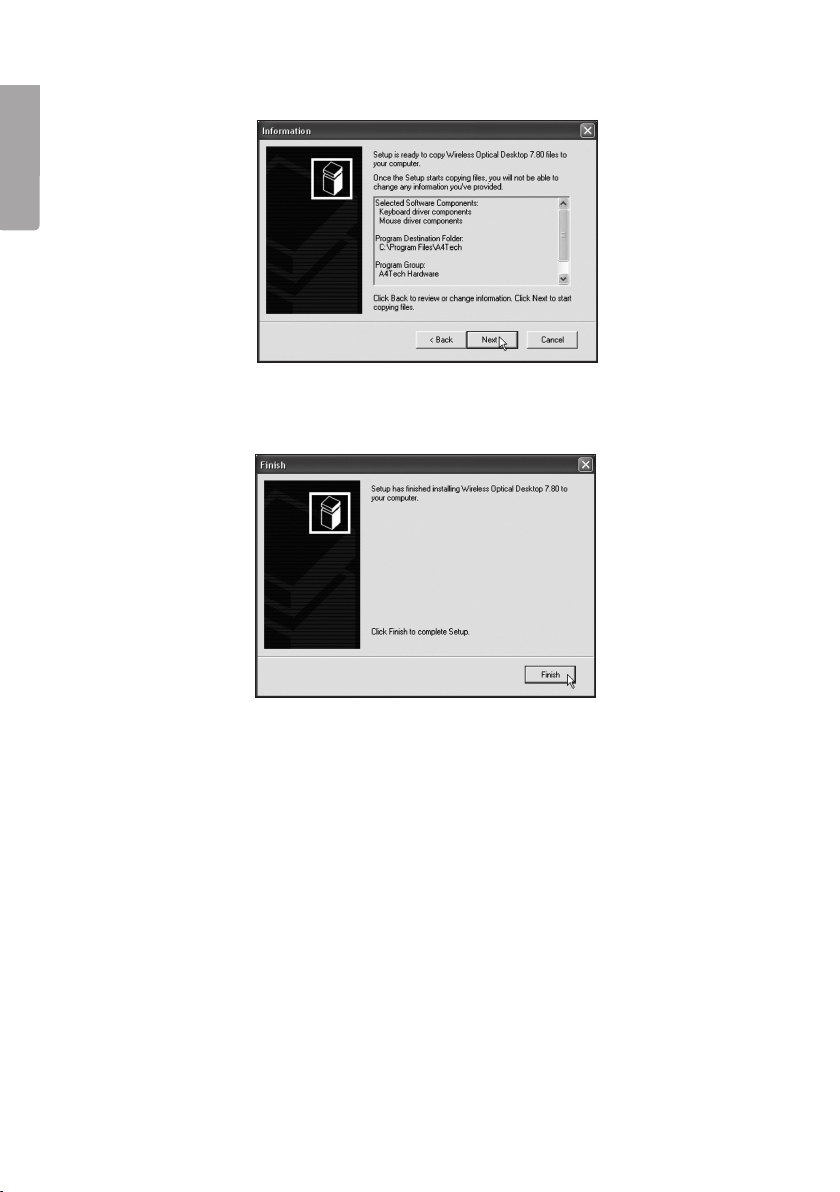
e. Click on Next to confirm your selection and continue theinstallation.
English
f. Click on Finish to complete theinstallation and close theinstallation programme.
8
Page 9
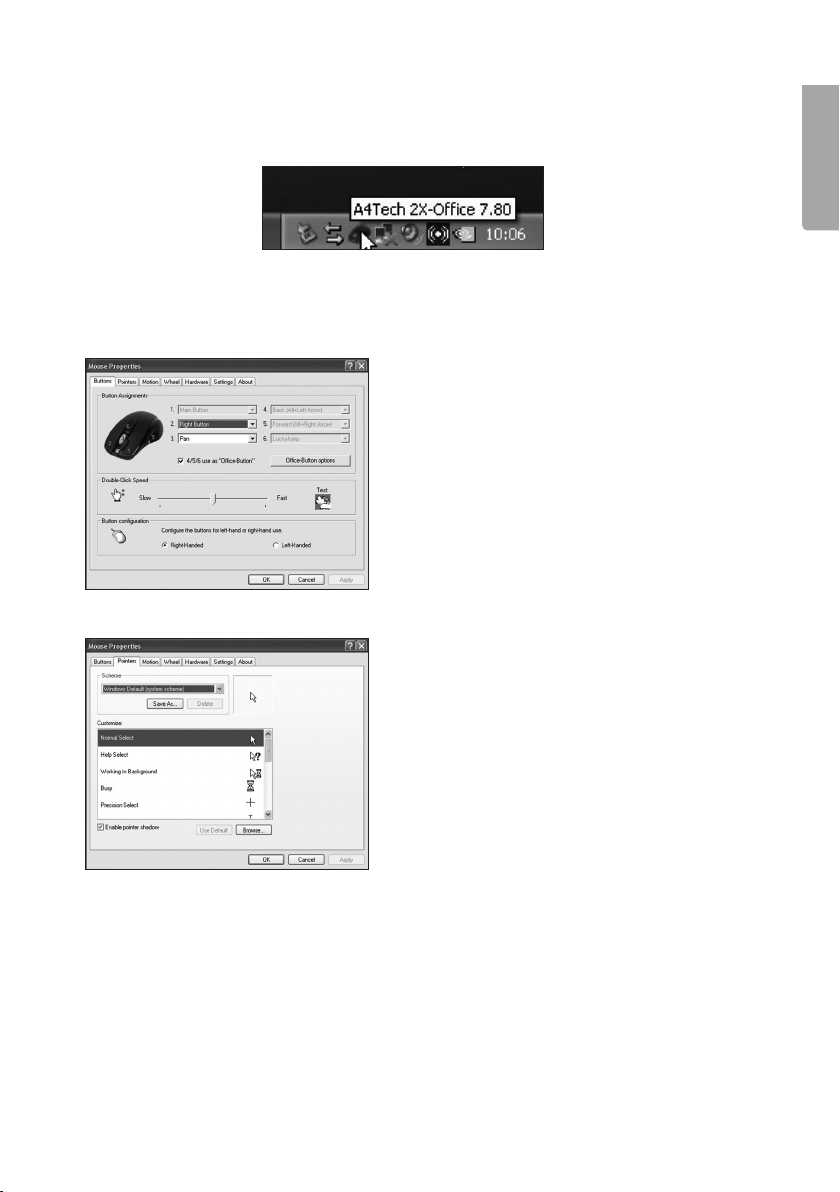
5.2 Setting themouse properties
Right-click on themouse symbol on thetoolbar and then select Properties.
The properties of themouse can now be altered using thefollowing seven tabs:
a. Buttons
• Button Assignments: Select thebuttons
for each function from thedrop-down list.
• Double-Click Speed: Increases/
decreases thespeed of thedouble-click
function. Double-click on Test to test
thesetting.
• Button Configuration: Configure
themouse for Right-handed or
Left-handed manoeuvring.
b. Pointers
• Scheme: Select thepointer display
using thedrop-down list. The available
pointers for each scheme are shown in
thewindow below.
English
9
Page 10
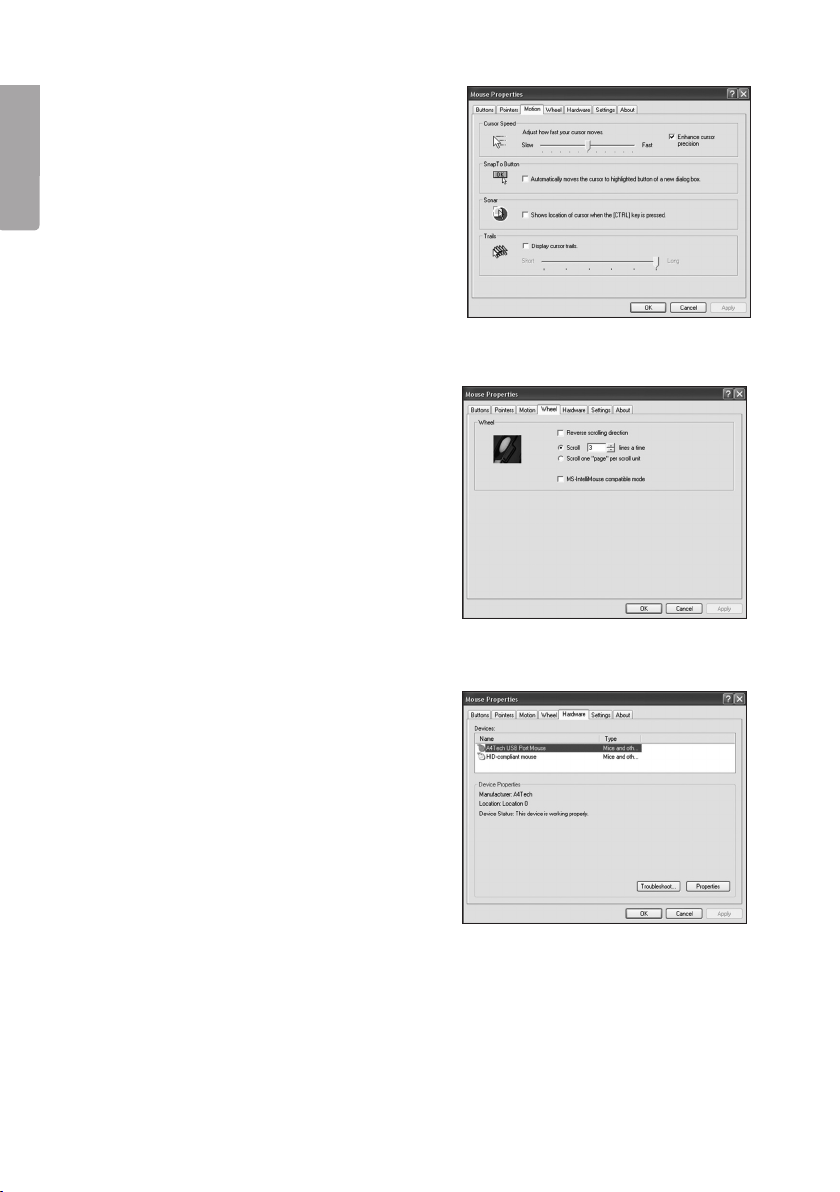
c. Motion
• Cursor Speed: Sets how fast thepointer
can move across thescreen.
• Snap To Button: Select this to
English
automatically move thepointer to
thealternative position suggested by
each window.
• Sonar: This function displays thepointer
more clearly when CTRL is pressed.
• Trails: This function will leave atrail
behind thepointer.
d. Wheel
• Reverse scrolling direction:
Reverse scrolling direction.
• Scroll … lines atime: Enter thenumber
of lines to be scrolled on each step of
thescroll wheel.
• Scroll one ”page” per scroll unit:
Scrolls an entire page for each
movement of thewheel.
• MS IntelliMouse compatible mode:
Select whether or not themouse is to
function as aMS Intellimouse.
e. Hardware
Display of all mice or other pointers connected
to thecomputer.
• You can troubleshoot or check
themouse’s properties.
10
Page 11
f. Settings
The scroll wheel can be assigned other
functions such as Luckyjump using
theButtons tab.
• Luckyjump combines commonly used
commands for Windows environments
into one convenient grid and places
them right under thepointer. The box on
theleft shows all available commands that
you can assign to Luckyjump. Clickon
thescroll wheel to view themenu box,
then click on thedesired function.
• NetJump combines commonly used
commands for net browsing, e-mails etc.
• You can change commands by
choosing anew one from thelist on
theleft and clicking on theicon on
theNet that you wish to swap.
• Configure your own commands:
Click on New/Update then choose
theicon and name of thenew command.
Enter thecommand.
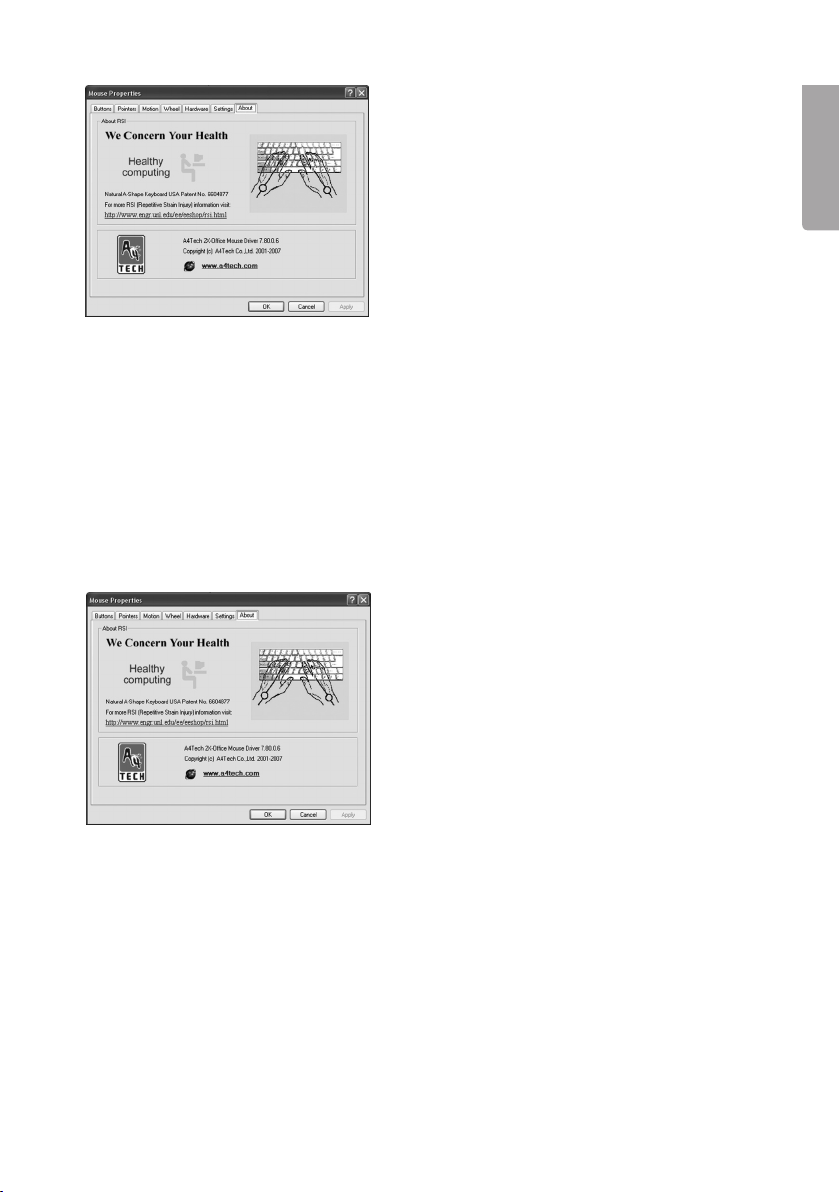
g. About
Shows information about themouse driver.
English
11
Page 12
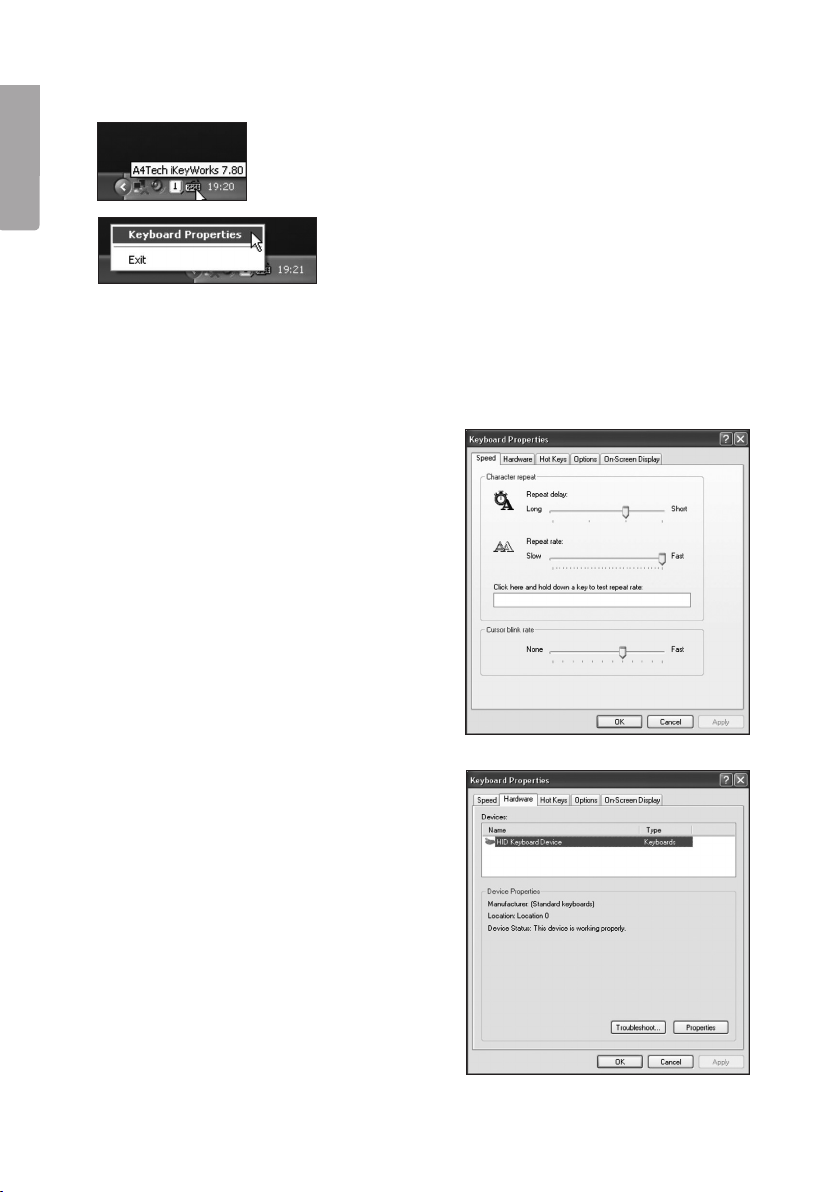
5.3 Setting thekeyboard properties
English
Right click on thekeyboard icon in thetaskbar and then choose Properties.
The properties of thekeyboard can now be altered using thefollowing five tabs:
a. Speed
• Repeat delay: Sets thetime
for delay when akey is pressed
down.
• Repeat rate: Sets therepeat
rate when akey is pressed
down.
• Cursor blink rate: Changes
thecursor’s blink rate.
b. Hardware
Displays thekeyboards which are
connected to thecomputer.
12
Page 13
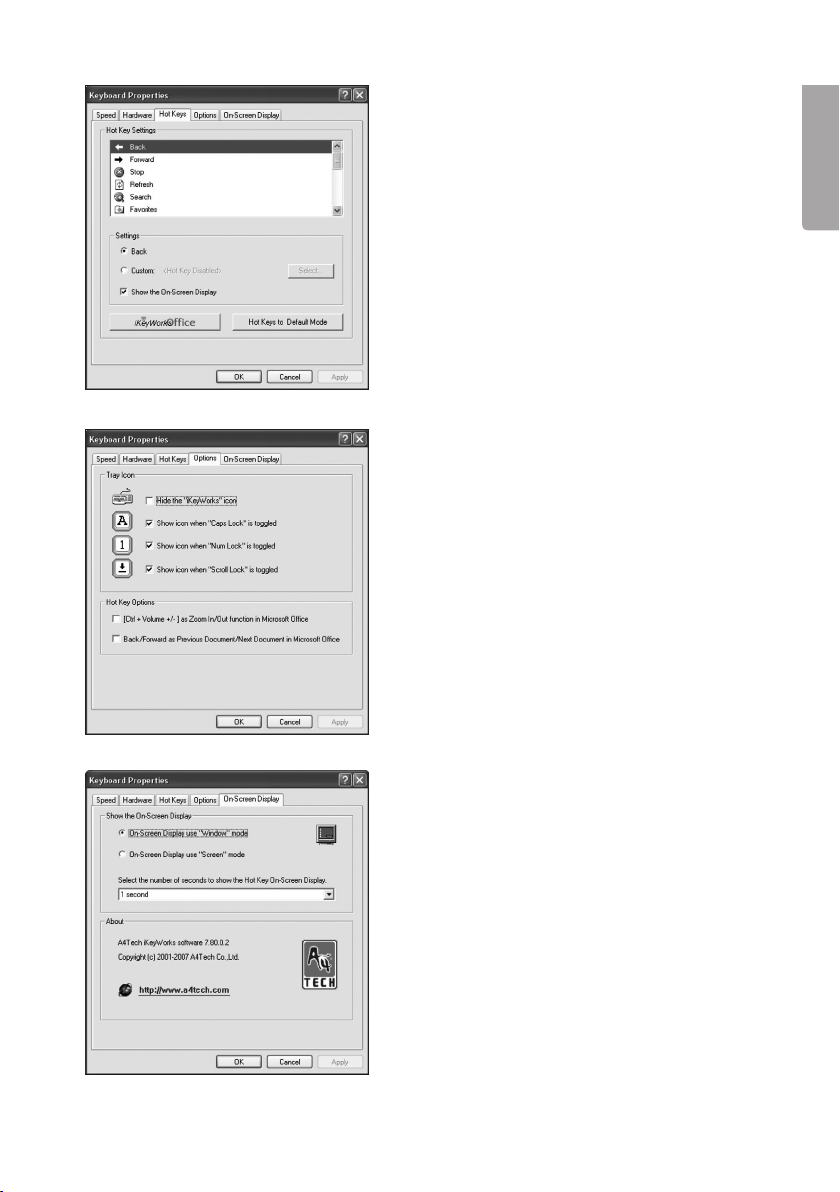
c. Hot Keys
Sets thefunctions for thekeyboard’s
hotkeys. Press Hot Keys Default Mode to
reset thehot keys to thepreset functions.
d. Options
• Hide the“iKeyWorks” icon: Mark to
hide thekeyboard’s icon in thetaskbar.
• Show icon when “Caps Lock” is
toggled: Mark to display an icon in
thetaskbar when Caps Lock is activated.
• Show icon when “Num Lock” is
toggled: Mark to display an icon in
thetaskbar when Num Lock is activated.
• Show icon when “Scroll Lock” is
toggled: Mark to display an icon in
thetaskbar when Scroll Lock is activated.
• Hot Keys Options: Changes
thefunctions for Volume +/- or Back/
Forward when they are used in Microsoft
Office (at thesame time as
the Ctrl-button is pressed down).
English
e. On-Screen Display
Chooses how theinformation will be
displayed on thescreen when ahot key
is used.
13
Page 14
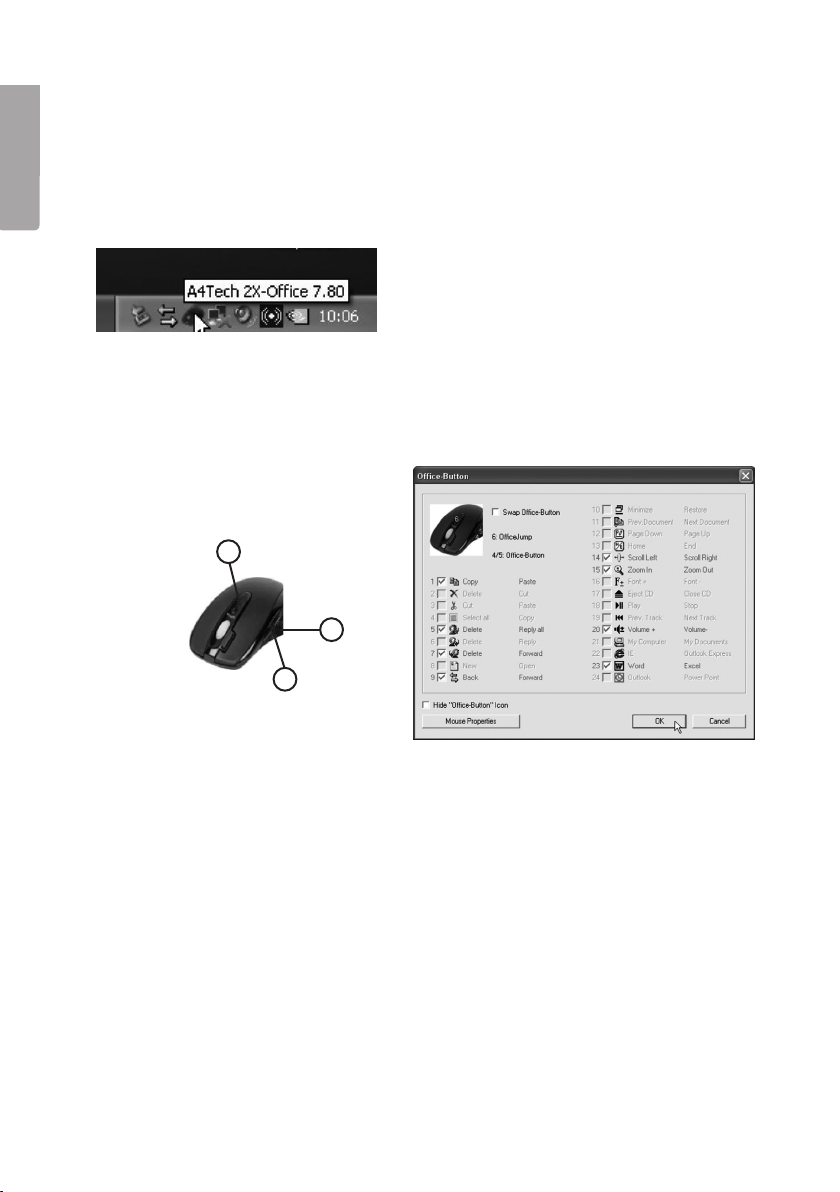
6. Office Button
The office button on thetop of themouse can help you to configure
button 4 and 5 to your favourite functions.
English
6.1 Configuring theproperties of theoffice button
1. Double-click on theoffice button symbol in thetaskbar.
2. Select which of your favourite functions you wish to choose using theoffice
button. Altogether 8 functions can be selected. Click OK to confirm.
6
5
4
Exemple
• If alternative 1 is chosen, button 4 will function as Copy and button 5 will
bePaste.
• If alternative 20 is chosen, button 4 will function as Volume + and button 5 will
be Volume –.
N.B:
• In order to choose afunction other than thepre-programmed functions one or
more of thepre-programmed functions must be deselected.
• Make sure that thealternative 4/5/6 use as Office-Button is selected under
theButtons tab in thesection Setting themouse properties.
14
Page 15
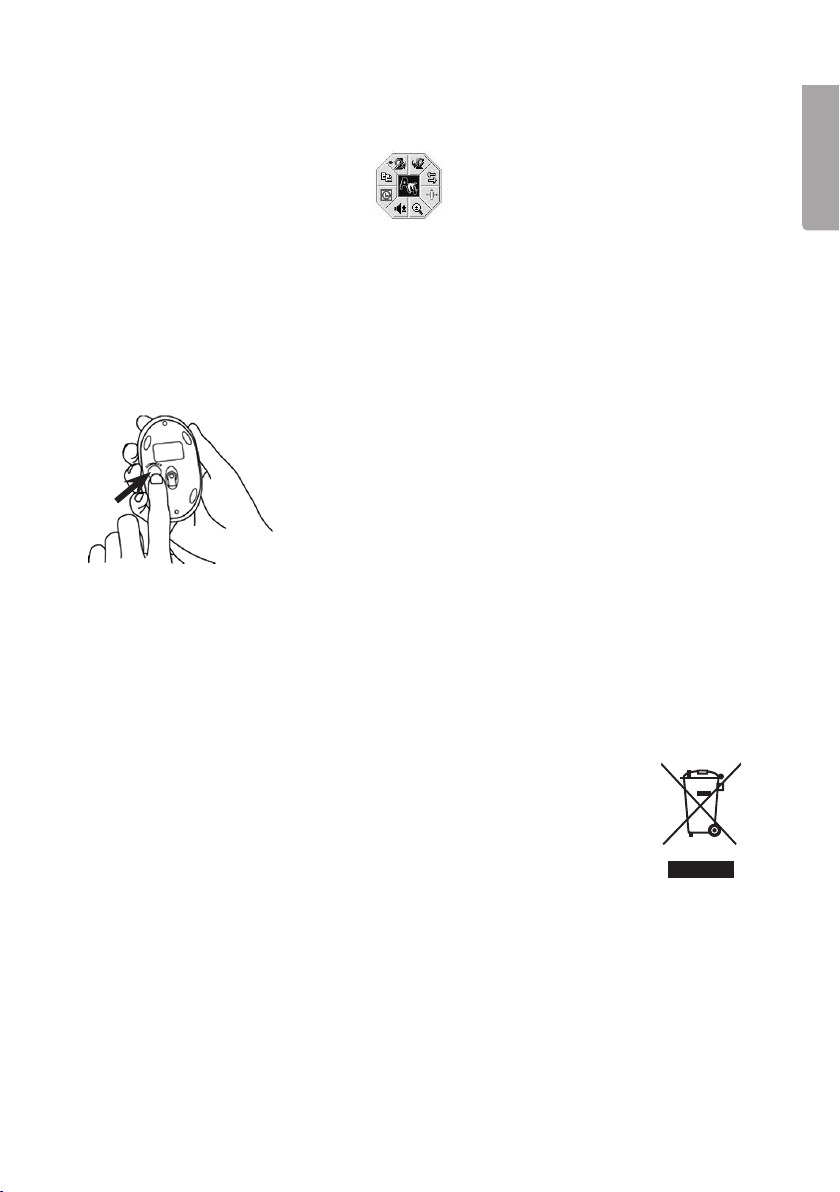
6.2 Using theoffice button
1. Click once on thebutton marked Office on thetop of themouse. The following
menu will appear:
2. Select afunction by clicking on thedesired function and then use button 4 and 5
for thedesired functions (e.g. browse back and forth on aweb page).
3. Click office button once more if you wish to select another favourite function.
7. Turning themouse on/off
Activating themouse: Press thered [CONNECT] button
on thebottom of themouse to turn it on. The red LED on
thebottom of themouse will come on.
Deactivating themouse: Press and hold in thered
[CONNECT] button on thebottom of themouse for
3seconds to turn it off. The red LED on thebottom of
themouse will go off.
8. Double-click
Use thebutton next to thescroll wheel to double-click. One click on this button will
result in adouble-click.
9. Cleaning
Use asoft damp cloth to wipe theproduct. Never use solvents or strong detergents.
English
10. Disposal
Follow local ordinances when disposing of this product. If you are
unsure about thedisposal of this product contact your municipality.
11. Specifications
Frequency range 2.402–2.480 GHz
Number of channels 16
Number of id-codes 1 048 576 combinations
Data transfer rate 2 Mbps
Range Up to 7 metres
15
Page 16

Trådlöst minitangentbord och mus
Art.nr 18-8029 Modell GK-670MD
38-2844 GK-670MD
Läs igenom hela bruksanvisningen före användning och spara den sedan för
framtida bruk. Vi reserverar oss för ev. text- och bildfel samt ändringar av tekniska
data. Vid tekniska problem eller andra frågor, kontakta vår kundtjänst (se adressuppgifter på baksidan).
Svenska
1. Beskrivning
• Trådlös överföring (2,4 GHz)
• 16 olika kanaler och automatiskt kanalbyte gör att tangentbord och mus fungerar
även imiljöer med flera applikationer som använder samma frekvensband
• Låg strömförbrukning, 8 mA (mus)
• Knapp för dubbelklick (mus)
• Snabbtangenter (tangentbord)
• Stöds av Windows 2000/ME/XP samt VISTA
2. Förpackningen innehåller
• Trådlöst minitangentbord
• Trådlös optisk mus
• Mottagare med usb-anslutning
• Bordsställ för mottagare
• Bruksanvisning
• Cd-skiva med programvara
Tänk på
• Att annan befintlig trådlös utrustning på samma frekvensband kan påverka
räckvidden negativt.
• Att räckvidden på all trådlös utrustning påverkas av vilka hinder som finns
mellan sändaren och mottagaren (t.ex. en betongvägg dämpar signalen
avsevärt mer än en gipsvägg).
Vid funktionsproblem, prova följande lösningar
• Stäng av övriga befintliga trådlösa utrustningar för att kontrollera om de kan
vara orsaken till problemet.
• Flytta den trådlösa utrustningen och/eller förkorta avståndet, samt minska
antalet hinder (väggar, möbler etc.) mellan sändaren och mottagaren.
16
Page 17
3. Sätta ibatterierna
3.1 Mus
Sätt i2 st. LR03/AAA-batterier enligt polaritetsmarkeringarna (”+” och ”–”) i batterifacket.
3.2 Tangentbord
Sätt i2 st. LR03/AAA-batterier enligt polaritetsmarkeringarna (”+” och ”–”) i batterifacket.
4. Anslutning till dator
Följande installationsanvisning gäller för Windows XP med Servicepack 2 installerat.
4.1 Ansluta mottagaren
1. Anslut mottagaren eller mottagarens förlängningskabel till en ledig usb-port på
din laptop eller pc.
Tips! Finns inga lediga usb-portar på datorn kan en extern usb-hubb
(medföljer ej) användas.
2. Datorn detekterar mottagaren och installerar automatiskt nödvändiga drivrutiner.
För vanliga funktioner för mus och tangentbord behövs inga andra drivrutiner
installeras.
Svenska
Ska avancerade funktioner för musen användas måste medföljande programvara
installeras enligt avsnitt Installation av programvara för avancerade funktioner.
17
Page 18

4.2 Anslutning av mus
1. Tryck en gång på [CONNECT] på mottagaren för att skapa en anslutning till
musen. Lysdioden på mottagaren blinkar med grönt sken.
2. Tryck därefter på knappen [CONNECT] på musens undersida för att slutföra
anslutningsprocessen, musen är nu klar att användas.
1
Svenska
2
4.3 Ansluta tangentbordet
1. Tryck en gång på [CONNECT] på mottagaren för att skapa en anslutning till
tangentbordet. Lysdioden på mottagaren blinkar med grönt sken.
2. Tryck därefter på knappen [CONNECT] på tangentbordets undersida för att
slutföra anslutningsprocessen, tangentbordet är nu klart att användas.
1
Obs!
Om tangentbordets eller musens batterier tas ur eller byts måste de på nytt
anslutas till mottagaren enligt steg 1 till 4 iinstruktionen.
2
4.4 Felsökning
Musen/tangentbordet fungerar inte trots att de anslutits
1. Ta ur och sätt imottagaren iusb-porten igen. Gör en ny anslutning
enligt instruktionen.
2. Prova att ansluta utrustningen till en annan usb-port eller dator.
3. Den optiska sensorn på musen kan fungera sämre på vissa underlag
så som glasytor, speglar eller liknande. Den optiska sensorn fungerar dock
på de flesta andra underlag.
18
Page 19

5. Installation av programvara
5.1 Installation av programvara för avancerade funktioner
Denna installation behövs inte om du bara ska använda musen och tangentbordet
med standardfunktioner utan extra funktioner.
1. Se först till att du avinstallerat eventuella tidigare programvaror eller drivrutiner för
mus och tangentbord innan du installerar den nya programvaran.
2. Sätt imedföljande cd-skiva idatorns cd-läsare.
3. Cd-skivan startar automatiskt* och startbilden visas. Klicka på Install Driver för
att påbörja installationen.
* Startar inte installationsprogrammet automatiskt, starta installationen genom att
köra filen Setup.exe som finns på cd-skivan.
Svenska
4. Följ installationsanvisningen:
a. Se först till att du stängt eventuella öppna program och klicka sedan på Next för
att påbörja installationen.
19
Page 20

b. Markera båda alternativen för att installera drivrutiner för både tangentbordet och
musen. Klicka sedan på Next.
Svenska
c. Klicka på Next för att installera programmet iföreslagen katalog eller på Browse
för att välja en annan katalog för installationen.
d. Klicka på Next för att fortsätta installationen.
20
Page 21

e. Välj Next för att bekräfta dina val och fortsätta installationen.
f. Klicka på Finish för att slutföra installationen och stänga installationsprogrammet.
Svenska
21
Page 22

5.2 Inställning av musens egenskaper
Högerklicka på musens ikon iaktivitetsfältet och välj sedan alternativet
Properties (Egenskaper).
Musens egenskaper kan nu ändras under programmets följande sju flikar:
Svenska
a. Buttons (Knappar)
• Button Assignments
(Knapptilldelningar): Välj
irullgardinslisten för respektive knapp
vilken funktion knappen ska ha.
• Double-Click Speed
(Dubbelklickshastighet): Ökar minskar
hastigheten för dubbeklick. Dubbelklicka
på Test för att prova dina inställningar.
• Button configuration
(Knappkonfugiration): Ställer in musen för
manövrering med höger (Right-Handed)
eller vänster (Left-Handed) hand.
b. Pointers (Pekare/Markör)
• Scheme (Schema): Välj markörens
visningsschema med hjälp av
rullgardinslisten. Tillgängliga markörer för
varje schema visas ifönstret under.
22
Page 23

c. Motion (Rörelse)
• Cursor Speed (Markörhastighet):
Ställer in hur snabbt markören rör sig
över skärmen.
• Snap To Button (Hoppa till förvalt
alternativ): Markera detta för att
automatiskt flytta markören till det
alternativ som är förvalt/föreslaget
i varje dialogruta/fönster.
• Sonar (Extra tydlig markering): Markera
för att visa markören extra tydligt när
CTRL trycks in.
• Trails (Spår): Markera för att visa spår
efter markörens rörelser.
d. Wheel (Scrollhjul)
• Reverse scrolling direction:
Byt scrollriktning.
• Scroll … lines atime: Anger hur många
rader som bläddras för varje steg på
scrollhjulet.
• Scroll one ”page” per scroll unit:
Bläddrar en hel sida för varje steg på
scrollhjulet.
• MS IntelliMouse compatible mode:
Markera om musen ska fungera som en
MS IntelliMouse.
Svenska
e. Hardware (Hårdvara)
Här visas alla möss eller andra pekdon som
är anslutna till datorn.
• Du kan felsöka eller kontrollera musens
egenskaper.
23
Page 24

f. Settings (Inställningar)
Scrollhjulet kan tilldelas olika funktioner bl.a.
Luckyjump under fliken Buttons.
• LuckyJump kombinerar vanligen
använda kommandon iWindowsmiljö
iett bekvämt rutnät och placerar dem
direkt under markören. Rutan till vänster
visar alla tillgängliga kommandon som
du kan tilldela LuckyJump. Tryck på
scrollhjulet för att visa menyrutan, och
klicka på önskad funktion.
Svenska
• NetJump, här grupperar du vanligtvis
använda kommandon när du websurfar,
mailar etc.
• Du växlar kommando genom att välja
ett nytt ilistan till vänster, och klicka på
den ikon inätet som du vill byta ut.
• Konfigurera egna kommandon: Klicka
på New/Uppdate… och välj sedan en
ikon och ett namn till det ny kommandot,
skriv därefter in kommandot.
g. About (Om)
Visar information om musens drivrutin.
24
Page 25

5.3 Inställning av tangentbordets egenskaper
Högerklicka på tangentbordets ikon iaktivitetsfältet och välj sedan alternativet
Properties (Egenskaper).
Tangentbordets egenskaper kan nu ändras under programmets följande fem flikar:
a. Speed (Hastighet)
• Repeat delay: Ställer in tiden för
fördröjning när en tangent hålls
intryckt.
• Repeat rate: Ställer in
repetitionshastigheten när en
tangent hålls intryckt.
• Cursor blink rate: Ändrar
markörens blinkintervall.
Svenska
b. Hardware (Hårdvara)
Här visas de tangentbord som är
anslutna till datorn.
25
Page 26

c. Hot Keys (Snabbtangenter)
Ställer in funktionerna för tangentbordets
snabbknappar. Tryck på Hot Keys Default
Mode för att återställa snabbknapparna till de
förvalda funktionerna.
Svenska
d. Options (Alternativ)
• Hide the”iKeyWorks” icon:
Markera för att dölja tangentbordets
ikon iaktivitetsfältet.
• Show icon when ”Caps Lock” is
toggled: Markera för att visa en ikon
iaktivitetsfältet när Caps Lock är
aktiverat.
• Show icon when ”Num Lock” is
toggled: Markera för att visa en ikon
iaktivitetsfältet när Num Lock är aktiverat.
• Show icon when ”Scroll Lock” is
toggled: Markera för att visa en ikon
iaktivitetsfältet när Scroll Lock är
aktiverat.
• Hot Keys Options: Ändrar funktionerna
för Volume +/- eller Back/Forward när de
används iMicrosoft Office (samtidigt som
Ctrl-knappen hålls nedtryckt).
e. On-Screen Display (Skärmvisning)
Väljer hur informationen skall visas på
skärmen när en snabbtangent används.
26
Page 27

6. Officeknappen
Med hjälp av officeknappen på musens ovansida kan man snabbt konfigurera knapp
4 och 5 till sina favoritfunktioner.
6.1 Konfigurera officeknappens egenskaper
1. Dubbelklicka på officeknappens ikon iaktivitetsfältet.
2. Välj vilka av dina favoritfunktioner som ska kunna väljas genom officeknappen.
Sammanlagt 8 funktioner kan väljas. Klicka på OK för att bekräfta.
6
5
Svenska
4
Exempel:
• Väljs alternativ 1 får knapp 4 egenskapen Copy (Kopiera) och knapp 5 får
egenskapen Paste (Klistra in).
• Väljs alternativ 20 får knapp 4 egenskapen Volume + (Volym upp) och knapp
5får egenskapen Volume – (Volym ned).
Obs!
• För att kunna välja en annan funktion än de förinställda måste först en eller några
av de andra funktionerna avmarkeras.
• Se till att du under fliken Buttons iavsnittet Inställning av musens egenskaper
markerat alternativet 4/5/6 use as ”Office-Button”.
27
Page 28

6.2 Använda officeknappen
1. Klicka en gång på knappen märkt Office på musens ovansida.
Följande meny visas:
2. Välj en funktion genom att klicka på den önskade funktionen och använd sedan
knapparna 4 och 5 för den valda funktionen (t.ex. bläddra bakåt eller framåt på
en webbsida).
Svenska
3. Klicka igen på officeknappen om du vill välja en annan favoritfunktion.
7. Avstängning/aktivering
Aktivera musen: Tryck en gång på den röda knappen
([CONNECT]) på musens undersida för att slå på musen.
Den röda lysdioden på musens undersida tänds.
Stänga av musen: Tryck och håll in den röda knappen
([CONNECT]) på musens undersida ica 3 sekunder för att
stänga av musen. Den röda lysdioden på musens undersida släcks.
8. Dubbelklick
Använd knappen bredvid scrollhjulet för att ”dubbelklicka”. Ett klick på knappen ger
istället ett dubbelklick.
9. Rengöring
Torka av med en mjuk lätt fuktad trasa. Använd aldrig lösningsmedel
eller starka rengöringsmedel.
10. Avfallshantering
När du ska göra dig av med produkten ska detta ske enligt lokala
föreskrifter. Är du osäker på hur du ska gå tillväga, kontakta din kommun.
11. Specifikationer
Frekvensområde 2,402–2,480 GHz
Antal kanaler 16
Antal id-koder 1 048 576 kombinationer
Överföringshastighet 2 Mbps
Räckvidd Upp till 7 meter
28
Page 29

Trådløst minitastatur og mus
Art.nr. 18-8029 Modell GK-670MD
38-2844 GK-670MD
Les nøye igjennom hele bruksanvisningen og ta vare på den til senere bruk.
Vi reserverer oss mot ev. tekst- og bildefeil, samt forandringer av tekniske data.
Ved tekniske problemer eller andre spørsmål, ta kontakt med vårt kundesenter
(se opplysninger på baksiden).
1. Beskrivelse
• Trådløs overføring (2,4 GHz).
• 16 forskjellige kanaler og automatisk kanalskifte gjør at tastaturet og musen også
fungerer imiljøer med flere applikasjoner som bruker samme frekvensbånd.
• Lavt strømforbruk, 8 mA (mus)
• Knapp for ”dobbelklikk” (mus)
• Hurtigtaster (tastatur)
• Støttes av Windows ME, XP, 2000 samt VISTA.
2. Forpakningen inneholder
• Trådløst minitastatur
• Trådløs optisk mus
• Mottaker med USB-kontakt
• Bordstativ for mottaker
• Bruksanvisning
• CD-plate med programvare
Norsk
Husk følgende
• At annet trådløst utstyr som er innstilt på samme frekvens kan på kan påvirke
rekkevidden negativt.
• At rekkevidden på alt trådløst utstyr påvirkes av hindringer som er mellom
sender og mottaker (en betongvegg kan f.eks. dempe signalene dramatisk
iforhold til en gipsvegg).
Ved problemer, prøv følgende
• Skru av øvrig trådløst utstyr for å kontrollere om de er årsak til problemene.
• Flytt det trådløse utstyret og gjør avstanden mellom sender og mottaker
mindre. Forsøk også å redusere antall hindringer mellom sender og mottaker
(vegger, møbler etc.).
29
Page 30

3. Sett ibatteriene
3.1 Mus
Sett i2 stk. LR03/AAA-batterier ifølge merkingen
(”+” og ”–”) ibatteriholderen.
3.2 Tastatur
Sett i2 stk. LR03/AAA-batterier ifølge merkingen
(”+” og ”–”) ibatteriholderen.
Norsk
4. Kobling til PC
Følgende installasjonsanvisning gjelder for Windows XP med Servicepack 2 installert.
4.1 Koble mottakeren
1. Sett mottakeren eller mottakerens forlengelseskabel til ien ledig USB-port på din
laptop eller PC.
Tips! Dersom det ikke er noen ledig USB-port kan en ekstern USB-hub
(må kjøpes separat) brukes.
2. Datamaskinen detekterer mottakeren og installerer automatisk nødvendige
drivere. Til de vanlige funksjonene for mus og tastatur trenger man ikke
åinstallere andre drivere.
Dersom man skal bruke avanserte musefunksjoner, må man derimot installere den
medfølgende programvaren som beskrevet iavsnittet Installasjon av programvare for
samtlige funksjoner.
30
Page 31

4.2 Tilkobling av mus
1. Trykk på knappen [CONNECT] på mottakeren for åkoble til musen.
Lysdioden på mottakeren blinker med et grønt lys.
2. Trykk deretter på knappen [CONNECT] på musens underside for åfullføre
tilkoblingsprosessen. Musen er nå klar til bruk.
1
2
4.3 Koble til tastaturet
1. Trykk på knappen [CONNECT] på mottakeren for åkoble til tastaturet.
Lysdioden på mottakeren blinker med et grønt lys.
2. Trykk deretter på knappen [CONNECT] på tastaturets underside for åfullføre
tilkoblingsprosessen. Tastaturet er nå klart til bruk.
1
Obs!
Hvis tastaturets eller musens batterier tas ut eller skiftes, må de kobles opp mot
mottakeren på nytt som beskrevet ipunktene 1 til 4 ovenfor.
2
Norsk
4.4 Feilsøking
Musen/tastaturet fungerer ikke på tross av at den er koblet til maskinen.
1. Ta ut og sett imottakeren iUSB-porten igjen. Koble opp på nytt, som
beskrevet ovenfor.
2. Prøv en av maskinens andre USB-porter.
3. Den optiske sensoren på musen kan fungere dårligere på enkelte underlag
som f.eks. glassplater, speil o.l. Den optiske sensoren fungerer dog på de fleste
andre underlag.
31
Page 32

5. Installasjon av programvare
5.1 Installasjon av programvare for samtlige funksjoner
Det er ikke nødvendig åutføre denne installasjonen dersom du kun skal bruke
musens standardfunksjoner.
1. Påse at du først avinstallerer eventuelle tidligere programvarer eller drivere for
mus og tastatur, før du installerer den nye programvaren.
2. Sett den vedlagte CD-platen idatamaskinens CD-ROM.
3. CD-avspillingen starter automatisk* og startbildet vises. Klikk på Install Driver
for åstarte installasjonen.
Norsk
* Dersom installasjonsprogrammet ikke startet automatisk, kan installasjonen startes
ved åkjøre filen Setup.exe som er på vedlagte CD-plate.
4. Følg installasjonsanvisningen:
a. Påse først at alle ev. åpne program er stengt og klikk deretter på Next
for åstarte installasjonen.
32
Page 33

b. Marker begge alternativene for åinstallere drivere for både tastatur og mus.
Klikk deretter på Next.
c. Klikk på Next for åinstallere programmet iden katalogen som blir foreslått eller
på Browse når du ønsker en annen katalog for installasjonen.
Norsk
d. Klikk på Next for åfortsette installasjonen.
33
Page 34

e. Velg Next for åbekrefte dine valg og åfortsette installasjonen.
f. Klikk på Finish for åfullføre installasjonen og åstenge installasjonsprogrammet.
Norsk
34
Page 35

5.2 Innstilling av musens egenskaper
Høyreklikk på musens ikon iaktivitetsfeltet og velg deretter alternativet
Properties (Egenskaper).
Musens egenskaper kan nå forandres under programmets følgende sju fliker:
a. Buttons (Knapper)
• Button Assignments
(Knappetildelinger): Velg fra
rullgardinlisten for respektive knapp
hvilken funksjon knappen skal ha.
• Double Click Speed –
(Dobbeltklikkehastighet): Øker
eller reduserer hastigheten ved
dobbeltklikking. Dobbeltklikk på Test
foråteste dine innstillinger.
• Button Configuration
(Knappeinnstilling): Still inn musen
formanøvrering for bruk av høyre
hånd (Right Hand) eller venstre hånd
(LeftHand).
Norsk
b. Pointers (Peker/Markør)
• Scheme (Skjema): Velg markørens
visningsskjema ved hjelp av
rullgardinlisten. De forskjellige markørene
vises ivinduet nedenfor.
35
Page 36

c. Motion (Bevegelse)
• Cursor Speed (Markørhastighet):
Innstilling for hvor raskt markøren skal
bevege seg på skjermen.
• Snap To Button (Hoppe til
forhåndsvalgt alternativ): Marker dette
for åautomatisk flytte markøren til det
alternativet som er forhåndsvalgt/foreslått
ihver dialogrute/vindu.
• Sonar (Ekstra tydelig markering):
Marker for åvise markøren ekstra tydelig
når CTRL trykkes inn.
• Trails (Spor): Marker her dersom du vil at
spor etter markøren skal vises.
D. Wheel (Scrollehjul)
• Reverse scrolling direction: Skift
Norsk
scrolleretning.
• Scroll … lines atime: Angir hvor
mangerader som skal flyttes ihvert
trinnpå scrollehjulet.
• Scroll one ”page” per scroll unit: Blar
hele sider for hvert trinn på schrollehjulet.
• MS IntelliMouse compatible mode:
Marker om musen skal fungere som en
MS IntelliMouse.
e. Hardware (Hardvare)
Her vises alle mus eller andre pekeredskaper
som er koblet til maskinen.
• Du kan feilsøke eller kontrollere musenes
egenskaper.
36
Page 37

F. Settings (Innstillinger)
Scrollehjulet kan tildeles forskjellige funksjoner
bl.a. Luckyjump under fliken Buttons.
• LuckyJump kombinerer vanligvis
kommandoer du bruker iWindows iet
rutenett og plasserer dem direkte under
markøren. Ruten til venstre viser alle
tilgjengelige kommandoene, som du kan
tildele LuckyJump. Trykk på scrollehjulet
for åfå vist menyruten, og klikk på
ønsket funksjon.
• NetJump – her grupperer du vanligvis
brukte kommandoer, når du surfer på
nettet, mailer etc.
• Du skifter kommando ved åvelge en ny
ilisten til venstre, og klikker på det ikonet
på nettet som du vil skifte ut.
• Konfigurer egne kommandoer: Klikkpå
New/Update og velg ikon og navn til
den nye kommandoen. Skriv deretter inn
kommandoen.
g. About (Om)
Viser informasjon om musens driver.
Norsk
37
Page 38

5.3 Innstilling av tastaturets egenskaper
Høyreklikk på tastaturets ikon iaktivitetsfeltet og velg deretter alternativet
Properties (Egenskaper).
Tastaturets egenskaper kan nå forandres under programmets følgende fem flikerna.
Speed (Hastighet)
• Repeat delay: Stiller inn tiden for
Norsk
forsinkelse når en knapp holdes
inntrykt.
• Repeat rate: Stiller inn
repetisjonshastigheten når en
knapp holdes inne.
• Cursor blink rate: Forandrer
intervallet på markørens blink.
b. Hardware (Hardvare)
Her vises hvilke tastaturer som er
koblet til datamaskinen.
38
Page 39

c. Hot Keys (Hurtigtangenter)
Stiller inn funksjonene for tastaturets hurtigtaster. Trykk på Hot Keys Default Mode for
åstille tilbake hurtigtastene til de forhåndsvalgte funksjonene.
d. Options (Alternativ)
• Hide the”iKeyWorks” icon:
Marker for åskjule ikonet til tastaturet
i aktivitetsfeltet.
• Show icon when ”Caps Lock”
is toggled: Marker for åvise et ikon
i aktivitetsfeltet når Caps Lock er aktivert.
• Show icon when ”Num Lock”
is toggled: Marker for åvise et ikon
i aktivitetsfeltet når Num Lock er aktivert.
• Show icon when ”Scroll Lock”
is toggled: Marker for åvise et ikon
i aktivitetsfeltet når Scroll Lock er aktivert.
• Hot Keys Options: Forandrer funksjonene
for Volume +/- eller Back/Forward når de
brukes iMicrosoft Office (samtidig som
Ctrl-knappen holdes nede).
Norsk
e. On-Screen Display (Skjermvisning)
Velger hvordan informasjonen skal vises
påskjermen når en hurtigtast brukes.
39
Page 40

6. Officeknappen
Med hjelp av officeknappen på musens overside kan man raskt konfigurere
knapp 4og 5 til sine favorittfunksjoner.
6.1 Konfigurere officeknappens egenskaper
1. Dobbeltklikk på officeknappens ikon iaktivitetsfeltet.
2. Velg hvilke av dine favorittfunksjoner som skal kunne velges ved hjelp av
officeknappen. Du kan velge til sammen 8 funksjoner. Trykk på OK for åbekrefte.
Norsk
6
5
4
Eksempel
• Dersom alternativ 1 velges, får knapp 4 egenskapen Copy (Kopier) og
knapp 5 egenskapen Paste (Lim inn).
• Velges alternativ 20 får knapp 4 egenskapen Volume + (Volum opp) og
knapp 5 får egenskapen Volume – (Volum ned).
Obs!
• For åkunne velge en annen funksjon enn de forhåndsinnstilte må først en eller
flere av de andre funksjonene avmerkes.
• Påse at du, under fliken Buttons iavsnittet Innstilling av musens egenskaper,
merker alternativet 4/5/6 use as ”Office-Button”.
40
Page 41

6.2 Bruk av officeknappen
1. Klikk en gang på knappen merket Office på musens overside.
Følgende meny vises:
2. Velg en funksjon ved åklikke på den ønskede funksjonen og bruk deretter
knappene 4 og 5 for den valgte funksjonen (f.eks. bla bakover eller framover
påen webside).
3. Klikk på officeknappen igjen dersom du vil velge en annen favorittfunksjon.
7. Avstenging/aktivering
Aktivere musen: Trykk en gang på den røde knappen
([CONNECT]) på musens underside for åslå den på.
Den røde lysdioden på musens underside tennes.
Skru av musen: Trykk og hold inne den røde knappen
([CONNECT]) på musens underside ica. 3 sekunder for
åskru av musen. Den røde lysdioden på musens underside tennes.
8. Dobbelklikk
Bruk knappen ved siden av scrollehjulet for ådobbeltklikke. Et klikk på knappen gir
et dobbeltklikk.
Norsk
9. Rengjøring
Rengjør med en myk og lett fuktet klut. Bruk aldri løsemiddel eller
sterke rengjøringsmiddel.
10. Avfallshåndtering
Når du skal kvitte deg med produktet, skal dette skje ihenhold
til lokale forskrifter. Er du usikker på hvordan du går fram, ta kontakt
med lokale myndigheter.
11. Spesifikasjoner
Frekvensområde 2,402–2,480 GHz
Antall kanaler 16
Antall id-koder 1 048 576 kombinasjoner
Overføringshastighet 2 Mbps
Rekkevidde Inntil 7 meter
41
Page 42

Langaton mininäppäimistö ja hiiri
Tuotenro 18-8029 Malli GK-670MD
38-2844 GK-670MD
Lue käyttöohjeet ennen tuotteen käyttöönottoa ja säilytä ne tulevaa tarvetta varten.
Pidätämme oikeuden teknisten tietojen muutoksiin. Emme vastaa mahdollisista
teksti- tai kuvavirheistä. Jos laitteeseen tulee teknisiä ongelmia, ota yhteys
myymälään tai asiakaspalveluun (yhteystiedot käyttöohjeen lopussa).
1. Kuvaus
• Langaton tiedonsiirto (2,4 GHz).
• 16 eri kanavaa ja automaattinen kanavanvaihto mahdollistavat näppäimistön ja
hiiren toiminnan myös sellaisissa ympäristöissä, joissa useat laitteet käyttävät
samaa taajuusaluetta.
• Matala virrankulutus, 8 mA (hiiri)
• Kaksoisnapsautuspainike (hiiri)
• Pikapainikkeet (näppäimistö)
• Tuetut järjestelmät: Windows 2000/ME/XP sekä VISTA
2. Pakkauksen sisältö
• Langaton mininäppäimistö
• Langaton optinen hiiri
Suomi
• Vastaanotin usb-liitännällä
• Pöytäteline vastaanottimelle
• Käyttöohje
• Asennuslevy (CD-ROM)
Ota huomioon
• Muut samalla taajuudella toimivat langattomat laitteet voivat heikentää kantamaa.
• Lähettimen ja vastaanottimen väliset esteet vaikuttavat kaikkien langattomien
laitteiden kantamaan (esim. betoniseinä heikentää signaalia huomattavasti
kipsiseinää enemmän).
Ongelmatilanteissa voit kokeilla seuraavia keinoja
• Sammuta muut langattomat laitteet selvittääksesi aiheuttavatko ne ongelmia.
• Siirrä langattomia laitteita ja/tai lyhennä etäisyyttä ja poista lähettimen ja
vastaan ottimen väliset esteet (seinät, huonekalut tms.).
42
Page 43

3. Paristojen asettaminen
3.1 Hiiri
Laita lokeroon kaksi LR03/AAA-paristoa
paristolokeron merkintöjen mukaisesti.
3.2 Näppäimistö
Laita lokeroon kaksi LR03/AAA-paristoa
paristolokeron merkintöjen mukaisesti.
4. Liittäminen tietokoneeseen
Seuraavat asennusohjeet koskevat käyttöjärjestelmää Windows XP, jossa on
Servicepack 2.
Suomi
4.1 Vastaanottimen liittäminen
1. Aseta vastaanotin tai vastaanottimen jatkokaapeli tietokoneen tai kannettavan
tietokoneen vapaaseen usb-porttiin.
Vihje! Jos koneessa ei ole vapaita usb-portteja, voidaan lisää vapaita portteja
saada ulkoisella usb-hubilla (ei sisälly).
2. Tietokone tunnistaa vastaanottimen ja asentaa automaattisesti tarvittavat ajurit.
Hiiren ja näppäimistön normaalikäyttöön ei tarvita muita ajureita.
Jos haluat käyttää hiiren erikoistoimintoja, täytyy mukana tuleva ohjelma asentaa
luvun Ohjelmiston asennus edistyneitä toimintoja varten ohjeiden mukaan.
43
Page 44

4.2 Hiiren liittäminen
1. Paina kerran vastaanottimen [CONNECT]-painiketta ja muodosta yhteys
hiireen. Vastaanottimen merkkivalo vilkkuu vihreänä.
2. Paina sitten [CONNECT]-painiketta hiiren pohjassa suorittaaksesi
yhteydenmuodostamisen loppuun. Hiiri on nyt valmis käyttöä varten.
1
2
4.3 Näppäimistön liittäminen
1. Paina kerran vastaanottimen [CONNECT]-painiketta ja muodosta yhteys
näppäimistöön. Vastaanottimen merkkivalo vilkkuu vihreänä.
2. Paina sitten [CONNECT]-painiketta näppäimistön pohjassa suorittaaksesi
yhteydenmuodostamisen loppuun. Näppäimistö on nyt valmis käyttöä varten.
1
Suomi
Huom.!
Mikäli näppäimistön tai hiiren paristot poistetaan tai vaihdetaan, laitteet tulee liittää
uudelleen vastaanottimeen ohjeen kohtien 1–4 mukaisesti.
2
4.4 Vianhaku
Hiiri/näppäimistö ei toimi vaikka se on liitetty tietokoneeseen
1. Irrota vastaanotin usb-portista ja aseta se sitten takaisin. Liitä hiiri uudestaan
käyttöohjeen mukaisesti.
2. Yritä liittää laite toiseen usb-porttiin tai toiseen tietokoneeseen.
3. Hiiren optinen tunnistin saattaa toimia heikommin joillakin alustoilla, kuten lasi- tai
peilipinnalla tai vastaavalla. Tunnistin toimii kuitenkin useimmilla muilla alustoilla.
44
Page 45

5. Ohjelmiston asennus
5.1 Ohjelmiston asennus edistyneitä toimintoja varten
Sinun ei tarvitse tehdä tätä asennusta, jos käytät ainoastaan hiiren ja näppäimistön
perustoimintoja.
1. Varmista ensin, että olet poistanut mahdolliset aiemmin asennetut hiiren ja
näppäimistön ohjelmistot ja ajurit, ennen kuin asennat uuden ohjelmiston.
2. Aseta mukana tuleva cd-levy tietokoneen cd-asemaan.
3. Cd-levy käynnistyy automaattisesti* ja näytölle ilmestyy käynnistyskuva.
Aloita asennus napsauttamalla Install Driver.
*Jos asennusohjelma ei käynnisty automaattisesti, aloita asentaminen käynnistämällä
levyllä oleva Setup.exe -tiedosto.
4. Noudata asennusohjeita:
a. Varmista ensin, että olet sammuttanut mahdolliset auki olevat ohjelmat ja
napsauta sitten Next aloittaaksesi asennuksen.
45
Suomi
Page 46

b. Valitse molemmat ajureiden asennusvaihtoehdot. Napsauta sen jälkeen Next.
c. Napsauta Next asentaaksesi ohjelman ehdotettuun kansioon tai Browse
asentaaksesi ohjelman johonkin muuhun kansioon.
Suomi
d. Jatka asennusta napsauttamalla Next.
46
Page 47

e. Vahvista valintasi ja jatka asennusta valitsemalla Next.
f. Viimeistele asennus ja sulje asennusohjelma napsauttamalla Finish.
Suomi
47
Page 48

5.2 Hiiren ominaisuuksien asentaminen
Napsauta hiiren kuvaketta tehtäväpalkissa hiiren oikealla näppäimellä ja valitse sitten
Properties (Ominaisuudet).
Hiiren ominaisuuksia voidaan nyt muuttaa ohjelman seitsemällä välilehdellä:
a. Buttons (Painikkeet)
• Button Assignments
(Painikemääritykset): Valitse
painikkeiden alasvetovalikoista toiminto
jokaiselle painikkeelle.
• Double Click Speed (Kaksois-
napsautusnopeus): Lisää/vähennä
kaksoisnapsautuksen nopeutta. Kokeile
asetusta kaksoisnapsauttamalla Test.
• Button Configuration
(Painikeasetukset): Säädä hiiri
oikealle(Right handed) tai vasemmalle
Suomi
(Left handed) kädelle.
b. Pointers (Osoitin/Nuoli):
• Scheme (Valikoima): Valitse osoittimen
näyttövalikoima alasvetovalikosta.
Valikoimaan kuuluvat osoittimet näkyvät
alla olevassa luettelossa
48
Page 49

c. Motion (Liike)
• Cursor Speed (Osoittimen
liikkumisnopeus): Säädä osoittimen
nopeus näytöllä.
• Snap To Button (Siirry etukäteen
valittuun vaihtoehtoon): Siirrä osoitin
automaattisesti ehdotetun painikkeen
päälle aina kun uusi ikkuna avautuu.
• Sonar (Korostus): Korostaa osoitinta,
aina kun painat CTRL-painiketta.
• Trails (Osoittimen jälki): Valitse
osoittimen jättämä jälki näytöllä.
d. Wheel (Rullanäppäin)
• Reverse scrolling direction:
Vaihda vierityksen suuntaa.
• Scroll … lines atime: Vieritä haluttu
määrä rivejä kerrallaan.
• Scroll one ”page” per scroll unit:
Vieritä sivu kerrallaan.
• MS IntelliMouse compatible mode:
Merkitse, jos haluat, että hiiri toimii kuten
MS IntelliMouse-hiiri.
Suomi
e. Hardware(Laitteet)
Tässä näkyvät kaikki hiiret ja muut vastaavat
tietokoneeseen liitetyt laitteet.
• Voit tehdä vianmäärityksen tai tarkistaa
hiiren muita ominaisuuksia.
49
Page 50

f. Settings (Asetukset)
Rullapainikkeelle voidaan antaa eri toimintoja
Painikkeet välilehdessä, esim. Luckyjump.
• LuckyJump yhdistää Windows-
ympäristössä tavallisesti käytettyjä
käskyjä mukavaan ruudukkoon ja sijoittaa
ne suoraan osoittimen alle. Vasemmalla
olevassa ruudussa näkyvät käskyt, joita
voidaan liittää LuckyJumpiin. Paina
rullapainiketta nähdäksesi valikkoruudun,
ja napsauta haluttua toimintoa.
• NetJump yhdistää verkkoselailussa,
sähköpostissa jne. tavallisimmin käytetyt
käskyt.
• Vaihda käskyjen välillä valitsemalla uusi
käsky vasemmalla olevasta listasta,
janapsauttamalla verkosta kuvaketta,
jonka haluat vaihtaa.
• Aseta omia komentoja: Napsauta
New/Update ja valitse uuden komennon
nimi ja kuvake. Syötä lopuksi komento.
Suomi
g. About (Ajureiden tietoja)
Näyttää tietoja hiiren ajureista.
50
Page 51

5.3 Näppäimistön ominaisuuksien asettaminen
Napsauta näppäimistön kuvaketta tehtäväpalkissa hiiren oikealla näppäimellä ja
valitse sitten Properties (Ominaisuudet).
Näppäimistön ominaisuuksia voidaan nyt muuttaa ohjelman viidellä välilehdellä:
a. Speed (Nopeus)
• Repeat delay: Aseta viiveen
kesto, kun näppäintä pidetään
painettuna.
• Repeat rate: Aseta
toistonopeus, kun näppäintä
pidetään painettuna.
• Cursor blink rate: Muuta
osoittimen vilkkumisväli.
Suomi
b. Hardware (Laitteet)
Tällä sivulla näet, mitkä näppäimistöt
tietokoneeseen on liitetty.
51
Page 52

c. Hot Keys (Pikapainikkeet)
Aseta toiminnot näppäimistön
pikapainikkeille. Paina Hot Keys Default
Mode palauttaaksesi pikapainikkeille
esiasetetut toiminnot.
d. Options (Vaihtoehdot)
• Hide the”iKeyWorks” icon:
Merkitse, kun haluat piilottaa
näppäimistön kuvakkeen tehtäväpalkissa.
• Show icon when ”Caps Lock” is
toggled: Merkitse kun haluat, että
tehtäväpalkissa näkyy kuvake,
kun Caps Lock on aktivoituna.
• Show icon when ”Num Lock” is
Suomi
toggled: Merkitse kun haluat, että
tehtäväpalkissa näkyy kuvake,
kun Num Lock on aktivoituna.
• Show icon when ”Scroll Lock” is
toggled: Merkitse kun haluat, että
tehtäväpalkissa näkyy kuvake,
kun Scroll Lock on aktivoituna.
• Hot Keys Options: Muuta Volume +/- :n
tai Back/Forwardin toimintoja, kun niitä
käytetään Microsoft Officessa (kun Ctrlpainiketta pidetään samanaikaisesti
painettuna).
e. On-Screen Display (Näyttö)
Valitse, miten tiedot näkyvät näytöllä kun
käytät pikapainiketta.
52
Page 53

6. Office-painike
Hiiren päällä olevan Office-painikkeen avulla voidaan painikkeet 4 ja 5
helposti määritellä suosikkitoiminnoille.
6.1 Määritä office-painikkeen ominaisuudet
1. Kaksoisnapsauta office-painikkeen kuvaketta tehtäväpalkissa.
2. Valitse ne toiminnot, jotka haluat pystyä valitsemaan office-painikkeella.
Voit valita yhteensä 8 toimintoa. Vahvista painamalla OK.
6
5
4
Esimerkki
• Jos valitset vaihtoehdon 1, on painikkeen 4 toiminto Copy (Kopioi) ja painikkeen
5 toiminto Paste (Liitä).
• Jos valitset vaihtoehdon 20, on painikkeen 4 toiminto Volume +
(Äänenvoimakkuuden lisäys) ja painikkeen 5 toiminto Volume –
(Äänenvoimakkuuden vähennys).
Huom.!
• Jos haluat valita jonkin muun kuin esiasetetun toiminnon, täytyy sinun ensin
poistaa yksi tai useampi toiminto.
• Varmista, että olet Buttons-välilehdellä kohdassa Hiiren ominaisuuksien
asentaminen valinnut vaihtoehdon 4/5/6 use as ”Office”-Button.
53
Suomi
Page 54

6.2 Office-painikkeen käyttö
1. Napsauta kerran Office-merkittyä painiketta hiiren päällä. Näytölle ilmestyy
seuraava valikko:
2. Valitse toiminto napsauttamalla haluamaasi toimintoa ja käytä sitten painikkeita
4ja 5 valitulle toiminnolle (esim. selaa taakse- tai eteenpäin verkkosivulla).
3. Napsauta uudestaan office-painiketta, jos haluat valita toisen toiminnon.
7. Sammutus/aktivointi
Hiiren aktivointi: Hiiri käynnistyy painamalla kerran
punaista ([CONNECT])-painiketta hiiren pohjassa.
Punainen merkkivalo hiiren pohjassa syttyy.
Hiiren sammuttaminen: Hiiri sammuu, kun painat punaista
([CONNECT])-painiketta hiiren pohjassa noin 3 sekunnin
ajan. Punainen merkkivalo hiiren pohjassa sammuu.
8. Kaksoisnapsautus
Käytä rullanäppäimen vieressä olevaa painiketta ”kaksoisnapsautukseen”.
Suomi
Yksi painikkeen painallus onkin kaksoisnapsautus.
9. Puhdistus
Pyyhi kevyesti kostutetulla liinalla. Älä käytä voimakkaita
puhdistusaineita tailiuottimia.
10. Kierrätys
Kierrätä tuote asianmukaisesti, kun poistat sen käytöstä.
Ota yhteys kuntasi jäteneuvontaan, mikäli olet epävarma.
11. Tekniset tiedot
Taajuusalue 2,402–2,480 GHz
Kanavien määrä 16
Id-koodien määrä 1 048 576 yhdistelmää
Tiedonsiirtonopeus 2 Mbps
Kantama Jopa 7 metriä
54
Page 55

Declaration of Conformity
Hereby, Clas Ohlson AB, declares that following product(s):
Wireless keyboard and wireless optical mouse
38-2844
Consisting of
Mouse G6–70MD
Keyboard GK-6
Receiver RG-20KM
is in compliance with theessential requirements and other relevant provisions
of Directive 1999/5/EC.
Article 3.1a (Safety): EN 60950–1
EMF/SAR 99/519/EC Council
Recommendation
Article 3.1b (EMC): EN 301489–1
EN 301489–3
Article 3.2 (Radio): EN 300440–1
EN 300440–2
Insjön, Sweden, January 2011
Klas Balkow
President
Clas Ohlson, 793 85 Insjön, Sweden
Page 56

Sverige
Kundtjänst Tel: 0247/445 00
Fax: 0247/445 09
E-post: kundtjanst@clasohlson.se
Internet www.clasohlson.se
Post Clas Ohlson AB, 793 85 INSJÖN
Norge
Kundesenter Tlf.: 23 21 40 00
Faks: 23 21 40 80
E-post: kundesenter@clasohlson.no
Internett www.clasohlson.no
Post Clas Ohlson AS, Postboks 485 Sentrum, 0105 OSLO
Suomi
Asiakaspalvelu Puh.: 020 111 2222
Sähköposti: info@clasohlson.fi
Internet www.clasohlson.fi
Osoite Clas Ohlson Oy, Annankatu 34–36 A, 00100 HELSINKI
Great Britain
For consumer contact, please visit
www.clasohlson.co.uk and click on
customer service.
Internet www.clasohlson.co.uk
 Loading...