

Page 1

Negative Scanner
Negativskanner
Negatiiviskanneri
Art.no Model
38-3299 FS-500-1
Ver. 201010
Page 2

2
Page 3

Negative Scanner
Article number 38-3299 Model FS-500-1
Please read the entire instruction manual before using the product and save it
for future reference. We reserve the right for any errors in text or images and any
necessary changes made to technical data. If you have any questions regarding
technical problems please contact Customer Services (see address on reverse).
1. Hardware requirements
Operating system: Windows XP or Windows Vista
RAM: Minimum 512 MB
Available hard disk space: Minimum 800 MB
2. Product description
• Scanner for 135 format negatives and slides.
• Software included.
• Automatic exposure control.
• Compatible with Windows XP (with SP2) and Vista
(not compatible with Mac or other operative systems).
• USB 2.0.
• 5 megapixels.
E N G L I S H
3
Page 4

3. Installation
N.B. Install the device drivers and software before connecting the negative
scanner to a USB port. This product is only designed to function with Windows XP
E N G L I S H
and Vista.
1. Start your computer.
2. Insert the supplied CD into your computer’s CD-ROM.
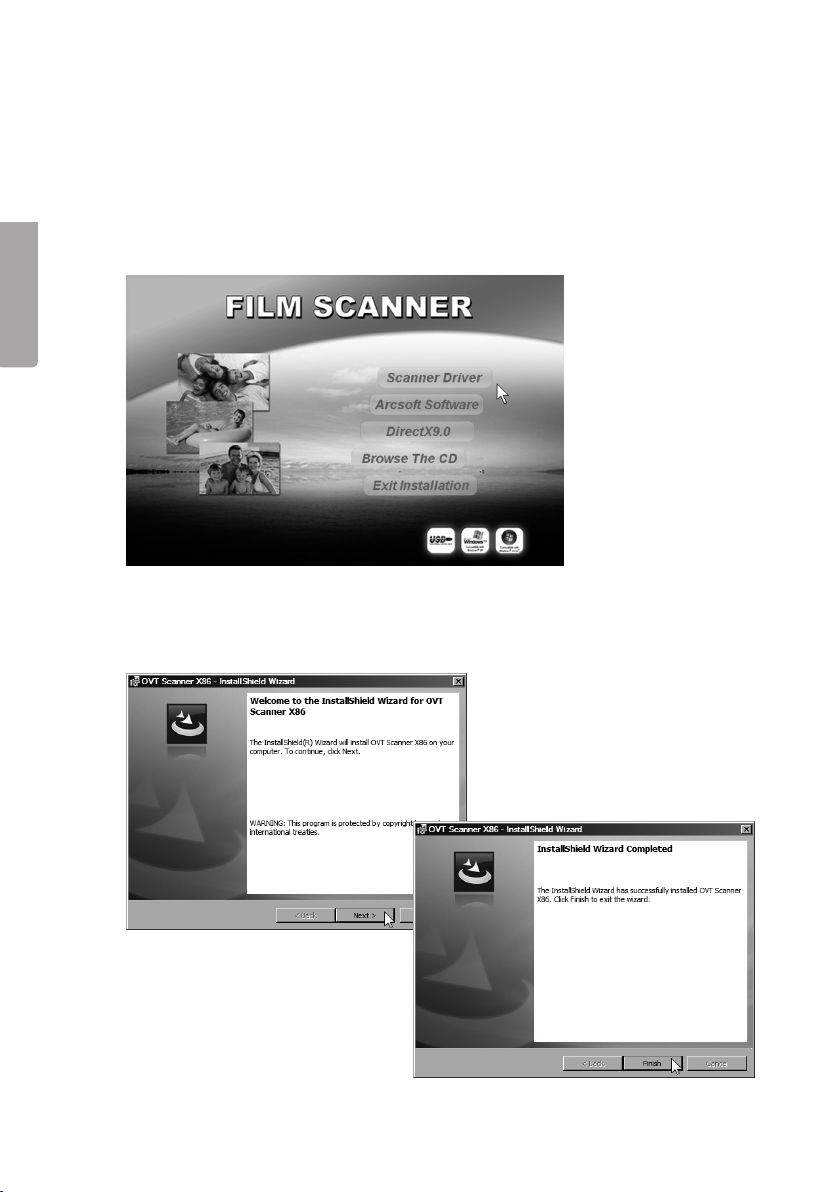
3. Open the disc with “Window’s Explorer” and click on Scanner Driver.
4. Click Next when prompted and follow the instructions.
5. Click on Finish to restart the
computer when the device driver
installation is complete.
4
Page 5

6. Click on Arcsoft Software Suite to begin installing the software programme.
7. Select a language for installation and click OK.
8. Click on Yes to accept the programme licence agreement and to begin installation.
E N G L I S H
9. Click Next for the remaining
dialogue windows. Click on
Finish to complete the
installation.
10. Restart your computer before using the software for the rst time.
11. Connect the negative scanner to an available USB port on your computer.
5
Page 6

4. Operation
1. Open the “Photo Impression 6” programme .
2. Click on Get Photos.
E N G L I S H
3. Click on Acquire from Film Scanner.
4. The ”Acquire from Scanner” window will open. Select your desired settings.
• Select OVT Scanner.
• Select the JPG or TIF le format.
• Select the quality, Low, Normal,
High or Highest.
• Under “Save to this location”, select
the folder you wish to save in.
• Under “Film Type”, select the format - Slides, Negatives (colour) or
B&W (black and white negative).
• Under “Colour Depth”, select the
desired colour depth 24 or 48 bits.
• Under “Dpi”, select the resolution
(pixels per inch) 1800 or 3200.
• Click on Calibrate to calibrate the
scanner then click on OK. N.B.
When calibrating the scanner, make
sure it is empty, i.e. that there are
no pictures inserted.
6
Page 7
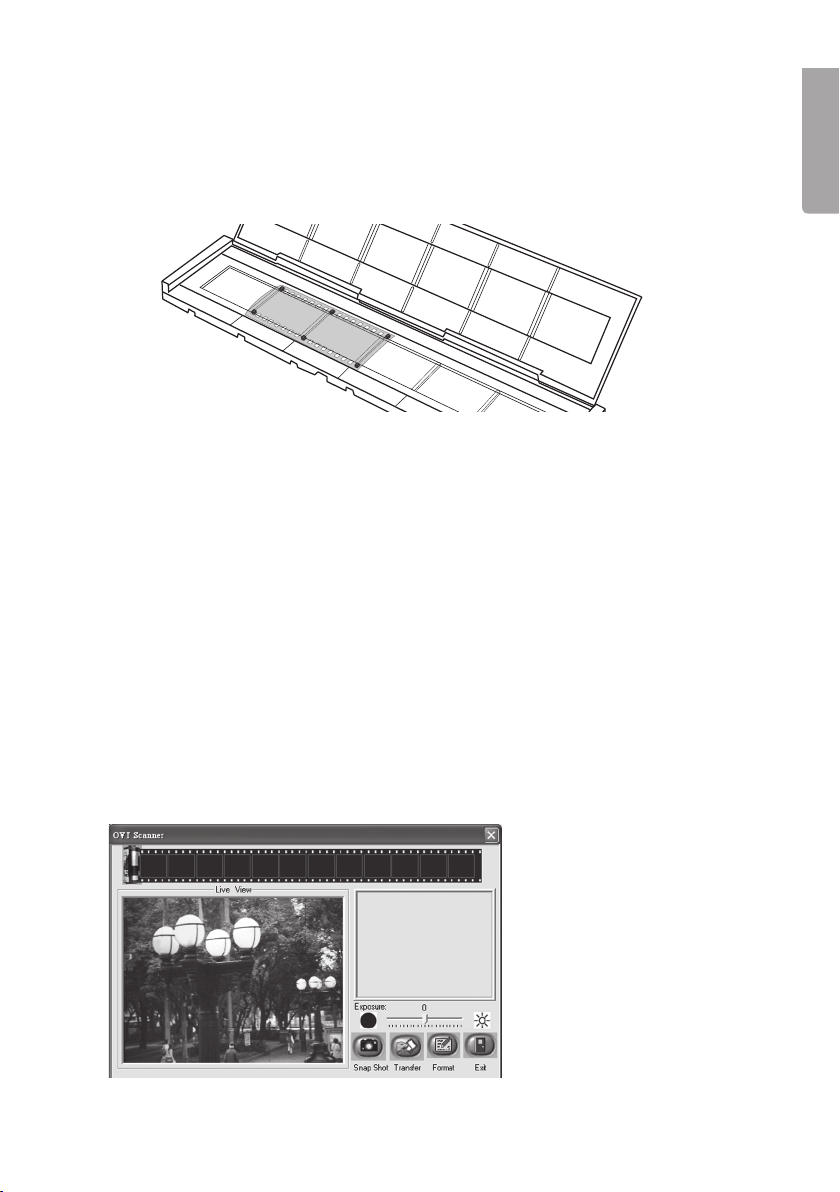
5. Insert a negative or slide into a holder and close it. Setup:
Pull up the tab with the white arrow on the side of the lm holder. Open the lm
holder and insert the lm so that the perforations t onto the fasteners in the
lm holder. Close the lm holder securely over the lm. Make sure to mount
the lm right side up. You can rotate the picture with the software but you cannot create a mirror image.
6. Insert the holder into the scanner from the right. The side of the holder to be
inserted has a directional arrow on it and also has a corner missing.
7. Click on Acquire.
8. A preview image will then be displayed. Click on Snap Shot or press the
scanner’s [COPY] button (The COPY button only works when the image is
shown in this mode).
9. Click on Transfer to save the picture. Saved images are displayed on the lm
strip at the top of the screen.
• In order to achieve the best possible picture quality wait 5 seconds after pressing Snapshot or Transfer so that the scanner has a chance to calibrate in the
white balance.
• The ”Exposure compensation” feature allows for manual exposure adjustment
which allows you to lighten or darken the picture for the best possible results
for the scanned picture. Click ● or ☼ to adjust the exposure which allows you
to see the results directly.
• Processing your adjustments takes a few seconds. Wait until this process is
complete until you click Transfer to save the image.
E N G L I S H
N.B. If you wish to view
your scanned images
press Exit. They will then
be displayed with their
original colour setting.
7
Page 8
5. Editing
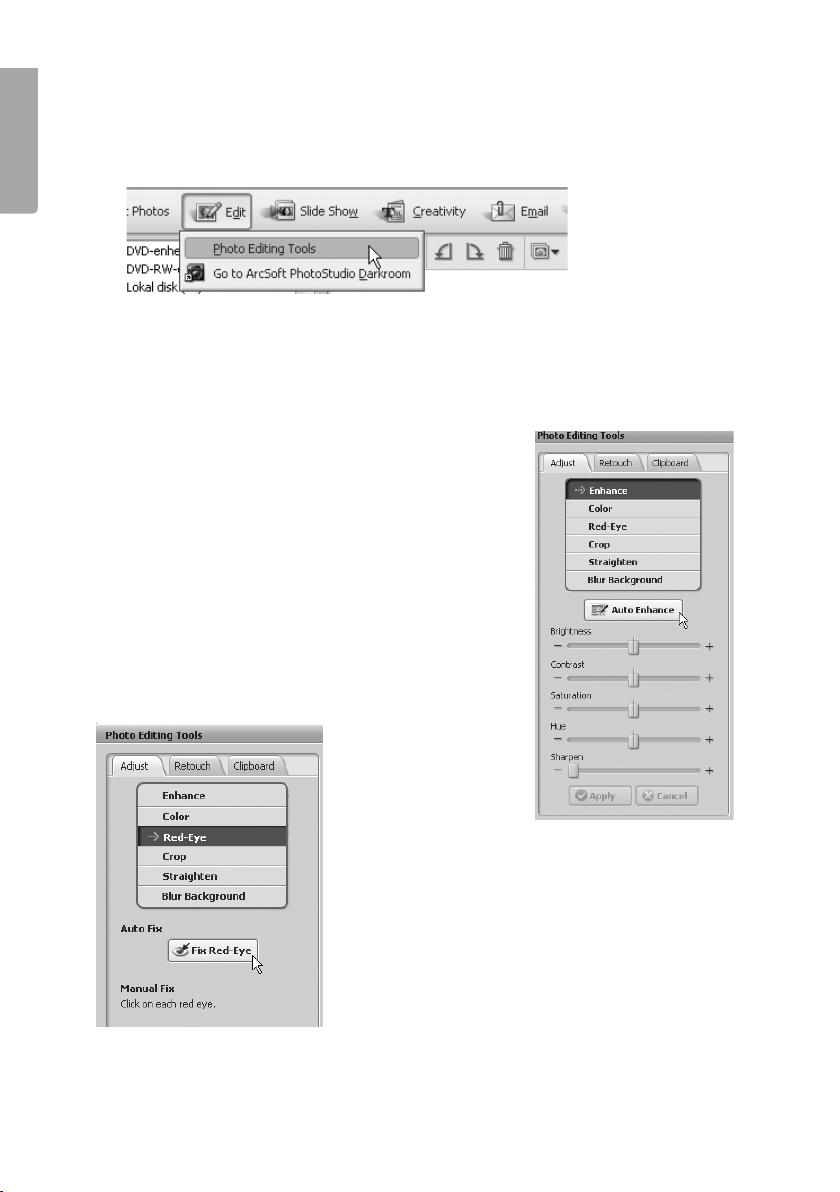
1. Highlight the picture.
2. Click on Edit/Photo Editing Tools.
E N G L I S H
The Photo Editing Tools programme has three tabs: Adjust – Retouch – Clipboard.
5.1 Adjust
Enhance
Click Auto Enhance to automatically enhance the
image or adjust manually by using the +/- control.
Save your changes by clicking Save as or click
Close to close without saving.
Color (adjust colour)
Adjust the colour manually using the control.
Save your changes by clicking Save as or click
Close to close without saving.
Red-Eye
Click on Fix Red Eye to remove “red eye”
automatically or remove it manually by placing
the mouse cursor over any red eye present in
the picture.
Save your changes by clicking Save as or click
Close to close without saving.
8
Page 9

Crop (cut)
Select the desired format or
highlight the desired size using the mouse cursor. Click
on Crop to conrm.
Save your changes by clicking Save as or click Close to
close without saving.
Straighten
Adjust the picture with the help of the grid.
Save your changes by clicking Save as or click Close to close without saving.
Blur Background
Trace a line over the image
using the cursor. The area
outside can be blurred by
using the control. Click on
Apply to conrm.
Save your changes by clicking Save as or click Close to
close without saving.
E N G L I S H
5.2 Retouch
The most common retouching tools are provided under this option.
5.3 Clipboard
Various tools for cutting and copying entire or partial images are included under
this option.
9
Page 10
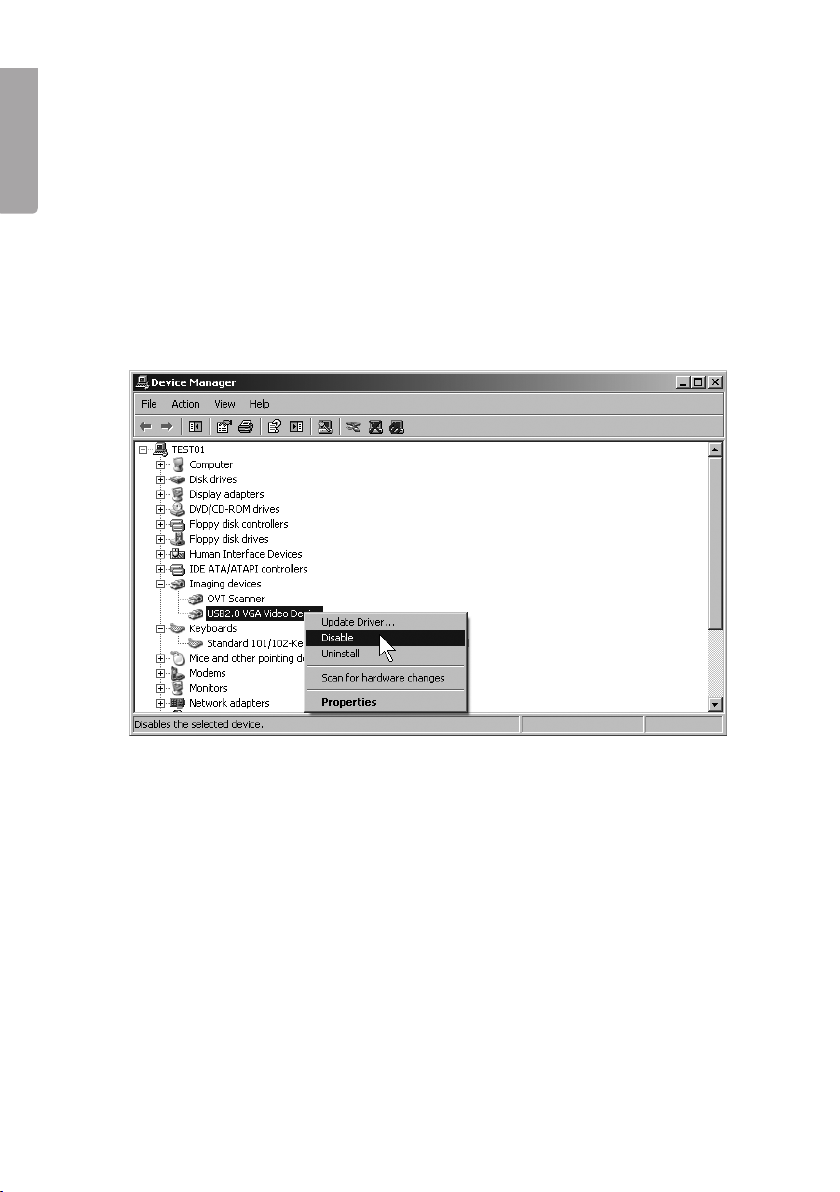
6. Troubleshooting
1. My computer doesn’t detect my scanner
If you are unable to scan images using the supplied software, try the following
E N G L I S H
solution: The problem might be that the scanner is not installed correctly and
appears as an Unknown Device.
a. Enter the Device Manager and right click on Unknown Device and then
select Update Driver Software.
b. Select automatic driver search.
c. Make sure that the driver and software on the CD-ROM have already
been installed.
d. The scanner should now be listed under Imaging Devices as “OVT Scanner”.
e. If it still doesn’t work, you probably have another imaging device installed which
is creating a conict within the program.
f. You should go to the Device Manager and look under Imaging Device for any
other device that might be active such as a web camera or digital camera.
g. Right click on these devices and select Inactivate. (You might need to restart
Windows for the changes to take effect)
h. The software should now work.
2. The scanned images are either overexposed or too bright.
a. Make sure that you wait at least 5 seconds before clicking Copy/Snapshot
after inserting the negatives into the negative holder.
b. Make sure that the negative is centered in the holder; otherwise, the colour
reproduction may be incorrect.
10
Page 11
3. There are dots on the scanned images.
Make sure the negative/slide is not dusty or that the opening around the holder
is not dusty or contains other debris. Use an aerosol tin of compressed air to
remove any dust or debris.
4. I have a problem when transfering images to a le a PhotoImpression le.
The error message “Failed to get image data” is shown every time
I press COPY or SNAPSHOT.
Remove the USB plug from the computer and connect it again. Make sure the
computer nds your scanner when you connect it. Try another USB port.
5. The negative scanner does not start.
Make sure that the scanner’s USB plug is connected to a USB port. It only
works when it is connectd to a USB port.
6. Why do my pictures look divided on the screen?
The negative/slides are incorrectly mounted in the holder. Check the alignment
of the negative/slides.
7. Why do my pictures look upside down or in the wrong direction?
The negative/slides are incorrectly mounted in the holder. Check the alignment
of the negative/slides.
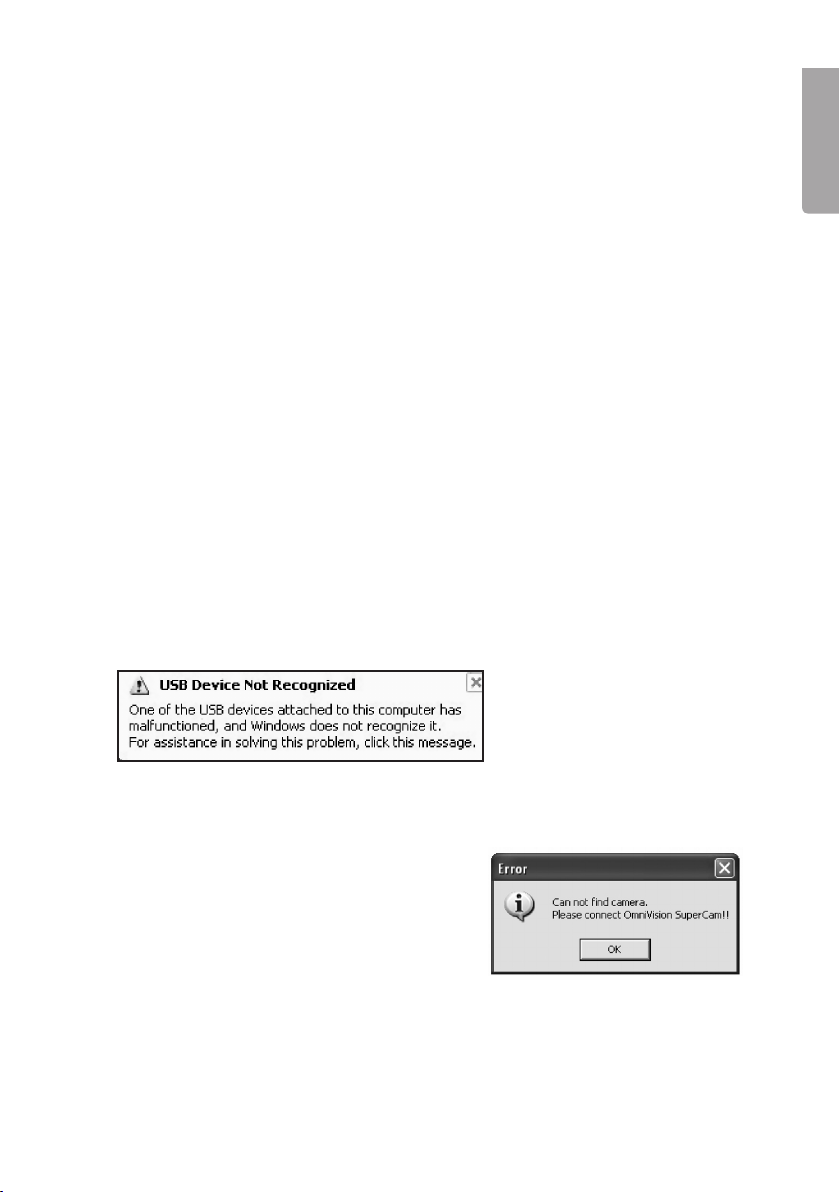
8. Why does the error message USB DEVICE NOT RECOGNIZED appear
when I connect the scanner to a USB port?
Make sure you are running Windows Vista or XP as your operative system.
Remove the USB plug from the computer and connect it again. Try connecting
to another USB port. Make sure that the PhotoImpression device drivers are
correctly installed on your computer. Restart your computer.
E N G L I S H
9. When I click “GET PHOTOS” or PhotoImpression the error message “Error Can not nd camera please connect OmniVision Super Cam!” comes up.
Make sure that the PhotoImpression device
drivers are correctly installed on your
computer. Restart your computer. Make
sure the computer nds your scanner when
you connect it. Try another USB port.
11
Page 12
10. How can I make sure that the PhotoImpression device drivers are correctly installed on my computer?
Go to: Start--> Control Panel--> Add or Remove Programs.
Remove program: OVT Scanner (device drivers) and ArcSoft PhotoImpression
E N G L I S H
6 (software).
Restart your computer and reinstall starting with the device drivers rst then
ArcSoft PhotoImpression.
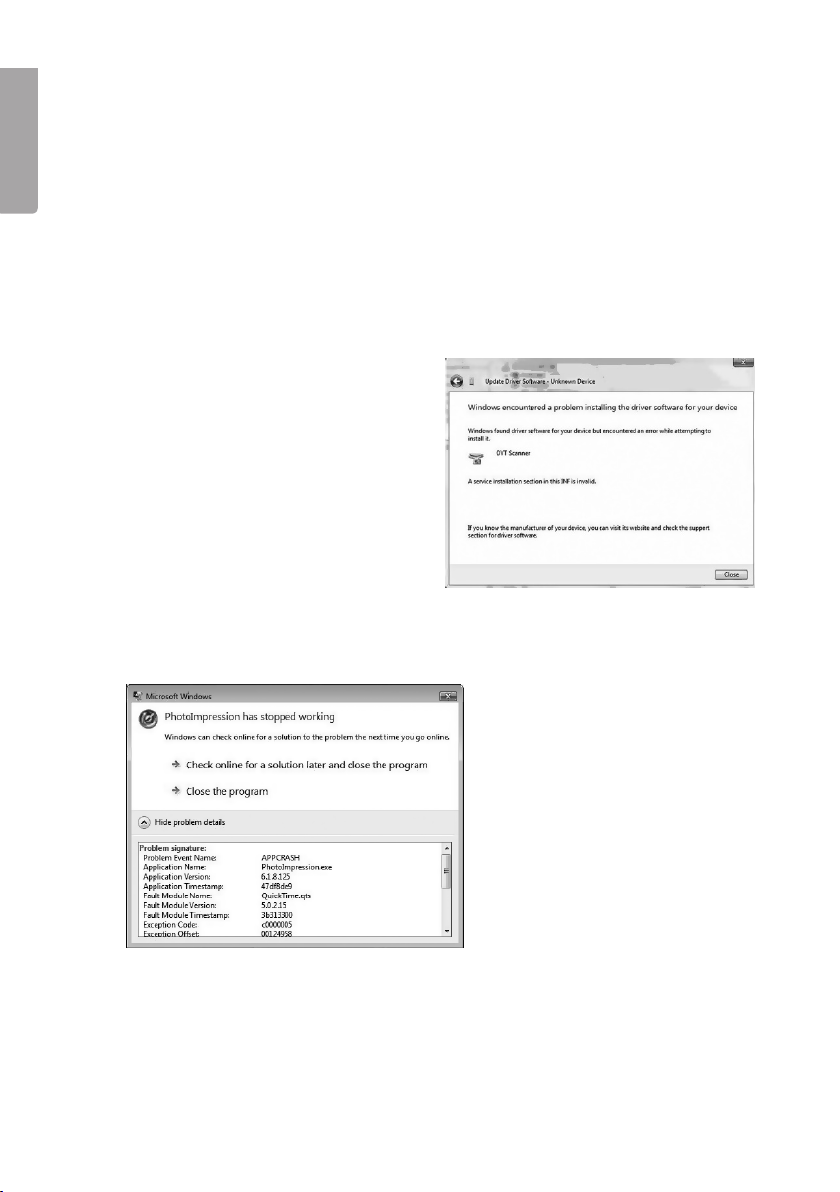
11. Why does the dialogue box “A service installation section in this INF is
invalid” come up?
This message means that the device drivers have not been correctly installed.
Try these steps:
a. Turn off your antivirus program tem-
porarily and then reinstall ArcSoft
PhotoImpression rst and then
the device drivers. Reactivate your
antivirus program after making sure
that the software is now correctly
installed. (The antivirus program may
have blocked P16 in the software).
b. Make sure that the scanner is cor-
rectly connected to a USB port on
your computer.
12. When I use the ArcSoft PhotoImpression feature, the error message
“PhotoImpression has stopped working” is shown on the screen.
This situation occures when the ArcSoft PhotoImpression software transfers
a large amount of data (or if another application is taking up a lot of resources)
which overloads the memory. Restart the program and close all other applications to free up more resources on your computer.
12
Page 13
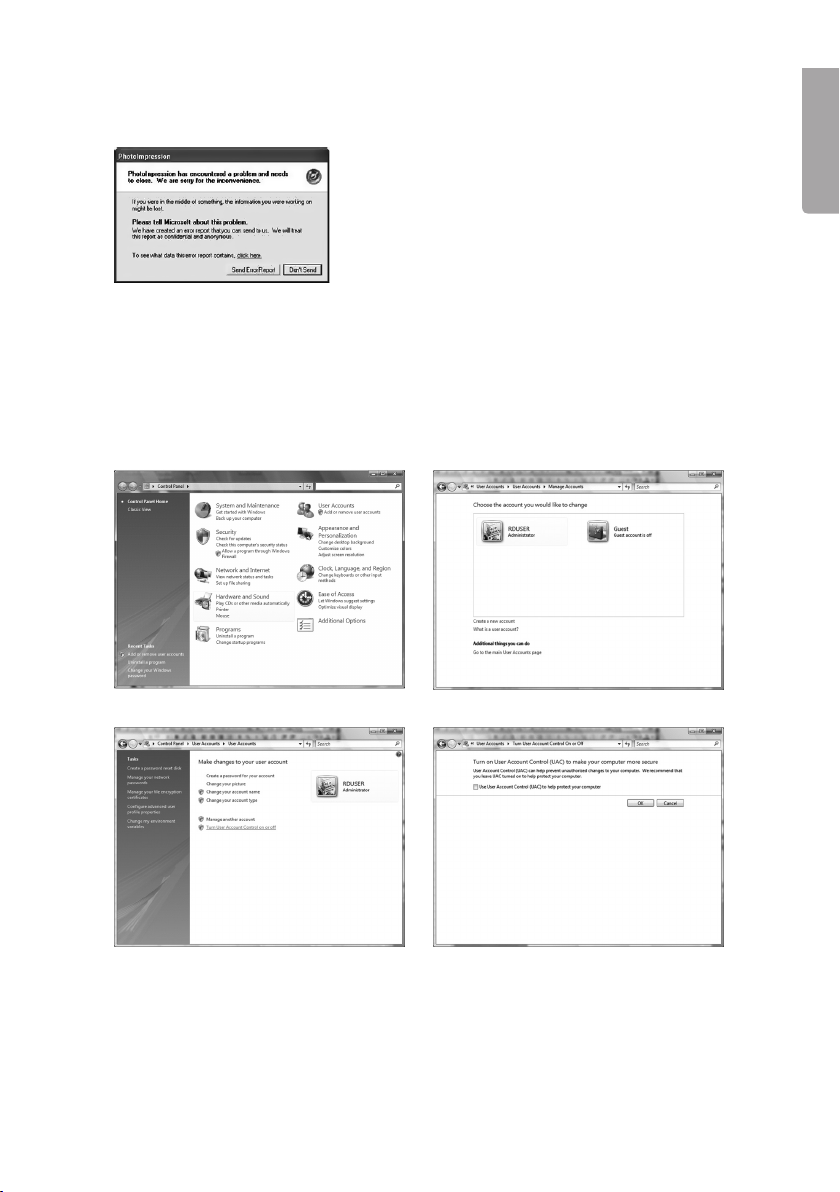
13. The error message: ArcSoft PhotoImpression has encountered
a problem...is shown.
Click Don´t Send and restart
the program.
14. Why can’t I use the Arcsoft Photoimpression Live View Window?
If you are using Windows Vista make sure the “UAC” (user account control) is
disabled and reinstall the device drivers then follow these steps:
a. Go to Start → control panel → classic view → user accounts → activate or
deactivate user account → Use user account control (UAC) to protect your
computer. Step 4 below shows how it looks when UAC is deactivated.
E N G L I S H
Step 1 Step 2
Step 4Step 3
b. Make sure that no similar USB2.0 devices like web cameras, USB ash drives,
etc. are connected to your computer.
c. Turn off your antivirus program temporarily. Reactivate your antivirus program
after making sure that the software is now correctly installed.
13
Page 14

7. Care and maintenance
• Do not expose the scanner to extreme temperatures.
• Clean the scanner using a dry, soft cloth. Avoid using strong cleaning agents
E N G L I S H
since this can damage the exterior.
8. Disposal
Follow local ordinances when disposing of this product. If you are unsure of how
to dispose of this product, please contact your municipality.
9. Specifications
Interface: USB 2.0
Image sensor: 5 megapixel CMOS sensor (5.174.400 pixels).
Lens: F=2.0, 4 glass elements, half-eld angle =15°
Frame rate: 5M (2592x1944) 2 frames per second, SXGA (1280x960)
15 frames per second
Focus: Fixed focus
Exposure control: Automatic
Colour balance: Automatic
Data conversion: 10 bits per colour channel
Scan method: Single pass
Light source: Backlight (3 white LEDs)
Power supply: USB port
Size: 90x90x165 mm
Software: Arcsoft Photoimpression 6
Languages: English, French, German, Italian, Spanish,
Traditional Chinese, Simplied Chinese and Japanese
Operating system: Windows XP and Windows Vista
14
Page 15

Negativskanner
Artikelnummer 38-3299 Modell FS-500-1
Läs igenom hela bruksanvisningen före användning och spara den sedan
för framtida bruk. Vi reserverar oss för ev. text- och bildfel samt ändringar
av tekniska data. Vid tekniska problem eller andra frågor, kontakta vår
kundtjänst (se adressuppgifter på baksidan).
1. Hårdvarukrav
Operativsystem: Windows XP eller Windows Vista
RAM: Minst 512 MB
Plats på hårddisken: Minst 800 MB
2. Produktbeskrivning
• Filmskanner för negativ och diapositiv i 135-format.
• Programvara medföljer.
• Automatisk exponering.
• Kompatibel med Windows XP (med SP2) och Vista
(ej kompatibelt med Mac eller andra operativsystem).
• USB 2.0.
• 5 Megapixlar.
S V E N S K A
15
Page 16
3. Installation
Obs! Installera drivrutiner och programvara först. Anslut sedan negativskannern
till en USB-port. Produkten är endast avsedd för Windows XP och Vista.
1. Starta datorn.
2. Lägg i den bifogade cd-skivan i datorns cd-läsare.
3. Öppna skivan i ”Utforskaren”, klicka på Scanner Driver.
S V E N S K A
4. Installationen börjar. Klicka på Next och följ instruktionerna på skärmen.
5. Klicka på Finish för att starta
om datorn när installationen
av drivrutinerna är klar.
16
Page 17

6. Klicka på Arcsoft Software Suite för att starta installationen av programvaran.
7. Välj installationsspråk och klicka på OK.
8. Klicka på Yes för att godkänna programlicensen och starta installationen.
S V E N S K A
9. Klicka på Next i de följande
rutorna under installationen.
Klicka på Finish för att slutföra
installationen
10. Starta om datorn innan programvaran används för första gången.
11. Anslut negativskannern till en ledig USB-port på datorn.
17
Page 18

4. Användning
1. Öppna programmet ”Photo Impression 6”.
2. Klicka på Get Photos.
3. Klicka på Acquire from Film Scanner.
S V E N S K A
4. ”Acquire from Scanner” öppnar, gör önskade inställningar.
• Välj OVT Scanner.
• Format, välj JPG eller TIF.
• Quality, välj kvalitet Low, Normal,
High eller Highest.
• Save to this location, välj önskad
mapp där bilderna skall sparas.
• Film Type, välj aktuell lmtyp Slide
(diapositiv) Negative (färg negativ)
B&W Negative (svartvit negativ).
• Color Depth, välj önskat färgdjup
24 eller 48 bitar.
• Dpi, upplösning (punkter per tum)
1800 eller 3200.
• Calibrate, klicka för att kalibrera
skannern, klicka på OK.
Obs! Vid kalibrering skall skannern vara
tom, dvs. ingen bild isatt.
18
Page 19

5. Montera negativ eller diapositiv i en hållare och stäng den. Gör så här:
Tryck upp iken med vita pilen på sidan av lmhållaren, öppna lmhållaren och
montera lmen så att perforeringen passar på styrningarna i lmhållaren. Tryck
ihop lmhållaren runt om. Tänk på att montera bilderna rättvända. Det går bra
att rotera bilden i programmet, men det går inte att vända en spegelvänd bild
så att den visas rätt.
6. Tryck in hållaren i skannern från höger. Sidan som skall in först har en pil
framåt och ett hörn borttaget.
7. Klicka på Acquire.
8. Bilden förhandsvisas i stora rutan. Klicka på Snap Shot eller tryck på
skannerns COPY-knapp (COPY-knappen fungerar endast när bilden visas
i det här läget).
9. Klicka på Transfer för att spara bilden. Sparade bilder visas i lmrutan överst.
• För att få bästa möjliga bildkvalitet bör du vänta i 5 sekunder när du har klickat
på Snapshot eller Transfer så att skannern får möjlighet att göra rätt inställ-
ning av vitbalansen.
• Funktionen ”Exposure compensation” gör det möjligt att justera exponeringen
manuellt för ljusare eller mörkare bild för att ge bästa möjliga resultat på den
inlästa bilden. Klicka på ● eller ☼ för att justera bildens ljus och se resultatet
direkt på bilden.
• Justeringen av bilden tar några sekunder, vänta tills den är klar innan du klickar på Transfer för att spara bilden.
S V E N S K A
19
Obs! Om du vill se de
inskannade bilderna
trycker du på Exit, då
visas de med rätt färger.
Page 20

5. Redigera bilderna
1. Markera bilden.
2. Klicka på Edit/Photo Editing Tools.
S V E N S K A
Programmet Photo Editing Tools har tre ikar: Adjust – Retouch – Clipboard.
5.1 Adjust
Enhance (Förbättra bild)
Klicka på Auto Enhance för att förbättra bil-
den automatiskt eller justera manuellt med
reglagen +/–.
Spara ändringarna genom att klicka på Save
as eller avvisa genom att klicka på Close.
Color (Justera färg)
Justera färgen manuellt med reglagen.
Spara ändringarna genom att klicka på Save
as eller förkasta genom att klicka på Close.
Red-Eye (Ta bort röda ögon)
Klicka på Fix Red Eye för att ta bort ”röda ögon”
på bilden automatiskt eller ta bort manuellt genom
att placera pekaren på de röda ögonen.
Spara ändringarna genom att klicka på Save as
eller avvisa genom att klicka på Close.
20
Page 21

Crop (Beskär)
Välj önskat format eller
markera önskad storlek
med pekaren.
Klicka på Crop för att
bekräfta.
Spara ändringarna genom
att klicka på Save ass.
Vill du inte spara, klicka
på Close.
Straighten (Räta upp)
Justera bilden med hjälp av rutnätet. Spara ändringarna genom att klicka på
Save as. Vill du inte spara, klicka på Close.
Blur Background (Gör bakgrunden oskarp)
Dra en linje med pekaren,
ytan utanför markeringen kan
göras oskarp med reglagen.
Klicka sedan på Apply för att
bekräfta.
Spara ändringarna genom att
klicka på Save as. Vill du inte
spara, klicka på Close.
S V E N S K A
5.2 Retouch
Här nns de vanligaste verktygen för retuschering av bilder.
5.3 Clipboard
Här nns olika verktyg för att klippa ut eller kopiera hela eller delar av bilderna.
21
Page 22

6. Felsökning
1. Datorn hittar inte skannern, varför?
Om det inte går att använda skannern med den medföljande programvaran så
kan en orsak vara: Skannern har inte installeras korrekt och dyker upp i Enhetshanteraren som Okänd enhet. Obs! Kontrollera först att drivrutinen samt
programvaran på skivanverkligen är installerad.
a. Gå till Start → Control panel → System → Hardware →Device Manager
och högerklicka på Unknown device (Okänd enhet) och välj Update Driver...
(Uppdatera drivrutin...)
b. Välj: Sök efter drivrutin automatiskt.
S V E N S K A
c. Skannern bör nu lägga till sig under under ”Imaging devices” (Bildenheter)
som OVT Scanner.
d. Om inte skannern fungerar trots att den visas som OVT Scanner under
”Bildenheter” kan det nnas en annan bildenhet installerad, vilket skapar
en konikt i programmet.
e. Kontrollera under ”Bildenheter” i ”Enhetshanteraren” om andra bildenheter nns
installerade, t.ex. webbkameror, digitalkameror osv.
f. Högerklicka på den enheten och välj Disable (Inaktivera). Ibland behövs en
omstart av Windows.
2. De inskannade bilderna blir överexponerade eller för ljusa.
a. Se till att du väntar i minst 5 sekunder innan du klickar på COPY/SNAPSHOT när
du har satt i bildhållaren.
b. Se till att lmen är centrerad i bildhållaren, annars kan bildens färger bli felaktiga.
22
Page 23

3. Prickar nns på de inskannade bilderna.
Kontrollera om negativ/DIA är dammiga eller om öppningen för bildhållaren
innehåller damm eller annat skräp. Använd en sprayburk med komprimerad luft
för att blåsa bort ev. damm.
4. Jag har problem med att överföra bilden till en l i programmet PhotoImpression. Felmeddelandet ”Failed to get image data” visas när jag
trycker på COPY eller SNAPSHOT.
Dra ur skannerns USB-kontakt från datorn och anslut den igen. Kontrollera att
datorn hittar skannern när du ansluter, prova att ansluta till en annan USB-port.
5. Filmskannern startar inte.
Kontrollera att skannerns USB-kontakt är ansluten till en USB-port, den
fungerar endast när den är ansluten till en USB-port.
6. Varför visas mina bilder uppdelade på skärmen?
Filmen/DIA-bilderna är felmonterade i bildhållaren. Kontrollera monteringen.
7. Varför visas bilderna upp och ner eller felvända?
Filmen/DIA-bilderna är felmonterade i bildhållaren. Kontrollera monteringen.
8. Varför visas felmeddelandet: ”USB Device Not Recognized” när jag
ansluter skannern till en USB port?
Kontrollera att du har Windows Vista eller XP som operativsystem. Dra ur
skannerns USB-kontakt från datorn och anslut den igen. Prova att ansluta till
en annan USB-port. Kontrollera att drivrutiner och PhotoImpression är rätt installerade på datorn. Stäng av datorn och starta om den.
9. När jag klickar på ”GET PHOTOS” eller PhotoImpression kommer ett
felmeddelande: ”Error - Can not nd camera please connect OmniVision
Super Cam!”
Kontrollera att drivrutiner och PhotoIm-
pression är rätt installerade på datorn.
Stäng av datorn och starta om den. Kontrollera att datorn hittar skannern när du
ansluter, prova att ansluta till en annan
USB-port.
S V E N S K A
23
Page 24

10. Hur kan jag kontrollera att drivrutiner och PhotoImpression är rätt
installerade på datorn?
Gå till: Start → Control Panel → Add or Remove Programs.
Avinstallera OVT Scanner (drivrutinerna) och ArcSoft PhotoImpression 6
(programvaran).
Starta om datorn och installera sedan om, drivrutinerna först och sedan
ArcSoft PhotoImpression.
11. Varför visas informationsrutan ”A service installation section in this
INF is invalid”?
Meddelandet betyder att drivrutinerna inte är rätt installerade. Du kan i detta fall:
S V E N S K A
a. Stänga av antivirusprogram tillfälligt
och installera sedan om ArcSoft PhotoImpression först och sedan drivrutinerna. Aktivera antivirusprogrammet
igen när du har kontrollerat att programvaran är rätt installerad. (Antivirusprogrammet har kanske blockerat
P16-programmet).
b. Kontrollera att lmskannern är rätt
ansluten till en USB-port på datorn.
12. När jag använder ArcSoft PhotoImpression programfunktion, visas
informationen ”PhotoImpression has stopped working” på skärmen.
Situationen uppstår när ArcSoft PhotoImpression överför stora mängder data
(eller om någon annan applikation tar mycket resurser) som överbelastar
minnet. Starta om programmet eller stäng andra applikationer för att frigöra
mera resurser på datorn.
24
Page 25

13. Ett felmeddelande visas: ”ArcSoft PhotoImpression has encountered
a problem...”
Klicka på Don´t Send och starta
om programmet.
14. Varför kan jag inte använda Arcsoft Photoimpression Live View Window?
Om du använder Windows Vista, se då till att ”UAC” (user account control) är
avaktiverat och installera sedan drivrutinerna igen. Följ dessa steg:
a. Gå till Start → Control panel → Classic view → User accounts → aktivera
eller avaktivera User account → Använd User account control (UAC) för att
skydda din dator. Steg 4 nedan visar att UAC är avaktiverat.
Steg 1 Steg 2
S V E N S K A
Steg 4Steg 3
b. Kontrollera att inga andra liknande USB 2.0-enheter som t.ex. webbkamera
eller USB-minne är anslutna till datorn.
c. Stäng av antivirusprogram tillfälligt. Aktivera antivirusprogrammet igen när du
har kontrollerat att programvaran är rätt installerad.
25
Page 26

7. Skötsel och underhåll
• Utsätt inte skannern för extrema temperaturer.
• Rengör skannern med en torr, mjuk trasa. Undvik starka rengöringsmedel
eftersom detta kan skada höljet.
8. Avfallshantering
När du ska göra dig av med produkten ska detta ske enligt lokala föreskrifter.
Är du osäker på hur du ska gå tillväga, kontakta din kommun.
S V E N S K A
9. Specifikationer
Interface: USB 2.0
Bildsensor: 5 Megapixlar CMOS sensor (5 174 400 pixlar).
Lins: F=2.0, 4 glaselement, bildvinkel =15°
Inläsningstid: 5 M (2592 x 1944) 2 bilder per sekund, SXGA
(1280x960) 15 bilder per sekund
Focus: Fixfocus
Exponeringskontroll: Automatisk
Färgbalans: Automatisk
Datakonvertering: 10 bitar per färgkanal
Skanningsmetod Singel pass
Ljuskälla: Bakgrundsbelysning (3 vita LED)
Strömförsörjning: Från USB-porten
Storlek: 90 x 90 x 165 mm
Programvara: Arcsoft Photoimpression 6
Programspråk: Engelska, Franska, Tyska, Italienska, Spanska,
Kinesiska och Japanska.
Operativsystem: Windows XP ochWindows Vista
26
Page 27

Negativskanner
Artikkelnummer: 38-3299 Modell: FS-500-1
Les bruksanvisningen nøye før bruk av produktet, og ta vare på den for ev. framtidig bruk. Vi reserverer oss mot ev. tekst- og bildefeil, samt forandringer av tekniske
data. Ved tekniske problemer eller andre spørsmål, ta kontakt med vårt kundesenter. (Se opplysninger om kundesenteret i denne bruksanvisningen).
1. Krav til Hardware
Operativsystem: Windows XP eller Windows Vista
RAM: Minst 512 MB
Lagringsplass på harddisk: Minst 800 MB
2. Produktbeskrivelse
• Filmskanner for negativer og dias i 135 format.
• Programvare medfølger.
• Automatisk eksponering.
• Kompatibel med Windows XP (med servicepack 2 installert) og Vista.
(Scanneren er ikke kompatibelt med Mac eller andre operativsystemer).
• Usb 2.0.
• 5 Megapixler.
N O R S K
27
Page 28

3. Installasjon
Obs! Start med å installere driver og programvare. Deretter kobles
negativskanneren til en usb-port. Produktet er kun beregnet for Windows XP
og Vista.
1. Start datamaskinen.
2. Legg den medfølgende cd-platen i maskinens cd-rom.
3. Åpne platen i ”Utforskeren” og klikk på Scanner Driver.
N O R S K
4. Installasjonen starter. Klikk på Next og følg instruksjonene på skjermen.
5. Klikk på Finish for å restarte
maskinen når installasjon av
driver er ferdig.
28
Page 29

6. Klikk på Arcsoft Software Suite for å starte installasjon av programvare.
7. Velg språk og klikk på OK.
8. Klikk på Yes for å godkjenne programlisensen og start installasjonen.
N O R S K
9. Klikk på Next i de
følgende rutene.
Klikk på Finish for å fullføre
installasjonen.
10. Restart datamaskinen.
11. Negativskanneren kobles til en ledig usb-port på maskinen.
29
Page 30

4. Bruk
1. Åpne programmet ”Photo Impression 6”.
2. Klikk på Get Photos.
3. Klikk på Acquire from Film Scanner.
N O R S K
4. ”Acquire from Scanner” åpnes. Foreta ønskede instillinger.
• Velg OVT Skanner.
• Format: Velg .jpg- eller .tif-format.
• Quality: Velg kvaliteten Low, Nor-
mal, High eller Highest.
• Save to this location: Velg ønsket
mappe for lagring bildene.
• Film Type: Velg aktuell lmtype:
Slide (dias), Negative (negative
fargebilder), B&W Negative
(sort/hvit negativ).
• Color Depth: Velg ønsket fargedybde: 24 eller 48 bits.
• Dpi: Velg oppløsning (punkter per
tomme) 1800 eller 3200.
• Calibrate: Klikk for å kalibrere
skanneren, og klikk deretter OK.
Obs! Ved kalibrering skal skanneren
være tom, dvs. uten bilder.
30
Page 31

5. Monter negativ eller dias i en holder og lukk den. Gjør følgende:
Trykk opp iken med den hvite pilen, som nnes på lmholderens side. Åpne
holderen og monter lmen slik at perforeringen passer til styringene på lmholderen. Trykk lmholderen sammen. Husk å montere bildet riktig vei (ikke speilvendt). Bildet kan roteres i programmet, men ikke speilvendes.
6. Fest holderen i skanneren fra høyre. Siden som skal inn først har en pil
i forkant og et skåret hjørne.
7. Klikk på Acquire.
8. Bildet forhåndsvises i den store ruten. Klikk på Snap Shot eller trykk på
skannerens COPY-knapp (COPY-knappen fungerer kun når bildet vises
i denne posisjonen).
9. Klikk på Transfer for å lagre bildet. Lagrede bilder vises i lmruten øverst.
• For å oppnå best mulig bildekvalitet, bør du vente i 5 sekunder når du har klikket på Snapshot eller Transfer, slik at skanneren får mulighet til å foreta riktig
innstilling av hvitbalansen.
• Funksjonen ”Exposure compensation” gjør det mulig å justere eksponeringen
manuelt for å få lysere eller mørkere bilde. Dette for å oppnå best mulig resultat
på det innleste bildet. Klikk på ● eller ☼ for å justere bildets lys og å se resultatet direkte på bildet.
• Justeringen av bildet tar noen sekunder. Vent til innstillingen er ferdig før du
klikker på Transfer, for å lagre bildet.
N O R S K
31
Obs! Hvis du ønsker
å se de innskannede
bildene trykker du
på Exit. Da kommer
bildene opp med
riktige farger.
Page 32

5. Redigere bilder
1. Merk bildet.
2. Klikk på Edit/Photo Editing Tools.
Programmet Photo Editing Tools har tre valg: Adjust – Retouch – Clipboard.
5.1 Adjust
Enhance (Redigere bildet)
N O R S K
Klikk på Auto Enhance for å forbedre bildet automatisk eller juster manuelt med +/- reguleringen.
Endringene lagres ved å klikke på Save as eller
forkastes ved å klikke på Close.
Color (Justere farge)
Fargen justeres manuelt med bryteren.
Endringene lagres ved å klikke på Save as eller
forkastes ved å klikke på Close.
Red-Eye (Fjerne røde øyne)
Klikk på Fix Red Eye for å fjerne ”røde øyne” på
bildet automatisk eller fjern dem manuelt ved å
plassere musepekeren på de røde øynene.
Endringene lagres ved å klikke på Save as eller
forkastes ved å klikke på Close.
32
Page 33

Crop (Beskjære)
Velg ønsket format eller
marker ønsket størrelse med
musepekeren.
Klikk på Crop for å bekrefte.
Endringene lagres ved
å klikke på Save as eller forkastes ved å klikke på Close.
Straighten (Rette opp)
Juster bildet ved hjelp av rutenettet.
Endringene lagres ved å klikke på Save as eller forkastes ved å klikke på Close.
Blur Background (Gjør bakgrunnen uskarp)
Trekk en linje med pekeren.
Flaten utenfor markeringen kan
lages uskarp med knappen.
Klikk deretter på Apply for
å fortsette.
Endringene lagres ved å klikke
på Save as eller forkastes ved
å klikke på Close.
N O R S K
5.2 Retouch
Her er de vanligste verktøyene for retusjering av bilder.
5.3 Clipboard
Her er det forskjellige verktøy for å beskjære bildet og for kopiering av hele eller
deler av det.
33
Page 34

6. Feilsøking
1. Datamaskinen nner ikke skanneren, hvorfor?
Hvis skanneren ikke kan brukes med den medfølgende progaramvaren, kan en
av grunnene være: Skanneren er ikke installert riktig og man får opp ”Ukjent
enhet” på skjermen. Obs! Kontroller først at driveren og programvaren på
cd-en er installert.
a. Gå til Start → Control panel → System → Hardware → Device Manager
og høyreklikk på Unknown device (Ukjent enhet) og velg Update Driver...
(Oppdatere driver...)
b. Velg: Søk automatisk etter drivere.
c. Skanneren bør legge seg under ”Imaging devices” (Bildeenheter) som
OVT Skanner.
d. Hvis skanneren ikke virker til tross for at den vises som OVT Skanner i ”Bilde-
ehneter” kan årsaken være at en annen bildeenhet er installert, og dette kan
skape en konikt i programmet.
N O R S K
e. Kontroller under ”Bildenheter” i ”Enhetsbehandling” om det er installert andre
bildeenheter som f.eks. webkameraer, digitalkameraer etc.
f. Høyreklikk på den enheten og velg Disable (Deaktivere). Start maskinen
på nytt.
2. De innskannede bildene blir overeksponerte eller for lyse.
a. Vent i minst 5 sekunder før du klikker på Copy/Snapshot når du har
plassert i bildeholderen.
b. Påse at lmen er sentrert i bildeholderen, ellers kan fargegjengivelsen bli feil.
34
Page 35

3. Det er prikker på de innskannede bildene.
Kontroller om negativer/dias er støvete eller om åpningen til bildeholderen
inneholder støv eller smuss. Bruk en sprayboks med komprimert luft til å blåse
bort ev. støv.
4. Det er problemer med å overføre bilder til en l i programmet PhotoImpression, feilmeldingen ”Failed to get image data” vises når jeg trykker
på COPY eller SNAPSHOT.
Trekk skannerens usb-kontakt ut fra datamaskinen og plugg den til igjen.
Kontroller at maskinen nner skanneren når du kobler til igjen, prøv eventuelt
en annen usb-port.
5. Filmskanneren starter ikke.
Kontroller at skannerens usb-kontakt er koblet til en usb-port. Den fungerer
kun når den er koblet til en usb-port.
6. Hvorfor vises bildene oppdelt på skjermen?
Filmen/dias-bildene er montert feil i holderen. Kontroller monteringen ...
7. Hvorfor vises bildene opp-ned eller speilvendt?
Filmen/dias-bildene er montert feil i holderen. Kontroller monteringen ...
8 Hvorfor vises feilmeldingen: ”USB Device Not Recognized” når du kobler
skanneren til en usb-port?
N O R S K
Kontroller at du har Windows Vista eller XP som operativsystem. Trekk skan-
nerens USB-kontakt ut fra datamaskinen og plugg den inn igjen. Prøv med en
annen usb-port. Kontroller at drivere og PhotoImpression er riktig installert på
datamaskinen. Restart maskinen.
9. Når jeg klikker på ”GET PHOTOS” eller PhotoImpression kommer
en feilmelding: ”Error - Can not nd camera please connect OmniVision
Super Cam!”
Kontroller at drivere og PhotoImpression
er riktig i installert på datamaskinen.
Restart maskinen. Kontroller at datamaskinen nner skanneren når du kobler om
og prøv gjerne å koble til en annen
usb-port.
35
Page 36

10. Hvordan kan jeg kontrollere at drivere og PhotoImpression er riktig
installert på datamaskinen?
Gå til: Start → Control Panel → Add or Remove Programs.
Avinstaller OVT Scanner (drivrere) og ArcSoft PhotoImpression 6 (programvaren).
Restart datamaskinen og installer deretter, driverne først og deretter ArcSoft
PhotoImpression.
11. Hvorfor vises informasjonsruten ”A service installation section in this
INF is invalid”?
Meldingen betyr at driverne ikke er riktig installert, brukeren kan da:
a. Lukke antivirusprogrammet mid-
lertidig og deretter først installere
ArcSoft PhotoImpression og deretter
driverne. Aktiver antivirusprogrammet igjen når du har kontrollert at
programvaren er riktig installert.
(Antivirusprogrammet har kanskje
N O R S K
blokkert P16 programmet).
b. Kontrollere at lmskanneren er riktig
tilkoblet til usb-port på datamaskinen.
12. Når ArcSoft PhotoImpression programfunksjon er i bruk, vises
informasjonen ”PhotoImpression has stopped working” på skjermen:
Situasjonen oppstår når ArcSoft PhotoImpression overfører større mengder
data (eller hvis andre applikasjoner tar mye ressurser) som overbelaster
minnet. Restart programmet eller steng de andre applikasjonene for å frigjøre
ressurser på datamaskinen.
36
Page 37

13. En feilmelding vises: ”ArcSoft PhotoImpression has encountered a problem...”
Klikk på Don´t Send og restart programmet.
14. Hvorfor kan jeg ikke bruke Arcsoft Photoimpression Live View Window?
Hvis Windows Vista benyttes så påse at ”UAC” (user account control) er avakti-
vert og installer deretter driverne igjen, gjør følgende:
a. Gå til Start → Control panel → Classic view → User accounts → aktiver
eller deaktiver User account → Bruk User account control (UAC) til
å beskytte datamaskinen. Trinn 4 nedenfor viser at UAC er deaktivert.
N O R S K
Trinn 1 Trinn 2
Trinn 4Trinn 3
b. Kontroller at ingen andre liknende USB2.0-enheter som f.eks. webkamera eller
usb-minne er koblet til maskinen.
c. Skru av antivirusprogramet midlertidig. Aktiver antivirusprogrammet igjen når
du har kontrollert at programvaren er riktig installert.
37
Page 38

7. Stell og vedlikehold
• Utsett ikke skanneren for ekstreme temperaturer.
• Rengjør skanneren med en myk, tørr klut. Unngå sterke rengjøringsmidler
da de kan skade skannerens deksel.
8. Avfallshåndtering
Når produktet skal kasseres, må det skje i henhold til lokale forskrifter.
Er du usikker på hvordan du går fram, ta kontakt med lokale myndigheter.
9. Spesifikasjoner
Interface: Usb 2.0
Bildesensor: 5 Megapixler CMOS sensor (5 174 400 pixler).
Linse: F2.0, 4 glasselementer, bildevinkel = 15°
Innlesningstid: 5 M (2592 x 1944) 2 bilder per sekund,
N O R S K
SXGA (1280 x 960) 15 bilder per sekund.
Fokus: Fixfokus
Eksponeringskontroll: Automatisk
Fargebalanse: Automatisk
Datakonvertering: 10 bits per fargekanal
Skanningsmetode: Singel pass
Lyskilde: Bakgrunnsbelysning (3 stk. hvite LED)
Strømforsyning: Via usb-port
Størrelse: 90 x 90 x 165 mm
Programvare: Arcsoft Photoimpression 6
Programspråk: Engelsk, Fransk, Tysk, Italiensk, Spansk,
Kinesisk og Japansk
Operativsystem: Windows XP eller Windows Vista
38
Page 39

Negatiiviskanneri
Tuotenumero 38-3299 Malli FS-500-1
Lue käyttöohjeet ennen tuotteen käyttöönottoa. Säilytä käyttöohjeet tulevaa
tarvetta varten. Pidätämme oikeuden teknisten tietojen muutoksiin. Emme vastaa
mahdollisista teksti- tai kuvavirheistä. Jos laitteeseen tulee teknisiä ongelmia, ota
yhteys myymälään tai asiakaspalveluun (yhteystiedot käyttöohjeen lopussa).
1. Laitteistovaatimukset
Käyttöjärjestelmä: Windows XP tai Windows Vista
RAM: Vähintään 512 Mt
Tilaa kovalevyllä: Vähintään 800 Mt
2. Tuotekuvaus
• Filmiskanneri negatiiveille ja diakuville 135-koossa.
• Mukana ohjelmisto.
• Automaattinen valotus.
• Yhteensopiva Windows XP:n (jossa SP2) ja Vistan kanssa.
(Ei yhteensopiva Macin tai muiden käyttöjärjestelmien kanssa).
• USB 2.0.
• 5 megapikseliä.
S U O M I
39
Page 40

3. Asennus
Huom.! Asenna ensin ajurit ja ohjelmisto. Liitä negatiiviskanneri vasta sen jälkeen
USB-porttiin. Tuote sopii vain Windows XP:hen ja Vistaan.
1. Käynnistä tietokone.
2. Aseta pakkaukseen sisältyvä cd-levy tietokoneesi cd-asemaan.
3. Avaa cd-levy ”Resurssienhallinnassa” ja napsauta Scanner Driver.
S U O M I
4. Asennus alkaa. Napsauta Next ja seuraa näytön ohjeita.
5. Napsauta Finish käynnistääksesi tietokoneen uudelleen, kun ajureiden asennus
on valmis.
40
Page 41

6. Käynnistä ohjelmiston asennus napsauttamalla Arcsoft Software Suite.
7. Valitse asennuksen kieli ja napsauta OK.
8. Hyväksy ohjelmistolisenssi ja aloita asennus napsauttamalla Yes.
S U O M I
9. Napsauta seuraavissa valintaikkunoissa Next.
Viimeistele asennus napsautta-
malla Finish.
10. Käynnistä tietokone uudestaan, ennen kuin käytät ohjelmistoa
ensimmäisen kerran.
11. Liitä negatiiviskanneri tietokoneen vapaaseen USB-porttiin.
41
Page 42

4. Käyttö
1. Avaa ohjelma ”Photo Impression 6”.
2. Napsauta Get Photos.
3. Napsauta Acquire from Film Scanner.
S U O M I
4. ”Acquire from Scanner” aukeaa. Tee haluamasi asetukset.
• Valitse OVT Scanner.
• Format, valitse JPG tai TIF.
• Quality, valitse laaduksi Low,
Normal, High tai Highest.
• Save to this location, valitse se
kansio, mihin haluat tallentaa kuvat.
• Film Type, valitse haluamasi lmityyppi Slide (diakuva) Negative
(värinegatiivi) B&W Negative
(mustavalkonegatiivi).
• Color Depth, valitse haluamasi
värisyvyys, 24 tai 48 bittiä.
• Dpi, erottelukyky (pistettä/tuuma)
1800 tai 3200.
• Calibrate, napsauta kun haluat kalibroida skannerin, napsauta OK.
Huom.! Skannerin tulee olla tyhjä kalibroitaessa (ei kuvaa sisällä).
42
Page 43

5. Aseta negatiivi tai diakuva pidikkeeseen ja sulje se. Toimi näin:
Työnnä ylöspäin lminpidikkeen sivussa olevaa liuskaa, jossa on valkoinen
nuoli, avaa lminpidike ja aseta lmi siten, että reiät sopivat pidikkeen säätimiin.
Paina lminpidike kiinni. Varmista, että asetat kuvat oikein päin. Voit kääntää
kuvaa ohjelman avulla, mutta et muuttaa sitä peilikuvaksi.
6. Työnnä pidike skanneriin oikealta puolelta. Se sivu, joka työnnetään ensin on
merkitty nuolella ja sen yksi kulma puuttuu.
7. Napsauta Acquire.
8. Voit esikatsella kuvaa isolla ruudulla. Napsauta Snap Shot tai paina skannerin
COPY-painiketta (COPY-painike toimii ainoastaan tässä esikatselutilassa).
9. Tallenna kuva napsauttamalla Transfer. Tallennetut kuvat näkyvät ylimpänä
lmiruudussa.
• Parhaan mahdollisen kuvanlaadun takaamiseksi odota 5 sekuntia sen jälkeen
kun olet painanut Snapshot tai Transfer. Tällöin skanneri ehtii säätää valkoba-
lanssin oikein.
• ”Exposure compensation”-toiminto mahdollistaa kuvan säätämisen manuaalisesti tummemmaksi tai vaaleammaksi. Säädä kuvan valotusta napsauttamalla
● tai ☼. Näet tuloksen suoraan kuvassa.
• Kuvan säätäminen kestää muutaman sekunnin. Odota, että säätö on valmis
ennen kuin tallennat kuvan painamalla Transfer.
S U O M I
43
Huom.! Jos haluat
katsoa skannattuja
kuvia, paina Exit,
niin kuvat näytetään
oikean värisinä.
Page 44

5. Kuvien muokkaaminen
1. Valitse kuva.
2. Napsauta Edit/Photo Editing Tools.
Photo Editing Tools -ohjelmassa on kolme sivua: Adjust – Retouch – Clipboard.
5.1 Adjust
Enhance (Paranna kuvaa)
Napsauta Auto Enhance, jos haluat parantaa
kuvaa automaattisesti tai säädä kuvaa manuaalisesti +/--säätimellä.
Tallenna muutokset napsauttamalla Save as tai
hylkää muutokset napsauttamalla Close.
S U O M I
Color (säädä väriä)
Voit säätää kuvan värejä manuaalisesti säätimellä.
Tallenna muutokset napsauttamalla Save as
tai hylkää muutokset napsauttamalla Close.
Red-Eye (silmien punaisuuden poisto)
Poista silmien punaisuutta automaattisesti
napsauttamalla Fix Red Eye tai manuaalisesti
asettamalla osoitin punaisten silmien kohdalle.
Tallenna muutokset napsauttamalla Save as tai
hylkää muutokset napsauttamalla Close.
44
Page 45

Crop (Leikkaa)
Valitse haluamasi formaatti
tai merkitse haluamasi koko
osoittimella. Vahvista napsauttamalla Crop.
Tallenna muutokset napsauttamalla Save as tai hylkää
muutokset napsauttamalla
Close.
Straighten (käännä)
Säädä kuvaa ruudukon avulla.
Tallenna muutokset napsauttamalla Save as tai hylkää muutokset
napsauttamalla Close.
Blur Background (tee taustasta epätarkka)
Vedä viiva osoittimella, merkinnän ulkopuolelle jäävä alue
voidaan muokata epätarkaksi
säätimellä.
Vahvista napsauttamalla
Apply.
Tallenna muutokset napsauttamalla Save as tai hylkää muutokset napsauttamalla Close.
S U O M I
5.2 Retouch
Tästä kohdasta löydät tavallisimmin tarvittavat työkalut kuvien retusointiin.
5.3 Clipboard
Täältä löydät työkalut, joilla voi leikata tai kopioida koko kuvan tai sen osia.
45
Page 46

6. Vianhaku
1. Miksi tietokone ei löydä skanneria?
Jos skannerin käyttö ei onnistu pakkauksessa olevan ohjelmiston avulla, syynä
voi olla: Skanneria ei ole asennettu oikein ja se näkyyn laitehallinnassa ”Tuntemattomana laitteena”. Huom.! Varmista ensin, että ajurit ja levyllä oleva ohjelmisto on asennettu oikein.
a. Siirry kohtaan Start → Control panel → System → Hardware → Device
Manager ja napsauta hiiren oikealla painikkeella Unknown device (Tuntema-
ton laite) ja valitse Update Driver... (Ajureiden päivittäminen...)
b. Valitse: Hae ajurit automaattisesti.
c. Skanneri asentuu kohtaan ”Imaging devices” (Kuvalaitteet) nimellä
OVT Scanner
d. Mikäli skanneri ei toimi, vaikka se näkyy nimellä OVT Scanner kohdassa.
”Kuvalaitteet”, voi syynä olla, että tietokoneelle on asennettu toinen kuvalaite,
joka aiheuttaa ongelmia.
S U O M I
e. Tarkasta ”Laitehallinnan” kohdassa ”Kuvalaitteet”, onko muita kuvalaitteita kuten
webkameroita tai digikameroita asennettuna.
f. Napsauta laitetta hiiren oikealla painikkeella ja valitse Disable (Poista aktivoin-
ti). Joissakin tapauksissa Windows tulee asentaa uudelleen.
2. Skannatut kuvat ylivalottuvat tai ovat liian vaaleita.
a. Odota vähintään 5 sekuntia ennen kuin napsautat COPY/SNAPSHOT, kun olet
asettanut kuvan pidikkeen kiinni.
b. Varmista, että negatiivi on keskitetty kuvapidikkeeseen, sillä muuten kuvan värit
voivat olla virheelliset.
46
Page 47

3. Skannatuissa kuvissa on pilkkuja.
Tarkista, onko negatiivi/dia pölyinen tai onko kuvanpidikkeen aukossa pölyä tai
muuta likaa. Puhalla mahdollinen pöly pois spray-paineilmalla.
4. Minulla on vaikeuksia siirtää kuva tiedostoon ohjelmassa PhotoImpression.
Kun painan COPY tai SNAPSHOT, niin saan vikailmoituksen ”Failed to get
image data”.
Irrota skannerin USB-liitin tietokoneesta ja liitä se takaisin. Tarkista, että tieto-
kone löytää skannerin liitettäessä. Yritä liittää toiseen USB-porttiin.
5. Laite ei käynnisty.
Varmista, että skannerin USB-liitin on liitetty USB-porttiin. Se toimii vain
liitettynä USB-porttiin.
6. Miksi kuvani näkyvät osissa näytöllä?
Negatiivit/diat on asetettu väärin kuvanpidikkeeseen. Tarkista.
7. Miksi kuvani näkyvät ylösalaisin tai väärinpäin?
Negatiivit/diat on asetettu väärin kuvanpidikkeeseen. Tarkista.
8. Saan seuraavan vikailmoituksen: USB DEVICE NOT RECOGNIZED, kun
liitän skannerin USB-porttiin.
S U O M I
Tarkista, että käyttöjärjestelmänä on Windows Vista tai XP. Irrota skannerin
USB-liitin tietokoneesta ja liitä se takaisin. Kokeile liittää skanneri toiseen
USB-porttiin. Tarkista, että ajurit ja PhotoImpression on asennettu oikein
tietokoneelle. Sammua tietokone ja käynnistä se uudelleen.
9. Kun napsautan ”GET PHOTOS” tai PhotoImpression, saan seuraavan
vikailmoituksen: ”Error - Can not nd camera please connect OmniVision
Super Cam!”
Tarkista, että ajurit ja PhotoImpression
on asennettu oikein tietokoneelle.
Sammuta tietokone ja käynnistä se
uudelleen. Tarkista, että tietokone löytää
skannerin liitettäessä. Yritä liittää toiseen
USB-porttiin.
47
Page 48

10. Miten voin tarkistaa, että ajurit ja PhotoImpression on asennettu
oikein tietokoneelle?
Siirry kohtaan: Start → Control Panel → Add or Remove Programs.
Poista asennus: OVT Scanner (ajurit) ja ArcSoft PhotoImpression 6 (ohjelmisto).
Käynnistä tietokone uudelleen ja asenna sitten ensin ajurit ja sitten ArcSoft
PhotoImpression.
11. Miksi inforuudussa lukee ”A service installation section in this INF
is invalid”?
Viesti tarkoittaa, ettei ajureita ole asennettu oikein. Voit toimia seuraavasti:
a. Sammuta virustorjuntaohjelma
tilapäisesti ja asenna ensin ArcSoft
PhotoImpression ja sitten ajurit.
Aktivoi virustorjuntaohjelma uudestaan, kun olet tarkistanu että
ohjelmisto on oikein asennettu.
(Virustorjuntaohjelma on saattanut
estää P16-ohjelman.)
b. Tarkista, että negatiiviskanneri on
oikein liitetty tietokoneen USBporttiin.
12. Kun käytän ArcSoft PhotoImpression -ohjelmatoimintoa, näytöllä lukee
S U O M I
”PhotoImpression has stopped working”.
Näin tapahtuu, kun ArcSoft PhotoImpression siirtää suuria tietomääriä, ja
ne kuormittavat muistia (tai jos jokin muu sovellus vie paljon resursseja).
Käynnistä ohjelma uudestaan tai sammuta muita sovelluksia vapauttaaksesi
tietokoneen resursseja.
48
Page 49

13. Saan seuraavan vikailmoituksen: “ArcSoft PhotoImpression has
encountered a problem...”.
Napsauta Don’t Send ja käynnistä
ohjelma uudestaan.
14. Miksi en voi käyttää Arcsoft Photoimpression Live View Windowia?
Jos käytät Windows Vistaa, varmista, että UAC (user account control) on pois
päältä, ja asenna sitten ajurit uudestaan. Noudata seuraavia ohjeita:
a. Siirry kohtaan Start → control panel → classic view → user accounts →
aktivoi tai poista päältä user account → Käytä vaihtoehtoa user account
control (UAC) suojataksesi tietokonetta. Alla oleva kohta 4 kertoo, että UAC
on pois päältä.
S U O M I
Kohta 1 Kohta 2
Kohta 4Kohta 3
b. Tarkista, ettei tietokoneeseen ole liitetty vastaavia USB2.0-laitteita, kuten
web-kameraa tai USB-muistia.
c. Sammuta virustorjuntaohjelma hetkeksi. Aktivoi virustorjuntaohjelma uudes-irustorjuntaohjelma uudes-
taan, kun olet tarkistanut, että ohjelmisto on oikein asennettu.
49
Page 50

7. Huolto ja ylläpito
• Älä altista skanneria äärimmäisille lämpötiloille.
• Puhdista skanneri kuivalla ja pehmeällä liinalla. Vältä voimakkaita
puhdistusaineita, sillä ne saattavat vahingoittaa kuorta.
8. Kierrätys
Kierrätä tuote asianmukaisesti, kun poistat sen käytöstä. Kysy tarkempia
kierrätysohjeita kuntasi jäteneuvonnasta.
9. Tekniset tiedot
Liitäntä: USB 2.0
Kuvakenno: 5 megapikseliä CMOS sensori (5 174 400 pikseliä)
Linssi: F=2.0, 4 lasielementtiä, kuvakulma =15°
Lukemisaika: 5M (2592x1944) 2 kuvaa sekunnissa, SXGA (1280x960)
15 kuvaa sekunnissa
Fokus: Fixfocus
Valotuksen tarkistus: Automaattinen
Väritasapaino: Automaattinen
Tiedon muuntaminen: 10 bittiä/värikanava
Skannausmetodi: Singel pass
S U O M I
Lamppu: Taustavalo (3 valkoista lediä)
Virtalähde: USB-portin kautta
Mitat: 90x90x165 mm
Ohjelmisto: Arcsoft Photoimpression 6
Kielet: englanti, ranska, saksa, italia, espanja,
T.C.S.C (kiina) ja japani
Käyttöjärjestelmät: Windows XP ja Windows Vista
50
Page 51

51
Page 52

Sverige
Kundtjänst Tel: 0247/445 00
Fax: 0247/445 09
E-post: kundtjanst@clasohlson.se
Internet www.clasohlson.se
Post Clas Ohlson AB, 793 85 INSJÖN
Norge
Kundesenter Tlf.: 23 21 40 00
Faks: 23 21 40 80
E-post: kundesenter@clasohlson.no
Internett www.clasohlson.no
Post Clas Ohlson AS, Postboks 485 Sentrum, 0105 OSLO
Suomi
Asiakaspalvelu Puh.: 020 111 2222
Sähköposti: info@clasohlson.fi
Internet www.clasohlson.fi
Osoite Clas Ohlson Oy, Annankatu 34–36 A, 00100 HELSINKI
Great Britain
For consumer contact, please visit
www.clasohlson.co.uk and click on
customer service.
Internet www.clasohlson.co.uk
 Loading...