

Page 1
Spray Gun
Färgspruta
Malingssprøyte
Maaliruisku
Important!
Read the entire instruction manual carefully
and make sure that you fully understand
it before you use the equipment. Keep the
manual for future reference.
Viktig information:
Läs hela bruksanvisningen noggrant och
försäkra dig om att du har förstått den innan
du använder utrustningen och spara den för
framtida bruk.
Viktig informasjon:
Les disse anvisningene nøye og forsikre deg
om at du forstår dem før du bruker enheten
og oppbevar dem for senere bruk.
Tärkeätä tietoa:
Lue nämä ohjeet huolellisesti ja varmista
että olet ymmärtänyt ne, ennen kuin alat
käyttää laitetta. Säilytä ohjeet myöhempää
tarvetta varten.
ENGLISHSVENSKANOR SKSUOMI
Art.no Model
18-3056 FL-999-UK
30-9579 FL-999
Ver. 200802
Page 2

Page 3

Spray Gun
Art.no: 18-3056 Model: FL-999-UK
30-9579 FL-999
Please read the entire instruction manual before using and save it for future use.
We apologise for any text or photographic errors and any changes in technical data.
If you have any questions concerning technical problems please contact our Custo-
mer Service Department (see address on reverse.)
Table of Contents
Description
Safety
Before starting
Use
Cleaning
Care and Maintenance
Troubleshooting Guide
Disposal
Technical Specications
ENGLISH
3
Page 4

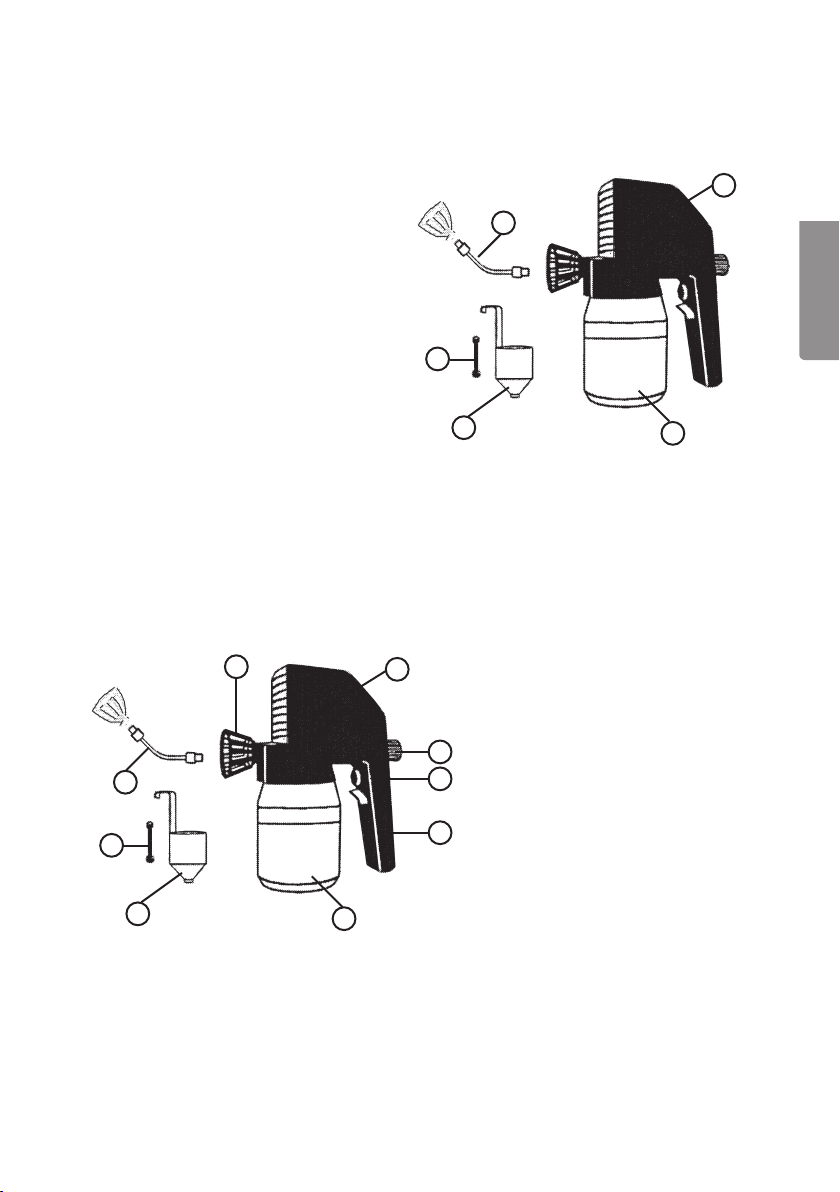
Description
Contents
ENGLISH
1. Spray Gun
2. Flexible Extension
3. Viscosity Cup
4. Non-Return Valve
5. Paint Container with Suction Tube
and Filter
1
2
4
3
5
Parts Guide
6
7
8
9
1
2
3
4
5
1. Motor Housing
2. Output Control Knob
3. Trigger
4. Handle
5. Paint Container
6. Nozzle
7. Flexible Extension
8. Non-Return Valve
9. Viscosity Meter
4
Page 5

General Safety Instructions
Warning: Read all the instructions. Failing to adhere to the following instructions
may lead to electric shocks, res and/or serious injury. The term “electrical hand
tools” in the warning text below is referring to your mains operated or battery
operated hand tool. Save the instructions.
1) The Work Area
a) Keep the work space clean and well illuminated. Cluttered and poorly lit
areas invite accidents.
b) Do not use electrical hand tools in explosive environments, i.e. nearby
ammable liquids, gas or dust. Electrical hand tools generate sparks that
could easily ignite dust or fumes.
c) Keep away from children and other spectators while using the electrical
hand tool. Disturbances can cause you to lose your concentration and control.
2) Electrical Safety
a) The electrical hand tool’s plug must t correctly into the wall socket. Never
modify the plug in any way. Never use an adaptor together with earthed
electrical hand tools. Unmodied plugs and suitable wall sockets decrease the
risk of electric shock.
b) Avoid physical contact with earthed objects, such as pipes, radiators,
ovens or refrigerators. There is an increased risk of electrical shock if your
body is earthed.
c) Do not expose the electrical hand tool to rain or other wet conditions.
If water gets inside an electrical hand tool it increases the risk of electrical
shock.
d) Do not abuse the lead. Never use the lead to carry the tool, drag or pull the
plug out of the wall socket. Keep the lead away from heat, oil, sharp edges
and movable parts. Damaged or tangled leads increase the risk of electrical
shock.
e) When you use an electrical hand tool outdoors; use an extension cord
suitable for this purpose. Use of an extension cord for outdoor use decreases
the risk of electrical shock.
ENGLISH
5
Page 6

3) Personal Safety
a) Pay attention to what you do and use common sense when using electrical
hand tools. Never use an electrical hand tool if you are tired or under
ENGLISH
the inuence of drugs, alcohol or medication. One moment of not paying
attention while using an electrical hand tool may result in serious injury.
b) Use protective equipment.
clothing such as a face mask, non-slip safety shoes, a helmet and ear defenders
when needed decreases the risk of injury.
c) Avoid accidental starts.
before you connect the device to the wall socket. Never carry an electrical
hand tool with one nger on the trigger or never connect the hand tool to a wall
socket when the switch is set to ON, since it may result in injury.
d) Remove all service tools/keys before switching on the hand tool.
A service tool forgotten on a rotating part of the electrical hand tool may result in
injury.
e) Do not overreach.
times. This gives better control in unexpected situations.
f) Wear suitable clothing. Do not wear loose tting clothes or jewellery. Keep
hair, clothes and gloves away from movable parts. Loose tting clothes,
jewellery or long hair could get caught in movable parts.
g) If the equipment for suctioning or collecting dust is available make sure
it is connected and used properly. Using technical aids may decrease dust
related hazards.
Make sure you stand steady and well balanced at all
Always use safety glasses. Using protective
Make sure that the power switch is set to OFF
4) Use and maintenance of the electrical hand tool.
a) Do not force the hand tool. Use a hand tool suitable for the work you are to
perform. The correct electrical hand tool will perform the task better and safer if
used at the correct feed rate.
b) Never use the electrical hand tool if the power switch does not switch the
tool on and off properly. All electrical hand tools that cannot be controlled by
the power switch are dangerous and must be repaired.
c) Unplug the lead from the wall socket before making any adjustments,
changing accessories or storing the electrical hand tool away. These
precautions reduce the risk of the electrical hand tool starting unexpectedly.
d) Store electrical hand tools that are not being used out of the reach of
children. Do not allow people who are unfamiliar with the tool or its
functions to operate the tool. Electrical hand tools can be dangerous if they
get into the hands of inexperienced users.
6
Page 7

e) Maintenance of electrical hand tools. Check if anything is incorrectly set,
if moving parts are catching, if anything is broken or if there is anything
which could cause the electrical hand tool to malfunction. If something
is damaged it must be repaired before use. Many accidents are caused by
poorly maintained electrical hand tools.
f) Keep the tools sharp and clean.
blades are less likely to jam and are easier to control.
g) Use the electrical hand tool, accessories and such according to the
instructions and in a way suitable for the type of electrical hand tool
used. Using the electrical hand tool for work other than suitable work could
result in a dangerous situation.
Properly maintained cutting tools with sharp
5) Service
a) Repairs and service should only be performed by qualied persons, and
only with original spare parts. This guarantees the safety of the electrical
hand tool.
ENGLISH
7
Page 8

Safety Instructions Specific to Spray Guns
• Do not use the spray gun for easily ignitable* paints or substances.
ENGLISH
• Do not use the spray gun with liquids containing particles or bres such as
metallic paint, re-retardant paint and paints containing asbestos.
• Do not clean the spray gun using easily ignitable solvents.
• Be aware of any possible hazards due to the nature of the material being
painted.
• Carefully read all the instructions and warning texts for the product to be used
in the spray gun including any requirements for protective clothing.
• Do not use any paint product without knowing how dangerous it is.
• Always pull the plug out of the power point when you stop working
(to prevent unexpected starts).
• Never point the spray gun at yourself or anyone else.
* Substances/liquids having a ash point above 55 °C.
Safety Symbols
Read the entire instruction manual
Safety glasses or a visor, a face mask
and ear protectors must be worn.
8
Page 9
Before Starting
Practice
When using the spray gun for the rst time it
is advisable to practice spraying on a piece of
waste chipboard or similar to get a feel for the
spray gun.
1. Make sure that the suction tube is securely
fastened onto the front tube in the lid of the
paint container. Make sure that the nonreturn valve is in place and that the nozzle is
screwed on.
2. The pressure can be adjusted using the knob
on the handle. Set the pressure to medium
before starting to spray and then adjust whilst
spraying.
Viscosity
The viscosity cup and a clock or watch are all that are needed to check the
viscosity of the paint.
1. Fill the measuring cup by dipping it into the paint (stir the paint rst if
it is lumpy).
2. Lift the cup above the surface of the paint and time how long it takes for the
paint to run through the hole at the bottom of the cup. (The longer it takes,
the higher the viscosity (thickness) of the paint.)
ENGLISH
9
Page 10

Viscosity Table
Note: These viscosities are only recommendations. Test the spray gun on
a surface with the same texture and incline as that to be sprayed before spraying
the real object if you are the least bit unsure as to which viscosity is suitable.
ENGLISH
Plastic and latex paint 24-28 seconds
Water based paint 20-25 seconds
Primer 24-26 seconds
Varnish 20-25 seconds
Oil based paint 18-22 seconds
Enamel paint 18-22 seconds
Aluminium paint 22-25 seconds
Car underseal 25-35 seconds
Wood sealant 28-35 seconds
Anti-corrosive paint No thinning required
Wood stain No thinning required
Use
Preparations
Note: Never start the spray gun without liquid in the container; it can shorten
the life of the pump.
1. Make sure that the power supply that you are using is compatible with the
rated power of the tool.
2. Pour the liquid to be sprayed into the container.
3. Thin the liquid if necessary and check its viscosity.
4. Place the container on a level surface; cover the surface with paper to catch
any drops.
5. Hold the spray gun over the container and attach the container by screwing the
container anticlockwise.
6. The spray gun is now ready for use.
10
Page 11
Operating Instructions
Adjust the paint flow using the control knob (2):
Reduce the ow by turning the knob clockwise (B)
or increase the ow by turning it anticlockwise (A).
Spraying
• As a rule, 30 cm is the ideal distance between the nozzle and the surface to
be sprayed. A greater distance can produce too widespread a spray pattern
and a lesser distance can create too thick a layer of paint.
ENGLISH
• Practice on a piece of scrap material if you are unsure.
• Keep the spray gun level and parallel to the surface at all times.
• For best results, sweep the spray gun in a smooth motion using the whole arm.
Do not direct the spray by exing your wrist.
Right Wrong
11
Page 12

• Sweep the spray gun from side to side and
up and down. For best results, start spraying
a little outside the actual spray area.
• When spraying large areas, use a criss-
ENGLISH
cross pattern.
• To prevent running when painting vertical surfaces, rst cover the surface with
a thin coat by spraying a ne spray from a greater distance and not spraying
too much paint on each sweep. The nal coat can be made from a closer
distance.
• On horizontal surfaces the spray gun should be angled at 45° and pointed
away from you.
• If the spraying is interrupted it is advisable to restart spraying on a piece
of paper before resuming.
Thinning
If the paint forms a stream instead of a mist it needs to be thinned further. Water
based paints are thinned using water, oil based paints use thinners such as white
spirits.
12
Page 13
Cleaning
Note: Never immerse the entire spray gun into cleaning uid.
After each use
1. Remove the container and pull out the suction tube.
2. Unscrew the four screws (13) under the container lid (12).
3. Detach the container lid from the motor housing (19) by pulling it downwards.
4. Remove the pump assembly from the motor housing. Take the pump apart and
clean all the components using a suitable paint thinner.
5. When reassembling the pump, make sure that the piston (11), piston spring
(10), non-return valve (8) and nozzle (6) are correctly aligned.
6. Plug the spray gun into a 230 V power point and hold it upside down. Pour a
little thin oil into the hole for the suction tube and pull the trigger. This will coat
the piston and cylinder with oil and prevent rust.
1
12
ENGLISH
11 10
13
Note: Insufcient or incorrect cleaning can lead to the piston jamming in the
cylinder. If a faint humming sound can be heard whilst spraying, release the
trigger immediately. Otherwise the motor can overheat and become damaged.
13
8 6
Page 14

Care and Maintenance
Remember to check the parts that wear out such as the nozzle, piston, spring, etc
after having sprayed 20–40 litres of paint. Be extra vigilant when using latex paint
as it wears out the parts more quickly than other types of paint.
ENGLISH
When to replace worn parts
1. Nozzle (6): When the paint no longer forms a ne spray and starts spitting out
instead.
2. Piston (11): Inspect regularly, change if necessary.
3. Non-return valve (8): Inspect the size of the three holes in the valve and the
evenness of the front surface. A worn valve that has scratches and damaged
holes must be replaced.
Disposal
Follow local ordinances when disposing of this product.
If you are unsure about how to dispose of this product
contact your municipality.
Specifications
Power Supply: 230 V AC, 50 Hz
Power: 75 W
Container Volume: 900 ml
Flow Rate: 200 ml/min
Cable Length: 3 m
Weight: 1.45 kg
Vibration X axis: 1.94 m/s²
Y axis: 4.94 m/s²
Z axis: 13.19 m/s²
Sound Pressure: LpA: 87.7 dB
Sound Power: LwA: 100.7dB
14
Page 15

Troubleshooting Guide
Problem Cause Remedy
Atomizing. Nozzle too far away. Hold it 30 cm away.
Paint too thin.
Use thicker paint.
ENGLISH
Overheated
motor.
Motor hums but
does not spray.
Motor runs but
does not spray.
The motor does
not start.
Paint “spits”
and motor
sounds strange.
Paint leaking
from the back
of the pump
assembly.
Pressure too high. Turn the output control
Worn nozzle Replace nozzle.
Spraying too long. Allow spray gun to cool for
Motor runs but does not spray. Check lter and non-return
Output control set wrong. Adjust setting.
Piston worn from acrylic paint spraying. Remove pump unit and
Faulty motor. Lubricate the piston and
Paint too thick Thin the paint.
Nozzle blocked Thoroughly clean.
Non-return valve missing. Replace it.
Non-return valve worn or blocked. Clean or change it.
Output control needs adjusting. Adjust it.
Suction lter is clogged. Clean or change it.
No mains power supply. Check fuse.
Faulty motor.
Output control set wrong. Adjust control knob.
Worn non-return valve or worn nozzle. Replace worn part.
Nozzle aperture too large. Change to a smaller one.
Paint too thick. Thin the paint.
Spray gun held at too high an angle,
no paint can enter the suction tube.
Gun pointed upwards when spraying. Hold gun level.
Scratched piston or cylinder. Replace worn part.
clockwise.
a few minutes.
valve.
Thin the paint.
thoroughly clean all parts.
cylinder.
Hold the gun upright or add
an extension to the tube.
15
Page 16

Färgspruta
Art.no: 18-3056 Model: FL-999-UK
30-9579 FL-999
Läs igenom hela bruksanvisningen före användning och spara den sedan
för framtida bruk. Vi reserverar oss för ev. text- och bildfel samt ändringar
av tekniska data. Vid tekniska problem eller andra frågor, kontakta vår kundtjänst
(se adressuppgifter på baksidan).
SVENSKA
Innehållsförteckning
Beskrivning 4
Säkerhet 5
Innan du börjar 9
Användning 10
Rengöring 13
Skötsel och underhåll 14
Avfallshantering 15
Tekniska specikationer 16
Felsökningsschema 14
16
Page 17
Beskrivning
Förpackningen innehåller
1. Färgspruta
2. Böjbar förlängning
3. Viskositetsbägare
4. Backventil
5. Färgbehållare med sugrör och lter
1
2
SVENSKA
4
3
5
Färgsprutans delar
6
7
8
9
1
2
3
4
5
1. Motorenhet
2. Mängdratt
3. Strömbrytare
4. Handtag
5. Färgbehållare
6. Munstycke
7. Böjbar förlängning
8. Backventil
9. Viskositetsmätare
17
Page 18

Generella säkerhetsinstruktioner
Varning! Läs alla instruktioner. Om nedanstående instruktioner inte följs kan detta
leda till elektrisk stöt, brand och/eller allvarlig skada. Termen ”elektriskt handverktyg” i varningstexten nedan refererar till ditt nätanslutna eller batteridrivna handverktyg. Spara dessa instruktioner!
1) Arbetsutrymmet
a) Håll arbetsutrymmet rent och väl upplyst. Belamrade och mörka utrymmen
SVENSKA
inbjuder till olyckor.
b) Använd inte elektriska handverktyg i explosiva miljöer, som i närheten av
lättantändliga vätskor, gaser eller damm. Elektriska handverktyg genererar
gnistor som kan antända damm eller ångor.
c) Håll undan barn och åskådare medan du använder det elektriska
handverktyget. Störningsmoment kan göra att du tappar kontrollen.
2) Elektrisk säkerhet
a) Det elektriska handverktygets stickpropp måste passa i vägguttaget.
Modiera aldrig stickproppen på något vis. Använd aldrig adapter
tillsammans med jordade elektriska handverktyg. Omodierade stickproppar
och passande vägguttag minskar risken för elektrisk stöt.
b) Undvik kroppskontakt med jordade föremål, som rör, element, köksspis
eller kylskåp. Det nns ökad risk för elektrisk stöt om din kropp är jordad.
c) Utsätt inte det elektriska handverktyget för regn eller våta förhållanden.
Om vatten tränger in i ett elektriskt handverktyg ökar det risken för elektrisk
stöt.
d) Misshandla inte nätsladden.
rycka stickproppen ur vägguttaget. Håll nätsladden undan från värme, olja,
vassa kanter och rörliga delar. Skadade eller trassliga nätsladdar ökar risken
för elektrisk stöt.
e) När du använder ett elektriskt handverktyg utomhus, använd en
skarvsladd anpassad för detta ändamål. Användning av en skarvsladd för
utomhusbruk minskar risken för elektrisk stöt.
Använd aldrig nätsladden för att bära, dra eller
18
Page 19

3) Personlig säkerhet
a) Var uppmärksam på vad du gör och använd sunt förnuft när du använder
ett elektriskt handverktyg. Använd inte ett elektriskt handverktyg om du
är trött eller påverkad av droger, alkohol eller medicinering. Ett ögonblicks
ouppmärksamhet när du använder ett elektriskt handverktyg kan resultera
i allvarlig personskada.
b) Använd skyddsutrustning.
skyddsutrustning som andningsskydd, halksäkra skyddsskor, hjälm och
hörselskydd vid behov minskar risken för personskada.
c) Undvik oavsiktlig start.
ansluter stickproppen till vägguttaget. Att bära ett elektriskt handverktyg
med ett nger på strömbrytaren/avtryckaren eller att ansluta ett elektriskt
handverktyg till elnätet när strömbrytaren är i läge ”ON” inbjuder till olyckor.
d) Tag bort alla serviceverktyg/nycklar innan du slår på det elektriska
handverktyget. Ett kvarglömt serviceverktyg på en roterande del av det
elektriska handverktyget kan reslutera i personskada.
e) Sträck dig inte för långt.
tiden. Detta möjliggör bättre kontroll i oväntade situationer.
f) Bär lämplig klädsel.
kläder och handskar undan från rörliga delar. Lösa kläder, smycken eller långt
hår kan fastna i rörliga delar.
g) Om utrustning för utsugning och uppsamling av damm nns tillgängligt,
se till att denna är ansluten och används ordentligt. Användning av dessa
hjälpmedel kan minska dammrelaterade faror.
Bär alltid skyddsglasögon. Användning av
Se till att strömbrytaren är i läge ”OFF” innan du
Se till att du står stadigt med god balans hela
Bär inte löst sittande kläder eller smycken. Håll hår,
SVENSKA
4) Användning och underhåll av det elektriska handverktyget
a) Pressa inte det elektriska handverktyget. Använd ett elektriskt handverktyg
som är avsett för det arbetsmoment du utför. Korrekt elektriskt handverktyg gör
jobbet bättre och säkrare med avsedd matningshastighet.
b) Använd inte det elektriska handverktyget om strömbrytaren inte slår
på och stänger av verktyget. Alla elektriska handverktyg som inte kan
kontrolleras med strömbrytaren är farliga och måste repareras.
c) Tag stickproppen ur vägguttaget innan du utför några justeringar, byter
tillbehör eller lägger undan det elektriska handverktyget för förvaring.
Dessa åtgärder i förebyggande syfte minskar risken för att starta det elektriska
handverktyget oavsiktligt.
19
Page 20

d) Förvara elektriska handverktyg som inte används utom räckhåll för
barn och låt inte personer som inte är förtrogna med det elektriska
handverktyget eller dessa instruktioner använda det. Elektriska
handverktyg är farliga om de kommer i händerna på ovana användare.
e) Underhåll elektriska handverktyg.
rörliga delar kärvar, om delar har gått sönder eller något annat som kan
påverka funktionen av det elektriska handverktyget. Om något är skadat
måste det repareras före användning. Många olyckor beror på dåligt
underhållna elektriska handverktyg.
SVENSKA
f) Håll verktygen vassa och rena.
vassa eggar är mindre benägna att kärva och lättare att kontrollera.
g) Använd det elektriska handverktyget, tillbehör och liknande enligt
instruktionerna och på det sätt som är ämnat för just den typen av
elektriskt handverktyg, och ta även hänsyn till arbetsförhållandena
och den typ av arbete som ska utföras. Användning av det elektriska
handverktyget för arbeten andra än vad det är ämnat för kan resultera
i en farlig situation.
Kontrollera om något är felinställt, om
Ordentligt underhållna skärverktyg med
5) Service
a) Låt behörig personal utföra service och reparationer, endast med
originalreservdelar. Detta garanterar att säkerheten på det elektriska
handverktyget behålls.
20
Page 21

Särskilda säkerhetsföreskrifter
för färgspruta
• Använd inte färgsprutan till lättantändliga* färger eller ämnen.
• Använd inte färgsprutan till vätskor som innehåller partiklar eller brer som
t.ex. metalliclacker, brandhämmande färger och färger som innehåller
asbestbrer.
• Rengör inte färgsprutan med lättantändliga* lösningsmedel.
• Uppmärksamma eventuella faror som kan uppstå beroende på materialet
som målas.
• Läs noggrant instruktionerna och varningstexten på produkten som
du ska använda i färgsprutan, inklusive eventuella krav på personlig
skyddsutrustning för produkten.
• Måla inte med någon produkt där farorna är okända.
• Dra alltid ur stickproppen ur vägguttaget när du slutar spruta (för att förhindra
oavsiktlig start).
• Rikta aldrig sprutan mot dig själv eller andra.
* Ämnen/vätskor som har en ampunkt över 55 °C.
SVENSKA
Produktmärkning med säkerhetssymboler
Läs hela bruksanvisningen!
Använd alltid skyddsglasögon eller visir och
andningskydd och hörselskydd.
21
Page 22

3. Innan du börjar
Övning
Om det är första gången du använder färgspruta, spruta gärna vatten mot en masonitskiva eller
liknande för att få in känslan för sprutan.
1. Se till att sugröret är säkert fastsatt
i främre röret i behållarlocket. Kontrollera
SVENSKA
att backventilen sitter på plats och att
munstycket är fastskruvat.
2. Du kan justera trycket med mängdratten bak
på handtaget. Ställ in trycket i ett mellanläge
innan du börjar spruta och justera ytterligare
under sprutningen.
Färgblandning
Viskositetsbägaren och en klocka är det enda du behöver för att kunna bedöma
viskositeten.
1. Fyll mätbägaren helt genom att doppa ner den i färgen (rör om färgen först
om den har klumpar).
2. Lyft upp den ovanför ytan och kontrollera hur lång tid det tar för färgen att
rinna ut genom bottenhålet. (Ju längre tid det tar, desto högre är viskositeten
(tjockleken) hos färgen.)
22
Page 23

Tabell över lämplig viskositet
Obs! Detta är endast rekommendationer, prova färgsprutan mot en yta med
samma struktur och lutning som den som ska sprutas, innan du påbörjar den
verkliga sprutmålningen om du är det minsta osäker vilken viskositet som
är lämplig.
Plast och latexfärg 24-28 sekunder
Vattenbaserad färg 20-25 sekunder
Grundfärg 24-26 sekunder
Fernissa 20-25 sekunder
Oljebaserad färg 18-22 sekunder
Emaljlack 18-22 sekunder
Aluminiumfärg 22-25 sekunder
Flytande rostskyddsmassa 25-35 sekunder
Trä förseglare 28-35 sekunder
Rötskyddsfärg Oförtunnat
Bets Oförtunnat
Användning
Förberedelser
Obs! Starta aldrig färgsprutan utan vätska i behållaren, det kan reducera
pumpens livslängd.
1. Kontrollera att nätspänningen i eluttaget är lika som märkskylten.
2. Häll vätskan som ska sprutas i behållaren.
3. Förtunna vätskan vid behov och kontrollera viskositeten.
4. Placera behållaren på ett plant underlag, lägg på ett papper som
kan suga upp ev. spill.
5. Placera färgsprutan över behållaren, vrid behållaren motsols till det tar stopp.
6. Färgsprutan är nu klar för användning.
SVENSKA
23
Page 24

Arbetsgång vid användning
Justera färgmängden med mängdratten (2)
Minska ödet genom att vrida medsols (B) eller öka
ödet genom att vrida motsols (A).
SVENSKA
Håll sprutan rätt
• Observera att 30 cm i regel är det bästa avståndet mellan mynning och yta.
Större avstånd kan ge för stor spridning och mindre avstånd kan ge ojämn
påläggning och för tjockt färgskikt.
• Prova innan sprutningen påbörjas om du är osäker.
• Håll alltid sprutan upprätt och spruta parallellt med ytan som ska sprutas.
• För sprutan i ett jämnt svep med hela armen för att få en jämn fördelning.
Vrid inte sprutan med handleden.
Rätt Fel
24
Page 25

• Svep med sprutan från vänster till höger och
tillbaka, från toppen till botten och tillbaka.
För bästa resultat, börja spruta lite utanför
själva sprutytan.
• På stora ytor kan man ibland med fördel
spruta både lodrätt och vågrätt.
• För att undvika att färgen rinner på lodräta ytor kan du försöka täcka sprutytan
med en n dimma på större sprutavstånd och inte spruta så tjockt i varje svep.
Spruta sedan sista lagret på något närmare håll.
• På vågrät yta riktar du sprutan i ungefär 45° vinkel mot ytan och sprutar bort
från dig.
SVENSKA
• Om du gör en paus i sprutningen är det bra att börja med att spruta mot en bit
papper innan du börjar spruta riktigt igen.
Förtunning
Om färgen bildar en stråle istället för att nfördelas måste du späda färgen ytterligare. Vattenburen färg förtunnas med vatten, och oljebaserad färg förtunnas med
färgförtunning, t.ex. lacknafta.
25
Page 26

Rengöring
Obs! Sänk aldrig ned hela färgsprutan i vätska för rengöring.
Efter varje sprutning
1. Ta bort behållaren och drag ur sugröret med silen.
2. Skruva ur dom fyra skruvarna (13) under behållarlocket (12).
3. Tag loss behållarlocket från motorenheten (1) genom att dra det nedåt.
SVENSKA
4. Tag isär delarna och rengör alla komponenter med lämplig färgförtunning.
5. När du sätter ihop aggregatet igen, se till att kolv (11), kolvfjäder (10),
backventil (8) och munstycke (6) blir rätt monterade.
6. Anslut stickproppen till ett 230 V vägguttag och håll aggregatet upp och ned.
Häll lite tunn olja i hålet för sugröret och tryck kort in avtryckaren.
Då rostskyddas kolv och cylinder.
1
12
11 10
13
Obs! Otillräcklig eller felaktig rengöring kan leda till att kolven skär (fastnar)
i cylindern. Om du hör ett svagt brummande ljud när du sprutar, släpp genast
avtryckaren. Annars riskerar motorn att överhettas med skador som följd.
26
8 6
Page 27

Skötsel och underhåll
Kom ihåg att kontrollera slitdelar som munstycke, backventil, kolv, kolvfjäder, etc.
när du har sprutat 20-40 liter färg. Var speciellt noga om du sprutat mycket latexfärg, eftersom den angriper delarna som då slits många gånger snabbare än om
man använder andra färger.
Byt ut slitdelarna i följande fall
1. Munstycke (6): När du märker att färgen inte längre nfördelas riktigt och
kanske börjar spottas ut.
2. Kolv (11): Kontrolleras regelbundet, byt vid behov.
3. Backventil (8): Undersök storleken på de tre hålen i ventilhuvudet och
ytjämnheten på framdelen. En sliten ventil har repor och förstorade hål
och måste bytas.
Avfallshantering
När du ska göra dig av med produkten ska detta ske enligt
lokala föreskrifter. Är du osäker på hur du ska gå tillväga,
kontakta din kommun.
Tekniska specifikationer
Strömförsörjning AC, 230 V, 50 Hz
Effekt 75 W
Storlek färgbehållare 900 ml
Spruteffekt 200 ml / min
Kabellängd 3 m
Vikt 1,45 kg
Vibration X led: 1,94 m/s2
Y led: 4,94 m/s2
Z led: 13,19 m/s2
Ljudtryck: LpA: 87.7 dB
Ljudeffekt: LwA: 100.7dB
SVENSKA
27
Page 28

Felsökningsschema
Problem Orsak Åtgärd
Dimbildning. Du håller sprutan för långt ifrån. Håll den ca 30 cm ifrån.
För tunn färg. Spruta med tjockare färg.
För högt tryck. Vrid mängdratten medurs.
Utslitet munstycke Byt munstycke.
Överhettad
SVENSKA
motor.
Motorn brum
mar, men det
sprutar inte.
Du har sprutat för länge. Låt sprutan vila efter några
minuters sprutning.
Motorn går, men det sprutar inte. Kolla ltret och att backventi-
len är isatt.
Färgen kan vara för tjock.
Mängdratten står fel. Justera inställningen.
Kolven har skurit efter akrylmålning. Tag ur drivenheten och
rengör alla delar noga.
Defekt motor. Smörj kolv och cylinder.
Motorn går
riktigt, men
sprutar inte.
Motorn går inte. Ingen ström i uttaget. Åtgärda.
Sprutan spottar
färg och motorn
låter konstigt.
Det läcker in
färg i pump
huset baktill.
För tjock färg. Förtunna.
Munstycket igensatt. Rengör det noga.
Backventil ej isatt. Sätt i den.
Backventil utsliten eller igensatt. Rengör eller byt ut den.
Mängdratten behöver justeras. Ställ in den riktigt.
Insugningsltret är igensatt. Rengör eller byt ut.
Defekt motor.
Mängdratten står fel. Justera.
Sliten atomiseringsventil eller slitet munstycke.
För stort hål i munstycket. Byt till ett mindre.
För tjock färg. Förtunna.
Du håller sprutan snett så att det inte kommer någon färg in i sugröret.
Du pekar sprutan uppåt när du sprutar. Håll den upprätt.
Det är repor i kolv eller cylinder. Byt ut sliten del.
Byt ut slitna delar.
Håll sprutan upprätt eller sätt
på en förlängning på röret.
28
Page 29

Malingssprøyte
Art.no: 18-3056 Model: FL-999-UK
30-9579 FL-999
Les nøye igjennom hele bruksanvisningen og ta vare på den til senere bruk.
Vi reserverer oss mot ev. tekst- og bildefeil, samt forandringer av tekniske data.
Ved tekniske problemer eller andre spørsmål, ta kontakt med vårt kundesenter
(se opplysninger på baksiden).
Innholdsfortegnelse
Beskrivelse 18
Sikkerhet 19
Før du begynner 23
Bruk 24
Rengjøring 27
Vedlikehold 28
Avfallshåndtering 29
Tekniske spesikasjoner 30
Feilsøkingsskjema 28
NOR SK
29
Page 30

Beskrivelse
Forpakningen inneholder
1. Malingssprøyte
2. Fleksibel forlengelse
3. Viskositetsmålebeger
4. Ventil
5. Malingsbeholder med sugerør
og lter
1
2
4
3
NOR SK
5
Malingssprøytens
6
7
8
9
1
2
3
4
5
deler
1. Motorenhet
2. Mengderegulator
3. Strømbryter
4. Håndtak
5. Malingsbeholder
6. Munnstykke
7. Fleksibel forlengelse
8. Ventil bak
9. Viskositetsmåler
30
Page 31

Generelle sikkerhetsinstruksjoner
Advarsel! Les alle instruksjonene grundig. Dersom instruksjonene ikke følges, kan
dette lede til brann, elektrisk støt og/eller alvorlig skade. Med begrepet ”elektriske
håndverktøy” i teksten under, menes strømtilkoblede håndverktøy. Ta vare på
denne instruksjonen.
1) Arbeidsplassen
a) Hold arbeidsplassen ren, ryddig og godt opplyst. Rotete arbeidsplass eller
dårlig opplyste områder kan føre til ulykker.
Bruk ikke elektriske håndverktøy i omgivelser med eksplosjonsfare, som
b)
for eksempel i nærheten av lettantennelige væsker, gasser eller støv.
Elektrisk håndverktøy kan danne gnister som igjen kan antenne støv eller
trespon.
c) Hold barn og andre tilskuere unna mens du bruker elektriske håndverktøy.
Du kan lett miste kontrollen dersom du blir forstyrret mens du arbeider.
2) Sikkerhet ved bruk av elektrisk strøm
a) Strømkabelens støpsel, til det elektriske verktøyet, må passe i vegguttaket.
Støpselet må ikke forandres på. Bruk aldri adapter sammen med elektrisk
håndverktøy som krever jording. Ved bruk av originale kontakter og støpsler
minskes faren for elektrisk støt.
b) Unngå kroppskontakt med jordede gjenstander som rør, ovner, komfyrer
og kjøleskap. Kroppskontakt med disse øker faren for elektrisk støt.
c) Elektrisk håndverktøy bør ikke utsettes for regn eller fuktighet.
kommer vann inn i et elektrisk håndverktøy, øker faren for elektrisk støt.
Håndter strømkabelen med forsiktighet. Den må ikke bli brukt til å bære
d)
verktøyet med. Dra ikke i kabelen når du skal ha stikket ut av kontakten. Hold
kabelen unna varme, olje, skarpe kanter og bevegelige deler. Skadde eller
deformerte støpsler kan øke faren for elektrisk støt.
e) Ved bruk av elektrisk håndverktøy utendørs, skal det benyttes skjøtekabel
som er beregnet til dette formålet. Når skjøtekabel som er beregnet for
utendørs bruk benyttes, minsker faren for elektrisk støt.
Hvis det
NOR SK
31
Page 32

3) Personlig sikkerhet
a) Vær våken og bruk sunn fornuft når du bruker et elektrisk verktøy. Ikke
bruk elektriske håndverktøy når du er trett eller påvirket av rusmidler,
alkohol eller sterke medisiner. Når du bruker elektrisk håndverktøy, kan et lite
øyeblikk med uoppmerksomhet resultere i store personskader.
Bruk verneutstyr. Benytt alltid vernebriller. Bruk av verneutstyr som
b)
støvmaske, sklisikre såler på skoene, hjelm og hørselsvern, ved behov, minsker
faren for personskade.
Unngå uønsket oppstart. Påse at strømbryteren står i posisjon ”OFF” før
c)
du kobler til strømmen. Det å bære et elektrisk håndverktøy med en nger på
avtrekkeren/strømbryteren, eller å koble til strømmen når strømbryteren står
i posisjon ”ON”, kan forårsake ulykker.
d) Fjern alle nøkler/serviceverktøy før du starter det elektriske håndverktøyet.
Et gjenglemt serviceverktøy på en roterende del, kan forårsake personskader.
e) Strekk deg ikke for langt.
NOR SK
tiden. Da er du bedre forberedt når uventede situasjoner oppstår.
Benytt fornuftige arbeidsklær. Ikke bruk løstsittende klær og smykker.
f)
Hold klær, hansker og smykker unna bevegelige deler. Løstsittende klær,
smykker eller langt hår, kan sette seg fast i bevegelige deler.
g) Hvis det er mulig å koble til en støvsamler/støvsuger, bør dette gjøres.
Ved bruk av sådanne hjelpemidler, kan en minske faren for støvrelaterte skader
og ulykker.
Påse at du står støtt og har god balanse hele
4) Bruk og vedlikehold av elektrisk håndverktøy
a) Ikke press et elektrisk håndverktøy. Bruk elektriske håndverktøy som er
beregnet til den arbeidsoperasjonen du skal utføre. Riktig innmatingshastighet
er viktig for å utføre bedre og sikrere arbeide.
b) Ikke bruk det elektriske håndverktøyet dersom ikke strømbryteren virker
og verktøyet kan skrues av. Alle elektriske håndverktøy, som ikke kan
kontrolleres med en strømbryter, er farlige og må repareres.
c) Dra ut støpselet før du utfører justeringer, bytter tilbehør eller legger det
elektriske håndverktøyet fra deg. Dette for å unngå at elektrisk håndverktøy
får en ukontrollert start.
d) Oppbevar elektrisk håndverktøy utilgjengelig for barn.
elektrisk håndverktøy er utilgjengelig for personer som ikke har fått tilstrekkelig
opplæring på eller er fortrolig med verktøyet. Elektrisk håndverktøy kan være
farlige dersom de kommer i hendene på ukyndige.
32
Påse også at
Page 33

e) Vedlikehold av elektrisk håndverktøy. Påse at verktøyet ikke er feilinnstilt,
at bevegelige deler ikke beveger seg usymmetrisk, at ingen deler er skadet
eller at det elektriske håndverktøyet har andre feil, som kan påvirke verktøyets
funksjon. Dersom noe er skadet må dette repareres før verktøyet tas i bruk.
Mange ulykker skyldes dårlig eller manglende vedlikehold.
f) Hold verktøyet rent. Påse også at det elektriske verktøyet holdes skarpt.
Godt vedlikeholdt skjæreverktøy, med skarpe egger, er lettere å kontrollere.
g) Følg instruksjonen, ta hensyn til arbeidsforholdene og den type arbeide
som skal utføres. Bruk av elektrisk håndverktøy til andre arbeidsoperasjoner
enn det det er beregnet til, kan skape farlige situasjoner.
5) Service
a) La profesjonelle fagfolk utføre service og reparasjoner. Benytt kun
originale reservedeler. Dette for å opprettholde sikkerheten ved bruk av
det elektriske håndverktøyet.
NOR SK
33
Page 34

Spesielle sikkerhetsforskrifter
for malersprøyte
• Malingssprøyten må ikke brukes til lettanntennelig* maling eller emner.
• Bruk ikke malingssprøyten til væsker som inneholder partikler eller bere
som f.eks. metallic lakk, brannhemmende maling eller maling som inneholder
asbestbere.
• Malingssprøyten må ikke rengjøres med lettanntennelige* løsemidler.
• Vær oppmerksom på ev. farer som kan oppstå avhengig av materiale som
males.
• Les instruksene og varselteksten på produktet grundig før bruk. Følg ev. krav
om bruk av verneutstyr.
• Bruk ikke maling med ukjent innhold, der farene er ukjente.
• Dra alltid stikkontakten ut fra vegguttaket når du er ferdig med å male.
NOR SK
(Dette for å forhindre uønsket start).
• Rett aldri sprøyten mot deg selv eller andre.
* Emner og væsker som har ammepunkt over 55 °C.
Produktmerkning med sikkerhetssymboler
Les bruksanvisningen!
Bruk alltid vernebriller eller visir og beskyttelse mot innånding
av giftige gasser og hørselsbeskyttelse.
34
Page 35

Før du begynner
Innøving
Hvis det er første gangen du skal bruke malingssprøyten, så sprut gjerne vann mot en plate, hvor
du kan observere hvor du har sprutet hen, til du
har blitt kjent med sprøyten.
1. Påse at sugerøret er godt festet i det fremre
røret i beholderlokket. Kontroller at ventilen
bak sitter på plass og at munnstykket er
skrudd fast.
2. Du kan justere trykket med mengderegulatoren bak på håndtaket. Still inn trykket
til en mellomposisjon før du starter å sprute,
og juster det underveis.
Blanding av maling
Viskositetsmålebegeret og en klokke er det eneste du trenger for å kunne
bedømme viskositeten.
1. Fyll målebegeret ved å dyppe det ned i malingen (rør om i malingen først, hvis
den inneholder klumper).
2. Ta den opp over overaten og kontroller hvor lang tid det tar for malingen å
renne ut gjennom hullet i bunnen av begeret. (Jo lengre tid det tar, desto høyere
er viskositeten (tykkelsen) på malingen.)
NOR SK
35
Page 36

Tabell over anbefalt viskositet
Obs! Dette er kun en anbefaling. Prøv malingssprøyten mot en overate med
samme struktur og helling som den som skal males, før du starter den egentlige
malingen, dersom du er det minste i tvil om hvilken viskositet malingen har.
Plast og latexmaling: 24-28 sekunder
Vannbasert maling: 20-25 sekunder
Grunnmaling: 24-26 sekunder
Lakk: 20-25 sekunder
Oljebasert maling: 18-22 sekunder
Emaljelakk: 18-22 sekunder
Aluminiumsmaling: 22-25 sekunder
Flytende rustbeskyttende masse: 25-35 sekunder
NOR SK
Treforsegler: 28-35 sekunder
Rötskyddsfärg: Ufortynnet
Beis: Ufortynnet
Bruk
Forberedelser
Obs! Start aldri malingssprøyten uten væske i beholderen. Det kan redusere
pumpens levetid.
1. Kontroller at nettspenningen på strømuttaket er den samme som sprøyten
krever (se merkeskilt).
2. Hell væsken som skal sprutes i beholderen.
3. Fortynn væsken ved behov og kontroller viskositeten.
4. Plasser beholderen på et plant underlag. Legg på et papir, som kan
suge opp ev. spill.
5. Plasser malingssprøyten over beholderen. Vri beholderen motsols
til den stopper.
6. Produktet er nå klart til bruk.
36
Page 37

Arbeidsgangen ved bruk
Juster malingsmengden med
mengderegulatoren (2)
Reduser yten ved å vri medsols (B) eller øk den
ved å vri motsols (A).
Hold malingssprøyten riktig
• 30 cm er som regel den beste avstanden mellom munningen og overaten, som
skal males. Større avstand kan gi for stor spredning, og mindre kan gi ujevne og
for tykke lag.
NOR SK
• Hvis du er usikker, så prøv deg fram før du starter sprøyting av ditt
arbeidsstykke.
• Hold alltid sprøyten oppreist og sprut parallelt med overaten som skal males.
• For å få en jevn fordeling bør sprøyten føres med en jevn bevegelse. Ikke vri
sprøyten med hendelen.
Riktig Galt
37
Page 38

• Beveg sprøyten fra venstre til høyre og
tilbake, eller fra toppen til bunnen og
tilbake. Best resultat oppnås hvis du starter
sprøytingen litt utenfor overaten som skal
males.
• På store ater kan man som regel med fordel
sprøyte både loddrett og vannrett på.
• For å unngå at fargen renner på loddrette ater, kan du forsøke å sprøyte med
en n tåke og med en større sprøyteavstand, og ikke sprøyte så tykke lag av
gangen. Siste laget kan legges på med mindre avstand.
• På vannrette ater retter du sprøyten i ca. 45° vinkel mot overaten og sprøyter
bort fra deg.
NOR SK
• Hvis du tar deg pauser i sprøytingen, er det best å starte med å sprøyte på en
papirbit før du går løs på arbeidsemnet igjen.
Fortynning
Dersom malingen lager en stråle i stedet for en sprøyt, må du spe malingen ytterligere. Maling som er vannbasert fortynnes med vann, og oljebasert maling fortynnes
med malingsfortynner som f.eks. whitesprite.
38
Page 39

Rengjøring
Obs! Senk aldri hele malingssprøyten ned i væske når du rengjør den.
Etter hver gangs bruk
1. Ta bort beholderen og dra ut sugerøret.
2. Skru ut de re skruene (13) under beholderlokket (12).
3. Ta beholderlokket fra motorenheten (1) ved å dra det nedover.
4. Dra pumpeenheten ut av aggregatet. Ta delene fra hverandre og rengjør alle
komponenter med malingsfortynner.
5. Når du setter sammen aggregatet igjen må du se til at stempelet (11),
stempelfjærer (10), ventil bak (8) og munnstykke (6) blir riktig montert.
6. Plasser stikkontakten i et vegguttak med 230 V, og hold aggregatet opp ned.
Hell litt tynn olje i hullet for sugerøret, og trykk kort inn avtrekkeren. Dette er
med på å rustbeskytte sprøyten.
1
12
NOR SK
11 10
13
Obs! Mangel på eller feil rengjøring kan føre til at stempelet fester seg i sylinderen.
Dersom du hører en svak brummende lyd når du sprøyter, slipp da opp avtrekkeren
snarest. Hvis ikke kan motoren bli overopphetet og skades.
39
8 6
Page 40

Vedlikehold
Husk på å kontrollere slitedelene som munnstykke, ventil, stempel, fjærer, etc. med
jevne mellomrom. Vær spesielt nøye hvis du bruker mye latexmaling, fordi den
angriper delene i sprøyten og de slites mange ganger raskere enn om men bruker
andre malingstyper.
Skift ut slitedelene ettersom disse slites
1. Munnstykke (6): Når du merker at malingen ikke lengre kommer ut nfordelt
og kanskje kommer mer i kladder.
2. Stempel (11): Kontrolleres regelmessig, skift ved behov.
3. Ventil bak (8): Undersøk størrelsen på de tre hullene i ventilhodet og framdelens
jevnhet. En slitt ventil har riper og ødelagt hull og må skiftes.
NOR SK
Når du skal kvitte deg med produktet, skal dette skje i henhold
til lokale forskrifter. Er du usikker på hvordan du går fram, ta kontakt
med lokale myndigheter.
Spesifikasjoner
Strømforsyning: AC, 230 V, 50 Hz
Effekt: 75 W
Størrelse på fargebeholdere: 900 ml
Sprøyteeffekt: 200 ml/min
Kabellengde: 3 m
Vekt: 1,45 kg
Vibrasjon X led: 1,94 m/s2
Y led: 4,94 m/s2
Z led: 13,19 m/s2
Lydtrykk: LpA: 87,7 dB
Lydeffekt: LwA: 100,7 dB
Avfallshåndtering
40
Page 41

Feilsøkingsskjema
Problem Årsak Tiltak
Tåkeopphop
ning.
Overopphetet
motor.
Motoren går,
men det kommer
ikke noe maling.
Motoren går
riktig, men spru
ter ikke.
Motoren går
ikke.
Sprøyten spytter
ut malingen og
motoren låter
rart.
Det lekker
maling inn
i pumpehuset
bakfra.
Du holder sprøyten for langt fra. Hold den ca. 30 cm fra.
For tynn farge. Bruk tykkere malingsblanding.
For høyt trykk.
Utslitt munnstykke. Skift munnstykke.
Du har sprutet for lenge. La sprøyten hvile etter noen
Motoren går, men det kommer ikke
noe maling.
Mengderegulatoren er galt innstilt. Juster innstillingen.
Stempelet har skjært seg etter bruk
av akrylmaling.
Defekt motor. Smør stempel og sylinder.
For tykk maling. Fortynn malingen.
Munnstykket tett. Rengjør det grundig.
Ventilen bak er ikke satt i. Sett den i.
Ventilen bak er utslitt eller tett. Rengjør eller skift den ut.
Mengderegulatoren trenger justering. Still den inn riktig.
Tett lter. Rengjør eller skift ut.
Ingen strøm i uttaket. Tiltak.
Defekt motor.
Mengderegulatoren er galt innstilt. Juster.
Utslitt venlil eller munnstykke. Skift ut slitte deler.
For stort hull i munnstykket. Skift til et mindre.
For tykk maling. Fortynn malingen.
Du holder sprøyten skjevt slik at
det ikke kommer noe maling inn i
sugerøret.
Du peker oppover med sprøyten når
du sprøyter.
Stempel eller sylinder er ripet opp. Skift ut slitte deler.
Vri justerrattet medurs.
minutters sprøyting.
Sjekk lteret og at ventilen
bak er satt i.
Malingen kan være for tykk.
Ta ut drivenheten og rengjør alle
deler nøye.
Hold sprøyten riktig eller sett på en
forlenging på røret.
Hold den rett.
41
NOR SK
Page 42

Maaliruisku
Art.no: 18-3056 Model: FL-999-UK
30-9579 FL-999
Lue käyttöohjeet ennen tuotteen käyttöönottoa. Säilytä käyttöohjeet tulevaa tarvetta varten. Pidätämme oikeuden teknisten tietojen muutoksiin. Emme vastaa
mahdollisista teksti- tai kuvavirheistä.
Sisällysluettelo
Kuvaus 32
Turvallisuus 33
Ennen kuin aloitat 37
Käyttö 38
Puhdistus 41
Huolto ja ylläpito 42
Kierrätys 43
Tekniset tiedot 44
Vianhakutaulukko 42
SUOMI
42
Page 43

Kuvaus
Pakkauksen sisältö
1. Maaliruisku
2. Taivutettava jatkokappale
3. Viskositeettiastia
4. Takaiskuventtiili
5. Värisäiliö, imuputki ja suodatin
1
2
4
3
5
SUOMI
Maaliruiskun osat
6
7
8
9
1
2
3
4
5
1. Moottori
2. Maalimäärän nuppi
3. Virtakytkimet
4. Kahva
5. Maalisäiliö
6. Suutin
7. Taivutettava jatkokappale
8. Takaiskuventtiili
9. Viskositeettimittari
43
Page 44

Yleisiä turvallisuusohjeita
Varoitus! Lue kaikki ohjeet. Seuraavien ohjeiden noudattamatta jättäminen
saattaa johtaa sähköiskuun, tulipaloon ja/tai vakavaan onnettomuuteen. Varoitustekstien termi ”sähkökäyttöinen käsityökalu” tarkoittaa sinun verkkovirralla tai
paristoilla/akulla toimivaa käsityökaluasi. Säästä nämä ohjeet!
1) Työtila
a) Pidä työtilat puhtaina ja hyvin valaistuina. Täynnä tavaraa olevat ja pimeät
tilat ovat avoin kutsu onnettomuudelle.
b) Älä käytä sähkökäyttöisiä käsityökaluja räjähdysherkässä ympäristössä,
kuten helposti syttyvien nesteiden, kaasujen tai pölyn lähellä.
Sähkökäyttöiset käsityökalut muodostavat kipinöitä, jotka saattavat sytyttää
pölyn tai höyryt.
c) Pidä lapset ja vierailijat loitolla, kun käytät sähkökäyttöisiä käsityökaluja.
Häiriötekijät saattavat johtaa laitteen hallinnan menettämiseen.
2) Sähköturvallisuus!
a) Sähkökäyttöisen käsityökalun pistokkeen tulee sopia pistorasiaan.
SUOMI
Älä muuta tuotetta millään tavalla. Älä käytä adapteria maadoitettujen
sähkökäyttöisten sähkötyökalujen kanssa. Pistokkeet, joita ei ole muutettu
sekä sopivat pistorasiat pienentävät sähköiskun vaaraa.
b) Vältä koskettamasta maadoitettuja esineitä, kuten putkia,
lämpöpattereita, hellaa tai jääkaappia. Sähköiskun riski kasvaa, mikäli
kehosi on maadoitettu.
c) Älä altista sähkökäyttöistä käsityökalua sateelle, äläkä käytä sitä
kosteissa olosuhteissa. Veden joutuminen sähkökäyttöiseen käsityökaluun
lisää sähköiskun vaaraa.
d) Käsittele sähköjohtoa varoen.
äläkä irrota pistoketta pistorasiasta johdosta vetämällä. Älä altista virtajohtoa
kuumuudelle, öljyille, teräville reunoille tai liikkuville osille. Vioittuneet tai
sotkeutuneet virtajohdot lisäävät sähköiskun vaaraa.
e) Kun käytät sähkökäyttöistä käsityökalua ulkona, käytä ainoastaan
ulkokäyttöön sopivia jatkojohtoja. Ulkokäyttöön sopivan jatkojohdon
käyttäminen pienentää sähköiskun vaaraa.
Älä käytä sähköjohtoa laitteen kantamiseen,
44
Page 45

3) Oma turvallisuutesi
a) Ole huolellinen ja käytä tervettä järkeä kun työskentelet sähkökäyttöisellä
käsityökalulla. Älä käytä sähkökäyttöistä käsityökalua, mikäli olet väsynyt
tai huumeiden, lääkkeiden tai alkoholin vaikutuksen alaisena. Lyhyenkin
hetken kestävä tarkkaavaisuuden herpaantuminen saattaa johtaa vakavaan
loukkaantumiseen.
b) Käytä suojavarusteita.
hengityssuojaimen, liukuestekenkien, kypärän ja kuulosuojaimien käyttäminen
vähentää loukkaantumisvaaraa.
c) Vältä tahatonta käynnistystä.
”OFF” ennen kuin liität pistokkeen seinäpistorasiaan. On äärimmäisen
vaarallista kantaa sähkökäyttöistä käsityökalua sormi liipaisimella tai liittää
sähkökäyttöinen käsityökalu pistorasiaan virtakytkimen ollessa ”ON”asennossa.
d) Poista kaikki huoltotyökalut/avaimet ennen kuin käynnistät
sähkökäyttöisen käsityökalun. Sähkökäyttöisen käsityökalun liikkuvan osan
päälle unohdettu työkalu saattaa johtaa onnettomuuteen.
e) Älä kurota liian kauas.
työn jokaisessa vaiheessa. Näin olet paremmin varustautunut mahdollisen
onnettomuuden sattuessa.
f) Käytä sopivia vaatteita.
vaatteet ja käsineet loitolla liikkuvista osista. Löysät vaatteet, korut tai pitkät
hiukset saattavat juuttua liikkuviin osiin.
g) Jos käytössäsi on pölynpoistojärjestelmä, käytä sitä.
apuvälineiden käyttö saattaa vähentää pölyyn liittyviä vaaroja.
Käytä aina suojalaseja. Suojavarusteiden, kuten
Varmista, että virtakytkin on asennossa
Varmista, että työasentosi on tasapainoinen
Älä käytä löysiä vaatteita tai koruja. Pidä hiukset,
Näiden
SUOMI
4) Sähkökäyttöisten käsityökalujen käyttäminen
ja huoltaminen.
a) Älä pakota sähkökäyttöistä käsityökalua. Käytä sähkökäyttöistä
käsityökalua, joka soveltuu suunnittelemaasi työtehtävään. Sopiva
sähkökäyttöinen käsityökalu tekee työn paremmin ja turvallisemmin oikealla
nopeudella.
b) Älä käytä sähkökäyttöistä käsityökalua, mikäli virtakytkin ei käynnistä
ja sammuta laitetta. Kaikki sähkökäyttöiset käsityökalut, joita ei voida hallita
virtakytkimellä, ovat vaarallisia ja ne tulee korjata.
c) Irrota pistoke pistorasiasta ennen kuin teet sähkökäyttöiseen
käsityökaluun säätöjä tai ennen kuin vaihdat sen varusteita tai ennen
kuin asetat sen säilytykseen. Nämä ennaltaehkäisevät toimenpiteet
vähentävät sähkökäyttöisen käsityökalun tahatonta käynnistymistä.
45
Page 46

d) Säilytä sähkökäyttöisiä käsityökaluja lasten ulottumattomissa. Älä
luovuta sähkökäyttöistä käsityökalua henkilöille, jotka eivät tunne
sitä tai sen käyttöohjetta. Sähkökäyttöiset käsityökalut ovat vaarallisia
tottumattomien käyttäjien käsissä.
e) Huolla sähkökäyttöisiä käsityökaluja.
kunnossa, että liikkuvat osat liikkuvat esteettä, että osat ovat ehjiä, ja että
sähkökäyttöisessä käsityökalussa ei ole muita seikkoja, jotka vaikuttavat
laitteen toimintaan. Jos jokin osa on vioittunut, se tulee korjata ennen
käyttöä. Monet onnettomuudet johtuvat väärin hoidetuista sähkökäyttöisistä
käsityökaluista.
f) Pidä työkalut puhtaina ja terävinä.
se on oikein hoidettu ja sen terät ovat teräviä.
g) Käytä sähkökäyttöistä käsityökalua, sen varusteita tms. ohjeiden
mukaisesti ja sellaisella tavalla, joka sopii kyseiselle sähkökäyttöiselle
käsityökalulle ja ota myös huomioon työskentelyolosuhteet ja
suoritettava työ. Sähkökäyttöisen käsityökalun käyttäminen muihin kuin sille
tarkoitettuihin työtehtäviin saattaa johtaa vaaratilanteeseen.
Tarkasta, että säädöt ovat
Terätyökalun hallinta on helpompaa, kun
5) Huolto
a) Laitteen saa huoltaa ja korjata ainoastaan ammattihenkilö ja huollossa
SUOMI
tulee käyttää ainoastaan alkuperäisosia. Näin taataan sähkökäyttöisen
käsityökalun turvallisuus.
46
Page 47

Maaliruiskua koskevia turvallisuusohjeita
• Älä ruiskuta helposti syttyviä* maaleja tai aineita.
• Älä ruiskuta nesteitä, jotka sisältävät hiukkasia tai kuituja, esim. metallicmaaleja, hitaasti palavia maaleja tai maaleja, jotka sisältävät asbestikuituja.
• Älä puhdista maaliruiskua helposti syttyvillä liuotusaineilla.
• Ota huomioon maalattavan materiaalin aiheuttamat mahdolliset vaarat.
• Lue maaliruiskussa käytettävän tuotteen ohjeet ja varoitustekstit ennen kuin
käytät maaliruiskua. Lue tuotteesta myös, mitä henkilökohtaisia suojavarusteita
tarvitset.
• Älä maalaa tuotteella, jonka vaarat eivät ole tiedossa.
• Irrota pistoke pistorasiasta kun lopetat maalaamisen (näin estetään tahaton
käynnistyminen).
• Älä suuntaa ruiskua itseäsi tai muita kohti.
• Älä käytä ruiskua kuivana, säiliössä tulee olla nestettä.
* Aineet ja nesteet, joiden leimahduspiste on yli 55 °C.
Tuotteen merkinnät ja turvallisuussymbolit
Lue koko käyttöohje!
Käytä aina suojalaseja tai visiiriä ja hengityssuojainta ja kuulosuojaimia.
SUOMI
47
Page 48

Ennen kuin aloitat
Harjoittele
Mikäli käytät ruiskua ensimmäistä kertaa,
kokeile ensin esim. ruiskuttamalla vettä
kovalevylle saadaksesi tuntuman maaliruiskuun.
1. Varmista, että imuputki on kiinnitetty
kunnolla säiliön kannen etummaiseen
putkeen. Varmista, että takaiskuventtiili on
paikallaan ja että suutin on kiinni.
2. Painetta säädellään kahvan takana olevalla
maalimääränupilla. Aseta paine aluksi
keskikohtaan ja säädä käytön aikana.
SUOMI
Maalin sekoittaminen
Tarvitset viskositeettiastian ja kellon määritelläksesi nesteen viskositeetin.
1. Upota mitta-astia maalipurkkiin täyttääksesi sen kokonaan (sekoita tarvittaessa
maali ensin tasaiseksi).
2. Nosta mitta-astia maalista ja katso kellosta, kuinka nopeasti maali valuu
pohjareiästä. Mitä hitaampi valumisaika, sitä suurempi maalin viskositeetti
(paksuus).
48
Page 49

Viskositeettitaulukko
Huom.! Taulukon arvot ovat suosituksia. Varmista oikea viskositeetti ruiskuttamalla ensin maalia kokeeksi pinnalle, jonka pinta ja maalauskulma vastaavat maalattavaa pinnaa, jos olet epävarma.
Muovi- ja lateksimaali 24–28 sekuntia
Vesiliukoinen maali 20–25 sekuntia
Pohjamaali 24–26 sekuntia
Vernissa 20–25 sekuntia
Öljypohjaiset maalit 18–22 sekuntia
Emalilakka 18–22 sekuntia
Alumiinimaali 22–25 sekuntia
Ruostesuojamaali, nestemäinen 25–35 sekuntia
Viimeistelylakka (puu) 28–35 sekuntia
Homeenesto Ohentamaton
Petsi Ohentamaton
Käyttö
Esivalmistelut
Huom.! Älä koskaan käynnistä maaliruiskua tyhjänä, se saattaa lyhentää
pumpun käyttöikää.
1. Varmista, että arvokyltin jännite on sama kuin pistorasian verkkojännite.
2. Kaada ruiskutettava maali astiaan.
3. Ohenna maalia tarvittaessa ja tarkista viskositeetti.
4. Aseta astia tasaiselle alustalle suojapaperin päälle.
5. Asenna ruiskuosa astiaan kiertämällä vastapäivään.
6. Ruisku on valmis käytettäväksi.
SUOMI
49
Page 50

Työskentelytapa
Säännöstele maalin määrää
maalimääräratilla (2):
Vähennä maalin määrää kääntämällä myötäpäivään
(B) ja lisää kääntämällä vastapäivään (A).
Pidä ruisku suorassa
• Suuttimen ja maalattavan pinnan paras etäisyys on n. 30 cm. Maali jakautuu
suuremmalle alueelle, jos etäisyys on suurempi. Maali jakautuu epätasaisesti
ja liian paksuksi kerrokseksi, jos etäisyys on puolestaan pienempi.
SUOMI
• Maalaa kokeeksi ensin muuta pintaa, jos olet epävarma.
• Pidä ruiskua aina suorassa ja samassa kulmassa kuin maalattava pinta.
• Liikuta ruiskua tasaisesti koko kättä liikuttaen, jotta saat tasaisen maalipinnan.
Älä käännä ruiskua ranteella.
Oikein Väärin
50
Page 51

• Liikuta ruiskua vasemmalta oikealla ja
takaisin, ylhäältä alas ja takaisin. Paras tulos
saadaan, kun ruiskuttaminen aloitetaan jo
hieman ennen maalattavaa pintaa.
• Suuria pintoja voidaan ruiskuttaa sekä vaakaettä pystysuuntaan.
• Maalin valuminen pystysuorilla pinnoilla voidaan estää ruiskuttamalla
hienojakoista sumua suuremmalta etäisyydeltä sen sijaan, että ruiskutetaan
paksu kerros läheltä. Ruiskuta viimeinen kerros hieman lähempää.
• Vaakatasopintoja maalatessa ruiskua kallistetaan noin 45° kulmaan pintaan
nähden. Ruiskuta poispäin itsestäsi.
SUOMI
• Mikäli pidät tauon ruiskutuksessa, kannattaa aloittaa ruiskuttamalla
paperinpalalle ennen varsinaista maalattavaa pintaa.
Maalin ohentaminen
Ohenna maalia enemmän, mikäli maali leviää ruiskuna/säteenä, eikä tasaisena
suihkuna. Vesipohjaisia maaleja ohennetaan vedellä ja öljypohjaisia maaleja
ohennetaan ohenteella, esim. mineraalitärpätillä.
51
Page 52

Puhdistus
Huom.! Älä upota väriruiskua veteen.
Jokaisen maalauskerran jälkeen
1. Poista säiliö ja irrota imuputki.
2. Poista kannen (12) alla olevat ruuvit (13) (4 kpl).
3. Poista säiliön kansi moottoriosasta (1) vetämällä sitä alaspäin.
4. Irrota pumppuyksikkö aggregaatista. Irrota osat ja puhdista kaikki komponentit
sopivalla ohenteella.
5. Kun kokoat laitteen, varmista että mäntä (11), männän jousi (10),
takaiskuventtiili (8) ja suutin (6) tulevat oikein kiinni.
6. Liitä pistoke pistorasiaan (230 V) ja pidä laitetta ylösalaisin. Kaada hieman
ohutta öljyä imuputken reikään ja paina lyhyesti liipaisimesta. Näin estetään
männän ja sylinterin ruostuminen.
SUOMI
11 10
Huom.! Riittämätön tai virheellinen puhdistus saattaa aiheuttaa männän leikkautumisen (juuttumisen) sylinteriin. Päästä liipaisin heti, mikäli ruiskuttaessa kuuluu
heikkoa mörisevää ääntä. Muuten moottori saattaa ylikuumentua ja vioittua.
1
12
8 6
13
52
Page 53

Huolto ja ylläpito
Muista tarkastaa kuluvat osat, kuten suutin, takaiskuventtiili, mäntä, männän jousi
ym. ruiskutettuasi noin 20–40 litraa maalia. Ole erityisen huolellinen lateksivärin
kanssa, sillä se kuluttaa osia hyvin paljon nopeammin kuin muut maalit.
Vaihda kuluneet osat seuraavissa tapauksissa
1. Suutin (6): Mikäli maali ei hajoa hienoksi sumuksi tai tulee ”sylkemällä” ulos.
2. Mäntä (11): Tarkasta säännöllisesti, vaihda tarvittaessa.
3. Takaiskuventtiili (8): Tarkasta venttiilinpään kolmen reiän mitat ja etuosan
pinnan tasaisuus. Kuluneessa venttiilissä on naarmuja ja suurentuneet reiät ja
se tulee vaihtaa.
Kierrätys
Kierrätä tuote asianmukaisesti, kun poistat sen käytöstä. Ota yhteys kuntasi
jäteneuvontaan, mikäli olet epävarma.
Tekniset tiedot
Virtalähde AC, 230 V, 50 Hz
Teho 75 W
Maalisäiliön tilavuus 900 ml
Ruiskuteho 200 ml minuutissa
Kaapelin pituus 3 m
Paino 1,45 kg
Tärinä suunnassa X: 1,94 m/s2
suunnassa Y: 4,94 m/s2
suunnassa Z: 13,19 m/s2
Äänenpaine: LpA 87,7 dB
Äänen teho: LwA 100,7 dB
SUOMI
53
Page 54

Vianhakutaulukko
Ongelma Syy Toimenpiteet
Sumuttuminen Ruisku liian kaukana. Pidä 30 cm:n päässä.
Liian ohutta maalia. Ruiskuta paksumpaa maalia.
Liian kova paine Käännä maalimäärärattia myötäpäivään.
Kulunut suutin Vaihda suutinta.
Moottori ylikuumenee Olet ruiskuttanut liian kauan. Anna ruiskun jäähtyä muutaman
minuutin ruiskutuksen jälkeen.
Moottori käy, mutta maalia ei
tule.
Moottorista kuuluu
ääntä, mutta maalia
ei tule.
Moottori käy oikein,
mutta ei ruiskuta.
SUOMI
Moottori ei käy. Pistorasiassa ei virtaa. Hoida kuntoon.
Ruisku sylkee maalia
ja moottori kuulostaa
oudolta.
Maalia vuotaa pum
pun rungon taakse.
Maalimääräratti väärässä asennossa.
Mäntä on leikannut akryylimaalauksen jäljiltä.
Viallinen moottori. Voitele mäntä ja sylinteri.
Liian paksua maalia. Ohenna.
Suutin tukossa. Puhdista huolella.
Takaiskuventtiili ei paikoillaan. Laita paikoilleen.
Takaiskuventtiili kulunut tai
tukossa.
Väärin säädetty maalimääränuppi.
Imusuodatin tukossa. Puhdista tai vaihda.
Viallinen moottori.
Maalimääräratti väärässä asennossa.
Kulunut takaiskuventtiili tai
kulunut suutin.
Liian suuri reikä suuttimessa. Vaihda pienempään.
Liian paksua maalia. Ohenna.
Ruiskua pidetään vinossa, jolloin
imuputkeen ei tule maalia.
Ruiskua osoitetaan ylöspäin
ruiskutettaessa.
Männässä tai sylinterissä on
naarmuja.
Tarkasta suodatin, varmista että
takaiskuventtiili ei ole tukossa.
Maali voi olla liian paksua.
Säädä.
Irrota moottoriyksikkö ja puhdista kaikki
osat huolella.
Puhdista tai vaihda.
Säädä kunnolla.
Säädä.
Vaihda kuluneet osat.
Pidä ruiskua suorassa tai laita putkeen
pidennin.
Pidä suorassa.
Vaihda kulunut osa.
54
Page 55

Declaration of Conformity
Hereby, Clas Ohlson AB, declares that the machinery:
Electric Spray Gun Cotech
Art. no: 18-3056 Model:FL-999-UK
Art. no: 30-9579 Model:FL-999
Complies with the provisions of the following Directives:
2006/95/EC LOW VOLTAGE EQUIPMENT
89/336/EEC EMC
Insjön, Sweden, February 2008
Klas Balkow
President
Clas Ohlson, 793 85 Insjön, Sweden
Page 56

SVERIGE
KUNDTJÄNST Tel: 0247/445 00
Fax: 0247/445 09
E-post: kundtjanst@clasohlson.se
INTERNET www.clasohlson.se
BREV Clas Ohlson AB, 793 85
INSJÖN
NORGE
KUNDESENTER Tlf.: 23 21 40 00
Faks: 23 21 40 80
E-post: kundesenter@clasohlson.no
INTERNETT www.clasohlson.no
POST Clas Ohlson AS, Postboks 485 Sentrum, 0105 OSLO
SUOMI
ASIAKASPALVELU Puh: 020 111 2222
Faksi: 020 111 2221
Sähköposti: info@clasohlson.fi
INTERNET www.clasohlson.fi
OSOITE Clas Ohlson Oy, Yrjönkatu
23 A, 00100 HELSINKI
UNITED KINGDOM
For consumer contact, please visit
www.clasohlson.co.uk and click on
customer service.
INTERNET www.clasohlson.co.uk
 Loading...