

Page 1
3D Printer, quick guide
3D-skrivare, snabbguide
3D-skriver, hurtigguide
3D-tulostin, pikaopas
3D-Drucker, Kurzanleitung
EnglishSvenskaNorskSuomiDeutsch
Art.no Model
38-7720 Finder
Ver. 20160926
Page 2

3D Printer, quick guide
Art.no 38-7720
English
Please read theentire instruction manual before using theproduct and then save
it for future reference. We reserve theright for any errors in text or images and any
necessary changes made to technical data. In theevent of technical problems or other
queries, please contact our Customer Services (see address details on theback).
Safety
Follow the safety guidelines below. Ensure that you have read and understood all
safety instructions and warnings which can appear in any documents which are
included with this product and its accessories.
• Keep the work area clean and well lit. Cluttered or dark areas invite accidents.
• Never use the product in areas where explosive gases or liquids are stored.
• Never use the product when you are tired, sick, under the influence of alcohol
ormedicine.
• Always unplug the mains lead when moving the product for service or
maintenance.
• If extension leads are used, ensure that they are designed for the purpose for
which they are intended to be used.
• Only use earthed power points with a voltage rating which correspond to the
specifications listed on the product’s rating plate.
• Do not place the mains lead where it can be crushed or damaged by sharp edges.
• Never use the product if it or its mains lead is damaged in any way.
• If the mains lead is damaged it should only be replaced by a qualified electrician.
• Never try to open the housing or try to repair the product in any way. The product
contains no user-serviceable parts.
• Never attempt to tamper with or modify the product in any way.
• Do not place the product so that it risks being exposed to moisture or affected by
water or any other types of liquids. Avoid exposing the product to direct sunlight,
dust or extremely cold or hot environments. The product is designed is designed
to function optimally in temperatures between 15–25 °C (59–77 °F) and a at
ahumidity level between 20–50 %.
• Pull up any long hair and ensure that any loose hanging clothing or jewellery risks
coming into contact with any of the product’s moving parts or hot components.
• Place the product on a stable, even surface and at a safe distance from all
flammable materials.
2
Page 3

• Never store or place metal objects or any type of liquids within the printing area
oron the product itself. This can lead to fire, electric shock or other types of
personal injury.
• Only operate the product in well-ventilated areas.
• Printed models should never be exposed to any type of heat emitted from
cookers, ovens, naked flames, candles, etc.
• Turn off the product and unplug it from the wall socket immediately if:
- The product begins to emits smoke or smells burnt
- Emits unusual sounds
- Metal or any types of liquid comes into contact with the product
- There is a possible risk of thunderstorms
- There is a power cut
• This product contains moving parts and parts which can reach temperatures
between 200–300 °C which can cause personal injury. Keep all bodily parts
at asafe distance from the printing area when the product is in operation.
Nevertouch the printer head while printing is in progress.
• Let the product cool down completely before handling it after use.
• Never attempt to bypass the safety mechanisms that prevent user access to
theprinting area and printer head.
• Printed models are extremely hot after being printed. Always let the models cool
before handling.
• Never leave the product unattended while it is operating.
• Never let children play with the product. Never let children use the product without
adult supervision. Adult supervision is always required in order to ensure safe
operation.
• Keep all models out of the hands of children. Models pose a choking risk.
• Printed models should never be used for food storage.
• Printed models should never be used for electrical installation purposes.
• Never print models that can break the laws or regulations in which the product
isused.
English
3
Page 4
English
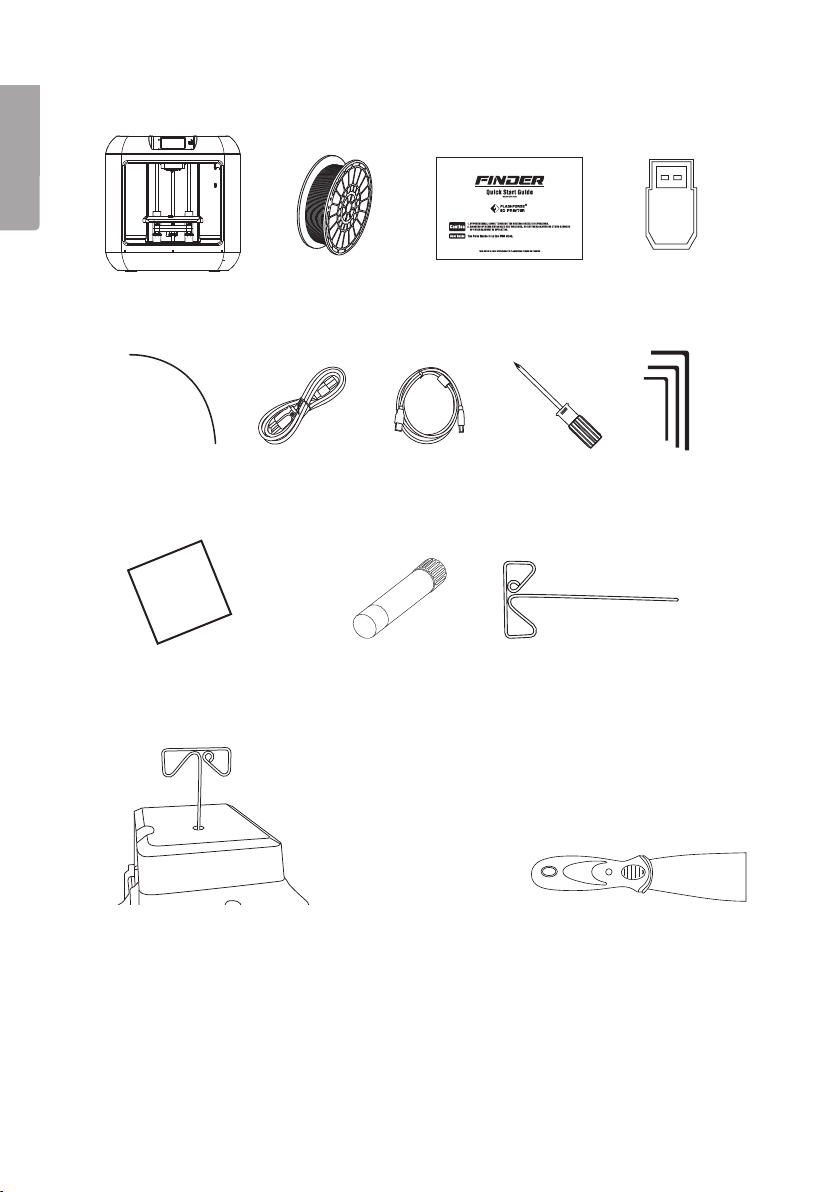
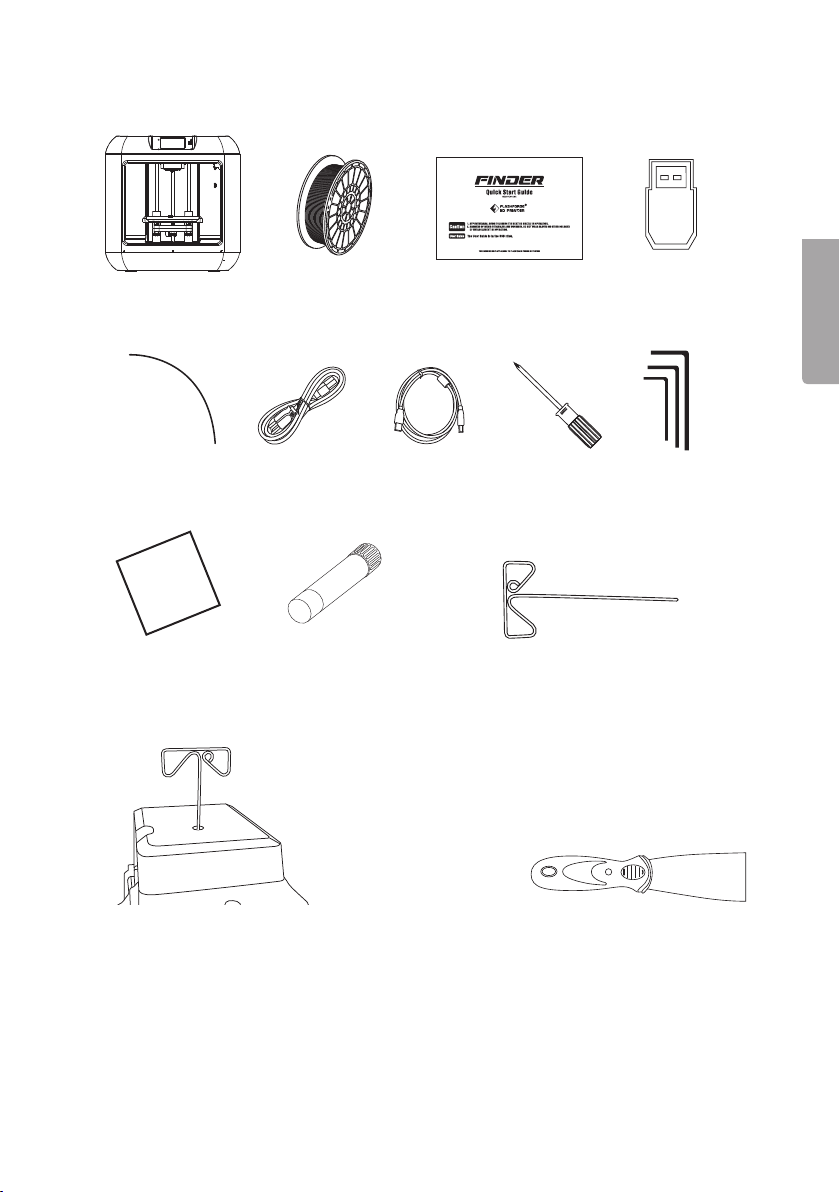
Package contents
3D Printer Filament spool Quickstart-guide USB flash drive
Filament guide
tube
Extra build sheet for
the build platform
The cleaning tool is only intended for
dislodging filament residue from the nozzle.
Note:Theextruder/printer nozzle must be heated
to the proper operating temperature before using
the tool. Carefully push the tool down through the
extruder passageway to dislodge any remaining
filament residue.
Mains lead USB cable Screwdriver Allen keys
Glue stick × 1
Extruder/printer nozzle
cleaningtool
Tool for removing printed
models from the build
platform.
4
Page 5
15
16
17
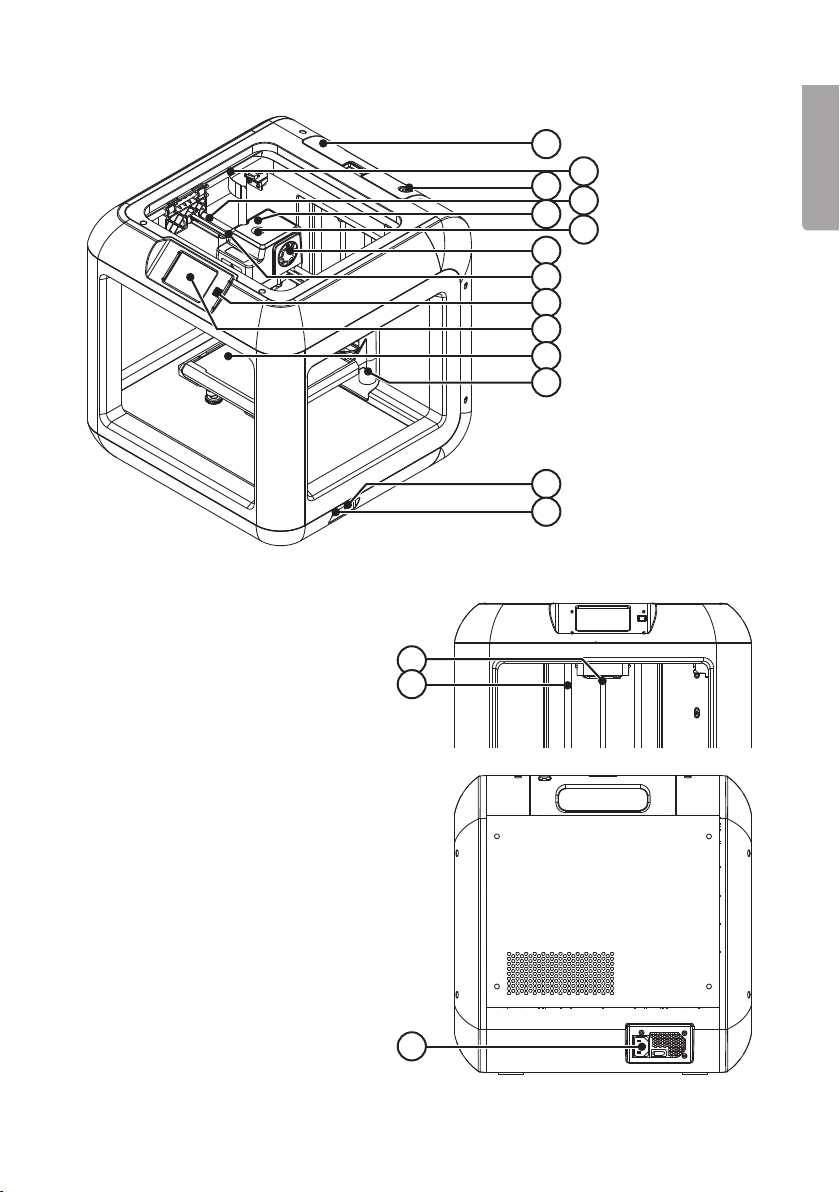
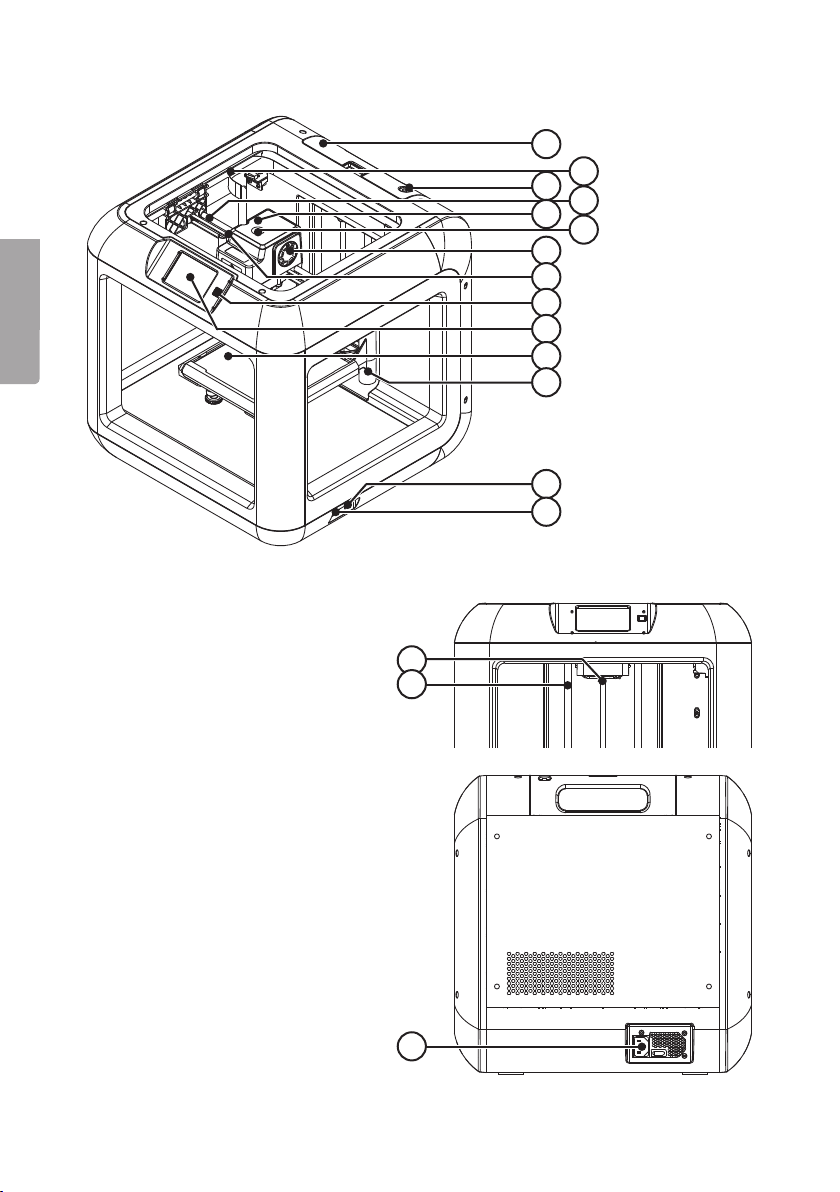
Product description
1. Filament cartridge
2. Y-axis guide rod
3. Filament outlet
4. X-axis guide rod
5. Extruder
6. Filament intake
7. Fan
8. Spring clamp
9. On/Off switch
10. Touch screen
11. Build platform
12. Levelling screw
13. USB cable input socket
14. USB flash drive input socket
15. Nozzle
16. Z-axis guide rod
17. Power lead socket
15
16
17
10
11
12
13
14
1
2
3
4
5
6
English
7
8
9
5
Page 6

English
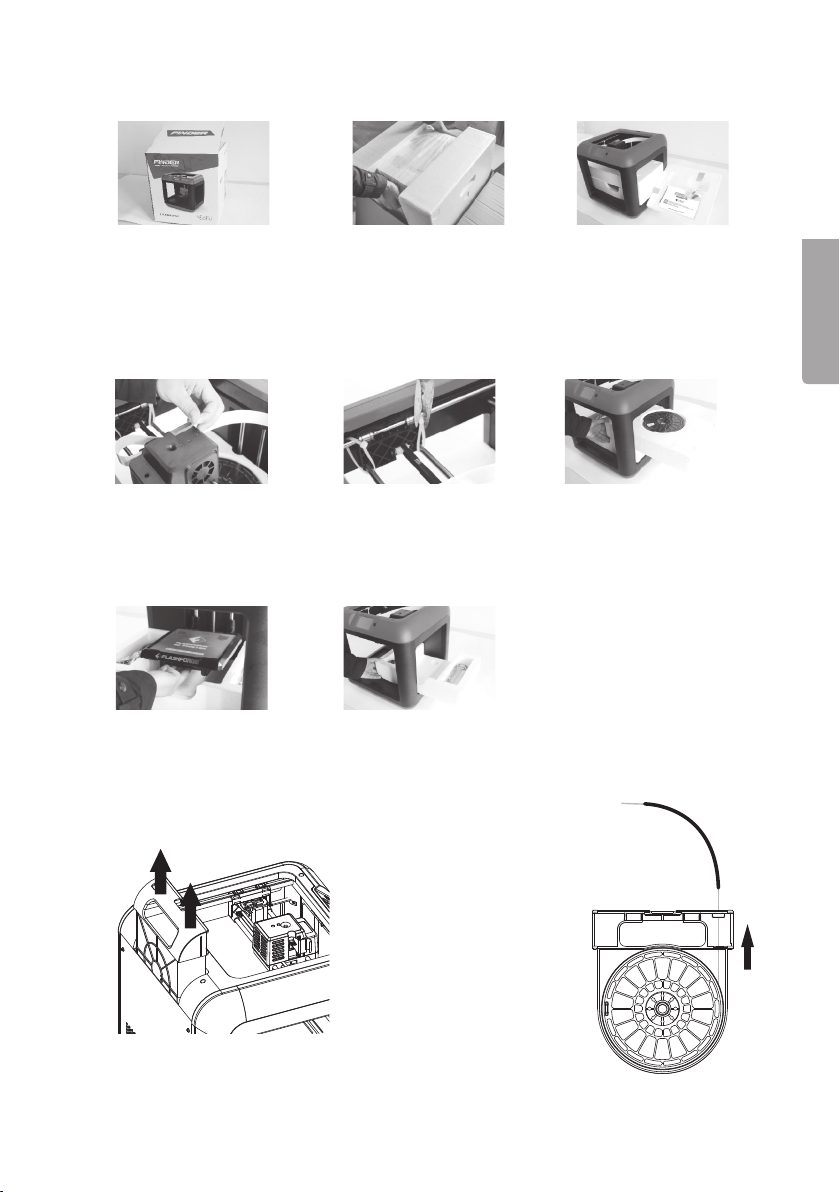
Unpacking
1. Place thebox on aclean,
firm and level surface.
4. Remove theblue tape
which holds theflat
cable in place.
7. Carefully lift thebuild
platform.
Add filament
1. Remove thefilament
cartridge from therear of
theprinter.
2. Open thebox, grip
thetwo handles and
lift theprinter out of
thebox.
5. Cut thefour cable ties
holding therods.
8. Carefully remove thepackaging
containing theUSB cable and
filament guide tube.
2. Thread thefilament
through thefilament
outlet and fit thefilament
spool into thecartridge.
Feed thefilament up
through thefilament
guide tube. Make
sure that theend of
thefilament is protruding
from theguide tube.
3. Remove all
6. Carefully remove
thefilament from
theprinter.
theprotective
transport wrapping.
6
Page 7
English
3. Refit thecartridge into
theprinter.
4. Press down thespring clamp (8) whilst
simultaneously inserting theend of thefilament
into thefilament intake (6) until it stops.
5. Release thespring clamp.
Settings
1. Plug themains lead into thepower lead socket (17) and into anavailable electrical socket.
2. Press in theon/off switch to turn theprinter on.
3. Press Tools–Setting–Language on thetouch screen to set thedesired language.
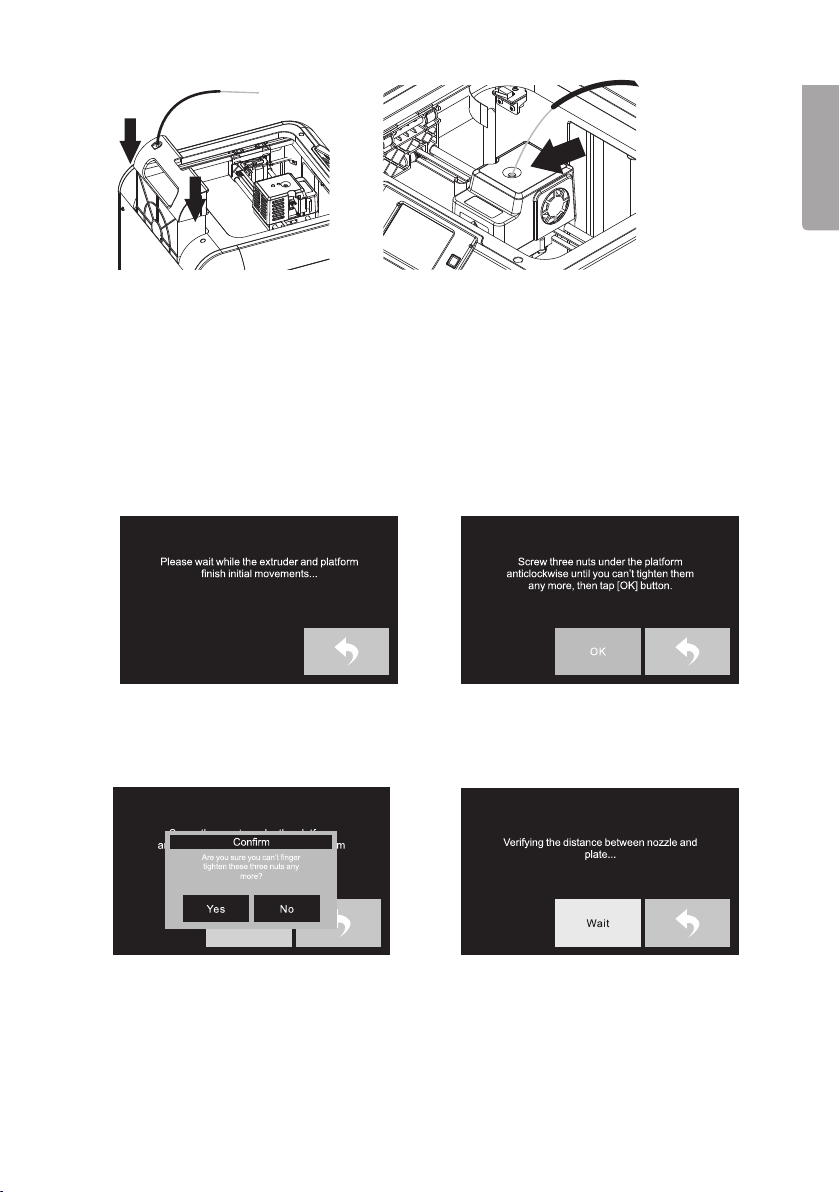
4. Press Tools–Level. Theextruder and
build platform will move into position.
Wait until they have finished moving.
5. Screw the3 nuts under thebuild
platform anticlockwise until they go
no further then press OK.
6. Thenext pop-up box asks if you
have tightened thenuts as much as
possible. Press Yes if you have or No
and tighten them some more.
7. When you have pressed Yes ,
theextruder will move to thefirst
point and thebuild platform will
move up and down to determine
thedistance between theextruder
nozzle and thebuild platform.
7
Page 8
English
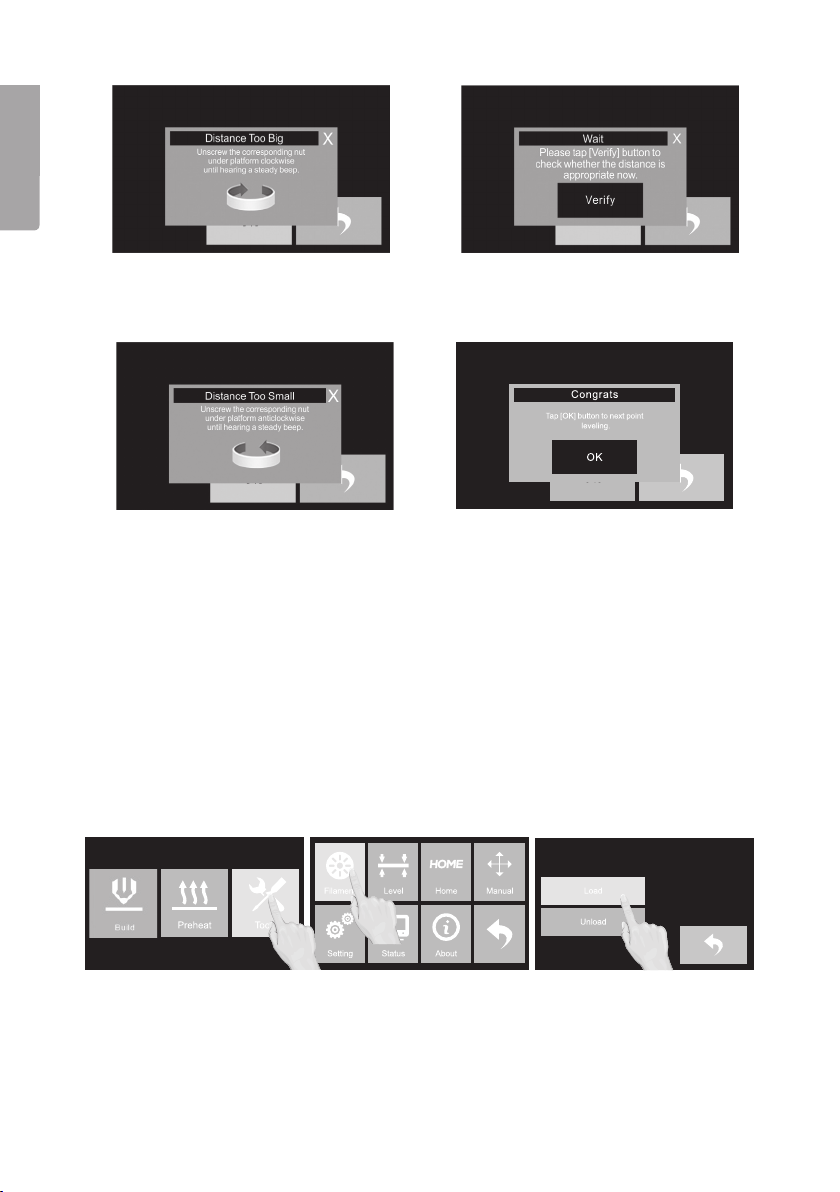
8. If thedistance is too large, adjust it by screwing thenut under theextruder clockwise.
Turn thenut until theprinter beeps and the “Verify” dialogue pop-up appears.
9. Press Verify to check thedistance.
If thedistance is too little, theabove
image will appear.
11. Press OK to confirm and go to thenext levelling point. Continue in thesame way
until “OK” is shown for all levelling points. When all thelevelling points have been
set, press Finish to exit.
10. Turn thenut under theextruder
anticlockwise until theprinter beeps
and the “Verify” dialogue pop-up
appears. Press Verify to check
thedistance. If thedistance is correct
theabove image will appear.
Filament
Loading
1. Press Tools–Filament–Load.
2. The extruder will heat up.
8
Page 9
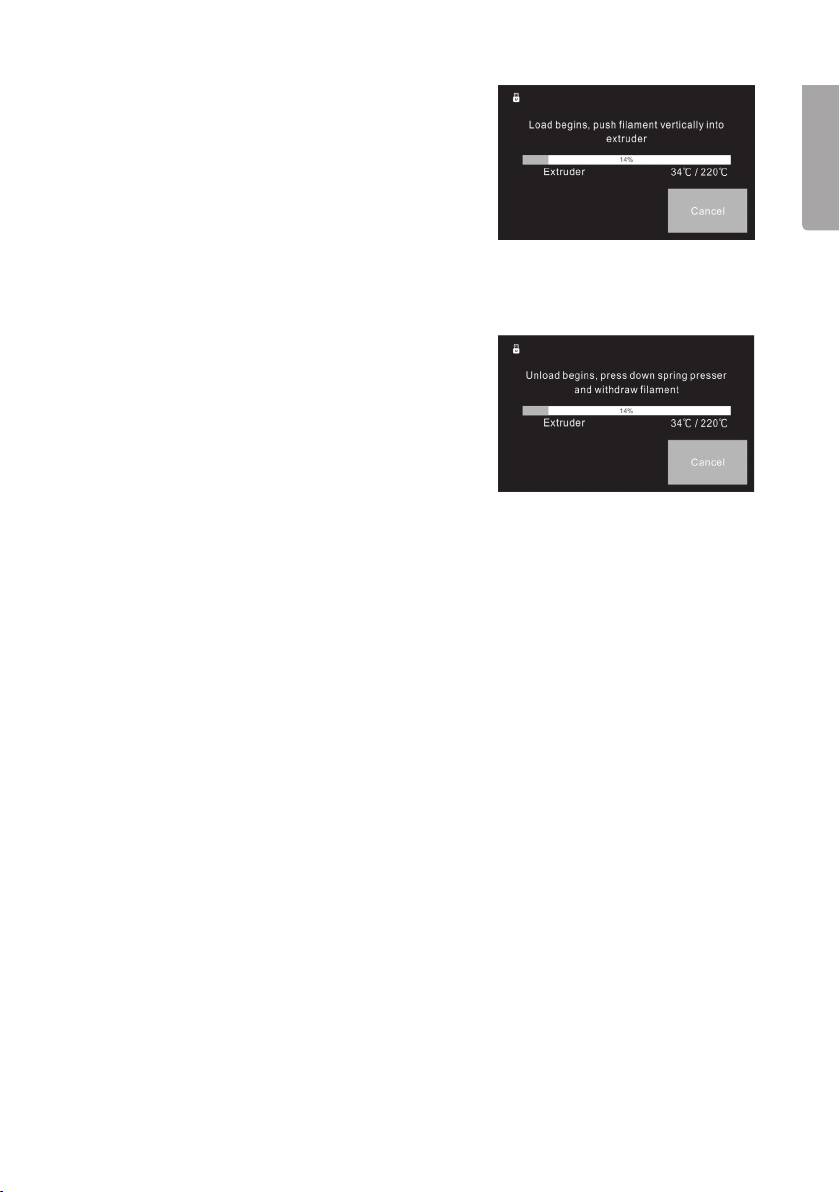
3. When it has warmed up to operating
temperature the following message will
bedisplayed:
4. Feed the filament vertically into the extruder.
5. Wait until the filament is extruded in a steady
stream and then press Cancel to finish.
Note: If there is a problem feeding in the filament,
try pressing Unload first and then Load.
Changing
1. Press Tools–Filament–Unload to heat up
theextruder.
2. When the printer beeps, the following
message will be displayed:
3. Press down the spring clamp (8) on the
left side of the extruder and carefully pull
thefilament out.
4. Press the return arrow when the filament has
all been pulled out.
5. Lift out the filament cartridge and coil up theold filament. Spools of unused
filament can be stored in plastic bags.
6. Select the filament spool that you wish to use and thread the filament through
the filament outlet (3), place the filament spool into the cartridge and re-insert
thecartridge into the printer.
7. Feed the filament through the filament guide tube.
8. Press Load to heat up the extruder. When the printer beeps, press down
thespring clamp and feed the filament through the filament intake (6).
9. When the filament is extruded steadily, release the spring clamp, press the return
arrow and return to the main menu.
Note: Do not pull out theold filamnet with force as it will damage theextruder.
If melted filament has cooled down inside theextruder and cannot be pulled out,
please repeat steps 1–7 above.
English
9
Page 10
English
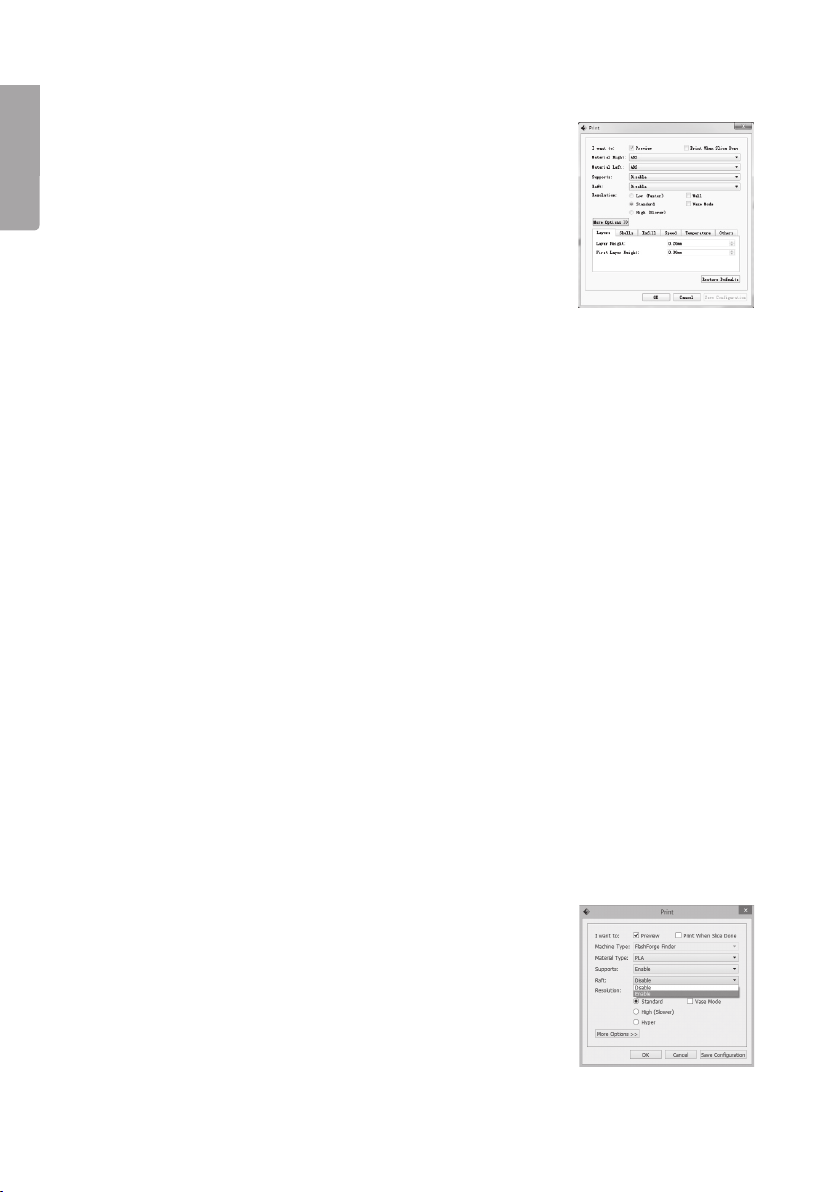
Thefirst print
1. Install theFlashPrint software on your computer. Click on
Print and complete thenecessary settings in thedialogue
pop-up which appears. Click on More Options for further
setup settings. Click on OK to create a .g file.
2. Copy the .g file to anUSB flash drive and insert theUSB
flash drive into theUSB port (14) on theprinter. Switch
theprinter on.
3. Press Build on thetouch screen, press theUSB icon
and then select thefile you want to print.
4. Press Build, theextruder will heat up and when it reaches
theoperating temperature it will automatically start to print.
Important considerations
1. Make sure that thebuild platform has been levelled as instructed in theSettings
section above before printing.
2. Make sure that thefilament has been loaded as instructed in theFilament–Loading
section above before printing.
3. Make sure that all theold filament has been fed out of theextruder before
beginning to print with new filament.
4. Never leave theprinter unattended while it is operating.
5. Remove the3D model with asuitable tool to avoid damaging themodel or
thebuild platform.
Tips and tricks
• If you have problems with your model coming loose and you have checked that it
isn’t because print bed level is calibrated incorrectly, you can try using aglue stick
and coat theprint bed before printing. Themodel will stick better and your printing
will be more successful since there will be less chance of it coming loose.
• You can also use aglue stick or blue masking tape directly on theglass surface of
theprint bed instead of using abuild sheet. Using aglue stick is good for ensuring
that your model has better adhesion during printing, especially if it has anarrow
base, e.g. models with small feet. By using aglue stick you’ll minimise therisk that
your model comes loose during printing.
• By selecting Raft in thesoftware before printing,
theprinter will build abase onto which themodel is
built. This base is then easily broken off once printing
is complete. TheRaft increases thecontact surface
against theprint bed and thus eliminates theproblem of
themodel coming loose during printing.
10
Page 11

3D-skrivare, snabbguide
Art.nr 38-7720
Läs igenom hela bruksanvisningen före användning och spara den sedan för framtida bruk.
Vi reserverar oss för ev. text- och bildfel samt ändringar av tekniska data. Vid tekniska
problem eller andra frågor, kontakta vår kundtjänst (se adressuppgifter på baksidan).
Säkerhet
Följ alla säkerhetsanvisningar i nedanstående text. Försäkra dig om att du har läst och
förstått alla säkerhetsföreskrifter och varningar som kan förekomma i andra dokument
som medföljer produkten eller dess tillbehör.
• Håll arbetsutrymmet rent och väl upplyst. Belamrade och mörka utrymmen
inbjuder till olyckor.
• Använd aldrig produkten i utrymmen där brännbara gaser eller vätskor förvaras.
• Använd aldrig produkten om du är trött, sjuk, påverkad av alkohol eller medicin.
• Dra alltid ut nätkabeln ur vägguttaget innan produkten flyttas och vid service eller
underhåll.
• Om du använder skarvkabel för att ansluta produkten till elnätet, försäkra dig om
att kabeln är lämplig för ändamålet innan den används.
• Produkten får endast anslutas till ett jordat vägguttag vars spänning
överensstämmer med den som anges på produktens märkskylt.
• Placera nätkabeln så att den inte kläms eller skadas av vassa kanter.
• Använd aldrig produkten om den eller nätkabeln på något sätt är skadade.
• Om nätkabeln skadas ska den bytas av behörig elektriker.
• Försök aldrig öppna höljet eller reparera produkten på något sätt. Den innehåller
inga delar som kan repareras av användaren.
• Försök aldrig modifiera eller förändra produkten på något sätt.
• Placera inte produkten så att den utsätts för fukt eller påverkas av vatten eller
annan vätska. Undvik ihållande solljus, dammiga, mycket kalla eller mycket varma
miljöer. Produkten är konstruerad för att fungera optimalt i temperaturer mellan
15–25 °C (59–77 °F) och i en luftfuktighet mellan 20–50 %.
• Sätt upp långt hår och se till att inte löst hängande smycken eller kläder kan
komma i kontakt med produktens rörliga eller varma delar.
• Placera produkten på en stabil, plan yta på avstånd från brandfarligt material.
• Förvara eller placera aldrig metallföremål eller vätska av något slag i
utskriftsområdet eller på produkten. Detta kan leda till brand, elektrisk stöt eller
annan personskada.
• Produkten får endast användas i välventilerade utrymmen.
Svenska
11
Page 12

• Utskrivna modeller får inte utsättas för någon form av värme t.ex. från som spisar,
• Slå omedelbart av produkten och dra ut nätkabeln ur vägguttaget om:
• Produkten innehåller rörliga delar som kan orsaka kroppsskada och delar
Svenska
• Låt produkten svalna helt innan den hanteras efter användning.
• Försök aldrig forcera ev. säkerhetssystem som förhindrar att användaren kommer
• Utskrivna modeller är mycket varma när de färdigställts. Låt alltid modellerna
• Lämna aldrig produkten oövervakad när den arbetar.
• Låt aldrig barn leka med produkten. Låt aldrig barn använda produkten utan
• Håll utskrivna modeller på avstånd från små barn. Modellerna utgör en kvävningsrisk.
• Utskrivna modeller får inte användas för förvaring av matvaror.
• Utskrivna modeller får aldrig användas i elektriska installationer.
• Skriv inte ut modeller som kan strida mot lagar och förordningar i det område där
ugnar, öppen eld, levande ljus.
- produkten avger rök eller luktar bränt
- avger onormala ljud
- metalldelar eller någon form av vätska kommer i kontakt med produkten
- risk för åska föreligger
- vid strömavbrott
som når temperaturer på 200–300 °C. Håll alla kroppsdelar på avstånd från
utskriftsområdet när produkten arbetar. Rör aldrig skrivarhuvudet när utskrift pågår.
ikontakt med utskriftsområdet och skrivarhuvudet.
svalna innan de hanteras.
vuxens närvaro. Vuxens närvaro krävs för att produkten ska kunna användas på
ettsäkert sätt.
produkten används.
12
Page 13
Iförpackningen
3D-skrivare Filamentspole Quickstart-guide USB-minne
Filamentrör Nätkabel USB-kabel Skruvmejsel Insexnycklar
Svenska
Extra buildsheet
till bädden
Använd endast rengöringsverktyget för att lossa
filament som fastnat. Obs! Filamentutgången/
skrivarhuvudet måste värmas upp innan du
använder verktyget. Tryck försiktigt ner verktyget
för att lossa filament som fastnat.
Limstift×1
13
Rengöringsverktyg för filamentutgång/skrivarhuvud
Verktyg för att lossa utskrivna
3D-modeller från bädden.
Page 14
15
16
17
Produktbeskrivning
Svenska
1. Filamentkassett
2. Y-axelns stödskena
3. Filamentutgång
4. X-axelns stödskena
5. Skrivarhuvud
6. Inmatning av filament
7. Fläkt
8. Hållare (håller och frigör filamentet)
9. På/av-knapp
10. Pekskärm
11. Bädd
12. Justering av bädd
13. Anslutning för USB-kabel
14. Anslutning för USB-minne
15. Munstycke
16. Z-axelns stödskena
17. Anslutning för nätkabel
15
16
17
10
11
12
13
14
1
2
3
4
5
6
7
8
9
14
Page 15
Uppackning
1. Placera förpackningen
på enplan, ren och
stabil yta.
4. Ta bort den blå tejpen
som håller den platta
kabeln.
7. Lyft försiktigt upp
bädden.
Fyll på filament
2. Öppna förpackningen,
använd de två
handtagen och
lyft ut skrivaren ur
förpackningen.
5. Använd ensax eller
avbitare och ta bort de
fyra buntbanden som
håller stödskenorna.
8. Ta försiktigt ut skydds plasten
som innehåller USB-kabel och
matningsröret för filament.
3. Ta bort skydds -
6. Ta försiktigt ut filamentet
plasten och lyft av
skyddslocket.
Svenska
från skrivaren.
1. Lyft upp filamentkassetten
ur skrivaren.
2. Trä filamentet igenom
kassettens utmatningshål
och sätt sedan filamentspolen ikassetten. Mata
ut filament och skjut
samtidigt filamentet
genom filamentröret.
Se till att enbit filament
når utanför röret.
15
Page 16

3. Sätt tillbaka kassetten iskrivaren. 4. Tryck ner hållaren (8) och skjut samtidigt in
Svenska
Inställningar
1. Anslut skrivarens nätkabel till anslutningen (17) och till ettvägguttag.
2. Tryck in på/av-knappen för att slå på skrivaren.
3. Tryck Tools–Setting–Language på pekskärmen och ställ in önskat språk.
filamentet iinmatningen (6) tills det tar stopp.
5. Släpp upp hållaren.
4. Tryck Tools–Level. Skrivarhuvudet
och bädden intar sina positioner.
Vänta tills de stannat.
6. Nästa dialogruta frågar om du dragit
de 3 skruvarna helt tills det tar stopp.
Tryck Ye s om så är fallet, eller No och
skruva igen.
5. Skruva de 3 skruvarna under bädden
moturs tills det tar stopp, tryck sedan OK.
7. När du tryckt Yes flyttar sig skrivarhuvudet mot sin första position och
bädden rör sig uppåt och nedåt
för att bestämma avståndet mellan
skrivarhuvudets munstycke och bädden.
16
Page 17

8. Om avståndet är för stort, justera med den skruv som befinner sig under
skrivarhuvudet genom att skruva den medurs. Skruva tills skrivaren avger
enljudsignal och dialogrutan med ”Verify” visas.
Svenska
9. Tryck Verify för att kontrollera avståndet.
Om avståndet är för litet visas bilden
ovan.
11. Tryck OK för att gå vidare till nästa mätpunkt. Fortsätt på samma sätt tills ”OK”
visas på alla mätpunkter. När alla mätpunkter kontrollerats tryck Finish för att avsluta.
10. Skruva aktuell skruv moturs tills
skrivaren avger enljudsignal och
dialogrutan med ”Verify” visas. Tryck
Verify för att kontrollera avståndet. Om
avståndet nu är rätt visas bilden ovan.
Filament
Laddning
1. Tryck Tools–Filament–Load.
2. Skrivarhuvudet värmas upp.
17
Page 18

3. När uppvärmningen är klar visas följande
meddelande på skärmen.
4. Mata in filamentet vertikalt i skrivarhuvudet.
5. Vänta tills filamentet matas ut med en jämn
ström ur skrivarhuvudet, tryck sedan på
Cancel för att avsluta.
Obs! Om du har problem med att mata in
filamentet, prova med att först trycka Unload för
en kort stund och sedan Load.
Svenska
Byte
1. Tryck Tools–Filament–Unload för att värma
2. När skrivaren avger en ljudsignal, visas
3. Tryck ner hållaren (8) på skrivarhuvudets
4. Tryck på tillbakapilen när filamentet är helt
5. Lyft ut filamentkassetten och rulla ihop det
6. Välj den filamentspole som du vill använda och trä upp filamentet genom filament-
7. För igenom filamentet genom filamentröret.
8. Tryck Load igen för att värma upp skrivarhuvudet. När skrivaren avger en
9. När filamentet börjar matas ut genom skrivarhuvudet, släpp upp hållaren, tryck på
Obs! Dra inte ut det gamla filamentet med våld, det kommer att skada skrivarhuvudet.
Om filamentet har kallnat i skrivarhuvudet och inte kan dras ut, upprepa steg 1–7 ovan.
upp skrivarhuvudet.
följande meddelande på skärmen.
vänstra sida och dra försiktigt ut filamentet.
utdraget.
gamla filamentet. Förvara gärna filamentspolar
som inte används i en plastpåse.
utgången (3), placera filamentspolen i kassetten och sätt tillbaka den på sin plats.
ljudsignal, tryck ner hållaren och mata ner filamentet i inmatningshålet (6).
tillbakapilen och gå tillbaka till huvudmenyn.
18
Page 19

Den första utskriften
1. Installera mjukvaran FlashPrint idatorn. Klicka Print
och gör sedan nödvändiga inställningar iden dialogruta
som visas. Klicka More Options för att göra ytterligare
inställningar. Klicka OK för att skapa en.g file.
2. Kopiera filen till ettUSB-minne och sätt minnet
ianslutningen (14) på skrivaren. Slå på skrivaren.
3. Tryck Build på pekskärmen, tryck på USB-ikonen
och välj sedan den fil du vill skriva ut.
4. Tryck Build, skrivarhuvudet värms upp, när
uppvärmningen är klar påbörjas utskriften.
Att tänka på
1. Försäkra dig om att bädden är justerad enligt avsnittet Inställningar ovan.
2. Försäkra dig om att filamentet har laddats enligt avsnittet Filament-Laddning ovan.
3. Se till att allt gammalt filament har matats ut ur skrivarhuvudet innan du påbörjar
utskrift med nytt filament.
4. Lämna aldrig skrivaren oövervakad när den arbetar.
5. Ta bort den utskrivna 3D-modellen med ettlämpligt verktyg så att inte bädden eller
objektet skadas.
Tips och tricks
• Har du problem med att modellen lossnar under utskrift och du har säkerställt att
det inte beror på felaktig nivåkalibrering av skrivarbädden kan du testa med att
använda ettvanligt limstift och limma på skrivarbädden innan utskrift. Då fäster
modellen bättre och risken för misslyckad utskrift p.g.a. att modellen lossnar minskar.
• Det går också att använda limstift eller blå maskeringstejp direkt på skrivarbäddens
glasskiva istället för att använda buildsheet. Limstiftet är bra att använda när man
vill försäkra sig om ettbra fäste när man skriver ut modeller med liten kontaktyta
mot skrivarbädden, t.ex. enfigur med små fötter. Genom att använda limstift
minimerar man risken att modellen lossnar under utskrift.
• Genom att välja Raft imjukvaran innan utskrift, bygger
skrivaren upp enplattform som modellen byggs på.
Plattformen går sen lätt att bryta bort efter att utskriften
är klar. Raft gör att kontaktytan mot skrivarbädden ökar
och därmed brukar problemet med att modellen lossnar
under utskrift försvinna.
Svenska
19
Page 20

Norsk
3D-skriver, hurtigguide
Art. nr. 38-7720
Les brukerveiledningen grundig før produktet tas ibruk, og ta vare på den for framtidig bruk.
Vi reserverer oss mot eventuelle feil itekst og bilder, samt endringer av tekniske data.
Ved tekniske problemer eller spørsmål, ta kontakt med vårt kundesenter.
(Se opplysninger på baksiden).
Sikkerhet
Følg alle sikkerhetsanvisningene i teksten nedenfor. Sørg for at du har lest og forstått
alle sikkerhetsforskriftene og advarslene i alle dokumenter som følger produktet og
tilbehøret.
• Hold arbeidsplassen ren, ryddig og godt opplyst. Mye rot og dårlig lys på
arbeidsplassen kan forårsake ulykker.
• Produktet må ikke benyttes på plasser hvor det oppbevares brennbare gasser
ellervæsker.
• Bruk ikke produktet når du er sliten, trett, syk eller påvirket av alkohol eller medisiner.
• Trekk alltid støpselet ut fra strømuttaket før produktet flyttes og ved service eller
vedlikehold.
• Hvis du bruker skjøteledning for å koble produktet til strømnettet, må du forsikre
deg om at kabelen er beregnet til og dimensjonert for dette.
• Produktet skal kun kobles til et jordet strømuttak. Sørg for at spenningen
istrømnettet stemmer med det som er oppgitt på produktets merkeskilt.
• Vær forsiktig med strømkabelen så den ikke kommer i klem eller utsettes for varme
eller skarpe kanter.
• Bruk ikke produktet dersom det eller strømkabelen er skadet.
• Hvis strømkabelen er skadet må den skiftes umiddelbart av en faglært elektriker.
• Dekselet må ikke åpnes. Produktet kan ikke repareres eller endres på.
Detinneholder ingen komponenter som kan repareres av brukeren.
• Produktets må ikke modifiseres eller endres på.
• Plasser ikke produktet slik at det utsettes for fuktighet, vann eller annen væske.
Unngå vedvarende sollys, mye støv, eller svært kalde eller varme omgivelser.
Produktet er konstruert for å kunne fungere optimalt i temperaturer mellom
15–25°C (59–77 °F) og ved en luftfuktighet på mellom 20–50 %.
• Bind opp langt hår og pass på å ikke ha løst hengende smykker eller klær som kan
komme i kontakt med bevegelige eller varme deler.
• Plasser produktet på et stabilt, plant underlag med god avstand fra brannfarlige
materialer.
20
Page 21

• Ikke oppbevar eller plasser metallgjenstander eller væske på selve produktet eller i
utskriftsområdet. Dette kan føre til brann, elektrisk støt og personskader.
• Rommet hvor produktet benyttes må være godt ventilert.
• Utskrevne modeller må ikke utsettes for noen form for varme som f.eks. fra
komfyrer, ovner, åpen flamme eller levende lys.
• Skru av produktet umiddelbart og trekk ut støpselet dersom:
- produktet avgir røyk eller lukter brent
- avgir unormal lyd
- metalldeler eller noen form for væske kommer i kontakt med produktet
- det er fare for tordenvær
- det er strømbrudd
• Produktet inneholder bevegelige deler som kan føre til skade på personer og deler
som kan komme opp i temperaturer på 200–300 °C. Hold alle kroppsdeler på god
avstand fra utskriftsområdet når skriveren jobber. Ikke berør skriverhodet mens
skrivingen pågår.
• La produktet avkjøles helt før du tar på eller bruker det.
• Prøv aldri å forsere eventuelle sikkerhetsanordninger som skal hindre bruker i å
komme i kontakt med utskriftsområdet og skriverhodet.
• Nyutskrevede modeller er svært varme. La dem avkjøles før de berøres.
• Forlat aldri skriveren uten tilsyn mens den jobber.
• La aldri barn leke med produktet. La aldri barn bruke produktet uten tilsyn av
voksne. Det må være voksne tilstede for å bruke produktet på en sikker måte.
• Hold de utskrevne modellene unna små barn. Modellene utgjør en viss fare for
kvelning.
• Utskrevne modeller må ikke brukes til oppbevaring av matvarer.
• Utskrevne modeller må ikke brukes til elektriske installasjoner.
• Ikke skriv ut modeller som kan stride mot lover og regler i det området der
produktet brukes.
Norsk
21
Page 22

Forpakningen inneholder
3D-skriver Filamentspole Quickstart-guide USB-minne
Norsk
Filamentrør Strømkabel USB-kabel Skrutrekker Insexnøkler
Ekstra buildsheet (plastark)
til vognen
Bruk kun rengjøringsverktøyet til å løsne tråden
når den har festet seg. Obs! Trådutgangen/
skriverhodet må varmes opp før du bruker
verktøyet. Trykk forsiktig ned verktøyet for å løsne
filamentet/tråden som har satt seg fast.
Limstift × 1
Rengjøringsverktøy til
trådtutgang/skriverhode
Verktøy til å løsne utskrevne
3D-modeller fra platen.
22
Page 23

15
16
17
Produktbeskrivelse
10
11
12
1
2
3
4
5
6
7
8
9
1. Filamentkassett
2. Y-aksens støtteskinne
3. Filamentutgang
4. X-aksens støtteskinne
5. Skrivehode
6. Innmating av filament
7. Vifte
8. Holder (holder og frigjør fiberne)
9. På/Av-knapp
10. Pekeskjerm
11. Bunnplate
12. Justering av såle/bunnplate
13. Uttak for USB-kabel
14. Tilkoblingspunkt for USB-minne
15. Munnstykke
16. Z-aksens støtteskinne
17. Tilkobling for strømkabel
15
16
17
13
14
Norsk
23
Page 24

Oppakking
Norsk
1. Forpakningen plasseres
på et plant og stabilt
underlag.
4. Fjern den blå teipen
som holder på den
flate kabelen.
7. Løft forsiktig opp
bunnplaten.
Lade filament
2. Åpne forpakningen,
løft ide to håndtakene
når skriveren tas ut av
forpakningen.
5. Klipp over buntebåndene (4 stk.)
som holder på
støtteskinnene.
8. Fjern beskyttelsesplasten med
USB-kabelen og materøret for
filament forsiktig.
3. Fjern beskyttelses-
6. Ta lokket forsiktig bort
fra underdelen.
plasten og ta av
beskyttelseslokket.
1. Ta filamentkassetten
ut av skriveren.
2. Tre filamentet gjennom
matehulle på kassetten
og sett deretter filamentspolen ikassetten.
Mat ut filamentet og
skyv samtidig filamentet
gjennom filamentrøret.
Pass på at enbit av
filametet rekker
utenfor røret.
24
Page 25

3. Sett kassetten tilbake iskriveren. 4. Trykk holderen (8) ned og skyv samtidig
filamentet iinnmatingen (6) til den stopper opp.
5. Slipp opp holderen.
Innstillinger
1. Plugg skriverens strømkabel til uttaket (17) på enheten og støpselet til et strømuttak.
2. Trykk på på/av-knappen for åstarte skriveren.
3. Trykk på Tools–Setting–Language på pekeskjermen og still inn på ønsket språk.
Norsk
4. Trykk på Tools–Level. Skriverhodet
og sålen stiller seg inn iriktige
posisjoner. Vent til de har stoppet.
6. Neste dialogrute vil stille spørsmål
om du ha trukke til de 3 skruene helt
til de stopper. Trykk Yes hvis det er
tilfelle, eller No og trekk til.
5. Skru ut de 3 skruene under sålen.
Skru moturs til de stopper og trykk
deretter OK.
7. Når du har trykket på Yes vil
skriverhodet flytte seg iposisjon
og sålen bevege seg opp og ned
for åbestemme avstanden mellom
skriverhodets munnstykke og såle.
25
Page 26

Norsk
8. Hvis avstanden er for stor må den justeres med den skruen som er under
skriverhodet. Drei medurs. Skru til skriveren avgir et lydsignal og dialogruten med
«Verify» vises.
9. Trykk Verify for åkontrollere avstanden.
Hvis avstanden er for liten vises bildet
ovenfør.
11. Trykk OK for ågå videre til neste målepunkt. Fortsett på samme måte til «OK»
vises på alle målepunkter. Når alle målepunktene er kontrollert, trykk Finish for
åavslutte.
10. Skru på den aktuelle skruen, moturs,
til skriveren avgir et lydsignal og
dialogruten med «Verify» vises. Trykk
Verify for åkontrollere avstanden. Hvis
avstanden er riktig vil bildet ovenfør vises.
Filament
Lading
1. Trykk på Tools–Filament–Load.
2. Skriverhodet varmes opp.
26
Page 27

3. Når oppvarmingen er fullført vil følgende
komme opp på skjermen:
4. Filamentet/glødetråden mates inn vertikalt
iskriverhodet.
5. Vent til filamentet mates jevnt ut fra
skriverhodet, og trykk på Cancel for åstoppe.
Obs! Hvis du har problemer med å mate inn
tråden bør du forsøke å trykke på Unload en kort
stund og deretter Load.
Skifte
1. Trykk Tools–Filament–Unload for å varme
opp skriverhodet.
2. Når skriveren avgir et lydsignal vil følgende
beskjed komme opp på skjermen.
3. Trykk holderen (8) på skriverhodets venstre
side ned og trekk tråden forsiktig ut.
4. Trykk på returpilen når tråden er trukket helt ut.
5. Løft trådkassetten ut og rull den gamle tråden
sammen. Oppbevar trådspolen som ikke er
ibruk i en plastpose.
6. Velg den trådspolen du skal bruke og tre tråden gjennom utgangen (3).
Plassertrådspolen i kassetten og sett den tilbake på plass.
7. Før tråden gjennom trådrøret.
8. Trykk på Load igejn for å varme opp skriverhodet. Når skriveren avgir et lydsignal,
trykkes holderen ned og tråden mates inn i innmatingshullet (6).
9. Når tråden begynner å komme ut gjennom skriverhodet, slipp opp holderen, trykk
på returpilen og gå tilbake til hovedmenyen.
Obs! Ikke bruk makt for åtrekke ut det gamle filamentet. Det vil bare skade skriverhodet.
Hvis filamentet har blitt kaldt iskriverhodet og ikke kan trekkes ut må man gjenta
trinnene 1–7 ovenfor.
Norsk
27
Page 28

Norsk
Den første utskriften
1. Installer softwaren FlashPrint på datamaskinen. Klikk Print
og foreta alle nødvendige innstillinger idialogruten som
kommer opp. Klikk More Options for åforeta ytterligere
innstillinger. Klikk OK for åopprette en.g file.
2. Kopier filen over på et USB-minne og plasser minnet
iuttaket (14) på skriveren. Skru på skriveren.
3. Trykk på Build på pekeskjermen. Trykk deretter på USBikonet og velg den filen du skal skrive ut.
4. Trykk på Build, og skrivehodet varmes opp. Når det er
varmt nok starter utskrivingen.
Husk følgende
1. Forviss deg om at sålen er justert slik det er beskrevet iavsnittet Innstillinger ovenfor.
2. Forsikre deg om at filamentet er ladet som beskrevet iavsnittet Filament-Lading ovenfor.
3. Pass på at alt gammelt filament er matet ut av skriverhodet før du starter utskriving
med nytt filament.
4. Forlat aldri skriveren mens den jobber.
5. Fjern den ferdig utskrevne 3D-modellen med et passende verktøy og pass på at
ikke byggesålen eller emnet blir skadet.
Tips og triks
• Hvis du har problemer med at modellen løsner ved utskifting og du har sikret at
det ikke kommer av feil nivåkalibrering av skriverbrettet, kan du teste med åbruke
envanlig limstift og lime brettet på før utskrift. Da vil modellen feste bedre og faren
for mislykket utskrift, som følge av at modellen løsner, reduseres.
• Man kan også bruke limstift eller blå maskeringsteip på glassplaten på skriverbrettet
istedet for åbruke buildsheet. Limstiften er smart åbruke når man skal sørge for
et godt feste ved utskriving av modeller med liten kontaktflate mot skriverbrettet,
som f.eks. utskriving av enfigur med små føtter. Ved at man bruker limstift
reduserer man faren for at modellen løsner under utskrivingen.
• Ved åvelge Raft isoftwearen før utskriving, bygger
skriveren opp enplattform som modellen bygges
på. Når utskriften er ferdig er det lett åfjerne denne
plattformen. Raft gjør at kontaktflaten mot skriverbrettet
øker og vil også gjøre at modellen ikke løsner så lett
under utskrivingen.
28
Page 29

3D-tulostin, pikaopas
Tuotenro 38-7720
Lue käyttöohje ennen käyttöä ja säilytä se tulevaa tarvetta varten. Emme vastaa
mahdollisista teksti- tai kuvavirheistä. Pidätämme oikeuden teknisten tietojen
muutoksiin. Jos laitteessa ilmenee teknisiä ongelmia tai sinulla on muuta kysyttävää,
ota yhteyttä asiakaspalveluumme (yhteystiedot takasivulla).
Turvallisuus
Noudata kaikkia alla olevia turvallisuusohjeita. Varmista että olet lukenut ja ymmärtänyt
kaikki turvallisuusohjeet ja varoitukset, joita saattaa olla tuotteen ja sen tarvikkeiden
mukana tulleissa muissa asiakirjoissa.
• Pidä työtilat puhtaina ja hyvin valaistuina. Täynnä tavaraa olevat ja pimeät tilat
lisäävät onnettomuusriskiä.
• Älä käytä laitetta tiloissa, joissa säilytetään helposti syttyviä kaasuja ja nesteitä.
• Älä käytä laitetta väsyneenä, sairaana tai alkoholin tai lääkkeiden vaikutuksen
alaisena.
• Irrota virtajohto pistorasiasta aina ennen laitteen siirtämistä ja huoltamista.
• Jos käytät jatkojohtoa, varmista että se on oikeantyyppinen.
• Laitteen saa liittää ainoastaan maadoitettuun pistorasiaan, jonka jännite vastaa
laitteen merkkikilvessä ilmoitettua jännitettä.
• Sijoita virtajohto siten, että terävät reunat eivät vahingoita sitä.
• Älä käytä laitetta, jos laite tai sen virtajohto on vioittunut.
• Vain sähköalan ammattilainen saa vaihtaa vaurioituneen virtajohdon.
• Älä avaa laitteen koteloa tai korjaa laitetta millään tavalla. Laite ei sisällä osia, joita
voi korjata kotona.
• Älä yritä muuttaa laitetta millään tavalla.
• Älä sijoita laitetta paikkaan, jossa se altistuu kosteudelle, vedelle tai muille nesteille.
Vältä suoraa auringonvaloa sekä pölyisiä, kylmiä ja kuumia tiloja. Laite toimii
optimaalisesti 15–25 °C:n lämpötilassa (59–77 °F) ja 20–50 %:n ilmankosteudessa.
• Varmista että pitkät hiukset ja irralliset korut eivät pääse kosketuksiin laitteen
liikkuvien tai kuumien osien kanssa.
• Sijoita laite vakaalle ja tasaiselle pinnalle riittävän kauas helposti syttyvistä
materiaaleista.
• Älä sijoita metalliesineitä tai nesteitä tulostusalueelle tai laitteen päälle. Se saattaa
johtaa tulipaloon, sähköiskuun tai loukkaantumiseen.
• Laitetta saa käyttää vain hyvin tuuletetuissa tiloissa.
• Tulostettuja malleja ei saa altistaa kuumuudelle, kuten uunille, liedelle, avotulelle tai
kynttilöille.
Suomi
29
Page 30

Suomi
• Sammuta laite välittömästi ja irrota virtajohto pistorasiasta, jos:
- laitteesta tulee savua tai se haisee palaneelle
- laitteesta kuuluu epätavallisia ääniä
- metalliesineitä tai nesteitä joutuu kosketuksiin laitteen kanssa
- on olemassa ukonilman vaara
- sattuu sähkökatko
• Laitteessa on liikkuvia osia, jotka saattavat johtaa loukkaantumiseen, ja osia,
joiden lämpötila on 200–300 °C. Pidä kaikki ruumiinosat riittävän kaukana
tulostusalueesta tulostuksen aikana. Älä koske tulostuspäähän tulostuksen aikana.
• Anna laitteen jäähtyä kokonaan ennen sen käsittelyä käytön jälkeen.
• Älä yritä muuttaa mahdollisia turvallisuusjärjestelmiä, jotka estävät käyttäjää
joutumasta kosketuksiin tulostusalueen ja tulostinpään kanssa.
• Tulosteet ovat erittäin kuumia valmistumisen jälkeen. Anna tulosteiden jäähtyä aina
ennen niiden käsittelemistä.
• Älä jätä laitetta ilman valvontaa sen ollessa päällä.
• Älä anna lasten leikkiä laitteella. Älä anna lasten käyttää laitetta ilman aikuisen
valvontaa. Laitteen turvallinen käyttö edellyttää aikuisen valvontaa.
• Älä jätä tulosteita pienten lasten ulottuville. Tulosteet saattavat aiheuttaa
tukehtumisvaaran.
• Tulosteita ei saa käyttää ruoan säilytykseen.
• Tulosteita ei saa käyttää sähköasennuksissa.
• Älä tulosta malleja, jotka saattavat olla lakien ja asetusten vastaisia niiden
käyttötarkoituksissa.
30
Page 31

Pakkauksen sisältö
3D-tulostin Lankakela Pikaopas USB-muistitikku
Langansyöttöputki
Mukana ylimääräinen
buildsheet
Käytä juuttuneen langan irrottamiseen ainoastaan
puhdistustyökalua. Huom.! Langan ulostuloaukko/
tulostinpää tulee lämmittää ennen työkalun
käyttöä. Poista juuttunut lanka painamalla työkalua
varovasti.
Virtajohto USB-johto Ruuvitaltta Kuusiokolo-
Liimapuikko × 1
avaimet
Suomi
Langan ulostuloaukon/
tulostinpään puhdistustyökalu
Työkalu tulostettujen
3D-mallien irrottamiseksi
tulostusalustasta.
31
Page 32

Suomi
15
16
17
Tuotekuvaus
1. Lankakasetti
2. Y-akselin tukikisko
3. Langan ulostuloaukko
4. X-akselin tukikisko
5. Tulostinpää
6. Tulostuslangan syötin
7. Puhallin
8. Pidike (tulostuslangan paikallaan
pitämistä ja vapauttamista varten)
9. Virtakytkin
10. Kosketusnäyttö
11. Tulostusalusta
12. Tulostusalustan säädin
13. USB-johdon liitäntä
14. USB-muistitikun liitäntä
15. Suutin
16. Z-akselin tukikisko
17. Virtajohdon liitäntä
15
16
17
10
11
12
13
14
1
2
3
4
5
6
7
8
9
32
Page 33

Pakkauksen avaaminen
1. Aseta pakkaus
tasaiselle, puhtaalle ja
vakaalle alustalle.
4. Irrota sininen teippi
litteän johdon ympäriltä.
7. Nosta tulostusalusta
varovasti ylös.
2. Avaa pakkaus. Tartu
5. Irrota tukikiskoista
8. Irrota varovasti USB-johdon ja
Täytä tulostuslankaa
kahvoihin ja nosta
tulostin pakkauksesta.
6. Irrota tulostuslanka
neljä nippusidettä
saksilla tai
katkaisupihdeillä.
tulostuslangan syöttöputken
suojamuovi.
3. Poista suojamuovi ja
irrota suojakansi.
varovasti tulostimesta.
Suomi
1. Nosta lankakasetti
tulostimesta.
2. Pujota tulostuslanka
kasetin syöttöaukon
läpi ja aseta lankakela
kasettiin. Syötä
tulostuslankaa ulos
kasetista ja työnnä
lanka samalla
langansyöttöputken läpi.
Varmista, että langan
pää ulottuu putken
ulkopuolelle.
33
Page 34

Suomi
3. Laita kasetti takaisin
tulostimeen.
4. Paina pidike (8) alas ja työnnä samalla tulostuslankaa syöttimeen (6), kunnes se pysähtyy.
5. Vapauta pidike.
Asetukset
1. Liitä tulostimen virtajohto liitäntään (17) ja pistorasiaan.
2. Käynnistä tulostin painamalla virtakytkintä.
3. Paina kosketusnäytön painikkeita Tools, Setting ja Language ja valitse kieli.
4. Paina painikkeita Tools ja Level.
Tulostinpää ja tulostusalusta siirtyvät
paikoilleen. Odota, kunnes ne
pysähtyvät.
5. Kiinnitä kolme ruuvia tulostusalustan
alle kiertämällä niitä vastapäivään,
kunnes ne pysähtyvät. Paina sitten
OK-painiketta.
6. Seuraavassa valintaikkunassa
kysytään, oletko kiristänyt kolme
ruuvia täysin kiinni. Paina Yespainiketta, jos olet kiristänyt ruuvit
täysin kiinni. Jos näin ei ole, paina
No-painiketta ja kiristä ruuvit
uudelleen.
7. Yes-painikkeen painamisen jälkeen
tulostinpää siirtyy ensimmäiseen
asentoon ja tulostusalusta määrittää
etäisyyden tulostinpään suuttimeen
liikkumalla ylös- ja alaspäin.
34
Page 35

8. Jos etäisyys on liian suuri, säädä sitä kiertämällä tulostinpään alla olevaa ruuvia
myötäpäivään. Kierrä, kunnes tulostimesta kuuluu äänimerkki ja näkyviin tulee
valintaikkuna, jossa on ”Verify”-painike.
9. Tarkasta etäisyys painamalla Verifypainiketta. Jos etäisyys ei ole tarpeeksi
suuri, näytöllä näkyy yllä oleva kuva.
11. Siirry seuraavaan mittauspisteeseen painamalla OK-painiketta. Toimi samoin,
kunnes kaikissa mittauspisteissä näkyy teksti ”OK”. Lopeta painamalla Finishpainiketta, kun kaikki mittauspisteet on tarkastettu.
10. Kierrä kyseistä ruuvia vastapäivään,
kunnes tulostimesta kuuluu äänimerkki
ja näkyviin tulee valintaikkuna, jossa
on ”Verify”-painike. Tarkasta etäisyys
painamalla Verify-painiketta. Kun
etäisyys on sopiva, näytöllä näkyy yllä
oleva kuva.
Tulostuslanka
Lataaminen
1. Paina painikkeita Tools, Filament ja Load.
2. Tulostinpää lämpenee.
Suomi
35
Page 36

Suomi
3. Kun tulostinpää on lämmennyt, näytöllä näkyy
seuraava ilmoitus.
4. Syötä tulostuslanka pystysuunnassa
tulostinpäähän.
5. Odota kunnes tulostuslanka tulee tasaisena
virtana tulostinpäästä ja lopeta painamalla
Cancel.
Huom.! Jos tulostuslangan syötössä on
ongelmia, paina ensin lyhyesti Unload ja sen
jälkeen Load.
Vaihtaminen
1. Lämmitä tulostinpää painamalla Tools–
Filament–Unload.
2. Kun tulostimesta kuuluu äänimerkki, näytöllä
näkyy seuraava ilmoitus.
3. Paina tulostinpään vasemmalla puolella olevaa
pidikettä (8) ja vedä tulostuslanka varoen ulos.
4. Paina takaisin-nuolta, kun tulostuslanka on
vedetty kokonaan ulos.
5. Nosta lankakasetti pois ja rullaa vanha
tulostuslanka kasaan. Suosittelemme, että
säilytät lankakeloja muovipussissa, kun niitä
eikäytetä.
6. Valitse lankakela ja pujota lanka ulostuloaukon (3) läpi. Aseta lankakela kasettiin ja
laita kasetti takaisin paikalleen.
7. Pujota tulostuslanka langansyöttöputken läpi.
8. Lämmitä tulostinpää painamalla uudelleen Load. Kun tulostimesta kuuluu
äänimerkki, paina pidike alas ja syötä tulostuslanka syöttöaukkoon (6).
9. Kun tulostuslanka tulee ulos tulostinpäästä, päästä pidike, paina takaisin-nuolta ja
palaa päävalikkoon.
Huom.! Älä poista vanhaa tulostuslankaa väkisin, sillä tulostinpää voi vahingoittua.
Jostulostuslanka on jäähtynyt tulostinpäässä eikä sitä voi vetää ulos, toista edellä
olevat vaiheet 1–7.
36
Page 37

Ensimmäinen tulostus
1. Asenna tietokoneeseen FlashPrint-ohjelmisto. Napsauta
Print-painiketta ja tee tarvittavat asetukset näkyviin
tulevassa valintaikkunassa. Napsauta More Options
-painiketta, jos haluat tehdä lisäasetuksia. Luo .g-tiedosto
napsauttamalla OK-painiketta.
2. Kopioi tiedosto USB-muistitikulle ja aseta muistitikku
tulostimen liitäntään (14). Käynnistä tulostin.
3. Paina kosketusnäytön Build-painiketta ja USB-kuvaketta
ja valitse sitten tulostettava tiedosto.
4. Paina Build-painiketta. Tulostinpää lämpenee. Tulostus
alkaa, kun tulostinpää on lämmennyt.
Muistettavaa
1. Varmista, että tulostusalusta on säädetty edellä olevan Asetukset-luvun mukaisesti.
2. Varmista, että tulostuslanka on ladattu edellä olevan Tulostuslanka – Lataaminen
-luvun mukaisesti.
3. Varmista, että vanha tulostuslanka on poistettu tulostinpäästä, ennen kuin aloitat
tulostuksen uudella langalla.
4. Älä jätä toiminnassa olevaa tulostinta ilman valvontaa.
5. Poista tulostettu 3D-malli sopivalla työkalulla, jotta tulostusalusta tai kohde ei vahingoitu.
Käyttövinkkejä
• Jos malli irtoaa tulostamisen aikana, eikä irtoaminen johdu tulostusalustan
virheellisestä tasokalibroinnista, voit kokeilla laittaa tulostusalustalle liimaa
tavallisella liimapuikolla ennen tulostamista. Näin malli kiinnittyy paremmin,
ja mallin irtoamisen riski pienenee.
• Tulostusalustan lasilevylle voi myös laittaa buildsheetin sijaan liimapuikkoliimaa
tai sinistä maalarinteippiä. Liimapuikon käyttäminen on kätevää, jos tulostetaan
malleja, joissa on pieni kontaktipinta tulostusalustaan, esim. pienijalkaiset hahmot.
Liimapuikon käyttäminen pienentää mallin irtoamisen vaaraa tulostamisen aikana.
• Valitsemalla ohjelmistosta Raft, tulostin rakentaa
alustan, jolle malli tulostetaan. Alusta on helppo taittaa
irti, kun tulostus on valmis. Raft lisää kontaktipintaa
tulostusalustaan ja se yleensä myös estää mallia
irtoamasta tulostuksen aikana.
37
Suomi
Page 38

3D-Drucker, Kurzanleitung
Art.Nr. 38-7720
Vor Inbetriebnahme diekomplette Bedienungsanleitung durchlesen und aufbewahren.
Irrtümer, Abweichungen und Änderungen behalten wir uns vor. Bei technischen Problemen
oder anderen Fragen freut sich unser Kundenservice über eine Kontaktaufnahme (Kontakt
siehe Rückseite).
Sicherheitsanweise
Alle Sicherheitsanweisungen im unten folgenden Text befolgen. Sicherstellen, dass
alle Sicherheitsvorschriften und Warnungen gelesen und verstanden wurden, die in
anderen Dokumenten vorkommen, die dem Produkt oder dessen Zubehör beiliegen.
• Das Arbeitsumfeld sauber und gut beleuchtet halten. Unordentliche und dunkle
• Das Produkt niemals in Räumen einsetzen, in denen brennbare Gase oder
• Das Gerät niemals bei Müdigkeit, Krankheit oder unter dem Einfluss von Drogen,
• Bevor das Produkt umgestellt wird und vor Reinigung und Servicearbeiten stets
• Werden Verlängerungskabel zum Anschließen des Produkts an das Stromnetz
• Das Produkt darf nur dann an eine Schuko-Steckdose angeschlossen werden,
• Das Netzkabel so legen, dass es nicht eingeklemmt wird oder über scharfe Kanten
• Das Produkt nie betreiben, wenn es selbst oder das Anschlusskabel auf irgendeine
Deutsch
• Ein beschädigter Netzstecker muss von einem qualifizierten Elektriker
• Niemals versuchen, das Gehäuse zu öffnen oder das Produkt auf irgendeine Weise
• Niemals versuchen, das Gerät zu reparieren oder anderweitig Änderungen daran
• Das Produkt geschützt vor Feuchtigkeit und der Beeinträchtigung durch Wasser
Umgebungen können zu Unfällen führen.
Flüssigkeiten gelagert werden.
Alkohol oder Medikamenten bedienen.
das Netzkabel aus der Steckdose ziehen.
benutzt, immer sicherstellen, dass das Kabel für den verwendeten Zweck geeignet ist.
wenn die Spannung mit der auf dem Typenschild des Gerätes angegebenen
Spannung übereinstimmt.
verläuft.
Weise beschädigt ist.
ausgetauscht werden.
zu reparieren. Es enthält keine Teile, die selbst repariert werden können.
vorzunehmen.
oder anderen Flüssigkeiten platzieren. Andauernde Sonneneinstrahlung, staubige,
sehr kalte oder sehr warme Umgebungen vermeiden. Das Produkt wurde so
konstruiert, dass es bei Temperaturen zwischen 15–25 °C (59–77 °F) und einer
Luftfeuchtigkeit zwischen 20–50 % optimal funktioniert.
38
Page 39

• Langes Haar hochbringen und sicherstellen, dass kein lose hängender Schmuck
oder Kleidung in Kontakt mit den beweglichen oder heißen Teilen des Produkts
kommen kann.
• Das Produkt auf einer stabilen, ebenen Oberfläche mit Abstand zu brennbaren
Materialien aufstellen.
• Niemals Metallgegenstände oder Flüssigkeiten im Druckbereich oder auf dem
Platzierung aufbewahren oder abstellen. Dies kann zu Feuer, Stromschlägen oder
Personenschäden führen.
• Das Produkt in gut belüfteten Räumen betreiben.
• Ausgedruckte Modelle von jeglicher Wärme bzw. Hitze fernhalten, z. B. Hitze von
Herd, Backofen, offenem Feuer, Kerzen.
• Das Produkt sofort ausschalten und den Stecker abziehen, wenn:
- das Produkt Rauch absondert oder angebrannt riecht
- ungewohnte Geräusche von sich gibt
- Metallteile oder irgendeine Flüssigkeit mit dem Produkt in Berührung kommen
- Gewitterrisiko besteht
- bei Stromausfall
• Das Produkt beinhaltet bewegliche Teile, die Verletzungen verursachen können
sowie Teile, die Temperaturen von 200–300 °C erreichen. Alle Körperteile daher
bei der Druckarbeit vom Druckbereich des Produktes fernhalten. Den Druckkopf
während des Druckprozesses niemals berühren.
• Das Gerät komplett abkühlen lassen, bevor es nach dem Drucken gehandhabt wird.
• Niemals versuchen, das Sicherheitssystem so zu manipulieren, dass es möglich
wird, in Kontakt mit dem Druckbereich und dem Druckkopf zu kommen.
• Ausgedruckte Modelle sind bei abgeschlossenem Druckvorgang zunächst sehr
heiß. Das Modell immer erst abkühlen lassen, bevor es berührt wird.
• Das Produkt im Betrieb niemals unbeaufsichtigt lassen.
• Kein Kinderspielzeug. Niemals Kinder ohne Aufsicht eines Erwachsenen das
Produkt verwenden lassen. Es ist die Anwesenheit eines Erwachsenen erforderlich,
damit das Produkt auf eine sichere Weise betrieben werden kann.
• Die ausgedruckten Modelle außer Reichweite von Kindern halten. Die Modelle
machen eine Gefahr durch Ersticken aus.
• Ausgedruckte Modelle dürfen nicht zur Aufbewahrung von Lebensmitteln benutzt
werden.
• Ausgedruckte Modelle dürfen niemals in elektrischen Installationen verwendet werden.
• Keine Modelle drucken, die gegen Gesetze und Vorschriften in den Bereichen
verstoßen, in denen das Produkt benutzt wird.
Deutsch
39
Page 40

Verpackungsinhalt
3D-Drucker Filamentspule Quickstart-Anleitung USB-Speicher
Deutsch
Filamentrohr Netzkabel USB-Kabel Schrau-
bendreher
Extra Haftfolie für
das Druckbett
Nur das Reinigungswerkzeug benutzen, um fest
steckendes Filament zu lösen, nichts anderes.
Hinweis: Der Filamentauslass/Druckkopf muss
erst aufgewärmt werden, bevor das Werkzeug
eingesetzt wird. Das Werkzeug vorsichtig nach
unten drücken, um das fest steckende Filament
zu lösen.
Klebestift × 1
Reinigungswerkzeug für den
Filamentauslass/Druckkopf
Werkzeug zum Lösen von
ausgedruckten 3D-Modellen
vom Druckbett.
Innensechskantschlüssel
40
Page 41

15
16
17
Produktbeschreibung
1. Filamentkassette
2. Stützschiene der Y-Achse
3. Filamentausgabe
4. Stützschiene der X-Achse
5. Druckkopf
6. Filamentaufnahme
7. Ventilator
8. Halterung (hält dasFilament
und gibt es frei)
9. Ein-/Ausschalter
10. Touchscreen
11. Druckbett
12. Einstellung des Druckbetts
13. Anschluss für USB-Kabel
14. Anschluss für USB-Speicher
15. Düse
16. Stützschiene der Z-Achse
17. Anschluss für Netzkabel
15
16
17
10
11
12
13
14
1
2
3
4
5
6
7
8
9
Deutsch
41
Page 42

Auspacken
1. DieVerpackung auf
4. Dasblaue Klebeband
7. Vorsichtig dasDrucker-
Deutsch
einer ebenen, sauberen
und stabilen Unterlage
abstellen.
entfernen,
dasdasflache Kabel
fixiert.
bett herausheben.
2. DieVerpackung öffnen
und diebeiden Griffe
dazu benutzen, den
Drucker aus dem
Karton zu heben.
5. Eine Schere oder
einen Seitenschneider
benutzen und damit
dievier Kabelbinder
um dieStützschienen
durchschneiden.
8. Vorsichtig den Kunststoffschutz abnehmen,
der dasUSB-Kabel und dasAufnahmerohr
für dasFilament enthält.
3. Den schützenden
Kunststofffilm
abziehen und den
Schutzdeckel
abnehmen.
6. Vorsichtig dasFilament
aus dem Drucker nehmen.
Filament
1. DieFilamentkassette aus
dem Drucker heben.
2. DasFilament durch
dieAufnahmeöffnung in der
Kassette führen und dann
dieSpule auf dieKassette
setzen. DasFilament
ausgeben und gleichzeitig
dasFilament durch dasRohr
schieben. Sicherstellen,
dass dasFilament aus dem
Rohr reicht.
42
Page 43

3. DieKassette wieder in
den Drucker setzen.
4. DieHalterung (8) herunterdrücken und
gleichzeitig dasFilament bis zum Anschlag
in dieAusgabe (6) drücken.
5. DieHalterung loslassen.
Einstellungen
1. DasNetzkabel des Druckers anden Anschluss (17) und aneine Steckdose anschließen.
2. Den Drucker mit dem Ein/Aus-Schalter einschalten.
3. Auf dem Touchscreen auf Tools–Setting–Language drücken und diegewünschte
Sprache einstellen.
4. Auf Tools–Level klicken. Der Druck-
kopf und dasDruckbett nehmen ihre
jeweiligen Positionen ein. Abwarten
bis dieTeile stillstehen.
6. Im nächsten Dialogfeld wird gefragt,
ob die3 Schrauben bis zum Anschlag
angezogen wurden. Ist dasso,
auf Yes drücken, wenn nicht, auf
No drücken und dieSchrauben
anziehen.
5. Die3 Schrauben unter dem Druckbett
bis zum Anschlag gegen den Uhrzeigersinn drehen, dann auf OK drücken.
Deutsch
7. Nachdem Ye s gewählt wurde, bewegt
sich der Druckkopf in seine erste
Position und dasDruckbett bewegt sich
nach oben und unten, um den richtigen
Abstand zwischen der Düse am
Druckkopf und dem Bett zu finden.
43
Page 44

8. Ist der Abstand zu groß, diesen mit der Schraube unter dem Druckkopf anpassen
(dieSchraube mit dem Uhrzeigersinn drehen). Schrauben bis der Drucker ein
Tonsignal abgibt und dasDialogfeld „Verify“ anzeigt.
9. Auf Verify drücken, um den Abstand
11. Auf OK drücken, um zum nächsten Messpunkt zu gehen. Auf dieselbe Weise weiter-
Deutsch
Filament
Laden
1. Auf Tools–Filament–Load drücken.
2. Der Druckkopf wird aufgewärmt.
10. Dieaktuelle Schraube gegen den Uhrzu überprüfen. Ist der Abstand zu
klein, wird der obere Bild angezeigt.
machen bis für alle Messpunkte „OK“ angezeigt wird. Wenn alle Messpunkte
überprüft wurden, mit Finish abschließen.
zeigersinn drehen bis der Drucker ein
Tonsignal abgibt und dasDialogfeld
„Verify“ anzeigt. Auf Verify drücken,
um den Abstand zu überprüfen.
IstderAbstand jetzt richtig, wird der
obere Bild angezeigt.
44
Page 45

3. Ist der Aufwärmvorgang abgeschlossen,
wird die folgende Mitteilung auf dem Display
angezeigt.
4. Das Filament vertikal in den Druckkopf einführen.
5. Abwarten, bis das Filament in einem
gleichmäßigen Strom aus dem Druckkopf
austritt, dann Cancel drücken, um den
Vorgang abzuschließen.
Hinweis: Entstehen Probleme beim Einführen des
Filaments, zunächst probeweise kurz auf Unload
klicken und dann auf Load.
Wechsel
1. Auf Tools–Filament–Unload drücken, um
den Druckkopf aufzuwärmen.
2. Wenn der Drucker ein Tonsignal von sich gibt,
wird die folgende Mitteilung auf dem Display
angezeigt.
3. Die Halterung (8) auf der linken Seite des
Druckkopfs herunterdrücken und das Filament
vorsichtig herausziehen.
4. Wenn das Filament komplett herausgezogen wurde, auf den Zurück-Pfeil drücken.
5. Die Filamentkassette herausheben und das alte Filament aufrollen. Filamentspulen
bei Nichtbenutzung idealerweise in einer Kunststofftüte aufbewahren.
6. Die gewünschte Filamentspule auswählen und das Filament durch die
Filamentausgabe (3) führen, die Spule in die Kassette setzen und diese wieder
anihren Platz setzen.
7. Das Filament durch das Filamentrohr führen.
8. Erneut auf Load drücken, um den Druckkopf aufzuwärmen. Wenn der Drucker
ein Tonsignal abgibt, die Halterung nach unten drücken und das Filament in
dieAusgabeöffnung (6) führen.
9. Die Halterung loslassen, wenn das Filament durch den Druckkopf ausgegeben
wird, auf den Zurück-Pfeil drücken und wieder zum Hauptmenü gehen.
Hinweis: DasFilament nie mit Gewalt herausziehen, sonst wird der Druckkopf
beschädigt. Wenn dasFilament im Druckkopf zu sehr abgekühlt ist und nicht
herausgezogen werden kann, dieSchritte 1–7 wiederholen.
Deutsch
45
Page 46

Der erste Ausdruck
1. DieSoftware FlashPrint auf dem Computer installieren.
2. DieDatei auf einen USB-Speicher kopieren und den
3. Auf dem Touchscreen auf Build drücken, auf das
4. Auf Build drücken, der Druckkopf wird aufgewärmt und wenn
Wichtige Hinweise
1. Sicherstellen, dass dasDruckbett wie im Abschnitt Einstellungen weiter oben
2. Sicherstellen, dass dasFilament wie im Abschnitt Filament weiter oben geladen wurde.
3. Sicherstellen, dass altes Filament aus dem Druckkopf entfernt wurde, bevor der
4. DasGerät im Betrieb niemals unbeaufsichtigt lassen.
5. Dasausgedruckte 3D-Modell mit einem geeigneten Werkzeug entfernen, sodass
Tipps und Tricks
• Löst sich dasModell während des Ausdrucks von der Platte und liegt dies nicht
Deutsch
• Es ist auch möglich, einen Klebestift oder blaues Klebeband direkt auf der
• Wird in der Software vor dem Ausdruck dieOption
Auf Print klicken und dann dieim Dialogfeld angezeigten
nötigen Einstellungen tätigen. Auf More Options klicken,
um weitere Einstellungen vorzunehmen. Auf OK klicken,
um eine .g-Datei zu erstellen.
Speicher in den Anschluss (14) am Drucker stecken.
Den Drucker einschalten.
USB-Symbol drücken und diegewünschte Datei auswählen.
dieser Vorgang abgeschlossen ist, wird mit dem Druck begonnen.
beschrieben eingestellt ist.
Druck mit neuem Filament begonnen wird.
weder Druckbett noch Objekt beschädigt werden.
aneiner fehlerhaften Kalibrierung des Druckbetts, kann ein normaler Klebestift
Abhilfe schaffen, indem dasDruckbett vor dem Ausdruck mit Klebstoff bestrichen
wird. So haftet dasModell besser und dasRisiko dafür, dass dasModell sich löst
und so den Druck beeinträchtigt, sinkt.
Glasscheibe des Druckbetts einzusetzen, anstatt eine Haftfolie zu verwenden.
Der Klebestift empfiehlt sich, wenn garantiert sein soll, dass Modelle mit geringer
Haftfläche gut am Druckbett haften, z. B. bei Figuren mit kleinen Füßen. Wird
ein Klebestift verwendet, sinkt dasRisiko, dass sich dasModell während des
Ausdrucks löst.
Raft gewählt, baut der Drucker eine Plattform, auf der
dann wiederum dasModell gebaut wird. DiePlattform
kann nach dem Ausdruck einfach abgebrochen
werden. Raft vergrößert dieKontaktfläche zum
Druckbett und dadurch erübrigt sich normalerweise
dasProblem, dass sich dasModell während des
Ausdrucks löst.
46
Page 47

Declaration of Conformity
Hereby, Clas Ohlson AB declares that following product(s):
38-7720
Finder
is/are in compliance with the essential requirements and other
relevantprovisions of Directive 2014/53/EU and 2014/30/EU.
Article 3.1a (Health): EN 62311
Article 3.1a (Safety): EN 60950-1
Article 3.1b (EMC): EN 301489-1
EN 301489-17
Article 3.2 (Radio): EN 300328
Insjön, Sweden, May 2016
Henrik Alfredsson
Manager Technique & Quality
Clas Ohlson, 793 85 Insjön, Sweden
47
Page 48

Sverige
Kundtjänst tel: 0247/445 00
fax: 0247/445 09
e-post: kundservice@clasohlson.se
Internet www.clasohlson.se
Post Clas Ohlson AB, 793 85 INSJÖN
Norge
Kundesenter tlf.: 23 21 40 00
faks: 23 21 40 80
e-post: kundesenter@clasohlson.no
Internett www.clasohlson.no
Post Clas Ohlson AS, Postboks 485 Sentrum, 0105 OSLO
Suomi
Asiakaspalvelu puh.: 020 111 2222
sähköposti: asiakaspalvelu@clasohlson.fi
Internet www.clasohlson.fi
Osoite Clas Ohlson Oy, Maistraatinportti 4 A, 00240 HELSINKI
Great Britain
Customer Service contact number: 020 8247 9300
e-mail: customerservice@clasohlson.co.uk
Internet www.clasohlson.co.uk
Postal 10 – 13 Market Place
Kingston Upon Thames
Surrey
KT1 1JZ
Deutschland
Kundenservice Unsere Homepage www.clasohlson.de besuchen und
auf Kundenservice klicken.
 Loading...