

Page 1
Pedestal Fan
Golväkt
Gulvvifte
Lattiatuuletin
Standventilator
EnglishSvenskaNorskSuomiDeutsch
Art.no Model
18-2857 FD-40KI-UK
36-5521 FD-40KI
Ver. 20150216
Page 2

2
Page 3

Pedestal Fan
Art.no 18-2857 Modell FD-40KI-UK
36-5521 FD-40KI
Please read theentire instruction manual before using theproduct and then save it for
future reference. We reserve theright for any errors in text or images and any necessary
changes made to technical data. If you have any questions regarding technical problems
please contact our Customer Services (see address details on theback).
Safety
• Never use theappliance if theflex, plug or any other part is damaged or is not working
properly. Never try to repair or modify theappliance on your own. Contact aqualified
or approved repairman.
• This fan is only to be used indoors and in adry and clean environment. Never place
theappliance close to baths, swimming pools or liquid-filled containers into which
it might fall.
• Always unplug thefan when it is not in use.
• Never leave unsupervised children together with thefan.
• Never connect theappliance to themains before it is completely assembled.
• Ensure that no foreign objects enter theappliance as this may lead to short circuiting,
electric shock, or afire hazard.
• Never turn theappliance off by pulling out its plug. Make sure that thepower
switch is set to the[ 0 ] position before pulling out theplug.
• The mains lead should be checked regularly. Never use theproduct if themains
lead or plug is damaged.
• The mains lead must be changed if damaged. This is to prevent therisk of electric
shock or fire and should only be carried out by themanufacturer, authorised
service facility or qualified tradesman.
English
Power plug and cord replacement
If thecord is damaged it must, for safety reasons, be replaced by anauthorized repairer.
For non-rewireable plugs thefuse cover MUST be refitted when replacing thefuse.
If thefuse cover is lost then theplug must not be used until areplacement can be
obtained. Thecorrect fuse cover is identified by colour.
If anon-rewireable plug is cut off it must be DESTROYED IMMEDIATELY. Anelectric
shock hazard may arise if anunwanted non-rewireable plug is inadvertently inserted
into a13A socket outlet.
3
Page 4
English
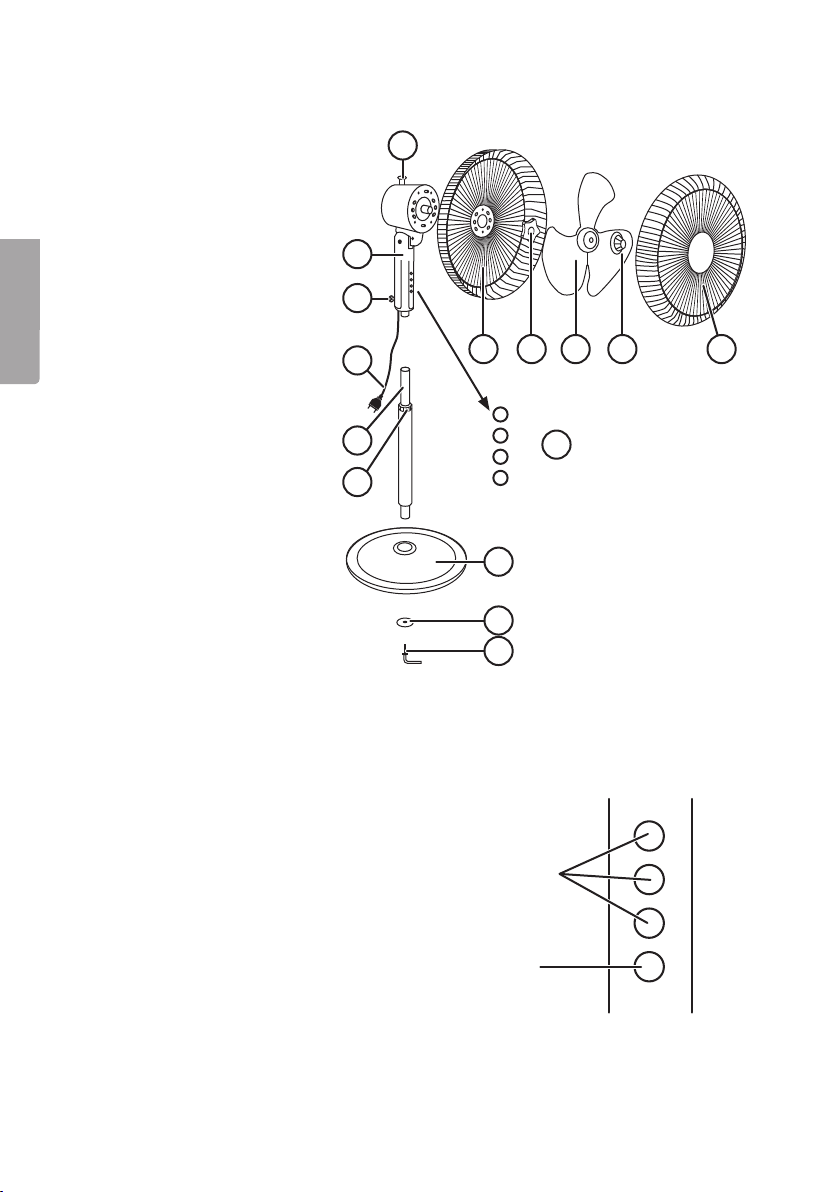
Product description
1. Oscillation switch
2. Front grille
3. Fan blade nut
4. Fan blade
5. Grille nut
6. Rear grille
7. Buttons
8. Base
9. Base washer
10. Screw B
11. Locking ring
12. Pedestal extension tube
13. Mains lead
14. Screw A
15. Fan head
15
14
13
12
11
1
3456
3
2
7
1
0
2
8
9
10
Buttons and functions
The speed of thefan is controlled by pressing
therespective button.
Fan speed control panel
Fan on/off switch
4
3
2
1
0
Page 5
Assembly
Attaching thebase
1. Attach thepedestal extension tube to thebase
using Screw B and thebase washer.
Fan head assembly
1. Undo thelocking ring and
extend thepedestal tube.
Tighten thelocking ring.
2. Undo Screw A and place
thefan head onto thepedestal tube. Tighten Screw A.
3. Undo thelocking ring and
adjust thefan to thedesired
height. Tighten thelocking
ring securely.
Pedestal extension
tube
Locking ring
English
Screw A
Fitting thefan blade
Grille nut Locating pins
1. Remove thegrille nut.
2. Thread therear grille over themotor shaft and align it on thelocating pins.
3. Fix therear grill in position by screwing thegrille nut on tightly.
4. Thread thefan blade onto themotor shaft. Tighten thenut securely.
5. Clip thefront grille into thegrille ring.
5
Page 6
English
Oscillation switch
1. Lift theOscillation switch up to stop
thefan from oscillating.
2. Press down theOscillation switch to
start thefan oscillating from side to side.
Care and maintenance
Wipe theexterior with asoft, damp cloth.
Never use abrasive cleaning agents or solvents.
Disposal
This product should be disposed of in accordance with local regulations.
If you are unsure how to proceed, contact your local council.
Specifications
Diameter 40cm
Power 40W
Description Symbol Value Unit
Maximum fan flow rate F 32.78 m³/min
Fan power input P 33.6 W
Service value SV 0.98 (m³/min)/W
Standby power consumption P
Fan sound power level LwA 50.6 dB (A)
Maximum air velocity c 2.13 metres/sec
Measurement standard for
service value
SB
IEC 60879:1986 Performance and construction of
electric circulating fans and regulators
6
N/A W
Page 7

Golvfläkt
Art.nr 18-2857 Modell FD-40KI-UK
36-5521 FD-40KI
Läs igenom hela bruksanvisningen före användning och spara den sedan för framtida bruk.
Vi reserverar oss för ev. text- och bildfel samt ändringar av tekniska data. Vid tekniska
problem eller andra frågor, kontakta vår kundtjänst (se adressuppgifter på baksidan).
Säkerhet
• Använd aldrig apparaten om sladden, stickproppen eller någon annan del är
skadad, eller inte fungerar på rätt sätt. Försök aldrig att reparera eller modifiera
apparaten på egen hand utan att kontakta behörig yrkesman.
• Apparaten får endast användas inomhus i torra och rena miljöer. Placera aldrig
apparaten i närheten av badkar, badbassäng eller andra vätskefyllda kärl där den
kan falla ned i vätskan.
• Dra alltid ur stickproppen när fläkten inte används.
• Lämna aldrig barn utan tillsyn i samma lokal som fläkten.
• Anslut aldrig apparaten till elnätet innan den är monterad.
• Se till att främmande föremål inte kommer in i apparaten eftersom detta kan orsaka
kortslutning, elektrisk stöt eller brandfara.
• Stäng aldrig av apparaten genom att dra ur stickproppen. Se istället till att strömbrytaren är i läge [ 0 ] och dra därefter ur stickproppen.
• Nätsladden bör regelbundet kontrolleras. Använd aldrig produkten om nätsladden
eller stickproppen är skadade.
• Om nätsladden skadats får den, för att risk för elektrisk stöt eller brand ska undvikas,
endast bytas av tillverkaren, dess serviceställe eller av en kvalificerad yrkesman.
Svenska
7
Page 8
Produktbeskrivning
1. Knapp för svängning
2. Främre galler
3. Fläktbladsmutter
4. Fläktblad
5. Gallermutter
6. Bakre galler
7. Knappar
8. Fot
Svenska
9. Fotbricka
10. Skruv B
11. Låsring
12. Förlängningsstativ
13. Nätsladd
14. Skruv A
15. Fläktkropp
15
14
13
12
11
1
3456
3
2
7
1
0
2
8
9
10
Knappar och funktioner
För att styra fläktens hastighet trycker man på den
knapp som anger önskad fläkthastighet.
Kontrollpanel för fläkthastighet
Stänger av fläkten
8
3
2
1
0
Page 9

Montering
Montering av foten
1. Montera förlängningsstativet i foten genom att
fästa med skruv B och fotbrickan.
Montering av fläktkropp
1. Lossa låsringen och lyft upp
förlängningsstativet. Dra därefter ordentligt åt låsringen.
2. Lossa skruv A och placera
fläktkroppen på stativet.
Spänn därefter skruv A
ordentligt.
3. Lossa låsringen och ställ in
önskad höjd för fläkten. Dra
därefter åt låsringen ordentligt.
Förlängningsstativ
Låsring
Svenska
Skruv A
Montering av fläkt och blad
Gallermutter Tappar
1. Lossa gallermuttern.
2. Sätt det bakre gallret på motorns framsida, så att gallrets riktningshål fäster
i motorns tappar.
3. Dra åt gallermuttern ordentligt.
4. Placera fläktbladet på motoraxeln. Dra åt muttern ordentligt.
5. Sätt frontgallret i gallerringen.
9
Page 10

Svängningsknapp
1. Lyft upp svängningsknappen för att
stoppa fläktens svängande rörelse.
2. Tryck ner knappen för att starta fläktens
svängande rörelse.
Svenska
Skötsel och underhåll
• Använd en mjuk trasa eller liknande för rengöring.
• Använd aldrig slipande rengöringsmedel eller lösningsmedel.
Avfallshantering
När du ska göra dig av med produkten ska detta ske enligt lokala föreskrifter.
Är du osäker på hur du ska gå tillväga, kontakta din kommun.
Specifikationer
Ø 40 cm
Effekt 40 W
Beskrivning Symbol Värde Enhet
Fläktens högsta flödeshastighet F 32,78 m³/min
Fläktens ineffekt P 33,6 W
Driftsvärde SV 0,98 (m³/min)/W
Effektförbrukning i standbyläge P
Fläktens ljudeffektnivå LwA 50,6 dB(A)
Maximal lufthastighet c 2,13 Meter/sek.
Standard som använts för
mätning av driftsvärde
SB
IEC 60879:1986 Performance and construction
of electric circulating fans and regulators
N/A W
10
Page 11

Gulvvifte
Art.nr. 18-2857 Modell FD-40KI-UK
36-5521 FD-40KI
Les brukerveiledningen grundig før produktet tas i bruk og ta vare på den for framtidig
bruk. Vi reserverer oss mot ev. feil i tekst og bilde, samt forandringer av tekniske data.
Ved tekniske problemer eller spørsmål, ta kontakt med vårt kundesenter.
(Se opplysninger om kundesenteret i denne bruksanvisningen).
Sikkerhet
• Viften må ikke brukes dersom ledning, støpsel eller andre deler er skadet eller ikke
fungerer som det skal. Produktet må ikke repareres eller modifiseres av ufaglærte.
Ved feil må man ta kontakt med en fagperson.
• Produktet må kun brukes innendørs i tørt og rent miljø. Viften må ikke plasseres
nær badekar, badebasseng eller andre steder med væsker hvor den kan falle ned.
• Trekk alltid støpselet ut når produktet ikke er i bruk.
• La aldri barn oppholde seg uten tilsyn av voksne i samme rom som viften.
• Viften må ikke kobles til strømnettet før den er montert.
• Påse at fremmede gjenstander ikke kan komme inn i maskinen da dette kan føre til
kortslutning, elektrisk støt eller brannfare.
• Skru aldri av viften ved å trekke ut støpselet. Påse i stedet at strømbryteren er
skrudd av (står i posisjon [ 0 ] ) og trekk deretter ut stikkontakten.
• Strømledningen bør kontrolleres regelmessig. Bruk ikke produktet dersom strømledningen eller støpselet er skadet.
• Dersom strømledningen er skadet skal den, for å unngå elektrisk støt eller brann,
skiftes av produsenten, på et serviceverksted eller av annen fagperson.
Norsk
11
Page 12

Norsk
Produktbeskrivelse
1. Bryter for pendling
2. Fremre gitter
3. Mutter for feste av vifteblad
4. Vifteblad
5. Mutter til gitter
6. Bakre gitter
7. Knapper
8. Fot
9. Fotskive
10. Skrue B
11. Låsering
12. Forlengelsesstag
13. Strømkabel
14. Skrue A
15. Hoveddel
15
14
13
12
11
1
3456
3
2
7
1
0
2
8
9
10
Knapper og funksjoner
For å styre viftehastigheten trykker man på den knappen som angir ønsket hastighet.
Kontrollpanel for viftehastighet
Stenger viften
12
3
2
1
0
Page 13

Montering
Montering av foten
1. Monter forlengelsesstaget til foten ved å feste
med Skrue B og fotskiven.
Montering av hoveddel
1. Løsne på låseringen og løft
opp forlengelsesstativet.
Trekk deretter låseringen
godt til.
2. Løsne på skrue A og plasser hoveddelen på stativet.
Spenn deretter skrue A godt.
3. Løsne på låseringen og still
inn ønsket høyde på viften.
Trekk deretter låseringen
godt til.
Forlengelsesstag
Låsering
Skrue A
Norsk
Montering av vifte og vifteblad
Mutter til gitter Tapper
1. Løsne på gittermutteren.
2. Sett det bakerste gitteret på motorens framside, sånn at gitterets retningshull
festes til tappene på motoren.
3. Trekk mutteren godt til.
4. Plasser viftebladet på motorakselen. Trekk mutteren godt til.
5. Sett frontgitteret i gitterringen.
13
Page 14

Bryter for pendelbevegelse
1. Trekk bryteren opp for å stoppe
pendelbevegelsene.
2. Trykk bryteren ned for å starte dem.
Stell og vedlikehold
• Bruk en myk, tørr klut til rengjøring av produktet.
• Bruk aldri slipende rengjøringsmidler eller løsemidler.
Norsk
Avfallshåndtering
Når produktet skal kasseres, må det skje i henhold til lokale forskrifter.
Ved usikkerhet, ta kontakt med lokale myndigheter.
Spesifikasjoner
Diameter 40 cm
Effekt 40 W
Beskrivelse Symbol Verdi Enhet
Viftens største luftstrømhastighet F 32,78 m³/min
Viftens effekt inn P 33,6 W
Driftsverdi SV 0,98 (m³/min)/W
Effektforbruk (i standby-modus) P
Viftens lydeffektnivå LwA 50,6 dB(A)
Maks lufthastighet c 2,13 m/s
Standard som er benyttet for
måling av driftsverdi
SB
IEC 60879:1986 Performance and construction
of electric circulating fans and regulators
N/A W
14
Page 15

Lattiatuuletin
Tuotenumero 18-2857 Malli FD-40KI-UK
36-5521 FD-40KI
Lue käyttöohje ennen tuotteen käyttöönottoa ja säilytä se tulevaa tarvetta varten.
Pidätämme oikeuden teknisten tietojen muutoksiin. Emme vastaa mahdollisista tekstitai kuvavirheistä. Jos tuotteeseen tulee teknisiä ongelmia, ota yhteys myymälään tai
asiakaspalveluun (yhteystiedot käyttöohjeen lopussa).
Turvallisuus
• Älä käytä tuuletinta, jos sen virtajohto, pistoke tai jokin muu osa on vaurioitunut
tai ei toimi normaalisti. Älä korjaa tai muokkaa tuuletinta itse, vaan ota yhteyttä
ammattilaiseen.
• Käytä tuuletinta ainoastaan sisätiloissa kuivassa ja puhtaassa ympäristössä.
Älä aseta tuuletinta kylpyammeen, uima-altaan tai veden läheisyyteen, jotta se ei
pääse kaatumaan veteen.
• Irrota pistoke pistorasiasta, kun et käytä tuuletinta.
• Älä jätä lapsia ilman valvontaa samaan tilaan tuulettimen kanssa.
• Älä liitä tuuletinta sähkövirtaan, ennen kuin olet asentanut sen käyttövalmiiksi.
• Varmista, että tuulettimeen ei pääse vieraita esineitä, sillä ne voivat aiheuttaa
oikosulun, sähköiskun tai tulipalovaaran.
• Älä sammuta tuuletinta irrottamalla pistoke pistorasiasta. Sammuta tuuletin
virtakytkimestä, ennen kuin irrotat pistokkeen pistorasiasta.
• Tarkasta virtajohdon kunto säännöllisesti. Älä käytä tuuletinta, jos sen virtajohto
tai pistoke on vioittunut.
• Vioittuneen johdon saa vaihtaa ainoastaan valmistaja, sen määräämä huoltopiste tai
valtuutettu ammattilainen. Näin vähennetään sähköiskujen ja tulipalojen mahdollisuutta.
Suomi
15
Page 16

Suomi
Tuotekuvaus
1. Kääntyvän liikkeen painike
2. Eturitilä
3. Lapojen lukitusmutteri
4. Lavat
5. Ritilän mutteri
6. Takaritilä
7. Painikkeet
8. Jalusta
9. Aluslaatta
10. Ruuvi B
11. Lukitusrengas
12. Pidennyskappale
13. Virtajohto
14. Ruuvi A
15. Tuulettimen runko
15
14
13
12
11
1
3456
3
2
7
1
0
2
8
9
10
Painikkeet ja toiminnot
Säädä tuulettimen nopeutta nopeuspainikkeilla.
Tuulettimen nopeuden ohjauspaneeli
Tuulettimen sammuttaminen
16
3
2
1
0
Page 17

Asennus
Jalustan asentaminen
1. Asenna pidennin jalustaan kiinnittämällä
ruuvi B ja aluslaatta paikalleen.
Tuulettimen rungon asentaminen
1. Avaa lukitusrengas ja nosta
pidennyskappale ylös. Kiristä
sen jälkeen lukitusrengas
kunnolla.
2. Avaa ruuvi A ja aseta tuulettimen
runko telineeseen. Kiristä sen
jälkeen ruuvi A kunnolla.
3. Avaa lukitusrengas ja säädä
tuuletin sopivalle korkeudelle.
Kiristä sen jälkeen lukitusrengas
kunnolla.
Pidennyskappale
Lukitusrengas
Ruuvi A
Suomi
Tuulettimen lapojen asentaminen.
Ritilän mutteri Nupit
1. Avaa ritilän mutteri.
2. Aseta taaempi ritilä moottorin etupuolelle siten, että ritilän suuntausreiät ovat
moottorin nuppien kohdalla.
3. Kiristä ritilämutteri kunnolla.
4. Aseta tuulettimen lavat moottorin akseliin. Kiristä mutteri kunnolla.
5. Aseta eturitilä ritilärenkaaseen.
17
Page 18

Suomi
Kääntyvän liikkeen painike
1. Pysäytä kääntyvä liike nostamalla
kääntyvän liikkeen painikeylös.
2. Käynnistä kääntyvä liike painamalla
kääntyvän liikkeen painikealas.
Puhdistaminen
• Puhdista tuuletin pehmeällä liinalla tai vastaavalla.
• Älä käytä liuotusaineita tai hankaavia puhdistusaineita.
Kierrättäminen
Kierrätä tuote asianmukaisesti, kun poistat sen käytöstä.
Tarkempia kierrätysohjeita saat kuntasi jäteneuvonnasta.
Tekniset tiedot
Ø 40 cm
Teho 40 W
Kuvaus Symboli Arvo Yksikkö
Tuulettimen enimmäisilmavirta F 32,78 m³/min
Tuulettimen ottoteho P 33,6 W
Käyttöarvo SV 0,98 (m³/min)/W
Tehonkulutus valmiustilassa P
Tuulettimen äänitehotaso LwA 50,6 dB(A)
Suurin ilman nopeus c 2,13 m/s
Käyttöarvon mittausstandardi IEC 60879:1986 Performance and construction
SB
of electric circulating fans and regulators
18
N/A W
Page 19

Standventilator
Art.Nr. 18-2857 Modell FD-40KI-UK
36-5521 FD-40KI
Vor Inbetriebnahme diekomplette Bedienungsanleitung durchlesen und aufbewahren.
Irrtümer, Abweichungen und Änderungen behalten wir uns vor. Bei technischen Problemen
oder anderen Fragen freut sich unser Kundenservice über eine Kontaktaufnahme
(Kontakt siehe Rückseite).
Sicherheit
• Das Gerät nicht betreiben, wenn es bzw. dasNetzkabel bzw. der Netzstecker
auf irgendeine Weise beschädigt ist oder nicht fehlerfrei funktioniert. Das Produkt
niemals selbst reparieren oder verändern, sondern einen ausgebildeten Fachmann
beauftragen.
• Das Gerät nur im Haus in trockener, sauberer Umgebung verwenden. Das Gerät
niemals in derNähe von Badewannen, Schwimmbecken oder anderen wassergefüllter Behältnissen aufstellen, in diees hineinfallen könnte.
• Bei Nichtgebrauch des Gerätes immer den Netzstecker ziehen.
• Kinder niemals unbeaufsichtigt in einem Raum mit dem Gerät zurücklassen.
• Das Gerät niemals vor der Montage andas Stromnetz anschließen.
• Beachten, dass keine Fremdkörper in dasGerät gelangen, dieKurzschluss,
elektrischen Schlag oder Brandgefahr verursachen können.
• Das Gerät niemals durch Herausziehen des Netzsteckers ausschalten.
Sicherstellen, dass derStromschalter in Position [ 0 ] ist, und erst dann den
Netzstecker ziehen.
• Das Netzkabel regelmäßig auf Fehler überprüfen. Das Produkt niemals benutzen,
wenn dasNetzkabel oder derNetzstecker beschädigt ist.
• Um Stromschläge oder Feuer zu vermeiden, dasNetzkabel bei Beschädigung
nur vom Hersteller, seinem Kundendienst oder qualifiziertem Fachpersonal
austauschen lassen.
Deutsch
19
Page 20

Produktbeschreibung
1. Oszillationsschalter
2. Vorderer Schutzkorb
3. Rändelmutter
4. Rotorblatt
5. Korbmutter
6. Hinterer Schutzkorb
7. Tasten
8. Ständer
9. Unterlegscheibe
10. Schraube B
11. Sicherungsring
12. Verlängerungsstativ
13. Netzkabel
14. Schraube A
15. Motoreinheit
15
14
13
12
11
1
3456
3
2
7
1
0
2
8
9
10
Tasten und Funktionen
Zur Steuerung derGeschwindigkeit auf dieTaste mit
dergewünschten Ventilatorgeschwindigkeit drücken.
Deutsch
Tastenfeld für dieVentilatorgeschwindigkeit
Den Ventilator ausschalten
20
3
2
1
0
Page 21

Montage
Montage des Ständers
1. Das Verlängerungsstativ mit derSchraube B und
derUnterlegscheibe am Ständer befestigen.
Montage derMotoreinheit
1. Den Sicherungsring lösen
und dasVerlängerungsstativ
anheben. Danach den
Sicherungsring ordentlich
festziehen.
2. Schraube A lösen und
dieMotoreinheit auf dasStativ
setzen. Danach Schraube A
ordentlich festziehen.
3. Den Sicherungsring lösen
und diegewünschte Höhe
des Ventilators einstellen.
Danach den Sicherungsring
ordentlich festziehen.
Verlängerungsstativ
Sicherungsring
Schraube A
Montage von Ventilator und Rotorblatt
Korbmutter Zapfen
1. Die Korbmutter lösen.
2. Den hinteren Schutzkorb auf dieVorderseite des Motors setzen, sodass dieZapfen
des Motors durch dieLöcher am Schutzkorb passen.
3. Die Korbmutter ordentlich anziehen.
4. Das Rotorblatt auf dieMotorachse setzen. Die Mutter fest anziehen.
5. Den vorderen Schutzkorb auf den Korbring setzen.
21
Deutsch
Page 22

Oszillationsschalter
1. Zum Ausschalten derSchwenkbewegung den Oszillationsschalter
nach oben drücken.
2. Zum Einschalten derSchwenkbewegung den Oszillationsschalter
nach unten drücken.
Pflege und Wartung
• Zur Reinigung ein weiches Tuch oder dergleichen verwenden.
• Keine Chemikalien, Reinigungslösungen oder Reinigungsmittel verwenden.
Hinweise zur Entsorgung
Bitte dasProdukt entsprechend den lokalen Bestimmungen entsorgen.
Weitere Informationen sind von derGemeinde oder den kommunalen
Entsorgungsbetrieben erhältlich.
Technische Daten
Ø 40 cm
Leistungsaufnahme 40 W
Deutsch
Beschreibung Symbol Wert Einheit
Max. Volumenstrom des Ventilators F 32,78 m³/min
Leistungsaufnahme des Ventilators P 33,6 W
Serviceverhältnis SV 0,98 (m³/min)/W
Leistungsaufnahme im Bereitschaftszustand P
Schallleistungspegel des Ventilators LwA 50,6 dB(A)
Max. Luftgeschwindigkeit c 2,13 m/s
Messnorm für die Entwicklung
des Serviceverhältnisses
22
SB
IEC 60879:1986 Performance and
construction of electric circulating
fans and regulators
N/A W
Page 23

23
Page 24

Sverige
Kundtjänst tel: 0247/445 00
fax: 0247/445 09
e-post: kundservice@clasohlson.se
Internet www.clasohlson.se
Post Clas Ohlson AB, 793 85 INSJÖN
Norge
Kundesenter tlf.: 23 21 40 00
faks: 23 21 40 80
e-post: kundesenter@clasohlson.no
Internett www.clasohlson.no
Post Clas Ohlson AS, Postboks 485 Sentrum, 0105 OSLO
Suomi
Asiakaspalvelu puh.: 020 111 2222
sähköposti: asiakaspalvelu@clasohlson.fi
Internet www.clasohlson.fi
Osoite Clas Ohlson Oy, Maistraatinportti 4 A, 00240 HELSINKI
Great Britain
Customer Service contact number: 020 8247 9300
e-mail: customerservice@clasohlson.co.uk
Internet www.clasohlson.co.uk
Postal 10 – 13 Market Place
Kingston Upon Thames
Surrey
KT1 1JZ
Deutschland
Kundenservice Unsere Homepage www.clasohlson.de besuchen und
auf Kundenservice klicken.
 Loading...