

Page 1
Stereo System with DVD Player
Musikanläggning med DVD-spelare
Musikkanlegg med DVD-spiller
Ministereo, jossa dvd-soitin
EnglishSvenskaNorskSuomi
Art.no. Model
18-8162 F71-UK
38-3863 F71
Ver. 201009
Page 2

2
Page 3

Stereo System with DVD Player
Art. no 18-8162 Model F71-UK
38-3863 F71
Please read the entire instruction manual before using the product and save it for future reference.
We reserve the right for any errors in text or images and any necessary changes made to technical data.
If you have any questions regarding technical problems please contact Customer Services.
1. Safety
1.1 Safety instructions
• The product should only be repaired by qualified service technicians.
• The product should not be taken apart or modified.
• Do not cover the product. Adequate ventilation with a distance of at least 15 cm between ventilation openings
and the surrounding area is necessary to prevent the device from overheating.
• Remove the batteries if the device is not to be used for a long time. This should prevent the batteries from leaking.
• The product should not be taken apart or modified. Certain parts inside the casing carry dangerous currents.
Touching these can lead to fire or electric shock.
• The product is designed for indoor use only.
• Never subject the product to high temperature, dust, heavy vibration, impacts, humidity or moisture.
English
• Do not place the product where there is a risk of it falling into water or other liquid. Do not place containers
with liquid on the product e.g. flower vases, coffee cups, fizzy drink bottles.
• Disconnect the device from the power supply by unplugging it from the wall socket. The device’s plug should
be easily accessible.
• The mains lead should be checked regularly. Never use the device if the mains lead or plug is damaged.
• The power lead must be changed if damaged. This is to prevent the risk of electric shock or fire and should
only be carried out by the manufacturer, qualified service facility or qualified technician.
• Never lay the power lead over hot surfaces or pull it round sharp edges or corners.
1.2 Pay attention to these safety symbols
Warning! Do not open the casing. Certain non-insulated
CAUTION/ATTENTION
CLASS 1
LASER PRODUCT
RISK OF ELECTRIC SHOCK
DO NOT OPEN
CLASS 1 LASER PRODUCT
Warning! Do not open the casing. The product contains invisible laser beams
that can cause eye damage. Do not look directly into the laser beam or look
directly at it using an optical instrument.
components inside the casing carry dangerous currents.
Touching these can lead to fire or electric shock.
3
Page 4

2. Power supply
Mains connection
1. Check that the voltage (V) which is shown on the rating plate on the back of the device is the same as
your local electrical power supply (230 V AC, 50 Hz). Contact Customer Services if this is not the case.
English
2. Unplug the player from the electrical socket to cut off the power completely. Unplug the device from
the wall socket to protect it in case of lightning and thunderstorms.
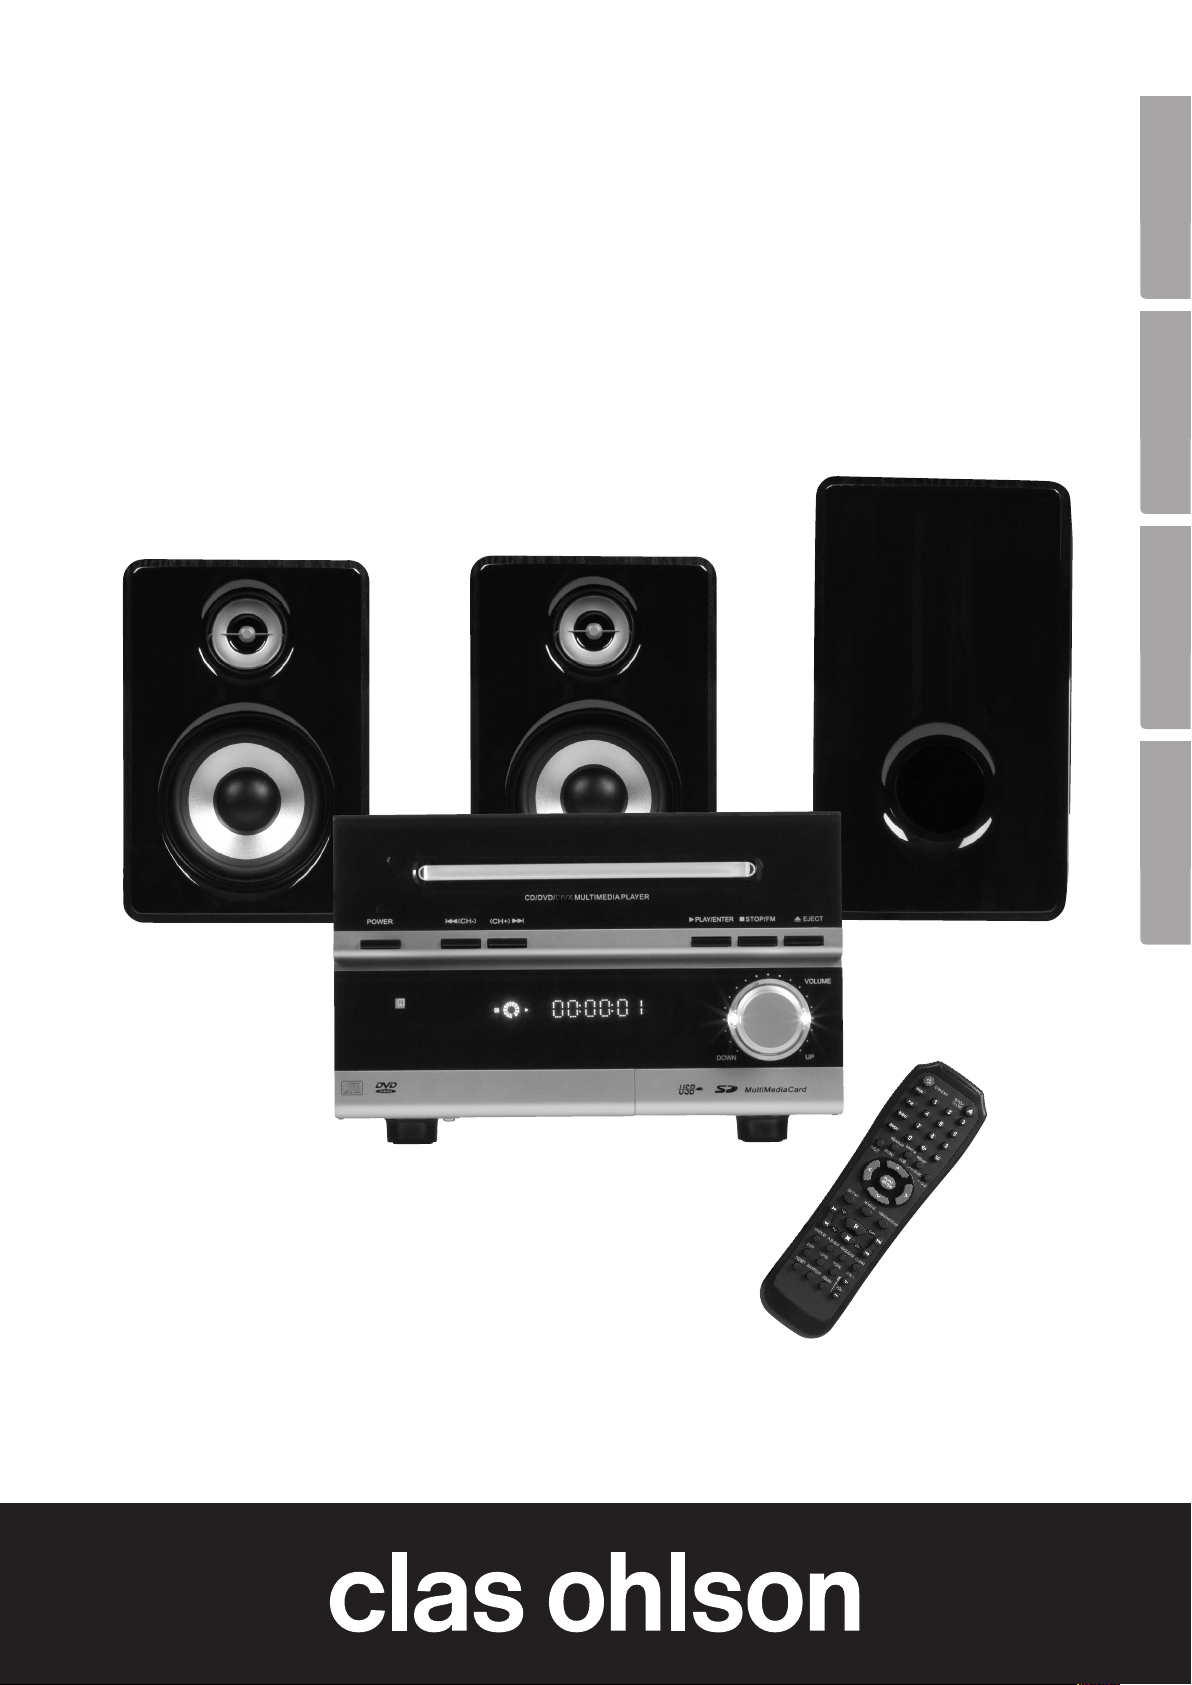
3. Product description
• Stereo System with CD/DVD/MP3/MPEG4 Player and FM radio.
• USB port and SD card slot.
• SCART, S-video, composite video and component video outputs.
• Coaxial and optical digital audio output and analogue audio outputs (2 x RCA).
• Line-in inputs (2 x RCA).
• Comes with 2 speakers, subwoofer and remote control.
4. Package contents
• Main unit
• 3 speakers (right, left and subwoofer)
• FM aerial
• Remote control
• Audio cable and video cable
• Instruction manual
4
Page 5
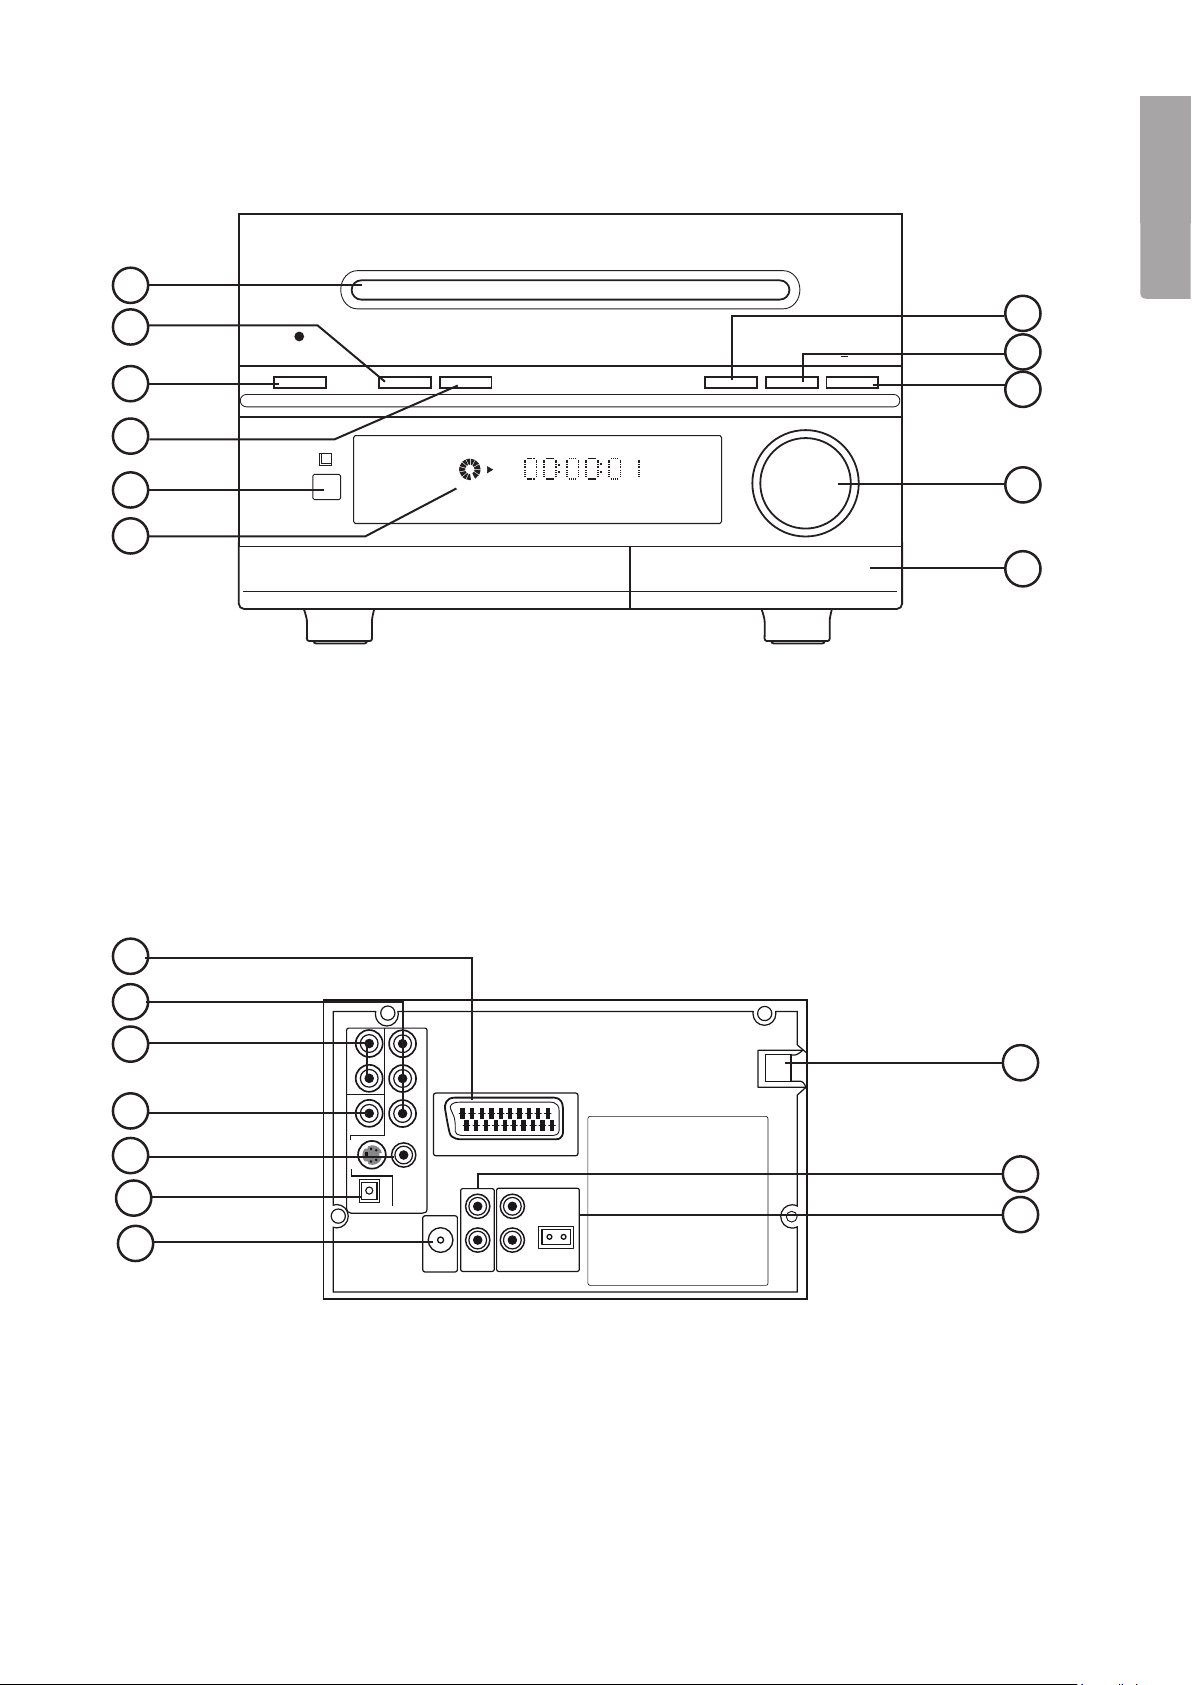
5. Buttons and functions
1
2
POWER
3
I◄◄(CH-)
(CH-) ►►I
CD/DVD/DIVX MULTIMEDIA PLAYER
►PLAY/ENTER
■
STOP/FM ▲ EJECT
English
7
8
9
4
R
CD
5
6
1. Disc tray
2. [I◄◄CH-] – Go to the previous track/folder
3. [POWER] – Switch system off/on
4. [►►I CH+] – Go to the next track/folder
5. IR sensor for remote control
6. Display
12
13
VOLUME
10
DOWN
UP
11
7. [PLAY/ENTER] – Start/confirm
8. [STOP/FM] – Stop (in playback mode)/listen to radio
(in stop mode)
9. [EJECT] – Open/close disc tray
10. [VOLUME] – Adjust the volume
11. Connections for USB and memory card (under flap)
14
15
16
17
18
12. SCART outlet
13. Y, Pb/Cb, Pr/Cr – Component video jacks
14. FR/FL – Connection for right/left front speaker
15. Coaxial – Coaxial cable socket
16. S-video and Video output
19
20
21
17. Optical – Optical fibre output
18. FM – FM aerial connection
19. Mains lead
20. Audio Input – Audio input left/right
21. Speaker outputs
5
Page 6
Remote control
22. [STANDBY] – Switch on or off (enter standby mode)
23. [DVD] – Play DVD (if one is loaded)
24. [FM] – Listen to the radio
English
25. [AUDIO] – Enter Audio Input setup mode
26. [DISPLAY] – Press this button during playback
to show information on the display
27. [SEARCH/MENU] – Open/close PBC or go
to root menu
28. [TITLE] – Show a list of files on the disc
29. [PLAY/ENTER] – Start or confirm
30. [SETUP] – Open settings menu
31. [ I I] Pause – temporarily stop playback
32. [►► TU+] – Fast forward 2x – 32x or search
for radio frequency
33. [◄◄TU-] – Fast rewind 2x – 32x or search
for radio frequency
34. [REPEAT A-B] – Press during playback to repeat
a selected section (A – B).
Press once where the section is to start (A).
Press once where the section is to end (B).
The selected section will be repeated until you press
once more to cancel repetition.
35. [REPEAT] – Select repeated playback of the disc
36. [LOUD] – Enable or disable Loudness
37. [DSP] – Select audio setting: Live – Pop – Dance –
Jazz – Classic
22
24
26
28
30
32
34
36
38
23
25
27
29
31
33
35
37
39
40
41
42
43
44
45
46
47
48
49
50
51
52
53
54
55
55
56
38. [RESET] – Return to default factory settings
39. [SHORTCUT] – Skip the introduction and warnings
at the beginning of the DVD
40. [OPEN/CLOSE] – Open/close disc tray
41. [0] – [9] – [10+] – Number keys.
Enter a track number for the desired track using
the number keys. If the number consists of two digits:
First, enter [10+] and then the next digit.
Example: Select track 16 = [10+] and [6].
42. [T/F] – Display the properties of the disc in the disc tray
43. [SAVE/SUB] – Select language when playing DVD
(if the disc supports this function)
44. [ANGLE] – Press during playback to change picture
angle (if the disc supports this function)
45. [MO/ST/LANG (L/R)] – Select playback mode mono/
stereo or language (for DVD)
46. [<][^][>][v] – Arrow buttons
47. [MUTE] – Press once to temporarily turn off sound,
press once more to turn sound back on
48. [USB/CARD/DVD] – Press to select desired function:
USB, memory card or DVD
49. [CH+ ►►I] – Go to the next track/folder
50. [CH– I◄◄] – Go to the previous track/folder
51. [■] Stop
Press once to stop playback. Press thereafter
[PLAY/ENTER] to resume playback from the place
it was stopped.
Press twice to stop playback. Press thereafter
[PLAY/ENTER] to resume playback from the
beginning.
52. [PROGRAM] – Create a playback list
Enter the desired programme number at the pointer
and confirm with [PLAY/ENTER].
Move the pointer to Start and press [PLAY/ENTER]
(29), to start playback.
Terminate programmed playback as follows:
Press [PROGRAM] to move the pointer to Stop,
press [PLAY/ENTER] to move the pointer to Exit,
press [PLAY/ENTER] to terminate the programmed
playback.
53. [CLEAR] – Delete the last entry
54. [TONE] – Adjust bass and treble
Press [TONE] to select bass/treble and
then press [VOL+]
55. [VOLUME +/-] Increase/decrease volume
56. [ZOOM] – Change picture size: 2x, 3x, 4x, 1/2x, ⅓x
or ¼ of original size
6
Page 7
POWER
LINK
ETHERNET
POWER
LINK
ETHERNET
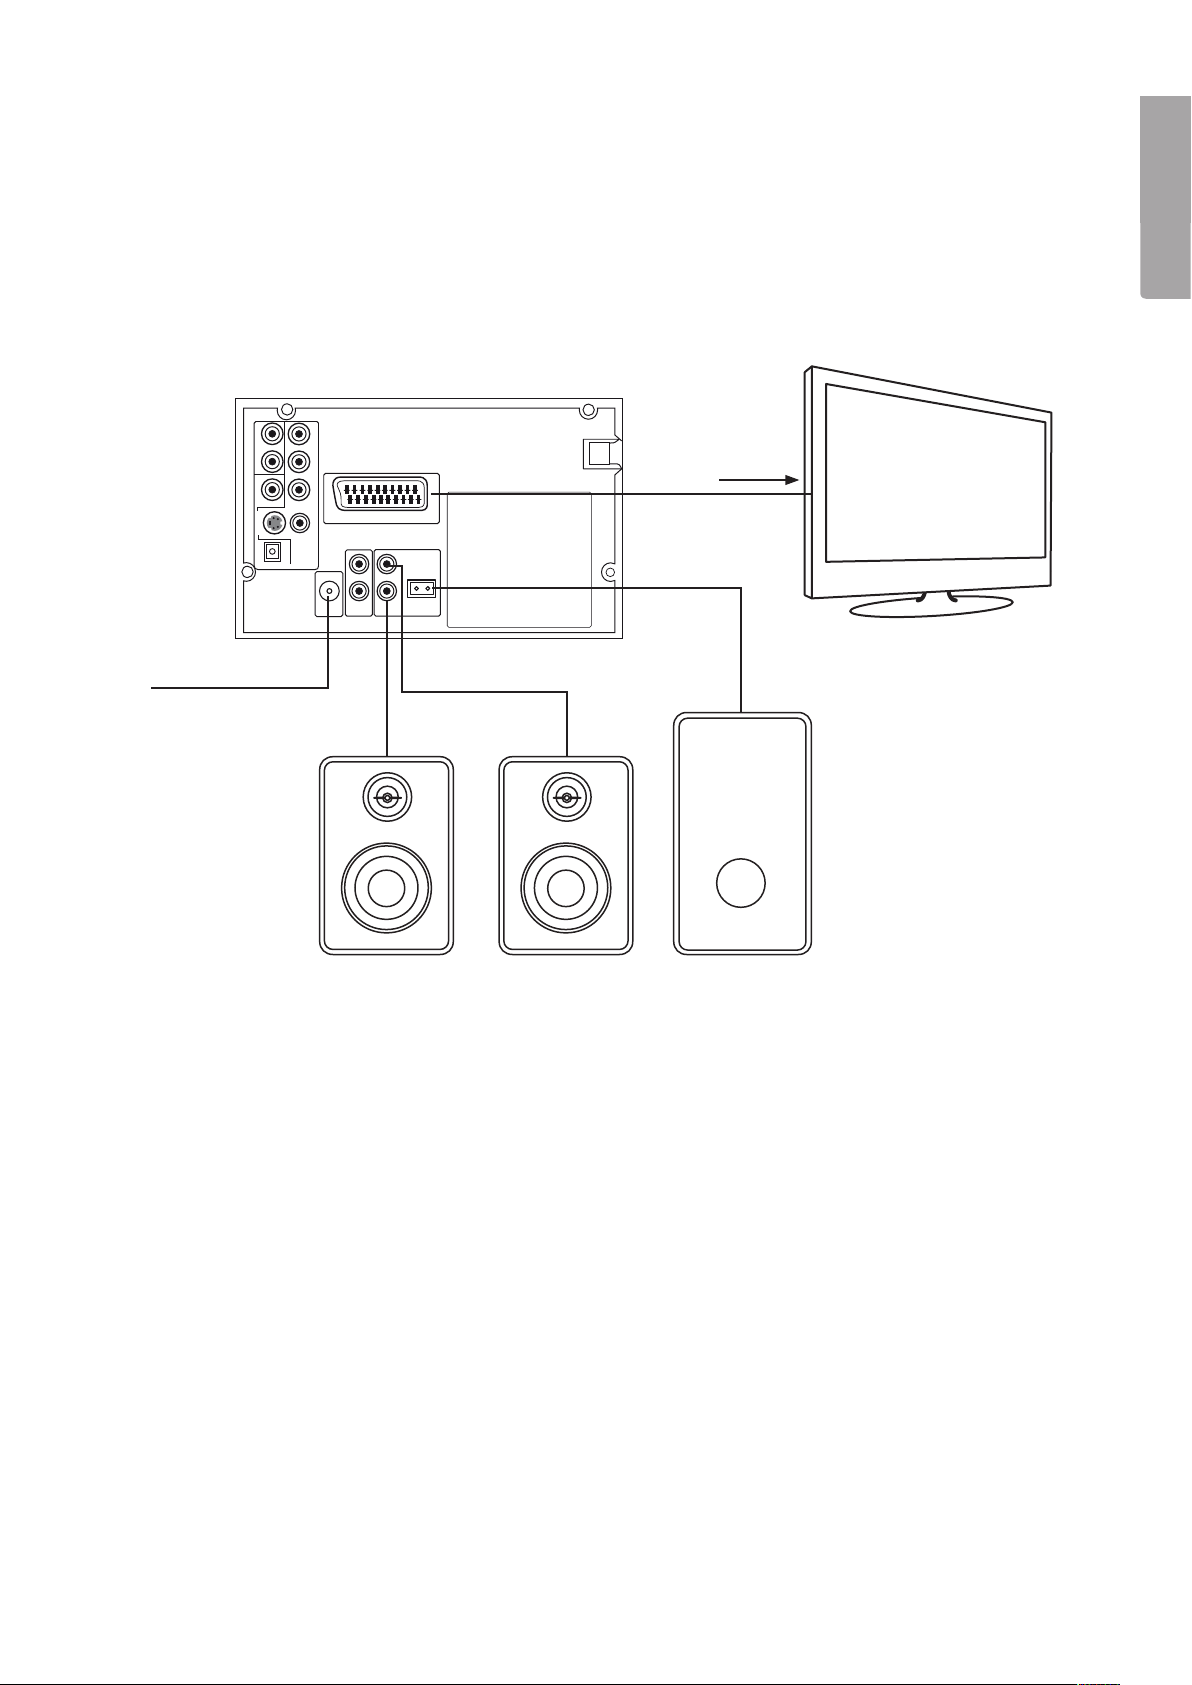
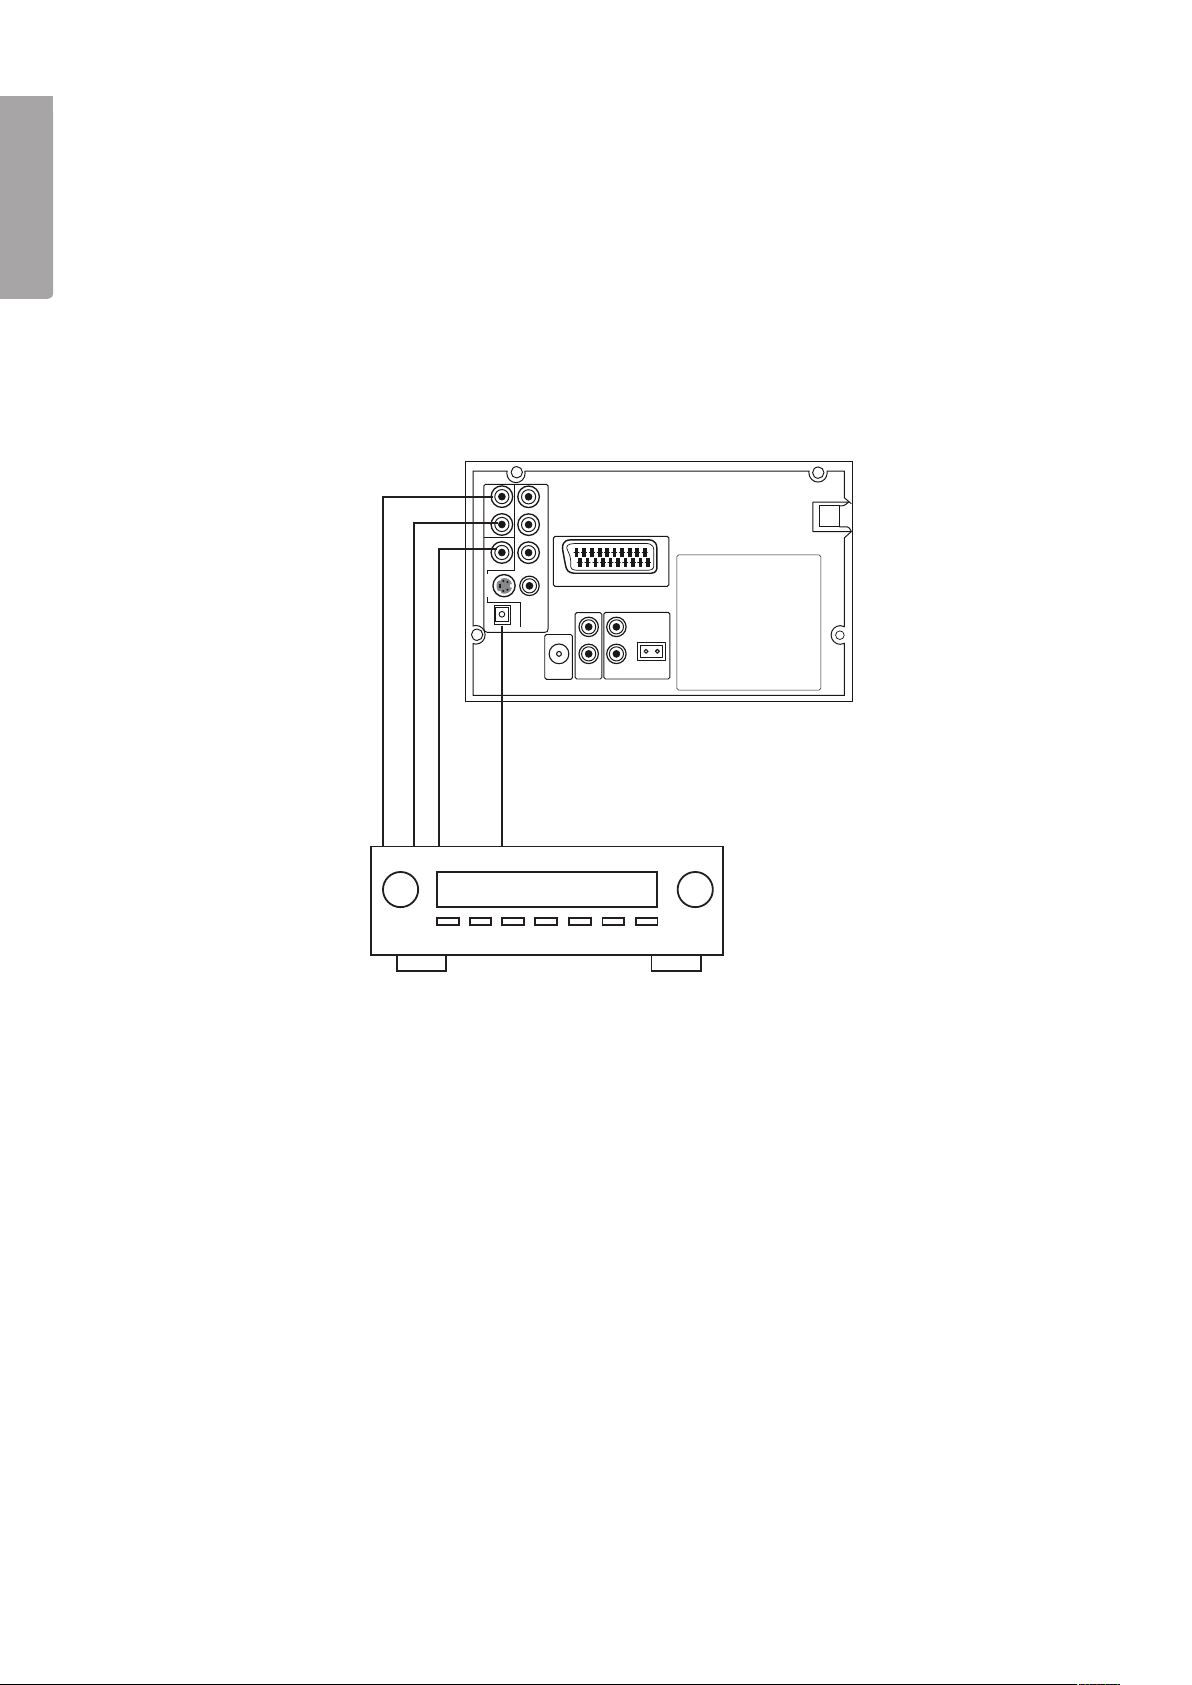
6. Connections
6.1 Preparing the stereo system for use
a. Unplug the stereo system.
b. Connect the right and left speaker to their respective connections R and L (21). Push the connectors in firmly.
c. Connect the subwoofer to SW (21).
d. Connect the aerial to FM (18).
e. Connect the cable from your computer sound card to Audio Input (20).
Video out
FM-aerial
English
Right speaker Left speaker Subwoofer
6.2 Connecting to the TV set
a. If your TV has a SCART outlet, you can use a SCART cable to connect the stereo system directly to your TV set
via the SCART outlet (12).
b. If your TV has a video input, you can use the video cable to connect the stereo system to your TV set. Connect
the cable to the Video input on your TV and to the Video Output on the stereo system. Check the connection
by tuning in the Video channel on your TV set.
c. If your TV has an S-video input, you can use the S-video cable to connect the stereo system to your TV set.
Connect the cable to S-video (16) on the stereo system. This type of connection provides the best sound quality.
d. If your TV has Pb/Cb, Y, Pr/Cr inputs, you can use a component video cable to connect the stereo system
to your TV set.
Note!
• Both devices must be switched off and unplugged when cables are connected.
• Set up the stereo system so it works with your TV set.
• Use only one of the above connection methods, if more than one method is used at the same time, the picture quality
will deteriorate.
• Do not use the [POWER] switch to repeatedly turn the system on and off. Wait at least 3 seconds before pressing
the [POWER] switch again.
• Never use a digital coaxial or digital optical output at the same time as the analogue output.
7
Page 8
6.3 Connecting to an amplifier (home theatre)
Digital output setup.
a. Connect a cable from the coaxial (15) or optical (17) output on the stereo system to the corresponding
input on the amplifier. In playback or stop mode, press [SETUP] (30) to enter setup mode.
English
b. Use the arrow buttons [<][^][>][v] (46) to advance to Audio Setup.
c. Go down to Digital Audio Setup using [v] and select SPDIF setup.
d. Go to Digital Output and select SPDIF/RAW or SPDIF/PCM.
e. Press [PLAY/ENTER] (29) to confirm.
f. Press [SETUP] (30) to exit the setup mode.
Coaxial output
Optical output
• If your TV has an S-video input, you can use the S-video cable to connect the stereo system to your TV set. This type
of connection provides the best sound quality.
• If your TV has Pb/Cb, Y, Pr/Cr inputs, you can use the component video cable to connect the stereo system to your
TV set. This will give you a natural picture.
• If your TV has a SCART outlet, you can use a SCART cable to connect the stereo system directly to your TV set via
the SCART outlet (12).
6.4 Remote Control
a. Insert the batteries into the remote control according to the marking in the battery compartment.
b. Point the remote control at the IR sensor (5). Range: 7 metres. There can be no obstructions between the remote
and the IR sensor.
• Interference from high voltage facilities or substations in the vicinity can shorten the range and effectiveness
of the remote control.
8
Page 9

7. Use
7.1 Listening to the radio
1. Press [POWER] (3) or [STANDBY] (22) to turn the stereo system on.
2. Press [FM] (24).
Manual switching
1. Tuning into a station manually:
Press [T/F] (42) and enter the desired frequency using the numerical buttons [0] – [9] (41).
2. Scan for station manually:
Press [T/F] (42). Then press [►► TU+] (32) or [◄◄ TU-] (33) to scan up or down.
3. Saving the station to memory:
a) Press [SAVE/SUB] (43) and then enter the desired station number.
Example: Save 99.7 MHz as number 28:
First, press [SAVE/SUB] (43) and then press [10+] [10+] [8] (to select memory slot) and then press [T/F] (42) to tune in
the frequency manually using the numerical buttons (41) or [►► TU+] (32) or [◄◄ TU-] (33) to search for a frequency.
b) Press [SAVE/SUB] (43) again to save settings and return to normal listening mode.
c) Delete an existing preset station by saving a new station on the old preset station’s number.
Automatic station scan
Start scanning for stations automatically as follows: Press [SEARCH/MENU] (27) to begin the automatic station scan.
All stations found will then be saved into the memory (up to 60). Press once more to terminate the automatic station scan.
Select mono or stereo sound
Press [MO/ST LANG (L/R)] (45) and select mono or stereo. Try repositioning the aerial if the signal is weak.
English
7.2 Quick guide for playback of DVD, MPEG4, CD, MP3, etc.
1. Switch on your TV and set it to AV mode to see the menu display.
2. Press [POWER] (3) or [STANDBY] (22) to turn the stereo system on.
3. Press [DVD] (23).
4. Press [EJECT] (9) or [OPEN/CLOSE] (40) to open the disc tray. Insert a disc and close the disc tray or connect a USB
device or SD memory. If you are using the stereo system disc player and connect an external memory device you must
select the desired function using [USB/CARD/DVD] (48): Move up or down using the arrows [^][v] (46) and confirm by
pressing [PLAY/ENTER] (29). The stereo system must be connected to a TV in order for you to see the selection of
functions.
5. Select the desired file/folder using [<] [>] (46).
6. Press [PLAY/ENTER] (29) to start playing the selected file.
7. Set desired volume using [VOL+/-] (55).
8. Press [II] (31) to pause playback and press again to resume playback.
9. Go to previous/next track using [CH+ ►►I] (49) or [CH– I◄◄] (50).
10. Press [■] (51) to stop playback.
Note! If the stereo system is to be used without a TV (without a menu display), then only one music source should be used:
(one CD or one type of memory device; not both at the same time). The stereo system will automatically set itself to the
correct function.
The files should be located in the root folder of the disc or memory device in order to facilitate playback without a TV picture.
Note! Always turn off the stereo (or change to DVD or TUNER mode) before removing the USB or SD card.
Doing otherwise may damage the memory device.
If you connect a USB device with a cable, the cable must not be longer than 0.5 m.
9
Page 10
7.3 Repeated playback
Push [REPEAT] (35) to activate repeated playback. The different media have different options for repeated playback.
Exit repeated playback by pressing [REPEAT].
English
7.4 Repeated playback A to B
To repeat a chosen section (A to B) of the current track.
1. Press [REPEAT A-B] (34) once where the section is to start (A).
2. Press [REPEAT A-B] (34) once where the section is to end (B).
3. The selected section will be repeated until you press [REPEAT A-B] once more to cancel repetition.
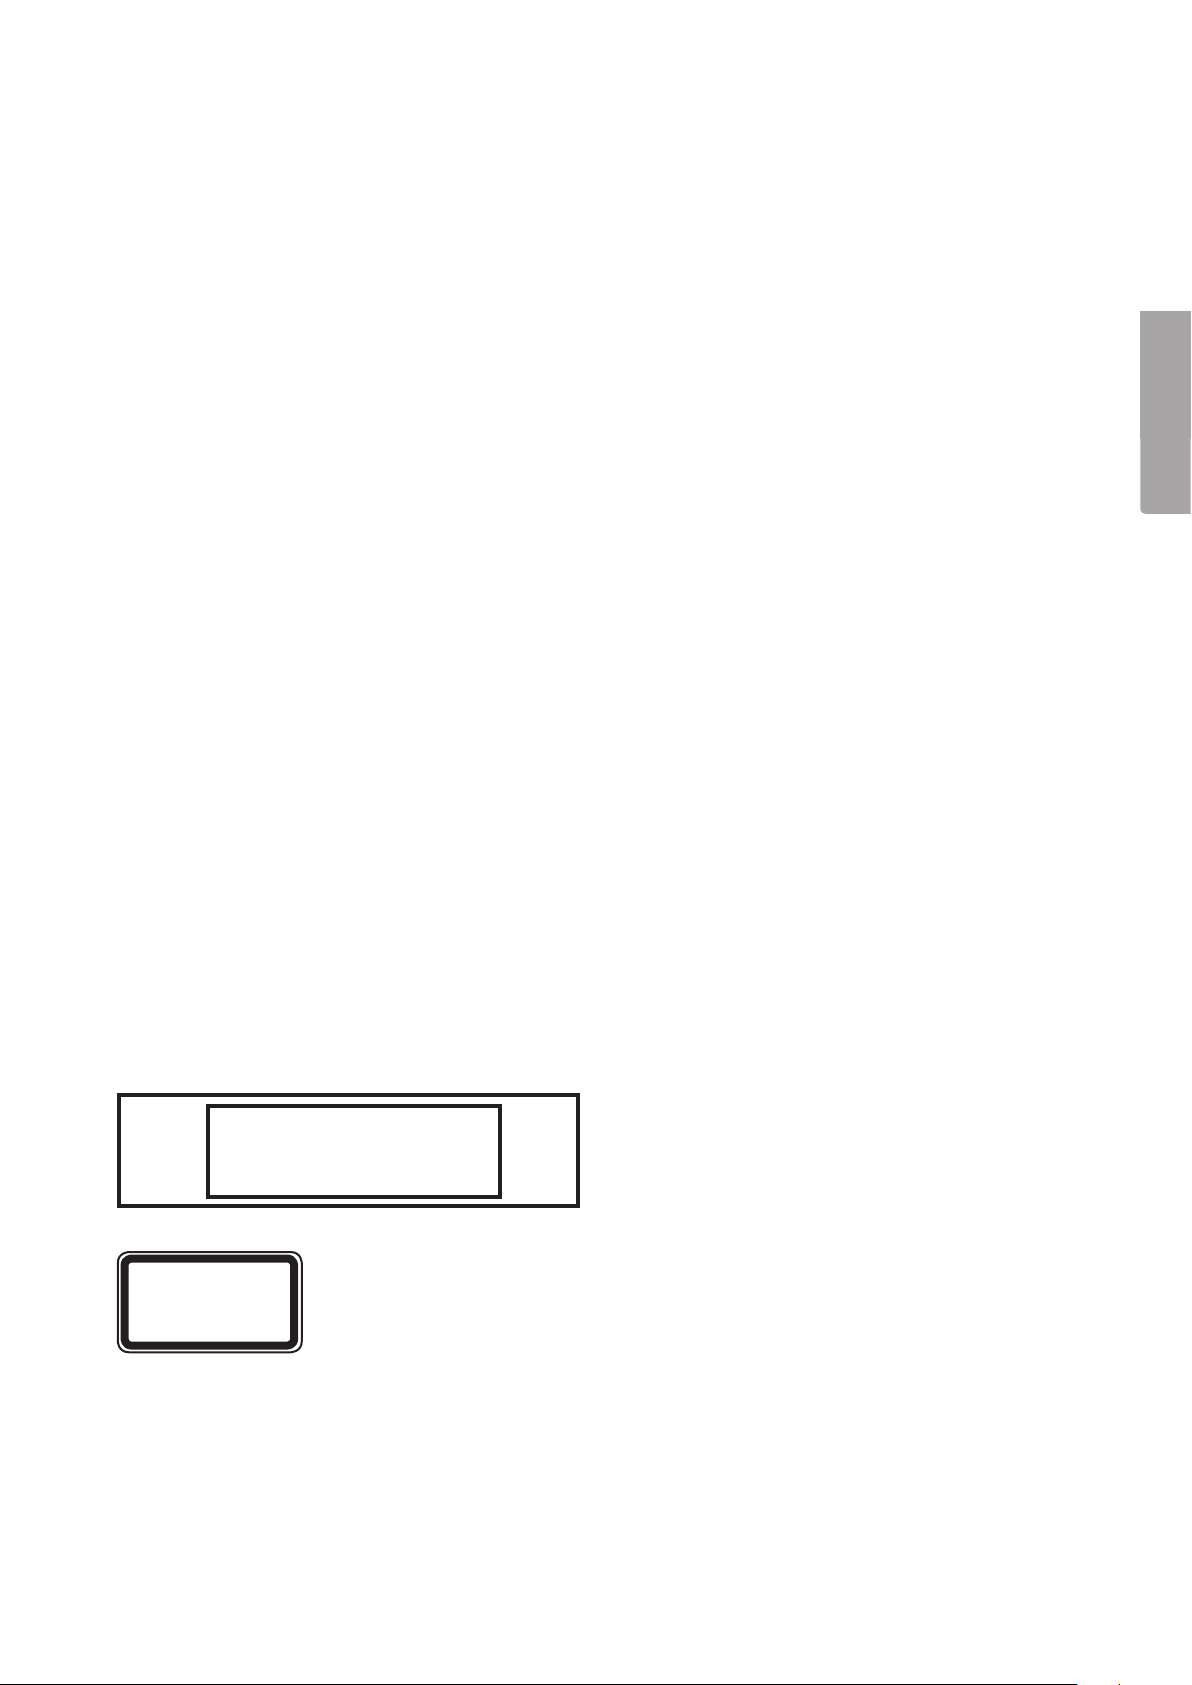
8. Menus
8.1 General Setup
x
GE NE RAL S ETUP PAG E
TV DISPLAY 16:9
ANGLE MARK OFF
OSD LANGUAGE ENG
CLOSE CAPTION OFF
SCREEN SAVER ON
LAST MEMORY OFF
S / W VERSION
GO TO GENERAL SETUP PAGE
A. TV Display
4.3PS, 4:3LB, 16:9.
B. Angle Mark
If you choose to activate Angle Mark, a symbol will appear on the display (if the disc has the option to change angle).
C. OSD Language
English, Swedish, Finnish or Norwegian (English is preset).
D. Close Caption
OFF, ON.
E. Screen Saver
ON, OFF.
F. Last Memory (in case of power cut)
ON, OFF.
G. S/W Version (indicates software version)
10
Page 11
8.2 Audio Setup
x
AU DI O S ET UP PAG E
ANALOG AUDIO SETUP
DIGITAL AUDIO SETUP
DOLBY DIGITAL SETUP
3 D PROCESSING
HDCD
GO TO AUDIO SETUP PAGE
A. Analogue Audio Setup
Downmix, LT/RT, Stereo, dialogue: Adjust dialogue volume.
B. Digital Audio Setup
• During playback of a DOLBY or MPEG disc, the output format of the optical or coaxial output
will be SPDIF/RAW format.
• SPDIF/PCM can be selected if the stereo system is connected to a 2-channel digital amplifier.
C. Dolby Digital Setup
Dual mono, Dynamic.
English
D. 3D processing
Concert, Living room, Hall, Bathroom, Cave, Arena and Church.
E. HDCD (sound filter for high definition CD)
OFF, 44.1 kHz, 88.2 kHz.
8.3 Video Setup Page
x
VI DE O S ET UP PAG E
VIDEO OUTPUT RGB
TV MODE
COLOR SETTING
GO TO VIDEO SETUP PAGE
A. Video Output
S-video, YUV, RGB.
B. TV Mode
Progressive, Interlaced.
C. Colour Setting
Sharpness, brightness, contrast, gamma, hue and saturation.
11
Page 12
8.4 Preference Setup Page (properties)
The menu appears if the disc tray is open or if you press [<] (46) twice during playback.
x
English
PR EF ERE NC E PAGE
TV TYPE PAL
PBC OFF
AUDIO ENG
SUBTITLE ENG
DISC MENU ENG
PARENTAL
DEFAULT
GO TO PREFERENCE SETUP PAGE
A. TV type
PAL, AUTO, NTSC. (PAL is most common in Europe).
B. PBC (Play Back Control)(with interactive menu for MPEG4s)
Open, Close.
C. Audio (Language)
English, Swedish, Finnish, Norwegian, French, Spanish, German and others.
D. Subtitle (Language)
English, Swedish, Finnish, Norwegian, French, Spanish, German and others.
E. Disc Menu (Language)
English, Swedish, Finnish, Norwegian, French, Spanish, German and others.
F. Parental
There are 8 different settings to prevent children from watching inappropriate films.
1. Move the pointer to the desired setting.
2. Press [PLAY/ENTER] to confirm, you will be asked for a password.
G. Default
Reset to factory settings and erase all personal settings.
8.5 Password Setup Page
x
PAS SW ORD S ET UP PAG E
PASSWORD MODE
PASSWORD
GO TO PASSWORD SETUP PAGE
A. Password
1. Enter the old password (the default password is: 138900).
2. Enter the new password and confirm.
12
Page 13

8.6 Exit Setup Page
Press [SETUP] to save settings, exit and return to normal display mode.
9. Care and maintenance
• Always unplug the device before cleaning it.
• Use a soft, dry cloth to clean the device.
• Do not use cleaning liquids that contain alcohol, ammonia, benzene or abrasives as these can damage the casing.
10. Troubleshooting
Problem Possible cause Solution
System will not switch on. Plug not properly pushed into socket. Push plug all the way in.
The remote control
doesn’t work.
No picture on TV. Cables connected incorrectly. Check the connections.
The batteries are flat. Change the batteries.
Remote not pointed at IR sensor. Point the remote control at
the IR sensor.
TV not set to AV channel. Set TV to AV channel.
English
TV mode is not the same as TV’s. Change TV mode: Progressive
or Interlaced.
Disc does not play. No disc in disc tray. Insert a disc.
The disc is upside down. Turn the disc over.
The disc is incompatible. Use a compatible disc.
No sound from the speakers. The speaker cables are not
properly connected.
The audio cables are not
properly connected.
Distorted sound/picture. The disc is dirty. Clean or replace the disc.
The disc is scratched. Change disc.
Poor recording.
Display error. Incorrect use. Read the instruction manual.
Check the connections.
Check the connections.
13
Page 14
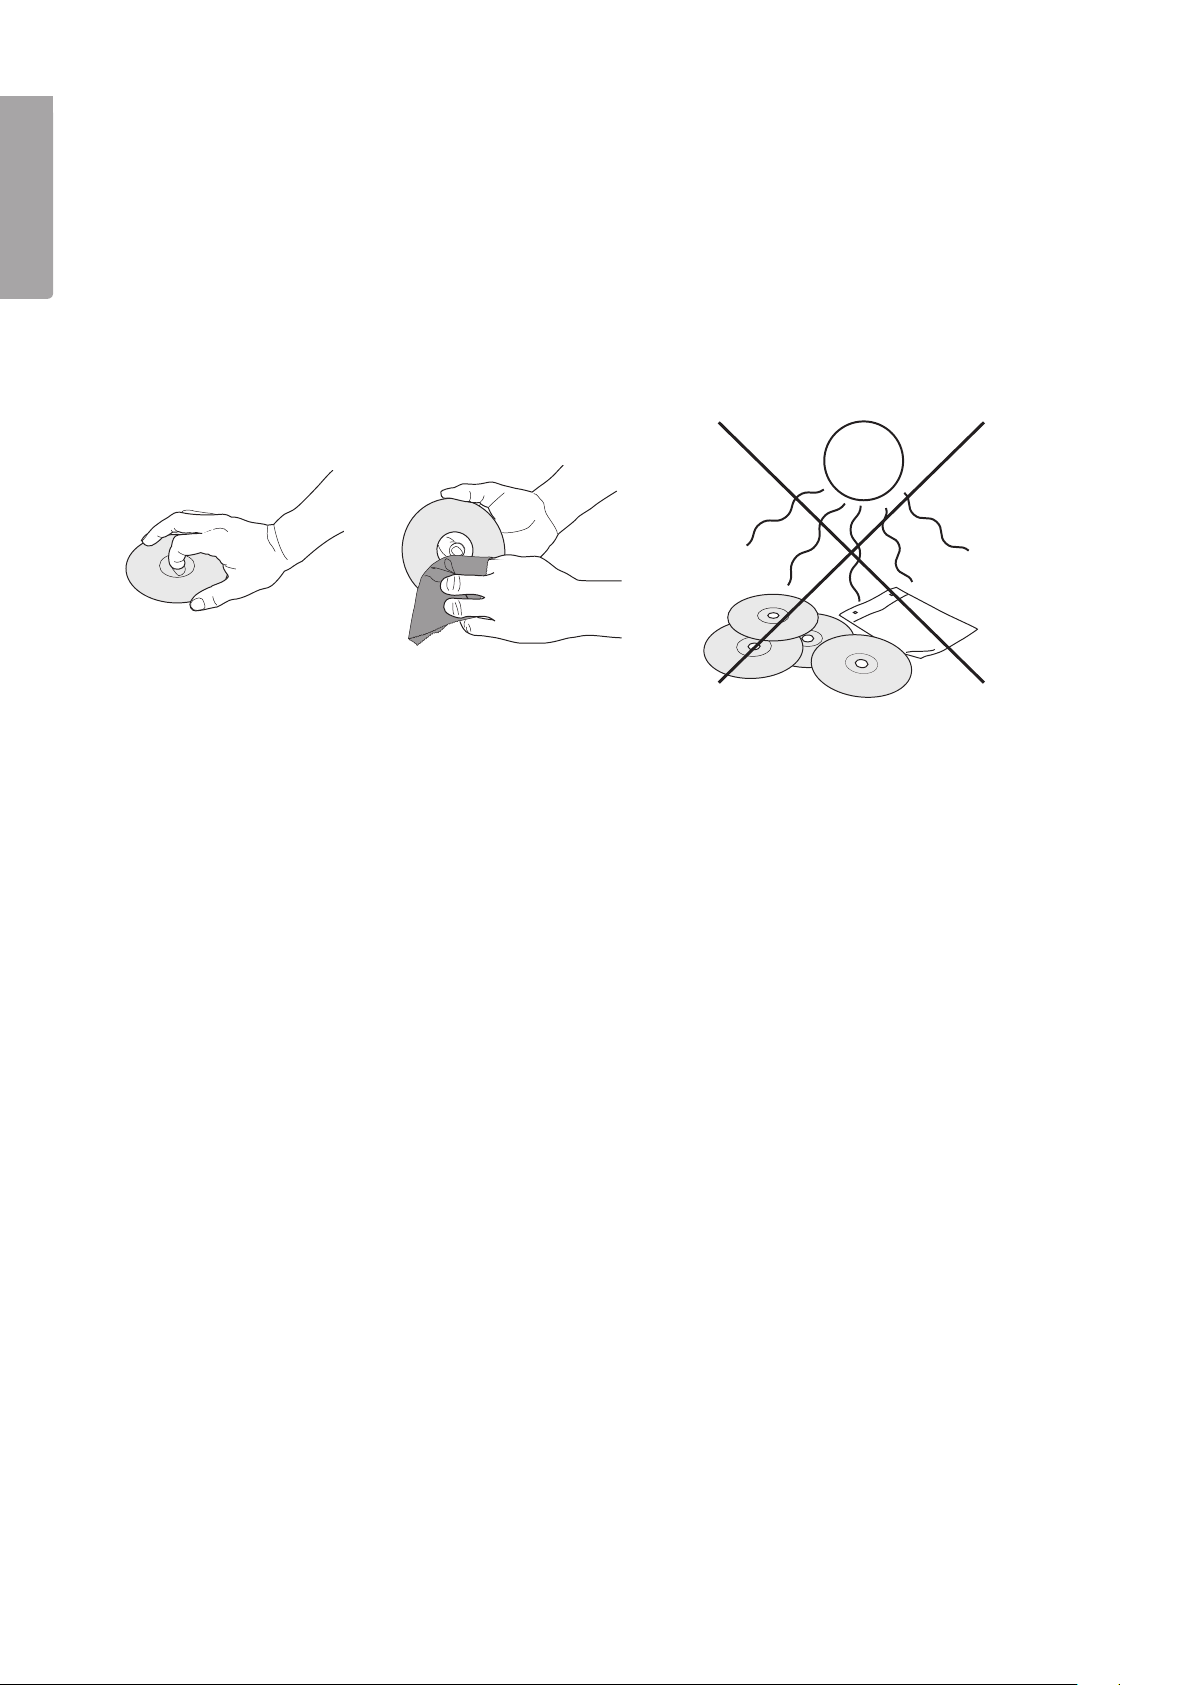
11. Proper handling of the CD player and CDs
• The lens of the CD player must not be touched!
• Sudden changes in the surrounding temperature can cause condensation and the CD player lens can
be covered by a layer of moisture. In such cases it is impossible to play a CD.
English
• Do not try to dry off the lens. Instead let the device stand in a warm room until the moisture has evaporated.
• Always close the CD door to keep the CD compartment dust-free. Use a soft, dry cloth to remove dust from
the CD compartment if needed.
• If the CD needs to be cleaned, clean it with a soft, lint-free cloth starting from the middle and wiping outwards
towards the edge in a straight line. Do not use cleaning liquid as it can damage the CD.
• Never attach stickers to the CD.
12. Disposal
Follow local ordinances when disposing of this product. If you are unsure of how to dispose of this product, please contact
your local authority.
13. Specifications
Input voltage: 230 V AC, 50/60 Hz
Power consumption: 80 W
Batteries: 2 x AAA/R03 (for remote control) (not included)
Audio format: MPEG1, MPEG2, PCM, stereo
Video format: MPEG2 for DVD, MPEG1, MPEG4
Outputs: Video, S-Video, SCART, optical, coaxial, component and connections for speakers.
Inputs: Audio Input, FM aerial. USB and SD memory card connections.
Radio
Frequency range FM 88-108 MHz
Size: Main unit: 20 x 13 x 20 cm, speaker: 14.5 x 19.5 x 22 cm, subwoofer: 14.5 x 31.5 x 26.5 cm
14
Page 15
Musikanläggning med DVD-spelare
Art. nr 18-8162 Modell F71-UK
38-3863 F71
Läs igenom hela bruksanvisningen före användning och spara den sedan för framtida bruk.
Vi reserverar oss för ev. text- och bildfel samt ändringar av tekniska data. Vid tekniska problem eller andra frågor,
kontakta vår kundtjänst (se adressuppgifter på baksidan).
1. Säkerhet
1.1 Säkerhetsföreskrifter
• Produkten får endast repareras av kvalificerad servicepersonal.
• Produkten får inte demonteras eller ändras.
• Täck inte över anläggningen. Tillräcklig ventilation, med ett minsta avstånd på 15 cm mellan
ventilationsöppningarna och omgivande ytor, är nödvändig för att förhindra överhettning.
• Ta ur batterierna om enheten inte ska användas under en längre period. Detta för att förhindra att
batterierna börjar läcka.
• Produkten får inte demonteras eller ändras. Farlig spänning finns oskyddat på komponenter inuti produktens hölje.
Kontakt med dessa kan leda till brand eller ge elektriska stötar.
• Produkten är avsedd endast för inomhusbruk.
• Utsätt aldrig produkten för höga temperaturer, dammig miljö, starka vibrationer, stötar, fukt eller väta.
• Placera inte produkten så att den kan falla ner i vatten eller annan vätska. Ställ inte heller några föremål som
innehåller vätska på produkten, t.ex. en blomvas eller läskedryck.
• Bryt strömmen till apparaten genom att dra apparatens stickpropp ur vägguttaget. Apparatens stickpropp måste
vara lättåtkomlig.
• Nätsladden bör regelbundet kontrolleras. Använd aldrig apparaten om nätsladden eller stickproppen är skadade.
• Om nätsladden skadats får den, för att undvika risk för elektrisk chock eller brand, endast bytas av tillverkaren,
dess serviceställe eller av en kvalificerad yrkesman.
• Placera aldrig nätsladden över heta ytor eller över skarpa kanter och hörn.
Svenska
1.2 Lägg märke till dessa säkerhetssymboler
Varning! Öppna inte höljet. Farlig spänning finns oskyd-
CAUTION/ATTENTION
CLASS 1
LASER PRODUCT
RISK OF ELECTRIC SHOCK
DO NOT OPEN
KLASS 1 LASERAPPARAT
Varning! Öppna inte höljet. Osynlig laserstrålning som kan orsaka ögonskador finns
innanför höljet. Rikta inte blicken in mot strålen och titta inte direkt på den genom
optiska instrument.
dad på komponenter inuti produktens hölje. Kontakt
med dessa kan leda till brand eller ge elektriska stötar.
15
Page 16

2. Strömförsörjning
Nätanslutning
1. Kontrollera om spänningen (V), som finns angiven på märkskylten på baksidan av enheten är densamma
som den i ditt lokala elnät (230 V AC, 50 Hz). Kontakta vår kundtjänst om så inte är fallet.
2. Dra kontakten ur eluttaget för att helt stänga av strömmen. Dra kontakten ur vägguttaget för att skydda enheten
under kraftiga åskväder.
3. Produktbeskrivning
• Musikanläggning med CD/DVD/MP3/MPEG4-spelare och FM-radio.
• Uttag för USB-minne och SD-kort.
Svenska
• SCART-, S-video-, kompositvideo- och komponentvideoutgång.
• Koaxial och optisk digital ljudutgång samt analog ljudutgång (2 x RCA).
• Lågnivåingång (2 x RCA).
• Lev. med 2 st. högtalare, subwoofer och fjärrkontroll.
4. Förpackningen innehåller
• Huvudenhet
• 3 st. högtalare (höger, vänster och subwoofer)
• FM-antenn
• Fjärrkontroll
• Audiokabel och videokabel
• Bruksanvisning
16
Page 17

5. Knappar och funktioner
1
2
POWER
I◄◄(CH-)
3
CD/DVD/DIVX MULTIMEDIA PLAYER
(CH-) ►►I
►PLAY/ENTER
■
STOP/FM ▲ EJECT
7
8
9
4
R
5
6
1. Skivfack
2. [I◄◄CH–] – Gå till föregående spår/mapp
3. [POWER] – Slå på/stäng av
4. [CH+►►I] – Gå till nästa spår/mapp
5. IR-sensor för fjärrkontroll
6. Display
12
13
VOLUME
CD
Svenska
10
DOWN
UP
11
7. [PLAY/ENTER] – Starta/bekräfta
8. [STOP/FM] – Stopp (vid uppspelning)/lyssna på radion
(i stoppläge)
9. [EJECT] – Öppna/stäng skivfacket
10. [VOLUME] – Justera volymen
11. Anslutning för USB och minneskort (under luckan)
14
15
16
17
18
12. SCART-utgång
13. Y, Pb/Cb, Pr/Cr – Komponentutgång
14. Fr/Fl – Anslutning för vänster/höger fronthögtalare
15. Coaxial – Anslutning för koaxialkabel
16. Utgång för S-video och video
19
20
21
17. Optical – Optisk fiberutgång
18. FM – Anslutning för FM-antenn
19. Nätkabel
20. Audio Input – Audioingång vänster/höger
21. Högtalarutgångar
17
Page 18

Fjärrkontroll
22. [STANDBY] – Slå på eller stäng av (gå till standbyläge)
23. [DVD] – Uppspelning av DVD-skiva (om det finns
en skiva i skivfacket)
24. [FM] – Lyssna på radio
25. [AUDIO] – Öppna inställningar för audioingång
26. [DISPLAY] – Tryck på knappen under uppspelning för
att visa information på displayen
27. [SEARCH/MENU] – Öppna/stäng PBC eller gå till rotmenyn
28. [TITLE] – Visa en lista över alla filer på skivan
29. [PLAY/ENTER] – Starta eller bekräfta
Svenska
30. [SETUP] – Öppna inställningar
31. [ I I] Paus – Stäng av uppspelningen tillfälligt
32. [►► TU+] – Snabbspolning framåt 2x – 32x eller
sök radiofrekvens
33. [◄◄ TU-] – Snabbspolning bakåt 2x – 32x eller
sök radiofrekvens
34. [REPEAT A-B] – Tryck under uppspelning för att repetera
ett utvalt avsnitt (A – B).
Tryck en gång där du vill att uppspelningen ska börja (A).
Tryck en gång där du vill stoppa uppspelningen (B).
Det valda avsnittet kommer nu att repeteras tills du trycker
en gång till för att avbryta.
35. [REPEAT] – Välj repeterad uppspelning av skivan
36. [LOUD] – Aktivera eller avaktivera bashöjning
37. [DSP] – Välj önskad ljudbild: Live – Pop – Dance –
Jazz – Classic
22
24
26
28
30
32
34
36
38
23
25
27
29
31
33
35
37
39
40
41
42
43
44
45
46
47
48
49
50
51
52
53
54
55
55
56
38. [RESET] – Återställ till fabriksinställningarna
39. [SHORTCUT] – Hoppa över introduktion och
varningar i början av DVD-skiva
40. [OPEN/CLOSE] – Öppna/stäng skivfacket
41. [0] – [9] – [10+] – Sifferknappar.
Skriv in spårnumret för det önskade spåret med
sifferknapparna. Om numret består av 2 siffror:
Slå först in [10+] och sedan nästa siffra.
Exempel: Välj spår 16 = [10+] och [6].
42. [T/F] – Visa egenskaperna för den skiva som ligger i skivfacket
43. [SAVE/SUB] – Välj språk vid uppspelning av DVD-skiva
(om skivan stöder funktionen)
44. [MO/ST/LANG – (L/R)] Välj uppspelningsläge mono/stereo
eller språk (för DVD-skiva)
45. [ANGLE] – Tryck under uppspelning för att byta bildvinkel
(om skivan stöder funktionen)
46. [<][^][>][v] – Riktningsknappar
47. [MUTE] – Tryck en gång för att stänga av ljudet tillfälligt,
tryck en gång till för att återgå till normal lyssning
48. [USB/CARD/DVD] – Tryck för att välja önskad funktion:
USB, minneskort eller DVD
49. [CH+ ►►I] – Gå till nästa spår/mapp
50. [CH– I◄◄] – Gå till föregående spår/mapp
51. [■] – Stopp.
Tryck en gång för att stoppa uppspelningen.
Tryck sedan på [PLAY/ENTER] för att återuppta
uppspelningen från den plats där den avbröts.
Tryck två gånger för att stoppa uppspelningen.
Tryck sedan på [PLAY/ENTER] för att återuppta
uppspelningen från början.
52. [PROGRAM] – Skapa en spellista.
Skriv in de önskade programnumren vid markören
och bekräfta med [PLAY/ENTER] .
Flytta markören till Start och tryck på [PLAY/ENTER]
(29) för att starta uppspelning.
Avsluta programmerad uppspelning så här: Tryck
på [PROGRAM] för att flytta markören till Stop,
tryck på [PLAY/ENTER] för att flytta markören till
Exit, tryck på [PLAY/ENTER] för att avsluta den
programmerade uppspelningen.
53. [CLEAR] – Radera den senaste inmatningen
54. [TONE] – Justera bas och diskant. Tryck på [TONE]
för att välja bass/treble och tryck på [VOL+]
55. [VOLUME +/-] – Öka/minska volym
56. [ZOOM] – Ändra bildens storlek: 2x, 3x, 4x, 1/2x,
1/3x eller 1/4x av originalstorlek
18
Page 19

POWER
LINK
ETHERNET
POWER
LINK
ETHERNET
6. Anslutningar
6.1 Gör klar musikanläggningen för användning
1. Dra ur musikanläggningens stickpropp.
2. Anslut höger och vänster högtalare till resp. R och L (21). Tryck in kontakterna så att de sitter säkert.
3. Anslut subwoofern till ”SW” (21).
4. Anslut antennen till ”FM” (18).
5. Anslut en kabel från datorns ljudkort till ”Audio Input” (20).
Video ut
Svenska
FM-antenn
Höger
högtalare
Vänster
högtalare
Subwoofer
6.2 Anslutning till TV-apparat
a. Om din TV har SCART-ingång kan du använda SCART-kabeln för att ansluta musikanläggningen direkt till TV-apparaten
från SCART-uttaget (12).
b. Om din TV har videoingång kan du använda videokabeln för att ansluta musikanläggningen till TV-apparaten. Anslut
kabeln till Video input på TV-apparaten och till Video Output på musikanläggningen. Kontrollera sedan anslutningen
genom att ställa in Video in-kanalen på TV-apparaten.
c. Om din TV har ingång för S-video kan du använda S-videokabeln för att ansluta musikanläggningen till TV-apparaten.
Anslut kabeln till S-video (16) på musikanläggningen. Denna anslutning ger den bästa bildkvaliteten.
d. Om din TV har Pb/Cb, Y, Pr/Cr-ingång kan du använda komponentkabel för att ansluta musikanläggningen
till TV-apparaten.
Obs!
• Båda enheterna ska vara avstängda och ha utdragen stickpropp innan kablarna ansluts.
• Ställ in musikanläggningen så att den är anpassad till TV-apparaten.
• Använd endast en av anslutningsmetoderna. Om du använder flera olika metoder samtidigt försämras bildkvaliteten.
• Använd inte strömbrytaren för att snabbt stänga av eller slå på musikanläggningen upprepade gånger. Vänta i minst
3 sekunder innan du trycker på strömbrytaren igen.
• Använd aldrig digital koaxial eller digital optisk utgång samtidigt som den analoga utgången.
19
Page 20

6.3 Anslutning till förstärkare (hemmabioanläggning)
Inställningar för digital utgång.
a. Anslut en kabel från koaxial (15) eller optisk (17) utgång på musikanläggningen till motsvarande ingång på förstärkaren.
I play- eller stoppläge, tryck på [SETUP] (30) för att öppna inställningarna.
b. Använd piltangenterna [v][^][>][<] (46) för att komma till Audio Setup.
c. Knappa ner till Digital Audio Setup med [v] och välj SPDIF setup.
d. Gå till Digital Output och välj SPDIF/RAW eller SPDIF/PCM.
e. Tryck på [PLAY/ENTER] (29) för att bekräfta.
f. Tryck på [SETUP] (30) för att stänga menyn.
Svenska
Koaxial utgång
Optisk utgång
• Om din TV har ingång för S-video kan du använda S-videokabeln för att ansluta musikanläggningen till TV-apparaten,
anslut kabeln till videoutgången på musikanläggningen. Denna anslutning ger den bästa bildkvaliteten.
• Om din TV har Pb/Cb, Y, Pr/Cr-ingång kan du använda komponentkabeln för att ansluta musikanläggningen till
TV-apparaten. Detta ger en naturlig bild.
• Om din TV har SCART-ingång kan du använda SCART-kabeln för att ansluta musikanläggningen direkt till
TV-apparaten från SCART-uttaget (12).
6.4 Fjärrkontroll
1. Sätt i batterierna i fjärrkontrollen enligt märkning i batterifacket.
2. Rikta fjärrkontrollen mot IR-sensorn (5). Räckvidden är upp till 7 meter. Det måste vara fri sikt mellan
fjärrkontrollen och IR-sensorn.
• Störningar från högspänningsanläggningar i närheten kan minska räckvidden och störa funktionen.
20
Page 21

7. Användning
7.1 Lyssna på radio
1. Tryck på [POWER] (3) eller [STANDBY] (22) för att slå på musikanläggningen.
2. Tryck på [FM] (24).
Manuell inställning
1. Ställ in önskad station manuellt:
Tryck på [T/F] (42) och skriv sedan in önskad frekvens med sifferknapparna [0] – [9] (41).
2. Sök station manuellt så här:
Tryck på [T/F] (42). Tryck sedan på [►► TU+] (32) eller [◄◄ TU-] (33) för att söka uppåt eller nedåt.
3. Spara en hittad radiokanal i minnet så här:
a) Tryck på [SAVE/SUB] (43) och skriv sedan in den önskade programplatsen.
Exempel: Spara 99,7 MHz som nummer 28:
Tryck först på [SAVE/SUB] (43) och tryck sedan på [10+] [10+] [8] (för att välja platsen) och sedan på [T/F] (42)
för att ställa in frekvensen manuellt med sifferknapparna (41) eller
[►► TU+] (32) eller [◄◄ TU-] (33) för att söka efter frekvensen.
b) Tryck på [SAVE/SUB] (43) igen för att spara och återgå till normalt lyssningsläge.
c) Radera en sparad station genom att spara en ny på samma minnesnummer.
Automatisk stationssökning
Starta automatisk stationssökning så här: Tryck på [SEARCH/MENU] (27) för att starta automatisk stationssökning.
Alla stationer som hittas blir sparade i minnet (upp till 60 stycken). Tryck en gång till för att avsluta den automatiska
stationssökningen.
Välj återgivning i mono eller stereo
Tryck på [MO/ST/LANG (L/R)] (45) och välj stereo eller mono. Pröva att rikta om antennen om signalen är svag.
7.2 Snabbguide för uppspelning av DVD, MPEG4, CD, mp3 etc.
1. Starta den anslutna tv:n och ställ den i A/V-läge för att se menybilden.
2. Tryck på [POWER] (3) eller [STANDBY] (22) för att slå på musikanläggningen.
3. Tryck på [DVD] (23).
4. Tryck på [EJECT] (9) eller [OPEN/CLOSE] (40) för att öppna skivfacket. Lägg i en skiva och stäng skivfacket eller anslut
en USB-enhet eller SD-minne. Om man t.ex. har en skiva i musikanläggningen och ansluter ett minne så måste man
välja önskad funktion med knappen [USB/CARD/DVD] (48): Använd pilarna [^][v] (46) för att nå de olika funktionerna
och bekräfta sedan med [PLAY/ENTER] (29). Musikanläggningen måste vara ansluten till en TV för att man ska kunna se
funktionerna man kan välja mellan.
Svenska
5. Välj önskad fil/mapp med [<] [>](46).
6. Tryck på [PLAY/ENTER] (29) för att starta uppspelning av det valda spåret.
7. Ställ in önskad volym med [VOLUME +/-] (55).
8. Tryck på [II] (31) för att göra paus i uppspelningen och tryck igen för att återuppta uppspelningen.
9. Gå till föregående/nästa spår med [CH+ ►►I] (49) eller [CH– I◄◄] (50).
10. Tryck på [■] (51) för att stoppa uppspelningen.
Observera! Om man använder musikanläggningen utan TV (utan musikanläggningens meny-bild) så anslut endast en
musikkälla: (en skiva eller en typ av minne, ej båda samtidigt). Musikanläggningen ställer automatiskt in sig på rätt funktion.
Filerna bör också ligga direkt i roten på skivan eller minnet för att underlätta uppspelningen utan TV-bild.
Obs! Stäng alltid av musikanläggningen (eller ändra till DVD- eller TUNER-funktion) innan du tar bort USB-minne eller
SD-minneskort, annars kan minnet förstöras.
Om du ansluter en USB-enhet med kabel får inte kabelns längd överskrida 0,5 meter.
21
Page 22

7.3 Repeterad uppspelning
• Tryck på [REPEAT] (35) för att repetera uppspelning. De olika mediatyperna har olika alternativ för repeterad uppspelning.
• Avsluta repeterad uppspelning genom att trycka på [REPEAT].
7.4 Repeterad uppspelning A till B
Repetera ett utvalt avsnitt (A till B) från det spår som spelas upp.
1. Tryck på [REPEAT A-B] (34) en gång där du vill att uppspelningen ska börja (A).
2. Tryck på [REPEAT A-B] en gång där du vill stoppa uppspelningen (B).
3. Det valda avsnittet kommer nu att repeteras tills du trycker en gång till på [REPEAT A-B] för att avbryta.
Svenska
8. Menyer
8.1. General Setup (Huvudmeny)
x
GE NE RAL S ETUP PAG E
TV DISPLAY 16:9
ANGLE MARK OFF
OSD LANGUAGE ENG
CLOSE CAPTION OFF
SCREEN SAVER ON
LAST MEMORY OFF
S / W VERSION
GO TO GENERAL SETUP PAGE
A. TV Display (bildformat)
4:3PS, 4:3LB, 16:9.
B. Angle Mark
Om du väljer att aktivera Angle Mark visas en symbol på bildskärmen (om skivan är inspelad med
möjlighet att byta bildvinkel).
C. OSD Language (menyspråk)
English, Swedish, Finnish och Norwegian (engelska är förinställt).
D. Close Caption (avsluta bildfångst)
OFF, ON.
E. Screen Saver (skärmsläckare)
ON, OFF.
F. Last Memory (minne för att fortsätta uppspelning efter avbrott)
ON, OFF.
G. S/W Version (visar vilken version av programvara som finns installerad)
22
Page 23

8.2. Audio Setup
x
AU DI O S ET UP PAG E
ANALOG AUDIO SETUP
DIGITAL AUDIO SETUP
DOLBY DIGITAL SETUP
3 D PROCESSING
HDCD
GO TO AUDIO SETUP PAGE
A. Analog Audio Setup (inställningar för analog audio)
Downmix, LT/RT, Stereo, Dialog: Justera dialogvolym.
B. Digital Audio Setup (inställningar för digital audio)
• Under uppspelning av DOLBY- eller MPEG-skiva kommer utgångsformatet för optisk eller koaxialutgång
att vara SPDIF/RAW-format.
• SPDIF/PCM kan väljas om musikanläggningen är ansluten till en 2-kanals digital förstärkare.
C. Dolby Digital Setup (inställningar för digital dolby)
Dual mono, Dynamic.
D. 3D processing (inställningar för 3D-ljud)
Concert, Living room, Hall, Bathroom, Cave, Arena och Church.
E. HDCD (filter för anpassning till skivans inspelade ljud)
OFF, 44,1 kHz, 88,2 kHz.
8.3. Video Setup Page
x
VI DE O S ET UP PAG E
VIDEO OUTPUT RGB
TV MODE
COLOR SETTING
Svenska
GO TO VIDEO SETUP PAGE
A. Video Output (videoutgång)
S-video, YUV, RGB.
B. TV Mode (välj skanningläge)
Progressive, Interlaced.
C. Color Setting (färginställningar)
Sharpness (skärpa), brightness (ljus), contrast (kontrast), gamma (gamma), hue (nyans) och saturation (mättnad).
23
Page 24

8.4. Preference Setup Page (egenskaper)
Menyn visas om skivluckan är öppen eller om du trycker på [<] (46) två gånger under uppspelning.
x
PR EF ERE NC E PAGE
TV TYPE PAL
PBC OFF
AUDIO ENG
SUBTITLE ENG
DISC MENU ENG
PARENTAL
DEFAULT
GO TO PREFERENCE SETUP PAGE
Svenska
A. TV type (ställ in TV-system)
PAL, AUTO, NTSC (PAL används oftast i Europa).
B. PBC (Play Back Control / uppspelning med interaktiv meny för MPEG4)
Open, Close.
C. Audio (välj språk)
English, Swedish, Finnish, Norwegian, French, Spanish, German m.fl.
D. Subtitle (välj textspråk)
English, Swedish, Finnish, Norwegian, French, Spanish, German m.fl.
E. Disk Menu (Language)
English, Swedish, Finnish, Norwegian, French, Spanish, German m.fl.
F. Parental (föräldralås)
Det finns 8 olika inställningar för att förhindra barn att se olämpliga filmer.
1. Flytta markören till önskad inställning.
2. Tryck [PLAY/ENTER] för att bekräfta. Du blir ombedd att skriva in ett lösenord.
G. DEFAULT (återgå till fabriksinställningarna)
Återgå till fabriksinställningarna och radera alla egna inställningar.
8.5. Password Setup Page
x
PAS SW ORD S ET UP PAG E
PASSWORD MODE
PASSWORD
GO TO PASSWORD SETUP PAGE
A. Password (byt lösenord)
1. Skriv in det gamla lösenordet (det fabriksinställda lösenordet är: 138900).
2. Skriv in det nya lösenordet och bekräfta.
24
Page 25

8.6. Exit Setup Page (återgå till normal visning)
Tryck på [SETUP] för att spara och återgå till normal visning.
9. Skötsel och underhåll
• Dra alltid ur stickproppen innan rengöring.
• Använd en mjuk, torr trasa för att rengöra enheten.
• Använd inte rengöringsmedel som innehåller alkohol, ammoniak, bensen eller slipmedel eftersom det kan skada höljet.
10. Felsökning
Problem Trolig orsak Lösning
Det går inte att slå på
musikanläggningen.
Fjärrkontrollen fungerar inte. Batterierna är slut. Byt batterierna.
Ingen bild på TV-apparaten. Anslutningarna är felkopplade. Kontrollera anslutningarna.
Skivan spelas inte upp. Ingen skiva i skivfacket. Lägg i en skiva.
Stickproppen är inte helt inskjuten
i uttaget.
Fjärrkontrollen är inte riktad
mot IR-sensorn.
TV:n är inte inställd i AV-läge. Ställ in AV-kanalen på TV:n.
Skanningläget är inte samma
som TV:n.
Skivan är felvänd. Vänd skivan rätt.
Skivan är inte kompatibel. Använd endast kompatibla skivor.
Kontrollera och tryck in helt.
Rikta fjärrkontrollen mot
IR-sensorn.
Ändra skanningläge: Progressive
eller Interlaced.
Svenska
Inget ljud från högtalarna. Högtalarkablarna är inte rätt anslutna. Kontrollera anslutningarna.
Audiokablarna är inte rätt anslutna. Kontrollera anslutningarna.
Avbrott i ljud och bild. Skivan är smutsig. Rengör eller byt skiva.
Skivan är repig. Byt skiva.
Dålig inspelning.
Displayen visar fel. Felaktig användning. Läs bruksanvisningen.
25
Page 26

11. Hantering av CD-spelare och CD-skivor
• CD-spelarens lins får inte vidröras.
• Plötsliga förändringar i den omgivande temperaturen kan orsaka kondens och göra att linsen i din CD-spelare
täcks av imma. Det är då inte möjligt att spela CD-skivor.
• Försök inte torka av linsen, utan låt anläggningen stå i ett varmt rum tills fukten har avdunstat.
• Stäng alltid CD-luckan för att hålla CD-facket dammfritt. Använd en mjuk, torr trasa för att torka bort damm
från CD-facket om det behövs.
• Om CD-skivan behöver rengöras, torka den med en mjuk, luddfri trasa från mitten ut mot kanten i rak linje.
Använd inte rengöringsmedel, eftersom det kan skada skivan.
• Fäst aldrig några klisterlappar på CD-skivan.
Svenska
12. Avfallshantering
När du ska göra dig av med produkten ska detta ske enligt lokala föreskrifter.
Är du osäker på hur du ska gå tillväga, kontakta din kommun.
13. Specifikationer
Drivspänning: 230 V AC, 50/60 Hz
Effektförbrukning: 80 W
Batterier: 2 x AAA/R03 (till fjärrkontroll), medföljer ej
Audioformat: MPEG1, MPEG2, PCM, stereo
Videoformat: MPEG2 för DVD, MPEG1, MPEG4
Utgångar: Video, S-Video, SCART, optisk, koaxial, komponent samt anslutningar för högtalare
Ingångar: Audio Input, FM-antenn. Anslutning för USB och SD-minneskort
Radio
Frekvensområde FM 88 – 108 MHz
Storlek: Huvudenhet 20 x 13 x 20 cm, högtalare 14,5 x 19,5 x 22 cm, subwoofer 14,5 x 31,5 x 26,5 cm
26
Page 27

Musikkanlegg med DVD-spiller
Art. nr. 18-8162 Modell F71-UK
38-3863 F71
Les bruksanvisningen nøye før produktet tas i bruk, og ta vare på den for framtidig bruk.
Vi reserverer oss mot ev. tekst- og bildefeil, samt forandringer av tekniske data. Ved tekniske problemer eller spørsmål,
ta kontakt med vårt kundesenter. (Se opplysninger om kundesenteret i denne bruksanvisningen).
1. Sikkerhet
1.1 Sikkerhetsinstruksjoner
• Produktet må kun repareres av kyndig servicepersonell.
• Produktet må ikke demonteres eller endres på.
• Produktet må ikke tildekkes. Sørg for tilstrekkelig ventilasjon rundt anlegget. En minsteavstand på 15 cm mellom
ventilasjonsåpningene og tilstøtende flater er nødvendig for å forhindre at anlegget blir overopphetet.
• Ta ut batteriene dersom produktet ikke skal brukes over tid. Dette for å hindre at batteriene skal begynne å lekke.
• Produktet må ikke demonteres eller endres på. Farlig spenning ligger ubeskyttet på visse komponenter under
produktets deksel. Kontakt med disse kan føre til brann eller gi elektriske støt.
• Produktet er kun beregnet for innendørs bruk.
Norsk
• Utsett aldri produktet for høye temperaturer, fuktighet, støvete miljøer, sterke vibrasjoner eller støt.
• Plasser ikke produktet slik at det kan komme i kontakt med vann eller annen væske. Plasser aldri produktet nær
gjenstander som kan forårsake at vann eller annen væske skylles over produktet.
• Produktet gjøres strømløst ved at støpselet trekkes ut av strømuttaket. Apparatets støpsel må være lett tilgjengelig.
• Strømledningen bør kontrolleres regelmessig. Bruk ikke apparatet dersom strømledning eller støpsel er skadet.
• Dersom strømledningen er skadet skal den, for å unngå risiko for elektrisk støt eller brann, kun byttes av produsenten,
serviceverksted eller av en fagperson.
• Plasser aldri strømledningen på varme flater eller rundt skarpe kanter eller hjørner.
1.2 Legg merke til følgende sikkerhetssymboler
Advarsel! Dekselet må ikke åpnes. Farlig spenning
CAUTION/ATTENTION
CLASS 1
LASER PRODUCT
RISK OF ELECTRIC SHOCK
DO NOT OPEN
KLASSE 1 LASERAPPARAT
Advarsel! Dekselet må ikke åpnes. Usynlig laserstråler som kan føre til øyeskader.
Vend ikke blikket mot strålen, og se ikke rett på den gjennom optiske instrumenter.
ligger ubeskyttet på visse komponenter under
produktets deksel. Kontakt med disse kan føre
til brann eller gi elektriske støt.
27
Page 28

2. Strømforsyning
Strømtilkobling
1. Kontroller om spenningen (V), som er angitt på merkeskiltet på baksiden av apparatet, er den samme som i ditt lokale
strømnett (230 V AC, 50 Hz). Hvis dette ikke er tilfelle, ta kontakt med kundetjenesten.
2. Når strømmen skal kobles helt fra tekkes støpselet ut fra strømuttaket. Trekk også støpselet ut av strømuttaket
for å beskytte anlegget ditt ved kraftig tordenvær.
3. Produktbeskrivelse
• Musikkanlegg med cd/dvd/mp3/mpeg4-spiller og FM-radio.
• Uttak for usb-minne og SD-minnekort.
• SCART-, S-video-, komposittvideo- og komponentvideoutgang.
• Koaksial og optisk digital lydutgang samt analog lydutgang (2 x RCA).
• Lavnivåingang (2 x RCA).
• Leveres med 2 stk. høyttalere, subwoofer og fjernkontroll.
Norsk
4. Forpakningen inneholder
• Hovedenhet
• 3 stk. høytalere (høyre, venstre og subwoofer)
• FM-antenne
• Fjernkontroll
• Audiokabel og videokabel
• Bruksanvisning
28
Page 29

5. Knapper og funksjoner
1
2
POWER
3
I◄◄(CH-)
(CH-) ►►I
CD/DVD/DIVX MULTIMEDIA PLAYER
►PLAY/ENTER
■
STOP/FM ▲ EJECT
7
8
9
4
R
CD
5
6
1. Plateskuff
2. [I◄◄CH-] – Gå til foregående spor/mappe
3. [POWER] – Skru på/av
4. [►►I CH+] – Gå til neste spor/mappe
5. IR-sensor for fjernkontroll
6. Display
12
13
VOLUME
10
DOWN
UP
11
7. [PLAY/ENTER] – Starte/bekrefte
8. [STOP/FM] – Stopp (ved avspilling)/lytte på radioen
(i stoppmodus)
9. [EJECT] – Åpne/lukke plateskuff
10. [VOLUME] – Justere volumet
11. Uttak for usb og minnekort (under lokket)
Norsk
14
15
16
17
18
12. SCART-utgang
13. Y, Pb/Cb, Pr/Cr – Komponentutgang
14. FR/FL – Utgang for venstre/høyre
fronthøyttaler
15. Coaxial – Uttak for koaksialkabel
16. Utgang for S-video og video
19
20
21
17. Optical – Optisk fiberutgang
18. FM – Inngang for FM-antenne
19. Strømkabel
20. Audio Input – Audioinngang venstre/høyre
21. Høyttalerutganger
29
Page 30

Fjernkontroll
22. [STANDBY] – Skru på/av (gå til standbymodus)
23. [DVD] – Spille av DVD-plate
24. [FM] – Lytte til radio
25. [AUDIO] – Åpne innstillinger for Audio Input (Audio inngang)
26. [DISPLAY] – Trykk på knappen under avspilling for å få opp
informasjon i displayet
27. [SEARCH/MENU] – Åpne/stenge PBC eller gå
til grunnmenyen
28. [TITLE] – Vis liste over alle filer på platen
29. [PLAY/ENTER] – Starte/bekrefte
30. [SETUP] – Åpner innstillingsmenyen
31. [ I I] Pause – Midlertidig pause i avspilling
32 [►► TU+] – Spole raskt framover 2x – 32x eller
søke radiofrekvens
33. [◄◄ TU-] – Spole raskt bakover 2x – 32x eller
søke radiofrekvens
34. [REPEAT A-B] – Trykk under avspilling for
Norsk
å repetere et bestemt avsnitt (A – B).
Trykk en gang der avspillingen skal starte (A).
Trykk en gang der avspillingen skal stoppe (B).
Det valgte avsnittet vil nå repeteres til man trykker
en gang til for å avbryte.
35. [REPEAT] – Velg repetert avspilling av platen
36. [LOUD] – Aktiver eller deaktiver Loudness (bassforsterking)
37. [DSP] – Velg ønsket lydbilde: Live – Pop – Dance –
Jazz – Classic
22
24
26
28
30
32
34
36
38
23
25
27
29
31
33
35
37
39
40
41
42
43
44
45
46
47
48
49
50
51
52
53
54
55
55
56
38. [RESET] – Anlegget stilles tilbake til fabrikkinnstillingene
39. [SHORTCUT] – Hopp over introduksjon og advarsler
på starten av DVD-platen
40. [OPEN/CLOSE] – Åpner/Stenger plateskuffen
41. [0] - [9] - [10+] – Talltaster.
Tast inn nummeret på ønsket spor med talltastene
Hvis nummeret består av to siffer: Tast først inn [10+]
og deretter det neste sifferet.
Eksempel: Velg spor 16 = [10+] og [6].
42. [T/F] – Vis egenskapene for platen som er i plateskuffen
43. [SAVE/SUB] – Velg språk ved avspilling av DVD-plate
(hvis platen støtter funksjonen)
44. [ANGLE] – Trykk under avspilling for å skifte bildevinkel
(hvis platen støtter funksjonen)
45. [MO/ST/LANG (L/R)] – Velg avspillingsmodus mono/stereo
eller språk (for DVD-plate)
46. [<][^][>][v] – Retningstaster
47. [MUTE] – Trykk en gang for å skru av lyden midlertidig.
Trykk en gang til for å gå tilbake til normal modus
48. [USB/CARD/DVD] – Trykk for å velge funksjon: USB,
minnekort eller DVD
49. [CH+ ►►I] – Gå til neste spor/mappe
50. [CH– I◄◄] – Gå til foregående spor/mappe
51. [■] – Stopp
Trykk en gang for å stoppe avspillingen.
Trykk deretter [PLAY/ENTER] for å gjenoppta
avspillingen fra det stedet avspillingen ble brutt.
Trykk to ganger for å stoppe avspillingen.
Trykk på [PLAY/ENTER] for å starte avspillingen
fra begynnelsen.
52. [PROGRAM] – Lag en spilleliste
Skriv inn ønskede programnumrene ved
markøren og bekreft med [PLAY/ENTER].
Flytt markøren til Start og trykk på [PLAY/ENTER]
for å starte avspillingen.
Avslutt programmert avspilling slik: Trykk på
[PROGRAM] for å flytte markøren til Stop.
Trykk på [PLAY/ENTER] for å flytte markøren til
Exit. Trykk på [PLAY/ENTER] for å avslutte den
programmerte avspillingen.
53. [CLEAR] – Slett det sist programerte
54. [TONE] – Juster bass og diskant.
Trykk på [TONE] for å velge bass/diskant og
trykk på [VOL+].
55. [VOLUME+/-] – Heve/senke volumet
56. [ZOOM] – Endre størrelsen på bildet: 2x, 3x, 4x,
1/2x, 1/3x eller ¼ av original størrelse
30
Page 31

POWER
LINK
ETHERNET
POWER
LINK
ETHERNET
6. Tilkoblinger
6.1 Klargjøring før bruk
a. Trekk ut støpselet.
b. Høyre og venstre høyttaler kobles til høyttaleruttakene R og L (21). Trykk inn kontaktene slik at de sitter godt festet.
c. Subwooferen kobles til SW (21).
d. Antennen kobles til FM (18).
e. Kabelen fra datamaskinens lydkort kobles til Audio Input (20).
Video ut
Norsk
FM-antenne
Høyre
høyttaler
Venstre
høyttaler
Subwoofer
6.2 Tilkobling til tv-apparat
a. Hvis tv-apparatet har SCART-inngang kan den benyttes for å koble musikkanlegget direkte til tv-apparatet.
b. Dersom tv-apparatet har videoinngang kan man benytte en videokabel til å koble musikkanlegget til tv-apparatet.
Kabelen kobles da til Video Input på tv-apparatet og til Video Output på musikkanlegget. Resultatet av koblingen
kontrolleres ved å stille inn Video In-kanalen på tv-apparatet.
c. Dersom tv-apparatet har S-video kan man benytte en S-videokabel til å koble musikkanlegget til tv-apparatet.
Kabelen kobles til S-video (16) på musikkanlegget. Denne koblingen gir den beste bildekvaliteten.
d. Dersom tv-apparatet har Pb/Cb, Y, Pr/Cr-inngang kan man benytte en komponentkabel til å koble
musikkanlegget til tv-apparatet.
Obs!
• Begge enhetene skal være avskrudd og støpslene trukket ut ved kobling av kablene.
• Still inn musikkanlegget slik at det er tilpasset tv-apparatet.
• Benytt kun en av tilkoblingsmetodene. Dersom man bruker flere metoder samtidig vil bildekvaliteten bli dårlig.
• Strømbryteren må ikke benyttes til å skru av/på musikkanlegget raskt gjentatte ganger. Vent i minst 3 sekunder
før du trykker på strømbryteren etter at du har brukt den en gang.
• Bruk aldri digital koaksial eller digital optisk utgang samtidig med den analoge utgangen.
31
Page 32

6.3 Kobling til forsterker (hjemmekinoanlegg)
Innstillinger for digital utgang.
a. Kabel fra koaksial (15) eller optisk (17) utgang på musikkanlegget kobles til tilsvarende inngang på forsterkeren.
Trykk på [SETUP] (30) spille- og stoppmodus for å åpne innstillingsmodus.
b. Bruk piltastene [v][^][>][<] (46) for å gå til Audio Setup.
c. Gå til Digital Audio Setup med [v] og velg SPDIF setup.
d. Gå til Digital Output og velg SPDIF/RAW eller SPDIF/PCM.
e. Trykk på [PLAY/ENTER] for å bekrefte dine valg.
f. Trykk på [SETUP] (30) for å lukke menyen.
Norsk
Koaksial utgang
Optisk utgang
• Dersom tv-apparatet har S-video kan man benytte en S-videokabel til å koble musikkanlegget til tv-apparatet.
Kabelen kobles til videoutgangen på musikkanlegget. Denne koblingen gir den beste bildekvaliteten.
• Dersom tv-apparatet har Pb/Cb, Y, Pr/Cr-inngang kan man benytte en komponentkabel til å koble musikkanlegget
til tv-apparatet. Dette gir et naturlig bilde.
• Hvis tv-apparatet har SCART-inngang kan den benyttes til å koble musikkanlegget direkte til tv-apparatet.
6.4 Fjernkontroll
1. Sett batteriene i som markeringen viser i batteriluken.
2. Rett fjernkontrollen mot sensoren. Rekkevidde på inntil 7 meter. Sikten må være fri mellom fjernkontrollen og sensoren.
• Rekkevidden kan bli redusert ved forstyrrelser av for eksempel høyspentanlegg etc.
32
Page 33

7. Bruk
7.1 Lytt på radio
1. Trykk på [POWER] (3) eller [STANDBY] (22) for å slå på musikkanlegget.
2. Trykk på [FM] (24)
Manuell innstilling
1. Stille inn ønsket stasjon:
Trykk på [T/F] (42) og skriv deretter inn ønsket frekvens med talltastene [0] – [9] (41).
2. Stasjon kan søkes manuelt slik:
Trykk på [T/F] (42). Trykk deretter på [►► TU+] (32) eller [◄◄ TU-] (33) for å søke oppover eller nedover.
3. Hvis man ønsker å lagre en radiokanal, gjør slik:
a) Trykk på [SAVE/SUB] (43) og skriv deretter inn den ønskede programplassen.
Eksempel: Lagre 99,7 MHz som nummer 28:
Trykk først på [SAVE/SUB] (43) og trykk deretter på [10+] [10+] [8] (for å velge plassen) og deretter på [T/F] (42) for å
stille inn frekvensen manuelt med talltastene (41) eller [►► TU+] (32) eller [◄◄ TU-] (33) for å søke etter frekvensen.
b) Trykk på [SAVE/SUB] (43) igjen for å lagre og å gå tilbake til normalt lyttemodus.
c) Lagrede kanaler slettes ved å lagre en ny over den gamle (på samme lagringsplass).
Automatisk stasjonssøk
Automatisk søk startes slik: Trykk på [SEARCH/MENU] (27) for å starte automatisk stasjonssøking.
Alle stasjoner som finnes blir lagret i minnet (inntil 60 stasjoner). Trykk en gang til for å avslutte denne funksjonen igjen.
Norsk
Velg mono eller stereo
Trykk på [MO/ST/LANG (L/R)] (45) og velg stereo eller mono. Prøv å dreie på antennen hvis signalene er svake.
7.2 Hurtigguide for avspilling av DVD, mpeg4, CD, mp3 etc.
1. Start den tilkoblede tv-en og still den i A/V-modus for å se menybildet.
2. Trykk på [POWER] (3) eller [STANDBY] (22) for å slå på musikkanlegget.
3. Trykk på [DVD] (23).
4. Trykk på [EJECT] (9) eller [OPEN/CLOSE] (40) for å åpne cd-luken. Legg i en plate og lukk plateskuffen eller koble til en
USB-enhet eller SD-minne. Hvis man f.eks. har en plate i musikkanlegget og kobler til et minne, må man velge ønsket
funksjon med knappen [USB/CARD/DVD] (48): Bla med pilene [^][v] (46) og bekreft deretter med [PLAY/ENTER] (29).
Musikkanlegget må være koblet til en TV for at man skal kunne se funksjonene man kan velge mellom.
5. Velg ønsket fil/mappe med [<] [>](46).
6. Trykk kort på [PLAY/ENTER] (29) for å starte avspilling av det valgte sporet.
7. Still inn ønsket volum [VOLUME +/-] (55).
8. Trykk på [II] (31) for å ta pause i avspillingen og trykk igjen for å gjenoppta spillingen.
9. Gå til foregående/neste spor med [CH+ ►►I] (49) eller [CH– I◄◄] (50).
10. Trykk på [■] (51) for å stoppe avspillingen.
Obs! Hvis man bruker musikkanlegget uten TV (uten musikkanleggets meny-bilde) så koble kun til en musikkilde:
(en plate eller en type minne, ikke begge samtidig). Musikkanlegget stiller seg automatisk inn på riktig funksjon.
Filene bør også ligge på roten av platen eller minnet for å forenkle avspillingen uten TV-bilde.
Obs! Skru alltid av anlegget (eller endre til DVD- eller TUNER-funksjon) før du tar ut usb-minnet eller sd-minnekortet.
Hvis ikke kan minnekortet bli ødelagt.
Hvis man kobler til en usb-enhet med kabel må ikke kabelens lengde overskride 0,5 meter.
33
Page 34

7.3 Repetert avspilling
• Trykk på [REPEAT] for å repetere avspillingen. De forskjellige medietypene har forskjellig alternativer
for repetert avspilling.
• Repetert avspilling avsluttes ved å trykke på [REPEAT] (35).
7.4 Repetert avspilling av sekvenser, A til B
Avsnitt/sekvenser kan repeteres.
1. Trykk på [REPEAT A-B] (34) en gang der avspillingen skal starte (A).
2. Trykk på [REPEAT A-B] (34) en gang der avspillingen skal stoppe (B).
3. Det valgte avsnittet vil nå repeteres til man trykker en gang til for å avbryte.
8. Menyer
8.1 General Setup (Hovedmeny)
x
GE NE RAL S ETUP PAG E
Norsk
TV DISPLAY 16:9
ANGLE MARK OFF
OSD LANGUAGE ENG
CLOSE CAPTION OFF
SCREEN SAVER ON
LAST MEMORY OFF
S / W VERSION
GO TO GENERAL SETUP PAGE
A. TV Display (bildeformat)
4:3PS, 4:3LB, 16:9.
B. Angle Mark
Hvis du velger å aktivere Angle Mark, vil et symbol komme opp på bildeskjermen (dersom platen støtter denne funksjonen).
C. OSD Language (menyspråk)
Engelsk, Svensk, Finsk og Norsk. (Den er forhåndsinnstilt på enkelsk språk).
D. Close Caption (avslutte bildefangst)
OFF, ON.
E. Screen Saver (skjermsparer)
ON, OFF.
F. Last Memory (minne for å fortsette avspillingen etter brudd)
ON, OFF.
G. S/W Version (viser hvilken versjon av programvaren som er installert)
34
Page 35

8.2 Audio Setup
x
AU DI O S ET UP PAG E
ANALOG AUDIO SETUP
DIGITAL AUDIO SETUP
DOLBY DIGITAL SETUP
3 D PROCESSING
HDCD
GO TO AUDIO SETUP PAGE
A. Analog Audio Setup (instillinger for analog audio)
Downmix, LT/RT, Stereo, dialog: Justere dialogvolum.
B. Analog Audio Setup (innstillinger for analog audio)
• Under avspilling av DOLBY- eller MPEG-plate kommer utgangsformatet for optisk- eller koaksialutgang
til å være SPDIF/RAW-format.
• SPDIF/PCM kan velges om musikkanlegget er koblet til en 2-kanals digital forsterker.
C. Analog Digital Setup (innstillinger for digital dolby)
Dual mono, Dynamic.
D. 3D processing (innstillinger for 3D lyd)
Concert, Living room, Hall, Bathroom, Cave, Arena og Church.
E. HDCD (filter for tilpassing til platens innspilte lyd)
OFF, 44,1 kHz, 88,2 kHz.
8.3 Video Setup Page
x
VI DE O S ET UP PAG E
VIDEO OUTPUT RGB
TV MODE
COLOR SETTING
GO TO VIDEO SETUP PAGE
Norsk
A. Video Output (videoutgang)
S-video, YUV, RGB.
B. TV Mode (velg skanningmodus)
Progressive, Interlaced.
C. Color Setting (fargeinnstillinger)
Sharpness (skarphet), brightness (lys), contrast (kontrast), gamma (gamma), hue (nyanse) og saturation (metning).
35
Page 36

8.4 Preference Setup Page (egenskaper)
Menyen vises dersom plateskuffen er åpen eller hvis du trykker på [<] (48) to ganger under avspilling).
x
PR EF ERE NC E PAGE
TV TYPE PAL
PBC OFF
AUDIO ENG
SUBTITLE ENG
DISC MENU ENG
PARENTAL
DEFAULT
GO TO PREFERENCE SETUP PAGE
A. TV-type (still inn TV-system)
PAL, AUTO eller NTSC. (PAL brukes oftast i Europa).
B. PBC (Play Back Control)(avspilling med interaktiv meny for MPEG4)
Open, Close.
C. Audio (Language) (velg språk)
Norsk
English, Swedish, Finnish, Norwegian, French, Spanish, German m.fl.
D. Subtitle (Language) (velg tekstspråk)
English, Swedish, Finnish, Norwegian, French, Spanish, German m.fl.
E. Disk Menu (Language)
English, Swedish, Finnish, Norwegian, French, Spanish, German m.fl.
F. Parental (foreldrekontroll)
Det er 8 forskjellige innstillinger for å hindre at barn får tilgang på upassende filmer.
1. Flytt markøret til ønsket innstilling.
2. Trykk [PLAY/ENTER] for å bekrefte. Du blir bedt om å skrive inn et passord.
G. DEFAULT (gå tilbake til fabrikkinnstillingene)
Gå tilbake til fabrikkinnstillingene og slette alle egne innstillinger.
8.5 Password Setup Page
x
PAS SW ORD S ET UP PAG E
PASSWORD MODE
PASSWORD
GO TO PASSWORD SETUP PAGE
A. Password (skifte passord)
1. Skriv inn det gamle passordet (det fabrikkinnstilte passordet er: 138900).
2. Skriv inn et nytt passord og bekreft det.
36
Page 37

8.6 Exit Setup Page (gå tilbake til normal visning)
Trykk inn [SETUP] for å lagre og gå tilbake til normal tidsvisning.
9. Stell og vedlikehold
• Trekk alltid støpselet ut fra vegguttaket før rengjøring.
• Bruk en myk, tørr klut for å rengjøre anlegget.
• Bruk ikke rengjøringsmidler som inneholder alkohol, ammoniakk, benzen eller slipende midler, da dette kan
skade dekselet.
10. Feilsøking
Problem Mulig årsak Løsning
Det går ikke å slå på anlegget. Støpselet er ikke riktig plugget inn. Trykk det helt inn.
Fjernkontrollen fungerer ikke. Batteriene er utbrukt. Skift batterier.
Fjernkontrollen er ikke rettet mot sensoren. Rett fjernkontrollen mot sensoren.
Ikke noe bilde på tv-skjermen. Kabler er feilkoblet. Kontroller koblingspunktene.
Tv-apparatet er ikke stilt inn i AV-modus. Still inn AV på tv-en.
Skanningmodus er ikke det samme som
på tv-apparatet.
Platen spilles ikke av. Det er ingen plate i plateskuffen. Legg i en plate.
Platen er lagt inn feil. Sjekk og legg den riktig vei.
Platen er ikke kompatibel. Benytt kun kompatible plater.
Ingen lyd fra høyttalerne. Nettverkskablene er ikke riktig koblet til. Kontroller tilkoblingene.
Audiokablene er ikke riktig koblet til. Kontroller tilkoblingene.
Brudd i lyd og bilde. Det er smuss på platen. Rengjør eller skift plate.
Platen har riper. Skift plate.
Endre Progressive eller Interlaced.
Norsk
Dårlig innspillingskvalitet.
Displayet viser feil. Feil bruk. Les bruksanvisningen.
37
Page 38

11. Håndtering av cd-spiller og cd-plater
• Cd-spillerens linse må ikke berøres.
• Plutselige forandringer i omgivelsenes temperatur kan forårsake kondens og gjøre så linsen på din CD-spiller dekkes
av dugg. Det blir da umulig å spille cd-plater.
• Forsøk ikke å tørke av linsen, men la anlegget stå i et varmt rom til fukten har fordampet.
• Steng alltid cd-luken for å holde cd-spilleren støvfri. Bruk en myk, tørr klut til å tørke bort støv fra lokket, ved behov.
• Dersom cd-platen må rengjøres kan den tørkes med en myk, klut som ikke loer. Tørk fra midten og ut mot kanten
i en rett linje. Bruk ikke rengjøringsmidler, da dette kan skade platen.
• Fest aldri klistremerker på cd-platen.
Norsk
12. Avfallshåndtering
Når produktet skal kasseres, må det skje i henhold til lokale forskrifter. Ved usikkerhet, ta kontakt med lokale myndigheter.
13. Spesifikasjoner
Spenning: 230 V AC, 50/60 Hz
Effektforbruk: 80 W
Batterier: 2 stk. AAA/R03 (til fjernkontroll) (medfølger ikke)
Audioformat: MPEG1, MPEG2, PCM, stereo
Videoformat: MPEG2 for DVD, MPEG1, MPEG4
Utganger: Video, S-Video, SCART, optisk, koaksial, component samt tilkoblinger for høyttaler
Innganger: Audio Input, FM-antenn. Tilkobling for usb-minne og SD-minnekort
Radio
Frekvensområde: FM 88 - 108 MHz
Størrelse: Hovedenhet 20 x 13 x 20 cm, høyttaler 14,5 x 19,5 x 22 cm, subwoofer 14,5 x31,5 x 26,5 cm
38
Page 39

Ministereo, jossa dvd-soitin
Tuotenumero 18-8162 Malli F71-UK
38-3863 F71
Lue käyttöohje ennen tuotteen käyttöönottoa ja säilytä se tulevaa tarvetta varten. Pidätämme oikeuden teknisten tietojen
muutoksiin. Emme vastaa mahdollisista teksti- tai kuvavirheistä. Jos laitteeseen tulee teknisiä ongelmia, ota yhteys myymälään tai asiakaspalveluun (yhteystiedot käyttöohjeen lopussa).
1. Turvallisuus
1.1 Turvallisuusohjeita
• Laitteen saa korjata vain valtuutettu huoltoliike.
• Älä pura tai muuta laitetta.
• Älä peitä laitetta. Riittävä ilmastointi (vähintään 15 cm ilmastointiaukon ja ympäröivän pinnan välillä) on välttämätön, jotta
laitteen ylikuumeneminen estetään.
• Poista paristot, jos laite on pitkään käyttämättä. Näin estetään paristojen vuotaminen.
• Älä pura tai muuta laitetta. Laitteen rungon sisällä on vaarallista jännitettä sisältäviä suojaamattomia komponentteja.
Niiden koskettaminen voi johtaa tulipaloon tai sähköiskuun.
• Laite on tarkoitettu vain sisäkäyttöön.
• Älä altista laitetta korkeille lämpötiloille, pölylle, tärinälle, iskuille, kosteudelle tai vedelle.
• Älä sijoita laitetta sellaiseen paikkaan, josta se voi tippua veteen tai muuhun nesteeseen. Älä laita laitteen päälle nesteitä
sisältäviä esineitä, kuten maljakoita tai limsapulloja.
• Katkaise laitteen virta irrottamalla sen pistoke seinäpistorasiasta. Pistokkeen tulee olla sellaisessa paikassa, johon on
helppo päästä.
• Tarkasta virtajohdon kunto säännöllisesti. Älä käytä laitetta, mikäli johto tai pistoke on vioittunut.
• Vioittuneen johdon saa vaihtaa ainoastaan valmistaja, sen määräämä huoltopiste tai valtuutettu ammattilainen. Näin
vältetään sähköiskut ja tulipalot.
• Älä sijoita johtoa kuumien pintojen tai terävien kulmien päälle.
2. Huomioi seuraavat turvallisuussymbolit
Varoitus! Älä avaa laitteen koteloa. Tuotteen rungon
CAUTION/ATTENTION
CLASS 1
LASER PRODUCT
RISK OF ELECTRIC SHOCK
DO NOT OPEN
LUOKAN 1 LASERLAITE
Varoitus! Älä avaa laitteen koteloa. Näkymätön lasersäde voi aiheuttaa silmävaurioita.
Älä katso säteeseen edes optisten instrumenttien läpi.
sisällä on vaarallista jännitettä sisältäviä suojaamattomia
komponentteja. Niiden koskettaminen voi johtaa tulipaloon tai sähköiskuun.
Suomi
39
Page 40

3. Virtalähde
Verkkoliitäntä
1. Varmista, että laitteen takaosan arvokilpeen merkitty jännite (V) on sama kuin sähköverkkosi jännite (230 V AC, 50 Hz).
Jos jännite ei ole sama, ota yhteyttä asiakaspalveluumme.
2. Katkaise laitteesta virta kokonaan irrottamalla pistoke pistorasiasta. Suojaa laitetta irrottamalla pistoke pistorasiasta
ukkosen ajaksi.
3. Tuotekuvaus
• Ministereo, jossa cd-/dvd-/mp3-/mpeg4-soitin ja FM-radio.
• Liitäntä usb- ja SD-muisteille.
• SCART-, S-video-, komposiittivideo- ja komponenttivideoulostulo.
• Koaksiaali- ja optinen digitaalinen ääniulostulo sekä analoginen ääniulostulo (2 x RCA).
• Linjatulo (2 x RCA).
• Pakkaukseen sisältyy 2 kaiutinta, subwoofer ja kaukosäädin.
4. Pakkauksen sisältö
• Pääyksikkö
• 3 kaiutinta (vasen, oikea ja subwoofer)
• FM-antenni
• Kaukosäädin
• Audiokaapeli ja videokaapeli
• Käyttöohje
Suomi
40
Page 41

5. Painikkeet ja toiminnot
1
2
POWER
3
I◄◄(CH-)
(CH-) ►►I
CD/DVD/DIVX MULTIMEDIA PLAYER
►PLAY/ENTER
■
STOP/FM ▲ EJECT
7
8
9
4
R
CD
5
6
1. Levykelkka
2. [I◄◄CH-] – Paluu edelliseen raitaan/kansioon
3. [POWER] – Päälle/pois päältä
4. [►►I CH+] – Siirtyminen seuraavaan raitaan/kansioon
5. Infrapunatunnistin kaukosäädintä varten
6. Näyttö
12
13
VOLUME
DOWN
7. [PLAY/ENTER] – Aloita toisto/vahvista
8. [STOP/FM] – Toiston pysäytys (toistotilassa) /
Radion kuuntelu (pysäytystilassa)
9. [EJECT] – Avaa/sulje levykelkka
10. [VOLUME] – Äänenvoimakkuuden säätö
11. Usb- ja muistikorttiliitännät (luukun alla)
UP
10
11
Suomi
14
15
16
17
18
12. SCART-liitäntä
13. Y, Pb/Cb, Pr/Cr – Komponenttiulostulo
14. Fr/F1 – Kaiutinliitännät (oikea/vasen)
15. Coaxial – Koaksiaalikaapeliliitäntä
16. S-video- ja videoulostulo
19
20
21
17. Optical – Optinen kuituliitäntä
18. FM – FM-antennin liitäntä
19. Virtajohto
20. Audio Input – Audiosisääntulo (vasen/oikea)
21. Kaiutinliitännät
41
Page 42

Kaukosäädin
22. [STANDBY] – Päälle/pois päältä (valmiustila)
23. [DVD] – Dvd-levyn toisto (jos soittimessa on dvd-levy)
24. [FM] – Radion kuuntelu
25. [AUDIO] – Audio Inputin yleiset asetukset (audiosisääntulo)
26. [DISPLAY] – Tietojen näyttö toistotilassa
27. [SEARCH/MENU] – Avaa/sulje PBC tai siirry valikkoon
28. [TITLE] – Näytä kaikki levyn tiedostot listana
29. [PLAY/ENTER] – Aloita toisto/vahvista
30. [SETUP] – Asetukset
31. [II ] – Toiston keskeytys
32. [►► TU+] – Pikakelaus eteenpäin 2x–32x tai
radiotaajuuden etsintä
33. [◄◄ TU-] – Pikakelaus taaksepäin 2x–32x tai
radiotaajuuden etsintä
34. [REPEAT A-B] – Valitun osan (A-B) uudelleentoisto
toistotilassa.
Paina yhden kerran kohdassa, josta haluat
uudelleentoiston alkavan (A).
Paina yhden kerran kohdassa, johon haluat
uudelleentoiston päättyvän (B).
Valittua osaa uudelleentoistetaan niin kauan,
kunnes keskeytät uudelleentoiston.
35. [REPEAT] – Levyn uudelleentoisto
36. [LOUD] – Loudness (bassonvahvistus) päälle/pois päältä.
37. [DSP] – Ääniasetuksen valinta: Live – Pop – Dance
Suomi
– Jazz – Classic
38. [RESET] – Tehdasasetusten palautus
22
24
26
28
30
32
34
36
38
23
25
27
29
31
33
35
37
39
40
41
42
43
44
45
46
47
48
49
50
51
52
53
54
55
55
56
39. [SHORTCUT] – Dvd-levyn alussa olevien alku- ja
varoitustekstien yli hyppääminen
40. [OPEN/CLOSE] – Avaa/sulje levykelkka
41. [0] – [9] – [10+] – Numeropainikkeet.
Valitse haluamasi raidan numero numeropainikkeilla.
Jos raidan numero on kaksinumeroinen, paina ensin [10+] ja
sitten seuraava numero. Esim. Raita 16 = Paina [10+] ja [6].
42. [T/F] – Soittimessa olevan levyn tietojen näyttäminen
43. [SAVE/SUB] – Dvd-levyn tekstityskielen valinta
(jos levy tukee toimintoa)
44. [ANGLE] – Kuvakulman vaihtaminen toistotilassa
(jos levy tukee toimintoa)
45. [MO/ST/LANG (L/R)] – Toistotilan mono/stereo tai kielen
valinta (dvd-levyt)
46. [<][^][>][v] – Nuolipainikkeet
47. [MUTE] – Mykistä ääni tilapäisesti painamalla kerran, palaa
normaalitilaan painamalla toisen kerran
48. [USB/CARD/DVD] – Valitse haluamasi toiminto: usb,
muistikortti tai dvd
49. [CH+ ►►I] – Siirry seuraavaan raitaan/kansioon
50. [CH– I◄◄] – Palaa edelliseen raitaan/kansioon
51. [■] – Pysäytys.
Lopeta toisto painamalla kerran. Jatka toistoa
samasta kohdasta painamalla [PLAY/ENTER].
Lopeta toisto painamalla kaksi kertaa.
Aloita toisto alusta painamalla [PLAY/ENTER].
52. [PROGRAM] – Soittolistan luominen.
Syötä raitojen numerot kohdistimen kohdalle ja
vahvista painamalla [PLAY/ENTER].
Aloita toisto siirtämällä kohdistin kohtaan Start
ja painamalla [PLAY/ENTER] (29).
Ohjelmoidun toiston lopettaminen:
Paina [PROGRAM], jolloin kohdistin siirtyy kohtaan
Stop. Paina [PLAY/ENTER], jolloin kohdistin siirtyy
kohtaan Exit. Lopeta ohjelmoitu toisto painamalla
[PLAY/ENTER].
53. [CLEAR] – Viimeisen syötön poistaminen
54. [TONE] – Basson ja diskantin säätäminen:
Valitse basso/treble painamalla [TONE].
Paina [VOL+]
55. [VOLUME +/-] – Äänenvoimakkuuden lisääminen/
vähentäminen
56. [ZOOM] – Kuvan koon muuttaminen: 2x, 3x, 4x,
1/2x, 1/3x tai ¼x normaalikoko
42
Page 43

POWER
LINK
ETHERNET
POWER
LINK
ETHERNET
6. Liitännät
6.1 Ennen laitteen käyttöönottoa
a. Irrota laitteen pistoke.
b. Liitä oikea ja vasen kaiutin kaiutinliitäntöihin R ja L (21). Paina liittimet kunnolla kiinni.
c. Liitä subwoofer SW-liitäntään (21).
d. Liitä antenni FM-liitäntään (18).
e. Liitä kaapeli tietokoneen äänikortista Audio Input -liitäntään (20).
Videoulostulo
FM-antenni
Oikea kaiutin Vasen kaiutin Subwoofer
6.2 Liittäminen televisioon
a. Jos televisiossa on SCART-sisääntulo, voit liittää television ministereon SCART-liitäntään (12) SCART-kaapelilla.
b. Jos televisiossa on videosisääntulo, voit liittää television ministereoon videokaapelilla. Liitä kaapeli television Video Input
-liitäntään ja ministereon Video Output -liitäntään. Varmista toiminta asettamalla televisio videokanavalle.
c. Jos televisiossa on S-videosisääntulo, voit liittää television ministereoon S-videokaapelilla. Liitä kaapeli ministereon
S-videoliitäntään (16). Tämä liitäntä takaa parhaan kuvanlaadun.
Suomi
d. Jos televisiossa on Pb/Cb, Y, Pr/Cr -sisääntulo, voit liittää television ministereoon komponenttikaapelilla.
Huom.!
• Molempien yksiköiden on oltava pois päältä ja irrotettuina pistorasiasta, kun kaapelit liitetään.
• Tee ministereon asetukset niin, että ne sopivat televisiolle.
• Käytä kerrallaan vain yhtä liitäntätapaa. Useampaa liitäntätapaa käytettäessä kuvanlaatu heikkenee.
• Älä kytke ministereota päälle tai pois päältä virtakytkimellä liian nopeasti useita kertoja peräkkäin. Odota vähintään
3 sekuntia, ennen kuin painat virtakytkintä uudelleen.
• Älä käytä digitaalista koaksiaali- tai digitaalista optista ulostuloa samanaikaisesti analogisen ulostulon kanssa.
43
Page 44

6.3 Liittäminen vahvistimeen (kotiteatteriin)
Digitaaliulostulon asetukset
a. Liitä kaapeli ministereon koaksiaali- (15) tai optisesta (17) ulostulosta vahvistimen vastaavaan sisääntuloon.
Avaa asetukset toisto- tai pysäytystilassa painamalla [SETUP] (30).
b. Valitse Audio Setup (Audioasetukset) nuolipainikkeilla [v][^][>][<] (46).
c. Valitse Digital Audio Setup (Digit lähdön asetukset) painikkeella [v] ja valitse SPDIF setup.
d. Valitse Digital Output (Digit lähtö) sekä SPDIF/RAW (Kaikki) tai SPDIF/PCM (vain PCM).
e. Vahvista painamalla [PLAY/ENTER] (29).
f. Sulje valikko painamalla [SETUP] (30).
Koaksiaaliulostulo
Optinen ulostulo
Suomi
• Jos televisiossa on S-videosisääntulo, voit liittää television ministereoon S-videokaapelilla. Liitä kaapeli ministereon
videoliitäntään. Tämä liitäntä takaa parhaan kuvanlaadun.
• Jos televisiossa on Pb/Cb, Y, Pr/Cr -sisääntulo, voit liittää television ministereoon komponenttikaapelilla. Tämä liitäntä
antaa luonnollisen kuvan.
• Jos televisiossa on SCART-sisääntulo, voit liittää television ministereon SCART-liitäntään (12) SCART-kaapelilla.
6.4 Kaukosäädin
1. Aseta paristot kaukosäätimeen paristolokeron merkintöjen mukaisesti.
2. Suuntaa kaukosäädin infrapunatunnistinta kohti (5). Kantama on jopa 7 metriä. Kaukosäätimen ja infrapunatunnistimen
välissä ei saa olla esteitä.
• Lähistöllä olevien suurjännitelaitteiden aiheuttamat häiriöt voivat vähentää kantamaan ja häiritä toimintaa.
44
Page 45

7. Käyttö
7.1 Radion kuuntelu
1. Kytke laite päälle painamalla [POWER] (3) tai [STANDBY] (22).
2. Paina [FM] (24).
Manuaalinen asetus
1. Kanavan manuaalinen asetus:
Paina [T/F] (42) ja syötä haluamasi taajuus numeropainikkeilla [0] – [9] (41).
2. Kanavan manuaalinen etsintä:
Paina [T/F] (42). Etsi kanavaa ylös- tai alaspäin painamalla [►► TU+] (32) tai [◄◄ TU-] (33).
3. Löytyneen radiokanavan tallentaminen muistiin:
a) Paina [SAVE/SUB] (43) ja syötä haluamasi muistipaikka.
Esimerkki: tallenna 99,7 MHz muistipaikalle 28:
Paina [SAVE/SUB] (43). Valitse muistipaikka painamalla [10+] [10+] [8]. Paina [T/F] (42) ja aseta taajuus manuaalisesti
numeropainikkeilla (41) tai etsi taajuus painamalla [►► TU+] (32) tai [◄◄ TU-] (33).
b) Tallenna ja palaa normaaliin kuuntelutilaan painamalla uudelleen [SAVE/SUB] (43).
c) Poista tallennettu kanava tallentamalla uusi kanava samaan muistipaikkaan.
Automaattinen kanavahaku
Aloita automaattinen kanavahaku painamalla [SEARCH/MENU] (27).
Kaikki löytyneet kanavat tallentuvat muistiin (jopa 60 kanavaa). Lopeta automaattinen kanavahaku painamalla
painiketta uudelleen.
Valinta mono/stereo
Valitse mono tai stereo painamalla [MO/ST/LANG (L/R)] (45). Suuntaa antenni uudelleen, jos signaali on heikko.
7.2
Pikaopas mm. dvd- ja cd-levyjen sekä MPEG4- ja mp3-tiedostojen toistamiseen
1. Käynnistä laitteeseen liitetty televisio ja valitse A/V-tila, jotta näet laitteen valikkokuvan.
2. Kytke laite päälle painamalla [POWER] (3) tai [STANDBY] (22).
3. Paina [DVD] (23).
4. Avaa levykelkka painamalla [EJECT] (9) tai [OPEN/CLOSE] (40). Aseta levy paikoilleen ja sulje levykelkka tai liitä
laitteeseen usb- tai SD-muisti. Jos laitteeseen liitetään muisti, kun laitteen sisällä on levy, haluttu tila on valittava
painikkeella [USB/CARD/DVD] (48): Valitse tila nuolipainikkeilla [^][v] (46) ja vahvista valinta painamalla [PLAY/ENTER]
(29). Laite on oltava liitetty televisioon, jotta tilavaihtoehdot ovat nähtävissä.
5. Valitse haluamasi tiedosto/kansio painikkeilla [<] [>](46).
6. Aloita haluamasi raidan toisto painamalla [PLAY/ENTER] (29).
7. Säädä äänenvoimakkuutta painamalla [VOLUME +/-] (55).
8. Keskeytä toisto painamalla [II] (31). Jatka toistoa painamalla painiketta uudelleen.
9. Siirry edelliseen/seuraavaan raitaan painamalla [CH+ ►►I] (49) tai [CH– I◄◄] (50).
10. Lopeta toisto painamalla [■] (51).
Huom.! Jos laitetta käytetään ilman televisiota, laitteen valikkokuva ei näy. Liitä siinä tapauksessa laitteeseen vain yksi
musiikkilähde kerrallaan, joko levy tai muisti (ei molempia yhtä aikaa). Silloin laite valitsee automaattisesti oikean tilan.
Tiedostojen on myös oltava suoraan levyn tai muistin juuressa, jotta toisto olisi mahdollisimman helppoa ilman televisiossa
näkyvää valikkokuvaa.
Suomi
Huom.! Sammuta laite aina (tai vaihda tilaksi DVD tai TUNER), ennen kuin poistat usb-muistin tai SD-muistikortin.
Näin estetään muistin vahingoittuminen.
Jos liität usb-muistin kaapelilla, kaapeli saa olla korkeintaan 0,5 metriä pitkä.
45
Page 46

x
7.3 Uudelleentoisto
Käynnistä uudelleentoisto painamalla [REPEAT] (35). Eri mediatyypeille voi valita eri uudelleentoistotapoja.
Lopeta uudelleentoisto painamalla [REPEAT].
7.4 Uudelleentoisto (A-B)
Valitun osan (A-B) uudelleentoisto parhaillaan kuunneltavalta raidalta.
1. Paina [REPEAT A-B] (34) yhden kerran kohdassa, josta haluat uudelleentoiston alkavan (A).
2. Paina [REPEAT A-B] yhden kerran kohdassa, johon haluat uudelleentoiston päättyvän (B).
3. Valittua osaa raidasta toistetaan, kunnes lopetat uudelleentoiston painamalla kerran [REPEAT A-B].
8. Valikot
8.1 General Setup (Yleiset asetukset)
GE NE RAL S ETUP PAG E
TV DISPLAY 16:9
ANGLE MARK OFF
OSD LANGUAGE ENG
CLOSE CAPTION OFF
SCREEN SAVER ON
LAST MEMORY OFF
S / W VERSION
GO TO GENERAL SETUP PAGE
A. TV Display (Kuvasuhde)
Suomi
4:3 PANSCAN, 4:3 LETTERBOX, 16:9 WIDE.
B. Angle Mark
Jos aktivoit Angle Mark -toiminnon, näytölle ilmestyy siitä ilmoittava kuva (jos levy on tallennettu niin, että
kuvakulmaa voi vaihtaa).
C. OSD Language (Valikkokieli)
English (Englanti), Swedish (Ruotsi), Finnish (Suomi) ja Norwegian (Norja). (Esiasetuksena englannin kieli).
D. Close Caption (Tekstitys kuulovammaisille)
OFF (Pois), ON (Päälle).
E. Screen saver (Ruudunsäästö)
ON (Päälle), OFF (Pois).
F. Last Memory (Viimeinen muisti, jatkaa toistoa sähkökatkoksen jälkeen)
ON (Päälle), OFF (Pois).
G. S/W Version (Asennetun ohjelmistoversion näyttö)
46
Page 47

8.2. Audio Setup (Audioasetukset)
x
AU DI O S ET UP PAG E
ANALOG AUDIO SETUP
DIGITAL AUDIO SETUP
DOLBY DIGITAL SETUP
3 D PROCESSING
HDCD
GO TO AUDIO SETUP PAGE
A. Analog Audio Setup (Analogiset audioasetukset)
Downmix, LT/RT (Vas/oik), Stereo, Dialog (puheäänen voimakkuuden säätäminen).
B. Digital Audio Setup (Digitaaliset audioasetukset)
• DOLBY- tai MPEG-levyltä toistettaessa optisen tai koaksiaaliulostulon formaatti on SPDIF/RAW (Kaikki).
• SPDIF/PCM (vain PCM) voidaan valita, jos laite on liitetty 2-kanavaiseen digitaalivahvistimeen.
C. Dolby Digital Setup (Dolby Digital -asetus)
Dual mono, Dynamic.
D. 3D processing (3D-äänen asetukset)
Concert (Konsertti), Living room (Olohuone), Hall (Aula), Bathroom (Kylpyhuone), Cave (Luola),
Arena (Areena) ja Church (Kirkko).
E. HDCD (Levyn äänien suodattaminen)
OFF, 44,1 KHz, 88,2 KHz.
8.3 Video Setup (Videoasetukset)
x
VI DE O S ET UP PAG E
VIDEO OUTPUT RGB
TV MODE
COLOR SETTING
GO TO VIDEO SETUP PAGE
A. Video Output (Videolähtö)
S-video, YUV, RGB.
Suomi
B. TV Mode (TV-tila)
Progressive, Interlaced.
C. Color Setting (Väriasetukset)
Sharpness (tarkkuus), brightness (kirkkaus), contrast (kontrasti), gamma (gamma), hue (värisävy)
ja saturation (värikylläisyys).
47
Page 48

x
8.4 Preference Setup (Etusija-asetukset)
• Valikko avautuu, kun levykelkka avataan tai kun painetaan toiston aikana kaksi kertaa [<] (48).
PR EF ERE NC E PAGE
TV TYPE PAL
PBC OFF
AUDIO ENG
SUBTITLE ENG
DISC MENU ENG
PARENTAL
DEFAULT
GO TO PREFERENCE SETUP PAGE
A. TV-type (TV:n tyyppi)
PAL, AUTO, NTSC. (Yleensä Euroopassa käytössä: PAL.)
B. PBC (Play Back Control) (MPEG4-toisto interaktiivisella valikolla)
Open (Auki), Close (Kiinni).
C. Audio (Kielen valinta)
English (Englanti), Swedish (Ruotsi), Finnish (Suomi), Norwegian (Norja), French (Ranska), Spanish (Espanja),
German (Saksa) jne.
D. Subtitle (Tekstityskielen valinta)
English (Englanti), Swedish (Ruotsi), Finnish (Suomi), Norwegian (Norja), French (Ranska), Spanish (Espanja),
German (Saksa) jne.
E. Disc Menu (Levyvalikon kielen valinta)
Suomi
English (Englanti), Swedish (Ruotsi), Finnish (Suomi), Norwegian (Norja), French (Ranska), Spanish (Espanja),
German (Saksa) jne.
F. Parental (Rajoitukset)
Lapsia voi estää katsomasta sopimattomia elokuvia 8 eri asetuksella.
1. Siirrä kohdistin haluamasi asetuksen kohdalle.
2. Vahvista painamalla [PLAY/ENTER], jonka jälkeen laite kysyy salasanaa.
G. DEFAULT (Oletusasetukset)
Palaa tehdasasetuksiin ja poista kaikki omat asetukset.
8.5 Password Setup (Salasanan asetus)
x
PAS SW ORD S ET UP PAG E
PASSWORD MODE
PASSWORD
GO TO PASSWORD SETUP PAGE
A. Password (Salasana)
1. Salasanan vaihto: Syötä vanha salasana (oletussalasana on 138900).
2. Syötä uusi salasana ja vahvista.
48
Page 49

8.6. Exit Setup (Poistu asetuksista)
Tallenna muutokset ja palaa normaalitilaan painamalla [SETUP].
9. Huolto ja ylläpito
• Irrota pistoke verkkovirrasta ennen puhdistusta.
• Käytä puhdistamiseen pehmeää ja kuivaa liinaa.
• Älä käytä puhdistusaineita, jotka sisältävät alkoholia, ammoniakkia, bentseeniä tai hiovia aineita.
Ne voivat vahingoittaa laitteen kuorta.
10. Vianetsintä
Ongelma Mahdollinen syy Ratkaisu
Laite ei käynnisty. Pistoke ei ole kunnolla pistorasiassa. Paina pistoke kunnolla pistorasiaan.
Kaukosäädin ei toimi. Paristot ovat lopussa. Vaihda paristot.
Kaukosäädin ei ole suunnattu
infrapunatunnistinta kohti.
Televisiossa ei näy kuvaa. Liitännät on tehty väärin. Tarkista liitännät.
Televisio ei ole AV-tilassa. Avaa television AV-kanava.
TV-tila ei ole sama kuin televisiossa. Vaihda TV-tilaa: Progressive tai Interlaced.
Laite ei toista levyä. Laitteessa ei ole levyä. Aseta levy laitteeseen.
Levy on väärin päin. Käännä levy.
Levy ei ole yhteensopiva laitteen
kanssa.
Kaiuttimista ei kuulu mitään. Kaiuttimien kaapeleita ei ole
liitetty oikein.
Audiokaapeleita ei ole liitetty oikein. Tarkista liitännät.
Kuva ja ääni pätkivät. Levy on likainen. Puhdista tai vaihda levy.
Levyssä on naarmuja. Vaihda levy.
Suuntaa kaukosäädin tunnistinta kohti.
Käytä laitteen kanssa yhteensopivia levyjä.
Tarkista liitännät.
Suomi
Huono tallennus.
Virhe näytössä. Laitetta on käytetty väärin. Lue käyttöohje.
49
Page 50

11. Cd-soittimen ja cd-levyjen käsittely
• Cd-soittimen lukupäähän ei saa koskea!
• Ympäristön äkilliset lämpötilanmuutokset voivat aiheuttaa kosteuden tiivistymisen cd-soittimen lukupäähän.
Tällöin cd-levyjä ei voi soittaa.
• Älä yritä kuivata lukupäätä, vaan anna laitteen olla lämpimässä huoneessa, kunnes kosteus on hävinnyt.
• Sulje aina cd-lokero, jotta se pysyy pölyttömänä. Käytä tarvittaessa pehmeää ja kuivaa liinaa pölyn poistamiseen.
• Puhdista cd-levy tarvittaessa pehmeällä, nukkaamattomalla liinalla keskeltä suoraan reunaa kohti. Älä käytä
puhdistusaineita, sillä ne voivat vahingoittaa levyä.
• Älä kiinnitä cd-levyihin tarroja.
12. Kierrätys
Kierrätä tuote asianmukaisesti, kun poistat sen käytöstä. Tarkempia kierrätysohjeita saat kuntasi jäteneuvonnasta.
Suomi
13. Tekniset tiedot
Käyttöjännite 230 V AC, 50/60 Hz
Tehonkulutus 80 W
Paristot 2 kpl Kaukosäätimeen AAA/R03 (myydään erikseen)
Audioformaatti MPEG1, MPEG2, PCM, stereo
Videoformaatti MPEG2 dvd:lle, MPEG1, MPEG4
Ulostuloliitännät Video, S-Video, SCART, optinen koaksiaali, komponetti ja kaiuttimet
Sisääntuloliitännät Audio Input, FM-antenni, usb-muisti ja SD-muistikortti
Radio
Taajuusalue FM 88 – 108 MHz
Mitat Pääyksikkö 20 x 13 x 20 cm, kaiutin 14,5 x 19,5 x 22 cm, subwoofer 14,5 x 31,5 x 26,5 cm
50
Page 51

51
Page 52

Sverige
Kundtjänst Tel: 0247/445 00
Fax: 0247/445 09
E-post: kundtjanst@clasohlson.se
Internet www.clasohlson.se
Post Clas Ohlson AB, 793 85 INSJÖN
Norge
Kundesenter Tlf.: 23 21 40 00
Faks: 23 21 40 80
E-post: kundesenter@clasohlson.no
Internett www.clasohlson.no
Post Clas Ohlson AS, Postboks 485 Sentrum, 0105 OSLO
Suomi
Asiakaspalvelu Puh.: 020 111 2222
Sähköposti: info@clasohlson.fi
Internet www.clasohlson.fi
Osoite Clas Ohlson Oy, Annankatu 34–36 A, 00100 HELSINKI
Great Britain
For consumer contact, please visit
www.clasohlson.co.uk and click on
customer service.
Internet www.clasohlson.co.uk
 Loading...