

Page 1
Cross Trainer
SVENSKA NOR SK SUOMIENGLISH
Art.no. Model
34-7508
ER-6472C
Ver. 200903
www.clasohlson.com
Page 2

Page 3

Cross Trainer
Art.no. 34-7508 Model ER-6472C
Please read the entire instruction manual before using and save it for future use.
We apologise for any text or photo errors and any changes of technical data.
If you have any questions concerning technical problems please contact our Customer Service Department
(see address on reverse).
Table of Contents
1. Safety 4
2. Packaging contents 5
. Assembly 6
4. Exercise Computer 12
5. Use 12
ENGLISH
6. Starting to exercise 1
7. Exercise instructions 17
8. Disposal 18
9. Specications 18
Page 4

ENGLISH
1. Safety
The product is tested according to these safety standards: EN975-1+A1 and EN975-5/HC
Warning: Always consult a doctor before you begin exercising if you suffer from any sickness or ailment
which might be exagerated by physical exercise. Stop the exercise immediately if you feel dizzy.
Check that all bolts, nuts and other parts are securely tightened on the Cross Trainer.
Place the Cross Trainer in a spacious area with at least 1 metre in all directions.
Read the entire instruction manual before you start exercising. Save it for future use.
• The Cross Trainer is made for home use only and tested up to a maximum body weight of 120 kg.
• Follow the assembly instructions carefully.
• Use only the included original parts.
• Check that all parts are included in the package before you start to assemble the Cross Trainer.
(See “Contents of package”.)
• When assembling, use only suitable tools and ask for assistance if needed.
• Place the Cross Trainer on an even, non-slip surface. Because of possible corrosion, the usage of the
Cross Trainer in damp conditions is not recommended.
• Before using, and every other month, check that all bolts and nuts on the Cross Trainer are
securely tightened and undamaged. Replace possible worn out parts immediately and do not use the
Cross Trainer until they are changed.
• Never use strong solutions/detergents when cleaning the Cross Trainer.
• The Cross Trainer is intended for adults. Children should not use it without adult supervision.
• Ensure that those using the Cross Trainer are aware of possible hazards, e.g. clothes getting caught in
moving parts during training.
• Consult your physician before starting with any exercise program. He can advise on the kind of training
and which level is suitable. Warning! Incorrect/excessive training can cause injuries.
• Follow the advice for correct training as detailed in the training instructions.
• The intensity can be adjusted from the computer.
4
Page 5
4
4
4
4
4
4
4
4
4
8
4
2
2
2
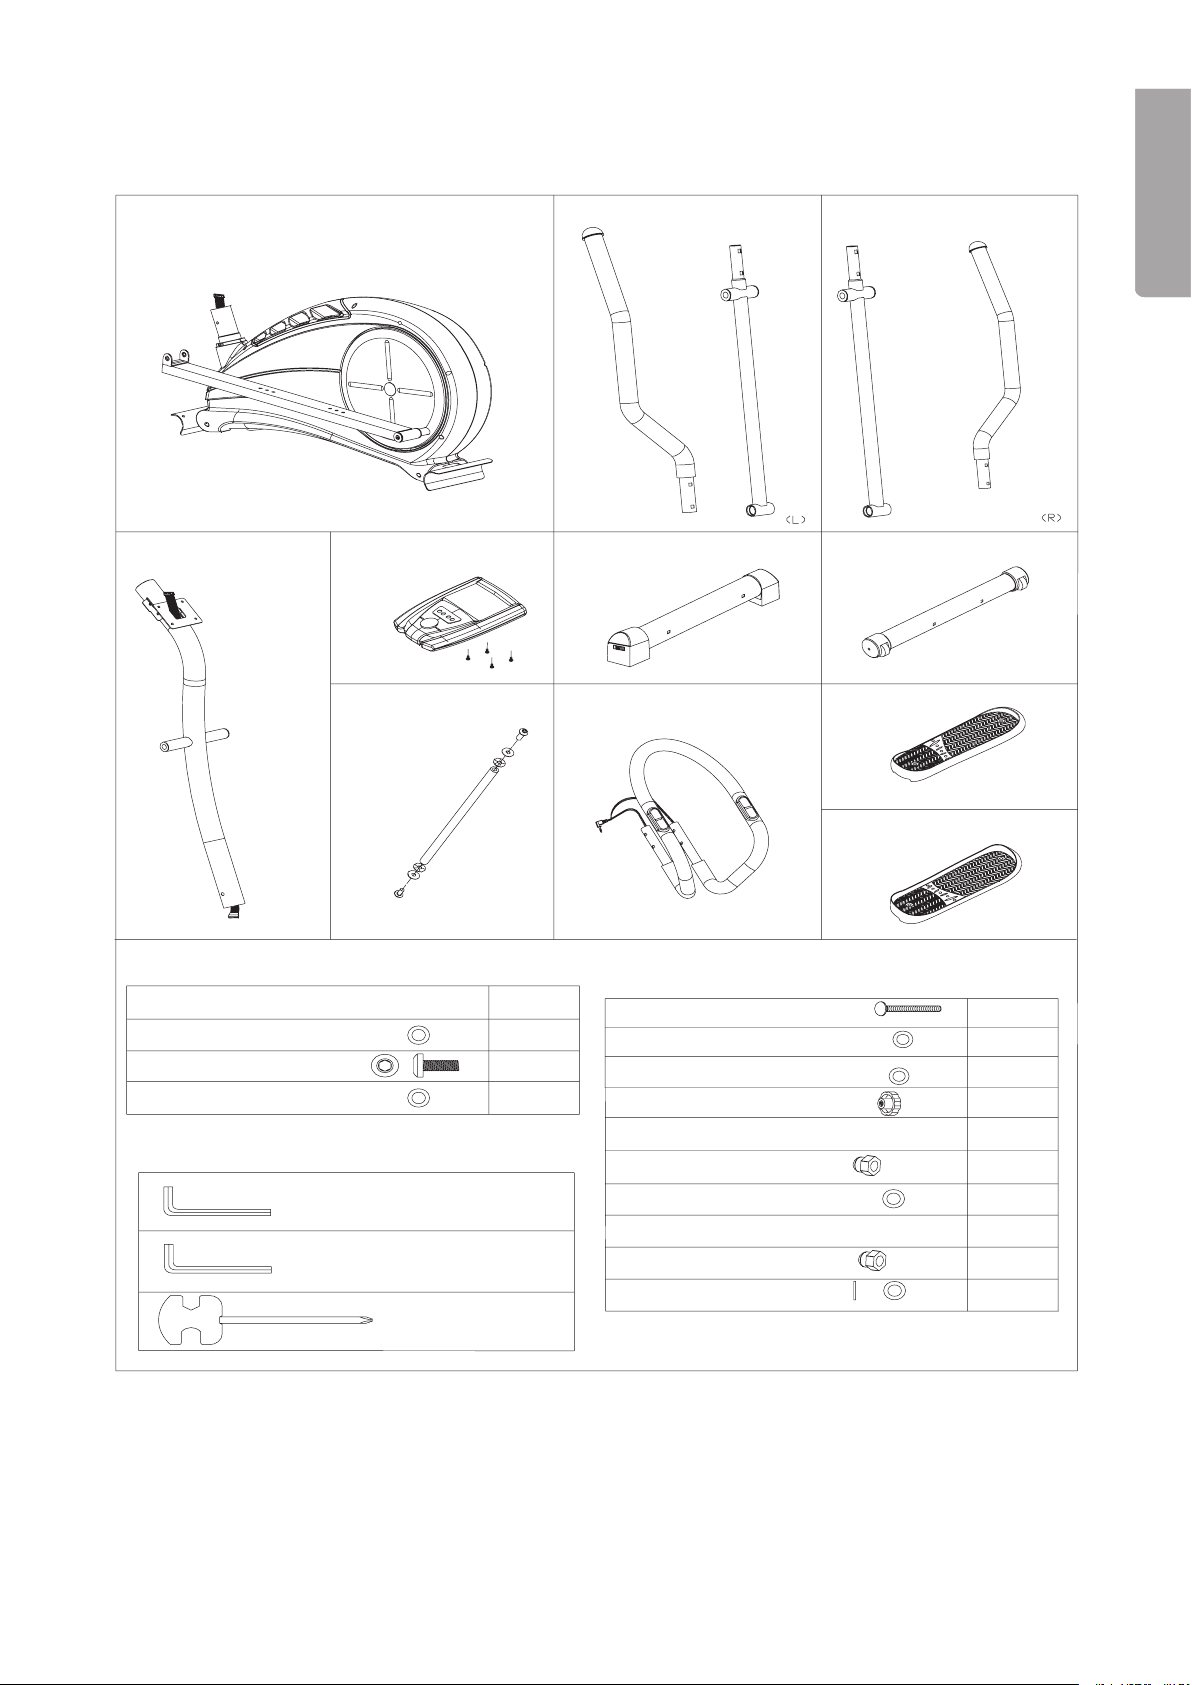
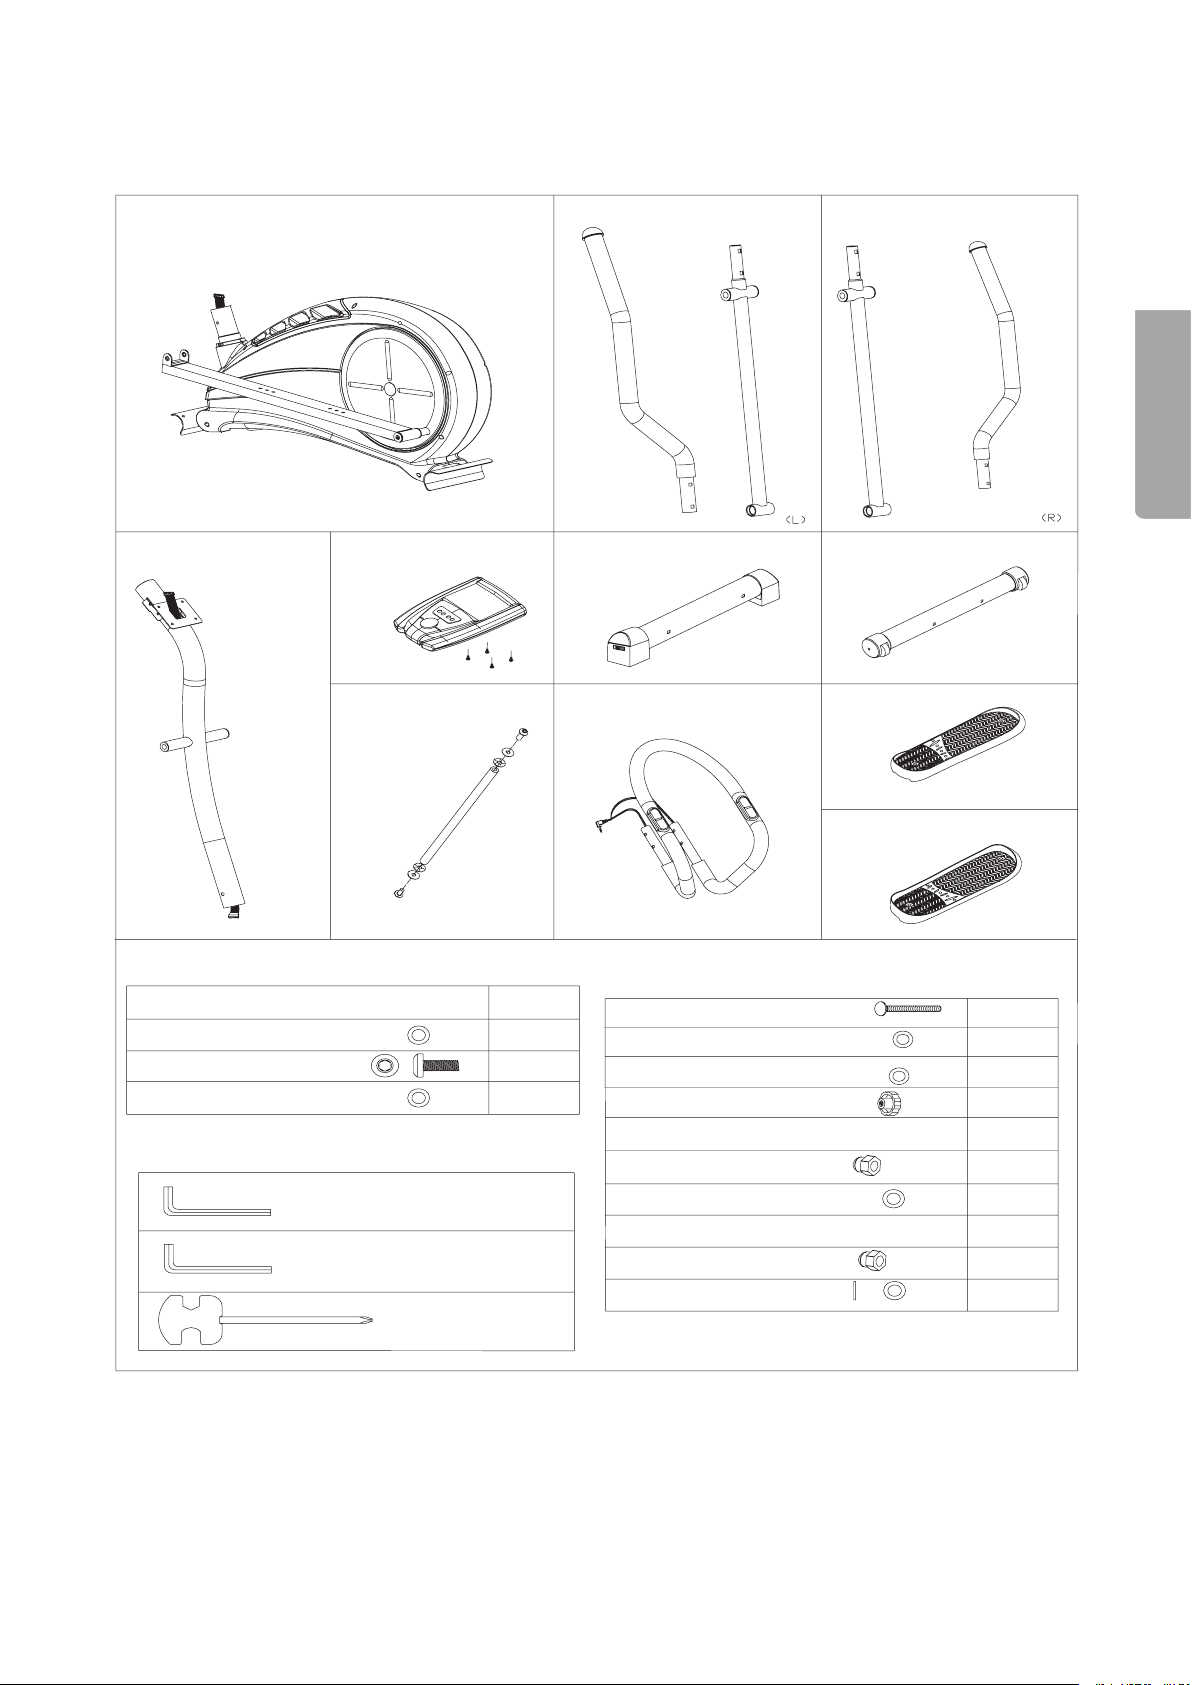
2. Packaging contains
ENGLISH
Bolt M8x40
Wave washer M8x5
Socket head screw M8x5
Washer M8
Allen key
Allen key
Phillips screwdriver
Coach bolt M6x50
Spring washer M6
Washer M6
Pedal locking knob
Bolt M8x70
Cap nut M8
Washer M8
Bolt M10x78
Cap nut M10
Washer M10
5
Page 6
ENGLISH
6A
5
4
10
11
1
6B
18
22
21
23
28
38
39R
44
45
46
35
34
33
43L
39L
32
30
40
42
19
24
25
14
17
16
79
15B
43R
86
12
26
81
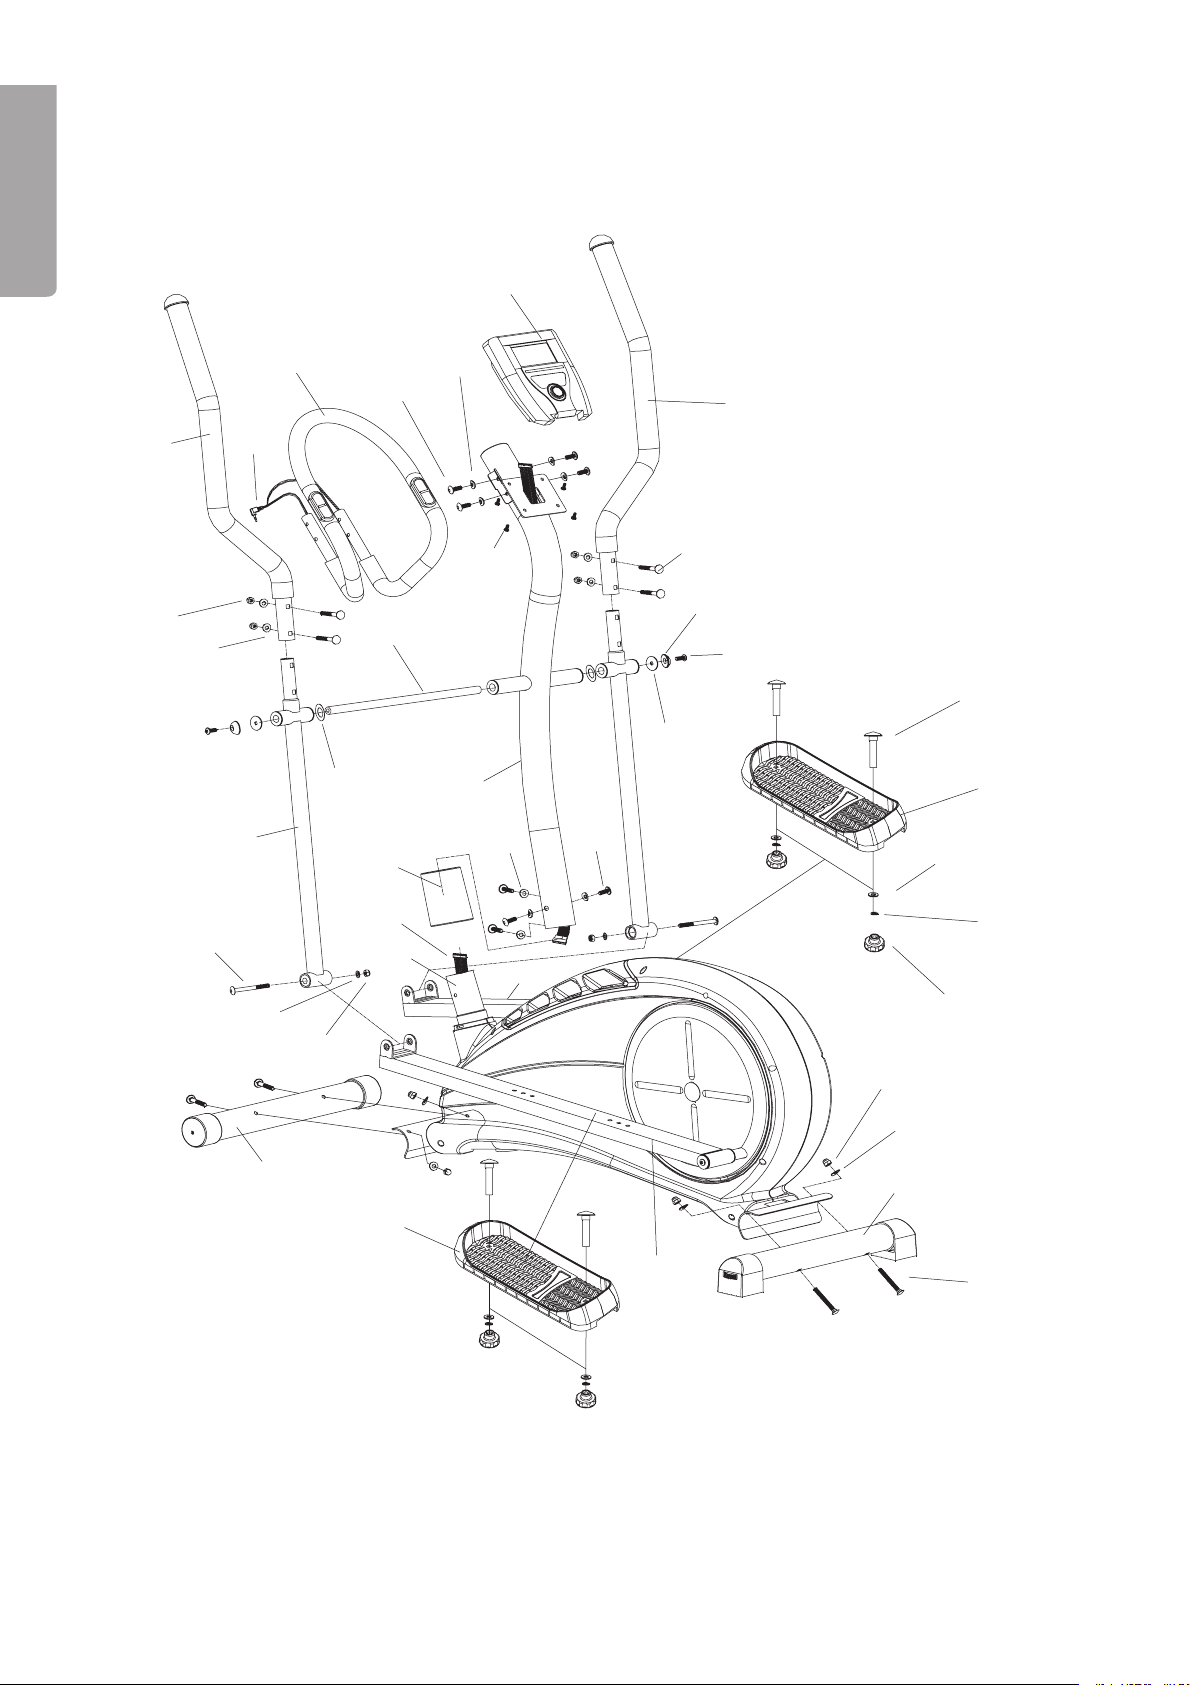
3. Assembly
6
Page 7
32
36
86
80
33
81
34
35
32
36
86
80
12
13A
28
26
79
13
86
33
81
34
35
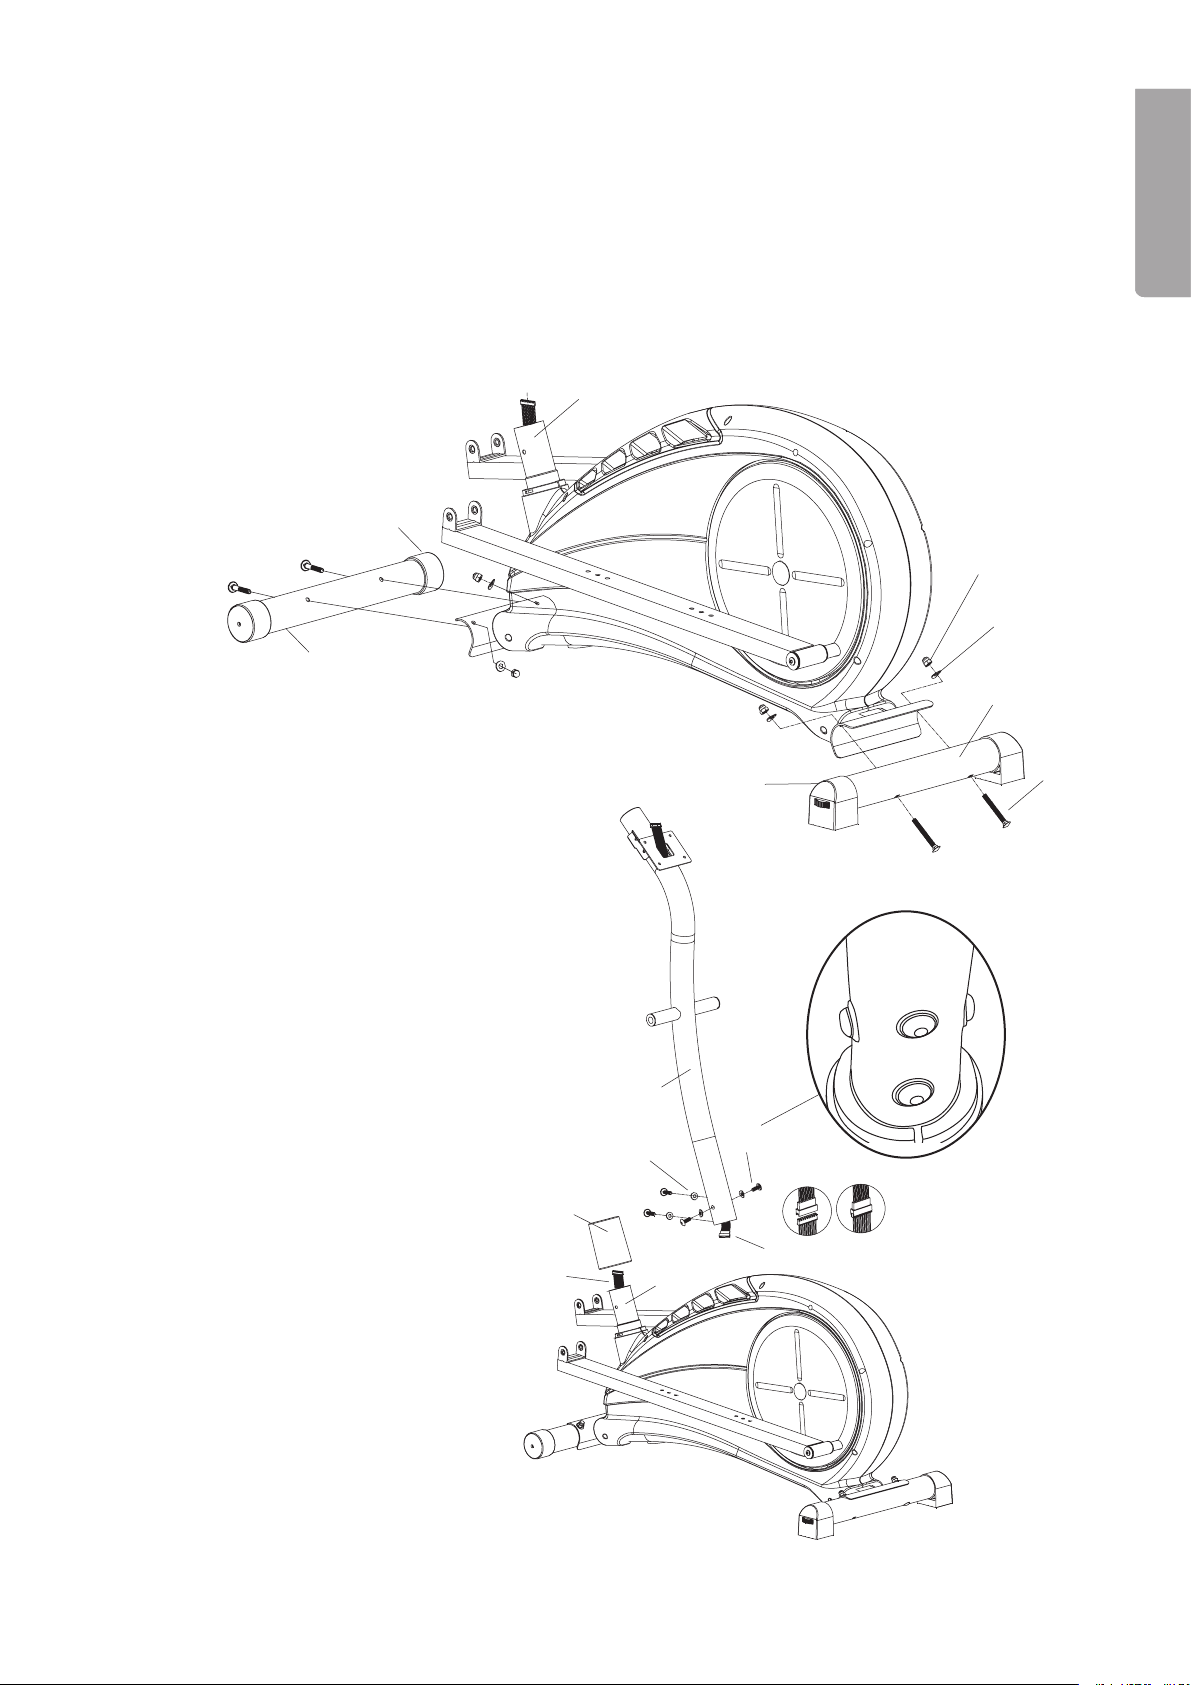
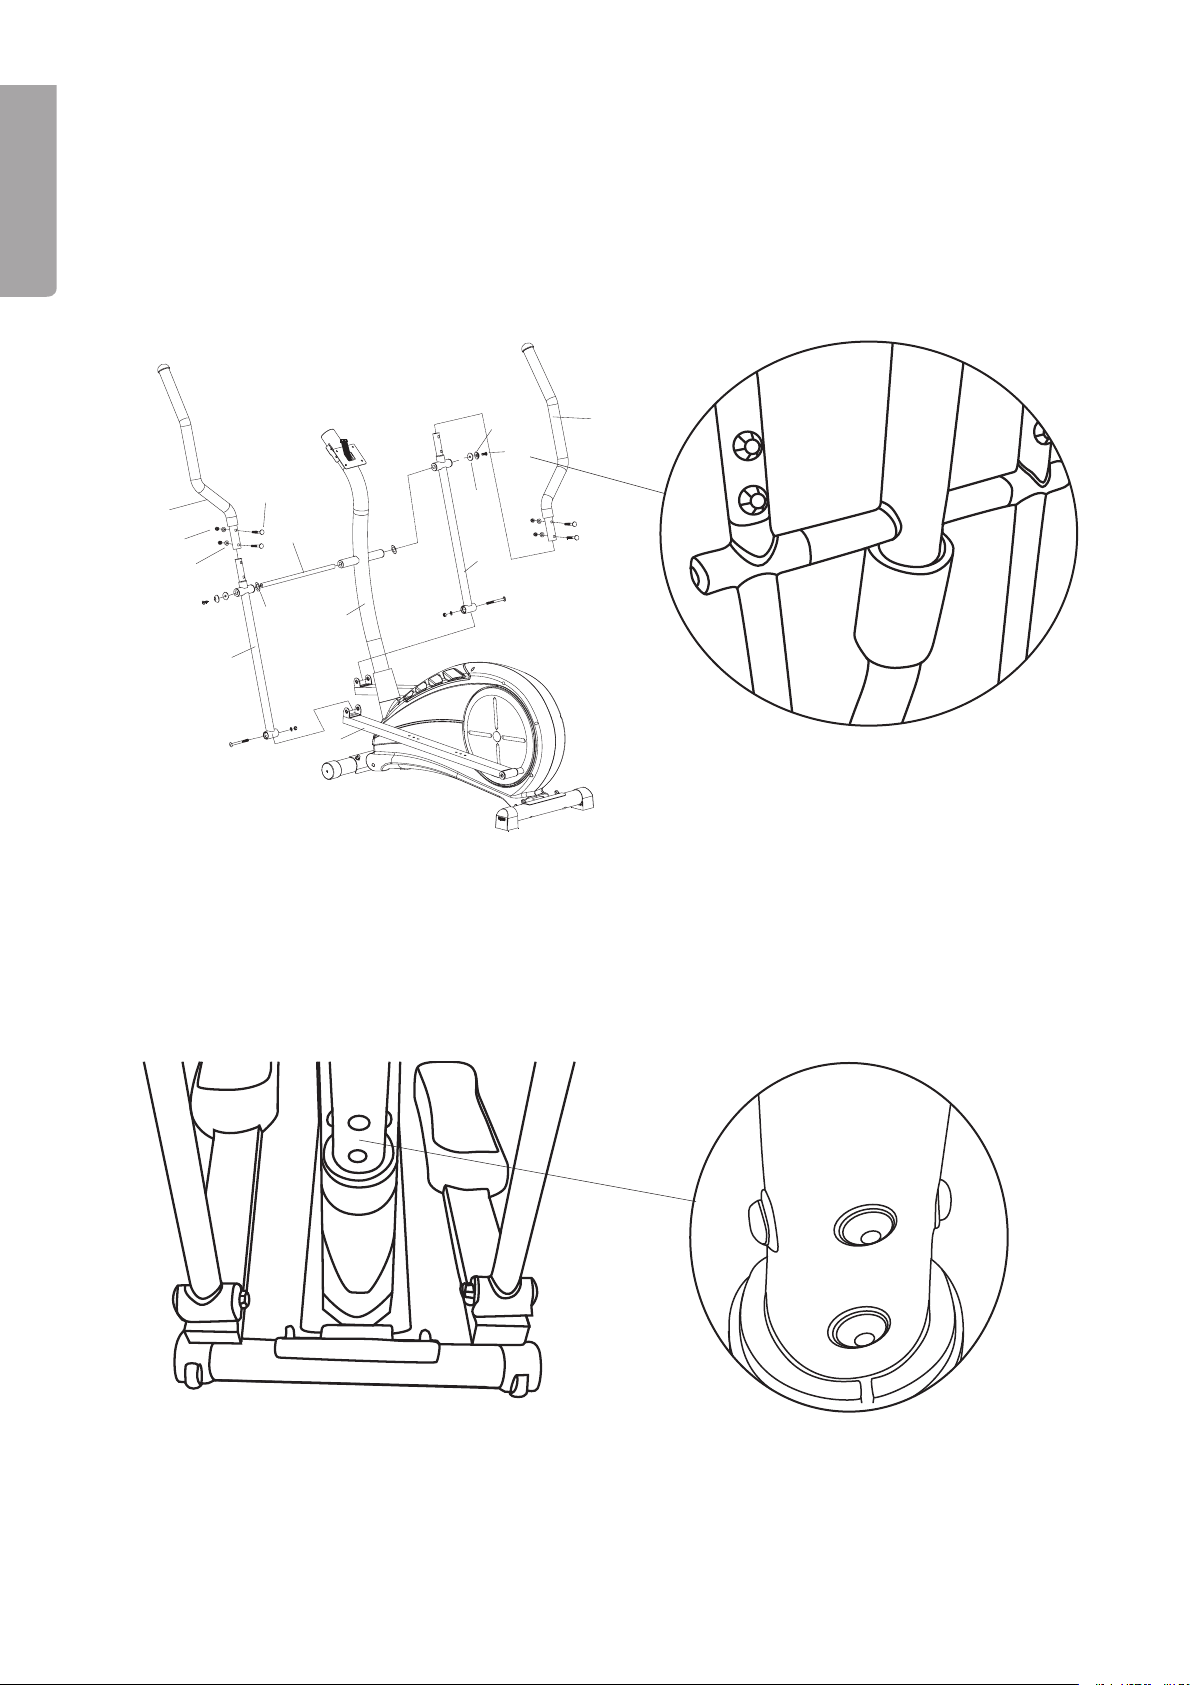
Step 1
1. Attach the front foot (2) and rear foot (81) to the base frame using two bolts (), washers (4) and cap
nuts (5) on each foot.
2. If the oor is uneven, the rear foot (81) has an individual height adjuster on both sides.
ENGLISH
. The front foot (2) has transportation wheels, which need to face towards the front of the
Step 2
Cross Trainer.
1. Fit the plastic collar (79) over the handlebar
post and then pass the computer cable (1A)
up from the base frame and connect it to the
computer cable (1) in the handlebar post.
2. First unscrew the pre-assembled bolts and
then secure the handlebar post (12) to the
base frame (86) using four M8x20 bolts (28)
and four washers (26).
. Attach the round plastic collar (79) part of
the way up the handlebar post using
a piece of sticky tape so that it is not
in the way during assembly. Do not
tighten the bolts (28) yet.
7
Page 8
ENGLISH
6A
16
17
19
18
25
24
12
43
6B
22
21
23
19
Step 3
1. Unscrew the pre-assembled screws (21) and then pass the axle (25) through the holes at the top of the
lower half of the moveable handlebars (19) and the handlebar post (12) as shown. Remember the washers (24) between the post and the handlebars. Secure the axle using the screws (21), wave washers (24),
washers (22) and the plastic washers (2).
2. Tighten the screws (21) making sure that the moveable handlebars can move back and forth freely but
without too much play.
. Attach the lower moveable handlebar (19) to the U-bracket of the pedal arm (4). Secure it using the bolts
(42), washers (0) and nuts (40). Adjust the tube to a comfortable length for you. Take up the slack in the
U-bracket.
4. It is now time to tighten the screws at the base of the frame. First tighten the two screws on the front, then
the two screws on the side. If the two side screws are tightened rst, the frame will be loose and noisy.
5. Remove the tape and attach the plastic collar (79).
6. Attach the upper halves of the moveable handlebars (6A & 6B) to the lower halves (19) using the bolts
(18), washers (17) and cap nuts (16).
8
Page 9
38
39R
44
45
46
19
43R
43L
39L
6B
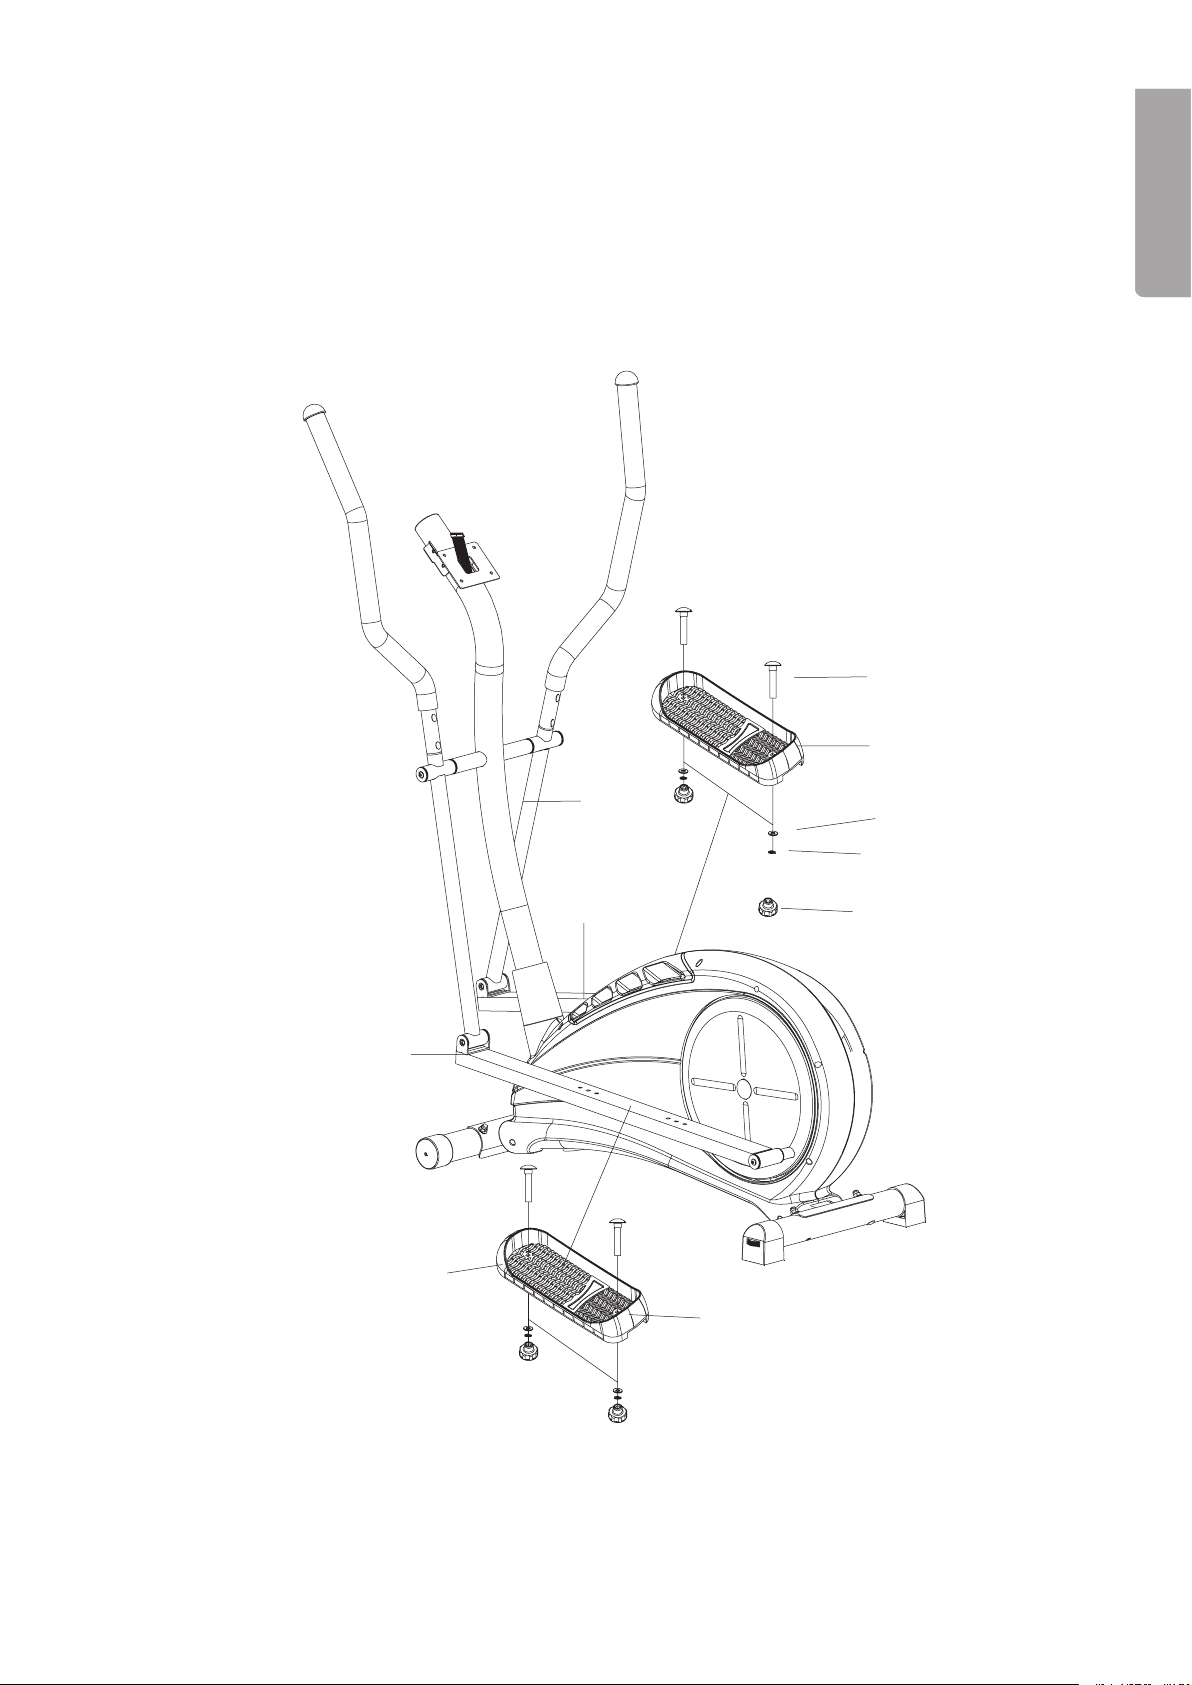
Step 4
1. Attach the footplates (9L & 9R) using the holes in the pedal arms (4) in a position that suits you best.
Experiment until you nd the best position for you. Secure using screws (8), washers (44) lock washers
(45) and locking knobs (46).
Note! Both footplates should be positioned on the same setting.
ENGLISH
9
Page 10

ENGLISH
12
14
11
10
13
1
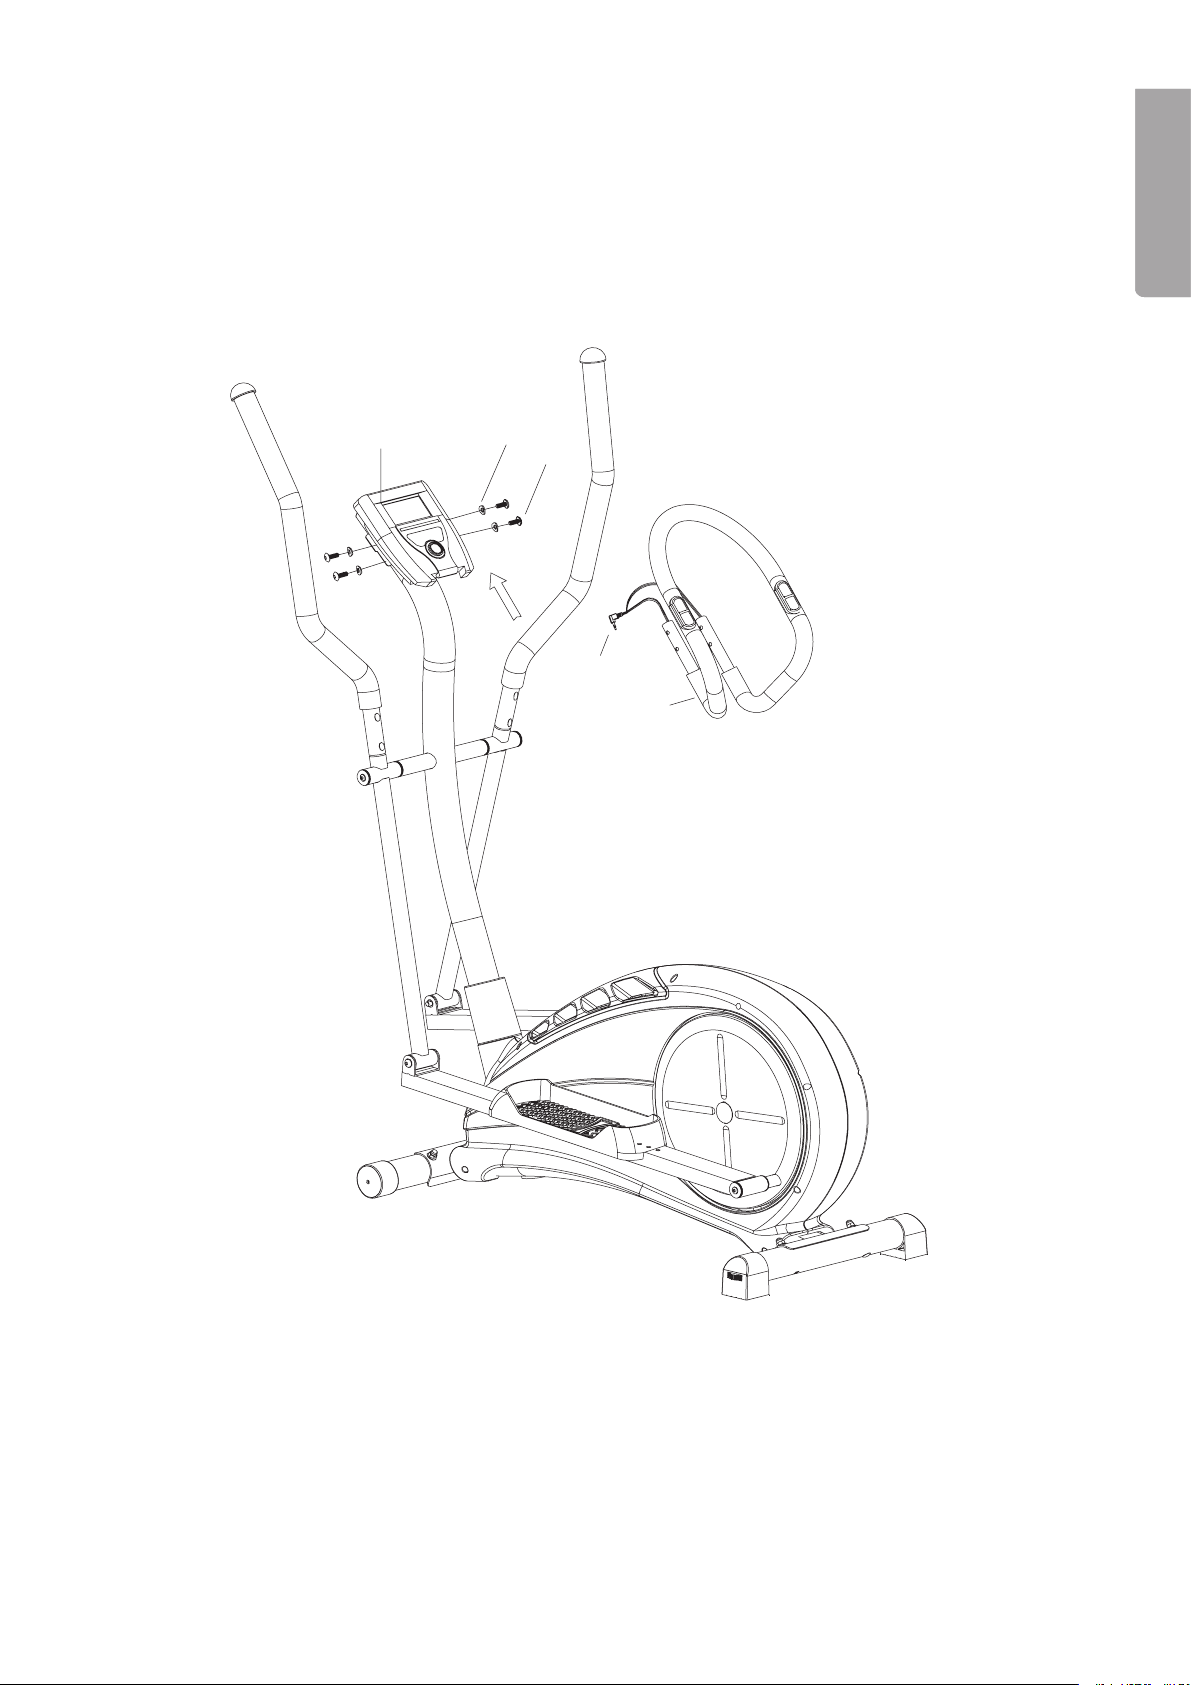
Step 5
1. First connect the computer cable (1) to the connection on the back of the computer(1). Then x the
computer to the bracket using the screws (14) supplied.
10
Page 11
5
4
10
11
1
Step 6
1. Attach the xed handlebar (4) to the handlebar post using the four bolts (10) and washers (11).
2. Plug the pulse rate sensor cable (5) into the back of the computer.
ENGLISH
11
Page 12

ENGLISH
4. Exercise Computer
Username
Speed
Time
Distance
Calories
RPM
Watts
PULSE RECOVERY
Pushing this button starts the
tness-test. The result is graded
from F1.0 to F6.0.
MEMORY
Stores the results from the Body
Fat test.
UP
Change setting/increase tension.
ENTER
Used for selecting programmes,
conrming settings and selecting the
display mode (time, speed, distance, etc.).
Pulse rate
Start/Stop
ST/SP
Start/Stop – pushing this
button starts or stops the
selected programme.
DOWN
Change setting/
reduce tension.
5. Use
Power Supply
Connect the DC plug from the supplied AC/DC adaptor (6 V, 1,000 mA, + in centre) to the outlet on the back
side of the rear foot (81). Connect the adaptor to a wall socket.
Turn on the display
Press any of the buttons or start pedalling to activate the display. Underneath PROGRAM the number 1
will ash for Program 1 MANUAL. Check that the AC/DC adaptor is correctly connected if the display
is not working .
Moving the Cross Trainer
Grip the xed handlebar and lift the
rear foot off the ground so that the
wheels on the front can rotate.
12
Page 13

6. Starting to Exercise
6.1 Basic use
Activating the display
Push one of the buttons or start pedalling to activate the display. If the display does not work, make sure that
the AC/DC adaptor is correctly connected.
Tension
The tension is represented by bars on the display, a high bar represents a high tension and a low bar represents a lower tension. The tension can be altered whilst you are exercising using [UP] and [DOWN].
Targets
Every exercise program has various targets which you can set, such as the workout time, distance travelled,
or number of calories burned.
To Pause
Push the [ST/SP] button whenever you would like to pause the training programme. The measurement will
pause and the display will show the current values. Push [ST/SP] again to resume the programme.
To change the function whilst training
Push [ST/SP] to stop the current programme. Push [UP] or [DOWN] to select another programme, conrm by
pushing [ENTER].
ENGLISH
Resetting
To reset set programmes, push [ST/SP] and hold it in for seconds. The computer will beep and the display
will briey show every sequence of the programme.
6.2 Selecting an Exercise Programme
Explanation of the menus/programmes
No. Programmes Explanation Targets/Settings
1 Manual Exercise programme with or without set
targets. The tension can be manually
adjusted whilst exercising.
2 Rolling Preset programme with varied tension
throughout the workout.
Valley Preset programme representing the ups
and downs of a valley.
4 Fat Burn Preset programme representing an
upward slope and a downward slope.
- TIME
- DISTANCE
- CALORIES
- TIME
- DISTANCE
- CALORIES
- TIME
- DISTANCE
- CALORIES
- TIME
- DISTANCE
- CALORIES
5 Ramp Preset programme with gradually
increasing tension.
1
- TIME
- DISTANCE
- CALORIES
Page 14

6 Mountain Preset mountain climbing programme
with tension levels rising and falling
throughout.
- TIME
- DISTANCE
- CALORIES
ENGLISH
7 Intervals Preset programme with the tension level
changing rapidly.
8 Watt Control Select tension manually. Constant
tension no matter how fast you pedal.
Tension preset to 100 W, but can
be altered.
9 55 % H.R.C. Heart rate controlled programme.
Exercise until you have reached 55%
of your maximum pulse.
10 75 % H.R.C. Heart rate controlled programme.
Exercise until you have reached 75 %
of your maximum pulse.
11 90 % H.R.C. Heart rate controlled programme.
Exercise until you have reached 90 %
of your maximum pulse.
- TIME
- DISTANCE
- CALORIES
- TIME
- DISTANCE
- CALORIES
- WATT
- TIME
- DISTANCE
- CALORIES
- AGE
- TARGET H.R
- TIME
- DISTANCE
- CALORIES
- AGE
- TARGET H.R
- TIME
- DISTANCE
- CALORIES
- AGE
- TARGET H.R
12 Target H.R Heart rate controlled programme.
Exercise until you have reached your
target pulse.
1
14 Body Test Presents the results of FAT%, BMR,
15 User Data Enter you personal details. - NAME: Max. 8 letters
Users Prole Allows you to create a personalised
programme by setting the tension levels
of each column.
BMI and BODY TYPE (see chart).
- TIME
- DISTANCE
- CALORIES
- TARGET H.R
- TIME
- DISTANCE
- CALORIES
- COLUMN 1-10
- HEIGHT
- WEIGHT
- AGE
- SEX
- HEIGHT
- WEIGHT
- AGE
- SEX
14
Page 15

Exercising without targets
Follow these steps to start exercising without setting
any targets:
1. Push [UP] or [DOWN] to select the desired exercise
programme (see the chart).
ENGLISH
2. Push [ST/SP] to start exercising without setting
any targets.
. You may now start exercising. Mount the Cross Trainer
as shown.
Entering your personal settings
1. Select program 15 (User Data) using [UP] or [DOWN],
conrm using [ENTER].
2. Change the setting using [UP] or [DOWN] and push
[ENTER] to advance to the next setting.
. Repeat the process until you have made all the settings.
Starting to exercise and setting targets
1. Push [UP] or [DOWN] to select the desired exercise programme (see the chart). Press [ENTER] to conrm.
2. Press [ENTER] once or repeatedly to select targets/settings.
. Change the setting using [UP] or [DOWN] and push [ENTER] to advance to the next setting.
4. Repeat the process until you have made all the settings.
5. When all the settings have been made, push [ST/SP] to start exercising.
6. You may now start exercising. Mount the Cross Trainer as shown.
Example:
Exercising in 15 minute intervals:
1. Select program 7 (Intervals) using [UP] or [DOWN].
2. Push [ENTER] to conrm, “TIME” is shown in the display.
. Set the time to 15 minutes using [UP] or [DOWN].
4. Push [ST/SP] to start exercising, the countdown is displayed.
5. A buzzer sounds for a few seconds when you have reached your target, e.g. when the
countdown reaches “0”.
15
Page 16
200
195
190
185
180
175
170
165
160
155
150
145
170
165.75
161.5
157.25
153
148.75
144.5
140.25
136
131.75
127.5
123.25
140
136.5
133
129.5
126
122.5
119
115.5
112
108.5
105
101.5
120
117
114
111
108
105
102
99
96
93
90
87
85
90
95
100
105
110
115
120
125
130
135
140
145
150
155
160
165
170
175
180
185
190
195
200
205
210
20 25 30 35 40 45 50 55 60 65 70 75 80
Max.
85%
70%
60%
6.3 Pulse measurement
• Place both palms against the pulse sensor on the handlebars. Hold both pulse sensors in order to obtain
as accurate a reading as possible. After a while your current pulse rate will be displayed.
ENGLISH
•
When the words “HOLD SENSOR” appear in the display during an exercise programme you should place
both palms against the sensors.
• Heart rate control is read magnetically. There is an automatic adjustment of the read heart rate
compared to the actual heart rate.
• If your pulse rate is less then the set target value, the load resistance will increase. If your pulse rate is
above the set target value, the load resistance will decrease.
• If the load resistance has decreased to its lowest possible value and your pulse is still above the set
target value the display starts to ash to warn you to slow down.
Pulse
Age
6.4 Measuring body fat – Body test (program 14)
1. Start program 14 (Body test).
2. Place both palms against the pulse sensor on the handlebars. Hold both pulse sensors in order to obtain
a correct reading. If the computer does not read a pulse value, ERROR will appear on the display.
. The results will be presented as FAT%, BMR, BMI and BODY TYPE. Push [ENTER] to select which result
you wish to view.
FAT% Chart
1 5 % - 14 %
16
2 15 % - 24 %
25 % - 29 %
4 0 % - 9 %
5 40 % - 50 %
N.B.
The results obtained from the computer are only for the interests of exercising and should not be used for
medical purposes.
Page 17

6.5 Fitness-test (Pulse Recovery)
This test is personal and is used to measure your pulse after you have nished exercising.
1. After your workout pass, push [PULSE RECOVERY] once.
2. Hold the pulse sensors in both hands and begin pedalling.
. The timer counts down from 60 seconds to zero.
4. When the test is over the result is displayed:
F1.0 Excellent
F2.0 Good
ENGLISH
F.0
F4.0 Below average
F5.0 Poor
F6.0 Very poor
Average
7. Exercise instructions
Many different factors have to be considered when you plan your training program. If you have been
physically inactive for a long time or if you suffer from any kind of illness you need to consult with a physician
before you plan your exercise program.
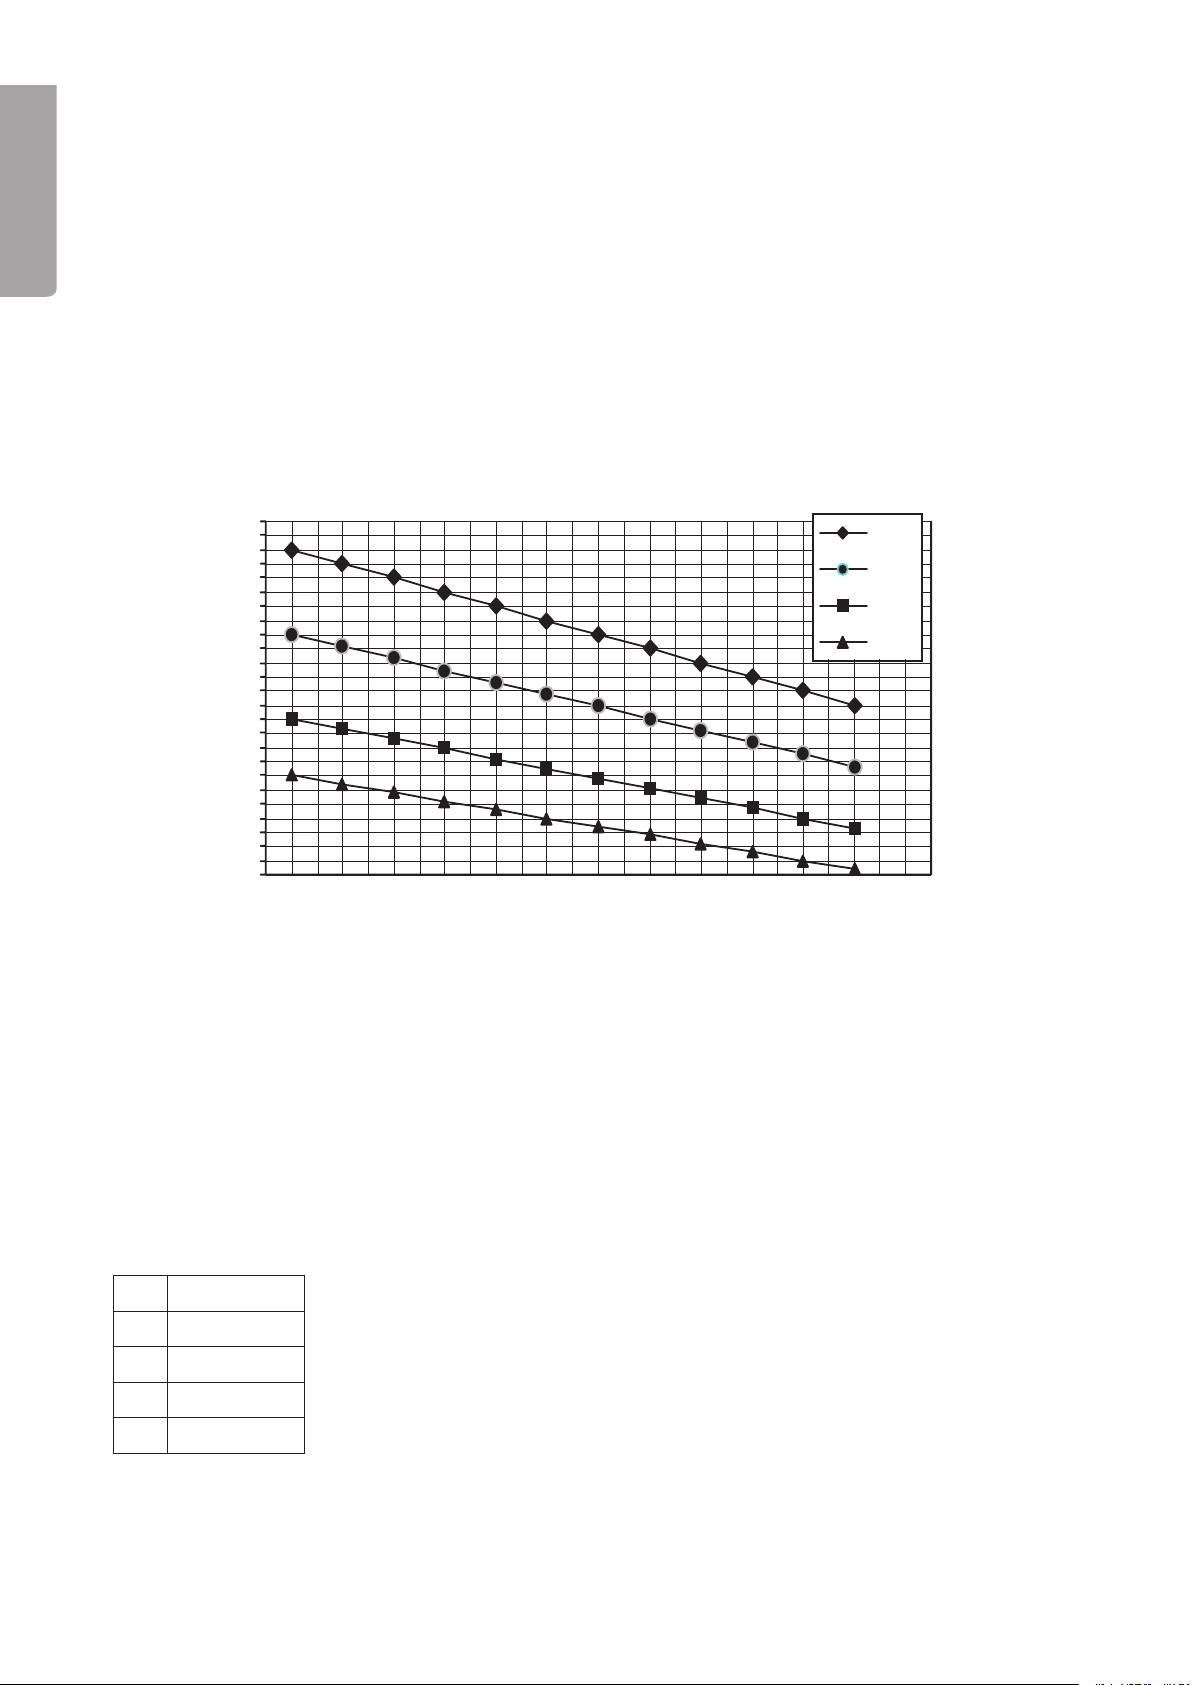
Intensity
• To achieve the best possible results the right intensity needs to be selected, this is based on your pulse.
This equation is often used to calculate your maximum pulse:
Max pulse = 220 – Your age
• During training your pulse should be between 60% and 85% of your maximum pulse (see the pulse chart
at the end of the instruction manual).
• For the rst few weeks of exercise your workout pulse should be 60% of your maximum pulse.
• When you have improved your values and have been training for a few weeks you can allow your workout
pulse to increase up to 85% of your maximum pulse.
Burning Fat
The body starts burning fat at 60% of your maximum pulse. The optimal fat burning will be at 60 to 70% of
your maximum pulse. You will achieve the best results if you normally do workouts of 0 minutes per week.
Example:
You are 52 years old and are starting to exercise and burn fat.
Maximum pulse rate
Lowest pulse rate
Maximum workout pulse rate
A workout pulse between 101 and 117 during training gives the best fat burning result in this example
according to the equation.
= 220 – 52 (age) = 168 pulse/min.
= 168 x 0.6 = 101 pulse/min.
= 168 x 0.7 = 117 pulse/min.
17
Page 18

ENGLISH
Workout tips!
Warm-up
Before every training session, you should warm-up for 5-10 minutes which can include some stretching or
walking with a light load.
Training session
During actual training a rate of 60 to 85% of the maximum pulse rate should be chosen. The length of the
training session can be calculated using the following as a guide.
• Daily training session
• 2-3 times per week
• 1-2 times per week
Cooling down:
For an effective cooling-down of the muscles and the metabolism the intensity should be drastically
decreased during the last 5-10 minutes. Stretching is also helpful in preventing muscle stiffness.
For best results:
• Exercising will show results after quite a short time and your workout pulse will soon decrease during the
training sessions.
• In order to achieve this, you will need to be motivated to exercise regularly. Choose xed hours for your
training.
• Begin exercising carefully, and then increase the amount of your training as you become more t.
• Wishing you luck with to healthier lifestyle!
= Approx.10 minutes per session.
= Approx. 20 minutes per session.
= Approx. 60 minutes per session.
8. Disposal
Follow local ordinances when disposing of this product. If you are unsure about how to dispose of this
product contact your municipality.
9. Specications
Power: 6 V DC, 1000 mA via the supplied mains adaptor 20 V AV, 50 Hz
Size:
Height 1600 mm
Length 140 mm
Width 590 mm
Flywheel 8 kg each
18
Page 19

Cross Trainer
Art.nr 34-7508 Modell ER-6472C
Läs igenom hela bruksanvisningen före användning och spara den sedan för framtida bruk.
Vi reserverar oss för ev. text- och bildfel samt ändringar av tekniska data.
Vid tekniska problem eller andra frågor, kontakta vår kundtjänst (se adressuppgifter på baksidan).
Innehållsförteckning
1. Säkerhet 20
2. Förpackningen innehåller 21
. Montering 22
4. Beskrivning av datorn 28
5. Användning 28
6. Börja träna 29
SVENSKA
7. Träningsinstruktioner
8. Avfallshantering 4
9. Specikationer 4
19
Page 20

1. Säkerhet
Produkten är testad enligt dessa säkerhetsstandarder: EN975-1+A1 och EN975-5/HC
Varning:
åkomma som kan förvärras av fysisk träning. Avbryt genast träningen om du känner dig yr.
Kontrollera att alla bultar/muttrar och andra delar sitter fast på motionscykeln och är åtdragna.
Placera Cross Trainern så att det nns en öppen yta runt motionscykeln på minst 1 meter i alla riktningar.
Läs hela bruksanvisningen innan du börjar träna med motionscykeln, spara bruksanvisningen för
framtida bruk.
• Cross Trainern är konstruerad för personlig användning i hemmet och är testad för en kroppsvikt
SVENSKA
• Följ monteringsanvisningens olika steg noga vid monteringen.
• Använd endast de delar eller tillbehör som medföljer förpackningen.
• Kontrollera att alla delar nns med i förpackningen innan du börjar montera Cross Trainern.
• Använd rätt verktyg vid monteringen, be någon om hjälp att hålla i om det behövs.
• Placera Cross Trainern på ett jämnt halkfritt underlag i en torr lokal, den ska inte användas eller förvaras
• Kontrollera innan första användningstillfället och sedan var eller varannan månad att alla bultar/muttrar
Rådgör alltid med en läkare innan du börjar träna om du lider av någon sjukdom eller annan
upp till 120 kg.
(Se ”Förpackningen innehåller”.)
i utomhus eller i lokaler som har hög luftfuktighet.
är åtdragna och oskadade samt att de sitter fast på Cross Trainern. Ersätt ev. slitna delar omedelbart,
använd inte Cross Trainern innan den är åtgärdad.
• Använd aldrig starka lösningsmedel/rengöringsmedel vid rengöring.
• Cross Trainern är främst avsedd för vuxna. Barn bör endast använda den under tillsyn av någon vuxen.
• Den som använder Cross Trainern bör vara medveten om de faror som nns t.ex. risk att fastna med
kläder i delar som rör sig under användning.
• Rådgör gärna med en läkare eller sjukgymnast innan du börjar träna så att de kan ge råd om lämplig
träningsmetod och belastning. Varning!
• Följ de träningsinstruktioner som nns i bruksanvisningen.
• Arbetsbelastningen kan justeras från datorn.
Felaktig/överdriven träning kan ge skador.
20
Page 21
4
4
4
4
4
4
4
4
4
8
4
2
2
2
2. Förpackningen innehåller
SVENSKA
Bult M8x40
Axialbricka M8
Insexbult M8x5
Bricka M8
Insexnyckel
Insexnyckel
Stjärnmejsel
Bult M6xP1.0x50 för pedaler
Fjäderbricka M6
Bricka M6
Ratt för pedalbult
Bult M8x70
Kupolmutter M8
Bricka M8
Bult M10x78
Kupolmutter M10
Bricka M10
21
Page 22

6A
5
4
10
11
1
6B
18
22
21
23
28
38
39R
44
45
46
35
34
33
43L
39L
32
30
40
42
19
24
25
14
17
16
79
15B
43R
86
12
26
81
3. Montering
SVENSKA
22
Page 23

32
36
86
80
33
81
34
35
32
36
86
80
12
13A
28
26
79
13
86
33
81
34
35
Steg 1
1. Montera främre (2) och bakre golvstöd (81) till bottenramen med två bultar (), brickor (4) samt
kupolmuttrar (5) till varje golvstöd.
2. Är underlaget ojämt har det bakre golvstödet (81) individuell justering av höjden på båda sidor.
. Det främre golvstödet har (2) har transporthjul, de skall vändas framåt vid montering.
Steg 2
1. Montera den runda plastkåpan (79) över
den främre ramen och för sedan upp
datorkabeln (1A) från bottenramen och
anslut den till datorkabeln (1) i den
främre ramen.
SVENSKA
2. Lossa först de förmonterade bultarna
och montera sedan den främre ramen
(12) på bottenramen (86) med fyra
M8x20-bultar (28) och fyra brickor (26).
. Fixera den runda plastkåpan (79) in
bit upp på ramen med hjälp av en
bit tejp så den inte är i vägen vid
monteringen. Dra inte åt bultarna
(28) vid detta tillfälle.
2
Page 24

Steg 3
6A
16
17
19
18
25
24
12
43
6B
22
21
23
19
1. Lossa de förmonterade skruvarna (21) och för sedan igenom axeln (25) genom hålen i de nedre
handtagsstängerna (19) och den främre ramen (12) enligt bilden. Kom ihåg brickorna (24) mellan ramen
och stängerna. Fäst axeln med skruvarna (21), axialbrickorna (24), brickorna (22) samt plastbrickorna (2).
2. Dra skruvarna (21) hårt men se till att handtagsstängerna kan röra sig lätt, dock utan att glappa.
SVENSKA
. Montera de nedre handtagsstängerna (19) i pedalarmarnas u-fästen (4). Fäst med bultarna (42),
brickorna (0) och muttrarna (40). Justera röret så det passar bra. Dra ihop U-fästet så det inte glappar.
4. Dra nu åt skruvarna längst ner på röret. Dra de två främre först så mycket det går och sen de på sidorna.
Drar man sidoskruvarna först kommer det att glappa vid användning och oljud uppstår.
5. Lossa tejpen å montera plastkåpan (79).
6. Fäst de övre handtagen (6A & 6B) på de nedre handtagsstängerna (19) med bultarna (18), brickorna (17)
och kupolmuttrarna (16).
24
Page 25

38
39R
44
45
46
19
43R
43L
39L
6B
Steg 4
1. Montera fotplattorna (9L & 9R) i de hål på pedalarmarna (4) som passar användaren bäst. Prova
dig fram till det avstånd som känns bäst. Använd skruvarna (8), brickorna (44), låsbrickorna (45) samt
rattarna (46).
Obs! Båda fotplattorna bör monteras med samma avstånd.
SVENSKA
25
Page 26

12
14
11
10
13
1
Steg 5
1. Anslut först datorkabeln (1) till kontakten på datordelens (1) baksida. Montera sedan datordelen på
hållaren med de medföljande skruvarna (14).
SVENSKA
26
Page 27

5
4
10
11
1
Steg 6
1. Fäst handtaget (4) på den främre ramen med hjälp av de fyra bultarna (10) och brickorna (11).
2. Anslut pulskännarnas kablage (5) till anslutningen på datorns baksida.
SVENSKA
27
Page 28

4. Beskrivning av datorn
Användarnamn
Hastighet
Tid
Distans
Kalorier
Varv (rpm)
Watt
PULSE RECOVERY
Tryck för att starta tness-test.
Resultatet graderas från F1.0
till F6.0.
MEMORY
SVENSKA
Lagrar uppmätta resultat från
Body Fat-testet.
UP
Ändra inställning/Öka belastning
ENTER
Tryck för att välja program,
bekräfta dina inställningar samt
välja visningsläge
(tid, hastighet, distans osv.).
Puls
Start/Stopp
ST/SP
Start/Stopp – Tryck för att
starta eller stoppa
valt program.
DOWN
Ändra inställning/
Minska belastning
5. Användning
Strömförsörjning
Anslut DC-pluggen från medföljande batterieliminator (6 V, 1000 mA, + på centrum) till uttaget på baksidan
nära det bakre golvstödet (81), anslut batterieliminatorn till ett eluttag.
Slå på displayen
Tryck på någon av knapparna eller börja trampa för att aktivera displayen, under ”Program” blinkar siffran 1
för Program1 MANUAL. Kontrollera att batterieliminatorn är rätt ansluten om inte displayen aktiveras.
Flytta ditt träningsredskap
Ta tag i handtaget och lyft upp bakdelen så att hjulen
i framkanten kan rulla fritt.
28
Page 29

6. Börja träna
6.1 Grundläggande användning
Aktivera displayen
Tryck på någon av knapparna eller börja trampa för att aktivera displayen. Kontrollera att batterieliminatorn
är rätt ansluten om displayen inte aktiveras.
Belastning
Belastningen följer staplarna på skärmen, en hög stapel ger hög belastning och en låg stapel ger lägre belastning. Belastningen kan ändras under träningens gång med [UP] och [DOWN].
Träningsmål
Varje träningsprogram har olika träningsmål som låter dig ställa in träningspassets tid, distans eller hur
många kalorier som ska förbrännas.
Pausa träningen
Tryck när som helst på [ST/SP] för att pausa träningen. Mätningen stannar och displayen fryser aktuella värden. Tryck igen på [ST/SP] för att återuppta träningen.
Ändra funktion under pågående träning
Tryck på [ST/SP] för att stoppa pågående program. Tryck på [UP] eller [DOWN] för att välja ett annat program, bekräfta genom att trycka på [ENTER].
Återställning
För att återställa inställda program, tryck och håll in [ST/SP] i ca sekunder. Datorn avger en ton och dis
playen visar under en kort stund samtliga segment.
-
6.2 Välja träningsprogram
SVENSKA
Förklaring av menyerna/träningsprogrammen
Nr Program Förklaring Träningsmål/Inställningar
1 Manual Träningsprogram med eller utan
inställda mål. Belastningen kan manuellt
ökas eller minskas under träningens
gång.
2 Rolling Förinställd belastning med varierat
motstånd under träningens gång.
Valley Förinställd belastning i form av en dal
med uppförs- och utförsbackar.
4 Fat Burn Förinställd belastning i form av en
backe upp och en backe ner.
5 Ramp Förinställd belastning med långsamt
ökande motstånd.
- TIME (tid)
- DISTANCE (distans)
- CALORIES (kaloriförbränning)
- TIME (tid)
- DISTANCE (distans)
- CALORIES (kaloriförbränning)
- TIME (tid)
- DISTANCE (distans)
- CALORIES (kaloriförbränning)
- TIME (tid)
- DISTANCE (distans)
- CALORIES (kaloriförbränning)
- TIME (tid)
- DISTANCE (distans)
- CALORIES (kaloriförbränning)
29
Page 30

6 Mountain Förinställd belastning i form av ett berg
med ökande och minskande motstånd
under träningens gång.
- TIME (tid)
- DISTANCE (distans)
- CALORIES (kaloriförbränning)
7 Intervals Förinställd belastning med snabbt
varierande motstånd.
8 Watt Control Låter dig själv välja belastningen.
Konstant belastning vilket betyder
samma motstånd oberoende av
hastighet. Belastningen är inställbar
men är förinställd till 100 W.
SVENSKA
9 55 % H.R.C. Pulsstyrt program. Träning tills du
uppnår 55 % procent av din maxpuls.
10 75 % H.R.C. Pulsstyrt program. Träning tills du
uppnår 75 % procent av din maxpuls.
11 90 % H.R.C. Pulsstyrt program. Träning tills du
uppnår 90 % procent av din maxpuls.
- TIME (tid)
- DISTANCE (distans)
- CALORIES (kaloriförbränning)
- TIME (tid)
- DISTANCE (distans)
- CALORIES (kaloriförbränning)
- WATT (effekt)
- TIME (tid)
- DISTANCE (distans)
- CALORIES (kaloriförbränning)
- AGE (ålder)
- TARGET H.R (målpuls)
- TIME (tid)
- DISTANCE (distans)
- CALORIES (kaloriförbränning)
- AGE (ålder)
- TARGET H.R (målpuls)
- TIME (tid)
- DISTANCE (distans)
- CALORIES (kaloriförbränning)
- AGE (ålder)
- TARGET H.R (målpuls)
12 Target H.R Pulsstyrt program. Träning tills du
uppnår inställd målpuls.
1
14 Body Test Presenterar resultatet i FAT%, BMR,
15 User Data Anger dina personliga inställningar. - NAME (namn): Max. 8 bokstäver
Users Prole Låter dig själv göra ett varierat program
genom att ställa in belastningen för
varje kolumn för sig.
BMI samt BODY TYPE (se tabell).
- TIME (tid)
- DISTANCE (distans)
- CALORIES (kaloriförbränning)
- TARGET H.R (målpuls)
- TIME (tid)
- DISTANCE (distans)
- CALORIES (kaloriförbränning)
- COLUMN 1-10 (kolumn 1 till 10)
- HEIGHT (längd)
- WEIGHT (vikt)
- AGE (ålder)
- SEX (kön)
- HEIGHT (längd)
- WEIGHT (vikt)
- AGE (ålder)
- SEX (kön)
0
Page 31

Starta träningen utan träningsmål
Använd denna träningsmetod om du vill träna utan att
ställa in några träningsmål.
1. Tryck på [UP] eller [DOWN] för att ställa in önskat
träningsprogram (se tabell).
2. Tryck [ST/SP] för att starta träningen utan att ställa in
några träningsmål.
. Du kan nu börja träningen. Ställ dig på crosstrainern
enligt bilden.
Ställa in dina personliga inställningar
1. Välj program 15 (User Data) med knapparna [UP] eller
[DOWN], bekräfta med [ENTER].
2. Ändra inställning med [UP] eller [DOWN] och tryck
[ENTER] för att gå till nästa inställning.
. Repetera tills du gjort alla inställningar.
SVENSKA
Starta träningen och ställ in träningsmål
1. Tryck på [UP] eller [DOWN] för att ställa in önskat träningsprogram (se tabell). Tryck [ENTER] för att bekräfta.
2. Tryck en eller era gånger på [ENTER] för att välja träningsmål/inställning.
. Ändra inställning med [UP] eller [DOWN] och tryck [ENTER] för att gå till nästa inställning.
4. Repetera tills du gjort alla inställningar.
5. När du gjort dina inställningar trycker du [ST/SP] för att starta träningen.
6. Du kan nu börja träningen. Ställ dig på crosstrainern enligt bilden.
Exempel:
Intervallträning i 15 minuter:
1. Välj program 7 (Intervals) med [UP] eller [DOWN].
2. Tryck [ENTER] för att bekräfta, ”TIME” visas i displayen.
. Ställ in tiden 15 minuter med knapparna [UP] eller [DOWN].
4. Tryck [ST/SP] för att starta träningen, nedräkningen visas i displayen.
5. En signal ljuder målet har nåtts, t.ex. när tiden har räknats ned till ”0”.
1
Page 32

200
195
190
185
180
175
170
165
160
155
150
145
170
165.75
161.5
157.25
153
148.75
144.5
140.25
136
131.75
127.5
123.25
140
136.5
133
129.5
126
122.5
119
115.5
112
108.5
105
101.5
120
117
114
111
108
105
102
99
96
93
90
87
85
90
95
100
105
110
115
120
125
130
135
140
145
150
155
160
165
170
175
180
185
190
195
200
205
210
20 25 30 35 40 45 50 55 60 65 70 75 80
Max.
85%
70%
60%
6.3 Pulsavläsning
• Placera båda händerna mot pulssensorerna på styret, håll i båda pulssensorerna för att få så noggrann
avläsning som möjligt. Efter en stund visas din aktuella puls.
När texten ”HOLD SENSOR” visas i displayen under ett träningsprogram placerar du båda händerna
•
mot pulssensorerna.
• Pulsen avläses magnetiskt, det nns en automatisk justering av den avlästa pulsen jämförd med den
faktiska pulsen.
• Om pulsen ligger under inställt målvärde ökas belastningen. Om pulsen ligger över inställt målvärde
minskas belastningen.
• Om belastningen har minskats till lägsta möjliga värde och pulsen fortfarande ligger över inställt målvärde
börjar displayen blinka för att varna dig att det är dags att sakta ner.
SVENSKA
Puls
Ålder
6.4 Mätning av kroppsfett – Body test (program 14)
1. Starta program 14 (Body test).
2. När texten ”HOLD SENSOR” visas placerar du båda händerna mot pulssensorerna på styret, håll i
båda pulssensorerna för att få så noggrann avläsning som möjligt. Om datorn inte registrerar någon
pulsmätning visas efter en stund texten ”ERROR” i displayen.
. Resultatet presenteras i FAT%, BMR, BMI samt BODY TYPE. Tryck [ENTER] för att välja det resultat
du vill visa.
Tabell FAT%
1 5 % - 14 %
2
2 15 % - 24 %
3 25 % - 29 %
4 30 % - 39 %
5 40 % - 50 %
Obs!
- Resultaten som presenteras av datorn får endast användas i träningssyfte, ej för medicinskt bruk!
Page 33

6.5 Fitness-test (Pulse Recovery)
Testet är personligt och används för att mäta sin pulsnivå efter avslutat träningspass.
1. Efter träningspasset, tryck en gång på [PULSE RECOVERY].
2. Håll båda händerna på pulssensorerna och börja trampa.
. Tiden räknas ned från 60 sekunder till noll.
4. Vid avslutat test visas resultatet på displayen:
F1.0 Utmärkt
F2.0 Bra
F3.0 Genomsnittlig
F4.0 Under genomsnitt
F5.0 Dålig
F6.0 Mycket dålig
SVENSKA
7. Träningsinstruktioner
Många olika faktorer måste tas med i beräkning när du lägger upp ditt träningsprogram. Har du varit fysiskt
inaktiv under lång tid eller lider du av någon sjukdom som kan försämras vid fysisk träning bör du rådgöra
med en läkare innan du lägger upp ditt träningsprogram.
Intensitet
• För att nå bästa möjliga resultat måste rätt intensitet väljas, detta baseras på din puls. Denna formel
används ofta för att räkna ut din max. puls:
Max puls = 220 – Din ålder
• Under träning bör arbetspulsen vara mellan 60 % och 85 % av din max. puls (Se pulsdiagrammet).
• De första veckorna som du tränar bör din arbetspuls ligga på 60 % av din max. puls.
• När du har förbättrat dina värden och har tränat några veckor kan du långsamt låta arbetspulsen öka upp
mot 85 % av din max. puls.
Fettförbränning
Kroppen börjar förbränna fett vid 60 % av din max. puls. Optimal fettförbränning får du vid 60 till 70 % av din
max. puls. Bästa träningsresultat får du normalt om du gör träningspass på 0 minuter per vecka.
Exempel:
Du är 52 år gammal och ska börja träna och förbränna fett.
Max. puls blir 220 – 52
Lägsta arbetspuls
Övre arbetspuls
Arbetspuls mellan 101 och 117 under träning ger således bästa fettförbränning i detta exempel enligt
formeln!
= 168 pulsslag/minut enligt formeln.
= 168 x 0,6 = 101 pulsslag/minut.
= 168 x 0,7 = 117 pulsslag/minut.
Page 34

Träningstips!
Uppvärmning
Värm upp 5 till 10 minuter innan du börjar ditt träningspass t.ex. med stretching eller gång med låg
belastning.
Träningsmängd
Arbetspuls mellan 60 till 85 % av din max. puls är lämplig under träning, träningspassets längd kan anpassas
efter denna lathund:
Daglig träning
Träning 2-3 gånger/vecka
SVENSKA
Träning 1-2 gånger/vecka
Efter träningspasset
Låt musklerna kylas ner efter träningen, dra ner på takt och belastning de sista minuterna. Ägna också en
stund efter träningspasset till att stretcha musklerna för att förebygga stelhet i musklerna.
Vägen till framgång
• Träningen kommer att ge resultat efter ganska kort tid, så att din arbetspuls sänks under arbetspassen.
• Försök att göra dina träningspass regelbundet, det är lättare att hålla ut om träningen sker vid samma
tidpunkt på dagen.
• Starta träningen försiktigt, öka sedan träningsdosen när du blir mera vältränad.
• Lycka till med en hälsosammare livsstil!
= ca 10 minuter vid varje träningspass.
= ca 20 minuter vid varje träningspass.
= ca 60 minuter vid varje träningspass.
8. Avfallshantering
När du ska göra dig av med produkten ska detta ske enligt lokala föreskrifter. Är du osäker på hur du ska gå
tillväga, kontakta din kommun.
9. Specikationer
Drivspänning: 6 V DC, 1000 mA via medföljande nätadapter 20 V AV, 50 Hz
Mått:
Höjd 1600 mm
Längd 140 mm
Bredd 590 mm
Svänghjul Vikt 8 kg/st.
4
Page 35

Cross Trainer
Art.nr 34-7508 Modell ER-6472C
Les nøye igjennom hele bruksanvisningen og ta vare på den til senere bruk.
Vi reserverer oss mot ev. tekst- og bildefeil, samt forandringer av tekniske data.
Ved tekniske problemer eller andre spørsmål, ta kontakt med vårt kundesenter
(se opplysninger på baksiden).
Innholdsfortegnelse
1. Sikkerhet 6
2. Forpakningen inneholder 7
. Montering 8
4. Beskrivelse av computeren 44
5. Bruk 44
6. Begynn å trene 45
NOR SK
7. Treningsinstruksjoner 49
8. Avfallshåndtering 50
9. Spesikasjoner 50
5
Page 36

1. Sikkerhet
Produktet er testet i henhold til følgende sikkerhetsstandarder: EN975-1+A1 og EN975-5/HC
Advarsel:
liknende, som kan forverres av fysisk aktivitet. Avbryt treningen umiddelbart dersom du føler deg
svimmel.
Kontroller at alle bolter og mutre sitter fast og er dratt til.
Plasser trimsykkelen slik at den har fritt rom på minst 1 meter i alle retninger.
Les hele bruksanvisningen før du starter å trene på denne trimsykkelen. Ta også vare på bruksanvisningen
for senere bruk.
• Cross traineren er konstruert for personlig bruk i hjemmet og er testet for en kroppsvekt inntil 120 kg.
• Følg monteringsanvisningens forskjellige trinn nøye ved montering.
• Bruk kun de deler og tilbehør som følger med i forpakningen.
• Kontroller at alle deler er med i forpakningen før du begynner å montere cross traineren.
(Se ”Forpakningen inneholder”).
• Bruk riktig verktøy til monteringen. Be om hjelp dersom det er behov for det.
Rådfør deg alltid med en lege før du starter å trene, dersom du lider av en sykdom eller
NOR SK
• Plasser Cross traineren på et jevnt og sklisikkert underlag i et tørt lokale. Den skal ikke oppbevares eller
brukes utendørs eller i lokaler som har høy luftfuktighet.
• Kontroller før første gangs bruk og deretter hver eller annenhver måned at alle bolter og mutre er dratt
godt til og at de er uskadet, samt at de sitter fast på Cross traineren. Erstatt umiddelbart ev. slitte deler,
bruk ikke Cross traineren før den er reparert.
• Bruk aldri sterke løsemidler/rengjøringsmidler ved rengjøring.
• Cross traineren er først og fremst beregnet for voksne. Hvis barn skal bruke den, bør det være under
tilsyn av voksne.
• Den som bruker Cross traineren bør være klar over de farer som nnes som f.eks. faren for at klær kan
sette seg fast i bevegelige deler.
• Rådfør deg gjerne med en lege eller idrettslege før du starter treningen, slik at de kan gi råd om passende
treningsmetoder og belastning. Advarsel!
• Følg de treningsinstruksjonene som nnes i bruksanvisningen.
• Arbeidsbelastningen kan justeres fra computeren.
Gal/overdrevet trening kan gi skader.
6
Page 37

4
4
4
4
4
4
4
4
4
8
4
2
2
2
2. Forpakningen inneholder
NOR SK
Bolt M8x40
Skive M8
Inseksbolt M8x5
Skive M8
Inseksnøkkel
Inseksnøkkel
Stjernetrekker
Bolt M6xP1,0x50 for pedaler
Sprengskive M6
Skive M6
Ratt for pedalbolt
Bolt M8x70
Kuppelmutter M8
Skive M8
Bolt M10x78
Kuppelmutter M10
Skive M10
7
Page 38

6A
5
4
10
11
1
6B
18
22
21
23
28
38
39R
44
45
46
35
34
33
43L
39L
32
30
40
42
19
24
25
14
17
16
79
15B
43R
86
12
26
81
3. Montering
NOR SK
8
Page 39

32
36
86
80
33
81
34
35
32
36
86
80
12
13A
28
26
79
13
86
33
81
34
35
Trinn 1
1. Monter fremre (2) og bakre gulvstøtte (81) til bunnrammen med to bolter (), skiver (4) samt
kuppelmutre (5) til hver gulvstøtte.
2. Hvis underlaget er ujevnt kan den bakerste gulvstøtten (81) justeres på høyden på begge sider.
. Det forreste gulvstøtten (2) har transporthjul. De skal vendes framover ved montering
Trinn 2
1. Monter det runde plastdekselet (79)
over den forreste rammen, før deretter
datakabelen (1A) opp fra bunnrammen
og koble den til datakabelen (1) i den
forreste rammen.
2. Løsne først de forhåndsmonterte
boltene. Monter deretter den forreste
rammen (12) på bunnrammen (86) med
re M8x20-bolter (28) og re skiver (26).
. Fest det runde plastdekselet (79) et
stykke opp på rammen med hjelp av
en bit teip, så den ikke er i veien ved
monteringen. Dra ikke til boltene (28) på
dette tidspunktet.
NOR SK
9
Page 40

Trinn 3
6A
16
17
19
18
25
24
12
43
6B
22
21
23
19
1. Løsne de forhåndsmonterte skruene (21) og før deretter akselen (25) gjennom hullene i de nedre
håndtaksstengene (19) og den fremre rammen (12) som vist på bildet. Husk skivene (24) mellom rammen
og stengene. Fest akselen med skruene (21), aksialskivene (24), skivene (22) samt plastskivene (2).
2. Dra skruene (21) hardt til, men påse at håndtakstengene kan bevege seg lett, dog uten å glippe.
NOR SK
. Monter de nedre håndtaksstengene (19) i pedalarmenes u-fester (4). Fest med boltene (42), skivene
(0) og mutrene (40). Juster røret så det passer bra. Dra sammen U-festet så det ikke glipper.
4. Dra nå til skruene lengst ned i røret. Dra først til de to fremre så mye det er mulig. Fortsett deretter med
de på sidene. Drar man til sideskruene først, vil det glippe ved bruk, og en ulyd vil oppstå.
5. Løsne teipen, og monter plastdekselet (79).
6. Fest de øvre håndtakene (6A & 6B) på de nedre håndtaksstengene (19) med boltene (18), skivene (17)
og kuppelmutrene (16).
40
Page 41

38
39R
44
45
46
19
43R
43L
39L
6B
Trinn 4
1. Monter fotplatene (9L og 9R) i de hullene på pedalarmene (4) som passer brukeren best. Prøv
deg fram til den avstanden som føles best. Bruk skruene (8), skivene (44), låseskivene (45) samt
rattene (46).
Obs! Begge fotplatene bør monteres med samme avstand.
NOR SK
41
Page 42

12
14
11
10
13
1
Trinn 5
1. Koble først datakabelen (1) til kontakten på computerdelens (1) bakside. Monter deretter
computerdelen på holderen med de medfølgende skruene (14).
NOR SK
42
Page 43

5
4
10
11
1
Trinn 6
1. Fest håndtaket (4) på den fremre rammen ved hjelp av de re boltene (10) og skivene (11).
2. Koble pulskjennernes kabling (5) til tilkoblingen på computerens bakside.
NOR SK
4
Page 44

4. Beskrivelse av treningscomputeren
Hastighet
Tid
Brukernavn
PULSE RECOVERY
Trykk for å starte tness-test.
Resultatet graderes fra F1.0
til F6.0.
MEMORY
Lagrer resultater fra Body
Fat-testen.
UP
Endre innstilling/Øk belastning.
NOR SK
ENTER
Trykk for å velge program, bekreft dine
innstillinger samt velg visningsmodus
(tid, hastighet, distanse osv.).
Distanse
Kalorier
Omdreininger (rpm)
Watt
Puls
Start/Stopp
ST/SP
Start/Stopp – Trykk for
å starte eller stoppe valgt
program.
DOWN
Endre innstilling/
Minske belastning.
5. Bruk
Strømforsyning
Koble DC-pluggen fra medfølgende batterieliminator (6 V, 1000 mA, + i sentrum) til uttaket på baksiden nær
den bakre gulvstøtten (81), koble batterieliminatoren til et strømuttak.
Slå på displayet
Trykk på en av knappene eller begynn å tråkke for å aktivere displayet. Under ”Program” blinker sifferet 1 for
Program1 MANUAL. Kontroller at batterieliminatoren er riktig tilkoblet hvis ikke displayet aktiveres.
Flytt treningsredskapet
Ta tak i håndtaket og løft opp bakdelen så hjulene i framkanten
kan rulle fritt.
44
Page 45

6. Begynn å trene
6.1 Grunnleggende bruk
Aktiver displayet
Trykk på en av knappene eller begynn å tråkke for å aktivere displayet. Kontroller at batterieliminatoren er
riktig tilkoblet hvis ikke displayet aktiveres.
Belasting
Belastningen følger grafene på skjermen, et høyt utslag gir høy belastning og et lavt utslag gir lavere belastning. Belastningen kan endres under treningens gang med [UP] og [DOWN].
Treningsmål
Hvert treningsprogram har forskjellige treningsmål som lar deg stille inn treningsøktens tid, distanse eller
hvor mange kalorier som skal forbrennes.
Ta pause i treningen
Trykk når som helst på (ST/SP) for å ta pause i treningen. Målingen stopper og displayet fryser aktuelle verdier. Trykk en gang til på (ST/SP) for å gjenoppta treningen.
Endre funksjon under pågående trening
Trykk på (ST/SP) for å stoppe pågående program. Trykk på [UP] eller [DOWN] for å velge et annet program.
Bekreft ved å trykke på [ENTER].
NOR SK
Tilbakestilling:
For å tilbakestille innstilte program, trykk og hold inne (ST/SP) i ca. sekunder. Computeren avgir en tone
og displayet viser samtlige segment en kort stund.
6.2 Velg treningsprogram
Forklaring på menyer/treningsprogram
Nr.: Program Forklaring Treningsmål/Innstillinger
1 Bruksanvisning Treningsprogram med eller uten
innstilte mål. Belastningen kan
manuelt økes eller minskes under
treningens gang.
2 Rolling Forhåndsinnstilt belastning med
variert motstand under treningens
gang.
Valley Forhåndsinnstilt belastning i
form av en dal med oppover- og
nedoverbakker.
4 Fat Burn Forhåndsinnstilt belastning i form
av en bakke med oppover- og
nedoverbakke.
- TIME (tid)
- DISTANCE (distanse)
- CALORIES (kaloriforbrenning)
- TIME (tid)
- DISTANCE (distanse)
- CALORIES (kaloriforbrenning)
- TIME (tid)
- DISTANCE (distanse)
- CALORIES (kaloriforbrenning)
- TIME (tid)
- DISTANCE (distanse)
- CALORIES (kaloriforbrenning)
5 Ramp Forhåndsinnstilt belastning med
langsomt økende motstand.
45
- TIME (tid)
- DISTANCE (distanse)
- CALORIES (kaloriforbrenning)
Page 46

6 Mountain Forhåndsinnstilt belastning i
form av en høyde med økende
og minskende motstand under
treningens gang.
- TIME (tid)
- DISTANCE (distanse)
- CALORIES (kaloriforbrenning)
7 Intervals Forhåndsinnstilt belastning med
hurtig varierende motstand.
8 Watt Control Lar deg selv velge belastningen.
Konstant belastning, noe som
betyr samme motstand uavhengig
av hastighet. Belastningen er
justerbar, men er forhåndsinnstilt til
100 W.
9 55 % H.R.C. Pulsstyrt program. Trening til du
oppnår 55 % av din makspuls.
10 75 % H.R.C. Pulsstyrt program. Trening til du
NOR SK
11 90 % H.R.C. Pulsstyrt program. Trening til du
oppnår 75 % av din makspuls.
oppnår 90 % av din makspuls.
- TIME (tid)
- DISTANCE (distanse)
- CALORIES (kaloriforbrenning)
- TIME (tid)
- DISTANCE (distanse)
- CALORIES (kaloriforbrenning)
- WATT (effekt)
- TIME (tid)
- DISTANCE (distanse)
- CALORIES (kaloriforbrenning)
- AGE (alder)
- TARGET H.R (målpuls)
- TIME (tid)
- DISTANCE (distanse)
- CALORIES (kaloriforbrenning)
- AGE (alder)
- TARGET H.R (målpuls)
- TIME (tid)
- DISTANCE (distanse)
- CALORIES (kaloriforbrenning)
- AGE (alder)
- TARGET H.R (målpuls)
12 Target H.R Pulsstyrt program. Trening til du
oppnår innstilt målpuls.
1
14 Body Test Presenterer resultatet i FAT %,
15 User Data Angir dine personlige innstillinger. - NAME (navn): Maks. 8 bokstaver
Users Prole Lar deg selv gjøre et variert program
ved å stille inn belastningen for hver
kolonne for seg.
BMR, BMI samt BODY TYPE (se
tabell).
- TIME (tid)
- DISTANCE (distanse)
- CALORIES (kaloriforbrenning)
- TARGET H.R (målpuls)
- TIME (tid)
- DISTANCE (distanse)
- CALORIES (kaloriforbrenning)
- COLUMN 1-10 (kolonne 1 til 10)
- HEIGHT (lengde)
- WEIGHT (vekt)
- AGE (alder)
- SEX (kjønn)
- HEIGHT (lengde)
- WEIGHT (vekt)
- AGE (alder)
- SEX (kjønn)
46
Page 47

Start treningen uten treningsmål
Bruk denne treningsmetoden dersom du vil trene
uten å stille inn noen treningsmål.
1. Trykk på [UP] eller [DOWN] for å stille inn ønsket
treningsprogram (se tabell).
2. Trykk [ST/SP] for å starte treningen uten å stille
inn noen treningsmål.
. Du kan nå begynne treningen. Stell deg på
crosstraineren som vist på bildet.
Still inn dine personlige innstillinger
1. Velg program 15 (User Data) med knappene [UP]
eller [DOWN], bekreft med [ENTER].
2. Endre innstilling med [UP] eller [DOWN] og trykk
[ENTER] for å gå til neste innstilling.
. Repeter til du har foretatt alle innstillinger.
NOR SK
Start treningen og still inn treningsmål
1. Trykk på [UP] eller [DOWN] for å stille inn ønsket treningsprogram (se tabell). Trykk på [ENTER] for å
bekrefte.
2. Trykk en eller ere ganger på [PROG] for å velge treningsmål/innstilling.
. Endre innstilling med [UP] eller [DOWN] og trykk [ENTER] for å gå til neste innstilling.
4. Repeter til du har foretatt alle innstillinger.
5. Når du har foretatt dine innstillinger trykker du [ST/SP] for å starte treningen.
6. Du kan nå begynne treningen. Stell deg på crosstraineren som vist på bildet.
Eksempel:
Intervalltrening i 15 minutter:
1. Velg program 7 (Intervals) med [UP] eller [DOWN].
2. Trykk [ENTER] for å bekrefte, ”TIME” vises i displayet.
. Still inn tiden 15 minutter med knappene [UP] eller [DOWN].
4. Trykk [ST/SP] for å starte treningen, nedtellingen vises i displayet.
5. Et signal lyder i noen sekunder når målet er nådd, f.eks. tiden har telt ned til ”0”.
47
Page 48

200
195
190
185
180
175
170
165
160
155
150
145
170
165.75
161.5
157.25
153
148.75
144.5
140.25
136
131.75
127.5
123.25
140
136.5
133
129.5
126
122.5
119
115.5
112
108.5
105
101.5
120
117
114
111
108
105
102
99
96
93
90
87
85
90
95
100
105
110
115
120
125
130
135
140
145
150
155
160
165
170
175
180
185
190
195
200
205
210
20 25 30 35 40 45 50 55 60 65 70 75 80
Max.
85%
70%
60%
6.3 Pulsavlesning
- Plasser begge hendene mot pulssensorene på styret. Hold i begge pulssensorene for å få så nøyaktig
avlesing som mulig. Etter en stund vises din aktuelle puls.
- Når teksten ”HOLD SENSOR” vises i displayet under et treningsprogram plasserer du begge hendene
mot pulssensorene.
Pulsen avleses magnetisk, det nnes en automatisk justering av den avleste pulsen sammenlignet med
den faktiske pulsen.
Dersom pulsen ligger under innstilt måleverdi økes belastningen. Dersom pulsen ligger over innstilt
måleverdi minskes belastningen.
Dersom belastningen har minsket til laveste mulige verdi og pulsen fortsatt ligger over innstilt måleverdi
begynner displayet å blinke for å advare deg om at det er på tide å roe ned.
Obs! Dette programmet kan kun brukes hvis computeren kan lese av pulsen uten avbrudd.
NOR SK
Puls
Alder
6.4 Måling av kroppsfett – Body test (program 14)
1. Start program 14 (Body test).
2. Når teksten ”HOLD SENSOR” vises, plasserer du begge hendene mot pulssensorene på styret. Hold i
begge pulssensorene for å få så nøyaktig avlesing som mulig. Dersom computeren ikke registrerer noen
pulsmåling, vises etter en stund teksten ”ERROR” i displayet.
. Resultatet presenteres i FAT %, BMR, BMI samt BODY TYPE. Trykk [Enter] for å velge det nummeret du
vil redigere.
Tabell FAT%
1 5 % - 14 %
2 15 % - 24 %
48
3 25 % - 29 %
4 30 % - 39 %
5 40 % - 50 %
Obs!
- Resultatene som presenteres av computeren skal kun brukes i forbindelse med trening, og ikke til
medisinsk bruk!
Page 49

6.5 Fitness-test (Pulse Recovery)
Testen er personlig og brukes for å måle ditt pulsnivå etter avsluttet treningsøkt.
1. Etter treningsøkten, trykk en gang på [PULSE RECOVERY].
2. Hold begge hendene på pulssensorene og start tråkkingen .
. Tiden telles ned fra 60 sekunder til null.
4. Ved avsluttet test. Vises resultatet i displayet:
F1,0 Utmerket
F2,0 Bra
F,0
F4,0 Under gjennomsnittet
F5,0 Dårlig
F6,0 Svært dårlig
Gjennomsnittelig
7. Treningsinstruksjoner
Mange ulike faktorer må tas med i beregningen når du legger opp ditt treningsprogram. Har du vært fysisk
inaktiv over en lang periode eller lider du av en sykdom som kan forverres ved fysisk trening, bør du rådføre
deg med en lege før du legger opp treningsprogrammet.
Intensitet
• For å oppnå best mulig resultat, må riktig intensitet velges. Dette baseres på din puls. Denne formelen
brukes ofte for å regne ut din maks. puls:
Maks. puls = 220 – Din alder
• Under trening bør arbeidspulsen være mellom 60 % og 85 % av din maks. puls (Se pulsdiagrammet).
• De første ukene som du trener bør din arbeidspuls ligge på 60 % av din maks. puls.
NOR SK
• Når du har forbedret dine verdier og har trent i noen uker, kan du langsomt la arbeidspulsen øke opp mot
85 % av din maks. puls.
Fettforbrenning
Kroppen begynner å forbrenne fett ved 60 % av din maks. puls. Optimal fettforbrenning får du ved 60 til 70 %
av din maks. puls. Best treningsresultat får du normalt om du har treningsøkter på 0 minutter per uke.
Eksempel:
Du er 52 år gammel og skal begynne å trene og forbrenne fett.
Maks. puls blir 220 – 52
Laveste arbeidspuls
Høyeste arbeidspuls = 168 x 0,7 = 117 pulsslag/minutt.
Arbeidspuls mellom 101 og 117 under trening gir således best fettforbrenning i dette eksemplet i følge
formelen!
= 168 pulsslag/minutt i følge formelen.
= 168 x 0,6 = 101 pulsslag/minutt.
49
Page 50

Treningstips!
Oppvarming
Varm opp 5 til 10 minutter før du begynner treningsøkten f.eks. med tøyning eller gange med lav belastning.
Treningsmengde
Arbeidspuls mellom 60 til 85 % av din maks. puls er passelig under trening, treningsøktens lengde kan
tilpasses etter denne lathund:
Daglig trening
Trening 2-3 ganger/uke
Trening 1-2 ganger/uke = ca. 60 minutter ved hver treningsøkt.
Etter treningsøkten
La musklene kjøles ned etter treningen, dra ned på takt og belastning de siste minuttene, bruk også en stund
etter treningsøkten til å tøye musklene for å forebygge stølhet i musklene.
Veien til framgang
NOR SK
• Treningen vil gi resultater etter ganske kort tid, så din arbeidspuls senkes under arbeidsøkten.
• Prøv å gjøre dine treningsøkter regelmessig, det er lettere å holde ut hvis treningen skjer på samme
tidspunkt på dagen.
• Start treningen forsiktig, øk deretter treningsmengden når du blir mer veltrenet.
• Lykke til med en sunnere livsstil!
= ca. 10 minutter ved hver treningsøkt.
= ca. 20 minutter ved hver treningsøkt.
8. Avfallshåndtering
Når du skal kvitte deg med produktet, skal dette skje i henhold til lokale forskrifter. Er du usikker på hvordan
du går fram, ta kontakt med lokale myndigheter.
9. Spesikasjoner
Spenning: 6 V DC, 1 000 mA via batterieliminator 20 V AC, 50 Hz
Mål:
Høyde: 1 600 mm
Lengde: 1 40 mm
Bredde: 590 mm
Svinghjul: Vekt 8 kg/stk.
50
Page 51

Cross Trainer
Tuotenumero 34-7508 Malli ER-6472C
Lue käyttöohjeet ennen tuotteen käyttöönottoa. Säilytä käyttöohjeet tulevaa tarvetta varten.
Pidätämme oikeuden teknisten tietojen muutoksiin. Emme vastaa mahdollisista teksti- tai kuvavirheistä.
Jos laitteeseen tulee teknisiä ongelmia, ota yhteys myymälään tai asiakaspalveluun (yhteystiedot
käyttöohjeen lopussa).
Sisällysluettelo
1. Turvallisuus 52
2. Pakkauksen sisältö 5
. Asennus 54
4. Tietokoneen kuvaus 60
5. Käyttö 60
6. Harjoittelun aloittaminen 61
7. Harjoitusohjeet 64
9. Kierrätys 66
10. Tekniset tiedot 66
SUOMI
51
Page 52

1. Turvallisuus
Tuote on testattu seuraavien turvallisuusstandardien mukaisesti: EN975-1+A1 ja EN975-5/HC.
Varoitus: J
lääkärin kanssa ennen harjoittelun aloittamista. Keskeytä harjoittelu välittömästi, jos sinua rupeaa
huimaamaan.
Varmista, että kaikki pultit, mutterit ja muut osat ovat paikoillaan ja kireällä.
Aseta laite sellaiseen paikkaan, että sen ympärillä on joka puolella tilaa vähintään yhden metrin verran.
Lue koko käyttöohje huolellisesti ennen laitteen käyttöönottoa. Säilytä ohjeet tulevaa tarvetta varten.
• Cross Trainer -laite on suunniteltu henkilökohtaiseen kotikäyttöön ja se kestää jopa 120 kg:n painon.
• Seuraa asennusohjeita huolellisesti asentaessasi laitetta.
• Käytä ainoastaan pakkauksen mukana tulleita osia ja varusteita.
• Varmista ennen asentamisen aloittamista, että pakkaus sisältää kaikki tarvittavat osat. (Ks. ”Pakkauksen
sisältö”).
• Käytä asentamiseen sopivia työkaluja ja pyydä tarvittaessa jotakuta toista pitelemään laitetta paikoillaan.
• Sijoita laite kuivaan paikkaan tasaiselle ja liukumattomalle alustalle. Älä käytä tai säilytä laitetta ulkona tai
kosteissa tiloissa.
• Varmista ennen ensimmäistä käyttökertaa ja sen jälkeen noin runsaan kuukauden välein, että kaikki pultit,
mutterit ja muut osat ovat kunnolla paikoillaan ja vahingoittumattomia. Vaihda kuluneet osat välittömästi
uusiin äläkä käytä laitetta ennen kuin tämä on tehty.
os sinulla on jokin sairaus tai vaiva, jota fyysinen harjoittelu voi pahentaa, keskustele
• Älä käytä puhdistukseen voimakkaita puhdistusaineita tai liuottimia.
• Cross Trainer -laite soveltuu aikuisille. Lapset saavat käyttää laitetta ainoastaan aikuisen valvonnassa.
SUOMI
• Laitetta käyttävän tulee olla tietoinen käyttöön liittyvistä mahdollisista vaaroista. Esim. vaatteet voivat
tarttua pyörän liikkuviin osiin käytön aikana.
• Suosittelemme, että keskustelet ennen käytön aloittamista lääkärin tai lääkintävoimistelijan kanssa.
He voivat neuvoa sinua oikeaan vastukseen ja harjoittelumetodeihin liittyvissä asioissa.
Varoitus! Virheellinen ja liiallinen harjoittelu voi aiheuttaa vammoja.
• Noudata käyttöohjeen harjoitteluohjeita.
• Harjoittelukuormitusta voidaan säätää tietokoneella.
52
Page 53

4
4
4
4
4
4
4
4
4
8
4
2
2
2
2. Pakkauksen sisältö
Pultti M8x40
Aksiaalialuslevy M8
Kuusiokolopultti M8x5
Aluslaatta M8
Kuusiokoloavain
Kuusiokoloavain
Ristipäätaltta
Pultti M6xP1,0x50, polkimille
Jousialuslevy M6
Aluslaatta M6
Poljinpultin nuppi
Pultti M8x70
Kupumutteri M8
Aluslaatta M8
Pultti M10x78
Hattumutteri M10
Aluslaatta M10
5
SUOMI
Page 54

6A
5
4
10
11
1
6B
18
22
21
23
28
38
39R
44
45
46
35
34
33
43L
39L
32
30
40
42
19
24
25
14
17
16
79
15B
43R
86
12
26
81
3. Asennus
SUOMI
54
Page 55

32
36
86
80
33
81
34
35
32
36
86
80
12
13A
28
26
79
13
86
33
81
34
35
1. askel
1. Asenna etummainen (2) ja taaempi lattiatuki (81) pohjakehykseen kahdella pultilla (), aluslevyillä (4)
sekä kupumuttereilla (5) kuhunkin lattiatukeen.
2. Jos lattia on epätasainen, on taaemmassa lattiatuessa (81) kummallakin puolella erillinen korkeuden
säädin.
. Etummaisessa lattiatuessa (2) on kuljetuspyörät, jotka tulee kääntää eteenpäin asennuksen ajaksi.
2. askel
1. Asenna pyöreä muovikupu (79) taaemman
kehyksen päälle ja laita tietokonejohto
(1A) pohjakehyksestä etukehyksen
tietokonejohtoon (1).
2. Avaa ensin esiasennetut pultit ja asenna
sen jälkeen etummainen kehys (12)
pohjakehykseen (86) neljällä M8x20-pultilla
(28) ja neljällä aluslaatalla (26).
. Kiinnitä pyöreä muovikupu (79) hieman
ylemmäs runkoon teipillä, jotta se ei ole tiellä
asennuksen aikana. Älä kiristä pultteja (28)
vielä tässä vaiheessa.
SUOMI
55
Page 56

3. askel
6A
16
17
19
18
25
24
12
43
6B
22
21
23
19
1. Avaa esiasennetut ruuvit (21) ja vie akseli (25) alempien kahvatankojen (19) reikien ja etummaisen
kehyksen (12) läpi kuvan osoittamalla tavalla. Muista laittaa aluslaatat (24) kehyksen ja tankojen välille.
Kiinnitä akseli ruuveilla (21), aksiaalialuslaatoilla (24), aluslaatoilla (22) sekä muovialuslaatoilla (2).
2. Kiristä ruuvit (21) tiukalle, mutta varmista, että kahvatangot pääsevät liikkumaan kevyesti, mutta ilman välystä.
SUOMI
(0) ja muttereilla (40). Säädä putki, jotta se sopii hyvin. Tiukenna U-kiinnike, jotta siinä ei ole välystä.
4. Kiristä nyt putken alimmat ruuvit. Kiristä ensin kaksi edessä olevaa ruuvia tiukalle ja sen jälkeen sivuilla olevat
ruuvit. Mikäli sivuruuvit kiristetään ensin, crosstrainerin käytön aikana ilmenee välystä ja kuuluu ääntä.
. Asenna alemmat kahvatangot (19) poljinvarsien U-kiinnikkeisiin (4). Kiinnitä pulteilla (42), aluslaatoilla
5. Irrota teippi ja asenna muovikupu (79).
. Kiinnitä ylemmät kahvat (6A ja 6B) alempiin kahvatankoihin (19) pulteilla (18), aluslaatoilla (17) ja
kupumuttereilla (16).
56
Page 57

38
39R
44
45
46
19
43R
43L
39L
6B
4. askel
1. Asenna jalkalevyt (9L ja 9R) poljinvarsien (4) reikiin (valitse itse sinulle parhaiten sopivat). Kokeile,
mikä etäisyys tuntuu parhaalta. Kiinnitä ruuveilla (8), aluslaatoilla (44), lukkoaluslaatoilla (45) sekä
nupeilla (46).
Huom.! Molemmat jalkalevyt tulee asentaa samalle etäisyydelle.
SUOMI
57
Page 58

12
14
11
10
13
1
5. askel
1. Liitä ensin tietokonejohto (1) tietokoneen (1) takana olevaan kontaktiin. Asenna sen jälkeen tietokoneosa
pidikkeeseen mukana tulevilla ruuveilla (14).
SUOMI
58
Page 59

5
4
10
11
1
6. askel
1. Kiinnitä kahva (4) etummaiseen kehykseen neljän pultin (10) ja aluslaatan avulla (11).
2. Liitä sykeantureiden johdot (5) tietokoneen takana olevaan liitäntään.
SUOMI
59
Page 60

4. Harjoittelutietokoneen kuvaus
Käyttäjänimi
PULSE RECOVERY
Paina aloittaaksesi tness-testin.
Tulosasteikko: F1.0 – F6.0.
MEMORY
Tallentaa Body Fat –testin
tuloksen.
UP
Muuta asetusta/
Lisää kuormitusta
Nopeus
Aika
ENTER
Paina valitaksesi ohjelman,
vahvistaaksesi asetukset sekä valitaksesi
näyttötilan (aika, nopeus, välimatka jne.).
Etäisyys
Kalorit
Kierrokset (rpm)
Watit
Syke
Käynnistys/pysäytys
ST/SP
Käynnistys/Pysäytys
Käynnistää ja pysäyttää
valitun ohjelman.
DOWN
Muuta asetusta/
Vähennä kuormitusta
5. Käyttö
Virtalähde
SUOMI
Liitä pakkauksen mukana olevan muuntajan (6 V, 1000 mA, + keskellä) DC-pistoke taaemman lattiatuen (81)
takana olevaan liitäntään. Liitä muuntaja verkkovirtaan.
Laita näyttö päälle
Paina jotakin painiketta tai ala polkea, niin näyttö aktivoituu. Tekstin ”Program” alla vilkkuu luku 1 tarkoittaen
Program 1 MANUAL. Jos näyttö ei mene päälle, varmista, että muuntaja on liitetty oikein.
Laitteen siirtäminen
Ota kiinni kahvasta ja nosta takaosaa siten,
että etuosan pyörät pääsevät pyörimään.
60
Page 61

6. Harjoittelun aloittaminen
6.1 Peruskäyttö
Näytön aktivoiminen
Aktivoi näyttö painamalla jotain painikkeista tai aloittamalla polkemisen. Jos näyttö ei mene päälle, varmista,
että muuntaja on liitetty oikein.
Kuormitus
Kuormitus noudattaa näytön pylväitä, korkea pylväs tarkoittaa suurta kuormitusta ja matala pylväs tarkoittaa
alhaista kuormitusta. Kuormitusta voi muuttaa harjoituksen aikana [UP] ja [DOWN]-painikkeilla.
Harjoittelutavoitteet
Jokaisessa harjoitteluohjelmassa on eri harjoittelutavoitteita, joissa voi asettaa harjoituksen pituuden,
välimatkan ja poltettavien kaloreiden määrän.
Tauon pitäminen harjoituksessa
Voit pitää tauon koska tahansa painamalla nuppia [ST/SP]. Mittaus pysähtyy ja senhetkiset arvot pysähtyvät
näytölle. Jatka harjoittelua painamalla uudestaan nuppia [ST/SP].
Toiminnon vaihto harjoittelun aikana
Lopeta ohjelmoitu harjoitus painamalla [ST/SP]. Valitse toinen ohjelma [UP] ja [DOWN]-painikkeilla. Vahvista
painamalla [ENTER].
Asetusten palauttaminen
Jos haluat poistaa asetetun ohjelman, paina [ST/SP] noin sekunnin ajan. Laitteesta kuuluu merkkiääni ja
kaikki
merkinnät näkyvät näytöllä lyhyen aikaa.
6.2 Harjoitteluohjelman valitseminen
Valikkojen/harjoitusohjelmien selitykset
Nro Ohjelma Selitys Harjoittelutavoitteet/Asetukset
1 Manuaalinen Harjoitteluohjelma
tavoitteella tai ilman.
Kuormitusta voi lisätä tai
vähentää manuaalisesti
harjoittelun aikana.
2 Rolling Vaihteleva vastus
harjoittelun aikana.
Valley Ylä- ja alamäkiä. - TIME (aika)
- TIME (aika)
- DISTANCE (välimatka)
- CALORIES (kalorien kulutus)
- TIME (aika)
- DISTANCE (välimatka)
- CALORIES (kalorien kulutus)
- DISTANCE (välimatka)
- CALORIES (kalorien kulutus)
SUOMI
4 Fat Burn 1 ylä- ja 1 alamäki. - TIME (aika)
- DISTANCE (välimatka)
- CALORIES (kalorien kulutus)
61
Page 62

5 Ramp Hitaasti kasvava vastus. - TIME (aika)
- DISTANCE (välimatka)
- CALORIES (kalorien kulutus)
6 Mountain Vuoriharjoitteluohjelma,
jossa kasvavaa ja
heikentyvää vastusta
harjoittelun aikana.
7 Intervals Nopeasti vaihteleva
vastus.
8 Watt Control Valitse itse kuormitus.
Jatkuva kuormitus,
mikä tarkoittaa samaa
vastusta nopeudesta
riippumatta. Kuormitus
on säädettävissä
(tehdasasetuksena 100
W).
9 55 % H.R.C. Sykeohjattu ohjelma.
Harjoittelu jatkuu, kunnes
saavutat 55 % prosenttia
maksimisykkeestäsi.
10 75 % H.R.C. Sykeohjattu ohjelma.
Harjoittelu jatkuu, kunnes
saavutat 75 % prosenttia
maksimisykkeestäsi.
SUOMI
11 90 % H.R.C. Sykeohjattu ohjelma.
Harjoittelu jatkuu, kunnes
saavutat 90 % prosenttia
maksimisykkeestäsi.
- TIME (aika)
- DISTANCE (välimatka)
- CALORIES (kalorien kulutus)
- TIME (aika)
- DISTANCE (välimatka)
- CALORIES (kalorien kulutus)
- TIME (aika)
- DISTANCE (välimatka)
- CALORIES (kalorien kulutus)
- WATT (teho)
- TIME (aika)
- DISTANCE (välimatka)
- CALORIES (kalorien kulutus)
- AGE (ikä)
- TARGET H.R (tavoitesyke)
- TIME (aika)
- DISTANCE (välimatka)
- CALORIES (kalorien kulutus)
- AGE (ikä)
- TARGET H.R (tavoitesyke)
- TIME (aika)
- DISTANCE (välimatka)
- CALORIES (kalorien kulutus)
- AGE (ikä)
- TARGET H.R (tavoitesyke)
12 Target H.R Sykeohjattu ohjelma.
Harjoittelu jatkuu, kunnes
tavoitesyke saavutetaan.
1
14 Body Test Näyttää tulokset: FAT%,
15 User Data Omat asetukset. - NAME (nimi): Maks. 8 kirjainta
Users Prole Voit itse tehdä vaihtelevan
ohjelman säätämällä
kuormituksen vaiheittain.
BMR, BMI sekä BODY
TYPE (katso taulukko).
- TIME (aika)
- DISTANCE (välimatka)
- CALORIES (kalorien kulutus)
- TARGET H.R (tavoitesyke)
- TIME (aika)
- DISTANCE (välimatka)
- CALORIES (kalorien kulutus)
- COLUMN 1-10 (vaiheet 1 - 10)
- HEIGHT (pituus)
- WEIGHT (paino)
- AGE (ikä)
- SEX (sukupuoli)
- HEIGHT (pituus)
- WEIGHT (paino)
- AGE (ikä)
- SEX (sukupuoli)
62
Page 63

Harjoittelun aloittaminen ilman tavoitteita
Käytä tätä harjoittelumuotoa, mikäli haluat harjoitella ilman harjoittelutavoitteita.
1. Valitse haluamasi harjoitteluohjelma painamalla [UP] ja [DOWN] (katso taulukko).
2. Aloita harjoittelu ilman harjoitteluohjelmaa painamalla [ST/SP].
. Nyt voit aloittaa harjoittelun. Asetu Cross Trainer -laitteen päälle kuvan osoittamalla tavalla.
Omien asetusten asettaminen
1. Valitse ohjelma 15 (User Data) painikkeilla [UP] tai [DOWN], vahvista painamalla [ENTER].
2. Muuta asetusta painikkeilla [UP] tai [DOWN] ja siirry seuraavaan asetukseen painamalla
[ENTER].
. Toista kunnes olet tehnyt kaikki asetukset.
SUOMI
6
Page 64

200
195
190
185
180
175
170
165
160
155
150
145
170
165.75
161.5
157.25
153
148.75
144.5
140.25
136
131.75
127.5
123.25
140
136.5
133
129.5
126
122.5
119
115.5
112
108.5
105
101.5
120
117
114
111
108
105
102
99
96
93
90
87
85
90
95
100
105
110
115
120
125
130
135
140
145
150
155
160
165
170
175
180
185
190
195
200
205
210
20 25 30 35 40 45 50 55 60 65 70 75 80
Max.
85%
70%
60%
Harjoittelun aloittaminen ja harjoittelutavoitteen asettaminen
1. Valitse haluamasi harjoitteluohjelma painamalla [UP] ja [DOWN] (katso taulukko). Vahvista
painamalla [ENTER].
2. Valitse haluamasi harjoittelutavoite/asetus painamalla [ENTER].
. Muuta asetusta painikkeilla [UP] tai [DOWN] ja siirry seuraavaan asetukseen painamalla [ENTER].
4. Toista kunnes olet tehnyt kaikki asetukset.
5. Kun olet tehnyt asetukset, aloita harjoittelu painamalla [ST/SP].
6. Nyt voit aloittaa harjoittelun. Asetu Cross Trainer -laitteen päälle kuvan osoittamalla tavalla.
Esimerkki:
Syke
SUOMI
Ikä
Intervalliharjoittelu, 15 minuuttia:
1. Valitse ohjelma 7 (Intervals) [UP] ja [DOWN]-painikkeilla.
2. Vahvista painamalla [ENTER], näytöllä lukee ”TIME”.
. Aseta aika (15 minuuttia) [UP] ja [DOWN]-painikkeilla.
4. Aloita harjoittelu painamalla [ST/SP], jäljellä oleva aika näkyy näytöllä.
5. Kun valittu aika on kulunut loppuun, laite ilmoittaa siitä äänimerkillä.
64
Page 65

6.3 Sykkeen mittaaminen
- Aseta kädet ohjaintangon sykeantureihin. Pidä kiinni molemmista antureista saadaksesi mahdollisimman
tarkan tuloksen. Sykkeesi näkyy hetken kuluttua.
- Kun harjoitteluohjelman aikana näytölle tulee teksti ”HOLD SENSOR”, aseta kädet sykeantureihin.
-
Syke mitataan magneettisesti. Mikäli mitattu syke eroaa todellisesta sykkeestä, säädetään se todellisen
sykkeen mukaan.
-
Jos syke on matalampi kuin asetettu sykearvo, kuormitus nousee. Jos syke on korkeampi kuin asetettu
sykearvo, kuormitus laskee.
-
Jos kuormitusta on laskettu niin paljon kuin mahdollista ja syke on edelleen asetettua sykearvoa
korkeampi, alkaa näyttö vilkkua ilmoittaakseen, että sinun kannattaa hidastaa.
6.4 Kehon rasvapitoisuuden mittaaminen – Body test (ohjelma 14)
1. Aloita ohjelma 14 (Body test).
2. Kun näytöllä ilmestyy teksti ”HOLD SENSOR”, aseta kädet ohjaintangon sykeantureihin. Pidä kiinni
molemmista antureista saadaksesi mahdollisimman tarkan tuloksen. Jos tietokone ei rekisteröi sykettä,
lukee näytöllä hetken jälkeen ”ERROR”.
. Laite näyttää tulokset: FAT%, BMR, BMI sekä BODY TYPE (katso taulukko). Valitse tulos, jota haluat
katsella painamalla [ENTER].
Taulukko FAT%
1 5 % - 14 %
2 15 % - 24 %
25 % - 29 %
4 0 % - 9 %
5 40 % - 50 %
Huom.!
Tietokoneen osoittama tulos on vain harjoittelukäyttöön, ei lääketieteellisen käyttöön!
SUOMI
6565
Page 66

6.5 Fitness-testi (Pulse Recovery)
Testi on henkilökohtainen ja sitä käytetään sykkeen mittaamiseen harjoitteluohjelman jälkeen.
1. Paina harjoitteluohjelman jälkeen kerran [PULSE RECOVERY].
2. Pidä molemmat kädet sykeantureilla ja polje.
. Laite laskee ajan 60 sekunnista nollaan.
4. Kun testi on loppu, tulos näkyy näytöllä:
F1,0 Erinomainen
F2,0 Hyvä
F3,0 Keskitasoa
F4,0 Alle keskitason
F5,0 Huono
F6,0 Erittäin huono
7. Harjoitusohjeet
On monta asiaa, jotka sinun täytyy ottaa huomioon, kun suunnittelet harjoitusohjelmaasi. Jos olet ollut
kauan harrastamatta liikuntaa tai jos sinulla on sairaus, joka voi pahentua fyysisen harjoittelun seurauksena,
suosittelemme, että keskustelet lääkärin kanssa ennen harjoittelun aloittamista.
Intensiteetti
• Kun valitset oikean intensiteetin, voit saavuttaa parhaan mahdollisen harjoittelutuloksen. Intensiteetti
perustuu sykkeeseen. Maksimisykkeen laskemiseen käytetään usein seuraavaa kaavaa:
SUOMI
Maksimisyke = 220 – ikäsi
• Harjoittelun aikana tulisi sykkeen olla 60–85 % maksimisykkeestä (ks. Syketaulukko käyttöohjeen
lopussa).
• Ensimmäisten viikkojen aikana harjoittelusykkeen tulee olla noin 60 % maksimisykkeestäsi.
• Muutaman viikon harjoittelun jälkeen voi harjoittelusyke olla jo lähempänä 85 %:a maksimisykkeestäsi.
Rasvanpoltto
Elimistö alkaa polttaa rasvaa, kun syke on 60 % maksimisykkeestä. Eniten rasvaa palaa sykkeen ollessa
60–70 % maksimisykkeestä. Parhaimman tuloksen saat, jos harjoittelet 0 minuutin ajan kolme kertaa
viikossa.
Esimerkki:
Olet 52-vuotias ja aloitat harjoittelun tarkoituksenasi polttaa rasvaa.
Maksimisykkeesi on 220 – 52 = 168 lyöntiä/min.
Matalin harjoittelusyke = 168 x 0,6 = 101 lyöntiä/minuutti
Korkein harjoittelusyke = 168 x 0,7 = 117 lyöntiä/minuutti
Kun harjoittelusykkeesi on 101–117, poltat rasvaa parhaalla mahdollisella tavalla.
66
Page 67

Harjoitteluvinkkejä
Lämmittely
Lämmittele 5–10 minuuttia ennen harjoittelun aloittamista. Voit esim. venytellä tai kävellä rauhallisesti.
Harjoittelun määrä
Harjoittelusyke 60–85 % maksimisykkeestä on sopiva harjoitteluun. Voit laskea harjoittelun pituuden
seuraavan taulukon mukaan:
Harjoittelet päivittäin = n. 10 minuuttia joka kerta.
Harjoittelet 2–3 kertaa viikossa = n. 20 minuuttia joka kerta.
Harjoittelet 1–2 kertaa viikossa = n. 60 minuuttia joka kerta.
Harjoittelun jälkeen
Anna lihasten jäähtyä harjoittelun jälkeen. Vähennä vauhtia ja vastusta viimeisten minuuttien ajaksi.
Venyttele lihaksia hetki harjoittelun jälkeen, niin ehkäiset niiden jäykistymistä.
Tie menestykseen
• Harjoittelu antaa tuloksia jo lyhyen ajan jälkeen. Huomaat tämän, kun harjoittelusykkeesi laskee.
• Yritä harjoitella säännöllisesti. Harjoittelusuunnitelman noudattaminen on helpompaa, jos harjoittelet aina
samaan aikaan päivästä.
• Aloita harjoittelu varovaisesti. Lisää harjoittelua sitä mukaa kun kuntosi kohenee.
• Onnea terveellisemmän elämän aloittamiseen!
8. Kierrätys
Kierrätä tuote asianmukaisesti, kun poistat sen käytöstä. Ota yhteys kuntasi jäteneuvontaan, mikäli olet
epävarma.
9. Tekniset tiedot
Käyttöjännite: 6 V DC, 1000 mA (muuntajan kanssa 20 V AC, 50 Hz)
Mitat
Korkeus 1 600 mm
Pituus 1 40 mm
Leveys 590 mm
Vauhtipyörä Paino 8 kg/kpl
67
Page 68

SVERIGE
KUNDTJÄNST Tel: 0247/445 00
Fax: 0247/445 09
E-post: kundtjanst@clasohlson.se
INTERNET www.clasohlson.se
BREV Clas Ohlson AB, 79 85 INSJÖN
NORGE
KUNDESENTER Tlf.: 2 21 40 00
Faks: 2 21 40 80
E-post: kundesenter@clasohlson.no
INTERNETT www.clasohlson.no
POST Clas Ohlson AS, Postboks 485 Sentrum, 0105 OSLO
SUOMI
ASIAKASPALVELU Puh: 020 111 2222
Faksi: 020 111 2221
Sähköposti: info@clasohlson.fi
INTERNET www.clasohlson.fi
OSOITE Clas Ohlson Oy, Yrjönkatu 2 A, 00100 HELSINKI
GREAT BRITAIN
For consumer contact, please visit
www.clasohlson.co.uk and click on
customer service.
INTERNET www.clasohlson.co.uk
 Loading...