

Page 1
English
GRE AT BRITAIN
For c on su mer c on ta ct, p le as e visit w ww. claso hl so n.co. uk a nd clic k on cust om er s ervic e.
Ver. 200907
Getting Started
Inserting the batteries
The transmitter requires 2 x LR44 (button-cell batteries).
The receiver requires 2 x AA / R6 batteries.
Setup:
1.a.Open the battery compartment of the receiver.
1.b.The transmitter has a battery holder on the back, pull
out the battery holder (you may need to use a small
screwdriver).
2. Insert the batteries according to the markings in the
battery compartment and battery holder respectively.
3. Replace the battery cover of the receiver. Push the
battery holder into the transmitter, making sure that the
two contacts enter the openings.
As soon as the batteries have been inserted correctly, the
clock will display 00:00 and the room temperature (the batteries in the transmitter are just for backup in case of power
cuts). When the transmitter is connected to an electrical
socket a red LED will come on to show that the transmitter
is working.
Connections
1. Connect the transmitter (EMT 7110) to an electrical
socket.
2. Plug the load device into the socket on the transmitter.
Operation
Synchronisation
The transmitter (EMT7110) and the receiver (EMR7370)
must be synchronised before any data can be transferred.
Setup:
1. Press and hold in [CHN] for 3 seconds to enter “channel
set mode”. A long audible beep will be emitted and the
channel number will start flashing.
2. Press on [UP] / [DOWN] to select a channel. There are
4 to choose from (the receiver can display data from 4
transmitters).
3a. Press [ON/OFF] to confirm channel selection.
A short audible beep will be emitted and the receiver’s
“programme mode” will open allowing synchronisation
to begin.
3b. Press and hold the button on the transmitter for 3
seconds until the green LED starts to flash rapidly; this
indicates that synchronisation beetween the transmitter
and receiver has begun.
4. When the receiver receives signals from the transmitter,
a frame will appear around the channel on the
display. This shows that the signal is strong and that
synchronisation is in progress.
5. Once the receiver (EMR7370) emits a beep and the
green LED on the transmitter (EMT7110) flashes every
15 seconds, the synchronisation between the two units
has been successful. A frame now appears around the
selected channel in the display.
6. When synchronisation is complete, the receiver display
will show the voltage and energy consumption of the
connected load device, energy data will then regularly
be shown on the receiver.
N.B.
• The
channel memory can be erased by pressing [ON/
OFF] in the beginning.
• Programming the receiver can take approximately
30 seconds.
• When synchronising, both EMT7110 (transmitter) &
EMT7370 (receiver) should be in programme mode.
Up to 4 transmitters can be used. Press [CHN] on the
receiver to select either: ALL, 1, 2, 3 or 4.
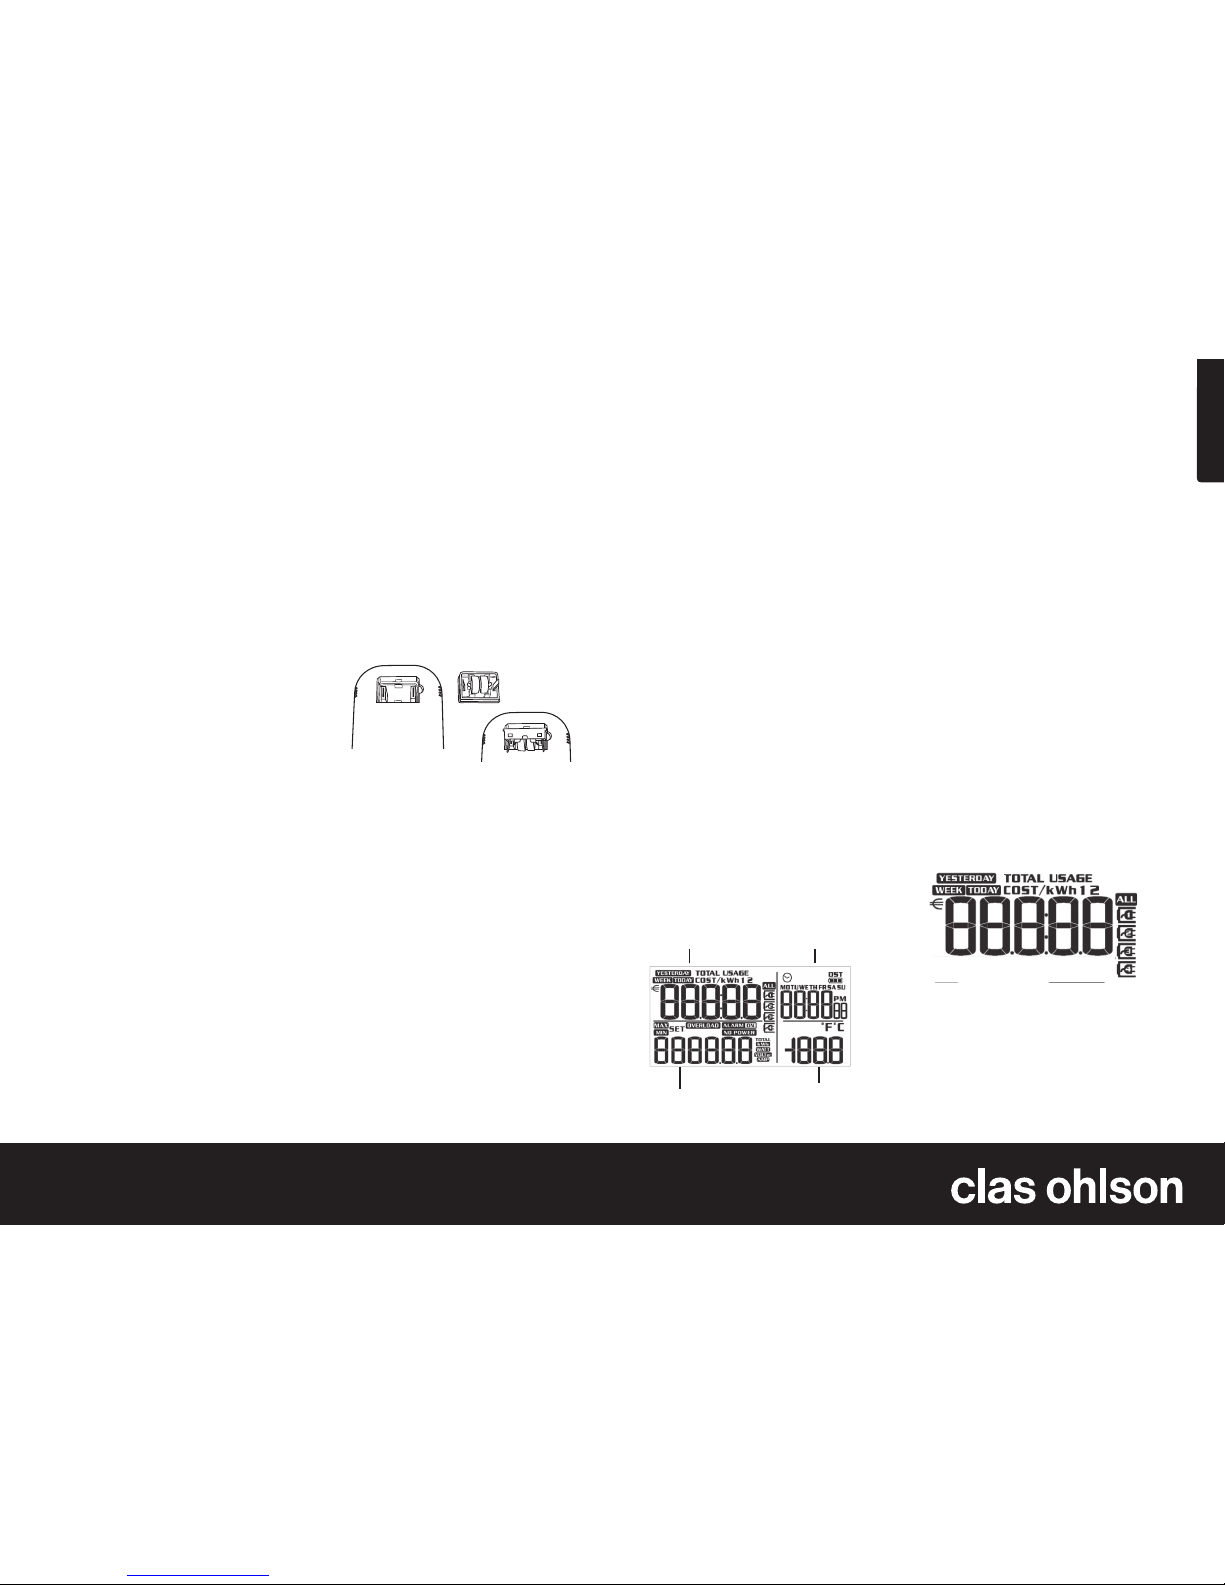
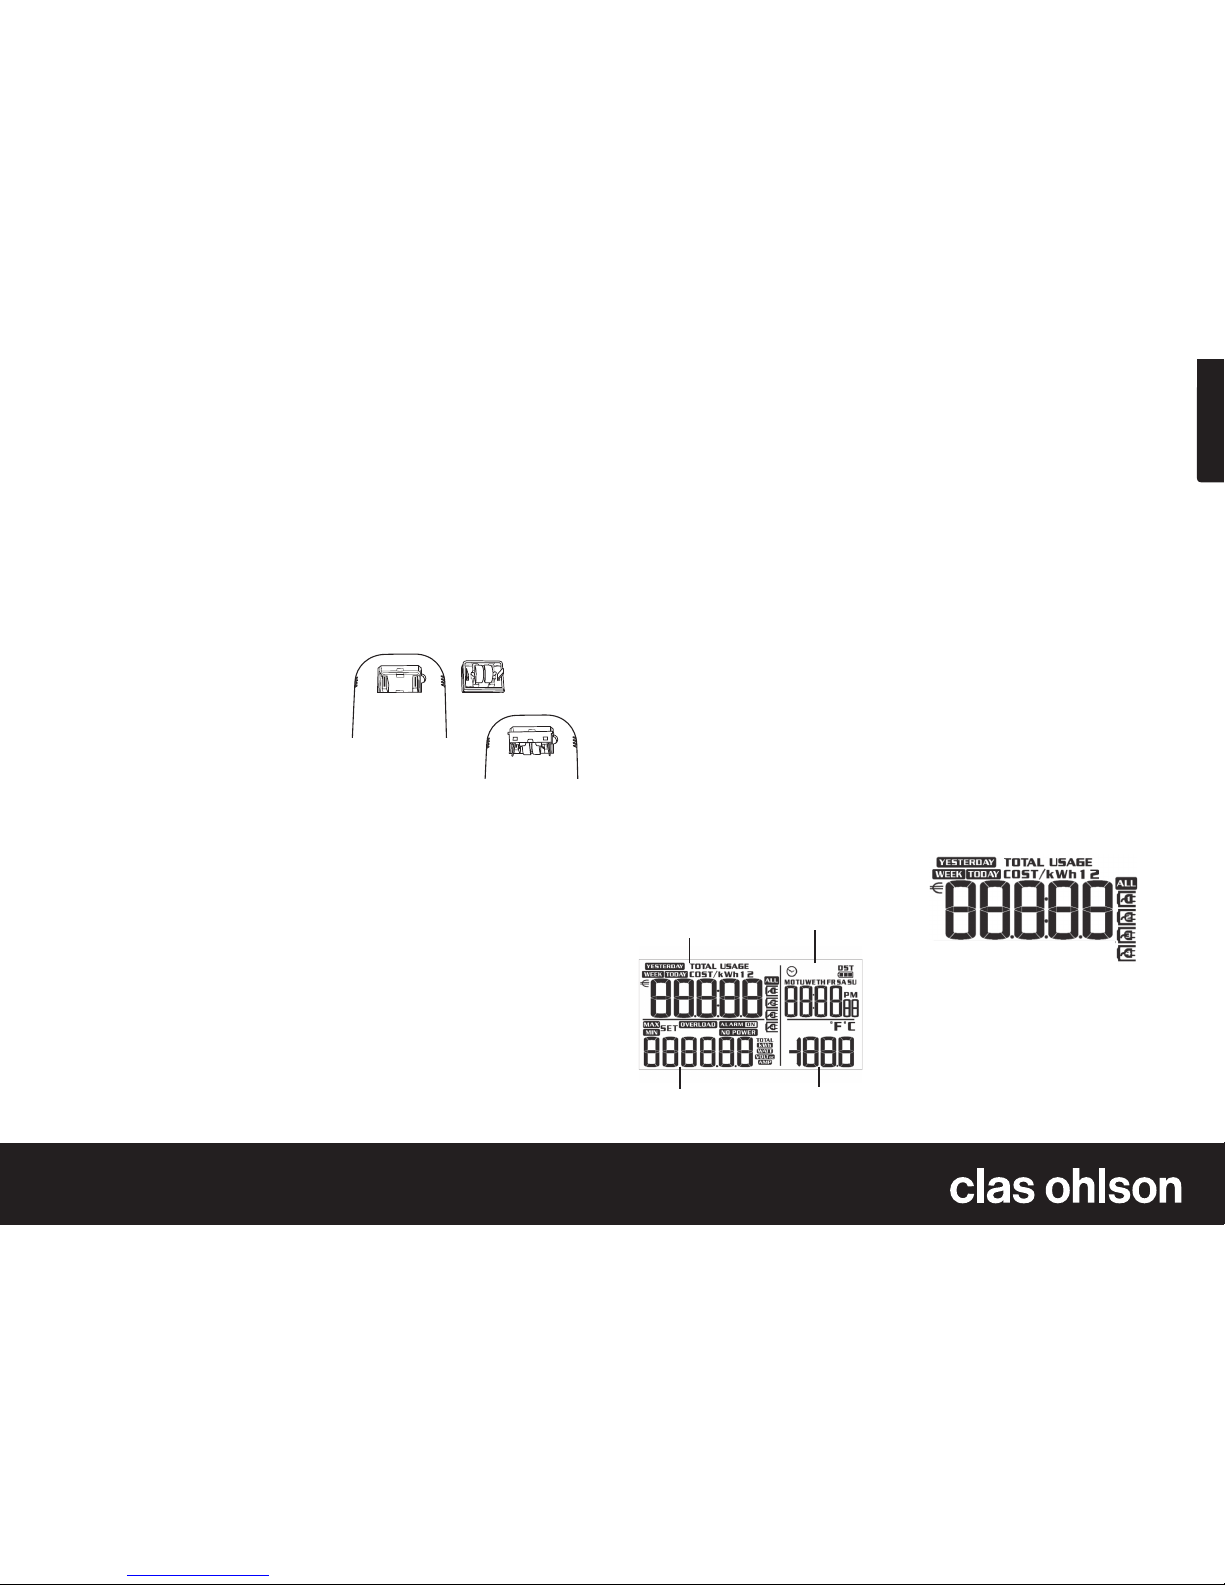
Display
The display on the EMR7370 is divided into 4 fields.
Field 1
Shows Price, Energy consumption
and Cost.
Field 2
Shows Voltage, Amperage draw,
Power, Overload and warning for
excessive energy costs.
Field 3
Shows time and day.
Field 4
Shows present
indoor temperature
(in ºF or ºC).
How to navigate the fields
• Reaching field 1:
Press on [MODE], and then use [UP] to navigate through
the functions.
•
Reaching field 2:
Press on [MODE], and then use [DOWN] to navigate
through the functions.
•
Reaching field 3:
Hold in [MODE] for approx. 3 seconds.
N.B. You must not be in field 1 when doing this!
•
Reaching field 4 (temperature). First go through the
settings for time and day in field 3.
Field 1: Price, Energy consumption and Cost
This product is capable of calculating dual-tariff costs; this
means that you can set two different charge rates/tariffs
for two different times. When the price is set, the cost is
calculated. Cost and energy consumption are shown in four
different ways, which allows you to calculate the best way to
save money.
• Today’s consumption
• Yesterday’s consumption
• Consumption over the past 7 days
• Overall consumption
Displayed in field 1
• ”€, £, $” Price
• “Today kWh” – current day’s consumption
• “Yesterday kWh” – yesterday’s consumption
• “Week kWh” – consumption for the last 7 days
• “Total kWh” – overall consumption
• “Today Cost” – today’s cost
• “Yesterday Cost” – yesterday’s cost
• “Week Cost” – cost for the last 7 days
• “Total Cost” – overall cost
Wireless Energy Meter
Art. no 36-3981 Model EMR7370
Please read the entire instruction manual before using the
product and save it for future reference. We reserve the right
for any errors in text or images and any necessary changes
made to technical data. If you have any questions regarding
technical problems please contact Customer Services.
Safety
• The product is intended for indoor use only.
• Check the product regularly, never use the energy meter
if it has been damaged. The product should only be
repaired or dismantled by qualified service technicians.
• The product must not be modified in any way.
• Never expose the product to moisture or humidity.
• The product must only be used as instructed in this
manual.
• Do not subject the product to extreme temperatures,
high humidity, blows or vibrations.
• Read and heed all warnings found on the product.
• Do not use the energy meter close to strong magnetic
fields such as those generated by transformers, electric
motors, etc.
• Do not use the product close to flammable/explosive
substances.
• If you are unsure or have any questions regarding the
use of the energy meter, contact a qualified electrician
before proceeding.
• The energy meter must only be used as per installation
category II (CAT II) according to IEC 664 where the peak
voltage does not exceed 2500 V.
Product description
• Wireless energy meter (receiver).
• Easy to install and programme.
• Portable. Easy to move from room to room.
• Can receive data from up to four wireless EMT7110
energy meters.
• Can even calculate dual-tariff charges.
• Displays present energy consumption.
• Displays voltage, amperage draw and power.
• A buzzer can be set to alert you in case of overloading
or when the energy consumption is excessive.
• ºC or ºF indoor temperature display.
• Time and date display.
Page 2
English
GRE AT BRITAIN
For c on su mer c on ta ct, p le as e visit w ww. claso hl so n.co. uk a nd clic k on cust om er s ervic e.
Ver. 200907
Setting the tariff
The tariff per kilowatt hour is displayed in the “COST / kWh
1” mode. You can set/change the tariff. This setting governs
the energy meter’s calculations of energy costs; therefore, it
is vital that the tariff is set correctly.
Tariff setting procedure:
1. With the display in COST / kWh – mode (mode
up),
press [ON/OFF] to select Price-1 or Price-2.
2. When the display shows Price-1 or Price-2-mode, press
[MODE] to enter the settings mode.
3. Press [MODE] to select the desired settings. The
number display will start flashing.
4. Adjust the chosen settings by pressing [UP] or [DOWN],
then press [MODE] to confirm.
5. If Price-2 shows 0 following the setting of the last
number for Price-1, the display will automatically exit
settings mode.
6. If Price-2 does not show 0 following the setting of the
last number in Price-1, the tariffs will be shown after
each other.
7. Press [MODE] to select hours and minutes.
8. Adjust the values by pressing [UP] or [DOWN].
N.B. The tariff value range is between 0.001/kWh and
9.999/kWh.
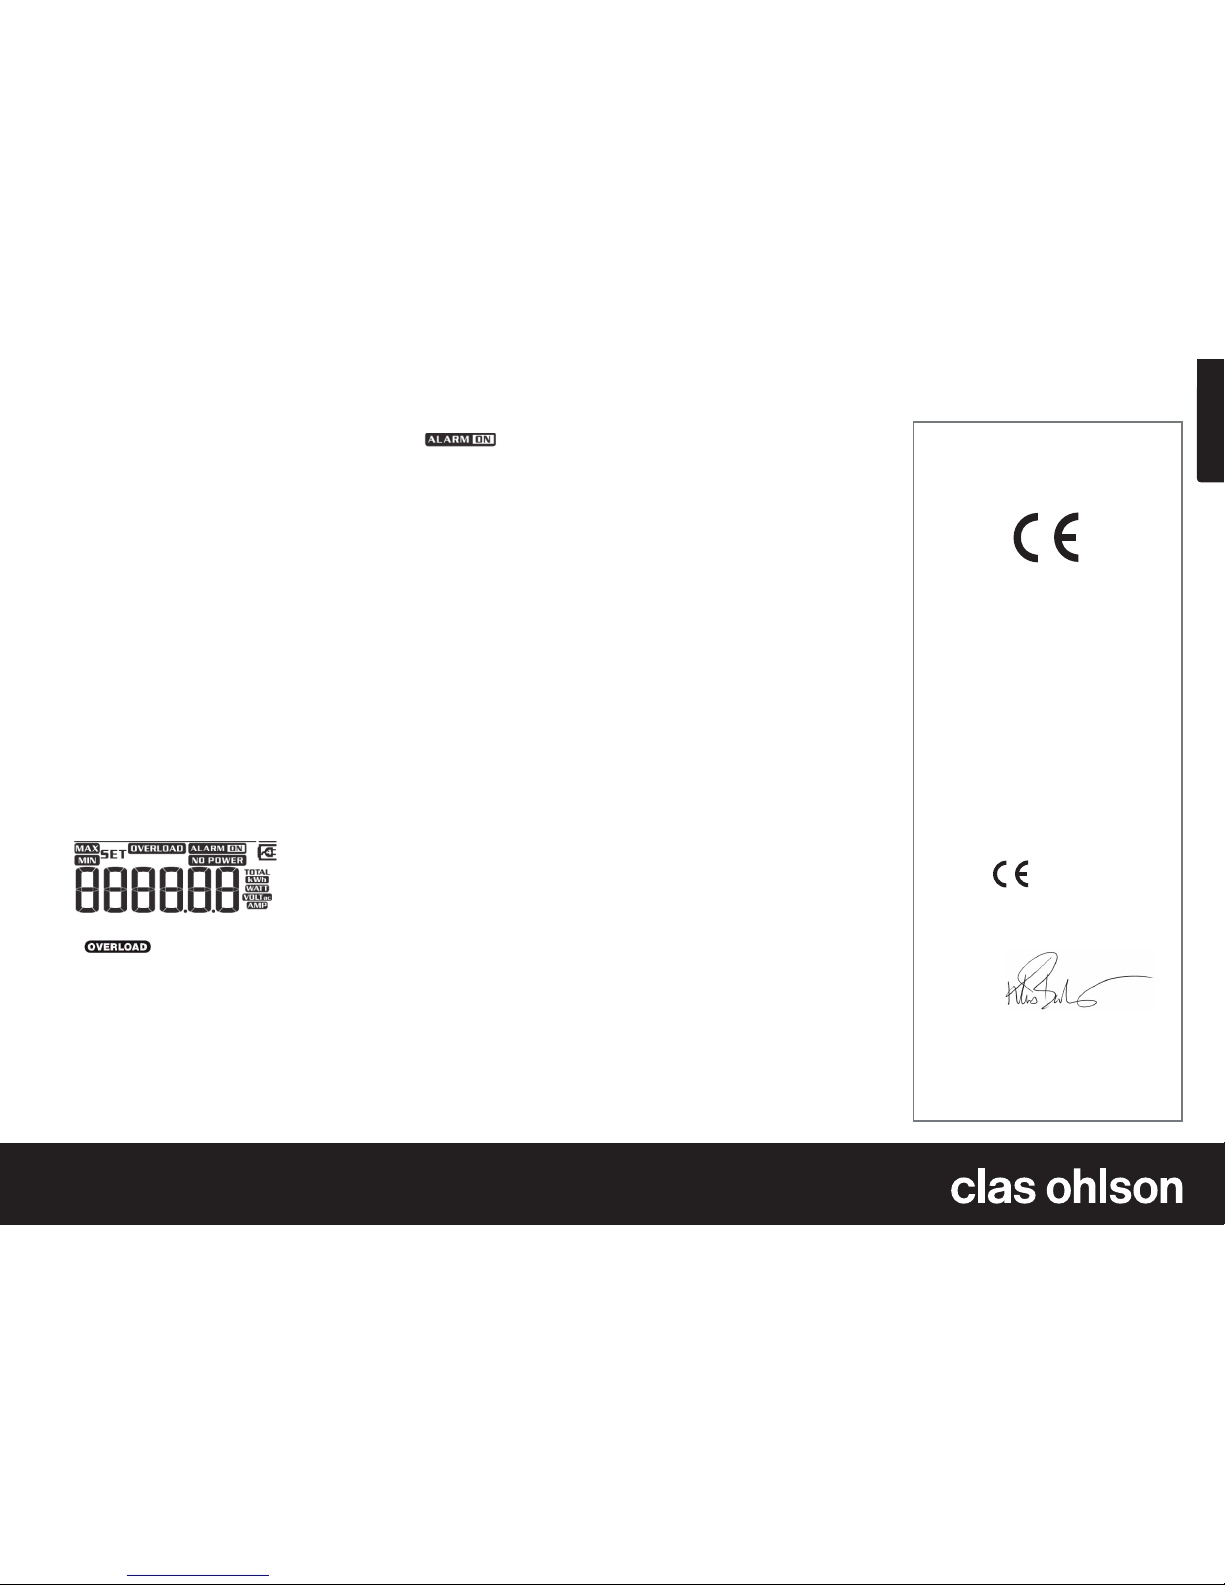
Field 2
The overload warning makes it possible to detect overloads, the “ ” symbol will flash on the display
and the buzzer will emit an audible signal if the load exceeds the set limit.
Setting the maximum load limit:
1. With the display in the OVERLOAD and WATT-mode
(down), press [MODE] to set “OVERLOAD”.
2. With the display in the OVERLOAD and WATTAGEmode, press [MODE] to set “OVERLOAD”.
3. Press [MODE] to select the desired value, the number
display will start flashing.
4. Adjust the values by pressing [UP] or [DOWN].
5. Push the [ON/OFF] button to activate or deactivate the
overload alarm.
6. When the last value has been set the display
automatically exits the settings mode.
N.B. If the setting is the same for all channels, you should
choose “ALL” by pressing [CHN] repeatedly.
Field 3/4. Setting the time, day
and temperature
1. Press and hold MODE for 3 seconds on any settings
except for OVERLOAD. The hour display will start to
flash. Use [UP] or [DOWN] to adjust.
Press [MODE] to confirm.
2. Setting the minutes. Use [UP] or [DOWN] to adjust.
Press [MODE] to confirm.
3. Setting the seconds. Use [UP] or [DOWN] to adjust.
Press [MODE] to confirm.
4. Setting the day. Use [UP] or [DOWN] to adjust.
Press [MODE] to confirm.
5. Field 4 opens: Select the temperature unit,
Fahrenheit or Celsius. Use [UP] or [DOWN] to change.
Press [MODE] to confirm.
6. Press [MODE] to exit the settings mode.
Power cuts
If the transmitter (EMR7110) is synchronised with the receiver (EMR7370), the data from the transmitter will appear
on the display. If the display shows “NO POWER” on the
transmitter channel, the electrical socket is not carrying any
current. Check the fuse!
Care and maintenance
Unplug the adaptor from the electrical socket before
cleaning. Wipe off with a dry cloth when needed.
Troubleshooting guide
Problem: The units are synchronised but transferred data
from the transmitter is incorrect.
Possible cause: Interference or weak signal
Solution: Re-synchronise
Problem: Synchronisation has been carried out but the
transmitter still flashes.
Possible cause: The receiver might be picking up
another signal.
Solution: Move the transmitter to another electrical socket
and re-synchronise.
Problem: The display is showing unrecognisable symbols
or no symbols at all.
Possible cause: The receiver is malfunctioning.
It needs to be reset: Remove the batteries and insert
them again.
Disposal
Follow local ordinances when disposing of this product.
If you are unsure of how to dispose of this product, please
contact your municipality.
Specifications
Model: EMR7370
Rated voltage: 230 V AC, 50 Hz
Measuring voltage: 190 V – 276 V
Measuring range, amperes: 5 mA – 16A (Max 16A)
Measuring range, watts: 1 W – 3999 W (resolution 1 W)
Measuring range, kWh: 0.0 – 999.99 kWh
Accuracy
Voltage: +/- 3 % (of the read value) (1, 2, 3)*
Current: +/- 3 % (of the read value) +/-0.01 A (1, 2, 3)*
Power: +/- 3 % (of the read value) +/- 2 W (1, 2, 3, 5)*
Energy: +/- 3 % (of the read value) +/-0.1 kWh (1, 2, 3, 5)*
Frequency: +/- 2 Hz (2, 3)*
Power factor: +/-0.1 (of the read value) for power factor
0.70 =< cosφ =<1.00 (2.4)*
* Accuracy depends on the following factors:
1). Mains frequency 45-65 Hz
2). Normal room temperature
3). Harmonic distortion of voltage/current < 15%
4). Current >= 1.00A sinusoidal at frequency of 50 or 60 Hz
Operating environment:
Operating temperature: 5ºC - 40ºC
Max. air humidity: 90% RF
Operating altitude: Up to 2000 m
Intended for indoor use
Declaration of Conformity
Hereby, Clas Ohlson AB declares,
that following product(s):
Wireless Energy Meter
Art. no. Model
36-3981 EMR7370
is in compliance with the essential requirements and
other relevant provisions of Directive 1999/5/EC.
Article 3.1b (EMC): EN 301489-1
EN 301489-3
Article 3.2 (Radio): EN 300220-1
EN 300220-2
0700
Insjön, Sweden, July 2009
Klas Balkow
President
Clas Ohlson, 793 85 Insjön, Sweden
Page 3
Svenska
SVERIGE • Kundtjänst Tel: 02 47 /445 00 , Fax: 02 47 /4 45 09 , E- post: k un dt janst @c la sohls on .s e, Inte rn et : ww w.cl as oh ls on.se
Ver. 200907
Trådlös energimätare
Art.nr 36-3981 Modell EMR7370
Läs igenom hela bruksanvisningen före användning och
spara den sedan för framtida bruk. Vi reserverar oss för
ev. text- och bildfel samt ändringar av tekniska data. Vid
tekniska problem eller andra frågor, kontakta vår kundtjänst.
Säkerhet
• Produkten är endast avsedd för inomhusbruk.
• Kontrollera produkten regelbundet, använd aldrig
energimätaren om den har blivit skadad. Produkten
får endast repareras eller demonteras av kvalificerad
servicepersonal.
• Produkten får inte modifieras på något vis.
• Utsatt aldrig produkten för fukt eller väta.
• Produkten får endast användas så som anges
i bruksanvisningen.
• Utsätt inte produkten för extrema temperaturer,
hög luftfuktighet, stötar eller vibrationer.
• Läs och beakta varningstexten på produkten.
• Använd inte energimätaren i närheten av starka
magnetfält som transformatorer, elmotorer etc.
• Använd inte produkten i närheten av brandfarliga/
explosiva substanser.
• Om du är orolig eller har någon fundering som rör
användningen av energimätaren kontakta då en
behörig elektriker.
• Energimätaren skall endast användas i
installationskategori II (CATII) enligt IEC 664 där
spänningstopparna inte överstiger 2500V
Produktbeskrivning
• Trådlös energimätare (mottagare).
• Lätt att installera och programmera.
• Portabel, lätt att flytta mellan olika rum.
• Tar emot data från upp till 4 trådlösa EMT7110
energimätare.
• Räknar ut kostnaden vid dubbeltariff-abbonemang.
• Displayen visar aktuell energiförbrukning.
• Spänning, strömförbrukning och effekt visas
på displayen.
• Alarmsummer kan ställas in så att den aktiveras vid
överbelastning eller när energikostnaden är mycket hög.
• Inomhustemperaturen visas i ºC eller ºF.
• Tid och vecka visas på displayen.
Att komma igång
Sätt i batterierna
Sändaren drivs av 2 X LR44 (knappcellsbatterier).
Mottagaren drivs av 2 X R6 (AA).
Gör så här:
1.a. Öppna batterilocket på mottagaren.
1.b. Sändaren har en batterihållare på baksidan, dra batterihållaren rakt ut (det kan behövas en liten skruvmejsel).
2. Sätt i batterierna enligt märkning i batterifack resp.
batterihållare.
3. Sätt tillbaka batterilocket på mottagaren. Tryck in bat
terihållaren på sändaren, se till att de två kontaktblecken
kommer in i öppningarna.
3a. Tryck på [ON/OFF] för att bekräfta valet av kanalnum-
mer, ett kort pip hörs och mottagarens ”inlärningsläge”
öppnar så att synkroniseringen kan påbörjas.
3b. Tryck och håll in tryckknappen på sändaren i 3
sekunder tills den gröna lysdioden börjar blinka snabbt,
då startar synkroniseringen av sändare och mottagare.
4. När mottagaren tar emot signaler från sändaren
visas en ram runt den valda kanalen på mottagarens
display, då är signalen från sändaren stark och
synkroniseringen pågår.
5. När ett pip hörs från mottagaren (EMR7370) och den
gröna lysdioden på sändaren (EMT7110) blinkar var 15:e
sekund har synkroniseringen mellan enheterna lyckats.
På displayen visas en ram runt den valda kanalen.
6. När synkroniseringen är klar visar mottagarens display
spänning och energiförbrukning för den anslutna
strömförbrukaren sedan kommer energidata visas
regelbundet på mottagarens display.
Obs!
• Kanalens minne kan raderas genom att trycka på [ON/
OFF] vid uppstart.
• Inlärningen tar ca 30 sekunder för mottagaren.
• Vid synkroniseringen måste både EMT7110 (sändare) &
EMR7370 (mottagare) vara i inlärningsläge.
Det går att koppla in 4 st. sändare. Tryck in[CHN] på energimätaren (mottagaren) för att välja mellan: ALL (alla), 1, 2,
3 eller 4.
Display
Displayen på EMR7370 delas i 4 olika fält.
Navigera i fälten
• För att komma in i fält 1:
Tryck på [MODE], använd sedan [UP] för att navigera
bland funktionerna.
• För att komma in i fält 2:
Tryck på [MODE], använd sedan [DOWN] för att
navigera bland funktionerna.
• För att komma in i fält 3:
Tryck och håll in [MODE] i 3 sekunder.
Obs! Man kan inte stå i fält 1 när detta görs!
• För att komma in i fält 4 (temperatur) måste man gå
igenom inställningarna för klocka och veckodag i fält 3.
Fält 1: Pris, energiförbrukning
och kostnad
Produkten har funktion för uträkning av kostnaden vid dubbeltariff, med det menas att du kan ställa in två olika priser
från två olika tider. När priset är inställt räknas kostnaden ut.
Kostnad och energiförbrukning visas på fyra olika sätt som
kan ge underlag och tips för energibesparing.
• Dagens förbrukning,
• Gårdagens förbrukning,
• Förbrukning för de senaste 7 dagarna
• Total förbrukning.
I fält 1 visas
När batterierna är rätt isatta i mottagaren och den fungerar
visas klockan 00:00 och aktuell rumstemperatur (på sändaren är batterierna bara en backupp för strömavbrott). När
sändaren är ansluten till ett eluttag lyser den röda lysdioden,
det visar att sändaren fungerar.
Anslutning
1. Anslut sändaren (EMT7110) till ett eluttag.
2 Anslut strömförbrukarens stickpropp till sändarens uttag.
Användning
Synkronisering
Sändare (EMT7110) och mottagare (EMR7370) måste
synkroniseras innan data kan överföras.
Gör så här:
1. Tryck och håll in [CHN] i 3 sekunder för att gå till
”kanalvalsläge”. Ett långt pip hörs och kanalnumret
börjar blinka.
2. Tryck på [UP] / [DOWN] för att välja önskad kanal, det
finns 4 kanaler (det går att visa data från 4 sändare till
mottagaren).
Fält 1
Visar pris, energiförbrukning
och kostnad
Fält 2
Visar spänning, strömförbrukning,
effekt, överbelastning och varning för
mycket hög energikostnad.
Fält 3
Visar tid och veckodag.
Fält 4
Visar aktuell inomhustemperatur (i ºF eller ºC)
• ”€, £, $” Pris
• ”Today kWh” Dagens förbrukning i kWh
• ”Yesterday kWh” Gårdagens förbrukning i kWh
• ”Week kWh” De senaste 7 dagarnas förbrukning i kWh
• ”Total kWh” Total förbrukning i kWh
• ”Today Cost” Dagens kostnad
• ”Yesterday Cost” Kostnad för gårdagen
• ”Week Cost” Kostnad för veckan (de senaste 7
dagarna).
• ”Total Cost” Totalkostnad.
Page 4

Svenska
SVERIGE • Kundtjänst Tel: 02 47 /445 00 , Fax: 02 47 /4 45 09 , E- post: k un dt janst @c la sohls on .s e, Inte rn et : ww w.cl as oh ls on.se
Ver. 200907
Inställning av energipris
I läge “COST / kWh 1” visas pris per kWh. Du kan ställa
in/ändra priset. Den här inställningen styr energimätarens
kalkylering av energikostnden, det är därför viktigt att inställningen blir rätt!
Ställ in energipriset så här:
1. När displayen är i COST / kWh –läge (mode
up), tryck
på [ON/OFF] för att välja Price-1 eller Price-2.
2. När displayen visar Price-1 eller Price-2-läge, tryck på
[MODE] för att öppna inställningsläget.
3. Tryck på [MODE] för att välja önskad siffra, den
valda siffran blinkar.
4. Justera den valda siffran genom att trycka på [UP] eller
[DOWN], tryck på [MODE] för att bekräfta.
5. Om Price-2 är 0 efter inställning av den sista siffran för
Price-1 då går displayen automatiskt ur inställningsläget.
6. Om Price-2 inte är 0 efter inställning av den sista siffran
för Price-1/2 visas värdena efter varandra.
7. Tryck på [MODE] för att välja Timmar och Minuter.
8. Justera den valda siffran genom att trycka på [UP] eller
[DOWN].
Obs! Värdet är inställbart mellan 0,001/kWh och 9,999/kWh
Fält 2
6. När du har ställt in den sista siffran, går displayen
automatiskt ur inställningsläget.
Obs! Om inställningen gäller för alla kanaler måste du välja
”ALL” genom att trycka på [CHN] upprepade gånger.
Fält 3/4. Ställ in klocka, veckodag och temperaturvisning
Problem:
Synkroniseringen är genomförd men sändaren blinkar ändå!
Trolig orsak: Mottagaren kanske tar upp en annan signal.
Lösning: Flytta sändaren till ett annat eluttag och gör en ny
synkronisering
Problem:
Displayen visar “konstiga” tecken eller lyser inte alls!
Trolig orsak: Fel funktion hos mottagaren.
En återställning behövs: Ta ur batterierna och sätt
i dom igen.
Avfallshantering
När du ska göra dig av med produkten ska detta ske enligt
lokala föreskrifter. Är du osäker på hur du ska gå tillväga,
kontakta din kommun.
Specifikationer
Modellbeteckning: EMR7370
Märkspänning: 230 V ~50 Hz
Mätspänning: 190 V – 276 V
Mätområde, Ampere: 5 mA – 16 A (Max 16 A)
Mätområde, Watt: 1 W – 3999 W (upplösning 1 W)
Mätområde, kWh: 0,0 – 999,99 kWh
Noggrannhet
Spänning: +/- 3 % (på avläst värde) (1, 2, 3)*
Ström: +/- 3 % (på avläst värde) +/-0.01 (1, 2, 3)*
Effekt: +/- 3 % (på avläst värde) +/-2W (1, 2, 3, 5)*
Energi: +/- 3 % (på avläst värde) +/-0.1kWh (1, 2, 3, 5)*
Frekvens: +/- 2 Hz (2, 3)*
Effektfaktor: +/-0.1 (på avläst värde) för effektfaktor
0.70 =< cosφ =<1.00 (2, 4)*
* Noggrannheten gäller vid dessa faktorer:
1). Nätfrekvens 45 – 65 Hz
2). Vid normal rumstemperatur
3). Harmonisk distortion för spänning/ström < 15%
4). Ström >= 1.00 A sinusoidal vid frekvens 50 eller 60 Hz
Användningsmiljö:
Användningstemperatur: 5ºC - 40ºC
Max. luftfuktighet: 90% RF
Användningshöjd: Upp till 2000 m
Avsedd för inomhusbruk
Överbelastningsvarning en gör det möjligt att upptäcka en
överbelastning, symbolen “ ” blinkar på displayen och en ton hörs från summern vid högre belastning
än den inställda gränsen.
Ställ in belastningsgränsen så här:
1. När displayen är i OVERLOAD och WATT-läge (down),
tryck på [MODE] för att ställa in ”OVERLOAD”.
2. När displayen är i OVERLOAD och WATTAGE-läge,
tryck på [MODE] för att ställa in ”OVERLOAD”.
3. Tryck på [MODE] för att välja önskad siffra, den valda
siffran blinkar.
4. Justera den valda siffran genom att trycka på [UP]
eller [DOWN].
5. Tryck på [ON/OFF] för att aktivera eller stänga av
överbelastningsalarm.
1. Tryck och håll in
MODE i
3 sekunder i vilken del av
displayen som helst förutom
OVERLOAD. Timmarna
börjar blinka. Använd [UP]
eller [DOWN] för att justera.
Tryck in [MODE] för att
bekräfta.
2. Ställ in minuterna. Använd
[UP] eller [DOWN] för att
justera. Tryck in [MODE] för
att bekräfta.
3. Ställ in sekunder. Använd [UP] eller [DOWN] för att
justera. Tryck in [MODE] för att bekräfta.
4. Ställ in veckodag. Använd [UP] eller [DOWN] för att
justera. Tryck in [MODE] för att bekräfta.
5. Fält 4 öppnas: Välj temperaturvisning i Fahrenheit eller
Celsius. Tryck [UP] eller [DOWN] för att ändra. Tryck in
[MODE] för att bekräfta ditt val.
6. Tryck på [MODE] för att gå ur inställningsläget.
Strömavbrott
Om sändaren (EMR7370) är synkroniserad med mottagaren
(EMR7370) visas värdena från sändaren på displayen. Om
displayen visar ”NO POWER” för den sändarens kanal är
det eluttaget strömlöst, kontrollera säkringen!
Skötsel och underhåll
Ta ur energimätaren från eluttaget innan rengöring.
Torka av med torr mjuk trasa vid behov.
Felsökningsschema
Problem:
Synkroniseringen är genomförd men överförda data från
sändaren är felaktiga!
Trolig orsak: Störningar eller svag signal
Lösning: Gör en ny synkronisering
Declaration of Conformity
Hereby, Clas Ohlson AB declares,
that following product(s):
Wireless Energy Meter
Art. no. Model
36-3981
EMR7370
is in compliance with the essential requirements and
other relevant provisions of Directive 1999/5/EC.
Article 3.1b (EMC): EN 301489-1
EN 301489-3
Article 3.2 (Radio): EN 300220-1
EN 300220-2
0700
Insjön, Sweden, July 2009
Klas Balkow
President
Clas Ohlson, 793 85 Insjön, Sweden
Page 5

Norsk
NOR GE • Kundes en te r Tel: 23 21 40 00 , Fax: 23 21 40 80 , E-post: kundesenter@ clasohlso n.no, Int ernett: www.cla sohlson.no
Ver. 200907
Trådløs energimåler
Art. nr.: 36-3981 Modell EMR7370
Les bruksanvisningen nøye før produktet tas i bruk, og ta
vare på den for ev. framtidig bruk. Vi reserverer oss mot ev.
tekst- og bildefeil, samt forandringer av tekniske data. Ved
tekniske problemer eller andre spørsmål, ta kontakt med
vårt kundesenter. (Se opplysninger om kundesenteret
i denne bruksanvisningen).
Sikkerhet
• Produktet er kun beregnet for innendørs bruk.
• Kontroller produktet regelmessig og ta det aldri i bruk
dersom det er skadet. Produktet skal kun demonteres
og repareres av kyndig servicepersonell.
• Produktet må ikke modifiseres.
• Utsett aldri produktet for fuktighet.
• Produktet skal kun brukes som angitt i denne
bruksanvisningen.
• Utsett ikke produktet for ekstreme temperaturer, høy
luftfuktighet, støt eller viberasjoner.
• Les og følg advarslene i denne anvisningen.
• Energimåleren må ikke brukes nær sterke magnetfelt
som transformatorer, elmotorer etc.
• Bruk ikke produktet nær brannfarlige eller
eksplosive stoffer.
• Dersom du er usikker eller har spørsmål
vedrørende bruken av energimåleren, så
ta kontakt med en fagperson.
• Energimåleren skal kun brukes i installasjonskategori II
(CATII) i henhold til IEC 664, og hvor spenningstoppene
ikke overstiger 2500 V.
Produktbeskrivelse
• Trådløs energimåler (mottaker).
• Enkel å installere og å programmere.
• Portabel.
• Kan motta data fra inntil 4 trådløse sendere (EMT7110).
• Beregner kostnadene.
• Displayet viser aktuelt energiforbruk.
• Spenning, strømforbruk og effekt vises i displayet.
• Alarmsummer som kan stilles inn slik at den varsles ved
overbelastning eller når energikostnadene er høye.
• Temperaturen vises i ºC eller ºF.
• Klokkeslett og ukedag vises i displayet.
Kom i gang
Sett i batteriene
Senderen drives med 2 stk. LR44- batterier.
Mottakeren drives med 2 stk. X R6 (AA).
Batteriene settes inn slik:
1.a. Åpne batterilokket på mottakeren.
1.b. Senderen har en batteriholder på baksiden.
Trekk denne rett ut ev. benytt en skrutrekker.
2. Plasser batteriene i som markeringen viser.
3. Fest lokket på mottakeren igjen. Plasser batteriholderen
på senderen og påse at de to kontaktene kommer inn
i åpningene.
Når batteriene er satt inn riktig i mottakeren og den fungerer
riktig vil klokken vise 00:00 og romtemperatur kommer opp
(på senderen er batteriene kun en backup for ev. stømavbrudd). Når senderen er tilkoblet et strømuttak vil den røde
lysdioden lyse. Dette indikerer at senderen virker.
Tilkobling
1. Koble senderen (EMT7110) til et strømuttak.
2. Strømforbrukerens kontakt kobles til senderens uttak.
Bruk
Synkronisering
Sender (EMT7110) og mottaker (EMR7370) må synkroniseres før data kan overføres.
Gjør som følger:
1. Trykk og hold inne [CHN] i ca. 3 sekunder for å gå
til ”kanalvalg-modus”. En lav pipetone vil høres og
kanalnummer blinker i displayet.
2. Trykk på [UP] / [DOWN] for å velge ønsket kanal. Det
er 4 kanaler dvs. man kan vise data fra 4 forskjellige
sendere på mottakeren.
3a. Trykk på [ON/OFF] for å bekrefte valget av kanalnum-
mer. Ett kort pip høres og mottakerens ”innlæringsmodus” åpnes slik at synkroniseringen kan starte.
3b. Trykk inn trykknappen på senderen og hold den inne i
3 sekunder til den grønne lysdioden begynner å blinke
hurtig. Nå startet synkroniseringsprosessen.
4. Når mottakeren mottar signaler fra senderen vil en
ramme komme opp rundt den valgte kanalen på
mottakerens display. Dette indikerer at signalene fra
senderen er sterke og at synkronisering pågår.
5. Når en pipetone høres fra mottakeren og den grønne
lysdioden på senderen blinker hvert 15. sekund, er
synkroniseringen vellykket. I displayet vises en ramme
rundt valgte kanal.
6. Når synkroniseringen er ferdig, viser mottakerens
display spenningen og energiforbruket for den
tilkoblede strømforbrukeren. Deretter kommer det data
regelmessig opp på mottakerens display.
Obs!
• Lagret data for kanalens minne kan slettes ved å trykke
på [ON/OFF] ved oppstart.
• Innlæringen tar ca. 30 sekunder.
• Ved synkroniseringen må både sender og mottaker
være i innlæringsmodus.
4 stk. sendere kan kobles til. Trykk inn [CHN] på energimåleren (mottakeren) for å velge mellom: ALL (alle),
1, 2, 3 eller 4.
Display
Displayet på EMR7370 deles inn i 4 forskjellige felt.
Felt 1
Viser pris, energiforbruk
og kostnad
Felt 2
Viser spenning, strømforbruk,
effekt, overbelastning og varsling
av høy energikostnad.
Felt 3
Viser tid og ukedag.
Felt 4
Viser aktuell temperatur inne (i ºF eller ºC).
Navigere mellom feltene
• For å komme inn til felt 1:
Trykk på [MODE], bruk deretter [UP] for å navigere
blandt funksjonene.
• For å komme inn til felt 2:
Trykk på [MODE], bruk deretter [DOWN] for å navigere
blant funksjonene.
• For å komme inn til felt 3:
Trykk og hold inne [MODE] i ca. 3 sekunder.
Obs! Man kan ikke gå fra felt 1 til 3!
• For å komme inn i felt 4
(temperatur) må man gå
gjennom innstillingene for klokke og ukedag i felt 3.
Felt 1: Pris, energiforbruk og
kostnad
Produktet har funksjon for beregning av kostnader ved dobbelttariff. Med dette menes at du kan stille inn to forskjellige
priser for to forskjellige tider. Når prisen er stillt inn beregnes
kostnaden. Kostnad og energiforbruk vises på fire forskjellige måter, noe som kan gi underlag og tips til energisparing.
• Dagens forbruk
• Gårsdagens forbruk
• Forbruk de siste 7 dagene
• Totalt forbruk
I felt 1 vises
• ”€, £, $” Pris
• ”Today kWh” Dagens forbruk i kWh
• ”Yersterday kWh” Gårsdagens forbruk i kWh
• ”Week kWh” De siste 7 dagenes forbruk i kWh
• ”Total kWh” Totalt forbruk i kWh
• ”Today Cost” Dagens kostnad
• ”Yesterday Cost” Kostnaden for i går
• ”Week Cost” Kostnaden for den siste uken
(de siste 7 dagene).
• ”Total Cost” Totalkostnad.
Page 6

Norsk
NOR GE • Kundes en te r Tel: 23 21 40 00 , Fax: 23 21 40 80 , E-post: kundesenter@ clasohlso n.no, Int ernett: www.cla sohlson.no
Ver. 200907
Innstilling av strømpriser
I “COST / kWh 1” vises pris per kWh. Her kan prisen fylles
inn og/eller endres. Dette er grunnlaget for kostnadsberegningene, så det er viktig at man stiller inn riktig pris her.
Prisen stilles inn slik:
1. Når displayet er i COST / kWh –modus (mode
up),
trykk på [ON/OFF] for å velge Price-1 eller Price-2.
2. Når displayet viser Price-1 eller Price-2-modus, trykk på
[MODE] for å åpne innstillingsmodus.
3. Trykk på [MODE] for å velge ønsket tall og det valgte
tallet blinker.
4. Tallet justeres ved å trykke på [UP] eller [DOWN].
Trykk så på [MODE] for å bekrefte.
5. Hvis Price-2 er 0 etter innstilling av det siste
tallet for Price-1, går displayet automatisk ut av
innstillingsmodus.
6. Hvis Price-2 ikke er 0 etter innstilling av det siste tallet
for Price-1/2 vises verdiene etter hverandre.
7. Trykk på [MODE] for å velge Timer og Minutter.
8. Juster det valgte tallet ved å trykke på [UP] eller [DOWN].
Obs! Verdiene kan stilles inn på mellom 0,001/kWh og
9,999/kWh.
Felt 2
Overbelastningsvarslingen gjør det mulig å oppdage ev.
overbelastning. Symbolet “ ” blinker i displayet og en lyd høres fra summeren når belastningen er
høyere enn det som er innstillt.
Still inn belastningsgrensen slik:
1. Når displayet er i OVERLOAD og WATT-modus (down),
så trykk på [MODE] for å stille inn ”OVERLOAD”.
2. Når displayet er i OVERLOAD og WATT-modus (down),
så trykk på [MODE] for å stille inn ”OVERLOAD”.
3. Trykk på [MODE] for å velge ønsket tall og det valgte
tallet blinker.
4. Juster det valgte tallet ved å trykke på [UP] eller [DOWN].
5. Trykk på [ON/OFF] for å aktivere/deaktivere
overbelastningsalarmen.
6. Når siste tall er stilt inn, går displayet automatisk ut av
innstillingsmodus.
Obs! Dersom innstillingen gjelder alle kanalene, må man
velge ”ALL” ved å trykke på [CHN] flere ganger.
Feltene 3/4. Stille inn klokke,
ukedag og temperaturvisning
1. Trykk inn [MODE] og hold
den inne i ca. 3 sekunder i
en av displayets deler, men
ikke i OVERLOAD. Timene
begynner å blinke. Bruk [UP]
eller [DOWN] for å justere.
Trykk på [Mode] for å bekrefte
innstillingen.
2. Still inn minuttene. Bruk [UP]
eller [DOWN] for å justere.
Trykk på [Mode] for å bekrefte
innstillingen.
3. Still inn sekunder. Bruk [UP] eller [DOWN] for å justere.
Trykk på [Mode] for å bekrefte innstillingen.
4. Still inn ukedag. Bruk [UP] eller [DOWN] for å justere.
Trykk på [Mode] for å bekrefte innstillingen.
5. Felt 4 åpnes: Velg om temperaturen skal vises
i Fahrenheit eller Celsius. Bruk [UP] eller [DOWN]
for å endre til ønsket enhet. Trykk på [Mode] for å
bekrefte innstillingen.
6. Trykk på [MODE]for å gå ut av innstillingsmodus.
Strømbrudd
Hvis senderen er synkronisert med mottakeren vil verdiene
fra senderen komme opp i displayet. Hvis displayet viser
NO POWER for senderens kanal, er strømuttaket strømløst.
Kontroller sikringen.
Stell og vedlikehold
Ta energimåleren ut fra strømuttaket før rengjøring.
Tørk av med en tørr klut ved behov.
Feilsøking
Problem:
Synkroniseringen er gjennomført, men dataene fra
senderen er feil.
Mulig årsak: Forstyrrelser eller svake signaler.
Løsning: Foreta en ny synkronisering.
Problem:
Synkroniseringen er gjennomført, men senderen
blinker fortsatt.
Mulig årsak: Mottakeren mottar andre signaler.
Løsning: Flytt senderen til et annet strømuttak og foreta
ny synkronisering.
Problem:
Displayet viser merkelige tegn eller den lyser ikke i det
hele tatt.
Mulig årsak: Feil funksjon hos mottaker.
Må stilles inn på nytt. Ta ut batteriene og sett dem inn igjen.
Avfallshåndtering
Når produktet skal kasseres, må det skje i henhold til
lokale forskrifter. Ved usikkerhet, ta kontakt med de
lokale myndighetene.
Spesifikasjoner
Modellbetegnelse: EMR7370
Spenning: 230 V ~50 Hz
Målepenning: 190 V – 276 V
Måleområde: 5 mA – 16 A (Maks. 16 A)
Måleområde: 1 W – 3999 W (oppløsning 1 W)
Måleområde: 0,0 – 999,99 kWh
Nøyaktighet
Spenning: +/- 3 % (på avlest verdi) (1, 2, 3)*
Strøm: +/- 3 % (på avlest verdi), +/- 0,01 A (1, 2, 3)*
Effekt: +/- 3 % (på avlest verdi), +/- 2 W (1, 2, 3, 5)*
Energi: +/- 3 % (på avlest verdi), +/- 0,1 kWh (1, 2, 3, 5)*
Frekvens: +/- 2 Hz (2, 3)*
Effektfaktor: +/- 0,1 (på avlest verdi) for effektfaktor
0,70 =< cosφ =<1,00, (2, 4)*
* Nøyaktigheten gjelder følgende:
1). Nettfrekvens 45 – 65 Hz
2). Ved normal romtemperatur
3). Harmonisk distorisjon for spenning/strøm < 15 %
4). Strøm >= 1,00 A sinusoidal ved frekvens 50 eller 60 Hz
Bruksmiljø
Brukstemperatur: 5 ºC – 40 ºC
Maks. luftfuktighet: 90 % RF
Maks. høyde over havet: Inntil 2 000 m
Beregnet for innendørs bruk.
Declaration of Conformity
Hereby, Clas Ohlson AB declares,
that following product(s):
Wireless Energy Meter
Art. no. Model
36-3981 EMR7370
is in compliance with the essential requirements and
other relevant provisions of Directive 1999/5/EC.
Article 3.1b (EMC): EN 301489-1
EN 301489-3
Article 3.2 (Radio): EN 300220-1
EN 300220-2
0700
Insjön, Sweden, July 2009
Klas Balkow
President
Clas Ohlson, 793 85 Insjön, Sweden
Page 7

Suomi
SUO MI • Asiaka sp al velu Pu h: 0 20 11 1 22 22, F ak si : 020 1 11 2 221, Sä hk öposti: i nf o@cla so hl so n.fi, K otisivu : ww w.clas oh ls on .fi
Ver. 200907
Langaton sähkönkulutusmittari
Tuotenumero 36-3981 Malli
EMR7370
Lue käyttöohjeet ennen tuotteen käyttöönottoa. Säilytä käyttöohjeet tulevaa tarvetta varten. Pidätämme
oikeuden teknisten tietojen muutoksiin. Emme vastaa mahdollisista teksti- tai kuvavirheistä. Jos laitteeseen tulee teknisiä
ongelmia, ota yhteys myymälään tai asiakaspalveluun.
Turvallisuus
• Tuote on tarkoitettu vain sisäkäyttöön.
• Tarkista tuotteen kunto säännöllisesti. Älä käytä säh-
könkulutusmittaria, jos se on vaurioitunut. Tuotteen saa
korjata tai purkaa vain valtuutettu huoltoliike.
• Tuotetta ei saa muuttaa millään tavalla.
• Älä altista tuotetta kosteudelle tai nesteille.
• Tuotetta saa käyttää ainoastaan käyttöohjeessa
kuvatulla tavalla.
• Älä altista tuotetta äärilämpötiloille, korkealle
ilmankosteudelle, iskuille tai tärinälle.
• Lue tuotteen varoitustekstit huolellisesti.
• Älä käytä sähkönkulutusmittaria vahvojen magneet-
tikenttien, kuten muuntajien tai sähkömoottoreiden,
läheisyydessä.
• Älä käytä tuotetta palonarkojen tai räjähdysherkkien
aineiden läheisyydessä.
• Jos olet epävarma tuotteen käytöstä, ota yhteyttä val-
tuutettuun sähköasentajaan.
• Sähkönkulutusmittaria saa käyttää ainostaan asennus-
kategoriassa II (CATII) IEC 664:n mukaan, eivätkä jännitepiikit saa ylittää 2500 V:tä.
Tuotekuvaus
• Langaton sähkönkulutusmittari (vastaanotin).
• Helppo asentaa ja ohjelmoida.
• Kannettava laite on helppo siirtää huoneesta toiseen.
• Vastaanottaa tietoja enintään neljästä langattomasta
EMT7110-sähkönkulutusmittarista.
• Laskee kaksoistariffisopimusten kustannukset.
• Näytöllä näkyy ajankohtainen sähkönkulutus.
• Jännite, virrankulutus ja teho näkyvät myös näytöllä.
• Hälytinmerkkiääni voidaan säätää hälyttämään ylikuormi-
tuksen sattuessa tai energiakulujen noustessa korkeiksi.
• Sisälämpötila esitetään celsius- tai fahrenheit-asteina.
• Näytöllä näkyy myös kellonaika ja viikko.
Käytön aloittaminen
Aseta paristot
Lähetin toimii kahdella LR44-nappiparistolla.
Vastaanotin toimii kahdella R6-paristolla (AA).
Toimi näin:
1.a. Avaa vastaanottimen paristolokero.
1.b. Lähettimen paristopidike on sen takapuolella. Vedä pidikettä suoraan ulospäin. Saatat tarvita pientä ruuvitalttaa.
2. Aseta paristot paristolokeroon ja paristopidikkeeseen
merkintöjen mukaisesti.
3. Aseta vastaanottimen paristolokeron kansi takaisin pai
kalleen. Paina lähettimen paristopidike takaisin paikalleen. Varmista, että kaksi kontaktipeltiä tulevat aukkojen
kohdalle.
Kun vastaanottimen paristot on asetettu oikein, sen kello
näyttää 00:00 ja ajankohtaisen lämpötilan. Lähettimen paristot ovat vain sähkökatkojen varalle. Kun olet liittänyt lähettimen pistorasiaan, sen punainen merkkivalo palaa merkkinä
siitä, että lähetin toimii.
Liitäntä
1. Liitä lähetin (EMT7110) verkkopistorasiaan.
2. Liitä mitattavan laitteen pistoke lähettimen pistorasiaan.
Käyttö
Synkronointi
Lähetin (EMT7110) ja vastaanotin (EMR7370) täytyy
synkronoida ennen kuin niiden välillä voidaan siirtää tietoa.
Toimi näin:
1. Paina [CHN] kolmen sekunnin ajan, niin pääset ka
navanvalintatilaan. Laitteesta kuuluu pitkä piip-ääni ja
kanavanumero alkaa vilkkua.
2. Valitse kanava painamalla [UP] / [DOWN]. Valittavana
n 4 kanavaa (4 lähettimestä voidaan lähettää tietoja
vastaanottimeen).
3a. Vahvista kanavanumero painamalla [ON/OFF]. Laitteesta
kuuluu lyhyt piip-ääni ja vastaanottimen ”oppimistila”
avautuu, jotta synkronointi voidaan aloittaa.
3b. Paina lähettimen painiketta 3 sekunnin ajan, kunnes
vihreä merkkivalo alkaa vilkkua nopeasti. Lähettimen ja
vastaanottimen synkronointi käynnistyy.
4. Kun vastaanotin vastaanottaa lähettimen signaaleja,
vastaanottimen näytölle, valitun kanavan ympärille
ilmestyy kehys. Tällöin lähettimen signaali on vahva ja
synkronointi on käynnissä.
5. Kun kuulet vastaanottimesta (EMR7370) piip-äänen
ja lähettimen (EMT7110) vihreä merkkivalo vilkkuu 15
sekunnin välein, laitteiden välinen synkronointi on onnistunut. Valitun kanavan ympärillä on kehys.
6. Kun synkronointi on valmis, vastaanottimen näytöllä
näkyy jännite ja liitetyn laitteen energiankulutus. Energiatiedot päivittyvät vastaanottimen näytölle säännöllisesti.
Huom.!
• Voit tyhjentää kanavan muistin painamalla käynnistyksen
yhteydessä [ON/OFF].
• Vastaanottimen oppimistoiminto kestää noin 30 sekuntia.
• Synkronoinnin aikana sekä vastaanottimen (EMR7370)
että lähettimen (EMT7110) tulee olla oppimistilassa.
Vastaanottimeen voi liittää 4 lähetintä. Paina vastaanottimen
[CHN]-painiketta valitaksesi ALL (kaikki), 1, 2, 3 tai 4.
Näyttö
EMR7370:n näyttö on jaettu neljään osaan.
Kenttä 1
Näyttää hinnan, energiankulutuksen ja kustannukset.
Kenttä 2
Näyttää jännitteen, virrankulutuksen, tehon, ylikuormituksen
ja varoituksen liian korkeista
energiakustannuksista.
Kenttä 3
Näyttää ajan ja
viikonpäivän.
Kenttä 4
Näyttää ajankohtaisen
sisälämpötilan (°F tai °C).
Liikkuminen kenttien välillä
• Siirtyminen kenttään 1:
Paina [MODE]. Liiku toimintojen välillä painamalla [UP].
• Siirtyminen kenttään 2:
Paina [MODE]. Liiku toimintojen välillä painamalla
[DOWN].
• Siirtyminen kenttään 3:
Pidä [MODE]-painiketta alas painettuna kolmen
sekunnin ajan.
Huom.! Et voi olla kentässä 1.
•
Siirry kenttään 4 (lämpötila) kellon ja viikonpäivän
asetusten kautta kentässä 3.
Kenttä 1: Hinta, energiankulutus
ja kustannukset
Laite laskee kaksoistariffin kustannukset. Voit siis asettaa
kaksi eri hintaa eri ajoille. Kun hinta on asetettu, laite laskee
kustannukset. Kustannukset ja energiankulutus näytetään
neljällä eri tavalla. Niiden avulla voit saada vinkkejä energian
säästämiseen.
• Päivän kulutus
• Eilisen kulutus
• Viimeisen viikon kulutus
• Yhteiskulutus
Kentässä 1 näkyy
• ”€, £, $” Hinta
• ”Today kWh” Päivän kulutus (kWh)
• ”Yesterday kWh” Eilisen kulutus (kWh)
• ”Week kWh” Viimeisen viikon kulutus (kWh)
• ”Total kWh” Kokonaiskulutus (kWh)
• ”Today Cost” Päivän kustannus
• ”Yesterday Cost” Eilisen kustannus
• ”Week Cost” Viikon kustannus
• ”Total Cost” Kokonaiskustannus
Page 8

Suomi
SUO MI • Asiaka sp al velu Pu h: 0 20 11 1 22 22, F ak si : 020 1 11 2 221, Sä hk öposti: i nf o@cla so hl so n.fi, K otisivu : ww w.clas oh ls on .fi
Ver. 200907
Sähkön hinnan asetus
Tilassa ”COST/kWh 1” näkyy hinta/kWh. Voit säätää tai
muuttaa hintaa. Tämä asetus ohjaa sähkönkulutusmittarin
kustannusten laskemista. On tärkeää, että asetat hinnan
oikein.
Aseta sähkön hinta seuraavalla tavalla:
1. Kun näytöllä näkyy COST / kWh (mode
up), paina
[ON/OFF] valitaksesi Price-1 tai Price-2.
2. Kun näyttö on Price-1- tai Price-2-tilassa, avaa
asetustila painamalla [MODE].
3. Valitse haluamasi numero painamalla [MODE].
Numero vilkkuu.
4. Muuta valittua numeroa painamalla [UP] tai [DOWN].
Vahvista valinta painamalla [MODE].
5. Jos Price-2 on viimeisen Price-1-numeron asetuksen
jälkeen 0, laite siirtyy automaattisesti pois asetustilasta.
6. Jos Price-2 ei ole 0 viimeisen Price-1-asetuksen jälkeen,
arvot näkyvät peräkkäin.
7. Valitse tunnit ja minuutit painamalla [MODE].
8. Säätä valittua numeroa painamalla [UP] tai [DOWN].
Huom.! Arvoa on säädettävissä 0,001/kWh–9,999/kWh.
Kenttä 2.
Ylikuormitusvaroitus varoittaa ylikuormituksesta.
Kuvake “ ” vilkkuu näytöllä ja äänimerkki
hälyttää, jos kuormitus ylittää asetetun rajan.
Aseta kuormituksen raja näin:
1. Kun näyttö on OVERLOAD- ja WATT-tilassa (down), ase
-
ta OVERLOAD painamalla [MODE].
2. Kun näyttö on OVERLOAD- ja WATTAGE-tilassa, aseta
OVERLOAD painamalla [MODE].
3. Valitse haluamasi numero painamalla [MODE].
Numero vilkkuu.
4. Säätä valittua numeroa painamalla [UP] tai [DOWN].
5. Aktivoi tai sammuta ylikuormituksen hälytys painamalla
[ON/OFF].
6. Kun olet asettanut viimeisen numeron, laite poistuu
automaattisesti asetustilasta.
Huom.! Jos asetus koskee kaikkia kanavia, valitse ”ALL”
painamalla [CHN] tarpeeksi monta kertaa.
Kentät 3/4. Kellon, viikonpäivän
ja lämpötilanäytön asetus
1. Paina MODE 3 sekunnin
ajan missä tahansa näytön
osassa, mutta ei OVERLOAD-tilassa. Tunnit vilkkuvat.
Säädä tunteja painamalla
[UP] tai [DOWN]. Vahvista
valinta painamalla [MODE].
2. Aseta minuutit. Säädä minuutteja painamalla [UP] tai
[DOWN]. Vahvista valinta
painamalla [MODE].
3. Aseta sekunnit. Säädä sekunteja painamalla [UP] tai
[DOWN]. Vahvista valinta painamalla [MODE].
4. Aseta viikonpäivä. Säädä viikonpäivä painamalla [UP] tai
[DOWN]. Vahvista valinta painamalla [MODE].
5. Kenttä 4 avautuu: Valitse lämpötilaksi Fahrenheit- tai
Celsius-asteet. Muuta valintaa painamalla [UP] tai
[DOWN]. Vahvista valinta painamalla [MODE].
6. Poistu asetustilasta painamalla [MODE].
Sähkökatko
Jos lähetin (EMR7370) on synkronoitu vastaanottimen
(EMR7370) kanssa, lähettimen lähettämät arvot vastaanottimen näytöllä. Jos lähettimen kanavan kohdalla lukee ”NO
POWER”, pistorasiassa ei ole virtaa. Varmista sulake.
Huolto ja ylläpito
Irrota sähkönkulutusmittari pistorasiasta ennen puhdistusta.
Pyyhi tarvittaessa kuivalla ja pehmeällä liinalla.
Vianhakutaulukko
Ongelma
Synkronointi on tehty, mutta lähettimen lähettämät tiedot
ovat virheellisiä.
Todennäköinen syy: Häiriöitä tai heikko signaali.
Ratkaisu: Tee uusi synkronointi.
Ongelma:
Synkronointi on tehty, mutta lähetin vilkkuu silti.
Todennäköinen syy: Vastaanottimen vastaanottaa
mahdollisesti toista signaalia.
Ratkaisu: Siirrä lähetin toiseen pistorasiaan ja tee
uusi synkronointi.
Ongelma:
Näytöllä näkyy kummallisia merkkeja tai se ei pala ollenkaan.
Todennäköinen syy: Vastaanotin ei toimi oikein.
Palauta asetukset. Irrota paristot hetkeksi.
Kierrätys
Kierrätä tuote asianmukaisesti, kun poistat sen käytöstä.
Kysy tarkempia kierrätysohjeita kuntasi jäteneuvonnasta.
Tekniset tiedot
Malli: EMR7370
Nimellisjännite: 230 V ~ 50 Hz
Mittausjännite: 190 V–276 V
Mitta-alue, ampeerit: 5 mA–16 A (Maks. 16 A)
Mitta-alue, watit: 1 W–3999 W (erotuskyky 1 W)
Mitta-alue, kWh: 0,0–999,99 kWh
Tarkkuus
Jännite: +/- 3 % (mitatusta arvosta) (1, 2, 3)*
Virta: +/- 3 % (mitatusta arvosta) +/-0.01 A (1, 2, 3)*
Teho: +/- 3 % (mitatusta arvosta) +/-2W (1, 2, 3, 5)*
Energia: +/- 3 % (mitatusta arvosta) +/-0.1kWh (1, 2, 3, 5)*
Taajuus: +/- 2 Hz (2, 3)*
Tehokerroin: +/-0.1 (mitatusta arvosta) kun tehokerroin on
0.70 =< cosφ =<1.00 (2, 4)*
* Tarkkuudet voimassa, kun seuraavat asiat pätevät:
1). Verkkotaajuus 45–65 Hz
2). Normaali sisälämpötila
3). Harmoninen jännitteen/virran vääristymä < 15 %
4). Virta >= 1.00A sinimuotoinen taajuuden ollessa 50
tai 60 Hz
Käyttöympäristö:
Käyttölämpötila: 5 ºC–40 ºC
Suurin ilmankosteus: 90 % RF
Käyttökorkeus: Maks. 2 000 m
Sisäkäyttöön.
Declaration of Conformity
Hereby, Clas Ohlson AB declares,
that following product(s):
Wireless Energy Meter
Art. no. Model
36-3981 EMR7370
is in compliance with the essential requirements and
other relevant provisions of Directive 1999/5/EC.
Article 3.1b (EMC): EN 301489-1
EN 301489-3
Article 3.2 (Radio): EN 300220-1
EN 300220-2
0700
Insjön, Sweden, July 2009
Klas Balkow
President
Clas Ohlson, 793 85 Insjön, Sweden
 Loading...