

Clas Ohlson E0060 Owner's Manual

Radio-controlled LED clock
Radiokontrollerad LED-klocka
Radiokontrollert LED-klokke
Radio-ohjattu led-kello
EnglishSvenskaNorskSuomi
Art.no Model
36-4143 E0060
Ver. 201001

Radio-controlled
English
LED clock
Art. no: 36-4143 Model E0060
Please read the entire instruction manual before using the product and save it
for future reference. We reserve the right for any errors in text or images and any
necessary changes made to technical data. If you have any questions regarding
technical problems please contact Customer Services.
Product description
• Radio-controlled
• Blue digits with two intensities
• Indoor/outdoor temperature
• Dual alarm with snooze
• Battery backup
• AC/DC adaptor and wireless outdoor sensor included
Radio-controlled
A radio-controlled clock gives exact time controlled by the atomic clock in
Braunschweig, Germany (accuracy ±1 second per 1 million years). The clock contains
a radio receiver that decodes the time signal (long wave 77.5 kHz) and adjusts the
time. The transmitter’s range is 2000 km, i.e. not reliable north of the Shetlands. The
high-precision 32 kHz quartz movement inside the clock keeps the correct time until
the next time your clock is synchronised.
Safety
• The product should only be repaired by qualified service technicians.
• The product is designed for indoor use only.
• Do not place the product where there is a risk of it falling into water or other liquid.
Do not place containers with liquid on the product e.g. flower vases, coffee cups,
fizzy drink bottles.
• Do not place the device in damp, dusty environments or where there are heavy
vibrations.
• Always remove the batteries when the clock is not to be used for a long time.
Batteries left in the clock for long periods can begin to leak and damage the
device or property.
2
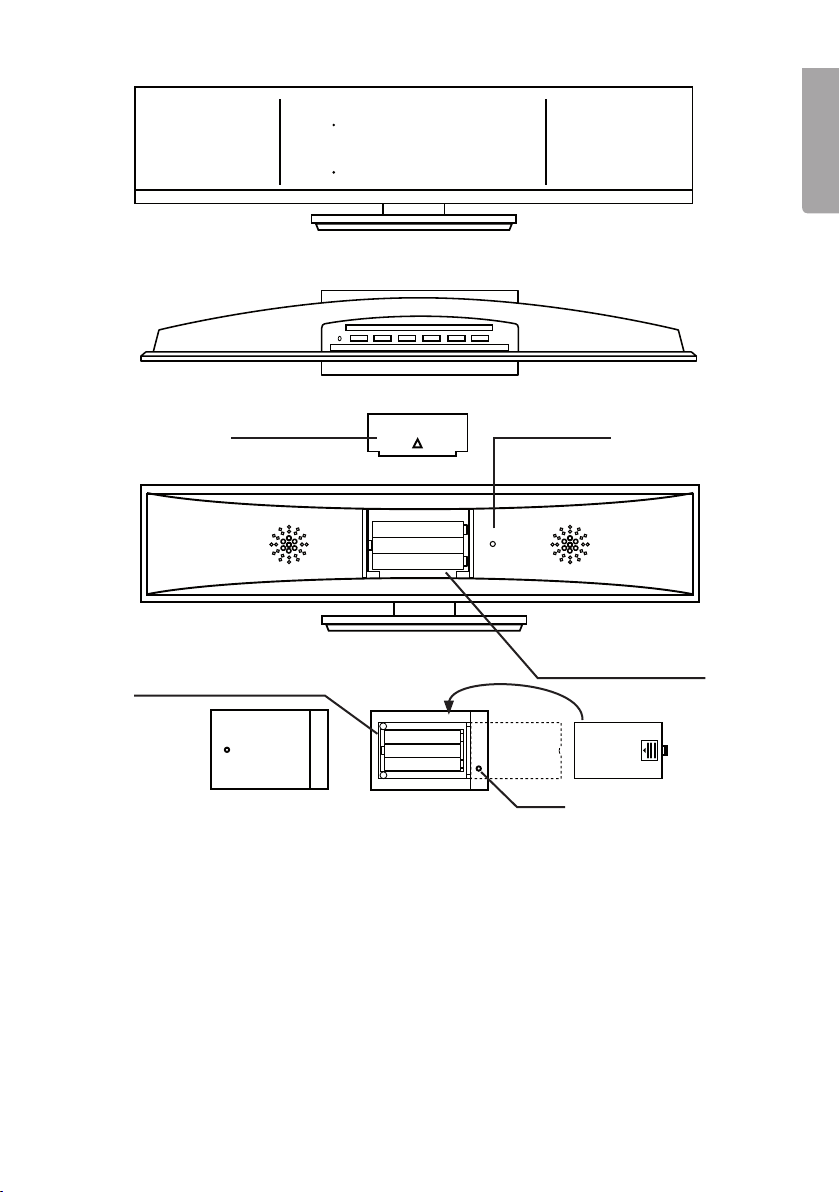
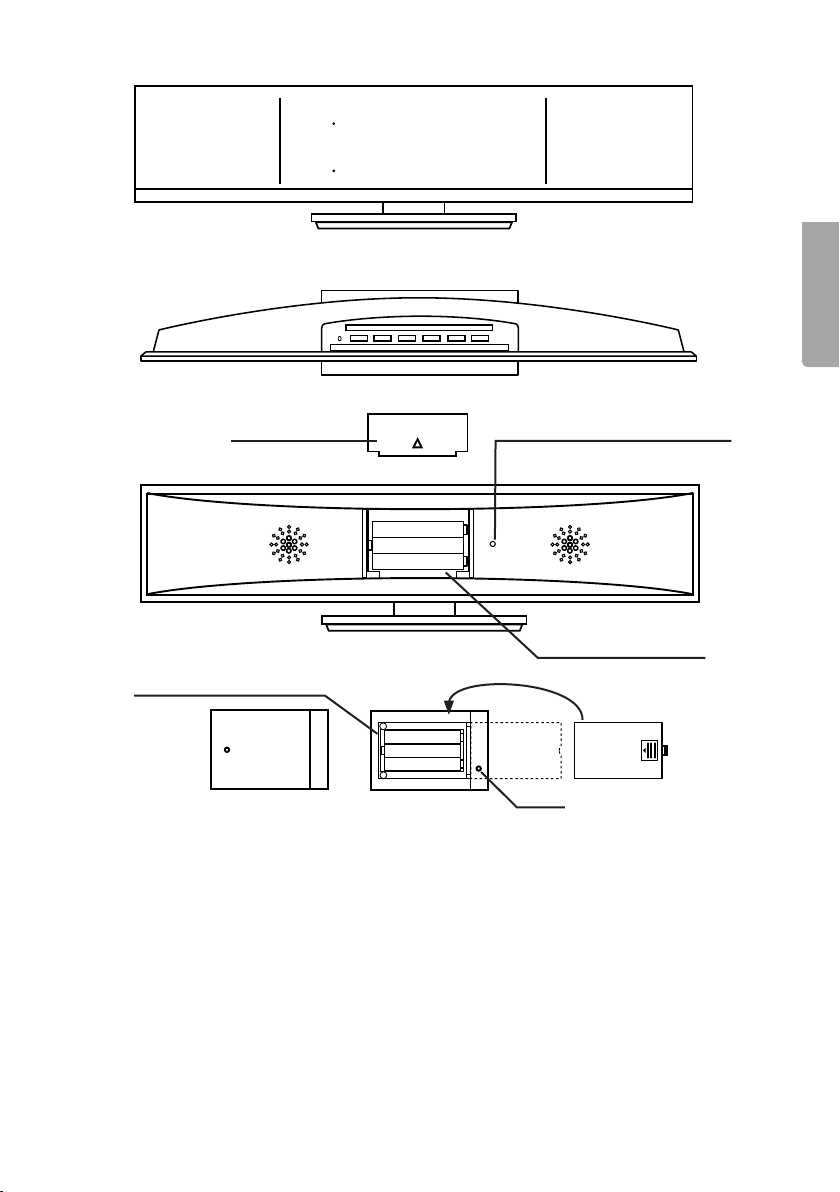
MAX
ALM1
ALM2
IN OUT
MAX
MIN
˚C˚C
MIN
MAX
IN OUT
ALM1
MAX
23
MIN
Indoor temperature Outdoor temperature
Battery compartment for
3 x AAA/LR03 batteries
Wireless outdoor temperature sensor
ALM2
Battery cover
I5:48
Adaptor socket
1.5 V AAA
-
+
-
+
1.5 V AAA
1.5 V AAA
1.5 V AAA
-
1.5 V AAA
1.5 V AAA
-
+
AC 4.5V
-
+
+
-
+
Battery compartment
for 3 x AAA/LR03
batteries
Reset
I6
˚C˚C
MIN
English
Battery
cover
Specifications
Operating voltage 9 V DC, 200 mA via the adaptor 230 V AC, 50 Hz
(included)
Clock backup batteries 3 x AAA/LR03 batteries (not included)
Outdoor sensor batteries 3 x AAA/LR03 batteries (not included)
Temperature sensor frequency 433.92 MHz
Size 285 x 40 x 75 mm
3
Getting started
Inserting the batteries
English
Clock
The backup batteries prevent the clock settings from being lost in case of power cuts.
1. Open the battery compartment on the back of the clock by sliding it straight up,
and insert 3 x AAA/LR03 batteries.
Make sure to insert the batteries according to the markings in the battery
compartment.
2. Replace the battery cover by sliding it straight down.
Outdoor sensor
1. Open the battery compartment on the back of the outdoor sensor by sliding it
straight down. Insert 3 x AAA/LR03 batteries into the battery compartment.
Make sure to insert the batteries according to the markings in the battery
compartment.
2. Replace the battery cover by sliding it straight up.
Setting the clock automatically
1. Plug the DC connector on the supplied AC/DC adaptor into the socket on the
back of the clock and then plug the adaptor into a wall outlet.
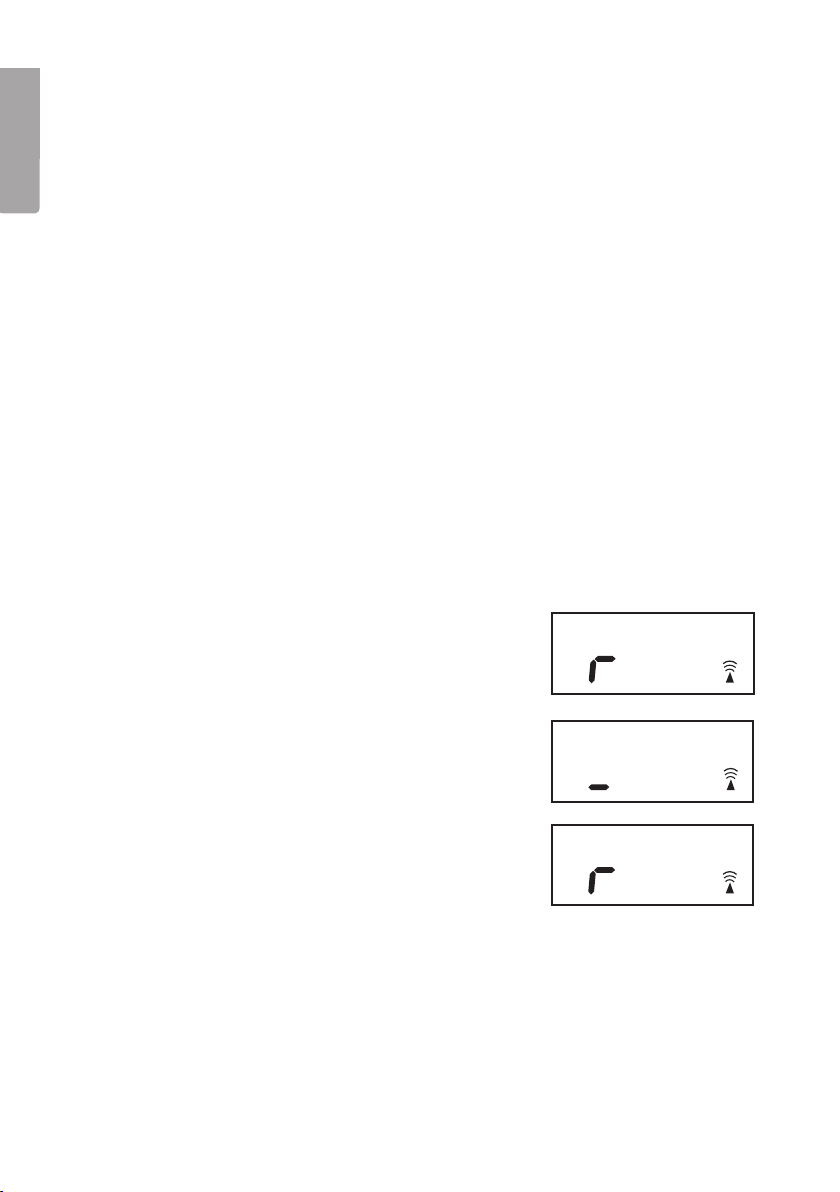
2. The clock will now start. The display will show r:00
and the reception symbol will start to flash.
3. The clock will now search for a radio signal that
will automatically set the clock. The strength of the
signal reception will appear on the display.
3 bars = Very strong reception
2 bars = Strong reception
1 bar = Weak reception
r = No reception
If you do not receive a signal, try moving the clock
a little or unplugging the adaptor and then plugging
it in again to restart the clock and start a new
search.
The signal strength indicators can change during
reception. This is quite normal.
4. If, after 21 minutes, the clock still hasn’t received a radio signal it will revert to
time display.
5. The time can be displayed at any time during the signal search. Press TIME once
to display the time. Press HR to return to reception mode.
:
00
:
00
:
00
4

Successful or unsuccessful reception
• When the signal reception has been successful the reception symbol on the
display is constant.
English
I2:30
Reception OK Unsuccessful reception
• If the reception is unsuccessful, no reception symbol will appear. See step 3.
Automatic radio signal reception
• The clock will automatically update the time every day at 1 am. If the time update
signal is not received at this time the clock will try to update the time at 2 am
and 3 am.
• If the update attempt at 3 am is unsuccessful, the clock will try to update every
3rd hour until the correct time has been received.
PM
I2:30
PM
Manual radio signal reception
• Press HR at any time. The clock will now enter reception mode for searching
for the correct time. The display will show r:00.
Setting the clock manually
1. Press and hold in TIME whilst simultaneously pressing repeatedly on WAVE/HR
to set the hours.
2. Press and hold in TIME whilst simultaneously pressing repeatedly on MIN to set
the minutes.
3. Release the TIME button when the clock is set.
Changing the time zone
• Press and hold in TIME. With the TIME button held in, press SNOOZE once.
The display will show “01”. Keep TIME held in and change the time zone using
the MIN button.
◦ “0” GMT +0 (United Kingdom)
◦ ”1” GMT +1 (Central European Time. E.g. Sweden)
◦ ”2” GMT +2 (Eastern European Time. E.g. Finland)
• Release the TIME button when the desired time zone has been selected.
5

Use
Using the alarm
English
Setting the alarm time
The clock has two alarm times. The alarm can be chosen using the selector on
the top of the clock.
• ALM 1 – Alarm time 1
• ALM 2 – Alarm time 2
• ALM 1+ALM 2 – Alarm time 1 and 2
• OFF – No alarm activated.
Setting alarm 1
1. Press and hold in ALM 1 whilst simultaneously pressing repeatedly on WAVE/HR
to set the hours.
2. Press and hold in ALM 1 whilst simultaneously pressing repeatedly on MIN
to set the minutes.
3. Release the ALM 1 button when the time is set.
Setting alarm 2
1. Press and hold in ALM 2 whilst simultaneously pressing repeatedly on WAVE/HR
to set the hours.
Press and hold in ALM 2 whilst simultaneously pressing repeatedly on MIN to set
the minutes.
2. Release the ALM 2 button when the time is set.
Activating the alarm
Press the ALM button. The display will show one of the following depending on
which alarm is activated. Example:
• ALM 1 – ALM 1 is displayed.
• ALM 2 – ALM 2 is displayed.
• ALM 1+ALM 2 – Both ALM 1 and ALM 2 are displayed.
• OFF – No alarm activated.
Deactivating alarm 1 and/or alarm 2
To deactivate alarm 1, press ALM. ALM 1 is shown on the display.
Setting the snooze time
1. Press and hold in SNOOZE for 2 seconds. The display shows “05”. Keep the
SNOOZE button held in whilst simultaneously pressing the MINUTE button to
change the snooze interval time.
2. The snooze time can be set to from between 5 and 60 minutes.
6

Switching the alarm off
• When the alarm sounds press SNOOZE once to temporarily switch the alarm off.
The alarm will then start sounding again after the set snooze time.
• To deactivate the alarm, press ALM 1 or ALM 2 respectively. ALM 1 or ALM 2
will then stop flashing in the display.
• The alarm will sound at the same time every day.
Using the thermometer
Reading the MAX/MIN temperature
• Press the MAX/MIN button to display the highest measured temperature.
• Press the MAX/MIN button again to display the lowest measured temperature.
To reset the max temperature
Press and hold in MAX/MIN to delete the old max temperature.
The thermometer shows “- -” and after a few moments it returns to normal mode.
To reset the min temperature
Press and hold in MAX/MIN to delete the old min temperature.
The thermometer shows “- -” and after a few moments it returns to normal mode.
Changing the light intensity of the display digits
Press SNOOZE to change the light intensity.
English
Care and maintenance
Use a soft damp cloth to clean the product. Never use strong solvents or cleaning agents.
Troubleshooting
The outdoor temperature is not displayed; only two lines appear on the display.
The wireless signal transmission is not working or is disrupted. Possible solutions:
• Press CLEAR once and then press RESET on the outdoor sensor to resynchronise
the sensor and indoor unit.
• Move the outdoor sensor closer to the indoor unit or to another location.
• Check the batteries of the outdoor sensor.
Disposal
Follow local ordinances when disposing of this product. If you are unsure of how to
dispose of this product, please contact your municipality.
7

Radiokontrollerad LED-klocka
Art.nr 36-4143 Modell E0060
Läs igenom hela bruksanvisningen före användning och spara den sedan
för framtida bruk. Vi reserverar oss för ev. text- och bildfel samt ändringar av
tekniska data. Vid tekniska problem eller andra frågor, kontakta vår kundtjänst
(se adressuppgifter på baksidan).
Svenska
Produktbeskrivning
• Radiokontrollerad
• Blå siffror i två ljusstyrkor
• Inne-/utetemperatur
• Dubbla alarm med repetition
• Batteribackup
• Batterieliminator och trådlös utomhusgivare medföljer.
Radiokontrollerad
En radiokontrollerad klocka ger dig mycket exakt tid som styrs av atomuret
i Braunschweig i Tyskland (gångnoggrannhet ± 1 sekund på 1 miljon år). Urverken
innehåller en radiomottagare som avkodar tidssignalen (långvåg 77,5 kHz) och justerar.
Sändarens räckvidd är ca 2000 km d.v.s. norr om Umeå är den ej tillförlitlig.
Urverken har också ett noggrant kalibrerat quartsverk med 32 kHz svängningar som
sköter driften.
Säkerhet
• Produkten får endast repareras av kvalificerad servicepersonal.
• Produkten är avsedd endast för inomhusbruk.
• Placera inte produkten så att den kan falla ner i vatten eller annan vätska.
Ställ inte heller några föremål som innehåller vätska på produkten, t.ex.
en blomvas eller läskedryck.
• Placera inte apparaten i en fuktig, dammig miljö eller där det förekommer
starka vibrationer.
• Ta alltid ur batterierna då klockan inte används under längre perioder.
Batterierna kan börja läcka och orsaka skada på apparat, person eller egendom.
8
MAX
ALM1
ALM2
IN OUT
MAX
MIN
˚C˚C
MIN
MAX
IN OUT
ALM1
MAX
23
MIN
Innetemperatur Utomhustemperatur
Batterifack för 3 st.
AAA/LR03-batterier
Trådlös utomhusgivare
ALM2
Batterilucka
I5:48
Anslutning för strömförsörjning
1.5 V AAA
-
+
-
+
1.5 V AAA
1.5 V AAA
1.5 V AAA
-
1.5 V AAA
1.5 V AAA
-
+
AC 4.5V
-
+
+
-
+
Batterifack för 3 st.
AAA/LR03-batterier
Reset
I6
˚C˚C
MIN
Svenska
Batterilock
Specifikationer
Drivspänning 9 V DC, 200 mA (via batterieliminator 230 V AC, 50 Hz)
Backupbatteri klocka 3 st. AAA/LR03-batterier (ingår ej)
Batteri utomhusgivare 3 st. AAA/LR03-batterier (ingår ej)
Frekvens temperaturgivare 433.92 MHz
Storlek 285 x 40 x 75 mm
9
 Loading...