

Page 1
Drill stand
Borrstativ
Borestativ
Porausteline
Bohrstativ
EnglishSvenskaNorskSuomiDeutsch
Art.no Model
40-7141 DS43
Ver. 20130719
Page 2

2
Page 3

Drill Stand
Art.no. 40-7141 Model DS43
Please read the entire instruction manual before use and save it for future reference.
We reserve the right for any errors in text or images and for making any necessary
technical changes to this document. If you should have any questions concerning
technical problems please contact our Customer Services.
Safety
• The base plate must be fastened to the work bench before work begins.
• The workpiece should always be securely fastened before working on it.
• Only use tools that are specifically designed for your needs.
• Always use safety glasses and gloves.
• Always use ear protection if the work creates a noisy work environment.
• Do not wear loose-fitting clothes that can become caught in the drill.
• Use a hairnet.
• Keep children at a distance from the work area.
• Store your power tools in a safe place out of children’s reach.
• Always remove the plug from the wall socket:
- before changing power tools.
- before service.
- when not using the power tool.
• Always follow the manufacturer’s recommendations.
English
3
Page 4
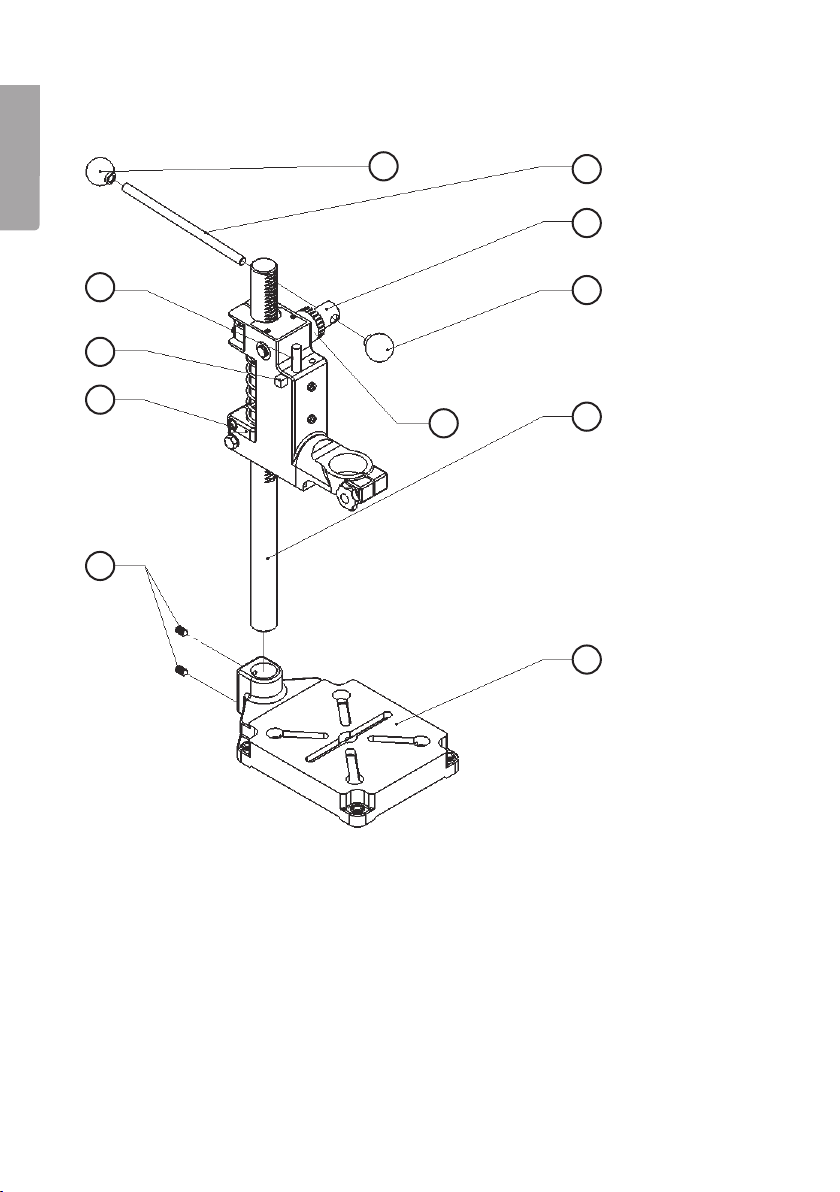
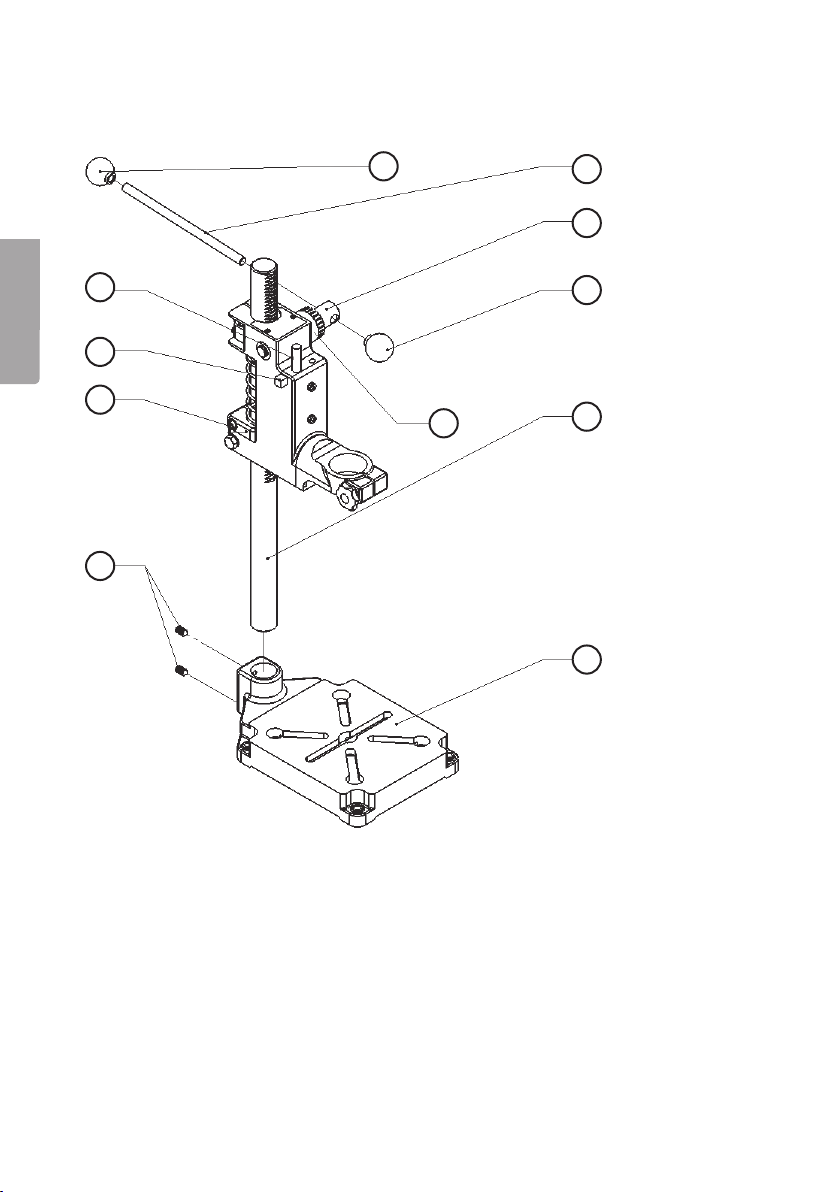
Parts
English
3
5
4
6
3
7
8
10
2
9
1
1. Base
2. Column
3. Knob
4. Shaft
5. Feed handle
6. Feed stop rod
7. Quick-adjust feed stop button
8. Height adjustment screw
9. Column lock screw
10. Depth gauge ring
4
Page 5

Assembly
1. Assemble the column (2) and feed
handle (5) as shown.
2. Securely fasten the drill to the drill
stand.
Operation
Setting the drill depth gauge
10 mm
5
English
2
8
10
5
1. Securely fasten a drill bit in the
drill chuck.
2. Loosen the height adjustment screw
(8) and adjust the height so that the
tip of the drill bit is approximately
10 mm over the workpiece.
3. Retighten the screw.
0 mm
4. Lower the drill bit using the feed
handle (5) so that the tip is level with
the workpiece.
5. Reset the depth by turning the depth
gauge ring (10).
6. The gauge should now display the
correct depth.
5
Page 6
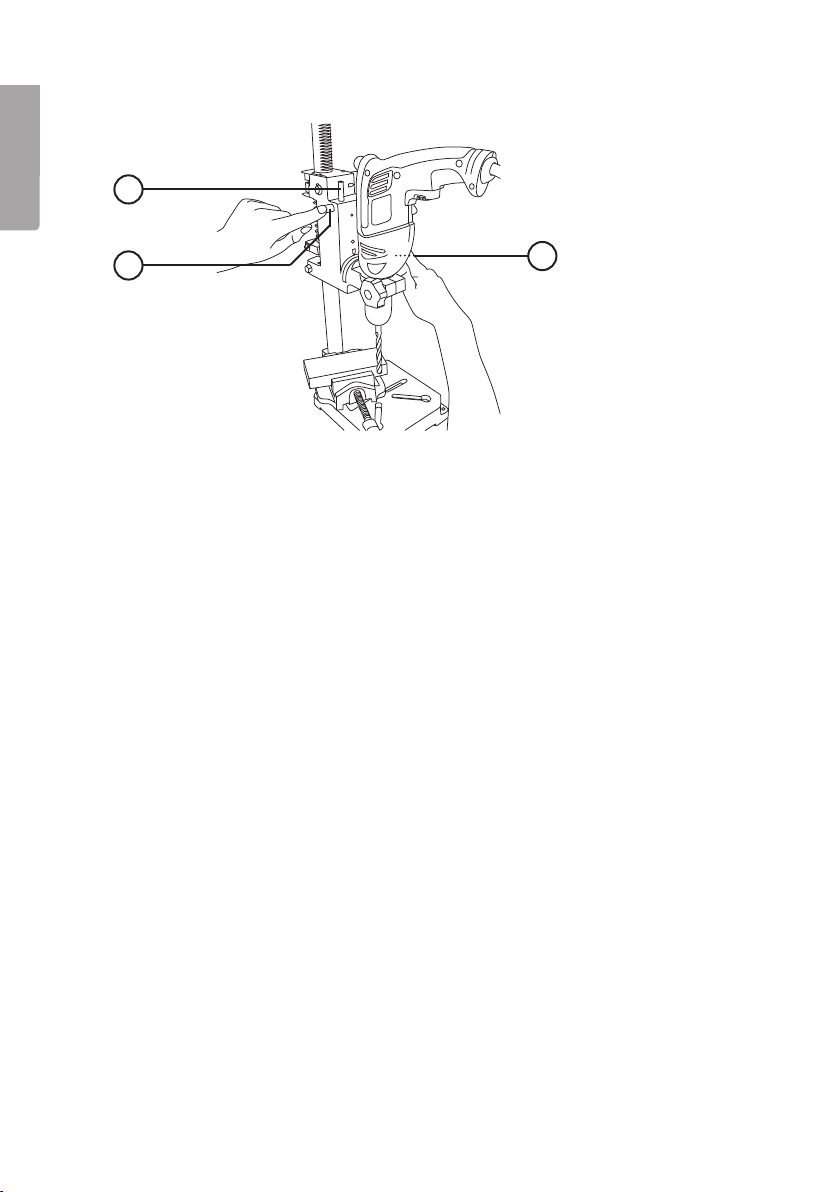
Setting the feed stop
English
6
7
1. Press in the quick-adjust feed stop button (7).
2. Lower the drill to the desired depth by turning the feed handle (5).
3. Depress the feed stop rod (6) as far as it goes and release the button (7).
4. Fine adjustments can be made by turning the feed stop rod (6).
5
Care and maintenance
Lubricate the column when necessary.
Disposal
Follow local ordinances when disposing of this product. If you are unsure of how to
dispose of this product, please contact your municipality.
Specifications
Column to spindle centre distance 121 mm
Stroke length 65 mm
Collar diameter 43 mm & 38 mm
Column height 500 mm
Column diameter 30 mm
Work table 260 × 165 mm
6
Page 7

Borrstativ
Art.nr 40-7141 Modell DS43
Läs igenom hela bruksanvisningen före användning och spara den sedan för framtida
bruk. Vi reserverar oss för ev. text- och bildfel samt ändringar av tekniska data. Vid
tekniska problem eller andra frågor, kontakta vår kundtjänst (se adressuppgifter på
baksidan).
Säkerhet
• Bottenplattan måste fästas på arbetsbänken före arbete.
• Arbetsstycket ska alltid spännas fast innan du börjar bearbeta det.
• Använd endast verktyg som passar dina speciella behov.
• Använd alltid skyddsglasögon och handskar.
• Använd öronskydd vid arbeten som förorsakar mycket buller.
• Använd inte löst hängande kläder som kan fastna i borren.
• Använd hårnät.
• Håll barn på behörigt avstånd från arbetsplatsen.
• Förvara dina maskiner på säker plats utom räckhåll för barn.
• Drag alltid stickkontakten ur väggen:
- före byte av maskin eller verktyg.
- före servicearbeten.
- när du inte använder maskinen.
• Följ alltid maskintillverkarens anvisningar.
Svenska
7
Page 8
Produktbeskrivning
Svenska
3
5
4
6
3
7
8
10
2
9
1
1. Bottenplatta
2. Pelare
3. Knopp
4. Axel
5. Spak
6. Borrstopp
7. Knapp för snabbjustering borrstopp
8. Skruv för justering av höjd
9. Skruvar för låsning av pelare
10. Skalring
8
Page 9

Montering
1. Montera pelaren (2) och spaken (5) som
bilden visar.
2. Spänn fast borrmaskinen i borrstativet.
Användning
Inställning av borrdjupsskala
8
10 mm
5
2
Svenska
10
5
1. Spänn fast borren i chucken
på maskinen.
2. Lossa skruven för justering av
höjd (8) och justera höjden så att
borren hamnar ca 10 mm ovanför
arbetssycket.
3. Dra åt skruven igen.
0 mm
4. Sänk borrspetsen med hjälp av
spaken (5) så att borrspetsen är
i jämnhöjd med arbetsstycket.
5. Nollställ skalan genom att vrida på
skalringen (10).
6. Skalan visar nu korrekt borrdjup.
9
Page 10

Inställning av borrstopp
6
Svenska
1. Tryck in knappen för snabbjustering av borrstopp (7).
2. Sänk borrspetsen genom att dra i spaken (5) till det djup som önskas.
3. Skjut ner borrstoppet (6) så långt det går och släpp knappen (7).
4. Finjustering kan göras genom att vrida på borrstoppet (6) .
Skötsel och underhåll
Smörj vid behov in pelaren något.
Avfallshantering
När du ska göra dig av med produkten ska detta ske enligt lokala föreskrifter.
Är du osäker på hur du ska gå tillväga, kontakta din kommun.
7
5
Specifikationer
Avstånd pelare-spindelcentrum 121 mm
Slaglängd 65 mm
Fäste för hals 43 mm & 38 mm
Pelarhöjd 500 mm
Pelardiameter 30 mm
Arbetsbord 260 × 165 mm
10
Page 11

Borestativ
Art.nr. 40-7141 Modell DS43
Les nøye igjennom hele bruksanvisningen og ta vare på den til senere bruk.
Vi reserverer oss mot ev. tekst- og bildefeil, samt forandringer av tekniske data.
Ved tekniske problemer eller andre spørsmål, ta kontakt med vårt kundesenter
(se opplysninger på baksiden).
Sikkerhet
• Bunnplaten må festes til arbeidsbenken før arbeidet starter.
• Arbeidsemnet skal alltid spennes fast før bearbeidingen startes.
• Bruk kun verktøy som er beregnet på dine spesielle behov.
• Bruk alltid vernebriller og hansker.
• Bruk hørselsvern ved arbeider som kan forårsake mye støy.
• Bruk ikke løst hengende klær som kan sette seg fast i boret.
• Bruk hårnett.
• Hold barn på trygg avstand fra arbeidsplassen.
• Oppbevar dine maskiner på et sikkert sted og utenfor barns rekkevidde.
• Trekk alltid stikkontakten ut fra strømuttaket:
- før skifte av maskin eller verktøy.
- før service og vedlikeholdsarbeider på maskinen.
- når maskinen ikke er i bruk.
• Følg alltid maskinprodusentens anvisninger.
Norsk
11
Page 12

Produktbeskrivelse
Norsk
3
5
4
6
3
7
8
10
2
9
1
1. Bunnplate
2. Søyle
3. Knott
4. Aksel
5. Spake
6. Borestopper
7. Knapp for hurtigjustering av borestopp
8. Skrue for justering av høyde
9. Skruer for låsing av søyle
10. Gradert skala
12
Page 13

Montering
1. Monter søyle (2) og spake (5)
som vist på bildet.
2. Spenn boremaskinen fast
i borestativet.
Bruk
Innstilling av boredybdeskala
10 mm
5
2
Norsk
8
10
5
1. Fest boret i chucken.
2. Løsne på skruen for justering av
høyden og juster slik at boret stopper
ca. 10 mm over arbeidsemnet.
3. Trekk skruen til.
0 mm
4. Senk borespissen ved hjelp av
spaken (5) så borespissen er jevnhøy
med arbeidsemnet.
5. Nullstill skalaen ved å dreie på
skalahjulet (10).
6. Skalaen viser nå riktig boredybde.
13
Page 14

Innstilling av borestopp
6
Norsk
7
1. Trykk inn knappen for hurtigjustering av borestopp (7).
2. Borespissen senkes ved å trekke i spaken (5) til den ønskede dybden.
3. Skyv borestoppen (6) så langt det går og slipp deretter knappen (7).
4. Finjustering kan utføres ved å dreie på borestoppen (6).
5
Stell og vedlikehold
Smør inn søylen ved behov.
Avfallshåndtering
Når produktet skal kasseres, må det skje i henhold til lokale forskrifter.
Er du usikker på hvordan du går fram, ta kontakt med lokale myndigheter.
Spesifikasjoner
Avstand søyle - spindelsentrum 121 mm
Slaglengde 65 mm
Feste for håndtak 43 mm og 38 mm
Søylehøyde 500 mm
Søylediameter 30 mm
Arbeidsbord 260 mm × 165 mm
14
Page 15

Porausteline
Tuotenro 40-7141 Malli DS43
Lue käyttöohjeet ennen tuotteen käyttöönottoa. Säilytä käyttöohjeet tulevaa tarvetta
varten. Pidätämme oikeuden teknisten tietojen muutoksiin. Emme vastaa mahdollisista teksti- tai kuvavirheistä. Jos laitteeseen tulee teknisiä ongelmia, ota yhteys
myymälään tai asiakaspalveluun (yhteystiedot käyttöohjeen lopussa).
Turvallisuus
• Kiinnitä pohjalevy työtasoon ennen työn aloittamista.
• Kiinnitä työkappale aina paikalleen ennen työn aloittamista.
• Käytä ainoastaan työtehtävään sopivia varusteita.
• Käytä aina suojalaseja ja suojakäsineitä.
• Käytä kuulosuojaimia meluisassa työssä.
• Älä käytä löysiä vaatteita, jotka saattavat juuttua porakoneeseen.
• Käytä hiusverkkoa.
• Pidä lapset riittävän kaukana työpisteestä.
• Säilytä koneita turvallisessa paikassa lasten ulottumattomissa.
• Irrota pistoke pistorasiasta aina:
- ennen koneen tai työkalun vaihtoa
- ennen huoltotöitä
- kun et käytä konetta.
• Noudata aina laitteen valmistajan ohjeita.
Suomi
15
Page 16

Tuotekuvaus
Suomi
3
5
4
6
3
7
8
10
2
9
1
1. Pohjalevy
2. Pylväs
3. Nuppi
4. Akseli
5. Vipu
6. Poranpysäytys
7. Poranpysäytyksen pikasäätöpainike
8. Korkeuden säätöruuvi
9. Pylvään lukitusruuvit
10. Asteikkorengas
16
Page 17

Asennus
1. Asenna pylväs (2) ja vipu (5) kuvan
osoittamalla tavalla.
2. Kiinnitä porakone poraustelineeseen.
Käyttö
Poraussyvyysasteikon säätäminen
8
10 mm
5
2
10
Suomi
5
1. Kiinnitä pora koneen istukkaan.
2. Avaa korkeuden säätöruuvi (8)
ja säädä korkeus niin että pora
sijoittuu noin 10 mm työkappaleen
yläpuolelle.
3. Kiristä säätöruuvi.
0 mm
4. Laske poran kärkeä vivun avulla
(5) siten, että poran kärki on
työkappaleen tasolla.
5. Nollaa asteikko kääntämällä
asteikkorengasta (10).
6. Asteikko näyttää nyt oikean
poraussyvyyden.
17
Page 18

Poranpysäytyksen asetus
6
Suomi
7
1. Paina poranpysäytyksen pikasäätöpainike pohjaan (7).
2. Laske porankärki haluamaasi syvyyteen vetämällä vivusta (5).
3. Paina poranpysäytintä (6) niin pitkälle kuin mahdollista ja päästä
pikasäätöpainike (7).
4. Hienosäädä kääntämällä poranpysäytintä (6).
5
Huolto ja ylläpito
Voitele pylvästä tarvittaessa.
Kierrätys
Kierrätä tuote asianmukaisesti, kun poistat sen käytöstä.
Kysy tarkempia kierrätysohjeita kuntasi jäteneuvonnasta.
Tekniset tiedot
Pylvään ja karan keskustan etäisyys 121 mm
Iskun pituus 65 mm
Kaulan kiinnitys 43 mm ja 38 mm
Pylvään korkeus 500 mm
Pylvään halkaisija 30 mm
Työtaso 260 × 165 mm
18
Page 19

Bohrstativ
Art.Nr. 40-7141 Modell DS43
Vor Inbetriebnahme die komplette Bedienungsanleitung durchlesen und aufbewahren.
Irrtümer, Abweichungen und Änderungen behalten wir uns vor. Bei technischen
Problemen oder anderen Fragen freut sich unser Kundenservice über eine
Kontaktaufnahme (Kontakt siehe Rückseite).
Sicherheit
• Die Bodenplatte muss vor der Arbeit an der Arbeitsbank befestigt werden.
• Das Werkstück ist vor Beginn der Bearbeitung immer einzuspannen.
• Dabei sind nur Werkzeuge zu verwenden, die dem jeweiligen Bedarf entsprechen.
• Immer mit Augenschutz und Handschuhen arbeiten.
• Bei Arbeiten mit starkem Lärm Gehörschutz tragen.
• Keine locker sitzenden Kleidungsstücke tragen, die sich im Bohrer verfangen können.
• Haarnetz tragen.
• Kinder in sicherem Abstand vom Arbeitsplatz fernhalten.
• Die Maschinen an einem sicheren Ort außerhalb der Reichweite
von Kindern verwahren.
• Immer den Stecker aus der Steckdose ziehen:
- vor dem Wechsel der Maschine oder des Werkzeugs.
- vor Servicearbeiten.
- bei Nichtverwendung der Maschine.
• Immer die Anweisungen des Maschinenherstellers beachten.
19
Deutsch
Page 20

Produktbeschreibung
3
5
4
6
3
7
8
10
2
9
1
Deutsch
1. Bodenplatte
2. Säule
3. Knopf
4. Achse
5. Hebel
6. Bohranschlag
7. Knopf zur Schnelleinstellung
des Bohranschlags
8. Schraube zur Höheneinstellung
9. Schrauben zur Sicherung der Säule
10. Skalenring
20
Page 21

Einbau
1. Die Säule (2) und den Hebel (5) gemäß
Abbildung anbringen.
2. Die Bohrmaschine im Bohrstativ
einspannen.
Verwendung
Einstellung der Bohrtiefenskala
8
10 mm
5
2
10
5
1. Den Bohrer im Futter der Maschine
einspannen.
2. Die Schraube zur Höheneinstellung
(8) lösen und die Höhe so einstellen,
dass sich der Bohrer etwa 10 mm
über dem Werkstück befindet.
3. Die Schraube wieder anziehen.
0 mm
Deutsch
4. Die Bohrerspitze mit dem Hebel (5) so
absenken, dass sie sich auf derselben
Höhe wie das Werkstück befindet.
5. Die Skala durch Drehen
des Skalenrings (10) auf Null stellen.
6. Danach zeigt die Skala die korrekte
Bohrtiefe an.
21
Page 22

Einstellung des Bohranschlags
6
1. Den Knopf für die Schnelleinstellung des Bohranschlags (7) betätigen.
2. Die Bohrerspitze durch Ziehen am Hebel (5) bis zum Erreichen der gewünschten
3. Den Bohranschlag (6) möglichst weit nach unten schieben und
4. Die Feineinstellung kann durch Drehen des Bohranschlags (6) erfolgen.
Pflege und Wartung
Die Säule bei Bedarf leicht schmieren.
Hinweise zur Entsorgung
Bitte das Produkt entsprechend den lokalen Bestimmungen entsorgen.
Deutsch
Weitere Informationen sind erhältlich von der Gemeinde oder den kommunalen
Entsorgungsbetrieben.
7
Tiefe absenken.
den Knopf (7) freigeben.
5
Technische Daten
Abstand Säule - Spindelzentrum 121 mm
Hub 65 mm
Halterung für den Hals 43 mm & 38 mm
Säulenhöhe 500 mm
Säulendurchmesser 30 mm
Arbeitstisch 260 × 165 mm
22
Page 23

Declaration of Conformity
Försäkran om överrenstämmelse
Samsvarerklæring
Vakuutus yhdenmukaisuudesta
Konformitätserklärung
CLAS OHLSON AB
SE-793 85 INSJÖN, SWEDEN
Declares that this product complies with the requirements of the following directives and standards
Intygar att denna produkt överensstämmer med kraven i följande direktiv och standarder
Bekrefter at dette produktet er i samsvar med følgende direktiver og standarder
Vakuuttaa, että tämä tuote täyttää seuraavien direktiivien ja standardien vaatimukset
Erklärt hiermit, dass dieses Produkt die Anforderungen und Bestimmungen folgender Richtlinien erfüllt
DRILL STAND
40-7141
DS43
Machinery directive
2006/42/EC
Klas Balkow
President
Insjön, Sweden, 2011-10-05
23
Page 24

Sverige
Kundtjänst tel: 0247/445 00
fax: 0247/445 09
e-post: kundservice@clasohlson.se
Internet www.clasohlson.se
Post Clas Ohlson AB, 793 85 INSJÖN
Norge
Kundesenter tlf.: 23 21 40 00
faks: 23 21 40 80
e-post: kundesenter@clasohlson.no
Internett www.clasohlson.no
Post Clas Ohlson AS, Postboks 485 Sentrum, 0105 OSLO
Suomi
Asiakaspalvelu puh.: 020 111 2222
sähköposti: asiakaspalvelu@clasohlson.fi
Internet www.clasohlson.fi
Osoite Clas Ohlson Oy, Maistraatinportti 4 A, 00240 HELSINKI
Great Britain
Customer Service contact number: 08545 300 9799
e-mail: customerservice@clasohlson.co.uk
Internet www.clasohlson.com/uk
Postal 10 – 13 Market Place
Kingston Upon Thames
Surrey
KT1 1JZ
Deutschland
Kundenservice Unsere Homepage www.clasohlson.de besuchen und
auf Kundenservice klicken.
 Loading...