

Page 1
iPod Speaker
iPod-högtalare
iPod-høyttaler
iPod-kaiutin
EnglishSvenskaNorskSuomi
Art.no. Model
38-3943 DM96
Ver. 201008
Page 2

2
Page 3
iPod Speaker
Art.no 38-3943 Model DM96
Please read the entire instruction manual before using the product and save it for future reference. We reserve the
right for any errors in text or images and any necessary changes made to technical data. If you have any questions
regarding technical problems please contact Customer Services.
1. Safety
• Never expose the device to moisture or damp.
• Do not expose the device to direct sunlight or high temperatures.
• Do not disassemble or modify the product. Repairs must be carried out by a qualified tradesman or workshop.
• If the device is not to be used for a longer period, pull out the plug from the wall socket.
• Never mix old and new batteries.
• If the remote is not to be used for a longer period, remove its batteries.
2. Contents
• iPod Speaker
English
• iPod-adaptors (4)
• Connecting cable (2 x RCA to 3.5 mm stereo)
• Aerial lead
• Remote control
• Instruction manual
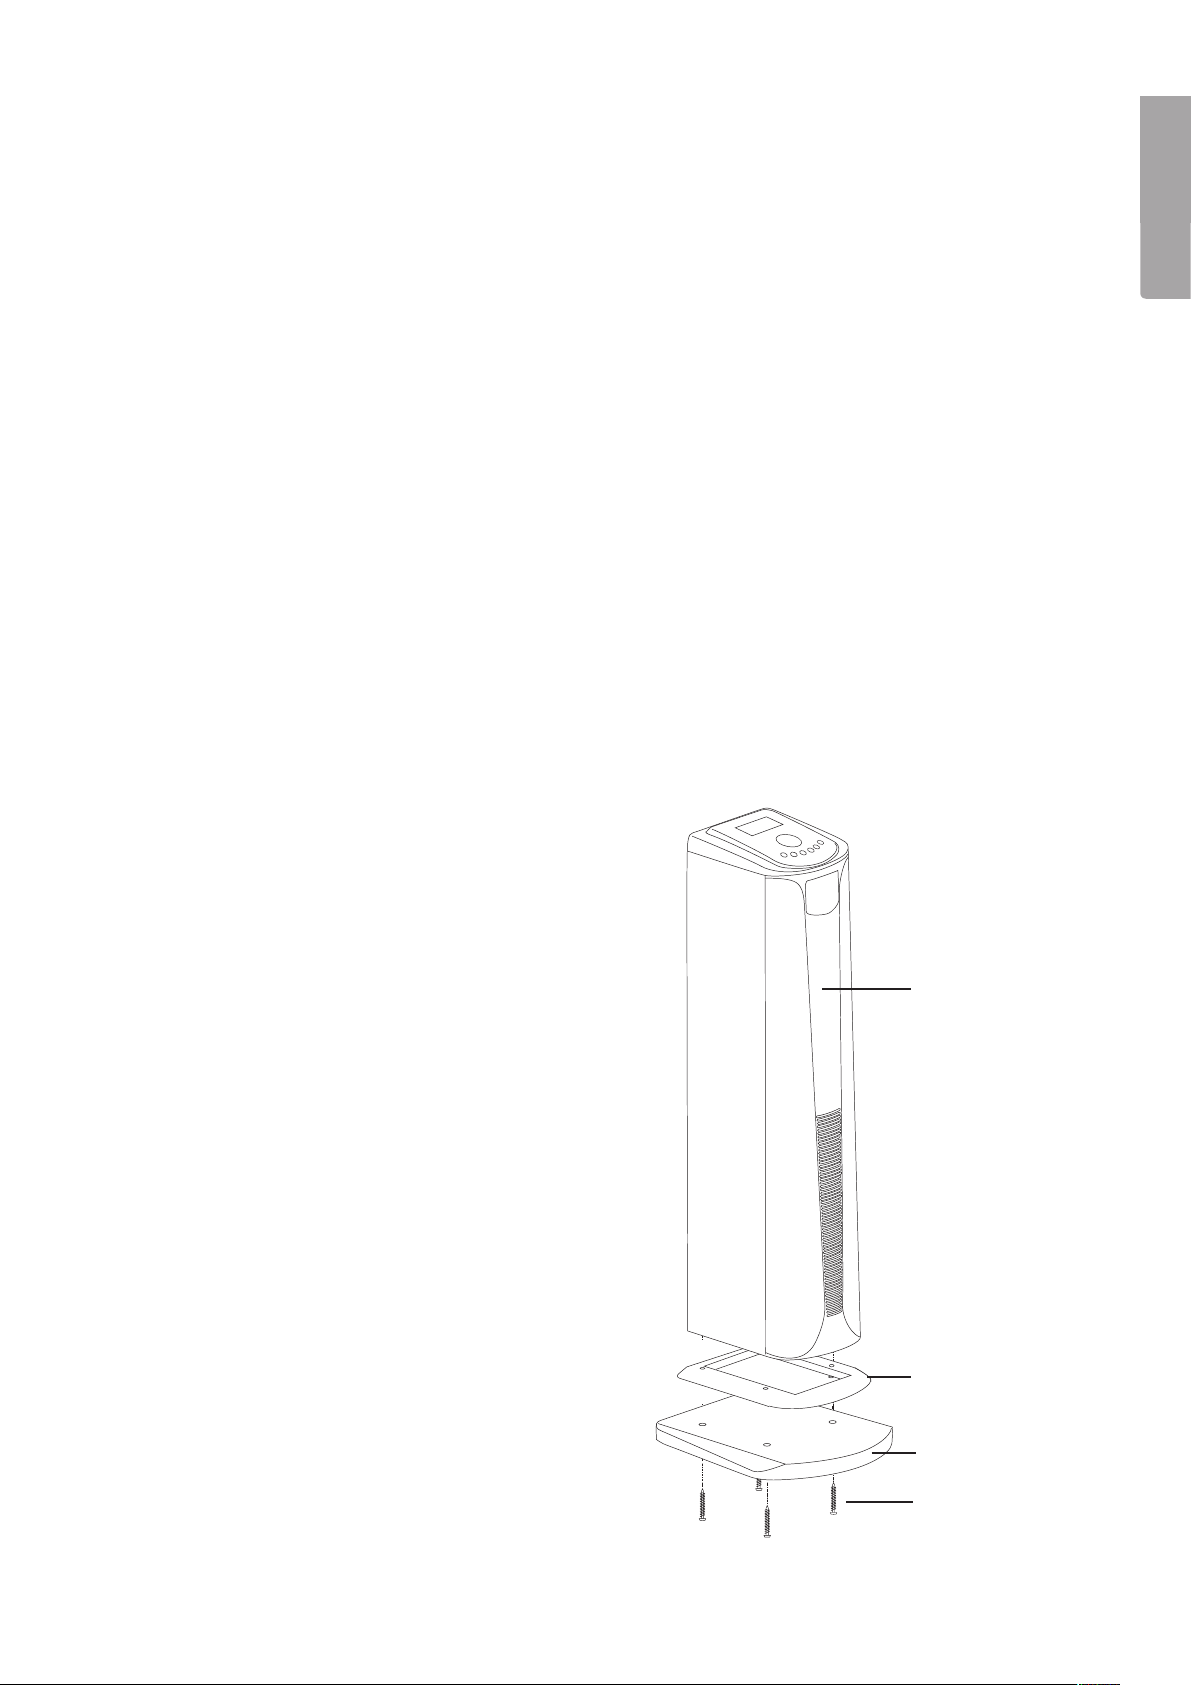
3. Assembly
Mount the foot to the bottom of the iPod speaker
using the included screws.
iPod Speaker
Speaker bottom
Foot
Foot screws
3
Page 4
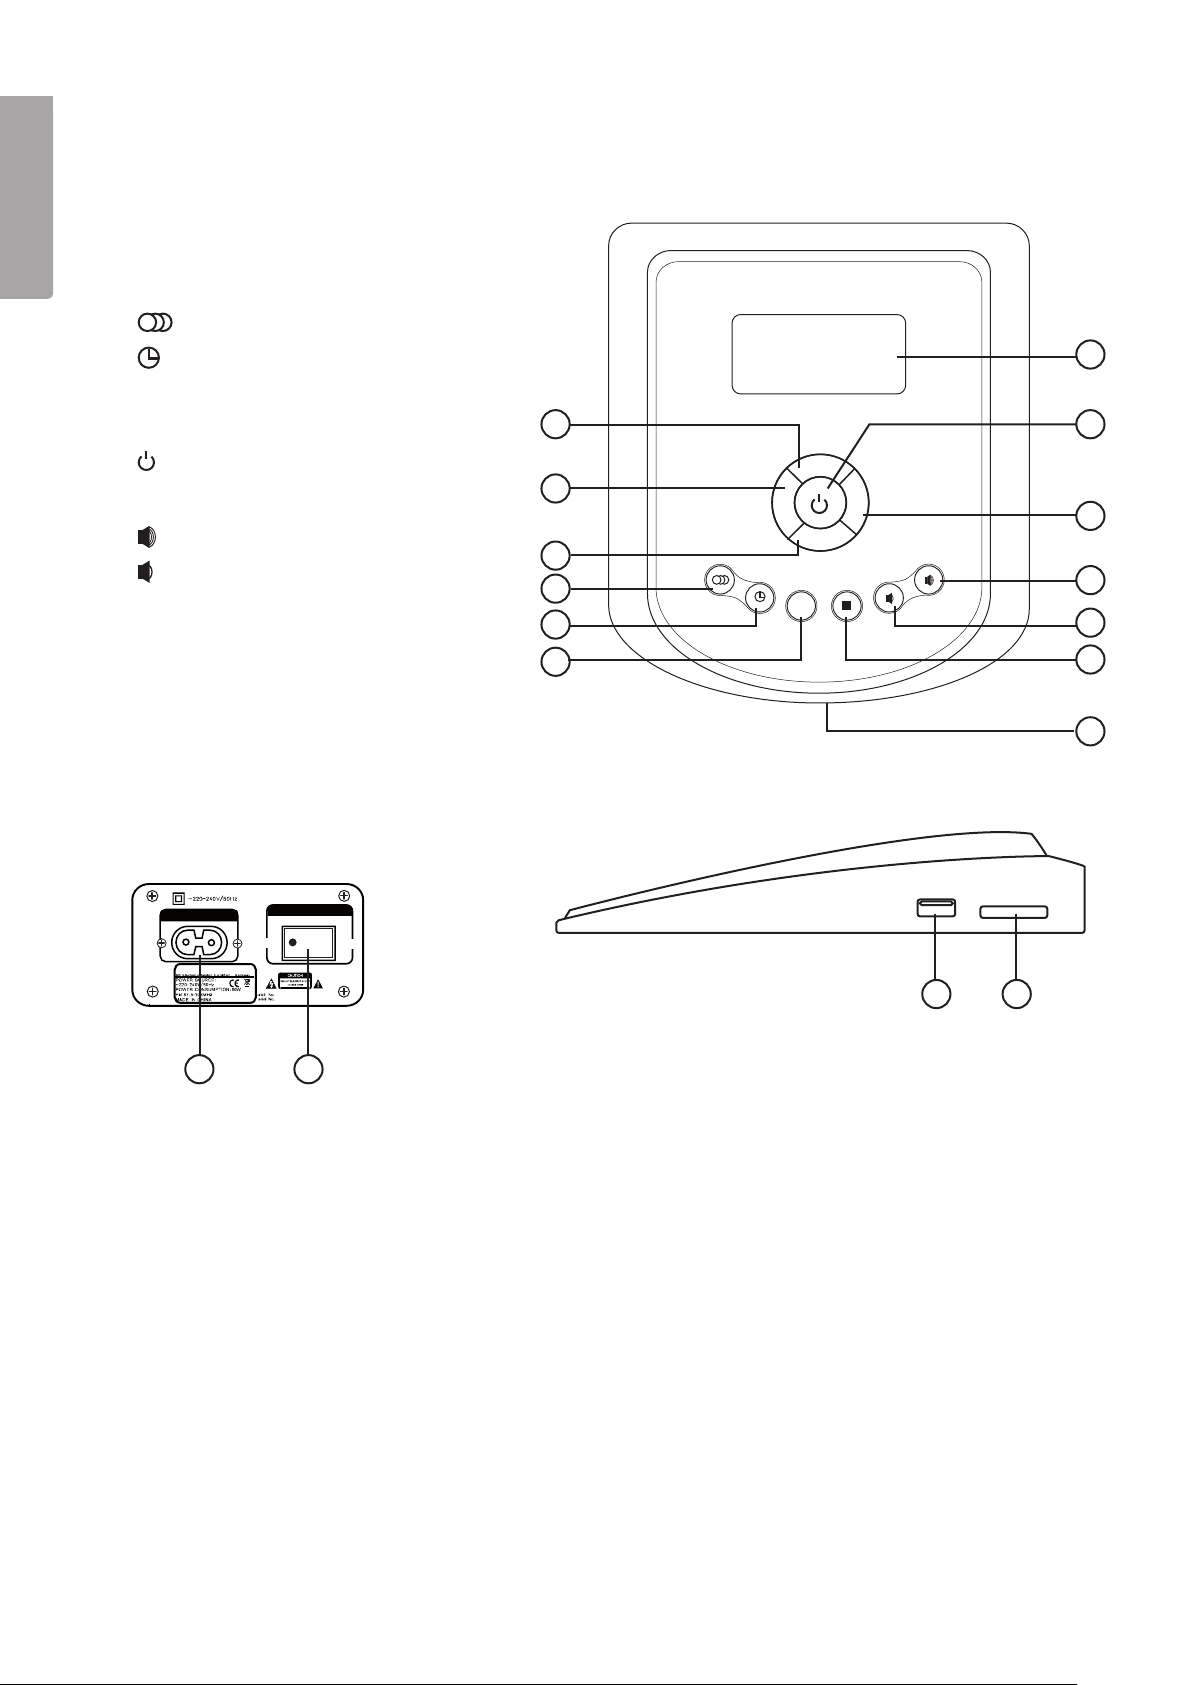
4. Product description
iPod speaker
English
2. [◄◄ ] – Rewind
3. [►► I] – Goes to next track
4. [ ] – Audio Input
1. [ I◄◄ ] – Goes to previous track
5. [ ] – Time
7
6. [► ►II] – Starts and pauses playback
7. iPod dock
8. [ ] – On/off
9. [► ► ] – Fast forward
1
PREV
I◄◄
2
◄◄
►►
F.FWDF.RWD
8
9
►►
PLAY/PAUSE
►
II
NEXT
I
STOP
+
VOL
–
VOL
10
11
12
10. [ ] Increases volume
11. [ ] – Decreases volume
12. [ ■ ] – Stops playback
13. Display
14. USB port
3
TIME
4
5
6
15. SD memory card slot
16. Power lead connection
13
17. Power switch
POWER INPUT
ON
16 17
POWER
OFF
14 15
4
Page 5
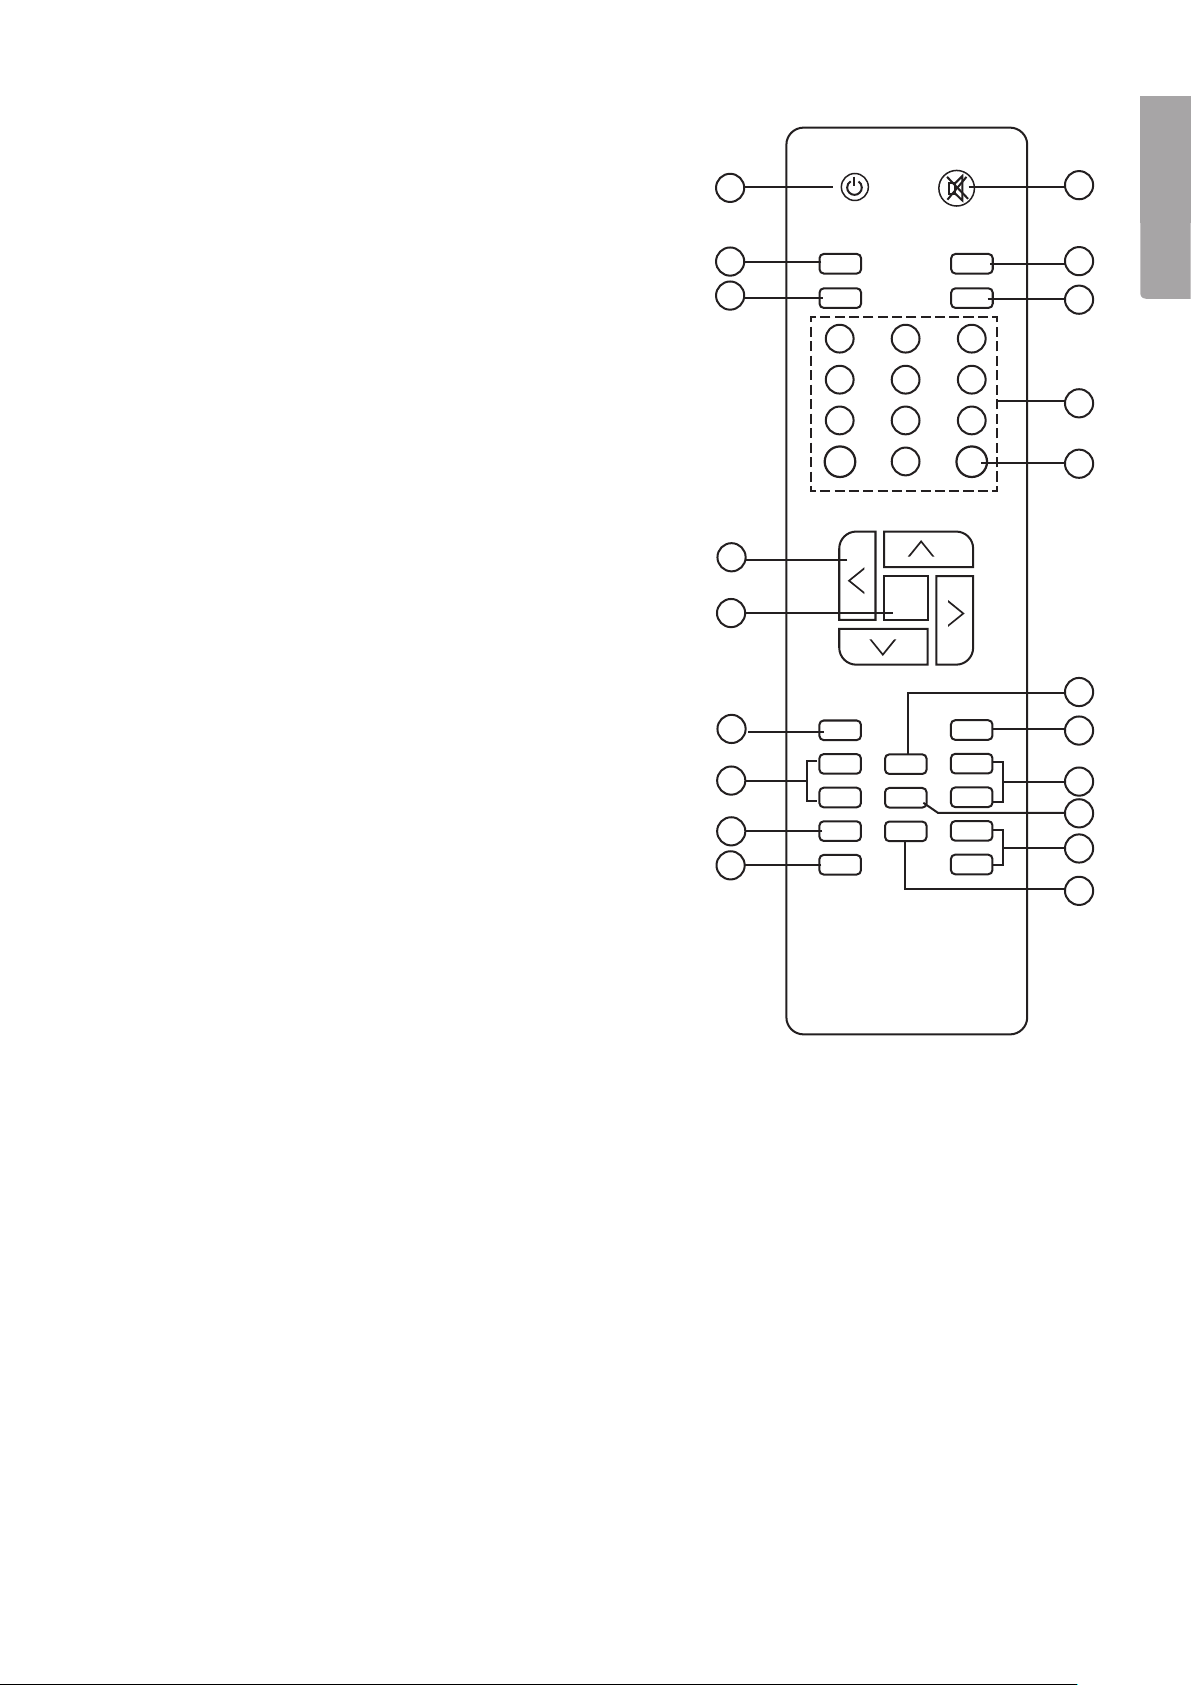
Remote Control
18. [STANDBY] – On/off
19. [AUDIO] – Activates the Audio input connected device
20. [USB/SD] – Activates the connected USB or SD memory
21. [ v,
22. [►II ] Starts and pauses playback.
23. [SEARCH] – Activates scanning mode.
24. [►►] and [◄◄] Fast-forward and rewind (in USB or SD mode),
25. [TIME] – Sets time, alarm, automatic-on, automatic shut-off.
26. [TONE] – Press sequentially to adjust treble (TR), bass (BS)
27. [MUTE] – Press to mute. Press again to un-mute.
28. [FM] – Turns on the FM-radio.
29. [iPod] – Activates iPod.
<, > ] Arrow keys for moving the iPod cursor.
^,
press again to resume playback. Depress and hold to fastforward or rewind (iPod mode). Scans radio stations, forwards
and backwards (radio mode). Note! Buttons don’t work with
devices connect to the Audio-in connection.
or subwoofer (SW). Adjusts [Vol +] [Vol +] volume.
18
19
20
21
22
STANBY MUTE
AUDIO FM
USB/SD
iPod
1 2 3
4 5 6
7 8 9
10+
0
►II
27
English
28
29
30
F
31
30. [0] – [10+] – Number keys.
31. [F] – Sets the radio station.
32. [RDS/STOP] – Activates/shuts-off RDS.
33. [MO/ST] – Mono/stereo and channel + and –
34. [ I◄◄] and [►►I ] – Goes to next or previous track.
35. [SAVE/VIDEO] – Save/confirm or select output.
36. [VOL+/-] – Volume control.
37. [MENU] – Accesses menu.
Inserting batteries into the remote control
1. Pinch the locking tabs and remove the battery cover.
2. Insert 2 x LR03/AAA batteries according to the polarity markings.
3. Replace the battery cover.
23
24
25
26
SEARCH
►►
◄◄ I◄◄
TIME
TONE
RSD
STOP
SAVE
VIDEO
MENU
MO/ST
►►I
VOL+
VOL-
32
33
34
35
36
37
5
Page 6
(RED) (GREEN) (BLUE) R L
Pr Y Pb/VIDEO AUDIO 1 AUDIO2
COMPONENT VIDEO OUT AUDIO IN FM
POWER
LINK
ETHERNET
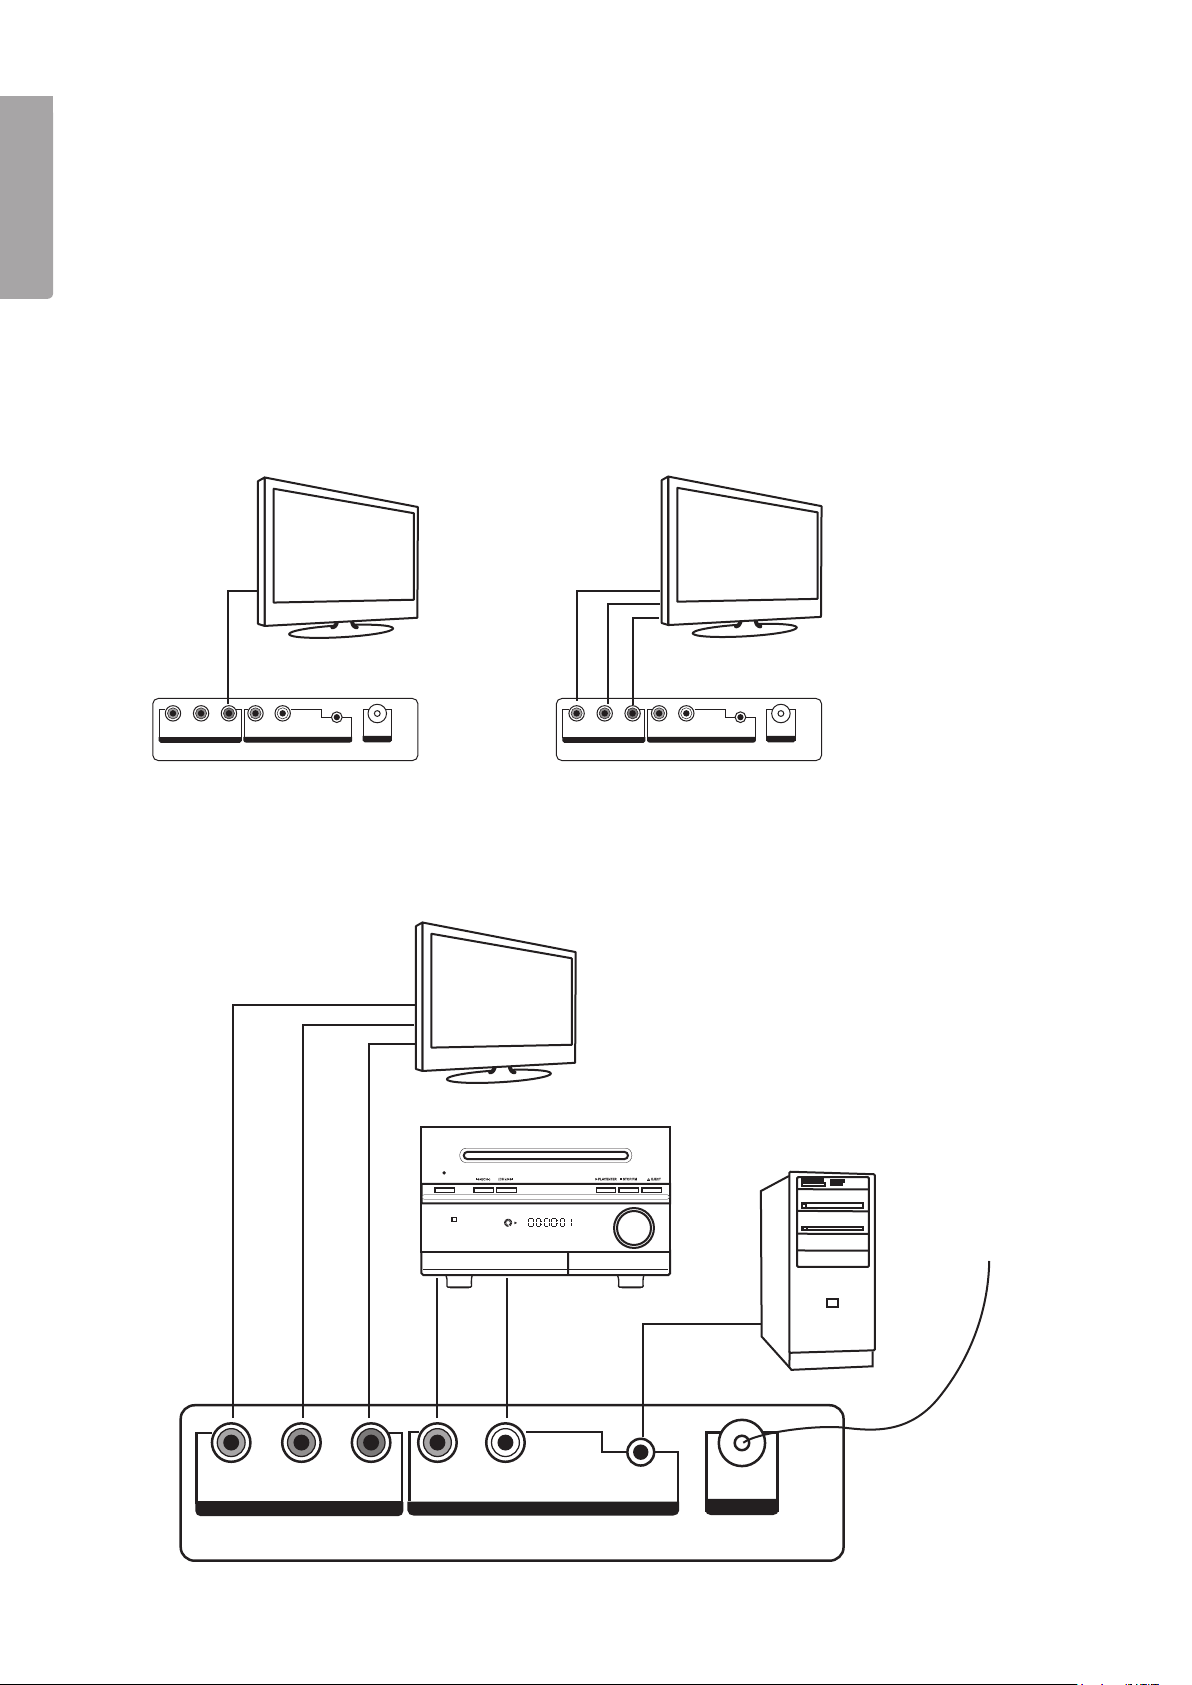
5. Connections
iPod – iPod/iPhone connection with charge capacity (adaptors for 4 different devices included).
SD – SD memory card slot
USB – USB port
English
Audio 1 – External audio connection (2 x RCA)
Audio 2 – External audio connection (Ø 3.5 mm stereo)
Ant – FM aerial connection
Component video Out – TV Video output Press [SAVE/VIDEO] (16) to select video output:
• Composite video output – blue RCA connection.
• Component video output – red, green, and blue RCA connections.
(RED) (GREEN) (BLUE) R L
Pr Y Pb/VIDEO AUDIO 1 AUDIO2
COMPONENT VIDEO OUT AUDIO IN FM COMPONENT VIDEO OUT AUDIO IN FM
Composite
Connection example
ANT
(RED) (GREEN) (BLUE) R L
Pr Y Pb/VIDEO AUDIO 1 AUDIO2
ANT
Component
POWER
R
CD/DVD/DIVX MULTIMEDIA PLAYER
CD
VOLUME
DOWN
UP
FM antenna
(RED) (GREEN) (BLUE) R L
Pr Y Pb/VIDEO AUDIO 1 AUDIO2
ANT
COMPONENT VIDEO OUT AUDIO IN FM
6
Page 7

6. Use
Preparations
1. Press the On/off button (17) on the back of the iPod speaker.
2. Press [STANDBY] (18) on the remote to turn the speaker on/off.
3. Use [ ] (4) to select the desired function or use the remote to select AUDIO (19), USB/SD (20), FM (28)
or iPod (29).
A. iPod
Select iPod if you want to playback audio files from your iPod/iPhone. The speaker display will show ”SUCCESS”
after a few seconds. You may now start playback from your iPod/iPhone. If the display shows ”FAILED”, remove
your iPod/iPhone and reconnect it. Control your iPod cursor using the arrow keys [ v, ^,<, > ] (21).
B. Audio/Aux in
Press AUDIO (19) or [ ] (4) and select AUX IN when connecting a MP3 player, computer, etc.
to the Audio-IN (Audio 1 or Audio 2) iPod speaker connection.
C. Radio
Press FM (28) or [ ] (4) on the speaker.
Setting a station
1. Press [F] (31).
2. Set a radio station by using the number keys to (30) to enter the radio station’s frequency channel.
English
3. Press [SAVE/VIDEO] (35) to save the station to memory.
Scanning for stations
1. Scan for stations manually by using [►►] or [◄◄] (24).
2. Press [SEARCH] (23) for automatic scanning. Scanning will stop once a station has been found.
3. To restart scanning, press again.
Saving stations to preset
1. Select the desired radio station.
2. Press [SAVE/VIDEO] (35) to save the station. Example: To save a station to preset 18, press [10+] and then 8.
Then press [SAVE/VIDEO] to save.
3. To listen to a preset station, use the number keys (30). Example: To listen to preset station 25, first press [10+]
twice and then 5.
RDS -function
Press [RDS/STOP] (32) to access RDS radio mode. If the station sends an RDS signal you will get information on:
PS: Programme service name
PTY: Programme type
RT: Radio text
CT: Time and date
Mono/Stereo
Press [MO/ST] (33) to select mono or stereo in FM mode. If the signal is too weak you will not be able to select
stereo mode.
7
Page 8

D. USB/CARD
Listening to audio files from USB or SD memory.
1. Connect a USB/SD memory to (14) or (15).
2. Press [USB/SD] (20) to start playback from the USB or CARD. Press [USB/SD] again to switch sources between
English
the USB and CARD.
3. Press [►►] (24) or [◄◄] (24) to fast-forward or rewind. Press [I◄◄] (34) or [►►I] (34) to go to the previos
or next track.
E. Video
In iPod mode you can connect the device to a TV. Press [SAVE/VIDEO] (33) to select composite or component video:
See section 5. ”Connections”.
Video output compatibility
Capacity 5G iPod iPod classic; 3G,
4G and 5G nano
Composite Yes Yes Yes Yes Yes
Component No Yes Yes Yes Yes
iPod touch,
iPhone
2G touch iPhone 3G,
iPhone 3GS
7. Time and alarm
To set the time, alarm and automatic-on/off press [TIME] (25). The available settings are as follows:
Set time
1. Set the hours using [VOL+] [VOL-] (36), press [ > ] (21).
2. Set the minutes in in the same way.
3. Press [TIME] (25) to confirm the settings.
Alarm 1 – Set the alarm time for alarm 1
1. Set the hours with [VOL+] [VOL-] (36).
2. Press [ > ] (21) and set the minutes in the same way.
3. Press [TIME] (25) to confirm the settings.
4. Press [ > ] (21) twice until the on or off light flashes.
5. Select OFF to deactivate the alarm.
Alarm 2
Same as alarm 1.
Set power off – Automatic shut-off 0 – 120 minutes
1. Set the minutes using the number keys [0] – [10+] (30).
2. Press [TIME] (25) to confirm the settings.
Set power on – Automatic-on)
1. Set the hours using [VOL+] [VOL-] (36), press [ > ] (21) and set the minutes in in the same way.
2. Press [TIME] (25) to confirm the settings.
Turinig off the alarm
When the alarm sound, press any available button to turn it off.
8
Page 9

8. Care and maintenance
Clean the product by wiping it with a soft, dry cloth. Do not use solvents or abrasive cleaning agents.
9. Disposal
Follow local ordinances when disposing of this product. If you are unsure of how to dispose of this product, please
contact your local authority.
10. Specifications
Input voltage: 220 – 240 V/50 Hz, power consumption: 60 W
Remote control batteries: 2 x AAA/LR03 (not included)
Output power: 15 W(x2) + 30 W ( RMS )
Inputs: iPod – iPod/iPhone connection (charging and file transfer)
SD – SD memory card slot
USB – USB port for USB devices (USB 2.0)
Audio 1 – External audio connection (2 x RCA)
Audio 2 – External audio connection (Ø 3.5 mm stereo)
Ant – FM aerial connection (75 Ω)
Outputs: Componentvideo Out – TV video output (composite and component video output)
Size: 84x18x22 cm
Weight: 10.5 kg
English
Compatible with iPod nano/touch and iPhone.
9
Page 10

iPod-högtalare
Art.nr 38-3943 Modell DM96
Läs igenom hela bruksanvisningen före användning och spara den sedan för framtida bruk.
Vi reserverar oss för ev. text- och bildfel samt ändringar av tekniska data.
Vid tekniska problem eller andra frågor, kontakta vår kundtjänst (se adressuppgifter på baksidan).
1. Säkerhet
• Utsätt inte apparaten för fukt eller väta.
• Utsätt inte apparaten för direkt solljus eller höga temperaturer.
Svenska
• Demontera aldrig produkten på egen hand. Reparationer måste utföras av kvalificerad serviceman eller verkstad.
• Om inte apparaten ska användas under en längre tid, dra ur stickproppen ur vägguttaget.
• Blanda aldrig nya och gamla batterier.
• Om inte fjärrkontrollen ska användas under en längre tid, ta ur batterierna ur fjärrkontrollen.
2. Förpackningen innehåller
• iPod-högtalare
• iPod-adapter (4st)
• Anslutningskabel (2 x RCA till 3,5 mm stereo)
• Antennkabel
• Fjärrkontroll
• Bruksanvisning
3. Montering
Montera fot och underdel på iPod-högtalaren med
de bifogade skruvarna.
iPod-högtalare
10
Underdel
Fot
Fästskruvar till fot
Page 11

4. Produktbeskrivning
iPod-högtalaren
1. [ I◄◄ ] – Gå till föregående fil
2. [◄◄ ] – Snabbspola bakåt
3. [►► I] – Gå till nästa fil
4. [ ] – Audio Input
5. [ ] – Tid
6. [ ► II ] – Starta uppspelning eller gör paus
7. iPod-docka
8. [ ] – Av/på
9. [► ► ] – Snabbspola framåt
10. [ ] – Öka volymen
11. [ ] – Sänk volymen
12. [ ■ ] – Stoppa uppspelning
13. Display
14. Anslutning för USB-enhet
15. Anslutning för SD-minne
16. Anslutning för nätkabel
17. Strömbrytare
POWER INPUT
POWER
ON
OFF
7
1
PREV
I◄◄
2
◄◄
►►
F.FWDF.RWD
8
Svenska
9
►►
I
3
4
TIME
PLAY/PAUSE
►
II
NEXT
STOP
5
6
+
VOL
–
VOL
10
11
12
13
16 17
14 15
11
Page 12

Fjärrkontrollen
18. [STANDBY] – Av/på.
19. [AUDIO] – Aktivera enhet som är ansluten till Audio ingång.
20. [USB/SD] – Aktivera anslutet USB-minne eller SD-minne.
18
STANBY MUTE
27
21. [v,
22. [►II] – Starta uppspelning eller gör paus.
23. [SEARCH] – Sökning.
24. [►►] och [◄◄] Snabbspola framåt och bakåt (i USB, eller
Svenska
<, >] – Riktningsknappar för att flytta markören på iPod.
^,
SD-läge), tryck igen för att återgå till normal uppspelning.
Tryck och håll in för att snabbspola framåt och bakåt
(iPod-läge). Sök radiofrekvens framåt och bakåt (i radio-läge).
Obs! knapparna fungerar inte med en enhet ansluten
till Audio-in.
19
20
AUDIO FM
USB/SD
1 2 3
4 5 6
7 8 9
10+
0
iPod
F
28
29
30
31
25. [TIME] – Ställ in tid, alarm, automatiskt påslag,
automatisk frånkoppling
26. [TONE] – Tryck flera gånger för att justera diskant (TR),
bas (BS) eller subwoofer (SW). Använd [Vol +] [Vol +]
för att justera.
21
►II
22
27. [MUTE] – Stänga av ljudet tillfälligt, tryck igen för
att aktivera ljudet igen.
28. [FM] – Aktivera FM-radio.
29. [iPod] – Aktivera iPod.
30. [0] – [10+] – Sifferknappar.
31. [F] – Ställ in radiofrekvens.
32. [RDS/STOP] – Aktivera/stäng av RDS.
33. [MO/ST] – Mono/stereo och kanal + och –.
23
24
25
26
SEARCH
►►
◄◄ I◄◄
TIME
TONE
RSD
STOP
SAVE
VIDEO
MENU
MO/ST
►►I
VOL+
VOL-
32
33
34
35
36
37
34. [I◄◄]och [►►I] – Gå till föregående eller till nästa fil.
35. [SAVE/VIDEO] Spara/bekräfta eller välj utgång.
36. [VOL+/-] – Öka eller sänk volymen.
37. [MENU] – Öppna meny.
Sätt i batterierna i fjärrkontrollen
1. Tryck in låsfliken och ta bort batterilocket.
2. Sätt i 2 st. LR03/AAA-batterier enligt märkning i batterifacket.
3. Sätt tillbaka batterilocket.
12
Page 13

5. Anslutningar
(RED) (GREEN) (BLUE) R L
Pr Y Pb/VIDEO AUDIO 1 AUDIO2
COMPONENT VIDEO OUT AUDIO IN FM
POWER
LINK
ETHERNET
iPod – Anslutning för iPod/iPhone med laddning (adapter för 4 olika enheter medföljer).
SD – Anslutning för SD-minneskort.
USB – Anslutning för USB-enhet.
Audio 1 – Anslutning för extern audioenhet (2 x RCA).
Audio 2 – Anslutning för extern audioenhet (Ø 3,5 mm stereo).
Ant – Anslutning för FM-antenn.
Componentvideo Out – Videoutgång till TV-apparat. Tryck på [SAVE/VIDEO] (16) för att välja videoutgång:
• Kompositvideoutgång – Anslut till blå RCA-kontakt.
• Komponentvideoutgång – Anslut till röd, grön och blå RCA-kontakt.
Svenska
(RED) (GREEN) (BLUE) R L
Pr Y Pb/VIDEO AUDIO 1 AUDIO2
COMPONENT VIDEO OUT AUDIO IN FM COMPONENT VIDEO OUT AUDIO IN FM
Komposit
Anslutningsexempel
ANT
(RED) (GREEN) (BLUE) R L
Pr Y Pb/VIDEO AUDIO 1 AUDIO2
ANT
Komponent
POWER
R
CD/DVD/DIVX MULTIMEDIA PLAYER
CD
VOLUME
DOWN
UP
FM antenn
(RED) (GREEN) (BLUE) R L
Pr Y Pb/VIDEO AUDIO 1 AUDIO2
ANT
COMPONENT VIDEO OUT AUDIO IN FM
13
Page 14

6. Användning
Förberedelser
1. Tryck på On/off-knappen (17) på baksidan på iPod-högtalaren.
2. Tryck på [STANDBY] (18) på fjärrkontrollen för att starta eller stänga av högtalaren.
3. Välj önskad funktion genom att trycka upprepade gånger på [ ] (4) eller på fjärrkontrollens knappar AUDIO (19),
USB/SD (20), FM (28) och iPod (29).
A. iPod
Välj läget iPod om du vill spela upp musik från din iPod/iPhone. Displayen på högtalaren visar ”SUCCESS” efter
några sekunder och du kan nu börja spela musik från din iPod/iPhone. Om displayen skulle visa ”FAILED” så
ta ur iPod/iPhone och sätt tillbaka den. Flytta markören på iPod med riktningsknapparna [v,
Svenska
B. Audio/Aux in
Tryck på AUDIO (19) eller [ ] (4) och välj AUX IN om du har anslutit en mp3-spelare, dator etc. till Audio-IN
(Audio 1 eller Audio 2) på iPod-högtalaren.
C. Radio
Tryck på FM (28) eller [ ] (4) på högtalaren.
Ställ in en känd kanal
<, >] (21).
^,
1. Tryck på [F] (31).
2. Ställ in en radiostation som har känd frekvens genom att knappa in frekvensen med sifferknapparna (30).
Tryck på [SAVE/VIDEO] (35) för att spara frekvensen i minnet.
Sök radiostation
1. Sök station manuellt genom att trycka på [►►] och [◄◄] (24).
2. Tryck på [SEARCH] (23) för att söka stationer automatiskt. Sökningen stoppar när en station hittas, tryck då en
gång till för att starta sökningen igen.
Spara kanal
3. Ställ in önskad kanal.
4. Tryck på [SAVE/VIDEO] (35) för att spara aktuell frekvens. Exempelvis om du vill spara frekvensen i minne 18,
tryck på [10+] och sedan [8] och avsluta med [SAVE/VIDEO] .
5. Lyssna till en redan sparad station, tryck på sifferknapparna (30). Exempel: om du vill välja station 25, tryck på
[10+] två gånger och [5] en gång.
RDS -funktion
Tryck på [RDS/STOP] (32) för att byta till RDS- radioläge. Om det finns en RDS-signal går det att få information om:
PS: Programservicenamn
PTY: Programtyp
RT: Radiotext
CT: Tid och datum
Mono/Stereo
Tryck på [MO/ST] (33) för att välja mono- eller stereoåtergivning i FM-läge. Om signalen är för svag går
det inte att välja stereo.
14
Page 15

D. USB/CARD
Det är även möjligt att lyssna på ljudfiler från en ansluten USB-enhet eller SD-minne.
1. Anslut ett USB-minne/SD-kort till (14) eller (15).
2. Tryck på [USB/SD] (20) för att spela USB eller CARD. Tryck på USB/SD igen för att skifta mellan USB eller CARD.
3. Tryck på [►►] (24) eller [◄◄] (24) för att snabbspola framåt eller bakåt. Tryck på [ ►►I ] (36) och [ I◄◄ ] (36) för
att gå till nästa eller föregående spår.
E. Video
I iPod-läge går det att ansluta enheten till en TV. Tryck på, [SAVE/VIDEO] (33) för att välja komposit eller
komponentvideo. Se 5. ”Anslutningar”.
Videoutgångens kompabilitet
Kapacitet 5G iPod iPod classic; 3G,
4G och 5G nano
Komposit Ja Ja Ja Ja Ja
Komponent Nej Ja Ja Ja Ja
iPod touch,
iPhone
2G touch iPhone 3G,
iPhone 3GS
7. Tid och alarm
För att ställa in tid, alarm och automatiskt till-/frånslag tryck på [TIME] (25). Det finns följande inställningar i alarm:
Set time (tid) – Ställ in tid
1. Ställ in timmar med [VOL+] [VOL-] (36)
2. Tryck [ > ] (21) och ställ in minuter på samma sätt.
3. Tryck [TIME] (25) för att bekräfta inställning.
Alarm 1 – Ställ in tillslag för alarm 1
1. Ställ in timmar med [VOL+] [VOL-] (36),
2. Tryck [ > ] (21) och ställ in minuter på samma sätt.
3. Tryck [TIME] (25) för att bekräfta inställning.
4. Tryck [ > ] (21) två gånger till on eller off blinkar.
5. Välj OFF för att avaktivera alarm.
Svenska
Alarm 2 – Ställ in tillslag för alarm 2
Lika som alarm 1.
Set power off (automatisk avstängning 0 – 120 minuter)
1. Ställ in minuter med sifferknapparna [0] – [10+] (30).
2. Tryck [TIME] (25) för att bekräfta inställning.
Set power on (automatiskt tillslag)
1. Ställ in timmar med [VOL+] [VOL-] (36),
2. Tryck [ > ] (21) och ställ in minuter på samma sätt.
3. Tryck [TIME] (25) för att bekräfta inställning.
Stäng av alarm
När alarmet ljuder, tryck på vilken knapp som helst för att stänga av.
15
Page 16

8. Skötsel och underhåll
Vid behov, torka av produkten med en mjuk torr trasa, använd aldrig lösningsmedel eller slipande rengöringsmedel.
9. Avfallshantering
När du ska göra dig av med produkten ska detta ske enligt lokala föreskrifter. Är du osäker på hur du ska gå tillväga,
kontakta din kommun.
10. Specifikationer
Drivspänning: 220 – 240 V/50 Hz, effektförbrukning: 60 W
Batterier till fjärrkontroll: 2 x AAA/LR03 (medföljer ej)
Svenska
Uteffekt: 15 W(x2) + 30 W ( RMS )
Ingångar: iPod – Anslutning för iPod/iPhone (laddning och filöverföring)
SD – Anslutning för SD-minneskort
USB – Anslutning för USB-enhet (USB 2.0)
Audio 1 – Anslutning för extern audioenhet (2 x RCA)
Audio 2 – Anslutning för extern audioenhet (Ø 3,5 mm stereo)
Ant – Anslutning för FM-antenn (75 Ω)
Utgångar: Componentvideo Out – Videoutgång till TV-apparat (komposit- och komponent videoutgång)
Storlek: 84 x 18 x 22 cm
Vikt: 10,5 kg
Passar iPod nano/touch samt iPhone.
16
Page 17

iPod-høyttaler
Art.nr. 38-3943 Modell DM96
Les bruksanvisningen nøye før produktet tas i bruk, og ta vare på den for framtidig bruk. Vi reserverer oss mot ev.
tekst- og bildefeil, samt forandringer av tekniske data. Ved tekniske problemer eller spørsmål, ta kontakt med vårt
kundesenter. (Se opplysninger om kundesenteret i denne bruksanvisningen).
1. Sikkerhet
• Utsett ikke produktet for fuktighet eller væsker.
• Utsett ikke produktet for høye temperaturer eller direkte sollys.
• Produktet må ikke demonteres av ukvalifiserte. Reparasjoner må utføres av kyndig servicepersonell
eller på verksted.
• Hvis ikke produktet skal brukes på en stund skal det kobles fra strømnettet. Trekk støpselet ut fra strømuttaket.
• Bland aldri nye og gamle batterier.
• Hvis ikke fjernkontrollen skal brukes på en stund anbefales det at batteriene tas ut.
2. Forpakningen inneholder
• iPod-høyttaler
Norsk
• iPod-adapter (4 stk.)
• Kabel for tilkobling (2 x RCA til 3,5 mm stereo)
• Antennekabel
• Fjernkontroll
• Bruksanvisning
3. Montering
Monter fot og underdel på iPod-høyttaleren med
de medfølgende skruene.
iPod-høyttaler
17
Underdel
Fot
Festeskruer til fot
Page 18

4. Produktbeskrivelse
iPod-høyttaler
1. [I◄◄ ] – Gå til foregående fil
2. [◄◄ ] – Hurtigspole bakover
3. [►► I] – Gå til neste fil
4. [ ] – Audio Input
5. [ ] – Klokke
7
6. [ ► II ] – Starte avspilling eller ta pause
7. iPod-dokkingstasjon
8. [ ] – Av/på
9. [► ►] – Hurtigspole framover
10. [ ] – Heve volumet
11. [ ] – Senke volumet
12. [ ■ ] – Stopp avspilling
13. Skjerm
Norsk
14. Uttak for usb-enhet
1
PREV
I◄◄
2
◄◄
►►
F.FWDF.RWD
8
9
►►
I
3
4
TIME
PLAY/PAUSE
►
II
NEXT
STOP
5
6
+
VOL
–
VOL
10
11
12
15. Tilkoblingspunkt for minnekort (SD)
16. Tilkobling for strømkabel
13
17. Strømbryter
POWER INPUT
POWER
ON
OFF
16 17
14 15
18
Page 19

Fjernkontrollen
18. [STANDBY] – Av/på.
19. [AUDIO] – Aktivere enheten som er koblet til Audio inngangen.
20. [USB/SD] – Aktiver tilkoblet usb- eller SD-minne.
18
STANBY MUTE
27
21. [ v,
<, > ] – Retningsknapper for å flytte markøren på iPoden.
^,
22. [►II ] – Starte avspilling eller ta pause.
23. [SEARCH] – Søke.
24. [►►] og [◄◄] Hurtigspole fram/tilbake (i usb- eller SD-
modus), trykk igjen for å gå tilbake til normal avspilling.
Trykk og hold inne for å hurtigspole fram- eller framover
(i iPod-modus). Søke radiofrekvens fram- og bakover
i radio-modus. Obs! Knappene fungerer ikke når en
enhet er koblet til Audio-in.
25. [TIME] – Stille inn klokkeslett, alarm, automatisk påslag,
automatisk frakobling.
26. [TONE] – Trykk flere ganger for å justere diskant (TR), bass
(BS) eller subwoofer (SW). Bruk Vol +/- for å justere.
27. [MUTE] – Skru av lyden midlertidig. Trykk igjen for
å aktivere lyden igjen.
28. [FM] – Aktivere FM-radio.
29. [iPod] – Aktivere iPod.
30. [0] til [10+] - Talltaster.
31. [F] – Still inn radiofrekvens.
32. [RDS/STOP] – Aktivere/deaktivere RDS.
33. [MO/ST] – Mono/stereo og kanal + og -
34. [ I◄◄] og [►►I ] – Gå til foregående eller neste fil.
19
20
21
22
23
24
25
26
AUDIO FM
USB/SD
1 2 3
4 5 6
7 8 9
10+
0
►II
RSD
MO/ST
►►I
VOL+
VOL-
SEARCH
►►
◄◄ I◄◄
TIME
TONE
STOP
SAVE
VIDEO
MENU
iPod
F
28
29
30
31
Norsk
32
33
34
35
36
37
35. [SAVE/VIDEO] – Lagre/bekrefte eller velge utgang.
36. [VOL +/-] – Volumkontroll, heve/senke volumet.
37. [MENU] – Meny.
Sette batteriet i fjernkontrollen
1. Trykk inn låsefliken på batterilokket og fjern lokket.
2. Sett i 2 stk. LR03/AAA-batterier, følg merkingen i
batteriholderen.
3. Sett batterilokket tilbake på plass igjen.
19
Page 20

(RED) (GREEN) (BLUE) R L
Pr Y Pb/VIDEO AUDIO 1 AUDIO2
COMPONENT VIDEO OUT AUDIO IN FM
POWER
LINK
ETHERNET
5. Tilkoblinger
iPod – For tilkobling av iPod/iPhone med lading (adapter for 4 forskjellige enheter medfølger).
SD – Tilkoblingspunkt for minnekort (SD).
USB – Uttak for usb-enhet.
Audio 1 – For tilkobling av ekstern audioenhet (2 x RCA).
Audio 2 – For tilkobling av ekstern audioenhet (Ø 3,5 mm stereo).
Ant – Inngang for FM-antenne.
Komponentvideo Out – Videoutgang til TV-apparat. Trykk på [SAVE/VIDEO] (16) for å velge videoutgang:
• Komposittvideoutgang – Koble til blå RCA-kontakt.
• Komposittvideoutgang – Koble til rød, grønn og blå RCA-kontakt.
Norsk
(RED) (GREEN) (BLUE) R L
Pr Y Pb/VIDEO AUDIO 1 AUDIO2
COMPONENT VIDEO OUT AUDIO IN FM COMPONENT VIDEO OUT AUDIO IN FM
Kompositt
Tilkoblingseksempel
ANT
(RED) (GREEN) (BLUE) R L
Pr Y Pb/VIDEO AUDIO 1 AUDIO2
ANT
Komponent
POWER
R
CD/DVD/DIVX MULTIMEDIA PLAYER
CD
VOLUME
DOWN
UP
FM antenne
(RED) (GREEN) (BLUE) R L
Pr Y Pb/VIDEO AUDIO 1 AUDIO2
ANT
COMPONENT VIDEO OUT AUDIO IN FM
20
Page 21

6. Bruk
Forberedelser
4. Trykk på On/off-knappen som sitter på iPod-høyttalerens bakside.
5. Trykk på STANDBY på fjernkontrollen for å starte eller stenge høyttaleren.
6. Velg ønsket funksjon ved å trykke gjentatte ganger på [ ] (4) eller på fjernkontrollens knapper AUDIO (19),
USB/SD (20), FM (28) og iPod (29).
A. iPod
Velg iPod-modus hvis det skal spilles av musikk fra iPoden/iPhonen. Displayet på høyttaleren vises SUCCESS etter
noen få sekunder og man kan starte avspilling fra iPod/iPhone. Hvis displayet viser FAILED så ta ut iPod/iPhone og
koble den til igjen. Flytt markøren på iPoden med retningsknappene [ v, ^,<, > ] (21).
B. Audio/Aux in
Trykk på AUDIO (19) eller [ ] (4) og velg AUX IN hvis du har koblet til en mp3-spiller, datamaskin etc.
til Audio-IN (Audio 1 eller Audio 2) på iPod-høyttakeren.
C. Radio
Trykk på FM (28) eller [ ] (4) på høyttaleren.
Still inn en kjent kanal
1. Trykk på [F] (31).
2. Still inn en radiostasjon som har en frekvens du kjenner ved å taste inn frekvensen med talltastene.
Trykk på [SAVE/VIDEO] (35) for å lagre frekvensen i minnet.
Søk radiostasjon
1. Søk stasjon manuelt ved å trykke på [►►] eller [◄◄] (24).
2. Trykk på [SEARCH] for å søke etter stasjoner automatisk. Søket stopper når den kommer til en stasjon.
Trykk da en gang til for å starte søket igjen.
Lagre kanal
1. Still inn ønsket kanal.
2. Trykk på [SAVE/VIDEO] (35) for å lagre frekvensen i minnet. Eksempel: Hvis man vil lagre frekvensen på
minneplass ”18” trykker man på 10+ og deretter på 8. Avslutt med [SAVE/VIDEO].
3. Lytte til en lagret stasjon: trykk på talltastene. Eksempel: Hvis man ønsker stasjon 25, så trykker man to ganger
på 10+ og én gang på 5.
RDS FUNKSJONER
Norsk
Trykk på [RDS/STOP] (32) for å skifte til RDS- radiomodus. Hvis der er et RDS-signal kan man få informasjon om:
PS: Programservicenavn
PTY: Programtype
RT: Radiotekst
CT: Klokkeslett og dato
Mono/Stereo
Trykk på [MO/ST] for å velge Mono eller Stereo i FM-modus. Dersom det er svake signaler kan man ikke velge stereo.
21
Page 22

D. USB/CARD
Lytte på lydfiler fra tilkoblet usb-enhet eller SD-minne.
1. Koble til et usb-minne eller SD-minnekort.
2. Trykk på [USB/SD] for å spille USB eller CARD. Trykk på USB/SD igjen for å skifte mellom USB eller CARD.
3. Trykk og hold inne [►►] eller [◄◄] (24) for å spole hurtig bak- eller framover. Trykk på [9] eller [ I◄◄/►►I] (34)
for å gå til foregående/neste spor.
E. Video
I iPod-modus kan man koble til et tv-apparat. Trykk på [SAVE/VIDEO] (35) for å velge kompositt eller
komponentvideo: Se 5. Tilkoblinger.
Videoutgang kompatibilitet
Kapasitet 5G iPod iPod classic; 3G,
4G og 5G nano
Kompositt Ja Ja Ja Ja Ja
Komponent Nei Ja Ja Ja Ja
iPod touch,
iPhone
2G touch iPhone 3G,
iPhone 3Gs
Norsk
7. Klokkeslett og alarm
For å stille inn klokkeslett, alarm og automatisk til-/fraslag, trykk på [TIME] (25). Velg mellom følgende innstillinger:
Set time (tid) – Stille inn klokkeslett
1. Stille inn timer med [VOL+] [VOL-] (36), trykk [ > ] (21).
2. Still inn minutter på samme måte.
3. Trykk [TIME] for å bekrefte innstilling.
Alarm 1
1. Stille inn time for tilslag for alarm 1 med [VOL+] [VOL-] (36).
2. Trykk [ > ] (21) og still inn minutter på samme måte.
3. Trykk [TIME] for å bekrefte innstilling.
4. Trykk [ > ] (21) to ganger til On eller Off blinker.
5. Velg Off for å deaktivere alarmen.
Alarm 2
Stilles inn på samme måte som alarm 1.
Set power off – Automatisk avstenging 0 – 120 minutter
1. Still inn minutter med talltastene [0] – [10+] (30).
2. Trykk [TIME] for å bekrefte innstilling.
Set power on – Automatisk tilslag
1. Stille inn timer med [VOL+] [VOL-] (36), trykk [ > ] (21) og still inn minutter på samme måte.
2. Trykk [TIME] for å bekrefte innstilling.
Skru av alarmen
• Trykk på en vilkårlig valgt knapp for å stoppe alarmen.
22
Page 23

8. Stell og vedlikehold
Tørk av produktet med en tørr, myk klut ved behov. Bruk aldri løsemidler eller slipende rengjøringsmidler.
9. Avfallshåndtering
Når produktet skal kasseres, må det skje i henhold til lokale forskrifter. Ved usikkerhet, ta kontakt med
lokale myndigheter.
10. Spesifikasjoner
Spenning: 220 – 240 V AC/50 Hz, effektforbruk: 60 W
Batterier til fjernkontrollen: 2 x LR03/AAA-batterier (medfølger ikke)
Uteffekt: 15 W (x 2) + 30 W ( RMS )
Innganger: iPod – For tilkobling av iPod/iPhone (lading og filoverføring)
SD – Tilkoblingspunkt for minnekort (SD).
USB – Uttak for usb-enhet (USB 2.0)
Audio 1 – For tilkobling av ekstern audioenhet (2 x RCA)
Audio 2 – For tilkobling av ekstern audioenhet (Ø 3,5 mm stereo)
Ant – Inngang for FM-antenne (75 Ω)
Utganger: Componentvideo Out – Videoutgang til tv-apparat (kompositt- og komponent videoutgang)
Størrelse: 84 x 18 x 22 cm
Vekt: 10,5 kg
Beregnet for iPod nano/touch.
Norsk
23
Page 24

iPod-kaiutin
Tuotenro 38-3943 Malli DM96
Lue käyttöohjeet ennen tuotteen käyttöönottoa. Säilytä käyttöohjeet tulevaa tarvetta varten. Pidätämme oikeuden teknisten tietojen muutoksiin. Emme vastaa mahdollisista teksti- tai kuvavirheistä. Jos laitteeseen tulee teknisiä ongelmia,
ota yhteys myymälään tai asiakaspalveluun (yhteystiedot käyttöohjeen lopussa).
1. Turvallisuus
• Älä anna laitteen kostua tai kastua.
• Suojaa laite suoralta auringonvalolta ja korkeilta lämpötiloilta.
• Tuotetta ei saa purkaa eikä siihen saa tehdä muutoksia. Tuotteen saa korjata vain koulutettu huoltohenkilöstö.
• Ellei laitetta ole tarkoitus käyttää pitkään aikaan, irrota pistoke pistorasiasta.
• Älä koskaan käytä sekaisin uusia ja vanhoja paristoja.
• Ellei kaukosäädintä aiota käyttää pitkään aikaan, irrota siitä paristot.
2. Pakkauksen sisältö
• iPod-kaiutin
• iPod-sovitin (4 kpl)
• Liitäntäjohto (2 x RCA 3,5 mm:n stereoon)
• Antennijohto
• Kaukosäädin
• Käyttöohje
Suomi
3. Asennus
Asenna iPod-kaiuttimeen jalka ja alaosa mukana tulevilla
ruuveilla (D).
iPod-kaiutin
24
Alaosa
Jalka
Jalan kiinnitysruuvit
Page 25

4. Tuotekuvaus
iPod-kaiutin
1. [◄◄ ] – Siirry edelliseen tiedostoon
2. [◄◄ ] – Pikakelaa taaksepäin
3. [►► I] – Siirry seuraavaan tiedostoon
4. [ ] – Audio Input
5. [ ] – Aika
6. [ ► II ] – Aloita toisto tai tauota
7. iPod-telakka
8. [ ] – Pois päältä/päälle
9. [► ► ] – Pikakelaus eteenpäin
10. [ ] – Lisää äänenvoimakkuutta
11. [ ] – Vähennä äänenvoimakkuutta
12. [ ■ ] – Pysäytä toisto
13. Näyttö
14. USB-liitäntä
15. SD-muistikorttipaikka
16. Virtajohdon liitäntä
17. Käynnistyskytkin
7
1
PREV
I◄◄
2
◄◄
►►
F.FWDF.RWD
8
9
►►
I
3
4
TIME
PLAY/PAUSE
►
II
NEXT
STOP
5
6
+
VOL
–
VOL
10
11
12
13
Suomi
POWER INPUT
ON
16 17
POWER
14 15
OFF
25
Page 26

Kaukosäädin
18. [STANDBY] – Pois päältä/päälle.
19. [AUDIO] – Aktivoi Audio-sisääntuloon liitetty yksikkö.
20. [USB/SD] – Aktivoi liitetty USB-muistikortti tai SD-muistikortti.
18
STANBY MUTE
27
21. [v,
22. [►II] Aloita toisto tai tauota.
23. [SEARCH] – Haku.
24. [►►] och [◄◄] Pikakelaus eteen- ja taaksepäin (USB- tai SD-
<, > ] Navigointinäppäimet kohdistimen siirtämiseksi
^,
iPodissa.
tilassa), paina uudelleen palataksesi tavalliseen toistoon. Paina ja
pidä alaspainettuna pikakelataksesi eteen- tai taaksepäin (iPod-
19
20
AUDIO FM
USB/SD
1 2 3
4 5 6
7 8 9
iPod
28
29
30
tilassa). Hae radiotaajuutta eteen- tai taaksepäin (radiotilassa).
Huom! Näppäimet eivät toimi yksikössä, joka on liitetty Audio
0
F
31
10+
sisääntuloon.
25. [TIME] – Aseta aika, äänimerkki, automaattikäynnistys,
automaattisammutus.
26. [TONE] – Paina useamman kerran säätääksesi diskanttia (TR),
bassoa (BS) tai subwooferia (SW). Käytä säätämiseen [Vol +]- ja
21
►II
22
[Vol +]-näppäimiä.
27. [MUTE] – Kytke ääni pois väliaikaisesti. Ääni kytkeytyy takaisin
päälle, kun painat näppäintä uudelleen.
RSD
MO/ST
►►I
VOL+
VOL-
28. [FM] – Aktivoi FM-radio.
23
29. [iPod] – Aktivoi iPod.
24
30. [0] – [10+] – Numeronnäppäimet.
31. [F] – Säädä radiotaajuus.
Suomi
32. [RDS/STOP] Aktivoi/sulje RDS.
25
26
SEARCH
►►
◄◄ I◄◄
TIME
TONE
STOP
SAVE
VIDEO
MENU
33. [MO/ST] – Mono/stereo ja kanava + ja –
32
33
34
35
36
37
34. [ I◄◄] och [►►I ] – Siirry edelliseen tai seuraavaan tiedostoon.
35. [SAVE/VIDEO] Tallenna/vahvista tai valitse ulostulo.
36. [VOL+/-] – Lisää tai vähennä äänenvoimakkuutta.
37. [MENU] – Avaa valikko.
Aseta paristot kaukosäätimeen
1. Paina salpa alas ja irrota paristokotelon kansi.
2. Aseta sisään 2 kpl LR03/AAA-paristoja paristokotelon
kuvien mukaan.
3. Laita kansi takaisin paikoilleen.
26
Page 27

(RED) (GREEN) (BLUE) R L
Pr Y Pb/VIDEO AUDIO 1 AUDIO2
COMPONENT VIDEO OUT AUDIO IN FM
POWER
LINK
ETHERNET
5. Liitännät
iPod – iPod/iPhone-liitäntä, myös lataus (mukana 4 sovitinta eri yksiköille).
SD – SD-muistikorttipaikka
USB – USB-liitäntä
Audio 1 – Ulkoisen audioyksikön liitäntä (2 x RCA)
Audio 2 – Ulkoisen audioyksikön liitäntä (Ø 3.5 mm:n stereo)
Ant – FM-antenniliitäntä
Componentvideo Out – TV:n videoulostulo. Paina [SAVE/VIDEO] (16) valitaksesi videoulostulon:
• Komposiittivideoulostulo – Liitä siniseen RCA-liittimeen.
• Komponenttivideoulostulo – Liitä punaiseen, vihreään ja siniseen RCA-liittimeen.
(RED) (GREEN) (BLUE) R L
Pr Y Pb/VIDEO AUDIO 1 AUDIO2
COMPONENT VIDEO OUT AUDIO IN FM COMPONENT VIDEO OUT AUDIO IN FM
Komposiitti
Liitäntäesimerkki
ANT
(RED) (GREEN) (BLUE) R L
Pr Y Pb/VIDEO AUDIO 1 AUDIO2
ANT
Komponentti
Suomi
POWER
R
CD/DVD/DIVX MULTIMEDIA PLAYER
CD
VOLUME
DOWN
UP
FM antenn
(RED) (GREEN) (BLUE) R L
Pr Y Pb/VIDEO AUDIO 1 AUDIO2
ANT
COMPONENT VIDEO OUT AUDIO IN FM
27
Page 28

6. Käyttö
Valmistelut
1. Paina iPod-kaiuttimen takana olevaa On/off-näppäintä (17).
2. Paina kaukosäätimestä [STANDBY]-näppäintä (18) käynnistääksesi tai sulkeaksesi kaiuttimen.
3. Valitse haluamasi toiminto painamalla toistuvasti [ ]-näppäintä (4) tai kaukosäätimen näppäimillä AUDIO (19),
USB/SD (20), FM (28) tai iPod (29).
A. iPod
Valitse iPod-tila, kun haluat soittaa musiikkia iPod/iPhonellasi. Kaiuttimen näyttöön tulee muutaman sekunnin
kuluttua näkyviin teksti ”SUCCESS” ja voit nyt aloittaa musiikin soittamisen iPod/iPhonellasi. Jos näyttöön tulee
teksti ”FAILED” irrota iPod/iPhone ja liitä se uudelleen. Siirrä iPodin kohdistinta navigointinäppäimillä [ v, ^,<, > ] (21).
B. Audio/Aux in
Paina AUDIO-näppäintä (19) tai [ ]-näppäintä (4) ja valitse AUX IN, jos olet liittänyt mp3-soittimen, tietokoneen jne.
iPod-kaiuttimen Audio-IN –liittimeen (Audio 1 tai Audio 2).
C. Radio
Paina näppäintä FM (28) tai kaiuttimen [ ]-näppäimellä (4).
Aseta radioasema, jonka taajuuden tiedät
1. Paina näppäintä [F] (31).
2. Hae haluamasi radioaseman taajuus näppäilemällä taajuus numeronäppäimillä (30).
3. Paina näppäintä [SAVE/VIDEO] (35) tallentaaksesi taajuuden muistiin.
Radioaseman haku
Suomi
1. Hae asema manuaalisesti käyttämällä näppäimiä [8] ja [7] (24).
2. Paina näppäintä [SEARCH] (23), kun haluat laitteen hakevan asemia automaattisesti.
Haku päättyy, kun asema löytyy.
3. Jos haluat jatkaa hakua, paina näppäintä uudelleen.
Radioaseman tallennus
1. Hae haluamasi radioasema.
2. Paina näppäintä [SAVE/VIDEO] (35) kyseisen taajuuden tallentamiseksi. Jos haluat esimerkiksi tallentaa taajuuden
muistipaikalle 18, paina näppäintä [10+] ja sen jälkeen näppäintä [8] ja vielä tallennusnäppäintä [SAVE/VIDEO].
3. Kun haluat kuunnella jo tallennettua asemaa, valitse aseman muistipaikan numero numeronäppäimillä (30). Jos
esimerkiksi haluat valita aseman 25, paina näppäintä [10+] kaksi kertaa ja näppäintä [5] kerran.
RDS -toiminto
Paina näppäintä [RDS/STOP] (32) vaihtaaksesi RDS- radiotilaan. Jos RDS-signaali on saatavilla, voit saada seuraavaa tietoa:
PS: Aseman nimi
PTY: Ohjelmatyyppi
RT: Radioteksti
CT: Aika ja päiväys
Mono/Stereo
Paina näppäintä [MO/ST] (33), kun haluat valita mono- tai stereolähetyksen FM-tilassa. Jos signaali on heikko,
ei stereolähetystä voida valita.
28
Page 29

D. USB/CARD
Voit myös kuunnella äänitiedostoja liitetystä USB- tai SD-muistista.
1. Liitä USB- tai SD-muisti liittimeen (14) tai (15).
2. Paina näppäintä [USB/SD] (20) toistaaksesi USB.ia tai CARD:ia. Paina näppäintä USB/SD uudelleen vaihtaaksesi
USB:ilta CARD:iin tai päinvastoin.
3. Paina näppäintä [►►] (24) tai [◄◄] (24), kun haluat pikakelata eteen- tai taaksepäin. Paina näppäimiä
[ I◄◄/►►I] (34) siirtyäksesi seuraavaan tai edelliseen raitaan.
E. Video
Laite voidaan iPod-tilassa liittää TV:seen. Paina näppäintä [SAVE/VIDEO] (33) valitaksesi komposiitti- tai komponenttivideon. Katso kohtaa 5. Liitännät.
Videoulostulon yhdistelmät
Kapasiteetti 5G iPod iPod classic; 3G,
4G ja 5G nano
Komposiitti Kyllä Kyllä Kyllä Kyllä Kyllä
Komponentti Ei Kyllä Kyllä Kyllä Kyllä
iPod touch,
iPhone
2G touch iPhone 3G,
iPhone 3GS
7. Aika ja äänimerkki
Aika, äänimerkki ja automaattikäynnistys ja –sammutus asetetaan painamalla näppäintä [TIME] (25).
Äänimerkkiin voidaan valita seuraavia asetuksia:
Set time (aika) – Aseta aika
1. Aseta tunnit näppäimillä [VOL+] [VOL-] (37),
2. Paina näppäintä [ > ] (21) ja aseta minuutit samalla tavalla.
3. Paina näppäintä [TIME] (25) vahvistaaksesi asetuksen.
Alarm 1 – Aseta äänimerkin 1 aloitusaika
1. Aseta tunnit näppäimillä [VOL+] [VOL-] (37),
2. paina näppäintä [ > ] (21) ja aseta minuutit samalla tavala.
3. Paina näppäintä [TIME] (25) vahvistaaksesi asetuksen.
4. Paina näppäintä [ > ] (21) kaksi kertaa, kunnes on tai off vilkkuvat.
5. Valitse OFF, kun haluat äänimerkin pois päältä.
Suomi
Alarm 2 – Aseta äänimerkin 2 aloitusaika
Samalla tavalla kuin äänimerkki 1.
Set power off – Automaattisammutus 0 – 120 minuuttia
1. Aseta minuutit numeronäppäimillä [0] – [10+] (30).
1. Paina näppäintä [TIME] (25) vahvistaaksesi asetuksen.
Set power on – Automattikäynnistys)
1. Aseta tunnit näppäimillä [VOL+] [VOL-] (37), paina näppäintä [w] (21) ja aseta minuutit samalla tavalla.
2. Paina näppäintä [TIME] (25) vahvistaaksesi asetuksen.
Äänimerkin sulkeminen
Äänimerkki suljetaan painamalla mitä tahansa näppäintä.
29
Page 30

8. Hoito
Pyyhi tuote tarvittaessa pehmeällä kuivalla liinalla. Älä käytä liuotinaineita tai hankaavia puhdistusaineita.
9. Kierrätys
Kun haluat päästä tuotteesta eroon, noudata paikallisia kierrätysohjeita. Ellet tiedä miten menetellä,
ota yhteys kotikuntaasi.
10. Erittelyt
Käyttöjännite: 220 – 240 V/50 Hz, teho: 60 W
Kaukosäätimen paristot: 2 x AAA/LR03 (ei mukana)
Ulosteho: 15 W(x2) + 30 W ( RMS )
Sisääntulot: iPod – iPod/iPhone-liitäntä (lataus ja tiedostonsiirto)
SD – SD-muistikortin liitäntä
USB – USB-liitäntä (USB 2.0)
Audio 1 – Ulkoisen audioyksikön liitäntä (2 x RCA)
Audio 2 – Ulkoisen audioyksikön liitäntä (Ø 3.5 mm:n stereo)
Ant – FM-antenniliitäntä (75 Ω)
Ulostulot: Componentvideo Out – Videoulostulo TV:lle (komposiitti- ja komponenttivideoulostulo)
Koko: 84 x 18 x 22 cm
Paino: 10,5 kg
Voidaan käyttää myös seuraavissa laitteissa: iPod nano/touch sekä iPhone.
Suomi
30
Page 31

Suomi
31
Page 32

Sverige
Kundtjänst Tel: 0247/445 00
Fax: 0247/445 09
E-post: kundtjanst@clasohlson.se
Internet www.clasohlson.se
Post Clas Ohlson AB, 793 85 INSJÖN
Norge
Kundesenter Tlf.: 23 21 40 00
Faks: 23 21 40 80
E-post: kundesenter@clasohlson.no
Internett www.clasohlson.no
Post Clas Ohlson AS, Postboks 485 Sentrum, 0105 OSLO
Suomi
Asiakaspalvelu Puh.: 020 111 2222
Sähköposti: info@clasohlson.fi
Internet www.clasohlson.fi
Osoite Clas Ohlson Oy, Annankatu 34–36 A, 00100 HELSINKI
Great Britain
For consumer contact, please visit
www.clasohlson.co.uk and click on
customer service.
Internet www.clasohlson.co.uk
 Loading...