

Page 1
Pulse watch
with pedometer
Pulsklocka med stegräknare
Pulsklokke med skritteller
Sykemittarikello ja askelmittari
Pulsuhr mit Schrittzähler
Art.no. Model
31-1055 D02I710
EnglishSvenskaNorsk
Suomi
Deutsch
Ver. 20130913
Page 2

Page 3

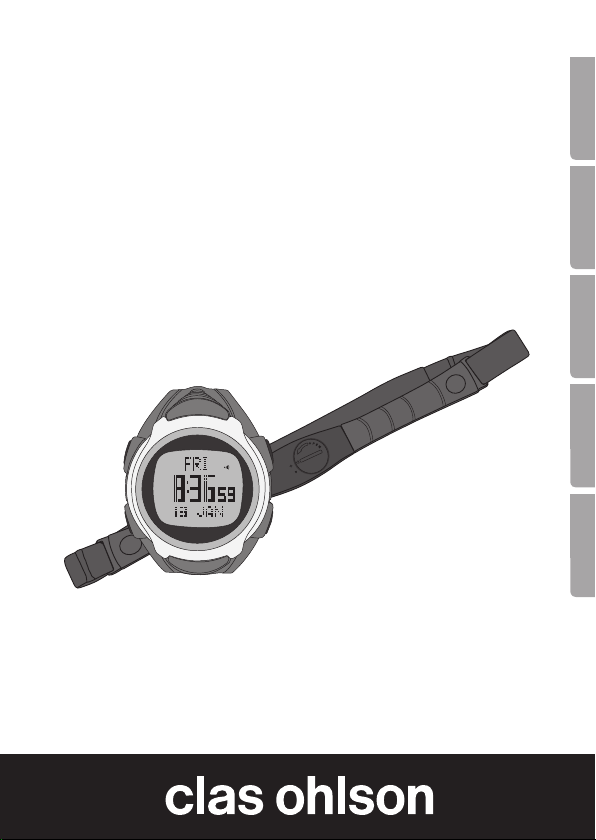
Pulse Watch with Pedometer
Art.no 31-1055 Model D02I710
Please read the entire instruction manual before using the product and save it
for future reference. We reserve the right for any errors in text or images and
any necessary changes made to technical data. If you have any questions
regarding technical problems please contact our customer services.
Safety
• Contact your physician or trainer if you are unsure about the amount of
physical activity you can engage in before attempting any pulse training
regimes.
• An average max pulse value can be calculated by subtracting your age
from 220. Example: If you are 40, your max pulse would be 180
(220 – 40 = 180).
Product description
Pulse Watch with Pedometer. Measures heart rate according to your personal
profile, using the included chest strap.
• Distance
• Speed
• Calories burned
• Stopwatch
• Timer
• Clock
• Date
• Memory
• Water resistant to 5 ATM
English
3
3
Page 4
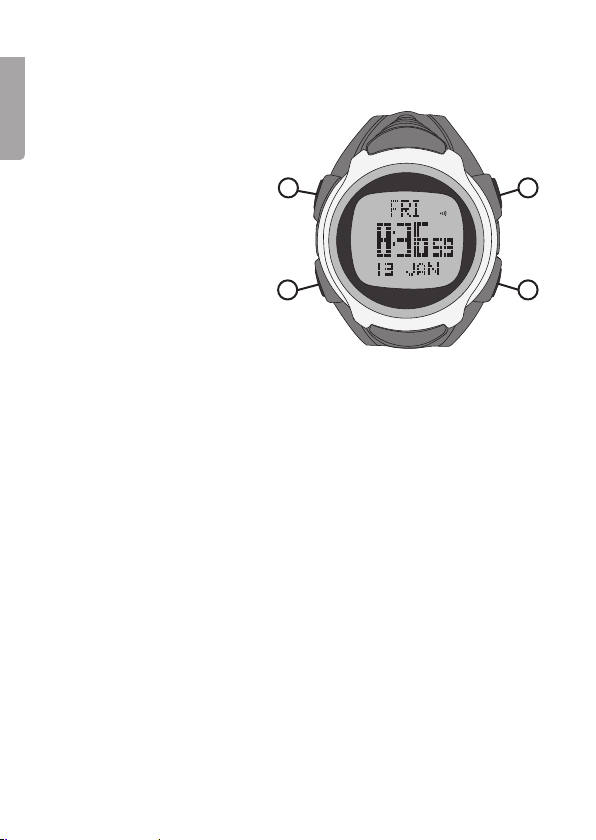
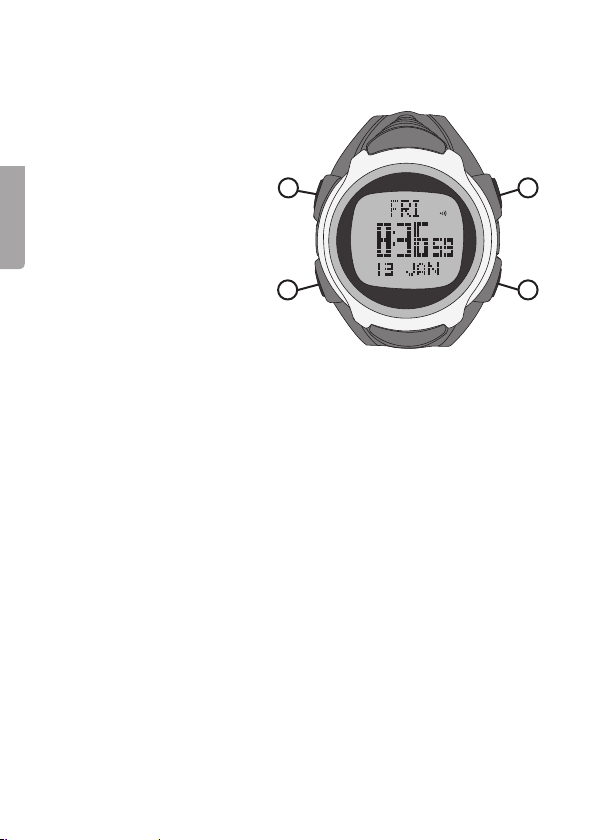
Buttons and functions
Pulse watch
1. [ LIGHT ]
English
• Turns the backlight on for
3 seconds.
2. [ MODE ] Function selector.
• Press and release to scroll
through the following
functions: Time, exercise,
stop watch (Chrono),
alarm, timer or dual time
display (Dual-T). Dualtime display allows you to
set your destination time
while travelling while also
keeping track of your local
time at home.
• Press and hold to enter/exit the settings mode for time, exercise,
alarm, timer and dual-time display.
• Press to change between different value settings, e.g. from seconds
to minutes for time display settings.
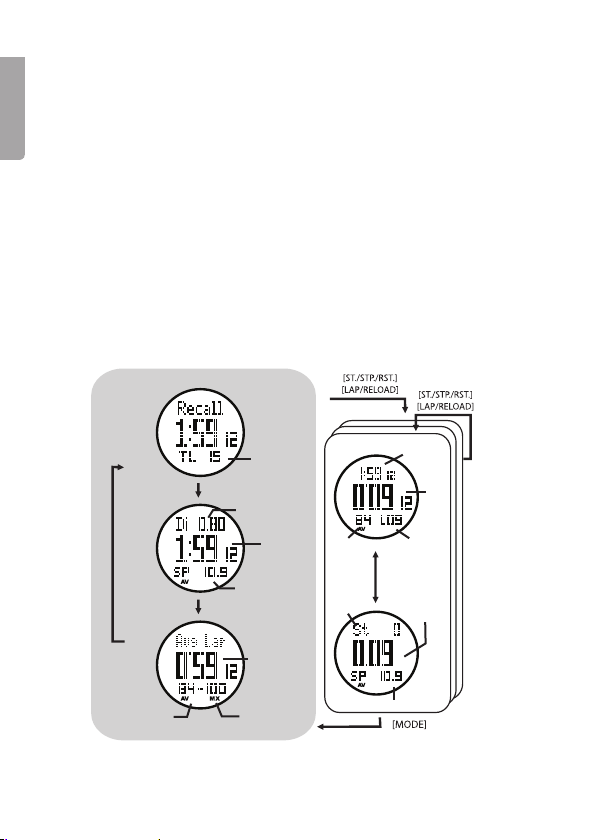
• Press and hold to enter the Recall-function in stopwatch mode.
3. [ ST./STP./RST. ] Start, stop and reset
• Press to start/stop the countdown while in exercise, stopwatch
or timer mode.
• Press and hold to reset.
• Press to increase values while in different settings, e.g. setting
the hours for time, etc.
4. [ LAP/RELOAD ]
• Press to decrease values while in different settings, e.g. setting
the hours for time, etc.
• Press and hold for 5 seconds to put the watch into standby and
turn off the display.
• Press to clear and restart the timer.
• Press to display the different exercise parameters.
1
2 4
3
4 5
Page 5

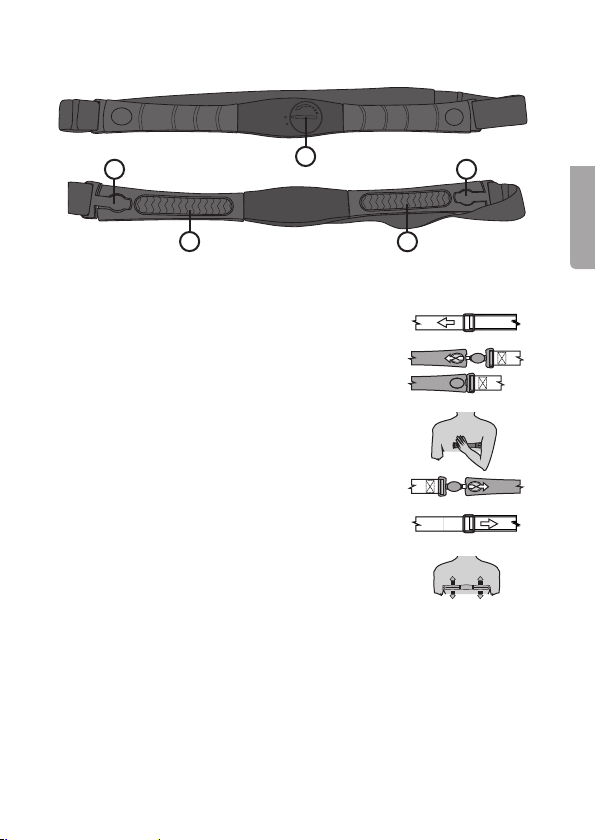
Chest strap
6 6
5
English
7
5. Battery compartment
6. Strap fastener
7. Sensor surface area
Note:
• Adjust the elastic strap so that it sits
securely on your chest during strenuous
physical activity. It is extremely important
that the contact area (7) has good contact
with your skin at all times for accurate
measurements to be registered.
• Clean the contact area using a few drops
of water and wiping off with a clean dry
cloth after every exercise session.
• Wash the skin area with both soap and
water before putting on the chest strap for
the best effect.
• If your skin is dry use a little contact gel to
allow for better signal transmission.
7
Page 6
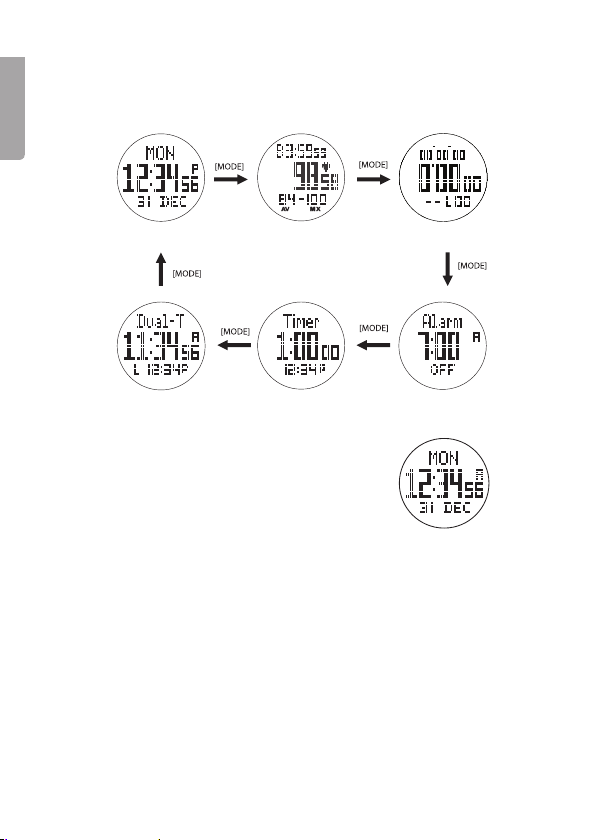
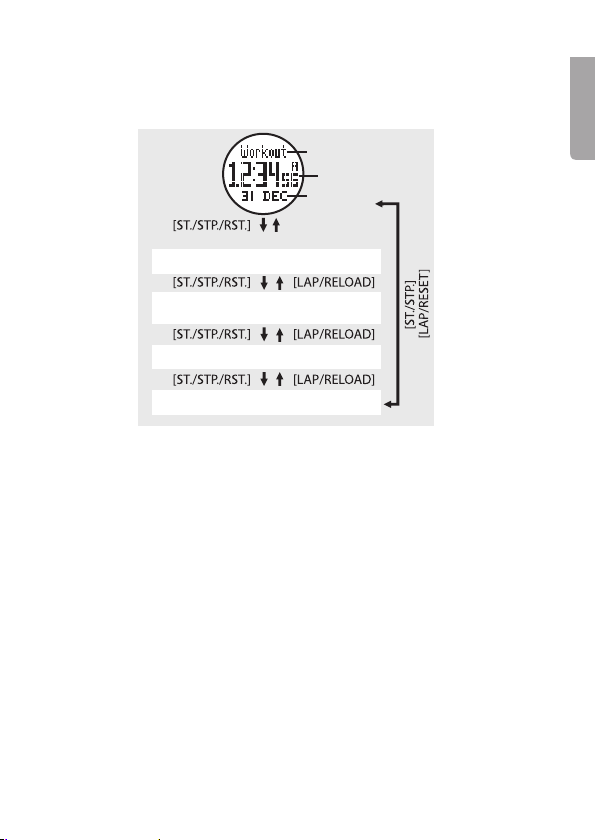
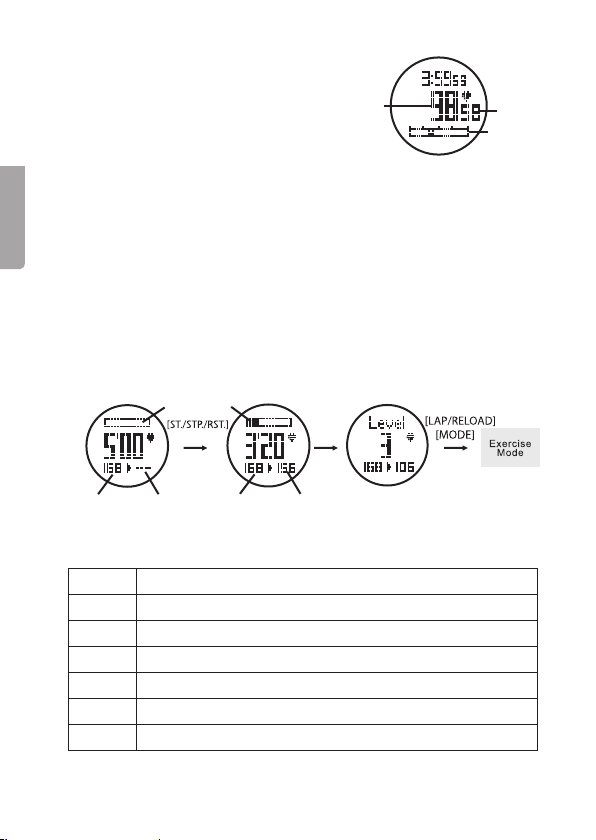
Operation
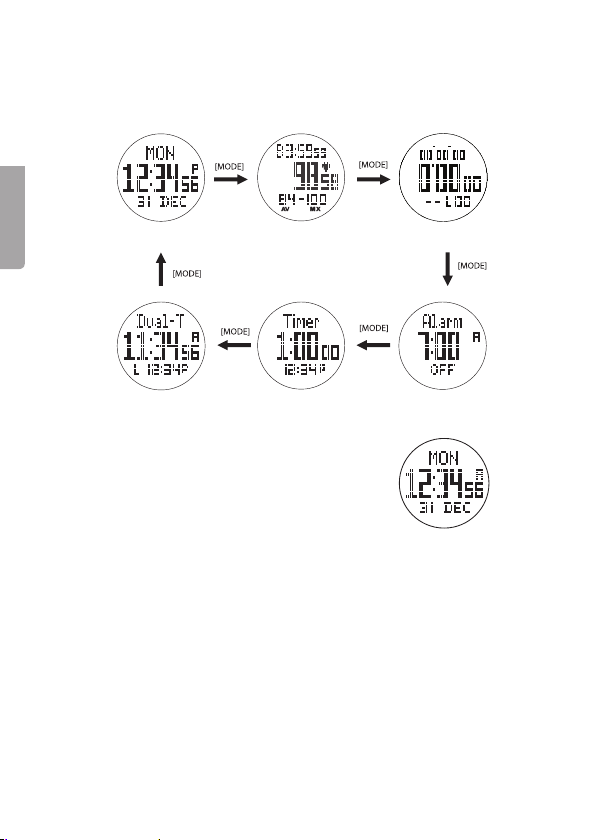
Each press on [ MODE ] will display the main functions of the pulse watch in
the following order:
English
Time display mode
Dual time
Excercise mode
Timer
Stop watch
Alarm
Time display mode
• Normal display mode shows day,
time and date.
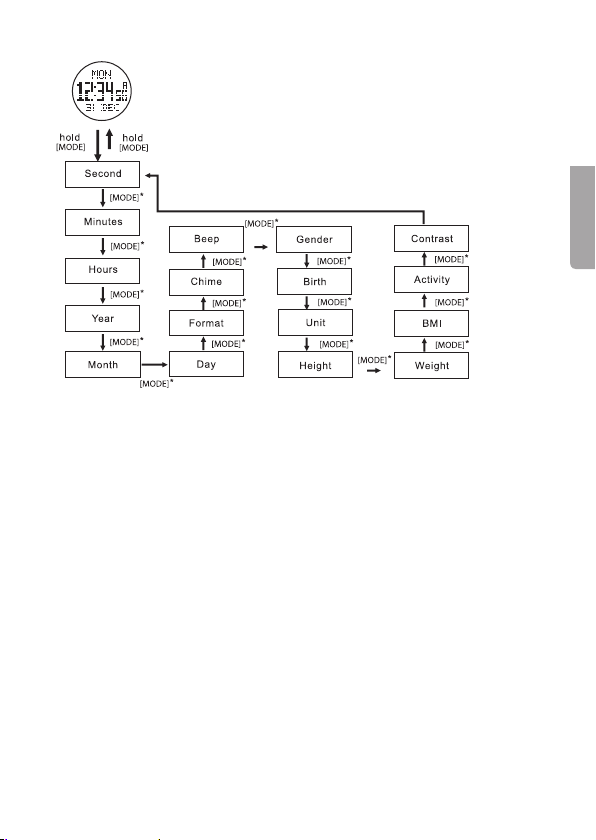
Time display settings:
• Press and hold [ MODE ] for approx. 2 seconds. The seconds setting will
then begin flashing.
• Use [ ST./STP./RST. ] to increase and [ LAP/RELOAD ] to decrease values.
• Press [ MODE ] to continue onto the minutes setting and use the same
procedure as described above for setting the minutes.
• Press [ MODE ] again to continue onto the hours setting. Follow the same
procedure to continue onto and input the other settings.
• 17 different settings can be entered as shown in the figure below.
• Hold [ MODE ] for about 2 seconds to exit the settings.
6 7
Page 7
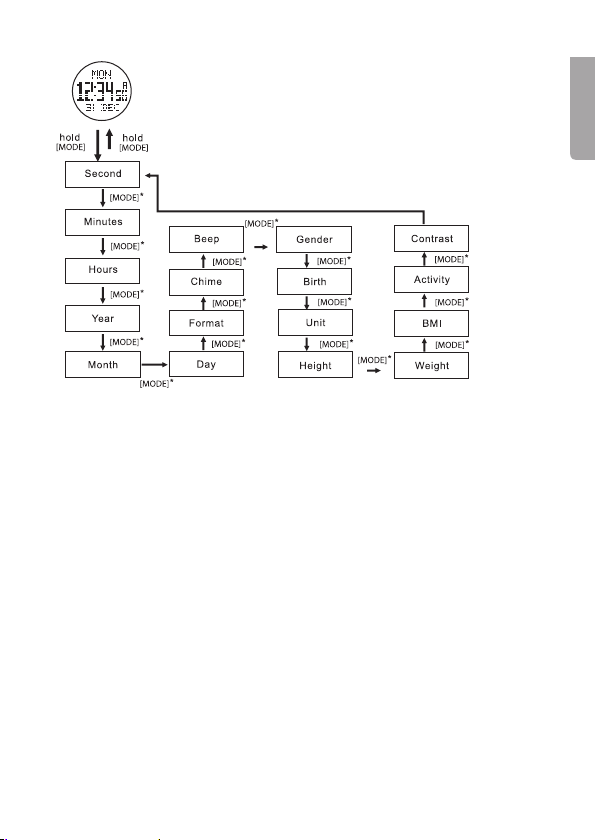
• Second
• Minute
• Hour
• Year
• Month
• Day
• Format (12 or 24 clock display)
• Chime
• Beep (keypad touch tone on/off)
• Gender (M-man, F-woman)
• Birth (Birth year)
• Unit (Measuring units: Metric-metres, Imperial-feet/inches)
• Height
• Weight
• BMI (Body mass index calculated using height and weight settings)
• Activity (LOW-not physically active, MEDIUM-exercises 2–3 times a week,
HIGH-engages in strenuous physical exercise on a regular basis)
• Contrast (Display’s contrast setting)
English
Page 8
Exercise
Heart rate
English
Heart rate view
• Your heart rate is measured automatically five seconds after you have
finished your exercise session.
• Press [ ST./STP./RST. ] to manually start/stop the exercise mode.
• Starting the exercise mode will delete all registered values from
the last exercise session.
• The measurement of your heart rate will discontinue automatically if no
pulse has been registered within five minutes.
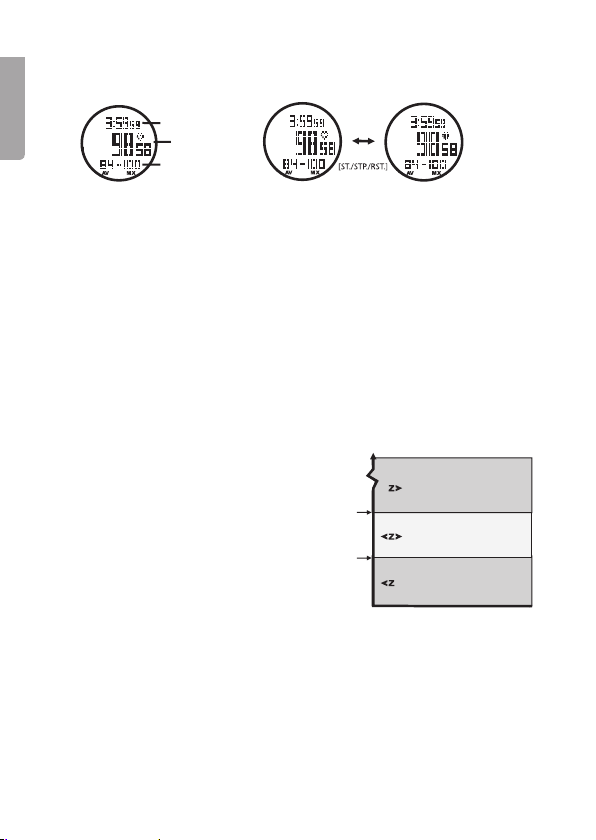
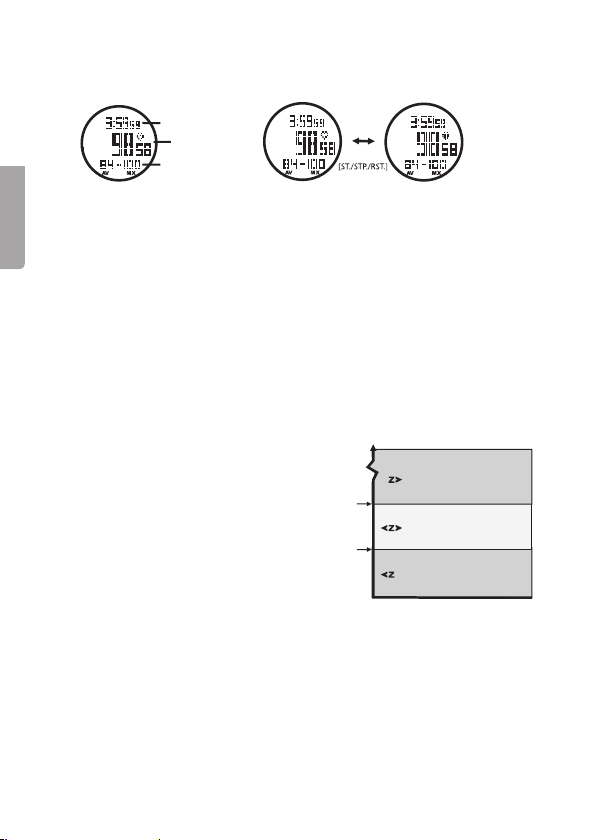
Heart rate alarm
• Set the desired pulse rate you wish to maintain during your exercise session.
• An alarm will sound if your pulse either exceeds or goes below the set
values (see the Settings section below).
• In order for the alarm to
sound the Above Z (pulse
rate exceeded) and Below Z
(below set pulse rate) settings
must be activated (see
the Settings section below).
The display will show symbols
that tell you whether you are
within, have exceeded or are
below your set pulse settings.
The alarm functions are
shown in the figure below.
• Having Heart rate or Distance as your main display values, you are also
able to choose various other values to be displayed both above and below
the main value. See Distance measurement below.
Note: The watch must be on your wrist and the chest strap must be securely
in place in order for any input to be registered. Stop the heart rate measurement
and then press and hold in [ ST./STP./RST. ] to clear and reset it.
Exercise data
Heart rate
Exercise data
OFF ON
Heart rate (beats per minute)
Set pulse rate exceeded
Max pulse rate
Above Zone
Below Zone
exceeded
Within set
pulse range
Below set
pulse range
8 9
Page 9

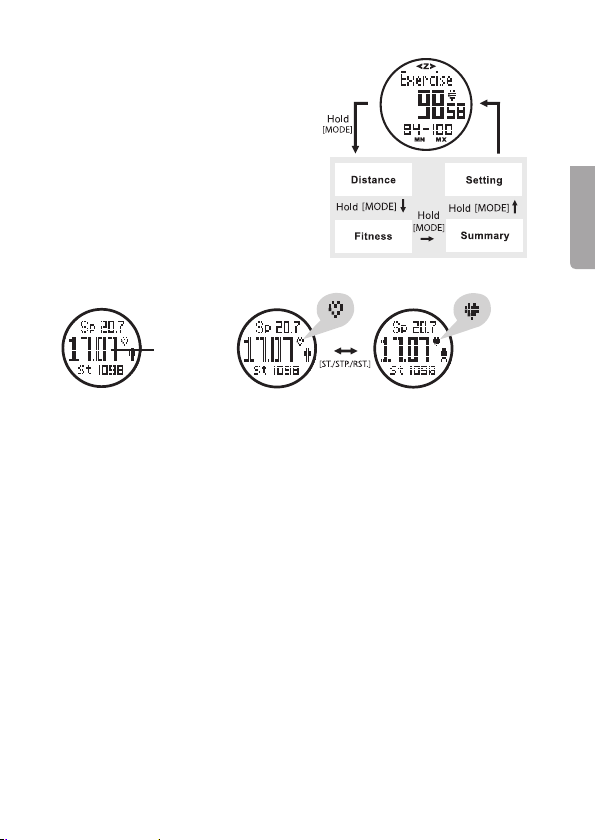
The following sub-categories are
available in exercise mode:
• Distance
• Fitness
• Summary
• Setting
Press and hold [ MODE ] in order to
display categories. Release [ MODE ]
once the desired category is displayed.
Distance measurement
Distance
English
Distance measuring
Having Heart rate or Distance as your main display values, you are also able
to choose various other values to be displayed both above and below
the main value.
• Press [ LAP/RELOAD ] to select between the following settings for the top row:
“0:00” Elapsed exercise time
“I” Within time range
“B” Time range exceeded
“A” Below time range
“Sp” Speed
“Di” Distance
• Press and hold [ LAP/RELOAD ] to select between the following settings
for the bottom row:
EMHR-diagram- Displays your current max pulse % (not displayed during
distance measurement).
“KC”- Calories burned
“G”- Fat burned
“St”- Pedometer
“AV”- Average pulse
“MX”-Max pulse for current exercise session (not displayed during
distance measurement).
“Heart symbol”- Current pulse (not displayed during heart rate measurement).
OFF
ON
Page 10
• If the EMHR-diagram is selected
during heart rate measurement
your current max pulse % will be
displayed on the bar graph and
English
also as a digit display to the right of
the main display value.
• Calculation example using EMHR:
For an 18-yr old user, they would subtract their age from 220:
220 – 18 = 202 (see Safety section above)
Measured pulse: 140
140/202×100 % ≈ 69 %
The user will have reached 69% of their max pulse.
Current
heart rate
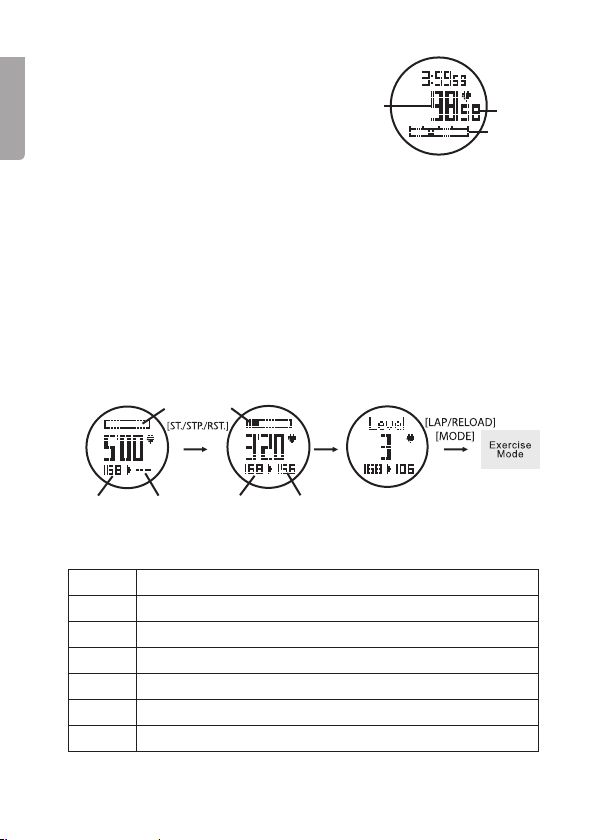
Fitness
The pulse watch can give you an indication of your fitness level by measuring
how fast your pulse rate returns to a normal rate after your exercise section.
The watch will measure how fast your pulse rate falls for five minutes after
your exercise session has ended. Results can be classified into six levels
where one is best.
Progress bar
EMHR
in %
EMHR
in bar
Current
heart
rate
Fitness level
Level BPM (beats per minute) after 5 minutes rest
1 < 100
2 105–100
3 110–105
4 120–110
5 130–120
6 >130
Timer
Initial
heart rate
Current
heart
rate
10 11
Page 11
Summary
Results from your exercise session will be saved in the following manner:
1st row
2nd row
3rd row
English
1st row
Exercise time
Pulse above
set value
Average speed
Steps
2nd row
Average
heart rate
Pulse within
set value
Distance
Fat Burn Calories
3rd row
Pulse below
Max- and
min pulse
set value
Maximum
speed
Note: All data is deleted once the Exercise session function is started again.
Page 12

Settings
Select Exercise mode. Press and hold [ MODE ] until Setting is shown in
the display. Press [ MODE ] again to browse between the different settings.
The following settings can be adjusted:
English
• When “My Zone” flashes while you are in Training Zone Select, press
[ ST./STP./RST. ] or [ LAP/RELOAD ] to select between Health, FatBurn,
Aerobic or My Zone.
• When “Above Z” (pulse above set value), “Below Z” (pulse below set value)
and “Speed Alarm On” or “OFF” flashes, press [ ST./STP./RST. ] or
[ LAP/RELOAD ] to switch the function on or off.
• If “My Zone-min and max”, “Sense” (pedometer sensitivity), “Speed alarm-ON/
OFF-High/Low”, “Sleep Time”, “Odo meter flash”, press [ ST./STP./RST. ]
or [ LAP/RELOAD ] to change the value. Holding either of the buttons
makes the values change quickly.
Note: The pedometer’s sensitivity is on a scale of 1–5 where 1 is the lowest
sensitivity and 5 the highest. When either Above Z or Below Z are triggered,
“Z” will be in the upper portion of the display.
• In order to calculate speed and distance correctly, the user must first input
their stride length for both running and walking.
• You can calibrate stride length for both Walk and Run modes by selecting
either Auto or Manual.
12 13
Page 13
Auto
1. Select the Calibrate Walk setting.
2. Press [ ST./STP./RST. ] to input the desired stride length.
3. Press [ LAP/RELOAD ] to start calibration.
4. Walk or run the displayed distance.
5. Press [ ST./STP./RST. ] or [ LAP/RELOAD ] to end calibration.
6. Calculations for both walking and running will be automatically calculated.
Manual
1. Select the Calibrate Walk or Run setting.
2. Press [ MODE ] in order to enter the settings for Walk St (walking stride)
or Run St (running stride).
3. Press [ ST./STP./RST. ] or [ LAP/RELOAD ] to end calibration.
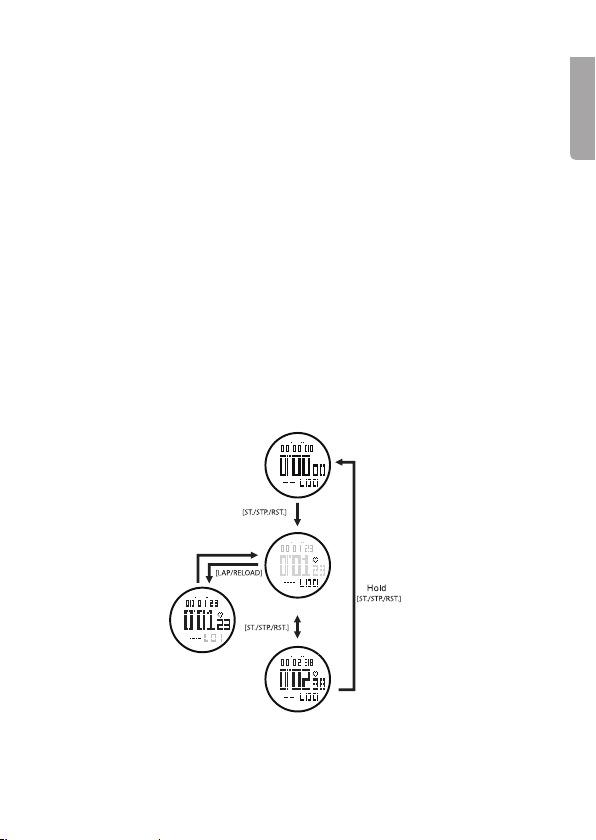
Stopwatch (Chronograph)
• Press [ ST./STP./RST. ] to start/stop the stopwatch.
• Press [ LAP/RELOAD ] to register lap-time.
• Press [ ST./STP./RST. ] to start/stop the stopwatch.
• Hold in [ ST./STP./RST. ] to clear and reset the stopwatch.
10 seconds
START
English
Lap time
STOP
Page 14
Stopwatch mode
While the stopwatch is selected you may also select other values to be
displayed on the top row. Hold in [ MODE ] once the stopwatch has started
taking time to select amongst the following functions:
English
• Speed
• Distance
• Step (stride)
• StopW (stopwatch)
• Release [ MODE ] once the desired function is displayed.
Lap data
You can save both your lap time and heart rate for any particular exercise session.
This data can then be displayed at the end of any exercise session.
• Hold in [ MODE ] once timekeeping has stopped until ”Recall” is shown in
the display. Release [ MODE ] once ”Recall” is shown to activate the function.
• The following readings will transition automatically in the display:
Auto switch
Auto switch
Average
heart rate
Total lap
numbers
Total distance
Total
elapsed time
Average speed
Average
lap time
Maximum
heart rate
Average
heart rate
Steps
per lap
Split time
Lap
number
Auto switch
Distance
per lap
Average speed
Lap
time
14 15
Page 15

Alarm settings
1. Press and hold [ MODE ] until the hours setting flashes.
2. Set the hours by pressing [ ST./STP./RST. ] or [ LAP/RELOAD ] (hold in
the buttons to advance quickly).
3. Press [ MODE ]. The minutes setting will begin to flash. Set the minutes
using the same procedure as described above.
4. Press and hold in [ MODE ] once you are finished to exit the settings mode.
will appear on the display when the alarm is activated.
•
• The alarm will sound for 30 seconds.
• Press any button to turn the alarm off.
Note: The alarm will remain active if the alarm time is changed.
Timer settings
• Press [ ST./STP./RST. ] to start/stop the timer.
• When the timer has stopped, press [ LAP/RELOAD ] to clear and reset.
• When the timer has counted down to its set time an alarm will sound for
30 seconds.
1. Press and hold [ MODE ] until the hours setting flashes.
2. Set the hours by pressing [ ST./STP./RST. ] or [ LAP/RELOAD ] (hold in
the buttons to advance quickly).
3. Press [ MODE ]. The minutes setting will begin to flash. Set the minutes
using the same procedure as described above.
4. Press [ MODE ]. The seconds setting will begin to flash. Set the seconds
using the same procedure as described above.
5. Press and hold in [ MODE ] once you are finished to exit the settings mode.
Dual-time display
Dual-time display allows you to set your destination time while travelling and
also keep track of your local time at home.
1. Press and hold [ MODE ] until the hours setting flashes.
2. Set the hours by pressing [ ST./STP./RST. ] or [ LAP/RELOAD ] (hold in
the buttons to advance quickly).
3. Press [ MODE ]. The minute setting will begin to flash. Set the minutes
using the same procedure as described above.
4. Press and hold in [ MODE ] once you are finished to exit the settings mode.
English
15
Page 16
Standby mode
• In order to save battery life the screen can be turned off.
• Hold in [ LAP/RELOAD ] for about five seconds in time display mode to
English
turn off the screen.
• Time will still be kept in standby mode.
• Press any button to exit standby mode and return to normal time display.
Care and maintenance
• Handle the watch and chest strap carefully. Never subject them to
unnecessary knocks or blows.
• Clean the watch and chest strap with a lightly moistened soft cloth.
• Store the watch and chest strap in a dry place if you do not intend to
use them for a long time.
Changing the watch battery
The watch casing must only be opened by qualified personnel. Let a tradesman
perform the battery change if you are at all unsure about carrying out
the procedure yourself.
Note: If the watch is used in extremely cold weather the low battery icon may
be displayed. This is normal and the icon will disappear as soon as the watch
begins to reach body temperature.
Changing the chest strap battery
1. Turn the battery compartment’s cover so that
its arrow is pointing to the corresponding
arrow on the chest strap unit.
2. Turn the cover past the arrow symbol to
make it easier to remove.
3. Remove the old battery and insert a new one (CR2032).
Note: Note the polarity markings at the bottom of the battery
compartment to ensure correct insertion. The plus symbol should be on
top facing you and fit securely under the retaining bracket.
4. The cover has a thin o-ring to prevent dust and moisture from entering
the device. Make sure that this ring is undamaged during battery change.
5. Replace the cover with the arrow symbols lined up and turn the cover
so that its arrow is again pointing to the circle symbol to ensure that it is
properly closed.
16 17
Page 17

Disposal
This product should be disposed of in accordance with local regulations.
If you are unsure how to proceed, contact your local authority.
Specifications
Current time mode
Time system am, pm, hours, minutes, seconds
Time format 12-hour or 24-hour
Calendar month, date and day of week (auto-calendar
function for day of week and leap year)
Alarm mode
Daily alarm and hourly chime
Alarm sound 30 seconds
Stopwatch mode
Resolution 1/100 second
Measuring range 9 hours, 59 minutes, 59.99 seconds
Countdown timer
Resolution 1 second
Measuring range 23 hours, 59 minutes, 59 seconds
Timer sounds The timer beeps once per minute for the last
10 minutes, every 10 seconds the last minute
and every second for the last five seconds.
It beeps for 30 seconds when it has counted
down to zero.
English
17
Page 18

Exercise mode
Six fitness levels measure how fast your pulse decreases during a five minute
recovery period.
Automatic and manual settings for stride length.
English
Displayable steps range 0–999,999 steps
Exercise timer Max 24 hours
Distance measuring 0–99.99 km/0-–62.13 miles
Speed measuring 45 km/h / 27.96 mph
Calorie burn range 0–9,999 calories
Auto start/stop schedule 6 schedules
Measuring range 30 to 240 bpm
Heart rate zone
alert setting Three pre-defined zones and one user defined zone
Heart rate zone alert Above max, Above zone and Below zone
Exercise memory One reading
Exercise record Total exercise time, average speed, total distance,
total steps, total calorie burn, total fat burn,
maximum/minimum/average heart rate, above/in/
below zone exercise time.
Pedometer Sleep time (waits 1–240 min if no steps are
recorded before shutting off), sensitivity 1–5 levels.
Backlight
Type of backlight Electro-luminescent (EL) backlight
Page 19

Pulsklocka med stegräknare
Art.nr 31-1055 Modell D02I710
Läs igenom hela bruksanvisningen före användning och spara den sedan
för framtida bruk. Vi reserverar oss för ev. text- och bildfel samt ändringar av
tekniska data. Vid tekniska problem eller andra frågor, kontakta vår kundtjänst
(se adressuppgifter på baksidan).
Säkerhet
• Kontakta din läkare eller tränare om du är osäker på hur hårt du kan träna
innan du använder de olika funktionerna för pulsmätning.
• Ett ungefärligt värde för maxpuls kan beräknas om man från värdet 220
drar sin ålder. Ex: Om du är 40 år så är din maxpuls 220 – 40 = 180.
Produktbeskrivning
Pulsklocka med stegräknare. Mäter puls med medföljande bröstband enligt
personlig profil.
• Distans
• Hastighet
• Kaloriförbrukning
• Stoppur
• Timer
• Klocka
• Datum
• Minne för tidigare träningsresultat
• Vattenskyddad 5 ATM
19
19
Svenska
Page 20
Knappar och funktioner
Pulsklocka
1. [ LIGHT ] Belysning
• Tänd displayens
bakgrundsbelysning
i 3 sekunder.
2. [ MODE ] Val av funktion
• Tryck kort för att i tur och
Svenska
ordning välja följande
funktioner:
Tidvisning, träning
(exercise), stoppur
(chrono), alarm, timer eller
dubbel tidvisning (Dual-T).
Dubbel tidvisning innebär
att du t.ex. kan ställa in
lokal tid när du anländer till ditt resmål
och samtidigt se vad klockan är hemma.
• Tryck och håll in för att påbörja och avsluta inställningar i funktionerna
tidvisning, träning, alarm, timer och dubbel tidvisning.
• Tryck kort för att byta värde vid olika inställningar, t.ex. från sekunder
till minuter vid tidsinställning.
• Tryck och håll in för att öppna Recall-funktionen i stoppursläge.
3. [ ST./STP./RST. ] Start, stopp och reset
• Tryck kort för att starta och stoppa räkneverken i funktionerna
träning, stoppur och timer.
• Håll in för att nollställa.
• Tryck kort för att öka värden vid olika inställningar, t.ex. timmar
vid tidsinställning.
4. [ LAP/RELOAD ]
• Tryck kort för att minska värden vid olika inställningar, t.ex. timmar
vid tidsinställning.
• Tryck och håll in i ca 5 sekunder för att aktivera viloläge, displayen släcks.
• Tryck kort i timerläge för att starta om timern från början.
• Tryck kort för att visa olika värden i träningsläge.
1
2 4
3
20 21
Page 21
Bröstband
6 6
7
5. Batterihållare
6. Fäste för elastisk rem
7. Kontaktytor för pulsmätning
Obs!
• Justera den elastiska remmen så att
bröstbandet sitter stadigt under träning.
Det är mycket viktigt att kontaktytorna (7)
har god kontakt med huden under hela
mätperioden.
• Rengör bröstbandets kontaktytor med
några droppar vatten och torka torrt med
en ren trasa före varje användning.
• Tvätta huden med tvål och vatten innan
bröstbandet sätts på plats för bästa
funktion.
• Om du har mycket torr hud, använd
gärna lite kontaktgel för att förbättra
signalöverföringen.
5
7
Svenska
21
Page 22
Användning
Varje knapptryckning på [ MODE ] visar pulsklockans huvudfunktioner
i följande turordning:
Svenska
Tidvisningsläge
Dubbel tidvisning
Träningsläge
Timer
Tidvisningsläge
• Displayen visar veckodag, tid och datum.
Inställningar i tidvisningsläge
• Håll in [ MODE ] i ca 2 sekunder. Sekunderna börjar blinka.
• Använd [ ST./STP./RST. ] för att öka värdet och [ LAP/RELOAD ] för att
minska värdet.
• Tryck kort på [ MODE ] för att gå vidare till minuter och ändra värdet på
samma sätt som ovan.
• Tryck kort på [ MODE ] igen för att gå vidare till timmar osv.
• 17 olika inställningar kan göras i den ordning som bilden nedan visar.
• Håll in [ MODE ] i ca 2 sekunder för att avsluta inställningarna.
22 23
Stoppur
Alarm
Page 23
• Second (sekunder)
• Minute (minuter)
• Hour (timmar)
• Year (år)
• Month (månad)
• Day (dag)
• Format (12- eller 24-timmarsvisning)
• Chime (ljudsignal)
• Beep (knappljud på/av)
• Gender (kön: M-man, F-kvinna)
• Birth (födelseår)
• Unit (längdformat: Metric-meter, Imperial-feet/inches)
• Height (längd)
• Weight (vikt)
• BMI (visar aktuellt BMI utifrån vikt- och längdinställningar)
• Activity (LOW: otränad, MEDIUM: tränar 2–3 gånger i veckan,
HIGH: tränar regelbundet på hög nivå)
• Contrast (inställning av displayens kontrast)
23
Svenska
Page 24
Träningsläge (Exercise)
Pulsmätning
Träningsdata
Puls
Träningsdata
Pulsmätning
• 5 sekunder efter det att träningsläget väljs startar pulsmätning automatiskt.
Svenska
• Tryck [ ST./STP./RST. ] för att manuellt stänga av eller starta träningsläget.
När träningsfunktionen startas kommer tidigare registrerad träningsdata
att raderas.
• Pulsmätningsfunktionen kommer att stängas av automatiskt om ingen
puls registreras inom 5 minuter.
Larm vid pulsmätning
• Det går att ställa in önskat pulsintervall som man vill hålla under träning.
• Pulsklockan kan larma om inställda pulsvärden över- eller underskrids
(se avsnitt Inställningar nedan).
• För att larmet ska ljuda
måste Above Z (över önskat
pulsintervall) och Below Z
(under önskat pulsintervall)
slås på (se avsnitt Inställningar
nedan). Pulsklockan visar en
symbol som indikerar om man
befinner sig inom, över eller
under inställt pulsintervall.
Den larmar enligt bilden.
• Under Pulsmätning och Distansmätning kan olika träningsdata väljas på
raderna över och under huvudvärdet som visas i mitten på displayen.
Se avsnitt Distansmätning nedan.
Obs! Pulsklockan måste sitta på handleden och bröstremmen måste sitta runt
bröstkorgen om pulsmätning ska kunna registreras. Stäng av pulsmätning och
håll in [ ST./STP./RST. ] för att nollställa träningsdata.
AV PÅ
Puls (slag per minut)
Above Zone
Below Zone
Över maxpuls
Under inställt
Över inställt
pulsintervall
Inom inställt
pulsintervall
pulsintervall
24 25
Page 25
Följande underkategorier finns
i träningsläge:
• Distansmätning (Distance)
• Konditionstest (Fitness)
• Sammanfattning (Summary)
• Inställningar (Setting)
Tryck och håll in [ MODE ] för att se
kategorierna. Släpp [ MODE ] när
önskad underkategori visas.
Distansmätning (Distance)
Distans
Svenska
Distansmätning
Under Pulsmätning och Distansmätning kan olika träningsdata väljas på
raderna över och under huvudvärdet som visas i mitten på displayen.
• Tryck [ LAP/RELOAD ] för att välja mellan följande data för den övre raden:
”0:00” Träningstid
”I” Du befinner dig inom inställd tidsram
”B” Du befinner dig efter inställd tidsram
”A” Du befinner dig före inställd tidsram
”Sp” Hastighet
”Di” Distans
• Tryck och håll in [ LAP/RELOAD ] för att välja mellan följande data för den
nedre raden:
EMHR-diagram- Visar i % hur långt från maxpuls man för tillfället är
(visas inte vid distansmätning).
”KC”- Kaloriförbrukning
”G”- Fettförbränning
”St”- Stegräknare
”AV”- Medelpuls
”MX”- Maxpuls för aktuellt träningstillfälle (visas inte vid distansmätning).
”Hjärtsymbol”- Nuvarande puls (visas inte vid pulsmätning).
AV PÅ
25
Page 26
• Om EMHR-diagram väljs under
pulsmätning visas i % hur långt från
maxpuls man för tillfället är dels
i undre radens diagram dels till
höger om aktuell puls.
• Räkneexempel för användning av EMHR:
En 18-årig användare drar sin ålder från 220:
220–18 = 202 (se avsnitt Säkerhet ovan).
Uppmätt puls: 140
Svenska
140/202×100 % ≈ 69 %
Användaren ligger på 69 % av sin maxpuls.
Nuvarande
puls
Konditionstest (Fitness)
Pulsklockan kan ge en indikation på din kondition genom att mäta hur snabbt
pulsen går ner efter avslutat träningspass. Klockan mäter hur pulsen sjunker
under 5 minuters återhämtning efter avslutat träningspass. Resultatet visas
i 6 nivåer där 1 är bäst.
Stapel som visar
återstående tid
EMHR i %
EMHR i
diagram
Aktuell
puls
Konditionsnivåer
Nivå BPM (pulsslag per minut) efter 5 minuters återhämtning
1 < 100
2 105–100
3 110–105
4 120–110
5 130–120
6 >130
Timer
Puls vid
mätningens
början
Aktuell
puls
26 27
Page 27

Sammanfattning (Summary)
Pulsklockan sparar träningsdata från det senast avslutade träningspasset.
Dessa resultat visas på följande sätt:
Övre rad
Mellanrad
Undre rad
Övre rad
Träningstid
Puls över övre
inställd gräns
Medelhastighet
Mellanrad
inställt område
Fettförbränning Kalorier
Steg
Undre rad
Medelpuls
Puls inom
Distans Maxhastighet
Max- och min
puls
Puls under nedre
inställd gräns
Obs! All data raderas när ett nytt träningspass påbörjas
(när Exercise startas på nytt).
27
Svenska
Page 28

Inställningar (Setting)
Välj Träningsläge (Exercise). Tryck och håll in [ MODE ] tills ”Setting” syns
i displayen. Släpp [ MODE ]. Tryck [ MODE ] igen för att stega mellan de
olika inställningarna. Följande inställningar kan göras:
Svenska
• När ”My Zone” blinkar i Training Zone Select, tryck [ ST./STP./RST. ] eller
[ LAP/RELOAD ] för att välja Health, FatBurn, Aerobic eller My Zone.
• När ”Above Z” (puls över inställt pulsintervall), ”Below Z” (puls under inställt
pulsintervall) och ”Speed Alarm On” eller ”OFF” blinkar, tryck [ ST./STP./
RST. ] eller [ LAP/RELOAD ] för att slå på eller av funktionerna.
• Om någon av funktionerna ”My Zone-min och max”, ”Sense” (stegräknarens känslighet), ”Speed alarm-ON/OFF-High/Low”, ”Sleep Time”
(stegräknarens viloläge), ”Odo meter” blinkar, tryck [ ST./STP./RST. ] eller
[ LAP/RELOAD ] för att ändra värdet. Håll in någon av knapparna för att
snabbt öka eller minska värdet.
Obs! Stegräknarens känslighet är 1–5 där 1 är låg och 5 hög.
När Above Z eller Below Z är påslaget visas ikonen ”Z” överst i displayen.
• För att pulsklockan ska kunna beräkna hastighet och avstånd på rätt sätt
är det nödvändigt för användaren att ange steglängd för gång och löpning.
• Det finns två sätt att kalibrera steglängden i menyerna för walk (gång) och
run (löpning), auto eller manuellt.
28 29
Page 29

Auto
1. Välj Calibrate Walk-inställningen.
2. Tryck [ ST./STP./RST. ] för att ställa in önskad sträcklängd.
3. Tryck [ LAP/RELOAD ] för att starta kalibreringen.
4. Gå eller spring den angivna sträckan.
5. Tryck [ ST./STP./RST. ] eller [ LAP/RELOAD ] för att avsluta kalibreringen.
6. Pulsklockan kommer automatiskt att kalkylera steglängden för gång och löpning.
Manuellt
1. Välj Calibrate Walk- eller Run-inställningen.
2. Tryck [ MODE ] för att öppna inställningarna för WalkSt (steglängd gång)
eller Run St (steglängd löpning).
3. När värdet blinkar, tryck [ ST./STP./RST. ] eller [ LAP/RELOAD ] för att ange
önskat värde.
Stoppur (Chronograf)
• Tryck [ ST./STP./RST. ] för att starta tidtagning.
• Tryck [ LAP/RELOAD ] under tidtagning för att registrera en varvtidtid.
• Tryck [ ST./STP./RST. ] för att stoppa tidtagning.
• Håll in [ ST./STP./RST. ] när tidtagningen är stoppad för att nollställa
tidtagningen.
10 sekunder
START
Svenska
Varvtid
STOPP
29
Page 30

Stoppursfunktion
När stoppursfunktionen är vald går det att välja vad som ska visas på
displayens översta rad. Håll in [ MODE ] när tidtagning har startats för att välja
mellan följande mätområden:
• Speed (hastighet)
• Distance (avstånd)
• Step (steg)
• StopW (stoppur)
• Släpp [ MODE ] när önskat mätområde visas.
Svenska
Varvdata
Pulsklockan kan spara varvtid och puls under ett träningstillfälle. Dessa data
kan visas efter träningstillfällets slut.
• Håll in [ MODE ] när tidtagningen är stoppad tills ”Recall” visas i displayen.
Släpp [ MODE ] när ”Recall” visas för att öppna funktionen.
• Pulsklockan skiftar automatiskt mellan att visa följande data:
Autobyte av
display
Autobyte av
display
Totalt antal
varv
Total distans
Total
förfluten tid
Medelhastighet
Medelvarvtid
MaxpulsMedelpuls
Medel-
puls
Steg
per varv
Split time
Varv-
nummer
Autobyte
av display
Distans
per varv
Medelhastighet
Varv-
tid
30 31
Page 31

Alarminställningar
1. Tryck och håll in [ MODE ] tills timmarna blinkar.
2. Ställ in timmarna genom att trycka [ ST./STP./RST. ] eller [ LAP/RELOAD ]
(håll in knapparna för att stega snabbare).
3. Tryck kort på [ MODE ], minuterna blinkar. Ställ in på samma sätt som ovan.
4. Tryck och håll in [ MODE ] när inställningen är klar för att avsluta inställningarna.
visas i displayen när larmet är aktiverat.
•
• Larmet ljuder i 30 sekunder.
• Tryck på valfri knapp för att stänga av.
Obs! Larmet aktiveras automatiskt om tiden ställs om.
Timerinställningar
• Tryck [ ST./STP./RST. ] för att starta och stoppa timern.
• När timern är stoppad, tryck [ LAP/RELOAD ] för att starta om från början.
• När timern har räknat ner inställd tid ljuder ljudsignalen i 30 sekunder.
1. Tryck och håll in [ MODE ] tills timmarna blinkar.
2. Ställ in timmarna genom att trycka [ ST./STP./RST. ] eller [ LAP/RELOAD ]
(håll in knapparna för att stega snabbare).
3. Tryck kort på [ MODE ], minuterna blinkar. Ställ in på samma sätt som ovan.
4. Tryck kort på [ MODE ], sekunderna blinkar. Ställ in på samma sätt som ovan.
5. Tryck och håll in [ MODE ] när inställningen är klar för att avsluta inställningarna.
Dubbel tidvisning
Dubbel tidvisning innebär att du t.ex. kan ställa in lokal tid när du anländer till
ditt resmål och samtidigt se vad klockan är hemma.
1. Tryck och håll in [ MODE ] tills timmarna blinkar.
2. Ställ in timmarna genom att trycka [ ST./STP./RST. ] eller [ LAP/RELOAD ]
(håll in knapparna för att stega snabbare).
3. Tryck kort på [ MODE ], minuterna blinkar. Ställ in på samma sätt som
ovan.
4. Tryck och håll in [ MODE ] när inställningen är klar för att avsluta inställningarna.
Svenska
31
Page 32

Viloläge
• För att spara batteri kan pulsklockans display stängas av.
• Håll ner [ LAP/RELOAD ] i ca 5 sekunder i tidvisningsläge för att
släcka displayen.
• Klockan fortsätter att hålla tiden i viloläget.
• Tryck på valfri knapp för att avbryta viloläget och återgå till tidvisningsläget.
Skötsel och underhåll
• Behandla klockan och bröstbältet varsamt. Utsätt dem inte för slag
Svenska
och stötar.
• Rengör klockan och bröstbältet med en lätt fuktad, mjuk trasa.
• Förvara klockan och bröstbältet i ett torrt utrymme om du inte tänker
använda dem under en längre period.
Batteribyte klocka
Klockans boett får endast öppnas av kvalificerad personal. Låt en urmakare
utföra batteribytet om du känner dig osäker på hur arbetet ska utföras.
Obs! Om klockan används i mycket kall väderlek kan symbolen för låg batterikapacitet visas utan att batteriet är förbrukat. Symbolen försvinner när klockan
blir varm.
Batteribyte bröstband
1. Vrid batterihållarens lock så att
pilsymbolen flyttas från punktsymbolen
till pilsymbolen på bröstbandet.
2. Vrid locket förbi pilen så går det lätt att
ta bort.
3. Ta ur det förbrukade batteriet och sätt
i ett nytt (CR2032). Obs! Se märkningen i botten på batterihållaren så att
batteriet monteras rätt.
Plus på batteriet ska vändas uppåt mot dig och batteriet måste
skjutas in under den lilla klacken.
4. Locket har en tunn o-ring som ser till att ingen fukt kommer in i batterihållaren.
Kontrollera att den är oskadad i samband med batteribytet.
5. Sätt tillbaka locket med pilsymbolen mot pilsymbolen på bröstbandet och
stäng locket genom att vrida tillbaka det till punktsymbolen.
32 33
Page 33

Avfallshantering
När du ska göra dig av med produkten ska detta ske enligt lokala föreskrifter.
Är du osäker på hur du ska gå tillväga, kontakta din kommun.
Specifikationer
Tidsfunktioner
Tidssystem am (fm), pm (em), h (timme), min (minut),
s (sekunder)
Tidsformat 12 eller 24 timmar
Kalender månad, datum och veckodag (automatisk
kalenderfunktion för skottår och veckodag).
Alarmfunktion
Återkommande alarm- och timsignal
Alarmsignal 30 sekunder
Stoppursfunktion
Upplösning 1/100 sekund
Mätintervall 9 timmar 59 minuter och 59,99 sekunder
Nedräkningstimer
Upplösning 1 sekund
Mätintervall 23 timmar 59 minuter och 59 sekunder
Timerljud Timern ljuder en gång i minuten de sista
tio minuterna, var tionde sekund den sista
minuten och en gång i sekunden de sista
fem sekunderna. Den ljuder i 30 sekunder
när den har räknat ner till noll.
Svenska
33
Page 34

Träningsfunktion
6 konditionsnivåer mäter hur fort pulsen går ner under en 5 minuter lång
återhämtningsperiod.
Automatisk och manuell inställning av steglängd.
Antal steg som kan visas 0–999999 steg
Träningstimer max 24 timmar
Mätning av
tillryggalagd sträcka 0–99,99 km/0-62,13 mile
Mätning av hastighet 45 km/h/27,96 mph
Kaloriförbrukning 0–9999 kalorier
Svenska
Schema för automatisk
start/stopp 6 scheman
Mätintervall 30 till 240 bpm
Inställning av zonalarm 3 förinställda zoner och en som du själv kan ställa in.
Zonalarm över max, över zon och under zon
Träningsminne En registrering
Träningsregistrering total träningstid, genomsnittlig hastighet,
total sträcka, totalt antal steg, kaloriförbrukning,
fettförbränning, högsta/lägsta/genomsnittlig puls
och träningstid över/inom/under zon.
Stegräknare viloläge (1–240 minuter), stegräknarens
känslighet (nivå 1–5).
Bakgrundsbelysning
Typ av
bakgrundsbelysning Elektroluminiscent (EL)
Page 35

Pulsklokke med skritteller
Art.nr. 31-1055 Modell D02I710
Les brukerveiledningen nøye før produktet tas i bruk, og ta vare på den for
framtidig bruk. Vi reserverer oss mot ev. tekst- og bildefeil, samt forandringer
av tekniske data. Ved tekniske problemer eller spørsmål, ta kontakt med vårt
kundesenter. (Se opplysninger om kundesenteret i denne bruksanvisningen).
Sikkerhet
• Ta kontakt med legen eller treneren din, før du bruker de forskjellige
funksjonene for pulsmåling, dersom du er usikker på hvor hardt du kan trene.
• En cirkaverdi for maksimal puls kan beregnes hvis man trekker alderen sin
fra verdien 220. Eks: Hvis du er 40 år, så er din makspuls: 220 – 40 = 180.
Produktbeskrivelse
Pulsklokke med skritteller. Måler puls med medfølgende brystbånd i henhold
til personlig profil.
• Distanse
• Hastighet
• Kaloriforbruk
• Stoppeklokke
• Timer (Tidsur)
• Klokke
• Dato
• Minne for tidligere treningsresultat
• Vannbeskyttet 5 ATM
Norsk
35
35
Page 36

Knapper og funksjoner
Pulsklokke
1. [ LIGHT ] Belysning
• Tenner bakgrunnsbelysningen på skjermen
i 3 sekunder.
2. [ MODE ] Velg funksjon
• Trykk kort for å velge blant
funksjonene i følgende
rekkefølge: Vising av
klokkeslett, trening
(Exercise), stoppeklokke
(Chrono), Alarm, Timer
eller dobbel tidsvisning
Norsk
(Dual-T). Den doble
tidsvisingen gjør at du
f.eks. kan stille inn lokal tid når du kommer fram til ditt reisemål
og samtidig vil se hva klokken er hjemme.
• Trykk og hold inne for å starte eller avslutte innstillinger i funksjonene
for vising av tid, trening, alarm, timer og dobbelt tidsvising.
• Trykk kort for å skifte verdi ved forskjellige innstillinger som for
eksempel fra sekunder til minutter ved tidsinnstillingen.
• Trykk inn og hold for å åpne Recall-funksjonen i stoppeklokkemodus.
3. [ ST./STP./RST. ] Start, stopp og reset
• Trykk kort for å starte eller stoppe telleverket i funksjonene trening,
stoppeklokke og timer.
• Hold inne for å nullstille.
• Trykk kort for å øke verdien ved forskjellige innstillinger, som f.eks.
timer ved tidsinnstilling.
4. [ LAP/RELOAD ]
• Trykk kort for å redusere verdien ved forskjellige innstillinger, som f.eks.
timer ved tidsinnstilling.
• Trykk og hold inne i ca. 5 sekunder for å aktivere hvilemodus,
og skjermen slukkes.
• Trykk kort i timemodus for å starte timeren fra starten.
• Trykk kort for å vise forskjellige verdier i treningsmodus.
1
2 4
3
36 37
Page 37

Brystbånd
6 6
7
5. Batteriholder
6. Feste for elastisk reim
7. Kontaktflater for pulsmåling
Obs!
• Juster den elastiske reimen slik at
brystbåndet sitter stabilt under treningen.
Det er svært viktig at kontaktflatene (7)
har god kontakt med huden i hele
måleperioden.
• Brystbåndets kontaktflater rengjøres
grundig med litt vann som tørkes av med
en rein klut mellom hver bruk.
• Vask huden med såpe og vann før
brystbåndet settes på plass, for å oppnå
best mulig resultat.
• Hvis du har veldig tørr hud kan du
gjerne bruke litt kontaktgel for å forbedre
signaloverføringen.
5
7
Norsk
37
Page 38

Bruk
Hvert tastetrykk på [ MODE ] viser pulsklokkens hovedfunksjoner i følgende
rekkefølge:
Tidsvisningsmodus
Norsk
Dobbelt tid
Treningsmodus
Timer
Tidsvisningsmodus
• Skjermen viser ukedag, klokkeslett og dato.
Innstillinger i tidsvisningsmodus
• Trykk og hold inne [ MODE ] inne i ca. 2 sekunder.
Sekundangivelsen begynner å blinke.
• Bruk [ ST./STP./RST. ] for å øke verdien og [ LAP/RELOAD ] for å
redusere verdien.
• Trykk kort på [ MODE ] for å gå videre til minutter og verdien endres på
samme måte som beskrevet ovenfor.
• Trykk deretter på [ MODE ] igjen for å gå videre til timer osv.
• 17 forskjellige innstillinger kan foretas i den rekkefølgen som bildet viser.
• Hold [ MODE ] inne i ca. 2 sekunder for å avslutte innstillingene.
38 39
Stoppeklokke
Alarm
Page 39

• Second (sekunder)
• Minute (minutter)
• Hour (timer)
• Year (år)
• Month (måned)
• Day (dag)
• Format (12- eller 24-timersvisning)
• Chime (lydsignal)
• Beep (knapplyd på/av)
• Gender (kjønn: M-mann, F-kvinne)
• Birth (fødselseår)
• Unit (lengdeformat: Metric-meter, Imperial-feet/inches)
• Height (høyde)
• Weight (vekt)
• BMI (viser aktuell BMI ut fra vekt- og høydeinnstillinger)
• Activity (LOW: utrent, MEDIUM: trent 2–3 ganger i uken,
HIGH: trent regelmessig på høyt nivå)
• Contrast (Innstilling av kontrast på skjermen)
39
Norsk
Page 40

Treningsmodus (Exercise)
Pulsmåling
Treningsdata
Puls
Treningsdata
Pulsmålning
• 5 sekunder etter at treningsmodus er valgt starter pulsmålingen automatisk.
• Trykk [ ST./STP./RST. ] for å stenge eller starte treningsmodus manuelt.
• Når treningsfunksjonen startes kommer tidligere registrerte treningsdata
til å slettes.
• Pulsmålingsfunksjonen vil stenges automatisk hvis den ikke registrerer
noen puls innen 5 minutter.
Norsk
Alarm ved pulsmåling
• Dette betyr at det går an å stille inn det pulsintervallet som man vil holde
under treningen.
• Pulsklokken kan alarmere hvis den innstilte pulsverdien over- eller
underskrides (se avsnittet Innstillinger nedenfor).
• For at alarmen skal varsle
må Above Z (over ønsket
pulsintervall) og Below Z
(under ønsket pulsintervall)
slås på (se avsnittet
Innstillinger nedenfor).
Pulsklokken viser et symbol
som indikerer om man
befinner seg innenfor, over
eller under det innstilte
pulsintervallet. Den vil
alarmere, som bildet viser.
• Under Pulsmåling og Distansemåling kan man velge forskjellige
treningsdata på radene over og under hovedverdien som vises i midten på
skjermen. Se avsnitt Distansemåling nedenfor.
Obs! Pulsklokken må sitte på håndleddet og brystreimen må plasseres rundt
brystet hvis pulsmålingen skal kunne registreres. Skru av pulsmåling og hold
[ ST./STP./RST. ] for å nullstille treningsdataene.
AV PÅ
Puls (slag per minutt)
Above Zone
Below Zone
Over maks puls
Over innstilte
pulsintervall
Innenfor innstilt
pulsintervall
Under innstilte
pulsintervall
40 41
Page 41

I treningsmodus finner man følgende
underkategorier:
• Distansemåling (Distance)
• Kondisjonstest (Fitness)
• Sammendrag (Summary)
• Innstillinger (Setting)
Trykk inn og hold [ MODE ] inne for å se
kategoriene. Slipp [ MODE ] når ønsket
underkategori vises.
Distansemåling (Distance)
Distanse
Distansemålning
Under Pulsmåling og Distansemåling kan man velge forskjellige treningsdata
på radene over og under hovedverdien som vises på midten av skjermen.
• Trykk [ LAP/RELOAD ] for å velge mellom følgende data for den øvre raden:
«0:00» Treningstid
«I» Du ligger innenfor innstilt tidsramme
«B» Du ligger etter innstilt tidsramme
«A» Du ligger foran innstilt tidsramme
«Sp» Hastighet
«Di» Distanse
• Trykk inn og hold [ LAP/RELOAD ] for å velge mellom følgende data for den
nedre raden:
EMHR-diagram – Viser, i prosenter, hvor langt fra maks puls man for tiden
ligger (vises ikke ved distansemåtning).
«KC» - Kaloriforbruk
«G» - Fettforbrenning
«St» - Skritteller
«AV» - Gjennomsnittlig puls,
«MX» - Maks puls for den aktuelle treningen (vises ikke ved distansemåling).
«Hjertesymbol» - Nåværende puls (vises ikke ved pulsmåling).
AV PÅ
41
Norsk
Page 42

• Hvis EMHR-diagrammet velges ved
pulsmåling, vises det i prosenter,
hvor langt fra maks puls man
for tiden er til dels under radens
diagram og til dels høyere enn
aktuell puls.
• Regneeksempel for bruk av EMHR:
En 18-åring trekker alderen sin fra 220: 220 – 18 = 202
(se avsnitt Sikkerhet ovenfor)
Målt puls: 140
140/202×100 % ≈ 69 %
Brukerens maks puls ligger på 69 %.
Nåværende
puls
Kondisjonstest (Fitness)
Pulsklokken kan gi en indikasjon på kondisjonen din ved at du måler hvor
raskt pulsen går ned etter avsluttet treningsøkt. Klokken måler hvordan pulsen
Norsk
synker etter 5 minutters innhenting etter avsluttet treningsøkt. Resultatet vises
i 6 nivåer der 1 er best.
Indikasjon på tiden
som er igjen
EMHR i %
EMHR i
diagram
Aktuell
puls
Kondisjonsnivåer
Nivå BPM (pulsslag per minutt) etter 5 minutters innhenting
1
2 105–100
3 110–105
4 120–110
5 130–120
6
Timer
< 100
>130
Puls ved
målingens
start
Aktuell
puls
42 43
Page 43

Sammendrag (Summary)
Pulsklokken lagrer treningsdata fra den siste avsluttede treningsøkten.
Disse resultatene vises på følgende måte:
Øverste rad
Mellomste rad
Nederste rad
Øverste rad
Treningstid
Puls over
øvre innstilte
Gjennomsnittlig
Trinn/skritt
grense
hastighet
Mellomste rad
Gjennomsnittlig
Puls innenfor
innstilt område
Distanse Maks hastighet
Fettforbrenning Kalorier
puls
Nederste rad
Maks- og min.
Puls under
nedre innstilte
grense
puls
Obs! Alle data slettes når en ny treningsøkt startes (når Exercise startes på nytt).
43
Norsk
Page 44

Innstillinger (Settings)
Velg Treningsmodus (Exercise). Trykk og hold [ MODE ] inne til «Setting» kommer
opp på skjermen. Slipp [ MODE ]. Trykk inn [ MODE ] igjen for å bevege deg
mellom de forskjellige innstillingene. Følgende innstillinger kan utføres:
Norsk
• Når «My Zone» blinker i Training Zone Select, trykk [ ST./STP./RST. ] eller
[ LAP/RELOAD ] for å velge Health, FatBurn, Aerobic eller My Zone.
• Når «Above Z» (puls over innstilte grense), «Below Z» (puls under innstilte
grense) og «Speed Alarm On» eller «OFF» blinker, trykk [ ST./STP./RST. ]
eller [ LAP/RELOAD ] for å slå på eller av funksjonene.
• Hvis en av følgende funksjoner «My Zone-min og max», «Sense» (skrittetellerens følsomhet), «Speed alarm-ON/OFF-High/Low», «Sleep Time»
(skritte-tellerens hvilemodus), «Odo meter» blinker, trykk [ ST./STP./RST. ] eller
[ LAP/RELOAD ] for å endre verdien. Hold en av knappene inne for raskt å
øke eller redusere verdien.
Obs! Skrittellerens følsomhet er 1–5 der 1 er lavt og 5 er høyt. Når Above Z eller
Below Z er på vises ikonet «Z» øverst på skjermen.
• For at pulsklokken skal kunne beregne hastigheten og avstanden på riktig måte,
er det nødvendig at brukeren oppgir skrittlengden sin for gange og løping.
• Det er to måter å kalibrere skrittlengden på i menyene for Walk (gange)
og Run (løping), Auto eller Manuelt.
44 45
Page 45

Auto
1. Velg Calibrate Walk innstillingen.
2. Trykk [ ST./STP./RST. ] for å stille inn ønsket strekningen.
3. Trykk på [ LAP/RELOAD ] for å starte kalibreringen.
4. Gå eller løp den angitte strekningen.
5. Trykk på [ ST./STP./RST. ] eller [ LAP/RELOAD ] for å avslutte kalibreringen.
6. Pulsklokken vil automatisk kalkulere skrittlengden for gange og løping.
Manuelt
1. Velg Calibrate Walk- eller Run- innstillingen.
2. Trykk [ MODE ] for å åpne innstillingsmodus for WalkSt (skrittlengde gange)
eller Run St (skrittlengde løping).
3. Når verdien blinker, trykk på [ ST./STP./RST. ] eller [ LAP/RELOAD ] for
å oppgi ønsket verdi.
Stoppeklokke (Chronograf)
• Trykk på [ ST./STP./RST. ] for å starte tidtakingen.
• Trykk på [ LAP/RELOAD ] under tidtaking for å registrere en rundetid.
• Trykk på [ ST./STP./RST. ] for å stoppe tidtakingen.
• Hold [ ST./STP./RST. ] inne når tidtakingen stopper, for å nullstille tidtakingen.
10 sekunder
START
Norsk
Rundetid
STOPP
45
Page 46

Stoppeklokkefunksjon
Når stoppeklokkefunksjonene er valgt kan man velge hva som skal vises på
skjermens øverste rad. Hold [ MODE ] inne når tidtakingen startes for å velge
mellom følgende måleområder:
• Speed (hastighet)
• Distance (avstand)
• Step (skritt)
• StopW (stoppeklokke)
• Slipp [ MODE ] når ønsket måleområde vises.
Rundeinformasjon
Pulsklokken kan lagre rundetid og puls under en treningsøkt. Disse dataene
kan vises etter treningsøkten er fullført.
• Hold [ MODE ] inne når tidtakingen er stoppet til «Recall» vises på
skjermen. Slipp [ MODE ] når «Recall» vises for å åpne funksjonen.
• Pulsklokken skifter automatisk mellom å vise følgende data:
Norsk
Auto skifte
av skjerm
Auto skifte
av skjerm
puls
puls
Split time
Rundenummer
Auto skifte
av skjerm
Distanse
per runde
Runde-
tid
Totalt antall
runder
Total distanse
Total
forbrukt tid
Gjennomsnittlig
hastighet
Gjennomsnittlig
rundetid
Maks pulsGjennomsnittlig
Gjennomsnittlig
Skritt
per runde
Gjennomsnittlig hastighet
46 47
Page 47

Alarminnstillinger
1. Trykk og hold [ MODE ] inne til timer blinker.
2. Still inn timene ved å trykke inn [ ST./STP./RST. ] eller [ LAP/RELOAD ]
(hold knappene inne for å gå raskere).
3. Trykk kort på [ MODE ], minuttene blinker, still inn minutter på samme måte
som beskrevet ovenfor.
4. Trykk og hold [ MODE ] inne for å avslutte når innstillingen er fullført.
vises i displayet når alarmen er aktivert.
•
• Alarmen alarmerer i 30 sekunder.
• Trykk på valgfri knapp for å stenge alarmen.
Obs! Alarmen aktiveres automatisk hvis tiden endres.
Timerinnstillinger
• Trykk på [ ST./STP./RST. ] for å starte og stoppe timeren.
• Når timeren er stoppet, trykk på [ LAP/RELOAD ] for å starte på nytt.
• Når timeren har telt ned den innstilte tiden kommer et lydsignal til
å alarmere i 30 sekunder.
1. Trykk og hold [ MODE ] inne til timer blinker.
2. Still inn timene ved å trykke inn [ ST./STP./RST. ] eller [ LAP/RELOAD ]
(hold knappene inne for å gå raskere).
3. Trykk kort på [ MODE ], minuttene blinker, still inn på samme måte som
beskrevet ovenfor.
4. Trykk kort på [ MODE ], sekundene blinker, still inn på samme måte som
beskrevet ovenfor.
5. Trykk og hold [ MODE ] inne for å avslutte når innstillingen er fullført.
Dobbelt tidsvisning
Den doble tidsvisingen innebærer at du f.eks. kan stille inn lokal tid når
du kommer fram til ditt reisemål og samtidig vil se hva klokken er hjemme.
1. Trykk og hold [ MODE ] inne til timer blinker.
2. Still inn timene ved å trykke inn [ ST./STP./RST. ] eller [ LAP/RELOAD ]
(hold knappene inne for å gå raskere).
3. Trykk kort på [ MODE ], minuttene blinker, still inn på samme måte som
beskrevet ovenfor.
4. Trykk og hold [ MODE ] inne for å avslutte når innstillingen er fullført.
Norsk
47
Page 48

Hvilemodus
• For å spare på batteriene kan pulsklokkens skjerm skrues av.
• Hold [ LAP/RELOAD ] nede i ca. 5 sekunder i tidsvisningsmodus for
å skru av skjermen.
• Klokken fortsetter å holde tiden i hvilemodus.
• Trykk på valgfri knapp for å avbryte hvilemodus og å gå tilbake til
tidsvisningsmodus.
Stell og vedlikehold
• Klokken og brystbåndet må behandles varsomt. Utsett dem ikke for
slag og støt.
• Rengjør klokken og brystbeltet med en lett fuktet, myk klut.
• Klokken og brystbeltet skal oppbevares tørt når de ikke er i bruk.
Skifte av batteri, klokke
Norsk
Klokkehuset skal kun åpnes av kvalifisert personale. Lever den til en urmaker
hvis du ikke er sikker på hvordan det skal utføres.
Obs! Hvis klokken brukes i veldig kaldt vær, kan symbolene for lavt batteri
vises selv om batteriet ikke er utbrukt. Dette symbolet forsvinner nå klokken
blir varm igjen.
Skifte av batteri, brystbånd
1. Drei batteriholderens lokk slik at
pilsymbolet flyttes fra punktsymbolet til
pilsymbolet på brystbåndet.
2. Drei lokket forbi pilen slik at det enkelt kan
tas av.
3. Ta ut det gamle batteriet og sett i et nytt (CR2032). Obs! Følg merking
for polaritet i bunnen av batteriholderen. Pluss på batteriet skal vende
oppover mot deg og batteriet må skyves inn under den lille sneppen.
4. Lokket har en tynn o-ring som gjør at fuktighet ikke trekker inn
i batteriholderen. Kontroller at den ikke er skadet samtidig med
skifte av batteri.
5. Sett lokket på plass igjen ved å ha pilsymbolet på lokket mot pilsymbolet
på brystbåndet og drei lokket til pilen kommer ovenfor punktsymbolet.
48 49
Page 49

Avfallshåndtering
Når produktet skal kasseres, må det skje i henhold til lokale forskrifter.
Ved usikkerhet, ta kontakt med lokale myndigheter.
Spesifikasjoner
Tidsfunksjoner
Tidssystem am (fm), pm (em), h (time), min (minutt),
s (sekund)
Tidsformat 12 eller 24 timer
Kalender Måned, dato og ukedag (automatisk kalender-
funksjon for skuddår og ukedag).
Alarmfunksjon
Repetisjon av alarm- og timesignal
Alarmsignal 30 sekunder
Stoppeklokkefunksjon
Oppløsning 1/100 sekund
Måleintervall 9 timer, 59 minutter og 59,99 sekunder
Nedtellingstimer
Oppløsning 1 sekund
Måleintervall 23 timer, 59 minutter og 59 sekunder
Timervarsling Timeren varsler en gang i minuttet de siste
ti minuttene, hvert tiende sekund det siste
minuttet og en gang i sekundet de siste
fem sekundene. Den vil varsle i 30 sekunder når
den har telt ned til null.
Norsk
49
Page 50

Treningsfunksjon
6 kondisjonsnivåer måler hvor raskt pulsen går ned i løpet av en
5 minutters innhentingsperiode.
Automatisk og manuell innstilling av skrittlengde.
Antall trinn som
kan vises 0–999999 trinn
Treningstimer Maks 24 timer
Måling av
tilbakelagt strekning 0–99,99 km/0–62,13 mile
Måling av hastighet 45 km/h / 27,96 mph
Kaloriforbruk 0–99999 kalorier
Skjema for automatisk
start/stopp 6 skjemaer
Måleintervall 30 til 240 bpm
Innstilling av sonealarm 3 forhåndsinnstilte soner og 1 som du selv
Norsk
kan stille inn.
Sonealarm Over maks, over sone og under sone
Treningsminne En registrering
Treningsregistrering Total treningstid, gjennomsnittlig hastighet,
total strekning, totalt antall skritt, kaloriforbruk,
fettforbrenning, høyeste/laveste/gjennomsnittlig
puls, treningstid over/innenfor/under sone.
Skritteller hvilemodus (1–240 minutter), skrittellerens
følsomhet (nivå 1–5).
Bakgrunnsbelysning
Type
bakgrunnsbelysning Elektroluminiscent (EL)
Page 51

Sykemittarikello ja askelmittari
Tuotenro 31-1055 Malli D02I710
Lue käyttöohje ennen tuotteen käyttöönottoa ja säilytä se tulevaa tarvetta
varten. Pidätämme oikeuden teknisten tietojen muutoksiin. Emme vastaa
mahdollisista teksti- tai kuvavirheistä. Jos laitteeseen tulee teknisiä ongelmia,
ota yhteys myymälään tai asiakaspalveluun (yhteystiedot käyttöohjeen lopussa).
Turvallisuus
• Jos et ole varma, kuinka kova harjoittelu sinulle sopii, ota yhteys lääkäriisi
tai valmentajaasi ennen mittarin käyttöönottoa.
• Maksimisykkeen likiarvo voidaan laskea vähentämällä arvosta 220 oma ikä.
Esimerkki: Jos olet 40-vuotias, maksimisykkeesi on 220 – 40 = 180.
Tuotekuvaus
Sykemittarikello ja askelmittari. Mittaa sykkeen mukana tulevalla lähetinvyöllä
käyttäjän profiilin mukaan.
• Matkan pituus
• Nopeus
• Kalorien kulutus
• Ajanotto
• Ajastin
• Kello
• Päiväys
• Muisti, joka tallentaa edellisen harjoituksen tuloksen
• Vesitiiviys 5 ATM
Suomi
51
51
Page 52

Painikkeet ja toiminnot
Sykemittarikello
1. [ LIGHT ] Valo
• Sytyttää näytön taustavalon
3 sekunnin ajaksi.
2. [ MODE ] Toiminnon valinta
• Paina lyhyesti valitaksesi
seuraavia toimintoja
järjestyksessä: Ajannäyttö,
harjoittelu (Exerciese),
ajanotto (Chrono),
äänimerkki, ajastin tai
kahden ajan näyttö
(Dual-T). Kahden ajan
näyttö mahdollistaa
paikallisen kellonajan
asettamisen matkoilla.
Samalla näet kellonajan kotona.
• Paina ja pidä pohjassa aloittaaksesi ja päättääksesi seuraavien
toimintojen asettamisen: ajannäyttö, harjoittelu, merkkiääni, ajastin
ja kahden ajan näyttö.
Suomi
• Paina lyhyesti vaihtaaksesi eri asetusten arvoja, esim. ajan asetus
sekunneista minuuteiksi.
• Paina ja pidä pohjassa aktivoidaksesi Recall-toiminto ajanottotilassa.
3. [ ST./STP./RST. ] Käynnistys, pysäytys ja palautus
• Käynnistä ja pysäytä harjoittelu-, ajanotto- ja ajastintoiminnon laskuri
painamalla painiketta lyhyesti.
• Nollaa pitämällä painiketta pohjassa.
• Paina painiketta lyhyesti suurentaaksesi eri asetusten arvoja, esim.
tunteja aikaa asettaessa.
4. [ LAP/RELOAD ]
• Paina lyhyesti pienentääksesi eri asetusten arvoja, esim. tunteja aikaa
asettaessa.
• Aktivoi virransäästötila painamalla painiketta ja pitämällä sitä pohjassa
noin 5 sekunnin ajan. Näyttö sammuu.
• Käynnistä ajastin uudelleen painamalla painiketta lyhyesti ajastintilassa.
• Kun painat painiketta lyhyesti, saat näkyviin harjoittelutilan eri arvot.
1
2 4
3
52 53
Page 53

Lähetinvyö
6 6
7
5. Paristolokero
6. Elastisen nauhan kiinnike
7. Anturiosat sykkeenmittausta varten
Huom.!
• Säädä elastista nauhaa siten, että
lähetinvyö pysyy kunnolla paikoillaan
harjoittelun aikana. On erittäin tärkeää,
että anturiosat (7) ovat kunnolla ihoa
vasten koko mittausjakson ajan.
• Puhdista lähetinvyön anturiosat
kosteuttamalla niitä muutamalla
vesipisaralla ja kuivaa ne puhtaalla liinalla
ennen jokaista käyttökertaa.
• Parhaan tuloksen saat, kun peset ihosi
saippualla ja vedellä, ennen kuin asetat
lähetinvyön paikalleen.
• Jos ihosi on hyvin kuiva, suosittelemme
käyttämään pientä määrää kontaktigeeliä
parantamaan signaalin vastaanottamista.
5
7
Suomi
Page 54

Käyttö
Joka kerta kun painat [ MODE ]-painiketta, sykemittarikellon päätoiminnot
näkyvät näytöllä seuraavassa järjestyksessä:
Ajannäyttötila
Kahden ajan näyttö
Ajannäyttötila
Suomi
• Näytöllä näkyy viikonpäivä, kellonaika
ja päivämäärä.
Harjoitustila
Ajastin
Ajannäyttötilan asetukset:
• Pidä [ MODE ]-painiketta pohjassa noin 2 sekunnin ajan.
Sekunnit alkavat vilkkua.
• Suurenna arvoa painamalla painiketta [ ST./STP./RST. ] ja pienennä
arvoa painamalla painiketta [ LAP/RESET ]. Siirry minuuttien asetukseen
painamalla lyhyesti painiketta [ MODE ] ja muuta arvoa samalla tavalla
kuin edellisessä kohdassa.
• Siirry tuntien asetukseen jne. painamalla lyhyesti painiketta [ MODE ].
• 17 eri asetusta voidaan suorittaa seuraavan sivun kuvan osoittamalla tavalla.
• Poistu asetustilasta pitämällä painiketta [ MODE ] pohjassa noin
2 sekunnin ajan.
54 55
Ajanotto
Äänimerkki
Page 55

• Second (sekunnit)
• Minute (minuutit)
• Hour (tunnit)
• Year (vuodet)
• Month (kuukaudet)
• Day (päivä)
• Format (12 tai 24 tunnin näyttö)
• Chime (äänimerkki)
• Beep (näppäinääni päällä/pois päältä)
• Gender (sukupuoli: mies: M, nainen: F).
• Birth (syntymävuosi)
• Unit (pituusyksikkö: metrit, tuumat)
• Height (pituus)
• Weight (paino)
• BMI (näyttää nykyisen BMI-arvon paino- ja pituusasetusten mukaisesti)
• Activity (LOW: ei harjoittelua, MEDIUM: harjoittelua 2–3 kertaa viikossa,
HIGH: säännöllistä korkean tason harjoittelua)
• Contrast (näytön kontrastin asetus)
Suomi
Page 56

Harjoitustila (Exercise)
Sykkeenmittaus
Harjoitustiedot
Syke
Harjoitustiedot
Sykkeenmittaus
• Sykkeenmittaus alkaa automaattisesti 5 sekuntia harjoitustilan
valinnan jälkeen.
• Sammuta tai käynnistä harjoitustila manuaalisesti painamalla [ ST./STP./RST. ].
• Kun harjoitustila käynnistetään, aiemmin rekisteröidyt harjoitustiedot poistuvat.
• Sykkeenmittaustoiminto sammuu automaattisesti, jos sykettä ei rekisteröidä
5 minuuttiin.
Sykkeenmittauksen äänimerkki
• Tämä tarkoittaa sitä, että laitteeseen voidaan asettaa sykeintervalli, jota
halutaan ylläpitää harjoittelun aikana.
• Sykemittarikellon äänimerkki soi, jos ennalta asetettu sykkeen arvo
ylitetään tai alitetaan (ks. alla oleva kohta Asetukset).
• ”Above Z” (syke on valittua
Suomi
sykeintervallia korkeampi) ja
”Below Z” (syke on valittua
sykeintervallia matalampi) täytyy
olla aktivoituina, jotta äänimerkki
voi soida (ks. alla oleva kohta
Asetukset). Sykemittarikellon
näytöllä näkyy symboli
merkkinä siitä, että syke on
valitun sykeintervallin rajoissa,
sykeintervallia korkeampi tai
matalampi. Äänimerkki soi
kuvan mukaisesti.
• Tiloissa Sykkeenmittaus ja Etäisyyden mittaus eri harjoitustietoja voidaan
valita keskellä näyttöä näkyviltä pääarvon ylä- ja alapuolella olevilta
riveiltä. Ks. alla oleva kohta Etäisyyden mittaus. Huom.! Sykemittarikellon
on oltava kunnolla ranteen ympärillä, ja lähetinvyön on oltava kunnolla
rintakehän ympärillä, jotta sykettä voidaan mitata.
• Nollaa harjoitustiedot poistamalla sykkenmittaus käytöstä ja pitämällä
pohjassa painiketta [ ST./STP./RST. ].
Pois päältä Päällä
Syke (lyöntiä/minuutti)
Valittua sykeintervallia
Above Zone
Below Zone
Maksimisyke ylittyy
sykeintervallin rajoissa
Valittua sykeintervallia
korkeampi syke
Syke on valitun
matalampi syke
56 57
Page 57

Harjoitustilan alakategoriat ovat:
• Etäisyyden mittaus (Distance)
• Kuntotesti (Fitness)
• Yhteenveto (Summary)
• Asetukset (Setting)
Selaa kategorioita painamalla
[ MODE ]-painiketta ja pitämällä sitä
pohjassa. Päästä [ MODE ]-painike
haluamasi alakategorian kohdalla.
Etäisyyden mittaus (Distance)
Etäisyys
Etäisyyden mittaus
Tiloissa Sykkeenmittaus ja Etäisyyden mittaus eri harjoitustietoja voidaan valita
keskellä näyttöä näkyviltä pääarvon ylä- ja alapuolella olevilta riveiltä.
• Paina painiketta [ LAP/RELOAD ] valitaksesi jokin seuraavista ylemmän
rivin tiedoista:
”0:00” Harjoitusaika
”I” Olet pysynyt asetetun ajan rajoissa
”B” Olet asetetusta ajasta jäljessä
”A” Olet asetetusta ajasta edellä
”Sp” Nopeus
”Di” Etäisyys
• Paina painiketta [ LAP/RELOAD ] ja pidä sitä pohjassa valitaksesi jonkin
seuraavista alemman rivin tiedoista:
EMHR-diagrammi: näytöllä näkyy prosentteina, kuinka kaukana olet tällä
hetkellä maksimisykkeestä (ei näy etäisyyden mittaus -tilassa).
”KC”: Kalorien kulutus
”G”: Rasvanpoltto
”St” Askelmittari
”AV”: Keskisyke
”MX”: Maksimisyke tämänhetkisessä harjoitustilanteessa
(ei näy etäisyyden mittaus -tilassa).
”Sydänsymboli”: Tämänhetkinen syke (ei näy sykkeenmittaus-tilassa).
Pois päältä Päällä
Suomi
Page 58

• Jos valitset EMHR-diagrammin
sykkeenmittauksen aikana, näytöllä
näkyy osittain alemman rivin diagrammissa ja osittain tämänhetkisen
sykkeen oikealla puolella prosentteina,
kuinka kaukana olet tällä hetkellä
maksimisykkeestä.
• Esimerkki EMHR:n laskutavasta:
18-vuotias käyttäjä vähentää ikänsä luvusta 220:
220 – 18 = 202 (ks. edellä oleva kohta Turvallisuus)
Mitattu syke: 140
140/202×100 % ≈ 69 %
Käyttäjän syke on 69 % maksimisykkeestä.
Tämänhet-
kinen syke
Kuntotesti (Fitness)
Sykemittarikello voi antaa tietoa kunnostasi mittaamalla, kuinka nopeasti
sykkeesi laskee harjoituksen jälkeen. Sykemittarikello mittaa, kuinka syke laskee
viiden minuutin palautumisen aikana harjoituksen jälkeen. Tulos näytetään
kuudella tasolla, joista ensimmäisen tason arvo on paras.
Pylväs näyttää jäljellä
olevan ajan
Suomi
EMHR %
EMHR
(diagrammi)
Tämänhet-
kinen syke
Kuntotasot
Taso BPM (lyönnit/ minuutti) 5 minuutin palautumisen jälkeen
1 < 100
2 105–100
3 110–105
4 120–110
5 130–120
6 >130
Ajastin
Syke
mittauksen
alussa
Tämänhet-
kinen syke
58 59
Page 59

Yhteenveto (Summary)
Sykemittarikello tallentaa edellisen harjoituksen harjoitustiedot.
Nämä tulokset näkyvät seuraavasti:
Ylempi rivi
Keskimmäinen rivi
Alempi rivi
Ylempi rivi
Harjoitusaika
Syke on valittua
rajaa korkeampi
Keskinopeus
Askeleet
Keskimmäinen
Keskisyke
Syke on valitun
alueen rajoissa
Etäisyys Maksiminopeus
Rasvanpoltto Kalorit
rivi
Alempi rivi
Maksimi- ja
minimisyke
Syke on valittua
rajaa matalampi
Huom.! Kaikki tiedot poistuvat, kun uusi harjoitusjakso aloitetaan
(kun Exercise-tila käynnistetään uudelleen).
Suomi
Page 60

Asetukset (Setting)
Valitse Harjoittelutila (Exercise). Paina ja pidä pohjassa painiketta [ MODE ],
kunnes näytöllä näkyy teksti ”Settings”. Päästä painike [ MODE ].
Paina [ MODE ]-painiketta uudelleen siirtyäksesi asetuksesta toiseen.
Voit valita seuraavia asetuksia:
Suomi
• Kun näytöllä kohdassa Training Zone Select vilkkuu ”My Zone”, valitse
Health, FatBurn, Aerobic tai My Zone painamalla painiketta [ ST./STP./
RST. ]
tai [ LAP/RESET ].
• Kun näytöllä vilkkuu ”Above Z” (syke valittua rajaa korkeampi), ”Below Z”
(syke valittua rajaa matalampi) ja ”Speed Alarm On” tai ”OFF”, paina
painiketta [ ST./STP./RST. ] tai [ LAP/RELOAD ] sammuttaaksesi tai
aktivoidaksesi toiminnot. Jos jokin toiminnoista ”My Zone-min ja max”,
”Sense” (herkkyys), ”Speed alarm-ON/OFF-High/Low”, ”Sleep Time”,
”Odo m eter” vi lkkuu, paina painiketta [ ST./STP./RST. ] tai [ LAP/RELOAD ]
muuttaaksesi arvoa. Voit suurentaa tai pienentää arvoa nopeasti pitämällä
yhtä painikkeista pohjassa.
Huom.! Askelmittarin herkkyys vaihtelee välillä 1–5; 1 on matala ja 5 on korkea.
Kun Above Z tai Below Z on aktivoituna, näytön yläreunassa näkyy symboli ”Z”.
• Käyttäjän on syötettävä kävelyn ja juoksun askelpituus, jotta
sykemittarikello voi laskea nopeuden ja etäisyyden oikein.
• Valikoissa Walk (kävely) ja Run (juoksu) askelpituus voidaan kalibroida joko
automaattisesti tai manuaalisesti.
60 61
Page 61

Automaattinen
1. Valitse asetus Calibrate Walk.
2. Aseta haluamasi matkan pituus painamalla [ ST./STP./RST. ].
3. Aloita kalibrointi painamalla [ LAP/RESET ]-painiketta.
4. Kävele tai juokse asettamasi matka.
5. Lopeta kalibrointi painamalla painiketta [ ST./STP./RST. ] tai [ LAP/RESET ].
6. Sykemittarikello laskee automaattisesti kävelyn tai juoksun askelpituuden.
Manuaalinen
1. Valitse asetus Calibrate Walk tai Calibrate Run.
2. Avaa asetukset WalkSt (kävelyn askelpituus) tai RunSt (juoksun
askelpituus) painamalla painiketta [ MODE ].
3. Kun arvo vilkkuu, paina [ ST./STP./RST. ] tai [ LAP/RELOAD ] ja syötä
haluamasi arvo.
Ajanotto (Chronograf)
• Aloita ajanotto painamalla painiketta [ ST./STP./RST. ].
• Rekisteröi kierrosaika painamalla painiketta [ LAP/RELOAD ] ajanoton aikana.
• Pysäytä ajanotto painamalla painiketta [ ST./STP./RST. ].
• Kun olet pysäyttänyt ajanoton, nollaa ajanotto pitämällä pohjassa
painiketta [ ST./STP./RST. ].
10 sekuntia
ALOITUS
Suomi
Kierrosaika
LOPETUS
Page 62

Ajanottotoiminto
Kun ajanottotoiminto on valittuna, voit valita, mitä haluat näkyvän ylimmällä
rivillä näytöllä. Kun ajanotto on käynnissä, pidä pohjassa painiketta [ MODE ]
valitaksesi jonkin seuraavista mittausalueista:
• Speed (nopeus)
• Distance (etäisyys)
• Step (askeleet)
• StopW (ajanotto)
• Päästä painike [ MODE ], kun haluamasi mittausalue näkyy näytöllä.
Kierrosajan tiedot
Sykemittarikello voi tallentaa yhden harjoituskerran kierrosajan ja syketiedot.
Nämä tiedot näkyvät näytöllä harjoituskerran päätyttyä.
• Pidä pohjassa painiketta [ MODE ] ajanoton päättymisen jälkeen, kunnes
näytöllä lukee ”Recall”. Aktivoi toiminto päästämällä painike [ MODE ],
kun näytöllä lukee ”Recall”.
• Sykemittarikellon näytöllä seuraavat tiedot vaihtuvat automaattisesti:
Suomi
Automaattinen
näytön vaihto
Automaattinen
näytön vaihto
Keskisyke
Kierrosten
kokonaismäärä
Kokonaisetäisyys
Kulunut aika
kokonaisuudes-
saan
Keskinopeus
Keskimääräinen
kierrosaika
Maksimisyke
Keskisyke
Askelta/
kierros
Split time
Kierrosnumero
Automaattinen
näytön vaihto
Etäisyys/
kierros
Keskinopeus
Kierro-
saika
62 63
Page 63

Äänimerkkiasetukset
1. Paina painiketta [ MODE ] ja pidä sitä pohjassa, kunnes näytöllä
vilkkuu tuntilukema.
2. Aseta tunnit painamalla painiketta [ ST./STP./RST. ] tai [ LAP/RELOAD ]
(pidä painikkeita pohjassa liikkuaksesi nopeammin valikossa).
3. Paina lyhyesti painiketta [ MODE ]. Kun näytöllä vilkkuu minuuttilukema,
aseta tieto samalla tavalla kuin edellä.
4. Kun olet suorittanut asetuksen, poistu asetustoiminnosta painamalla
painiketta [ MODE ] ja pitämällä sitä pohjassa.
• Näytöllä näkyy
• Äänimerkki soi 30 sekunnin ajan.
• Sammuta ääni painamalla mitä tahansa painiketta.
Huom.! Äänimerkki aktivoituu automaattisesti, jos aikaa muutetaan.
, kun äänimerkkitoiminto on aktivoitu.
Ajastimen asetukset
• Käynnistä ja pysäytä ajastin painamalla painiketta [ ST./STP./RST. ].
• Kun ajastin on pysäytetty, voit käynnistää ajastimen uudelleen alusta
painamalla painiketta [ LAP/RESET ].
• Kun ajastimeen asetettu aika on kulunut, äänimerkki soi 30 sekunnin ajan.
1. Paina painiketta [ MODE ] ja pidä sitä pohjassa, kunnes näytöllä vilkkuu
tuntilukema.
2. Syötä tunnit painamalla painiketta [ ST./STP./RST. ] tai [ LAP/RELOAD ]
(pidä painikkeita pohjassa liikkuaksesi nopeammin valikossa).
3. Paina lyhyesti painiketta [ MODE ]. Kun näytöllä vilkkuu minuuttilukema,
aseta tieto samalla tavalla kuin edellä.
4. Paina lyhyesti painiketta [ MODE ]. Kun näytöllä vilkkuu sekuntilukema,
aseta tieto samalla tavalla kuin edellä.
5. Kun olet suorittanut asetuksen, poistu asetustoiminnosta painamalla
painiketta [ MODE ] ja pitämällä sitä pohjassa.
Kahden ajan näyttö
Kahden ajan näyttö mahdollistaa paikallisen kellonajan asettamisen matkoilla.
Samalla näet kellonajan kotona.
1. Paina painiketta [ MODE ] ja pidä sitä pohjassa, kunnes näytöllä vilkkuu
tuntilukema.
2. Syötä tunnit painamalla painiketta [ ST./STP./RST. ] tai [ LAP/RELOAD ]
(pidä painikkeita pohjassa liikkuaksesi nopeammin valikossa).
3. Paina lyhyesti painiketta [ MODE ]. Kun näytöllä vilkkuu minuuttilukema,
aseta tieto samalla tavalla kuin edellä.
4. Kun olet suorittanut asetuksen, poistu asetustoiminnosta painamalla
painiketta [ MODE ] ja pitämällä sitä pohjassa.
63
Suomi
Page 64

Virransäästötila
• Sammuta sykemittarikellon näyttö säästääksesi paristoja.
• Sammuta näyttö ajannäyttötilassa pitämällä painiketta [ LAP/RELOAD ]
pohjassa noin 5 sekunnin ajan.
• Kello toimii normaalisti, vaikka virransäästötila on käytössä.
• Paina mitä tahansa painiketta kytkeäksesi tämä toiminto pois päältä ja
palataksesi ajannäyttötilaan.
Huolto ja ylläpito
• Käsittele kelloa ja lähetinvyötä varoen. Älä altista tuotteita iskuille
tai tärähdyksille.
• Puhdista kello ja lähetinvyö pehmeällä, kevyesti kostutetulla liinalla.
• Säilytä kelloa ja lähetinvyötä kuivassa tilassa, jos ne ovat pitkään käyttämättä.
Kellon pariston vaihto
Vain ammattihenkilö saa avata kellon kotelon. Anna kellosepän suorittaa
pariston vaihto, jos olet epävarma.
Huom.! Jos kelloa käytetään hyvin kylmissä sääolosuhteissa, pariston matalan
varaustason symboli saattaa näkyä näytöllä, vaikkei paristo ole loppuun kulunut.
Symboli poistuu näytöltä, kun kello lämpenee.
Suomi
Lähetinvyön pariston vaihto
1. Käännä paristolokeron kantta siten, että
nuolikuvake siirtyy pistekuvakkeesta
lähetinvyön nuolikuvakkeeseen.
2. Käännä kantta nuolikuvakkeen ohi, jotta
se irtoaa helposti.
3. Poista käytetty paristo ja laita tilalle uusi (CR2032). Huom.! Katso
paristolokeron pohjassa oleva merkintä, jotta asetat pariston oikein.
Pariston plusnavan tulee osoittaa ylöspäin, eli käyttäjää kohti, ja paristo
tulee työntää sisälle pienen koron alle.
4. Kannessa on ohut o-rengas, joka varmistaa, ettei paristolokeroon pääse
kosteutta. Varmista, että se on ehjä pariston vaihdon yhteydessä.
5. Aseta kansi takaisin siten, että kannessa oleva nuolikuvake osoittaa
lähetinvyössä olevaan nuolikuvakkeeseen päin. Sulje kansi kääntämällä
sitä takaisin pistekuvakkeeseen päin.
64 65
Page 65

Kierrätys
Kierrätä tuote asianmukaisesti, kun poistat sen käytöstä.
Tarkempia kierrätysohjeita saat kuntasi jäteneuvonnasta.
Tekniset tiedot
Aikatoiminnot
Aikajärjestelmä am (aamupäivä), pm (iltapäivä), h (tunti),
min (minuutti), s (sekunnit)
Ajan muoto 12 tai 24 tunnin näyttö
Kalenteri kuukausi, päivämäärä ja viikonpäivä
(automaattinen kalenteritoiminto karkausvuodelle
ja viikonpäivälle).
Äänimerkkitoiminto
Toistuva hälytys- ja tuntiäänimerkki
Äänimerkki 30 sekuntia
Ajanottotoiminto
Tarkkuus 1/100-sekuntia
Mittausintervalli 9 tuntia, 59 minuuttia ja 59,99 sekuntia
Ajastin
Tarkkuus 1 sekuntia
Mittausintervalli 23 tuntia, 59 minuuttia ja 59 sekuntia
Ajastimen ääni Ajastin soi kerran minuutissa viimeisen
kymmenen minuutin ajan, joka kymmenes
sekunti viimeisen minuutin ajan ja kerran
sekunnissa viimeisen viiden sekunnin ajan.
Ääni soi 30 sekunnin ajan, kun ajastin on
laskenut nollaan.
Suomi
65
Page 66

Harjoitustoiminto
6 kuntotasoa käytetään mittaamaan, kuinka nopeasti syke laskee
5 minuutin palautuksen aikana.
Automaattinen ja manuaalinen askelpituuden kalibrointi.
Askelmäärä, joka voi
näkyä näytöllä 0–999999 askelta
Harjoitusajastin maks. 24 tuntia
Suoritetun matkan
mittaaminen 0–99,99 km/0–62,13 mailia (mile)
Nopeuden mittaaminen 45 km/h/27,96 mph
Kalorien kulutus 0–9999 kaloria
Ohjelma automaattiselle
käynnistykselle/
pysäytykselle 6 ohjelmaa
Mittausintervalli 30–240 bpm
Sykealueen
äänimerkin asetus 3 ennalta asetettua sykealuetta ja 1,
jonka voit itse asettaa.
Sykealueen äänimerkki maksimi ylittyy, sykealueen yläpuolella tai
sykealueen alapuolella.
Harjoitusmuisti Rekisteröinti
Suomi
Harjoitusten tallennus
(rekisteröinti) kokonaisharjoitusaika, keskinopeus,
kokonaismatka, kokonaisaskelmäärä,
kalorien kulutus, rasvanpoltto, korkein/matalin
keskisyke ja harjoitusaika yli/alle sykealueen
tai sen rajoissa.
Askelmittari energiansäästötoiminto (1–240 minuuttia),
askelmittarin herkkyys (tasot 1–5).
Taustavalo
Taustavalon tyyppi Elektroluminesenssi (EL)
Page 67

Pulsuhr mit Schrittzähler
Art.Nr. 31-1055 Modell D02I710
Vor Inbetriebnahme die komplette Bedienungsanleitung durchlesen und
aufbewahren. Irrtümer, Abweichungen und Änderungen behalten wir uns vor.
Bei technischen Problemen oder anderen Fragen freut sich unser Kundenservice
über eine Kontaktaufnahme (Kontakt siehe Rückseite).
Sicherheitshinweise
• Bei Zweifeln bezüglich der möglichen Intensität des Trainings vor dem
Gebrauch der verschiedenen Funktionen für die Pulsmessung an einen
Arzt oder Trainer wenden.
• Ein Näherungswert für den maximalen Puls kann durch Abziehen des
Alters vom Wert 220 berechnet werden. Ein Beispiel: Bei einem Alter von
40 beträgt der maximale Puls 220 – 40 = 180.
Produktbeschreibung
Pulsuhr mit Schrittzähler. Misst den Puls mit dem mitgelieferten Brustband
entsprechend dem persönlichen Profil.
• Strecke
• Geschwindigkeit
• Kalorienverbrauch
• Stoppuhr
• Timer
• Uhr
• Datum
• Speicher für vorhergehende Trainingsresultate
• Wassergeschützt 5 ATM
Deutsch
67
67
Page 68

Tasten und Funktionen
Pulsuhr
1. [ LIGHT ] Beleuchtung
• Hintergrundbeleuchtung
des Displays 3Sekunden
lang einschalten.
2. [ MODE ] Wahl der Funktion
• Kurz drücken, um jeweils in
der folgenden Reihenfolge
die entsprechenden
Funktionen zu wählen:
Zeitanzeige, Training
(exercise), Stoppuhr
(chrono), Alarm, Timer
oder doppelte Zeitanzeige
(Dual-T). Die doppelte
Zeitanzeige bedeutet, dass beispielsweise eine Ortszeit bei
Eintreffen am Reiseziel eingestellt werden kann und gleichzeitig
die Zeit zu Hause angezeigt wird.
• Zum Starten und Beenden der Einstellungen der Funktionen
Zeitanzeige, Training, Alarm, Timer und doppelte Zeitanzeige drücken
Deutsch
und gedrückt halten.
• Kurz drücken, um den Wert für verschiedene Einstellungen zu ändern,
beispielsweise von Sekunden zu Minuten bei der Zeiteinstellung.
• Drücken und gedrückt halten, um die Recall-Funktion im StoppuhrModus aufzurufen.
3. [ ST./STP./RST. ] Start, Stop und Reset
• Kurz drücken, um den Zähler in den Funktionen Training, Stoppuhr
und Timer zu starten und zu stoppen.
• Zum Nullstellen gedrückt halten.
• Kurz drücken, um den Wert für verschiedene Einstellungen
zu erhöhen, beispielsweise Stunden bei der Zeiteinstellung.
4. [ LAP/RELOAD ]
• Kurz drücken, um den Wert für verschiedene Einstellungen
zu verringern, beispielsweise Stunden bei der Zeiteinstellung.
• Drücken und ca. 5 Sekunden gedrückt halten, um die Ruhestellung
zu aktivieren. Das Display erlischt.
• Im Timer-Modus kurz drücken, um den Timer neu zu starten.
• Kurz drücken, um verschiedene Werte im Training-Modus anzuzeigen.
1
2 4
3
68 69
Page 69

Brustband
6 6
5
7
5. Batteriefach
6. Befestigung für elastischen Riemen
7. Kontaktflächen für Pulsmessung
Hinweis:
• Elastischen Riemen so einstellen,
dass das Brustband beim Trainieren
festsitzt. Die Kontaktflächen (7) müssen
während der gesamten Messzeit guten
Hautkontakt haben.
• Vor jedem Einsatz Kontaktflächen
des Brustbandes mit einigen Tropfen
Wasser reinigen und mit einem sauberen
Lappen abwischen.
• Um eine optimale Funktion zu gewährleisten,
Haut mit Seife und Wasser waschen,
bevor das Brustband angebracht wird.
• Bei einer zu trockenen Haut kann mit
etwas Kontaktgel die Signalübertragung
verbessert werden.
7
Deutsch
69
Page 70

Bedienung
Bei jeder Tastenbetätigung von [ MODE ] werden die Hauptfunktionen der
Pulsuhr in folgender Reihenfolge angezeigt:
Zeitanzeige
Doppelte Zeitanzeige
Zeitanzeige-Modus
Deutsch
• Im Display werden Wochentag, Uhrzeit
und Datum angezeigt.
Trainingsmodus
Timer
Stoppuhr
Einstellungen im Zeitanzeige-Modus
• [ MODE ] ca. 2 Sekunden lang gedrückt halten. Die Sekunden beginnen
zu blinken.
• Mit [ ST./STP./RST. ] Wert erhöhen und mit [ LAP/RELOAD ] Wert verringern.
• Kurz [ MODE ] drücken, um zu den Minuten zu wechseln, und Wert wie
oben beschrieben ändern.
• Kurz erneut [ MODE ], um zu den Stunden zu wechseln, usw.
• Gemäß dem nachfolgend abgebildeten Schema können 17 verschiedene
Einstellungen vorgenommen werden.
• [ MODE ] ca. 2 Sekunden lang gedrückt halten, um die Einstellungen
zu beenden.
70 71
Alarm
Page 71

• Second (Sekunden)
• Minute (Minuten)
• Hour (Stunden)
• Year (Jahr)
• Month (Monat)
• Day (Tag)
• Format (12- oder 24-Stunden-Anzeige)
• Chime (akustisches Signal)
• Beep (Tastenton ein/aus)
• Gender (Geschlecht: M-männlich, F-weiblich)
• Birth (Geburtsjahr)
• Unit (Einheitenformat: Metric-Meter, Imperial-Fuß/Zoll)
• Height (Größe)
• Weight (Gewicht)
• BMI (zeigt den aktuellen BMI aufgrund der Gewichts- und Größen-
einstellungen an)
• Activity (LOW: untrainiert, MEDIUM: trainiert 2–3 Mal pro Woche,
HIGH: trainiert regelmäßig auf hohem Niveau)
• Contrast (Einstellung des Displaykontrasts)
71
Deutsch
Page 72

Training-Modus (Exercise)
Pulsmessung
Trainingsdaten
Puls
Trainingsdaten
Pulsmessung
• 5 Sek. nach Wählen des Training-Modus startet die Pulsmessung automatisch.
• [ ST./STP./RST. ] drücken, um den Training-Modus manuell zu stoppen
oder zu starten.
Bei Starten der Trainingsfunktion werden zuvor gespeicherte
Trainingsdaten gelöscht.
• Die Pulsmessfunktion wird automatisch gestoppt, wenn 5 Minuten lang
kein Puls registriert wird.
Alarm bei Pulsmessung
• Es kann das gewünschte Pulsintervall eingestellt werden, das beim
Training eingehalten werden soll.
• Die Pulsuhr kann einen Alarm auslösen, wenn der Pulswert über- oder
unterschritten wird (siehe Abschnitt Einstellungen).
Deutsch
• Damit der Alarm ausgelöst
werden kann, muss
Above Z (über dem
gewünschten Pulsintervall)
und Below Z (unter dem
gewünschten Pulsintervall)
eingeschaltet werden (siehe
Abschnitt Einstellungen).
Die Pulsuhr zeigt mit einem
Symbol an, ob man sich
im, über oder unter dem
eingestellten Pulsintervall
befindet. Der Alarm wird wie
abgebildet ausgelöst.
AUS EIN
Puls (Schläge pro Minute)
Über eingestelltem
Above Zone
Below Zone
Über maximalen Puls
Unter eingestelltem
Im eingestelltem
Pulsintervall
Pulsintervall
Pulsintervall
72 73
Page 73

• Unter Pulsmessung und Streckenmessung können in den Zeilen über
und unter dem Hauptwert, der in der Displaymitte angezeigt wird,
verschiedene Trainingsdaten gewählt werden.
Siehe Abschnitt Streckenmessung.
Hinweis: Damit der Puls registriert werden kann, muss die Pulsuhr am
Handgelenk getragen werden und der Brustriemen um den Brustkorb gelegt
sein. Pulsmessung stoppen und [ ST./STP./RST. ] gedrückt halten, um die
Trainingsdaten auf Null zu stellen.
Im Training-Modus gibt es folgende
Unterkategorien:
• Streckenmessung (Distance)
• Konditionstest (Fitness)
• Übersicht (Summary)
• Einstellungen (Setting)
Zum Anzeigen der Kategorien [ MODE ]
drücken und gedrückt halten. [ MODE ]
loslassen, wenn die gewünschte Unterkategorie angezeigt wird.
Streckenmessung (Distance)
Strecke
Deutsch
Streckenmessung
Unter Pulsmessung und Streckenmessung können in den Zeilen über und
unter dem Hauptwert, der in der Displaymitte angezeigt wird, verschiedene
Trainingsdaten gewählt werden.
• [ LAP/RELOAD ] drücken, um für die obere Zeile zwischen folgenden
Daten zu wählen:
„0:00“ Trainingszeit
„I“ Der Wert befindet sich im eingestellten Zeitrahmen.
„B“ Der Wert befindet sich nach dem eingestellten Zeitrahmen.
„A“ Der Wert befindet sich vor dem eingestellten Zeitrahmen.
„Sp“ Geschwindigkeit
„Di“ Strecke
AUS EIN
73
Page 74

• [ LAP/RELOAD ] drücken und gedrückt halten, um für die untere Zeile
zwischen folgenden Daten zu wählen:
EMHR-Diagramm – Zeigt in % an, wie weit der aktuelle Wert vom
maximalen Puls entfernt ist. (Wird nicht bei Streckenmessung angezeigt.)
„KC“- Kalorienverbrauch
„G“- Fettverbrennung
„St“ Schrittzähler
„AV“- Mittlerer Puls
MX-Maxpuls für das aktuelle Training (wird nicht bei Streckenmessung
angezeigt.)
„Herzsymbol“- Aktueller Puls (wird nicht bei Pulsmessung angezeigt.)
• Bei Wählen von EMHR-Diagramm
während der Pulsmessung wird im
Diagramm der unteren Zeile sowie
rechts vom aktuellen Puls in %
angezeigt, wie weit der aktuelle Wert
vom maximalen Puls entfernt ist.
• Rechenbeispiel für die Verwendung von EMHR:
Ein 18-jähriger Benutzer zieht sein Alter von 220 ab:
220–18 = 202 (siehe Abschnitt Sicherheitshinweise).
Gemessener Puls: 140
Deutsch
140/202×100 % ≈ 69 %
Der Benutzer befindet sich bei 69 % seines maximalen Pulses.
Aktueller
Puls
Konditionstest (Fitness)
Die Pulsuhr kann einen Hinweis zur Kondition geben, indem gemessen wird,
wie schnell der Puls nach Abschluss einer Trainingseinheit sinkt. Die Uhr
misst, wie der Puls in der fünfminütigen Erholungsphase nach Abschluss einer
Trainingseinheit sinkt. Das Ergebnis wird in 6Niveaus angezeigt, wobei 1 das
beste Ergebnis ist.
Balken zur Anzeige
der Restzeit
EMHR in %
EMHR in
Diagramm
Aktueller
Puls
Timer
Puls bei
Beginn der
Messung
Aktueller
Puls
74 75
Page 75

Konditionsniveaus
Niveau BPM (Pulsschläge pro Minute) nach
der fünfminütigen Erholungsphase
1 < 100
2 105–100
3 110–105
4 120–110
5 130–120
6 >130
Übersicht (Summary)
Die Pulsuhr speichert Trainingsdaten der zuletzt abgeschlossenen
Trainingseinheit. Dieses Ergebnis wird auf folgende Weise angezeigt:
Obere Zeile
Mittlere Zeile
Untere Zeile
Obere Zeile
Trainingszeit Mittlerer Puls
Puls über der
oberen einge-
stellten Grenze
Mittlere
Geschwindigkeit
Schritte
Mittlere Zeile
Puls im einge-
stellten Bereich
Strecke
Fettverbrennung
Untere Zeile
Maximaler und
minimaler Puls
Puls unter der
unteren eingestellten Grenze
Maximale
Geschwindigkeit
Kalorien
Hinweis: Bei Beginn einer neuen Trainingseinheit (erneutes Starten
von „Exercise“) werden alle Daten gelöscht.
75
Deutsch
Page 76

Einstellungen (Setting)
Training-Modus (Exercise) wählen. [ MODE ] drücken und gedrückt halten,
bis „Setting“ am Display angezeigt wird. [ MODE ] loslassen. [ MODE ] erneut
drücken, um zwischen den verschiedenen Einstellungen zu wechseln.
Folgende Einstellungen können vorgenommen werden:
Deutsch
• Wenn „My Zone“ in Training Zone Select blinkt, [ ST./STP./RST. ] oder [ LAP/
RELOAD ] drücken, um Health, FatBurn, Aerobic oder My Zone zu wählen.
• Wenn „Above Z“ (Puls über eingestelltem Pulsintervall), „Below Z“ (Puls
unter eingestelltem Pulsintervall) und „Speed Alarm On“ oder „OFF“ blinkt,
[ ST./STP./RST. ] oder [ LAP/RELOAD ] drücken, um die Funktionen einoder auszuschalten.
• Wenn eine der Funktionen „My Zone-min und max“, „Sense“ (Empfindlichkeit
des Schrittzählers), „Speed alarm-ON/OFF-High/Low“, „Sleep Time“
(Ruhestellung des Schrittzählers), „Odo meter“ blinkt, [ ST./STP./RST. ] oder
[ LAP/RELOAD ] drücken, um den Wert zu ändern. Eine der Tasten gedrückt
halten, um den Wert schnell zu erhöhen oder zu verringern.
Hinweis: Die Empfindlichkeit des Schrittzählers reicht von 1 bis 5, wobei
1 niedrig und 5 hoch ist. Wenn Above Z oder Below Z eingeschaltet ist,
wird das Symbol „Z“ oben im Display angezeigt.
• Damit die Pulsuhr die Geschwindigkeit und den Abstand richtig berechnen
kann, muss der Benutzer die Schrittlänge für Gehen und Laufen angeben.
• Es gibt zwei Möglichkeiten zum Kalibrieren der Schrittlänge in den Menüs
für walk (Gehen) und run (Laufen): Auto oder Manuell.
76 77
Page 77

Auto
1. Einstellung Calibrate Walk wählen.
2. Zum Einstellen der gewünschten Streckenlänge [ ST./STP./RST. ] drücken.
3. Zum Starten der Kalibrierung [ LAP/RELOAD ] drücken.
4. Angegebene Strecke gehen oder laufen.
5. Zum Abschluss der Kalibrierung [ ST./STP./RST. ] oder [ LAP/RELOAD ] drücken.
6. Die Pulsuhr berechnet automatisch die Schrittlänge für Gehen und Laufen.
Manuell
1. Einstellung Calibrate Walk oder Run wählen.
2. [ MODE ] drücken, um die Einstellungen für WalkSt (Schrittlänge Gehen)
oder RunSt (Schrittlänge) aufzurufen.
3. Wenn der Wert blinkt, [ ST./STP./RST. ] oder [ LAP/RELOAD ] drücken,
um den gewünschten Wert anzugeben.
Stoppuhr (Chronograph)
• Zum Starten der Zeitnahme [ ST./STP./RST. ] drücken.
• Während der Zeitnahme [ LAP/RELOAD ] drücken, um eine Rundenzeit
zu speichern.
• Zum Stoppen der Zeitnahme [ ST./STP./RST. ] drücken.
• [ ST./STP./RST. ] gedrückt halten, wenn die Zeitnahme gestoppt ist,
um die Zeitnahme auf Null zu stellen.
10 Sekunden
START
Deutsch
Rundenzeit
STOPP
77
Page 78

Stoppuhrfunktion
Wenn die Stoppuhrfunktion gewählt ist, kann gewählt werden, was in der
obersten Zeile im Display angezeigt wird. Bei gestarteter Zeitnahme [ MODE ]
drücken, um zwischen folgenden Messbereichen zu wählen:
• Speed (Geschwindigkeit)
• Distance (Strecke)
• Step (Schritte)
• StopW (Stoppuhr)
• [ MODE ] loslassen, wenn der gewünschte Messbereich angezeigt wird.
Rundendaten
Die Pulsuhr kann die Rundenzeit und den Puls während einer Trainingseinheit
speichern. Diese Daten können nach Abschluss der Trainingseinheit
angezeigt werden.
• Bei gestoppter Zeitnahme [ MODE ] gedrückt halten, bis „Recall“ im
Display angezeigt wird. [ MODE ] loslassen, wenn „Recall“ angezeigt wird,
um die Funktion aufzurufen.
• Die Pulsuhr wechselt automatisch zwischen der Anzeige der folgenden Daten:
Deutsch
Automatischer
Wechsel des
Displays
Automatischer
Wechsel des
Displays
Mittlerer Puls
Gesamtanzahl
Runden
Gesamtstrecke
Gesamte
verstrichene
Zeit
Mittlere
Geschwindigkeit
Mittlere
Rundenzeit
Maximaler Puls
Split time
Runden-
zeit
Mittlerer
Puls
Schritte pro
Runde
Runden-
zahl
Autom. Wechsel
der Anzeige
Strecke pro
Runde
Mittlere
Geschwindigkeit
78 79
Page 79

Alarmeinstellungen
1. [ MODE ] drücken und gedrückt halten, bis die Stunden blinken.
2. Stunden durch Drücken von [ ST./STP./RST. ] oder [ LAP/RELOAD ]
einstellen. (Zum schnelleren Blättern Tasten gedrückt halten.)
3. [ MODE ] kurz drücken. Die Minuten blinken. Einstellung wie oben
beschrieben durchführen.
4. [ MODE ] drücken und gedrückt halten, wenn die Einstellung fertig ist,
um die Einstellungen abzuschließen.
wird im Display angezeigt, wenn der Alarm aktiviert ist.
•
• Der Alarm ertönt 30Sekunden lang.
• Zum Ausschalten beliebige Taste drücken.
Hinweis: Der Alarm wird bei einem Umstellen der Zeit automatisch aktiviert.
Timer-Einstellungen
• Zum Starten und Stoppen des Timers [ ST./STP./RST. ] drücken.
• Bei gestopptem Timer [ LAP/RELOAD ] drücken, um neu zu starten.
• Wenn der Timer die eingestellte Zeit nach unten gezählt hat,
ertönt 30Sekunden lang das akustische Signal.
1. [ MODE ] drücken und gedrückt halten, bis die Stunden blinken.
2. Stunden durch Drücken von [ ST./STP./RST. ] oder [ LAP/RELOAD ]
einstellen. (Zum schnelleren Blättern Tasten gedrückt halten.)
3. [ MODE ] kurz drücken. Die Minuten blinken. Einstellung wie oben
beschrieben durchführen.
4. [ MODE ] kurz drücken. Die Sekunden blinken. Einstellung wie oben
beschrieben durchführen.
5. [ MODE ] drücken und gedrückt halten, wenn die Einstellung fertig ist, um
die Einstellungen abzuschließen.
Doppelte Zeitanzeige
Die doppelte Zeitanzeige bedeutet, dass beispielsweise eine Ortszeit bei
Eintreffen am Reiseziel eingestellt werden kann und gleichzeitig die Zeit
zu Hause angezeigt wird.
1. [ MODE ] drücken und gedrückt halten, bis die Stunden blinken.
2. Stunden durch Drücken von [ ST./STP./RST. ] oder [ LAP/RELOAD ]
einstellen. (Zum schnelleren Blättern Tasten gedrückt halten.)
3. [ MODE ] kurz drücken. Die Minuten blinken. Einstellung wie oben
beschrieben durchführen.
4. [ MODE ] drücken und gedrückt halten, wenn die Einstellung fertig ist,
um die Einstellungen abzuschließen.
Deutsch
79
Page 80

Ruhestellung
• Zum Schonen der Batterie kann das Display der Pulsuhr ausgeschaltet werden.
• [ LAP/RELOAD ] ca. 5Sekunden lang im Zeitanzeige-Modus gedrückt
halten, um das Display auszuschalten.
• Die Uhr misst in der Ruhestellung nach wie vor die Zeit.
• Beliebige Taste drücken, um die Ruhestellung zu beenden und zum
Zeitanzeige-Modus zurückzukehren.
Pflege und Wartung
• Uhr und Brustriemen sorgsam behandeln. Diese keinen Schlägen und
Stößen aussetzen.
• Uhr und Brustriemen mit einem angefeuchteten, weichen Tuch reinigen.
• Uhr und Brustriemen an einem trockenen Ort aufbewahren, wenn diese
voraussichtlich längere Zeit nicht verwendet werden.
Batteriewechsel Uhr
Das Uhrgehäuse darf ausschließlich von qualifiziertem Personal geöffnet
werden. Bei Zweifeln über die Art und Weise der Vorgehensweise
den Batteriewechsel beim Uhrmacher durchführen lassen.
Hinweis: Wenn die Uhr bei sehr kaltem Wetter benutzt wird, wird das Symbol
für niedrigen Batterieladezustand angezeigt, ohne dass die Batterie verbraucht
ist. Das Symbol verschwindet, sobald die Uhr wieder warm wird.
Deutsch
Batteriewechsel Brustband
1. Deckel des Batteriehalters so drehen,
dass das Pfeilsymbol vom Punktsymbol zum
Pfeilsymbol am Brustband bewegt wird.
2. Wenn der Deckel über den Pfeil hinaus
gedreht wird, ist er leicht zu entfernen.
3. Batterie herausnehmen und eine neue Batterie (CR2032) einsetzen.
Hinweis: Die Markierung hinter der Abdeckung weist die korrekte
Montage der Batterien aus. Der Pluspol der Batterie muss nach oben
zum Benutzer zeigen und die Batterie muss unter den kleinen Zapfen
geschoben werden.
4. Der Deckel weist einen dünnen O-Ring auf, der dafür sorgt, dass keine
Feuchtigkeit in den Batteriehalter eindringt. Sicherstellen, dass dieser beim
Batteriewechsel nicht beschädigt wird.
5. Deckel mit dem Pfeilsymbol zum Pfeilsymbol am Brustband wieder
einsetzen und Deckel durch Zurückdrehen zum Punktsymbol schließen.
80 81
Page 81

Hinweise zur Entsorgung
Bitte das Produkt entsprechend den vor Ort geltenden Bestimmungen entsorgen.
Weitere Informationen sind von der Gemeinde oder den kommunalen
Entsorgungsbetrieben erhältlich.
Technische Daten
Zeitfunktionen
Zeitsystem am (Vorm.), pm (Nachm.), h (Stunde), min (Minute),
s (Sekunden)
Zeitformat 12 oder 24 Stunden
Kalender Monat, Datum und Wochentag
(automatische Kalenderfunktion für Schaltjahre und Wochentag).
Alarmfunktion
Wiederkehrende Alarm- und Zeitsignale
Alarmsignal 30 Sekunden
Stoppuhrfunktion
Auflösung 1/100 Sekunde
Messintervall 9 Stunden 59 Minuten und 59,99 Sekunden
Countdown-Timer
Auflösung 1 Sekunde
Messintervall 23 Stunden 59 Minuten und 59 Sekunden
Timer-Signal Der Timer ertönt einmal pro Minute in den letzten zehn Minuten,
jede zehnte Sekunde in der letzten Minute und einmal pro
Sekunde in den letzten fünf Sekunden. Er ertönt 30 Sekuden
lang, wenn er bis Null heruntergezählt hat.
Deutsch
81
Page 82

Trainingsfunktion
6 Konditionsniveaus messen, wie schnell der Puls in einer fünfminütigen
Erholungsphase sinkt.
Automatisches und manuelles Einstellen der Schrittlänge.
Anzahl an Schritten,
die angezeigt werden kann 0–999999 Schritte
Training-Timer max. 24 Stunden
Messen von
zurückgelegten Strecken 0–99,99 km/0-62,13 Meilen
Messen der Geschwindigkeit 45 km/h/27,96 mph
Kalorienverbrauch 0–9999 Kalorien
Schema für automatischen
Start/Stopp 6 Schemata
Messintervall 30 bis 240 bpm
Einstellung von Zonenalarm 3 voreingestellte Zonen und eine selbst
eingestellte Zone.
Zonenalarm über Max., über Zone und unter Zone
Trainingsspeicher Eine Registrierung
Trainingsregistrierung gesamte Trainingszeit, mittlere Geschwindigkeit,
gesamte Strecke, gesamte Anzahl an Schritten,
Kalorienverbrauch, Fettverbrennung, höchster/
niedrigster/mittlerer Puls und Trainingszeit
über/in/unter Zone.
Deutsch
Schrittzähler Ruhestellung (1–240 Minuten), Empfindlichkeit
des Schrittzählers (Niveau 1–5).
Hintergrundbeleuchtung
Art der Hintergrundbeleuchtung Elektroluminiszenz (EL)
82 83
Page 83

8383
Page 84

Sverige
Kundtjänst tel: 0247/445 00
fax: 0247/445 09
e-post: kundtjanst@clasohlson.se
Internet www.clasohlson.se
Post Clas Ohlson AB, 793 85 INSJÖN
Norge
Kundesenter tlf.: 23 21 40 00
faks: 23 21 40 80
e-post: kundesenter@clasohlson.no
Internett www.clasohlson.no
Post Clas Ohlson AS, Postboks 485 Sentrum, 0105 OSLO
Suomi
Asiakaspalvelu puh.: 020 111 2222
sähköposti: asiakaspalvelu@clasohlson.fi
Internet www.clasohlson.fi
Osoite Clas Ohlson Oy, Maistraatinportti 4 A , 00240 HELSINKI
Great Britain
Customer Service c ontact number: 08545 300 9799
e-mail: customerservice@clasohlson.co.uk
Internet www.clasohlson.com/uk
Postal 10 – 13 Market Place
Kingston Upon Thames
Surrey
KT 1 1JZ
Deutschland
Kundenservice Unsere Homepage www.clasohlson.de besuchen und
auf Kundenservice klicken.
 Loading...