

Page 1

18-3058 • 30-9686
SCROLL SAW
85 W
HS85-D
KONTURSÅG KONTURSAG
KUVIOSAHA DEKUPIERSÄGE
Important!
Read the entire instruction manual
carefully and make sure that you fully
understand it before you use the
equipment. Keep the manual for future
reference.
Viktig information:
Läs hela bruksanvisningen noggrant och
försäkra dig om att du har förstått den
innan du använder utrustningen. Spara
bruksanvisningen för framtida bruk.
Viktig informasjon:
Les disse anvisningene nøye og forsikre
deg om at du forstår dem, før du tar
produktet i bruk. Ta vare på anvisningene
for seinere bruk.
Tärkeää tietoa:
Lue nämä ohjeet huolellisesti ja varmista
että olet ymmärtänyt ne, ennen kuin
alat käyttää laitetta. Säilytä ohjeet
myöhempää tarvetta varten.
Wichtiger Hinweis:
Vor Inbetriebnahme die komplette
Bedienungsanleitung sorgfältig
durchlesen und aufbewahren.
ENGLISHSVENSKANORSKSUOMIDEUTSCH
Art.no Model
18-3058 MQ50II-UK
30-9686 MQ50II
Ver. 20161128
Original instructions
Bruksanvisning i original
Originalbruksanvisning
Alkuperäinen käyttöohje
Original Bedienungsanleitung
Page 2

Page 3

Scroll Saw
Art.no 18-3058 Model MQ50II-UK
30-9686 MQ50II
Please read theentire instruction manual before using theproduct and save it for future reference.
We apologise for any text or photo errors and any changes of technical data. If you have any
questions concerning technical problems please contact our Customer Service Department
(see address on reverse.)
Safety
General Safety Instructions
Warning: When using this machine all basic safety precautions must be followed to avoid
therisk of fire, electrocution and personal injury. Read these instructions carefully before using
theproduct and keep them for future reference.
• Keep work area clean.
Cluttered areas and benches invite injuries.
• Consider work area environment.
Do not expose power tools to rain. Do not use power tools in damp or wet locations.
Keep work area well lit. Do not use power tools where there is risk of cause fire or explosion.
• Guard against electric shock.
Avoid body contact with earthed or grounded surfaces (e.g. pipes, radiators, ranges, refrigerators).
• Keep children away.
Do not let visitors touch thetool or extension cord. All visitors should be kept away from area.
• Store idle tools.
When not in use, tools should be stored in adry, high or locked up place, out of reach of children.
• Do not force thetool.
It will do thejob better and safer at therate for which it was intended.
• Use theright tool.
Do not force small tools or attachments to do thejob of aheavy duty tool. Do not use tools
for purposes not intended; for example, do not use circular saws to cut tree limbs or logs.
• Dress properly.
Do not wear loose clothing or jewellery, they can be caught in moving parts. Rubber gloves
and non-skid footwear are recommended when working outdoors. Wear protecting hair
covering to contain long hair.
• Use safety glasses.
Also use face or dust mask if thecutting operation is dusty.
• Connect dust extraction equipment.
If devices are provided for theconnection of dust extraction and collection facilities ensure
these are connected and properly used.
ENGLISH
3
Page 4

• Do not abuse thecord.
Never carry thetool by thecord or yank it to disconnect it from thesocket. Keep thecord
ENGLISH
away from heat, oil and sharp edges.
• Secure work.
Use clamps or avice to hold thework. It is safer than using your hand and it frees both
hands to operate thetool.
• Do not overreach.
Keep proper footing and balance at all times.
• Maintain tool with care.
Keep cutting tools sharp and clean for better and safer performance. Follow instructions for
lubrication and changing accessories. Inspect tool cord periodically and if damaged have it
repaired by anauthorized service facility. Inspect extension cords periodically and replace,
if damaged. Keep handles dry, clean and free from oil and grease.
• Disconnect tools.
When not in use, before servicing and when changing accessories such as blades,
bits and cutters.
• Remove adjusting keys and wrenches.
Form thehabit of checking to see that keys and adjusting wrenches are removed from
thetool before turning it on.
• Avoid unintentional starting.
Do not carry aplugged-in tool with afinger on theswitch. Ensure switch is off when plugging in.
• Use outdoor extension leads.
When tool is used outdoors, use only extension cords intended for outdoor use.
• Stay alert.
Watch what you are doing. Use common sense. Do not operate tool when you are tired.
• Check damaged parts.
Before further use of thetool, aguard or other part that is damaged should be carefully
checked to determine that it will operate properly and perform its intended function.
Check for alignment of moving pans, free running of moving parts, breakage of pans,
mounting and any other conditions that may affect its operation. Aguard or other pan
that is damaged should be properly repaired or replaced by anauthorized service centre
unless otherwise indicated in this instruction manual. Have defective switches replaced by
anauthorized service facility. Do not use thetool if theswitch does not turn it on and off.
• Use recommended accessories.
Theuse of any accessory or attachment, other than those recommended in this instruction
manual, may present arisk of personal injury.
• Have your tool repaired by aqualified person.
This electric tool is in accordance with therelevant safety requirements. Repairs should only
be carried out by qualified persons using original spare parts, otherwise this may result in
considerable danger to theuser.
4
Page 5

Additional Safety Rules for Scroll Saws
• Never have your hands under thetable when using thescroll saw.
• Make sure that thescroll saw is securely fastened to thetable/workbench with clamps or
bolts and that thetable is stable.
• Avoid holding theworkpiece in such away that you need to change grip in themiddle of
acut. Think carefully about how to hold theworkpiece safely before starting to cut.
• Never place hands or fingers in thepath of thesaw blade or in such aposition that they
might come into contact with thesaw blade if your hand slips.
• Make sure that thescroll saw blade has completely stopped and that theplug has been
pulled before making any adjustments or clearing away sawdust and offcuts.
• Always use safety glasses, ear defenders and aface mask.
• Never start thescroll saw unless thesaw table is clear of tools and waste materials.
• Make sure that thecorrect type of saw blade has been fitted and that it is securely fixed
before starting thescroll saw.
• Extra care should be exercised when sawing very small, very large or irregularly shaped
workpieces. Never saw aworkpiece that does not lie flat on thesurface of thesaw table
without arranging extra means of support for theworkpiece.
• Hold theworkpiece steady on thesaw table and feed theworkpiece slowly towards
thesaw blade.
• Care should be taken when reversing theworkpiece out of asaw cut. Thesaw blade could
get stuck in thesaw cut. Switch thepower off, pull out theplug and knock asuitable wedge
in thesaw cut to open it. Theworkpiece can then be reversed out of thesaw cut.
• Make sure that theblade guard is undamaged and correctly attached.
Product safety labels
ENGLISH
Always wear eye and ear protection.
Respiratory protection required, sawdust can be harmful to your health.
5
Page 6
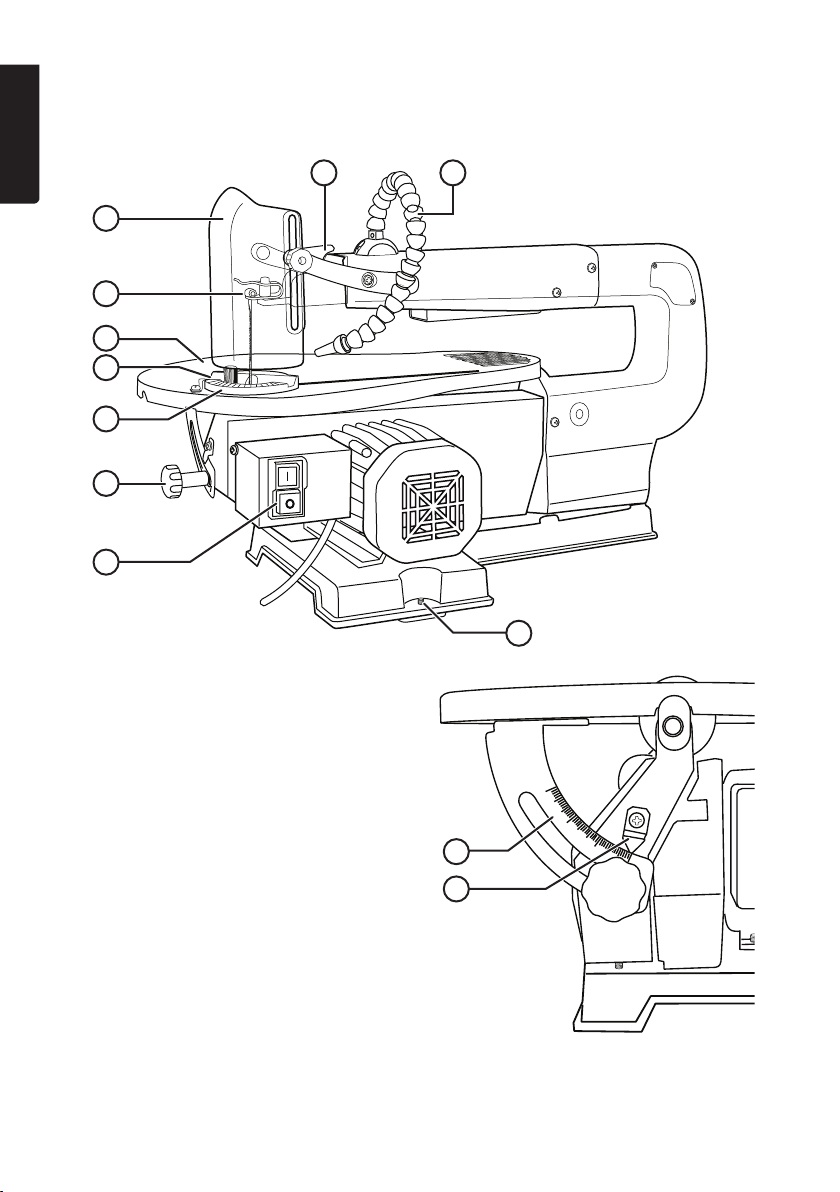
Product Description
ENGLISH
1
2
5
6
7
8
9
1. Blade Guard
2. Upper Blade Holder (thelower one is
inside themachine, under thesaw table)
3. Blade Tensioner
4. Dust Blower
5. Saw Table
6. Table Insert
7. Mitre Guide
8. Tilt Angle Locking Knob
9. ON/OFF Switch (1/0)
10. Mounting Hole (3×)
11. Tilt Angle Scale
12. Tilt Angle Pointer
3
4
10
45
30
11
15
12
6
Page 7

45
30
15
45
30
15
Assembly
Thesaw is delivered
fully assembled
except for theblade
guard and dust
blower tube.
Attach theblade
guard as shown in
thefigure and screw
on theblower tube.
Installation
Select agood position for thescroll saw. It should have plenty of space, good ventilation, be well-lit
and close to anearthed wall socket.
Mounting the Scroll Saw
Thescroll saw has three mounting holes. Bolt themachine to astable surface.
Place flat washers between theheads of thebolts and theholes, use lock nuts that do not
vibrate loose. Do not overtighten thebolts (thebolts, washers and nuts needed to mount
themachine are not included).
Calibrating the Tilt Angle Scale
To calibrate thetilt angle scale first undo thetable
locking knob (8) and then set thetable at 90 degrees
to thesaw blade. Use atry square or similar
instrument to make sure that theangle is 90°.
Undo thescrew holding thepointer (12),
set it to 0° and then tighten thescrew again.
Theangle scale (11) is convenient to use but is
not 100% accurate. For best results it is best
to double-check theangle using abevel gauge
before sawing.
11
12
8
ENGLISH
45°
7
Page 8
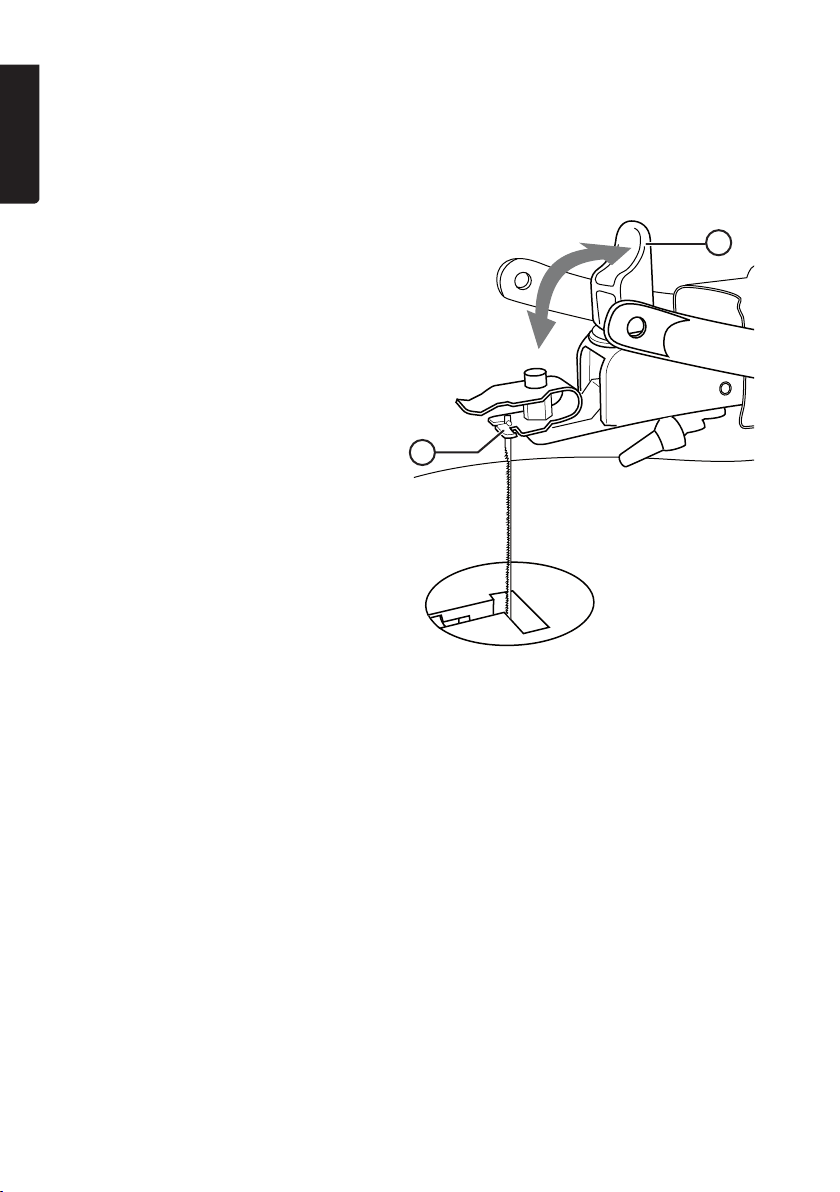
Fitting and Replacing the Blade
Switch thescroll saw off and pull out theplug before fitting or replacing thesaw blade.
ENGLISH
Pin End Saw Blades
• Release theblade tension by lifting
thequick-release blade tension lever (3).
• Theblade can then be unhooked from
first theupper and then thelower blade
holder.
• When fitting anew blade theteeth must
point downwards. Certain blades have
teeth pointing in both directions, in which
case it does not matter which way up
theblade is fitted.
• Hook theblade into thelower blade
holder first and then into theupper blade
holder (2) before tensioning theblade
with thetension lever (3).
• Make sure that theblade is sitting
securely in theslots of theblade holder.
• Thetension of thesaw blade can be
adjusted by turning thedial on thequickrelease tensioner. Turn it clockwise to
increase thetension and anticlockwise to
reduce thetension.
Note:
Look at theblade holders when you have removed thesaw blade. It is possible to insert
theblades in two ways: For sawing from thefront and from theside. Sawing from theside is
appropriate for workpieces longer than 410 mm.
2
3
Important: Only saw from theside when thetable is set on 0° angle.
8
Page 9

45
30
15
Pinless Saw Blade
Two holders for pinless saw blades are included. First theholder must be attached to theblade;
anadjustable spanner will be needed (anadjustable spanner is not included).
ENGLISH
1. Insert thesaw blade between thetwo nuts
and tighten thesocket head screw onto
thenut using theallen key. Make sure that
theblade is placed at one of thecorners of
thenuts and that thenuts are in line. This is
very important as thecorners of thenuts are
going to act as “pins” and fit into theslots in
theupper and lower blade holders.
2. After having attached ablade holder to each
end of thesaw blade it can be installed
in thesame way as apin end saw blade.
Make sure that thecorners of thenuts slot
into theslots of theupper and lower blade
holders.
Helpful Suggestions
There are five common causes of saw blade failure:
1. Thesaw blade is under too much or too little tension.
2. Too much pressure is exerted on theblade whilst sawing.
3. Theblade is twisted or bent because theworkpiece is not fed straight.
4. Theblade is worn out.
5. Theworkpiece is too thick. Thesaw can cut material up to 50 mm thick.
Using the Scroll Saw
Ascroll saw can cut difficult curves where other types of saw are inappropriate. Ascroll saw can
also be used for cross-cutting, rip sawing and bevelling. Things to consider when using ascroll saw:
• Thesaw will not work on its own. Theoperator of thesaw is responsible for ensuring that
theworkpiece is fed into theblade and for letting theblade do thesawing.
• Theworkpiece must be fed into theblade slowly and smoothly because theteeth of thesaw
blade are very small and only cut on thedownward stroke. Feeding theworkpiece into
theblade too quickly could easily break theblade.
9
Page 10

• Even if thesaw is capable of sawing through wood up to 50 mm thick, best results are
achieved working with materials up to 25 mm thick. When sawing wood thicker than 25 mm
ENGLISH
therate of feed must be very slow and care must be taken not to bend theblade.
• Sooner or later theteeth of thesaw blade will wear out. Best results will be achieved if
theblade is changed regularly. Depending on thematerial of theworkpiece thesaw blade will
retain its edge for anything from ahalf-hour to two hours continuous sawing.
• Bear in mind that thesaw blade will try to follow thegrain of thewood (thepath of least resistance).
• If you have never used ascroll saw before, it will take awhile to get to know how thesaw
and theworkpiece behave during thesawing process. You can count on getting through
afew saw blades. Scroll saw blades are quite fragile, not at all as sturdy as theblades used
in handsaws or circular saws.
Responsible disposal
This symbol indicates that this product should not be disposed of with general
household waste. This applies throughout theentire EU. In order to prevent
any harm to theenvironment or health hazards caused by incorrect waste
disposal, theproduct must be handed in for recycling so that thematerial can
be disposed of in aresponsible manner. When recycling your product, take it to
your local collection facility or contact theplace of purchase. They will ensure that
theproduct is disposed of in anenvironmentally sound manner.
Technical Data
Power Supply 230 V, 50 Hz
Output Power 85 W
Max Cutting Depth 50 mm
Throat 410 mm
Blade Length 133 mm
Strokes per Minute 1400
Stroke Length 17 mm
Table Size 375 × 250 mm
Overall Size 580 × 280 × 340 mm
Table Tilt 0–45°
Saw Blade Pin End (holders for pinless blade included)
Weight 12.5 kg
10
Page 11

Kontursåg
Art.nr 18-3058 Modell MQ50II-UK
30-9686 MQ50II
Läs igenom hela bruksanvisningen före användning och spara den sedan för framtida bruk.
Vi reserverar oss för ev. text- och bildfel samt ändringar av tekniska data.Vid tekniska problem
eller andra frågor, kontakta vår kundtjänst (se adressuppgifter på baksidan).
Säkerhet
Generella säkerhetsinstruktioner
Varning! När du använder detta verktyg ska grundläggande försiktighetsåtgärder iakttas för att
minska risken för brand, elektrisk chock och personskada. Läs alla dessa instruktioner innan du
använder produkten och spara dessa instruktioner.
• Håll arbetsplatsen ren.
Belamrade ytor och bord inbjuder till olyckor.
• Tag hänsyn till arbetsmiljön.
- Utsätt inte verktygen för regn.
- Använd inte verktygen ifuktiga eller våta utrymmen.
- Håll arbetsplatsen väl upplyst.
- Använd inte verktygen inärheten av lättantändliga vätskor eller gaser.
• Undvik elektrisk chock.
Undvik kroppskontakt med jordade föremål som t.ex. vattenledningar, element, köksspisar
och kylskåp.
• Håll andra människor på avstånd.
Låt inga människor, speciellt inte barn, som inte deltar iarbetet röra vid verktyget eller dess
skarvsladdar. Håll dem på avstånd från arbetsplatsen.
• Förvara verktyget iettsäkert utrymme.
När verktygen inte används, förvara dem ietttorrt låst utrymme utom räckhåll för barn.
• Överbelasta inte verktyget.
Det gör jobbet bättre och säkrare med avsedd matningshastighet.
• Använd rätt verktyg.
Pressa inte små verktyg att utföra stora jobb som kräver kraftfulla verktyg. Pressa inte
ettverktyg eller entillsats att göra ettarbetsmoment som den inte är gjord för;
använd t.ex. inte encirkelsåg för att kapa trädgrenar eller timmer.
• Bär lämplig klädsel.
Bär inga löst sittande kläder eller smycken, de kan fastna iroterande delar. Bär halksäkra
skor rekommenderas vid arbete utomhus. Bär hårnät eller liknande om du har långt hår.
• Bär alltid skyddsutrustning.
Bär skyddsglasögon.
Använd också dammfilter eller skyddsmask vid dammande arbeten.
SVENSKA
11
Page 12

• Använd utsugningsutrustning.
Om verktyget är förberett för anslutning av utrustning för utsugning och uppsamling av
damm, se till att utrustningen är ansluten och korrekt använd.
• Misshandla inte nätsladden.
Ryck inte isladden, utan dra istickproppen när du ska ta ur den ur vägguttaget. Se till att
nätsladden inte kommer ikontakt med värme, olja eller vassa kanter.
• Spänn fast arbetsstycket ordentligt.
När det är möjligt, använd tvingar eller skruvstäd för att spänna fast arbetsstycket.
Det är säkrare än att hålla fast arbetsstycket med ena handen.
• Sträck dig inte för långt.
SVENSKA
Se till att du hela tiden står säkert med god balans.
• Håll verktygen itrim.
Se till att de är rena och eggarna vassa för optimal effekt och ettsäkert resultat. Följ manualens
rekommendationer för smörjning och byte av tillbehör. Kontrollera nätsladden regelbundet.
Om den är skadad ska den bytas av enkvalificerad servicetekniker. Syna alla skarvsladdar
regelbundet så att de inte är skadade. Se till att maskinens/verktygets handtag och reglage
är torra, rena och helt fria från olja, fett etc.
• Slå av strömmen.
Dra ur stickproppen och tryck in nödstopp före service och vid byte av tillbehör som
hyvelstål, borrar, stål, slipband eller blad.
• Ta bort alla nycklar och serviceverktyg.
Gör det till envana att kontrollera att alla nycklar och serviceverktyg är borttagna från
maskinen innan du slår på strömmen.
• Undvik oavsiktlig start.
Bär inte ettverktyg med ettfinger på strömbrytaren/avtryckaren om sladden sitter iettuttag.
Se till att strömbrytaren står på OFF när du sätter in stickproppen.
• Använd rätt skarvsladdar.
Om du använder skarvsladdar utomhus, använd endast de som är avsedda för utomhusbruk.
Använd skarvsladdar med tillräcklig ledararea och rulla ut hela sladden.
• Använd sunt förnuft och var försiktig.
Tänk efter innan du utför ettarbetsmoment, så att du kan utföra det på ettsäkert sätt.
Använd inte maskinen/verktyget när du är trött, påverkad av mediciner etc.
• Kontrollera följande innan du startar verktyget:
- Att alla skydd och övriga delar är oskadade och fyller sin funktion.
- Att rörliga delar kan rotera fritt och är rätt inriktade.
- Att inga rörliga delar kan fastna.
- Att ingen defekt har uppstått.
- Andra omständigheter som kan påverka arbetets utförande.
Ettskydd eller någon annan del som skadats, skall repareras fackmässigt eller bytas ut.
Skadade nätsladdar och strömbrytare ska alltid bytas ut av fackman. Använd aldrig verktyget
om du inte kan stänga av eller starta det på ettbetryggande sätt.
12
Page 13

• Använd rekommenderade tillbehör.
Användning av ej rekommenderade tillbehör kan vålla olyckor eller risk för personskada.
• Repareras endast av kvalificerad tekniker.
Verktyget överensstämmer med gällande säkerhetskrav. Reparationer av verktyget ska alltid
utföras av fackman, med originalreservdelar, annars kan verktyget vålla olyckor eller risk för
personskada.
Särskilda säkerhetsföreskrifter för kontursåg
• Håll aldrig händerna under bordet när du använder kontursågen.
• Fixera kontursågen med tvingar eller skruvar på arbetsbänken/bordet och se till att det står
stabilt på golvet.
• Undvik att hålla iarbetsstycket så att du måste byta grepp under ettarbetsmoment.
Tänk efter hur du ska hålla arbetsstycket på ettsäkert sätt innan du påbörjar sågningen.
• Placera aldrig fingrar eller händer isågbladets bana eller så att de kommer ikontakt med
sågbladet om handen slinter.
• Se alltid till att kontursågens blad har stannat helt och att stickproppen är urdragen innan
justering eller borttagning av spån och avkap.
• Använd alltid skyddsglasögon, hörselskydd och andningsskydd.
• Starta aldrig kontursågen om inte sågbordet är rensat från verktyg, sågrester mm.
• Kontrollera att rätt typ av sågblad monterats och att det sitter korrekt ihållarna innan
kontursågen startas.
• Var extra försiktig med mycket små, mycket stora eller oregelbundet formade arbetsstycken,
såga aldrig arbetstycken som inte har enflat anliggningsyta mot sågbordet såvida inte extra
stöd anordnats för arbetsstycket.
• Håll arbetsstycket stadigt mot sågbordet och mata varsamt arbetsstycket mot sågbladet.
• Var försiktig när du backar bladet ur ettsågspår. Bladet kan fastna ispåret. Slå av strömmen,
dra ur stickproppen och slå ilämplig kil isågspåret. Sedan kan du försöka backa med
arbetsstycket.
• Se till att skydden är hela och är rätt monterade.
SVENSKA
Produktmärkning med säkerhetssymboler på maskinen
Använd alltid hörselskydd och skyddsglasögon.
Använd andningsskydd, trädamm kan vara hälsovådligt.
13
Page 14

Produktbeskrivning
1
2
SVENSKA
5
6
7
8
9
1. Bladskydd
2. Övre bladfäste (Det nedre finns
inne imaskinen under sågbordet)
3. Snabbspänningsreglage för blad
4. Blåsrör
5. Sågbord
6. Iläggsbricka
7. Geringslinjal
8. Låsratt för låsning av sågbordets vinkel
9. Strömbrytare 1/0
10. Fästhål (3 st.)
11. Skala för sågbordets vinkel
12. Visare för skala
3
4
10
45
30
11
15
12
14
Page 15

45
30
15
45
30
15
Montering
Sågen levereras fullt
hopsatt med undantag för bladskydd
och blåsrör.
Sätt fast bladskyddet som bilden
visar och gänga fast
blås röret på plats.
Installation
Välj enbra placering för kontursågen med gott utrymme, bra ventilation och belysning,
samt ettjordat eluttag på bekvämt avstånd.
Fastsättning av kontursågen
Kontursågen har tre fästhål. Bulta fast maskinen på enstabil yta. Placera planbrickor mellan
bultskallar och fästhål, använd gärna låsmuttrar som inte lossnar av vibrationerna. Dra inte åt för
hårt (bultar och brickor för att fästa maskinen medföljer ej maskinen).
Inställning av arbetsbordets vinkelskala
För inställning av vinkelskalan lossar du låsratten
för sågbordet (8) och ställer in bordet i90° vinkel
mot sågbladet. Använd envinkelhake eller något
annat lämpigt som har enexakt 90° vinkel.
Lossa skruven som håller visaren (12), ställ in
visarens spets på 0° och dra åt skruven igen.
Vinkelskalan (11) är bekväm att använda men kan
inte ge 100% precision. Dubbelkolla därför med
gradskiva före sågning för att få bästa resultat.
11
SVENSKA
45°
12
8
15
Page 16

Montering och byte av sågblad
Stäng av kontursågen och dra ur stickkontakten innan montering eller byte av sågblad.
Sågblad med stift
• Lossa på bladspänningen genom att fälla
upp snabbspänningsreglaget (3).
• Bladet kan nu hakas av, först det övre
och sedan det nedre bladfästet.
• Vid montering av det nya bladet måste
SVENSKA
bladets tänder vändas neråt mot
sågbordet, vissa blad har tandning åt
båda hållen, då spelar det ingen roll hur
man vänder det.
• Haka nu ibladet idet nedre bladfästet först och sedan idet övre (2)
och spänn bladet genom att fälla ner
snabbfästningsreglaget (3).
• Kontrollera att bladet hamnat iurtagen på
bladfästena och sitter bra.
• Spänningen på sågbladet kan justeras
genom att vrida på snabb spänningsreglaget, vrid medurs för att öka
spänningen och vrid moturs för att
minska spänningen.
2
3
Obs!
Titta på bladfästena när du tagit bort sågbladet. Då ser du att man kan sätta ibladet på två olika
sätt: för sågning framifrån och från sidan. Sågning från sidan blir aktuell vid arbetsstycken större
än 410 mm.
Viktigt: Såga från sidan endast när bordet står på 0° vinkel.
16
Page 17

45
30
15
Sågblad utan stift
Två hållare för blad utan stift medlevereras. Först måste du sätta fast hållarna på bladet,
se till att du har enskiftnyckel till hands (skiftnyckel ingår ej).
1. Stick in sågbladet mellan de två muttrarna
och dra åt med insexnyckeln. Se till att
sågbladet placeras vid enav dom sex
kanterna på muttrarna samt att kanterna på
dom två muttrarna är ilinje. Detta är mycket
viktigt då muttrarnas kant kommer att fungera
som ”stift” och skall passas in iurtagen på
det övre och nedre bladfästet.
2. Efter att ha monterat enbladhållare ivar ända
på sågbladet kan det monteras på samma
sätt som ettsågblad med stift. Se till att
kanten på muttrarna passas in iurtagen på
det övre och nedre bladfästet.
Tänk på detta:
Sågblad brister av fem olika orsaker:
1. Sågbladet är spänt för löst eller för hårt.
2. Du matar för hårt.
3. Du böjer eller vrider bladet genom att inte mata rakt mot bladet.
4. Bladet är utslitet.
5. Arbetsstycket är för tjockt. Sågen tar upp till 50 mm tjocklek, inte mer.
SVENSKA
Kontursågning
Med enkontursåg kan man såga besvärliga kurvor som andra sågar inte klarar av.
Enkontursåg kan även användas för kapning, klyvning och snedsågning.
Tänk på följande när du använder enkontursåg:
• Sågen sågar inte av sig själv. Det är du som styr matningen av arbetsstycket
mot bladet och låter sågen såga medan du matar fram arbetstycket.
• Du måste mata sakta och jämnt därför att tänderna är väldigt små och de skär bara när de
rör sig neråt. Om du matar för fort är det lätt hänt att bladet brister.
17
Page 18

• Även om sågen kan såga iupp till 50 mm tjockt trä får du bättre resultat iarbets stycken som
är upp till 25 mm tjocka. Itjockare virke än 25 mm måste du mata väldigt sakta och tänka på
att inte böja eller vrida bladet.
• Förr eller senare slits tänderna på sågbladet ut. För bästa resultat måste du därför byta blad
ganska ofta. Beroende på materialet iarbetsstycket behåller ettsågblad sin skärpa ienhalv
timme upp till två timmar vid oavbruten sågning.
• Kom ihåg att bladet gärna vill följa ådringen iträt – minsta motståndets lag.
• Om du inte har använt enkontursåg tidigare tar det givetvis lite tid att lära känna sågen,
och att lära sig hur såg och arbetsstycke samverkar. Du kan räkna med att det går åt några
SVENSKA
sågblad. De som används vid kontursågning är rätt så ömtåliga och är inte av samma typ
som de blad som finns på handsågar och cirkelsågar.
Avfallshantering
Denna symbol innebär att produkten inte får kastas tillsammans med annat
hushållsavfall. Detta gäller inom hela EU. För att förebygga eventuell skada på
miljö och hälsa, orsakad av felaktig avfallshantering, ska produkten lämnas till
återvinning så att materialet kan tas omhand på ettansvarsfullt sätt. När du lämnar
produkten till återvinning, använd dig av de returhanteringssystem som finns där
du befinner dig eller kontakta inköpsstället. De kan se till att produkten tas om
hand på ettför miljön tillfredställande sätt.
Tekniska data
Drivspänning 230 V, 50 Hz
Effekt 85 W
Max. såghöjd 50 mm
Max. sågdjup 410 mm
Bladlängd 133 mm
Slag per minut 1440
Slaglängd 17 mm
Mått för arbetsbord 375 × 250 mm
Yttermått 580 × 280 × 340 mm
Bordslutning 0−45°
Sågblad Med stift (hållare för blad utan stift medföljer)
Vikt 12,5 kg
18
Page 19

Kontursag
Art.nr. 18-3058 Modell MQ50II-UK
30-9686 MQ50II
Les nøye igjennom hele bruksanvisningen og ta vare på den til senere bruk. Vi reserverer oss
for ev. tekst- og bildefeil, samt forandringer av tekniske data. Ved tekniske problemer eller andre
spørsmål, ta kontakt med vårt kundesenter (se opplysninger på baksiden).
Sikkerhet
Generelle sikkerhetsregler for egen og andres sikkerhet
• Hold arbeidsstedet ryddig.
Uryddige arbeidsplasser innbyr til ulykker.
• Bruk ikke maskinen irisikofylt miljø.
Elektromaskiner skal ikke benyttes ifuktige, våte miljøer eller ved regn. Påse at belysningen
er god på arbeidsstedet. Sørg for god luftsirkulasjon ved støvfylte oppgaver. Bruk aldri elektriske
maskiner/verktøy der de kan forårsake brann eller eksplosjon!
• Unngå elektrisk sjokk.
Unngå kroppskontakt med jordede formål som vannledning, element, komfyr etc. samtidig
som du bruker elektromaskiner/verktøy.
• Hold barn og tilskuere på avstand.
Barn og tilskuere bør befinne seg på sikkerhetsavstand fra elektromaskiner/verktøy eller
elkabler på arbeidsstedet.
• Barnesikker oppbevaring.
Oppbevar elektromaskiner/verktøy innelåst eller utenfor rekkevidde for barn når de ikke
er ibruk.
• Press ikke maskinen.
Maskinen gjør jobben bedre og sikrere med beregnet matehastighet.
• Bruk riktig verktøy.
Press ikke et verktøy eller lignende til åutføre et arbeidsmoment den ikke er beregnet for.
• Bruk egnet kledsel.
Bruk ikke løstsittende klær, vanter, hals-/armbånd, ringer eller andre smykker som kan sette seg
fast iroterende deler. Sklisikre sko anbefales. Bruk hårnett eller tilsvarende om du har langt hår.
• Bruk verneutstyr.
Benytt alltid vernebrille, vanlige briller duger ikke! Bruk også støv-/vernemaske samt
hørselvern der dette kreves.
• Utlufting.
Bruk tilgjengelig utsugingsutrustning for åfjerne og samle opp støv og spon. Om maskinen er
beregnet for det, påse at utrustningen brukes på riktig måte og tømmes ved behov.
• Beskadige ikke nettkabelen.
Bær aldri maskinen inettkabelen. Rykk ikke ikabelen, men trekk istøpselet når strømmen
brytes. Påse at kabelen ikke kommer ikontakt med varme, olje eller skarpe kanter.
NORSK
19
Page 20

• Sett fast emnet ordentlig.
Bruk tvinger eller skruestikke der dette er mulig, du kan da håndtere verktøyet med begge
hender. Dette er sikrere enn åholde emnet med enhånd.
• Strekk deg ikke for langt.
Sørg for at du hele tiden står stødig og med god balanse.
• Hold verktøyet igod stand.
Se etter at eggen er hvass for optimal effekt og sikkert resultat. Følg manualens anbefalinger
for smøring og bytte av tilbehør. Kontrollér nettkabelen regelmessig, om den er skadet skal
den byttes av enkyndig person. Dette gjelder også ved bruk av skjøteledninger. Maskinens
håndtak, strømbryter m.m. skal være rene, tørre og fri for olje, fett etc.
• Slå av strømmen.
Trekk ut støpselet og trykk inn nødstopp innen service utføres eller ved bytte av tilbehør som
høvelstål, bor, slipebånd, blad etc.
• Ta bort alle nøkler og serviceverktøy.
Gjør det til envane åkontrollere at alle nøkler og serviceverktøy er fjernet fra maskinen før du
slår på strømmen.
NORSK
• Unngå utilsiktet start.
Bær ikke verktøyet med fingeren på strømbryteren/avtrekkeren om nettkabelen sitter iet uttak.
Påse at bryteren står iOFF når støpselet settes i.
• Bruk egnet skjøteledning.
Om du benytter skjøteledning utendørs, bruk kun ledning som er beregnet for dette formål
samt påse at de har riktig trådareal. Rull ut hele ledningen!
• Bruk sunn fornuft og vær varsom.
Tenk etter, innen du utfører et arbeidsmoment, at dette kan utføres på ensikker måte. Bruk ikke
maskinen/verktøyet når du er trett, påvirket av medisin etc.
• Kontroller at alle deler er uskadet.
Før du starter verktøyet, kontroller at all beskyttelse og øvrige deler er uskadet og oppfyller
sin funksjon, at alle deler kan rotere fritt og er riktig justert, at ingen bevegelige deler kan sette
seg fast, at ingen defekt har oppstått og øvrige omstendigheter som kan påvirke arbeidets
utførelse. Et vern eller annen del som er skadet skal fagmessig repareres eller skiftes ut.
Skadde kabler og strømbrytere skal alltid byttes av enfagmann. Bruk aldri verktøyet dersom
du ikke kan stenge av eller starte det på enbetryggende måte.
• Bruk anbefalt tilbehør.
Bruk av ikke anbefalt tilbehør kan volde ulykke eller risiko for personskade.
• Repareres kun av kyndig tekniker.
Verktøyet overensstemmer med gjeldende sikkerhetskrav. Reparasjoner skal alltid utføres
av fagmann, med originale reservedeler, ellers kan verktøyet volde skade eller risiko for
personskade.
20
Page 21

Spesielle sikkerhetsforskrifter for kontursag
• Hold aldri hendene under bordet mens du bruker kontursagen.
• Fest kontursagen med tvinger eller skruer på arbeidsbenken/bordet, og påse at bordet står
stabilt på gulvet.
• Unngå åholde iarbeidsstykket så du må bytte grep under et arbeidsmoment. Tenk nøye
igjennom hvordan du skal holde arbeidsstykket på ensikker måte før du begynner sagingen.
• Plasser aldri fingre eller hender isagbladets bane, eller så de kommer ikontakt med
sagbladet hvis hånden glipper.
• Påse alltid at kontursagens blad har stoppet helt, og at støpselet er dratt ut før justering eller
fjerning av spon og avkapp.
• Bruk alltid vernebriller, hørselsvern og støvmaske.
• Start aldri kontursagen hvis ikke sagbordet er renset for verktøy, sagrester etc.
• Kontroller at riktig type sagblad er montert, og at det sitter korrekt iholderne før
kontursagen startes.
• Vær ekstra forsiktig med svært små, svært store eller uregelmessig formede arbeidsstykker,
sag aldri arbeidstykker som ikke har enflat anleggsflate mot sagbordet dersom ikke ekstra
støtte er ordnet til arbeidsstykket.
• Hold arbeidsstykket stødig mot sagbordet og mat det forsiktig mot sagbladet.
• Vær forsiktig når du trekker bladet ut fra et sagspor. Bladet kan feste seg isporet. Slå av
strømmen, trekk ut støpselet og slå enkile inn isagsporet. Deretter kan du prøve åtrekke
arbeidsstykket ut.
• Påse at all beskyttelse hele tiden er riktig montert.
Produktmerking med sikkerhetssymboler på maskinen
NORSK
Bruk alltid vernebriller og hørselsvern.
Bruk åndedrettsvern. Trestøv kan være helseskadelig.
21
Page 22

Produktbeskrivelse
1
2
5
6
7
NORSK
8
9
1. Bladbeskyttelse
2. Øvre bladfeste (Det nedre er inne
imaskinen, under sagbordet)
3. Hurtigspenningsregulering for blad
4. Blåserør
5. Sagbord
6. Innleggsbrikke
7. Gjæringslinjal
8. Låseratt for låsing av sagbordets vinkel
9. Strømbryter 1/0
10. Festehull (3 stk.)
11. Skala for sagbordets vinkel
12. Viser for skala
3
4
10
45
30
11
15
12
22
Page 23

45
30
15
45
30
15
Montering
Sagen leveres
fullt sammensatt
med unntak av
bladbeskyttelse og
blåserør.
Fest bladbeskyttelsen
som bildet viser,
og skru blåserøret
på plass.
Installasjon
Velg enbra plassering for kontursagen med god plass rundt den og med skikkelig ventilasjon
og belysning, samt et jordet strømuttak på bekvem avstand.
Festing av kontursagen
Kontursagen har tre festehull. Bolt fast maskinen på enstabil flate. Plasser planbrikker mellom
bolthoder og festehull, bruk gjerne låsemutre som ikke løsner av vibrasjonene. Trekk ikke til for
hardt (bolter og brikker, for åfeste maskinen, medfølger ikke).
Innstilling av arbeidsbordets vinkelskala
For innstilling av vinkelskalaen løsner du låserattet
for sagbordet (8), og stiller inn bordet i90°
vinkel mot sagbladet. Bruk envinkelhake eller
noe annet passende som har nøyaktig 90°
vinkel. Løsne skruen som holder viseren (12),
still viserens spiss på 0° og dra til skruen igjen.
Vinkelskalaen (11) er bekvem og bruke, men kan
ikke gi 100% presisjon. Dobbelsjekk derfor med
gradskive før saging, for åfå best mulig resultat.
11
NORSK
45°
12
8
23
Page 24

Montering og skifte av sagblad
Skru av kontursagen, og dra ut støpselet fra stikkontakten før montering eller bytte av sagblad.
Sagblad med stift
• Løsne på bladspenningen ved åfelle opp
hurtigspenningsreguleringen (3).
• Bladet kan nå hakes av, først det øvre og
deretter det nedre bladfestet.
• Ved montering av det nye bladet, må
bladets tenner vendes nedover mot
sagbordet. Visse blad har tanning ibegge
retninger, og da spiller det ingen rolle
hvilken vei det monteres.
• Sett nå bladet idet nedre bladfestet først,
og deretter idet øvre (2). Spenn bladet
NORSK
ved åfelle ned hurtigfestereguleringen (3).
• Kontroller at bladet har havnet iuttakene
på bladfestene og sitter bra.
• Spenningen på sagbladet kan justeres
ved åvri på hurtigspenningsreguleringen.
Vri med urviseren for åøke spenningen
og vri mot urviseren for åminske
spenningen.
Obs!
Se på bladfestene når du har fjernet sagbladet. Da ser du at man kan sette ibladet på to
forskjellige måter: For saging forfra, og fra siden. Saging fra siden blir aktuell ved arbeidsstykker
større enn 410 mm.
2
3
Hvis du skal mate sideveis må bordet være plant, det vil si at vinkelen må stilles på 0°.
24
Page 25

45
30
15
Sagblad uten stift
To holdere for blad uten stift medfølger. Først må du feste holderne på bladet. Påse at du har
enskiftnøkkel tilgjengelig. (Skiftnøkkel medfølger ikke).
1. Stikk sagbladet inn mellom de to mutterne,
og dra til med inseksnøkkelen. Påse at
sagbladet plasseres ved enav de seks
kantene på muttrene, samt at kantene på de
to muttrene er på linje. Dette er svært viktig
da muttrenes kant vil fungere som ”stift”, og
skal passes inn iuttakene på det øvre og
nedre bladfestet.
2. Etter åha montert enbladholder ihver ende
på sagbladet, kan det monteres på samme
måte som et sagblad med stift. Påse at
kanten på muttrene passes inn iuttakene på
det øvre og nedre bladfestet.
Tenk på dette:
Fem forskjellige årsaker til at sagblad brekker:
1. Sagbladet er spent for løst eller for hardt.
2. Du mater for hardt.
3. Du bøyer eller vrir bladet ved åikke mate rett mot bladet.
4. Bladet er utslitt.
5. Arbeidsstykket er for tykt. Sagen tar opptil 50 mm tykkelse, ikke mer.
NORSK
Kontursaging
Med enkontursag kan man sage vanskelige kurver som andre sager ikke klarer.
Enkontursag kan også brukes til kapping, kløyving og skråsaging. Husk følgende
når du bruker enkontursag:
• Sagen sager ikke av seg selv. Det er du som styrer matingen av arbeidsstykket mot bladet,
og lar sagen sage mens du mater fram arbeidsstykket.
• Du må mate sakte og jevnt på grunn av at tennene er veldig små og de skjærer bare når de
beveger seg nedover. Dersom du mater for raskt brekker bladet lett.
25
Page 26

• Selv om sagen kan sage iopp til 50 mm tykt tre, får du bedre resultat iarbeidsstykker som er
opp til 25 mm tykke. Itykkere virke enn 25 mm må du mate veldig sakte og huske på åikke
bøye eller vri bladet.
• Før eller senere slites tennene på sagbladet ut. For beste resultat må du derfor bytte blad
ganske ofte. Avhengig av materialet iarbeidsstykket, beholder et sagblad sin skarphet ifra
enhalv time og opp til to timer ved uavbrutt saging.
• Husk at bladet gjerne vil følge årringene itreet – minste motstands lov.
• Dersom du ikke har brukt enkontursag tidligere, tar det naturligvis litt tid ålære åkjenne
sagen, og ålære seg hvordan sag og arbeidsstykke virker sammen. Du kan regne med at
det går med noen sagblad. De som brukes ved kontur-saging er relativt ømfintlige, og er ikke
av samme type som de bladene som finnes på håndsager og sirkelsager.
Avfallshåndtering
Symbolet viser til at produktet ikke skal kastes sammen med husholdnings avfallet.
Dette gjelder ihele EØS-området. For åforebygge eventuelle skader på helse og
NORSK
miljø, som følge av feil håndtering av avfall, skal produktet leveres til gjenvinning,
slik at materialet blir tatt hånd om på enansvarsfull måte. Benytt miljøstasjonene
som er der du befinner deg eller ta kontakt med forhandler. De kan se til at
produktet blir behandlet på entilfredsstillende måte som gagner miljøet.
Tekniske data
Drivspenning 230 V, 50 Hz
Effekt 85 W
Maks. saghøyde 50 mm
Maks. sagdybde 410 mm
Bladlengde 133 mm
Slag per minutt 1440
Slaglengde 17 mm
Mål for arbeidsbord 375 × 250 mm
Ytre mål 580 × 280 × 340 mm
Bordhelling 0–45°
Sagblad Med stift (holder for blad uten stift medfølger)
Vekt 12,5 kg
26
Page 27

Kuviosaha
Tuotenro 18-3058 Malli MQ50II-UK
30-9686 MQ50II
Lue käyttöohjeet ennen tuotteen käyttöönottoa. Säilytä käyttöohjeet tulevaa tarvetta varten.
Pidätämme oikeuden teknisten tietojen muutoksiin. Emme vastaa mahdollisista teksti- tai kuvavirheistä. Jos laitteeseen tulee teknisiä ongelmia, ota yhteys myymälään tai asiakaspalveluun
(yhteystiedot käyttöohjeen lopussa).
Turvallisuus
Yleisiä turvallisuusohjeita turvallisuuden takaamiseksi
• Pidä työtilat siisteinä.
Täynnä tavaraa olevat työtasot ovat avoin kutsu onnettomuudelle.
• Älä käytä konetta vaarallisessa ympäristössä.
Sähkökäyttöisiä koneita ei saa käyttää kosteissa ja märissä tiloissa eikä sateella.
Huolehdi työpisteen riittävästä valaistuksesta. Huolehdi myös pölynpoistosta.
Älä käytä sähkökäyttöisiä työkaluja paikoissa, joissa on tulipalon tai räjähdyksen vaara.
• Vältä sähköiskuja.
Vältä kontaktia maadoitettuihin esineisiin, kuten vesijohtoihin, lämpöpattereihin, lieteen ym.
työskennellessäsi sähkötyökalulla.
• Pidä lapset ja vierailijat loitolla.
Heidän tulee olla riittävän kaukana työpisteestä.
• Säilytä laite poissa lasten ulottuvilta.
• Älä pakota konetta.
Anna koneen työskennellä puolestasi oikealla nopeudella.
• Käytä oikeita työkaluja.
Älä pakota konetta tai lisälaitetta työtehtävään, johon laite ei sovellu.
• Käytä sopivia vaatteita.
Älä käytä löysiä vaatteita, käsineitä, kaulaketjuja, sormuksia, rannerengasta tai muita koruja,
jotka voivat tarttua liikkuviin osiin. Liukuestekengät lisäävät turvallisuutta. Pitkät hiukset tulee
suojata hiusverkolla tai vastaavalla.
• Käytä aina suojalaseja.
Käytä aina suojalaseja, tavalliset silmälasit eivät anna riittävää suojaa. Käytä myös hengityssuojainta
ja suojanaamaria, jos pölyä on paljon.
• Käytä pölynpoistoa.
Käytä pölynpoistoa pölyn ja lastujen imemiseen, mikäli laitteessa on tämä toiminto.
Käytä välineitä oikealla tavalla ja tyhjennä ne säännöllisesti.
• Käsittele sähköjohtoa varoen.
Älä kanna konetta johdosta. Kun irrotat pistokkeen, vedä pistokkeesta,
älä johdosta. Johtoa ei saa altistaa kuumuudelle, öljylle tai teräville esineille.
SUOMI
27
Page 28

• Kiinnitä materiaali kunnolla.
Käytä esim. ruuvipuristinta, mikäli mahdollista. Näin kätesi jäävät vapaaksi, ja voit työskennellä
molemmin käsin. Tämä on turvallisempaa kuin työkappaleesta kiinni pitäminen.
• Älä kurota liian kauas.
Varmista, että työasentosi on tasapainoinen työn jokaisessa vaiheessa.
• Pidä työvälineet kunnossa.
Varmista työvälineiden puhtaus ja terien terävyys. Näin työskentely on turvallisempaa ja
tehokkaampaa ja lopputulos parempi. Noudata voiteluohjeita ja varusteiden vaihtamisesta
annettuja ohjeita. Tarkista virtajohto säännöllisesti. Anna sähkömiehen vaihtaa vioittunut
virtajohto. Tarkista johdot säännöllisesti ja varmista että ne ovat kunnossa. Varmista, että
työkalun kahvat, säätimet ym. ovat puhtaita, ja että niissä ei ole öljyä ym.
• Katkaise virta.
Irrota pistoke ja paina hätäkatkaisinta ennen huoltoa ja laitteiden vaihtoa, esim. höylän terät,
poranterät, hiomanauhat ja terät.
• Poista kaikki avaimet ja työkalut.
Ota tavaksesi poistaa ne koneesta ennen virran kytkemistä.
• Vältä tahatonta käynnistystä.
Konetta kannettaessa sormi ei saa olla virtakytkimellä/liipaisimella johdon ollessa seinässä.
Kun pistoke liitetään pistorasiaan, tulee virtakytkimen olla OFF-asennossa.
• Käytä oikeita jatkojohtoja.
Käytä ulkona ainoastaan ulkokäyttöön tarkoitettuja jatkojohtoja. Jatkojohdon johtimen pintaalan tulee olla riittävä. Kierrä koko johto auki.
• Käytä tervettä järkeä ja ole varovainen.
SUOMI
Suunnittele työvaiheet etukäteen, niin työ sujuu turvallisemmin. Älä käytä laitetta väsyneenä,
lääkkeiden vaikutuksen alaisena jne.
• Varmista, että osat ovat kunnossa.
Varmista ennen koneen käynnistämistä, että kaikki suojat ja muut osat ovat kunnossa
ja toimivat moitteettomasti. Huolehdi siitä, että liikkuvat osat liikkuvat vapaasti ja että ne
on suunnattu oikein, eivätkä jää kiinni. Tarkista myös, ettei koneessa ole muita vikoja
tai työskentelyyn vaikuttavia seikkoja. Ainoastaan ammattilainen saa vaihtaa tai korjata
vioittuneet suojat ja muut osat. johdot ja virtakytkimet. Älä käytä työkalua, mikäli et voi
käynnistää ja sammuttaa sitä turvallisesti.
• Käytä suositeltuja lisälaitteita.
Muiden kuin suositeltujen lisälaitteiden käyttö saattaa johtaa onnettomuuksiin
tai henkilövahinkoihin.
• Korjauksen saa suorittaa ainoastaan ammattihenkilö.
Laite on voimassa olevien turvallisuusvaatimusten mukainen. Laitteen saa korjata vain
ammattilainen. Korjauksessa tulee turvallisuussyistä käyttää ainoastaan alkuperäisosia.
28
Page 29

Erityisiä turvallisuusohjeita kuviosahalle
• Älä pidä käsiä pöydän alla käyttäessäsi kuviosahaa.
• Kiinnitä kuviosaha puristimilla tai ruuveilla työpöytään/-tasoon ja varmista, että se seisoo
tasaisesti lattialla.
• Älä pidä kiinni työkappaleesta siten, että sinun tarvitsee päästää ote työtehtävän aikana.
Mieti ennen työn aloittamista, kuinka voit pitää työkappaleesta turvallisesti kiinni.
• Älä aseta sormia tai käsiä terän eteen tai siten, että ne joutuvat kosketuksiin terän kanssa
otteen pettäessä.
• Varmista, että sahan terä on pysähtynyt täysin ja että pistoke on irrotettu pistorasiasta ennen
laitteen huoltoa tai purujen ja sahauskappaleiden poistoa.
• Käytä aina suojalaseja, kuulosuojaimia tai hengityssuojainta.
• Älä käynnistä kuviosahaa, mikäli sahauspöydällä on työkaluja, sahauskappaleita tms.
• Varmista ennen sahan käynnistämistä, että sahassa on oikean tyyppinen terä ja että se on
kunnolla kiinni pidikkeissä.
• Ole erityisen huolellinen työskennellessäsi hyvin pienten tai suurten tai epätavallisen muotoisten
työkappaleiden kanssa. Mikäli sahattavan kappaleen työpöytää koskettava pinta on epätasainen,
se tulee tukea erillisillä tuilla.
• Pidä työkappaletta tukevasti työpöytää vasten ja syötä työkappaletta kohti sahanterää.
• Ole varovainen, kun peruutat sahanterän urasta. Terä saattaa juuttua uraan. Sammuta virta,
irrota pistoke ja laita uraan sopiva kiila. Yritä nyt uudelleen.
• Varmista, että suojat ovat ehjät ja että ne on asennettu oikein.
Tuotteen merkinnät ja turvallisuussymbolit
Käytä aina suojalaseja ja kuulosuojaimia.
Käytä hengityssuojainta, puupöly saattaa olla terveydelle vaarallista.
SUOMI
29
Page 30

Tuotekuvaus
1
2
5
6
7
8
9
SUOMI
1. Teräsuoja
2. Ylempi teräkiinnike (Alempi kiinnike on
koneessa sahauspöydän alla)
3. Terän pikakiristyssäädin
4. Puhallusputki
5. Sahauspöytä
6. Levy
7. Jiiriviivain
8. Sahauspöydän kulman lukitusnuppi
9. Virtakytkin 1/0
10. Kiinnitysreikä (3 kpl)
11. Sahauspöydän kulman asteikko
12. Asteikon osoitin
3
4
10
45
30
11
15
12
30
Page 31

45
30
15
45
30
15
Kokoaminen
Sahassa on
toimitusvaiheessa
kaikki muu
asennettuna,
paitsi teräsuoja ja
puhallusputki.
Kiinnitä teräsuoja
kuvan osoittamalla
tavalla ja kierrä
puhallusputki
paikoilleen.
Asennus
Valitse hyvä ja tilava sijoituspaikka kuviosahalle. Paikan tulee olla hyvin tuuletettu ja valaistu.
Varmista myös, että sopivalla etäisyydellä on maadoitettu pistorasia.
Kuviosahan kiinnittäminen
Kuviosahassa on kolme kiinnitysreikää. Kiinnitä työkappale tasaiselle ja vakaalle pinnalle. Aseta
pulttien kantojen ja kiinnitysreikien väliin aluslaatat. Suosittelemme, että käytät lukkomuttereita,
jotka eivät aukea tärinän vaikutuksesta. Älä kiristä liikaa (koneen kiinnittämiseen tarvittavat pultit ja
laatat eivät sisälly pakkaukseen).
Työpöydän kulman säätäminen
Aloita avaamalla sahauspöydän (8) lukitusnuppia
ja säätämällä pöytä 90 asteen kulmaan suhteessa
sahanterään. Käytä suorakulmaa tai muuta
vastaavaa, jotta saat tarkan 90 asteen kulman.
Avaa osoittimen (12) ruuvi ja säädä osoittimen
kärki kohtaan 0° ja kiristä ruuvi. Kulma-asteikko (11)
on helppokäyttöinen, mutta se ei takaa 100 %:n
tarkkuutta. Tämän vuoksi kulma kannatta
varmistaa myös asteikkolevyllä parhaan
tarkkuuden takaamiseksi.
11
12
8
31
SUOMI
45°
Page 32

Sahanterän asennus ja vaihto
Sammuta kuviosaha ja irrota pistoke ennen sahanterän vaihtoa tai asennusta.
Sahanterät, joissa nasta
• Löysää terän jännitettä kääntämällä auki
pikakiristyssäädintä (3).
• Terän voi nyt irrottaa; irrota ensin ylempi
teräkiinnike ja sen jälkeen alempi
teräkiinnike.
• Uusi terä asennetaan siten, että terät
osoittavat alaspäin kohti sahauspöytää.
Joissain terissä on molemminpuolinen
hammastus, tällöin terän voi asentaa
kumminkin päin.
• Kiinnitä terä ensin alempaan
teräkiinnikkeeseen ja sen jälkeen
ylempään (2) teräkiinnikkeeseen (2)
ja kiristä terä kääntämällä alas
pikakiristyssäädin (3).
• Varmista, että terä on teräkiinnikkeiden
urissa ja että se on kunnolla kiinni.
• Sahanterän jännitettä säädetään
SUOMI
pikakiristyssäädintä kiertämällä: lisää
jännitettä kiertämällä myötäpäivään
ja vähennä jännitettä kiertämällä
vastapäivään.
Huom.!
Katso teräpidikkeitä, kun olet irrottanut terän. Nyt näet, että terän voi kiinnittää kahdella eri tavalla:
Sahaukseen edestä päin ja sahaukseen sivulta. Sivustasahausta käytetään työkappaleen ollessa
suurempi kuin 410 mm.
2
3
Tärkeää: Sahaa sivulta ainoastaan silloin, kun pöydän kulma on 0°.
32
Page 33

45
30
15
Sahanterä ilman nastaa
Mukana kaksi pidikettä terälle ilman nastaa. Kiinnitä ensin pidikkeet terään.
Varmista, että käytössäsi on jakoavain (jakoavain ei sisälly).
1. Laita sahanterä kahden mutterin väliin
ja kiristä kuusiokoloavaimella. Varmista,
että sahanterä asetetaan yhteen mutterin
kuudesta kulmasta, varmista myös, että
mutterit ovat linjassa keskenään. Tämä on
hyvin tärkeää, sillä muttereiden reunat toimivat
”nastoina”, ja ne tulee sovittaa ylemmän ja
alemman teräkiinnikkeen uraan.
2. Kun olet asentanut teränpitimen sahanterän
kumpaankin päähän, terä voidaan asentaa
samalla tavalla kuin nastallinen terä. Varmista,
että muttereiden reunat sopivat ylemmän ja
alemman teränkiinnittimen uriin.
Huom.:
Sahanterän hajoamiseen on viisi eri syytä:
1. Sahanterä on liian kireällä tai löysällä.
2. Liian nopea syöttönopeus.
3. Terää taipuu tai kääntyy, koska työkappaletta ei syötetä suoraan.
4. Terä on kulunut.
5. Työkappale on liian paksu. Työkappaleen suurin paksuus on 50 mm.
SUOMI
Kuviosahaus
Kuviosahalla voidaan sahata hankalia mutkia, jotka eivät tavallisella sahalla onnistu. Kuviosahaa
voidaan myös käyttää katkaisuun, halkaisuun ja vinosahaukseen.
Ota huomioon kuviosahauksessa:
• Saha ei käynnisty itsekseen. Käyttäjä itse työntää työkappaletta kohti terää, jolloin saha sahaa
työkappaletta, kun sitä työnnetään eteenpäin.
• Syötä hitaasti ja tasaisesti, sillä hampaat ovat hyvin pienet ja ne sahaavat vain liikkuessaan
alaspäin. Jos syötät liian nopeasti, terä saattaa hajota.
33
Page 34

• Vaikka sahalla voidaan sahata jopa 50 mm:n paksuista puuta, paras tulos saavutetaan, kun puun
paksuus on alle 25 mm. Jos puun paksuus on yli 25 mm, syötä hitaasti ja varo, ettei terä
taivu tai käänny.
• Terän hampaat kuluvat. Paras tulos saavutetaan, kun terä vaihdetaan riittävän usein.
Työkappaleen materiaalista riippuen sahanterä pysyy terävänä puolesta tunnista kahteen
tuntiin jatkuvassa sahauksessa.
• Ota huomioon, että terä seuraa puun syitä (pienimmän vastuksen lain mukaisesti).
• Mikäli et ole aiemmin käyttänyt kuviosahaa, voi käyttöön tottumisessa mennä jonkin aikaa.
Opettele tuntemaan kuinka saha toimii. Käytön opettelussa tärvääntyy yleensä muutamia
teriä. Kuviosahan terät ovat melko herkkä, eivätkä ne ole samantyyppisiä kuin käsisahojen
ja sirkkeleiden terät.
Kierrättäminen
Tämä symboli tarkoittaa, että tuotetta ei saa laittaa kotitalousjätteen sekaan. Ohje
koskee koko EU-aluetta. Virheellisestä kierrättämisestä johtuvien mahdollisten
ympäristö- ja terveyshaittojen ehkäisemiseksi tuote tulee viedä kierrätettäväksi,
jotta materiaali voidaan käsitellä vastuullisella tavalla. Kierrätä tuote käyttämällä
paikallisia kierrätysjärjestelmiä tai ota yhteys ostopaikkaan. Ostopaikassa tuote
kierrätetään vastuullisella tavalla.
Tekniset tiedot
Käyttöjännite 230 V, 50 Hz
SUOMI
Teho 85 W
Sahauskorkeus maks. 50 mm
Maks. sahaussyvyys 410 mm
Terän pituus 133 mm
Iskua minuutissa 1440
Iskun pituus 17 mm
Työpöydän mitat 375 × 250 mm
Mitat 580 × 280 × 340 mm
Pöydän kallistus 0–45°
Sahanterä Nastalla (mukana pidike nastattomalle terälle)
Paino 12,5 kg
34
Page 35

Dekupiersäge
Art.Nr. 18-3058 Modell MQ50II-UK
30-9686 MQ50II
Vor Inbetriebnahme diekomplette Bedienungsanleitung durchlesen und aufbewahren.Irrtümer,
Abweichungen und Änderungen behalten wir uns vor. Bei technischen Problemen oder anderen
Fragen freut sich unser Kundenservice über eine Kontaktaufnahme (Kontakt siehe Rückseite).
Sicherheitshinweise
Allgemeine Sicherheitsanweisungen
Warnung: Bei der Verwendung dieses Werkzeugs sind grundsätzliche Vorsichtsmaßnahmen
zu beachten, damit dieGefahr von Feuer, elektrischen Schlägen und Verletzungen auf ein
Minimum beschränkt bleibt. Vor Gebrauch des Produkts sämtliche Anweisungen lesen und diese
aufbewahren.
• Der Arbeitsplatz ist sauber zu halten.
Vollgestellte Flächen und Tische erhöhen dasRisiko von Unfällen.
• Rücksicht auf dasArbeitsumfeld nehmen.
- DasWerkzeug niemals Regen aussetzen.
- DasWerkzeug nicht in Räumlichkeiten mit Feuchte oder Nässe verwenden.
- Den Arbeitsplatz immer gut beleuchten.
- DasWerkzeug nicht in der Nähe von leicht entzündlichen Flüssigkeiten oder
Gasen verwenden.
• Stromschläge vermeiden.
Körperkontakt mit geerdeten Gegenständen wie Wasserleitungen, Heizkörpern, Herde oder
Kühlschränke vermeiden.
• Andere Personen auf Abstand halten.
Personen, insbesondere Kinder, dienicht ander Arbeit teilnehmen, dasWerkzeug oder
dessen Verlängerungskabel nicht anfassen lassen. Bei diesen Personen ist auf ausreichenden
Abstand vom Arbeitsplatz zu achten.
• DasWerkzeug aneinem sicheren Ort aufbewahren.
Nicht verwendetes Werkzeug in einem trockenen, verschlossenen Raum und außer
Reichweite von Kindern aufbewahren.
• DasWerkzeug nicht überlasten.
Es leistet bessere und sicherere Arbeit mit der vorgesehenen Vorschubgeschwindigkeit.
• Dasrichtige Werkzeug einsetzen.
Kleines Werkzeug nicht mit großen Arbeiten überbeanspruchen, für dieeigentlich kräftigere
Geräte erforderlich sind. Werkzeuge oder Zubehör nicht für Arbeitsschritte zweckentfremden,
für diesie nicht vorgesehen sind, also z. B. nicht eine Kreissäge zum Entasten verwenden.
• Geeignete Kleidung tragen.
Keine lockeren Kleidungs- oder Schmuckstücke tragen, da sie anrotierenden Teilen hängenbleiben können. Für dieArbeit im Freien wird dasTragen rutschfester Schuhe empfohlen.
Bei langem Haar ein Haarnetz oder dergleichen tragen.
DEUTSCH
35
Page 36

• Immer persönliche Schutzausrüstung tragen.
Augenschutz tragen. Bei staubenden Arbeiten einen Staubfilter oder eine Schutzmaske verwenden.
• Absaugeinrichtung verwenden.
Wenn Absaug- und Auffangeinrichtungen für Staub montiert werden können, ist
sicherzustellen, dass diese angeschlossen sind und korrekt angewendet werden.
• Niemals dasNetzkabel zweckentfremden.
Nicht am Kabel, sondern am Stecker ziehen, wenn dieMaschine vom Strom genommen
wird. Sicherstellen, dass dasAnschlusskabel nicht mit Hitze, Öl oder scharfen Kanten in
Kontakt kommt.
• DasWerkstück ordentlich festspannen.
Wenn möglich, Zwingen oder einen Schraubstock verwenden, damit dasWerkzeug mit beiden
Händen geführt werden kann. Dasist sicherer, als dasWerkstück mit einer Hand zu halten.
• Nicht zu weit nach vorne strecken.
Für einen sicheren Stand und gutes Gleichgewicht sorgen.
• DieWerkzeuge mit Sorgfalt pflegen.
Sicherstellen, dass sie sauber und dieKlingen scharf sind. Dies trägt zu einer optimalen
Leistung und einem sicheren Ergebnis bei. Zum Schmieren und beim Wechsel von Zubehör
den Empfehlungen der Betriebsanleitung folgen. DasNetzkabel regelmäßig kontrollieren. Bei
Beschädigungen von einem qualifizierten Servicetechniker austauschen lassen. Sämtliche
Verlängerungskabel regelmäßig auf Schäden kontrollieren. Sicherstellen, dass Griffe und
Schalter der Maschine/des Werkzeugs trocken, sauber und frei von Öl, Fett usw. sind.
• Den Strom abschalten.
Vor Servicearbeiten und dem Wechsel von Zubehör wie Hobelmesser, Bohrer, Klinge,
Schleifbänder oder -blätter den Stecker herausziehen und den Nothalt betätigen.
• Alle Schlüssel und Einstellwerkzeuge entfernen.
Routinemäßig überprüfen, ob sämtliche Schlüssel und Einstellwerkzeuge von der Maschine
entfernt wurden, bevor der Strom eingeschaltet wird.
• Versehentliches Einschalten vermeiden.
DasWerkzeug nicht mit einem Finger am Ein-/Ausschalter bzw. Startschalter tragen, wenn
dasKabel in der Steckdose steckt. Sicherstellen, dass der Ein-/Ausschalter auf OFF steht,
wenn der Stecker in dieSteckdose gesteckt wird.
DEUTSCH
• Geeignete Verlängerungskabel verwenden.
Im Außenbereich ausschließlich Verlängerungskabel benutzen, diefür diesen Zweck zugelassen
sind. Verlängerungskabel mit ausreichendem Querschnitt verwenden und immer asgesamte
Kabel abrollen.
• Mit Vernunft und Achtsamkeit andieArbeit gehen.
Dieeinzelnen Arbeitsschritte gut planen, damit sie sicher durchgeführt werden können.
Bei Müdigkeit, unter Einfluss von Medikamenten etc. nicht mit der Maschine/dem Werkzeug
arbeiten.
• Vor dem Starten des Werkzeugs ist Folgendes sicherzustellen:
- Schutzvorrichtungen und sonstige Teile müssen unbeschädigt sein und ihre Funktion erfüllen.
- Bewegliche Teile müssen korrekt eingestellt sein und sich frei drehen können.
- Bewegliche Teile dürfen sich nicht verfangen oder festfahren.
- Es darf kein Defekt vorliegen.
- Es dürfen keine sonstigen Umstände dieAusführung der Arbeit behindern.
36
Page 37

Beschädigte Schutzvorrichtungen und Schäden ananderen Teilen müssen fachgerecht
repariert oder ausgetauscht werden. Defekte Kabel und Schalter müssen immer von einem
Fachmann ausgetauscht werden. Niemals ein Werkzeug verwenden, dassich nicht sicher
ein- oder ausschalten lässt.
• Dasempfohlene Zubehör verwenden.
DieVerwendung von nicht empfohlenem Zubehör kann zu Unfällen oder Verletzungen führen.
• Reparaturen nur von qualifizierten Technikern ausführen lassen.
DasWerkzeug erfüllt diegeltenden Sicherheitsanforderungen. Reparaturen des Werkzeugs
müssen immer von einem Fachmann und mit Original-Ersatzteilen ausgeführt werden, sonst
kann es zu Unfällen oder Verletzungen kommen.
Besondere Sicherheitshinweise für Dekupiersägen
• Beim Einsatz der Dekupiersäge niemals dieHände unter den Tisch halten.
• DieDekupiersäge mit Zwingen oder Schrauben auf der Werkbank/dem Tisch befestigen und
sicherstellen, dass dieser stabil auf dem Fußboden steht.
• DasWerkstück nach Möglichkeit nicht so halten, dass während eines Arbeitsschritts
umgegriffen werden muss. Vor dem Sägen darüber nachdenken, wie dasWerkstück sicher
gehalten werden kann.
• Niemals dieFinger oder Hände in den Weg des Sägeblatts halten oder so halten, dass sie
mit dem Sägeblatt in Berührung kommen, wenn dieHand abrutscht.
• Vor Einstellarbeiten und vor dem Entfernen von Spänen oder Sägeabfall stets sicherstellen,
dass dasSägeblatt der Dekupiersäge völlig stillsteht und der Netzstecker gezogen ist.
• Immer Augenschutz, Gehörschutz und Atemschutz verwenden.
• DieDekupiersäge niemals starten, solange sich Werkzeug, Sägeabfall etc. auf
dem Sägetisch befindet.
• Vor dem Start der Dekupiersäge kontrollieren, dass daskorrekte Sägeblatt montiert ist und
dass dasSägeblatt korrekt in den Halterungen sitzt.
• Bei sehr kleinen, sehr großen oder unregelmäßig geformten Werkstücken besondere Vorsicht
walten lassen. Niemals Werkstücke sägen, dienicht flach auf dem Sägetisch aufliegen, wenn
dasWerkstück nicht zusätzlich abgestützt wird.
• DasWerkstück fest gegen den Sägetisch drücken und vorsichtig dem Sägeblatt zuführen.
• Vorsicht beim Herausziehen des Sägeblatts aus der Trennfuge. DasSägeblatt kann sich
in der Trennfuge verkanten. Maschine abschalten, Netzstecker ziehen und geeigneten
Keil in dieTrennfuge einschlagen. Dann kann versucht werden, dasWerkstück vorsichtig
zurückzuziehen.
• Sicherstellen, dass dieSchutzeinrichtungen vollständig und korrekt angebracht sind.
DEUTSCH
Produktkennzeichnung mit Piktogrammen
Immer Gehörschutz und Augenschutz tragen.
Atemschutz tragen. Holzstaub kann gesundheitsschädlich sein.
37
Page 38

Produktbeschreibung
1
2
5
6
7
8
9
1. Sägeblattschutz
2. Obere Sägeblatthalterung (dieuntere
befindet sich im Inneren der Maschine
DEUTSCH
unter dem Sägetisch)
3. Schnellspanner für Sägeblatt
4. Ausblasrohr
5. Sägetisch
6. Einlegescheibe
7. Gehrungslineal
8. Drehknopf zum Feststellen
des Sägetischwinkels
9. Ein-/Ausschalter 1/0
10. Befestigungsloch (3 St.)
11. Skala für Sägetischwinkel
12. Anzeiger für Skala
3
4
10
45
30
11
15
12
38
Page 39

45
30
15
45
30
15
Montage
Bei Lieferung
ist dieSäge
komplett montiert,
ausgenommen
Sägeblattschutz
und Ausblasrohr.
Den Sägeblattschutz wie
abgebildet
anbringen und
dasAusblasrohr
festschrauben.
Installation
DieDekupiersäge aneinem geeigneten Ort mit ausreichend Platz, guter Lüftung und
guter Beleuchtung aufstellen. Außerdem muss sich in bequemem Abstand eine geerdete
Netzsteckdose befinden.
Fixieren der Dekupiersäge
DieDekupiersäge weist drei Befestigungslöcher auf. DieMaschine auf einer stabilen Unterlage
anschrauben. Zwischen Schraubenköpfen und Befestigungslöchern flache Scheiben einlegen.
Vorzugsweise Gegenmuttern verwenden, diesich durch Vibrationen nicht lösen. Nicht zu stark
anziehen (Schrauben und Scheiben zur Befestigung der Maschine sind separat erhältlich).
Einstellung der Winkelskala des Sägetischs
Zur Einstellung der Winkelskala den Drehknopf
des Sägetischs (8) lösen und den Sägetisch in
einen 90°-Winkel zum Sägeblatt stellen.
Ein Winkelmaß oder einen anderen geeigneten
Gegenstand verwenden, der einen exakten
90°-Winkel aufweist. DieHalteschraube des
Anzeigers (12) lösen, den Anzeiger mit der Spitze
auf 0° stellen und dieSchraube wieder anziehen.
DieWinkelskala (11) ist einfach zu verwenden,
kann jedoch kein 100 % exaktes Ergebnis liefern.
Für ein optimales Ergebnis daher vor dem Sägen
mit einem Winkelmesser nachmessen.
11
12
8
39
DEUTSCH
45°
Page 40

Montage und Wechsel des Sägeblatts
Vor dem Montieren oder Wechseln des Sägeblatts dieDekupiersäge abschalten und
den Netzstecker ziehen.
Sägeblätter mit Arretierstift
• Den Schnellspanner (3) nach oben
klappen, um dieBlattspannung zu lösen.
• DasSägeblatt kann nun herausgenommen werden. Erst oben
herausnehmen, dann unten.
• Beim Montieren des neuen Sägeblatts
darauf achten,dass dieSägezähne nach
unten gegen den Sägetisch gerichtet
sind. Manche Sägeblätter weisen in
beide Richtungen stehende Sägezähne
auf. Bei diesen spielt dieAusrichtung
keine Rolle.
• Nun dasSägeblatt zuerst in der unteren
Sägeblatthalterung, dann in der oberen
Sägeblatt-halterung (2) einhaken.
Den Schnellspanner (3) nach unten
klappen, um dasSägeblatt zu spannen.
• Sicherstellen, dass dasSägeblatt
gut in den Aussparungen der
Sägeblatthalterungen sitzt.
• DieSägeblattspannung kann durch
Drehen am Schnellspanner reguliert
werden. Drehung im Uhrzeigersinn erhöht
dieSpannung, Drehung gegen den
Uhrzeigersinn verringert dieSpannung.
DEUTSCH
Hinweis:
Es ist nützlich, dieSägeblatthalterungen einmal anzuschauen, wenn dasSägeblatt ausgebaut ist.
Es ist erkennbar, dass dasSägeblatt in zwei unterschiedlichen Positionen montiert werden kann,
zum Sägen von vorn und zum Sägen von der Seite. Sägen von der Seite spielt bei Werkstücken
eine Rolle, diegrößer als 410 mm sind.
2
3
Wichtig: Beim Sägen von der Seite muss der Arbeitstisch immer im 0°-Winkel stehen.
40
Page 41

45
30
15
Sägeblätter ohne Arretierstift
Für Sägeblätter ohne Arretierstift werden zwei Halter mitgeliefert. Zunächst müssen dieHalter
am Sägeblatt angebracht werden. Hierzu ist ein Rollgabelschlüssel erforderlich (Der Rollgabelschlüssel ist separat erhältlich).
1. DasSägeblatt zwischen diebeiden Muttern
schieben und mit einem Innensechskantschlüssel
anziehen. Sicherstellen, dass dasSägeblatt
parallel zu einer der sechs Kanten der Muttern
liegt und dieKanten der beiden Muttern bündig
aufeinander liegen. Dies ist sehr wichtig, da
dieKanten der Muttern als „Arretierstift“ dienen
und in dieAussparung ander oberen und unteren
Sägeblatthalterung passen sollen.
2. Nachdem anbeiden Enden des Sägeblatts ein
Halter angebracht wurde, kann dasSägeblatt
genau wie ein Sägeblatt mit Arretierstift montiert
werden. Sicherstellen, dass sich dieKante der
Muttern in dieAussparung der oberen bzw.
unteren Sägeblatthalterung einpasst.
Bitte beachten:
Es gibt fünf mögliche Ursachen für den Bruch eines Sägeblatts:
1. DasSägeblatt ist zu fest oder zu locker gespannt.
2. DasWerkstück wird zu schnell zugeführt.
3. DasSägeblatt wird gebogen oder gedreht, indem dasWerkstück nicht gerade gegen
dasSägeblatt zugeführt wird.
4. DasSägeblatt ist verschlissen.
5. DasWerkstück ist zu dick. DieSäge eignet sich nur für Werkstücke bis 50 mm Dicke.
DEUTSCH
Arbeiten mit der Dekupiersäge
Eine Dekupiersäge eignet sich zum Sägen schwieriger Konturen, diemit anderen Sägen nicht
gesägt werden können. Eine Dekupiersäge kann jedoch auch zum Trennen, Spalten und für
Schrägschnitt eingesetzt werden. Beim Einsatz der Dekupiersäge bitte beachten:
• DieSäge sägt nicht von selbst. Der Benutzer schiebt dasWerkstück gegen dasSägeblatt
und bewirkt dadurch, dass dieSäge in dasWerkstück einschneidet.
• DasWerkstück behutsam und gleichmäßig zuführen, da dieSägezähne sehr klein sind
und nur bei Abwärtsbewegung schneiden. Wird dasWerkstück zu hart zugeführt,
kann dasSägeblatt leicht brechen.
41
Page 42

• DieSäge sägt zwar bis zu 50 mm dickes Holz, ein besseres Ergebnis wird aber bei
Werkstücken bis 25 mm erzielt. Werkstücke von mehr als 25 mm Dicke sehr behutsam
zuführen. DasSägeblatt nicht biegen oder drehen.
• Früher oder später sind dieZähne des Sägeblatts verschlissen. Für optimale Ergebnisse
muss dasSägeblatt recht oft ausgetauscht werden. Abhängig vom Material des Werkstücks
ist ein Sägeblatt bei ununterbrochenem Sägen eine halbe Stunde bis zwei Stunden lang scharf.
• DasSägeblatt tendiert dazu, den Fasern des Holzes – dem Weg des geringsten Widerstands
– zu folgen.
• Beim ersten Arbeiten mit einer Dekupiersäge dauert es etwas, dieSäge kennenzulernen
und ein Gespür dafür zu entwickeln, wie Säge und Werkstück sich zusammen verhalten.
Es ist damit zu rechnen, dass einige Sägeblätter kaputt gehen werden. Sägeblätter
für Dekupiersägen sind anders als Sägeblätter für Handsägen und Kreissägen relativ
empfindlich.
Hinweise zur Entsorgung
Dieses Symbol zeigt an, dass dasProdukt nicht gemeinsam mit dem Haushaltsabfall entsorgt werden darf. Dies gilt in der gesamten EU. Um möglichen
Schäden für dieUmwelt und Gesundheit vorzubeugen, diedurch fehlerhafte
Abfallentsorgung verursacht werden, soll dieses Produkt auf verantwortliche Weise
recycelt werden um dienachhaltige Wiederverwertung von stofflichen Ressourcen
zu fördern. Bei der Rückgabe des Produktes bitte dievorhandenen Recyclingund Sammelstationen benutzen oder den Händler kontaktieren. Dieser kann
dasProdukt auf eine umweltfreundliche Weise recyceln.
Technische Daten
Betriebsspannung 230 V, 50 Hz
Leistungsaufnahme 85 W
Max. Sägehöhe 50 mm
Max. Sägetiefe 410 mm
DEUTSCH
Sägeblattlänge 133 mm
Hubzahl pro Minute 1440
Hublänge 17 mm
Abmessungen des Sägetischs 375 × 250 mm
Außenabmessungen 580 × 280 × 340 mm
Tischneigung 0–45°
Sägeblatt Mit Arretierstift (Halter für Sägeblätter
ohne Arretierstift sind separat erhältlich)
Gewicht 12,5 kg
42
Page 43

Declaration of Conformity
Försäkran om överensstämmelse
Samsvarerklæring
Vakuutus yhdenmukaisuudesta
Konformitätserklärung
CLAS OHLSON AB
SE-793 85 INSJÖN, SWEDEN
Declares that this product complies with the requirements of the following directives and standards
Intygar att denna produkt överensstämmer med kraven i följande direktiv och standarder
Bekrefter at dette produktet er i samsvar med følgende direktiver og standarder
Vakuuttaa, että tämä tuote täyttää seuraavien direktiivien ja standardien vaatimukset
Erklärt hiermit, dass dieses Produkt die Anforderungen und Bestimmungen folgender Richtlinien erfüllt
Scroll Saw
Cocraft 30-9686 / 18-3058
MQ50II / MQ50II-UK
Machinery
Directive
2006/42/EC
EN 61029-1: 2009/A11
AFPS GS 2014:01
EMC Directive
2014/30/EU
EN 55014-1: 2006/A2: 2011
EN 55014-2: 1997/A2: 2008
EN 61000-3-2: 2014
EN 61000-3-3: 2013
Henrik Alfredsson
Manager Technique & Quality
Insjön, Sweden, 2016-11-24
Low Voltage
Directive
2014/35/EU
Page 44

Sverige
Kundtjänst tel: 0247/445 00
fax: 0247/445 09
e-post: kundservice@clasohlson.se
Internet www.clasohlson.se
Post Clas Ohlson AB, 793 85 INSJÖN
Norge
Kundesenter tlf.: 23 21 40 00
faks: 23 21 40 80
e-post: kundesenter@clasohlson.no
Internett www.clasohlson.no
Post Clas Ohlson AS, Postboks 485 Sentrum,
0105 OSLO
Suomi
Asiakaspalvelu puh.: 020 111 2222
sähköposti: asiakaspalvelu@clasohlson.fi
Internet www.clasohlson.fi
Osoite Clas Ohlson Oy, Kaivokatu 10 B,
00100 HELSINKI
Great Britain
Customer Service contact number: 020 8247 9300
e-mail: customerservice@clasohlson.co.uk
Internet www.clasohlson.co.uk
Postal 10 – 13 Market Place
Kingston Upon Thames
Surrey
KT1 1JZ
Deutschland
Kundenservice Hotline: 040 2999 78111
E-Mail: kundenservice@clasohlson.de
Homepage www.clasohlson.de
Postanschrift Clas Ohlson GmbH, Jungfernstieg 38,
20354 Hamburg
 Loading...