

Page 1

18-3609 ∙ 41-1024
WET & DRY BENCH GRINDER
250 W
HW 250
WHETSTONE AND GRINDING WHEEL
KOMBISLIPMASKIN
KOMBISLIPEMASKIN
YHDISTELMÄHIOMAKONE
KOMBISCHLEIFMASCHINE
Important!
Read the entire instruction manual
carefully and make sure that you fully
understand it before you use the
equipment. Keep the manual for future
reference.
Viktig information:
Läs hela bruksanvisningen noggrant och
försäkra dig om att du har förstått den
innan du använder utrustningen. Spara
bruksanvisningen för framtida bruk.
Viktig informasjon:
Les disse anvisningene nøye og forsikre
deg om at du forstår dem, før du tar
produktet i bruk. Ta vare på anvisningene
for seinere bruk.
Tärkeää tietoa:
Lue nämä ohjeet huolellisesti ja varmista
että olet ymmärtänyt ne, ennen kuin
alat käyttää laitetta. Säilytä ohjeet
myöhempää tarvetta varten.
Wichtiger Hinweis:
Vor Inbetriebnahme die komplette
Bedienungsanleitung sorgfältig
durchlesen und aufbewahren.
ENGLISHSVENSKANORSKSUOMIDEUTSCH
Art.no Model
18-3609 TLG-150WG
41-1024 TLG-150WG
Ver. 20160509
Original instructions
Bruksanvisning i original
Originalbruksanvisning
Alkuperäinen käyttöohje
Original Bedienungsanleitung
Page 2

Page 3

Wet & Dry Bench Grinder
Art.no 18-3609 Model TLG-150WG
41-1024 TLG-150WG
Please read theentire instruction manual before using theproduct and then save
it for future reference. We reserve theright for any errors in text or images and any
necessary changes made to technical data. If you have any questions concerning
technical problems please contact our Customer Services.
General safety instructions
Warning: When using this machine all basic safety precautions must be followed to
avoid therisk of fire, electrocution and personal injury. Read these instructions carefully
before using theproduct and keep them for future reference.
1. Keep thework area tidy. Cluttered surfaces and benches invite accidents.
2. Take stock of your working environment. Do not expose themachine to rain.
Do not use themachine in moist or wet areas. Keep theworking area well lit.
Never operate themachine near flammable liquid or gas.
3. Avoid electric shocks. Avoid body contact with earthed objects such as pipes,
radiators, ovens or refrigerators.
4. Keep other people at asafe distance. Do not allow anyone, especially children,
not involved in thework process to touch themachine or its electric cable. Keep
children and bystanders at asafe distance from thework area.
5. Store themachine in asafe place. When themachine is not in use, keep it in
alocked, dry area, away from children.
6. Do not force themachine. Themachine will work better and safer at thefeed rate
for which it was intended.
7. Use thecorrect tool for thejob. Do not try to use small tools to perform jobs
requiring more powerful tools. Do not use atool for apurpose for which it was not
designed, e.g. using acircular saw for lopping branches off trees.
8. Dress properly. Do not wear loose-fitting clothing or jewellery; they could be
caught in moving parts. Non-slip shoes are recommended for outdoor work.
Wear ahairnet or similar if you have long hair.
9. Always use safetywear. Wear safety glasses. Use adust mask or dust filter when
working in dusty environments.
10. Use dust extraction equipment. If themachine is equipped with or connected to
adust extractor/collector, make sure that it is turned on and used correctly.
11. Do not abuse themains lead. Do not pull or tug themains lead when unplugging
themachine, grip and pull theplug itself. Make sure that themains lead does not
come into contact with heat, oil, or sharp edges.
12. Firmly secure theworkpiece. If possible use vices or clamps to hold
theworkpiece in place. This is much safer than holding theworkpiece in one hand.
13. Do not overreach. Make sure that you stand steady and balanced all times.
ENGLISH
3
Page 4

14. Look after your machine. Make sure that your machine is clean and that any
cutting edges are sharp for maximum effect and best results. Follow theinstruction
ENGLISH
manual’s recommendations regarding lubrication and replacement of accessories.
Inspect themains lead regularly. If it is damaged it should be replaced by
aqualified service technician. Inspect all leads and cables regularly to check for
any damage. Make sure that thehandles and controls of themachine are clean,
dry and free from oil, grease etc.
15. Turn thepower off. Pull out theplug and push in theemergency stop button
before servicing or changing any blades, drill bits, cutters or sanding discs.
16. Remove all spanners and repair tools. Make ahabit of checking to make sure
that themachine is free of all spanners and tools before turning thepower on.
17. Avoid unintentional starting. Do not walk around with your finger on thetrigger
of apower tool if it is plugged in. Make sure that theon/off switch is set to OFF
before plugging in any power tool.
18. Use thecorrect extension leads. If you use extension leads outdoors, only
use those designed for outdoor use. Only use extension leads with thick enough
diameter core wires and roll out thewhole lead.
19. Use common sense and be careful. Think before carrying out any task, so
that it is carried out safely. Never operate themachine when you are tired, under
theinfluence of medicine, etc.
20. Check thefollowing before turning themachine on:
- That all guards and other parts are whole and in working order.
- That moving parts can rotate freely and are correctly aligned.
- That no moving parts can get caught.
- That there are no visible defects.
- That no other factors have occurred that could influence theexecution of your work.
Any safety guard or other part that is damaged should be repaired by atradesman
or replaced. Damaged power leads and switches must always be replaced by
atradesman. Never operate amachine if you cannot stop or start themachine
comfortably.
21. Use only recommended accessories. Theuse of non-recommended accessories
can cause accidents and personal injury.
22. Should only be repaired by aqualified technician. This machine conforms to
current safety requirements. Repairs should only be carried out by aqualified repair
person using genuine identical replacement parts. Otherwise themachine could be
dangerous and cause aninjury.
4
Page 5

Specic safety rules for bench grinders
• Do not touch themains lead if it has been damaged whilst you have been using
thebench grinder. Unplug themachine immediately and have themains lead
replaced by aqualified electrician.
• Do not use thebench grinder if it is dusty and do not use it in adusty environment.
• If used outdoors, thebench grinder should be connected to themains via anRCD
(tripping at max 30 mA within max 30 ms). If anextension lead is used outdoors,
it must be of atype approved for outdoor use.
• If adangerous situation arises, unplug themachine from theelectrical supply immediately.
• Keep themains lead to therear of thebench grinder at all times.
• Danger of fire from flying sparks!
• Grinding metal creates sparks, keep bystanders and pets out of range of any
flying sparks. Make sure that there are no combustible materials in and around
theworkplace.
• Warning: Harmful fumes!
• Working with harmful dust poses ahealth risk for theoperator of thebench grinder
and for anyone close to theworkplace.
• Wear eye protection.
• Use hearing protection.
• Wear aface mask.
• Wear protective gloves.
• Risk of burns!
• Theworkpiece will become very hot when it is ground. Do not touch thepart of
theworkpiece which has just been ground, let it cool first. When grinding for along
time, interrupt theprocess occasionaly to allow theworkpiece to cool before
continuing. Do not use thebench grinder continuously for longer than 30 minutes.
• Only use grinding wheels recommended by themanufacturer and that are rated at
thesame or higher speed than thespeed specified on therating plate of themachine.
• Only use grinding wheels which are labelled with data specifying themanufacturer,
type of bonding, dimensions and permissible rpm.
• Always keep grinding wheels in adry place where thetemperature is as constant
as possible.
• Use only thesupplied clamping flanges to mount thegrinding wheels.
• Theclamping flanges used must be of thesame size and format. Any backing
layers used between thegrinding wheel and flanges must be made of elastic
materials such as rubber.
• It is prohibited to enlarge themounting hole in thegrinding wheel by drilling.
• Theadjustable upper guard should be adjusted regularly to compensate for wear
on thewheel.
• Thebench grinder must not be used without thesafety guard. Make sure not to
exceed thefollowing distances: Workpiece support–grinding wheel: max 2mm,
safety guard–grinding wheel: max 2mm. Alarge gap between theworkpiece
support and grinding wheel will increase therisk of accidents.
• Thesafety guard, workpiece support and transparent guard must all be fitted
before thebench grinder is used.
ENGLISH
5
Page 6

• Always unplug thebench grinder before changing agrinding wheel.
• Themaximum peripheral speed of thedry grinding wheel is: Ø 150 = 23 m/s.
ENGLISH
Themaximum peripheral speed of thewet grinding wheel is: Ø 200 = 1.3m/s.
• Themaximum permissible motor housing temperature is 80°C.
• Fill thewater container up to thespindle shaft.
• Ensure that thebench grinder is securely fastened to astable surface before use.
Use thefour mounting holes in thebase.
• Adjust thespark deflector periodically to compensate for thewear of thewheel.
Thedistance between thespark deflector and thegrinding wheel should be as little
as possible and should not exceed 2 mm.
• Thegrinding wheel must be replaced at thelatest when thespark deflector and
theworkpiece support can no longer be set amaximum distance of 2 mm from
thegrinding wheel.
• Only use grinding wheels recommended by themanufacturer and that are rated at
thesame or higher speed than thespeed specified on therating plate of thebench
grinder.
• When thegrinding wheels are blocked due to abnormal feed force or ajammed
workpiece during grinding, turn themachine off and disconnect it from thepower
supply. Remove theworkpiece and ensure that both grinding wheels run freely.
Turn themachine on and resume grinding with reduced feed force.
• Do not grind materials containing asbestos. Asbestos is aknown carcinogen.
• Never use damaged or deformed wheels or brushes.
• Avoid contact with themoving grinding wheel.
• Hold theworkpiece firmly with both hands at all times when working.
• Keep your proper footing and balance at all times.
• After you have finished grinding metal, allow thegrinding wheel(s) to come to astandstill.
• When taking abreak from your work, before carrying out any tasks on thedevice
itself and when you are not using themachine, always pull themains plug out of
themains socket.
• Handle themachine carefully and treat it with respect. Always keep themachine
clean, dry and free of oil or grease.
• Remain alert at all times! Always watch what you are doing and proceed with
caution. Do not use themachine if you cannot concentrate or you are feeling unwell.
• Store grinding wheels in such away that they are not subject to mechanical loads
or damaging environmental influences.
Product safety symbols
Please read theentire instruction manual before using and save it for
future reference.
Always wear hearing protection.
Always wear safety glasses or avisor and breathing protection.
6
Page 7
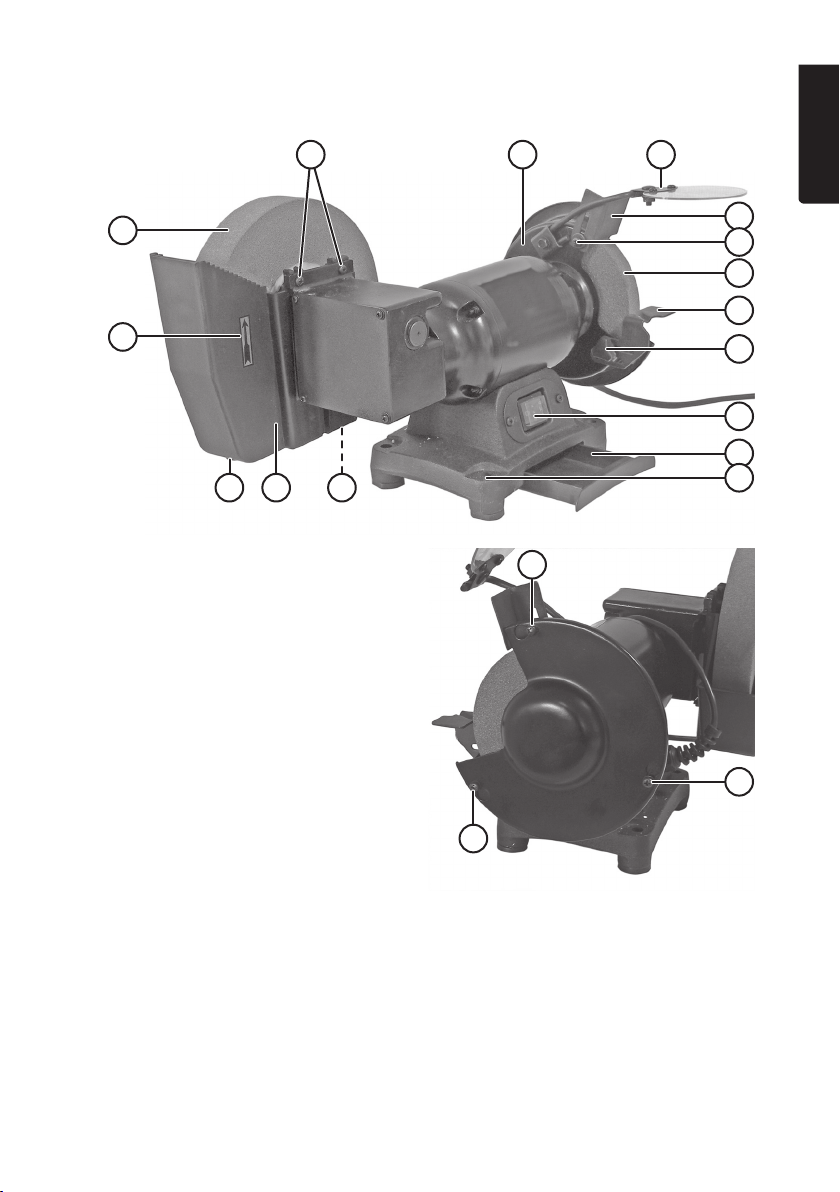
Description
11410
ENGLISH
13
12
101116
1. Safety screen and holder
2. Spark deflector
3. Spark deflector locking screw
4. Grinding wheel (60 grit)
5. Tool rest / workpiece support
6. Tool rest locking knob
7. Power switch ON/OFF [ 1 – 0 ]
8. Coolant drawer
9. Mounting hole
10. Water container nut and bolt
11. Water container
12. Rotation arrow
13. Wet grinding wheel (80 grit)
14. Grinding wheel safety guard
15. Removable safety guard fastening screws
16. Drain plug
2
3
4
5
6
7
8
9
15
15
15
7
Page 8
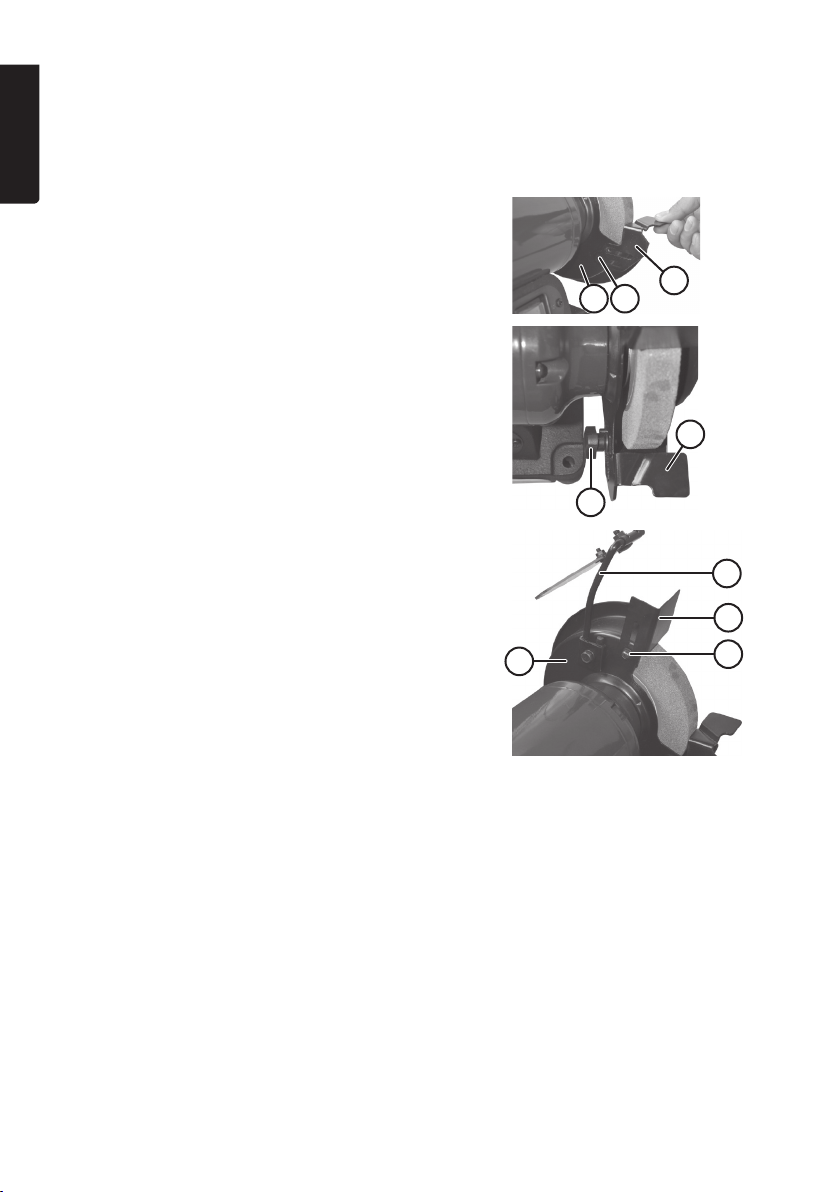
Assembly
Caution: Plug themachine in only after completing all assembly and adjustment work
ENGLISH
and reading and understanding theuser manual and safety instructions.
1. Attach thetool rest (5) to thegrinding
wheel guard (14) using thelocking knob (6).
Thegap between thegrinding wheel and
thetool rest should be set to amaximum
of 2 mm.
2. Attach thespark deflector (2) to thegrinding
wheel guard (14) using thelocking
screw (3). Thegap between thegrinding
wheel and thetool rest should be set to
amaximum of 2 mm.
3. Attach thesafety screen holder (1) to
thegrinding wheel guard (14) using
thescrews and u-washer. Set theangle
and then tighten thescrews.
14
614
6
5
5
1
2
3
Operating instructions
• Make sure that thegrinding wheel can rotate freely before starting themachine.
• Adjust thesafety screen so that you have agood view of thegrinding operation.
• Remember that thegrinding wheel gets smaller as it wears out; adjust thedistance
between thetool rest and wheel and between thespark deflector and wheel to
2mm accordingly.
Overload protection
If themotor is overloaded, it will turn off automatically. Let it cool before attempting to
turn it on again.
8
Page 9

Using the dry grinding wheel
1. Plug themains lead into awall socket.
2. Start thebench grinder and let it get up to speed before beginning to grind.
3. Hold theworkpiece firmly in both hands and support it on thetool rest. Move
theworkpiece slowly and steadily towards thegrinding wheel. Grinding can lower
thespeed of thegrinding wheel. Reduce thepressure alittle until thewheel has
returned to its full speed.
4. Cool theworkpiece in thecoolant drawer (8) if it gets too hot.
5. Turn thebench grinder off using thepower button and then unplug it from thewall
socket.
Warning:
• Small workpieces should be held with pliers or asimilar tool.
• Only ever grind on theface of thegrinding wheel, never on thesides.
• As most materials get hot during grinding, you must be very careful with theworkpiece.
Using the wet grinding wheel
1. Pour water into thewater container (11).
2. Plug themains lead into awall socket.
3. Start thebench grinder and let it run until thegrinding wheel is completely wet
before beginning to grind. When thegrinding wheel has been saturated with water,
thelevel of water in thecontainer may drop and should be topped up.
4. Grind thetool on thegrinding wheel.
5. Turn thebench grinder off using thepower button and then unplug it from thewall socket.
6. Empty thewater container after grinding. Thedrain plug (16) is located on
thebottom of thewater container. Let thegrinding wheel dry completely before
putting thebench grinder away for storage.
ENGLISH
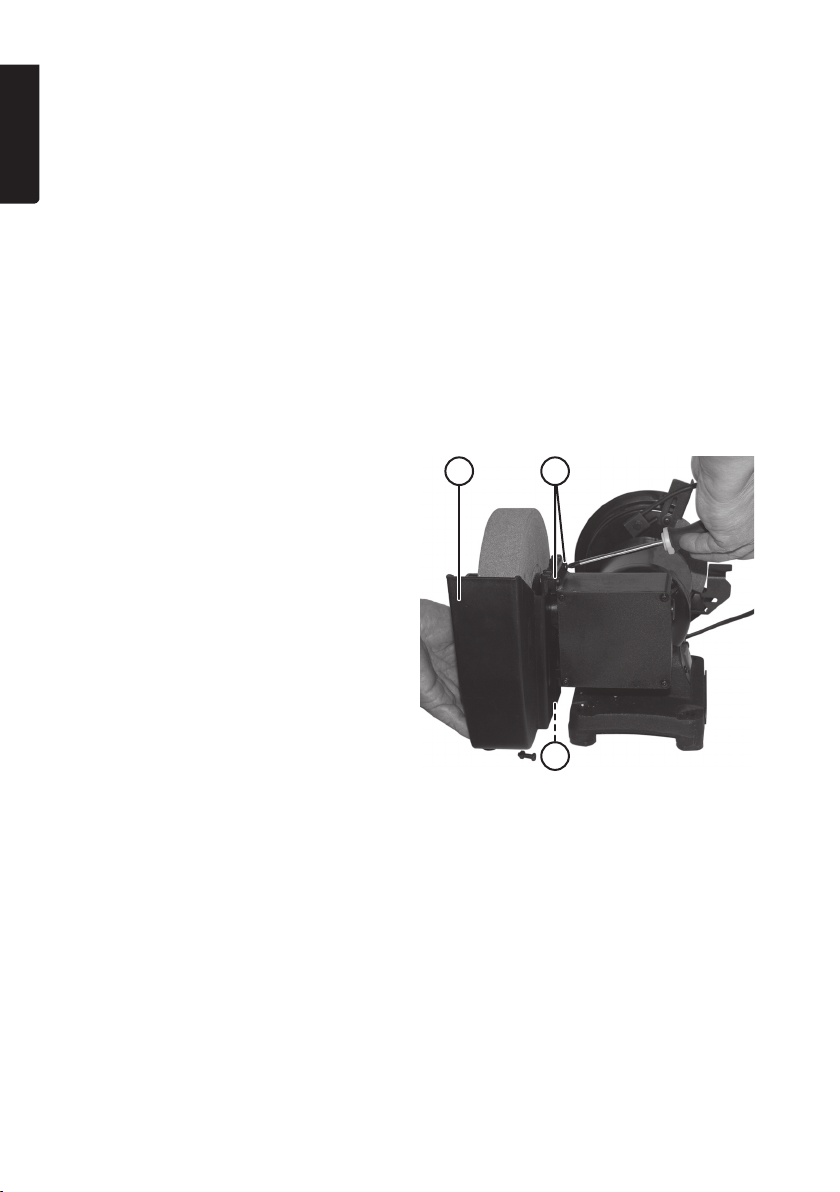
Changing the dry grinding wheel
Warning: In order to prevent injury by accidentally starting thebench grinder,
themachine must be turned off and thepower plug disconnected from thesocket
before thegrinding wheel is replaced.
1. Set thepower switch to 0 and unplug thegrinder from thewall socket before
changing thegrinding wheel.
2. Fold up thesafety screen and its holder.
3. Undo thespark deflector (2) and thetool rest (5) and move them away from
thewheel to give you enough room to change thewheel.
4. Undo the3 retaining screws (15) and twist thedetachable safety guard (14) clockwise
to give you access to thegrinding wheel.
5. Hold thewheel, remove theretaining nut and outer flange from thespindle.
Theretaining nut is threaded opposite to thedirection of rotation.
6. Remove theold grinding wheel and attach anew one.
7. Assemble in reversed order.
9
Page 10
8. Adjust thespark deflector (2) and tool rest (5) to max 2mm from thegrinding
wheel and tighten.
9. Make sure that thegrinding wheel can rotate freely before starting themachine.
ENGLISH
10. Stand to theside of themachine. Start it and let it get up to speed to make sure
thewheel is balanced before grinding.
Note:
• Do not remove thecardboard discs attached to thesides of thenew grinding
wheel because they aid thesecure grip of theflange against thegrinding wheel.
• Check thenew grinding wheel for cracks or other visible damage before fitting.
Never use adamaged grinding wheel.
• Do not tighten thenut too much with aspanner because thegrinding wheel may
break.
Changing the wet grinding wheel
1. Set thepower switch to 0 and
unplug thegrinder from thewall
socket before changing thegrinding
wheel.
2. Drain thewater from thecontainer (11).
Loosen the3 nuts and bolts (2 at
thetop and 1 at thebottom) holding
thewater container. Thenuts and
bolts don’t need to be removed,
just loosened. Push thecontainer
towards thegrinding wheel and
then downwards to remove it.
3. Important: Hold thewet grinding
wheel to prevent any load from
being exerted on thegearbox when
theretaining nut and flange are
removed from thespindle.
4. Remove theold wet grinding wheel and attach thenew one.
5. Assemble in reversed order.
6. Stand to theside of themachine. Start it and let it get up to speed to make sure
thewheel is balanced before grinding.
11
10
10
Care and maintenance
• Unplug themains lead before cleaning theproduct.
• Clean theproduct using asoft, moist cloth. Use amild detergent.
Never use solvents or strong, abrasive cleaning agents.
10
Page 11

Responsible disposal
This symbol indicates that this product should not be disposed of
with general household waste. This applies throughout theentire EU.
In order to prevent any harm to theenvironment or health hazards
caused by incorrect waste disposal, theproduct must be handed in
for recycling so that thematerial can be disposed of in aresponsible
manner. When recycling your product, take it to your local collection
facility or contact theplace of purchase. They will ensure that
theproduct is disposed of in anenvironmentally sound manner.
Specications
Rated voltage 230–240 VAC, 50 Hz
Rated power S1: 150 W, S2 (30 min) 250 W
No-load speed,
dry grinding wheel 2850 rpm
No-load speed,
wet grinding wheel 130rpm
Max peripheral speed Wet grinding wheel 1.3 m/s,
Dry grinding wheel 23 m/s
IP rating IP23
Grinding wheels Ø 200×40×Ø 20mm (wet stone for
sharpening edged tools)
Ø150×20×Ø12.7 mm (dry grinding wheel)
Noise emission data LpA = 68 dB(A), uncertainty KpA = 3 dB(A)
LwA = 85.3 dB(A), uncertainty KwA = 3 dB(A)
Hearing protection must be worn
when thesound level exceeds 80 dB(A)
Weight 11.5kg
ENGLISH
11
Page 12

Kombislipmaskin
Art.nr 18-3609 Modell TLG-150WG
41-1024 TLG-150WG
Läs igenom hela bruksanvisningen före användning och spara den sedan för framtida bruk.
Vi reserverar oss för ev. text- och bildfel samt ändringar av tekniska data.
Vid tekniska problem eller andra frågor, kontakta vår kundtjänst.
SVENSKA
Generella säkerhetsinstruktioner
Varning! När du använder detta verktyg ska grundläggande försiktighetsåtgärder
iakttas för att minska risken för brand, elektrisk chock och personskada. Läs dessa
instruktioner innan du använder produkten och spara dem.
1. Håll arbetsplatsen ren. Belamrade ytor och bord inbjuder till olyckor.
2. Ta hänsyn till arbetsmiljön. Utsätt inte verktyget för regn. Använd inte verktyget
ifuktiga eller våta utrymmen. Håll arbetsplatsen väl upplyst. Använd inte verktyget
inärheten av lättantändliga vätskor eller gaser.
3. Undvik elektrisk chock. Undvik kroppskontakt med jordade föremål som t.ex.
vattenledningar, element, köksspisar och kylskåp.
4. Håll andra människor på avstånd. Låt inga människor, speciellt inte barn, som
inte deltar iarbetet röra vid verktyget eller dess skarvsladdar. Håll åskådare på
avstånd från arbetsplatsen.
5. Förvara verktyget iettsäkert utrymme. När verktyget inte används, förvara det
ietttorrt låst utrymme utom räckhåll för barn.
6. Överbelasta inte verktyget. Det gör jobbet bättre och säkrare med avsedd
matningshastighet.
7. Använd rätt verktyg. Pressa inte små verktyg att utföra stora jobb som kräver
kraftfulla verktyg. Pressa inte ettverktyg eller entillsats att göra ettarbetsmoment
som den inte är gjord för; använd t.ex. inte encirkelsåg för att kapa trädgrenar eller
timmer.
8. Bär lämplig klädsel. Bär inga löst sittande kläder eller smycken, de kan fastna
iroterande delar. Halksäkra skor rekommenderas vid arbete utomhus. Sätt upp
håret eller liknande om du har långt hår.
9. Bär alltid skyddsutrustning. Bär skyddsglasögon. Använd också dammfilter eller
skyddsmask vid dammande arbeten.
10. Använd utrustning för uppsugning av damm. Om verktyget är förberett
för anslutning av utrustning för utsugning och uppsamling av damm, se till att
utrustningen är ansluten och korrekt använd.
11. Misshandla inte nätsladden. Ryck inte isladden, utan dra istickproppen när
du ska ta utden ur vägguttaget. Se till att nätsladden inte kommer ikontakt med
värme, olja eller vassa kanter.
12
Page 13

12. Spänn fast arbetsstycket ordentligt. När det är möjligt, använd tvingar eller
skruvstäd för att spänna fast arbetsstycket. Det är säkrare än att hålla fast
arbetsstycket med ena handen.
13. Sträck dig inte för långt. Se till att du hela tiden står säkert med god balans.
14. Håll verktyget itrim. Se till att det är rent och att eggarna är vassa för optimal
effekt och ettsäkert resultat. Följ bruksanvisningens rekommendationer för
smörjning och byte av tillbehör. Kontrollera nätsladden regelbundet. Om den
är skadad ska den bytas av enkvalificerd fackman. Syna alla skarvsladdar
regelbundet så att de inte är skadade. Se till att verktygets handtag och reglage är
torra, rena och helt fria från olja, fett etc.
15. Slå av strömmen. Dra ur stickproppen och tryck in nödstopp före service och vid
byte av tillbehör som hyvelstål, borrar, stål, slipband eller blad.
16. Ta bort alla nycklar och serviceverktyg. Gör det till envana att kontrollera att alla
nycklar och serviceverktyg är borttagna från verktyget innan du slår på strömmen.
17. Undvik oavsiktlig start. Bär inte ettverktyg med ettfinger på strömbrytaren/
avtryckaren om sladden sitter iettuttag. Se till att strömbrytaren står på OFF när
du sätter in stickproppen.
18. Använd rätt skarvsladdar. Om du använder skarvsladdar utomhus, använd
endast de som är avsedda för utomhusbruk. Använd skarvsladdar med tillräcklig
ledararea och rulla ut hela sladden.
19. Använd sunt förnuft och var försiktig. Tänk efter innan du utför ettarbetsmoment,
så att du kan utföra det på ettsäkert sätt. Använd inte verktyget när du är trött,
påverkad av mediciner etc.
20. Kontrollera följande innan du startar verktyget:
- Att alla skydd och övriga delar är oskadade och fyller sin funktion.
- Att rörliga delar kan rotera fritt och är rätt inställda.
- Att inga rörliga delar kan fastna.
- Att ingen defekt har uppstått.
- Att inga andra omständigheter har uppstått som kan påverka arbetets utförande.
Ettskydd eller någon annan del som skadats, ska repareras fackmässigt
eller bytas ut. Skadade nätsladdar och strömbrytare ska alltid bytas ut av
fackman. Använd aldrig verktyget om du inte kan stänga av eller starta det på
ettbetryggande sätt.
21. Använd rekommenderade tillbehör. Användning av ej rekommenderade tillbehör
kan vålla olyckor eller utgöra risk för personskada.
22. Repareras endast av kvalificerad tekniker. Verktyget överensstämmer med
gällande säkerhetskrav. Reparationer av verktyget ska alltid utföras av fackman
och med originalreservdelar. Annars kan verktyget vålla olyckor eller risk för
personskada.
SVENSKA
13
Page 14

Särskilda säkerhetsföreskrifter bänkslipmaskin
• Vidrör inte anslutningskabeln om den har blivit skadad under tiden som du
använder kombislipmaskinen. Dra genast ut stickproppen ur eluttaget och låt
enkvalificerad fackman byta ut anslutningskabeln.
• Använd inte kombislipmaskinen om den är dammig och använd den inte
iendammig lokal.
• Vid användning utomhus ska kombislipmaskinen anslutas till elnätet via
enjordfelsbrytare (utlösningsström max 30 mA inom max 30 ms). Om skarvkabel
SVENSKA
används utomhus ska den vara godkänd för utomhusbruk.
• Om enfarlig situation uppstår, dra genast ut stickproppen från eluttaget.
• Se till att anslutningskabeln alltid hålls på kombislipmaskinens baksida.
• Fara för brand från flygande gnistor!
• Vid slipning av metall flyger gnistor omkring, se därför till att ingen person eller
husdjur finns iriskzonen. Se till att inga brännbara material finns inärheten av
arbetsplatsen.
• Varning! Skadliga ångor!
• Arbete med skadligt damm utgör enhälsorisk för den som använder kombislipmaskinen och för alla som befinner sig inärheten av arbetsplatsen.
• Använd skyddsglasögon.
• Använd hörselskydd.
• Använd andningsskydd.
• Använd skyddshandskar.
• Risk för brännskada!
• Arbetsstycket blir varmt vid slipning. Vidrör inte den del som du just har slipat,
låt den svalna innan. Om du slipar ilånga perioder, avbryt slipningen ibland och
låt arbetsstycket svalna innan du fortsätter slipa. Använd inte kombislipmaskinen
kontinuerligt imer än 30 minuter.
• Använd endast slipskivor som är rekommenderade av tillverkaren och som är märkta
med ettvarvtal som motsvarar eller är större än märkningen på produktens märkskylt.
• Använd endast slipskivor som är märkta med: tillverkare samt slipskivans typ av
bindemedel, dimension och max varvtal.
• Förvara alltid slipskivorna torrt och med så konstant temperatur som möjligt.
• Använd alltid de medföljande flänsarna vid montering av slipskivorna.
• Flänsarna som används måste ha samma storlek och typ. Om någon typ av
mellanlägg används måste det vara gjort av elastiskt material som t.ex. gummi.
• Det är inte tillåtet att borra upp centrumhålet islipskivan.
• Justera det ställbara skyddet isprängskyddets övre framkant regelbundet för att
kompensera för slitaget på slipskivan.
• Kombislipmaskinen får inte användas utan sprängskydd. Se till att dessa mått inte överskrids: Anhåll/slipskiva max 2 mm och främre ställbara skyddet/slipskivan max 2 mm.
Stor spalt mellan anhåll och slipskiva innebär ökad olycksrisk.
• Sprängskyddet, anhållet och det transparenta skyddet måste vara monterade
innan kombislipmaskinen används.
• Dra ut stickproppen innan byte av slipskiva.
14
Page 15

• Max periferihastighet för slipskiva: Ø 150 = 23 m/s. Max periferihastighet för
våtslipsten: Ø 200 = 1,3 m/s.
• Max tillåten motortemperatur 80 ºC.
• Fyll ivatten ibehållaren vid slipskivan upp till spindeln.
• Se till att kombislipmaskinen monteras fast ordentligt på ettstadigt underlag före
användning. Använd de 4 monteringshålen ibottenplattan.
• Justera det främre ställbara skyddet för att kompensera för slitaget på slipskivan.
Tänk på att avståndet mellan skyddet och slipskivan ska hållas så litet som möjligt
och ej får överstiga 2 mm.
• Slipskivan måste bytas ut när främre ställbara skyddet och anhållet inte går att
justera till 2 mm avstånd från slipskivan.
• Använd endast slipskivor som är rekommenderade av tillverkaren och som
är märkta med ettvarvtal som motsvarar eller är större än märkningen på
kombislipmaskinens märkskylt.
• Om slipskivan blockeras av för hård anliggningskraft eller av att ettarbetsstycke
har fastnat mellan skydd och slipskiva, stäng av kombislipmaskinen och dra
ur stickproppen. Ta bort det som blockerar slipskivan och kontrollera att båda
slipskivorna är lättrörliga. Starta slipningen igen med minskad anliggningskraft.
• Slipa aldrig föremål som innehåller asbest, då asbest är konstaterat som cancerogent.
• Använd aldrig skadade eller deformerade skivor eller borstar.
• Undvik all kontakt med roterande slipskiva.
• Håll iarbetsstycket stadigt med båda händer hela tiden som slipningen pågår.
• Se till att stå stadigt med god balans.
• När du har avslutat slipning av metall, låt slipskivorna stanna helt.
• Om du gör ettiuppehåll iarbetet, utför justering eller service etc. eller om du inte
ska använda kombislipmaskinen, dra då ur stickproppen.
• Hantera kombislipmaskinen försiktigt och med respekt. Se till att hålla den ren,
torr och fri från olja och fett.
• Var alltid uppmärksam! Tänk efter hela tiden på vad du gör och var försiktig när
du fortsätter med nästa moment. Använd inte kombislipmaskinen om du är
okoncentrerad eller om du inte mår bra.
• Förvara slipskivorna så att de inte belastas mekaniskt på något sätt, och så att de
inte utsätts för skadlig miljöpåverkan.
SVENSKA
Produktmärkning med säkerhetssymboler
Läs igenom hela bruksanvisningen före användning och spara den sedan
som referensmaterial.
Använd alltid hörselskydd.
Använd alltid skyddsglasögon eller visir samt andningskydd.
15
Page 16

Beskrivning
11410
13
SVENSKA
12
1. Skyddsglas med fäste
2. Gnistskydd
3. Låsskruv för gnistskydd
4. Slipskiva (korn 60)
5. Anhåll
6. Låsvred för anhåll
7. Strömbrytare ON/OFF [ 1 – 0 ]
8. Vattenlåda för kylning
9. Monteringshål
10. Fästskruvar för vattenbehållare
11. Behållare för kylvatten
12. Rotationsmärkning
13. Våtslipsten (korn 80)
14. Sprängskydd för slipskiva
15. Fästskruvar för löstagbart sprängskydd
16. Dräneringsplugg
2
3
4
5
6
7
8
101116
15
15
9
15
16
Page 17

Montera kombislipmaskinen
Varning! Anslut inte stickproppen till etteluttag innan kombislipmaskinen är helt
monterad och justerad samt bruksanvisningen och varningstexten är läst.
1. Montera anhållet (5) på sprängskyddet (14)
med låsvredet (6). Justera avståndet mellan
slipskiva och anhåll till max 2 mm.
5
614
5
6
2. Montera gnistskyddet (2) på sprängskyddet
(14) med låsskruven (3). Justera avståndet
mellan slipskiva och gnistskydd till max 2 mm.
3. Montera skyddsglasets fäste (1) på sprängskyddet (14) med skruven och U-brickan.
Ställ in skyddsglasets lutning och dra åt
skruvarna.
14
SVENSKA
1
2
3
Användning
• Kontrollera att slipskivan kan rotera fritt innan du slår på maskinen.
• Justera skyddsglaset så att du har god överblick över slipningen.
• Tänk på att slipskivan slits och blir mindre, justera avståndet till 2 mm eller mindre
mellan slipskivan och anhållet samt mellan slipskivan och gnistskyddet.
Överbelastningsskydd
Om motorn överbelastas stängs den av automatiskt. Låt motorn svalna innan den kan
startas igen.
17
Page 18

Användning med slipskiva
1. Anslut stickproppen till etteluttag.
2. Starta motorn med strömbrytaren och låt slipmaskinen gå upp ivarv innan
slipningen påbörjas.
3. Håll iarbetsstycket med båda händerna och lägg det mot anhållet. Tryck försiktigt
arbetsstycket mot slipskivan. Om slipskivans fart minskar vid slipningen måste du
minska trycket mot slipskivan.
4. Kyl arbetsstycket ikyllådan (8) om det blir för varmt.
5. Stäng av med strömbrytaren och dra ut stickproppen.
SVENSKA
Varning!
• Små arbetsstycken ska hållas fast med entång eller motsvarande verktyg.
• Slipa endast på slipskivans runda sida, slipa aldrig på sidorna.
• De flesta material blir varma vid slipning, var försiktig när du hanterar arbetsstycket.
Användning med våtslipsten
1. Häll ivatten ibehållaren (11).
2. Anslut stickproppen till etteluttag.
3. Starta motorn med strömbrytaren och låt slipmaskinen gå tills våtslipstenen är
helt våt innan slipningen påbörjas. När våtslipstenen mättas med vatten kan nivån
sjunka ivattenbehållaren, fyll då på med mer vatten.
4. Slipa verktyget på våtslipstenen.
5. Stäng av med strömbrytaren och dra ut stickproppen.
6. Töm ut vattnet ur vattenbehållaren, det finns endräneringsplugg (16) på undersidan
av vattenbehållaren. Låt stå tills våtslipstenen har torkat.
Byte av slipskiva
Varning! För att undvika risk för personskada genom oavsiktlig start av kombislipmaskinen ska den stängas av och stickproppen ska vara utdragen ur eluttaget innan
byte av slipskiva!
1. Ställ strömbrytaren på 0 och dra ut nätsladdens stickpropp ur uttaget innan byte
av slipskiva!
2. Vik upp skyddsglaset (1) och dess fäste.
3. Lossa gnistskyddet (2) och anhållet (5) och dra ut dem från slipskivan så att den
nya slipskivan får plats.
4. Lossa de 3 fästskruvarna (15) något och vrid det löstagbara sprängskyddet (14)
medurs så att slipskivan friläggs.
5. Håll fast slipskivan, lossa spindelmutter och yttre flänsen från spindeln. Spindelmuttern är gängad mot rotationsriktningen.
6. Ta bort den gamla slipskivan och sätt dit den nya.
7. Montera iomvänd ordning.
8. Justera gnistskyddet (2) och anhållet (5) till max 2 mm avstånd från slipskivan och
dra åt.
18
Page 19

9. Kontrollera att slipskivan kan rotera fritt innan du startar kombislipmaskinen.
10. Stå bredvid kombislipmaskinen och starta den och låt den gå ienminut för att
kontrollera att slipskivan är balanserad innan du börjar slipa.
Obs!
• Ta inte bort skyddspapperen på sidorna av slipskivan, de gör att slipskivan hålls
fast säkert av flänsarna.
• Kontrollera att den nya slipskivan inte har sprickor eller annan synlig skada innan
montering. Använd aldrig enskadad slipskiva.
• Dra inte åt spindelmuttern för hårt så att slipskivan spricker.
Byte av våtslipsten
1. Ställ strömbrytaren på 0 och dra ut
nätsladdens stickpropp ur uttaget
innan byte av våtslipsten!
2. Demontera vattenbehållaren (11).
Lossa de 3 fästskruvarna (10)
(2 iöver kanten och 1 på undersidan) av vattenbehållaren.
Skruvarna behöver inte lossas helt!
Tryck vattenbehållaren mot
våtslipstenen och för den sedan
nedåt och ta bort den.
3. Viktigt! Håll fast våtslipstenen så
att växellådan inte belastas när du
lossar spindelmutter och fläns från
spindeln.
4. Ta bort den gamla våtslipstenen och sätt dit den nya.
5. Montera iomvänd ordning.
6. Stå bredvid kombislipmaskinen och starta den och låt den gå ienminut för att
kontrollera att slipskivan är balanserad innan du börjar slipa.
11
10
10
SVENSKA
Skötsel och underhåll
• Dra ur stickproppen innan rengöring.
• Torka av produkten med enlätt fuktad, mjuk trasa. Använd ettmilt rengöringsmedel,
aldrig lösningsmedel eller starka, slipande rengöringsmedel.
19
Page 20

Avfallshantering
Denna symbol innebär att produkten inte får kastas tillsammans
med annat hushållsavfall. Detta gäller inom hela EU. För att
förebygga eventuell skada på miljö och hälsa, orsakad av felaktig
avfallshantering,ska produkten lämnas till återvinning så att materialet
kan tas omhand på ettansvarsfullt sätt. När du lämnar produkten till
återvinning, använd dig av de returhanteringssystem som finns där du
befinner dig eller kontakta inköpsstället. De kan se till att produkten tas
om hand på ettför miljön tillfredställande sätt.
SVENSKA
Specikationer
Märkspänning 230–240 VAC, 50 Hz
Märkeffekt S1: 150 W, S2 (30 min) 250 W
Varvtal, obelastad slipskiva 2850 V/min
Varvtal våtslipsten 130 V/min
Max periferihastighet Våtslipsten 1,3 m/s, slipskiva 23 m/s
Skyddsklass IP23
Slipskivor Ø 200 × 40 × Ø 20 mm (våtslipsten för finslipning
av eggverktyg)
Ø 150 × 20 × Ø 12,7 mm (slipskiva för grovslipning)
Ljud LpA = 68 dB(A), onoggrannhet KpA = 3 dB(A)
LwA = 85,3 dB(A), onoggrannhet KwA = 3 dB(A)
Använd hörselskydd
när ljudet överstiger 80 dB(A)
Vikt 11,5 kg
20
Page 21

Kombislipemaskin
Art.nr. 18-3609 Modell TLG-150WG
41-1024 TLG-150WG
Les brukerveiledningen grundig før produktet tas ibruk, og ta vare på den for framtidig bruk.
Vi reserverer oss mot eventuelle feil itekst og bilder, samt endringer av tekniske data.
Ved tekniske problemer eller spørsmål, ta kontakt med vårt kundesenter.
Generelle sikkerhetstiltak
Advarsel! Ved bruk av denne maskinen må man følge alle advarsler og være forsiktig
for åredusere faren for brann, elektrisk støt og personskade. Les alle instruksjonene
før produktet tas ibruk, og spar dem til ev. senere bruk.
1. Hold arbeidsplassen ryddig og ren. Uorden på gulv, arbeidsbord etc. kan føre til
ulykker.
2. Ta hensyn til arbeidsmiljøet. Ikke utsett maskinen for regn. Bruk ikke maskinen
ifuktige eller våte omgivelser. Hold arbeidsplassen godt opplyst. Bruk ikke maskinen
nær lettantennelige væsker eller gasser.
3. Unngå elektrisk støt. Unngå kroppskontakt med jordede gjenstander som f.eks.
rør, ovner, komfyrer og kjøleskap etc.
4. Hold andre personer på avstand. Ikke la uvedkommende, spesielt ikke
barn, berøre verktøyet eller dens ledninger. Hold tilskuere på sikker avstand fra
arbeidsplassen.
5. Oppbevar maskinene på ensikker plass. Når maskinen ikke er ibruk må den
oppbevares tørt, iet låst rom og utenfor barns rekkevidde.
6. Overbelast ikke maskinen. Den gjør jobben bedre og sikrere med normal
matingshastighet.
7. Bruk riktig verktøy. Press ikke små verktøy til åutføre jobb som krever verktøy
med større kapasitet. Press ikke et verktøy til åutføre et arbeidsmoment som det
ikke er beregnet til åutføre.
8. Bruk fornuftige klær. Ikke bruk løstsittende klær eller smykker. De kan feste
seg iroterende deler. Bruk sklisikkert fottøy ved arbeider utendørs. Hårnett eller
tilsvarende bør benyttes, hvis du har langt hår.
9. Benytt alltid verneutstyr. Bruk vernebriller. Bruk også støvmaske eller vernemaske
ved støvende arbeider.
10. Bruk utstyr for oppsuging av støv. Dersom verktøyet er utstyrt med tilkobling
for utsugingsutstyr og oppsamler av støv, påse da at dette utstyret blir montert og
brukt riktig.
11. Påse at ikke strømledningen skades. Trekk ikke iledningen, men istøpselet
når produktet skal kobles fra strømnettet. Påse at strømledningen ikke kommer
ikontakt med varme, olje, skarpe kanter eller annet som kan skade den.
12. Spenn arbeidsstykket ordentlig fast. Når det er mulig, må skrustikke eller tvinger
benyttes til fastspenning av arbeidsstykket. Det er sikrere enn åholde fast emnet
med den ene hånden.
NORSK
21
Page 22

13. Strekk deg ikke for langt. Sørg for, hele tiden, åha god balanse ikroppen og stå stødig.
14. Vedlikehold maskinen. Påse at det er rent og eggene skarpe, for optimal effekt
og godt resultat. Følg manualens anbefalinger for smøring, skifte av tilbehør etc.
Kontroller strømledningen regelmessig. Hvis den er skadet skal den byttes av
enkyndig servicetekniker. Sjekk alle skjøteledninger regelmessig så de ikke er
skadet. Påse at maskinens/verktøyets håndtak og brytere er tørre, rene og helt fri
for olje, fett etc.
15. Skru av strømmen. Dra ut støpslet og trykk inn nødstopp før service, og ved bytte
av tilbehør som høvelstål, bor, skjær, slipebånd eller blad.
16. Fjern alle nøkler og serviceverktøy. Gjør det til envane åkontrollere at alle nøkler
og serviceverktøy er fjernet fra maskinen før strømmen kobles til.
17. Unngå uønsket oppstart. Forflytt ikke maskinen med enfinger på strømbryteren
hvis ledningen er koblet til strømuttaket. Påse at strømbryteren står på OFF når
støpslet plugges til strømnettet.
18. Bruk riktige skjøteledninger. Dersom man benytter skjøteledning utendørs,
NORSK
skal den være godkjent for utendørs bruk. Bruk skjøteledninger med tilstrekkelig
lengde, rull ut hele ledningen.
19. Bruk sunn fornuft, og vær forsiktig. Tenk deg om før du utfører enarbeidsoperasjon,
så du kan utføre det på ensikker måte! Bruk ikke maskinen hvis du er sliten, trett,
påvirket av medisiner etc.
20. Kontroller følgende før du starter verktøyet:
- At all beskyttelse og øvrige deler er uskadet, og fyller sin funksjon.
- At bevegelige deler kan rotere fritt og er riktig innstilt.
- At ingen bevegelige deler kan sette seg fast.
- At ingen defekt har oppstått.
- Andre omstendigheter som kan påvirke utførelsen av arbeidet.
Beskyttelser eller annet som er skadet skal repareres/skiftes ut av kyndig fagperson.
Strømledninger og strømbrytere som er skadet skal alltid skiftes ut av kyndig
fagperson. Bruk aldri maskinen hvis du ikke kan stoppe eller starte det på
enbetryggende måte.
21. Bruk anbefalt tilbehør. Bruk av tilbehør som ikke er anbefalt av produsent kan
føre til ulykker eller personskader.
22. Repareres kun av kvalifisert tekniker. Maskinen følger gjeldende krav til sikkerhet.
Reparasjoner av produktet skal alltid utføres av fagpersoner og med originale
reservedeler. Hvis ikke er det fare for ulykker og personskader.
22
Page 23

Spesielle sikkerhetsforskrifter
• Ikke berør strømledningen hvis den her blitt skadet mens du jobbet med maskinen.
Trekk ut støpselet fra strømuttaket umiddelbart og la enkvalifisert fagmann skifte
ledning.
• Ikke bruk maskinen dersom den er nedstøvet. Bruk den heller ikke istøvete lokaler.
• Kombislipemaskinen skal kobles til strømnettet via enjordfeilbryter
(utløsningsstrøm maks. 30 mA iløpet av maks. 30 ms). Dersom man bruker
skjøteledning utendørs, skal den være beregnet for utendørs bruk.
• Hvis det oppstår farlige situasjoner må støpselet trekkes ut umiddelbart.
• Pass på at ledningen alltid holdes på baksiden av kombislipemaskinen.
• Fare for brann fra flygende gnister!
• Sliping av metall fører til gnistdannelse, så pass på at det ikke er noen personer
eller husdyr ifaresonen. Pass på at det ikke er brennbare materialer nær
arbeidsplassen.
• Advarsel! Skadelig damp!
• Arbeider med skadelig støv er helsefarlig for operatøren av maskinen og eventuelt
andre som oppholder seg på arbeidsplassen.
• Bruk vernebriller.
• Bruk hørselsvern.
• Bruk åndedrettsvern.
• Bruk vernehansker.
• Fare for brannskader!
• Arbeidsemnet kan bli svært varmt ved sliping. La den delen av arbeidsemnet som
nettopp er blitt slipt avkjøles før du berører det. Hvis du skal slipe på samme sted
over enlengre periode må arbeidsstykket avkjøles innimellom. Bruk ikke maskinen
imer enn 30 minutter istrekk.
• Bruk kun slipeskiver som er anbefalt av produsenten og som er merket med et
turtall som tilsvarer eller er større enn det sliperen er merket med.
• Bruk kun slipeskiver som er merket med produsent itillegg til type bindemiddel,
dimensjon og maks turtall.
• Slipeskivene skal alltid oppbevares tørt og med så konstant temperatur som mulig.
• Bruk alltid de medfølgende flensene ved montering av slipeskivene.
• Alle flenser som brukes må ha samme størrelse og være av samme type. Hvis man
bruker mellomlegg må det være av elastisk materiale som f.eks. gummi.
• Sentrumshullet islipeskiven må ikke under noen omstendigheter bores opp.
• Juster den justerbare beskyttelsens øvre fremkant regelmessig for åkompensere
for slitasjen på slipeskiven.
• Maskinen må ikke brukes uten vernedekselet. Pass på at ikke følgende mål overskrides:
Anhold/slipeskive maks 2 mm og fremre justerbare beskyttelsesdeksel/slipeskive
maks 2 mm. Stor avstand mellom anhold og slipeskiven øker faren for ulykker.
• Sprengdekselet, anholdet og den transparente beskyttelsen må være montert før
slipemaskinen tas ibruk.
• Trekk ut støpselet før skifting av slipeskive.
NORSK
23
Page 24

• Maks periferihastighet for slipeskive: Ø 150 = 23 m/s. Maks periferihastighet for
våtslipesten: Ø 200 = 1,3 m/s.
• Maks tillatt motortemperatur 80 ºC.
• Fyll vann ibeholderen ved slipeskiven. Fyll opp til spindelen.
• Påse at kombislipemaskinen er festet ordentlig på et stabilt underlag, før den tas
ibruk. Bruk de 4 monteringshullene ibunnplaten.
• Juster den forreste gnistfangeren regelmessig for åkompensere for slitasjen på
slipeskiven. Avstanden mellom gnistfangeren og slipeskiven skal være så liten som
mulig og må ikke overstige 2 mm.
• Slipeskiven må skiftes ut når den fremre justerbare gnistfangeren og anholdet ikke
kan justeres til åvære 2 mm.
• Bruk kun slipeskiver som er anbefalt av produsenten og som er merket med et
turtall som tilsvarer eller er større enn det sliperen er merket med.
• Hvis slipeskiven blokkeres av f.eks. for hardt press mot anleggsflaten eller av at
et arbeidsemne har festet seg mellom beskyttelsesdekselet og slipeskiven, må
NORSK
kombislipemaskinen stoppes og støpselet trekkes ut. Fjern det som blokkerer
slipeskiven og kontroller at begge slipeskivene er lette ådreie rundt. Start slipingen
igjen med mindre kraft mot slipeskiven.
• Ikke slip asbestholdige materialer. Asbestfibrene er kreftfremkallende.
• Ikke bruk skadede eller deformerte skiver eller børster.
• Unngå all kontakt med den roterende slipeskiven.
• Hold godt iarbeidsemnet med et fast grep og med begge hender mens slipingen pågår.
• Påse at du står stødig og har god balanse ikroppen under hele arbeidsoperasjonen.
• La slipeskivene stoppe helt når du har slipt metallgjenstander.
• Hvis du tar pause iarbeidet, for justering, service etc. eller hvis du ikke skal bruke
kombislipemaskinen, så trekk ut støpselet.
• Kombislipemaskinen må behandles forsiktig og med respekt. Den må holdes ren,
tørr og fri for olje og fett.
• Vær oppmerksom hele tiden! Følg nøye med på arbeidsoperasjonen og vær forberedt
på neste moment. Ikke bruk maskinen hvis du er uopplagt eller ikke helt frisk.
• Sørg for at slipeskivene ikke får mekanisk belastning ved lagring. Pass også på at
de ikke utsettes for skadelig miljøpåvirkning.
Produktmerking med sikkerhetssymboler
Les igjennom hele bruksanvisningen grundig før produktet tas ibruk,
og ta vare på den til senere bruk.
Bruk alltid hørselsvern.
Bruk alltid vernebriller eller visir og støvmaske.
24
Page 25

Beskrivelse
11410
13
12
101116
1. Gjennomsiktig beskyttelsesdeksel
med feste
2. Gnistdeksel
3. Låseskrue for gnistdeksel
4. Slipeskive (korn 60)
5. Anhold
6. Låseratt for anhold
7. Strømbryter ON/OFF [ 1 – 0 ]
8. Vannbeholder for kjøling
9. Monteringshull
10. Festeskruer for vannbeholder
11. Beholder til kjølevann
12. Merking av rotasjonsretning
13. Slipestein for våtsliping (korn 80)
14. Sprengbeskyttelse for slipeskive
15. Festeskruer for avtakbar
sprengbeskyttelse
16. Dreneringsplugg
15
15
2
3
4
5
6
7
8
9
15
NORSK
25
Page 26

Montering av kombislipemaskin
Advarsel! Ikke plugg maskinen til strømuttaket før den er ferdig montert og justert, og
bruksanvisning og alle varseltekster er lest.
1. Monter anholdet (5) på spreng beskyttelsen (14)
med låserattet (6). Juster avstanden mellom
slipeskiven og anholdet til maks 2 mm.
5
614
NORSK
6
2. Monter gnistdekselet (2) på sprengbeskyttelsen (14) med låseskruen (3).
Juster avstanden mellom slipeskiven og
gnistdekselet til maks 2 mm.
3. Monter festet til beskyttelsesglasset (1)
på sprengbeskyttelsen (14) med skruen
og U-skiven. Still inn ønsket vinkel og trekk
til skruene igjen.
14
Bruk
• Kontroller at slipeskiven kan rotere fritt, før du starter maskinen.
• Juster beskyttelsesglasset slik at du har god oversikt over slipingen.
• Husk at slipeskiven slites og blir mindre. Juster avstanden til 2 mm eller mindre
med jevne mellomrom.
Overbelastningsvern
Motoren stopper automatisk ved overbelastning. La den avkjøles før den startes på nytt.
5
1
2
3
26
Page 27

Bruk med slipeskive
1. Koble støpselet til et strømuttak.
2. Start motoren, og la den komme opp imaksimalt turtall, før du starter slipingen.
3. Hold iarbeidsemnet med begge hendene og legg det mot anholdet. Press arbeidsemnet forsiktig mot slipeskiven. Hvis hastigheten på slipeskiven reduseres ved
slipingen må trykket fra arbeidsemnet reduseres.
4. Kjøl arbeidsemnet ivannbeholderen (8) hvis det blir for varmt.
5. Steng motoren med strømbryteren og trekk deretter støpselet ut av strømuttaket.
Advarsel!
• Små arbeidsemner må holdes med entang eller tilsvarende verktøy.
• Bruk kun slipeskivens ytre kant til åslipe med, slip aldri med skivens sider.
• De fleste materialer blir varme ved sliping. Vær forsiktig når du jobber med arbeidsemnet.
Bruk med slipestein for våtsliping
1. Hell vann ibelholderen (11).
2. Koble støpselet til et strømuttak.
3. Start motoren med strømbryteren. La maskinen gå til slipesteinen for våtsliping er
helt våt, før slipingen startes. Når slipesteinen blir mettet med vann vil vannivået
ibeholderen synke. Etterfyll.
4. Slip verktøyet på slipesteinen for våtsliping.
5. Steng strømbryteren og trekk deretter støpselet ut av strømuttaket.
6. Åpne opp dreneringspluggen (16) ibunnen av vannbeholderen og tøm ut vannet.
La den stå til slipesteinen for våtsliping har tørket.
Skifte av slipeskive
Advarsel! For åunngå personskader som følge av uønsket oppstart, må maskinen
skrus av og støpselet trekkes ut før skifting av slipeskive!
1. Still strømbryteren på 0 og trekk støpselet ut av strømuttaket, før skifte av slipeskive.
2. Skru av beskyttelsesglasset (1) og festet.
3. Løsne på gnistdekselet (2) og anholdet (5), og trekk dem ut fra slipeskiven sånn at
den nye slipeskiven får plass.
4. Løsne litt på de 3 festeskruene (15) og drei det avtagbare sprengdekselet (14)
medurs slik at slipeskiven går fritt.
5. Hold på slipeskiven, løsne spindelmutteren og den ytre flensen fra spindelen.
Spindelmutteren er gjenget mot rotasjonsretningen.
6. Erstatt den gamle slipeskiven med enny.
7. Monter alle delene iomvendt rekkefølge (se punktene over).
8. Juster gnistdekselet (2) og anholdet (5) til maks 2 mm fra slipeskiven og trekk til.
9. Kontroller at slipeskiven kan rotere fritt, før du starter maskinen.
10. Stå ved siden av maskinen og start den. La den gå ica. ettminutt for åkontrollere
at skiven er sentrert/balansert, før slipingen starter.
NORSK
27
Page 28

Obs!
• Ikke fjern beskyttelsespapiret fra sidene på slipeskiven. De hjelper til med festing
mot flensene.
• Kontroller at den nye slipeskiven er hel og ikke har sprekker, før montering.
Bruk aldre slipeskiver som er skadet.
• Trekk ikke spindelmutteren for hardt til.
Skifte av våtslipestein
1. Still strømbryteren på 0 og dra
ut strømledningens støpser fra
uttaket før skifting av slipestein
for våtsliping!
2. Demonter vannbeholderen (11).
Løsne på de 3 festeskruene (2
NORSK
ioverkanten og 2 på undersiden)
av vannbeholderen. Skruene
trenger ikke åskrus helt ut! Trykk
vannbeholderen mot slipestenen for
våtsliping og deretter nedover før
den fjernes.
3. Viktig! Hold våtslipesteinen slik
at den ikke belaster girkassen når
spindelmutteren og flensen skrus av
spindelen.
4. Erstatt den gamle våtslipeskiven med enny.
5. Monter alle delene iomvendt rekkefølge.
6. Stå ved siden av maskinen og start den. La den gå ica. ettminutt for åkontrollere
at skiven er sentrert/balansert, før slipingen starter.
11
10
10
Stell og vedlikehold
• Trekk alltid ut støpselet før rengjøring.
• Rengjør produktet med enmyk, lett fuktet klut. Bruk et mildt rengjøringsmiddel ved
behov. Unngå åbruke løsemidler og slipende rengjøringsmidler.
28
Page 29

Avfallshåndtering
Symbolet viser til at produktet ikke skal kastes sammen med husholdningsavfallet. Dette gjelder ihele EØS-området. For åforebygge eventuelle
skader på helse og miljø, som følge av feil håndtering av avfall, skal
produktet leveres til gjenvinning, slik at materialet blir tatt hånd om på
enansvarsfull måte. Benytt miljøstasjonene som er der du befinner deg
eller ta kontakt med forhandler. De kan se til at produktet blir behandlet
på entilfredsstillende måte som gagner miljøet.
Spesikasjoner
Spenning 230–240 VAC, 50 Hz
Effekt S1: 150 W, S2 (30 min) 250 W
Turtall, ubelastet slipeskive 2850 o/min
Turtall våtslipesten 130 o/min
Maks periferihastighet Våtslipestein 1,3 m/s, slipeskive 23 m/s
Beskyttelsesklasse IP23
Slipeskiver Ø 200×40×Ø 20 mm (våtslipestein for finsliping
av verktøyegger)
Ø150×20×Ø12,7 mm (for grovsliping)
Lyd LpA = 68 dB(A), unøyaktighet KpA = 3 dB(A)
LwA = 85,3 dB(A), unøyaktighet KwA = 3 dB(A)
Bruk hørselvern når
lyden oversiger 80 dB (A)
Vekt 11,5 kg
NORSK
29
Page 30

Yhdistelmähiomakone
Tuotenro 18-3609 Malli TLG-150WG
41-1024 TLG-150WG
Lue käyttöohjeet ennen tuotteen käyttöönottoa ja säilytä ne tulevaa tarvetta varten.
Pidätämme oikeuden teknisten tietojen muutoksiin. Emme vastaa mahdollisista tekstitai kuvavirheistä. Jos tuotteeseen tulee teknisiä ongelmia, ota yhteys myymälään tai
asiakaspalveluun (yhteystiedot käyttöohjeen lopussa).
Yleiset turvallisuusohjeet
Varoitus! Työkalun käytön aikana on noudatettava perusvarotoimia tulipalo-, sähköisku- ja henkilövahinkoriskin pienentämiseksi. Lue ohjeet ennen tuotteen käyttöä ja
laita ne talteen.
1. Pidä työpiste puhtaana. Täynnä tavaraa olevat pinnat ja pöydät lisäävät
onnettomuusriskiä.
2. Kiinnitä huomiota työympäristöön. Älä jätä työkalua sateeseen. Älä
käytä työkalua kosteissa tai märissä tiloissa. Huolehdi työpisteen riittävästä
valaistuksesta. Älä käytä työkalua helposti syttyvien nesteiden tai kaasujen
läheisyydessä.
3. Ehkäise sähköiskut. Älä koske maadoitettuihin esineisiin, kuten vesijohtoihin,
SUOMI
lämpöpatteriin, lieteen ja jääkaappiin.
4. Älä päästä muita ihmisiä työkalun lähelle. Ulkopuoliset ihmiset, erityisesti lapset,
eivät saa liikkua työkalun tai sen jatkojohtojen läheisyydessä. Sivustakatsojien on
pysyttävä loitolla työpisteestä.
5. Säilytä työkalua turvallisessa paikassa. Kun työkalua ei käytetä, säilytä sitä
kuivassa lukitussa paikassa lasten ulottumattomissa.
6. Älä ylikuormita työkalua. Se toimii paremmin ja turvallisemmin oikealla
nopeudella.
7. Käytä oikeaa työkalua. Älä ylikuormita pieniä työkaluja suurissa töissä, joissa
tarvitaan voimaa. Älä käytä työkalua tai sen lisäosaa väkisin työtehtävään, johon
se ei ole tarkoitettu. Älä esimerkiksi käytä pyörösahaa puunoksien tai puutavaran
katkaisuun.
8. Käytä tarkoituksenmukaisia vaatteita. Älä käytä löysiä vaatteita tai koruja, jotka
voivat juuttua pyöriviin osiin. Ulkotöissä on suositeltavaa käyttää liukuestekenkiä.
Pitkät hiukset on sidottava kiinni.
9. Käytä aina suojavarusteita. Käytä suojalaseja. Käytä pölyisissä töissä myös
pölysuodatinta tai hengityssuojainta.
10. Käytä pölynpoistolaitteita. Jos työkaluun on mahdollista liittää pölynpoisto- ja
keräysjärjestelmä, varmista, että se on liitetty ja että sitä käytetään oikein.
11. Käsittele sähköjohtoa oikein. Älä irrota sähköjohtoa pistorasiasta vetämällä
johdosta vaan tarttumalla kiinni pistokkeesta. Sähköjohto ei saa joutua kosketuksiin
lämmön, öljyn tai terävien reunojen kanssa.
30
Page 31

12. Kiinnitä työkappale asianmukaisesti paikalleen. Käytä työkappaleen kiinnittämiseen
puristinta tai ruuvipuristinta, mikäli mahdollista. Se on turvallisempaa kuin työkappaleen
pitäminen paikallaan yhdellä kädellä.
13. Älä kurota liian kauas. Varmista, että työasentosi on koko ajan tasapainoinen.
14. Pidä työkalu hyvässä kunnossa. Työkalun on oltava puhdas ja sen terien terävät,
jotta se toimii ihanteellisesti ja turvallisesti. Noudata voitelussa ja tarvikkeiden
vaihdossa käyttöohjeen suosituksia. Sähköjohto on tarkistettava säännöllisesti.
Pätevän ammattilaisen on vaihdettava vioittunut johto. Tarkasta säännöllisesti,
ovatko jatkojohdot ehjiä. Työkalun kädensijojen ja säädinten on oltava kuivat ja
puhtaat, eikä niissä saa olla lainkaan öljyä, rasvaa tai vastaavia aineita.
15. Katkaise virta. Irrota pistoke pistorasiasta ja paina hätäpysäytintä ennen huoltoa ja
tarvikkeiden, esimerkiksi terien, porien tai hiomanauhan, vaihtoa.
16. Poista kaikki avaimet ja huoltotyökalut. Ota tavaksi tarkastaa, että kaikki
avaimet ja huoltotyökalut on poistettu työkalusta ennen virran kytkemistä päälle.
17. Estä työkalun tahaton käynnistyminen. Älä kanna työkalua sormi virtakytkimellä/
liipaisimella, jos sähköjohto on liitetty pistorasiaan. Virtakytkimen on oltava OFFasennossa, kun liität pistokkeen pistorasiaan.
18. Käytä oikeanlaisia jatkojohtoja. Ulkona saa käyttää ainoastaan ulkokäyttöön
tarkoitettuja jatkojohtoja. Käytä jatkojohtoja, joissa on riittävä johtimen poikkipintaala, ja kelaa koko johto auki.
19. Käytä tervettä järkeä ja ole varovainen. Suunnittele työvaiheet etukäteen,
jotta voit suorittaa ne turvallisesti. Älä käytä työkalua väsyneenä ja lääkkeiden tai
vastaavien aineiden vaikutuksen alaisena.
20. Tarkasta ennen työkalun käynnistämistä toteutuvatko seuraavat asiat:
- kaikki suojukset ja muut osat ovat ehjiä ja ne toimivat tarkoituksenmukaisesti
- liikkuvat osat on asennettu oikein ja ne pystyvät pyörimään vapaasti
- liikkuvat osat eivät voi jäädä kiinni
- laitteessa ei ole häiriöitä
- muita työn toteutukseen vaikuttavia seikkoja ei ole ilmennyt.
Jos suojus tai muu osa on vaurioitunut, se on vaihdettava tai korjautettava
ammattilaisella. Vioittuneen sähköjohdon ja virtakytkimen saa vaihtaa vain
ammattilainen. Älä käytä työkalua, jos et voi sammuttaa tai käynnistää sitä
turvallisesti.
21. Käytä suositeltuja tarvikkeita. Muiden kuin suositeltujen tarvikkeiden käyttö voi
aiheuttaa onnettomuuksia tai henkilövahinkoja.
22. Työkalun saa korjata ainoastaan pätevä teknikko. Työkalu on voimassa olevien
turvallisuusvaatimusten mukainen. Työkalun saa korjata ainoastaan ammattilainen.
Korjauksessa on käytettävä alkuperäisvaraosia. Muuten työkalu voi aiheuttaa
onnettomuuksia tai henkilövahinkoja.
SUOMI
31
Page 32

Penkkihiomakoneita koskevat erityiset turvallisuusohjeet
• Älä koske liitäntäjohtoon, jos se on vahingoittunut yhdistelmähiomakoneen käytön
aikana. Irrota pistoke välittömästi pistorasiasta ja anna pätevän ammattilaisen
vaihtaa liitäntäjohto.
• Älä käytä yhdistelmähiomakonetta, jos se on pölyinen. Älä myöskään käytä
hiomakonetta pölyisessä tilassa.
• Ulkokäytössä yhdistelmähiomakone on liitettävä sähköverkkoon vikavirtasuojakytkimen
välityksellä (laukaisuvirta enintään 30 mA enintään 30ms:n kuluessa). Jos jatkojohtoa
käytetään ulkona, sen on oltava hyväksytty ulkokäyttöön.
• Vaaratilanteessa irrota pistoke heti pistorasiasta.
• Liitäntäjohto on pidettävä aina yhdistelmähiomakoneen takapuolella.
• Kipinät aiheuttavat tulipalovaaran!
• Metallin hionnasta syntyy kipinöitä, jotka lentävät eri suuntiin. Huolehdi tästä syystä
siitä, että vaara-alueella ei ole ihmisiä tai kotieläimiä. Tarkasta, että työpisteen
lähellä ei ole tulenarkoja materiaaleja.
• Varoitus! Pölyn hengittäminen on terveydelle haitallista!
• Pöly aiheuttaa terveysriskin yhdistelmähiomakoneen käyttäjälle ja kaikille työpisteen
lähellä oleskeleville henkilöille.
• Käytä suojalaseja.
• Käytä kuulosuojaimia.
• Käytä hengityssuojainta.
• Käytä suojakäsineitä.
SUOMI
• Palovammariski!
• Työkappale kuumenee hionnan aikana. Älä koske juuri hiottuun kohtaan, vaan anna
sen jäähtyä. Jos hionta kestää pitkään, keskeytä työskentely aika ajoin ja anna
työkappaleen jäähtyä ennen hionnan jatkamista. Älä käytä yhdistelmähiomakonetta
yhtäjaksoisesti yli puolta tuntia.
• Käytä ainoastaan valmistajan suosittelemia hiomalaikkoja, joihin merkitty kierrosluku
vastaa tuotteen arvokilpeen merkittyä kierroslukua tai on sitä suurempi.
• Käytä ainoastaan hiomalaikkoja, joissa on seuraavat merkinnät: valmistaja,
hiomalaikan sideaineen tyyppi, mitat ja enimmäiskierrosluku.
• Säilytä hiomalaikkoja kuivassa ja mahdollisimman tasaisessa lämpötilassa.
• Käytä hiomalaikan asennuksessa sen mukana toimitettuja laippoja.
• Käytettävien laippojen on oltava kooltaan ja tyypiltään samanlaisia. Mahdollisesti
käytettävien välilevyjen on oltava joustavaa materiaalia, esimerkiksi kumia.
• Hiomalaikan keskellä olevaa reikää ei saa suurentaa.
• Säädä laikan suojuksen yläetureunassa olevaa suojusta säännöllisesti sitä mukaa
kun hiomalaikka kuluu.
• Yhdistelmähiomakonetta ei saa käyttää ilman laikan suojusta. Seuraavat mitat eivät
saa ylittyä: tuen ja hiomalaikan väli enintään 2 mm ja etummaisen säädettävän
suojuksen ja hiomalaikan väli enintään 2 mm. Suuri rako tuen ja hiomalaikan välissä
suurentaa onnettomuusriskiä.
• Laikan suojus, tuki ja läpinäkyvä suojus on asennettava ennen
yhdistelmähiomakoneen käyttöä.
32
Page 33

• Irrota pistoke ennen hiomalaikan vaihtoa.
• Hiomalaikan kehänopeus on enintään Ø 150 = 23 m/s. Märkähiomakiven
kehänopeus on enintään Ø 200 = 1,3 m/s.
• Moottorin suurin sallittu lämpötila on 80 °C.
• Kaada hiomalaikan yhteydessä olevaan säiliöön vettä karaan asti.
• Yhdistelmähiomakone on kiinnitettävä huolellisesti kestävään alustaan ennen
käyttöä. Käytä pohjalevyn neljää kiinnitysreikää.
• Kun hiomalaikka kuluu, säädä etummaista säädettävää suojusta. Suojuksen ja
hiomalaikan väli on pidettävä mahdollisimman pienenä, eikä se saa olla yli kahta
millimetriä.
• Hiomalaikka on vaihdettava, kun etummaista säädettävää suojusta ja tukea ei
voida säätää kahden millimetrin etäisyydelle laikasta.
• Käytä ainoastaan valmistajan suosittelemia hiomalaikkoja, joihin merkitty kierrosluku
vastaa yhdistelmähiomakoneen arvokilpeen merkittyä kierroslukua tai on sitä suurempi.
• Jos hiomalaikka jumiutuu liian suuren kosketusvoiman tai suojuksen ja hiomalaikan
väliin juuttuneen työkappaleen vuoksi, sammuta yhdistelmähiomakone ja irrota
pistoke pistorasiasta. Poista hiomalaikkaan juuttunut kappale ja tarkasta, että
molemmat hiomalaikat liikkuvat esteettömästi. Aloita hionta uudelleen pienemmällä
kosketusvoimalla.
• Älä koskaan hio asbestia sisältäviä esineitä, sillä asbesti on todettu syöpää aiheuttavaksi.
• Älä koskaan käytä vahingoittuneita tai vääntyneitä laikkoja tai harjoja.
• Älä koske pyörivään hiomalaikkaan.
• Pidä lujasti kiinni työkappaleesta molemmin käsin koko hionnan ajan.
• Varmista, että työasentosi on tasapainoinen.
• Kun olet lopettanut metallin hionnan, anna hiomalaikkojen pysähtyä kokonaan.
• Irrota pistoke pistorasiasta, kun pidät tauon, säädät tai huollat yhdistelmähiomakonetta
tai kun et aio enää käyttää sitä.
• Käsittele yhdistelmähiomakonetta varovaisesti ja huolellisesti. Pidä kone puhtaana
ja kuivana ja poista öljy- ja rasvatahrat.
• Älä anna keskittymisen herpaantua! Keskity aina käsillä olevaan työhön
ja ole varovainen, kun siirryt seuraavaan työvaiheeseen. Älä käytä
yhdistelmähiomakonetta, jos et pysty keskittymään tai jos voit huonosti.
• Säilytä hiomalaikkoja siten, että ne eivät altistu mekaaniselle kuormitukselle tai
haitallisille ympäristövaikutuksille.
SUOMI
Tuotteen merkinnät ja turvallisuussymbolit
Lue koko käyttöohje ennen käyttöä ja säilytä se tulevaa tarvetta varten.
Käytä aina kuulosuojaimia.
Käytä aina suojalaseja tai visiiriä ja hengityssuojainta.
33
Page 34

Kuvaus
11410
13
12
1. Suojalasi ja pidike
2. Kipinäsuoja
SUOMI
3. Kipinäsuojan lukkoruuvi
4. Hiomalaikka (raekoko 60)
5. Tuki
6. Tuen lukitusvipu
7. Virtakytkin ON/OFF [ 0–1 ]
8. Jäähdytysvesiastia
9. Kiinnitysreikä
10. Vesisäiliön kiinnitysruuvit
11. Jäähdytysvesisäiliö
12. Pyörimissuuntamerkintä
13. Märkähiomakivi (raekoko 80)
14. Hiomalaikan suojus
15. Irrotettavan laikan suojuksen kiinnitysruuvit
16. Vedenpoistotulppa
2
3
4
5
6
7
8
101116
15
15
9
15
34
Page 35

Yhdistelmähiomakoneen asennus
Varoitus! Älä liitä pistoketta pistorasiaan ennen kuin olet asentanut ja säätänyt
yhdistelmähiomakoneen kokonaan ja lukenut käyttöohjeen ja varoitukset.
1. Asenna tuki (5) laikan suojukseen (14)
lukitusvivulla (6). Säädä hiomalaikka ja tuki
enintään kahden millimetrin etäisyydelle
toisistaan.
2. Asenna kipinäsuoja (2) laikan suojukseen
(14) lukkoruuvilla (3). Säädä hiomalaikka
ja kipinäsuoja enintään kahden millimetrin
etäisyydelle toisistaan.
3. Asenna suojalasin pidike (1) laikan
suojukseen (14) ruuvilla ja U-aluslevyllä.
Säädä suojalasin kaltevuuskulma ja kiristä
ruuvit.
6
14
5
614
5
1
SUOMI
2
3
Käyttö
• Tarkasta ennen koneen käynnistämistä, että hiomalaikka pyörii esteettömästi.
• Säädä suojalasi siten, että se ei heikennä näkyvyyttä hionnan aikana.
• Muista, että hiomalaikka pienenee kuluessaan. Säädä hiomalaikan ja tuen sekä
hiomalaikan ja kipinäsuojan välinen etäisyys enintään kahteen millimetriin.
Ylikuormitussuoja
Moottori sammuu automaattisesti, jos se ylikuormittuu. Anna moottorin jäähtyä ennen
kuin käynnistät sen uudelleen.
35
Page 36

Hiomalaikan käyttö
1. Liitä pistoke pistorasiaan.
2. Käynnistä moottori virtakytkimellä ja anna hiomakoneen kierrosluvun nousta ennen
hionnan aloittamista.
3. Pidä kiinni työkappaleesta molemmin käsin ja aseta se tukea vasten. Paina työkappaletta varovasti hiomalaikkaa vasten. Jos hiomalaikan liike hidastuu hionnan
aikana, laikkaan kohdistuvaa painetta on vähennettävä.
4. Jäähdytä työkappaletta jäähdytysastiassa (8), jos se kuumenee liikaa.
5. Sammuta laite virtakytkimellä ja irrota pistoke pistorasiasta.
Varoitus!
• Pienistä työkappaleista on pidettävä kiinni pihdeillä tai vastaavalla työkalulla.
• Hio ainoastaan hiomalaikan pyöreällä sivulla, älä koskaan reunoilla.
• Useimmat materiaalit kuumenevat hionnan aikana. Ole siksi varovainen
työkappaletta käsitellessäsi.
Märkähiomakiven käyttö
1. Kaada vettä säiliöön (11).
2. Liitä pistoke pistorasiaan.
3. Käynnistä moottori virtakytkimellä ja anna hiomakoneen käydä ennen hionnan aloittamista, kunnes märkähiomakivi on täysin märkä. Kuin märkähiomakivi kyllästyy
SUOMI
vedellä, säiliön vedenkorkeus saattaa laskea. Lisää silloin vettä säiliöön.
4. Hio työkappaletta märkähiomakivellä.
5. Sammuta laite virtakytkimellä ja irrota pistoke pistorasiasta.
6. Tyhjennä vesisäiliö säiliön alla olevasta vedenpoistotulpasta (16). Jätä paikalleen,
kunnes märkähiomakivi on kuivunut.
Hiomalaikan vaihto
Varoitus! Yhdistelmähiomakoneen tahattoman käynnistymisen aiheuttamien henkilövahinkojen välttämiseksi kone on sammutettava ja pistoke on irrotettava pistorasiasta
ennen hiomalaikan vaihtoa.
1. Aseta virtakytkin asentoon 0 ja irrota sähköjohdon pistoke pistorasiasta ennen
hiomalaikan vaihtoa.
2. Käännä suojalasi (1) ja sen pidike ylös.
3. Löysää kipinäsuoja (2) ja tuki (5) ja vedä ne irti hiomalaikasta, niin että uudelle
laikalle tulee tilaa.
4. Löysää kolmea kiinnitysruuvia (15) hiukan ja kierrä irrotettavaa laikan suojusta (14)
myötäpäivään niin, että hiomalaikka irtoaa.
5. Pidä kiinni hiomalaikasta ja irrota karan mutteri ja ylempi laippa karasta.
Karan mutterin kierteet ovat pyörimissuuntaa vastaan.
6. Poista vanha hiomalaikka ja aseta uusi tilalle.
7. Kokoa osat käänteisessä järjestyksessä.
36
Page 37

8. Säädä kipinäsuoja (2) ja tuki (5) enintään kahden millimetrin etäisyydelle hiomalaikasta ja kiristä.
9. Tarkasta ennen yhdistelmähiomakoneen käynnistämistä, että hiomalaikka pyörii
esteettömästi.
10. Seiso yhdistelmähiomakoneen vieressä, kun käynnistät koneen. Anna koneen
käydä minuutin ajan ennen hionnan aloittamista varmistaaksesi, että laikka on
tasapainossa.
Huomio!
• Älä poista hiomalaikan sivuilla olevia suojapapereita. Niiden avulla hiomalaikka
pysyy turvallisesti paikallaan laippoihin tuettuna.
• Tarkasta ennen asentamista, että uudessa hiomalaikassa ei ole halkeamia tai muita
näkyviä vaurioita. Älä koskaan käytä vaurioitunutta hiomalaikkaa.
• Älä kiristä karan mutteria niin lujasti, että hiomalaikka halkeaa.
Märkähiomakiven vaihto
1. Aseta virtakytkin asentoon 0 ja irrota
sähköjohdon pistoke pistorasiasta
ennen märkähiomakiven vaihtoa!
2. Irrota vesisäiliö (11). Löysää
vesisäiliön kolme kiinnitysruuvia (10)
(kaksi yläreunassa ja yksi
alapuolella). Ruuveja ei tarvitse
irrottaa! Työnnä vesisäiliötä
märkähiomakiveä kohti. Työnnä sitä
sitten alaspäin ja irrota se.
3. Tärkeää! Pidä märkähiomakivestä
kiinni, niin että se ei kuormita
vaihdelaatikkoa, kun kierrät karan
mutterin ja laipan irti karasta.
4. Poista vanha märkähiomakivi ja
aseta uusi tilalle.
5. Kokoa osat käänteisessä järjestyksessä.
6. Seiso yhdistelmähiomakoneen vieressä, kun käynnistät koneen. Anna koneen
käydä minuutin ajan ennen hionnan aloittamista varmistaaksesi, että laikka on
tasapainossa.
11
10
10
SUOMI
Kunnossapito ja huolto
• Irrota pistoke pistorasiasta ennen puhdistusta.
• Kuivaa tuote nihkeällä, pehmeällä liinalla. Käytä mietoa puhdistusainetta.
Älä koskaan käytä liuottimia tai voimakkaita, hankaavia puhdistusaineita.
37
Page 38

Kierrättäminen
Tämä symboli tarkoittaa, että tuotetta ei saa laittaa kotitalousjätteen
sekaan. Ohje koskee koko EU-aluetta. Virheellisestä kierrättämisestä
johtuvien mahdollisten ympäristö- ja terveyshaittojen ehkäisemiseksi
tuote tulee viedä kierrätettäväksi, jotta materiaali voidaan
käsitellä vastuullisella tavalla. Kierrätä tuote käyttämällä paikallisia
kierrätysjärjestelmiä tai ota yhteys ostopaikkaan. Ostopaikassa tuote
kierrätetään vastuullisella tavalla.
Tekniset tiedot
Nimellisjännite 230–240 VAC, 50 Hz
Nimellisteho S1: 150 W, S2 (30 min) 250 W
Kierrosluku
(kuormittamaton hiomalaikka) 2850 kierr./min
Märkähiomakiven kierrosluku 130 kierr./min
Suurin kehänopeus Märkähiomakivi 1,3 m/s, hiomalaikka 23 m/s
Suojausluokka IP23
Hiomalaikat Ø 200 × 40 × Ø 20 mm
(märkähiomakivi terätyökalun jäljen viimeistelyyn)
Ø 150 × 20 × Ø 12,7 mm
SUOMI
(hiomalaikka karkeaan hiontaan)
Ääni LpA = 68 dB(A), mittausepätarkkuus KpA = 3 dB(A)
LwA = 85,3 dB(A), mittausepätarkkuus KwA = 3 dB(A)
Käytä kuulosuojaimia,
kun melutaso on yli 80 dB(A)
Paino 11,5 kg
38
Page 39

Kombischleifmaschine
Art.Nr. 18-3609 Modell TLG-150WG
41-1024 TLG-150WG
Vor Inbetriebnahme dieBedienungsanleitung vollständig durchlesen und für künftigen
Gebrauch aufbewahren. Irrtümer, Abweichungen und Änderungen behalten wir uns vor.
Bei technischen Problemen oder anderen Fragen freut sich unser Kundenservice über
eine Kontaktaufnahme.
Allgemeine Sicherheitsanweisungen
Warnung: Bei der Verwendung dieses Werkzeugs sind grundsätzliche Vorsichtsmaßnahmen zu beachten, damit dieGefahr von Feuer, Elektroschlägen und Verletzungen
auf ein Minimum beschränkt bleibt. Vor Gebrauch des Produkts diese Anweisungen
durchlesen und aufbewahren.
1. Den Arbeitsplatz sauber halten. Vollgestellte Flächen und Tische erhöhen
dasRisiko von Unfällen.
2. Rücksicht auf dasArbeitsumfeld nehmen. DasWerkzeug niemals Regen
aussetzen. DasWerkzeug nicht in Räumlichkeiten mit Feuchte oder Nässe
verwenden. Den Arbeitsplatz immer gut beleuchten. DasWerkzeug nicht in der
Nähe von leicht entzündlichen Flüssigkeiten oder Gasen verwenden.
3. Stromschläge vermeiden. Körperkontakt mit geerdeten Gegenständen wie
Wasserleitungen, Heizungen, Kochherd oder Kühlschrank vermeiden.
4. Andere Personen auf Abstand halten. Personen, insbesondere Kinder, dienicht
ander Arbeit teilnehmen, dasWerkzeug oder dessen Verlängerungskabel
anfassen lassen. Zuschauer und andere Personen vom Arbeitsplatz fernhalten.
5. DasWerkzeug aneinem sicheren Ort aufbewahren. DasWerkzeug bei
Nichtbenutzung in einem trockenen, verschlossenen Raum außer Reichweite von
Kindern aufbewahren.
6. DasWerkzeug nicht überlasten. Es leistet bessere und sicherere Arbeit mit der
vorgesehenen Vorschubgeschwindigkeit.
7. Dasrichtige Werkzeug einsetzen. Kleines Werkzeug nicht mit großen Arbeiten
überbeanspruchen, für dieeigentlich kräftigere Geräte erforderlich sind. Werkzeuge
oder Zubehör nicht für Arbeitsschritte zweckentfremden, für diesie nicht
vorgesehen sind, also z. B. nicht eine Kreissäge zum Entasten verwenden.
8. Geeignete Arbeitskleidung tragen. Keine lockeren Kleidungs- oder
Schmuckstücke tragen, da sie anrotierenden Teilen hängenbleiben können.
Für dieArbeit im Freien wird dasTragen rutschfester Schuhe empfohlen.
Langes Haar hochstecken o. ä.
9. Immer eine Schutzausrüstung tragen. Augenschutz tragen. Bei staubenden
Arbeiten einen Staubfilter oder eine Schutzmaske anwenden.
10. Ausrüstung zum Aufsaugen von Staub benutzen. Wenn Staubabsaug-
und -auffangvorrichtungen montiert werden können, sicherstellen, dass diese
angeschlossen sind und korrekt angewendet werden.
DEUTSCH
39
Page 40

11. DasNetzkabel stets mit Sorgfalt behandeln. Nicht am Kabel sondern am
Stecker ziehen, wenn dieMaschine vom Strom genommen wird. Sicherstellen, dass
dasAnschlusskabel nicht mit Hitze, Öl oder scharfen Kanten in Kontakt kommt.
12. DasWerkstück ordentlich festspannen. Wenn möglich, Zwingen oder einen
Schraubstock verwenden, damit dasWerkzeug mit beiden Händen geführt werden
kann. Dasist sicherer, als dasWerkstück mit einer Hand zu halten.
13. Immer eine stabile und bequeme Arbeitsposition einnehmen. Für einen
sicheren Stand und gutes Gleichgewicht sorgen.
14. DieWerkzeuge mit Sorgfalt pflegen. Sicherstellen, dass dasWerkzeug für
optimale Leistung und ein sicheres Ergebnis sauber ist und dieKlingen scharf
sind. Zum Schmieren und beim Wechsel von Zubehör den Empfehlungen aus
der Bedienungsanleitung folgen. DasNetzkabel regelmäßig kontrollieren. Bei
Beschädigungen dasNetzkabel von einem qualifizierten Servicetechniker wechseln
lassen. Sämtliche Verlängerungskabel regelmäßig auf Schäden überprüfen.
Sicherstellen, dass Griffe und Schalter trocken, sauber und frei von Öl, Fett usw.
sind.
15. Den Strom abschalten. Vor Servicearbeiten und Wechsel von Zubehör wie
Hobelklinge, Bohrer, Klinge, Schleifband oder -blätter den Stecker herausziehen
und den Nothalt betätigen.
16. Alle Schlüssel und Servicewerkzeuge entfernen. Routinemäßig überprüfen, ob
sämtliche Schlüssel und Servicewerkzeuge von der Maschine entfernt wurden,
bevor der Strom eingeschaltet wird.
17. Versehentliches Einschalten vermeiden. DasWerkzeug nicht mit einem
Finger am Ein-/Ausschalter tragen, wenn dasKabel in der Steckdose steckt.
Sicherstellen, dass der Startschalter auf OFF steht, wenn der Stecker in
dieSteckdose gesteckt wird.
18. Geeignete Verlängerungskabel anwenden. Im Außenbereich ausschließlich
Verlängerungskabel benutzen, diefür diesen Zweck zugelassen sind.
Verlängerungskabel mit ausreichendem Querschnitt verwenden und immer
DEUTSCH
dasgesamte Kabel abrollen.
19. Mit Vernunft und Achtsamkeit andieArbeit gehen. Dieeinzelnen Arbeitsschritte
gut planen, damit sie sicher durchgeführt werden können. Bei Müdigkeit, unter
Einfluss von Medikamenten etc. nicht mit der Maschine/dem Werkzeug arbeiten.
20. Vor dem Starten der Maschine Folgendes sicherstellen:
- dass Schutzvorrichtungen und sonstige Teile unbeschädigt sind und ihre
Funktion erfüllen.
- dass bewegliche Teile korrekt eingestellt sind und sich frei drehen können.
- dass bewegliche Teile sich nicht verfangen oder festfahren können.
- dass kein Defekt vorliegt.
- dass keine sonstigen Umstände dieAusführung der Arbeit behindern.
Beschädigte Schutzvorrichtungen oder Schäden ananderen Teilen müssen
fachgerecht repariert bzw. ausgewechselt werden. Defekte Kabel und Schalter
müssen immer von einem Fachmann ausgewechselt werden. Niemals ein
Werkzeug verwenden, dassich nicht sicher ein- oder ausschalten lässt.
40
Page 41

21. Dasempfohlene Zubehör verwenden. DieVerwendung von nicht empfohlenem
Zubehör kann zu Unfällen oder Verletzungen führen.
22. Reparaturen nur von qualifizierten Technikern ausführen lassen. DieMaschine
erfüllt diegeltenden Sicherheitsanforderungen. Reparaturen nur von einem
Fachmann und mit Original-Ersatzteilen ausführen lassen. Ansonsten kann
dieMaschine eine Unfall- oder Verletzungsgefahr darstellen.
Besondere Sicherheitsvorschriften für Tischschleifmaschinen
• DasAnschlusskabel nicht berühren, falls es während des Betriebs beschädigt
wurde. Sofort den Stecker aus der Steckdose ziehen und dasAnschlusskabel von
einem qualifizierten Servicetechniker austauschen lassen.
• DieMaschine nicht benutzen, wenn sie verstaubt ist. DieMaschine nicht in
staubigen Räumen benutzen.
• Bei der Benutzung im Außenbereich dieMaschine mit einer FehlerstromSchutzeinrichtung andasStromnetz anschließen (Auslösestrom max. 30 mA in
max. 30 ms). Bei der Benutzung im Freien nur Verlängerungskabel, diefür den
Außenbereich zugelassen sind, benutzen.
• Entsteht eine gefährliche Situation, sofort den Stecker aus der Steckdose ziehen.
• Darauf achten, dass dasAnschlusskabel immer auf der Rückseite des Gerätes bleibt.
• Feuergefahr durch fliegende Funken!
• Beim Schleifen von Metall fliegen Funken herum, daher sicherstellen, dass sich
keine Personen oder Haustiere in der Risikozone befinden. Sicherstellen, dass sich
keine brennbaren Materialien in der Nähe des Arbeitsplatzes befinden.
• Warnung: Schädliche Dämpfe!
• DieArbeit mit gefährlichem Staub bedeutet ein Gesundheitsrisiko für den Benutzer
des Gerätes und alle, diesich in der Nähe des Arbeitsplatzes befinden.
• Augenschutz tragen.
• Gehörschutz tragen.
• Atemschutz benutzen.
• Handschutz benutzen.
• Verbrennungsgefahr!
• DasWerkstück wird beim Schleifen heiß. Geschliffene Flächen nicht direkt berühren,
sondern erst abkühlen lassen. Langandauerndes Schleifen mit gelegentlichen
Pausen unterbrechen, damit dasWerkstück abkühlen kann, bevor dieArbeit
fortgesetzt wird. DasGerät nicht länger als 30 min im Dauerbetrieb benutzen.
• Nur Schleifscheiben benutzen, dievom Hersteller empfohlen werden und mit einer
Drehzahl gekennzeichnet sind, dieder Kennzeichnung am Typenschild des Geräts
entspricht oder größer ist.
• Nur Schleifscheiben benutzen, diefolgendermaßen gekennzeichnet sind: Hersteller
sowie dieArt des Bindemittels der Schleifscheibe, Größe und max. Drehzahl.
• DieSchleifscheiben immer trocken und in möglichst gleichbleibender Temperatur
aufbewahren.
DEUTSCH
41
Page 42

• Immer diemitgelieferten Flanschen zur Befestigung der Schleifscheiben benutzen.
• Dieverwendeten Flanschen müssen von derselben Größe und Sorte sein. Wird ein
Zwischenstück benutzt, muss dieses aus elastischem Material bestehen, z. B. aus
Gummi.
• Es ist nicht erlaubt, dasZentrumloch der Schleifscheibe aufzubohren.
• Dieverstellbare Sicherung ander oberen Vorderkante der Schutzhaube regelmäßig
einstellen, um den Verschleiß der Schleifscheibe zu kompensieren.
• DasGerät niemals ohne Schutzhaube benutzen. Sicherstellen, dass diese Maße
nicht überschritten werden: Anschlag/Schleifscheibe max. 2 mm und vordere
verstellbare Sicherung/Schleifscheibe max. 2 mm. Ein großer Spalt zwischen
Anschlag und Schleifscheibe beinhaltet ein erhöhtes Unfallrisiko.
• DieSchutzhaube, der Anschlag und dietransparente Sicherung müssen vor dem
Start des Gerätes montiert sein.
• Vor dem Wechsel der Schleifscheibe den Stecker abziehen.
• Max. Umfangsgeschwindigkeit der Schleifscheibe: Ø 150 = 23 m/s.
Max. Umfangsgeschwindigkeit des Nass-Schleifsteins: Ø 200 = 1,3 m/s.
• Max. erlaubte Motortemperatur 80 °C.
• Den Behälter ander Schleifscheibe bis zur Spindel mit Wasser füllen.
• Sicherstellen, dass dasGerät vor Anwendung auf einer stabilen Unterlage
ordentlich festmontiert wird. Die4 Montagelöcher am Sockel benutzen.
• Dievordere verstellbare Sicherung anpassen, um den Verschleiß der
Schleifscheibe zu kompensieren. Bitte beachten, dass der Abstand zwischen dem
Funkenfänger und der Schleifscheibe so klein wie möglich sein muss und 2 mm
nicht übersteigen darf.
• DieSchleifscheibe muss ausgetauscht werden, wenn dievordere verstellbare
Sicherung und der Anschlag nicht auf einen Abstand von 2 mm zur Schleifscheibe
gebracht werden können.
• Nur Schleifscheiben benutzen, dievom Hersteller empfohlen werden und mit einer
Drehzahl gekennzeichnet sind, dieder Kennzeichnung am Typenschild des Geräts
DEUTSCH
entspricht oder größer ist.
• Wird dieSchleifscheibe durch zu harte Anlegekraft blockiert oder durch ein
Werkstück, dass sich zwischen Sicherung und Schleifscheibe verklemmt hat,
dasGerät ausschalten und den Stecker abziehen. DieBlockade entfernen und
sicherstellen, dass beide Schleifscheiben leichtgängig sind. Den Schleifvorgang
erneut mit weniger Anlegekraft starten.
• Niemals Gegenstände schleifen, dieAsbest enthalten, da Asbest nachweislich ein
Krebserreger ist.
• Niemals beschädigte oder deformierte Scheiben oder Bürsten verwenden.
• Jeglichen Kontakt mit der rotierenden Schleifscheibe vermeiden.
• DasWerkstück dieganze Zeit während des Schleifens mit beiden Händen stabil
festhalten.
• Für einen sicheren Stand und ein gutes Gleichgewicht sorgen.
• Nach dem Schleifen von Metall, dieSchleifscheiben komplett zum Stillstand
kommen lassen.
42
Page 43

• Bei Arbeitsunterbrechungen, Wartung oder Service sowie bei Nichtbenutzung den
Stecker abziehen.
• DasGerät vorsichtig und respektvoll behandeln. Sicherstellen, dass es sauber,
trocken und frei von Öl und Fett ist.
• Immer aufmerksam arbeiten! Dieganze Zeit bewusst bei der Sache sein und neue
Arbeitsschritte vorsichtig einleiten. DasGerät nicht bei schlechter Konzentration
oder schlechtem Wohlbefinden benutzen.
• DieSchleifscheiben so aufbewahren, dass sie nicht mechanisch belastet werden
und sicherstellen, dass sie keiner schädlichen Umweltbeeinträchtigung ausgesetzt
sind.
Produktkennzeichnung mit Sicherheitssymbolen
Vor dem Einsatz diegesamte Bedienungsanleitung durchlesen und zum
späteren Nachschlagen aufbewahren.
Immer Gehörschutz tragen.
Beim Arbeiten sind immer Augenschutz oder Visier sowie Atemschutz zu tragen.
43
DEUTSCH
Page 44

Beschreibung
11410
13
12
1. Schutzglas mit Halterung
2. Funkenschutz
3. Sicherungsschraube für
den Funkenschutz
4. Schleifscheibe, Körnung 60
5. Anschlag
6. Drehriegel für den Anschlag
7. Stromschalter ON/OFF [ 0 – 1 ]
DEUTSCH
8. Wasserbehälter für dieKühlung
9. Montagelöcher
10. Befestigungsschrauben
des Wasserbehälters
11. Behälter für dasKühlwasser
12. Rotationsmarkierung
13. Nass-Schleifstein, Körnung 80
14. Schutzhaube für Schleifscheibe
15. Befestigungsschrauben für
dieabnehmbare Schutzhaube
16. Ablaufstutzen
2
3
4
5
6
7
8
101116
15
15
9
15
44
Page 45

Das Gerät montieren
Warnung: Den Stecker erst dann aneine Steckdose anschließen, wenn dasGerät
komplett zusammengebaut und eingestellt wurde sowie dieBedienungsanleitung und
dieWarntexte gelesen wurden.
1. Den Anschlag (5) mit dem Drehriegel (6)
ander Schutzhaube (14) montieren. Den
Abstand zwischen Schleifscheibe und
Anschlag auf höchstens 2 mm einstellen.
2. Den Funkenschutz (2) mit der Sicherungsschraube (3) ander Schutzhaube (14)
montieren. Den Abstand zwischen
Schleifscheibe und Funkenschutz auf
höchstens 2 mm einstellen.
3. DieHalterung des Schutzglases (1) mit
der Schraube und der U-Scheibe ander
Schutzhaube (14) DieNeigung des
Schutzglases einstellen und dieSchrauben
anziehen.
6
14
5
614
5
1
2
3
DEUTSCH
Benutzung
• Vor dem Start sicherstellen, dass dieSchleifscheibe frei rotieren kann.
• DasSchutzglas so einstellen, dass der Schleifvorgang gut überwacht werden kann.
• Daran denken, dass dieSchleifscheibe verschleißt und kleiner wird. Den Abstand
zwischen Schleifscheibe und Anschlag sowie Schleifscheibe und Funkenschutz auf
2 mm oder weniger einstellen.
Überlastungsschutz
Bei einer Überbelastung schaltet der Motor automatisch aus. Den Motor vor dem
erneuten Start abkühlen lassen.
45
Page 46

Benutzung mit Schleifscheibe
1. Den Netzstecker in eine Steckdose stecken.
2. Vor Beginn des Schleifens den Motor mit dem Stromschalter einschalten und auf
dievolle Drehzahl laufen lassen.
3. DasWerkstück mit beiden Händen halten und anden Anschlag legen. DasWerkstück vorsichtig andieSchleifscheibe drücken. Wird dieSchleifscheibe beim
Schleifen langsamer, muss der Druck auf dieScheibe verringert werden.
4. DasWerkstück im Kühlbehälter (8) abkühlen, falls es zu heiß wird.
5. Mit dem Stromschalter ausschalten und den Stecker abziehen.
Warnung:
• Kleine Werkstücke mit einer Zange oder einem ähnlichen Werkzeug festhalten.
• Nur auf der runden Seite der Schleifscheibe schleifen, niemals anden Seiten.
• Diemeisten Materialien werden beim Schleifen heiß, dasWerkstück daher
vorsichtig handhaben.
Benutzung mit Nass-Schleifstein
1. Wasser in den Behälter (11) füllen.
2. Den Netzstecker in eine Steckdose stecken.
3. Vor Beginn des Schleifens den Motor mit dem Stromschalter einschalten und
laufen lassen bis der Schleifstein komplett nass ist. Wenn der Schleifstein Wasser
aufnimmt, kann der Wasserstand im Behälter sinken, in dem Fall neues Wasser
nachfüllen.
4. DasWerkzeug am Nass-Schleifstein schleifen.
5. Mit dem Stromschalter ausschalten und den Stecker abziehen.
6. Den Wasserbehälter entleeren, dazu gibt es einen Ablaufstutzen (16) ander
Unterseite des Behälters. Stehen lassen, bis der Nass-Schleifstein getrocknet ist.
Schleifscheibenwechsel
DEUTSCH
Warnung: Um Verletzungen durch einen unabsichtlichen Start des Gerätes zu vermeiden,
dieses vor dem Wechsel der Schleifscheibe ausschalten und den Stecker abziehen!
1. Den Schalter auf 0 setzen und den Stecker des Netzkabels vor dem Austausch
der Schleifscheibe aus der Steckdose ziehen.
2. DasSchutzglas (1) und dessen Halterung hochklappen.
3. Den Funkenschutz (2) und den Anschlag (5) lösen und von der Schleifscheibe
ziehen, sodass eine neue Schleifscheibe Platz hat.
4. Die3 Befestigungsschrauben (15) etwas lösen und dieabnehmbare Schutzhaube
(14) mit dem Uhrzeigersinn drehen, sodass dieSchleifscheibe freigelegt wird.
5. DieSchleifscheibe festhalten, dieSpindelmutter und den äußeren Flansch von der
Spindel lösen. DieSpindelmutter hat ein Gewinde gegen dieDrehrichtung.
6. Diealte Schleifscheibe entfernen und dieneue einsetzen.
7. In umgekehrter Reihenfolge montieren.
46
Page 47

8. Den Funkenschutz (2) und den Anschlag (5) auf einen Abstand von höchstens 2 mm
von der Schleifscheibe einstellen und festziehen.
9. Vor dem Start der Maschine sicherstellen, dass sich dieSchleifscheibe frei drehen kann.
10. Vor dem Beginn des Schleifens neben dem Gerät stehen, dieses starten und eine
Minute laufen lassen, um sicherzustellen, dass dieSchleifscheibe ausgewuchtet ist.
Hinweis:
• DasSchutzpapier anden Seiten der Schleifscheibe nicht entfernen, dies sorgt
dafür, dass dieSchleifscheibe von den Flanschen stabil gehalten wird.
• Vor der Montage sicherstellen, dass dieneue Schleifscheibe keine Risse oder
andere sichtbaren Schäden hat. Niemals beschädigte Schleifscheiben verwenden.
• DieSpindelmutter nicht zu stark anziehen, sonst kann dieSchleifscheibe zerreißen.
Austausch des Nass-Schleifsteins
1. Den Schalter auf 0 setzen und den
Stecker des Netzkabels vor dem
Austausch des Nass-Schleifsteins
aus der Steckdose ziehen.
2. Den Wasserbehälter abbauen (11).
Die3 Befestigungsschrauben vom
Wasserbehälter lösen (2 ander
Oberseite und 1 ander Unterseite).
DieSchrauben müssen nicht komplett gelöst werden! Den Wasserbehälter anden Nass-Schleifstein
drücken und dann nach unten
führen und abnehmen.
3. Wichtig! Den Nass-Schleifstein
festhalten, sodass dasGetriebe
beim Lösen der Spindelmutter und
des Flansches von der Spindel
nicht belastet wird.
4. Den alten Nass-Schleifstein entfernen und den neuen einsetzen.
5. In umgekehrter Reihenfolge montieren.
6. Vor dem Beginn des Schleifens neben dem Gerät stehen, dieses starten und eine
Minute laufen lassen, um sicherzustellen, dass dieSchleifscheibe ausgewuchtet ist.
11
10
10
DEUTSCH
Pege und Wartung
• Vor der Reinigung den Stecker aus der Steckdose ziehen.
• DasProdukt mit einem weichen, leicht befeuchteten Tuch reinigen. Keine scharfen
Chemikalien, Reinigungslösungen oder starke Reinigungsmittel verwenden.
47
Page 48

Hinweise zur Entsorgung
Dieses Symbol zeigt an, dass dasProdukt nicht gemeinsam mit dem
Haushaltsabfall entsorgt werden darf. Dies gilt in der gesamten EU.
Um möglichen Schäden für dieUmwelt und Gesundheit vorzubeugen,
diedurch fehlerhafte Abfallentsorgung verursacht werden, dieses
Produkt zum verantwortlichen Recycling geben, um dienachhaltige
Wiederverwertung von stofflichen Ressourcen zu fördern. Bei
der Abgabe des Produktes bitte dievorhandenen Recycling- und
Sammelstationen benutzen oder den Händler kontaktieren. Dieser kann
dasProdukt auf eine umweltfreundliche Weise recyceln.
Technische Daten
Nennspannung 230–240 VAC, 50 Hz
Nennleistung S1: 150 W, S2 (30 min) 250 W
Drehzahl der Schleifscheibe,
unbelastet 2850 /min
Drehzahl des Nass-Schleifsteins 130 /min
Max. Umfanggeschwindigkeit Nass-Schleifstein 1,3 m/s, Schleifscheibe 23 m/s
Schutzklasse IP23
Schleifscheiben Ø 200 × 40 × Ø 20 mm (Nass-Schleifstein zum
Feinschleifen von Schneidewerkzeugen)
Ø 150 × 20 × Ø 12,7 mm (Schleifscheibe zum
Grobschleifen)
Schallpegel LpA = 68 dB(A), Unsicherheit KpA = 3 dB(A)
LwA = 85,3 dB(A), Unsicherheit KwA = 3 dB(A)
Gehörschutz tragen, wenn der
Geräuschpegel folgenden Wert
DEUTSCH
übersteigt 80 dB(A)
Gewicht 11,5 kg
48
Page 49

Declaration of Conformity
Försäkran om överensstämmelse
Samsvarerklæring
Vakuutus yhdenmukaisuudesta
Konformitätserklärung
CLAS OHLSON AB
SE-793 85 INSJÖN, SWEDEN
Declares that this product complies with the requirements of the following directives and standards
Intygar att denna produkt överensstämmer med kraven i följande direktiv och standarder
Bekrefter at dette produktet er i samsvar med følgende direktiver og standarder
Vakuuttaa, että tämä tuote täyttää seuraavien direktiivien ja standardien vaatimukset
Erklärt hiermit, dass dieses Produkt die Anforderungen und Bestimmungen folgender Richtlinien erfüllt
WET & DRY BENCH GRINDER
Cocraft 41-1024 / 18-3609
TLG-150WG
Machinery Directive
2006/42/EC
EN 61029-1:2009+A11:2010
EN 61029-2-4:2011
EMC Directive
2004/108/EC
EN 55014-1:2006+A1+A2
EN 55014-2:1997+A1+A2
EN 61000-3-2:2006+A1+A2
EN 61000-3-3:2008
Henrik Alfredsson
Manager Technique & Quality
Insjön, Sweden, 2016-04-25
Page 50

Page 51

Page 52

Sverige
Kundtjänst tel: 0247/445 00
fax: 0247/445 09
e-post: kundservice@clasohlson.se
Internet www.clasohlson.se
Post Clas Ohlson AB, 793 85 INSJÖN
Norge
Kundesenter tlf.: 23 21 40 00
faks: 23 21 40 80
e-post: kundesenter@clasohlson.no
Internett www.clasohlson.no
Post Clas Ohlson AS, Postboks 485 Sentrum,
0105 OSLO
Suomi
Asiakaspalvelu puh.: 020 111 2222
sähköposti: asiakaspalvelu@clasohlson.fi
Internet www.clasohlson.fi
Osoite Clas Ohlson Oy,Maistraatinportti 4 A,
00240 HELSINKI
Great Britain
Customer Service contact number: 020 8247 9300
e-mail: customerservice@clasohlson.co.uk
Internet www.clasohlson.co.uk
Postal 10 – 13 Market Place
Kingston Upon Thames
Surrey
KT1 1JZ
Deutschland
Kundenservice Unsere Homepage www.clasohlson.de
besuchen und auf Kundenservice klicken.
 Loading...