

Clas Ohlson 34-8327 Owner's Manual
Grill
Grilli
Kugelgrill
EnglishSvenskaNorskSuomiDeutsch
Art.no
34-8327
Ver. 20151001

2

Grill
Art.no 34-8327
Please read theentire instruction manual before using theproduct and save it for future reference.
We reserve theright for any errors in text or images and any necessary changes made to technical data.
If you have any questions regarding technical problems please contact our Customer Services
(see address on reverse).
Safety
Caution: Risk for carbon monoxide poisoning.
Theincomplete burning of e.g. charcoal can create poisonous carbon monoxide gas which is both odourless
and tasteless. Never use thegrill indoors or in areas with poor ventilation.
Before Use
1. Place thegrill on aneven fireproof surface with plenty of free space to thesides. Make sure that no
flammable objects are close by, e.g. dry branches or similar which may hang over thegrill.
2. Do not use thegrill in strong winds.
3. Only use thegrill when it is completely assembled with all screws and nuts securely tightened.
Lighting thecharcoal
1. Pour thecharcoal onto thecharcoal grate.
2. Only use lighter fluids which are intended for lighting charcoal. Never use petrol, alcohol or similar products
to light thegrill.
3. Never spray lighter fluid or similar products onto theglowing coals. It can cause flames to explode.
4. Do not cover thecoals before they begin glowing.
5. Do not store thebottle containing lighter fluid close to thelit grill.
English
Use
1. Never leave thegrill unattended when it is lit. Make sure that children and pets are kept at asafe distance
from thegrill!
2. Never touch hot sections of thegrill without oven mitts.
3. Never move thegrill when it is lit.
4. Lift off thelid carefully. Thefire can flame up when thelid is removed and more oxygen is introduced.
5. Dropping grease can cause flames. Keep awater filled spray bottle close by to dampen any flames
when needed.
Note: Do not fuel thebarbecue with wood. Theexcessive heat generated will ruin theenamel coating.
After use
1. Fire hazard! Let thegrill cool completely before emptying theashes into atight sealing metal container.
Never dump ashes directly into therubbish bin. Some undetected embers may remain.
2. If you wish to finish grilling before thecharcoal has burned out: replace thelid and shut theair vents.
Do not leave thegrill unattended before it has cooled off completely.
3. Thegrill must be completely extinguished and cold before you put it away for storage.
3
English
Assembly
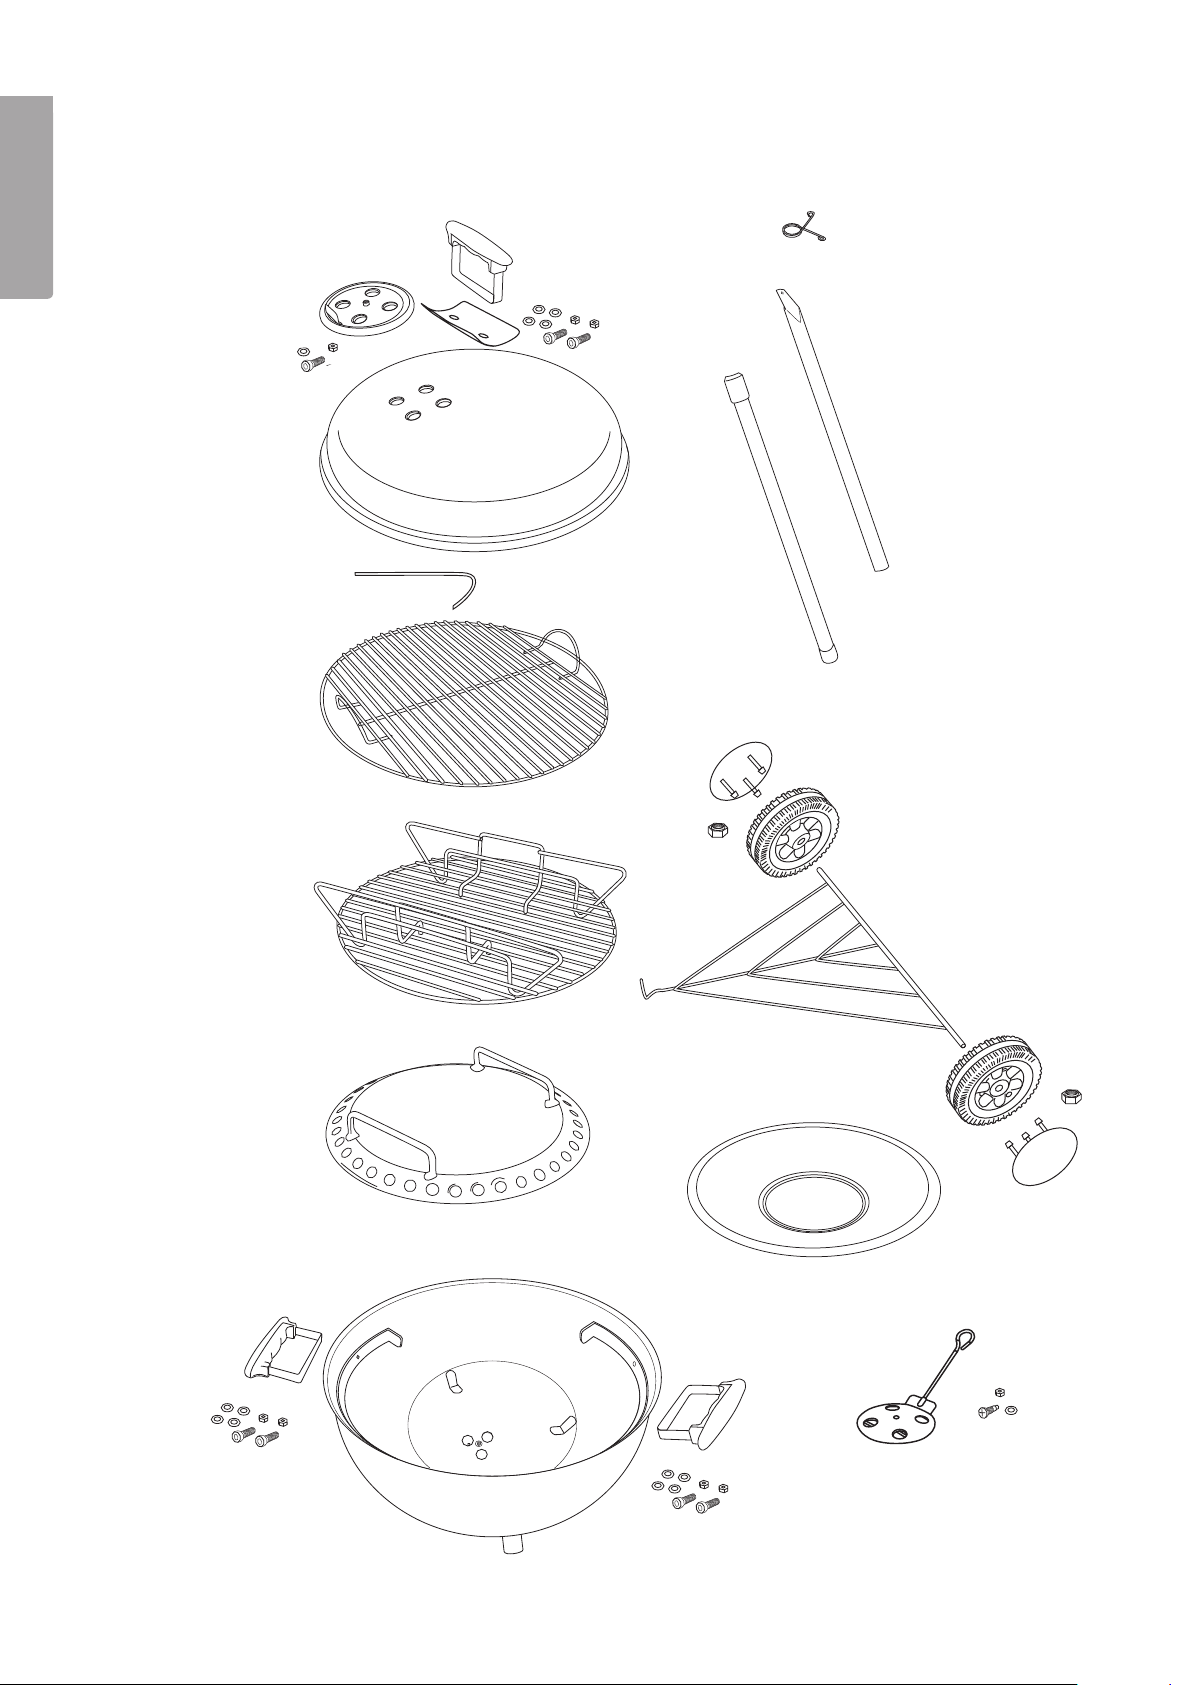
Check that all parts are in thebox.
Upper air vent
1 set
Lid 1 pc.
Lid hook 1 pc.
Grill grate 1 pc.
Spring clip 3 pcs.
Handle and
heat deflector
Leg, short 2 pcs.
Leg, long 1 pc.
Charcoal grate 1 pc.
Upper ash tray 1 pc.
Grill grate support 2 pcs.
Handle 2 pcs.
Wheels and wheel
covers 2 pcs.
Wire shelf 1 pc.
Lower ash tray 1 pc.
Base 1 pc.
Bottom air vent 1 pc.
4

Assembling thelegs and wheels
1. Place thespring clips on each leg.
2. Check thegrill’s base where theholes for thehandles are located. Insert thelong leg into thebracket which
sits in line with thepair of holes for thehandle. Then insert theother legs into theremaining brackets as
shown in thefigure.
3. First, attach thewire shelf onto thelong leg and then attach it to theshorter legs so that thethreaded ends
stick out through theholes in thelegs.
4. Mount thewheels onto thethreaded ends that stick out through theholes on theshorter legs and then
screw them together using thenuts. Insert thewheel covers.
2
1
English
Assembling theair vents and handles
1. Attach the lower air vent to the bowl as shown in the picture
on the left above.
2. Attach the upper air vent to the lid as shown in the picture
on the right above.
3. Attach thehandles and thegrill grate supports to theside and
thehandle and heat deflector to thelid.
Assembling theremaining parts
1. Place thelower ash tray onto thespring clips.
2. Place theupper ash tray onto thebase’s bottom.
3. Attach thespacers onto thecharcoal grate and then place it above theupper ashtray. When grilling,
charcoal should be poured between thespacers to concentrate theheat into thecentre of thegrill so
as to generate less heat waste to thesides.
4. Thegrill grate is placed above.
5

English
Care and Maintenance
Care
• Do not use water for cleaning thegrill before it has cooled. Thesurface can be damaged.
• Tighten thescrews if needed.
• Make sure that theair vents are not blocked by ashes.
• Store thecharcoal in adry place, making them easier to light. Use aplastic or metal container preferably,
with atight sealing lid.
• Store thegrill in adry place for extended storage.
Cleaning
After every use:
• Use abrass brush to scrape away food rests from thegrill grate and other parts if needed.
• Do not use sharp objects to scrape grill’s parts. Thesurface can be damaged.
Detailed cleaning:
1. Use warm water with washing-up liquid to clean thegrill grate, charcoal grate and theentire grill.
2. Rinse completely with water.
3. Dry completely with paper towels. Do not let thegrill air dry.
4. Brush vegetable oil onto themetal surfaces to prevent rust. However, do not use vegetable oil on
thecharcoal grate and theinside of thebase.
Responsible disposal
This symbol indicates that this product should not be disposed of with general household waste.
This applies throughout theentire EU. In order to prevent any harm to theenvironment or health
hazards caused by incorrect waste disposal, theproduct must be handed in for recycling so that
thematerial can be disposed of in aresponsible manner. When recycling your product, take it to
your local collection facility or contact theplace of purchase. They will ensure that theproduct is
disposed of in anenvironmentally sound manner.
6

Grill
Art.nr 34-8327
Läs igenom hela bruksanvisningen före användning och spara den sedan för framtida bruk.
Vi reserverar oss för ev. text- och bildfel samt ändringar av tekniska data.
Vid tekniska problem eller andra frågor, kontakta vår kundtjänst (se adressuppgifter på baksidan).
Säkerhet
Varning! Risk för kolmonoxidförgiftning.
Vid ofullständig förbränning av t.ex. kol bildas den mycket giftiga gasen kolmonoxid som är lukt- och smaklös.
Använd aldrig grillen inomhus eller på platser med dålig ventilation.
Före användning
1. Ställ grillen på ett plant brandsäkert underlag med gott om plats på sidorna. Se till att inga brännbara föremål
finns i närheten, t.ex. torra kvistar eller liknande som hänger över grillen.
2. Använd inte grillen i stark blåst.
3. Använd endast grillen när den är helt komplett, rätt monterad samt alla skruvar och muttrar är åtdragna.
Tändning av grillen
Svenska
1. Häll kolet på kolgallret.
2. Använd endast tändprodukter som är avsedd för tändning av grillar. Använd aldrig bensin, T-sprit eller
liknande produkter för att tända grillen.
3. Spruta aldrig tändvätska eller liknande produkter på glödande kol eftersom det kan flamma upp häftigt.
4. Lägg inte på locket förrän kolen börjar glöda.
5. Förvara inte flaskan med tändvätska i närheten av den tända grillen.
Användning
1. Lämna aldrig grillen utan tillsyn när den är tänd. Se till att barn och husdjur håller sig på ett säkert avstånd
från grillen!
2. Vidrör inte några av grillens heta delar utan handskar.
3. Flytta inte grillen när den är tänd.
4. Lyft av locket försiktigt. Elden kan flamma upp när locket öppnas och mera syre tillförs.
5. Eldslågor kan uppstå av droppande fett. Ha gärna en duschflaska med vatten i närheten för att
dämpa lågorna vid behov.
Obs! Elda inte med ved i grillen. Värmen blir för hög och förstör emaljen på grillen.
Efter användning
1. Brandfara! Låt grillen kallna helt och töm sedan ur askan i en metallhink med tättslutande lock.
Häll aldrig askan direkt i en soptunna eftersom det kan finnas glöd kvar som inte syns.
2. Om du vill avsluta grillningen innan kolet har brunnit ut: lägg på locket och stäng dragluckan.
Lämna inte grillen utan tillsyn förrän den är helt kall.
3. Grillen måste vara helt släckt och kall innan du ställer undan den för förvaring.
7
Montering
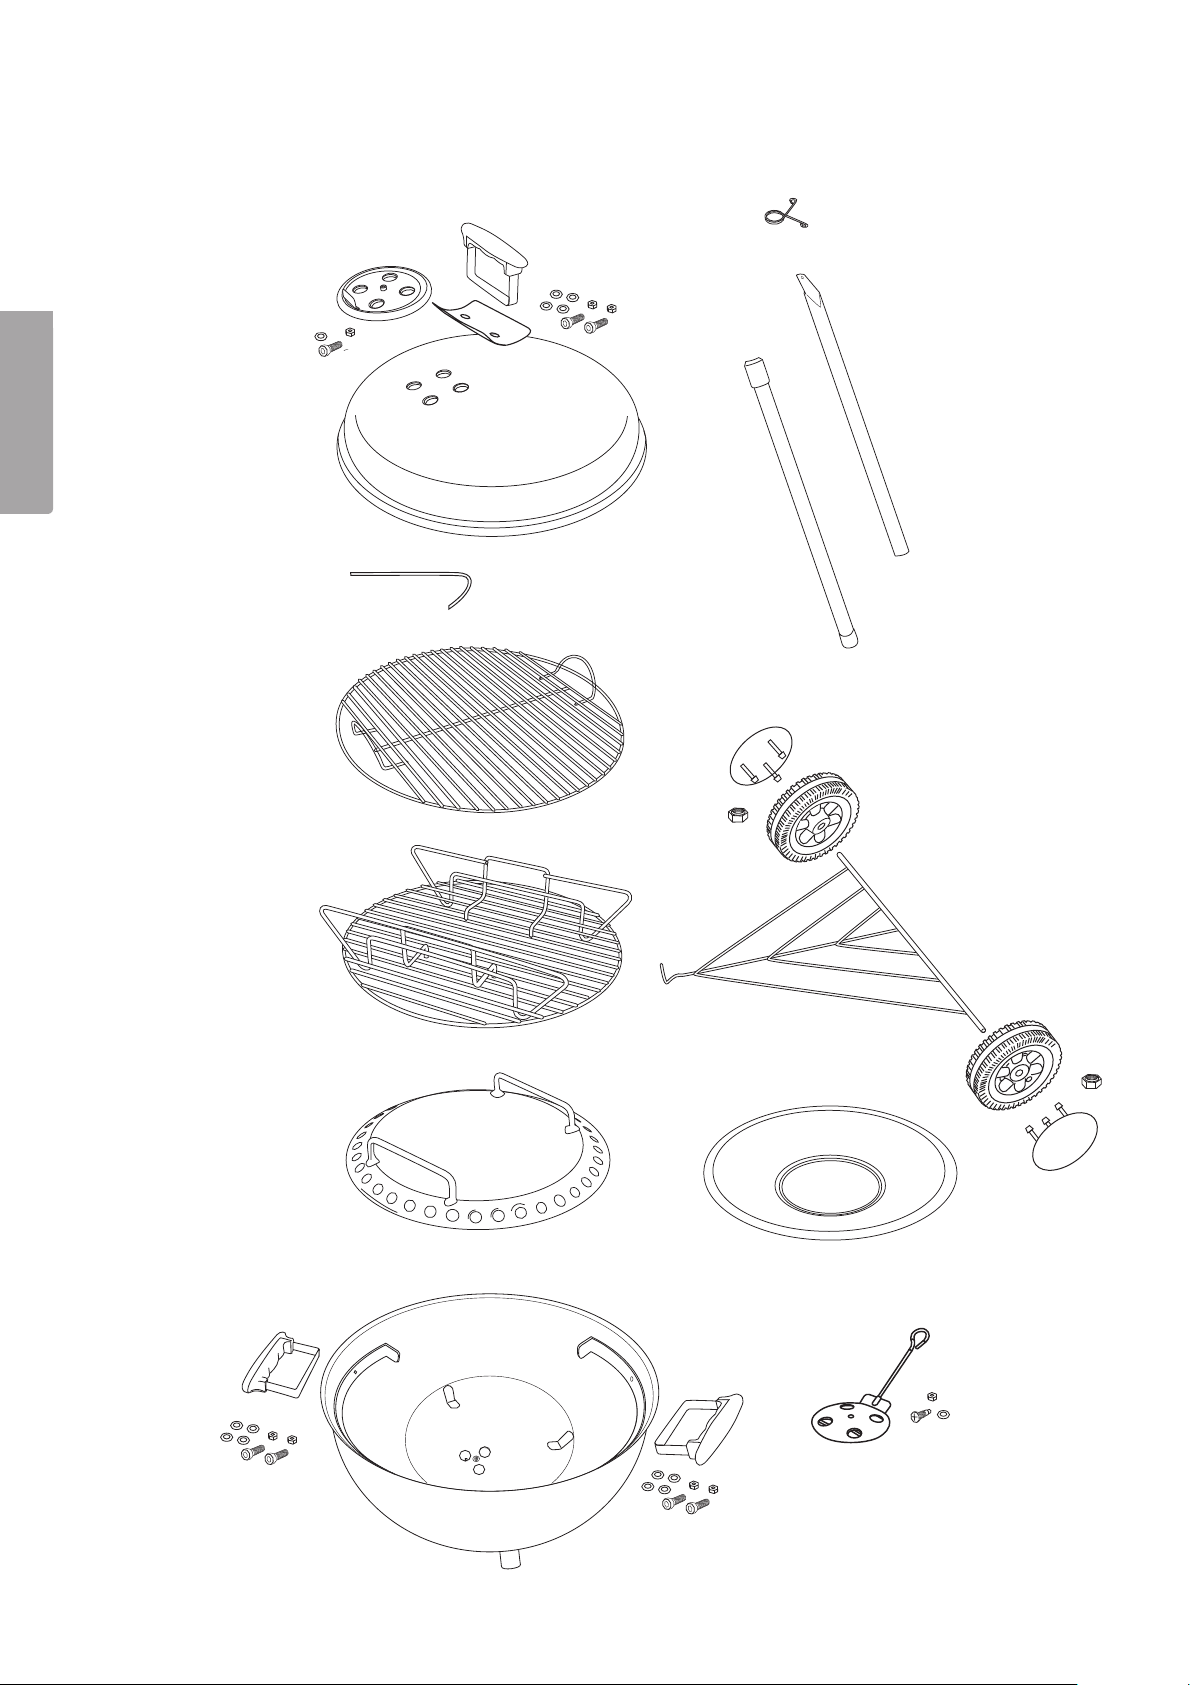
Kontrollera att alla delar finns med i förpackningen.
Svenska
Övre draglucka
1 sats
Lock 1 st.
Lockhängare 1 st.
Grillgaller 1 st.
Handtag och
Fjäderklämma 3 st.
värmeskyddsplåt
Ben, kort 2 st.
Ben, långt 1 st.
Hjul med
hjulsidor 2 st.
Kolgaller 1 st.
Övre askbricka 1 st.
Grillgallerstöd 2 st.
Handtag 2 st.
Trådhylla 1 st.
Nedre askbricka 1 st.
Underdel 1 st.
Nedre draglucka 1 st.
8
 Loading...