

Page 1

English
Digital Time Switch
Art.no 32-8934 Model EF700ET
Features
• Programmable on/off switching of electrical devices, ideal
for lighting.
• Ideal for automation, saving energy and for home safety.
• Can be switched on/off manually like anormal on/off switch.
• Up to 70 on/off operations per week (10 programmes,
10 on, 10 off).
• Countdown or random function.
• Simple conversion to Summer Time.
Description
1
2
3
4
5
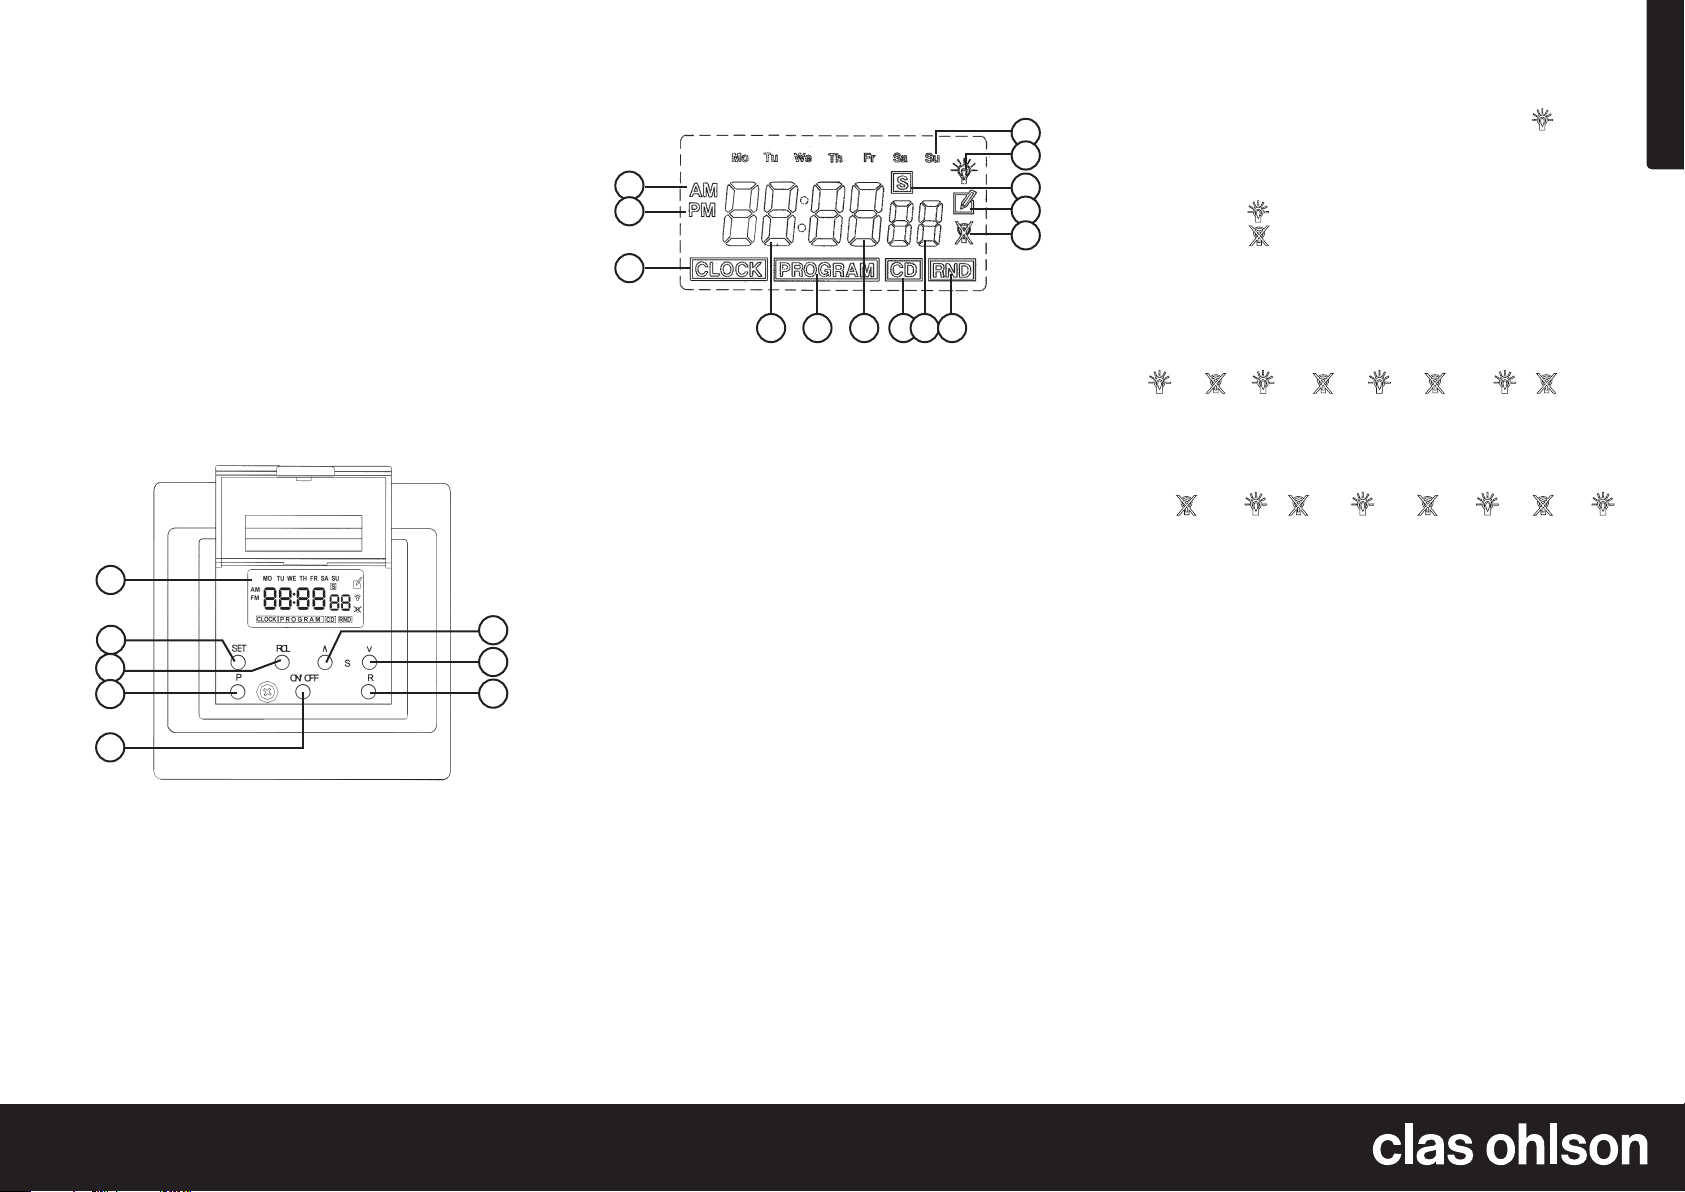
1. LCD Display - Displays time and programme setting.
2. [ SET ] - Starts and confirms programme.
3. [ RCL ] - Push and hold in to pause/continue programmes.
4. [ P ] - Select programme mode: Programme, Countdown,
Random on/off or Clock.
5. [ ON/OFF ] - On/Off
6. [ ▲ ] - Increase setting when programming.
7. [ ▼ ] - Decrease setting when programming.
8. [ R ] - (Reset) deletes all settings.
6
7
8
Symbols on theDisplay
n
m
a
b
l
k
j
c
d e f g h i
a. AM (morning, before 1200)
b. PM (afternoon, after 1200)
c. Clock
d. Hour
e. Programme
f. Minutes
g. [ CD ] Countdown
h. Seconds
i. [ RND ] Random
j. No power supply to the wall socket
k. Programme is activated
l. [ S ] Daylight Saving Time
m. Power on
n. Mo–Su Days of the week
Setting theTime and Day
1. Press [ SET ] when “CLOCK” appears in thedisplay. The days
of theweek will start to flash and thesetup can begin.
2. Select theday using theup/down arrows [ ▲ ] and [ ▼ ].
3. Press [ SET ] when thecorrect day appears on thedisplay.
4. The hour digit will now start to flash, select thecorrect hour
using theup/down arrows [ ▲ ] and [ ▼ ], press [ SET ] to save
thesetting when thecorrect hour is shown on thedisplay.
5. The minute digits will start to flash, select thecorrect minute
using theup/down arrows [ ▲ ] and [ ▼ ], press [ SET ] to
save thesetting when thecorrect time is shown on thedisplay.
Programming theTimer
1. Press [ P ] when “CLOCK” appears on thedisplay, 1
and “PROGRAM” are shown, thesymbols mean:
• The number represents theprogramme group (1–10).
• This symbol
• This symbol
• “PROGRAM” indicates that thedisplay is in programme
mode.
2. To select programme group and on/off time: Press [ ▲ ] to
advance in theprogramme groups and on/off time. Press
[ ▲ ] (first come on time) → press [ ▲ ] (first go off time) and
so on for as many programmes as are required (up to 10).
1
→ 1 , 2 → 2 ... 9 → 9 → 10 →
Press [ ▼ ] to go backwards in programme group and on/off time.
Press [ ▼ ] (10-off) → press [ ▼ ] (10-on) and so on.
10 →
3. Press [ SET ] to confirm when thesettings appear on
4. The weekly display will flash, complete thesettings by
→ 10 , 9 → 9 ......2 → 2 → 1 → 1
the display.
pressing [ ▲ ] to advance in thefollowing order:
• Mo Tu We Th Fr Sa Su
The programmes are valid from Monday to Sunday.
• Mo→ Tu→ We→ Th→ Fr→ Sa→ Su
The programmes are valid from Monday to Sunday.
• Mo Tu We Th Fr
The programmes are valid from Monday to Friday.
• Sa Su
The programmes are valid from Saturday to Sunday.
• Mo Tu We Th Fr Sa
The programmes are valid from Monday to Saturday.
• Mo We Fr
The programme is valid on Monday, Wednesday and
Friday.
• Tu Th Sa
The programme is valid on Tuesday, Thursday and
Saturday.
• Mo Tu Wed
The programmes are valid from Monday to Wednesday.
• Th Fr Sa
The programmes are valid from Thursday to Saturday.
indicates when theprogramme comes on.
indicates when theprogramme goes off.
Ver. 20131212
GREAT BRITAIN • customer service
tel: 08545 300 9799 e-mail: customerservice@clasohlson.co.uk internet: www.clasohlson.com/uk
Page 2
English
5. Use [ ▼ ] to move backwards in reverse order, press [ SET ]
to save thesettings when thecorrect day is shown.
6. The hour digit will now start to flash, select thecorrect hour
using theup/down arrows [ ▲ ] and [ ▼ ], press [ SET ] to
save thesetting when thecorrect hour is shown on thedisplay.
7. The minute digits will start to flash, select thecorrect minute
using theup/down arrows [ ▲ ] and [ ▼ ], press [ SET ] to
save thesetting when thecorrect time is shown on thedisplay.
8. Other programmes can be set or set programmes can be
changed by: repeating steps 2 to 7 described above.
Manual Function
NOTE: The symbol appears in thedisplay when thetime switch is
activated in either theon or off mode according to theprogramme:
• Press [ RCL ] and hold until thesymbol disappears, in order
to override thepre-programmed settings and control
the ON/OFF activation manually.
• Press [ RCL ] one more time in order to return to
the pre-programmed settings. The icon will reappear.
• The display automatically returns to displaying thetime
if no button is pushed within 15 seconds.
Countdown function
1. Press [ P ] when ”CLOCK” is shown on thedisplay until
the ”CD” symbol appears.
2. Press [ SET ] in order to begin programming. The hour display
begins to flash.
3. Select thecorrect hour using theup/down arrows [ ▲ ] and
[ ▼ ], press [ SET ] to save thesetting when thecorrect hour
is shown on thedisplay.
4. The minute digits will start to flash, select thecorrect minute
using theup/down arrows [ ▲ ] and [ ▼ ], press [ SET ] to save
thesettings. The countdown function can be set from 1 min.
up to 99 hrs. and 59 min.
5. The display must be in CD mode in order to start
the countdown function. Push [ ON/OFF ] in order to start.
”CD” flashes as areminder that acountdown is in progress
when thedisplay is in theCLOCK mode.
6. Press [ ON/OFF ] in order to stop acoundown (this only
works when ”CLOCK” shows on thedisplay.)
7. When thecountdown programme is active it is themain
programme. Even if there are other programme settings,
the countdown will continue for its set time and
subsequently turn off thepower.
Random function
1. Press [ P ] when ”CLOCK” is shown on thedisplay until
the ”RND” symbol appears.
2. Press [ ON/OFF ] in order to start/stop therandom function.
3. ”RND” flashes to when therandom function is active when
”CLOCK” is shown on thedisplay.
Example:
The set time is 06:00
dom function is activated, thepower will be turned on approx.
16–24 minutes after 06:00 and is turned off approx. 24–42 minutes
before 18:00.
(on) and 18:00 (off). When theran-
Other functions
Manual to/from operation
• Press once on thecover to turn on thepower.
thedisplay. If
thepre-programmed setting will dictate when thepower will
be shut off.
• Press once on thecover to turn on thepower. is shown
in thedisplay. If
that thepre-programmed setting will dictate when thepower
will be shut off.
Daylight Savings Time
• Press theup/down arrows simultaneously [ ▲ ] and [ ▼ ] in
order to transition to Daylight Savings Time when ”CLOCK”
is shown on thedisplay. The time and theprogrammed
setting are now synchronised to Daylight Savings Time.
”S” now shows on thedisplay.
• Press theup/down arrows simultaneously [ ▲ ] and [ ▼ ]
in order to transition to standard time when ”CLOCK” is
shown on thedisplay. The time and theprogrammed
setting are now synchronised to standard time.
Reset
• Press [ R ] once in order to clear all programmed settings.
12/24 hour display
• When you have changed batteries or have pressed [ R ]
the 24 H will begin to flash, change to a12 hour clock
display by pressing [ ▲ ] or press [ ▼ ] to return to a24 hour
display. Confirm by pressing [ SET ].
is also shown in thedisplay, this means that
is also shown in thedisplay, this means
is shown in
Battery change
If thedigits in thedisplay disappear when thetimer is removed
from thepower point, thebatteries need to be changed. Remove
thedisplay according to Connection point 3 below. The battery
compartment is on theback of thedisplay. Change the2 batteries
to new ones of SR69 type.
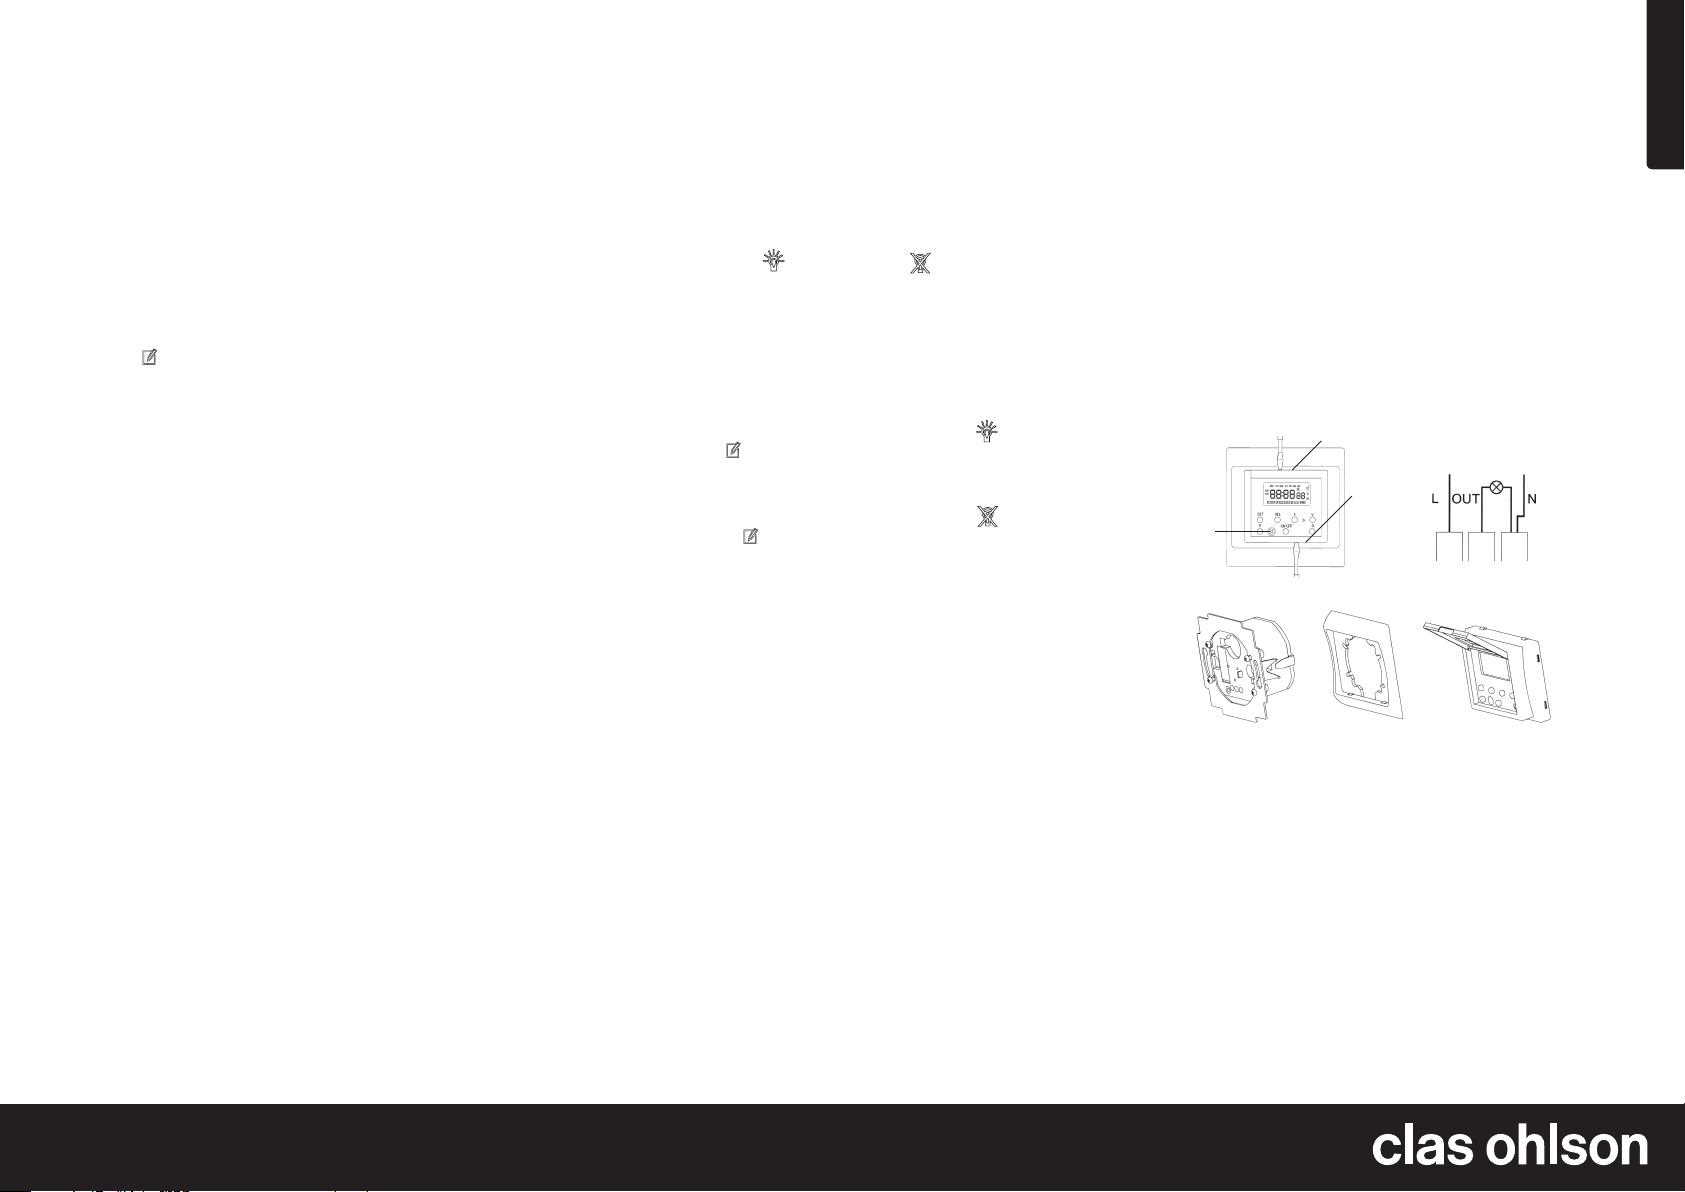
Connection
1. Programme in thedesired ON/OFF times in thetimer as
explained above.
2. Remove thefuse from thepower point. Make sure there is
no power.
3. Disassemble thetime switch: Loosen thescrew (A) and
insert ascrewdriver at (B) and carefully bend.
B
B
A
Fig. 1.
Fig. 3.
4. Connect thecables to thetime switch according to fig. 3.
5. Mount thetime switch in thesocket moulding, and tighten. (Fig 4)
6. Mount theinner cover plate (fig. 5) with thescrews.
7. Fasten theexternal cover on inner cover plate.
8. Replace thefuse and test.
Fig. 4.
Fig. 2.
Fig. 5.
Specifications
Rated Voltage 230 V AC, 50 Hz
Max load 500 W or 3.15 A (resistive)
Batteries 2×1.5 V (SR69, V371)
Ver. 20131212
GREAT BRITAIN • customer service
tel: 08545 300 9799 e-mail: customerservice@clasohlson.co.uk internet: www.clasohlson.com/uk
Page 3
Svenska
Kopplingsur
Art.nr 32-8934 Modell EF700ET
Presentation
• Ställ in till-/från- slag av anslutna elektriska apparater,
speciellt lämpligt för belysning.
• Idealiskt för automation, energibesparing och säkerhet
i hemmet.
• Kan också manövreras manuellt som en vanlig
strömbrytare.
• Upp till 70 Till-/Från- slag per vecka. (10 program, 10 On – 10 Off)
• Nedräknande eller slumpvis funktion.
• Enkel omställning till sommartid.
Beskrivning
1
2
3
4
5
1. LCD Display - visar tid och programmeringsinställning.
2. [SET] - starta och bekräfta programmering.
3. [RCL] - tryck och håll in knappen för att avsluta/fortsätta
inställda program.
4. [P] - välj programmeringsläge: Program, nedräkning,
slumpvis till-/frånslag eller klocka.
5. [ON/OFF] - Av/På
6. [▲] - Öka inställning vid programmering.
7. [▼] - Minska inställning vid programmering.
8. [R] - (Reset) radera alla inställningar.
6
7
8
Displaysymboler
n
m
a
b
l
k
j
c
d e f g h i
a. AM (tiden före klockan 12.00)
b. PM (tiden efter klockan 12.00)
c. Clock (klockan)
d. Timme
e. Programmering
f. Minut
g. [CD] Nedräkning
h. Sekund
i. [RND] Slumpvis
j. Ingen ström till uttaget
k. Programmerade inställningar aktiverade
l. [S] Sommartid
m. Ström på
n. Mo–Su Veckodag, Måndag – Söndag
Inställning av tid och veckodag
1. Tryck på [SET] när ”CLOCK” visas på displayen, veckodagarna
börjar blinka på displayen och inställningen kan börja.
2. Välj rätt veckodag med upp/ner pilarna [▲] och [▼].
3. Tryck på [SET] när rätt veckodag visas på displayen.
4. Timmarkeringen börjar blinka, välj rätt timme med upp/ner
pilarna [▲] och [▼], tryck på [SET] för att spara inställningen
när rätt timme visas på displayen.
5. Minutmarkeringen börjar blinka, välj rätt minut med upp/ner
pilarna [▲] och [▼], tryck på [SET] för att spara inställningen
när rätt tid visas på displayen.
Programinställningar
1. Tryck på [P] när ”CLOCK” visas på displayen, 1
(programgrupp och på/av) och ”PROGRAM” visas,
symbolerna betyder:
• Siffran visar programgruppens nummer (1–10).
• Ikonen
• Ikonen visar programmets frånslag (av).
• ”PROGRAM” visar att displayen är i programmeringsläge.
2. Välj programgrupp och till-/frånslag: Tryck på [▲] för att
stega framåt i programgrupperna och till-/frånslag.
Tryck [▲] (första tillslag) → tryck [▲] (första frånslag) osv. så
många programgrupper som behövs (upp till 10).
→ 1 , 2 → 2 ... 9 → 9 → 10 →
1
Tryck på [▼] för att stega bakåt i programgrupperna och
till-/frånslag
Tryck [▼] (10-av) → tryck [▼] (10-till) osv.
10 →
3. Tryck på [SET] för att bekräfta när dina inställningar visas
4. Veckodisplayen blinkar, ställ in genom att trycka på [▲] för
→ 10 , 9 → 9 ......2 → 2 → 1 → 1
på displayen.
att stega framåt i följande ordning:
• Mo Tu We Th Fr Sa Su
Programinställningen gäller måndag till söndag.
• Mo→ Tu→ We→ Th→ Fr→ Sa→ Su
Inställningen gäller måndag till söndag.
• Mo Tu We Th Fr
Programinställningen gäller måndag till fredag.
• Sa Su
Programinställningen gäller lördag till söndag.
• Mo Tu We Th Fr Sa
Programinställningen gäller måndag till lördag.
• Mo We Fr
Inställningen gäller måndag, onsdag och fredag.
• Tu Th Sa
Inställningen gäller tisdag, torsdag och lördag.
• Mo Tu Wed
Programinställningen gäller måndag till onsdag.
• Th Fr Sa
Programinställningen gäller torsdag till lördag.
visar programmets tillslag (på).
Ver. 20131212
SVERIGE • kundtjänst tel. 0247/445 00 fax 0247/445 09 e-post kundservice@clasohlson.se internet www.clasohlson.se
Page 4

Svenska
5. Använd [▼] för att stega bakåt i motsatt ordning, tryck
[SET] för att spara inställningen när rät dag visas.
6. Timmarkeringen börjar blinka, välj rätt timme med upp/ner
pilarna [▲] och [▼], tryck på [SET] för att spara inställningen
när rätt timme visas på displayen.
7. Minutmarkeringen börjar blinka, välj rätt minut med upp/ner
pilarna [▲] och [▼], tryck på [SET] för att spara inställningen
när rätt minut visas på displayen.
8. Du kan ställa in andra programgrupper eller ändra ett inställt
program genom att: upprepa punkt 2 till 7 enligt ovan.
Manuell funktion
OBS! Ikonen visas på displayen när kopplingsuret är aktivt
i av eller på -läge enligt programmering:
• Tryck på [RCL] och håll intryckt till symbolen försvinner, för
att tillfälligt stoppa de inprogrammerade inställningarna och
styra till/från -slag manuellt, ikonen försvinner.
• Tryck på [RCL] en gång till för att återgå till tidigare
programmerad inställning, ikonen visas igen.
• Displayen återgår automatiskt till visning av klockan om
ingen knapptryckning har skett på 15 sekunder.
Nedräknande funktion
1. Tryck på [P] när ”CLOCK” visas på displayen, till ”CD” visas.
2. Tryck på [SET] för att börja inställning, timmarkeringen börjar
blinka på displayen.
3. Välj rätt timme med upp/ner pilarna [▲] och [▼], tryck på
[SET] för att spara inställningen när rätt timme visas på
displayen.
4. Minut-markeringen börjar blinka, välj rätt minut med upp/
ner pilarna [▲] och [▼], tryck på [SET] för att spara
inställningen. Nedräkningen kan ställas in från 1 minut till 99
timmar 59 minuter.
5. För att starta nedräkningsprogrammet ska displayen vara i
CD-läge, tryck på [ON/OFF] för att starta. ”CD” blinkar för att
visa att nedräkningen löper när displayen är i CLOCK-läge.
6. Tryck på ON/OFF för att stänga av nedräkningen (det kan
endast göras när ”CLOCK” visas på displayen).
7. När nedräkningsprogrammet är aktiverat styr det, även om
det finns andra programmerade inställningar, nedräkningen
löper hela den inställda tiden och därefter bryts strömmen.
Slumpvis funktion
1. Tryck på [ P ] när ”CLOCK” visas på displayen, till ”RND” visas.
2. Tryck på [ ON/OFF ] för att starta/stoppa slumpvisa funktionen.
3. ”RND” blinkar för att visa att den slumpvisa funktionen är
aktiverad när ”CLOCK” visas på displayen.
Exempel:
Inställd tid är 06:00
visa funktionen är aktiverad slås strömmen på 16–24 minuter
efter 06.00 och slås av 24–42 minuter före 18.00.
(till) och 18:00 (från). När den slump-
Övriga funktioner
Manuell styrning av till/från –slag
• Tryck en gång på locket för att slå på strömmen, visas
på displayen, om också visas på displayen styr de
programmerade inställningarna nästa från -slag.
• Tryck en gång till på locket för att slå av strömmen,
visas på displayen, om också visas på displayen styr
de programmerade inställningarna nästa tillslag.
Sommartid
• Tryck samtidigt på upp/ner pilarna [▲] och [▼] för att
övergå till sommartid när ”CLOCK” visas på displayen,
klockan och de programmerade inställningarna flyttas fram
en timme, ”S” visas på displayen.
• Tryck samtidigt på upp/ner pilarna [▲] och [▼] för att återgå
till normaltid när ”CLOCK” visas på displayen, klockan och
de programmerade inställningarna flyttas fram en timme.
Återställning (Reset)
• Tryck på [R] en gång för att nollställa all programmering.
12/24 timmars visning
• När du har bytt batteri eller tryckt på [R] blinkar ”24 H”,
ändra till 12 timmars visning genom att trycka på [▲] eller
[▼] för att gå tillbaka till 24 timmars visning. Bekräfta genom
att trycka på [SET].
Batteribyte
Om siffrorna i displayen försvinner när kopplingsuret tas ur vägguttaget, behöver batterierna bytas: Lossa displaydelen enligt
Anslutning punkt 3 . På baksidan av displaydelen sitter batterifacket, byt dessa 2 batterier mot nya med SR69 beteckning.
Anslutning
1. Ställ in önskade till/från –slag på kopplingsuret enligt ovan.
2. Ta ur säkringen till väggdosan, kontrollera att det är strömlöst.
3. Dela kopplingsuret på följande sätt: Först lossa skruven (A)
och sedan sätt in en mejsel vid (B) och bänd försiktigt.
B
B
A
Fig. 1.
Fig. 3.
4. Anslut kablarna till kopplingsuret enligt Fig. 2.
5. Montera kopplingsuret i väggdosan, dra åt fästskruvarna. (Fig 3)
6. Montera täckplattan (Fig. 4) med skruvarna.
7. Fäst locket (Fig. 5) på täckplattan med skruv.
8. Sätt i säkringen och prova.
Fig. 4.
Fig. 2.
Fig. 5.
Specifikationer
Märkspänning 230 V AC, 50 Hz
Max belastning 500 W eller 3,15 A (resistiv)
Batterier 2×1,5 V (SR69, V371)
Ver. 20131212
SVERIGE • kundtjänst tel. 0247/445 00 fax 0247/445 09 e-post kundservice@clasohlson.se internet www.clasohlson.se
Page 5

Norsk
Koblingsur
Art.nr. 32-8934 Modell EF700ET
Presentasjon
• For innstilling av til- og fraslag på elektriske apparater.
Passer spesielt godt til belysning/lamper.
• Ideell for automasjon, energisparing og sikkerhet i hjemmet.
• Kan også styres manuelt som en vanlig strømbryter.
• Inntil 70 stk. til- og fraslag per uke (10 program, 10 ON–10 OFF).
• Tidsbestemt eller tilfeldig funksjon.
• Enkelt å veksle mellom sommer- og vintertid.
Beskrivelse
1
2
3
4
5
1. LCD-display - Viser tid og programmering.
2. [SET] - Starte og bekrefte programmering.
3. [RCL] - Trykk og hold knappen inne, for å avslutte/fortsette
innstilte program.
4. [P] - Velg programmeringsposisjonen: Program, nedtelling,
tilfeldig/slumpvis til- og fraslag eller klokke.
5. [ON/OFF] - På/av
6. [▲] - Øke innstilling ved programmering.
7. [▼] - Redusere innstilling ved programmering.
8. [R] - (Reset) slette alle innstillinger.
6
7
8
Displaysymboler
n
m
a
b
l
k
j
c
d e f g h i
a. AM (tiden mellom midnatt (0:00) og 12:00)
b. PM (tiden mellom 12:00 og 24:00)
c. Clock (klokken)
d. Time
e. Programmering
f. Minutt
g. [CD] Nedtelling
h. Sekund
i. [RND] Slumpvis
j. Ingen strøm i uttaket
k. Programmerte innstillinger aktiveres
l. [S] Sommertid
m. Ström på
n. Mo–Su Ukedag, Mandag – Søndag
Innstilling av tid og ukedag
1. Trykk på [SET] når ”CLOCK” vises i displayet. Ukedagene vil
begynne å blinke i displayet og innstilling kan starte.
2. Velg riktig ukedag med opp/ned tastene [▲] eller [▼].
3. Trykk på [SET] når riktig ukedag kommer opp i displayet.
4. Markeringen for timer begynner å blinke. Velg riktig time
med opp/ned pilene [▲] og [▼]. Trykk på [SET] for å lagre
innstillingen når riktig time kommer opp på displayet.
5. Markeringen begynner å blinke, velg riktig minutt med opp/
ned pilene [▲] og [▼]. Trykk på [SET] for å lagre innstillingen
når riktig tid kommer opp på displayet.
Programinnstillinger
1. Trykk på [P] når ”CLOCK” kommer opp på displayet.
1 (programgruppe og på/av) og ”PROGRAM” vises.
Symbolene betyr:
• Sifrene viser programgruppens nummer (1–10)
• Ikonet
• Ikonet viser programmets fraslag (av).
• ”PROGRAM” viser at displayet er i programmeringsposisjon.
2. Velg programgruppe og til-/fraslag: Trykk på [▲] for å gå
framover i programgruppene og til-/fraslag.
Trykk [▲] (første tilslag) → trykk [▲] (første fraslag) osv. så
mange programgrupper som trengs (opp til 10).
→ 1 , 2 → 2 ... 9 → 9 → 10 →
1
Trykk på [▲] for å gå bakover i programgruppene og til-/fraslag.
Trykk [▼] (10-av) → trykk [▼] (10-til) osv.
10 →
3. Trykk på [SET] for å bekrefte, når dine innstillinger vises
4. Ukedag blinker. Still inn ved å trykke på piltastene når du
→ 10 , 9 → 9 ......2 → 2 → 1 → 1
på displayet.
skal gå frammover. Rekkefølgen er slik:
• Mo Tu We Th Fr Sa Su
Programinnstillingen gjelder mandag til søndag
• Mo→ Tu→ We→ Th→ Fr→ Sa→ Su
Innstillingen gjelder mandag til søndag
• Mo Tu We Th Fr
Programmeringen gjelder mandag til fredag
• Sa Su
Programinnstillingen gjelder lørdag til søndag
• Mo Tu We Th Fr Sa
Programmeringen gjelder mandag til lørdag
• Mo We Fr
Innstillingen gjelder mandag, onsdag og fredag
• Tu Th Sa
Innstillingen gjelder tirsdag, torsdag og lørdag
• Mo Tu Wed
Programmeringen gjelder mandag til onsdag
• Th Fr Sa
Programmeringen gjelder torsdag til lørdag
viser programmets tilslag (på).
Ver. 20131212
NORGE • kundesenter tel. 23 21 40 00 fax 23 21 40 80 e-post kundesenter@clasohlson.no internett www.clasohlson.no
Page 6

Norsk
5. Bruk [▼] til å gå bakover i motsatt rekkefølge. Trykk [SET]
for å lagre innstillingen når riktig dag vises.
6. Markeringen for timer begynner å blinke. Velg riktig time
med opp/ned pilene [▲] og [▼]. Trykk på [SET] for å lagre
innstillingen når riktig time kommer opp på displayet.
7. Minuttmarkeringen begynner å blinke. Velg riktig minutt
med opp/ned pilene [▲] og [▼]. Trykk på [SET] for å lagre
innstillingen når riktig tid kommer opp på displayet.
8. Du kan stille inn andre programgrupper eller andre
programmer ved å: gjenta punkt 2 til 7 som beskrevet ovenfor.
Manuell funksjon
OBS! Ikonet vises på displayet når koblingsuret er aktivt
i av og på-posisjonen i henhold til programmering:
• Trykk på [RCL] og hold inne til symbolet forsvinner, for
å stoppe de programmerte innstillingene midlertidig og
styre til- og fraslagene manuelt. Ikonet forsvinner.
• Trykk på [RCL] en gang til for å gå tilbake til tidligere
programmerte innstillinger. Ikonet kommer fram igjen.
• Displayet går automatisk til vising av klokke igjen hvis man
ikke trykker på noen knapper i løpet av 15 sekunder.
Nedtellingsfunksjon
1. Trykk på [P] når ”CLOCK” vises på displayet, til ”CD” vises.
2. Trykk på [SET] for å starte innstilling, timemarkøren
begynner å blinke på displayet.
3. Velg riktig time med opp/ned pilene [▲] og [▼]. Trykk på
[SET] for å lagre innstillingen når riktig time kommer opp
på displayet.
4. Markeringen begynner å blinke, velg riktig minutt med
opp/ned pilene [▲] og [▼]. Trykk på [SET] for å lagre
innstillingen. Nedtellingen kan stilles inn fra 1 minutt til
99 timer og 59 minutter.
5. For å starte nedtellingsprogrammet skal displayet være i CDposisjon. Trykk på ON/OFF for å starte. ”CD” blinker for å vise
at nedtellingen løper når displayet er i CLOCK-posisjon.
6. Trykk på [ON/OFF] for å stenge nedtellingen (det kan kun
utføres når ”CLOCK” vises på displayet).
7. Når nedtellingsprogrammet er aktivert er det det som
styrer, selv om det er andre programmerte innstillinger.
Nedtellingen løper hele den innstilte tiden og deretter
brytes strømmen.
Slumpvis funksjonen
1. Trykk på [P] når ”CLOCK” vises på displayet, til ”RND” vises.
2. Trykk på [ON/OFF] for å starte/stoppe den tilfeldige
slumpvise funksjonen.
3. ”RND” blinker for å vise at den slumpvise funksjonen er
aktivert når ”CLOCK” vises på displayet.
Eksempel:
Innstilt tid er 06:00
funksjonen er aktivert slås strømmen på 16–24 minutter etter
06:00 og den slås av 24–42 minutter føre 18:00.
(til) og 18:00 (fra). Når den slumpvise
Øvrige funksjoner
Manuelt til-/fraslag
• Trykk en gang på lokket for å slå på strømmen. vises
på displayet. Hvis også vises på displayet, er det de
programmerte innstillingene som styrer neste fraslag.
• Trykk en gang til på lokket for å slå på strømmen. vises
på displayet. Hvis også vises på displayet, er det de
programmerte innstillingene som styrer neste tilslag.
Sommertid
• Trykk samtidig på opp/ned pilene [▲] og [▼] for å gå over
til sommertid når ”CLOCK” vises på displayet. Klokken og
de programmerte innstillingene flyttes fram en time.
”S” vises på displayet.
• Trykk samtidig på opp/ned pilene [▲] og [▼] for å gå tilbake
til normaltid (vintertid) når ”CLOCK” vises på displayet.
Klokken og de programmerte innstillingene flyttes til riktig tid.
Tilbakestilling (reset)
• Trykk på [R] (8) en gang for å slette all programmering.
12 eller 24 timers visning
• Når du har skiftet batteri eller trykket på [R] blinker ”24H”.
Du kan forandre til 12 timers visning ved å trykke på [▲]
eller [▼] for å gå tilbake til 24 timers visning. Bekreft ved
å trykke på [SET].
Skifte av batteri
Hvis tallene i displayet forsvinner når koblingsuret tas ut av
strømuttaket, trenger batteriene å skiftes ut. Løsne displaydelen
som beskrevet i pkt. 3 Tilkoblinger nedenfor. På baksiden av
displaydelen sitter batteriholderen. Skift de to batteriene med
2 stk. SR69-batterier.
Tilkobling
1. Still inn ønsket til- og fraslag på koblingsuret som
beskrevet ovenfor.
2. Ta ut sikringen til vegguttaket og kontroller at det er strømløst.
3. Del koblingsuret ved å: løsne skruen (A) og sett inn et
skrujern ved (B) og bend forsiktig.
B
B
A
Fig. 1.
Fig. 3.
4. Koble kablene til koblingsuret i henhold til fig. 2.
5. Monter koblingsuret i vegguttaket. Dra til festeskruene. (Fig. 3)
6. Monter dekkplaten (fig. 4) med skruene.
7. Fest lokket (fig. 5) på dekkplaten med en skrue.
8. Sett inn sikringen igjen og prøv.
Fig. 4.
Fig. 2.
Fig. 5.
Spesifikasjoner
Spenning 230 V AC, 50 Hz
Maks. belastning 500 W eller 3,15 A (resistiv)
Batterier 2 stk. 1,5V (SR69, V371)
Ver. 20131212
NORGE • kundesenter tel. 23 21 40 00 fax 23 21 40 80 e-post kundesenter@clasohlson.no internett www.clasohlson.no
Page 7

Suomi
Kellokytkin
Tuotenro 32-8934 Malli EF700ET
Tuotteen esittely
• Kytkee ohjelmoinnin mukaisesti sähkölaitteet päälle/pois.
Soveltuu erityisesti valaisimille.
• Automaatiota, energiatehokkuutta ja turvallisuutta kotonasi.
• Voidaan käyttää myös tavallisena manuaalisena katkaisijana.
• Jopa 70 päälle-/poiskytkentää viikossa (10 ohjelmaa,
10 päälle-/poiskytkentää).
• Lähtölaskenta- ja satunnaistoiminnot.
• Helppo kesäajan asetus.
Kuvaus
1
2
3
4
5
1. Nestekidenäyttö - Näyttää ajan ja ohjelman tilan.
2. [SET] - Aloita ja tallenna ohjelmointi.
3. [RCL] - Lopeta/jatka ohjelmoitua toimintaa pitämällä
painiketta pohjassa.
4. [P] - Valitse ohjelmointitila: Ohjelmointi, lähtö-laskenta,
satunnainen kytkentä tai kello.
5. [ON/OFF] - Päälle/pois päältä.
6. [▲] - Korota arvoa ohjelmoinnin aikana.
7. [▼] - Alenna arvoa ohjelmoinnin aikana.
8. [R] - Tehdasasetusten palautus (Reset).
6
7
8
Näytön merkinnät
m
a
b
c
d e f g h i
a. AM (aamutunnit ennen klo 12:00)
b. PM (iltatunnit klo 12:00 jälkeen)
c. Kello
d. Tunnit
e. Ohjelmointi
f. Minuutit
g. [CD] Lähtölaskenta
h. Sekunnit
i. [RND] Satunnainen kytkentä
j. Virtakytkin pois päältä, laitteille ei syötetä virtaa
k. Ohjelmointi kytketty toimintaan
l. [S] Kesäaika
m. Virta päällä
n. Mo–Su Viikonpäivät, maanantai - sunnuntai
Kellonajan ja viikonpäivän asetus
1. Paina [SET] kellotilassa (kun näytöllä näkyy ”CLOCK”).
Viikonpäivät alkavat vilkkua näytöllä ja voit aloittaa asetuksen.
2. Valitse oikea viikonpäivä nuolinäppäimillä [▲] ja [▼].
3. Vahvista viikonpäivän valinta painamalla [SET].
4. Tuntimäärä alkaa vilkkua. Säädä tunnit oikeaksi
nuolinäppäimillä [▲] ja [▼]. Vahvista painamalla [SET].
5. Minuuttimäärä alkaa vilkkua. Säädä minuutit oikeaksi
nuolinäppäimillä [▲] ja [▼]. Vahvista painamalla [SET].
Ohjelmointi
n
l
k
j
1. Paina [P] kellotilassa (kun näytöllä näkyy ”CLOCK”). Näytölle
ilmestyy 1 (ohjelmaryhmä päälle/pois) ja ”PROGRAM”.
Merkinnät tarkoittavat seuraavaa:
• Numero on ohjelmaryhmän numero (1–10).
• Kuvake
• Kuvake
• ”PROGRAM” tarkoittaa, että laite on ohjelmointitilassa.
2. Valitse ohjelmaryhmä ja päälle- tai poiskytkennän asetus:
Selaa ohjelmia ja asetuksia eteenpäin nuolinäppäimellä
[▲]. Ensimmäinen [▲] (1. päällekytkentä) → toinen [▲]
(1. poiskytkentä) jne. niin monelle ohjelmalle kuin tarvitset
(enint. 10 ohjelmaa).
1
→ 1 , 2 → 2 ... 9 → 9 → 10 →
Selaa ohjelmia ja asetuksia taaksepäin nuolinäppäimellä [▼].
Ensimmäinen [ ▼ ] (10. poiskytkentä) → toinen [▼] (10. pääl-
lekytkentä) jne.
10 →
3. Vahvista valinta aina painamalla [SET].
4. Viikonpäivien kuvakkeet vilkkuvat. Valitse haluamasi asetus
→ 10 , 9 → 9 ......2 → 2 → 1 → 1
askeltamalla eteenpäin nuolinäppäimellä [▲]. Asetus vaihtuu
seuraavasti:
• Mo Tu We Th Fr Sa Su
Ohjelma voimassa joka päivä (ma-su).
• Mo→ Tu→ We→ Th→ Fr→ Sa→ Su
Ohjelma voimassa joka päivä (ma-su).
• Mo Tu We Th Fr
Ohjelma voimassa joka arkipäivä (ma-pe).
• Sa Su
Ohjelma voimassa viikonloppuisin (la-su).
• Mo Tu We Th Fr Sa
Ohjelma voimassa maanantaista lauantaihin (ma-la).
• Mo We Fr
Ohjelma voimassa maanantaisin, keskiviikkoisin ja
perjantaisin (ma, ke, pe).
• Tu Th Sa
Ohjelma voimassa tiistaisin, torstaisin ja lauantaisin.
• Mo Tu Wed
Ohjelma voimassa maanantaista keskiviikkoon (ma-ke)
• Th Fr Sa
Ohjelma voimassa torstaista lauantaihin (to-la)
tarkoittaa ohjelmoinnin päällekytkentää.
tarkoittaa ohjelmoinnin poiskytkentää.
Ver. 20131212
SUOMI • asiakaspalvelu puh. 020 111 2222 sähköposti asiakaspalvelu@clasohlson.fi kotisivu www.clasohlson.fi
Page 8

Suomi
5. Selaa käänteisessä järjestyksessä nuolinäppäimellä [▼].
Tallenna haluamasi asetus painamalla [SET].
6. Tuntimäärä alkaa vilkkua. Säädä tunnit oikeaksi
nuolinäppäimillä [▲] ja [▼]. Vahvista painamalla [SET].
7. Minuuttimäärä alkaa vilkkua. Säädä minuutit oikeaksi
nuolinäppäimillä [▲] ja [▼]. Vahvista painamalla [SET].
8. Voit asettaa lisää ohjelmaryhmiä tai muuttaa asetuksia
toistamalla kohdat 2 – 7.
Manuaalinen toiminta
Huom.! Kuvake näkyy näytöllä kun kellokytkimen katkaisija
on ohjelmoinnin mukaisesti päällä tai pois päältä.
• Pidä [RCL]-painiketta pohjassa kunnes kuvake katoaa.
Ohjelmointi on tilapäisesti pois käytöstä. Katkaisijaa voi nyt
ohjata manuaalisesti.
• Palaa takaisin ohjelmoinnin mukaiseen toimintaan pitämällä
[RCL]-painiketta pohjassa kunnes kuvake palaa näyttöön.
• Näyttö palaa automaattisesti ohjelmointi-/asetustilasta
kellotilaan jos mitään painiketta ei paineta 15 sekunnin
kuluessa edellisestä painalluksesta.
Lähtölaskenta
1. Paina [P] kellotilassa (kun näytöllä näkyy ”CLOCK”) kunnes
näytölle ilmestyy ”CD”.
2. Aloita asetus painamalla [SET]. Tunnit alkavat vilkkua
näytöllä.
3. Säädä tunnit oikeaksi nuolinäppäimillä [▲] ja [▼].
Vahvista painamalla [SET].
4. Minuuttimäärä alkaa vilkkua. Säädä minuutit oikeaksi
nuolinäppäimillä [▲] ja [▼]. Vahvista painamalla [SET].
Lähtölaskenta-ajaksi voidaan säätää mitä tahansa
1 minuutin ja 99 h 59 min väliltä.
5. Aloita lähtölaskenta [ON/OFF]-painikkeella kellokytkimen
ollessa CD-tilassa. Kellotilassa ”CD”-kuvake vilkkuu merkiksi
siitä, että lähtölaskenta on käynnissä.
6. Sammuta laskenta [ON/OFF]-painikkeella (vain kellotilassa,
kun näytöllä näkyy ”CLOCK”).
7. Laskenta ohittaa kaikki muut asetukset. Virta katkaistaan
laskurin päästessä asetetun ajan loppuun.
Satunnaistoiminto
1. Paina [P] kellotilassa (kun näytöllä näkyy ”CLOCK”)
kunnes näytölle ilmestyy ”RND”.
2. Käynnistä satunnaistoiminta ON/OFF-painikkeella.
3. Kellotilassa ”RND”-kuvake vilkkuu merkiksi siitä, että
satunnaistoiminta on käynnissä.
Esimerkki:
Kytkimeen on ohjelmoitu päällekytkentä klo 06:00
klo 18:00
06:00 jälkeen ja sammuttaa virran 24–42 minuuttia ennen klo 18:00.
. Satunnaistoiminto kytkee virran 16–24 minuuttia klo
ja poiskytkentä
Muut toiminnot
Manuaalinen kytkentä
• Paina kantta kerran kytkeäksesi virran päälle. ilmestyy
näytölle. Jos myös kuvake näkyy, ohjaa ohjelmointi
seuraavan poiskytkennän.
• Paina kantta toisen kerran kytkeäksesi virran pois.
ilmestyy näytölle. Jos myös kuvake näkyy, ohjaa
ohjelmointi seuraavan päällekytkennän.
Kesäaika
• Kello ja kaikki ohjelmoinnit siirtyvät tunnilla eteenpäin, kun
painat molempia nuolinäppäimiä [▲] ja [▼] yhtä aikaa
kellotilassa (näytöllä näkyy ”CLOCK”). ”S” ilmestyy näytölle
kesäajan merkiksi.
• Kello ja kaikki ohjelmoinnit siirtyvät takaisin talviaikaan,
kun painat molempia nuolinäppäimiä [▲] ja [▼] yhtä aikaa
kellotilassa (näytöllä näkyy ”CLOCK”).
Tehdasasetusten palautus (reset)
• Nollaa kaikki ohjelmoinnit painamalla [R]-painiketta kerran.
Näyttötavan valinta, 12 tai 24 tuntia
• Paristonvaihdon ja tehdasasetusten palauttamisen jälkeen
ruudulla vilkkuu ”24 H”. Muuta 12 tunnin näyttötapaan
painamalla nuolinäppäintä [▲] tai palaa takaisin 24 tunnin
näyttötapaan painamalla [▼]. Tallenna asetus painamalla [SET].
Pariston vaihto
Paristot tulee vaihtaa, kun näytön numerot katoavat irrottaessasi kellokytkimen seinäpistorasiasta. Irrota näyttöosa (ks.
Liittäminen, kohta 3 alla). Paristolokero on näyttöosan takana.
Vaihda molemmat paristot uusiin SR69-paristoihin.
Liittäminen
1. Säädä halutut ohjelmoinnit ohjeiden mukaisesti.
2. Irrota seinäpistorasian sulake, varmista ettei rasiaan tule
sähköä.
3. Avaa kellokytkin seuraavasti: irrota ruuvi (A), aseta ruuvitaltta
kohtaan (B) ja taivuta varovasti.
B
B
A
Kuva 1.
Kuva 3.
4. Liitä kaapelit kuvan 2 mukaisesti.
5. Asenna kellokytkin pistorasiaan, kiristä kiinnitysruuvit. (Kuva 3).
6. Kiinnitä peitelevy (kuva 4) ruuveilla.
7. Kiinnitä kansi (kuva 5) peitelevyyn ruuveilla.
8. Aseta sulake paikalleen ja testaa.
Kuva 4.
Kuva 2.
Kuva 5.
Tekniset tiedot
Nimellisjännite 230 V/AC, 50 Hz
Suurin sallittu kuorma 500 W tai 3,15 A (resistiivinen)
Paristot 2×1,5 V (SR69, V371)
Ver. 20131212
SUOMI • asiakaspalvelu puh. 020 111 2222 sähköposti asiakaspalvelu@clasohlson.fi kotisivu www.clasohlson.fi
Page 9

Deutsch
Zeitschaltuhr
Art.Nr. 32-8934 Modell EF700ET
Funktion
• Die Uhr dient zum Ein-/Ausschalten angeschlossener elektrischer
Geräte, insbesondere Leuchten.
• Ideal zur Automatisierung, Energieeinsparung und für mehr
Sicherheit im eigenen Heim.
• Kann auch als gewöhnlicher Schalter benutzt werden.
• Bis zu 70 Ein-/Ausschaltungen pro Woche. (10 Programme,
10 EIN – 10 AUS)
• Countdown- oder Zufallsfunktion
• Einfache Umstellung auf Sommerzeit
Beschreibung
1
2
3
4
5
1. LCD-Display zur Anzeige von Uhrzeit und Programmierung.
2. [ SET ] Taste zum Starten und Bestätigen bei Programmierung.
3. [ RCL ] Taste zum Drücken und gedrückt Halten, um eingestellte
Programme zu beenden/fortzufahren.
4. [ P ] – Auswahl des Programmiermodus: Programm, Countdown,
zufälliges Ein-/Ausschalten oder Uhr
5. [ ON/OFF ] - Ein/Aus
6. [ ▲ ] – Wert bei Programmierung erhöhen
7. [ ▼ ] – Wert bei Programmierung senken
8. [ R ] – (Reset) Taste zum Löschen aller Einstellungen
6
7
8
Displaysymbole
n
m
a
b
l
k
j
c
d e f g h i
a. AM (Zeitraum von 00.00 Uhr bis 12.00 Uhr mittags)
b. PM (Zeitraum von 12.00 Uhr mittags bis 00.00 Uhr)
c. Clock (Uhr)
d. Stunde
e. Programmierung
f. Minute
g. [ CD ] Countdown
h. Sekunde
i. [ RND ] Zufallsfunktion
j. Steckdose ohne Spannung
k. Programmierte Einstellungen aktiviert
l. [ S ] Sommerzeit
m. Strom eingeschaltet
n. Mo–Su Wochentage, Montag–Sonntag
Einstellung von Zeit und Wochentag
1. Wenn „CLOCK“ im Display erscheint, [ SET ] betätigen.
Die Wochentage blinken und dieEinstellung kann erfolgen.
2. Mit den Aufwärts-/Abwärtspfeilen [ ▲ ] und [ ▼ ] den richtigen
Wochentag einstellen.
3. [ SET ] betätigen, wenn derrichtige Wochentag erscheint.
4. Wenn dieStundenanzeige blinkt, richtige Stunde mit Aufwärts-/
Abwärtspfeilen [ ▲ ] und [ ▼ ] einstellen und zum Speichern [ SET ]
betätigen.
5. Wenn dieMinutenanzeige blinkt, richtige Minute mit Aufwärts-/
Abwärtspfeilen [ ▲ ] und [ ▼ ] einstellen und zum Speichern [ SET ]
betätigen.
Programmeinstellungen
1. Wenn „CLOCK“ im Display angezeigt wird, [ P ] betätigen. 1
(Programmgruppe und ein/aus) und „PROGRAM“ werden nun
angezeigt. Bedeutung dieser Symbole:
• Die Ziffer steht für dieNummer derProgrammgruppe (1–10).
• Das Symbol
• Das Symbol
• „PROGRAM“ zeigt an, dass sich dasDisplay im Programmier-
modus befindet.
2. Programmgruppe wählen und ein-/ausschalten: Auf [ ▲ ] drücken,
um in den Programmgruppen und beim Ein-/Ausschalten vorwärts
zu „blättern“. [ ▲ ] (erstes Einschalten) → und danach [ ▲ ] (erstes
Ausschalten) betätigen usw., je nach benötigten Programmgruppen
(bis zu 10).
1
→ 1 , 2 → 2 ... 9 → 9 → 10 →
Auf [ ▼ ] drücken, um in den Programmgruppen und beim Ein-/
Ausschalten rückwärts zu „blättern“.
[ ▼ ] betätigen (10 AUS) → und danach [ ▼ ] (10 EIN) usw.
10 →
3. [ SET ] betätigen, um dieangezeigten Einstellungen zu bestätigen.
4. Wenn dieWochenanzeige blinkt, lässt sich durch Betätigen von
• Mo Tu We Th Fr Sa Su
• Mo→ Tu→ We→ Th→ Fr→ Sa→ Su
• Mo Tu We Th Fr
• Sa Su
• Mo Tu We Th Fr Sa
• Mo We Fr
• Tu Th Sa
• Mo Tu Wed
• Th Fr Sa
→ 10 , 9 → 9 ......2 → 2 → 1 → 1
[ ▲ ] in folgender Reihenfolge vorwärts „blättern“:
Die Programmeinstellung gilt von Montag bis Sonntag.
Die Einstellung gilt von Montag bis Sonntag.
Die Programmeinstellung gilt von Montag bis Freitag.
Die Programmeinstellung gilt von Samstag bis Sonntag.
Die Programmeinstellung gilt von Montag bis Samstag.
Die Einstellung gilt für Montag, Mittwoch und Freitag.
Die Einstellung gilt für Dienstag, Donnerstag und Samstag.
Die Programmeinstellung gilt von Montag bis Mittwoch.
Die Programmeinstellung gilt von Donnerstag bis Samstag.
zeigt, ob dasProgramm eingeschaltet ist (EIN).
zeigt, ob dasProgramm ausgeschaltet ist (AUS).
Ver. 20131212
DEUTSCHLAND • Kundenservice
Unsere Homepage www.clasohlson.de besuchen und auf Kundenservice klicken.
Page 10

Deutsch
5. Mit [ ▼ ] wird rückwärts geblättert und mit [ SET ] dieim Display
gezeigte Einstellung gespeichert.
6. Wenn dieStundenanzeige blinkt, richtige Stunde mit Aufwärts-/
Abwärtspfeilen [ ▲ ] und [ ▼ ] einstellen und zum Speichern [ SET ]
betätigen.
7. Wenn dieMinutenanzeige blinkt, richtigen Wert mit Aufwärts-/
Abwärtspfeilen [ ▲ ] und [ ▼ ] einstellen und zum Speichern [ SET ]
betätigen.
8. Durch Wiederholung dero. a. Punkte 2 bis 7 können weitere
Programmgruppen eingestellt oder eine bestehende
Programmierung geändert werden.
Manuelle Funktion
Achtung: Das Symbol zeigt an, ob derProgrammiermodus ein-
oder ausgeschaltet ist.
• Taste [ RCL ] gedrückt halten, bis dasSymbol verschwindet, um
dieprogrammierten Einstellungen zu stoppen und dasEin-/Ausschalten
manuell zu regeln. Das Symbol verschwindet.
• [ RCL ] 1 x drücken, um zur früheren Einstellung zurückzukehren.
Das Symbol erscheint wieder.
• Wenn 15 Sekunden lang keine Taste berührt wurde, wird
automatisch zur Zeitanzeige zurückgekehrt.
Countdown-Funktion
1. Erscheint „CLOCK“ im Display, [ P ] betätigen, bis „CD“ angezeigt wird.
2. [ SET ] betätigen, um mit derEinstellung zu beginnen.
Die Stunden müssen im Display blinken.
3. Die richtige Stunde mit Aufwärts-/Abwärtspfeilen [ ▲ ] und [ ▼ ]
einstellen und zum Speichern [ SET ] betätigen.
4. Wenn dieMinutenanzeige blinkt, den richtigen Wert mit Aufwärts-/
Abwärtspfeilen [ ▲ ] und [ ▼ ] einstellen und zum Speichern [ SET ]
betätigen. Der Countdown kann von
1 Minute bis zu 99 Stunden und 59 Minuten eingestellt werden.
5. Um dasCountdown-Programm zu starten, muss sich dasDisplay
im CD-Modus befinden. Zum Starten [ ON/OFF ] betätigen. „CD“
blinkt. Damit wird angezeigt, dass derCountdown (im CLOCKModus) läuft.
6. Zum Abstellen ON/OFF betätigen. Das kann auch erfolgen, wenn
„CLOCK“ im Display angezeigt wird.
7. Bei eingeschaltetem Countdown übersteuert dieser ggf. andere
programmierte Einstellungen. Der Countdown läuft während
dervorgegebenen Zeit, danach wird derStrom unterbrochen.
Zufallsfunktion
1. Wenn „CLOCK“ im Display angezeigt wird, auf [ P ] drücken, bis
„RND“ angezeigt wird.
2. Zum Starten und Stoppen derZufallsfunktion [ ON/OFF ] betätigen.
3. Bei eingeschalteter Zufallsfunktion blinkt „RND“ und „CLOCK“ wird
angezeigt.
Beispiel:
Zeit auf 06.00
Bei eingeschalteter Zufallsfunktion wird derStrom 16 bis 24 Minuten
(nach 6.00 Uhr) eingeschaltet und 24 bis 42 Minuten (vor 18.00 Uhr)
abgeschaltet.
(Einschalten) und 18.00 (Ausschalten) einstellen.
Sonstige Funktionen
Manuelles Ein-/Ausschalten
• Zum Einschalten des Stroms 1 x auf den Deckel drücken.
erscheint im Display. Wird zusätzlich angezeigt, erfolgt
dasnächste Abschalten gemäß derprogrammierten Einstellungen.
• Zum Abschalten des Stroms 1 x auf den Deckel drücken.
erscheint im Display. Wird zusätzlich angezeigt, erfolgt
dasnächste Einschalten gemäß derprogrammierten Einstellungen.
Sommerzeit
• Zum Umstellen (im „CLOCK“-Modus) gleichzeitig dieAufwärts-/
Abwärtstasten [ ▲ ] und [ ▼ ] betätigen. Uhrzeit und programmierte
Einstellungen werden eine Stunde vorgestellt und im Display
erscheint „S“.
• Zum Umstellen (im „CLOCK“-Modus) gleichzeitig dieAufwärts/Abwärtstasten [ ▲ ] und [ ▼ ] betätigen. Uhrzeit und programmierte
Einstellungen werden eine Stunde zurückgestellt.
Zurücksetzen (Reset)
• Zum Zurücksetzen programmierter Werte 1 x [ R ] betätigen.
12- und 24-Stundenformat
• Nach dem Batteriewechsel bzw. Betätigen derTaste [ R ] blinkt
„24 H“. Mit derTaste [ ▲ ] kann das12-Stundenformat und mit
derTaste [ ▼ ] wieder das24-Stundenformat eingestellt werden. Mit
[ SET ] bestätigen.
Batteriewechsel
Erlöschen dieZiffern, wenn dieZeitschaltuhr aus derSteckdose genommen wird, müssen dieBatterien getauscht werden. Die Displayseite
(s. Punkt 3 Anschlüsse herstellen) lösen. Auf derRückseite des Displays
befindet sich dasBatteriefach. Beide Batterien gegen
2 neue austauschen (SR69).
Anschlüsse herstellen
1. Die gewünschte Ein-/Ausschaltzeit wie oben beschrieben einstellen.
2. Sicherung für dieWandsteckdose herausnehmen bzw. abschalten
und sicherstellen, dass kein Strom fließt.
3. Die Zeitschaltuhr wie folgt auseinanderbauen: Erst dieSchraube
(A) lösen und dann einen Schraubenzieher bei (B) ansetzen und
vorsichtig hebeln.
B
B
A
Abb. 1.
Abb. 3.
1. Kabel gemäß Abb. 2 anschließen.
2. Zeitschaltuhr in dieWandsteckdose stecken und Schrauben wieder
festziehen. (Abb. 3).
3. Abdeckplatte (Abb. 4) mit den Schrauben befestigen.
4. Deckel (Abb. 5) derAbdeckplatte mit Schrauben befestigen.
5. Sicherung einsetzen und testen.
Abb. 4.
Abb. 2.
Abb. 5.
Technische Daten
Nennspannung 230 V AC, 50 Hz
Max. Last 500 W oder 3,15 A (Widerstandslast)
Batterien 2×1,5 V (SR69, V371)
Ver. 20131212
DEUTSCHLAND • Kundenservice
Unsere Homepage www.clasohlson.de besuchen und auf Kundenservice klicken.
 Loading...