


Multi Touch Screen/ Interactive Flat
Panel Display
User Manual
TL18.201401202
Please kinly keep this manual for future inquiries.
This manual is used as the LCD all in one tpuch TV manual, the actual product may be slightly different with description.

2
Content
Matters Needing Attention
.................................................................................................................
3
Installing Requirement
........................................................................................................................
5
Carrying capacity
.........................................................................................................................
5
Abstract heat
...............................................................................................................................
5
Summary
.............................................................................................................................................
6
Characteristics
.............................................................................................................................
6
Basic Operation
...................................................................................................................................
7
Turn on
........................................................................................................................................
7
Turn off
........................................................................................................................................
7
Introduction of OSD
..............................................................................................................................
8
How To Choose Analog Channel ..................................................................................................
8
How To Choose Application
........................................................................................................
8
Introduction Of “Set ....................................................................................................................
9
How To Use TV
...................................................................................................................................
12
Network Setting
........................................................................................................................
13
Wired Network Setup
...............................................................................................................
13
Wireless Network Setup
.........................................................................................................
14
Network Status Lookup
.............................................................................................................
15
Remote Control
.................................................................................................................................
16
Control Panel
.....................................................................................................................................
18
Switchover Among Three Signals
......................................................................................................
20
Full Touch
...........................................................................................................................................
21
Specification Of PC Mode(VGA Input).........................................................................................22
Supporting Format Of USB
................................................................................................................
22
Maintaining Guide
.............................................................................................................................
23
FCC
.................................................................................................................................................
23

3
Safety Considerations
warning
Do not place containers with liquid on or near this product.
Use only dry cloth to clean.
Do not block any ventilation holes.
Install this product according to manufacturer’s User Manual.
A distance of at least 16cm must be kept from this product and other objects and/or walls.
Do not install this product near heat sources.
This product must be connected to a power point which is appropriately earthed.
Use the earthed power plug supplied by with this product.
Keep the power cord tangle free.
Use a properly functioning power point at all times.
Disconnect the power plug during storm or if you intend not to use for a long period of time.
The device is a heavy product and when moving use appropriate equipment to avoid injury.
Use qualified technicians to mount the device on the wall and/or mobile trolley. Abide by
manufacturers’ mounting instructions.
Use only qualified technicians for all repairs.
Antenna must be kept away from power cord.
The external antenna must be connected to earth to prevent potential damage caused by
voltage surge or ESD(Electro Static Discharge)
Follow instructions when inserting batteries into the remote control unit. Discard all
batteries appropriately.
Do not use mixed batteries (old and new, carbon-zinc and alkaline).

4
Installing Requirement
Carrying capacity
Better use the wall mount brackets supplied together with the product, if not, please
make sure the carrying capacity is not less than 4 times the actual load weight and make sure
the machine can be placed on it stably.
Be sure the mounting surface is not less than 4 times the actual load weight. If the
mounting surface is the building wall or roof, the surface must be solid brick, concrete or
something have equivalent strength. If the mounting surface is loose material (such as brick
wall on old houses, wood etc.) ,metal, non-metal structure, or the decoration layer is too
thick on surface, which strength is obviously insufficient, please take corresponding
measures to strengthen , support it , eliminate security risks exists.
Abstract heat
Requirement
Distancebetween the machine and mounting surface(cm)
Standard Power
Leftside&rightside
Topside
Bottom
Backside
Over 100W
102020
10
Note: If the machine inlay in the wall, or in the box, in addition to meet the above requirements,
the vent area of the bottom, side, top required not less than 50% of the sealing area, keep the air
circulation.
Graphic
:

5
*Ref to the standard of CAS 132-2006
Summary
The interactive tablet is the interactive products based on independent R&D, and a multi-functional
teaching equipment set the interactive teaching, multimedia presentation, digital speech, touch
operation, handwriting input as a whole. From design to production, we give full consideration to the
application characteristics of the field of education. Convenient operation, full digital intelligent
control, we can use fingers or non-transparent objects on the screen to write, modify or delete ,which
is an perfect tool for the modern education.
Characteristics :
Tailored for teaching and meeting system.
High brightness, high contrast screen, clear view under bright sunlight or indoor and
outdoor environment .
When we need in low brightness display mode , press on key can enter the power saving
mode, which reduce the backlight brightness to save energy and protect the
environmental .
Using the advanced infrared array scanning induction technology , HID free drive, we
can use the machine once connect.
The graphics processing of the software are all based on vector graphics, which has the

6
characteristics of high compression, distortion etc..
variety of selection on pen type,line width,color .
Powerful screen editing function, support real-time editing.
A variety of background selection, support user-defined background, has the image
insertion function for any graphics or picture , .
Intelligent identification function of geometric graphics, has various kinds of graphics
identification, high recognition rate, and can identify several pen at same time .
Simulation function of brush cause the font looks vigorous .
Support to save the file we wrote as the PDF, JPEG, GIF, PNG, TIFF, BMP and other
formats.
Simulated operation of mouse.
Supports dual touch, multi finger touch.
User management module realizes the function of adding or delete user, switching user,
customizing the user information and etc, which drives the software setting much
match to a user's habits
Support for other application software.
Support the identification on English, numbers, special characters .
Basic Operation
Turn on
Use 100~240V 50/60Hz alternating current as the power supply of the machine。
Open the baot-shape swith in the middle of the bottm on the machine (near the
power interface side) to connect power supply. (the status on indicator window is
red light)
We can press the "power" button on the machine panel or the "standby" button
on the remote control to tunrn on the machine (the status on indicator window is
green light), if the built-in OPS does not start-up, press the "SET" button on the
machine panel to open the computer power supply (this function just support all
in on touch model).
Turn off
If you want to turn off machine temporarily , please press the “power” button.
We can shut down the computer by press "SET" button on the panel under the
stauts of the ops computer working . (this function just support all in on touch
model)
If you want to shut down the machine completely, please press the baot-shape

7
swith in the middle of the bottm on the machine (near the power interface side)
or unplug the power plug.
If the machine has built-in PC, please shut down PC first, and then cut off the
power.
Turn on the machine by the power switch, we can see Android characters shows on
the right bottom of screen display , which means the Android system is starting
and please do not cut off the power supply at this time, only can we cut off the
power supply after the Android system finish booting loading.
Introduction of OSD
Operation Of OSD How To Choose Analog Channel
1.Three ways as follows to choose the channel:
1.1 Press “Source” to choose
1.2 Press “▲(Source)”as follows to choose
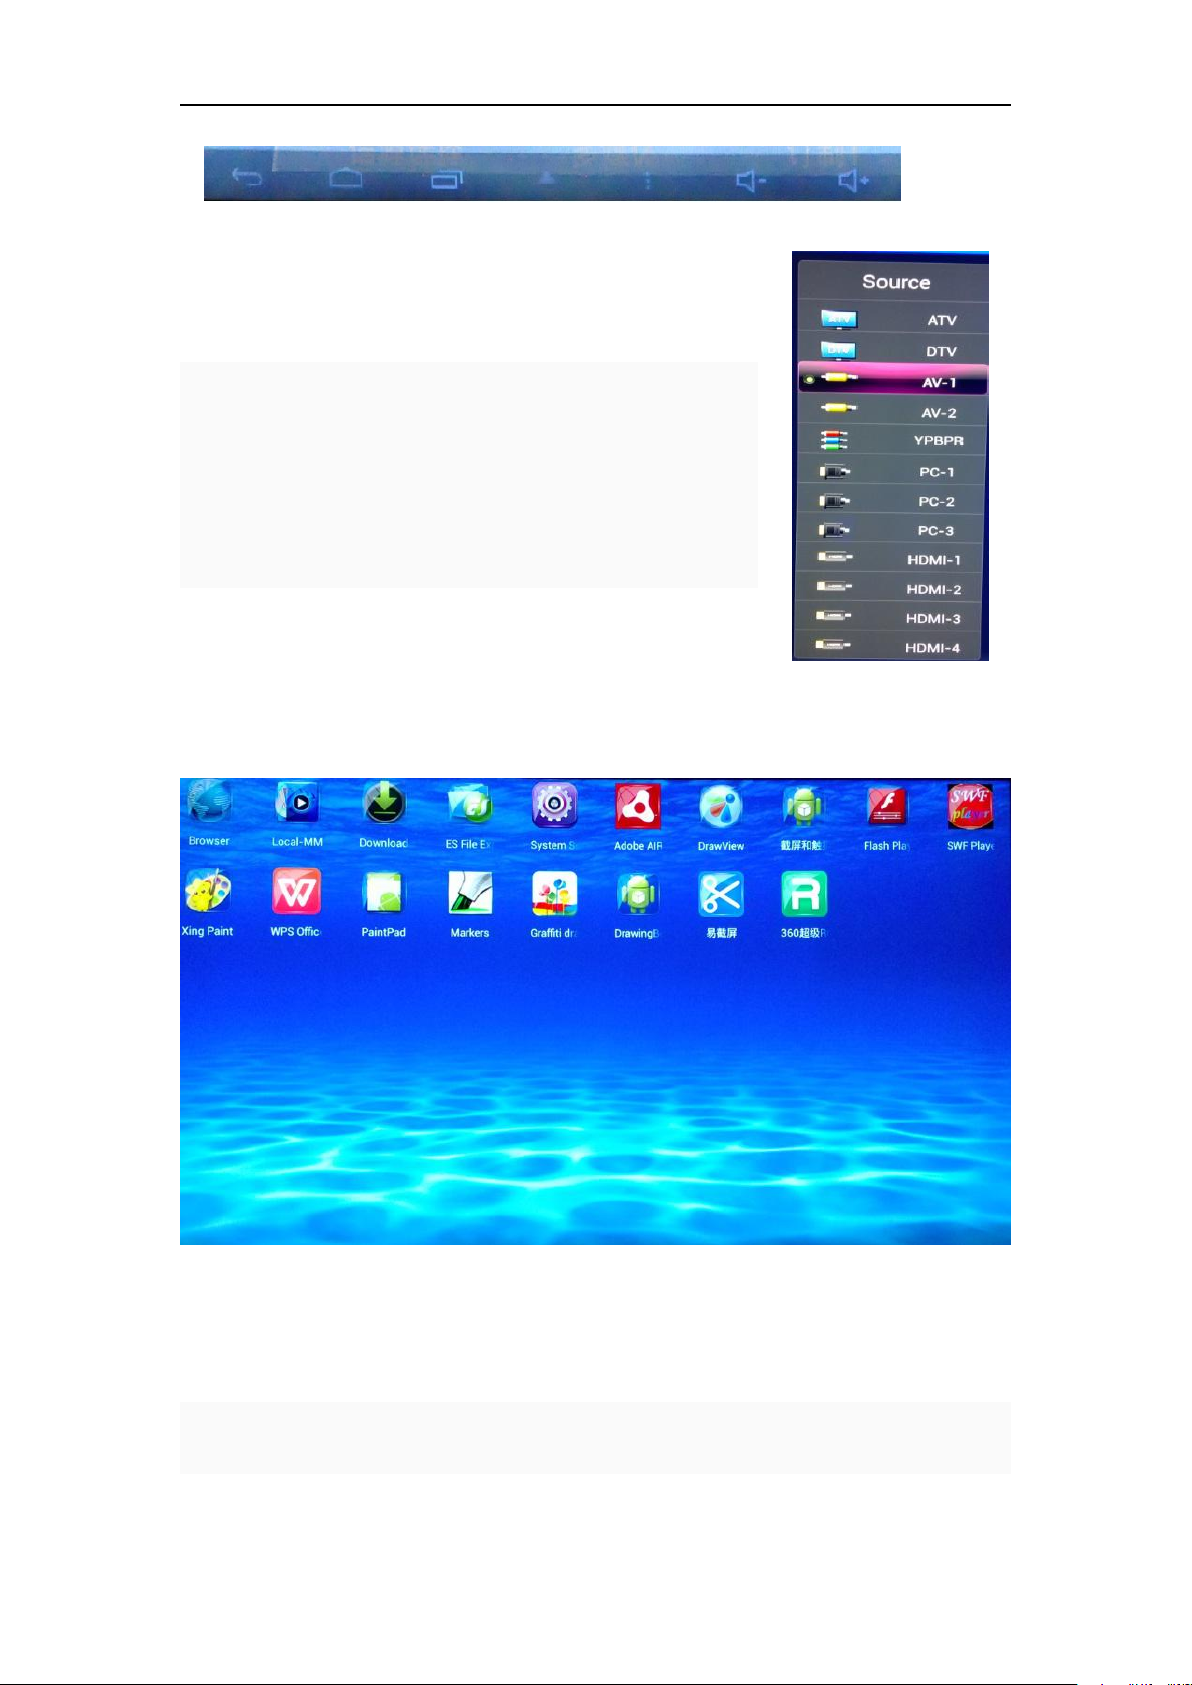
8
1.3 Press “Source”on the front panel or remote control to choose.
2. It will showed as follows after choosing the “Source”
3. When “Source”showed as above, there are three ways to enter
it
:
3.1 Directly click.
3.2 Select "source" and then automatically enter it.
3.3 Press “▲▼”to select the signal channel wanted and then press
"OK" to confirm.
4. Also can enter it by the Full Touch Menu. Please refer to the details
at the introduction of Full Touch Menu.
How To Choose Application
1.1 Press any applications as follows to choose:
Introduction Of “Set”
1. Menu of the image setting will show up through the following three ways:
1.1 Enter from "Menu" which is at the bottom of the screen;

9
1.2 Enter from the "Menu" on the remote control .
1.3 Enter from the "Menu" on the front panel .
2. Operate on “Set” through the following two ways:
2.1 Directly click on the icon to choose.
2.2 Press "▲▼" to select. (content of “Set”: Picture, Sound, Tuner, Adjust,Function)
*Picture
1.1 Directly click on the icon to choose.
1.2 Press“ ▲▼”to select. Press " ◄► " to confirm the submenu and adjust the value. Press " ◄► "
to move to the wanted submenu(purple color lights means be selected)
*Sound
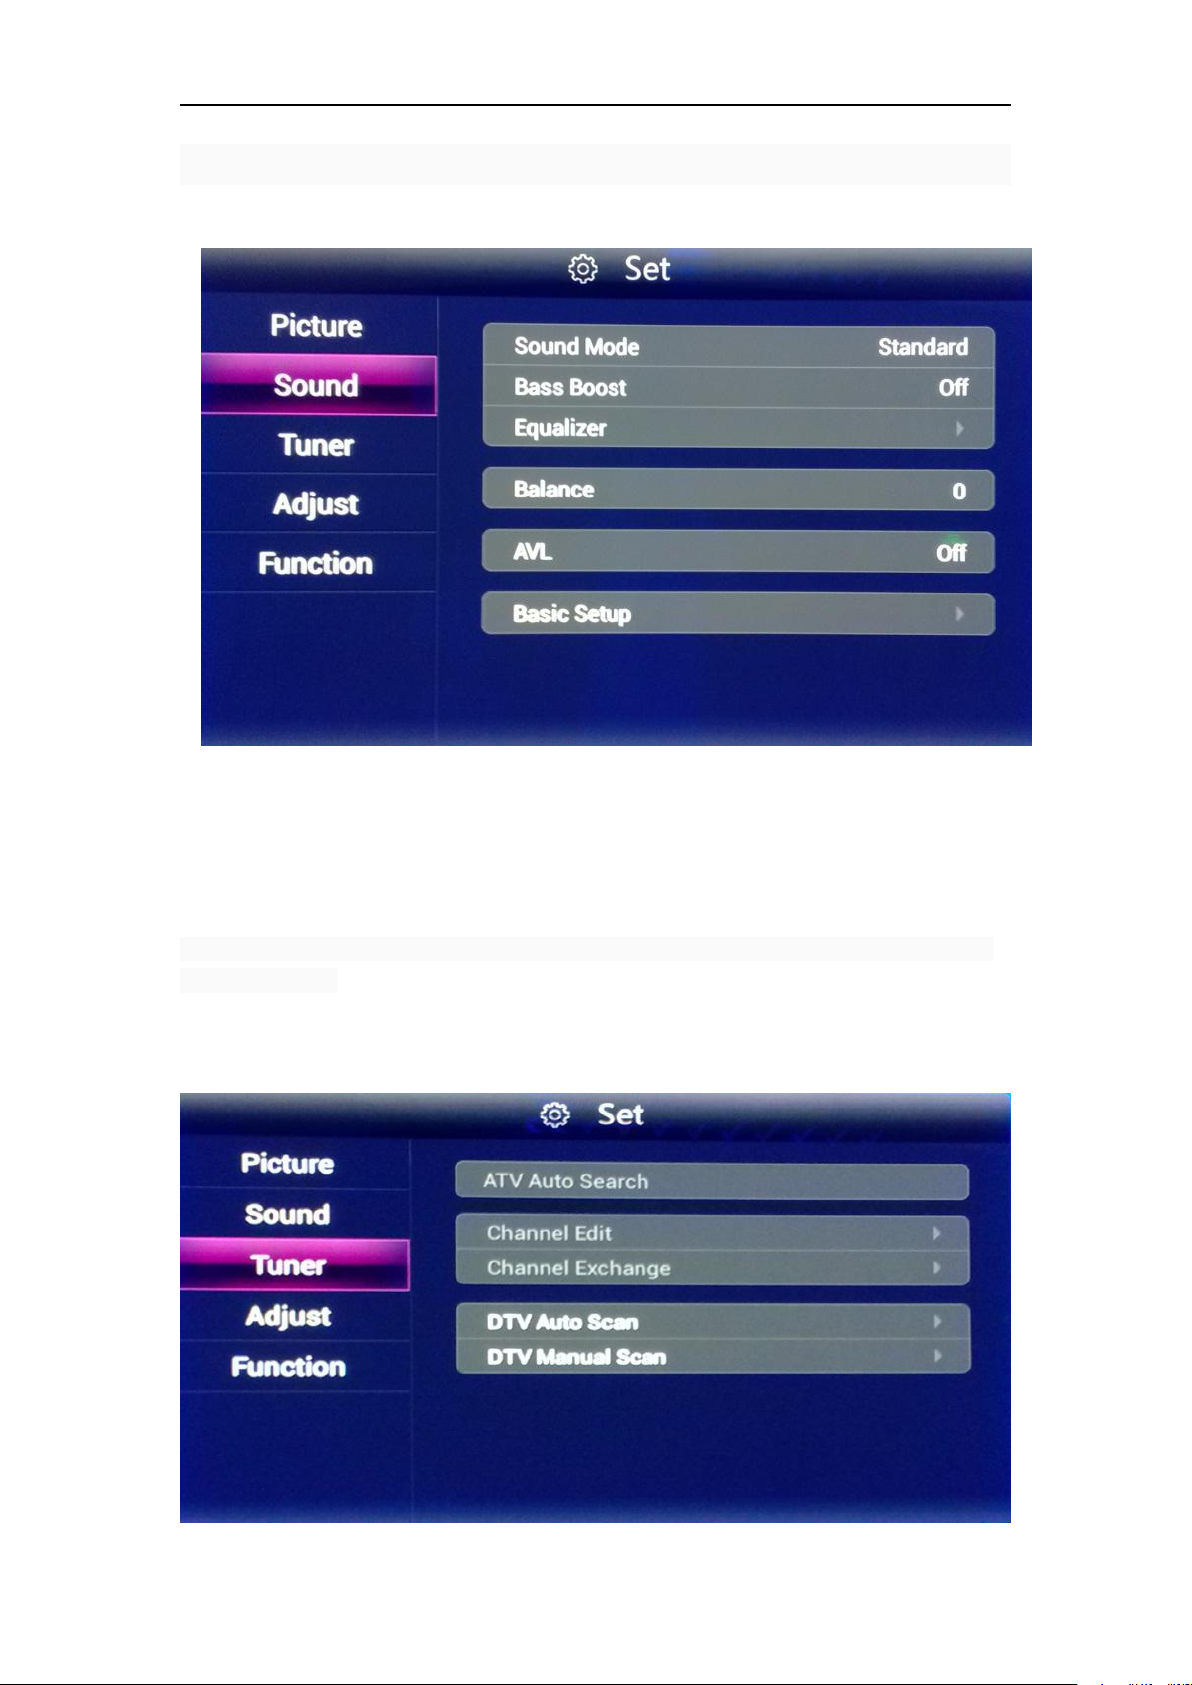
10
1.1 Directly click on the icon to choose.
1.2 Press“ ▲▼”to select. Press " ◄► " to confirm the submenu and adjust the value. Press " ◄► "
to move to the wanted submenu(purple color lights means be selected)
*Tuner
1.1 Press “Adjust”to select the submenu.
1.2 Press“ ▲▼”to select. Press " ◄► " to confirm the submenu and adjust the value. Press " ◄► " to
move to the wanted submenu(purple color lights means be selected).Press" ► " to choose ATV
Auto Search and DTV Auto Scan.
1.3 Press “Enter” to start automatic search. If you need to interrupt, please press "stop" to return to
the previous menu.
*Adjust

11
1.3 Press “Adjust”to select the submenu.
1.4 Press“ ▲▼”to select. Press " ◄► " to confirm the submenu and adjust the value. Press " ◄► "
to move to the wanted submenu(purple color lights means be selected)
*Function
1.1 This button is only for the TV which has 3D function. Press the “Function” to select.
1.2 Press“ ▲▼”to select. Press“ ▲▼”to select. Press " ◄► " to confirm the submenu and adjust
the value. Press " ◄► " to move to the wanted submenu(purple color lights means be selected)
1.3 Useless for TV without 3D function
12
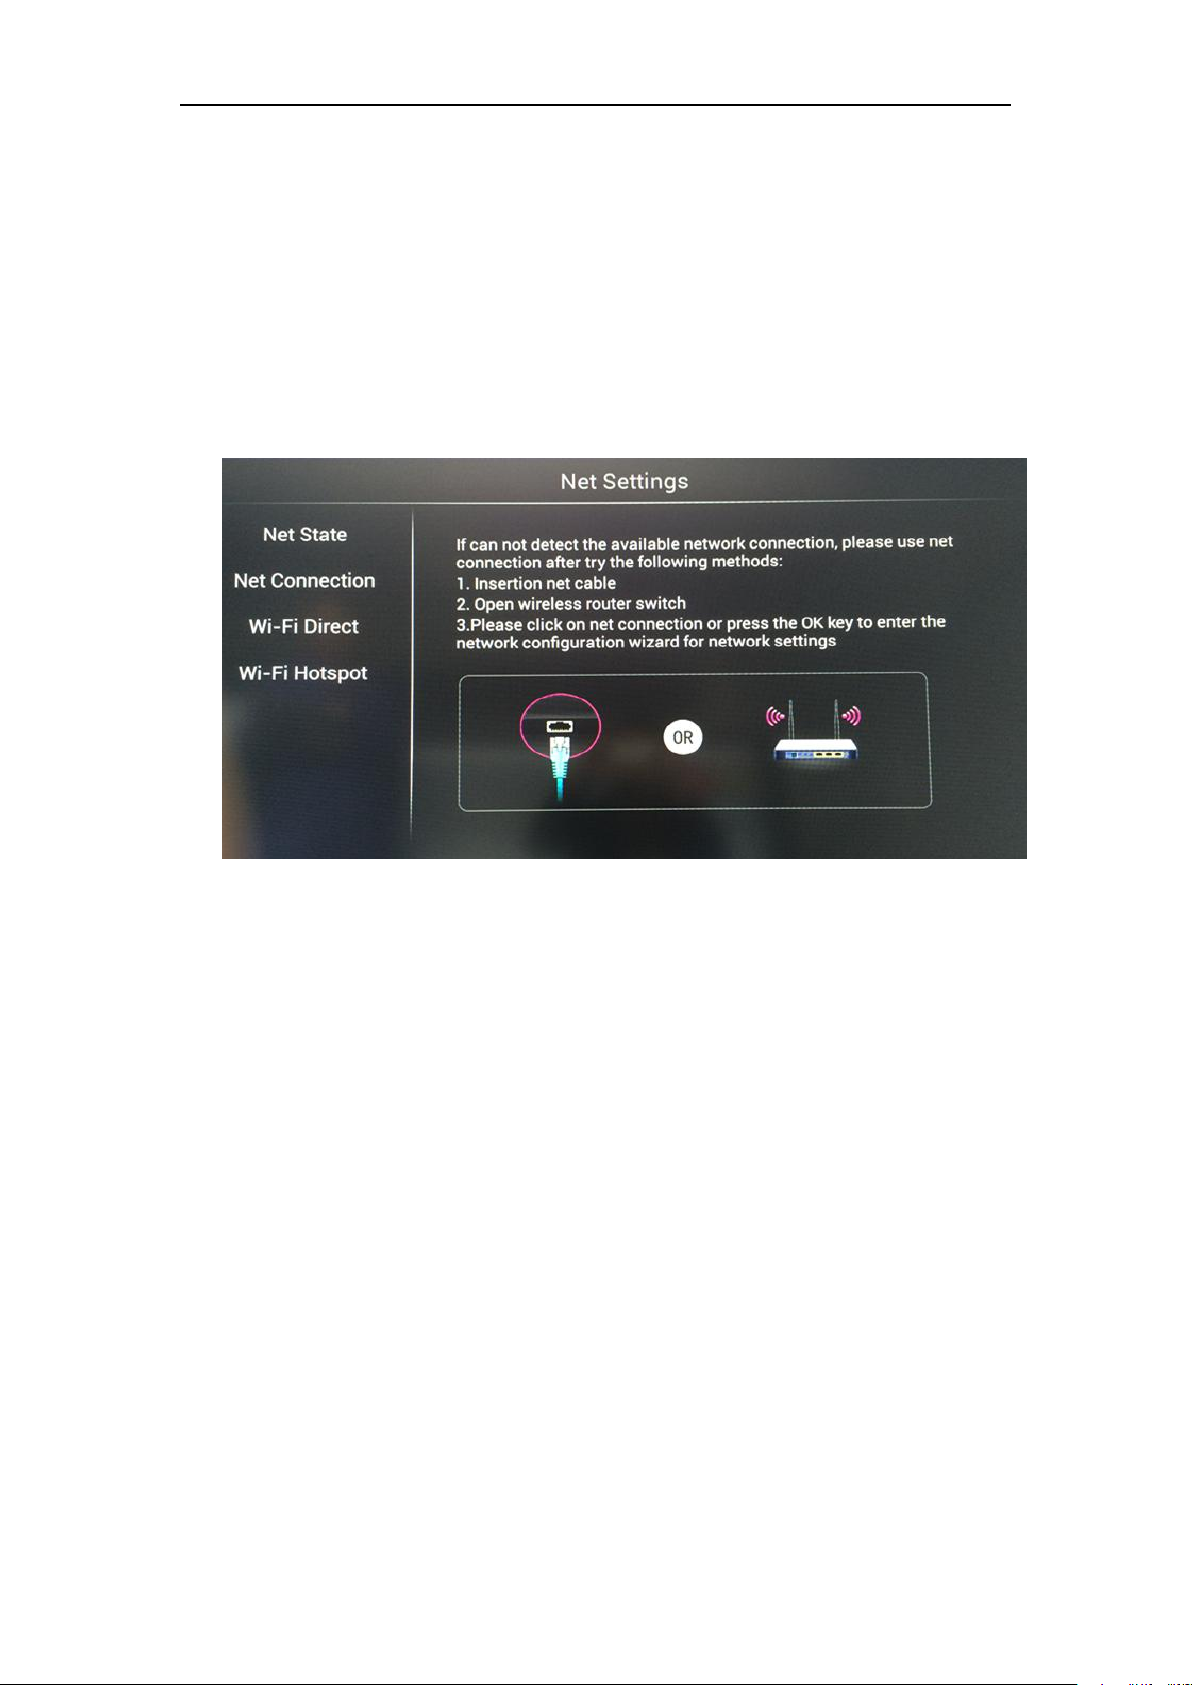
How To Use TV:
Network Setting
Choose the net connecting mode and set the right number.
Press “main page” to enter the main menu, press " ▲▼◄► " button to select [system setting] and
press “enter”to enter the submenu. Press " ▲▼ " button so select “Net Settings”and
press“enter” to enter. Press " ▲▼ " to select between WIFI or WIRED.
A.Wired Network Setup
It will be automatically equipped with an IP number if LAN is connected and DHCP(set
automatically) is supported.
Follow the steps to set the IP manually:
1) Press " ◄► " to select”automatically get IP address” [Close]
2) Press " ▲▼◄► " to select the number needed to be changed, press numeric keys to input
the [IPv4 Address], [Subnet Mask]、[ Default Gateway]、[DNS address]
3) Press [ Save] and press“Enter”to save the IP address setting. Press " ▼ " to select [Next] to
enter wired network setting
B.Wireless Network Setup
1) The system will search the available wired and wireless network automatically, press “◄►”to
select [Wireless Network] and press“Enter”to enter the wireless network setting.
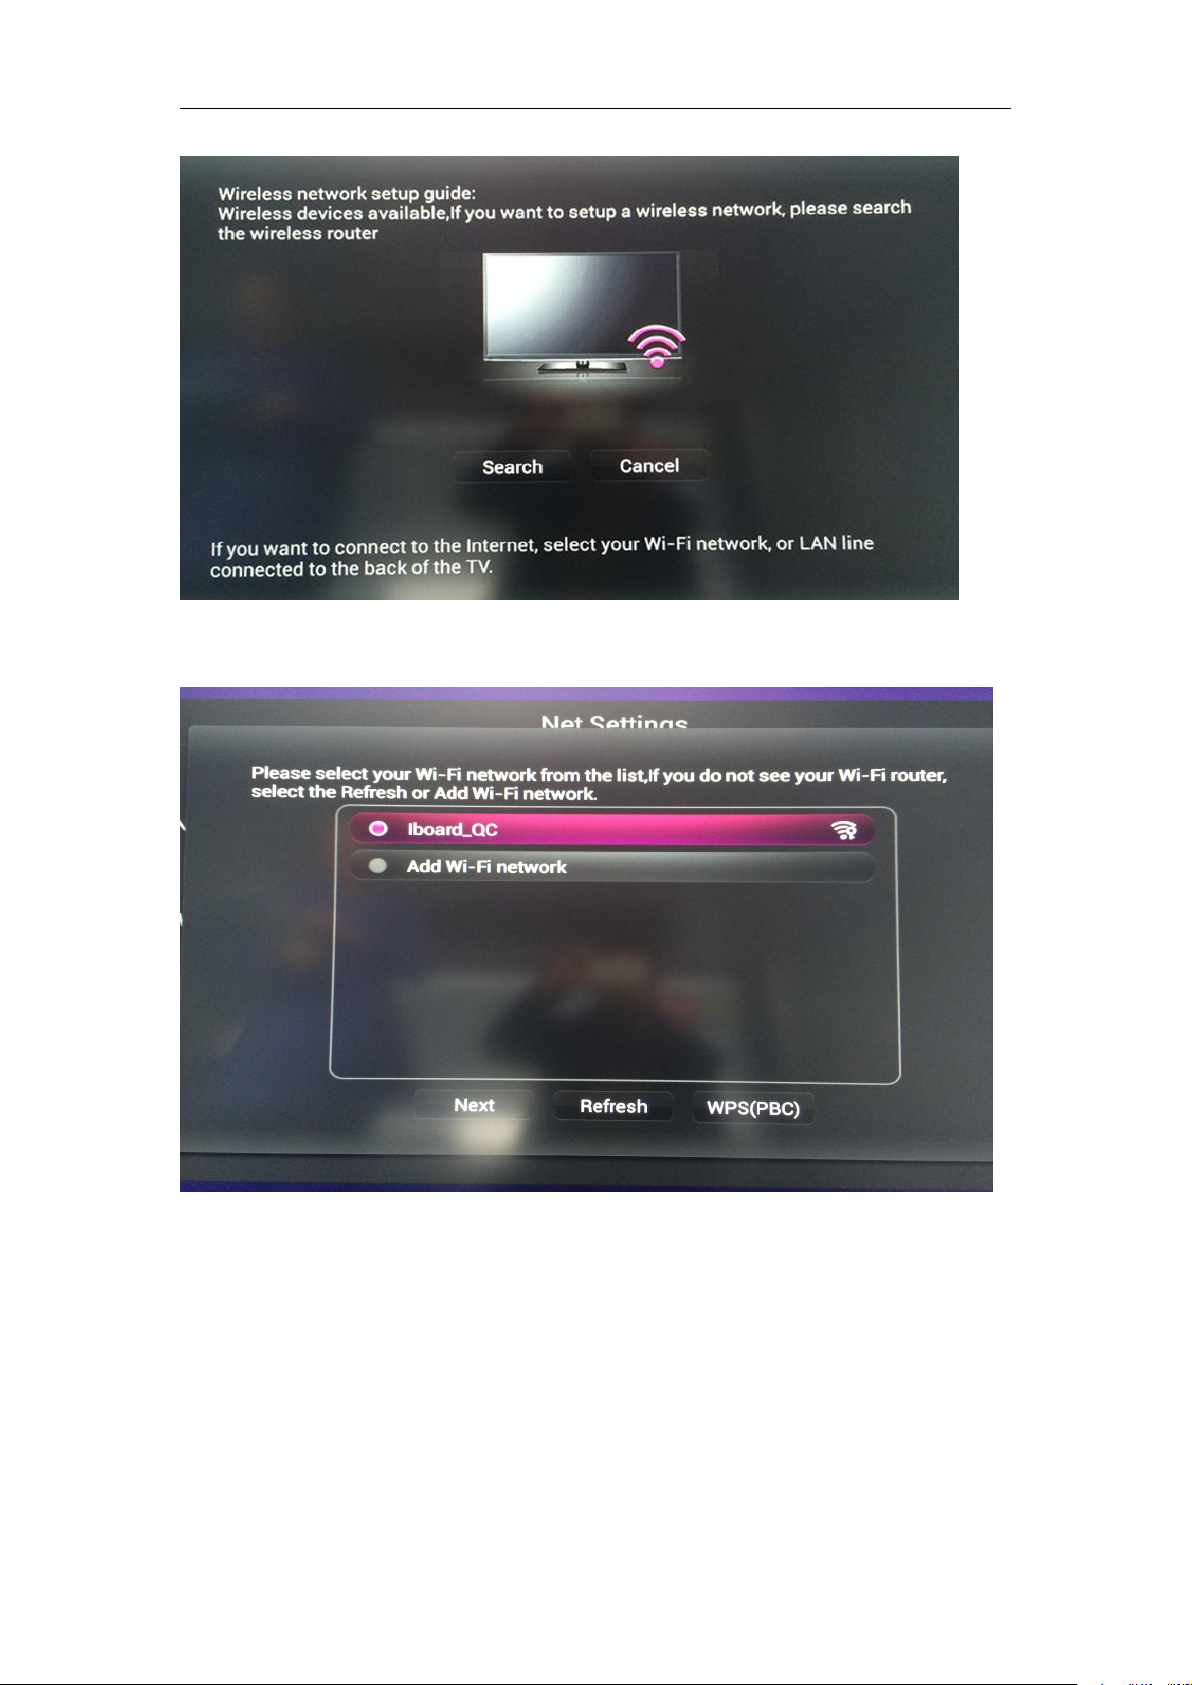
13
2) Press "◄► " to select [Search] to enter the network setting, press " ▲▼ " to select the
WI-FI network from the list, press " ▲▼ " to select [Next ] and press enter
3) Password: Input the WI-FI password, press “Enter”and then press " ▲▼◄► " to select [Finish]
and press“Enter”, then press " ▲▼◄►" to select “Next”to start the wireless connection.

14
Network Status Lookup
Check the connection status of the current network and the detailed information.
Remote control

15
Remote control A
1) Standby: turn on or turn off the machine
2) Mute: mute or restore the sound
3) 0-9 numeric key: selection or input
numbers
4) DIS: display the screen
5) CHLISI: program list under TV ,can be
edited,deleted or skipped etc
6) INPUT:enter or select source channel
7) MENU: enter or exit from the menu
8)、12)、9)、10)up/down/left/right: select
up/down/left/right
11) OK: confirm the selection
13 ) EPG: EPG: application key for DTV
14) Exit: Exit
15) VOL+/-: VOL+/ VOL- to
16) HOME: enter the main page
17) 3D: save energy
18) CH+/-: select previous channel or next
channel
19) Screen Display: display the screen
20) Play/Pause、Stop: play audio/video or
pause audio/video,stop the playing
audio/video
21) PRSRN: insert a SD card before
screenshot
22) TV:select TV channel
23) Forward/Rewind: Forward or Rewind
the audio/video
24) Previous/Next: select previous or next page
25) Sleep: set start and off time of the sleep
26) P.MODE:select image mode as standard, soft etc
27) S.Mode: select sound mode as: standard, music, theater etc

16
Remote control B
1) Standby: turn on or turn off the machine
2) Indicator: indicator lights if press any button
3) Image mode: select image mode as standard, soft etc
4) Sound Mode: select sound mode as: standard, music,
theater etc
5) Display mode
6) Sleep: set start and off time of the sleep
7) 0-9 key: ATV/DTV channel selection or input numbers
8) Main page: enter the main page
9) EPG: application key for DTV
10) Audio source: enter or select source channel
11) Menu: enter or exit from the menu
12) OK: confirm the selection
13) up/down/left/right: select up/down/left/right
14) Screen Display: display the screen
15) Exit
16) VOL+/-: VOL+/ VOL- to increase/decrease the volume
17) Channel+/-: select previous channel or next channel
18) PgUp: previous page
19) PgDn: next page
20) F1/F2/F3/F4: application key for DTV, same as the
function for F1/F2/F3/F4 on computer (activated when
connecting to computer)
21) F5/F6: previous page /next page, same as the function
for F5/F6 on computer (activated when connecting to
computer)
22) F7/F8:Forward or Rewind, same as the function for
F7/F8 on computer (activated when connecting to computer)
23) F9/F10: pause/play/stop, play audio/video, pause
audio/video or stop audio/video, same as the function for
F9/F10 on computer (activated when connecting to computer)
24) F11/F12:same as the function for F11/F12 on computer (activated when connecting to
computer)
25) Alt+Tab/Space/Alt+F4/+Right: same as the function for Alt+Tab/Space/Alt+F4/+Right on
computer (activated when connecting to computer)
26) Computer: select computer channel
27) HDMI: select HDMI channel
28) Calibration: VGA
29) TV: select TV channel
30) Liston only: turn on or turn off
31) Energy saving: switch between standard and energy saving mode
32) Screenshot: insert a SD card before screenshot

17
33) 3D: turn on and turn off 2D/3D function
Attention: Shortcut keys for computer on the remote control work normally when touch TV
works normally
Control Panel
Buttons on front panel
A-Turn On/Off
B-Source Input
C-Menu
D-Volume+
E-Volume-
F- Channel+
G-Channel-(Menu item+/-)
H- PC turn on/off
I- TV USB(input)
J- PC USB (input)

18
Buttons on rear panel
*When HDMI1/HDMI2/HDMI3 connects to the HDMI of computer or DVD etc
When select HDMI1 on “Source”menu, HDMI1 and TOUCHPORT are connected,HDMI2 、
HDMI3 is disconnected.
When select HDMI2 on “Source”menu, HDMI2 and TOUCHPORT are connected,HDMI1 、
HDMI3 is disconnected.
When select HDMI3 on “Source”menu, HDMI2 and TOUCHPORT are connected,HDMI1 、
HDMI2 is disconnected.
* VGA IN: Computer signal input
When select PC1 on “Source”menu, VGA-IN ,AUDIO-IN and TOUCHPORT are connected.
AUDI0-IN should be connected to the audio input of the PC.
*OPS: When select OPS on “Source”menu, it will show the interface of the OPS without any
connection, works only for products with OPS.
* Y PB PR-IN: Connect to the Y PB PR terminal of the DVD

19
* AV1-IN、AV2-IN: Connect to the AV output of the DVD
* AV-OUT: Connect to the AV-IN of another TV
* RF-IN: Input terminal of TV signal
* USB1、USB2、USB3.0: Connect to USB Disk
* SD CARD: Insert SD CARD
* RJ45: Wired internet port
Switchover Among Three Signals
*When select HDMI1 on “Source”menu, HDMI1 and TOUCHPORT are connected,HDMI2、
HDMI3 is disconnected.
*When select HDMI2 on “Source”menu, HDMI2 and TOUCHPORT are connected,HDMI1、
HDMI3 is disconnected.
*When select HDMI3 on “Source”menu, HDMI3 and TOUCHPORT are connected,HDMI1、
HDMI2 is disconnected.
Full Touch
Open the machine, wait till Android characters disappear and screen displays normal and then use
finger or touch pen draw straight line from the center of the bottom upwards (the line should be
longer then 10CMS). If the menu of the full touch hasn’t appeared, please draw straight line upwards
again, the menu of the full touch is as follows:

20
Press the buttons directly with your hand or touch pen
Press EXIT to exit from the full touch interface

21
Specification Of PC Mode (VGA Input):
S/N
Standar
d
Resolution
Refresh
Rate(Hz)
Horizontal
Frequency
(Khz)
Vertical
Frequenc
y(Hz
)
Horizontal/Ver
tical
synchronizatio
n unipolarity
(
TTL
)
1
VESA
640X480
60
31.560N/N
2
VESA
640X480
72
37.972N/N
3
VESA
640X480
75
37.575N/N
4
VESA
800X600
56
35.156P/P
5
VESA
800X600
60
37.960P/P
6
VESA
800X600
72
48.172P/P
7
VESA
800X600
75
46.975P/P
8
VESA
1024X768
60
48.460N/N
9
VESA
1024X768
70
56.570N/N
10
VESA
1024X768
756075
N/N
11
VESA
1280X960
606060
N/N
12
VESA
1280X960
75
75.15975N/N
13
VESA
1280X1024
606460
P/P
14
VESA
1280X1024
758075
P/P
15
VESA
1600X1200
607560
P/P
16
VESA
1920X1080
60
66.547
59.988
P/P
Supporting format of USB
Multimedia
Type
Document Format
File Extension
Picture
JPEG、BMP、PNG
.jpg、.jpeg、.bmp 、.png
Movie
MPEG1、MPEG2、
MPEG4、H264、RV8、
、RV9、RV10、MJPEG、
Divx、Xvid
.avi、.mpg、.dat、.vob、.mov、.mkv、.rm、 .rmvb、.mp4
、.ts、.trp
Music
WMA 、MP3、M4A 、
(AAC)
.wma、.mp3、.m4a、.aac
Text
TXT
.txt

22
Maintaining Guide
Explanation
Bellowing situation is not production faulty:
1. if there is a little tiny red, blue, green spots on the TV screen (Highlights spots), or dark spot
(scotoma) under some picture, it’s not production faulty. because the manufacture of LCD panel
requires very sophisticated production technology, it may produce very few pixels too bright or
too dark . it’s under the international quality standard, would not affect the overall performance
of the flat panel.
2. there might be a little noise when the back light adjust or production cooling, it’s normal
aspect.
3. if the picture and sound without problem, bellowing phenomenon is normal aspect:
A. Feel electrostatic when touch LCD screen and the metal shell;
B. A little high temperature on screen and its backside.

23
Self-checking
Please check bellowing question accordingly before require a repair.
Can’t start the machine
Whether the power plug is properly connected?
Whether there is a barrier between the monitor and remote control receiver?
Don't press the switch too many times in very short time, because it designed a
protection.
Need a few seconds for re-start, when you just shut it down.
No image or image is
monochrome
Whether the color is properly adjusted?
Whether the format of the color is correct?
Whether use the mute function?
No signal when
connects to outer
devices
Whether the external devices and the monitor are connected properly?
Whether choose the correct monitor receiving signal source?
Does the external devices work well?
Image is not good as
showed in the shop or
supper market
Signal source is different
Try to change the source to HDMI.
Please adjust the resolution of the video output device to 1080i or 720 p
Please use HDMI or YPBPR to transfer the high resolution image

24
Trouble shooting
Problem
Causing
Solution
No touch
Touch Port is not connected or USB
cable has problem
1.Please use a new USB cable to test or inspect
2. Check if the Touch Port is broken
Infrared tube is blocked
Ensure the infrared tube is not blocked
Need calibration every
time open the monitor
Infrared tube is blocked or equipped
with restore card
Reposition the serving program after turn off the PC
calibration not accurate
Calibration operation incorrect
Use Auto button on the remote control to make the image
full screen, then reposition with a pen
There are waves during
the writing
Wrong writing method
1. Use a pen to write. Stay away from the tip when
holding the pen.
2.The angel between the pen and the screen should be
more than 60 degrees(make sure the sleeve and wrist are
not too close to the screen )
Has strong light or interference to the
infrared tube
Remove the interference or change to an environment
without interference
Lines broken during
writing
Writing method incorrect
1. Use the pen to write.
2. Stay away from the tip when holding the pen.
3. The angel between the pen and the screen should be
more than 60 degrees(make sure the sleeve and wrist are
not too close to the screen )
The shelter area is not big enough
during the writing or the tip of the pen
is too sharp
Change the tip or use a pen with big shelter area
Infrared tube is blocked
Check whether there is something blocks on the infrared
tube
Has strong light or interference to the
infrared tube
Remove the interference or change to an environment
without interference
Can’t write
Color of the pen is the same or similar
to the color of the screen
Change the color of the pen
There are other things on the screen
during writing
1. Use a pen to write. Stay away from the tip when
holding the pen.
2. The angel between the pen and the screen should be
more than 60 degrees(make sure the sleeve and wrist are
not too close to the screen )
Has strong light or interference to the
infrared tube
Remove the interference or change to an environment
without interference
Writing method incorrect
1. Use a pen to write.
2. Stay away from the tip when holding the pen.
3. The angel between the pen and the screen should be
more than 60 degrees(make sure the sleeve and wrist are
not too close to the screen )
Not work in
windows 8 system
The laptop with touch screen itself
Connect the VGA or HDMI of touch monitor to laptop first,
then connect touch USB.

Touch frame trouble shooting
Problem
No sound or image
Has image but no sound
No image or image is monochrome
Image or sound is interfered
Malfunction of remote control
Monitor trouble shooting
solutions
1. Check whether the power cord is connected to the power socket, and
whether the power is on
2. Check whether the switch of the screen is opened
3. Check whether the standby button of the panel is opened
4. Check whether the input line of video and audio is normal
5. Check whether switched to the correct signal input source
6. Check the brightness of image and contrast settings
7. Check the volume
1. Check the volume
2. Check whether the mute button on the remote control is turned on
3. Check the audio connection between computer and screen
Adjust the setting of the color
Check the format of the color
1. Find out the interference electrical equipment around the touch
screen, move it away
2. Do not share the same power socket with the interference electrical
equipment
1. Replace the battery
2. Clean the top of the launch window of the remote control (whether it
is blocked)
3. Check the battery contact point (whether poor contact)
Product Energy Conservation
When you no use it, please set the product to the off state to reduce energy consumption.
In the premise of watching quality, lowering the brightness of the screen can reduce energy
consumption during using.
The device complies with RF specifications when the device used at more than 20 cm from your body.
If there is malfunction indeed, please power off the touch monitor, pull
out the power cable and contact our after-sales on the warranty card
for further help.
FCC
This device complies with Part 15 of the FCC Rules.Operation is subject
to the following two conditions: (1) this device may not cause harmful
interference, and (2) this device must accept any interference received,
including interference that may cause undesired operation.
25
 Loading...