

Page 1
SAFETY PRECAUTION
CAUTION:
The lightening flash with
arrowhead symbol, within an
equilateral triangle, is intended
to alert the user to "dangerous
voltage" and to prevent from a
risk of electric shock.
Warning:
To reduce the risk of electric
shock, don't open the cabinet.
Refer servicing to qualified
personnel only.
The exclamation point within an
equilateral triangle is intended to
alert the user to important
operating and maintenance
(servicing).
WARNING: The apparatus shall not be exposed to dripping or splashing and that no objects filled
with liquids, such as vases, shall not be placed on the apparatus.
WARNING: Do not place naked flame sources, such as lighted candles on the apparatus;
otherwise, there is the danger of fire.
WARNING: The unit should be connected to a power supply only of the type descry bed in the
operating instructions or as marked on the unit. If you are not sure of the type of power supply (for
example: 120 or 230V) to your home, consult your local dealer or local power company.
WARNING: Do not open the cabinet or touch any parts in the inner mechanism. Consult your local
dealer for technical service if the opening is required.
WARNING: The mains plug is used as the disconnect device, the disconnect device shall remain
readily operable.
WARNING: Take attention to the environmental aspects of battery disposal. The battery of remote
control should not be exposed excessive heat such as sunshine, fire or the like.
WARNING: Maintenance man must use the appointed screw in the rear plate.
WARNING: Ensure a minimum distance of 5 cm around the apparatus for sufficient ventilation.
WARNING: Ensure that the ventilation is not impeded by covering the ventilation openings with
items such as newspapers, table-cloths, curtains, etc.
WARNING: Use the apparatus only in moderate climates (not in tropical climates).
Page 2
WARNING: Not allow to pull out the HDMI cable or AV cable when the box is running, otherwise, it
may damage the video output.
Note: Do not open the cabinet to avoid the unit direct exposure to radiation.
Unit Cleaning: After the unit power is turned off, you can clean the cabinet, panel and remote
control with a soft cloth lightly moistened with a mild detergent solution.
Attachments: Never add any attachments and/or equipment without the manufacturer consent; as
such additions may result in the risk of fire, electric shock or other personal injury.
Locating: Slots and openings in the cabinet are provided for ventilation to protect it from
overheating. Do not block these openings or allow them to be blocked by placing the STB on a bed,
sofa or other similar surface, nor should it be placed over a radiator or heat register.
Power-Cord Protection: Place the power-supply cord out of the way, where it will not be walked on.
Please take special attentions to cords at plugs, convenience receptacles and the point where they
exit from the unit.
Object and Liquid Entry: Never put objects of any kind into this STB through openings, as they
may touch dangerous voltage points or short-out parts that could result in a fire or electric shock.
Never spill any liquid on the STB.
Note: Moisture may be formed inside the unit in the following conditions:
When the unit is suddenly moved from a cold environment or an air-condition room to a warm place.
Immediately after a heater has been turned on.
In a steamy or very humid room.
If the moisture forms inside the unit, it may not operate properly. To correct this problem, turn on the
power and wait about two hours for the moisture to evaporate.
Parts Replacement: When the unit parts need to be replaced, user should make sure the service
technician use the replacement parts specified by the manufacturer or having the same
characteristics as the original part. Unauthorized replacement may put the unit in the risk of fire,
electric shock or other hazards.
Safety Check: After all the maintenances and repairs are done, user is required to request the
service technician to conduct the overall safety check to ensure the machine is in the proper
condition.
Page 3
This marking indicates that this product should not be disposed with other household
wastes throughout the EU. To prevent possible harm to the environment or human health from
uncontrolled waste disposal, recycle it responsibly to promote the sustainable reuse of material
resources. To return your used device, please use the return and collection systems or contact the
retailer where the product was purchased. They can take this product for environmental safe
recycling.
“The normal function of the product may be disturbed by strong Electro-Magnetic Interference. If so,
simply reset the product to resume normal operation by following the instruction manual. In case the
function could not resume, please use the product in other location.”
Page 4

Contents
1
Contents
1. Remote Control & Panel Description ................................................................................... 4
1.1 Front Panel Description ........................................................................................................ 4
1.2 Rear Panel Description ......................................................................................................... 5
1.3 Remote Control Description .................................................................................................. 6
2. Basic Operations ..................................................................................................................... 7
2.1 Switch on STB ...................................................................................................................... 7
2.2 Standby Mode ...................................................................................................................... 7
2.3 MUTE ................................................................................................................................... 7
2.4 Function Keys ....................................................................................................................... 7
2.5 ZOOM .................................................................................................................................. 7
2.6 SUB ...................................................................................................................................... 7
2.7 TIMESHIFT .......................................................................................................................... 8
2.8 USB ...................................................................................................................................... 8
2.9 TV/Radio .............................................................................................................................. 8
2.10 TXT .................................................................................................................................... 8
2.11 PVR LIST ........................................................................................................................... 9
2.12 SLEEP ................................................................................................................................ 9
2.13 ► ....................................................................................................................................... 9
2.14 II ......................................................................................................................................... 9
2.15 ■ ....................................................................................................................................... 9
2.16 ● ....................................................................................................................................... 9
2.17 MENU................................................................................................................................. 9
2.18 EXIT ................................................................................................................................... 9
2.19 CH▲/▼ .............................................................................................................................10
2.20 Vol◄/► .............................................................................................................................10
2.21 OK .....................................................................................................................................10
2.22 EPG ..................................................................................................................................11
2.23 INFO .................................................................................................................................12
2.24 I◄◄/►►I .........................................................................................................................12
2.25 ◄◄/►► ...........................................................................................................................12
2.26 AUDIO ...............................................................................................................................12
2.27 SAT ...................................................................................................................................13
2.28 Channel Number ...............................................................................................................13
2.29 FAV ...................................................................................................................................13
2.30 RECALL ............................................................................................................................13
3. Video ....................................................................................................................................... 14
4. Music ....................................................................................................................................... 14
5. Picture ..................................................................................................................................... 15
6. Applications ............................................................................................................................ 15
6.1 Rec Manager .......................................................................................................................16
6.2 Disk Manager ......................................................................................................................17
6.3 News ...................................................................................................................................18
6.4 Youtube ...............................................................................................................................18
6.5 DLNA ..................................................................................................................................19
6.6 Dailymotion .........................................................................................................................23
6.7 KartinaTV ............................................................................................................................23
Page 5

Contents
2
6.8 VIMEO.................................................................................................................................23
6.9 Online Video ........................................................................................................................24
6.10 Photo .................................................................................................................................24
6.11 Google Map .......................................................................................................................24
6.12 Weather .............................................................................................................................25
6.13 Radio .................................................................................................................................25
6.14 Gmail .................................................................................................................................25
6.15 IPTV ..................................................................................................................................26
6.16 ISO ....................................................................................................................................26
6.17 Ebook ................................................................................................................................26
7. Setting ..................................................................................................................................... 27
7.1 Installation ...........................................................................................................................27
7.1.1 Antenna Setting .........................................................................................................28
7.1.2 Satellite List ...............................................................................................................28
7.1.3 Transponder List........................................................................................................30
7.1.4 Motor Setting .............................................................................................................31
7.1.5 Limit Setup ................................................................................................................32
7.2 Channel ...............................................................................................................................32
7.2.1 Channel Manager ......................................................................................................33
7.2.2 Channel Editor ...........................................................................................................34
7.2.3 Favorite List ...............................................................................................................35
7.2.4 Channel Setup ...........................................................................................................36
7.2.5 Delete All Channel .....................................................................................................36
7.3 Audio ...................................................................................................................................37
7.3.1 1Preferred Audio .......................................................................................................37
7.3.2 2Preferred Audio .......................................................................................................37
7.3.3 Hard Hearing .............................................................................................................38
7.3.4 Volume Set ................................................................................................................38
7.3.5 HDMI Audio ...............................................................................................................38
7.3.6 SPDIF........................................................................................................................39
7.4 Video ...................................................................................................................................39
7.4.1 Aspect Ratio ..............................................................................................................39
7.4.2 Video Output .............................................................................................................40
7.4.3 Video Resolution .......................................................................................................40
7.4.4 Contrast .....................................................................................................................41
7.4.5 Brightness .................................................................................................................41
7.4.6 Saturation ..................................................................................................................41
7.4.7 HUE ..........................................................................................................................42
7.4.8 SHARPNESS ............................................................................................................42
7.5 OSD Language ....................................................................................................................42
7.5.1 OSD Transparency ....................................................................................................43
7.5.2 1Preferred Subtitle .....................................................................................................43
7.5.3 2Preferred Audio .......................................................................................................44
8. System .................................................................................................................................... 45
8.1 Date Time ............................................................................................................................45
8.2 Timers .................................................................................................................................45
8.3 Child Lock ...........................................................................................................................46
8.4 Upgrade ..............................................................................................................................47
8.5 Factory Reset ......................................................................................................................47
8.6 Auto Standby .......................................................................................................................48
Page 6

Contents
3
8.7 Standby Display ..................................................................................................................48
8.8 Network Setup .....................................................................................................................48
8.9 Multi Media ..........................................................................................................................49
8.10 PVR Config........................................................................................................................50
8.11 Card ..................................................................................................................................50
8.12 Version ..............................................................................................................................50
9. Troubleshooting ..................................................................................................................... 51
10. Technical Specification ....................................................................................................... 53
Page 7
4
Remote Control & Panel Description
1. Remote Control & Panel Description
1.1 Front Panel Description
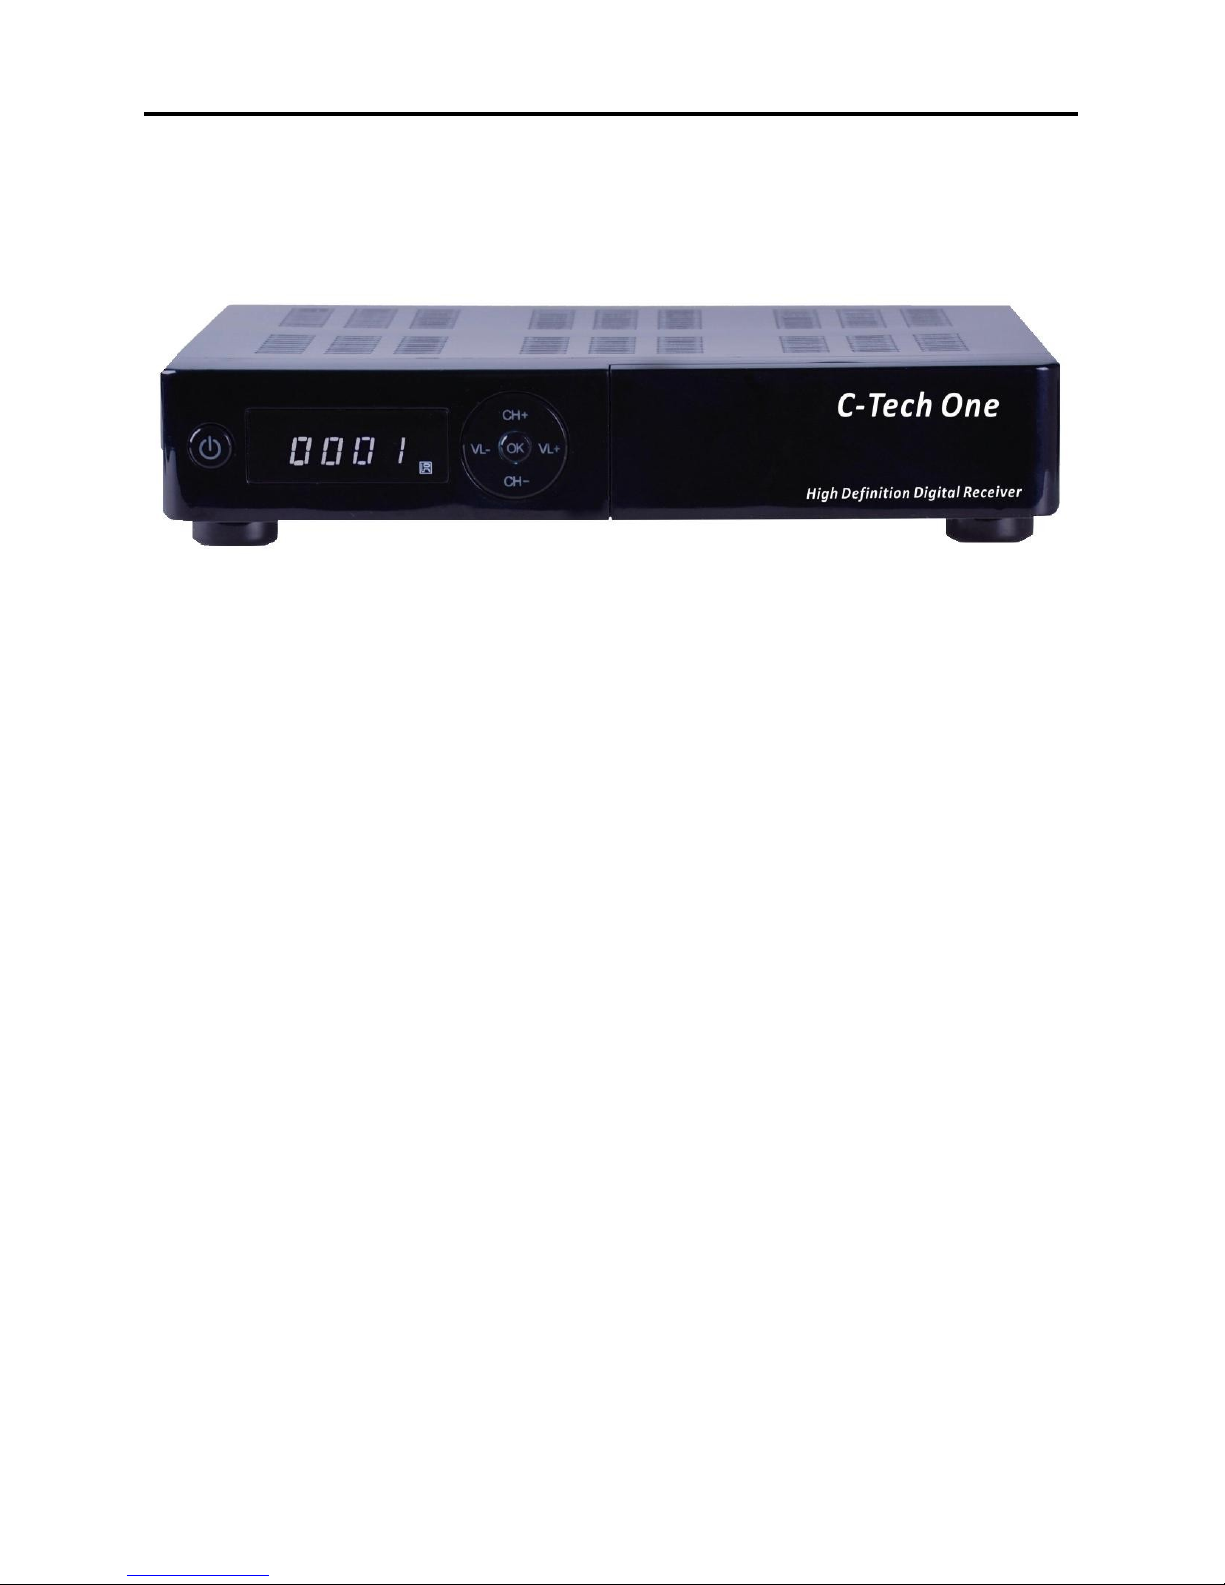
1. POWER: Is used to switch between the working mode and the standby mode.
2. Display: (4-Digit/7-Segment) Displays the received channel number while operating
and time in standby mode.
3. IR-Sensor: Detects the infrared signals from the remote control unit.
4. CH+/-: Used to move the highlight bar or change channel up / dn.
5. VL+/-: Used to move the highlight bar or change volume up / dn.
6. OK: Confirms selections or opens channel list.
Page 8
5
Remote Control & Panel Description
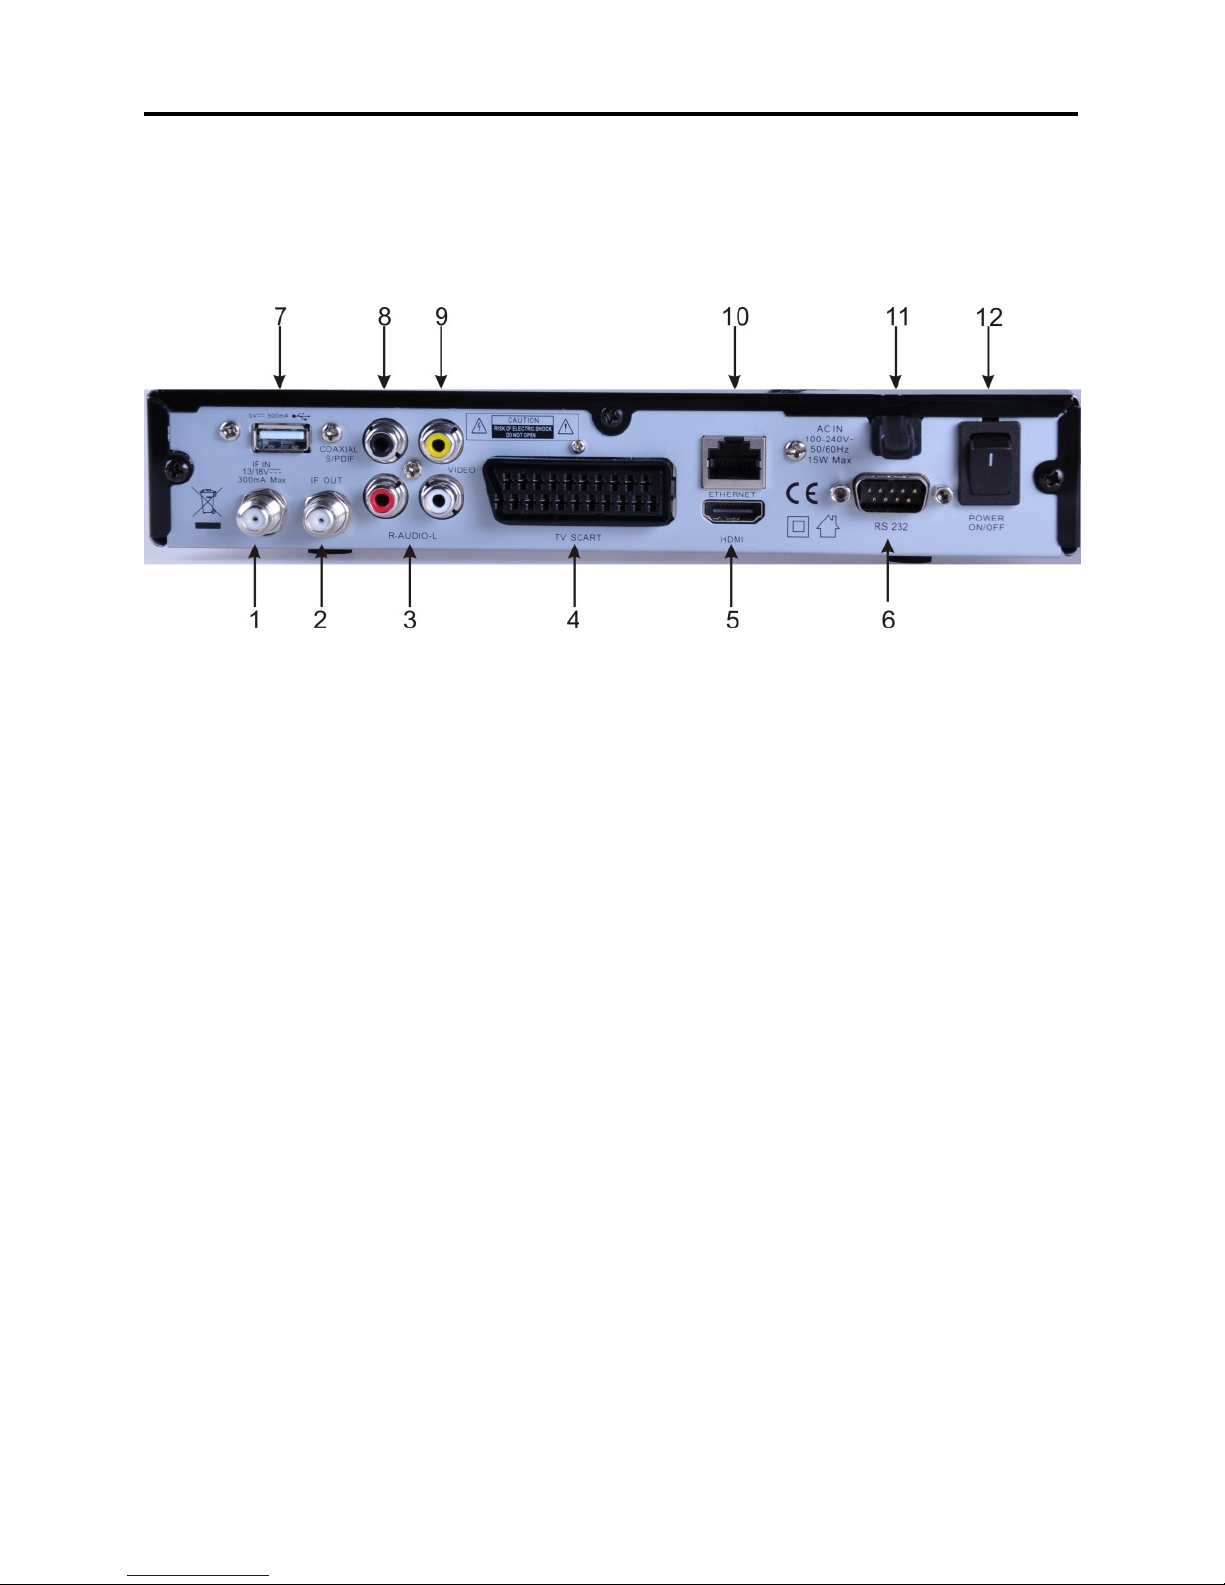
1.2 Rear Panel Description
1. IF IN: Satellite input.
2. IF OUT: Satellite output for cascading to other devices
Note: The operation of another receiver at the same time is only possible with limited
channel selection.
3. AUDIO R/L: HiFi outputs for stereo set.
4. TV-SCART: Output SCART for the connection to a TV set.
5. HDMI: HDMI output for the connection to a TV set.
6. RS-232: Serial Port allowing software upgrades.
7. USB: USB2.0 Host Port.
8. COAXIAL S/PDIF: Coaxial output for digital audio (AC3).
9. VIDEO: CVBS video output for TV AV in.
10. ETHERNET: Connect to the internet using an network cable.
11. AC IN: Mains input cable.
12. POWER ON/OFF: Allows to completely switch off the receiver.
Page 9
Remote Control & Panel Description
6
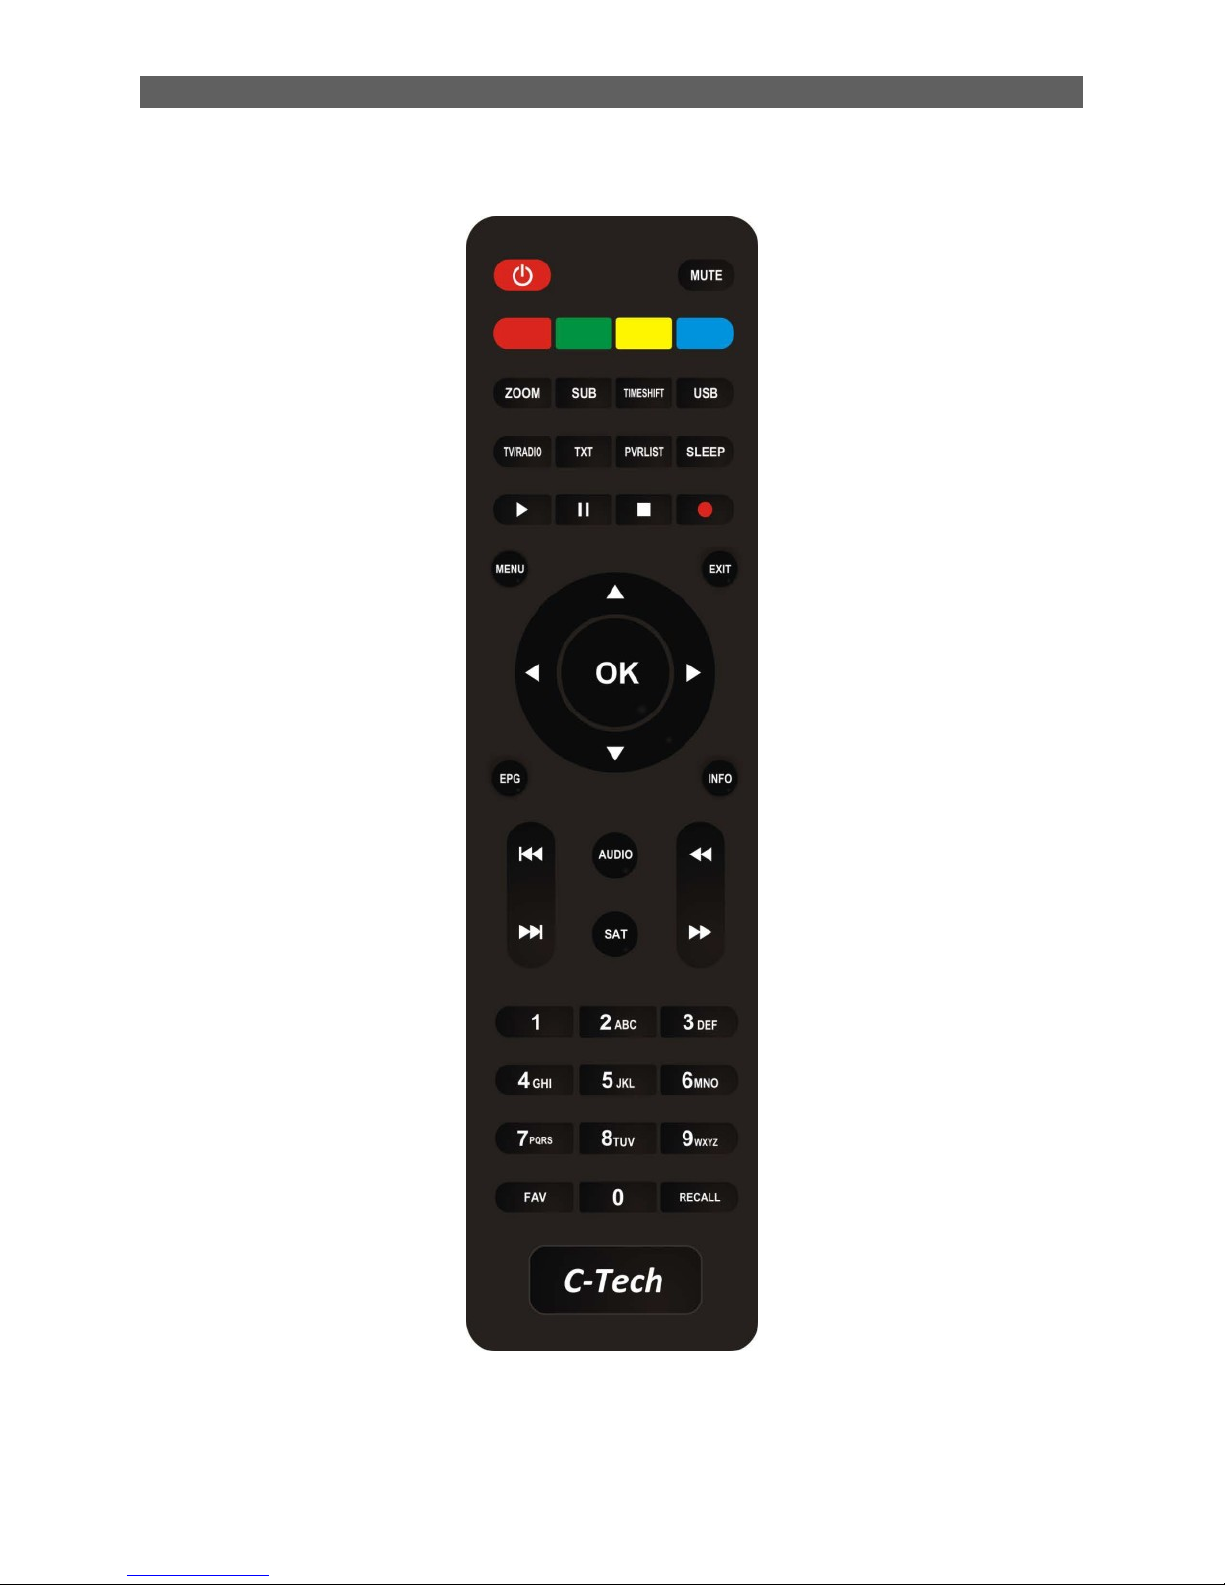
1.3 Remote Control Description
Page 10
Basic Operations
7
2. Basic Operations
2.1 Switch on STB
Switch the [Device‟s Main Power] switch on.
When the STB is first used it will display “Init Install” window. You will set OSD Language, Time
Zone, Single Satellite Search and Multi Satellite Search.
Press [▲/▼] keys to highlight the item, press [OK] or [►] key to edit the option, you can press
[▲/▼ ] key to select option, press [OK] or [►] key to confirm the selection
2.2 Standby Mode
1. Press [Power] button to switch from TV/radio mode to standby mode
2. In standby mode press [Power] button again to switch back to TV/radio mode. The last
active channel will be showed.
2.3 MUTE
1. Press the [Mute] button to mute the sound. On the bottom left screen an mute icon will be
displayed to indicate the muted sound.
2. Press the [Mute] button again to restore the sound.
2.4 Function Keys
RCU have four function key, the colour of button are red, green, yellow and blue, they have
special performance in different menu.
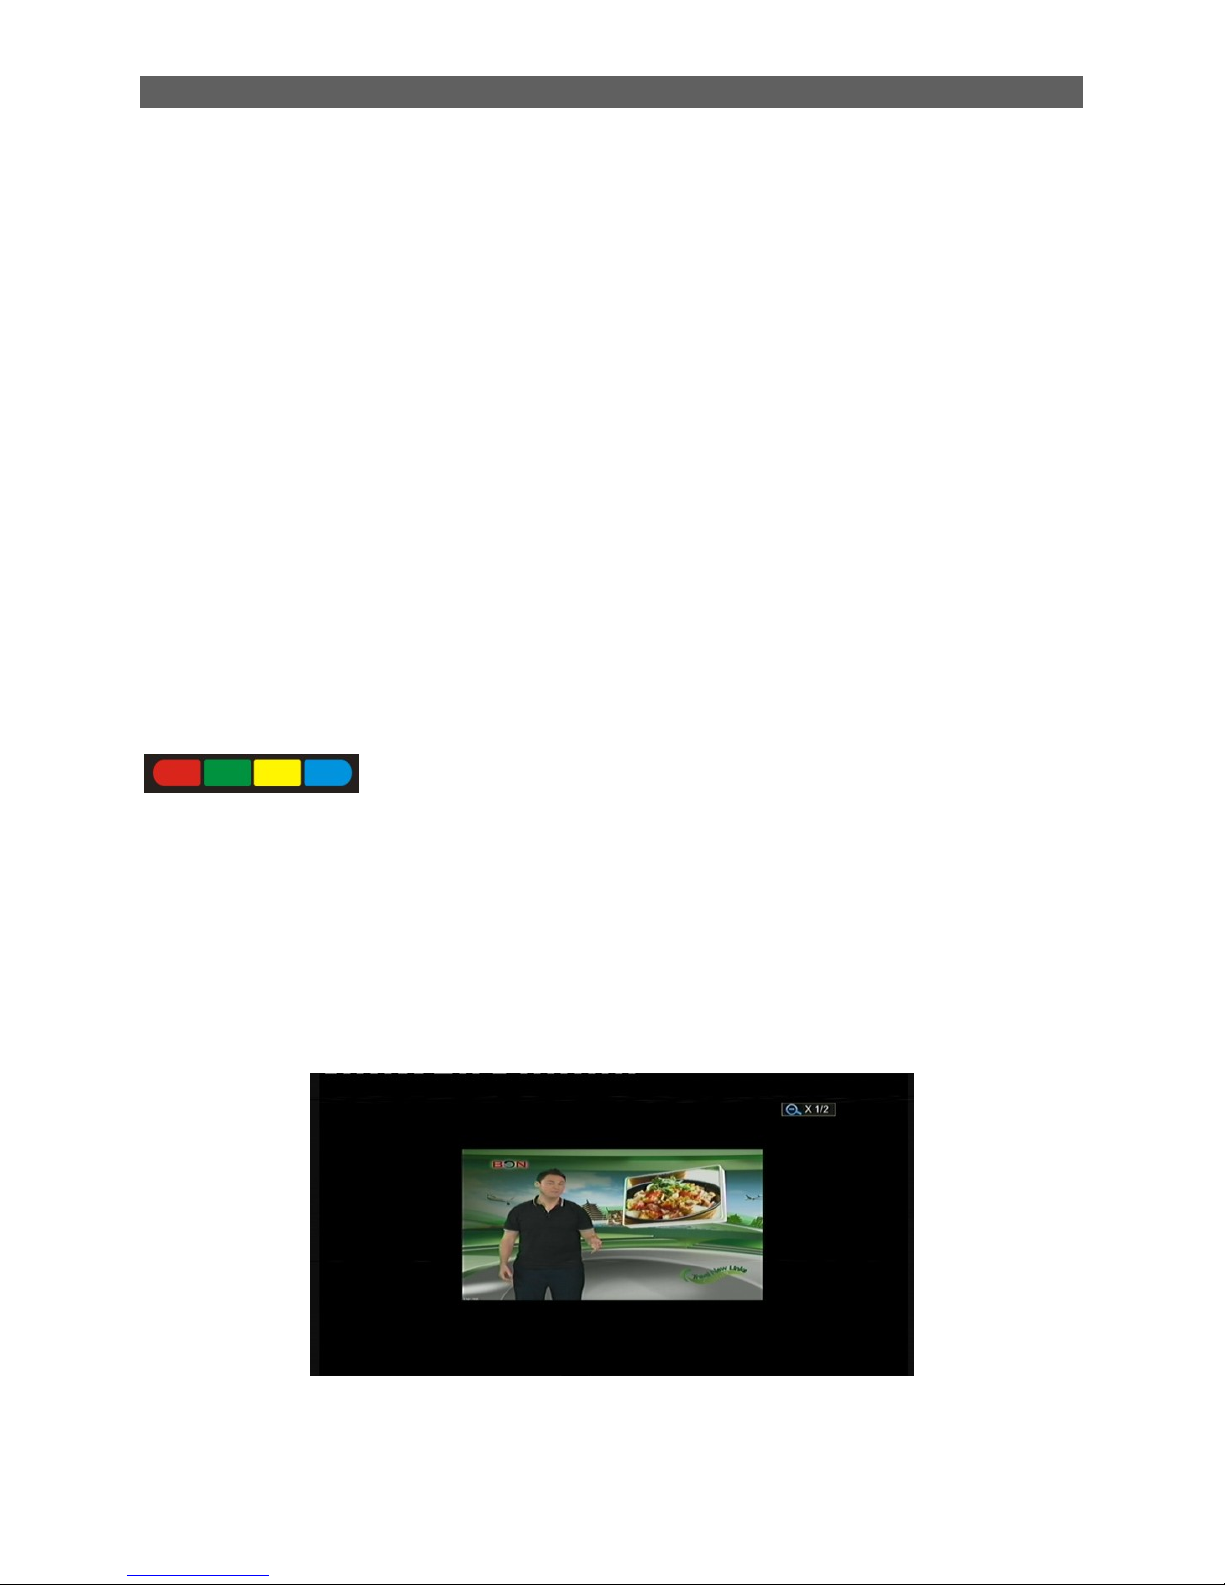
2.5 ZOOM
Zoom in or out the images of screen.
1. Press the [ zoom] button, the scale of screen will display on the top right Conner. Continue to
press the [ zoom ] button will switch the scale.
2. Press the [◄/►/▲/▼] button can move the image of screen.
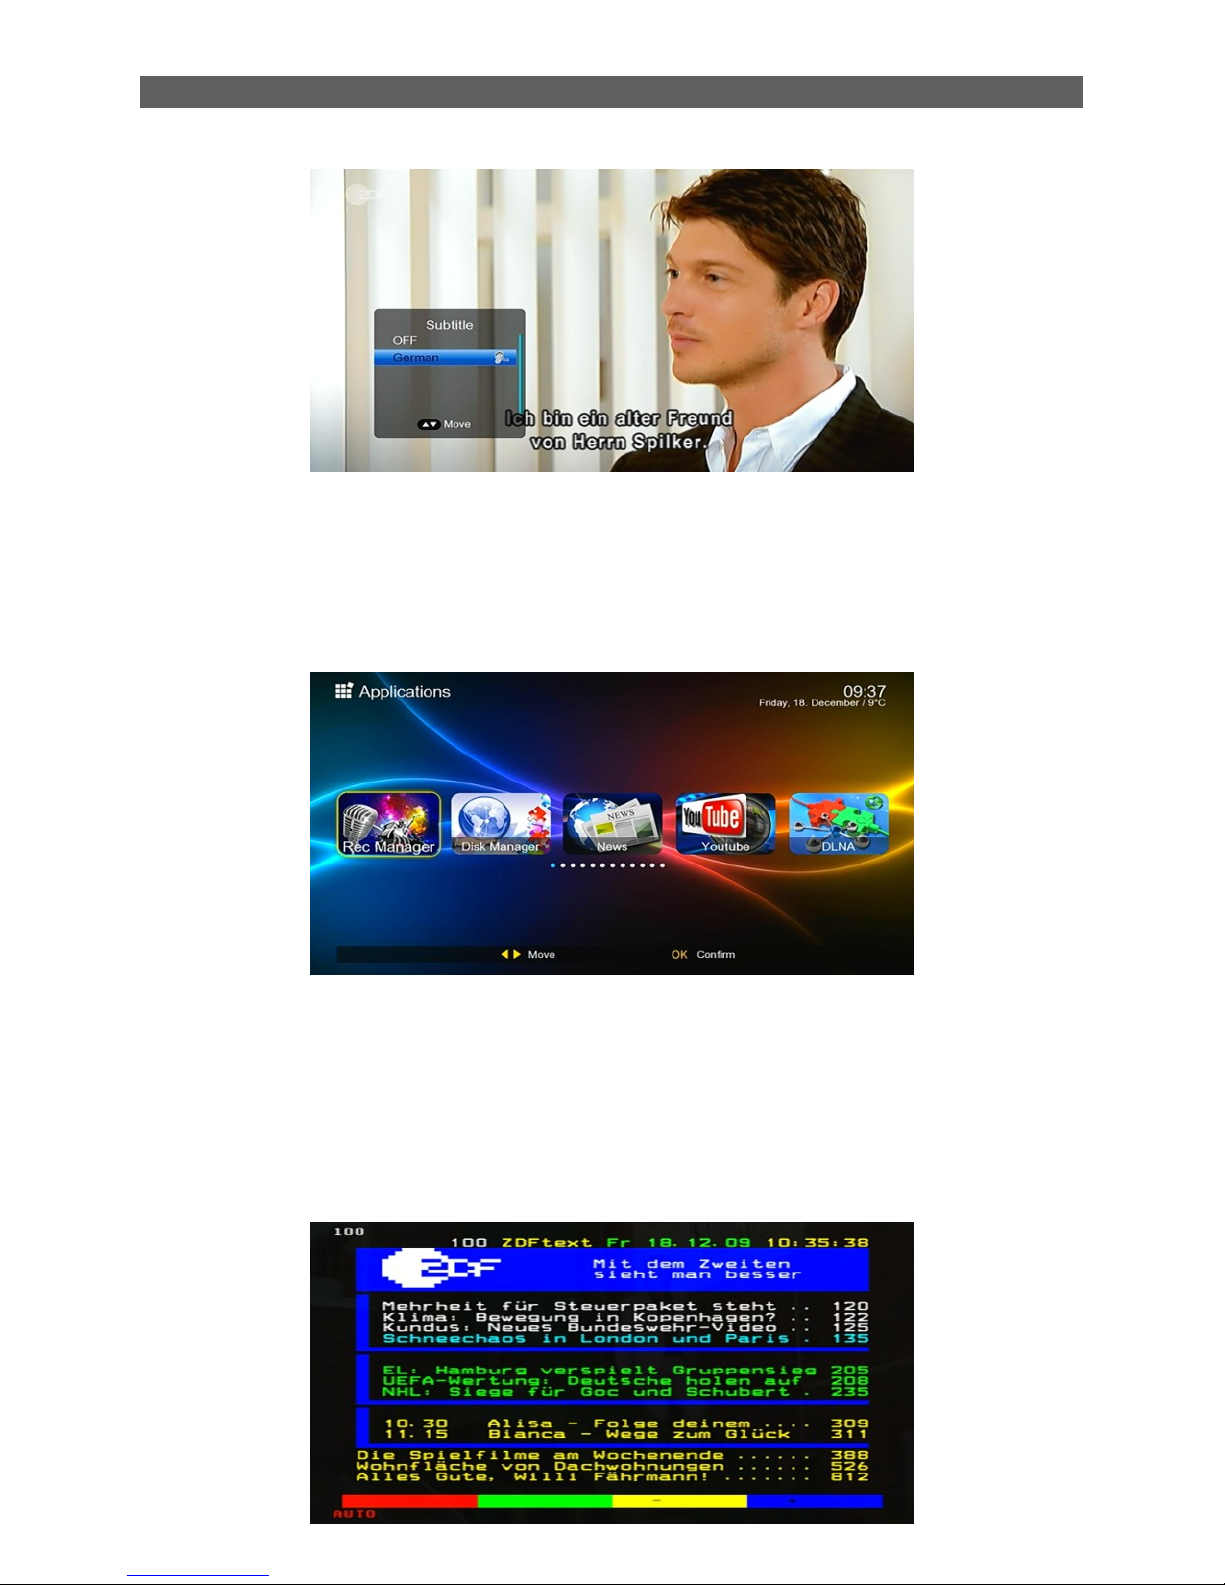
2.6 SUB
Enter the program subtitle selection menu.
Page 11
Basic Operations
8
The optional selection depend on the channel..
2.7 TIMESHIFT
In TV mode, press the [TIMESHIFT ] button will play back the recordings recorded, press the
"stop" you will be asked to "Do you want to stop TIMESHIFT " menu.
2.8 USB
In TV mode, press [USB] button to access directly to the “Applications” menu.
The function “Applications” menu is same as [Main Menu Applications].
2.9 TV/Radio
In TV mode, press [TV/Radio] to switch to Radio mode. In Radio mode press [TV/Radio] again to
switch back to TV mode.
2.10 TXT
Press TXT key to enter the Teletext mode. See the figure below:
Page 12

Basic Operations
9
Basic Operations
At the bottom of a Teletext page, enter a page number (range: 100~899) to go to corresponding
page.
Press [▲/▼] keys to turn to the previous or next pages. The pages that have no teletext contents
will be auto skipped.
Long press [▲/▼] keys to quickly turn pages.
Press OK key to change the transparency of the background.
Press [◄/►] keys to enter the previous or next sub pages of the current page if there exist. If the
AUTO option is selected, the sub pages will be auto turned.
The four color function keys are navigation keys. Their concrete functions depend on the
streaming.
Press TXT or EXIT keys to exit the teletext mode.
2.11 PVR LIST
In TV mode, press [PVR LIST] button to access to the “Device List” press the [ok ] button ,display
“Record List” menu.
2.12 SLEEP
Press [SLEEP] button in TV mode to set the sleep timer. Continue to press the sleep button to
select sleep time 10min ~ 120min or “Sleep_off”
If you set a sleep time, the system will change to standby mode after the chosen time period.
2.13 ►
Play multimedia files.
2.14 II
Pause multimedia playback.
Start the Timeshift function while in the record state or the Timeshift function is in Pause mode.
2.15 ■
Stop multimedia playback.
Stop recording.
2.16 ●
Record the current program while in full screen playing state.
2.17 MENU
Press [Menu] button to enter or exit the current menu.
2.18 EXIT
Press [Exit] button to exit the current menu.
Page 13
Basic Operations
10
2.19 CH▲/▼
to change previous/next channel, Move cursor up/down.
2.20 Vol◄/►
Adjust volume, select highlighted menu, display sub-menu, return to previous menu
2.21 OK
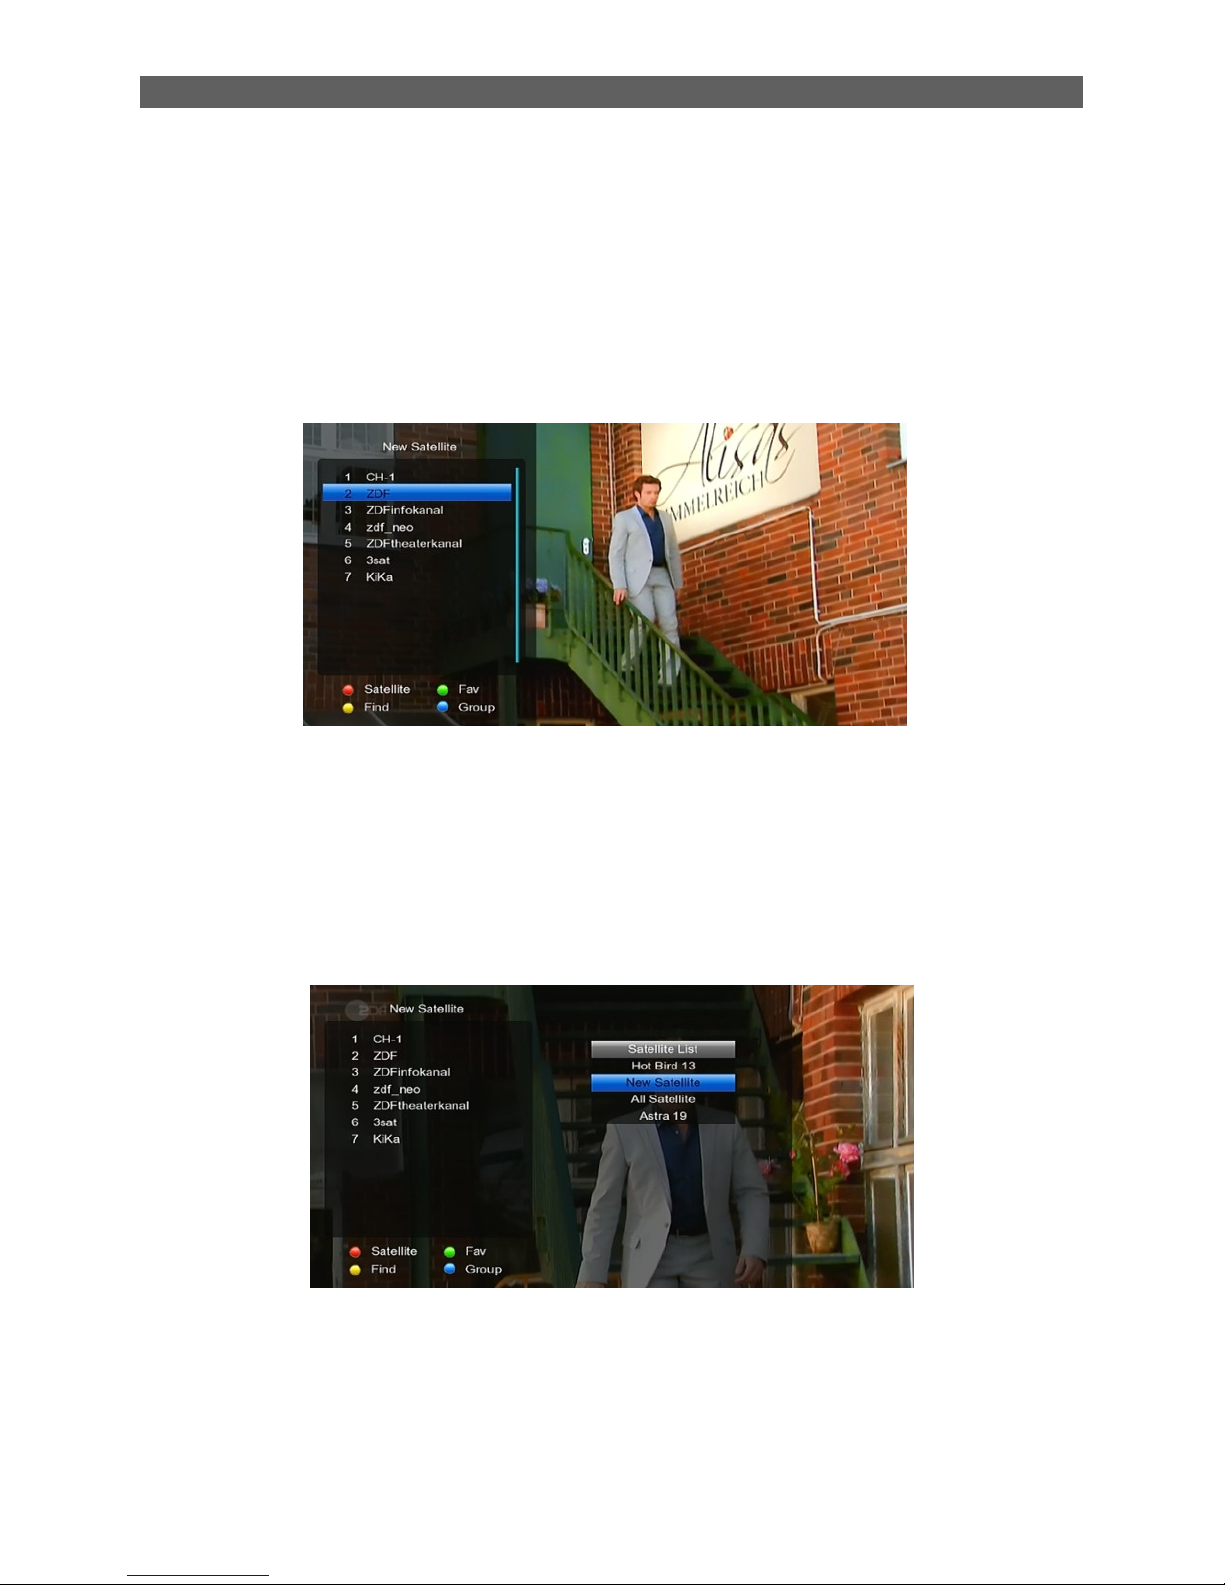
1. In TV mode press [OK] button to open the Channel List window.
2. Press [CH▲/▼] to switch channel and confirm it with [OK] to switch to it.
3. The colour buttons offer further functions to manage the channel list.
Press [Red] to open the sat window. Press [CH▲/▼] to select and [OK] to confirm
your choice.
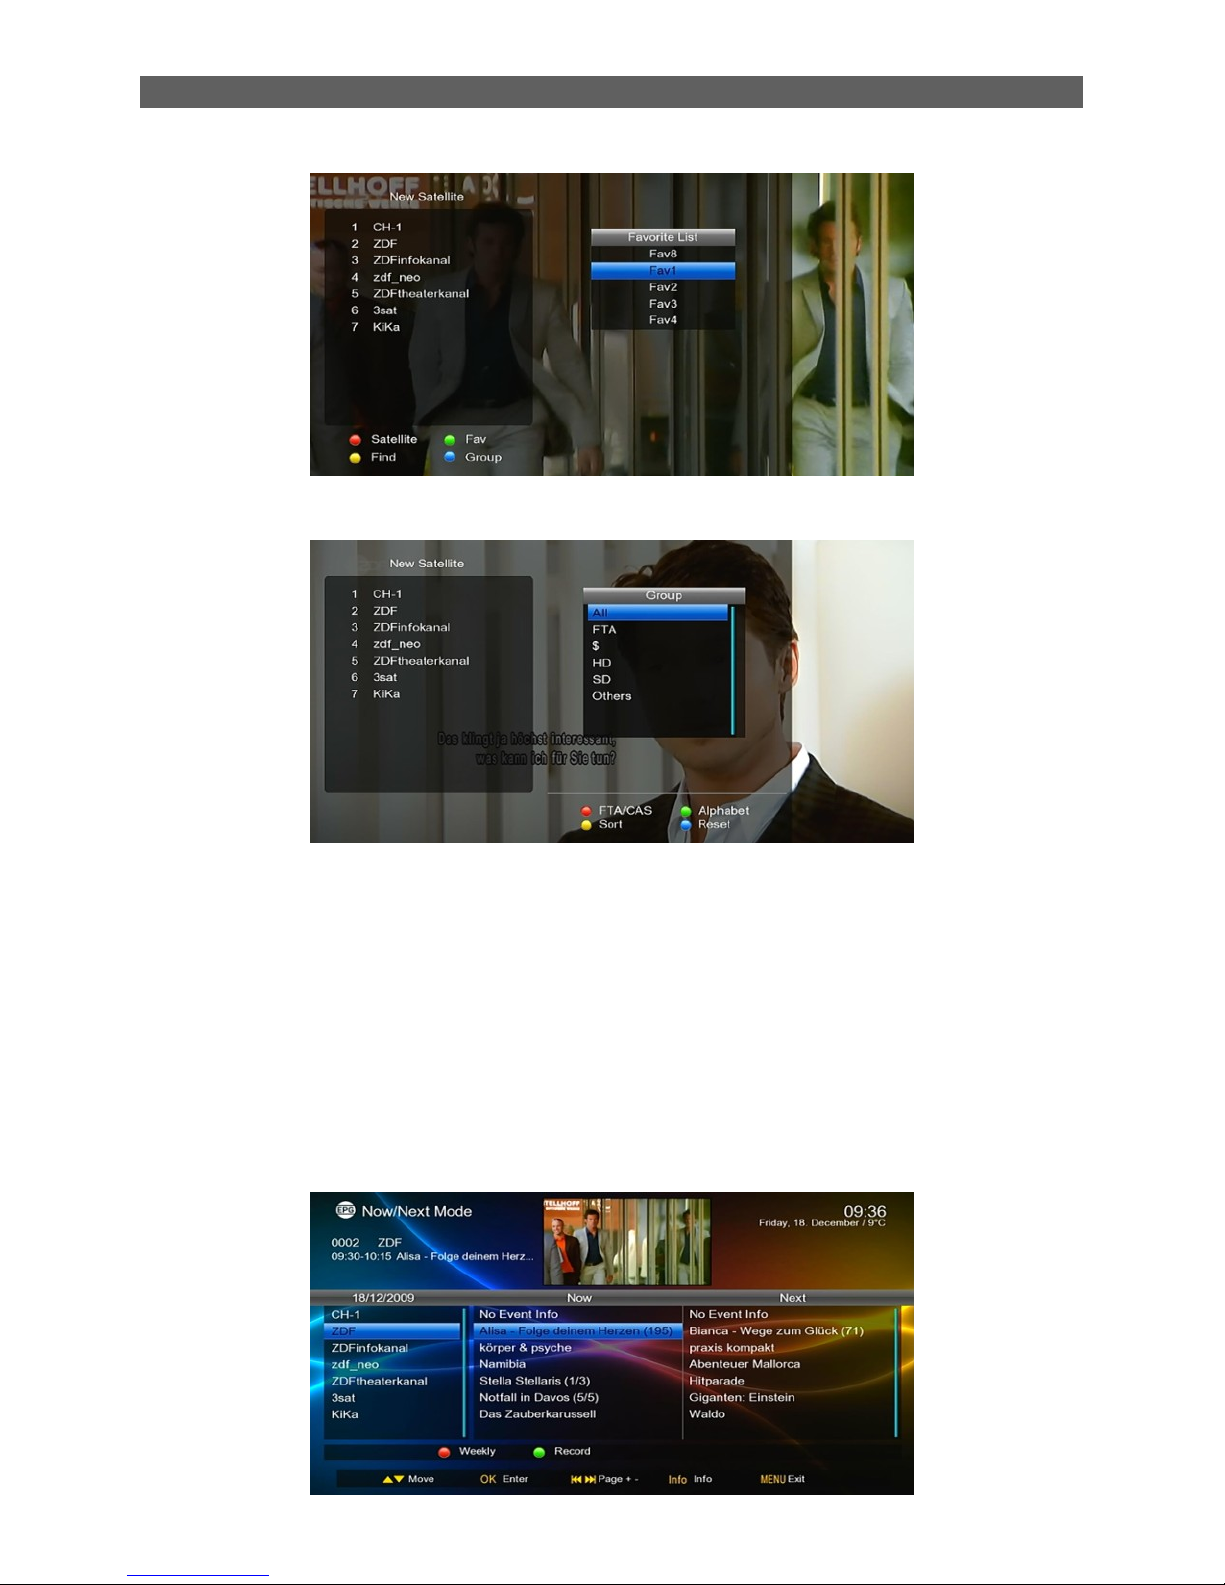
Press [Green] button to display [ Fav list], Press [▲/▼] to select and [OK] to confirm
your choice.
Press [Yellow] button to open the Find window. You can use this feature to find
channel by their names.
Page 14
Basic Operations
11
Press [Blue] button to open the “Group” window like showed beside.
2.22 EPG
To get the information of programs being played or to be played in coming days, press EPG key to
enter the electronic program guide (EPG). The EPG information depend on the channel, if the
channel have not EPG information, the relative field show “No Event Info”.
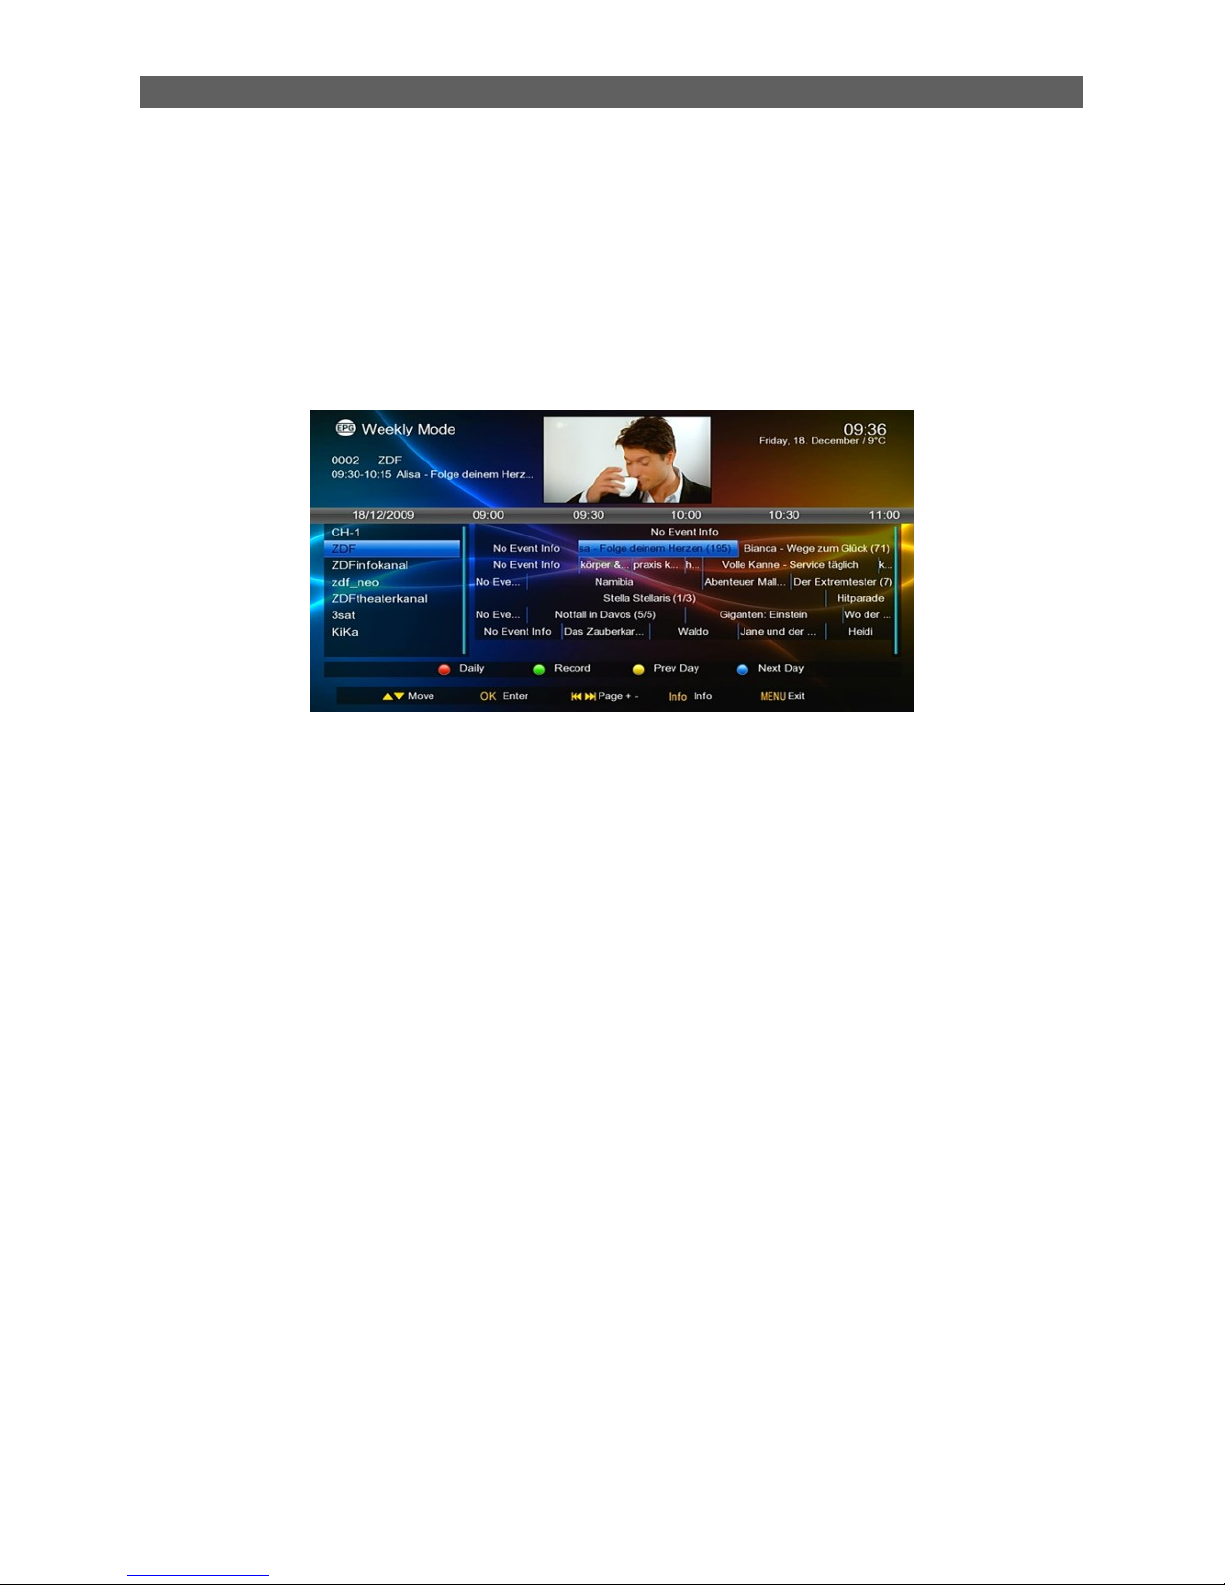
EPG info has three modes: Now/Next Mode, Daily Mode and Weekly Mode. The system will
enter the Now/Next mode by default, and you can press the red function key to change to other
modes. Press EXIT or EPG keys to exit EPG.
1. Now/Next Mode
Page 15
Basic Operations
12
Green function key: When the highlight is in Area 5, press this key to record the selected program.
When the highlight is in Area 6, press this key to schedule to record the selected program
(Scheduled Record).
In addition, press INFO key to show the detailed information of the selected program.
2. Daily Mode
In Daily Mode, you can find the information of the programs on a day. See the figure below:
Yellow or blue function keys: Display EPG information of previous day or next day.
Green function key: If the selected program is being played, pressing this key can record the
program. If the selected program has not been played yet, pressing this key can schedule to play
or record the program.
2.23 INFO
Show or hide program info.
Show the information of the selected item while in EPG state.(Optional)
Show the detailed information of the being played media file while in multimedia playback .state.
(Optional)
Show the record information or record list while in record mode.
2.24 I◄◄/►►I
Go to the previous or next media file to play while in multimedia playback state.
2.25 ◄◄/►►
Fast Rewind or Fast Forward while in multimedia playback state.
Selection: 2x, 4x, 8x, 16x, 32x speed.
2.26 AUDIO
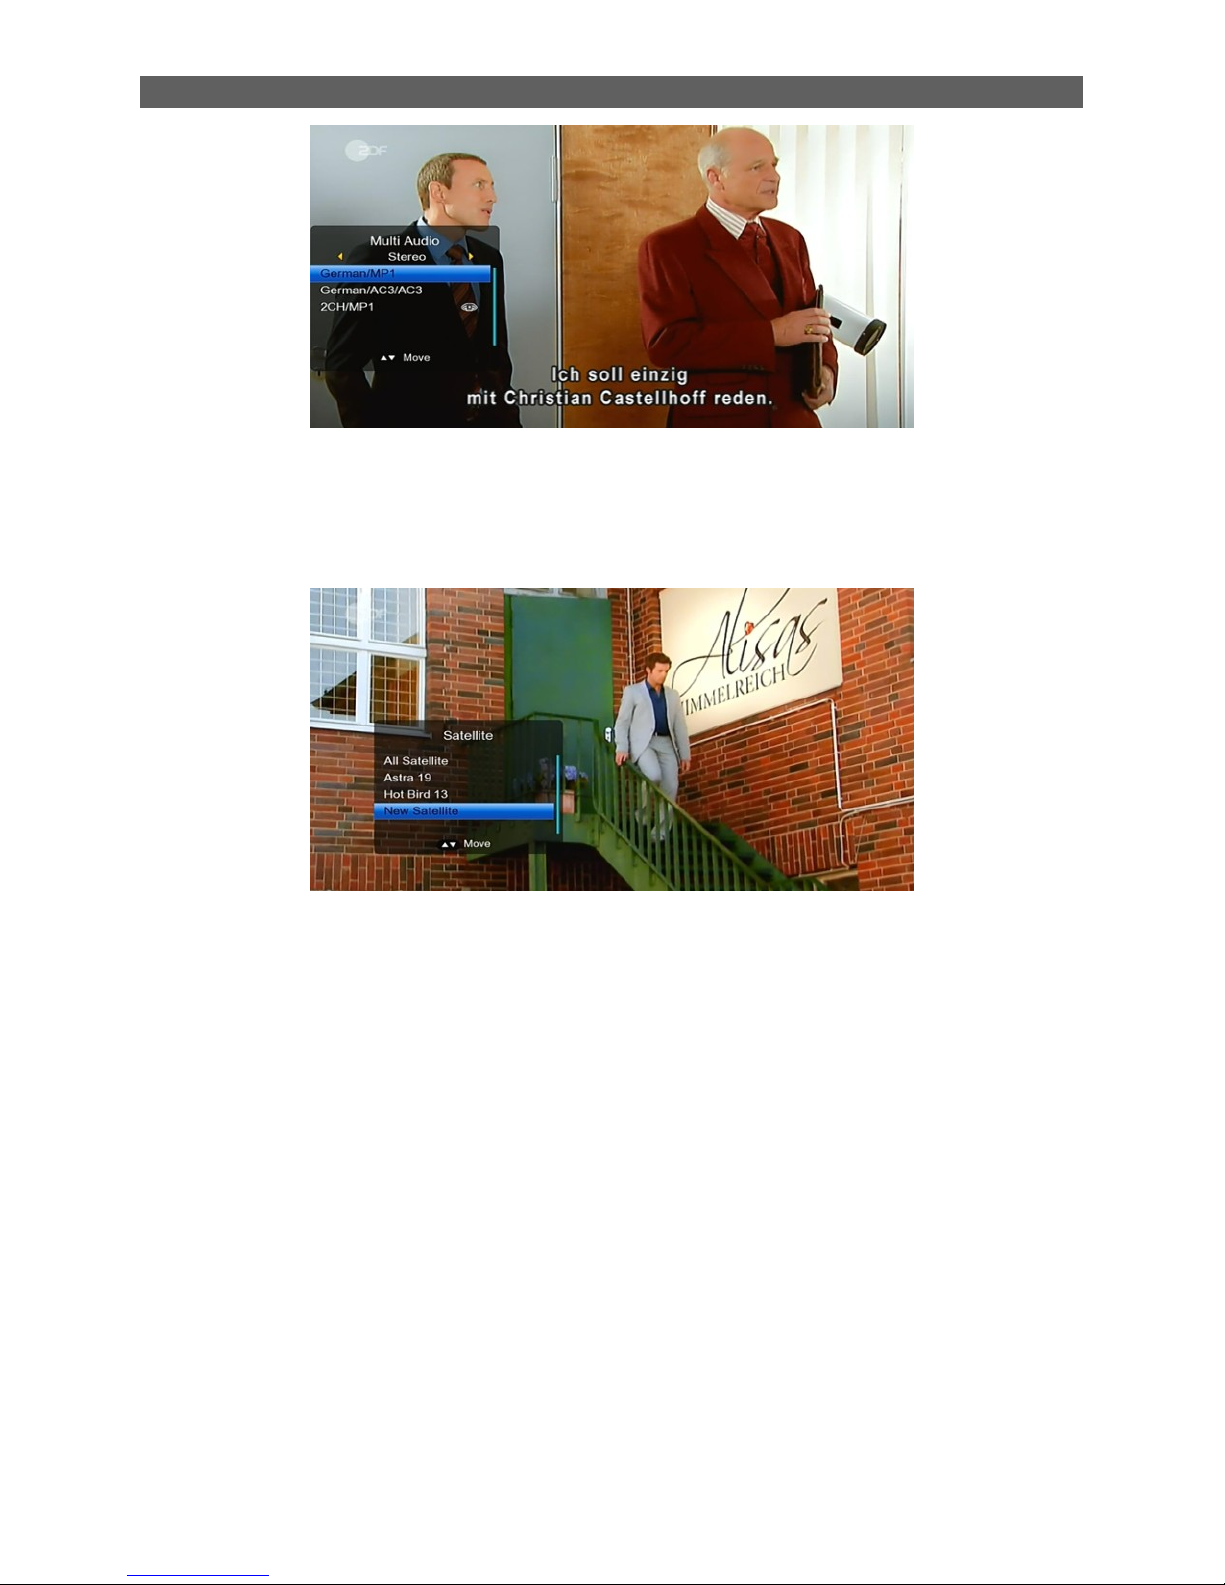
1. In TV mode, press the [Audio] button to open the Multi Audio window.
2. Press [VOL◄/►] to select sound channels
3. Press [▲/▼] to select audio language.(Optional)
Page 16
Basic Operations
13
2.27 SAT
1. In TV mode, press [SAT] button to open satellite list and select there, then press [OK] to
open “TV Channel List” menu, select channel of the current.
2. In satellite list, press [CH▲/▼] to switch directly between satellites.
2.28 Channel Number
In TV mode you can enter the channel number directly with your remote control unit and confirm
the number with the OK button to change to the desired channel
2.29 FAV
1. In TV mode press the [FAV] button to display the Favorite Group window on the screen as
the picture beside shows.
2. In the Favorite Group window you can select the desired favorite channel with [CH▲/▼]
and confirm it with [OK] to switch to it. In bigger groups you can navigate with [PGUP/
PGDN].
3. With [VOL◄/►]. You can select different Favorite Groups.
4. Press [Exit] to close the Favorite Group window.
? Frequently Asked Question
Q: Why the screen displays “No Favorite Channel” after pressing the [Favorite] button?
A: No channels have been assigned to a Favorite Group yet. You can do this in the channel
menu.
2.30 RECALL
Pressing the [Recall] button allows you to toggle between the actual and the last selected
channel.
Page 17
Menu Operations
14
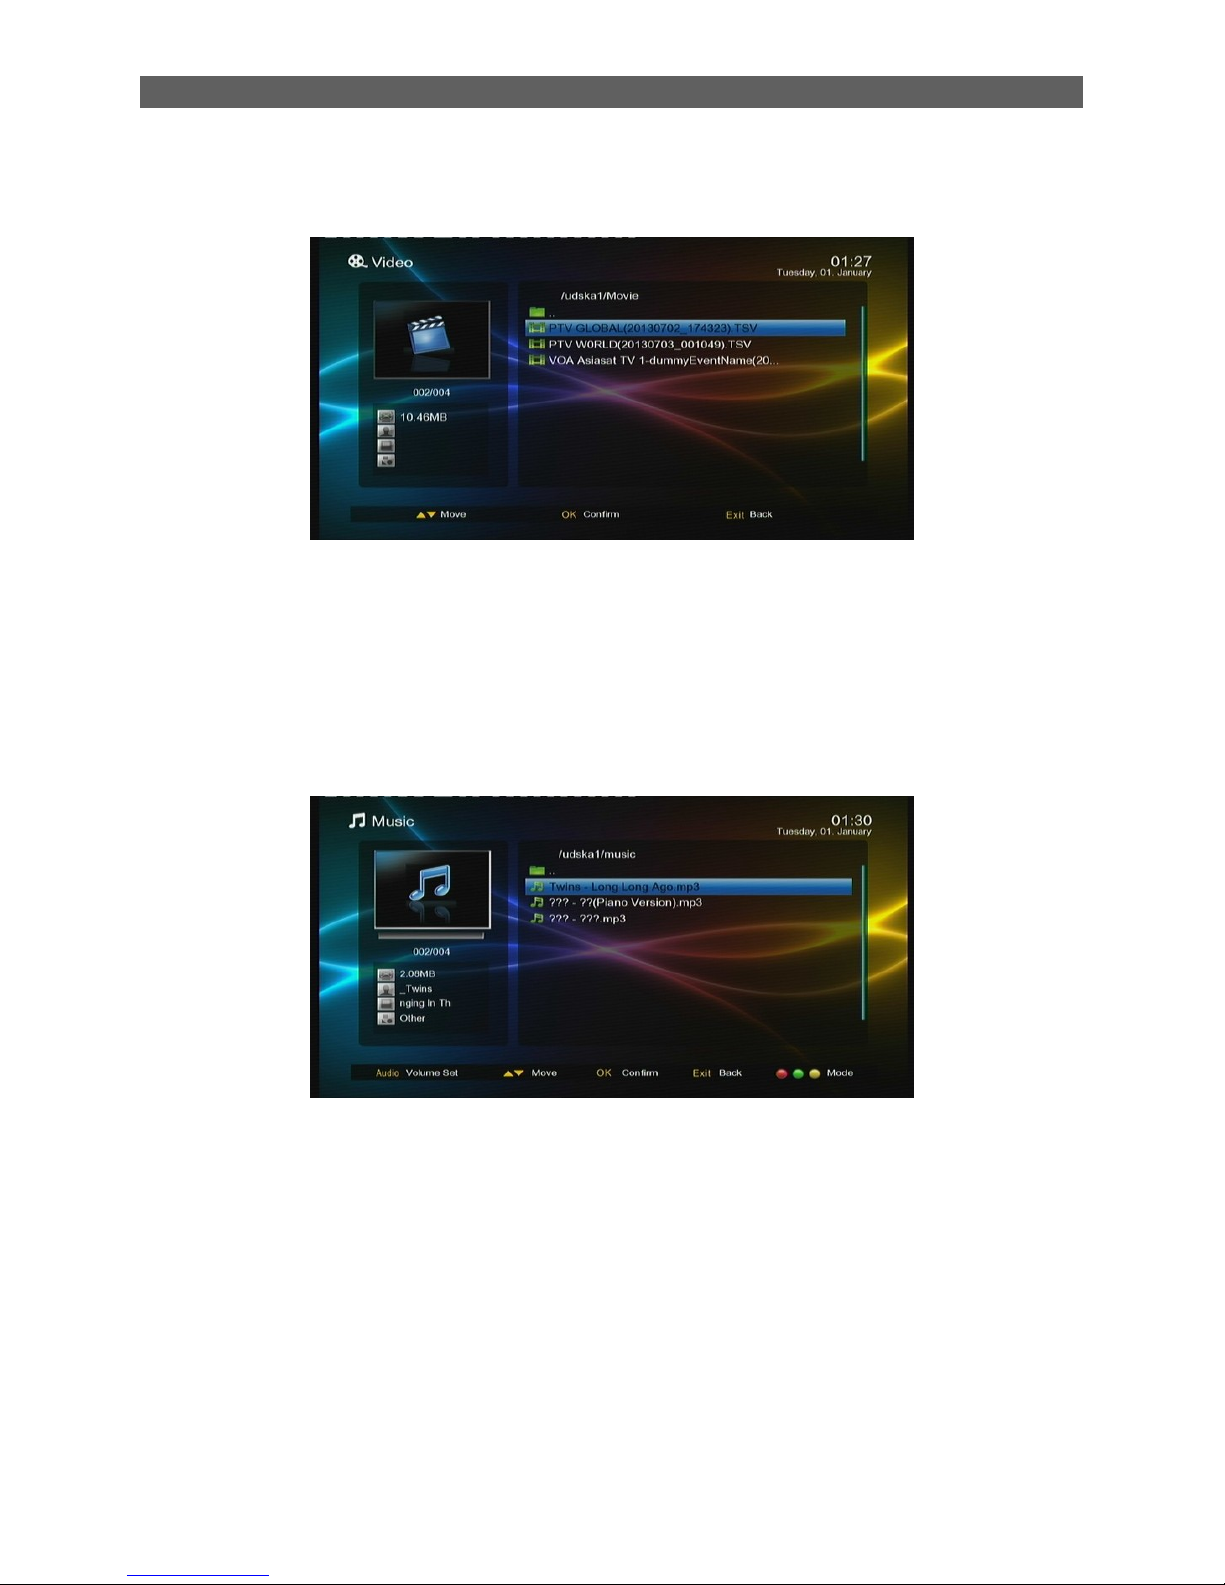
3. Video
The Movie module is for playing video files stored on the USB (CARD) device.
Press [OK]or [ ►] keys to play the selected video file
Press [I◄◄/►►I] and [◄◄/►►] to play the previous or next video at the same directory
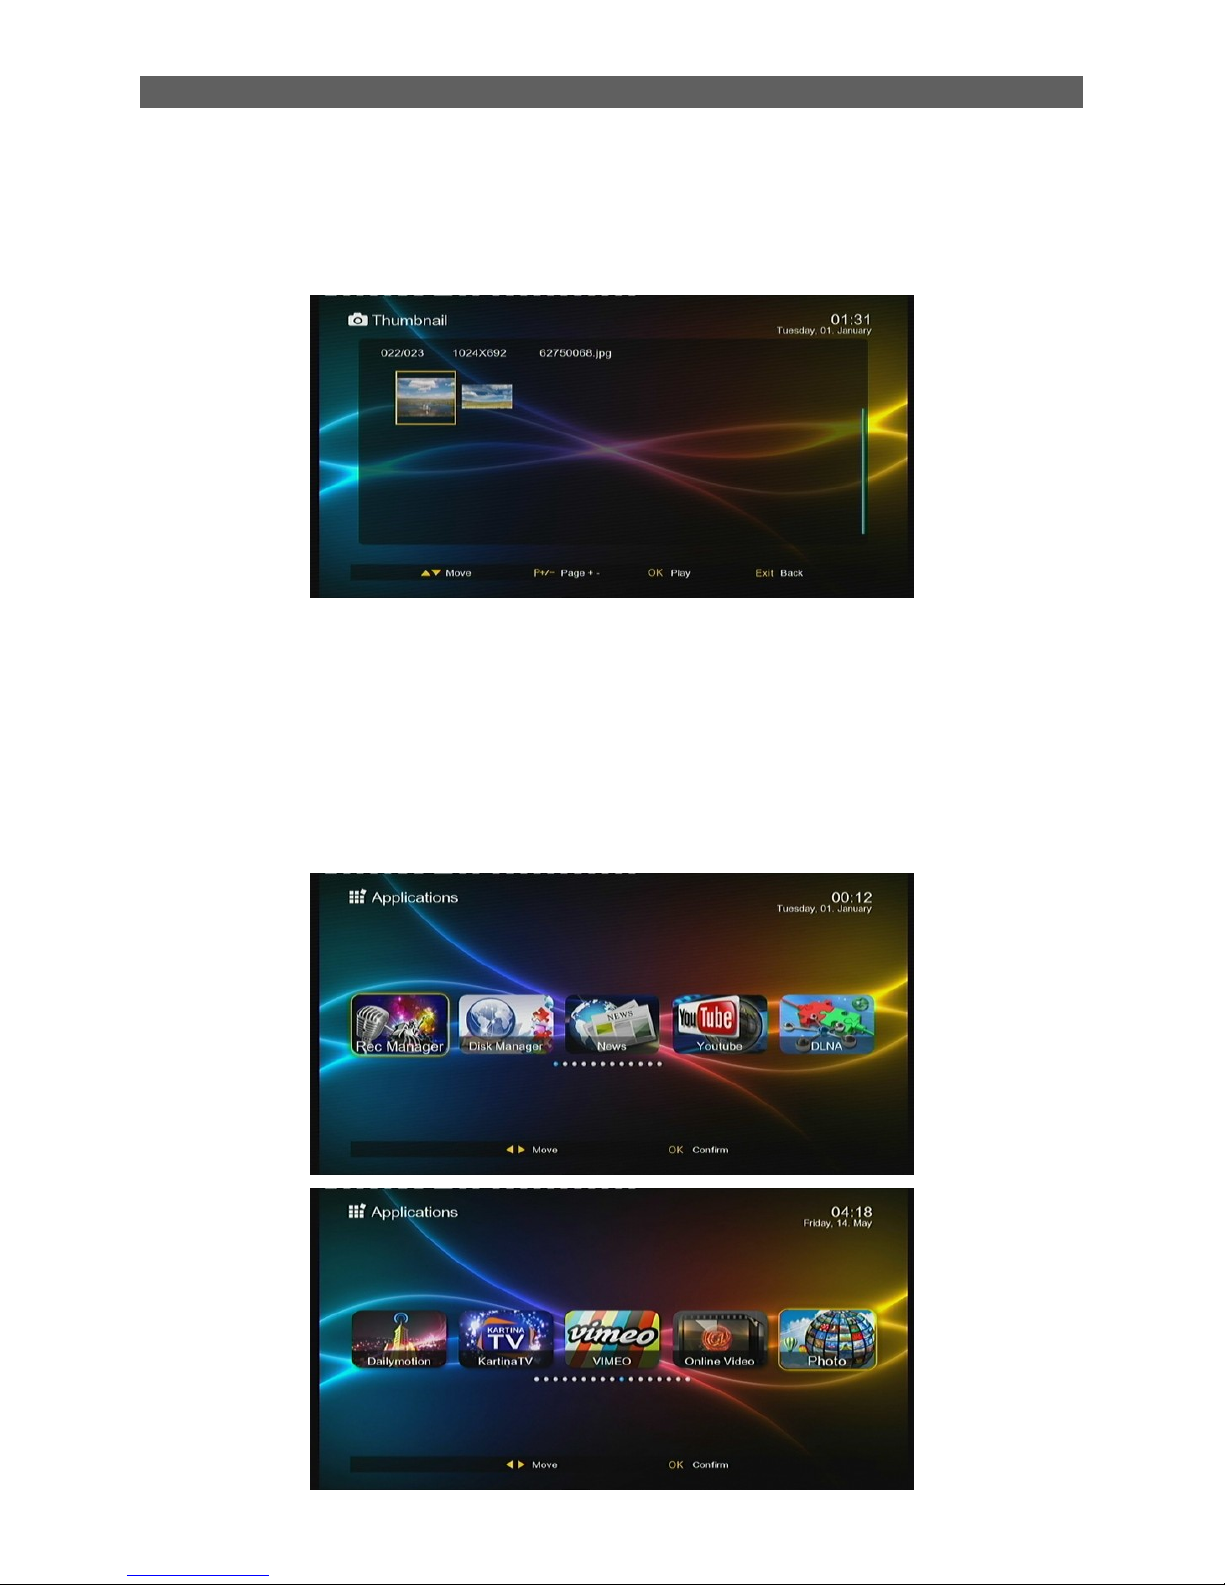
4. Music
The Music module is for playing audio files stored on the USB (CARD) device. Most popular audio
formats are all supported.
Press [▲/▼] keys to select the previous or next audio files.
Press [OK]or [ ►] keys to play the selected audio file. (If the audio file is under a folder,
pressing [◄] key can exit the folder.)
Fast Play: Press [◄◄/►►]keys to fast move forward or backward through the audio
file. The max fast play speed is x32. Press PLAYS keys to resume the normal playback.
Stop: Press STOP key to stop the current playback.
Pause: Press PAUSE key to pause the current playback. Pressing PLAY key can
resume the playback.
Exit: Press EXIT or RECALL keys to exit the playback interface and return to the
multimedia type select interface. (Note that if the background play function has been
turned on, the music will not stop but become background music.)
Page 18
Menu Operations
15
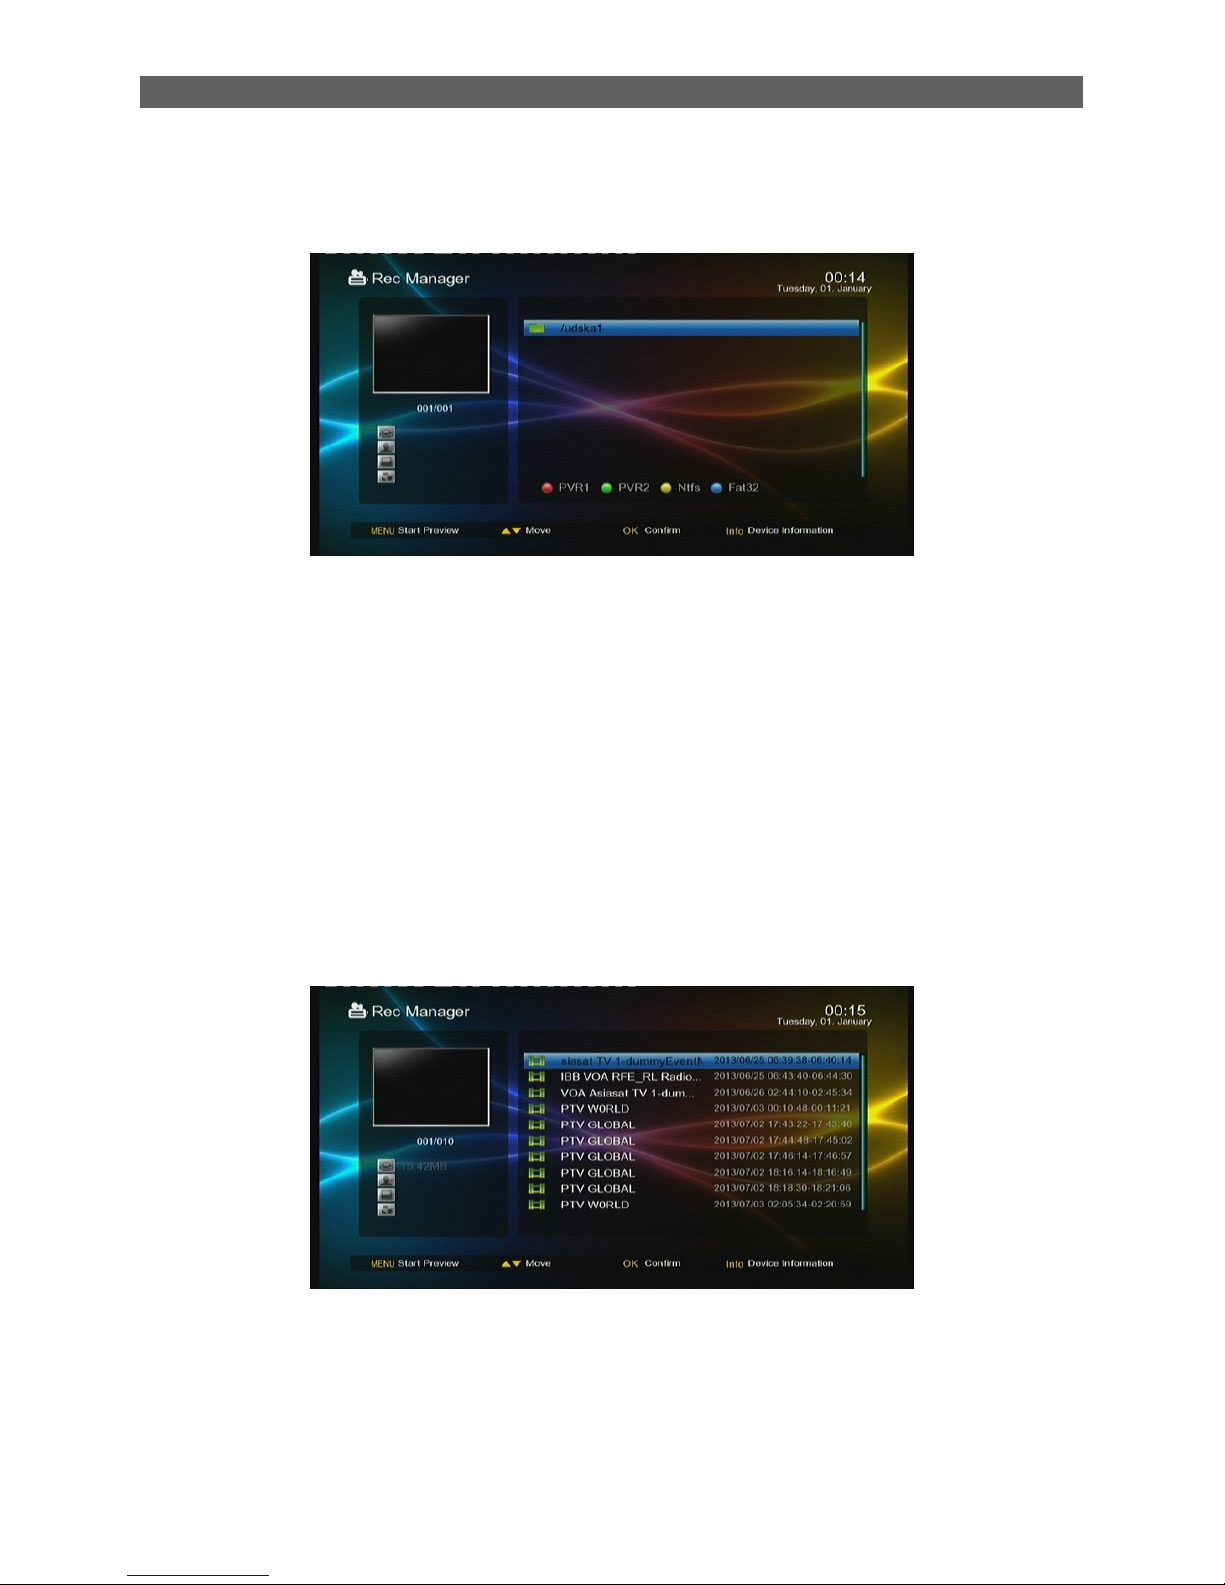
5. Picture
The Picture module is for playing image files stored on the USB (CARD) device. Most popular
image formats are all supported.
In the Module Select Area, press [◄/►] keys to select the Photo type, then press [OK] or [▼] keys
to enter the image file list area. See the figure above:
6. Applications
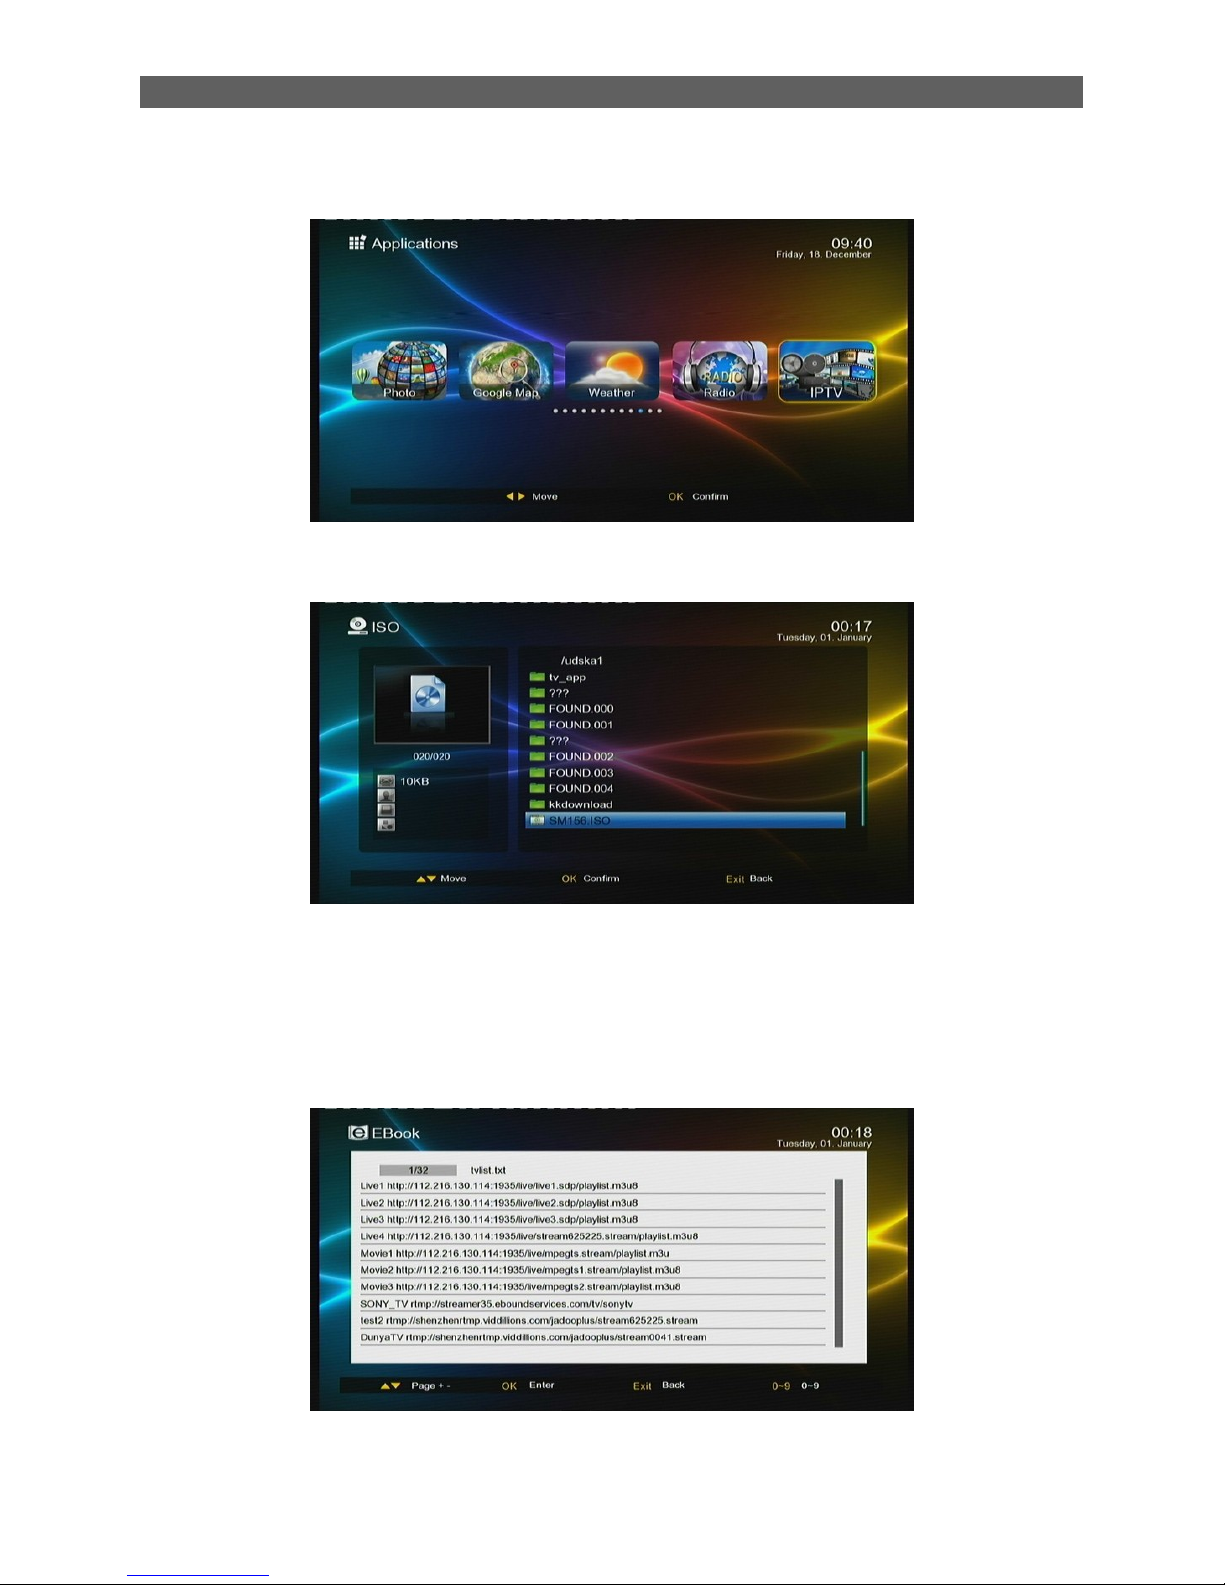
This option shows all the applications you can use, the figure as below:
Page 19
Menu Operations
16
6.1 Rec Manager
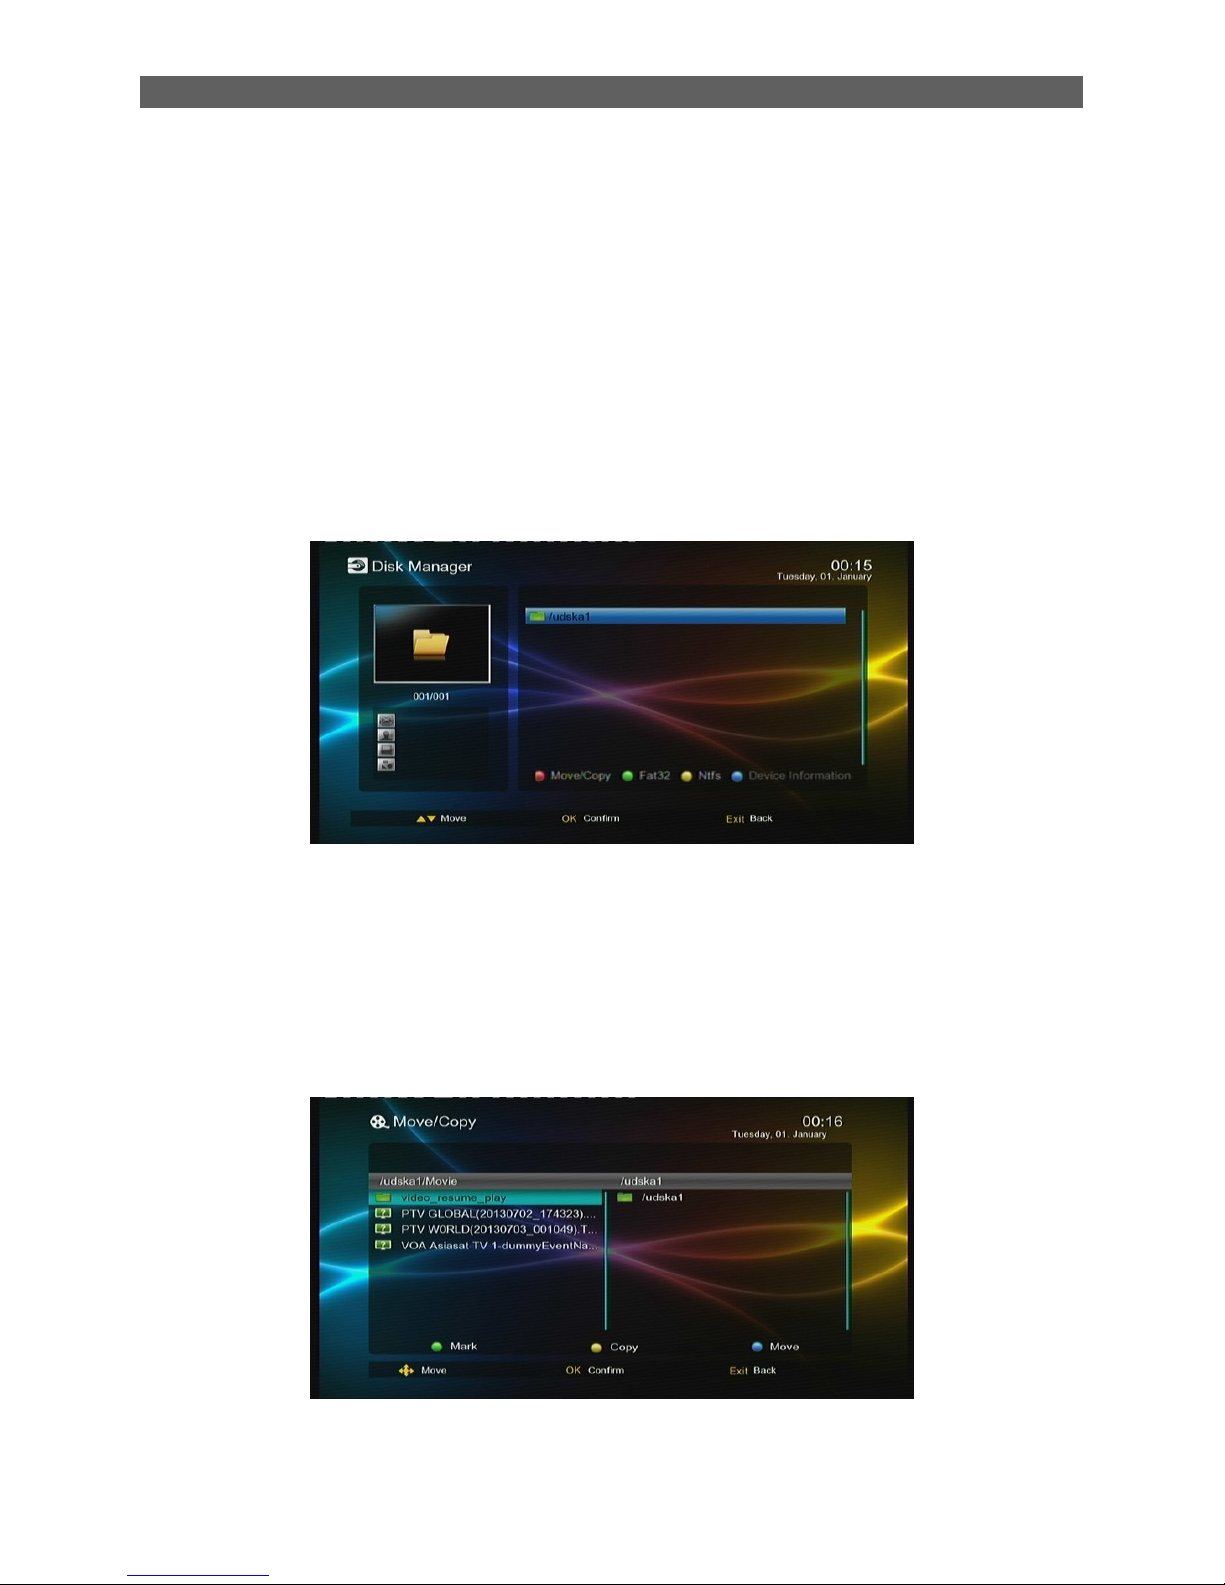
The Rec Manager module is for users to carry out record setting and view the programs recorded:
If the USB (CARD) device has more than one partition, you should manually set the partition in
which record files will be saved.
Red and Green function key: Set the selected partition as the default record partition.
Blue function key: Format the selected partition into FAT32 format.
Yellow function key: Format the selected partition into NTFS format.
To view record files, select the partition that stores the record files and then press ENTER key to
enter it. The system will auto list all the recorded programs, see below:
To play a record file: press [▲/▼] keys to select the record file first and then press
[OK]or[ ►] keys to play it.
Page 20
Menu Operations
17
During playback, the things you can do only include to press [◄◄/►►] keys to fast
backward or forward play the file, and to press RECALL key to return to the record file list.
Both file switching and repeat mode setting cannot be done.
When the playback completes, the system will auto return to the record file list.
To delete a record file: select it first and then press the red function key.
To rename a record file: select it first and then press the green function key.
6.2 Disk Manager
The Disk Manager module is for disk and file management:
If the selected object is a partition:
Green function key: Format the selected partition into FAT32 format.
Yellow function key: Format the selected partition into NTFS format.
Red function key: Move or copy the files (folders) in this partition. See the figure
below.
Page 21
Menu Operations
18
The left list is the Source list, the right list is the Destination list. Before moving or copying a file
(folder), the things you should do include: selecting the file (folder) from the left list, then press the
green function key to confirm your selection, and then entering the destination directory in the
right list. Next, to copy the file (folder) you have selected, press the yellow function key; to just
move it, press the blue function key.
If the selected object is a file (folder):
Red function key: Move or copy the selected file (folder).
Green function key: Rename the selected file (folder).
Yellow function key: Delete the selected file (folder).
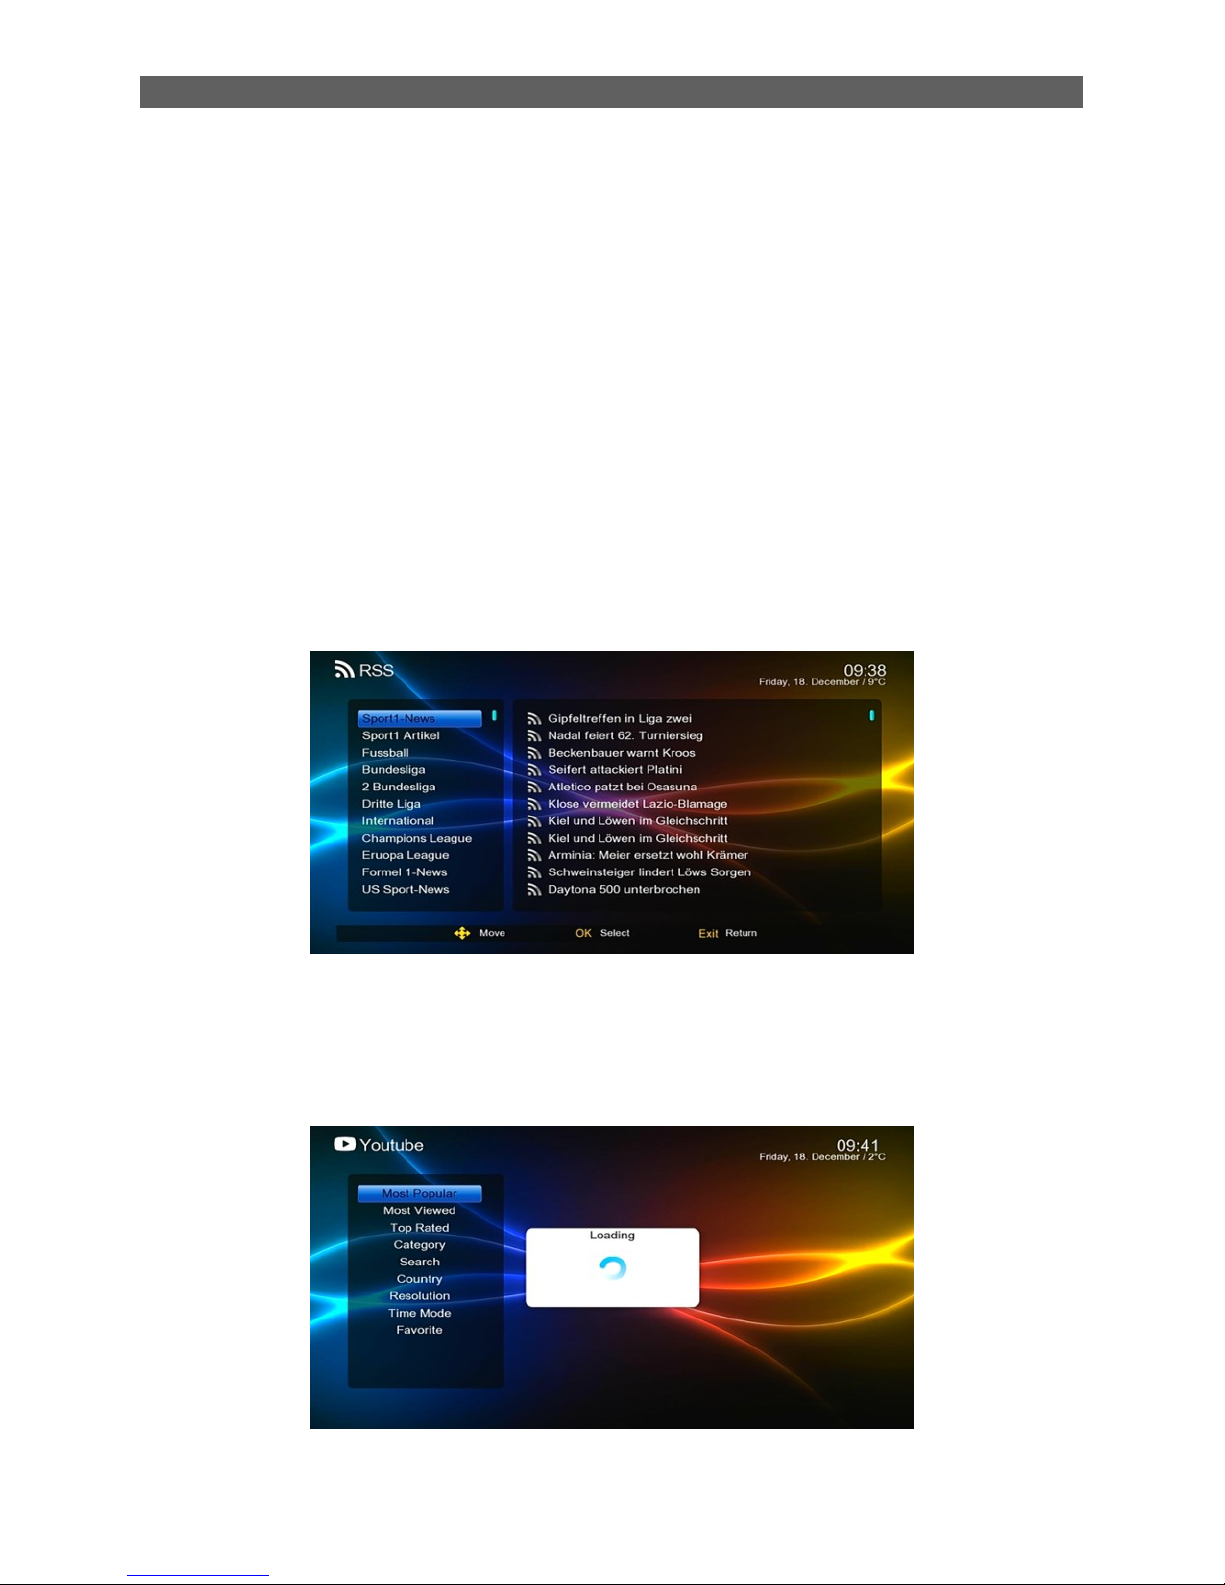
6.3 News
This module arranges news into several categories - National News, International News,
Entertainment News, etc - for users to quickly find their favorites. See the figure below:
6.4 Youtube
The following menu is a Youtube site; you can remote control up or down to select a channel, and
so on
Page 22
Menu Operations
19
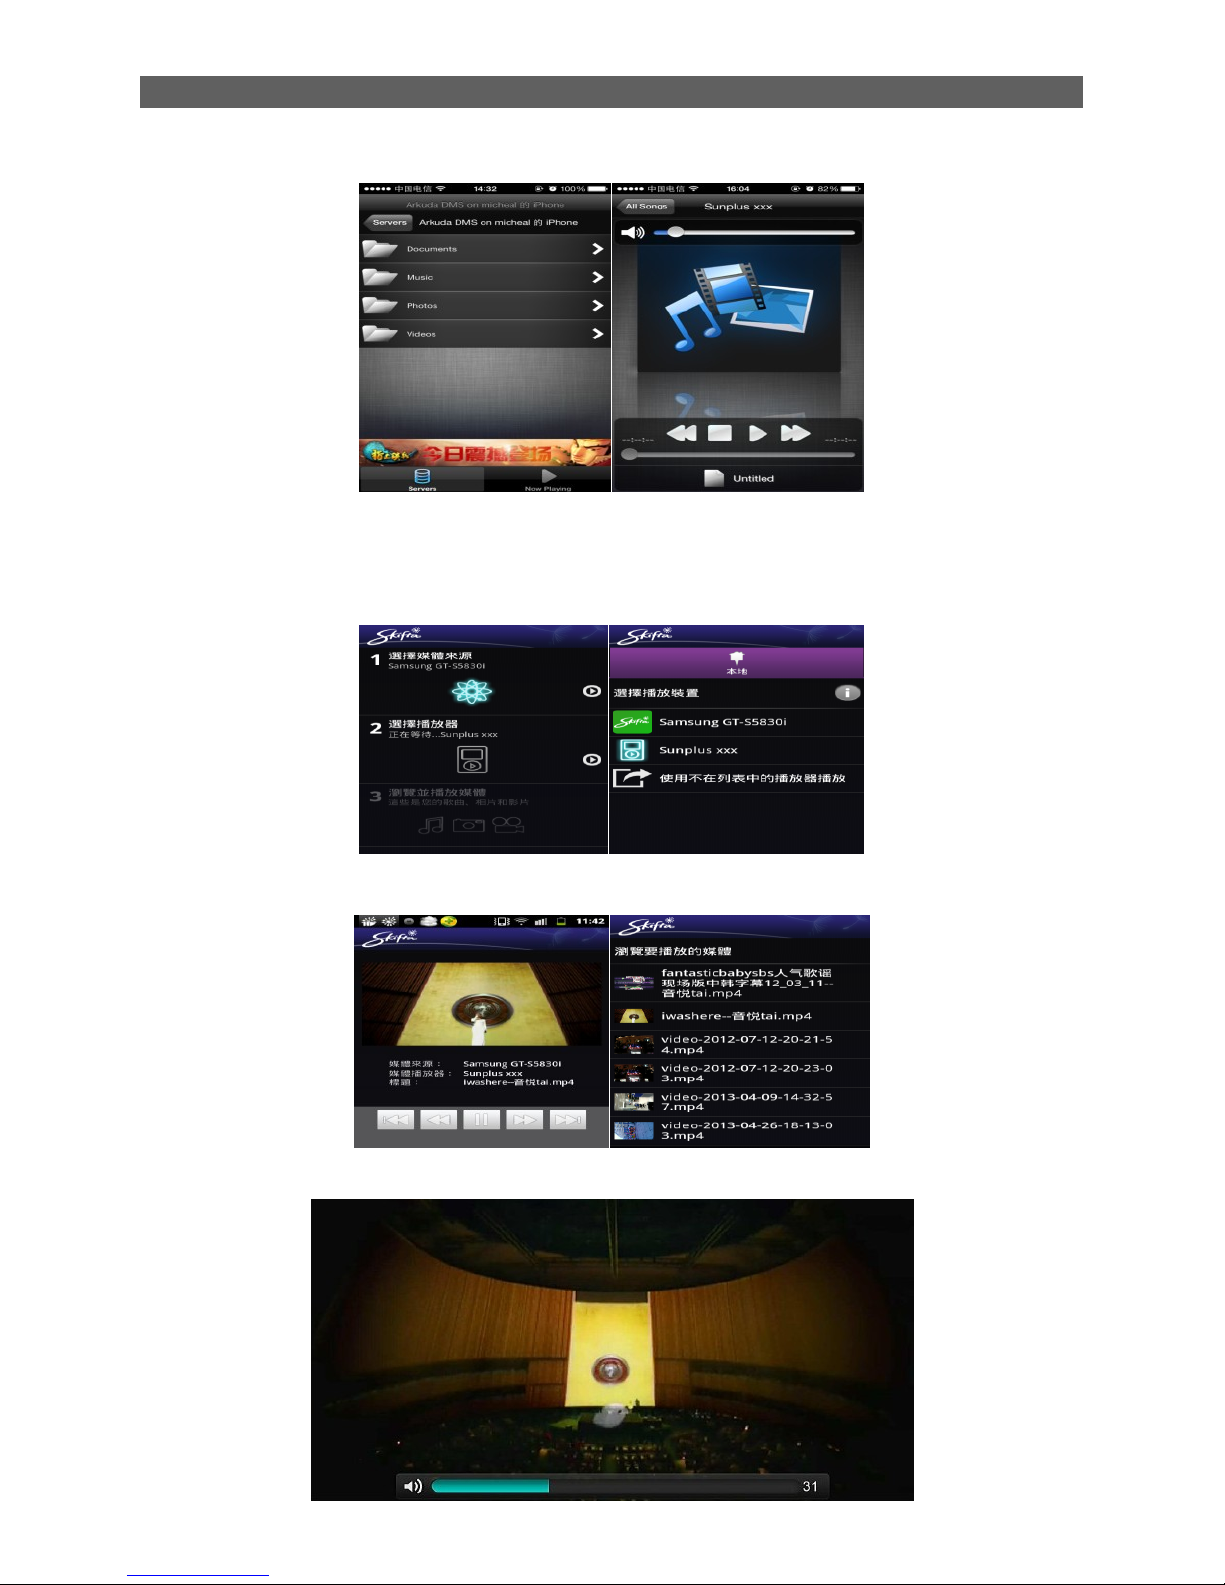
6.5 DLNA
DLNA function: the full name is “Digital Living Network Alliance”, which is a new network
application in Sunplus. It offers a communication and media play between your STB and your
mobile, laptop, Ipad…and support 2 functions:
1) DMP: Digital Media Player.
2) DMR: Digital Media Renderer.
3) DMS: Digital Media Server.
You can select the media from your mobile and play on TV through the STB (control side is your
mobile)
Step 1, Install DLNA tool into Mobile phone
(Suggestion:Skifta for Android system, and ArkMC lite for iOS system)
Step 2, Setup the network, be sure that the Phone and the STB in the same LAN.
See below Pictures:
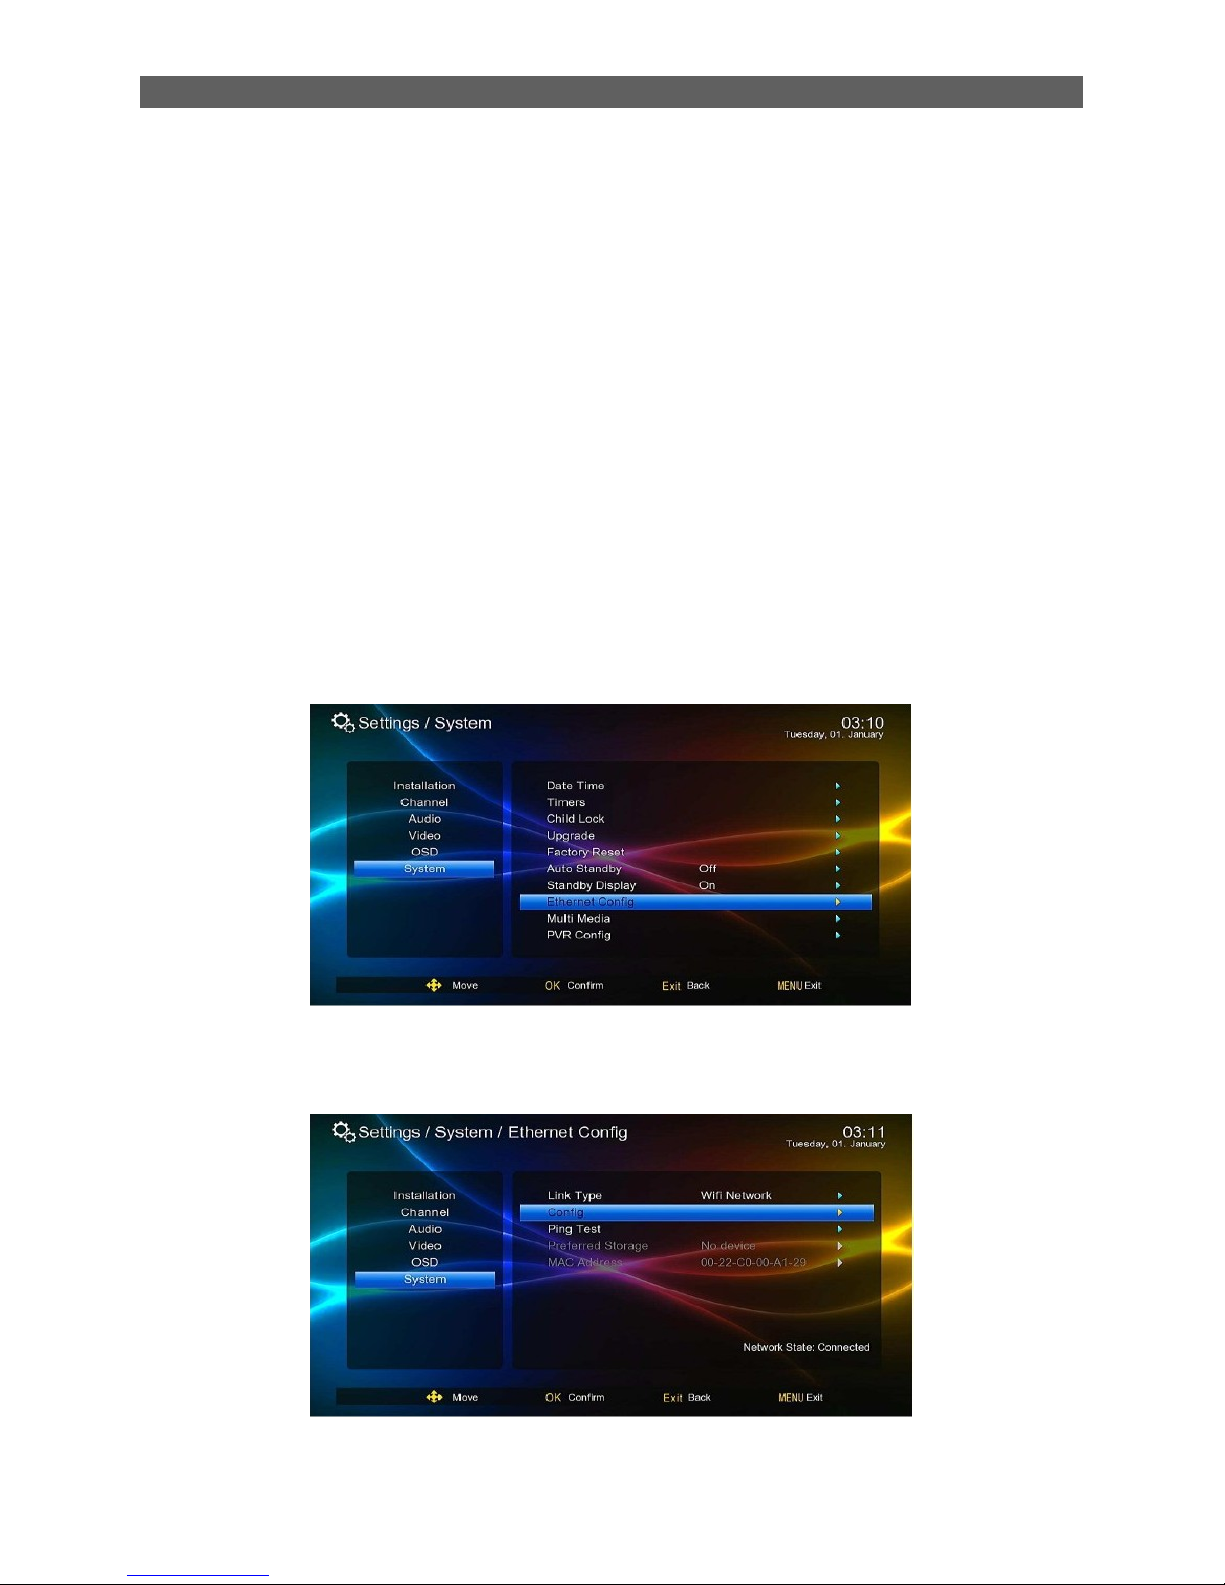
STB: Main menuSetttings System Ethernet config
Choose link type, you will see “Network state: Connected”;
Get into config, confirm STB connected the same net as Mobile phone.
Page 23
Menu Operations
20
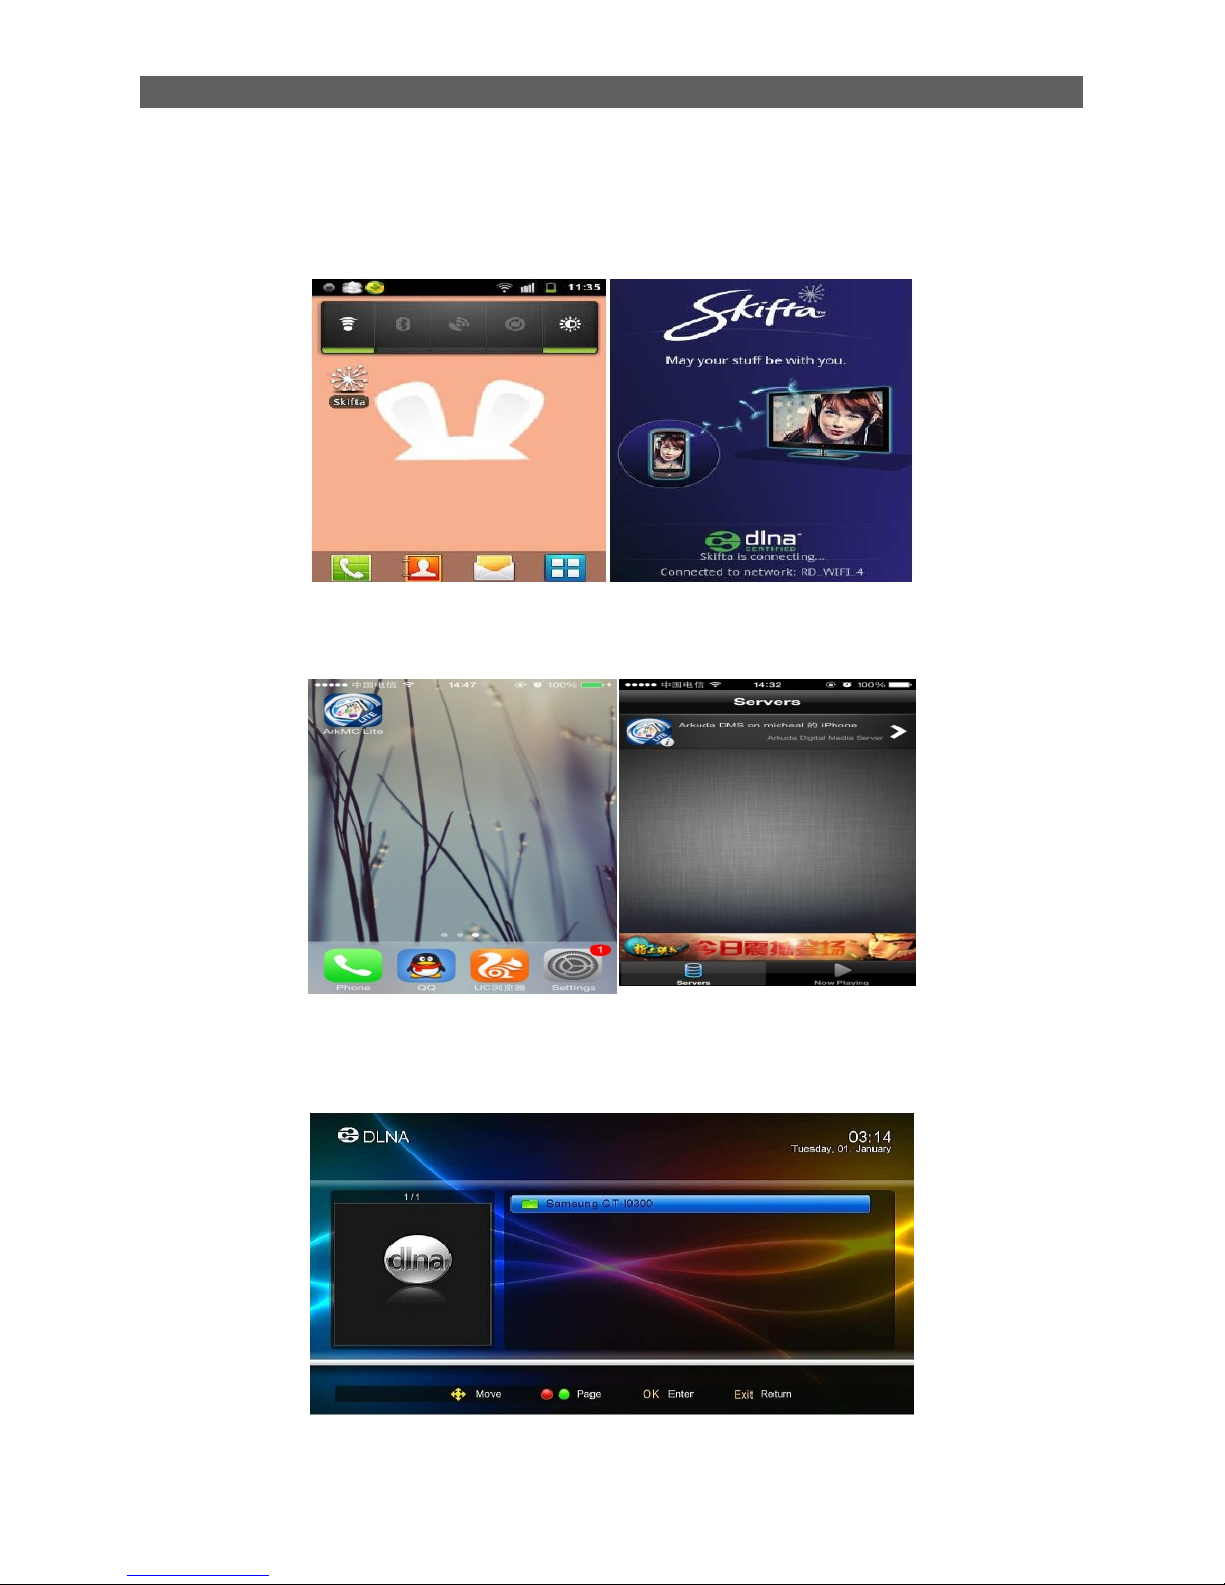
Step3,
A: Android Phone
Open the DLNA S/w in the phone, and keep it in opening state. (Keep the permission for outside
visiting),
B: iOS phone,
Open theArkMC lite, and keep it in opening state. (Keep the permission for outside visiting),
Step4, Setup STB, Open DMP function
STB: Main menu Application DLNA DMP
Waiting for seconds, STB will find the Phone, show as below
Step5, Choose the media files, play it.
Press Ok, choose the media file (Video, picture,MP3)
Page 24
Menu Operations
21
Step 1 and Step2 is same as DMP testing.
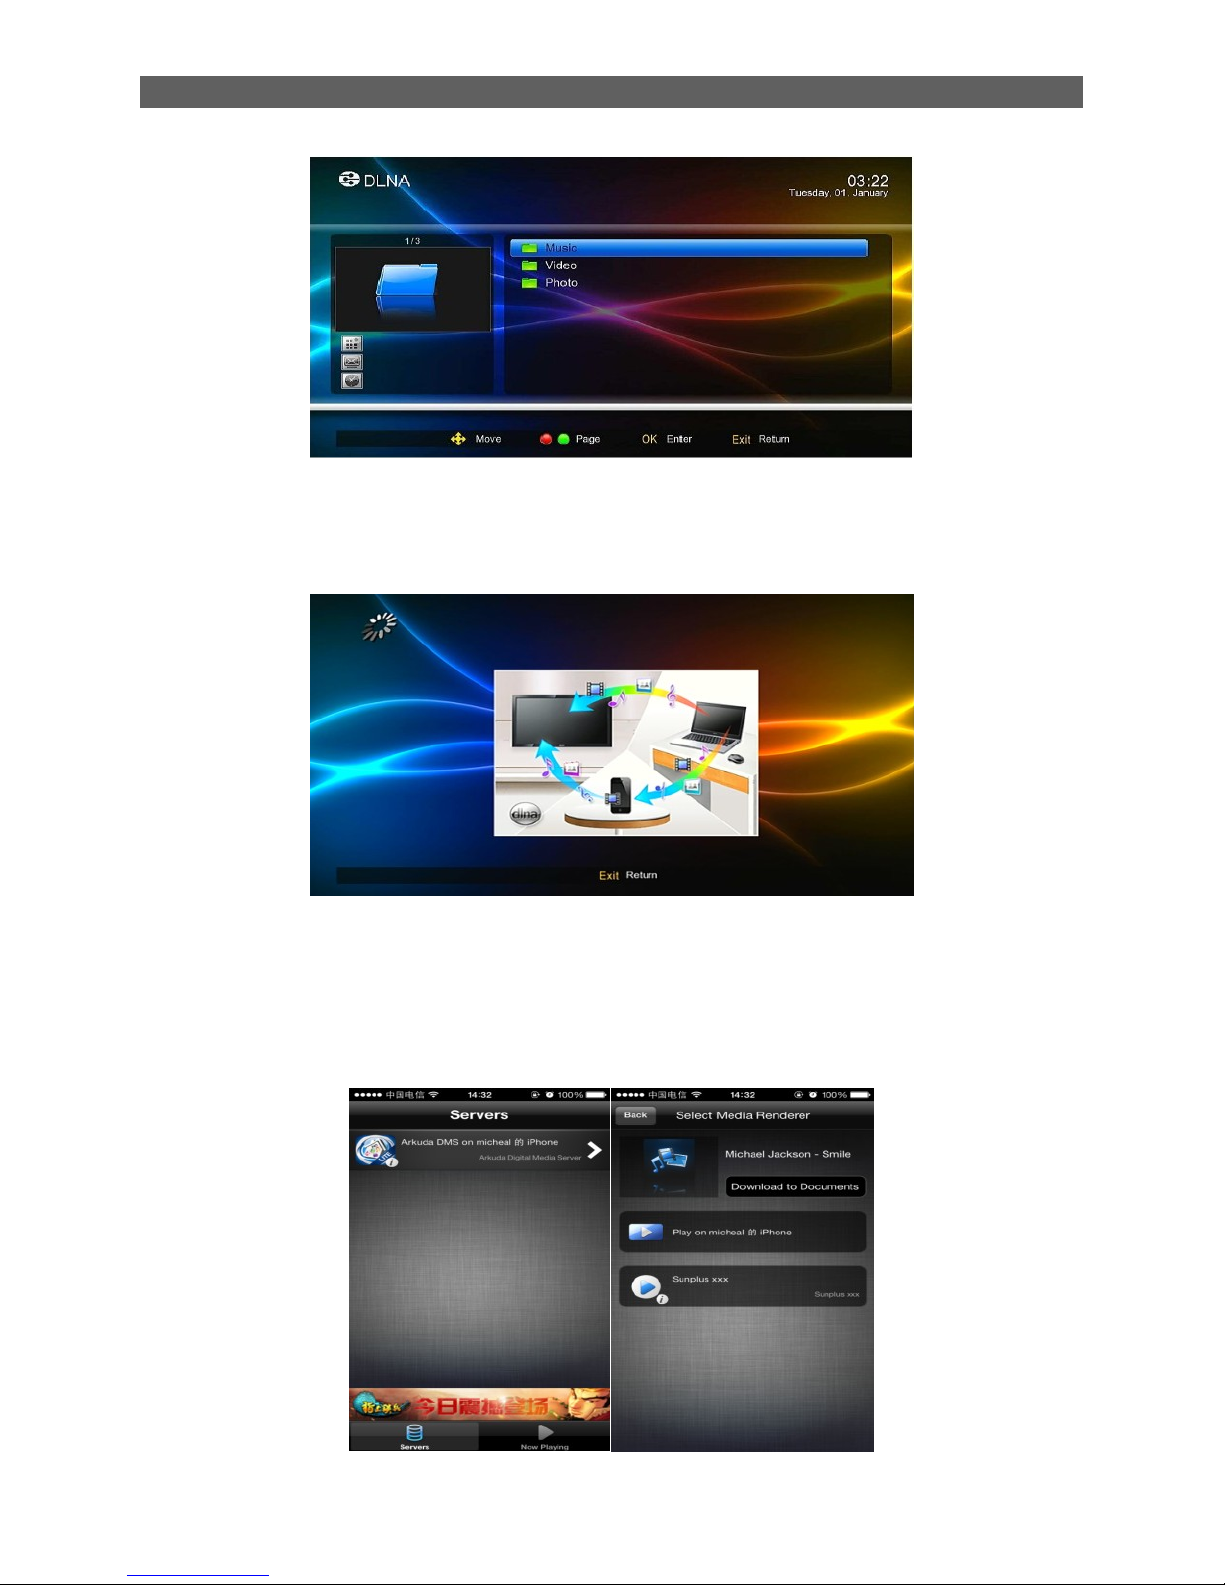
Step3: Main menu Application DLNA DMR, you can see a window as below, keep it.
Step4,
A: iPhone:
Open the DLNA Tool in the phone,will see the pictures as below,
This step is asking you choose the media resource, get into it the next step is choose Media
player. Here we choose Sunplus xxx.
Page 25
Menu Operations
22
The picture as below, it‟s a media list in the iPhone, choose a file and play it,
B : Android Phone:
Open the DLNA Tool in the phone,will see the pictures as below,
This step is asking you choose the media resource, get into it the next step is choose Media
player. Here we choose Sunplus xxx.
Finally, we can choose the file to play through “Browse and play media” .
The picture as below, it‟s a media list in the iPhone, choose a file and play it,
Step 5: You will see the window on the TV. Enjoy it!
Page 26
Menu Operations
23
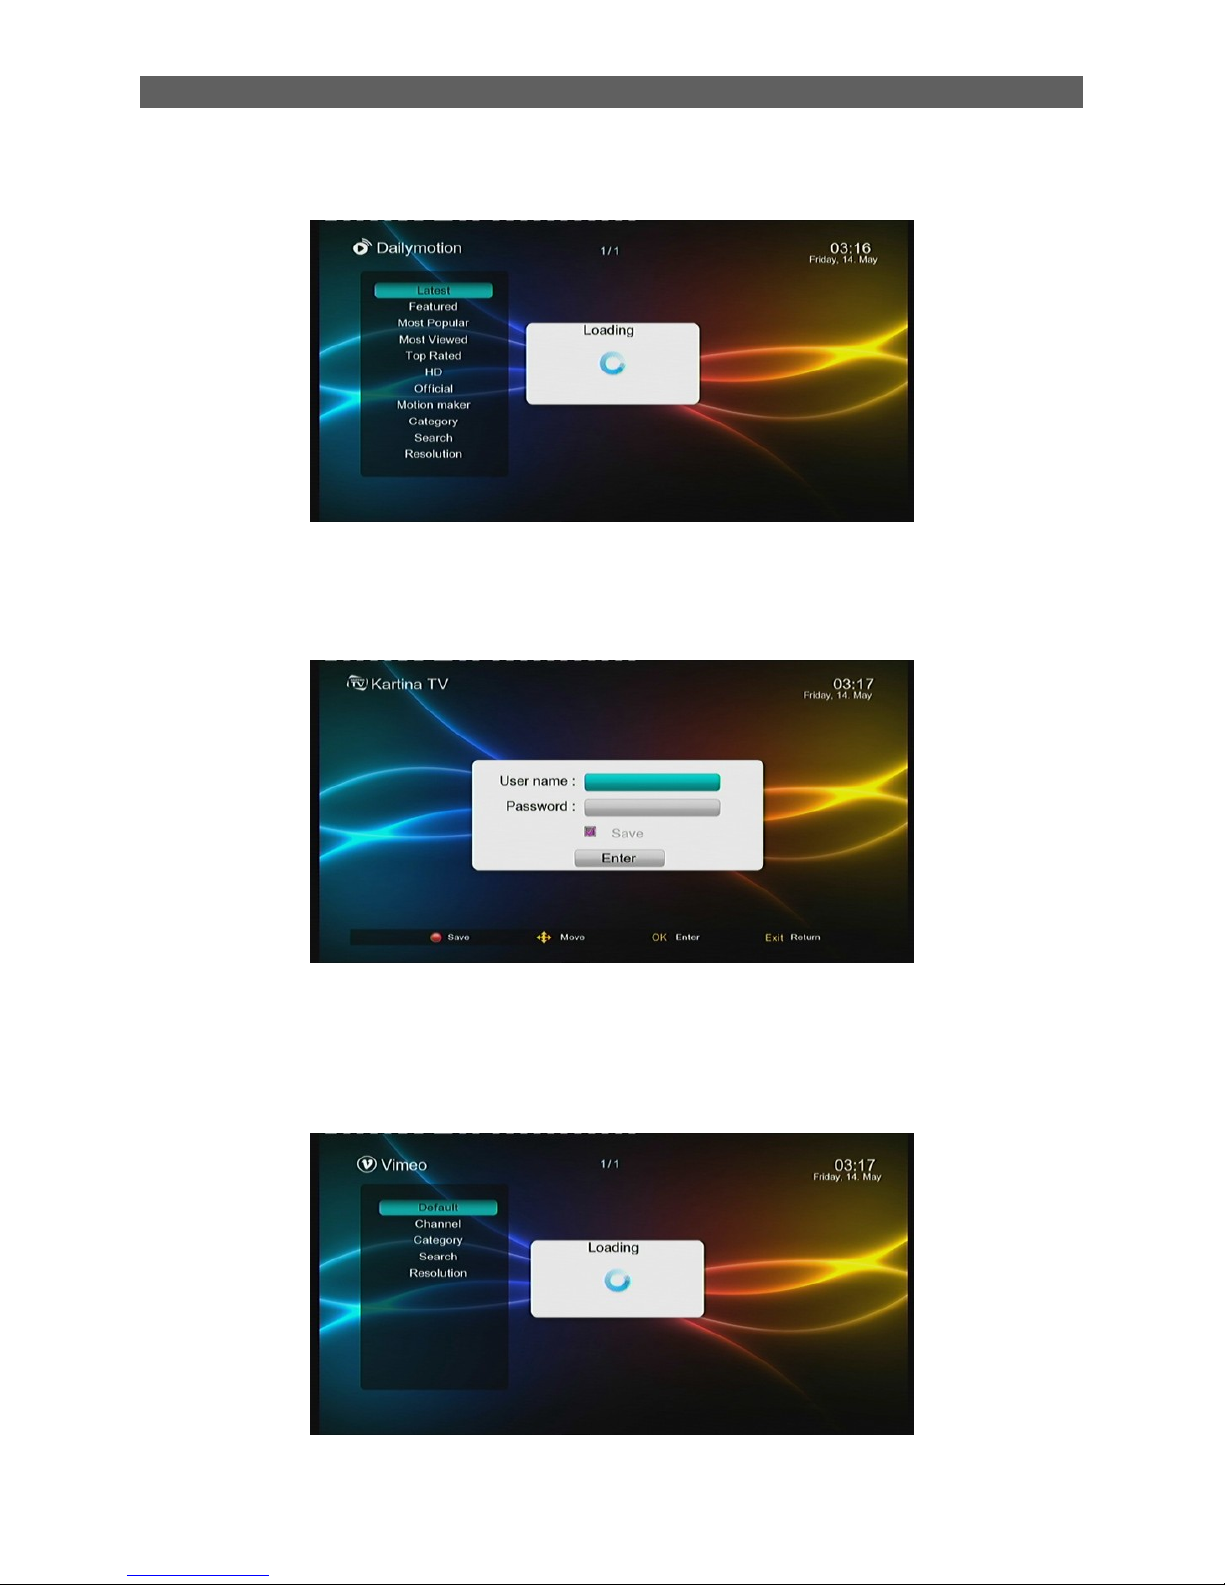
6.6 Dailymotion
Dailymotion is a video-sharing website on which users can upload, watch and share videos.
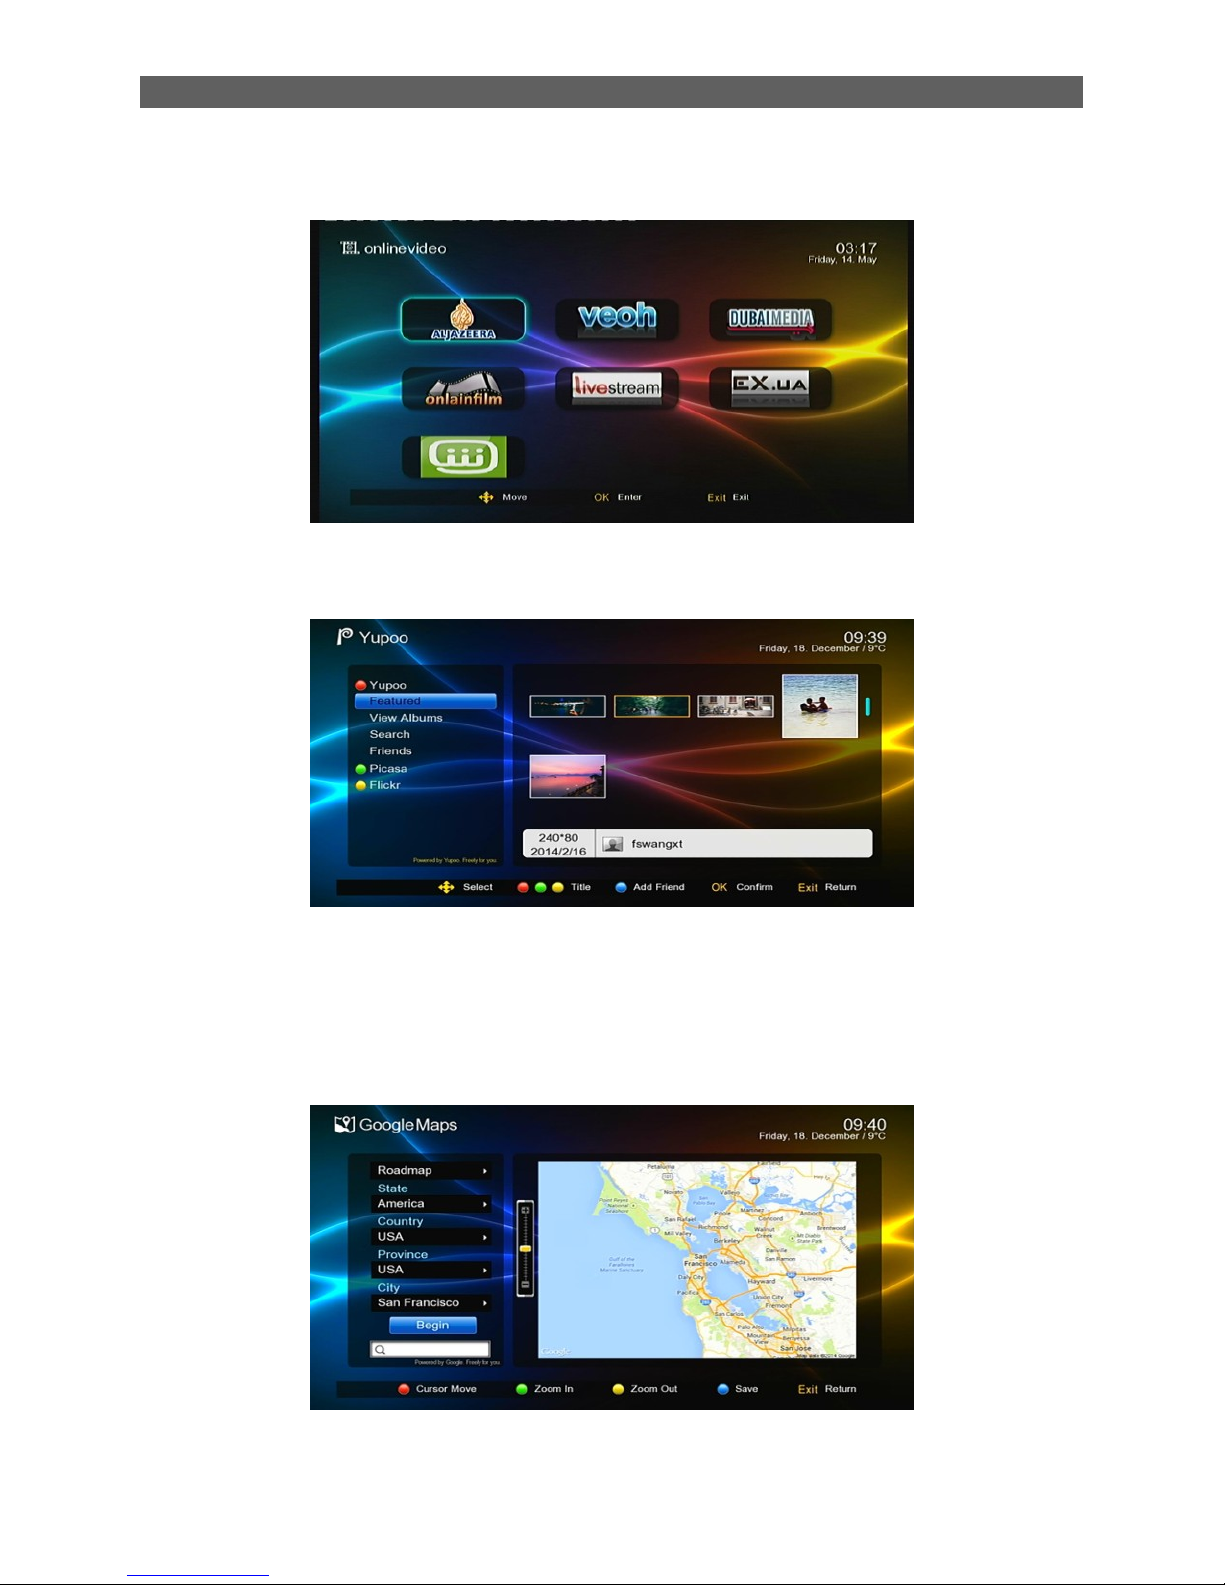
6.7 KartinaTV
Kartina TV is Russian Internet Television via Internet. The figure as below:
6.8 VIMEO
Vimeo is a respectful community of creative people who are passionate about sharing the videos
they make. The figure as below:
Page 27
Menu Operations
24
6.9 Online Video
This option access the Online Video.
6.10 Photo
The Photo module is for playing image files stored on the USB (CARD) device. Most popular
image formats are all supported.
In the Module Select Area, press [◄/►] keys to select the Photo type, then press [OK] or [▼] keys
to enter the image file list area. See the figure above:
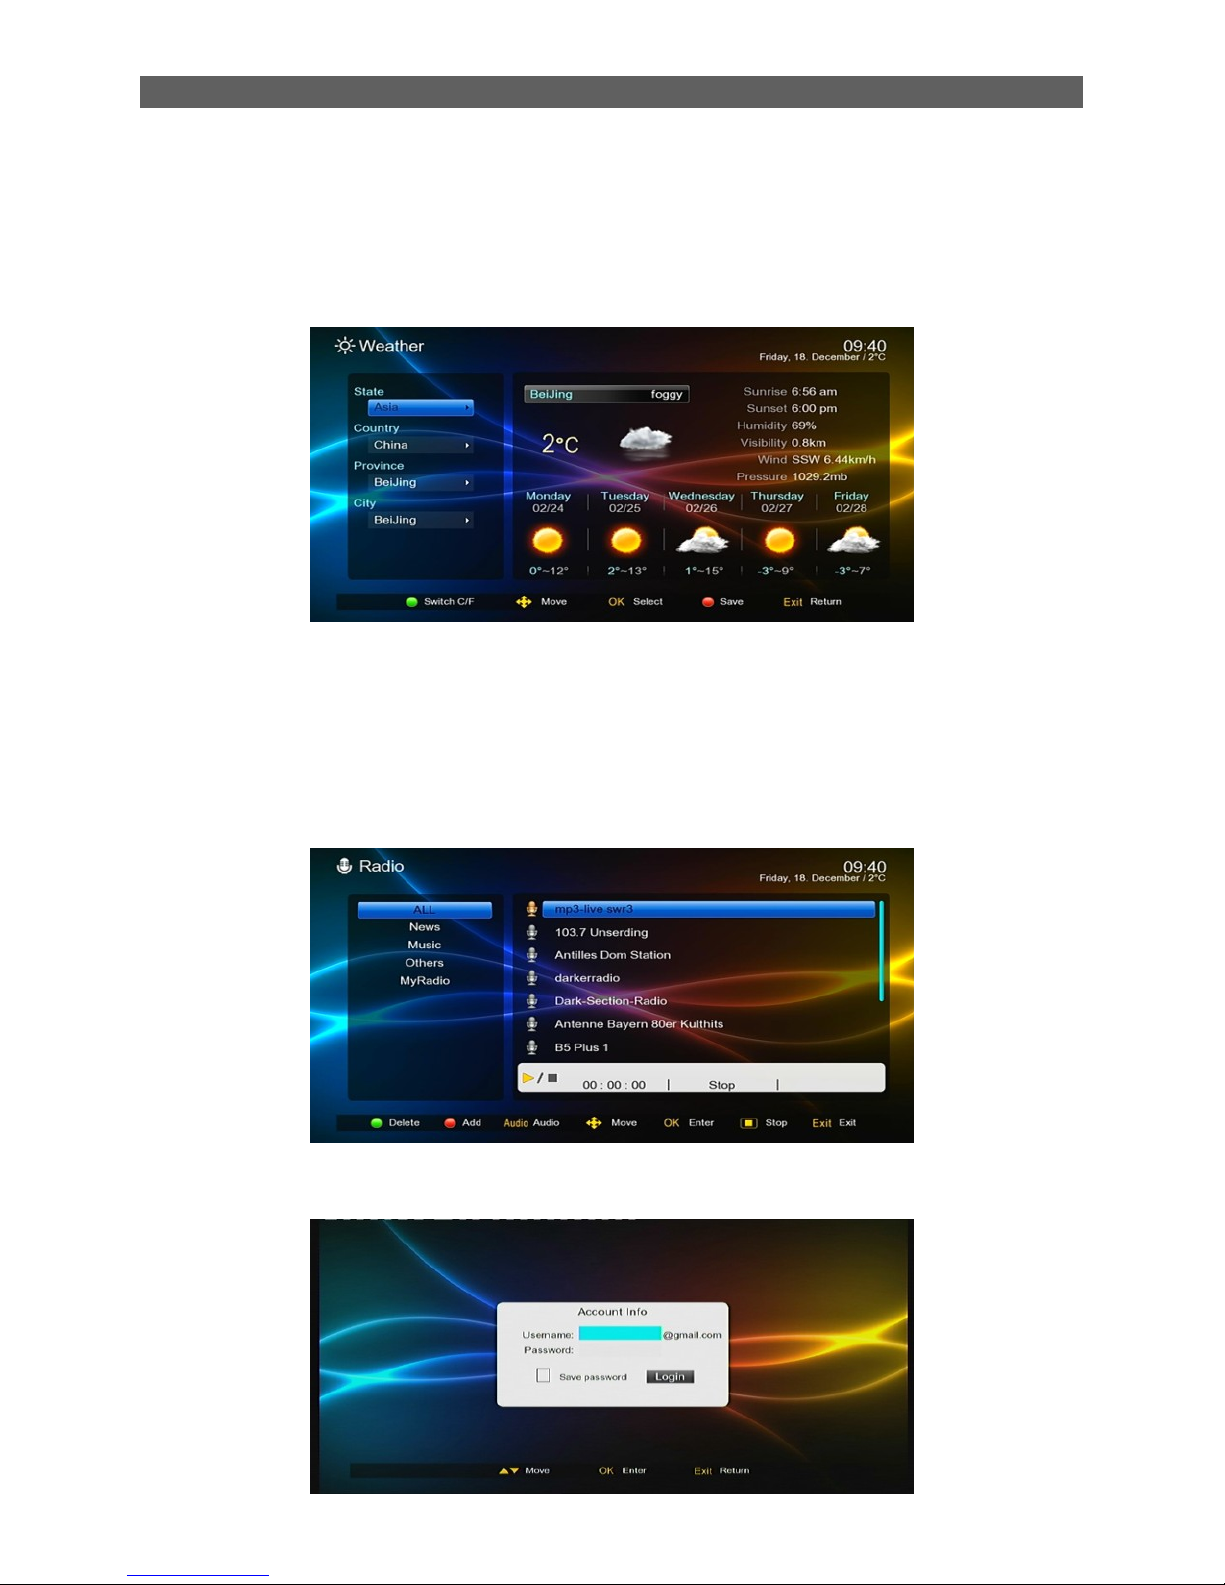
6.11 Google Map
Google Map can help users know where they are and the environment around them, and also
search for a certain location and surroundings. See the figure below:
In the Google Map page, you can press the red function key to switch between the map search
setting area and the map display area; press the green/yellow function keys to zoom in or out the
Page 28
Menu Operations
25
map; press the blue function key to save the current map; [▲/▼] & [◄/►] keys to move the focus
in the map to view different locations.
6.12 Weather
The Weather module provides weather forecast information for users. To enter this module, select
the Weather item in the Network menu by pressing [◄/►] keys and then press [OK] key. See the
figure below for the Weather page:
In this module you can get current weather conditions and forecast within a week for locations in
the world. You can press direction keys to set a city through the search fields at left and then press
[OK] key to view the weather information of the city. For example, to view Beijing‟s weather
information, select Beijing City in the search field area and then press [OK] key. Then you will find
the Beijing‟s weather information at the right side.
6.13 Radio
Online radio and TV channels, you can use [◄/►] an[▲/▼] to select the menu program.
6.14 Gmail
This is free E-mail server. This figure as below:
Page 29
Menu Operations
26
6.15 IPTV
This function is free Internet TV
6.16 ISO
ISO can play some files, such as CD or something like that.
6.17 Ebook
The EBook module is for reading electronic books.
TXT format is available. Turning pages: Press PAGE+/- keys to turn page up and down.
Exit: Press RECALL or EXIT keys to return to the book list.
Page 30
Menu Operations
27
7. Setting
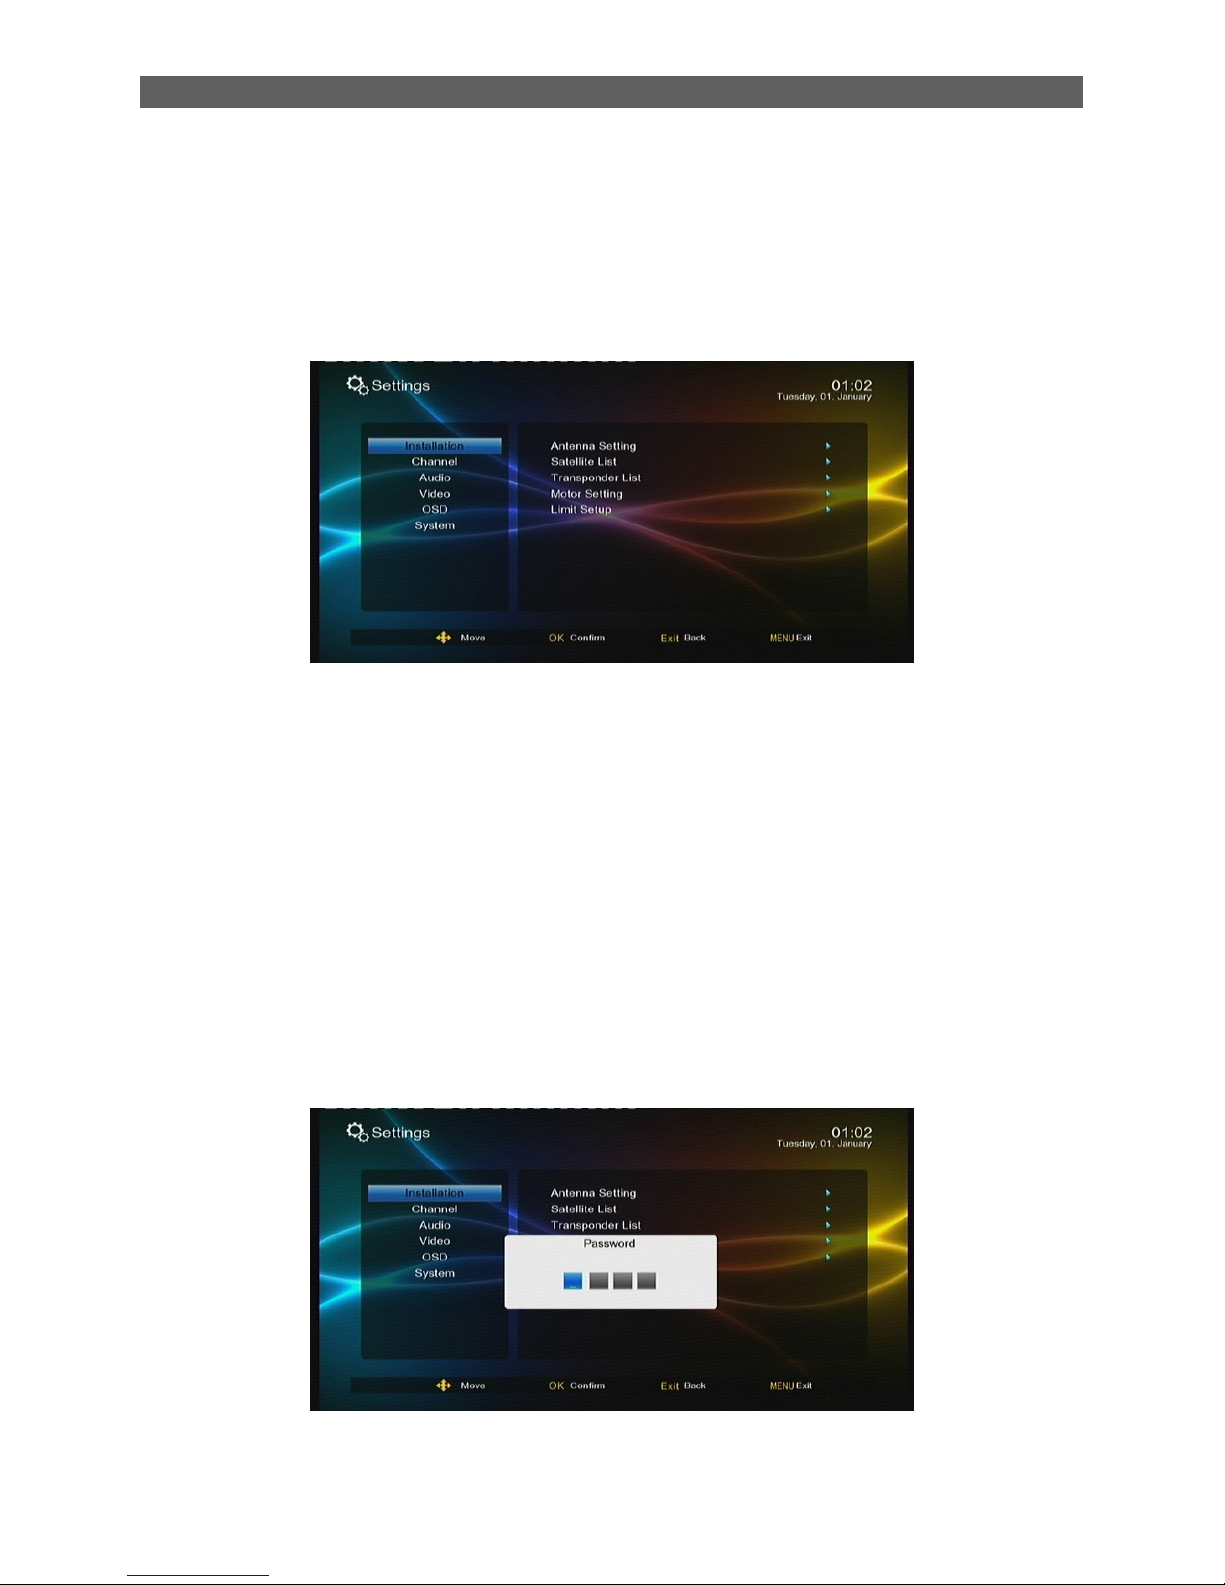
The Main Menu has six items: Installation, Channel, System Setting, Tool, Media, and Net Work,
which include all setting items of the system.
Press [MENU] key to display the Main Menu, see the figure below:
7.1 Installation
Press [▲/▼] keys in the Main Menu to highlight the Installation item and then press [OK] or [►]
keys. A password input dialog pops out. After entering a correct password (default password is
„0000‟), there are five sub-menu:
The password can be change in main menusystem settingchild lock sub-menu
Antenna Setting: Antenna and LNB settings
Satellite List: Satellite list setting
Transponder List: Transponder list setting
Motor Setting: Polar axis motor setting
Limit Setup: Polar axis move limit setting
Page 31
Menu Operations
28
7.1.1 Antenna Setting
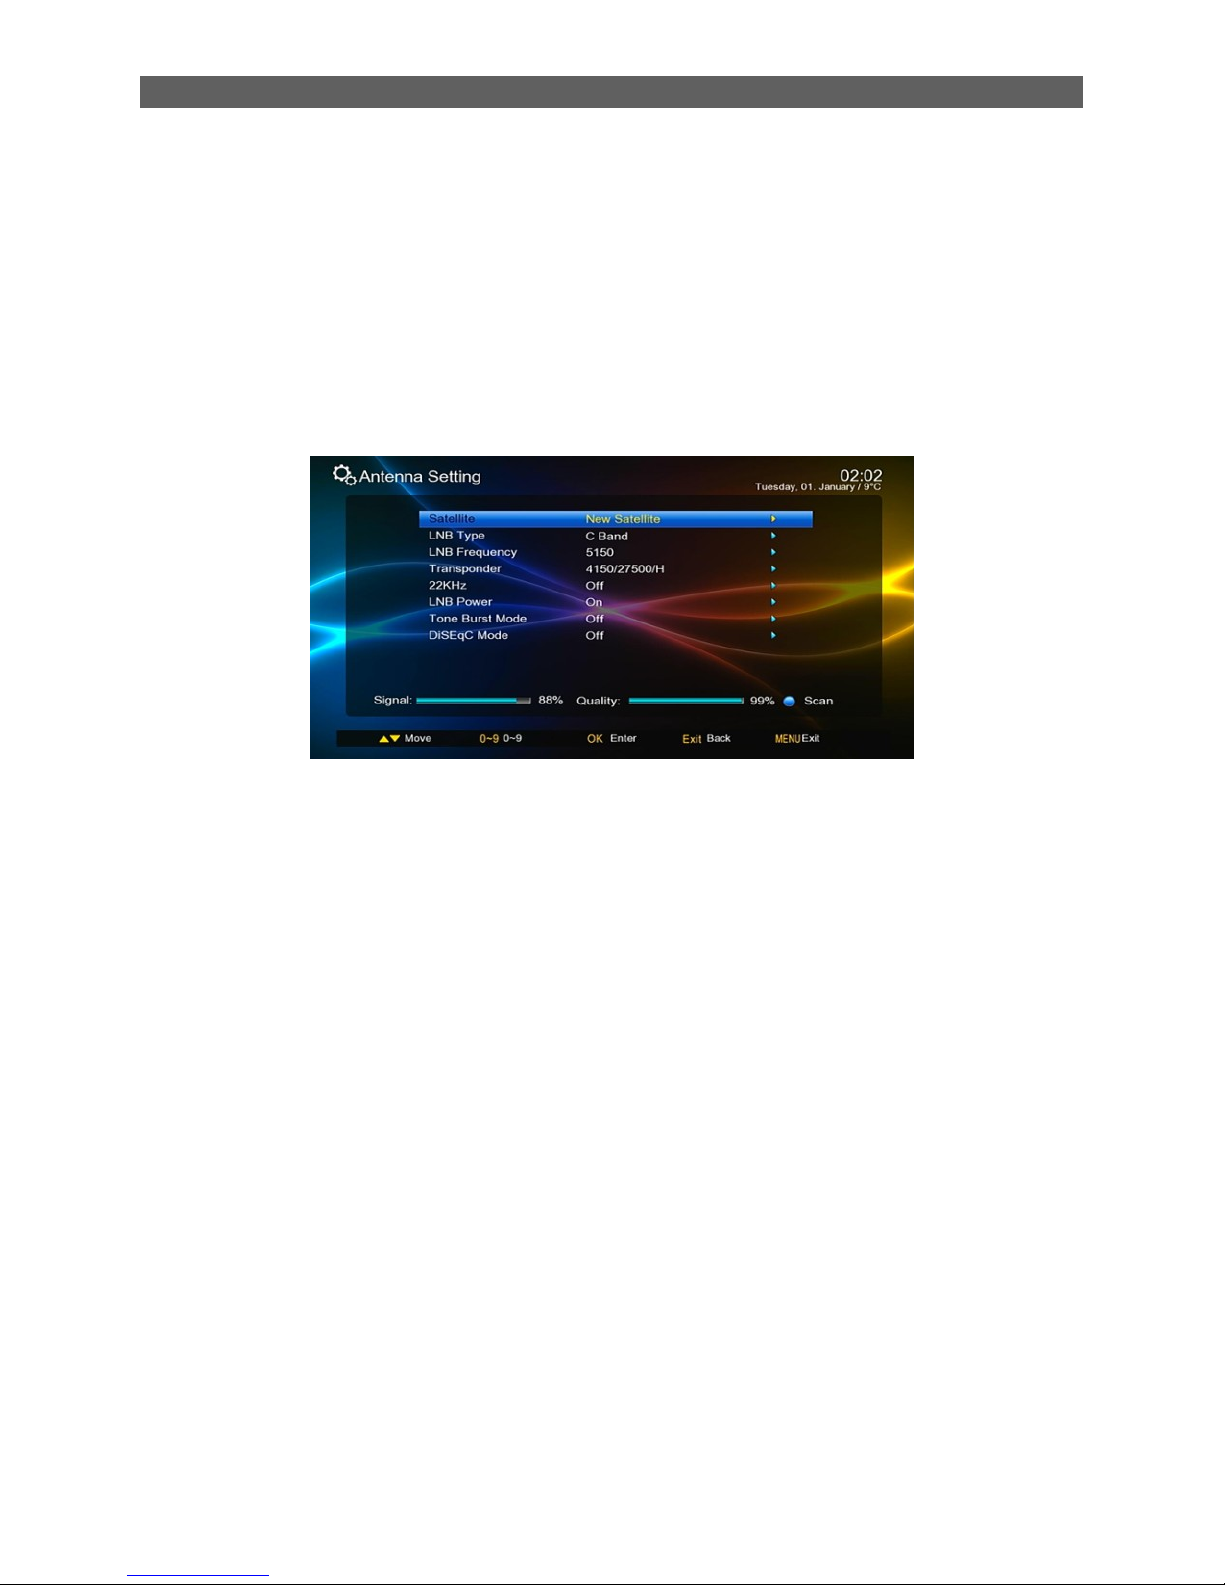
In the Installation menu press [▲/▼] keys to highlight the Antenna Setting sub-menu and then
press [OK] or [ ►] keys to enter the Antenna Setting.
In the Antenna Setting page, you can press [▲/▼] keys to highlight a scan criteria and then
press [OK] or [ ►] key to enter corresponding editing state. In the editing state press [▲/▼]
keys to select an option and then press [OK] or [ ►] key to confirm the setting.
After set correct scan criteria, press [blue function] button, the scan window display, select
correct scan option, Press [ok] to begin scan channel.
You can select following scan criteria:
Satellite: Select a satellite from the existing satellite list.
LNB Type: Set the working frequency band for LNB (three options: Ku Band, C Band
and User).
LNB Frequency: Set the local oscillation frequency of LNB.
Transponder: Select a transponder from the existing transponder list.
22 KHz: Turn on or off the 22 KHz switch (On, Off, Auto).
LNB Power: Set whether or not there is a STB to supply power to LNB.
Tone Burst Mode: Select tone burst mode (three potions: Tone Burst A, Tone BurstB,
NONE).
DiSEqC (Digital Satellite Equipment Control) Mode: Select input signal. When more
than one LNB is used, DiSEqC can be used to select one LNB to input.
7.1.2 Satellite List
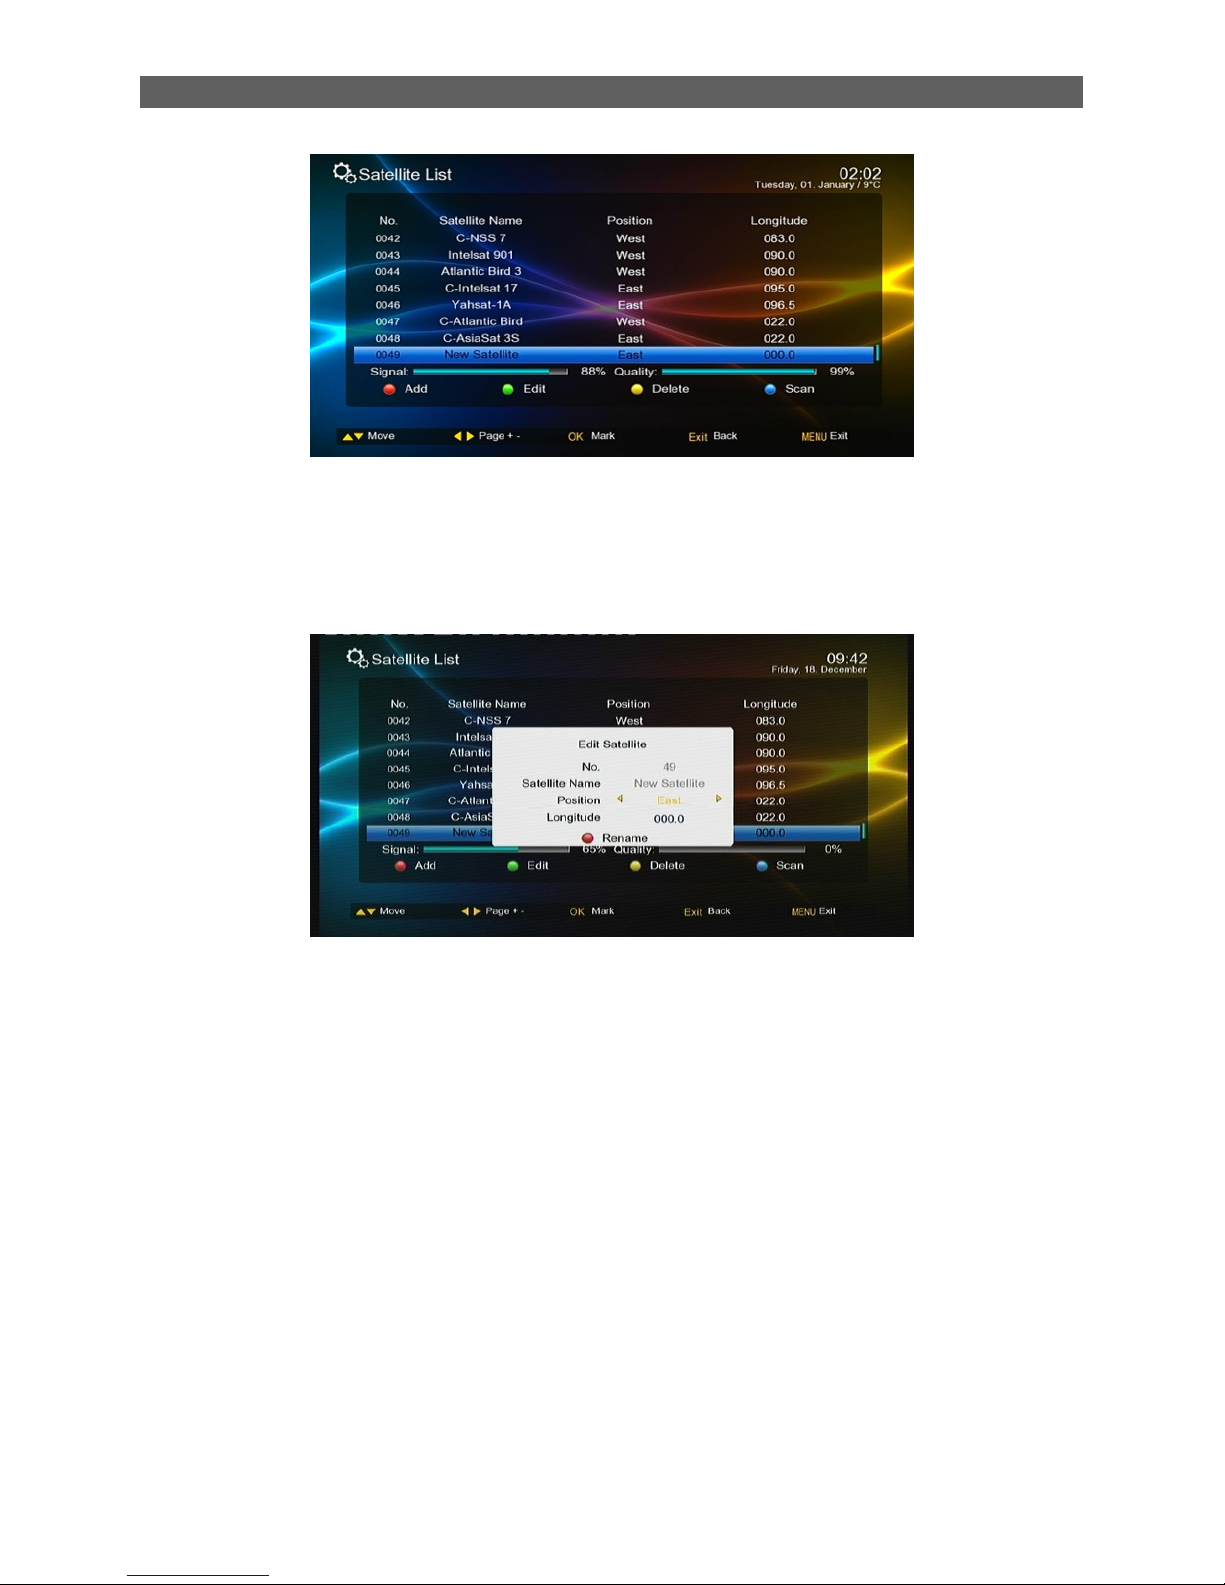
Path: Main MenuInstallationSatellite List
After entering the satellite interface, you can press the blue button channel search
Page 32
Menu Operations
29
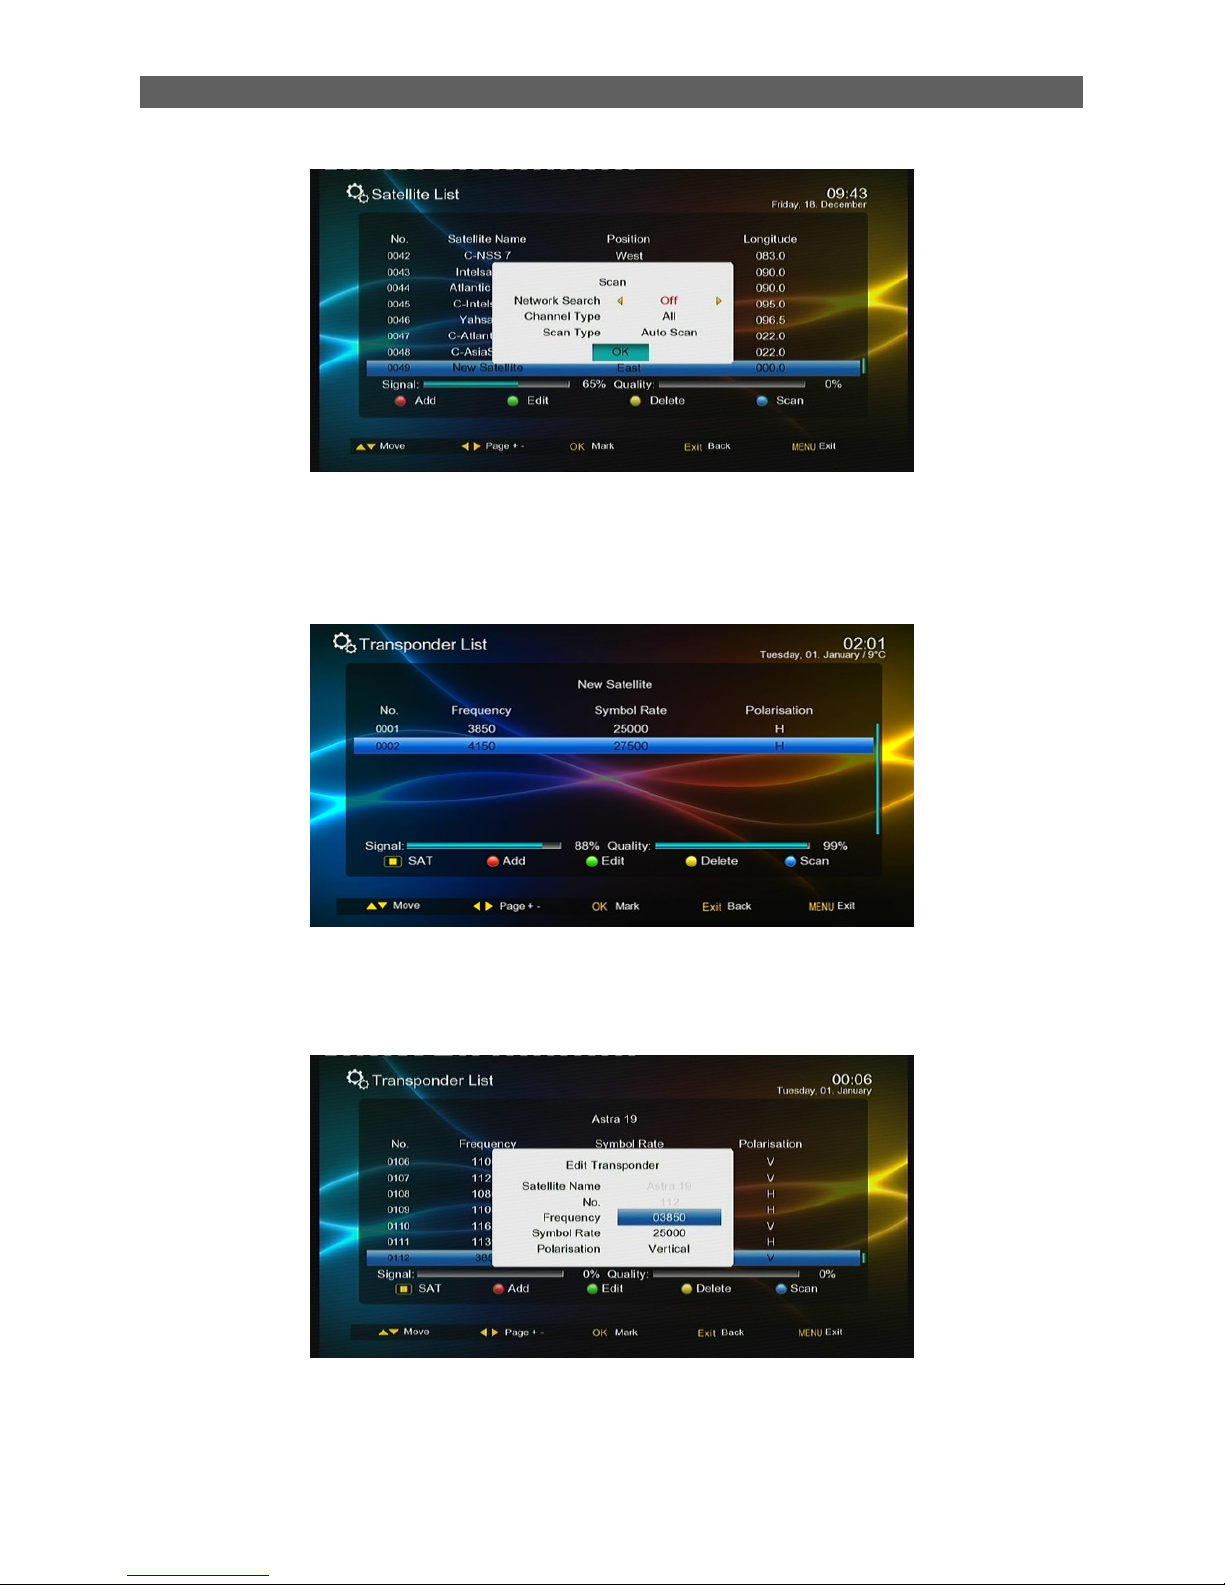
The Satellite List (see figure above) shows all the satellites the system has stored. Users can
press color function keys on the remote controller to edit the list,
[red function] key: add a satellite
Press [red function] key, set the position and longitude of satellite, the default satellite name is
new satellite, you can press [red function] key again to rename it.
[Green function] key: edit a satellites
[Yellow function] key: delete a satellite
Scan channel by satellite
Press [▲/▼] keys to highlight the satellite which you want to scan channel, Press [blue] key, the
scan window display, select correct scan criteria, press [ok] button, the system will begin to scan
channel of this satellite,
Page 33
Menu Operations
30
7.1.3 Transponder List
In the Installation menu, press [▲/▼] keys to highlight the Transponder List item
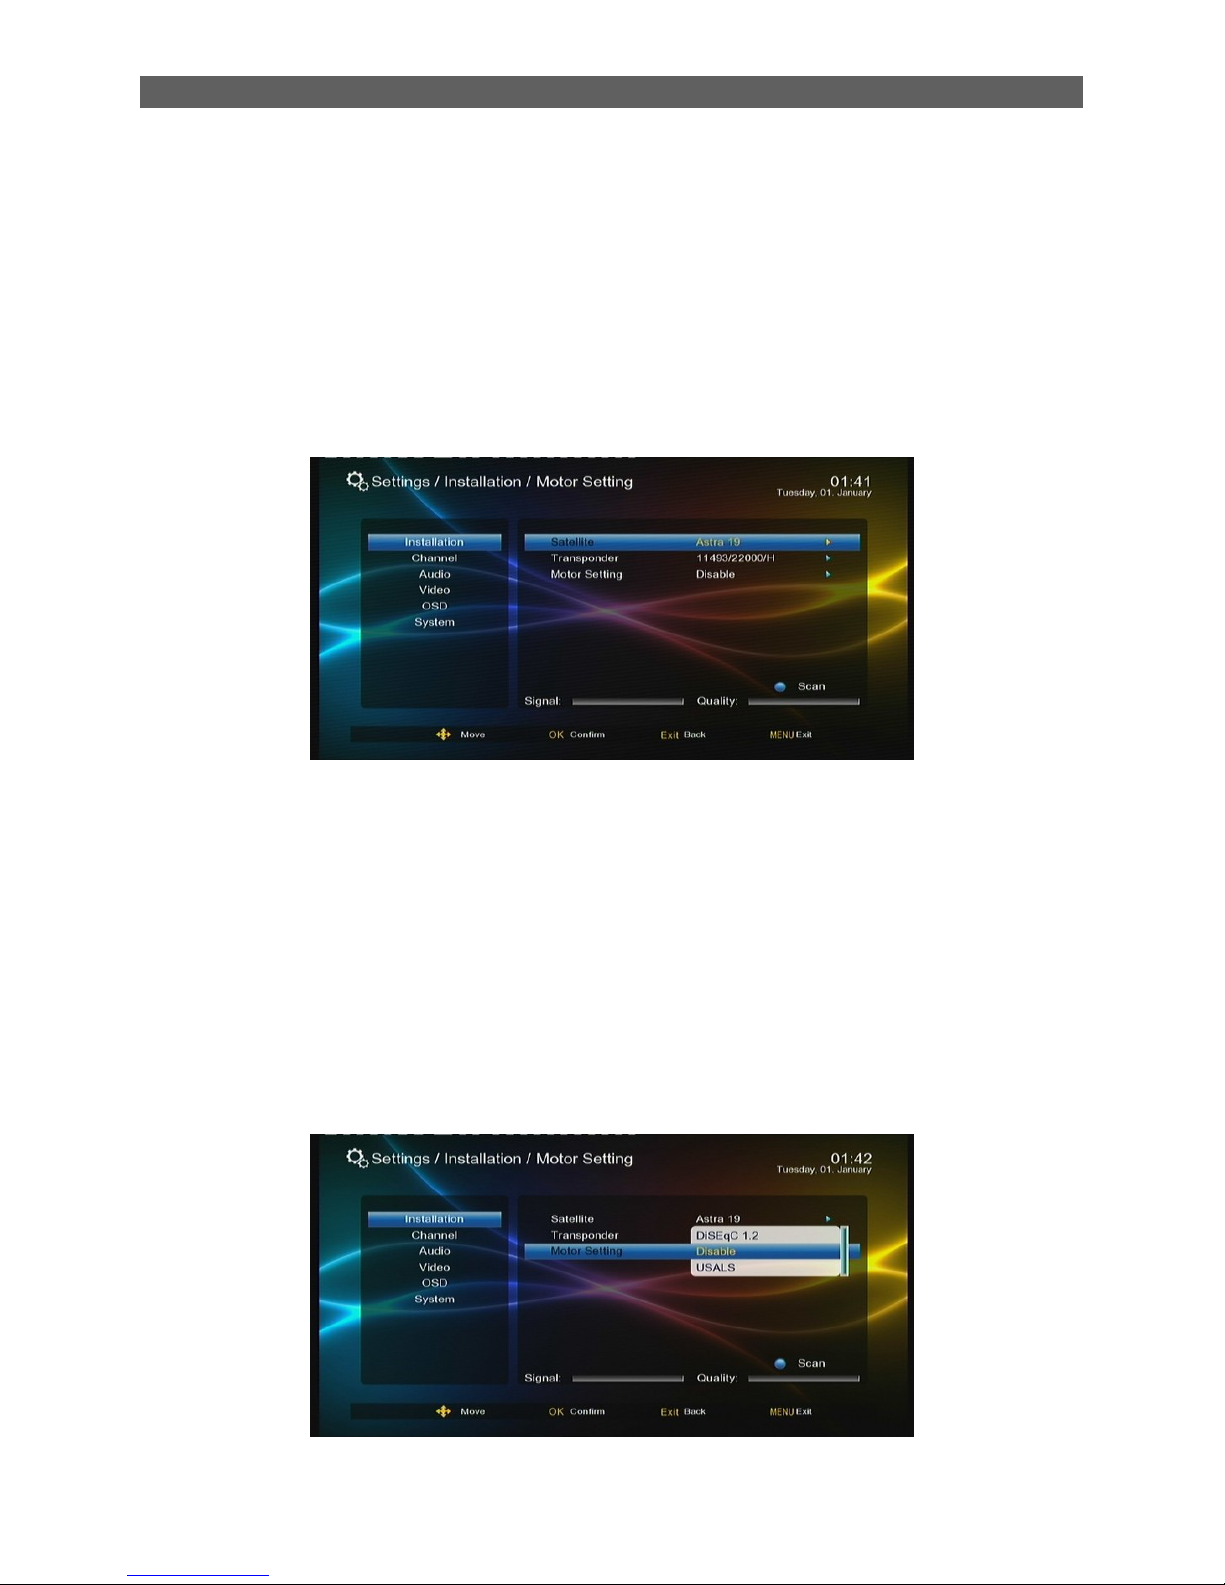
And then press [OK] or [►] keys to enter the Transponder List page. See the figure below.
The Transponder List stores the transponders of current satellite of current system. Each
transponder may have multiple frequencies. You can press color function keys on the remote
controller to edit the list,
Press [red function] key, set the Frequency, Symbol Rate and Polarization of transponder, press [ok]
key to store it.
Page 34
Menu Operations
31
[Green function] key: edit a Transponder
[Yellow function] key: delete a Transponder
Scan channel by Transponder
Press [▲/▼] keys to highlight the Transponder which you want to scan channel, Press [blue] key,
the scan window display, select correct scan criteria, press [ok] button, the system will begin to
scan channel of this Transponder,
7.1.4 Motor Setting
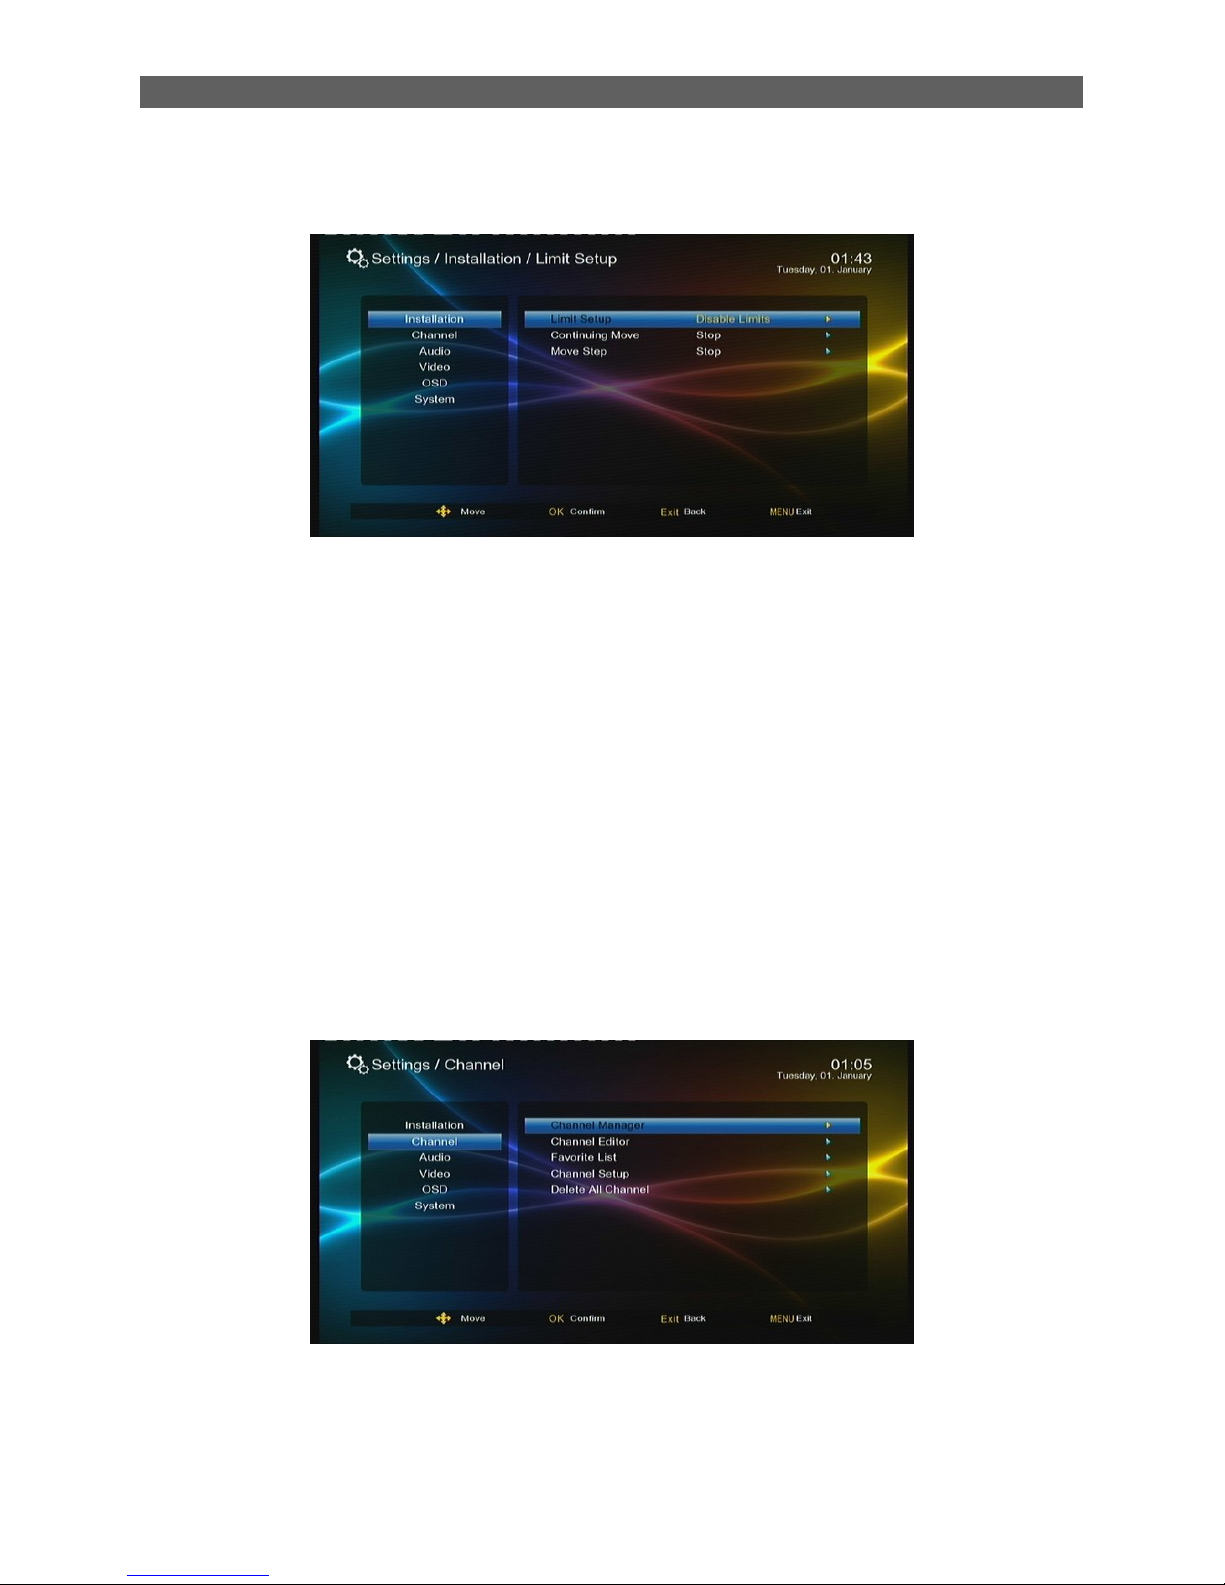
Through the Motor Setting page you can control the polar axis motor to adjust the direction of
antenna so as to make the antenna accurately point to the satellite.
Satellite: Select a satellite.
Transponder: Select a transponder.
Motor setting: Set the polar axis motor.
If you have already selected a satellite and a transponder, when moving the polar axis you will
find the signal strength and quality indicators at the bottom of the page.
.
Page 35
Menu Operations
32
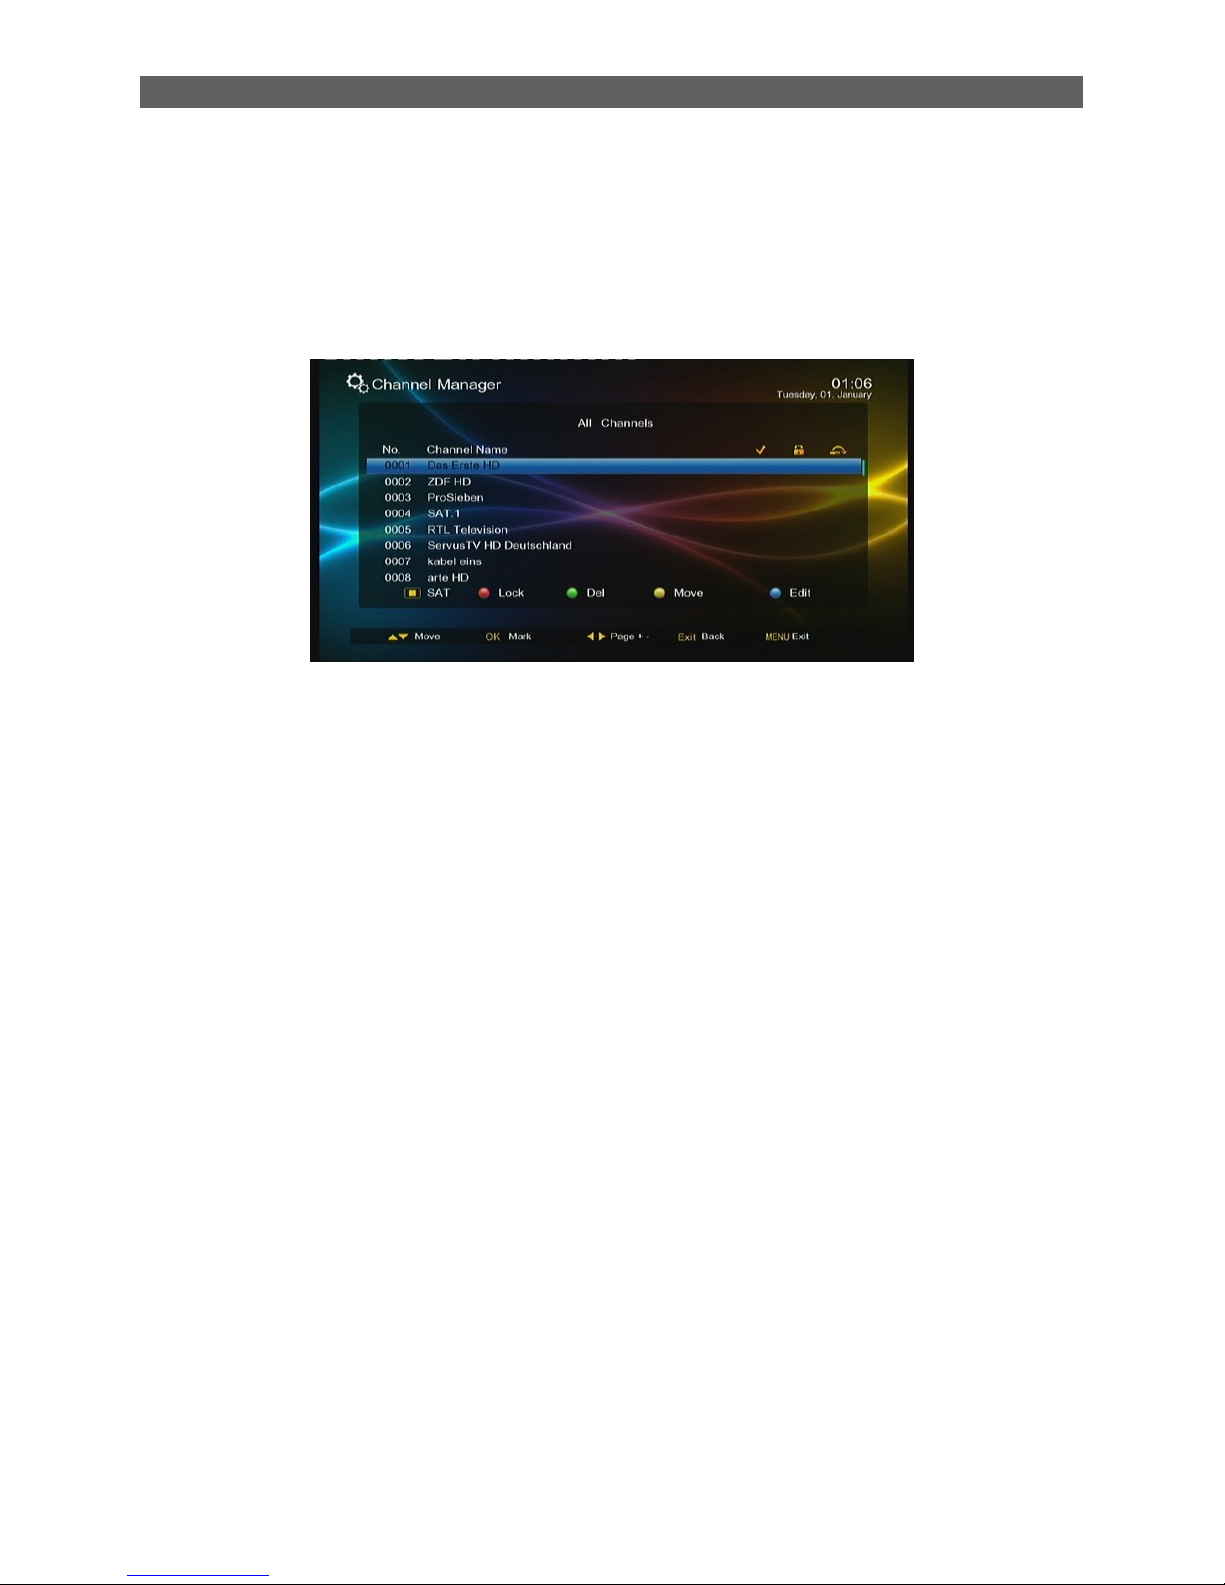
7.1.5 Limit Setup
There are three sub items:
Limit Setup: Polar axis move limit setting.
Continuing Move: Enable polar axis continuous move.
Move Step: Enable polar axis step move. After setting, you can press [◄/►] keys to move the
polar axis east or west step by step.
7.2 Channel
The Channel menu has five items: Channel Manager, Channel Editor, Favourite List, Channel
Setup and Delete All channel. To enter the Channel menu, press [ ▲/▼] keys in the Main Menu to
highlight The Channel item and then press [OK] or [ ►] keys. The Channel menu is shown as
below:
Page 36
Menu Operations
33
7.2.1 Channel Manager
The system provides powerful channel management function. You can through the Channel
Manager menu to manage your channels such as deleting, locking, sorting, skipping or renaming.
To enter the Channel Manager Menu, in the Channel menu press [▲/▼] keys to select the Channel
Manager Item and then press [OK] key. See the figure below:
If there is no program channel data in the database, „No Program‟ message will appear and both
the Channel Manager and Favorite List menus cannot be accessed.
[■] key: sorting channel by satellite
Press [ ■ ] key, channel manager window popup the satellite you can select, press [ ▲/▼] to
select the satellite name, press [ok] button, the channel belong to this satellite will be displayed on
the channel list field, select “All Channel” will display all channel you store.
[red function] key: lock or unlock the selected channel
Press [red function] key. Key in a correct four-digit password (default password: 0000) in the pop-up
dialog, when you want to watch, delete this channel, you must write correct password
The password can be change in main menusystem settingchild lock sub-menu
When the channel under locked, press [Lock] button will unlock the channel
Press [Green function] key: delete channel
Delete a channel:
To delete a channel, press [▲/▼] keys to select the channel and then press the [green function] key.
Key in a correct four-digit password (default password: 0000) in the pop-up dialog, a confirm
window will display, select “YES” to delete the channel, select “No” cancel the deletion.
Delete a group of channel:
Press [▲/▼ ] to highlight the channel, press [ok] to select this channel(press [ok] key will cancel the
selection), use the same method to select others channels which you want to delete, the selected
channel will be marked “√”, press the [green function] key, Key in password (default password:
0000) in the pop-up dialog, a confirm window will display, select “YES” to delete the channel, select
“No” cancel the deletion.
Page 37
Menu Operations
34
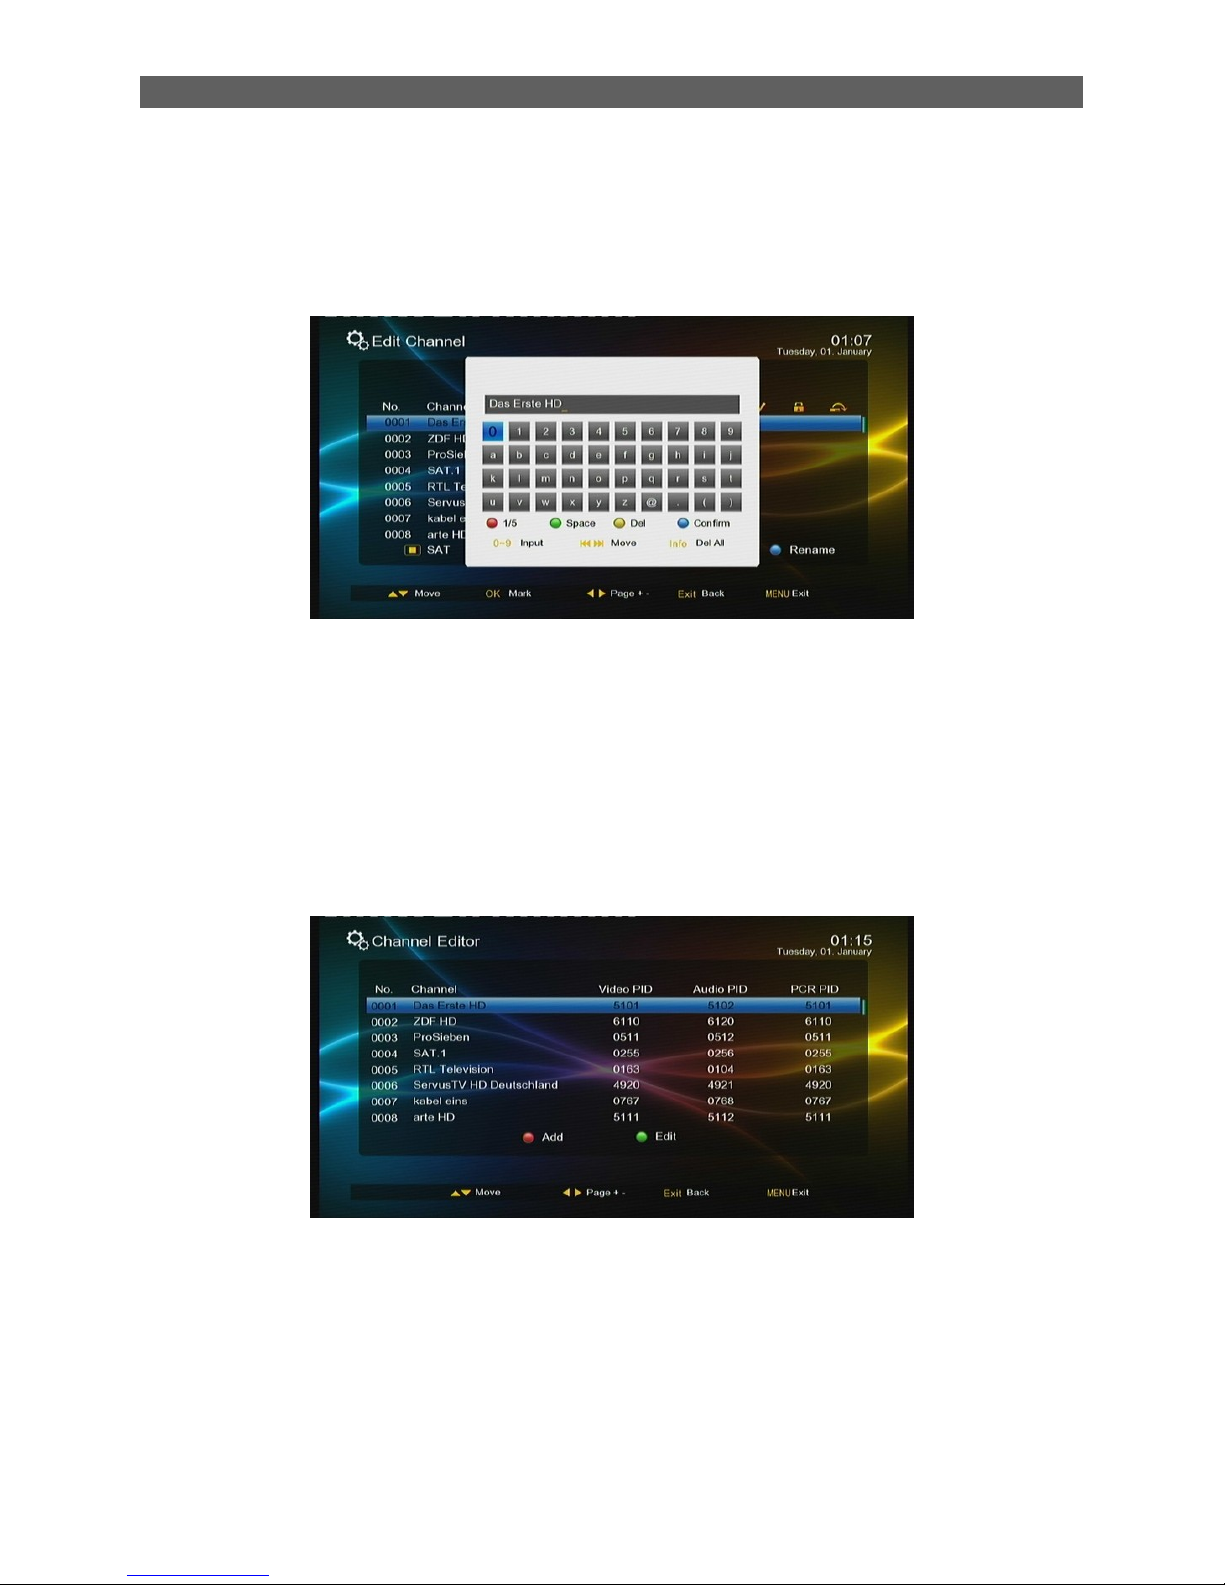
[Blue function] key: Edit channel
Press [▲/▼] keys to select the channel and then press the blue function key to enter the channel
name edit page.See the figure below:
After editing, press [ok] key to confirm.
Press Menu key to exit the Channel Manager menu.
Press EXIT key to go back to the Main menu.
7.2.2 Channel Editor
To enter the Channel Editor menu, in the Channel menu press [▲/▼ ] keys to select the Channel
Editor item and then press [ok] key.
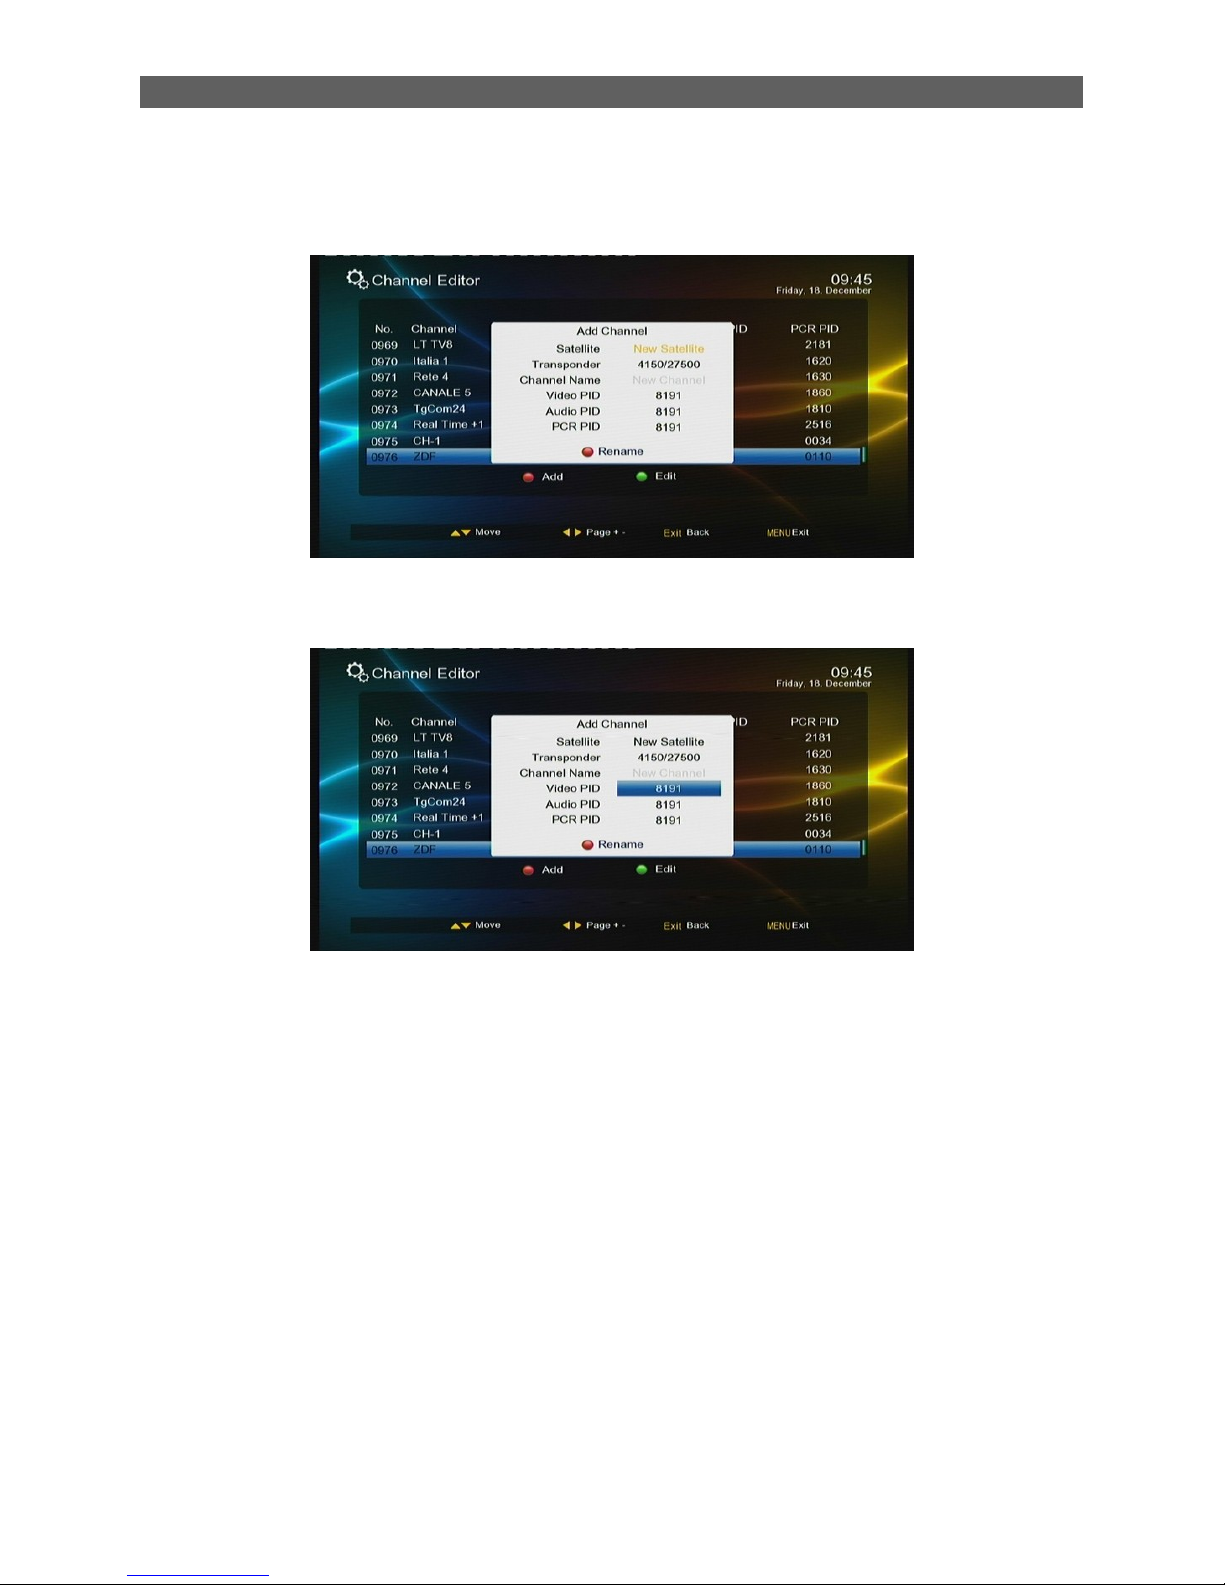
The Channel Editor menu contains two functions: Channel Add and Channel Edit, Press [▲/▼] keys
to select the channel and then press the red or green color function keys on the remote control to
manage it: press the red function key to add a new channel; the green function key to edit the
attributes of selected channel (Channel name, Video/Audio/PCR Pid).
Page 38
Menu Operations
35
To add a new channel, press red color function key to enter the add channel page. See the
figure below.
To edit a channel, press ▲/▼ keys to select the channel, then press the green function key
to enter the channel edit page.
Press Menu key to exit the Channel Editor menu.
Press EXIT key to go back to Main menu.
7.2.3 Favorite List
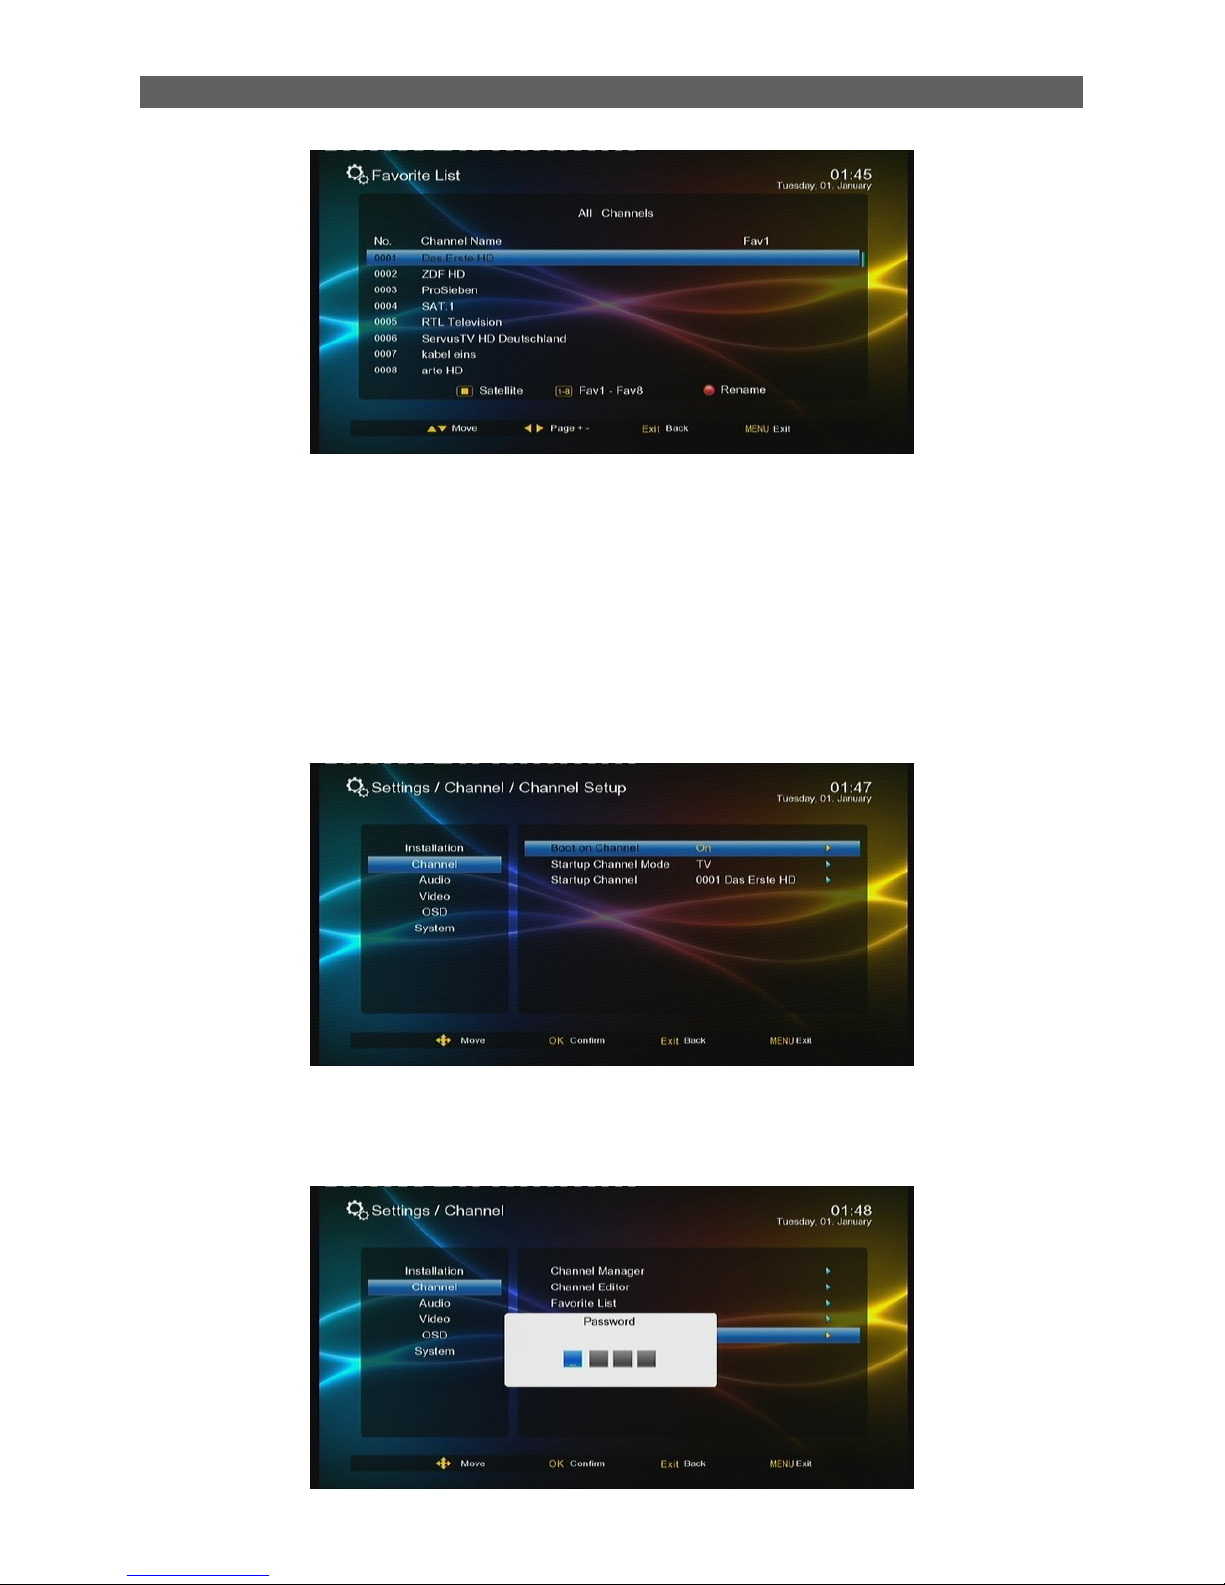
The system provides a favorite channels list function. You can through the Favorite List menu to
add, delete or group your favorite channels.
To enter the Favorite List menu, in the Channel menu press [▲/▼] keys to select the Favorite List
item and then press [OK] key.
There are total 8 favorite lists. You can select them by number 1-8 on RCU
Add the channel into Favourite List
Select the Favourite List you want to add the channel into it by number 1-8 on RCU, press [▲/▼]
key highlight the channel, press [ok], the channel will be mark „√‟,press [ok] again will cancel the
selection
Page 39
Menu Operations
36
Rename the name of Favorite List
Select the Favorite List you want to rename by number 1-8 on RCU, press [red function] key to
rename it
7.2.4 Channel Setup
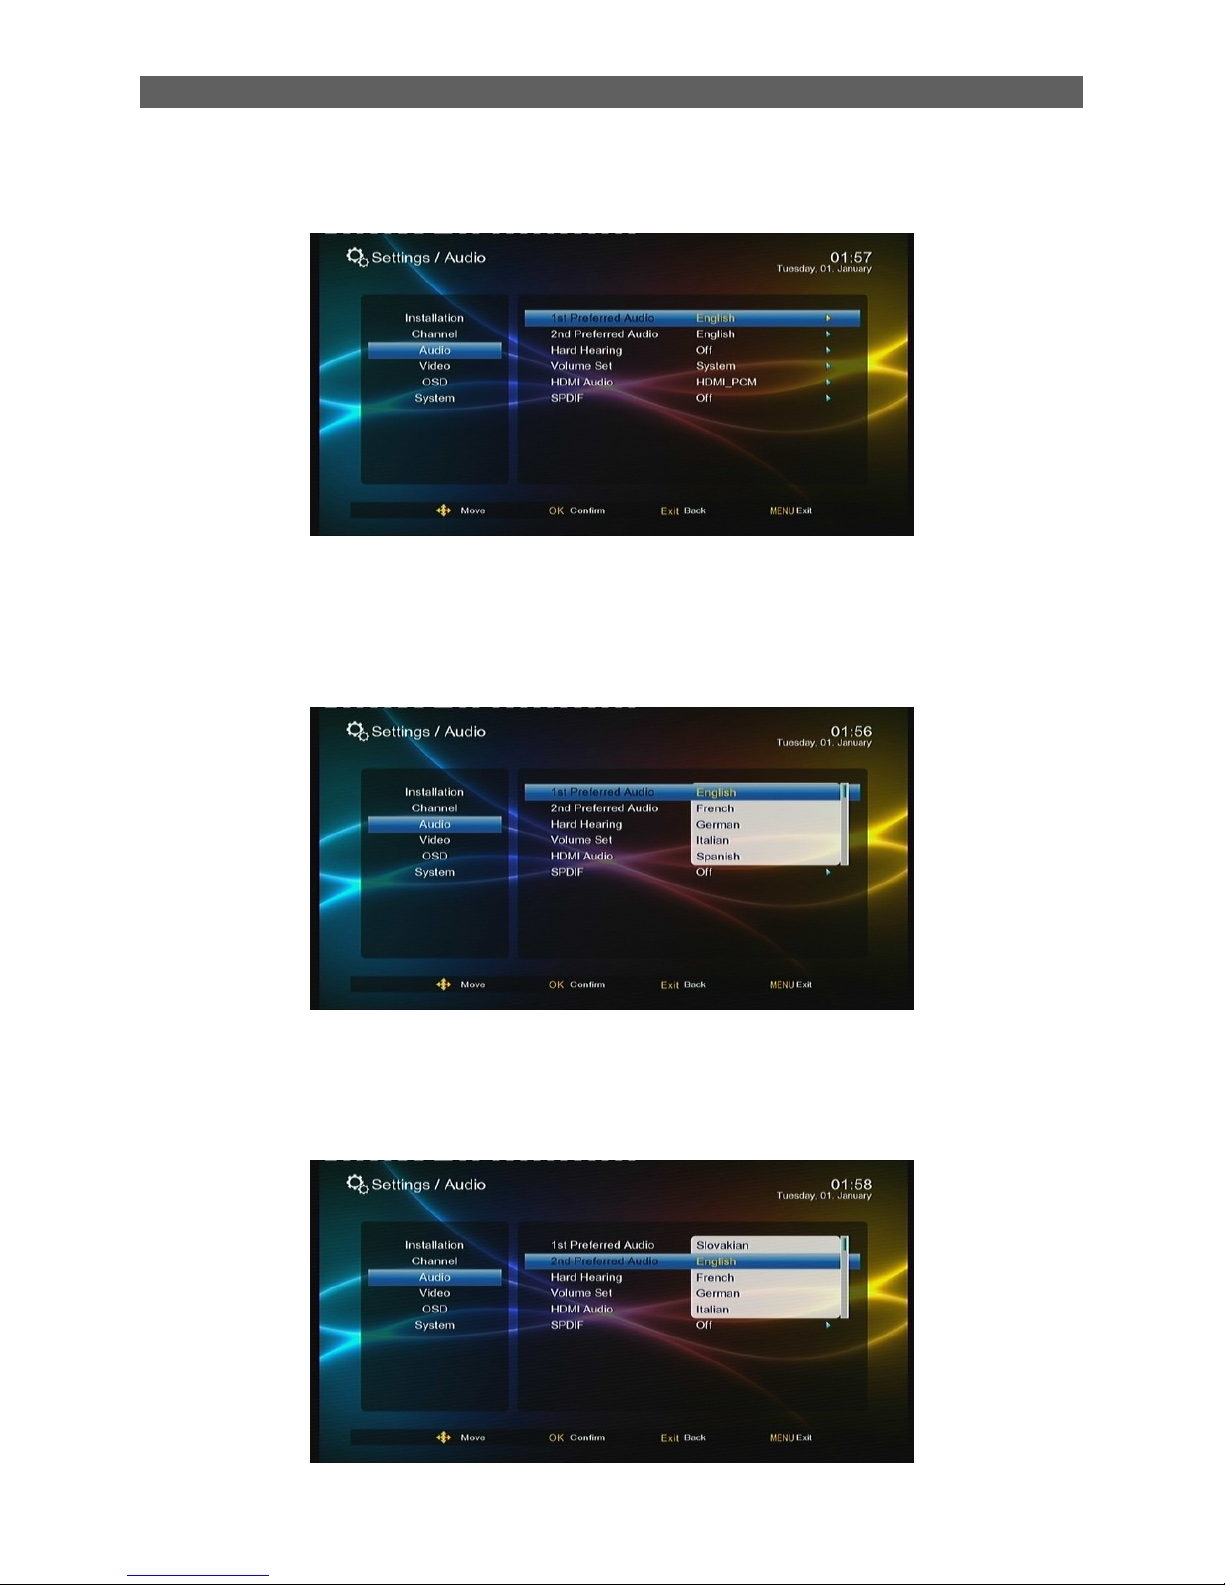
This item is to set the default channel after the system boots. By default, after the system boots,
the channel that is being played before the previous turning off will be auto played. If you want to
make the system always play the Awaz TV every boot on, you can configure the setting items in
the Channel Setup menu as follows.
7.2.5 Delete All Channel
Highlight Delete All Channel sub-menu, press [ok] or [ ►] keys, a warning window will display,
select „yes‟ will delete all channel, select “no” will cancel the operation.
Page 40
Menu Operations
37
7.3 Audio
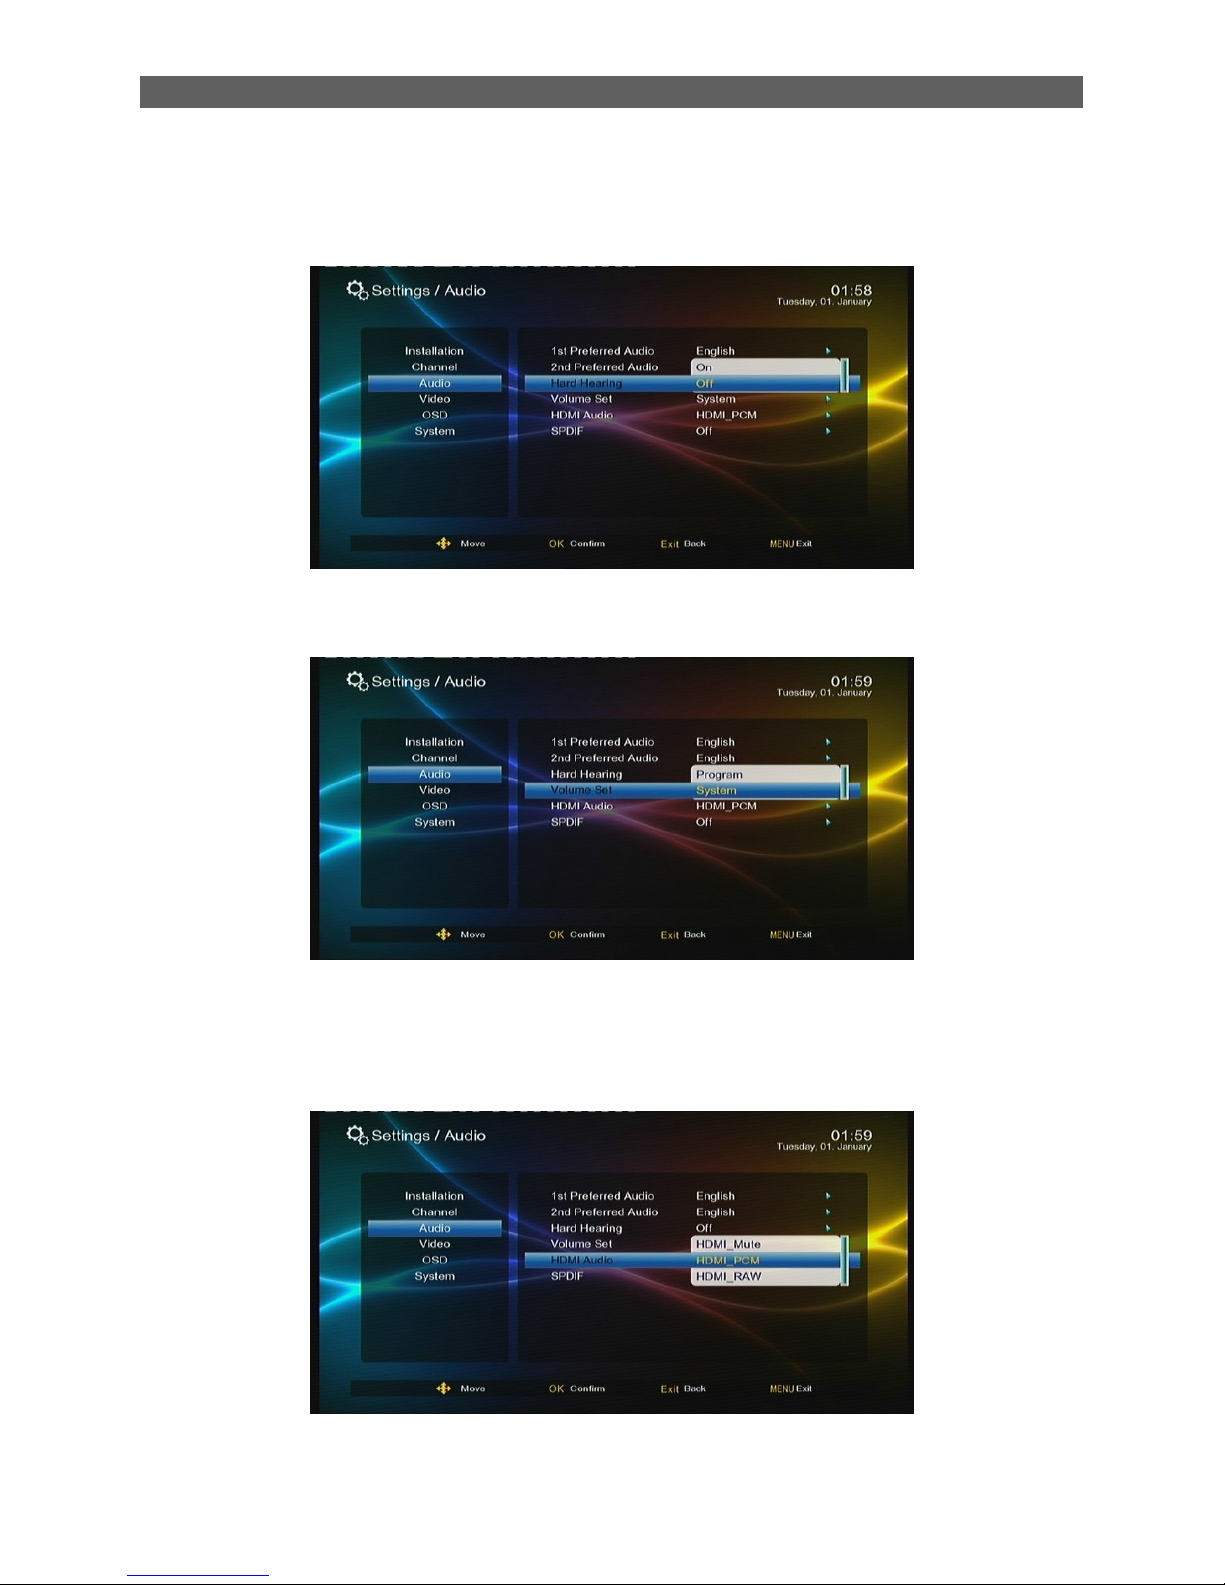
Press[▲/▼] key to highlight the Audio menu, press [ok] or [ ►] to enter sub-menu.
7.3.1 1Preferred Audio
The Preferred Audio Subtitle is used to set the default audio language. When a program has
audios of multiple languages, the system will auto search the matched audio to play according to
the settings here. Two preferred audios can be set and the first one has a higher priority.
7.3.2 2Preferred Audio
The Preferred Audio Subtitle is used to set the default audio language. When a program has
audios of multiple languages, the system will auto search the matched audio to play according to
the settings here. Two preferred audios can be set and the first one has a higher priority.
Page 41
Menu Operations
38
7.3.3 Hard Hearing
The Hard Hearing item provides a kind of subtitle display service special for hearing impairment
users, available when the streaming includes this service.
7.3.4 Volume Set
The Volume Set item provides System and Program two choices.
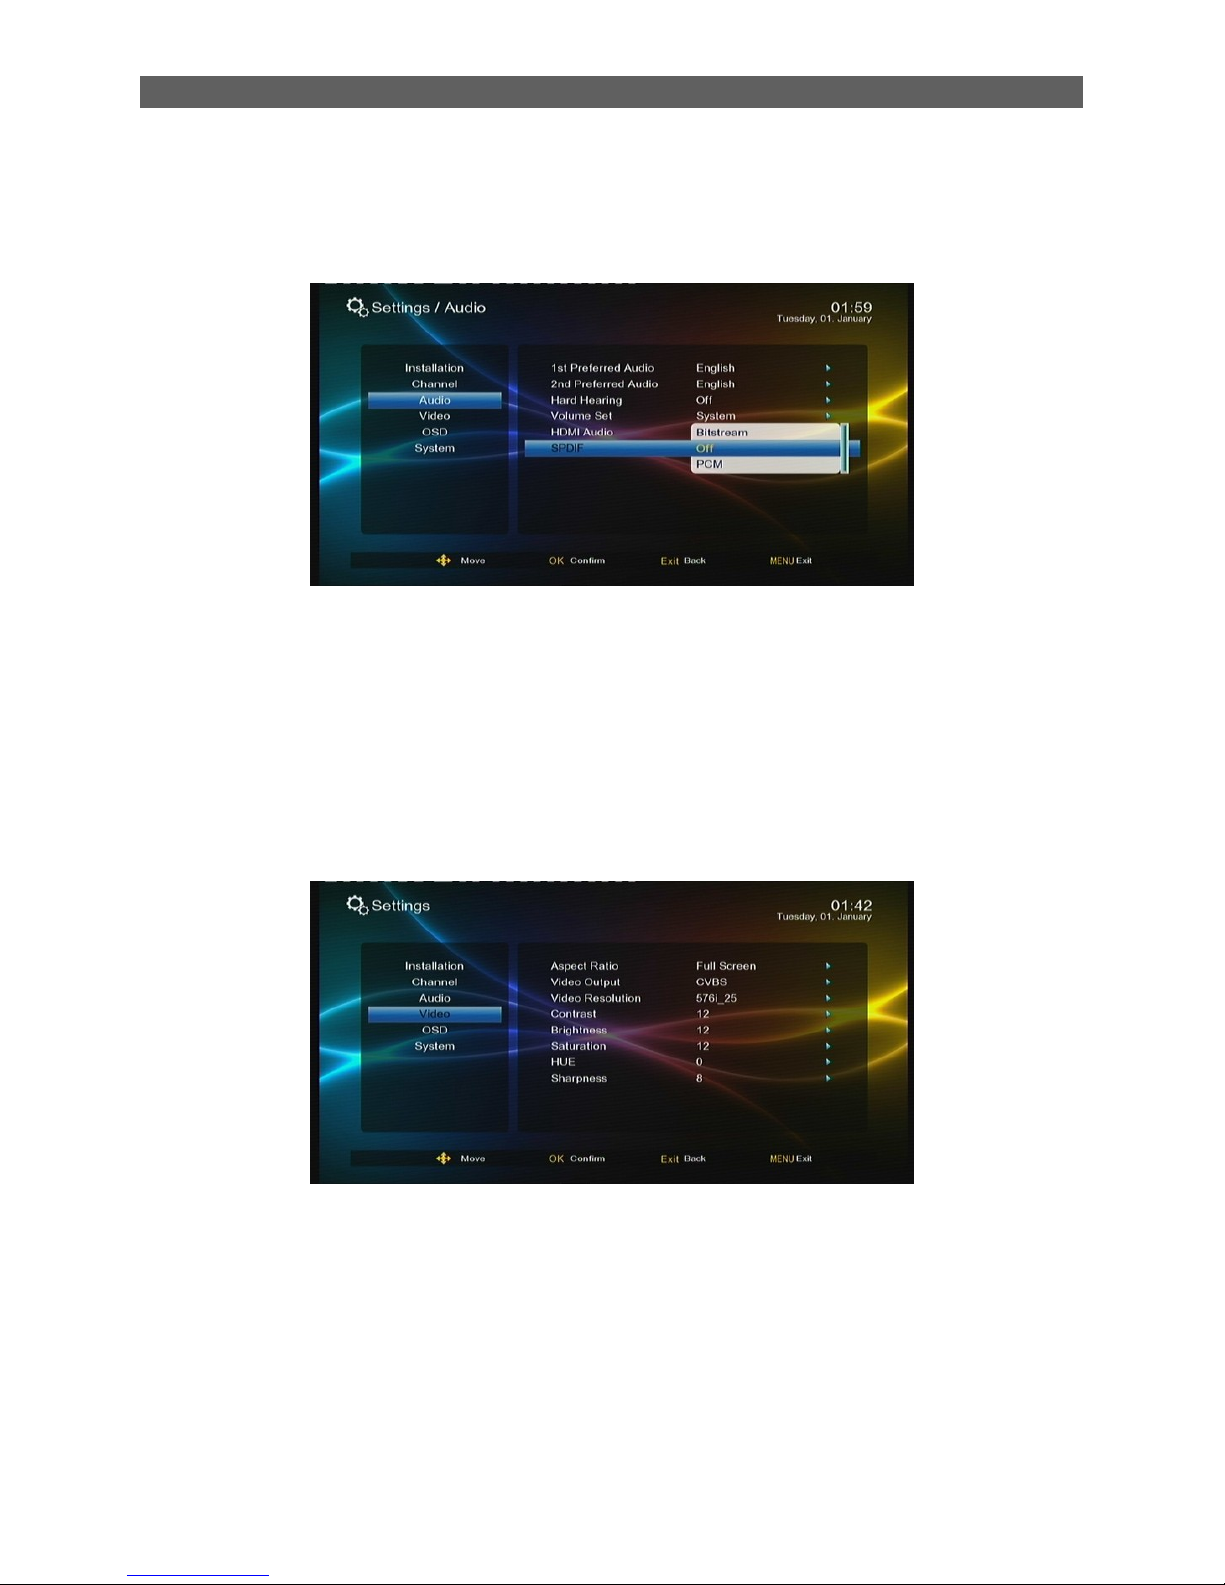
7.3.5 HDMI Audio
The HDMI audio item is to set the output format of audios. After highlighting this item, press [Ok]
key to pop out an option list:
The list has three options: HDMI_RAW, HDMI_Mute, HDMI_PCM.
Page 42
Menu Operations
39
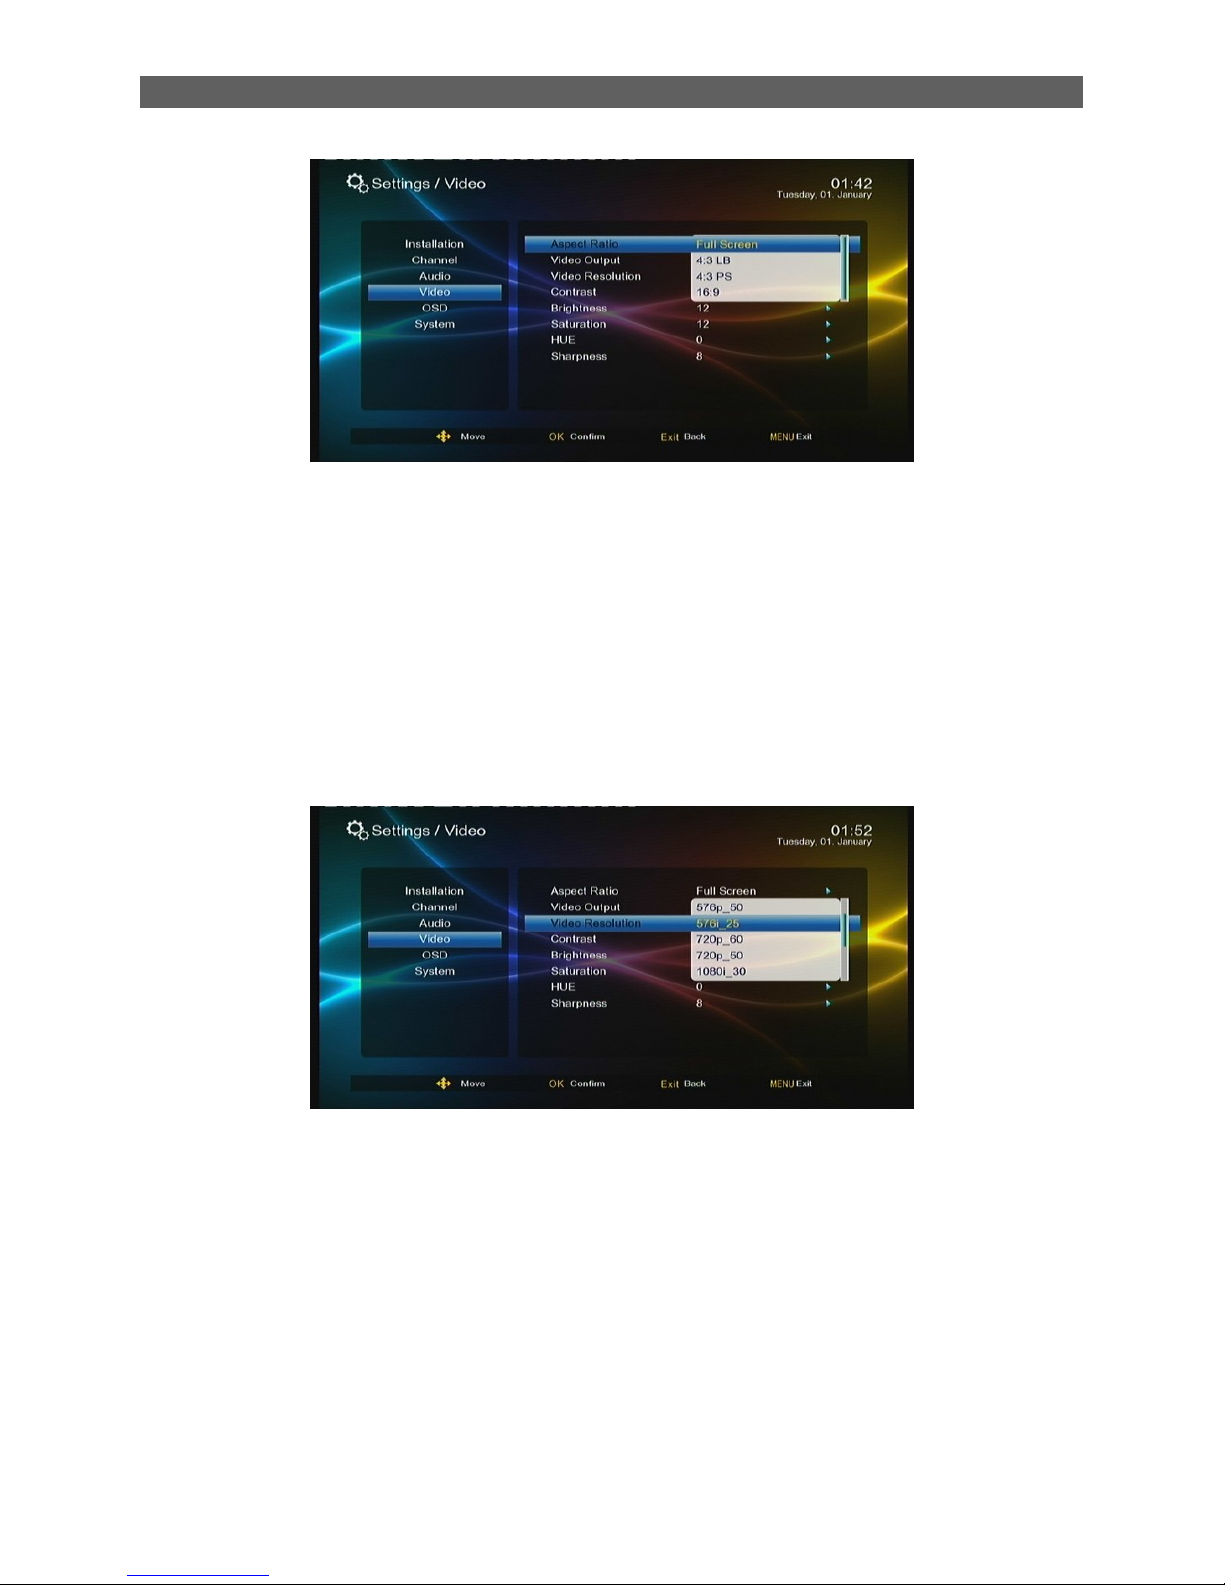
7.3.6 SPDIF
The SPDIF item is to set the output format of digital audios. After highlighting this item, press [OK]
key to pop out an option list:
The list has three options: PCM, Bitstream and Mute.
7.4 Video
Press [▲/▼] key to highlight the system setting main menu and press [ok] or [►] to enter
sub-menu.
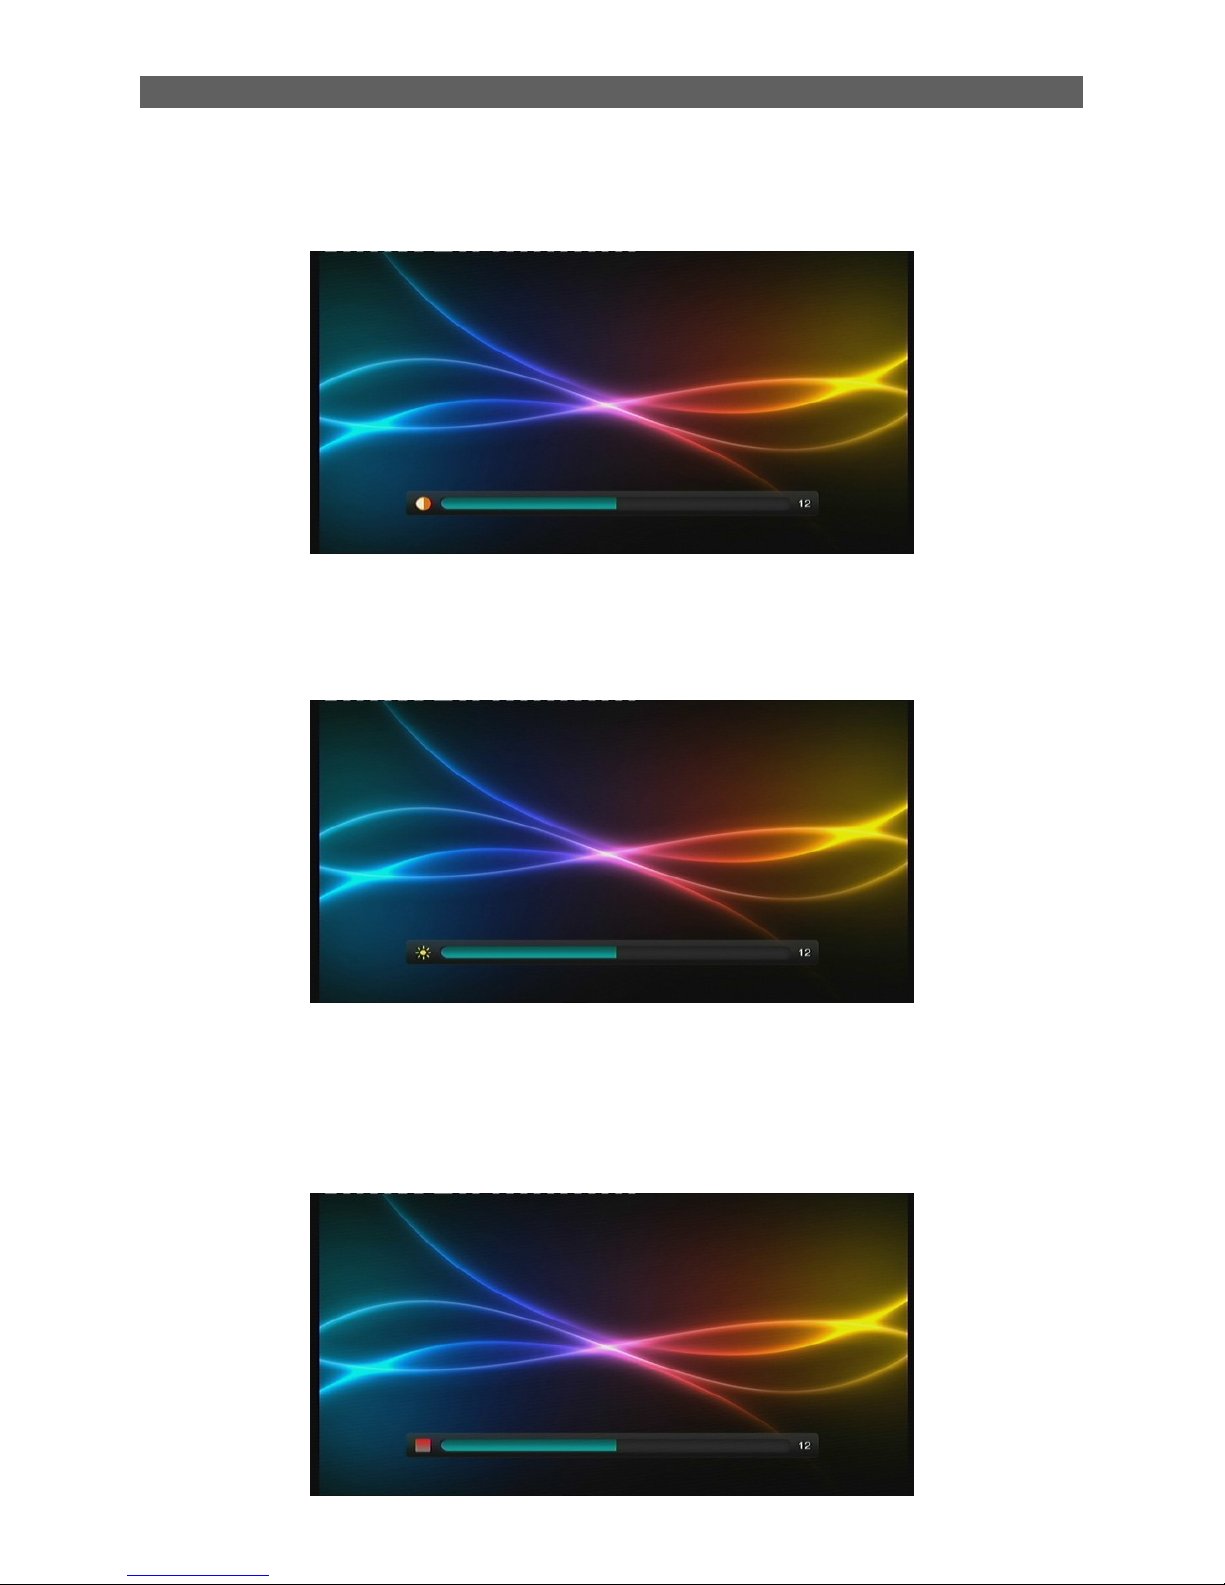
7.4.1 Aspect Ratio
The Aspect Ratio item is to set the proportion between the length and width of output videos. After
highlighting this item, press [OK] key to pop out an option list, see the figure below:
Page 43
Menu Operations
40
The list has two options: 16: 9, Full Screen.
7.4.2 Video Output
The Video Output item is to set the format of video output.
7.4.3 Video Resolution
The Video Resolution item is to set the resolution (up to 1080p_60 (Full HD)) and refresh rate of
video output. After highlighting this item, press [OK] key to pop out an option list
The list has following options („p‟ indicates progressive scan; “I” indicates interlaced scan):
Auto Detect
480p_60, 480i_30
576p_50, 576i_25
720p_60, 720p_50
1080p_60, 1080p_50, 1080i_30, 1080i_25
Page 44
Menu Operations
41
7.4.4 Contrast
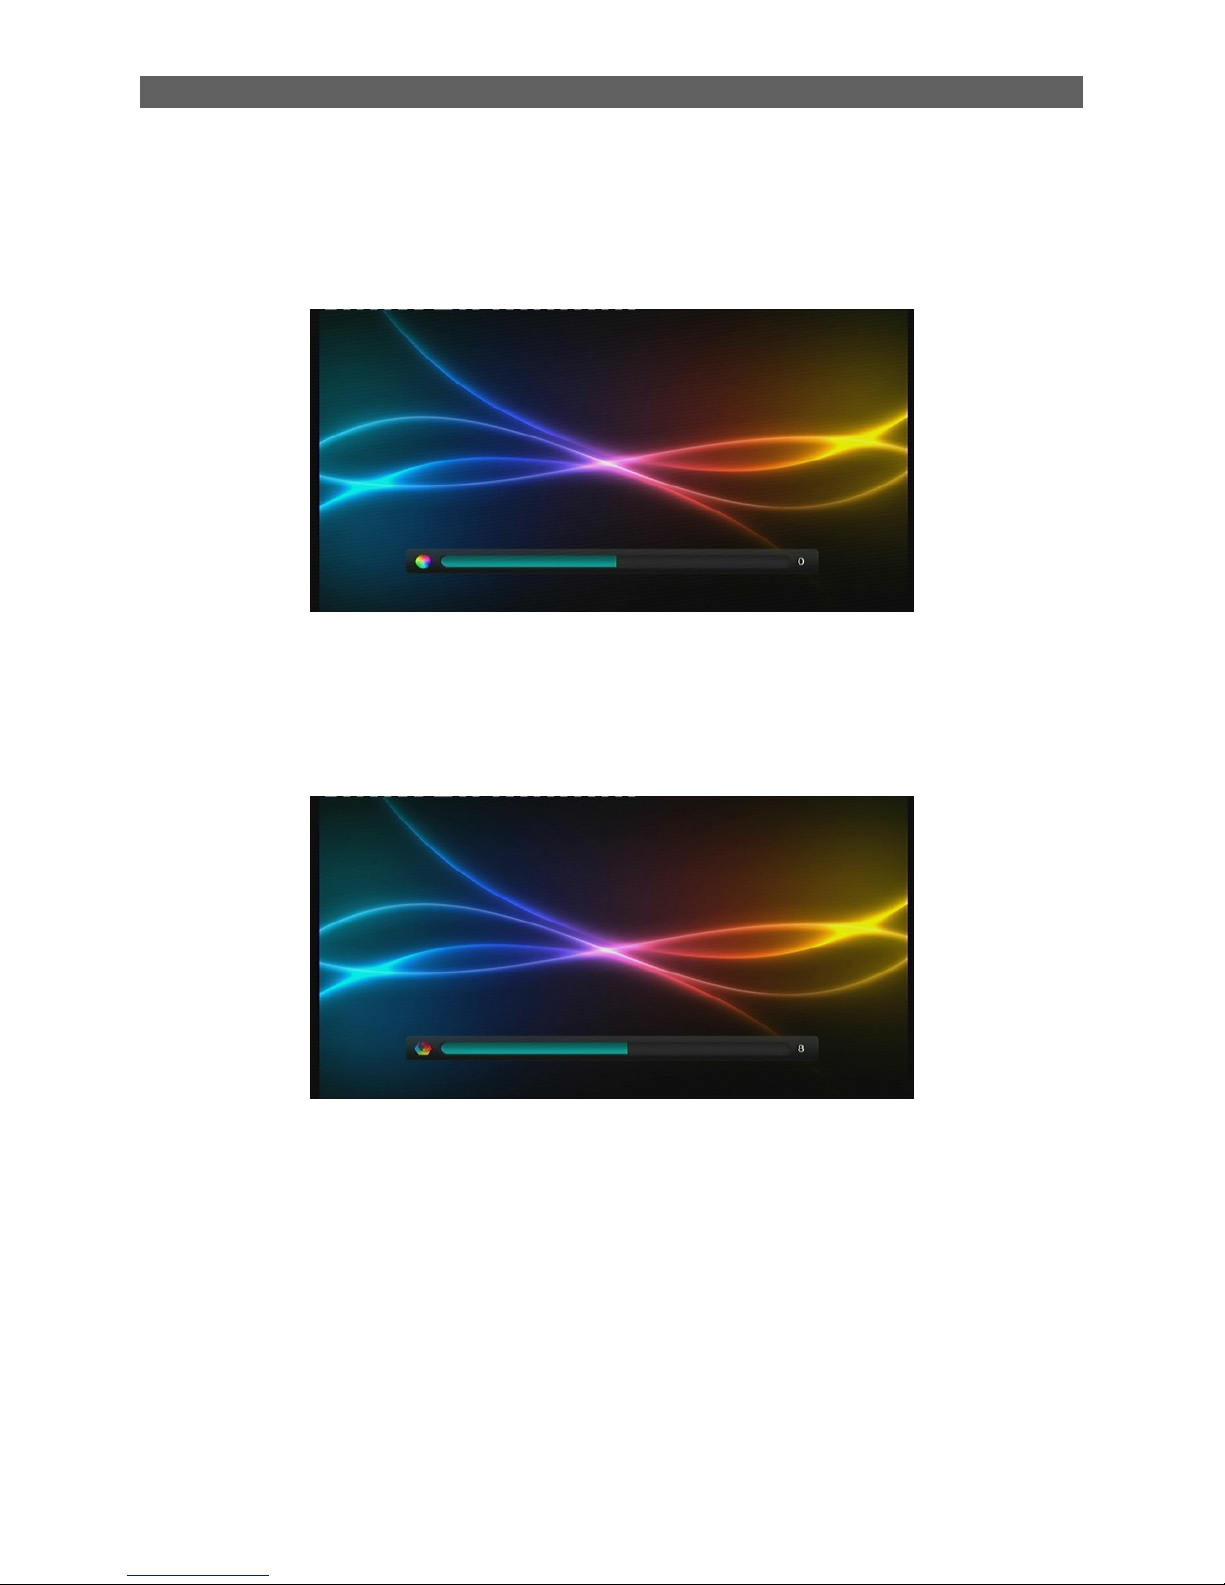
The Contrast item determines the contrast level of the system. After highlighting the Contrast item,
press [OK] key to enter its setting interface:
7.4.5 Brightness
The Brightness item is to adjust the brightness level of the system. After highlighting the
Brightness item, press [OK] key to enter its setting interface, see the figure below:
Press [◄/►] keys to adjust the brightness level from 0 to 24. After setting, press [OK] key or just
wait for 3 seconds to return to the AV menu.
7.4.6 Saturation
The Saturation item is to adjust the saturation level of the system from 0 to 24.
Page 45
Menu Operations
42
7.4.7 HUE
The HUE item is to adjust the hue level of the system from -30 to 30. After highlighting this item,
press [OK] key to enter its setting interface:
7.4.8 SHARPNESS
The Sharpness item is to adjust the Sharpness level of the system. After highlighting the
Brightness item, press [OK] key to enter its setting interface:
In addition, in this interface press [▲/▼] keys can switch among Contrast, Brightness, Saturation,
Hue and Sharpness.
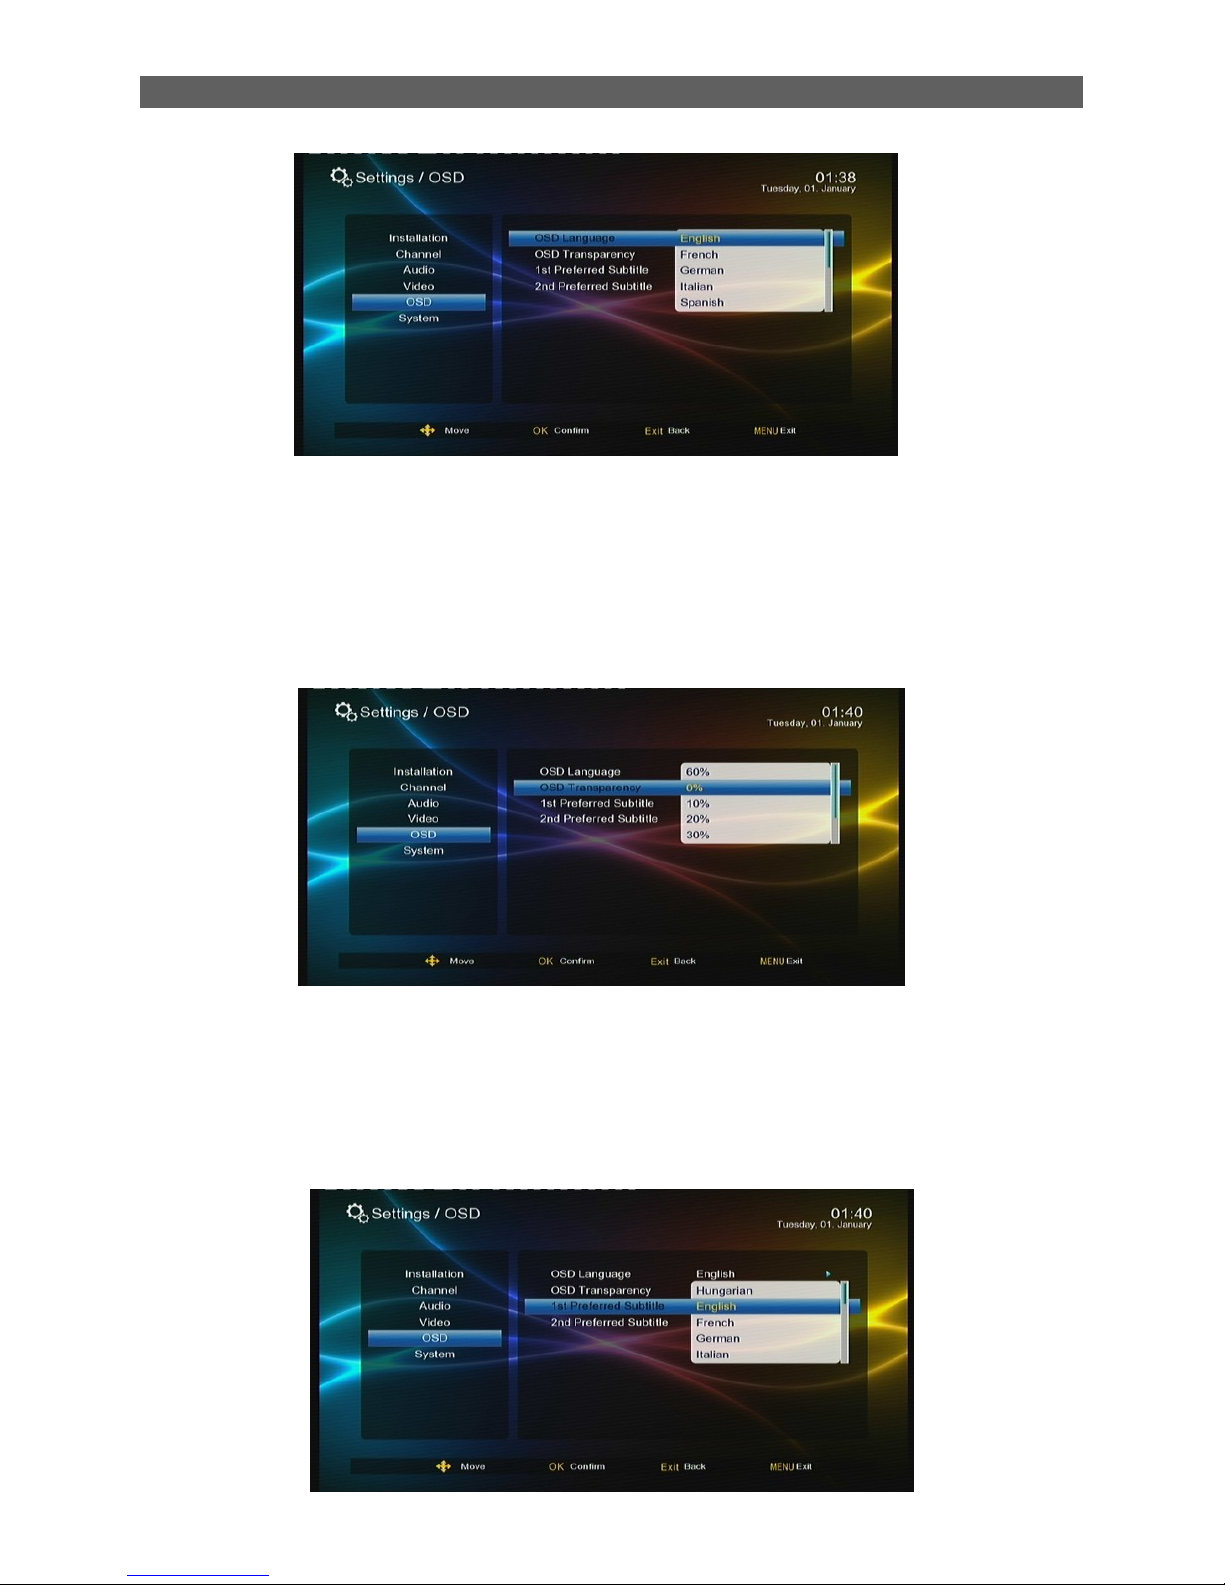
7.5 OSD Language
The OSD Language sub-menu defines the language of menu and prompts. To change the OSD
languages, press [▲/▼] keys to highlight this item and then press [ok] or [ ►] keys to pull down a
language list. In this list, you can press [▲/▼] keys to select a language and the press [ok] key to
confirm.
Page 46
Menu Operations
43
7.5.1 OSD Transparency
Through the OSD Transparency sub-menu you can adjust the transparency of OSD display in the
Main Menu. To change the OSD transparency, press [▲/▼] keys to highlight the OSD
Transparency item and then press [ok] or [ ►] keys to pull down a transparency list. The list has
seven transparency levels from 0% to 60%.The bigger the level value is ,the higher the
transparency is, After selecting a transparency ,press [OK] key to confirm.
7.5.2 1Preferred Subtitle
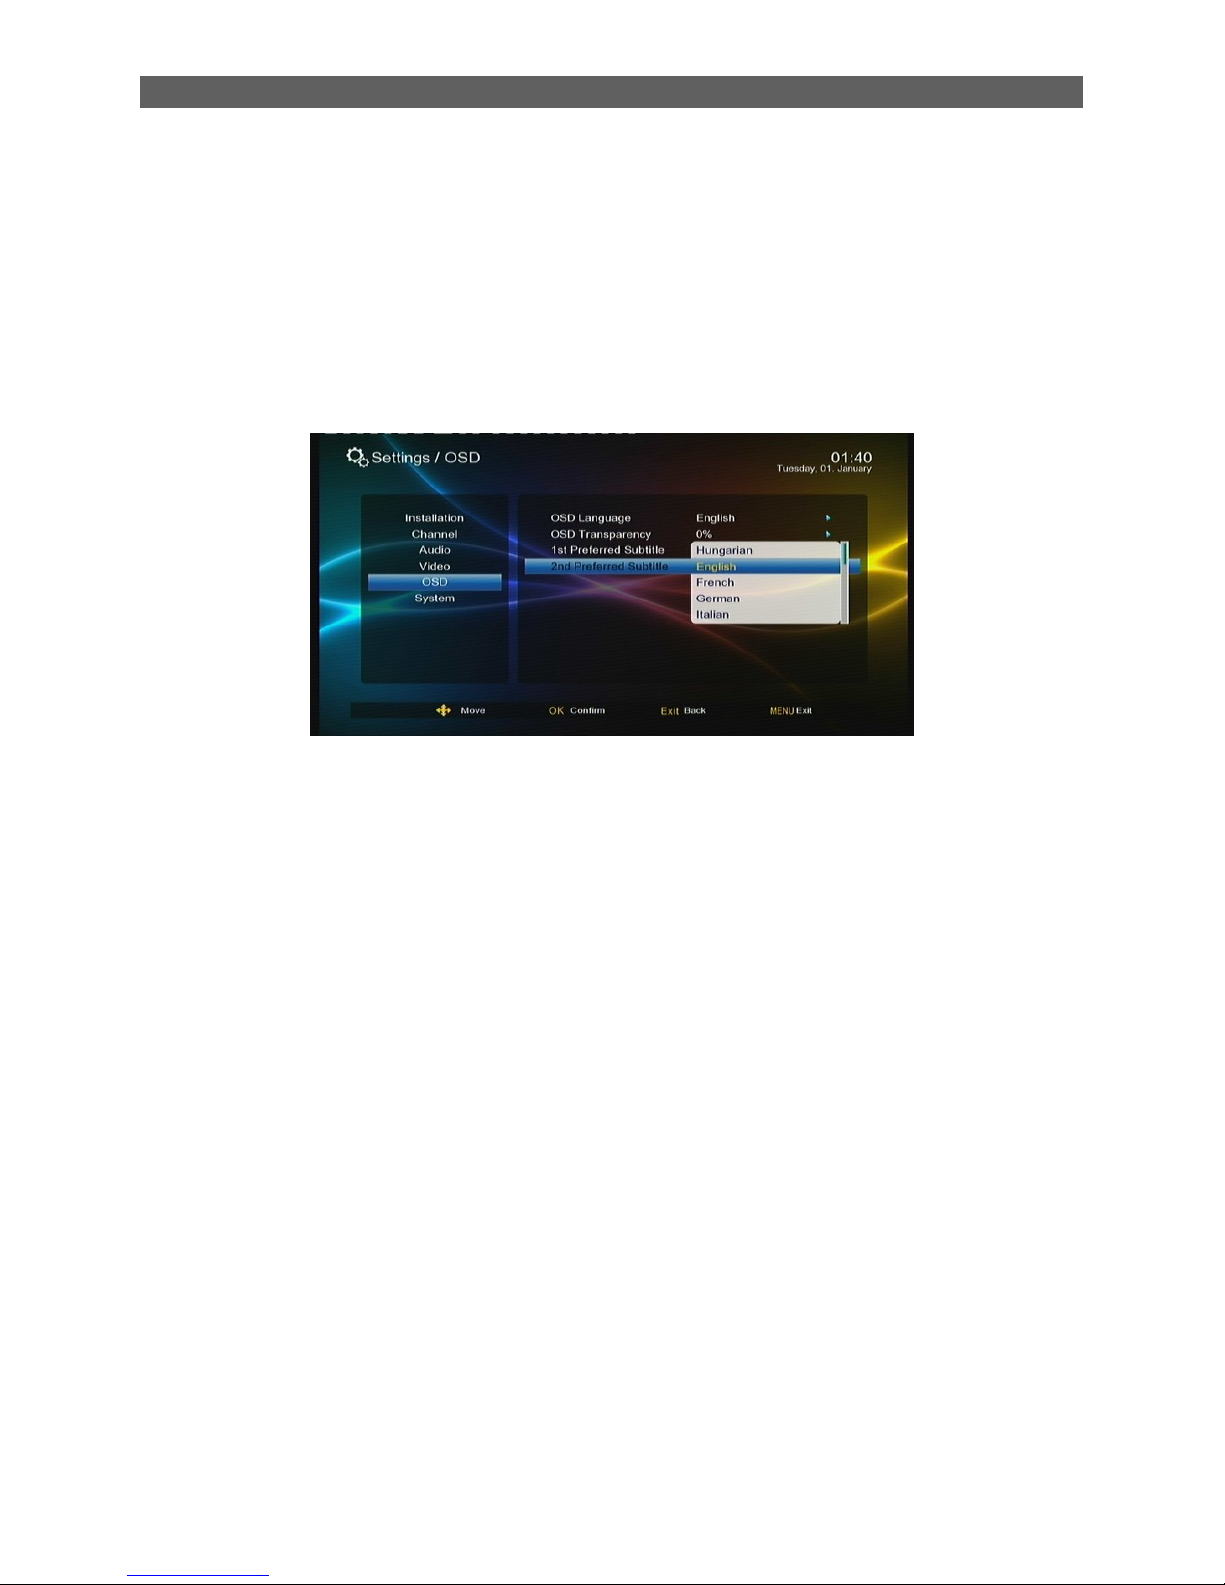
The 1Preferred Subtitle sub-menu is used to set subtitle languages. When a program has
subtitles of multiple languages, we can set priorities for these languages through this item. Two
preferred subtitle languages can be set here and the first one has a higher priority. The system will
then auto search the matched subtitle to play.
Page 47
Menu Operations
44
To change preferred subtitle languages, press [▲/▼] keys to highlight the Preferred Subtitle
sub-menu and then press [ok] or [ ► ] keys to pull down a language list. In this list, you can press
[▲/▼] keys to select a desired language and then press [OK] key to confirm.
7.5.3 2Preferred Audio
The 2Preferred Audio Subtitle is used to set the default audio language. When a program has
audios of multiple languages, the system will auto search the matched audio to play according to
the settings here. Two preferred audios can be set and the first one has a higher priority.
Page 48
Menu Operations
45
8. System
Press[▲/▼] key to highlight the system main menu, press [ok] or [ ►] to enter sub-menu.
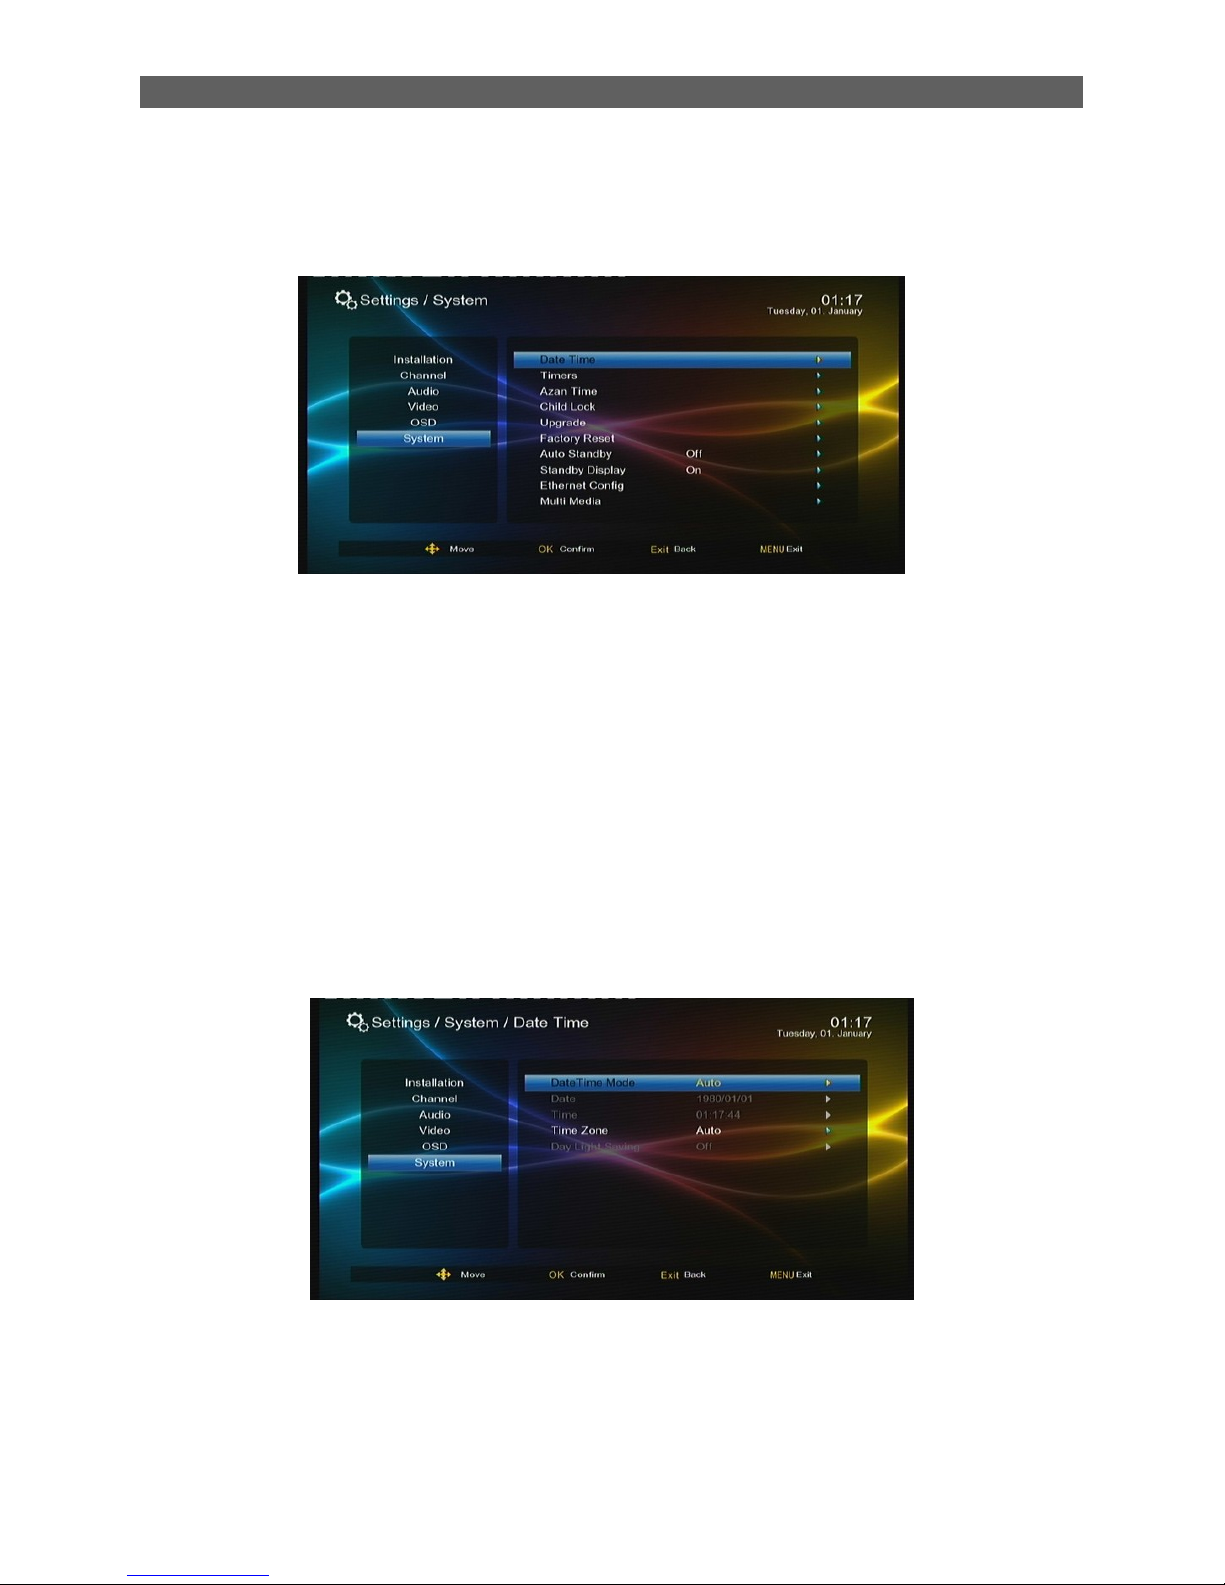
8.1 Date Time
Setup the date time setting of system
Date Time Mode
Auto: both the Date and Time items will be set automatically (cannot be set by hand),you can set
up time Zone and Day light saving item
Manual: users can set the Date and Time items by hand, but Time Zone and Day light saving item
cannot be set.
If the Time Zone item is set as Auto ,the Day light Saving item will be grayed (cannot be set by
hand).if the Time Zone item is set as a concrete time zone, you can set whether or not to use the
daylight saving time according to the selected time zone.
8.2 Timers
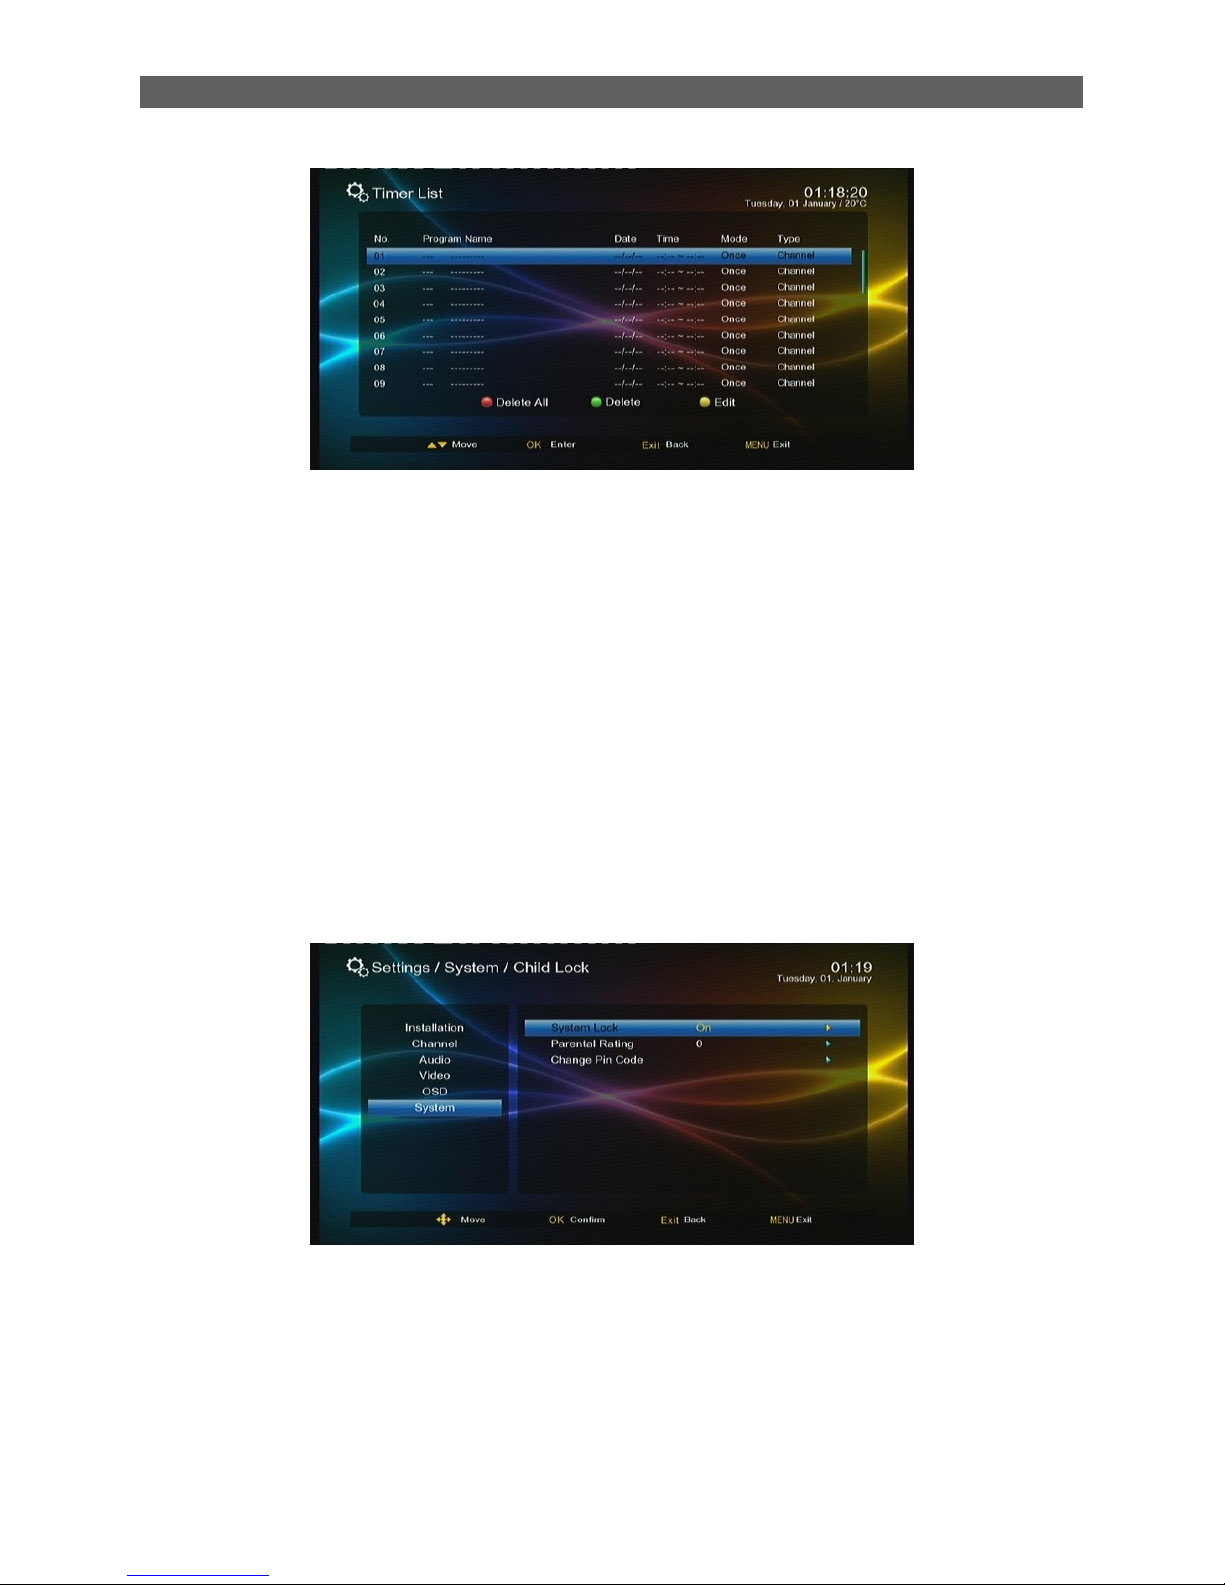
Through the Timers item, you can manage scheduled programs. In the Timers menu you can view
and edit the scheduled program‟s name, start time, schedule type and so on:
This is the interface timers
Page 49
Menu Operations
46
Program Name indicates the scheduled program.
Data and Time indicate the scheduled time.
Mode indicates the frequency of schedule: Once, Daily, Weekly or Monthly.
Type indicates the behaviors after the scheduled time is reached.
8.3 Child Lock
The Child Lock sub-menu is to set a program lock in order to protect children from watching some
improper programs to their ages.
After highlighting the Child Lock item in the Setting menu press [OK] key, and a password input
dialog will appear. Input a correct password (default: 0000) to enter the Child Lock menu.
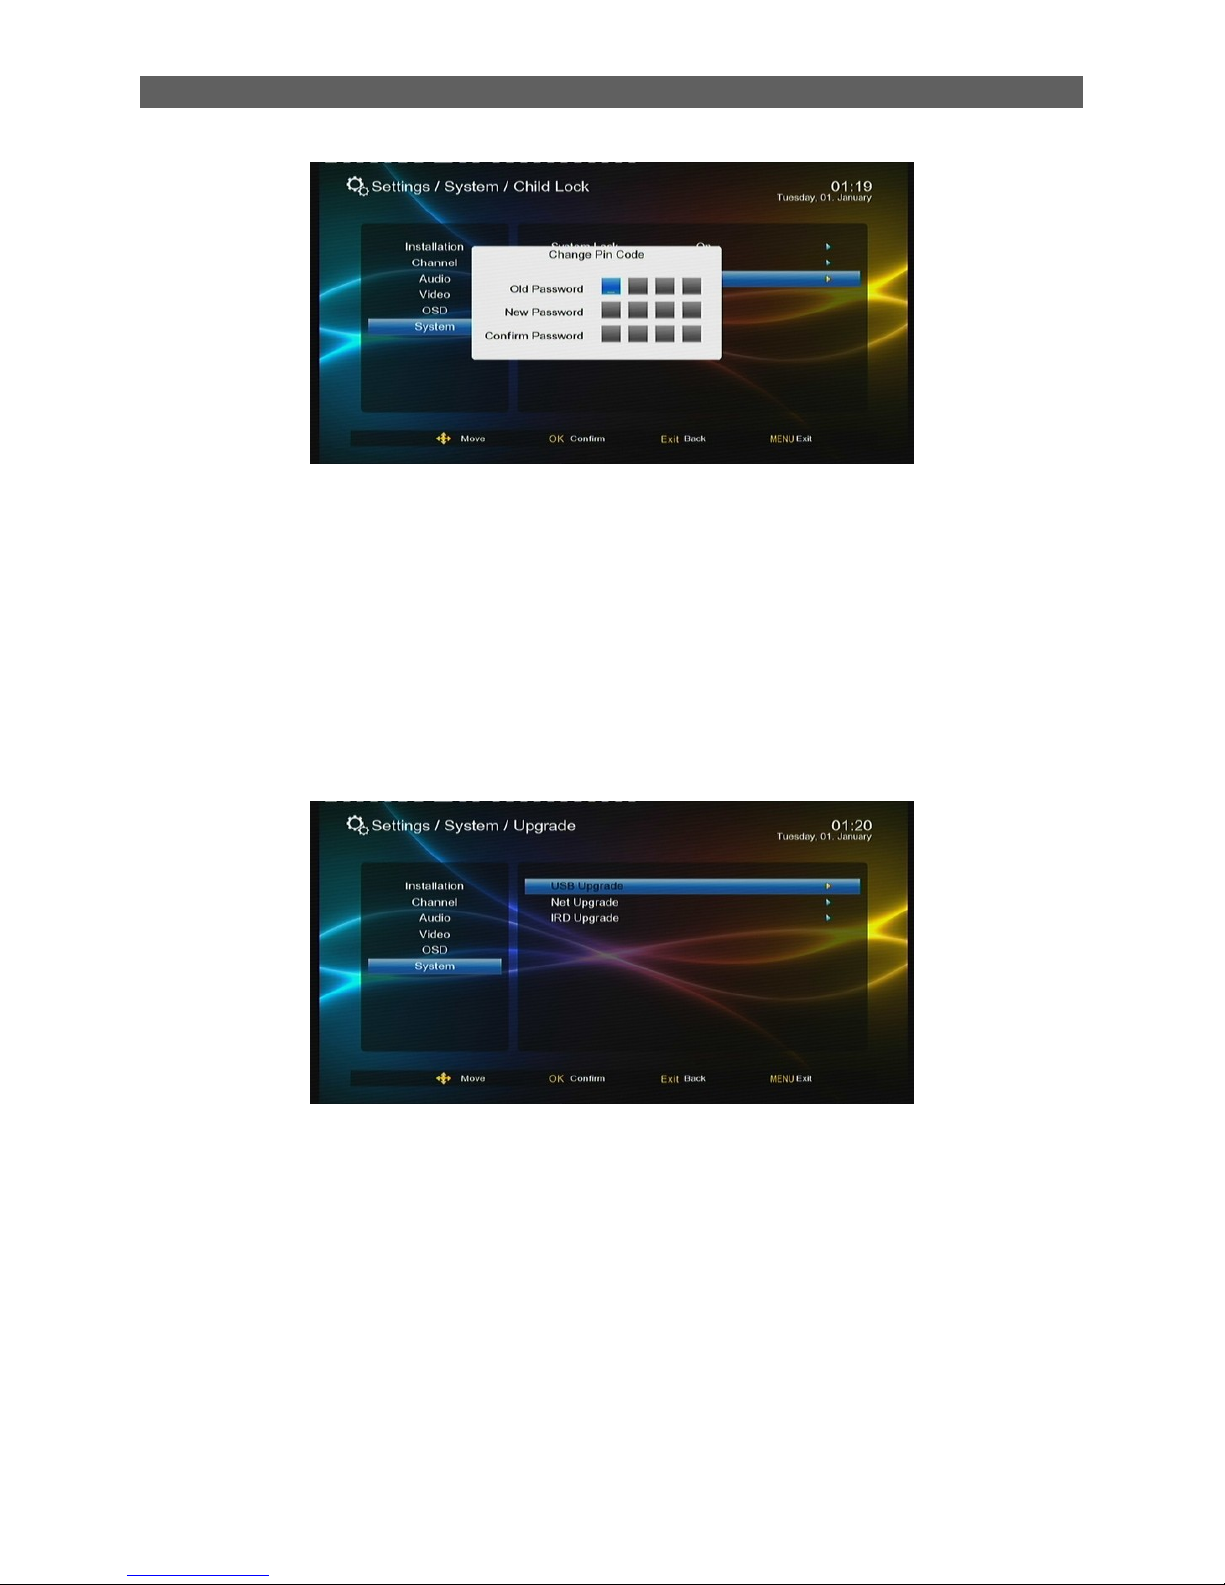
There are three menu items:
System Lock: Turn on or off the child lock function.
Parental Rating: Set rating from 4 ages to 18 ages. If set as 0, no limit.
Change Pin Code: Change the password of the child lock. When this item gets the
highlight, press [ OK ]key to call out the Change Pin Code dialog. See the figure below:
Page 50
Menu Operations
47
In this dialog, enter the correct old password first and then give a new password twice. Thus the
password is changed completely.
8.4 Upgrade
Carry out system software upgrade.
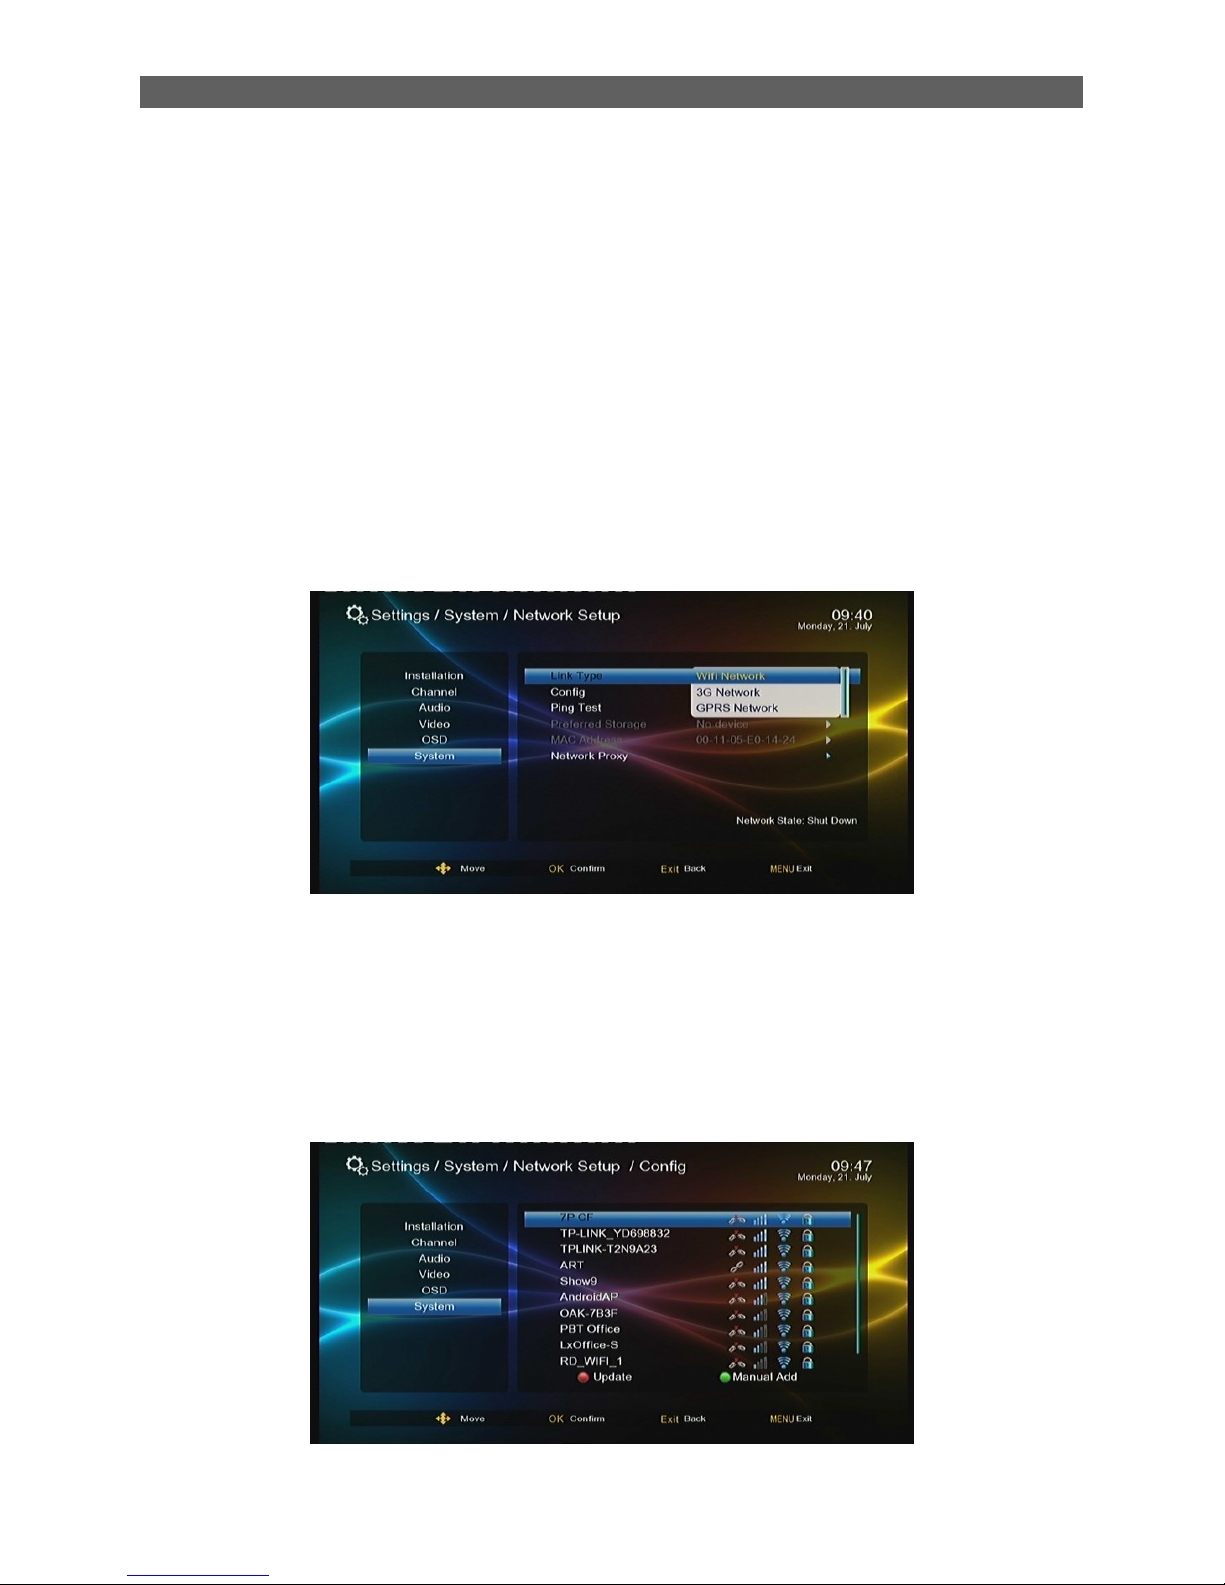
At present the system supports three methods to upgrade the system software: USB Upgrade,
Net Upgrade. IRD Upgrade. This is the data base config interface configuration:
:
8.5 Factory Reset
Through the Factory Reset item you can reset the system to factory settings.
Press ▲/▼ keys to highlight this item and then press [ OK ] key, and a password input dialog will
appear. Input a correct password (default: 0000), and the system will then start to reset to factory
settings. When finished, “Init Install” window display (refer to chapter 2.1)
Page 51
Menu Operations
48
8.6 Auto Standby
The Auto Standby item is to set the system enter the standby mode when the period is expired,
you can chose “off”,”1hr”,”2 hr ”,”3 hr”.
8.7 Standby Display
The Auto Standby item sets whether the system will enter the standby mode if there is no any
operation for a certain time period.
If the Auto Standby item is set as „On‟, the system will auto enter the standby mode after three
hours of no operations.
8.8 Network Setup
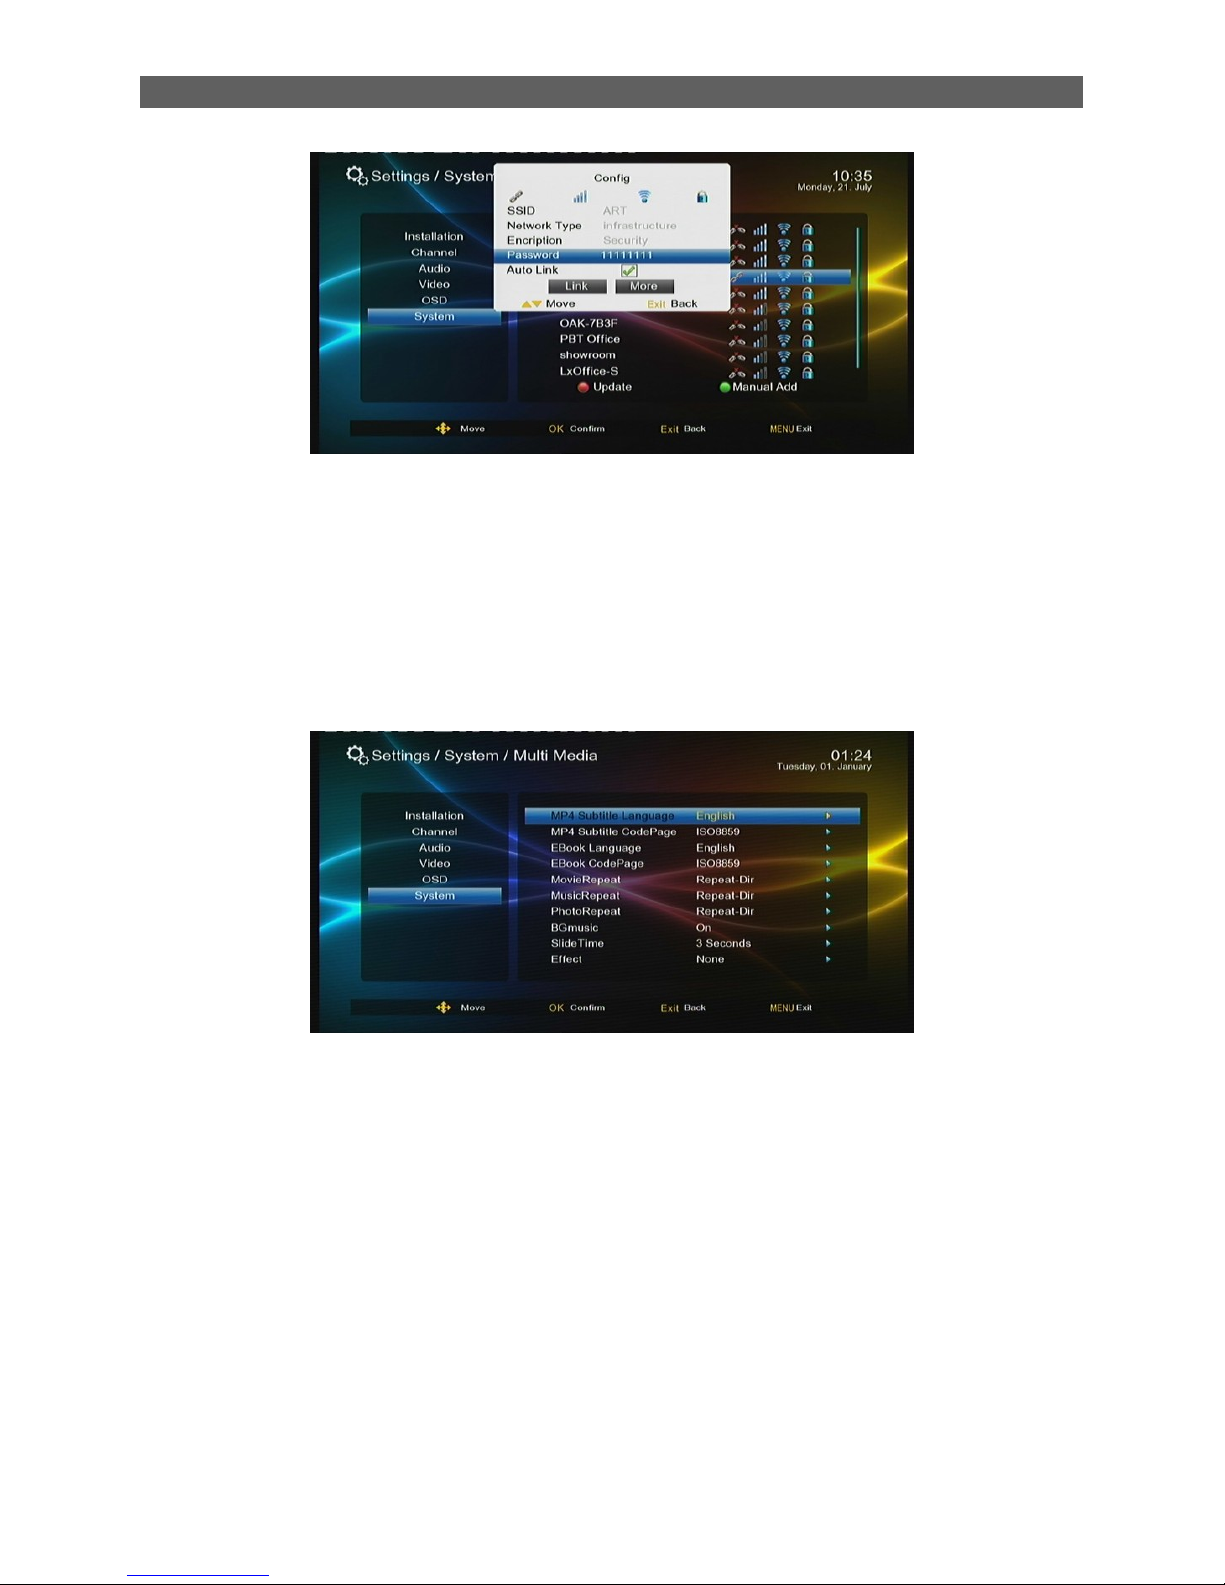
Before you want to use the internet, you must plug in the wireless USB dongle to the USB port
Link Type: Wifi Network , 3G Network and GPRS Network.
Select the link type: “Wifi Network”. Move the highlight to “Config” and press [OK] button to start
search access point. Select the network name of your Wi-Fi access point from the list, and input
the right “password” and select “Auto Link”.
Page 52
Menu Operations
49
If Network is connected, it should get the correct IP address and display the “ Network Connect
success”
8.9 Multi Media
The Multimedia item is only for the Multimedia Mode.
Main parameter included:
MovieRepeat: Set repeat mode for movie playback. Three options: Dir, One, OFF.
MusicRepeat: Set repeat mode for music playback. Three options: Dir, One, OFF.
PhotoRepeat: Set repeat mode for photo playback. Three options: Dir, One, OFF.
Bgmusic: Turn on or off background music (while playing photos or eBooks).
Slide Time: Set time interval for photo slideshow mode.
Effect: Set special effect for photo slideshow mode.
Page 53
Menu Operations
50
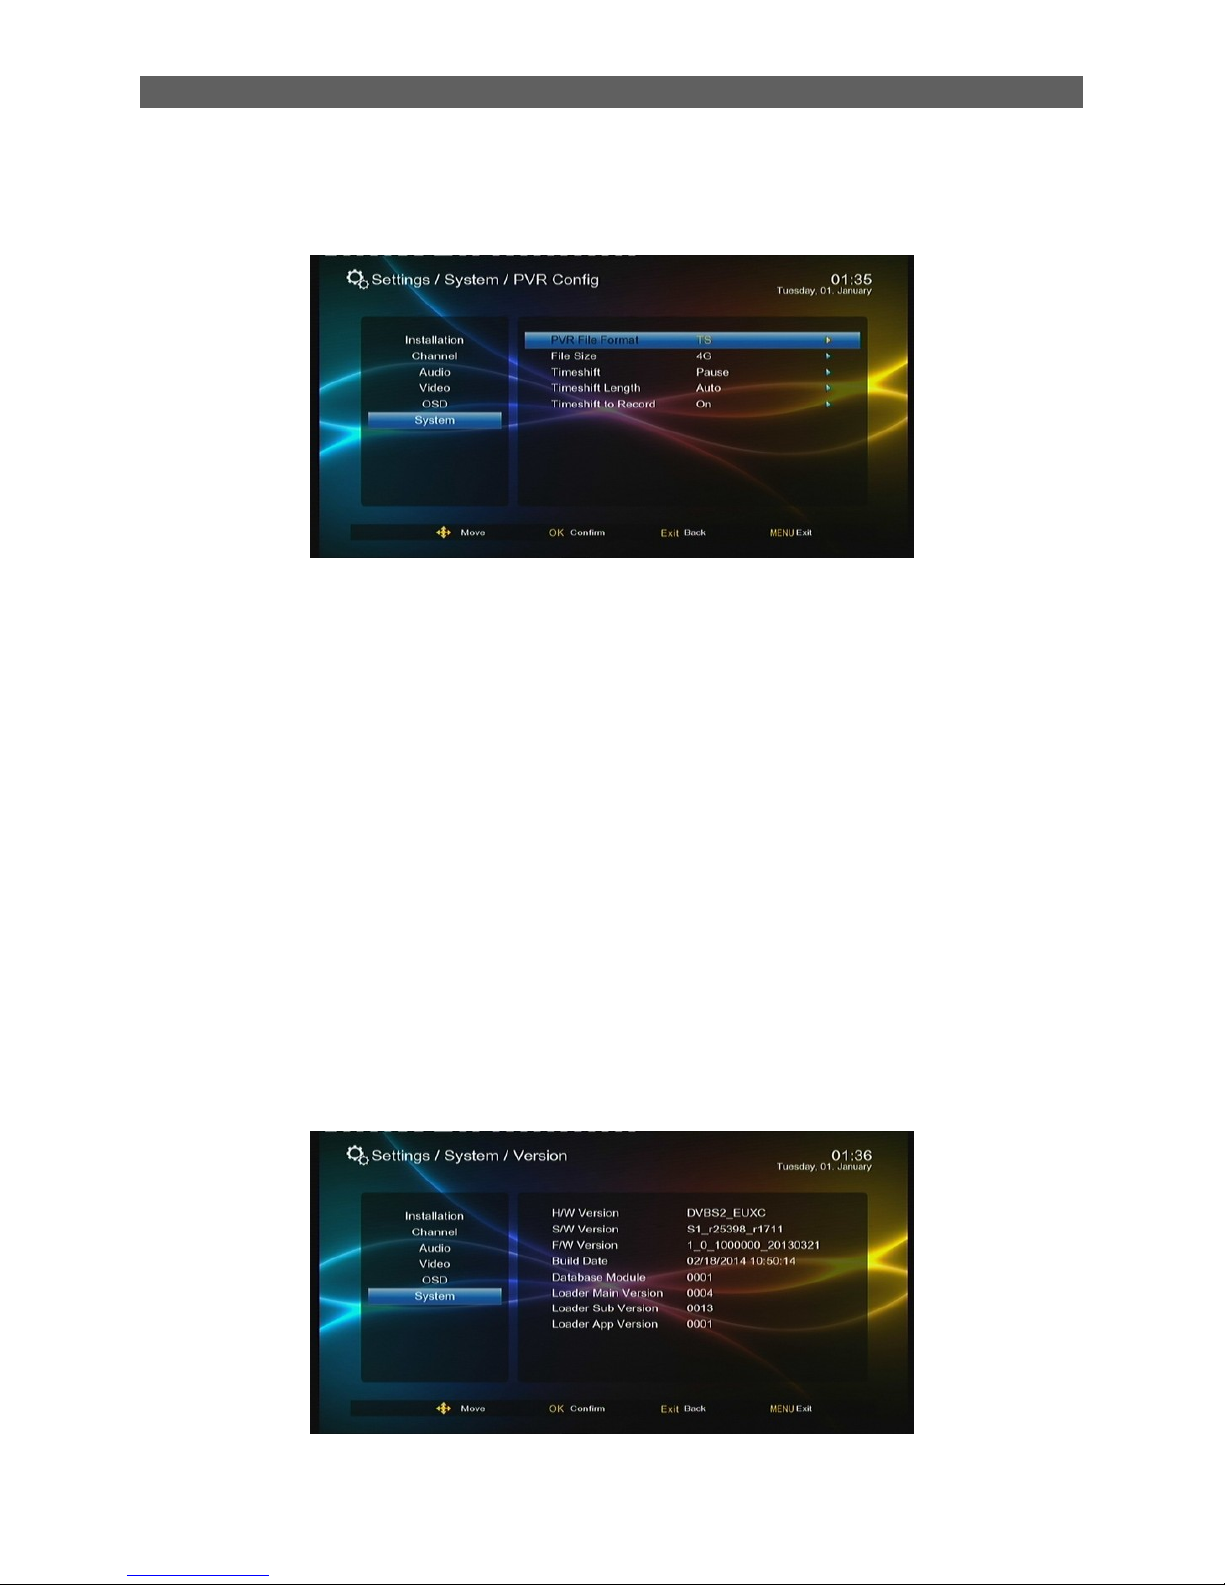
8.10 PVR Config
Through the PVR Config item you can do some settings on Timeshift and Record functions.
PVR File Format: Set the format of record files , TS or PS.
File Size: Set the size of a single record file. Four Options:1G,2G,3G or 4G..
Timeshift: Set a method to start the timeshift function. Three options: Auto, Pause and Off.
Timeshift Length: Set the time shift length. Four options: Auto, 30 min, 1hr and 2hr.when disk is
full, the earlier data will be overwritten and it is not limited by this parameter‟s setting. This setting
is unavailable when Timeshift is set as “off”.
Set “on” during timeshift, if you press “REC” key, the system. Will record the data which has been
buffered by timeshift will be saved into a file .If “OFF” is selected ,the buffered data will be
removed when the timeshift end
8.11 Card
Show the message of card.
8.12 Version
Through the Version item you can view the version information of system hardware and software
as well as the build date of the system:
Page 54

Troubleshooting
51
9. Troubleshooting
There may be various reasons behind receiver problems. Check the receiver according to the
procedures described below. If you can‟t solve your problem even after following the
troubleshooting procedures, please contact the dealer, Do not open the receiver cover, it may
cause a dangerous situation.
1) No message display on the front panel
The power cord is not plugged in。
Check that the power cable is plugged in to the wall outlet
2) No picture or sound
--Wrong connection of the audio / video output of the receiver to TV
Connect the audio / video output of the receiver to TV correctly
-- Wrong connection for the satellite antenna
Connect the antenna cable correctly
-- No or bad signal message appears
Check other device connected between antenna and the receiver, or adjust the antenna position
--Audio muting
Press the MUTE button
--TV power
Turn TV on
3) No picture
-- The receiver can’t receiver the signal
Check the antenna cable, replace the cable‟ or connect the cable to the receiver tightly
--Incorrect values of some tuner parameters
Set the values of tuner parameters correctly. Refer to the installation menu
4) No or bad signal
--The UHF Antenna is not pointing
Adjust the antenna
--Signal too strong
Connect the signal attenuator to the signal input
Page 55

Troubleshooting
52
5) The remote controller does not operate
--The batteries of the remote controller are not inserted or exhausted
Check whether the batteries are inserted correctly in your remote controller.
Check and replace the batteries of the remote controller
6) Poor picture quality / Less channels in scanning
-- Signal loss cable
Change the antenna power in antenna menu
7) Screen shows “ LNB Short” or STB constant reboot
-- LNB Short circuit
Check all the facilities installation by below steps :
a) Unplug the LNB Cable, if no warning on the screen, the short circuit is from the external
environment and external factors .
b) Please reboot the STB to check if warning still existing. if not showing , we can eliminate the
STB system crash situation .
c) If there is not the STB problem, please check the cable which connected the STB TUNER part,
and check whether the connection head appearance the short circuit situation.
d) It had better to check all the facilities in turns on the cable (such as: DISEqC switch,multi
switch ,LNB) if they have short circuit problem or not .
Page 56

Technical Specification
53
10. Technical Specification
VIDEO
Decoding MPEG-4 & MPEG-2 & MEPG-1 compatible
Bit rate Max 15Mbps
Output PAL/NTSC
Aspect ratio 4:3, 16:9, Auto
Active pixel SD: 720x480 @ 30fps; 720x576 @ 25fps
HD: 480p, 576p, 720i, 720p, 1080i,1080p
Output connector RCA, HDMI
AUDIO
Decoding MPEG-2/MPEG-1 layer I & II
Mode Mono, Dual, Stereo, Joint stereo
Bit rate Max 384Kbps
DEMODULATOR
Demodulation QPSK & 8PSK
Symbol rate SCPC/MCPC
Outer code RS (204, 188, 8)
Inner code ALL DVB rates
Energy dispersion DVB-S/S2 recommendation
INPUT SIGNAL
Frequency 950MHz ~ 2150MHz
Input level -65dBm ~ -25dBm
Channel bandwidth 36MHz
Input socked F-type connector
LNB CONTROL
Power supply 13/18V (300mA max) with short circuit protection
Polarized control 13/18V polarization (vertical/horizontal)
DiSEqC control DiSEqC1.0, DiSEqC1.1 and DiSEqC1.2
MISCELLANEOUS
Supply voltage 100-240VAC,50/60Hz
Power consumption Max.15 watts
Operation temperature 0°c to +40°c
Storage temperature -40°c to +65°c
Dimension (W * D * H) 230 * 175 * 45 mm
Weight 1.2Kg
 Loading...