

Page 1
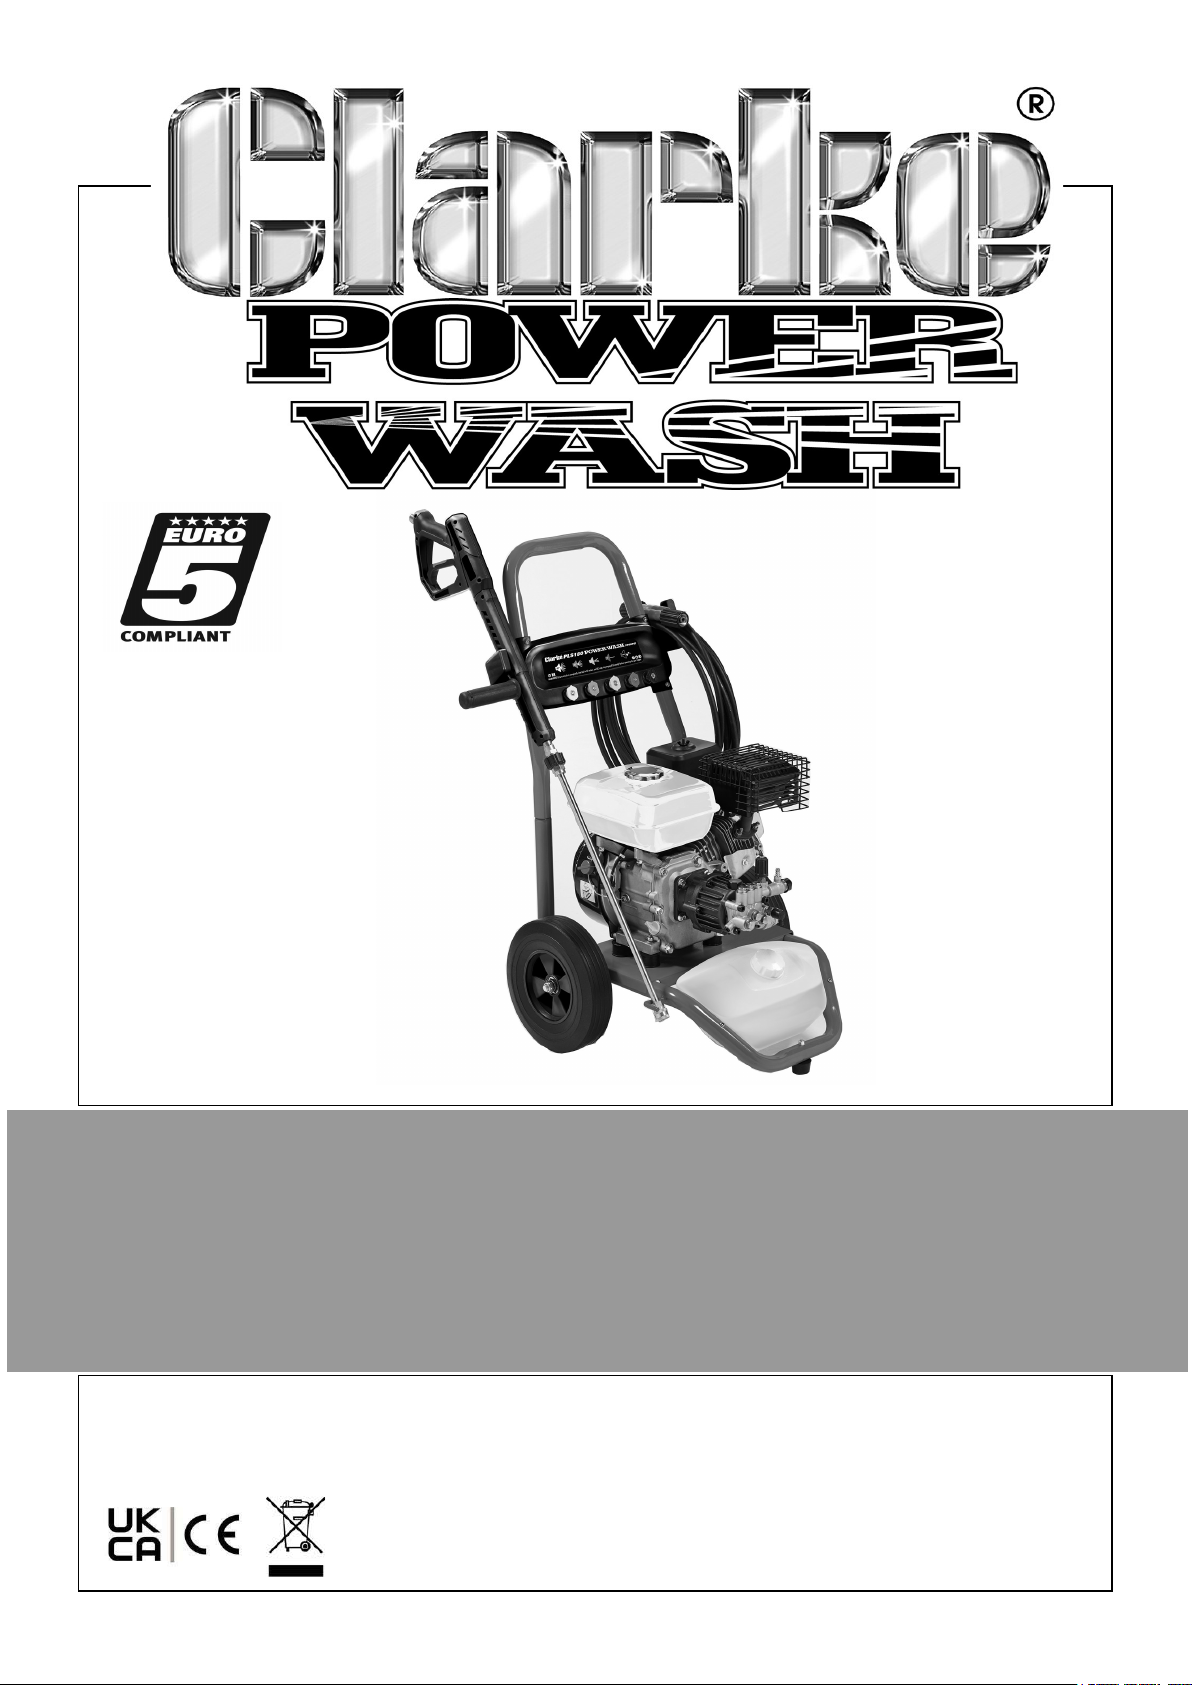
PETROL PRESSURE WASHER
MODEL NO: PLS180
PART NO: 7330422
OPERATION & MAINTENANCE
INSTRUCTIONS
ORIGINAL INSTRUCTIONS DL1224
Page 2
INTRODUCTION
Thank you for purchasing this CLARKE Petrol Pressure Washer.
Before attempting to use this product, please read this manual thoroughly and follow
the instructions carefully. In doing so you will ensure the safety of yourself and that of
others around you, and you can look forward to your purchase giving you long and
satisfactory service.
GUARANTEE
This product is guaranteed against faulty manufacture for a period of 12 months from
the date of purchase. Please keep your receipt which will be required as proof of
purchase.
This guarantee is invalid if the product is found to have been abused or tampered
with in any way, or not used for the purpose for which it was intended.
Faulty goods should be returned to their place of purchase, no product can be
returned to us without prior permission.
This guarantee does not effect your statutory rights.
UNPACKING
Unpack your pressure washer and check to ensure the following items are present.
Contact your CLARKE dealer immediately if any parts are missing or damaged.
1 x Petrol Pressure Washer 1 x Gun Side Handle
2 x Wheel/Tyre Assembly & Fixings 5 x Gun Nozzles
1 x Gun Assembly 1 x Rubber Foot c/w Fixings
1 x Lance Assembly 1 x Spark Plug Box Spanner
1 x High Pressure Hose (Outlet) 1 x Engine Manual
1 x Detergent Inlet Hose & Filter 1 x Nozzle Pin
2
Parts & Service: 020 8988 7400 / E-mail: [email protected] or [email protected]
Page 3
GENERAL SAFETY RULES
WARNING: WATER AT HIGH PRESSURE CAN BE DANGEROUS AND
CAN CAUSE DAMAGE TO PERSONS OR PROPERTY IF THE OPERATOR
IS CARELESS. NEVER ALLOW ANYONE TO OPERATE THIS
EQUIPMENT UNLESS THEY ARE THOROUGHLY RELIABLE, AND
FAMILIAR WITH THE SAFETY PRECAUTIONS.
1. DO NOT point the spray at other people, animals, electrical equipment or the
machine itself.
2. DO NOT hold your finger over the high pressure nozzle.
3. DO NOT let children or untrained personnel use this machine.
4. DO NOT operate the machine with any of the covers removed.
5. DO NOT try to repair this machine. ALWAYS refer to your CLARKE service
department for all repairs.
6. DO NOT supply any liquid other than water to the water inlet.
7. DO NOT use the detergent pickup facility to introduce flammable liquids/solvents,
e.g. paint thinners, petrol, oil as there is a risk of explosion.
8. ALWAYS release the remaining pressure in the system; turn off the water supply
and operate the trigger before you remove hoses or accessories.
9. ALWAYS keep the machine dry and away from the water spray.
10. ALWAYS use protective clothing and safety glasses. Loose particles and other
items can be propelled at high speed by the water spray.
11. ALWAYS hold the gun securely & expect it to ‘kick’ when you pull the trigger.
12. ALWAYS respect the requirements of the local water company. Pressure washers
may only be connected to the mains water supply if a system separator (also
known as a back-flow preventer) is installed in the supply hose.
13. ALWAYS disconnect from the water supply, and make sure that you drain the
system when not in use. KEEP in a cool dry location.
14. ONLY use detergents that are suitable for pressure washers, we recommend that
you use CLARKE Traffic Film Remover or CLARKE Wash and Wax (available from
your dealer).
15. WARNING High pressure water jets can be dangerous, the jet must not be
directed at a person or anything that they are wearing.
16. WARNING High pressure hoses, fittings and couplings are important for the
safety of the machine. Use only hoses, fittings and couplings recommended by the
manufacturer.
17. WARNING Water that passes through a system separator (also known as a backflow preventer) is not safe to drink.
18. DO NOT use the pressure washer if there is damage to the inlet/outlet hose or the
machine.
3
Parts & Service: 020 8988 7400 / E-mail: [email protected] or [email protected]
Page 4
SAFETY SYMBOLS
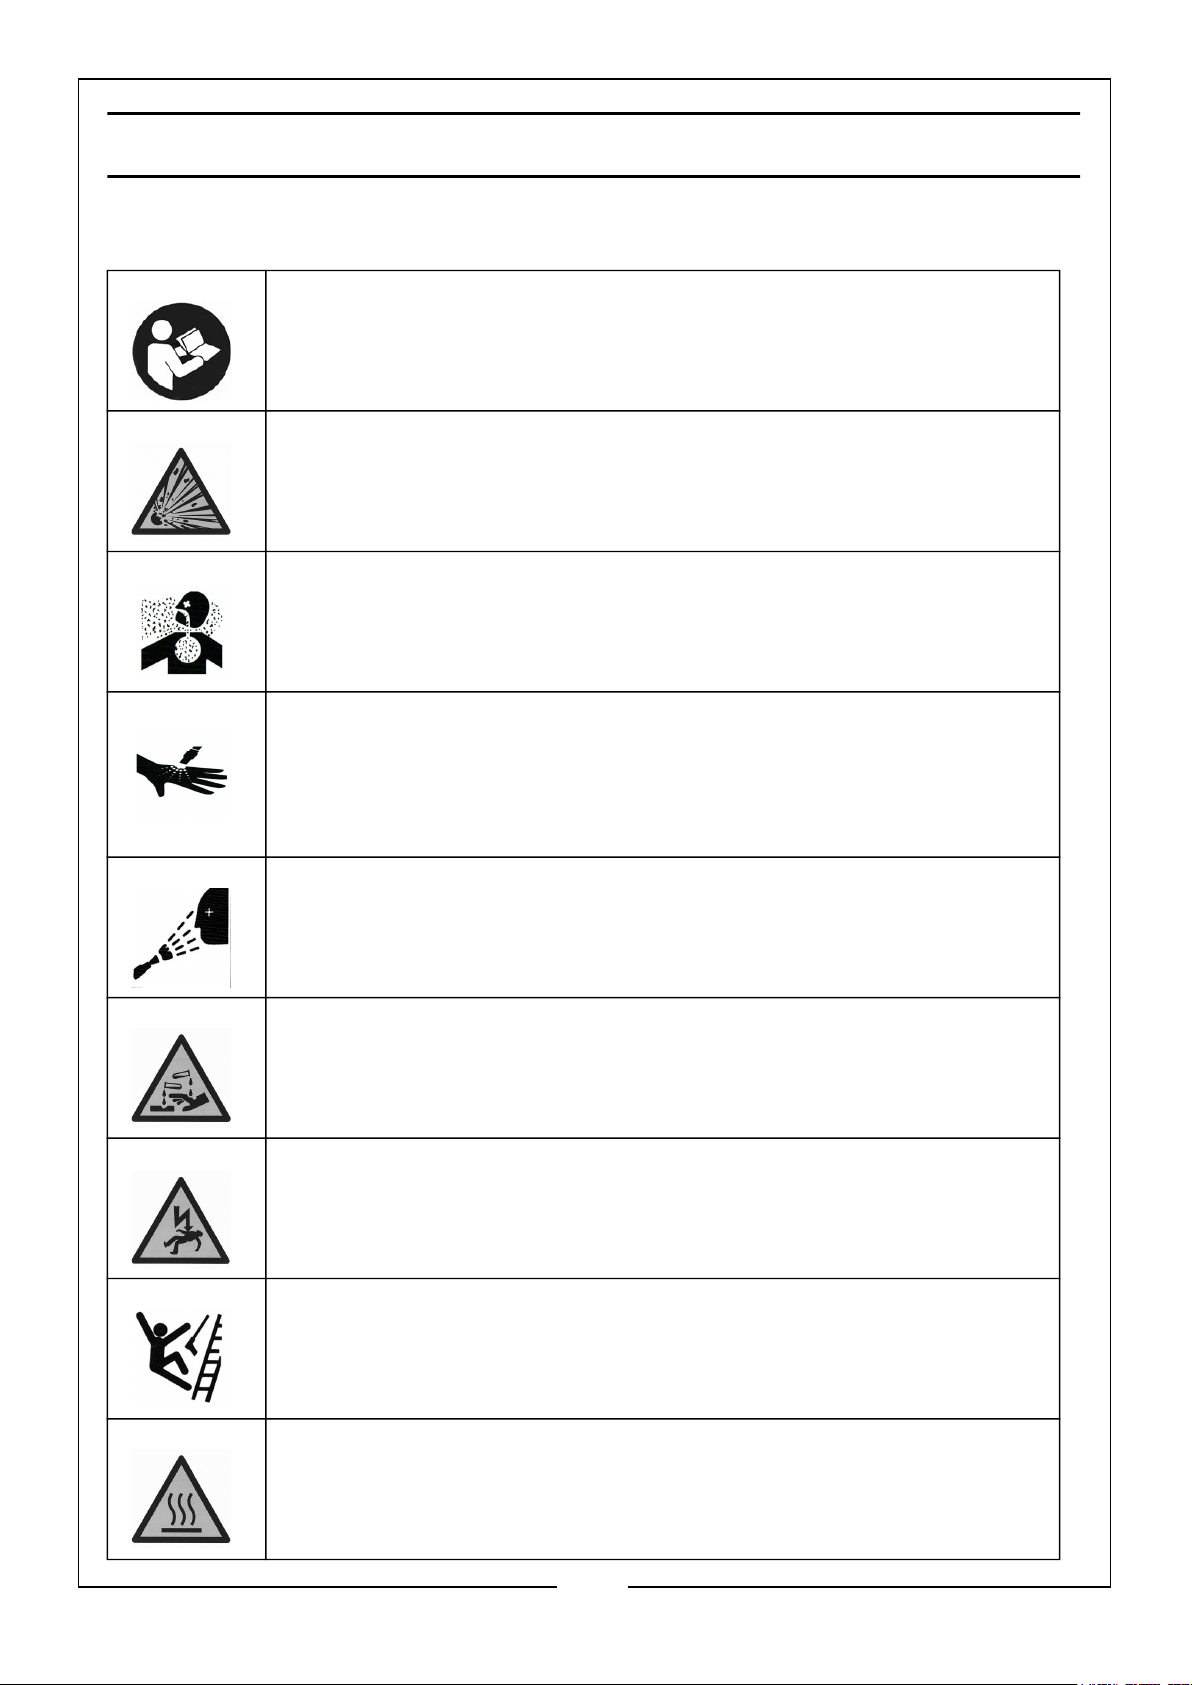
ALWAYS: Read this manual and make sure that all warnings and
instructions are clear before you use this pressure washer.
DANGER: Risk of fire or explosion. Stop the engine before you refuel
the pressure washer. Keep flammable materials away from the work
area. DO NOT spray flammable liquids.
DANGER: R isk t o bre ath ing. Engine e xhaus t fumes can kill.
For outdoor use only. Work in a well ventilated area.
WARNING: Risk of injection or severe injury. DO NOT directly
discharge stream at persons or animals. Keep clear of
nozzle. This machine should only be used by qualified
operators.
WARNING: Risk of spray injury. Spray can propel objects.
Always wear ANSI approved Z87.1 Safety Glasses.
WARNING: Risk of Detergent burn. NEVER spray acids,
corrosive or toxic Detergents. Use only cleaners formulated for
pressure washers.
WARNING: Risk of electrocution. Never direct the spray
toward any electrical device or electrical outlet.
WARNING: R i sk o f u n s a fe o p e r a t i o n . Kee p children and
animals away from this equipment. Gun kicks back. Hold with both
hands.
WARNING: Risk of hot surfaces. Avoid contact with hot engine
exhaust components. Don't allow hoses to contact the engine
muffler during or after use.
4
Parts & Service: 020 8988 7400 / E-mail: [email protected] or [email protected]
Page 5
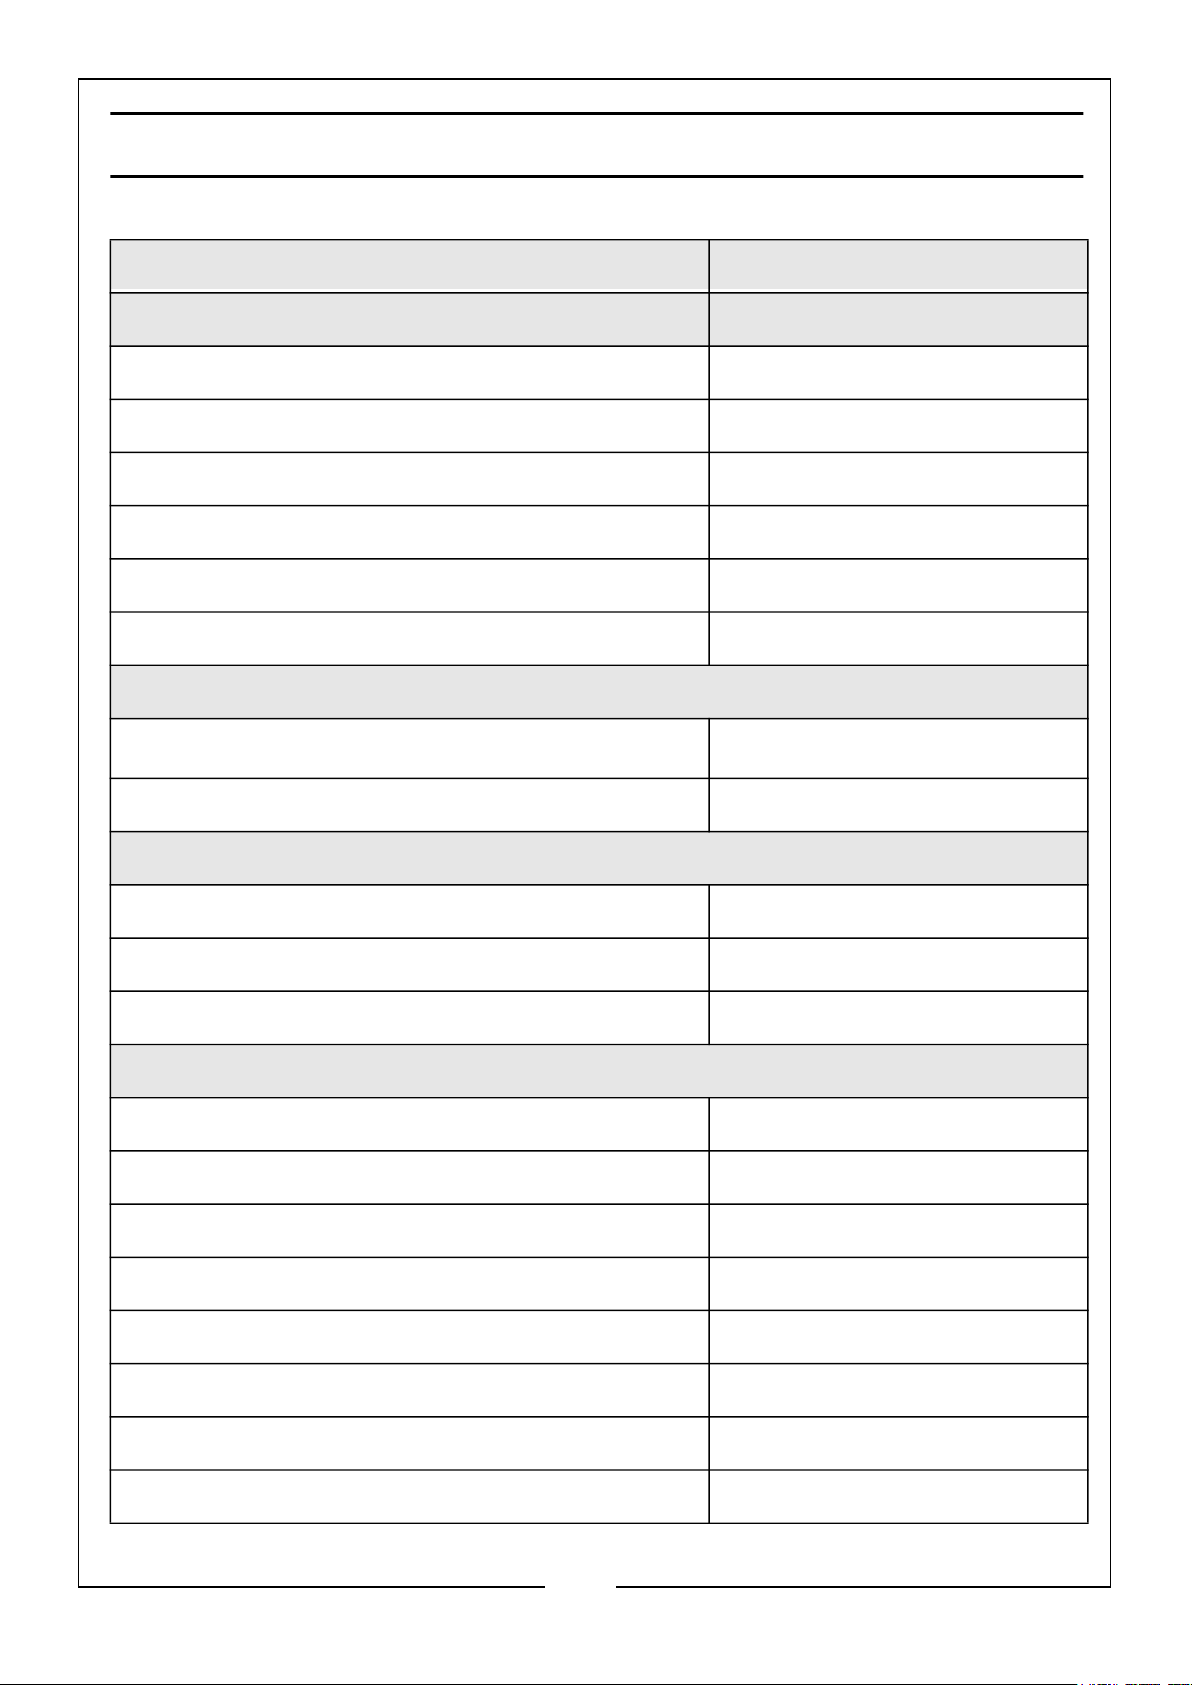
SPECIFICATIONS
Model PLS180
Engine
Engine Model KB200
Power & RPM 5hp / 3.8kW / 3600rpm
Engine Type & Size Petrol (unleaded), 196cc
Starting System Pull / Recoil
Fuel Tank Capacity (L) & Fuel Consumption (L/Hr) 3.6 / 1.44
Oil Capacity (L) & Grade 0.6 / 10W40
Water supply
Input Water Temperature
Flow Rate (l/min) (Mains Supply/Barrel) 7.8 / 7.5
Water Pump
Maximum Pressure 2596 Psi / 179 Bar
Working Pressure 2393 Psi / 165 Bar
Detergent Tank Capacity (L) 3
Dimensions & Environmental
Dimensions (D x W x H) 730mm x 530mm x 900mm
Outlet Hose Length (metres) 8
Detergent Hose Length (metres) 1.5
Weight (kg) 35.3
0oC - 30oC
Measured sound pressure level LWA dB 82.8
Guaranteed sound pressure level LWA dB 89
Uncertainty Factor LWA dB 3
Engine Emissions (CO/HC/Nox/HC+Nox/CO2) 289.55/5.53/2.75/8.28/693.68
5
Parts & Service: 020 8988 7400 / E-mail: [email protected] or [email protected]
Page 6
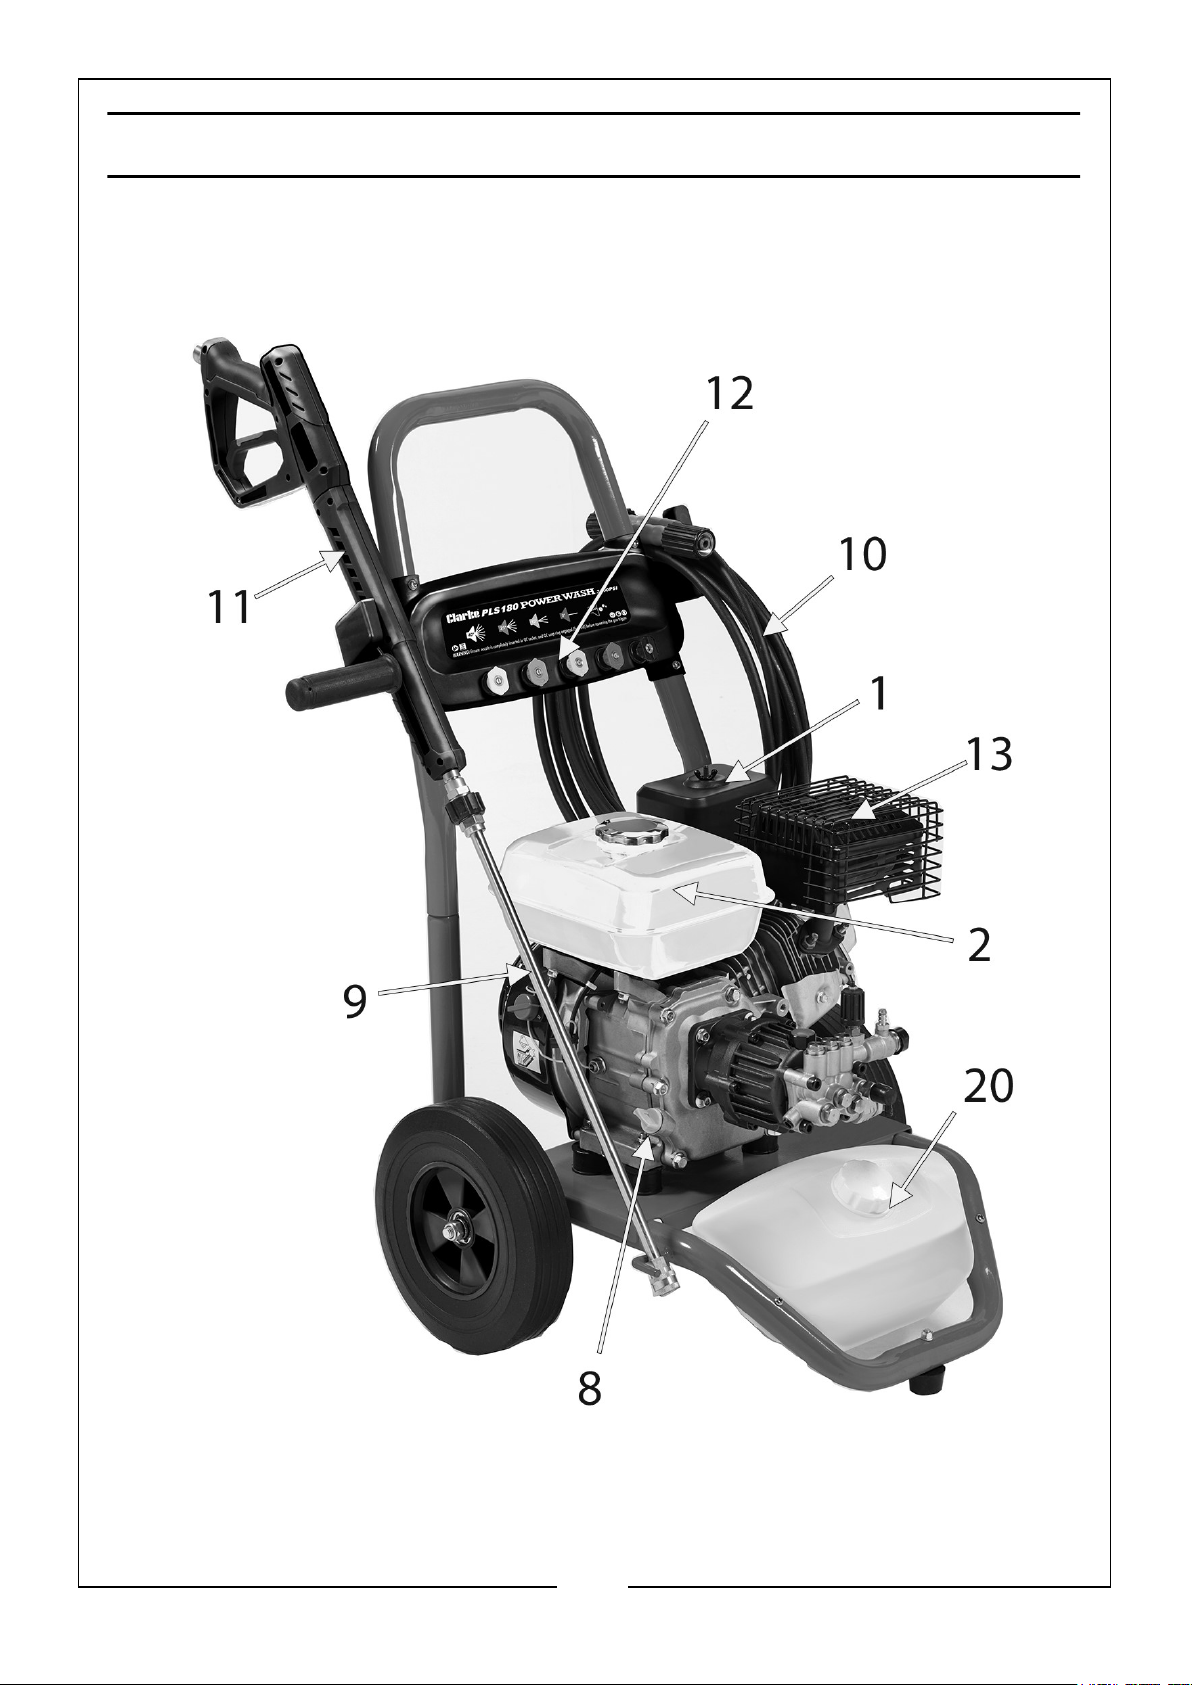
Page 7
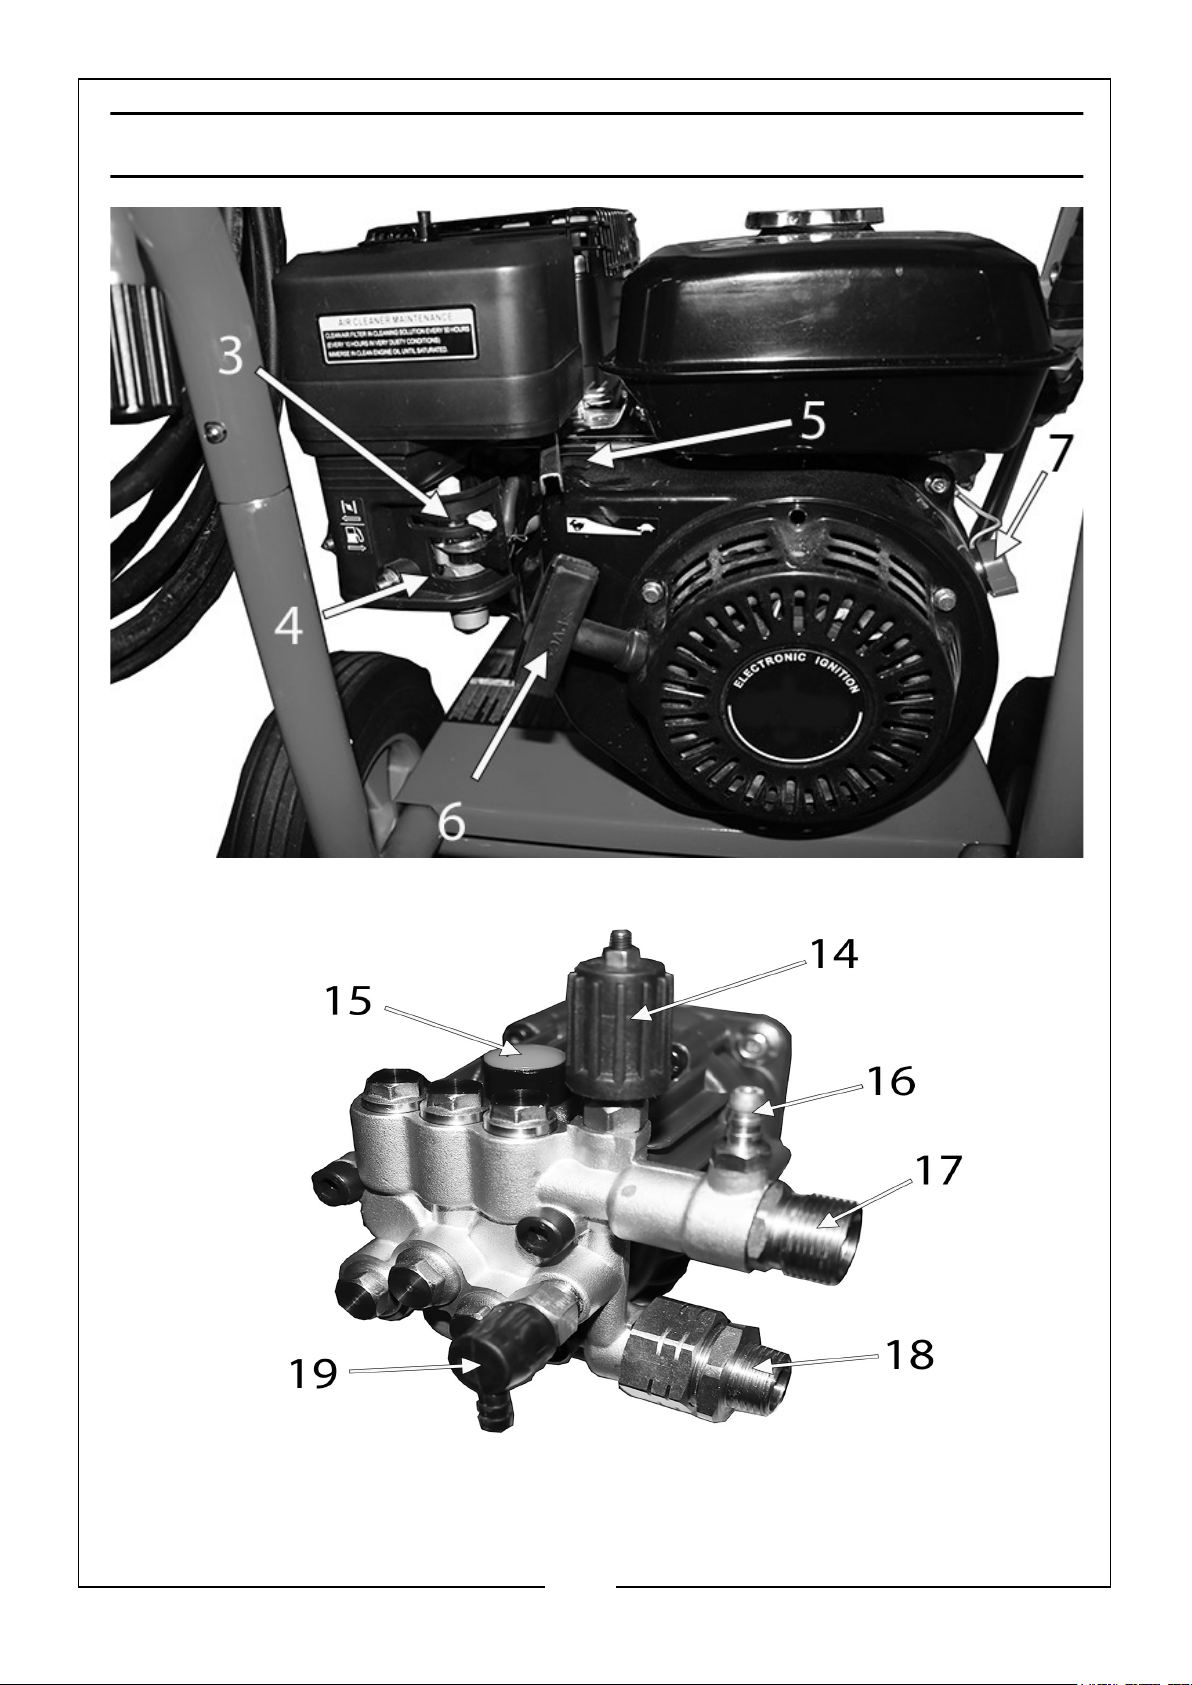
Page 8
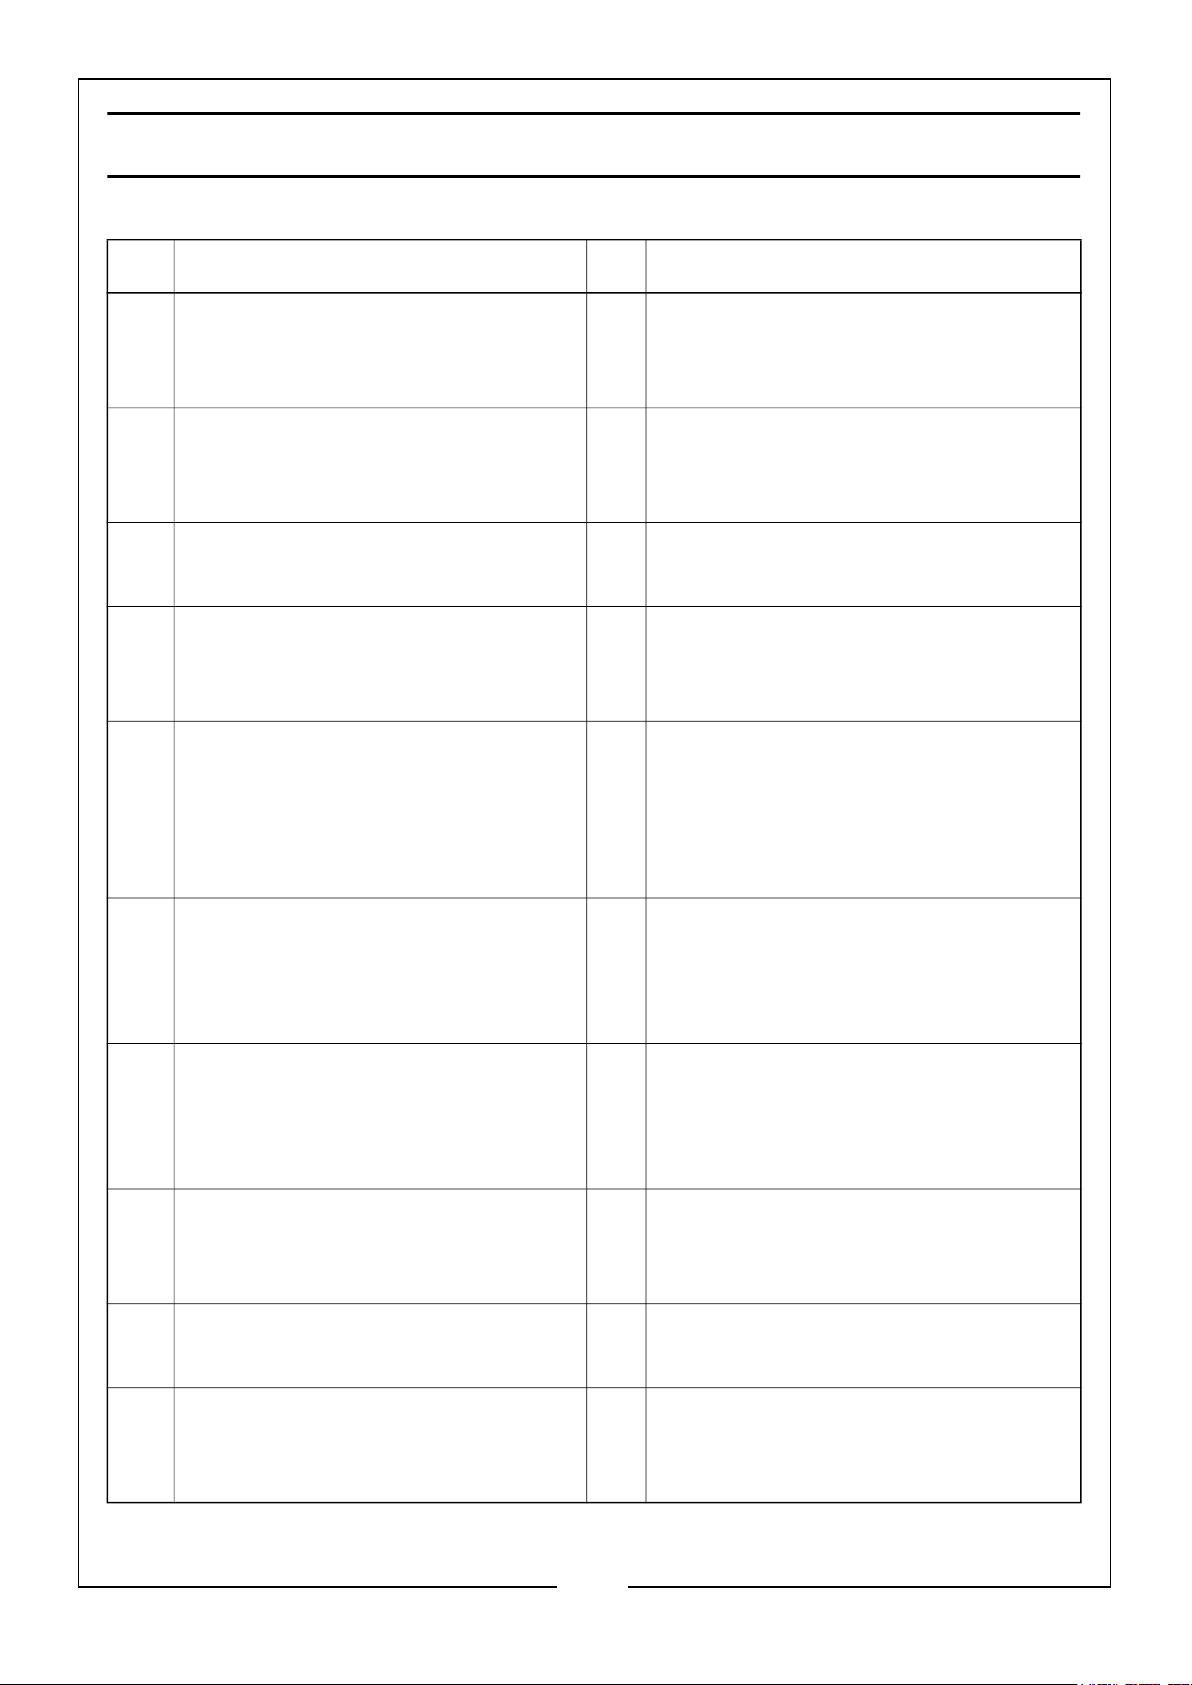
OVERVIEW DECRIPTIONS
NO DESCRIPTION NO DESCRIPTION
1 Air Filter - Protects the engine by
filtering dust and debris out of the
intake air.
2 Fuel Tank - Fill the tank with
regular unleaded petrol. Always
leave room for fuel expansion.
3 Choke Lever - Prepares a cold
engine for starting.
4 Fuel Valve - Used to turn fuel on
and off to engine.
5 Throttle Lever - Sets the engine
in starting mode for recoil starter.
11 Spray Gun - Controls the application
of water onto the cleaning surface
with trigger. Includes safety latch.
12 Spray Nozzles - 0/15/25/40 degree
and detergent nozzle for various high
pressure cleaning applications
13 Engine Exhaust
14 Pressure Adjusting Knob - To
raise and reduce the pressure by
turning this knob.
15 Shipping Plug - The pump is
shipped with a shipping plug to prevent oil leaking during transportation.
Replace with the attached pump
breather plug/dipstick before using.
6 Recoil Starter - Use for starting
the engine manually.
7 Ignition Switch - Set this switch
to ‘ON’ before using the recoil
starter. Set switch to ‘OFF’ to switch
off engine.
8 Oil Filler Cap - Fill the engine with
oil here.
9 Gun Lance with Quick Connect
- Attach the spray nozzles on to it.
10 High Pressure Hose - Connect
one end to the water pump and the
other end to the spray gun.
16 Detergent Injector - Used to
syphon detergent or other pressure
washer detergents into the low
pressure stream.
17 Water Outlet - To connect to the
high pressure hose.
18 Water Inlet with Filter Screen -
Connect garden hose here. Always
have the filter screen present.
19 Pump Head Built with Thermal
Relief System.
20 Detergent Tank - 3 Litre Capacity
8
Parts & Service: 020 8988 7400 / E-mail: [email protected] or [email protected]
Page 9
ASSEMBLY
Your pressure washer requires some assembly before it is ready for use. You will require
the following tools:
• Open Ended Spanner: 10mm
• Open Ended Spanner: 14mm
• Open Ended Spanner: 17mm
UNPACKING
WARNING: PRESSURE WASHER IS HEAVY. DO NOT ATTEMPT TO
LIFT AND REMOVE THE PRESSURE WASHER UNIT FROM THE
CARTON WITHOUT ASSISTANCE FROM ANOTHER PERSON OR
UNPACK AS INSTRUCTED BELOW.
1. Set the carton on a rigid, flat surface. Remove all loose parts and packing.
2. Leave pressure washer in the carton.
3. Using a box cutter, open the carton completely by cutting the four corners
allowing the sides to lay flat.
4. Leave the pressure washer on the carton while you install the wheels and rubber
feet.
FITTING THE WHEELS
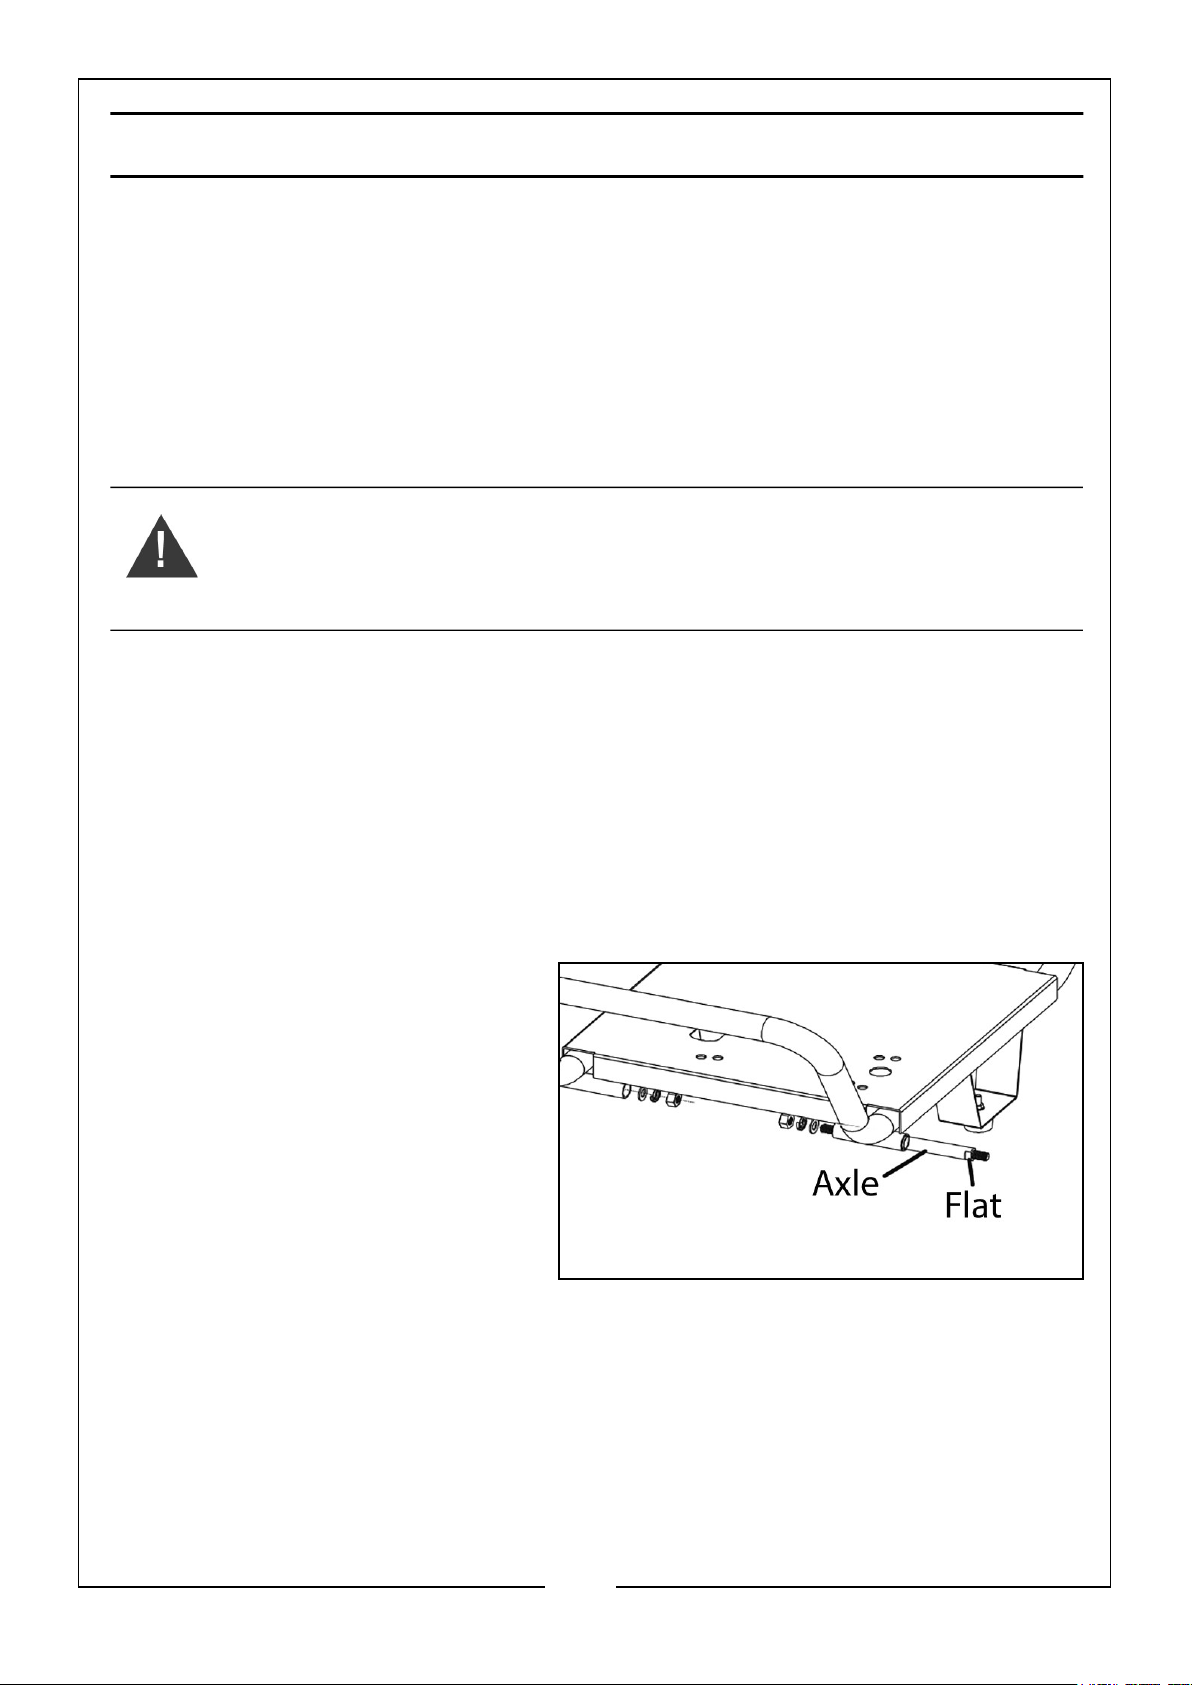
1. Fit the axles into the axle sockets
as shown. Secure with the nuts
and washers supplied,
9
Parts & Service: 020 8988 7400 / E-mail: [email protected] or [email protected]
Page 10
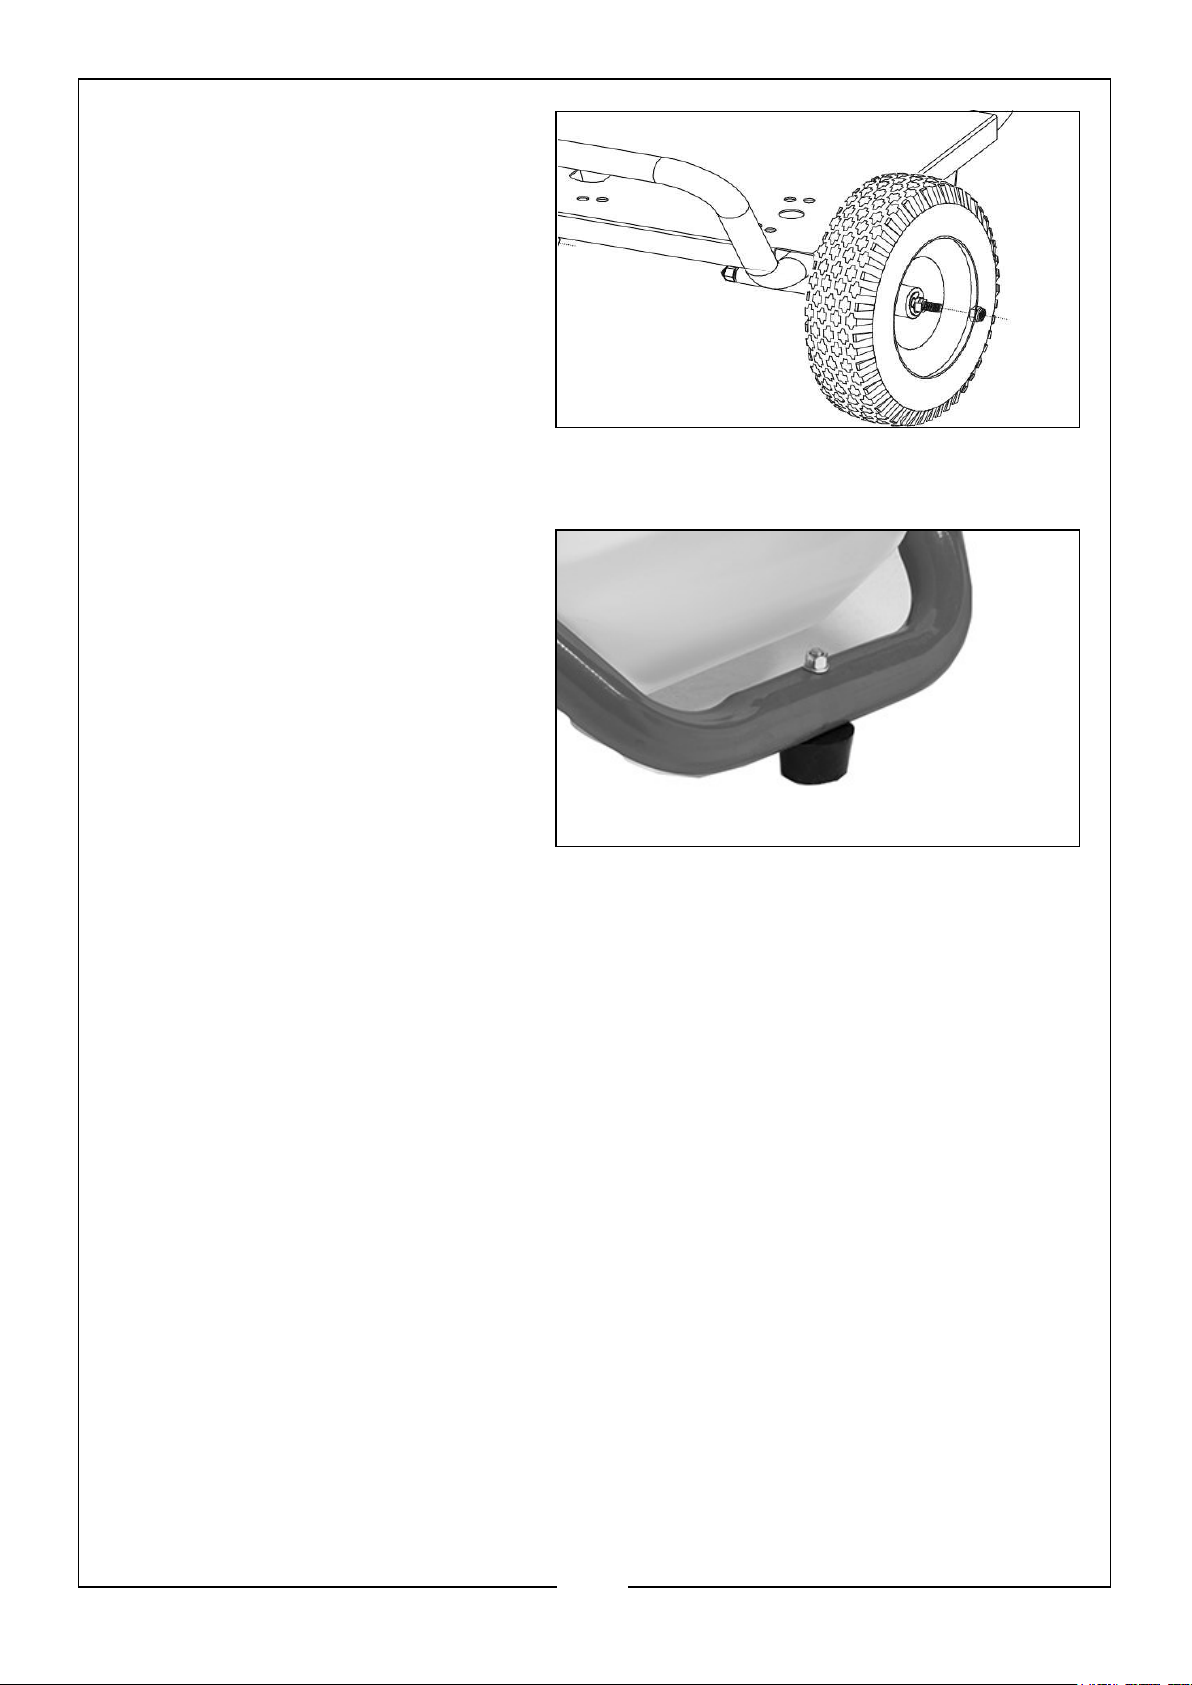
2. Fit the wheels to the axles and
secure with the nut and washer
supplied.
NOTE: DO NOT over-tighten the
nuts, as the wheels must
be able to rotate freely.
FITTING THE RUBBER FOOT
1. Fit the rubber foot to the frame,
in front of the detergent tank as
shown.
• Secure with the nut and
spring washer supplied.
10
Parts & Service: 020 8988 7400 / E-mail: [email protected] or [email protected]
Page 11
PREPARING THE PRESSURE PUMP
WARNING: FAILURE TO REMOVE THE SHIPPING PLUG AND
REPLACE IT WITH THE DIPSTICK/OIL PLUG WILL DAMAGE THE
PRESSURE PUMP. FAILURE TO ADD PUMP BREATHER PLUG WILL
VOID THE WARRANTY.
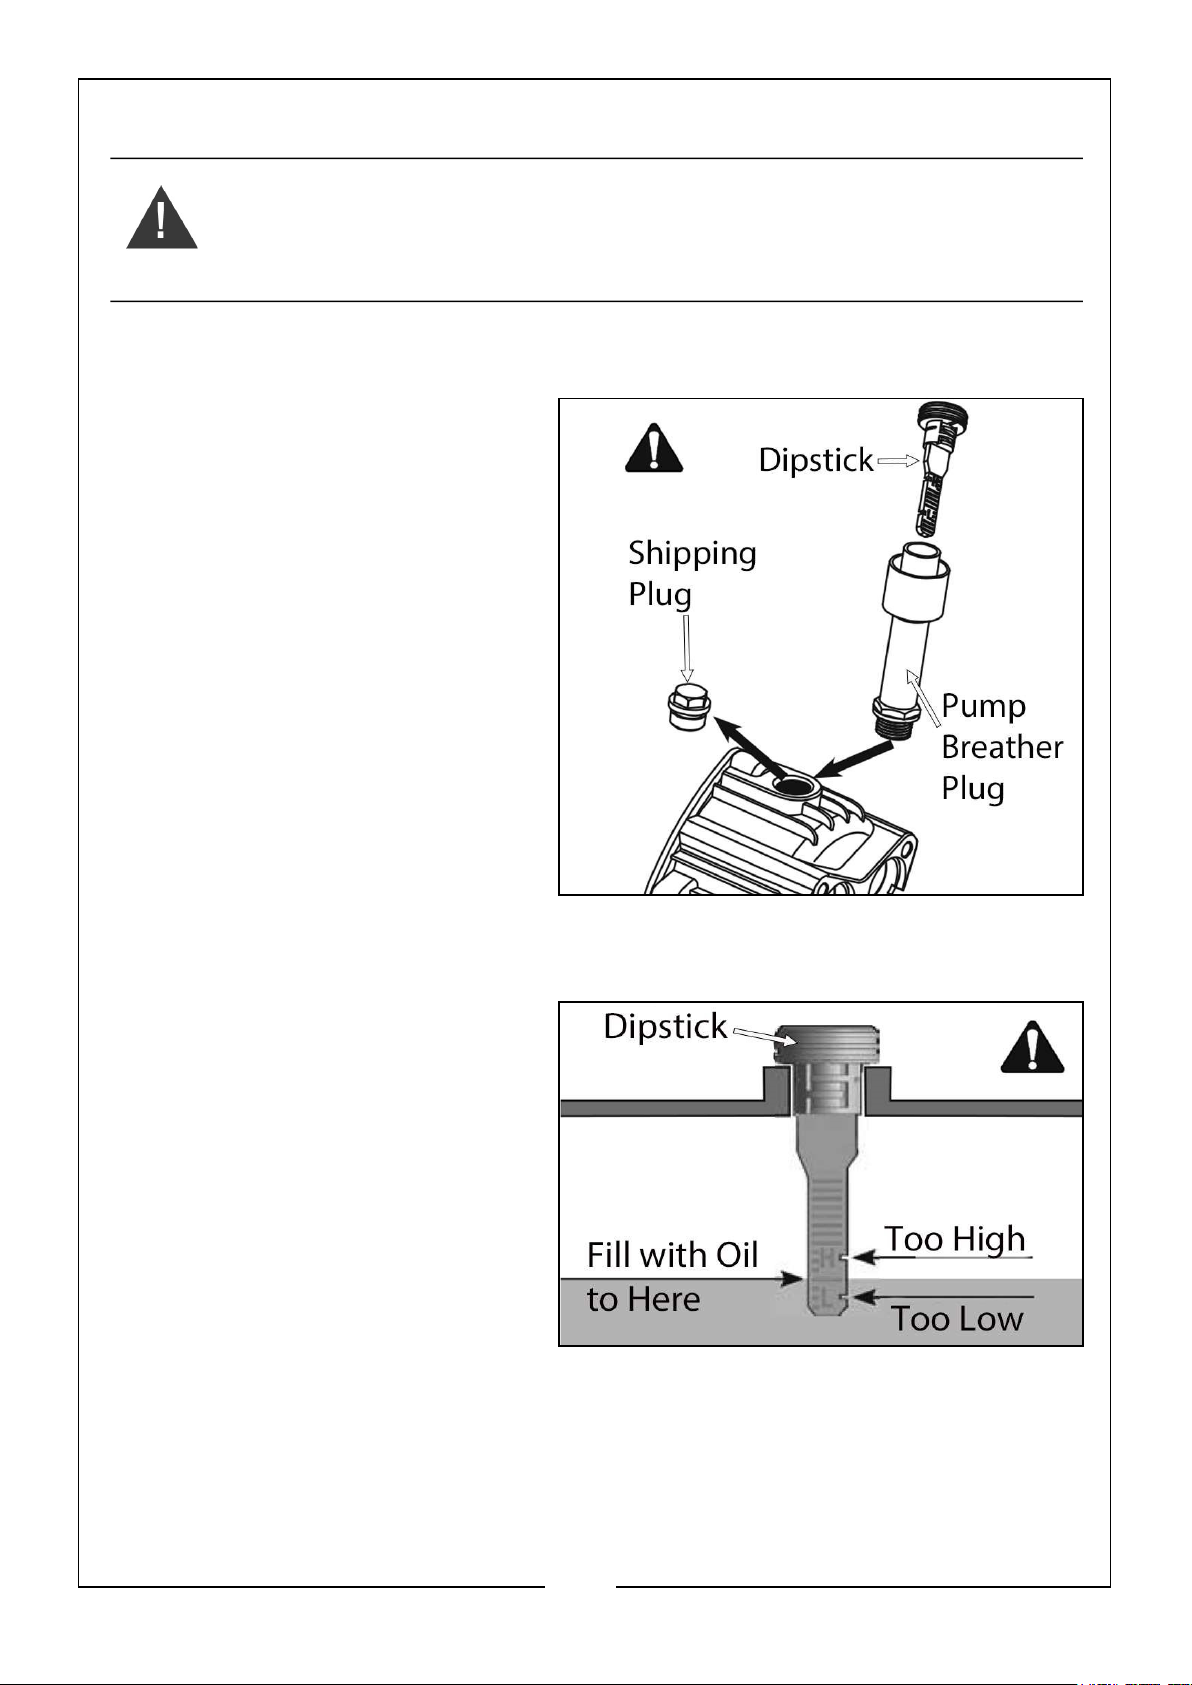
The pressure pump has a shipping plug inserted into the opening for the pump
breather plug.
1. Using a 10mm open ended
spanner or socket wrench,
remove the shipping plug from
the pressure pump.
NOTE: Save the shipping plug for
future use.
2. Remove the pump breather plug
with the dipstick from the parts
bag.
3. Insert the breather plug into the
oil filling hole and tighten it.
NOTE: Make sure the O-ring is
present on the plug. Without
the O-ring the oil will leak
through the thread.
TO CHECK THE OIL LEVEL
1. Remove the dipstick from the
breather plug, and remove the
breather plug from the pump.
Insert the dipstick and check the
oil level, and add oil if the level is
lower than recommended, and
DO NOT over fill.
NOTE: Oil Type: SAE10W30
NOTE: Max. Quantity: 120ml
11
Parts & Service: 020 8988 7400 / E-mail: [email protected] or [email protected]
Page 12
BEFORE USE
WARNING: TO CARRY OUT THIS CHECK, PLACE THE PRESSURE
WASHER ON LEVEL GROUND WITH THE ENGINE SWITCHED OFF.
WARNING: TAKE CARE NOT TO TOUCH ANY HOT PARTS OF THE
PRESSURE WASHER WHEN CHECKING THE OIL LEVELS.
IMPORTANT: The engine is supplied without any oil in it and must be
filled to the correct level before use, see below.
ADD ENGINE OIL
WARNING: RUNNING THE ENGINE WITH INSUFFICIENT OIL WILL CAUSE
ENGINE DAMAGE.
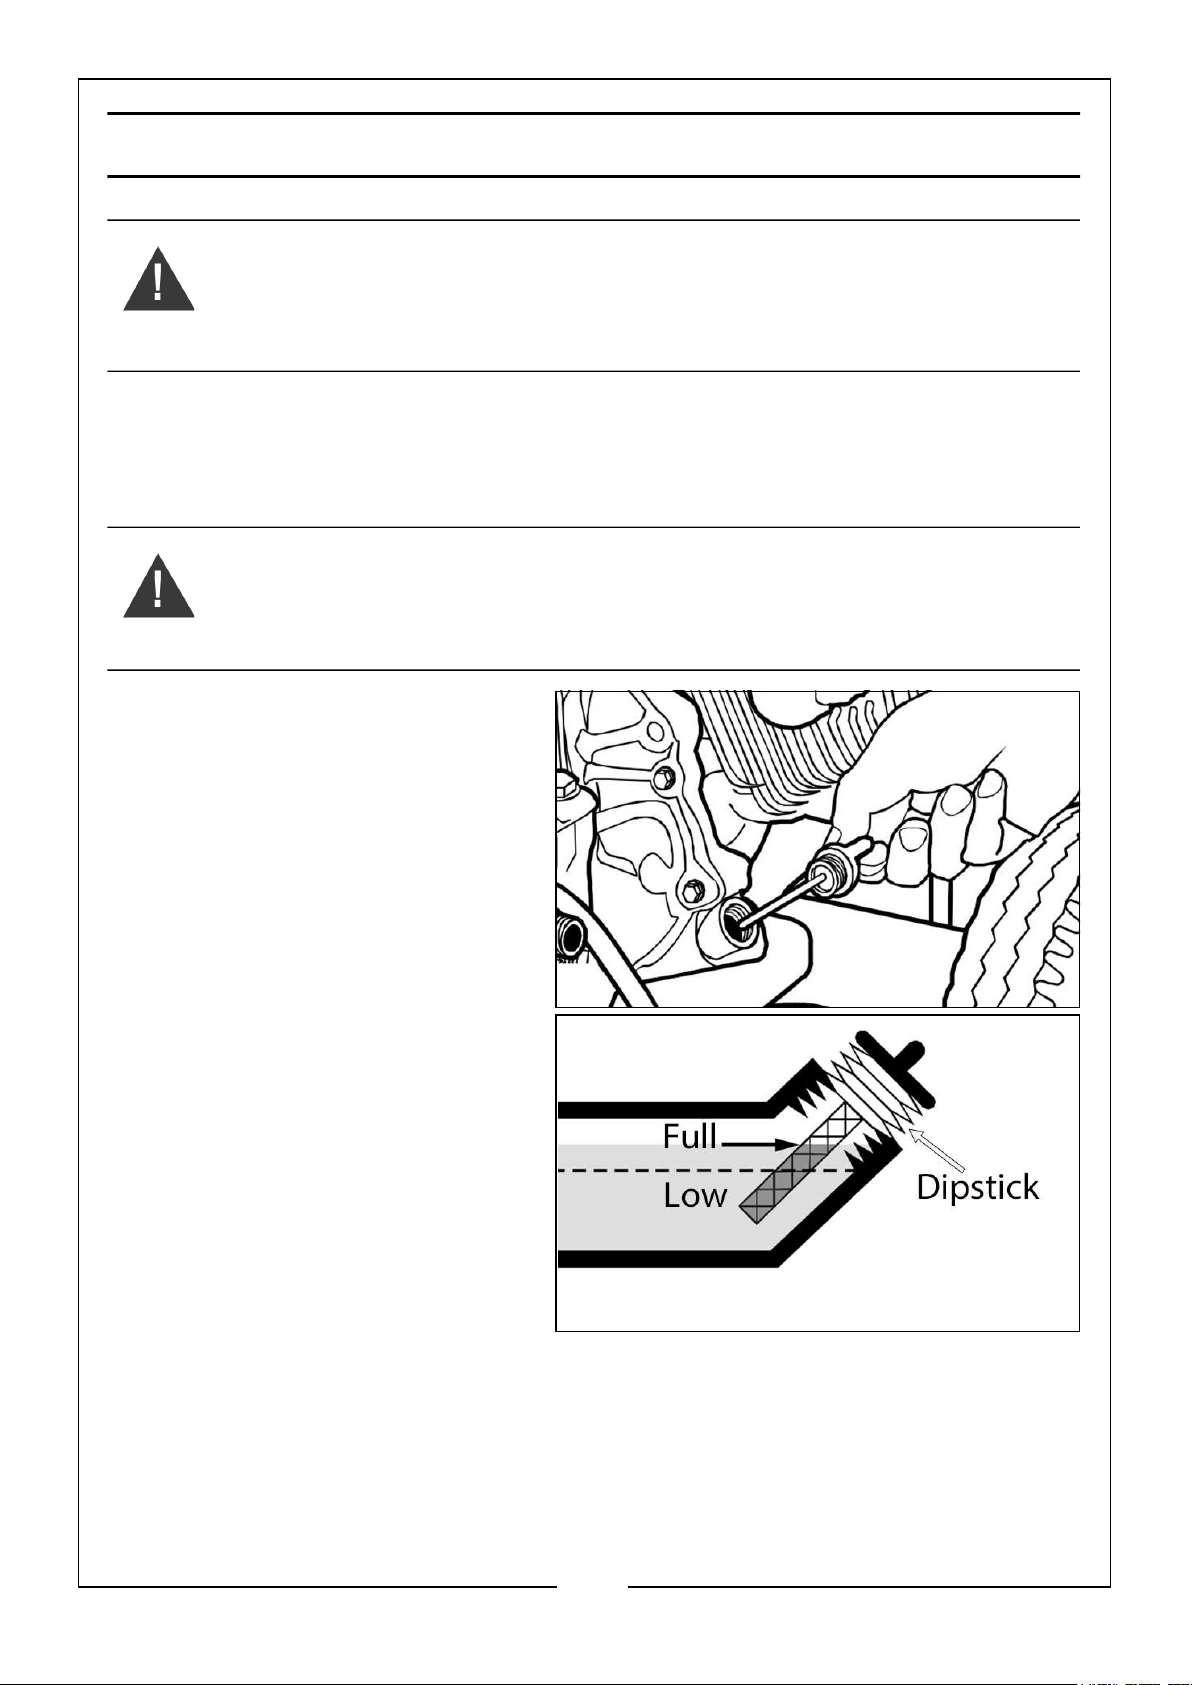
1. Turn the oil filler cap/dipstick
anti-clockwise and remove it
from the oil filler tube.
2. Wipe the oil filler cap/dipstick
with a clean cloth.
3. Insert the oil filler cap/dipstick
back into the oil filler tube and
then remove it again. Do not
screw it in when doing this.
4. If the oil is at the low mark, fill
the oil reservoir to the edge of
the oil filler hole.
NOTE: Oil Type: SAE10W40
NOTE: Max. Quantity: 600ml
5. Replace the oil filler cap/dipstick.
12
Parts & Service: 020 8988 7400 / E-mail: [email protected] or [email protected]
Page 13
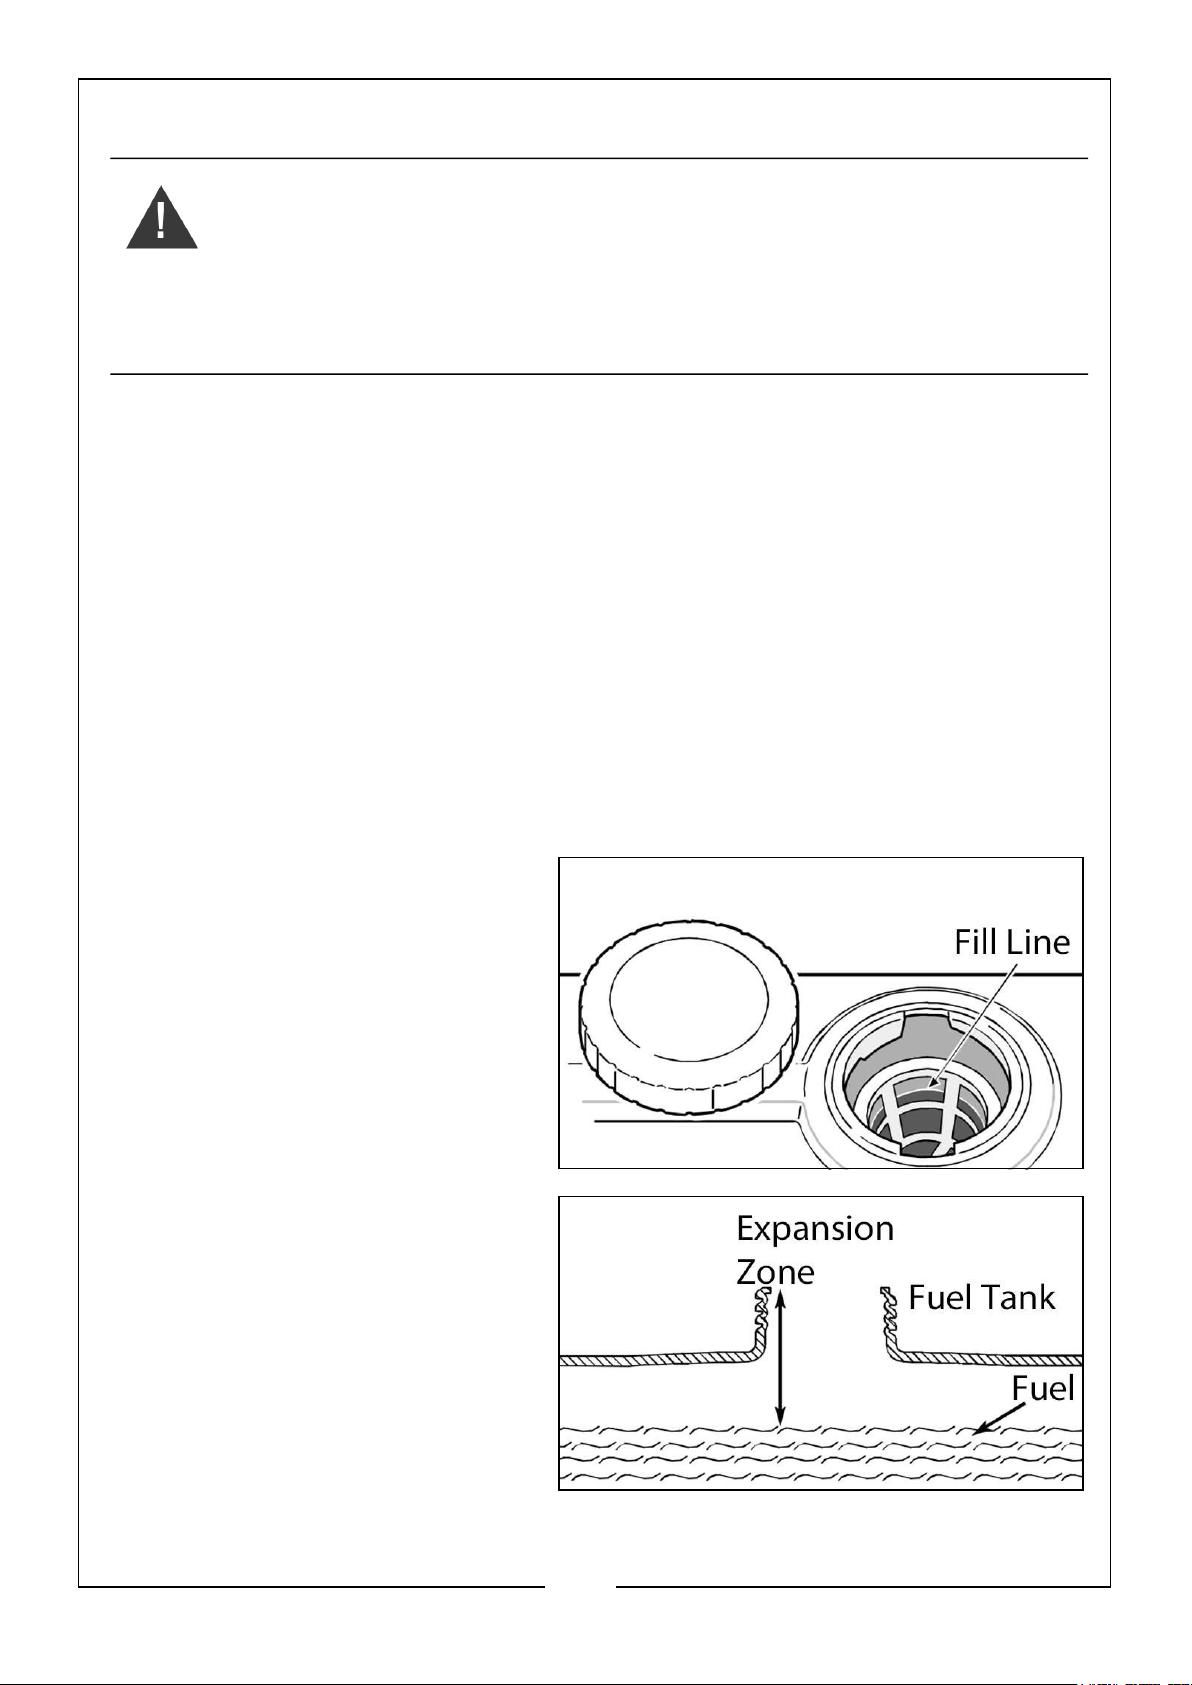
ADD FUEL
WARNING: ALWAYS REFUEL IN A WELL VENTILATED AREA AWAY
FROM ANY SOURCES OF IGNITION AND HEAT.
WARNING: DO NOT SMOKE WHILE REFUELLING
WARNING: ALLOW THE UNIT TO COOL DOWN BEFORE REFUELLING.
WARNING: DO NOT LEAVE FUEL WITHIN THE REACH OF CHILDREN.
• The engine is certified to run on standard unleaded petrol (E10).
• DO NOT use unapproved petrol such as E85 (85% ethanol/15% petrol).
• DO NOT mix oil with the petrol.
• DO NOT modify the engine to run on alternative fuels
• Mix in a fuel stabilizer, if required, when adding the fuel to the pressure washer
to protect the fuel system from forming gum deposits (see ‘Long Term Storage’
on page 27).
• If the engine doesn’t run correctly after fueling, switch fuel brands.
1. Place the pressure washer on a flat level surface.
2. Turn the pressure washer ‘OFF’ and let it cool for at least two minutes before
removing the fuel cap.
3. Clean the area around the fuel
cap and loosen the fuel cap
slowly to release the pressure.
4. Slowly add unleaded petrol to
the fuel tank. Use extreme
caution not to over fill the tank
above the fill line. This allows
appropriate space for fuel to
expand.
5. Fit the fuel cap and allow any
spilled fuel to evaporate or wipe
clean before starting the engine.
13
Parts & Service: 020 8988 7400 / E-mail: [email protected] or [email protected]
Page 14
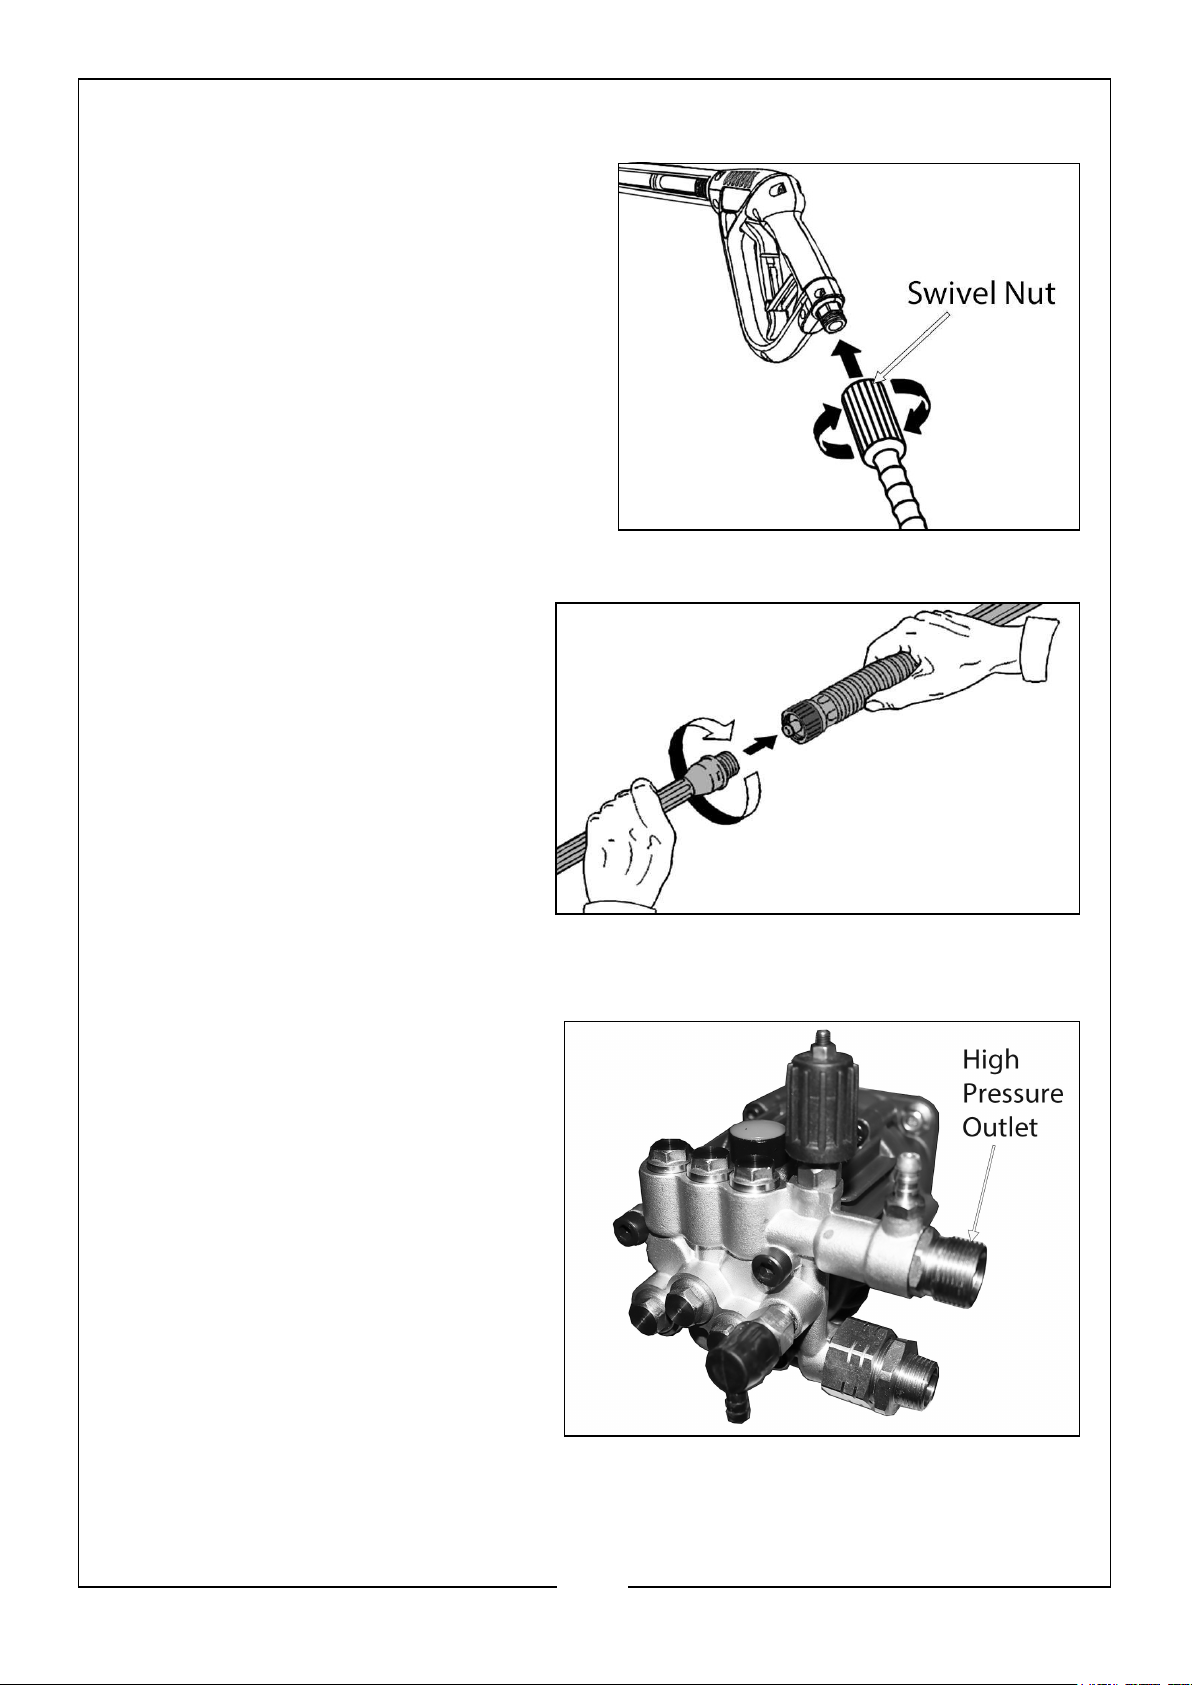
ATTACHING HIGH PRESSURE HOSE TO SPRAY GUN
1. Insert the hose fitting into the gun
fitting port, as shown.
2. Turn the swivel nut clockwise tightly
on the gun male fitting.
CONNECTING THE SPRAY
LANCE TO SPRAY GUN
1. Push the spray lance onto the
spray gun and twist, as shown.
CONNECT HOSE AND WATER SUPPLY TO PUMP
1. Attach the other end of the high
pressure hose to the high
pressure outlet on the pump. Pull
on the hose to be sure of a tight
and secure connection.
2. Before connecting the garden
hose to the pressure washer, run
water through it for 30 seconds to
clean out any debris.
14
Parts & Service: 020 8988 7400 / E-mail: [email protected] or [email protected]
Page 15
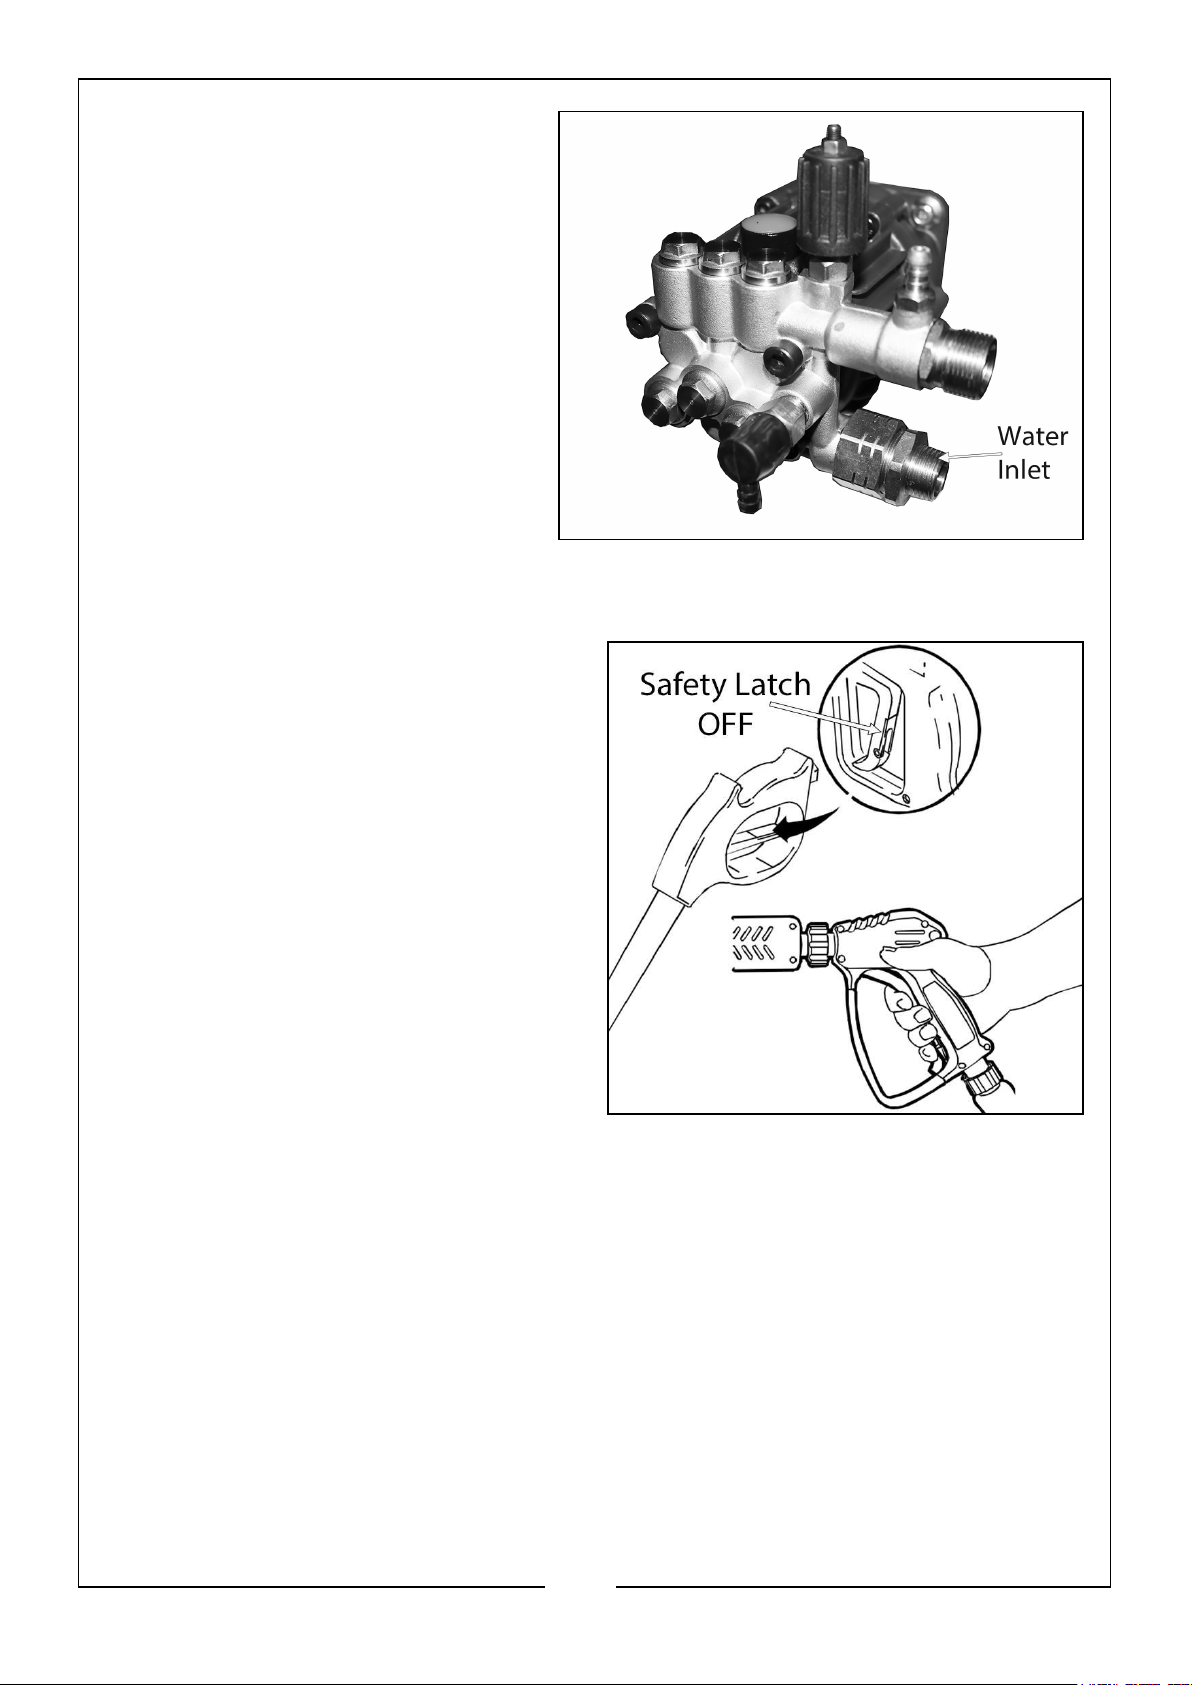
3. Before connecting the garden
hose to the water inlet, inspect
the inlet screen. Clean the
screen if it contains any debris or
replace if damaged.
NOTE: DO NOT run the pressure
washer if the inlet screen is
damaged or missing.
NOTE: DO NOT syphon standing
water for the water supply.
Use only cold water (less
than 30oC).
4. Connect the garden hose (DO
NOT exceed 50ft (15m) in length and diameter no less than 13mm) to the water
inlet. Tighten by hand.
5. Turn on the water supply, set the
safety latch to the ‘OFF’ position (lift
latch up into the back of the handle)
and squeeze the gun trigger to purge
the pump system of air and
impurities.
15
Parts & Service: 020 8988 7400 / E-mail: [email protected] or [email protected]
Page 16
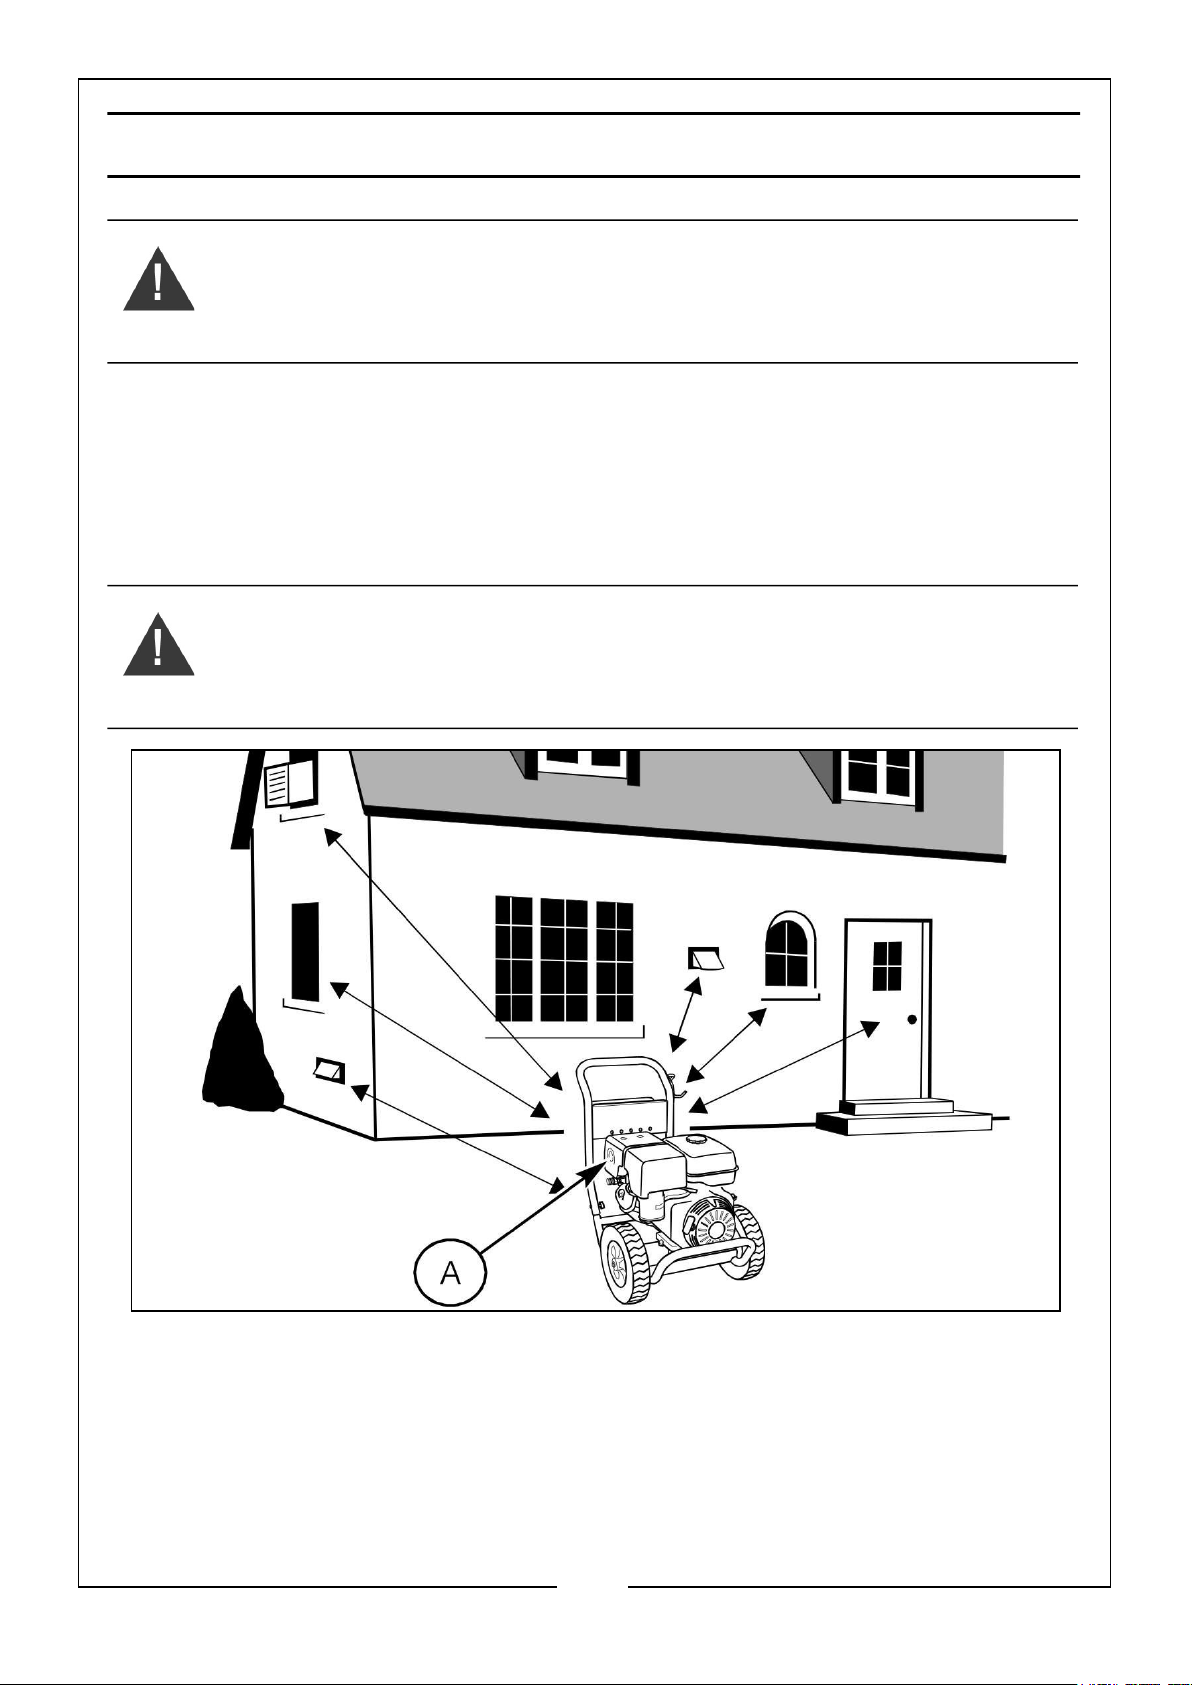
PRESSURE WASHER LOCATION
WARNING: EXHAUST HEAT/GASES CAN IGNITE COMBUSTIBLES,
STRUCTURES OR DAMAGE THE FUEL TANK, CAUSING A FIRE. KEEP
AT LEAST 5FT (1.5M) CLEARANCE ON ALL SIDES OF THE PRESSURE
WASHER INCLUDING OVERHEAD.
Place the pressure washer in a well ventilated area. This will allow for removal of
deadly exhaust gas. DO NOT place the pressure washer where gas could accumulate
and enter inside or be drawn into a potentially occupied building. Ensure exhaust gas
(A) is kept away from any windows, doors, ventilation intakes, or other openings that
can allow exhaust gas to collect in a confined area. Prevailing winds and air currents
should be taken into account.
WARNING: OPERATE THE PRESSURE WASHER ONLY OUTDOORS. DO
NOT START OR RUN THE ENGINE INDOORS OR IN ENCLOSED
AREAS, EVEN IF WINDOWS AND DOORS ARE OPEN.
16
Parts & Service: 020 8988 7400 / E-mail: [email protected] or [email protected]
Page 17
STARTING & STOPPING YOUR PRESSURE
WASHER
WARNING: DO NOT RUN THE PUMP WITHOUT THE WATER SUPPLY
CONNECTED AND TURNED ON.
HOW TO START YOUR PRESSURE WASHER
To start your pressure washer for the first time, follow these instructions step by step.
This starting information also applies if you have let the pressure washer sit idle for at
least a day.
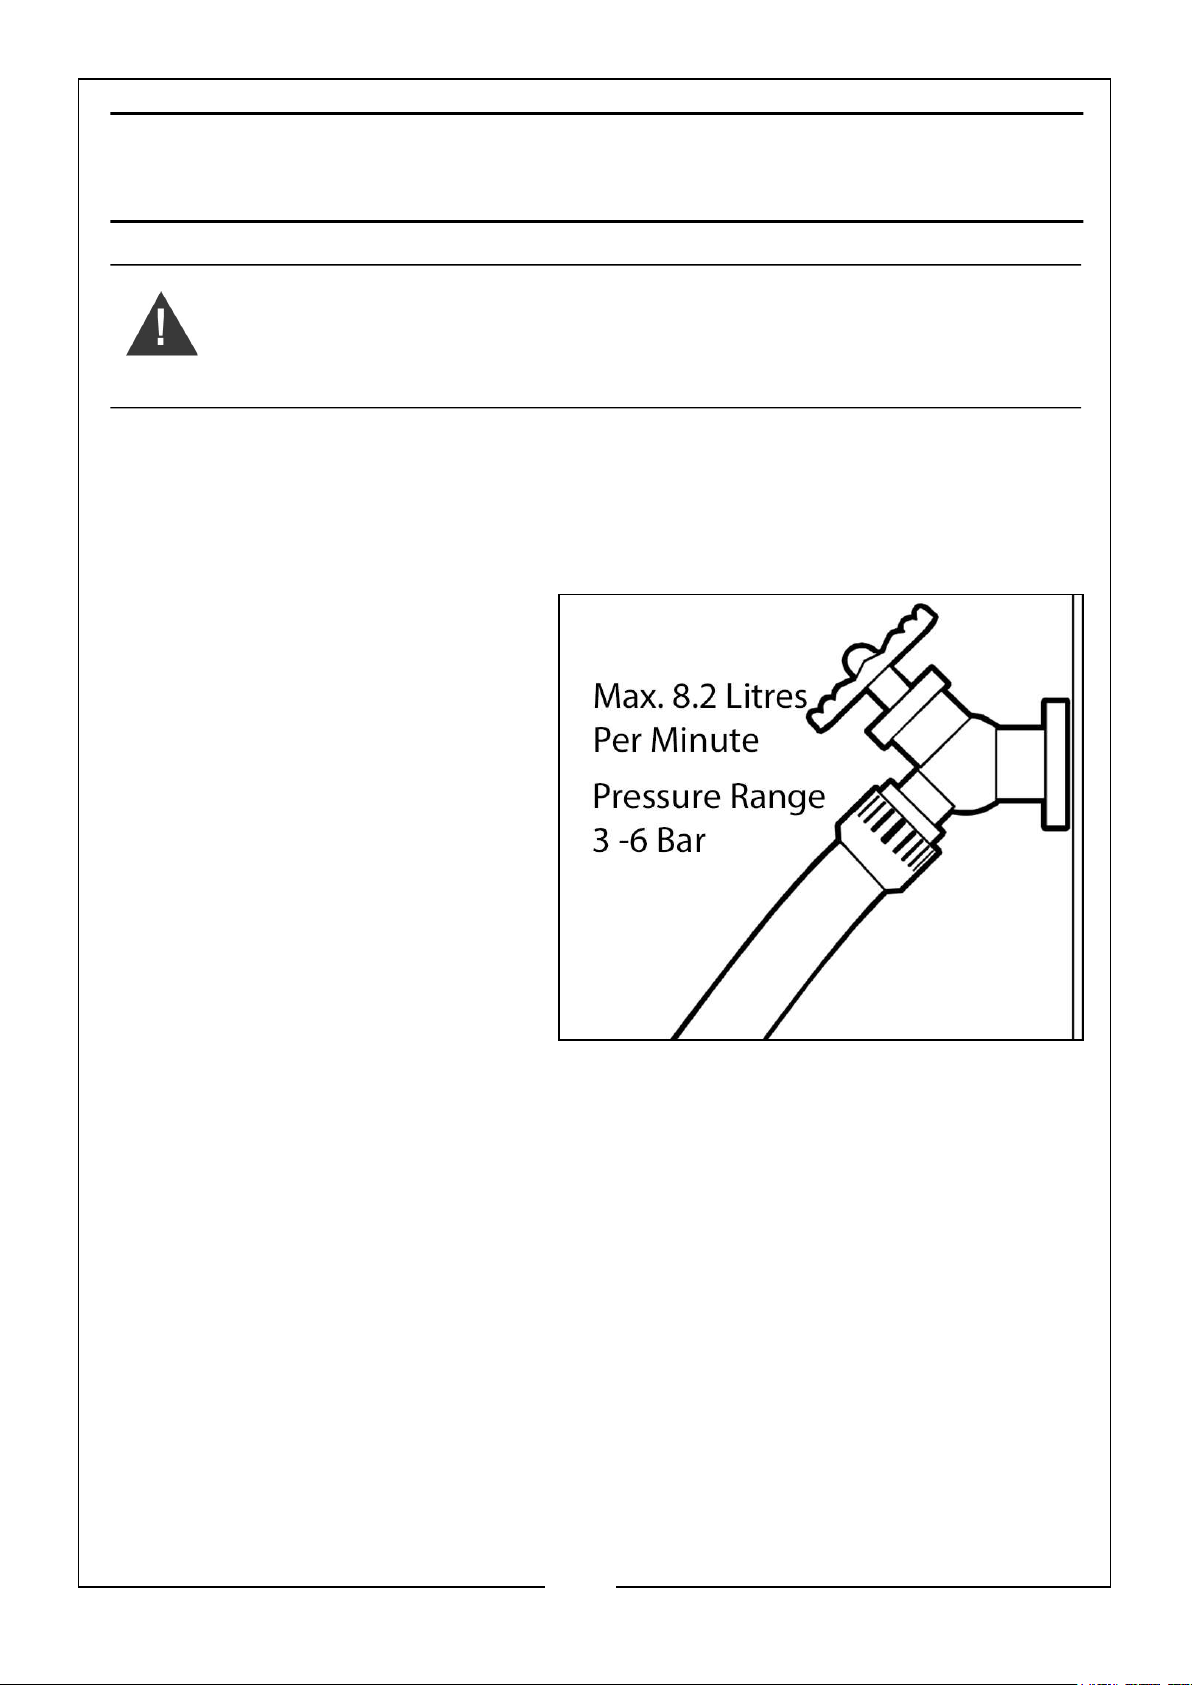
1. Place the pressure washer near
an outside water source capable
of supplying water at a
maximum flow rate of 8.2 Litre
per minute and pressure range
of 3-6 bar (43-87psi).
2. Check that the high pressure
hose is tightly connected to the
spray gun and pump.
3. Make sure the washer is on a
level surface.
4. Uncoil the high pressure hose
completely before using the
pressure washer.
17
Parts & Service: 020 8988 7400 / E-mail: [email protected] or [email protected]
Page 18
5. Connect the garden hose to the
water inlet on the pressure
washer.
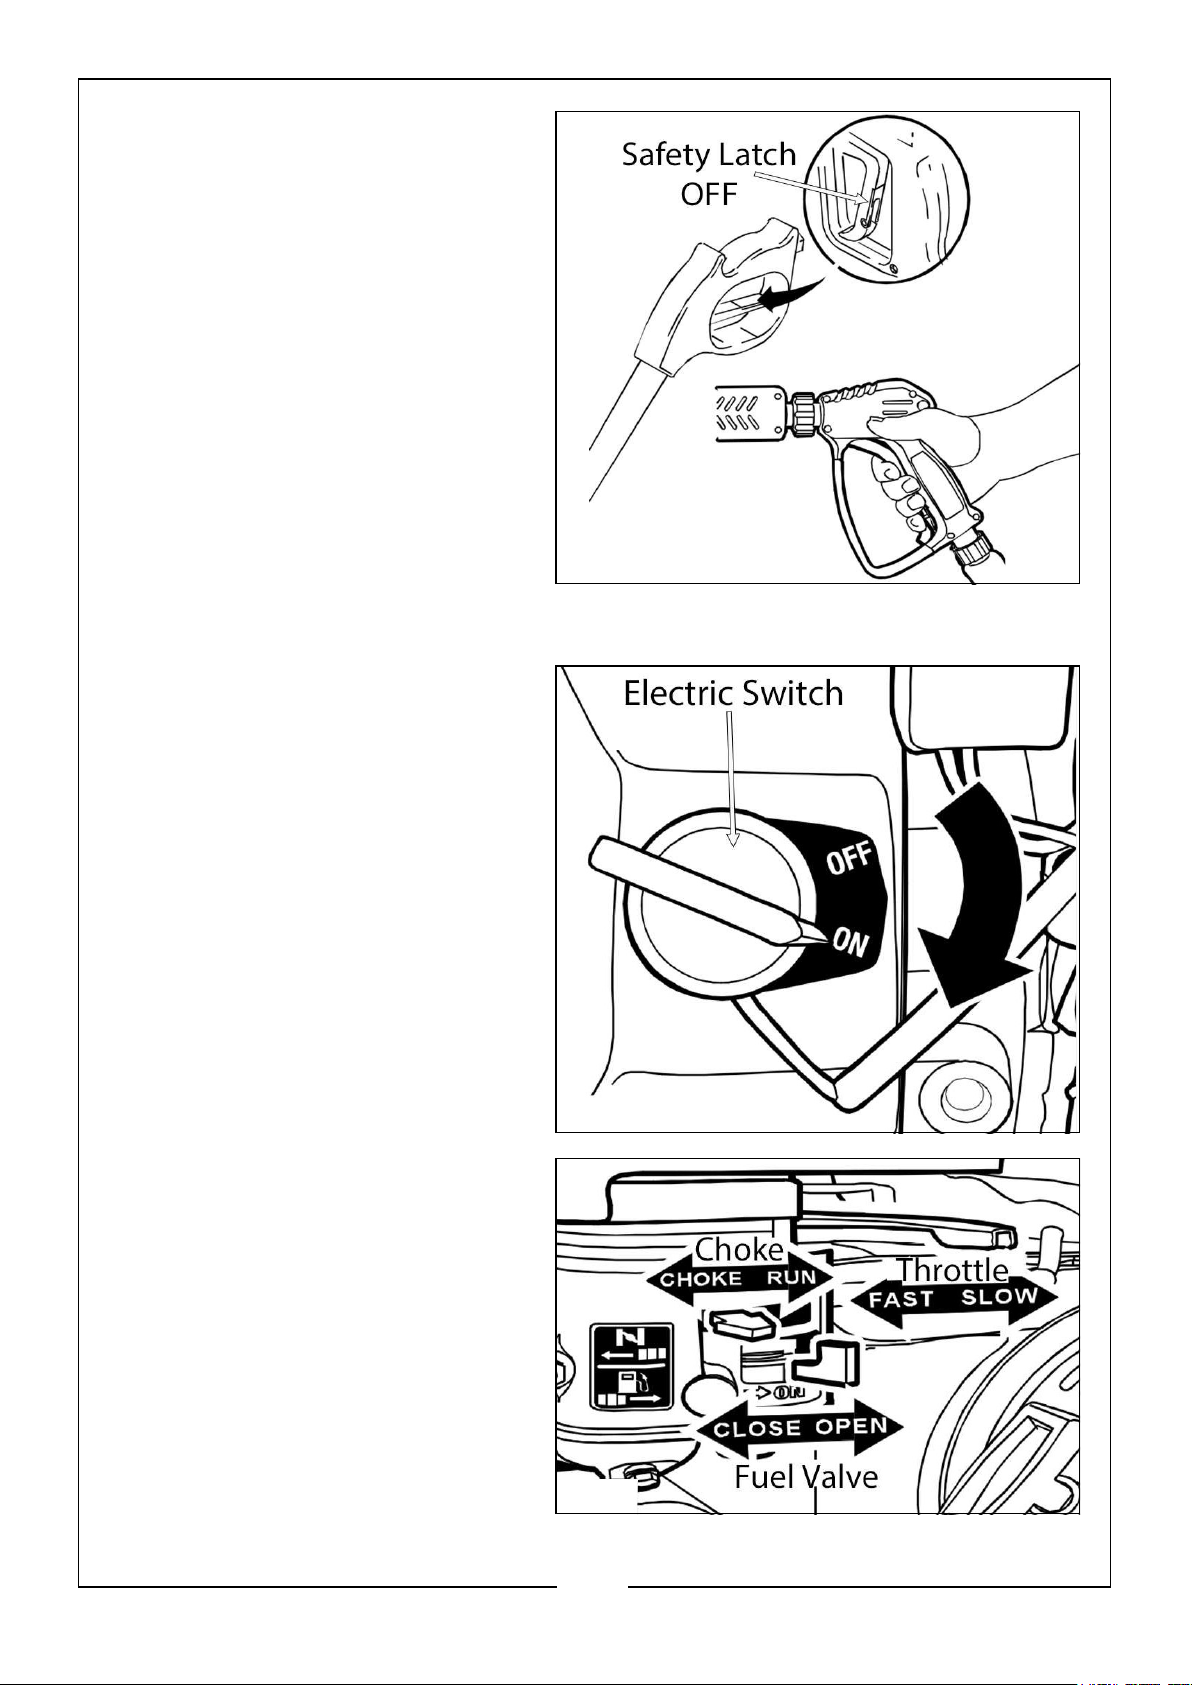
6. Turn ‘ON’ the water supply, take
the safety latch ‘OFF’, point the
gun in a safe direction and
squeeze the trigger to purge the
pump of air and impurities.
7. Attach the lance to the spray
gun. Tighten by hand.
8. Choose the nozzle you want to
use, pull back on the collar of the
quick release connector, insert
the nozzle and release the
connector. Tug on the nozzle to
make sure it is securely in place.
9. Rotate the electric switch to the
‘ON’ position.
10. Move the throttle control lever to
the ‘FAST’ position, shown on
the engine as a rabbit.
11. Move the choke lever to the
‘CHOKE’ position and the fuel
value to the ‘OPEN’.
NOTE: For a warm engine, be sure
the choke lever is in the
‘RUN’ position.
18
Parts & Service: 020 8988 7400 / E-mail: [email protected] or [email protected]
Page 19
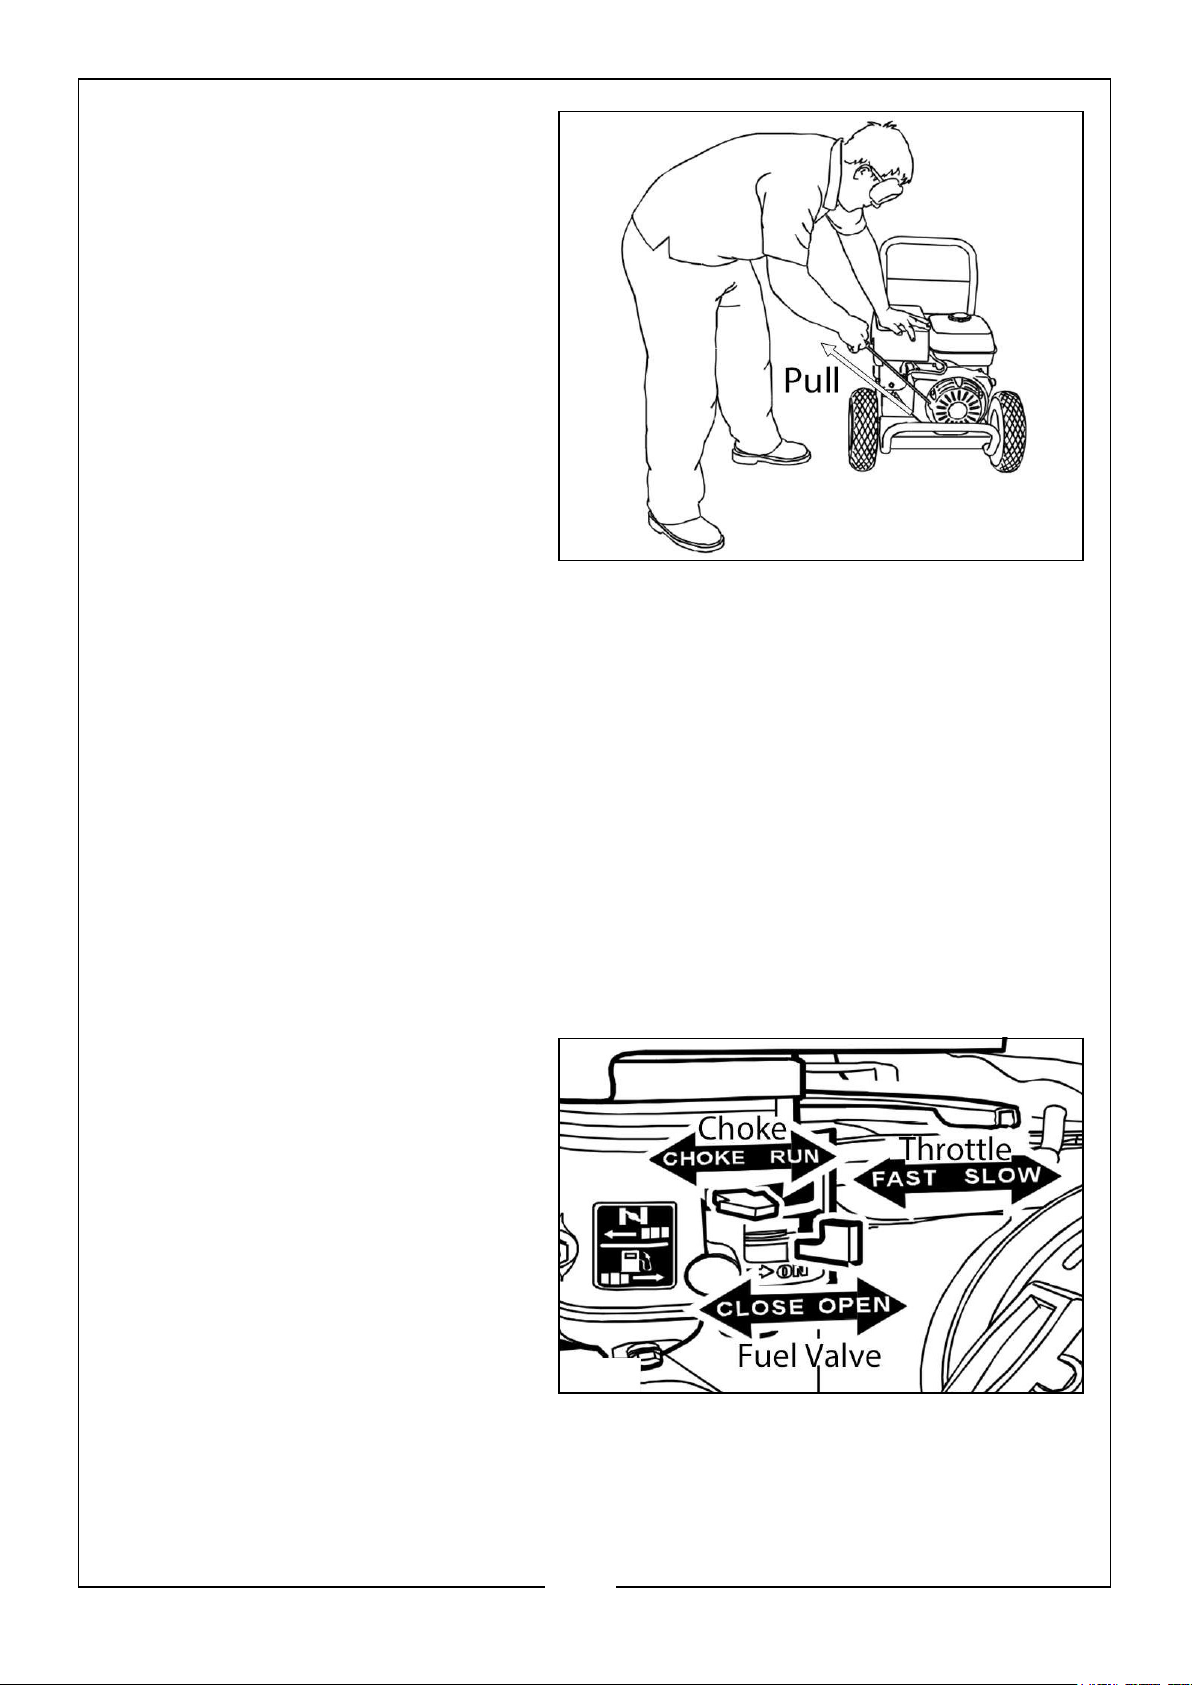
12. When starting the engine,
position yourself as shown and
grasp the starter grip handle and
pull slowly until you feel some
resistance. Then pull rapidly to
start the engine.
13. Return the starter grip handle
slowly. DO NOT let the rope
snap back against the starter.
14. When the engine starts, slowly
move the choke lever to the
‘RUN’ position, as the engine
warms. If the engine falters,
move the choke lever to the
‘CHOKE’ position, then back to
the ‘RUN’ position.
15. After each starting attempt where the engine fails to run, always point the gun in
a safe direction and squeeze the trigger to release any high pressure build up.
16. If the engine fails to start after six pulls, move the choke lever to the ‘RUN’
position and repeat steps 12 to 15.
NOTE: Allow the engine to run at no load, low pressure for five minutes after each
start up so the engine can stabilize.
HOW TO STOP YOUR PRESSURE WASHER
1. Release the spray gun trigger and let the engine idle for two minutes.
2. Move the throttle lever on the engine to the ‘SLOW’ position.
3. Move the fuel valve lever on the
engine to the ‘CLOSE’ position.
4. ALWAYS point the spray gun in a
safe direction, press the red
button and squeeze the trigger
to release retained high water
pressure.
NOTE: The spray gun traps high
water pressure, even when
the engine has stopped and
the water supply has been
disconnected.
NOTE: For an emergency switch off, rotate the electric switch to the ‘OFF’ position.
19
Parts & Service: 020 8988 7400 / E-mail: [email protected] or [email protected]
Page 20
APPLYING DETERGENTS
NOTE: Use only detergents designed for pressure washers; household detergents,
acids, alkaline, bleaches, solvents, flammable material or industrial grade
solutions can damage the pump. Many detergents may require mixing prior to
use. Prepare cleaning solutions as instructed on the solution bottle.
TO APPLY DETERGENTS
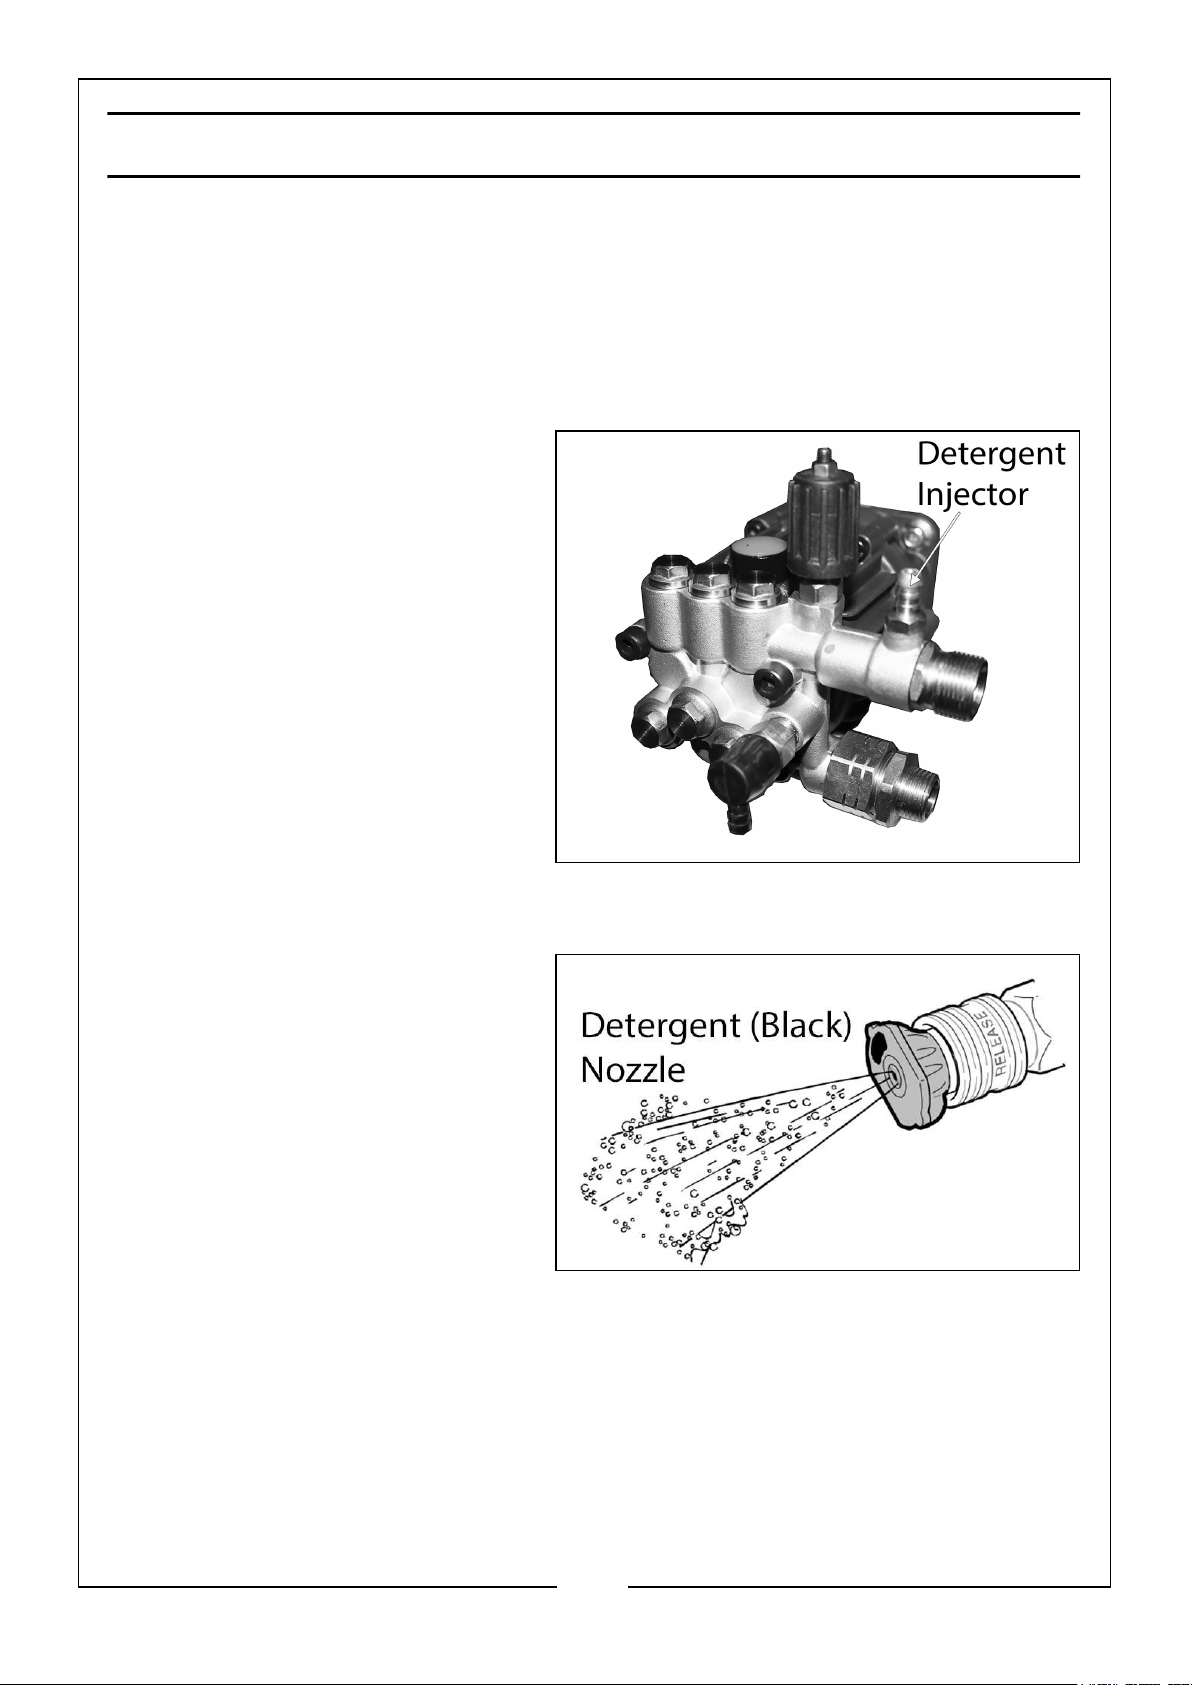
1. Press the detergent hose onto
the barbed detergent injector
fitting located on top of the high
pressure hose connection (Water
Outlet).
2. Remove the cap from the
detergent tank located at the
front of the washer.
3. Fill the tank with detergent of
choice, making sure you follow
the detergent instructions.
4. Place the other end of the
detergent hose, with filter, into
the detergent tank holding the
detergent or cleaning solution, making sure the filter is fully submerged.
5. Install the detergent (black)
nozzle on the end of the spray
gun.
NOTE: Detergents should not be
applied with any of the high
pressure nozzle tips (white,
green, yellow or red).
6. Make sure the garden hose is
connected to the water inlet.
Check that the high pressure
hose is connected to the spray gun and pump. Turn on the water supply and start
the engine.
20
Parts & Service: 020 8988 7400 / E-mail: [email protected] or [email protected]
Page 21
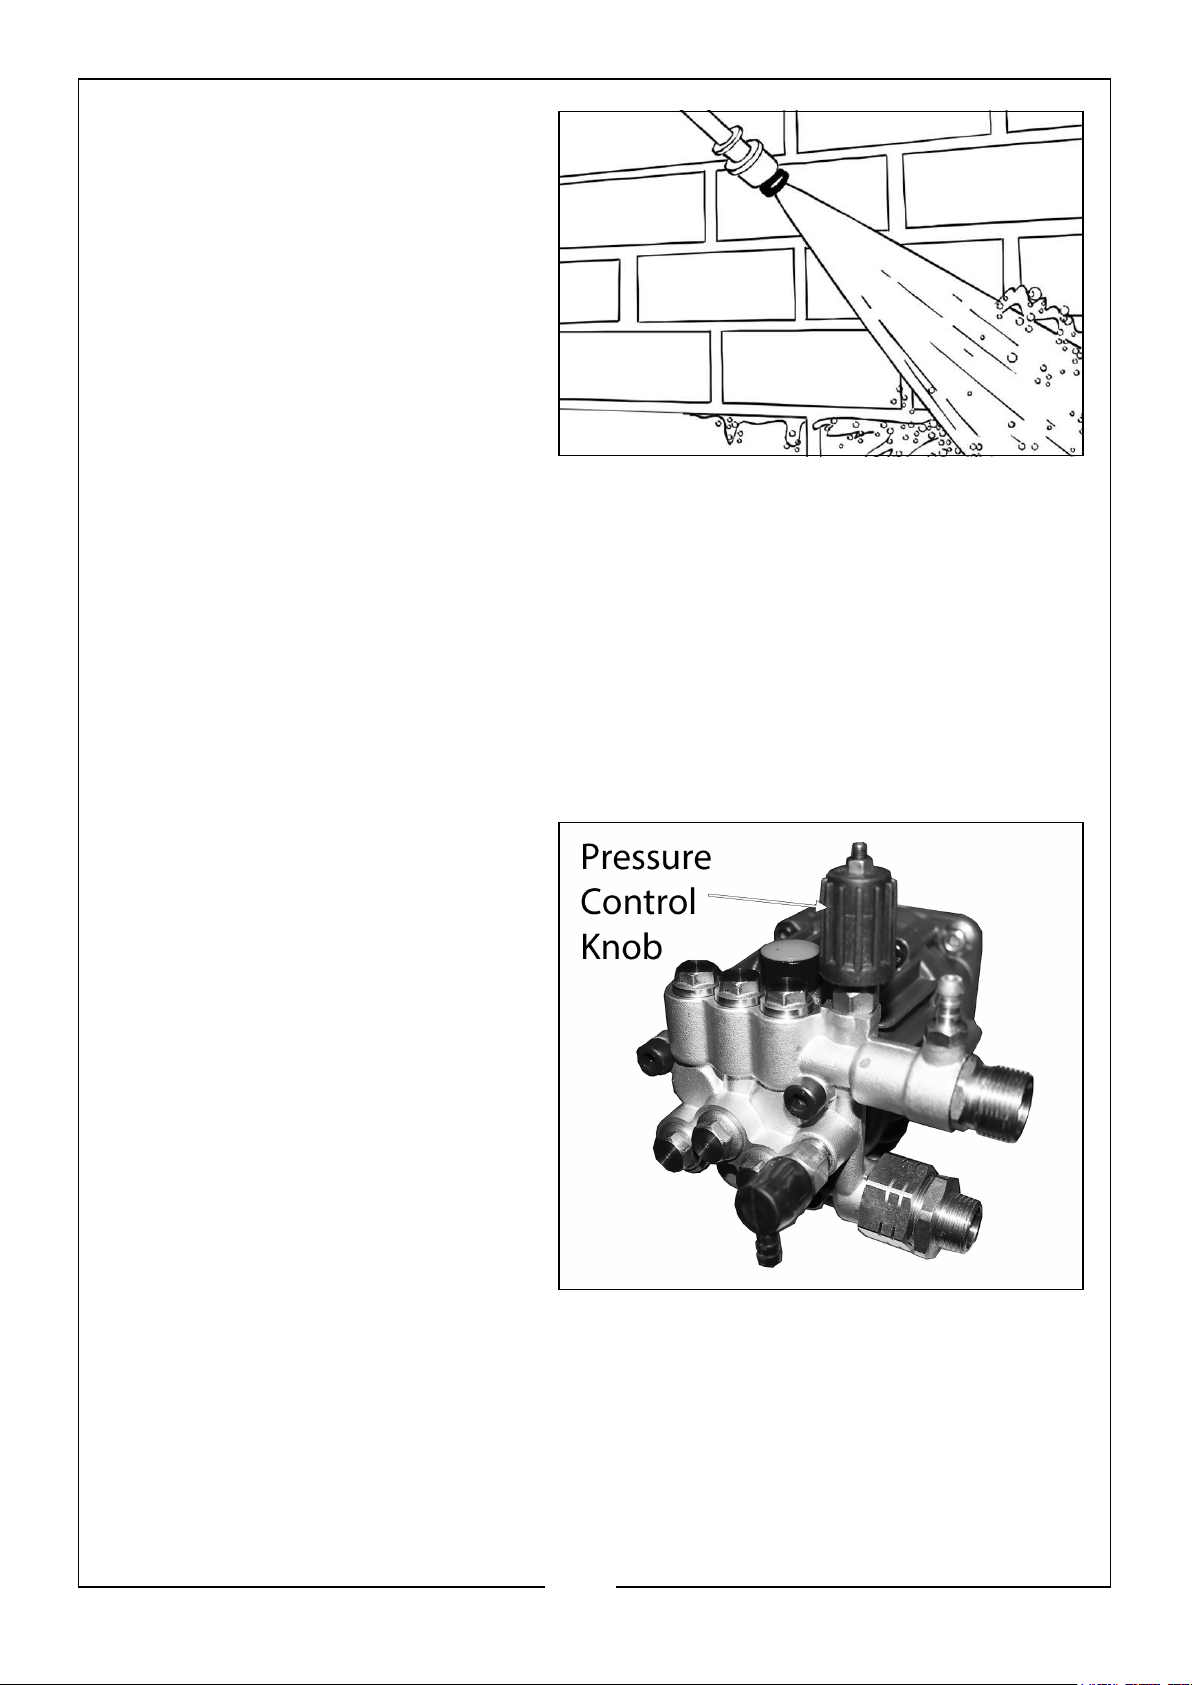
7. Apply the detergent to a dry
surface, starting at lower
portions of the area to be
cleaned and work upwards using
long even overlapping strokes.
8. Allow the detergent to soak in
for 3-5 minutes before washing
and rinsing. Reapply as needed
to prevent surface from drying.
DO NOT allow detergent to dry
on to prevent streaking.
NOTE: You must flush the detergent syphoning system after each use by placing the
filter and detergent hose in a bucket of clean water, then run the pressure
washer at low pressure for 1-2 minutes.
RINSING
1. Disconnect the detergent hose from the inlet and remove from the detergent tank.
Replace the tank cap.
2. Remove the black nozzle tip from the spray gun.
3. Select and install the desired high pressure nozzle tip.
4. Decrease the spray pressure by
turning the pressure control
knob counterclockwise, or
clockwise for increased pressure.
5. Use lower pressure to wash
items such as a car or boat. Use
the higher pressure to strip paint
and degrease driveways.
6. Apply a high pressure spray to a
small area and then check the
surface for any damage. If no
damage is found, you can
assume it is OK to continue
rinsing.
7. Start at the top of the area to be
rinsed, working down with the same overlapping strokes as you used for cleaning.
21
Parts & Service: 020 8988 7400 / E-mail: [email protected] or [email protected]
Page 22
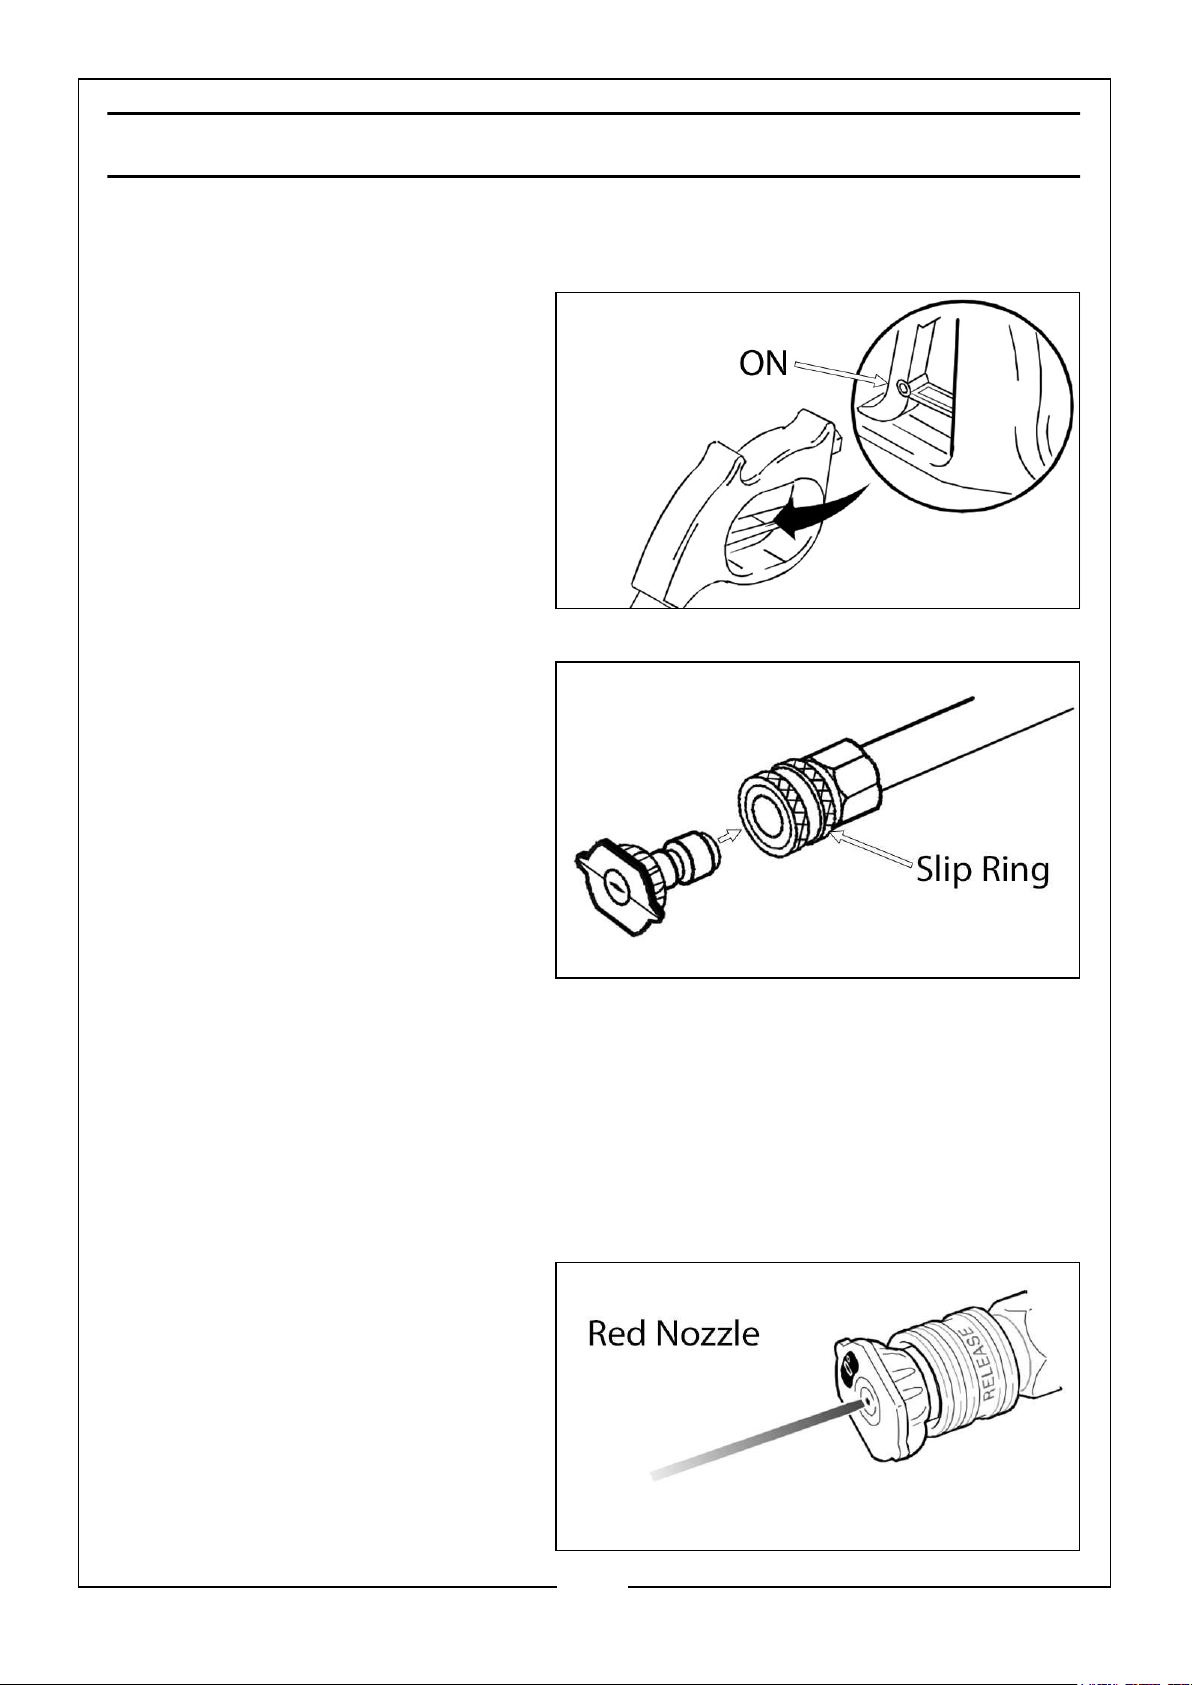
USING THE NOZZLE TIPS
ATTACHING/CHANGING PRESSURE NOZZLES TO SPRAY LANCE
1. ALWAYS make sure the safety
latch on the gun trigger is in the
‘ON’ position before changing a
nozzle.
2. Pull back the slip ring on the
female quick release fitting of
the spray lance.
3. Insert the male quick release
fitting on the pressure nozzle
into the female quick release on
the spray lance.
4. Release the slip ring and twist.
Listen for a click to ensure both
quick release sections are
coupled.
5. To remove a nozzle, repeat steps 1 - 4 in reverse order.
NOZZLE TYPES
The pressure washer comes with five spray nozzles. Each nozzle is colour coded and
delivers a specific spray pattern and pressure for a particular cleaning job. The size of
the nozzle determines the size of the fan spray and the pressure out of the nozzle.
0O NOZZLE - RED
This nozzle delivers a pinpoint
stream of pressurised water and is
extremely powerful. It covers only a
small area of cleaning. This nozzle
should only be directed at surfaces
that can withstand high pressure
such as metal or concrete. DO NOT
use this nozzle to clean wood.
22
Parts & Service: 020 8988 7400 / E-mail: [email protected] or [email protected]
Page 23
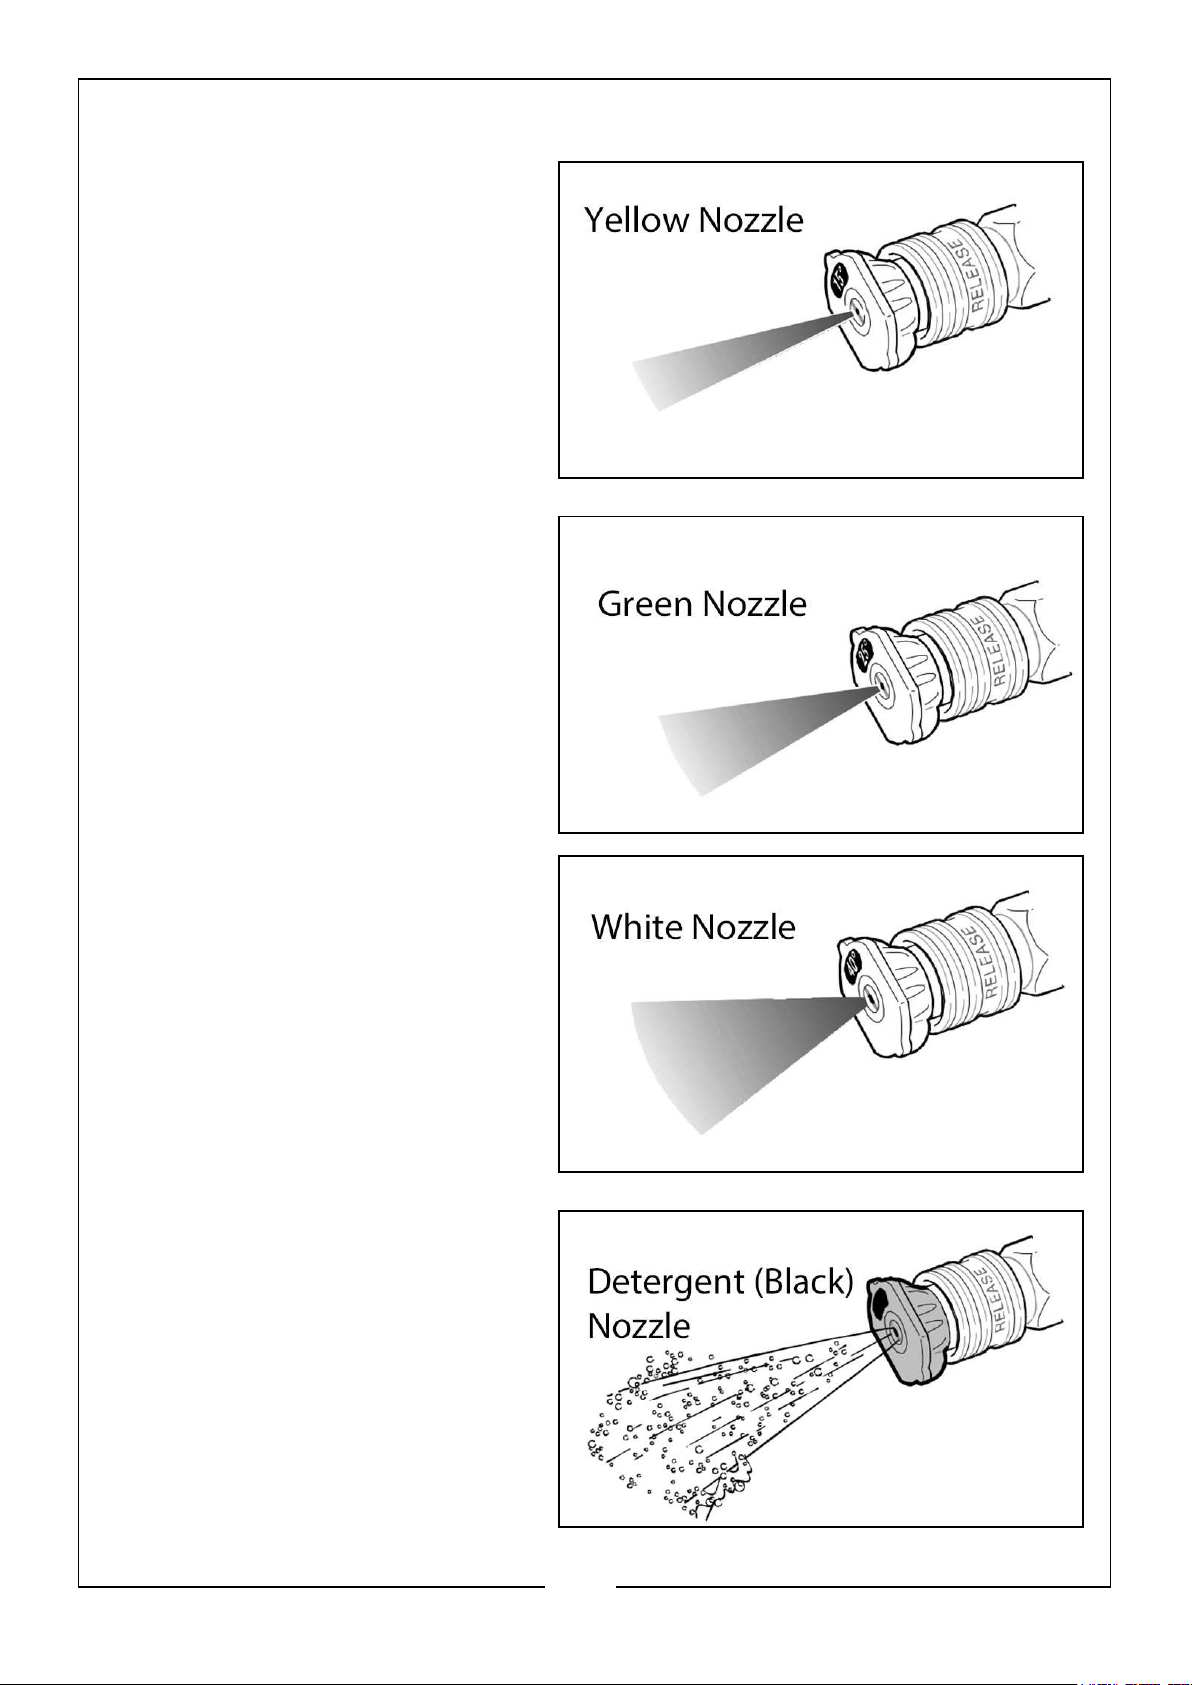
15O NOZZLE - YELLOW
This nozzle delivers a powerful 15o
spray pattern for intense cleaning of
small areas. This nozzle should only
be used on areas and materials that
can withstand high pressure.
25O NOZZLE - GREEN
This nozzle delivers a 25o spray
pattern for intense cleaning of larger
areas. This nozzle should only be
used on areas and materials that
can withstand pressure from this
nozzle.
40O NOZZLE - WHITE
This nozzle delivers a 40o spray
pattern and a less powerful stream
of water. This nozzle can cover a
wide area and should be used for
most general cleaning jobs.
DETERGENT NOZZLE - BLACK
This nozzle is used to apply special
detergents and cleaning solutions.
This nozzle produces the weakest
pressure stream of the five nozzles.
23
Parts & Service: 020 8988 7400 / E-mail: [email protected] or [email protected]
Page 24

MAINTENANCE
GENERAL RECOMMENDATIONS
Regular maintenance will improve the performance and extend the life of the pressure
washer.
The pressure washer’s warranty does not cover items that have been subjected to
operator abuse or negligence. To receive full value from the warranty, the operator
must maintain the pressure washer as instructed in this manual and in the engine
manual, including correct storage as detailed in the storage section of this manual.
NOTE: Should you have any questions about replacing components on the pressure
washer, please contact the CLARKE service department.
• Some adjustments will need to be made periodically to properly maintain your
pressure washer. Check the spray gun and extension lance assembly for wear.
• All maintenance in this manual and the engine operator’s manual should be
made at least once each season.
• Once a year you should clean or replace the spark plug and clean or replace
the air filter. A new spark plug and clean air filter will assure proper fuel-air
mixture and help your engine run better and last longer. Please refer to the
engine operators manual for more details.
PRESSURE WASHER MAINTENANCE
CLEAN DEBRIS
Daily or before use, clean accumulated debris from the cleaning system. Keep the
linkage, spring and controls clean. Keep the area around and behind the muffler free
from any combustible debris. Inspect cooling air slots and openings on the pressure
washer. These openings must be kept clean and unobstructed.
• Use a damp cloth to wipe exterior surfaces clean.
• Use a soft bristle brush to loosen caked on dirt, oil, etc.
• Use a vacuum cleaner to pick up loose dirt and debris.
• NEVER use the pressure washer to clean itself.
CHECK AND CLEAN THE INLET SCREEN
Examine the screen on the pump water inlet (see item 18 on pages 6/7). Clean it if
the screen is clogged or replace it if the screen is damaged.
CHECK HIGH PRESSURE HOSE
The high pressure hose can develop leaks from wear, kinking or abuse. Inspect the
hose each time before using it. Check for cuts, leaks, abrasions or bulging of the
24
Parts & Service: 020 8988 7400 / E-mail: [email protected] or [email protected]
Page 25
cover, damage or movement of couplings. If any of these conditions exist, replace the
hose immediately.
WARNING: NEVER REPAIR THE HIGH PRESSURE HOSE, ALWAYS
REPLACE IT. REPLACEMENT HOSE RATING MUST EXCEED THE
MAXIMUM PRESSURE RATING OF THE WASHER.
CHECK DETERGENT SYPHONING TUBE
Examine the filter on the detergent tube and clean if clogged. The tube should fit
tightly on the ridged fitting (see item 16 on pages 6/7). Examine the tube for leaks or
tears. Replace the filter or tube if either is damaged.
CHECK GUN
Examine the hose connection to the spray gun and make sure it is secure, and make
sure the safety latch is present and working correctly. Replace the spray gun
immediately if the safety latch is damaged or not working.
CHECK SPRAY LANCE
Occasionally, the spray lance can become clogged with foreign materials such as dirt.
When this happens, excessive pressure can develop. Whenever the pressure nozzle
becomes partially clogged the pump pressure will pulsate. If this happens, it should
be immediately cleaned.
NOZZLE MAINTENANCE
A pulsing sensation felt while squeezing the spray gun trigger may be caused by
excessive pump pressure. The principal cause of excessive pump pressure is a spray
tip clogged or restricted with foreign materials, such as dirt, etc. To correct the
problem, immediately clean the spray tip following these instructions.
1. Shut off the engine and turn off the water supply.
2. ALWAYS point the spray gun in a safe direction; squeeze the trigger to release
retained high water pressure.
3. Remove the spray nozzle from the end of the nozzle extension (see page 22).
4. Use the nozzle pin to free any foreign material clogging or restricting the spray tip.
5. Remove the lance from the spray gun.
6. Using a garden hose, remove additional debris by back flushing water through the
lance.
7. Reinstall the nozzle onto the lance.
8. Reconnect the lance top the spray gun.
9. Make sure the garden hose is connected to the water inlet.
10. Check that the high pressure hose is connected to the spray gun and pump.
25
Parts & Service: 020 8988 7400 / E-mail: [email protected] or [email protected]
Page 26
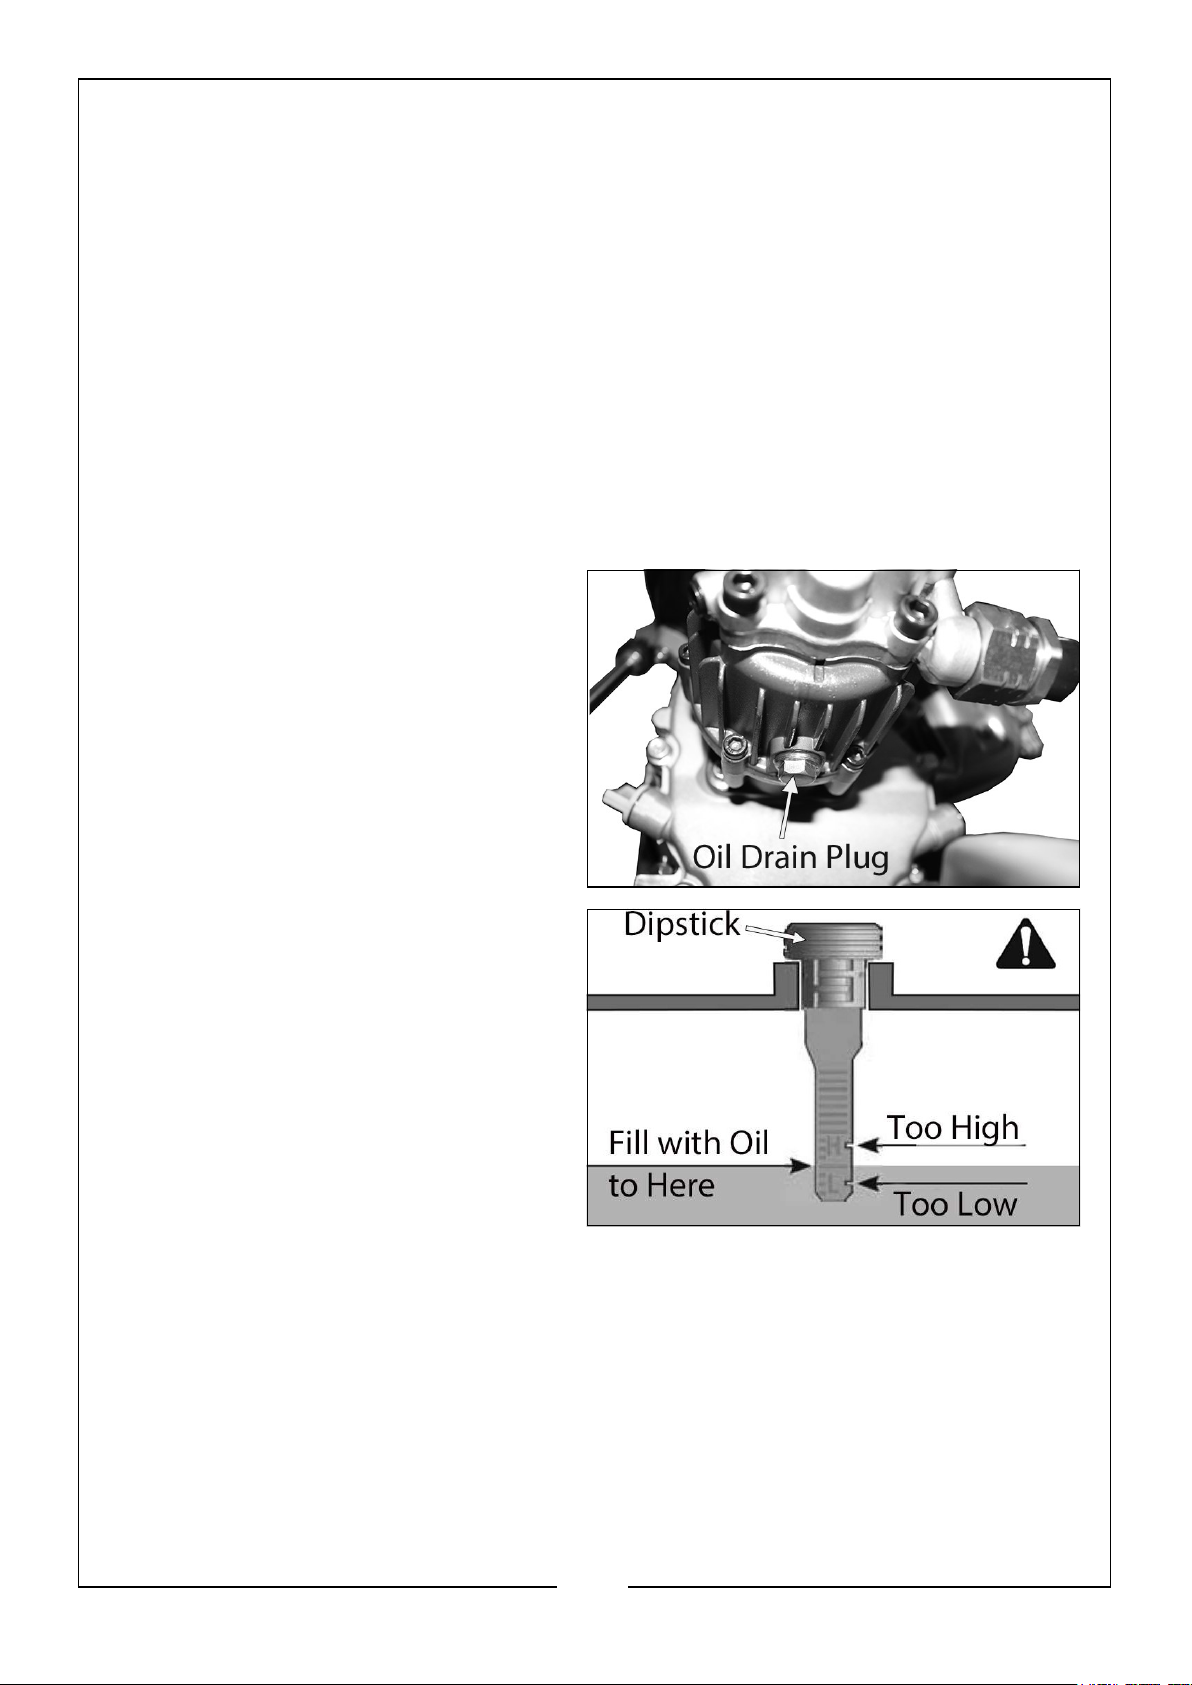
11. Turn on water supply.
12. Start the engine.
13. Test pressure washer by operating with each quick connect spray nozzle.
PUMP OIL MAINTENANCE
CHANGING PUMP OIL
Change the pump oil after the first 25 hours of operation and then every 50 hours or
3 months, whichever occurs first.
NOTE: When changing the pump oil, use only high quality SAE10W30 oil. Use no
special additives.
CHANGING PUMP OIL AS FOLLOWS
1. Clean area around the oil drain plug
at the bottom of the pump.
2. Remove oil drain plug. Drain oil
completely into an approved
container.
3. When oil has completely drained,
reinstall the oil drain plug and
tighten firmly.
4. Clean the area around the pump oil
breather plug/dipstick. Remove the
dipstick and fill the pump with the
recommended oil.
5. Reinstall the pump oil dipstick.
6. Wipe up any spilled oil.
PUMP OIL CAPACITY AND TYPE
1. The oil capacity is 150ml
2. Below 40oF (4oC) the use of SAE30 will result in difficult starting. Above 80oF
(27oC) the use of 10W30 may cause increased oil consumption. Check oil level
more frequently.
ENGINE MAINTENANCE
Consult the engine operator manual for more information.
26
Parts & Service: 020 8988 7400 / E-mail: [email protected] or [email protected]
Page 27

STORAGE
LONG TERM STORAGE
Petrol fuel can become stale when stored over 30 days. Stale fuel causes acid and
gum deposits to form in the fuel system or crucial carburetor parts. To keep fuel
fresh, add a fuel stabilizer liquid additive to the fuel. The fuel stabilizer is available at
most auto part stores.
Draining the petrol is unnecessary if the fuel stabilizer is used according to the
instructions that come with it.
Run the engine for a minimum of two minutes after the stabilizer has been added, to
allow it to circulate throughout the engine. The engine and fuel can be stored up to
24 months.
TO PROTECT AGAINST RUST FORMATION DURING STORAGE
OIL THE CYLINDER BORE
1. Remove the spark plug and pour approximately 1/2oz (15ml) of clean engine oil
into the cylinder.
2. Reinstall the spark plug and pull the starter handle slowly to distribute the oil. DO
NOT start the engine at this time.
3. Slowly pull the recoil starter 2 or 3 times to distribute and coat the cylinder bore
with oil.
STORAGE OF PRESSURE PUMP
1. Drain all the water from the high pressure hose, coil it and store it in the cradle of
the pressure washer handle.
2. Drain all the water from the spray gun and lance by holding the spray gun in a
vertical position with the nozzle pointed downwards. Squeeze the trigger to
remove fluids from the spray gun and lance. Store the gun and lance in the cradle
on the side of the washer.
3. Store the detergent hose, high pressure hose and spray gun so they are protected
from damage, such as being run over.
OTHER STORAGE TIPS
1. DO NOT store petrol from one season to another unless its been treated with a
fuel stabilizer.
2. Replace fuel container, if metal, and it begins to rust. Rust, dirt and debris can
contaminate the fuel supply and components resulting in poor performance and/
or internal damage to the engine.
27
Parts & Service: 020 8988 7400 / E-mail: [email protected] or [email protected]
Page 28
3. Cover the pressure washer with a suitable cover that does not retain moisture
such as a plastic or plastic coated tarpaulin.
4. Let the pressure washer cool before covering it.
5. Store the pressure washer in a clean and dry area.
6. DO NOT let the pressure washer freeze.
RECOMMENDATION
It is recommended that you follow these steps to protect the internal seals of the
pressure washer when storing the unit for more than 30 days and/or when freezing
temperatures are expected.
1. Obtain a funnel, 6oz (175ml) of Recreational Vehicle (RV) antifreeze (ethanol and
propylene glycol) and approximately 36 inches of garden hose with a male hose
connector on one end.
WARNING: USE ONLY RV ANTIFREEZE (ETHANOL AND PROPYLENE
GLYCOL). ANY OTHER TYPE OF ANTIFREEZE IS CORROSIVE AND
CAN DAMAGE THE PRESSURE PUMP
2. Disconnect the spark plug. Ensure the cap cannot touch any metal on the
pressure washer.
3. Connect the 36 inch length of garden hose to the water inlet of the pressure pump
and place the funnel at the other end.
4. Add the RV antifreeze to the funnel and hose.
5. Pull the engine starter handle slowly several times until the antifreeze comes out
of the pressure hose connection of the pump.
6. Remove the hose from the water inlet of the pump.
7. Reconnect the spark plug.
28
Parts & Service: 020 8988 7400 / E-mail: [email protected] or [email protected]
Page 29
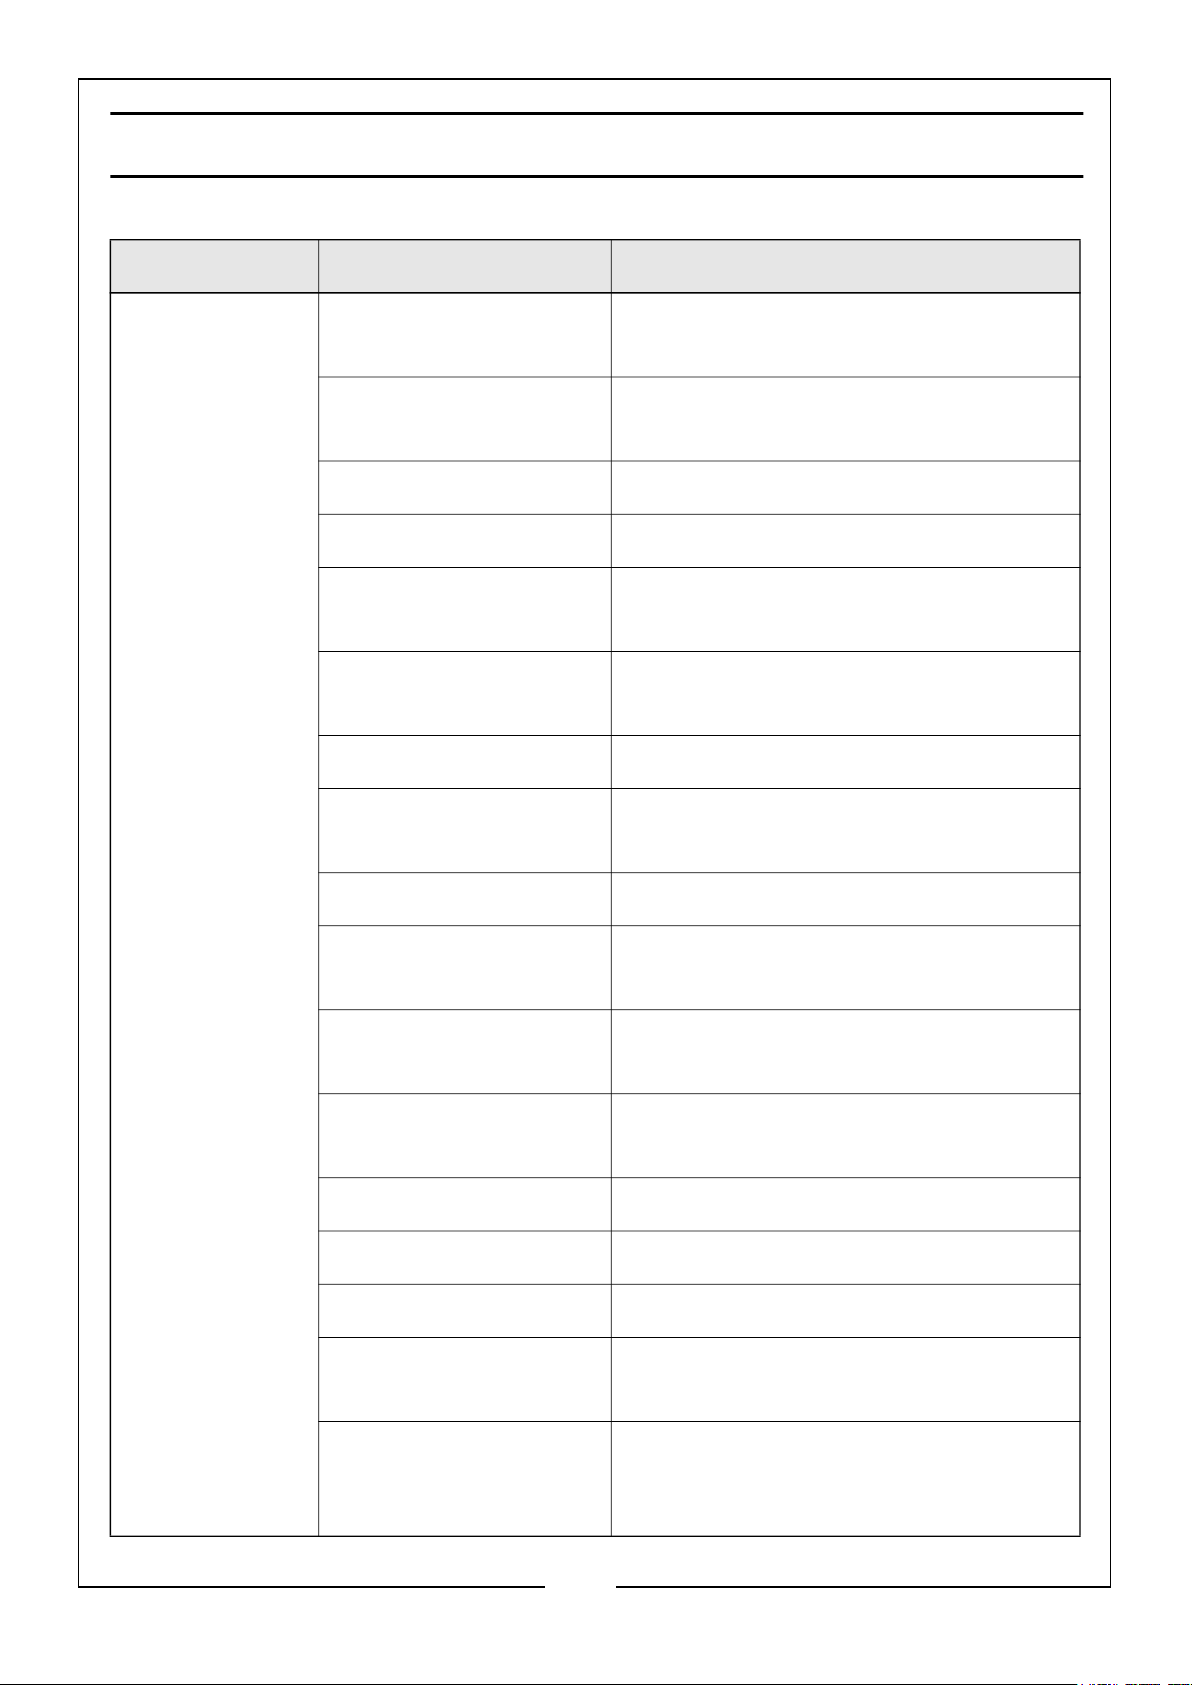
TROUBLESHOOTING
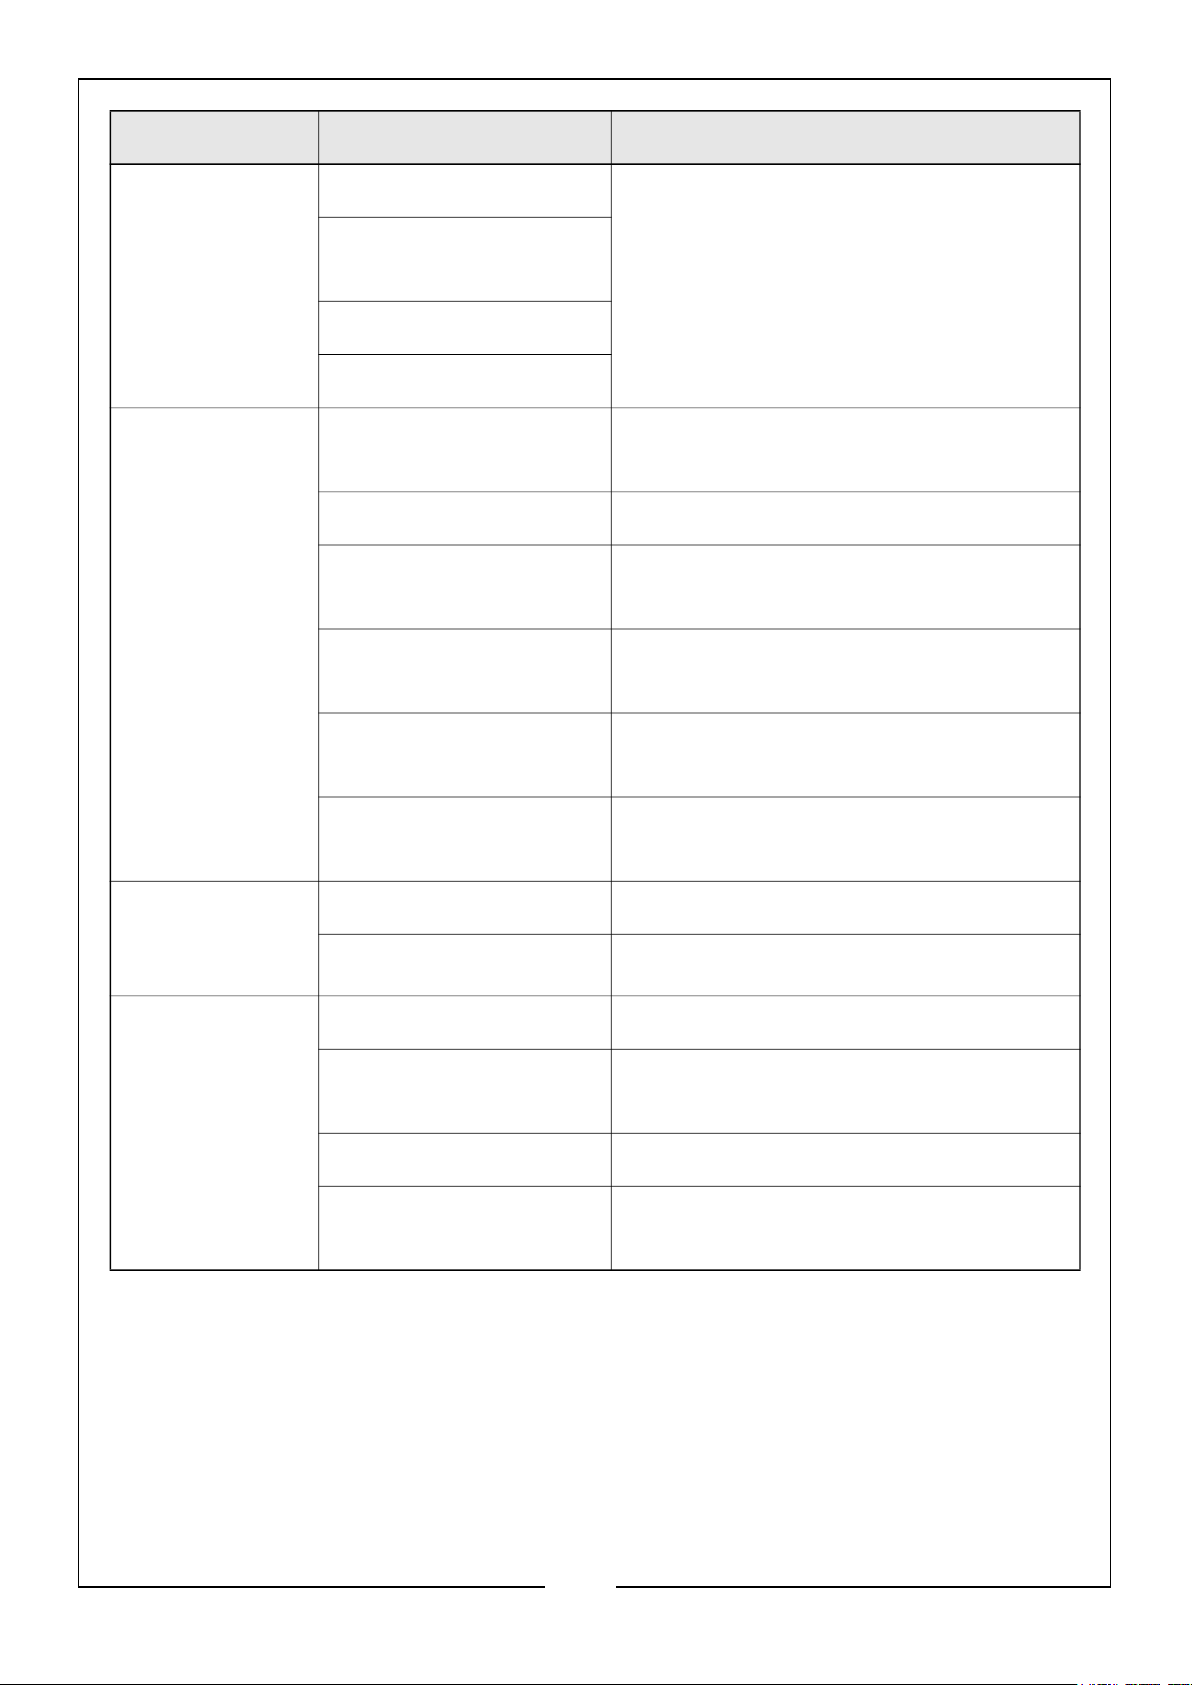
PROBLEM CAUSE SOLUTION
Engine will not
start; or starts
and runs rough
Rocker switch set to
‘OFF’ position
Fuel valve is in the ‘OFF’
position
Dirty air filter Clean or replace air filter
Out of fuel Fill fuel tank
Stale fuel Drain fuel tank and carburetor; fill with
Spark plug wire not
connected to spark plug
Bad spark plug Replace spark plug
Water in fuel Drain fuel tank and carburetor; fill with
Flooded carburettor Wait 5 minutes and re-crank engine
Set switch to ‘ON’ position
Turn fuel valve to ‘ON’ position
fresh fuel
Check and/or connect wire to spark plug
fresh fuel
Excessively rich fuel/air
mixture
Intake valve stuck open
or closed
Engine has lost
compression
Low engine oil Add oil
Wrong fuel Use recommended fuel
Engine is too hot Allow engine to cool
Choke is in wrong
position
Pressure build up after 2
pulls of recoil starter or
after initial use
Contact the CLARKE service department
Contact the CLARKE service department
Contact the CLARKE service department
Check choke position
Squeeze gun trigger to relieve pressure
29
Parts & Service: 020 8988 7400 / E-mail: [email protected] or [email protected]
Page 30
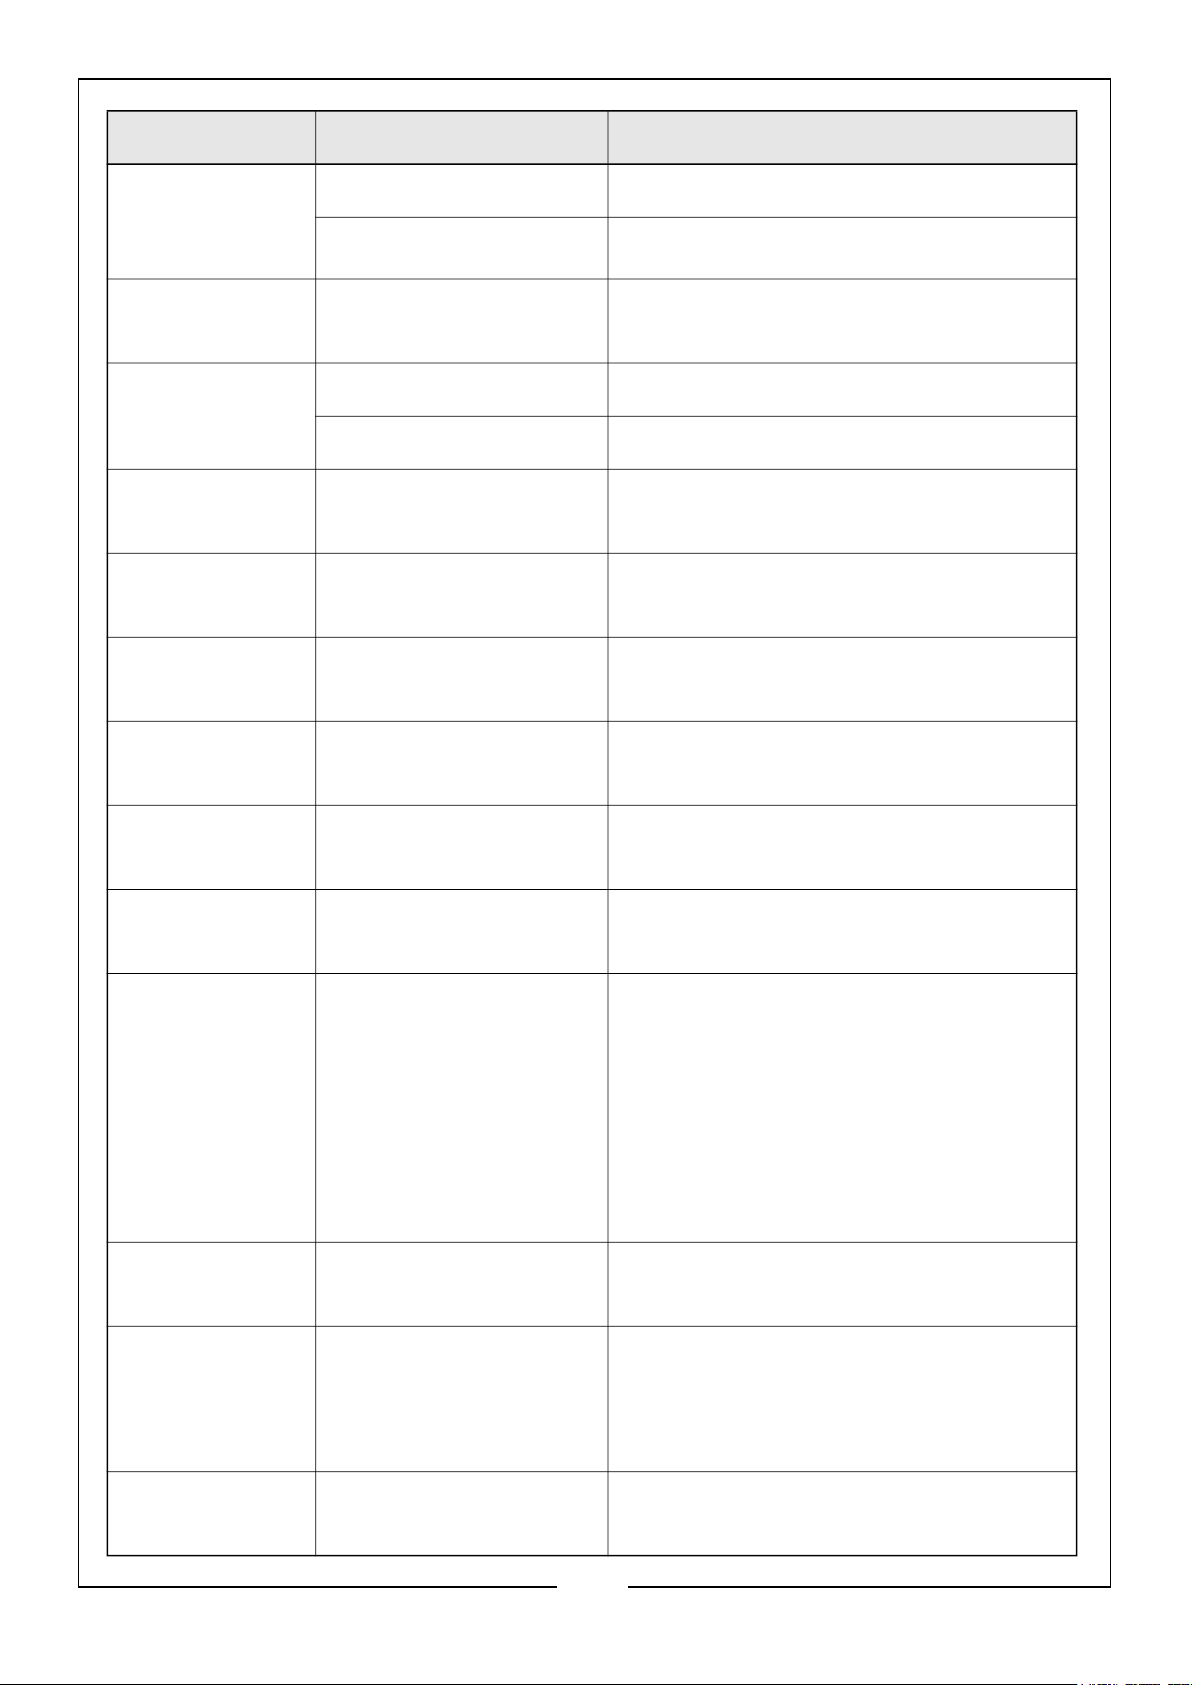
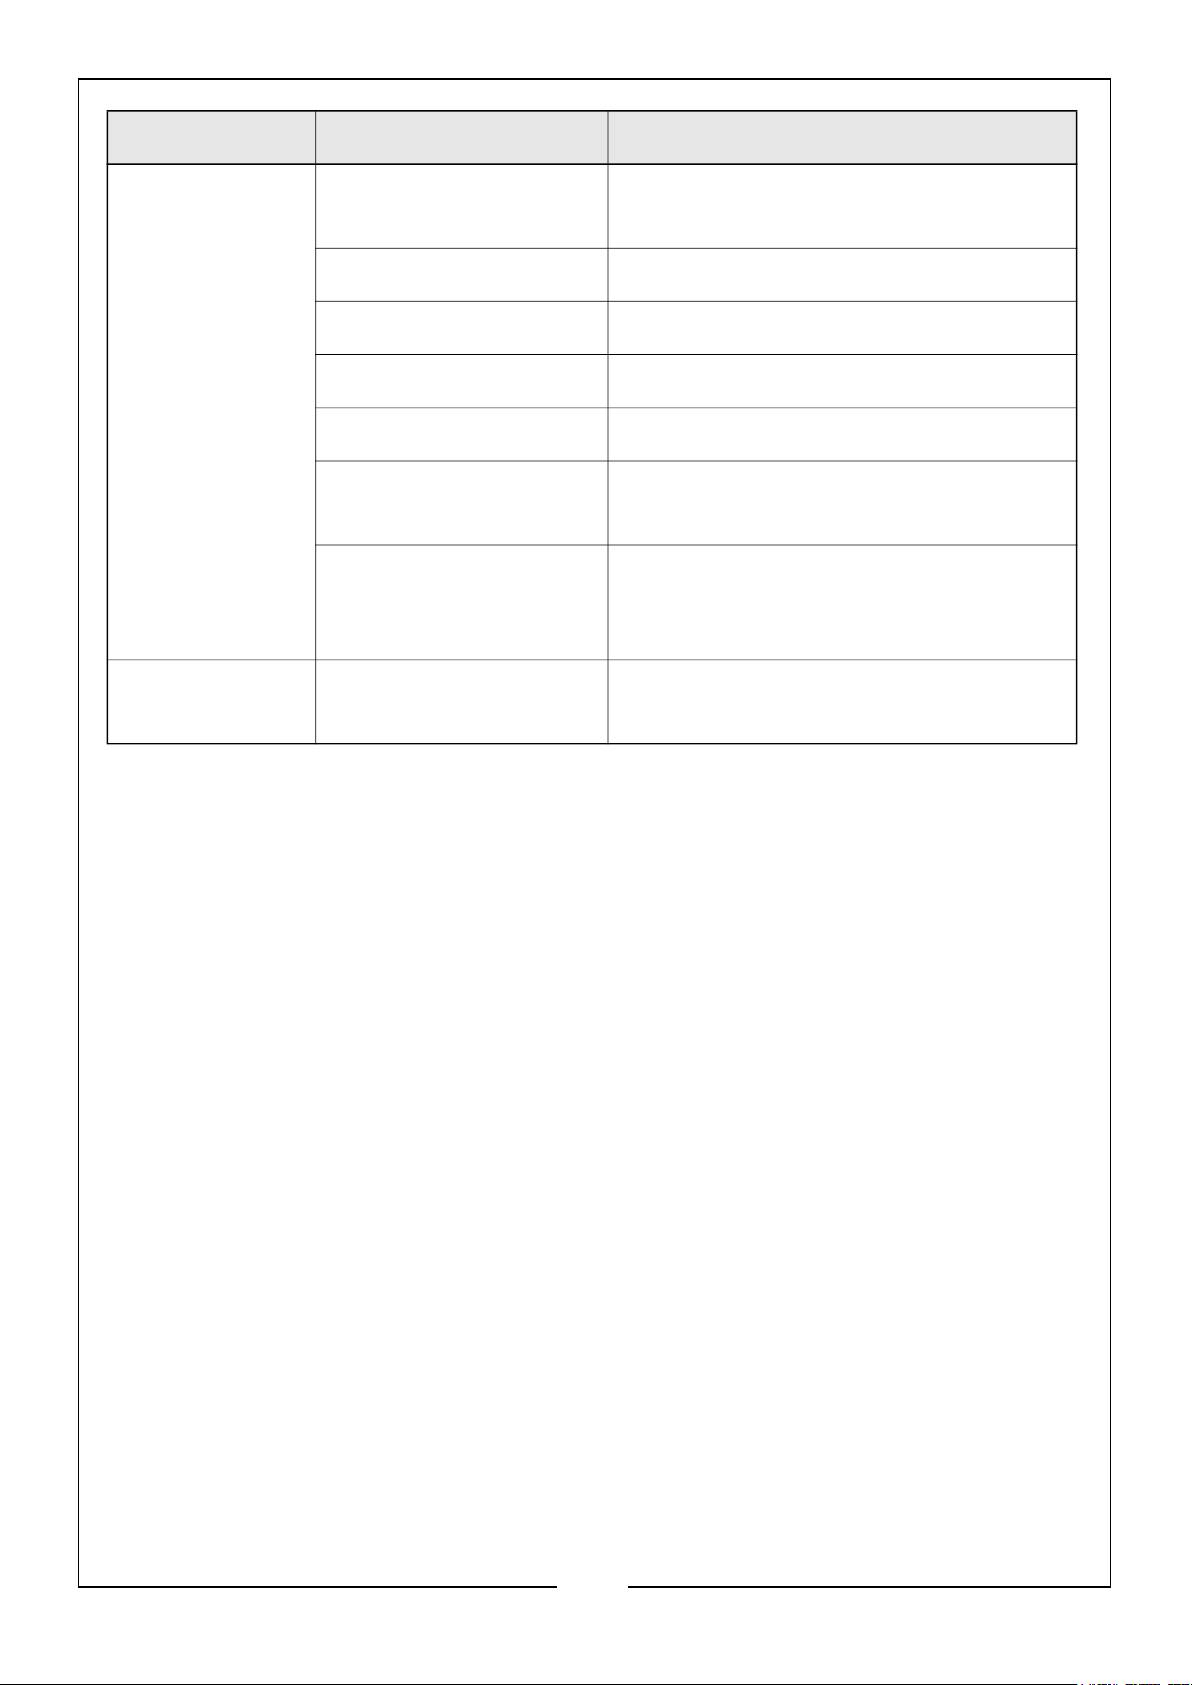
PROBLEM CAUSE SOLUTION
Engine shuts
down when
running
Engine hunts or
falters
Engine lacks
pressure
No pressure or
low pressure
Out of fuel Fill fuel tank
Low engine oil Add oil
Carburetor is running
Contact the CLARKE service department
too rich or too lean
Cylinder pressure is low Contact the CLARKE service department
Dirty air filter Clean or replace air filter
Spray lance not set to
high pressure
See ‘Using The Nozzle Tips’ section on
page 22/23
Low water supply Water supply should be a maximum of
8.2 l/min @ 3-6 bar pressure.
Hose fitting leaks during
high pressure
Tighten hose fittings. Use thread sealant
tape if necessary
Nozzle obstructed See ‘Nozzle Maintenance’ section on
page 25
Water filter screen
Remove and clean filter
obstructed
Defective thermal relief
Contact the CLARKE service department
valve
Air in hose Stop engine and water source.
Disconnect water source from pump
inlet and turn water source to ‘ON’ to
remove all air from hose. When steady
stream of water is present, turn water
source to ‘OFF’. Reconnect water source
to pump inlet and turn on water source.
Squeeze trigger to remove remaining air
Choke lever in choke
Move choke to ‘NO CHOKE’ position
position
Throttle control lever is
hot to touch in fast
position
Move throttle control lever to slow
position. If it still remains hot contact
the CLARKE service department
High pressure hose too
long
Use high pressure hose under 300ft
(105m)
30
Parts & Service: 020 8988 7400 / E-mail: [email protected] or [email protected]
Page 31
PROBLEM CAUSE SOLUTION
No or low
pressure (after
period of normal
use)
Pump will not
draw detergents
Worn seal or packing Have parts cleaned or replaced by
CLARKE service department
Worn or obstructed
valves
Worn unloader piston
Worn E-Z start valve
Spray lance not set to
low pressure
See ‘Applying Detergents’ section on
page 20/21
Detergent filter clogged Clean filter
Detergent screen not in
detergent
Detergent solution too
thick
Ensure end of detergent hose is fully
submerged into detergent
Dilute detergent. Detergent solutions
should have same consistency as water
Pressure hose too long Lengthen water supply hose instead of
pressure hose
Water leaking at
spray gun/spray
lance connection
Water leaking at
pump
Detergent build up in
detergent injector
Have parts cleaned or replaced by
CLARKE service department
Worn or broken O ring Check and replace O ring
Lose hose connection Tighten hose connections
Loose connections Tighten connections
Piston packings worn Have parts cleaned or replaced by
CLARKE service department
Worn or broken O Ring Check and replace O ring
Pump head or tubes
damaged from freezing
Have parts cleaned or replaced by
CLARKE service department
31
Parts & Service: 020 8988 7400 / E-mail: [email protected] or [email protected]
Page 32
PROBLEM CAUSE SOLUTION
Oil leaking at
pump
Oil seals worn Have parts cleaned or replaced by
CLARKE service department
Loose drain plug Tighten drain plug
Worn drain plug O Ring Inspect and replace O ring
Worn fill plug O Ring Inspect and replace O ring
Pump overfilled Check for correct amount of oil
Incorrect oil used Drain and refill with correct type and
amount of oil
Vent plug clogged Clean vent. Use air hose to clear
blockage. If problem persists, replace
vent plug
Pump pulsates Nozzle obstructed See ‘Using The Nozzle Tips’ section on
page 22/23
If the following does not solve your problem, please contact the CLARKE service
department.
32
Parts & Service: 020 8988 7400 / E-mail: [email protected] or [email protected]
Page 33
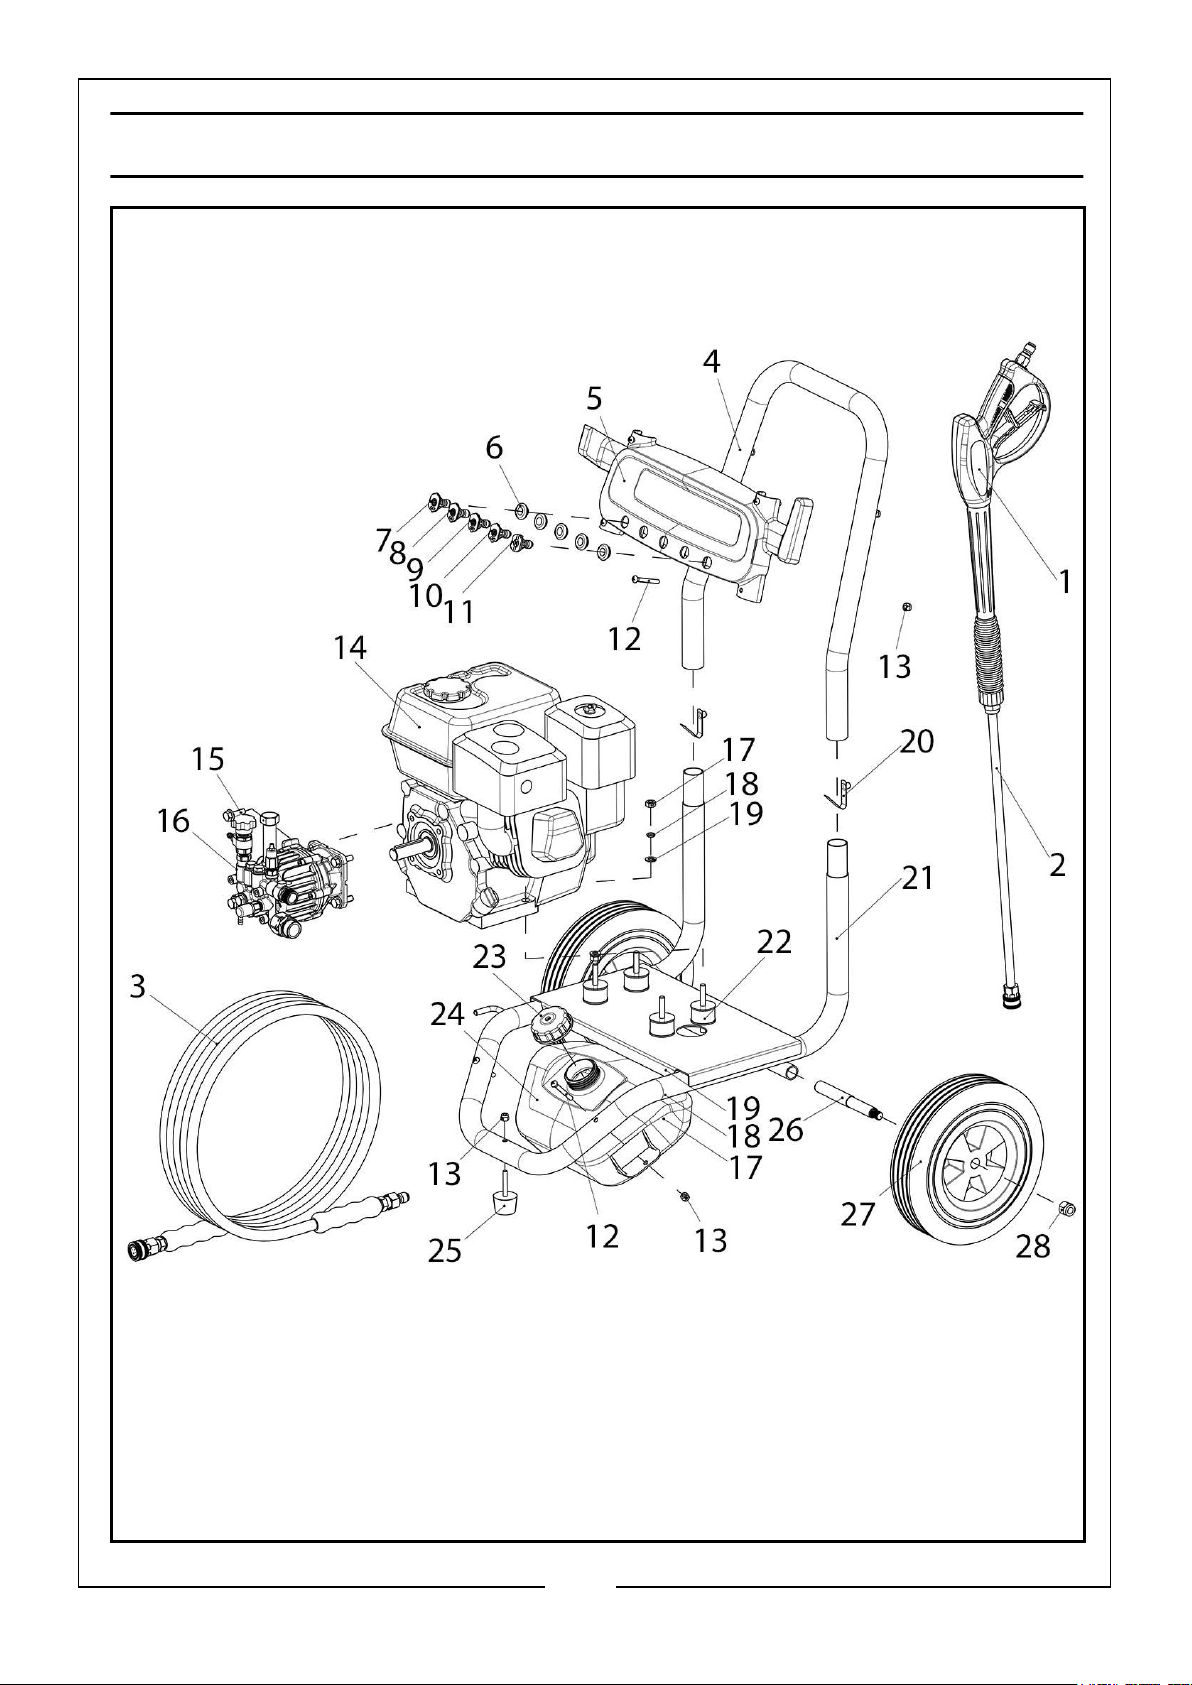
EXPLODED DIAGRAM - FRAME
33
Parts & Service: 020 8988 7400 / E-mail: [email protected] or [email protected]
Page 34
PARTS LIST- FRAME
1 Spray Gun 15 Bolt M8 x 25
2 Lance 16 Pump
3 High Pressure Hose 17 Nut M8
4 Handle 18 Spring Washer D8
5 Nozzle Panel 19 Plain Washer D8
6 Nozzle Grommet 20 Push Clip
7
0o Nozzle
8
15o Nozzle
9
25o Nozzle
10
40o Nozzle
11 Detergent Nozzle 25 Rubber Foot
12 Screw M6 x 45 26 Axle
13 Nut M6 27 Wheel
14 Engine 28 Nut M12
21 Lower Frame
22 Engine Mount Rubber Feet
23 Detergent Tank Cap
24 Detergent Tank
34
Parts & Service: 020 8988 7400 / E-mail: [email protected] or [email protected]
Page 35
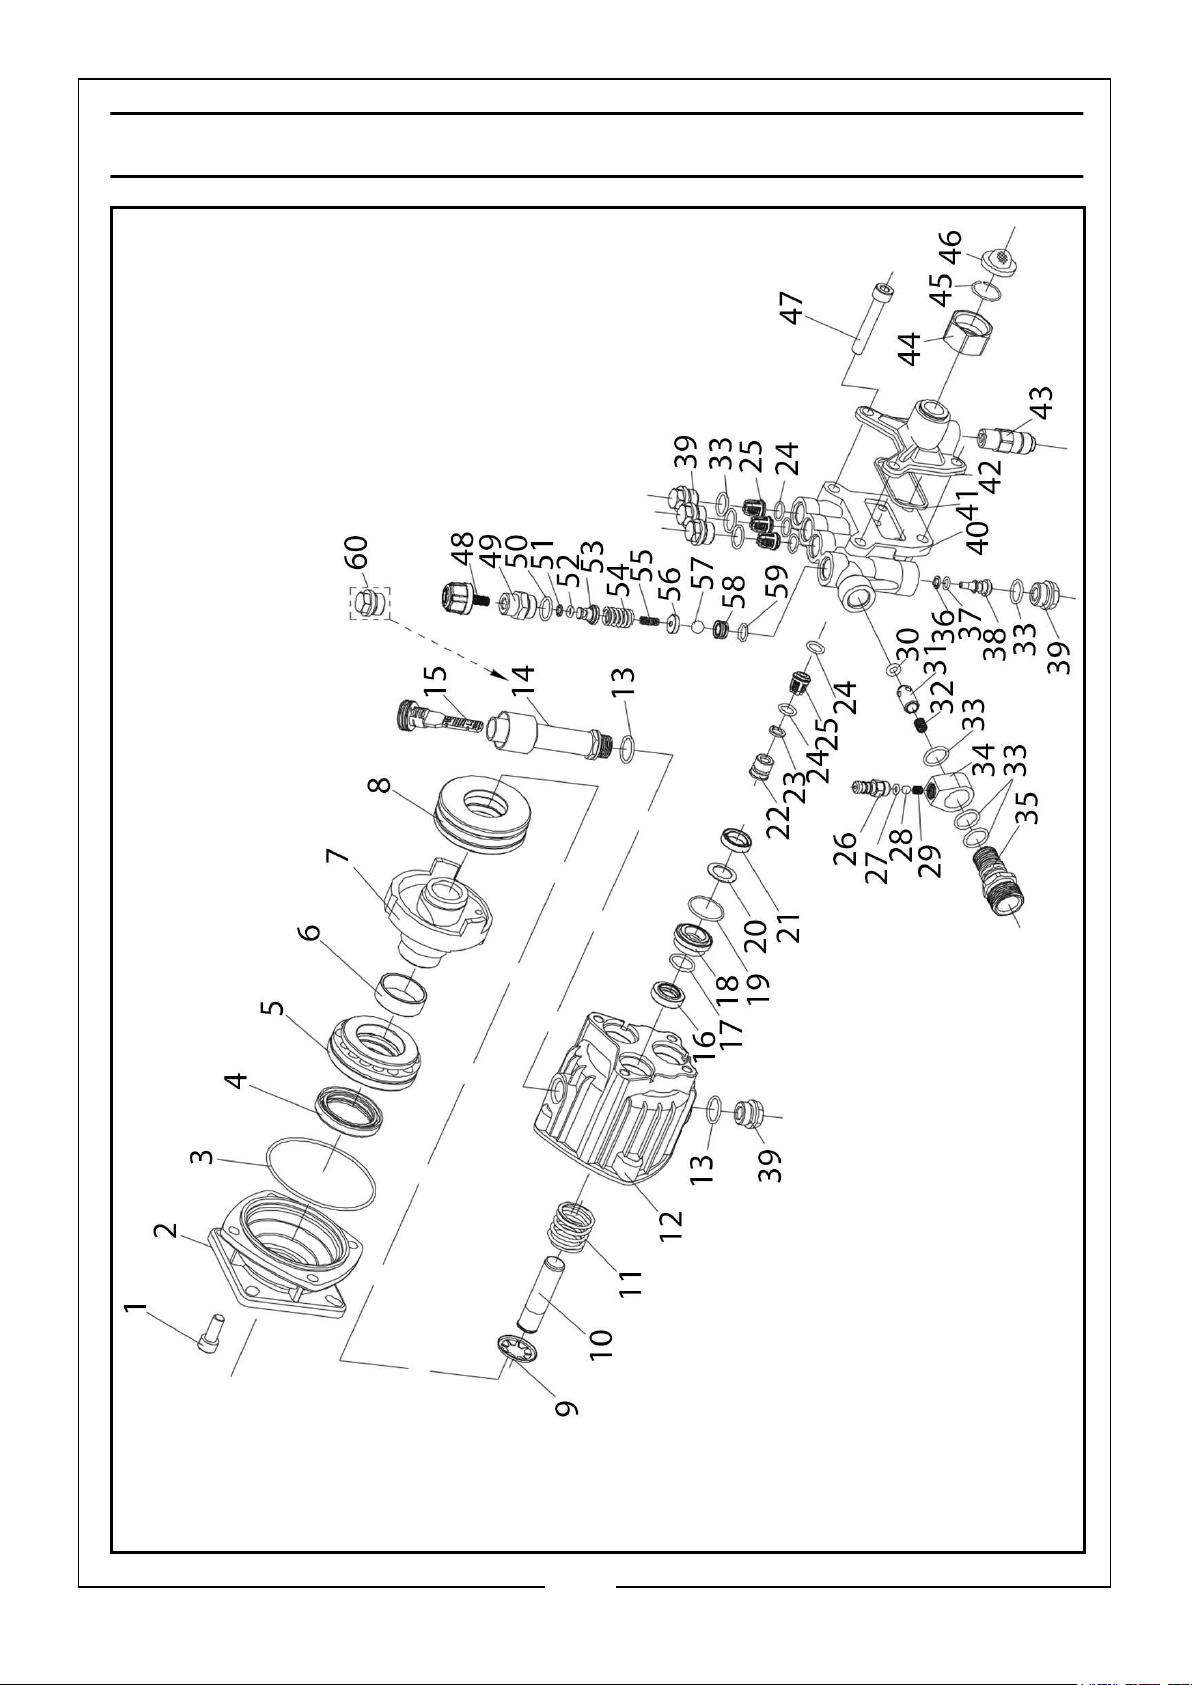
EXPLODED DIAGRAM - PUMP
35
Parts & Service: 020 8988 7400 / E-mail: [email protected] or [email protected]
Page 36
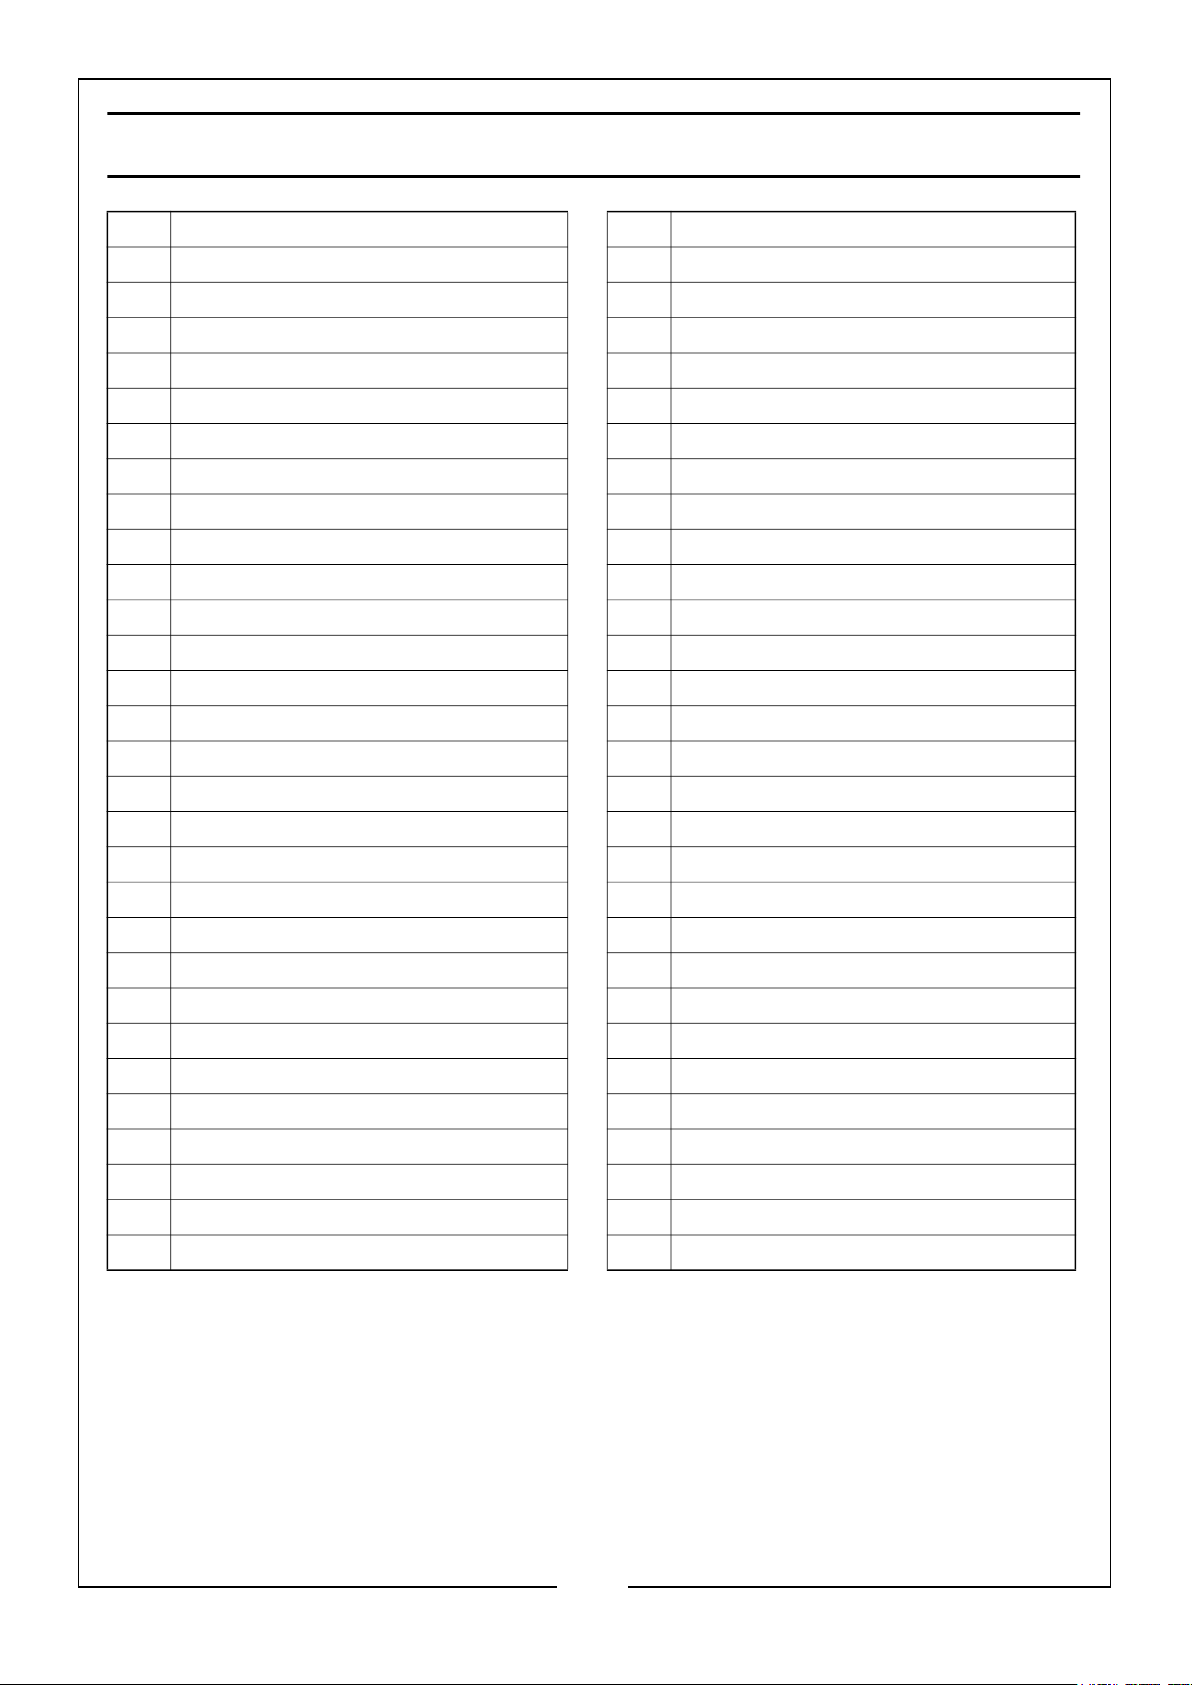
PARTS LIST- PUMP
1 Screw M8 x 16 31 Outlet Valve
2 Mounting Flange 32 Valve Spring
3 O Ring 80 x 2.4 33 O Ring
4 Radial Shaft Seal 34 Siphon Body
5 Rear Bearing 35 Outlet Connector
6 Sheath 36 Backup Ring
7 Wobble Plate 37 O Ring
8 Front Bearing 38 Valve Core
9 Spring Disc 39 Plug
10 15mm Plugger 40 Pump Manifold
11 Plunger Spring 41 Seal Gasket
12 Crankcase 42 Water Inlet Body
13 O Ring 14.2 x 1.9 43 Thermal Relief Valve
14 Pump Breather Plug 44 Inlet Swivel Nut
15 Dipstick 45 Clip Ring
16 Oil Seal 46 Water Filter
17 O Ring 15 x 2.2 47 Manifold Bolt
18 Spacer 48 Screw
19 O Ring 22 x 2 49 Screw Plug
20 Pressure Ring 50 O Ring
21 Water Seal 51 Backup Ring
22 Inlet Valve Plug 52 O Ring
23 Backup Ring 53 Spring Holder
24 O Ring 54 Large Pressure Spring
25 Check Valve 55 Small Pressure Spring
26 Detergent Inlet 56 Ball Holder
27 O Ring 4.47 x 1.78 57 Ball
28 Ball 58 Valve Port
29 Cone Spring 59 O ring
30 O Ring 60 Oil Plug (for Shipping)
36
Parts & Service: 020 8988 7400 / E-mail: [email protected] or [email protected]
Page 37
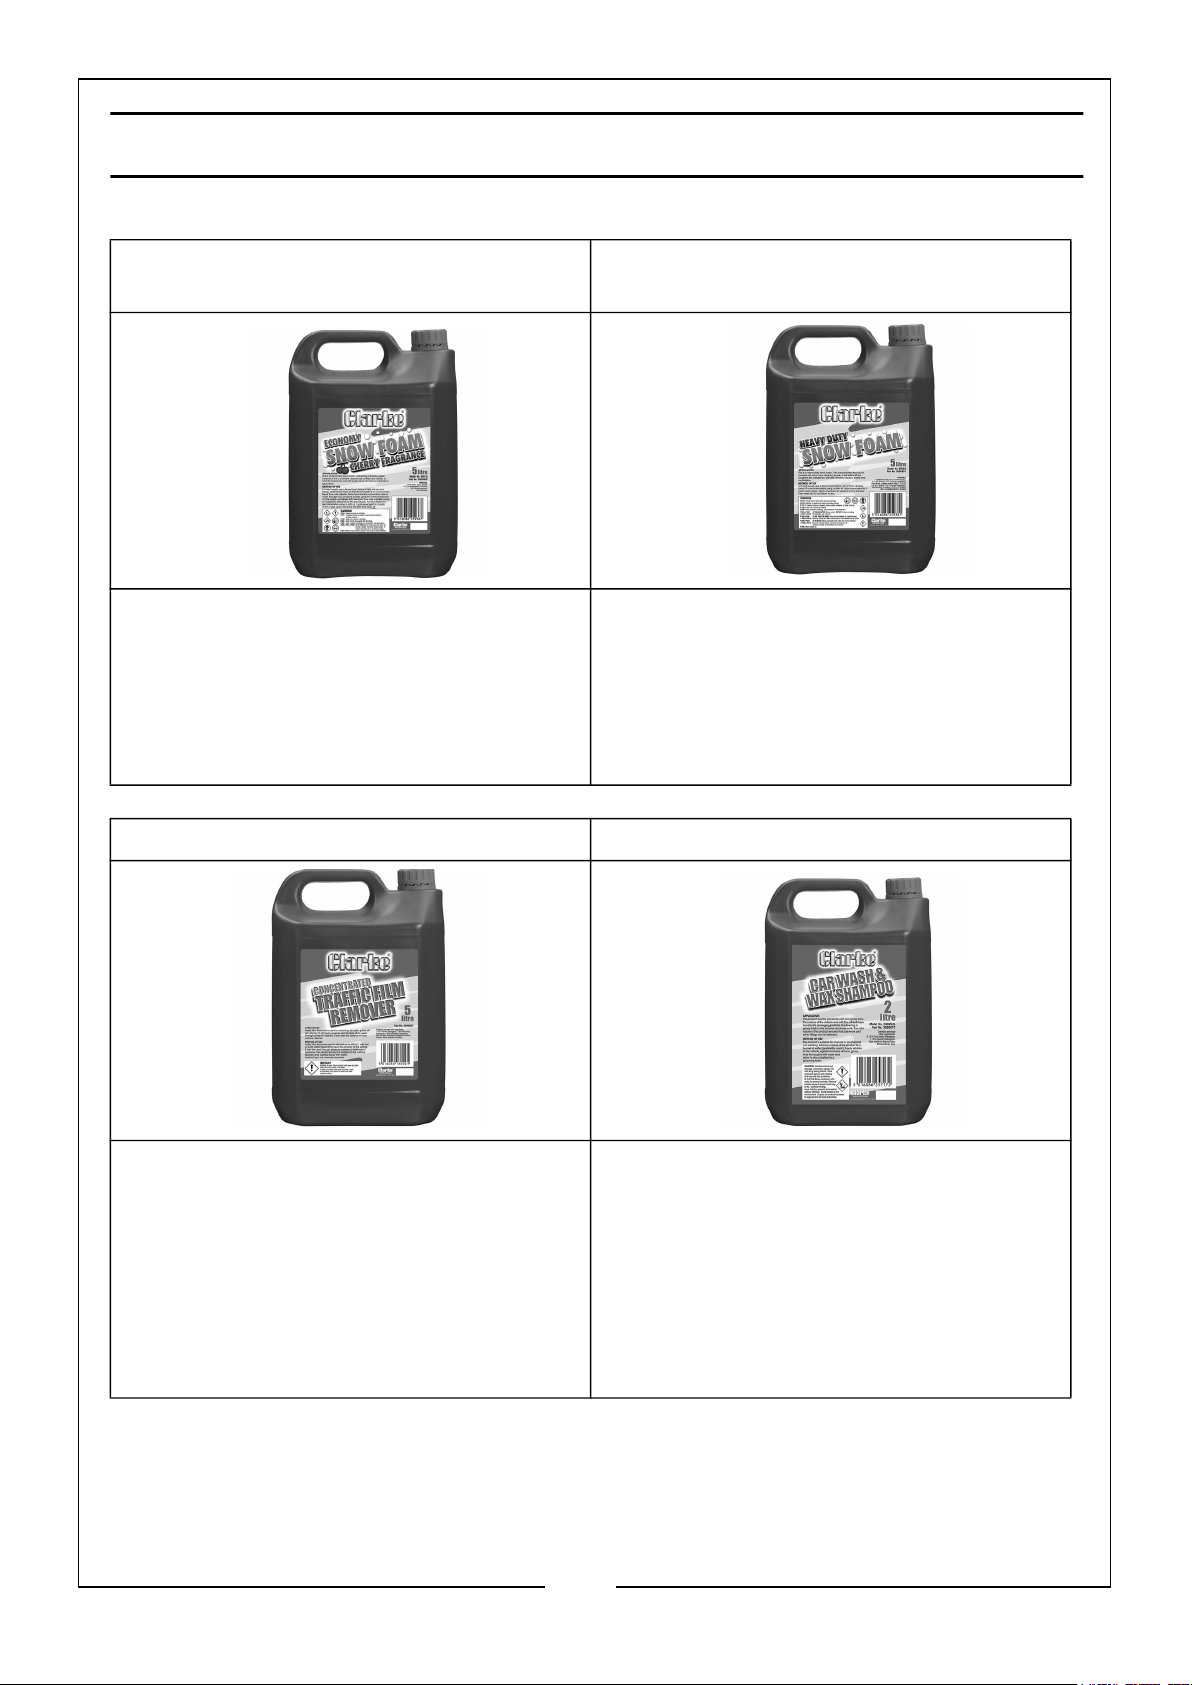
ASSOCIATED PRODUCTS
Economy Snow Foam Cherry Fragrance
- SFEC5
• Powerful cleaner with finishing gloss
treatment
• Contains no caustic or harmful
chemicals
• 5 Litres
• Part No. 3050805
Traffic Film Remover Wash & Wax Car Shampoo - PWWS2L
Heavy Duty Snow Foam - SFHD5
• Suitable for off-road vehicles,
tractors, trucks and motorbikes
• Raw cleaning power to lift the
toughest dirt
• 5 Litres
• Part No. 3050807
• Used to clean grime off all vehicles
• Will also clean engines and chassis
• 5 Litres
• Part No. 3050821
Parts & Service: 020 8988 7400 / E-mail: [email protected] or [email protected]
• Lifts any damaging particles to leave
a glossy finish on chrome and
bodywork
• Mild nature of the product ensures
paintwork and fittings are not
affected
• 2 Litres
• Part No. 3050807
37
Page 38
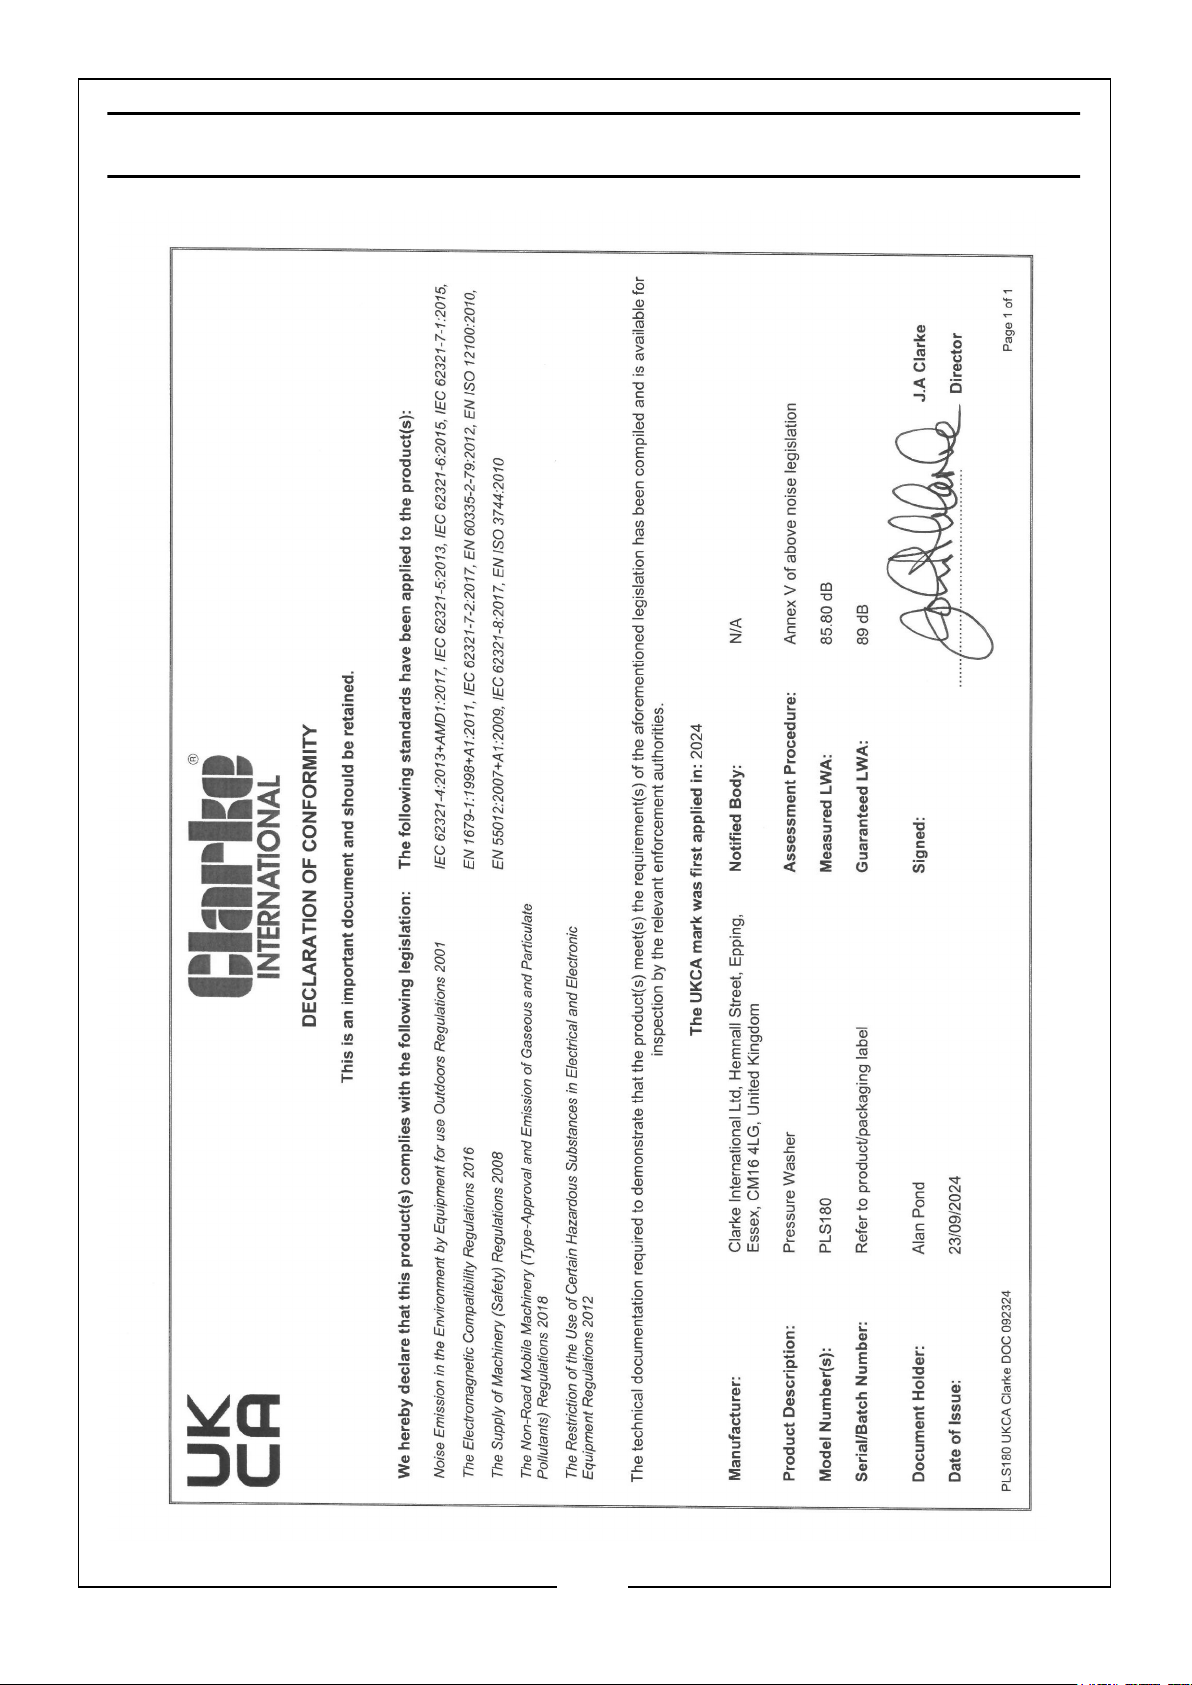
DECLARATION OF CONFORMITY - UKCA
38
Parts & Service: 020 8988 7400 / E-mail: [email protected] or [email protected]
Page 39
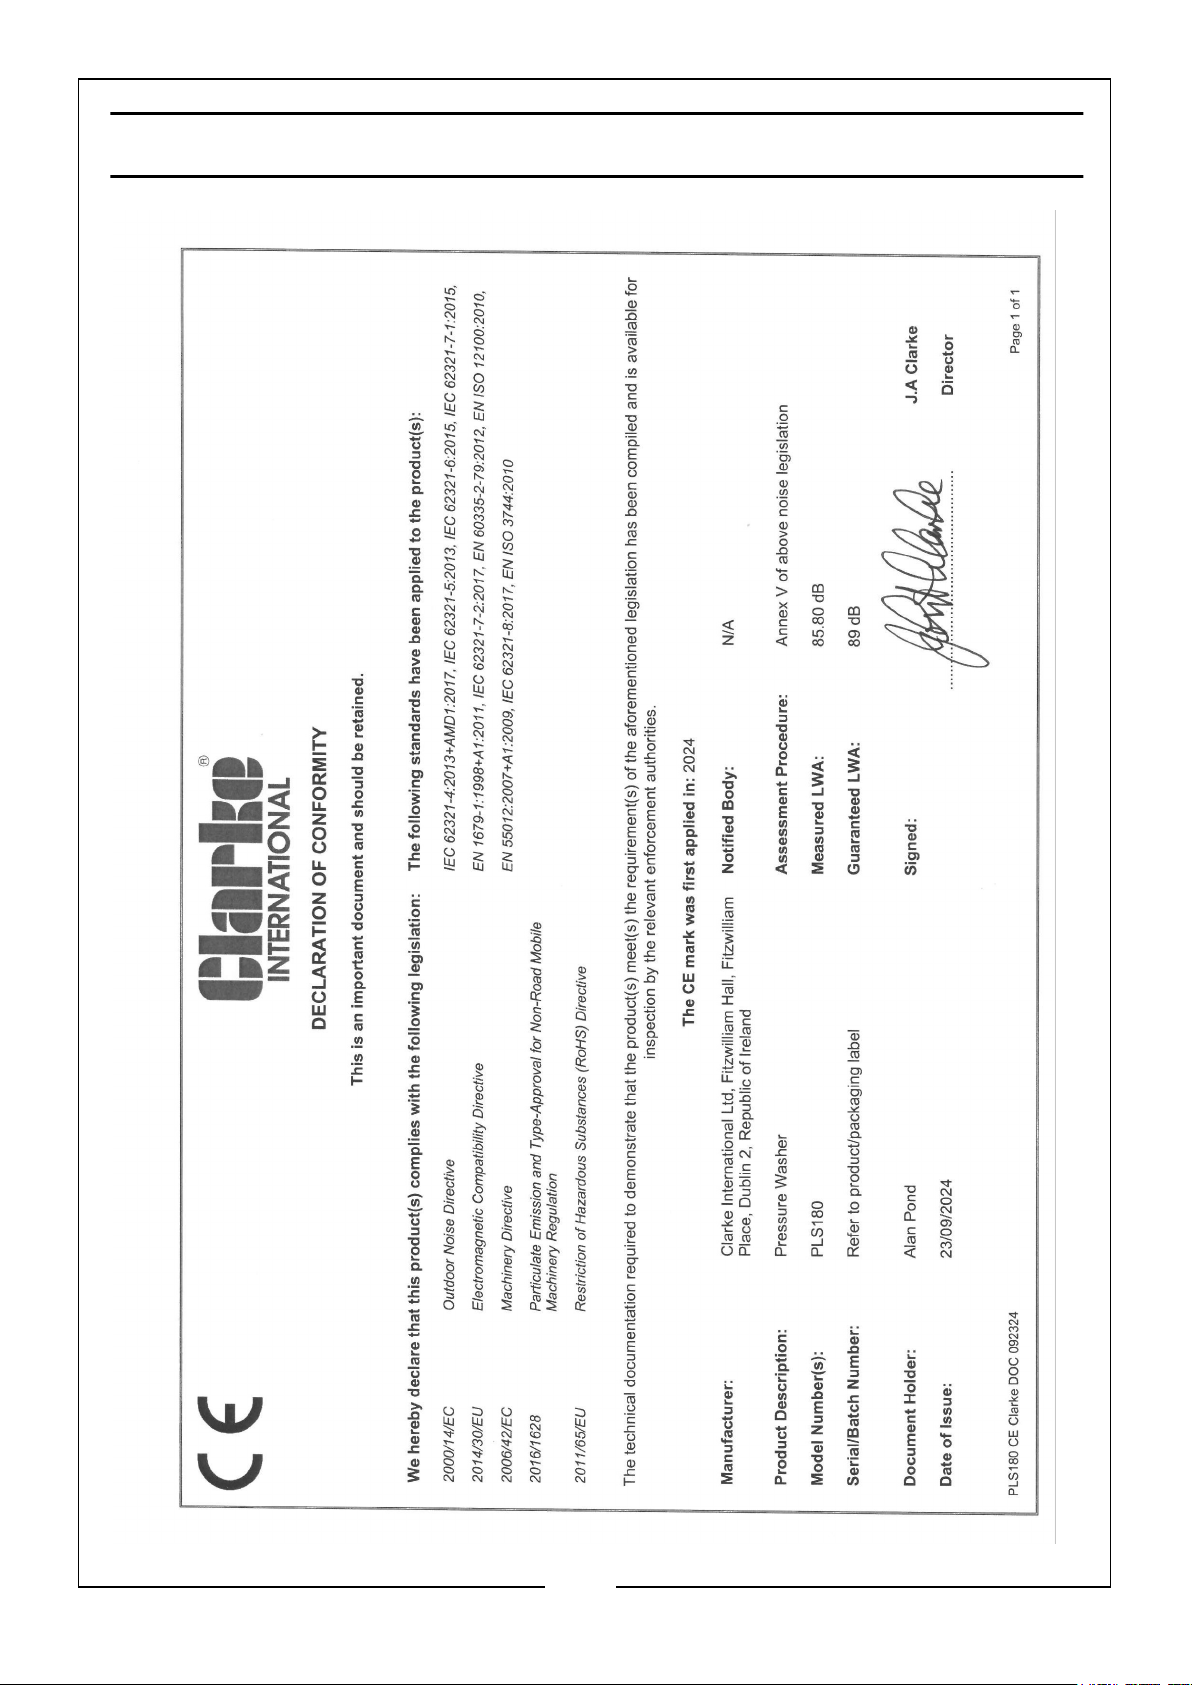
DECLARATION OF CONFORMITY - CE
39
Parts & Service: 020 8988 7400 / E-mail: [email protected] or [email protected]
Page 40

 Loading...