

Page 1
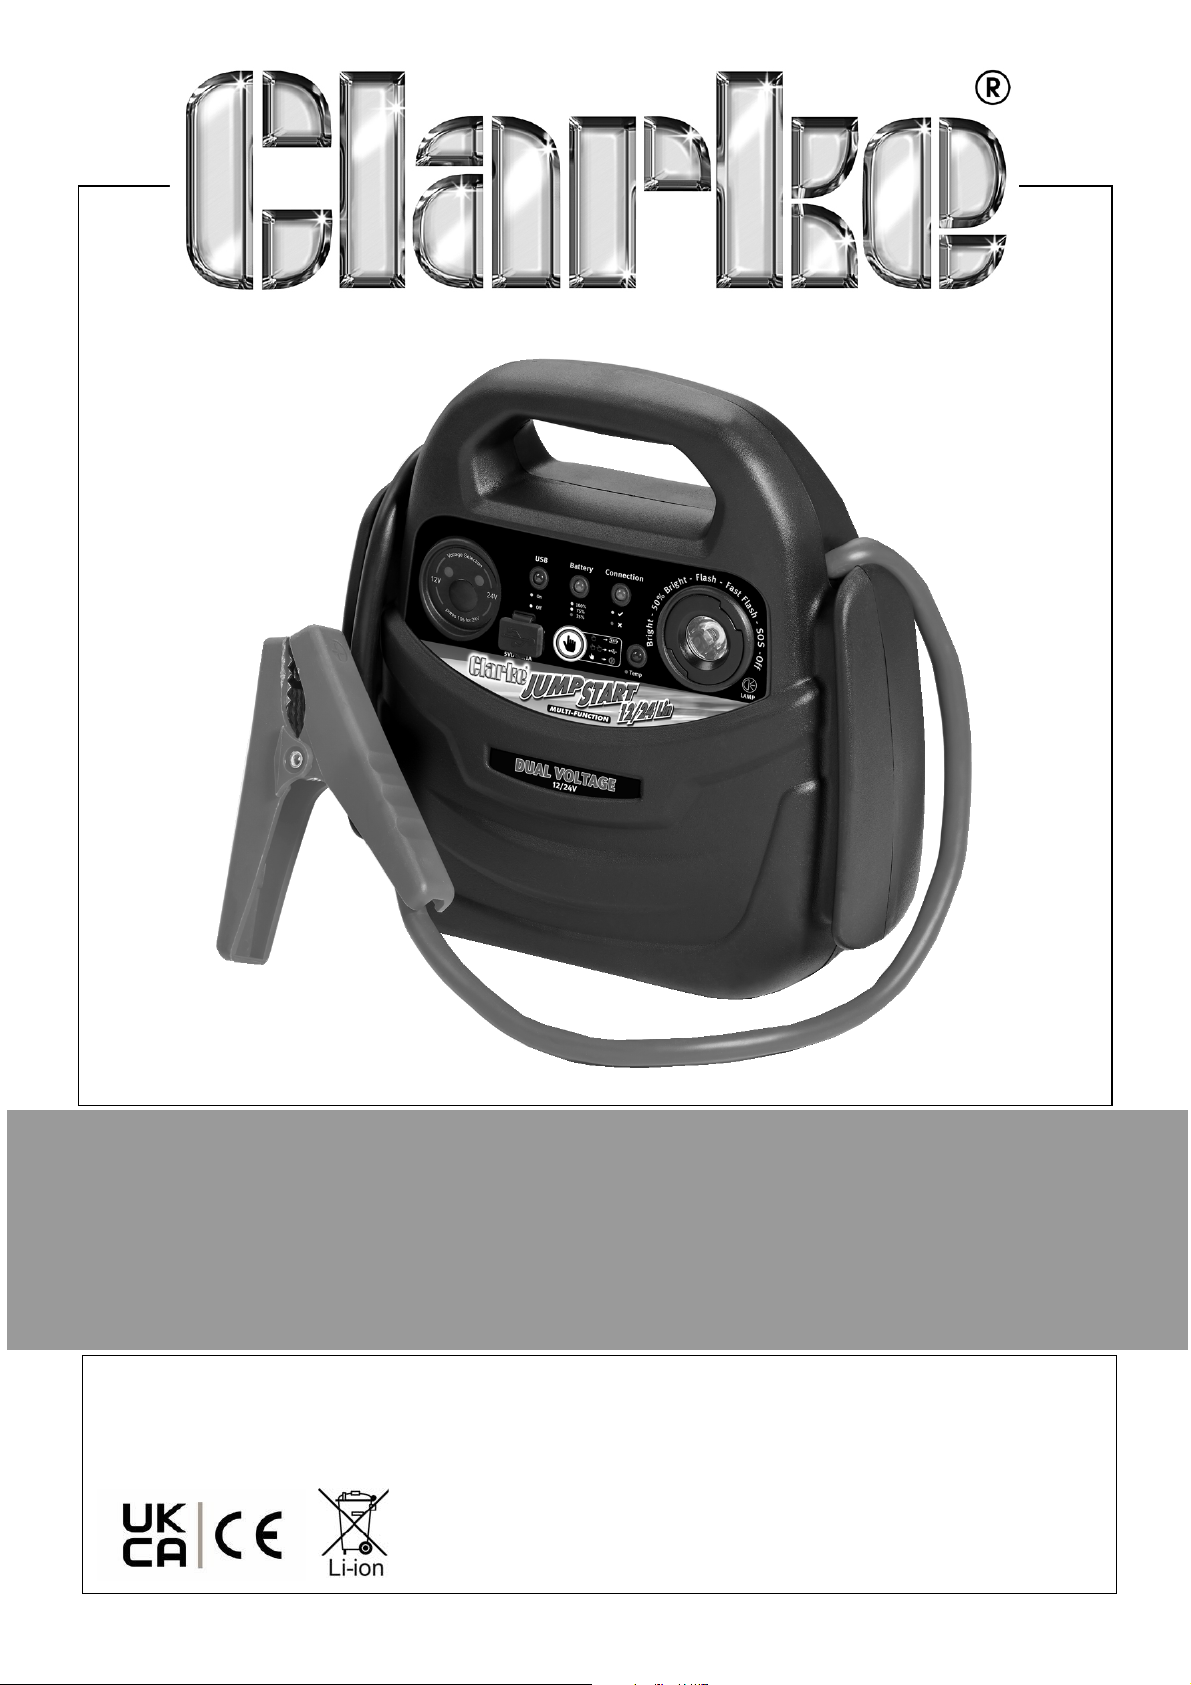
12/24V JUMPSTARTER
MODEL NO: JS1224LIN
PART NO: 6238905
OPERATING & MAINTENANCE
INSTRUCTIONS
ORIGINAL INSTRUCTIONS DL0723
Page 2
INTRODUCTION
Thank you for purchasing this CLARKE Jumpstarter.
The JS1224LiN is a rechargable power pack which can be used to start a car in
the event of a flat battery. The unit can also be used to power electrical
appliances via a cigarette lighter type socket using the adaptor supplied. The
unit also incorporates a built-in lamp and may be used as a stand alone light
source. A visual warning will appear in the event that the clamps are
incorrectly fitted for jump starting (wrong polarity).
Before attempting to use this product, please read this manual thoroughly and
follow the instructions carefully. In doing so you will ensure the safety of yourself
and that of others around you, and you can look forward to your purchase
giving you long and satisfactory service.
Please keep these instructions in a safe place for future reference.
SPECIFICATIONS
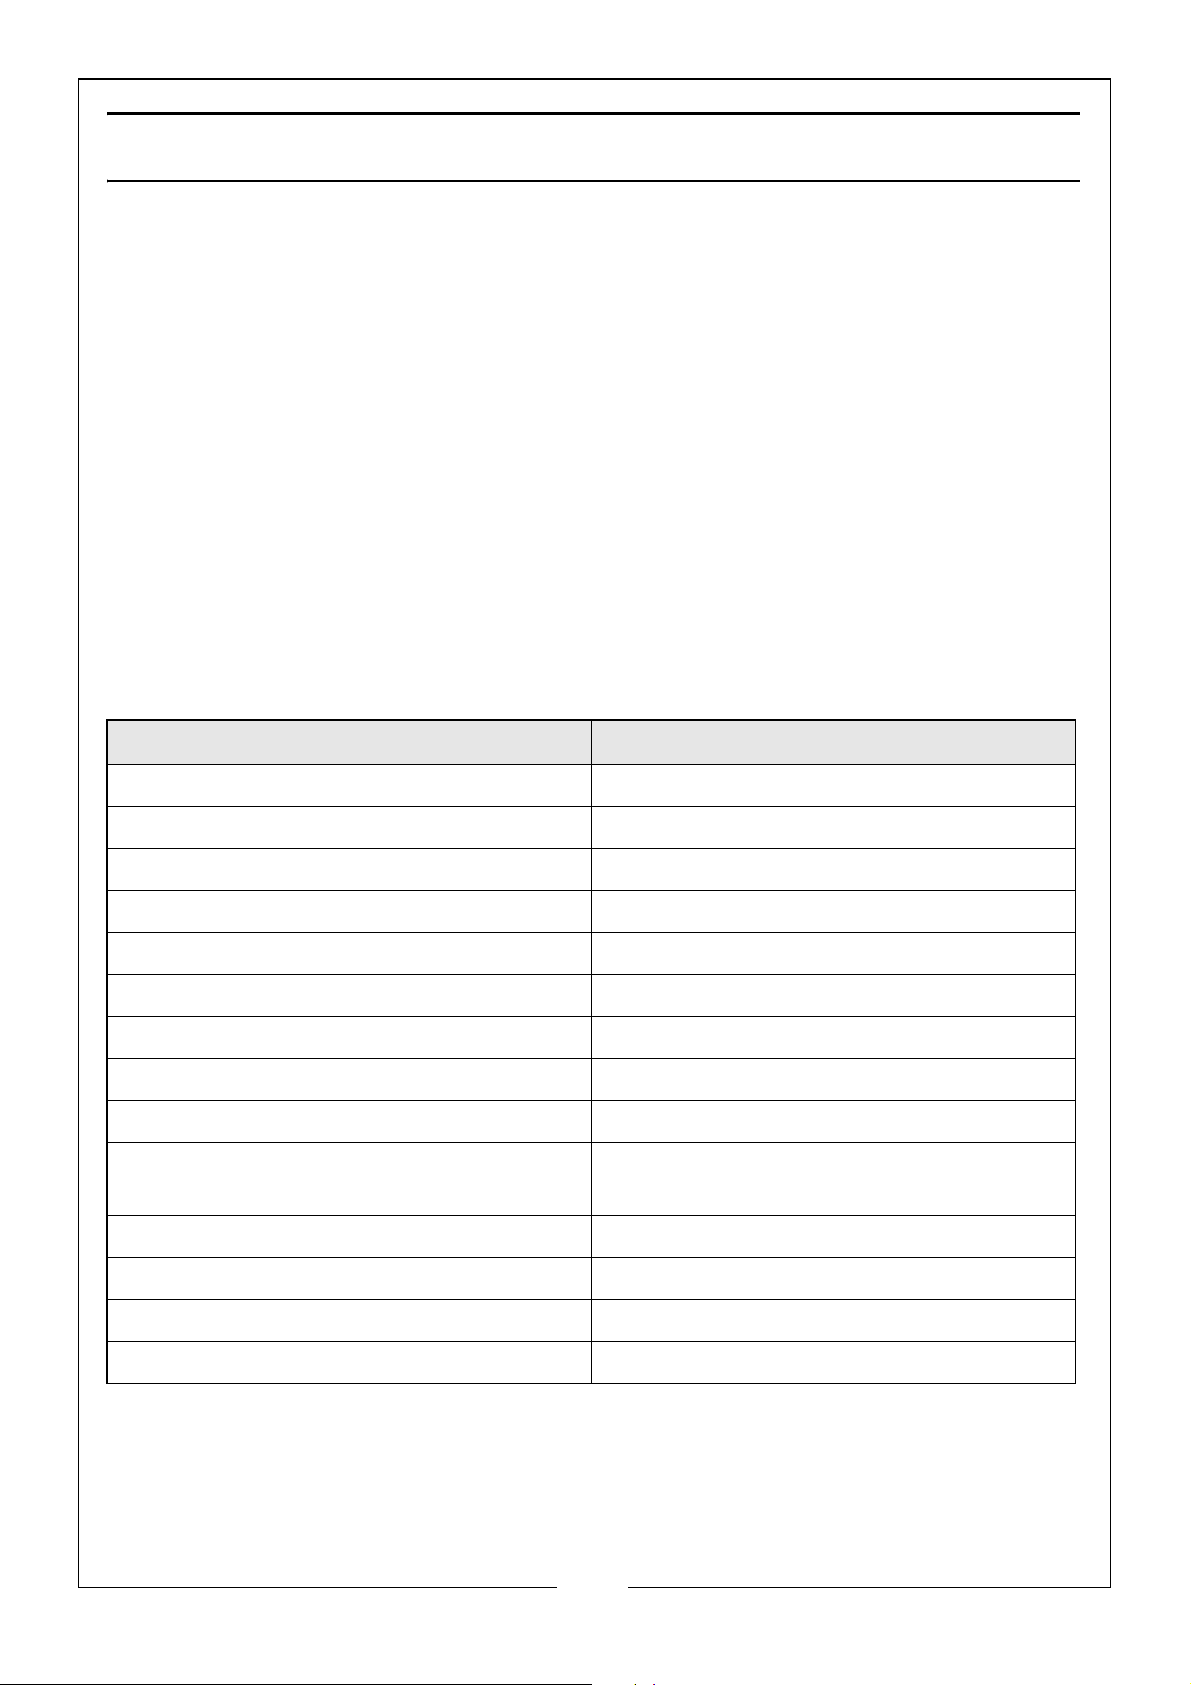
Item Specification
Product Size (D x W x H) 120mm x 248mm x 230mm
Weight 2.2kg
Insulation/Protection Class Class II (Charger)
Max Output Current (12V) Starting 600A, Peak 1200A
Max Output Current (24V) Starting 400A, Peak 900A
Input Voltage 230V-50Hz
Battery Type Sealed Re-chargeable Lithium-ion
Electric Charge Value 4,000mAh
Charge/Discharge Current Nominal: 500mA, Maximum: 4000mA
Estimated Engine Starting Capacity Up to 4 Litres (Diesel) or
6 Litres (Petrol)
Charge Lifetime (Based on 3L Engine) Approx. 20 Vehicle Starts
Charging Time 6-8 Hours
Auxiliary (USB) Socket Output 5V DC / 2.1A
COB LED Worklight 3.2V / 1W
Please note that the details and specifications contained herein, are correct
at the time of going to print. However, CLARKE International reserve the right
to change specifications at any time without prior notice.
2
Parts & Service: 020 8988 7400 / E-mail: [email protected] or [email protected]
Page 3

GENERAL SAFETY RULES
WARNING: HYDROGEN GAS AND BATTERY ACID (SULPHURIC ACID) CAN
BE: EXPLOSIVE, CORROSIVE TO SKIN, EYES AND HAIR, DAMAGING TO
CLOTHING AND METALS, FLAMMABLE, POISONOUS TO BREATHE
1. ALWAYS ensure when jump-starting that air can circulate freely around the
jumpstart.
2. NEVER allow the negative and positive leads on this unit to touch each
other or to touch the same metal object. NEVER allow the cables to
become wrapped around the operator or any other person.
3. Although the jumpstarter may be used outdoors, DO NOT leave it exposed
to the elements. AV OI D direct sunlight, direct heat, rain/moisture etc.
4. DO NOT operate the jumpstarter if any of the cables are damaged.
Consult your CLARKE dealer for repair or replacement.
5. DO NOT operate the jumpstarter if the case is damaged, NEVER attempt
any repairs yourself. Consult your CLARKE dealer or a qualified person for
inspection and repair.
6. Ensure the vehicle battery posts and battery clamps are perfectly clean
before use.
7. ALWAYS wear suitable protective clothing and eye protection when
working with lead-acid batteries.
8. The jumpstarter is NOT designed to be used as a replacement for the
vehicle battery.
9. DO NOT attempt to BOOST CHARGE the jumpstarter's sealed battery.
10. ALWAYS keep your body and clothing dry. NEVER work in damp area
without adequate insulation against electric shock.
11. NEVER jump-start the engine whilst the jumpstarter is being charged.
12. ALWAYS store the jumpstarter out of reach of children.
13. If acid comes into contact with the eyes, flush the eyes with clean water
continuously and seek medical help immediately.
14. If splashed by battery acid, immediately flush the area of the splash with
clean water. If a burning sensation is felt or any blistering occurs, seek
medical help immediately
3
Parts & Service: 020 8988 7400 / E-mail: [email protected] or [email protected]
Page 4
ENVIRONMENTAL RECYCLING POLICY
Through purchase of this product, the customer is taking on the obligation to
deal with the WEEE in accordance with the WEEE regulations in relation to the
treatment, recycling & recovery and environmentally sound disposal of the
WEEE.
In effect, this means that this product must not be disposed of with general
household waste but in accordance with the laws governing Waste Electrical
and Electronic Equipment (WEEE) at a recognised disposal facility.
SYMBOLS DISPLAYED ON THE PRODUCT
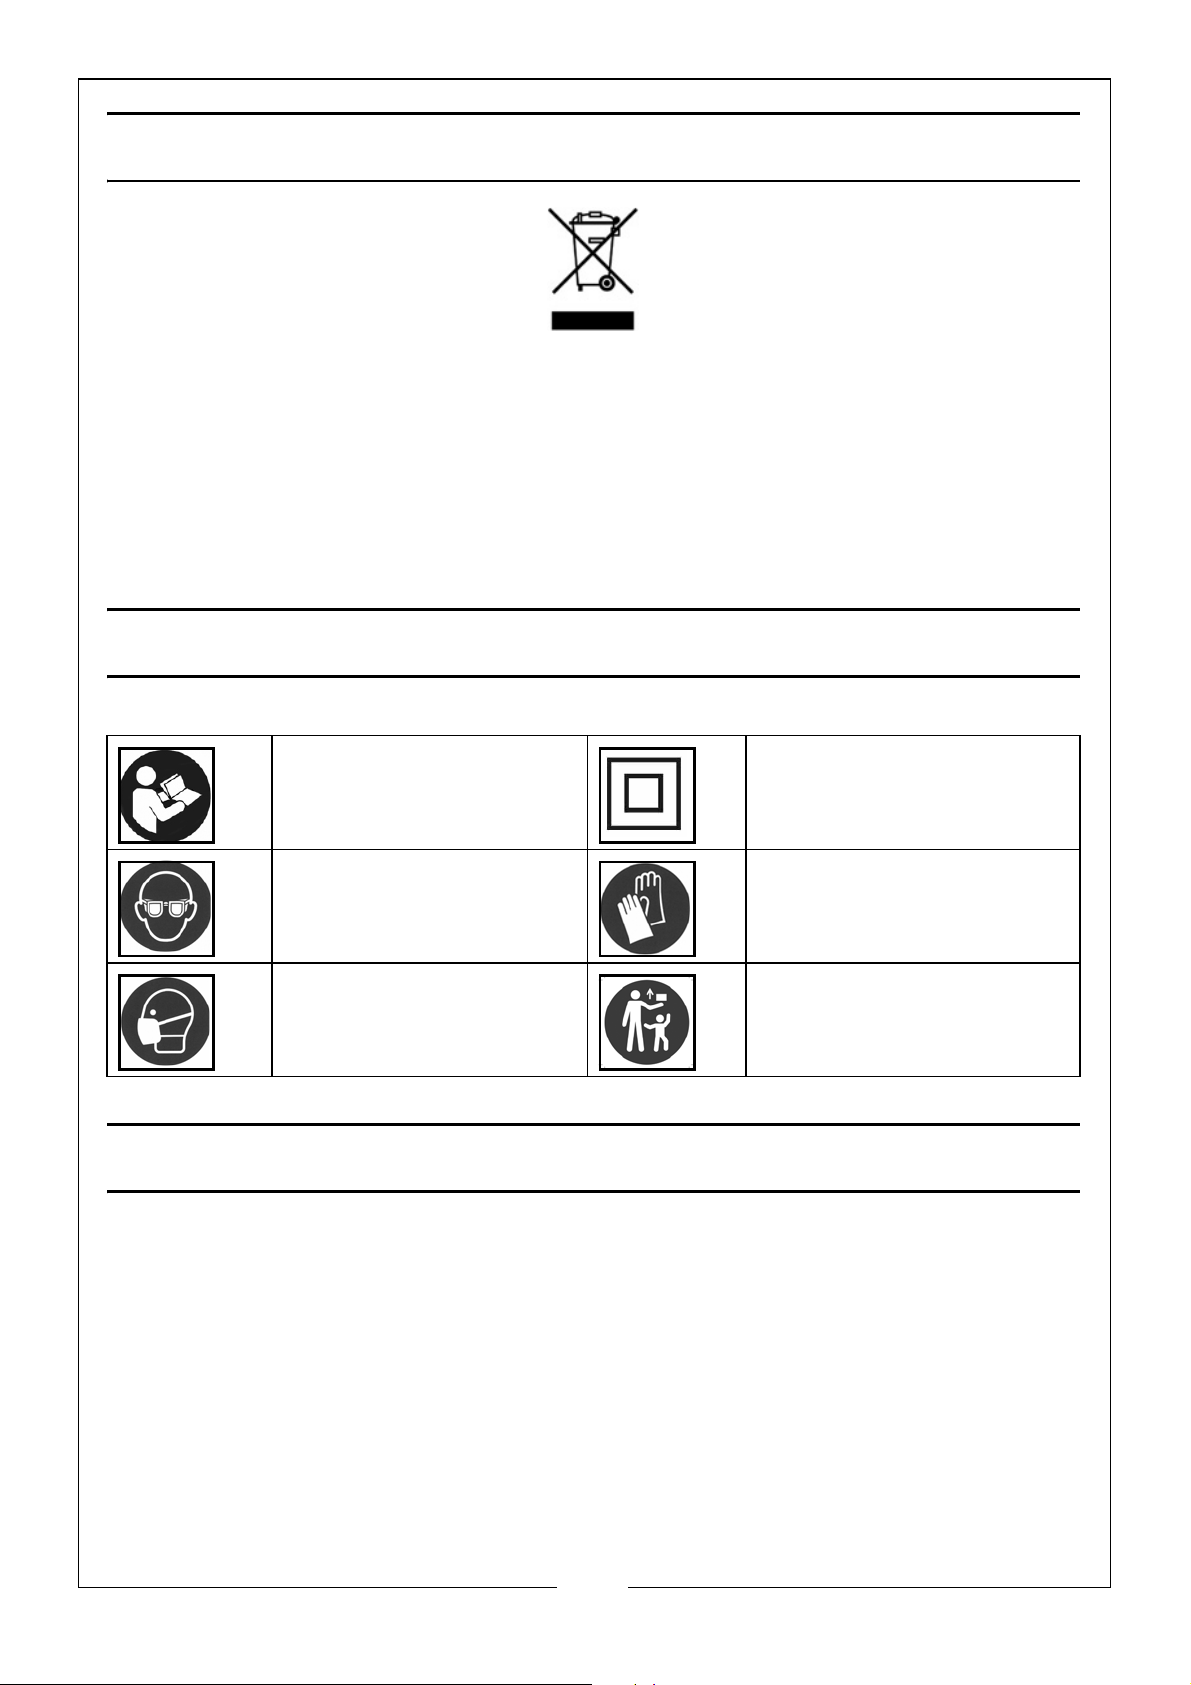
Read instruction
manual before use
Always use eye
protection
Always use a face
mask
Class 2 Appliance
(Charger)
Always use protective
gloves
Always keep out of
reach of children
GUARANTEE
This product is guaranteed against faulty manufacture for a period of 12
months from the date of purchase. Please keep your receipt which will be
required as proof of purchase.
This guarantee is invalid if the product is found to have been abused or
tampered with in any way, or not used for the purpose for which it was
intended.
Faulty goods should be returned to their place of purchase, no product can
be returned to us without prior permission.
This guarantee does not effect your statutory rights.
4
Parts & Service: 020 8988 7400 / E-mail: [email protected] or [email protected]
Page 5
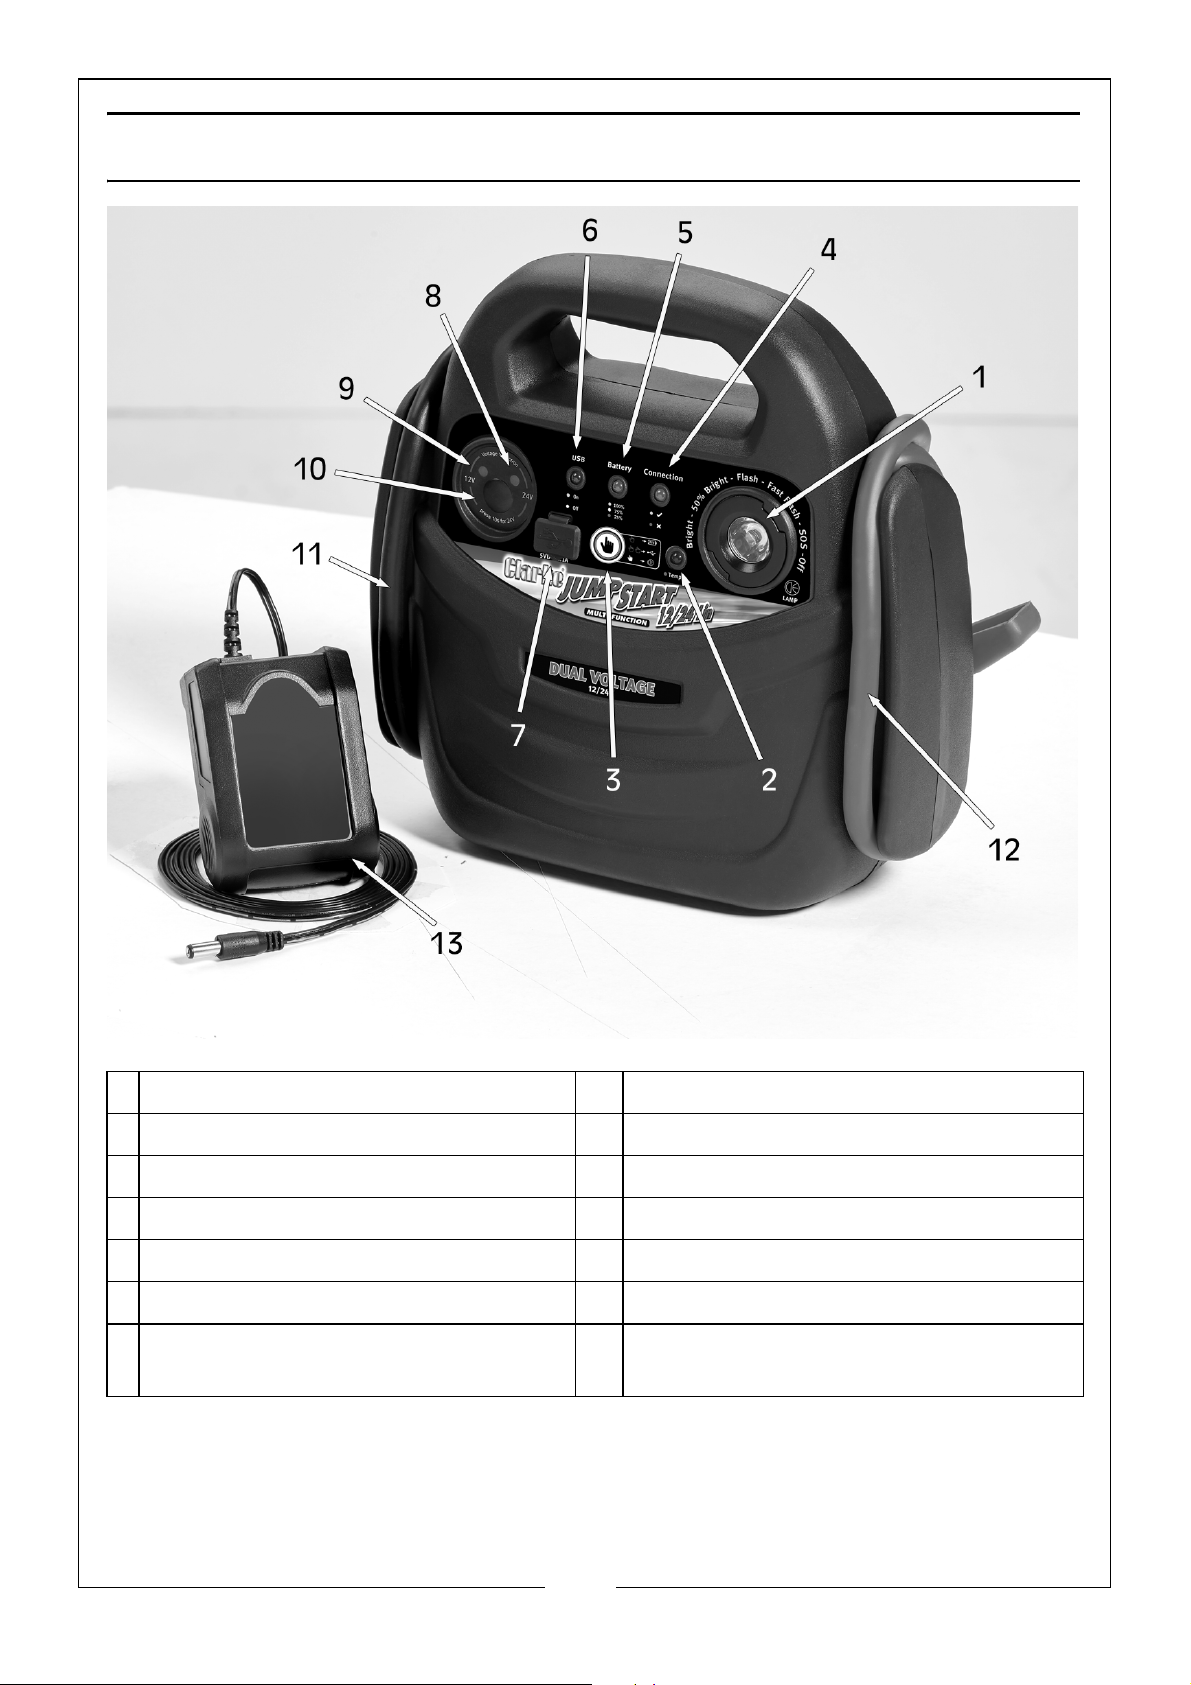
COMPONENT IDENTIFICATION
1 LED Work Light 8 24V Stage Indicator
2 Temperature Indicator 9 12V Stage Indicator
3 On/Off Button 10 12V to 24V Manual Shift Button
4 Starting/Connection Indicator 11 Black Negative (-) Cable & Clamp
5 Battery Status Indicator 12 Red Positive (+) Cable & Clamp
6 USB Indicator 13 Input Charging Adaptor
7 USB Charging Port 14 Input Charging Port (Not Shown, on
Reverse of Jumpstarter)
5
Parts & Service: 020 8988 7400 / E-mail: [email protected] or [email protected]
Page 6
CHARGING JUMPSTARTER
CAUTIONS
1. ALWAYS use the original charger for charging. Unqualified chargers will
shorten the life of the product and may even be dangerous.
2. ALWAYS charge the unit before using for the first time (see below).
3. DO NOT charge for long periods of time unattended.
4. ALWAYS charge in a well ventilated area and on a non-flammable surface.
5. NEVER try and jump start while the device is being charged.
6. After each use, press the On/Off button. When the battery level is showing
a yellow light, the device should be charged as soon as possible. If the red
light is showing then charge immediately.
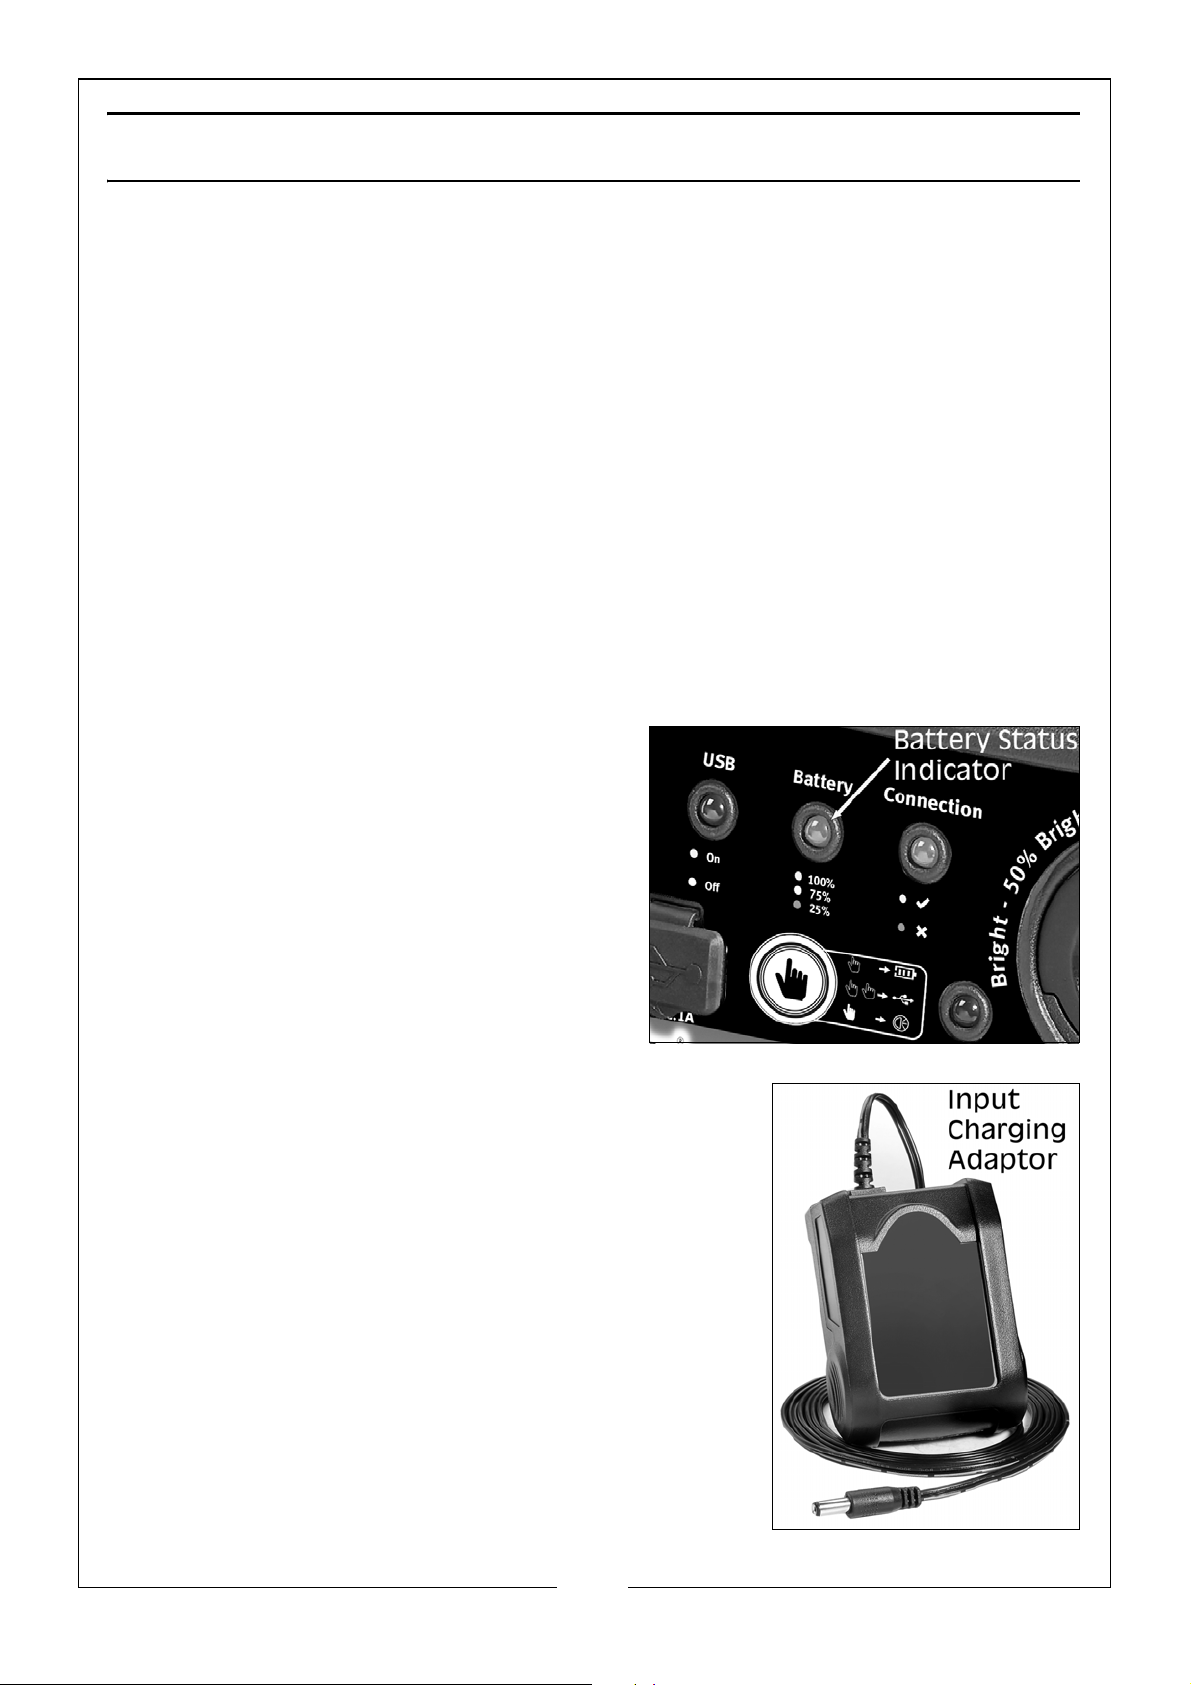
CHECKING THE JUMPSTARTER CHARGE LEVEL
1. Press the On/Off button.
• The battery status indicator light will
show either Red (25%), Yellow (75%)
or Green (100%).
CHARGING THE JUMPSTARTER
1. Charge your jumpstarter battery fully before
using it for the first time.
2. Insert the input charging adaptor into the input
charging port on the rear of the Jumpstarter.
3. Insert the charger into a mains power outlet and
switch on.
• During charging, the battery indicator light
will flash relative to the charging stage, Red
(25%), Yellow (75%), Green (100%).
• Charging will take a maximum of 6-8 hours,
depending on how much charge is still left in
the jumpstarter.
6
Parts & Service: 020 8988 7400 / E-mail: [email protected] or [email protected]
Page 7
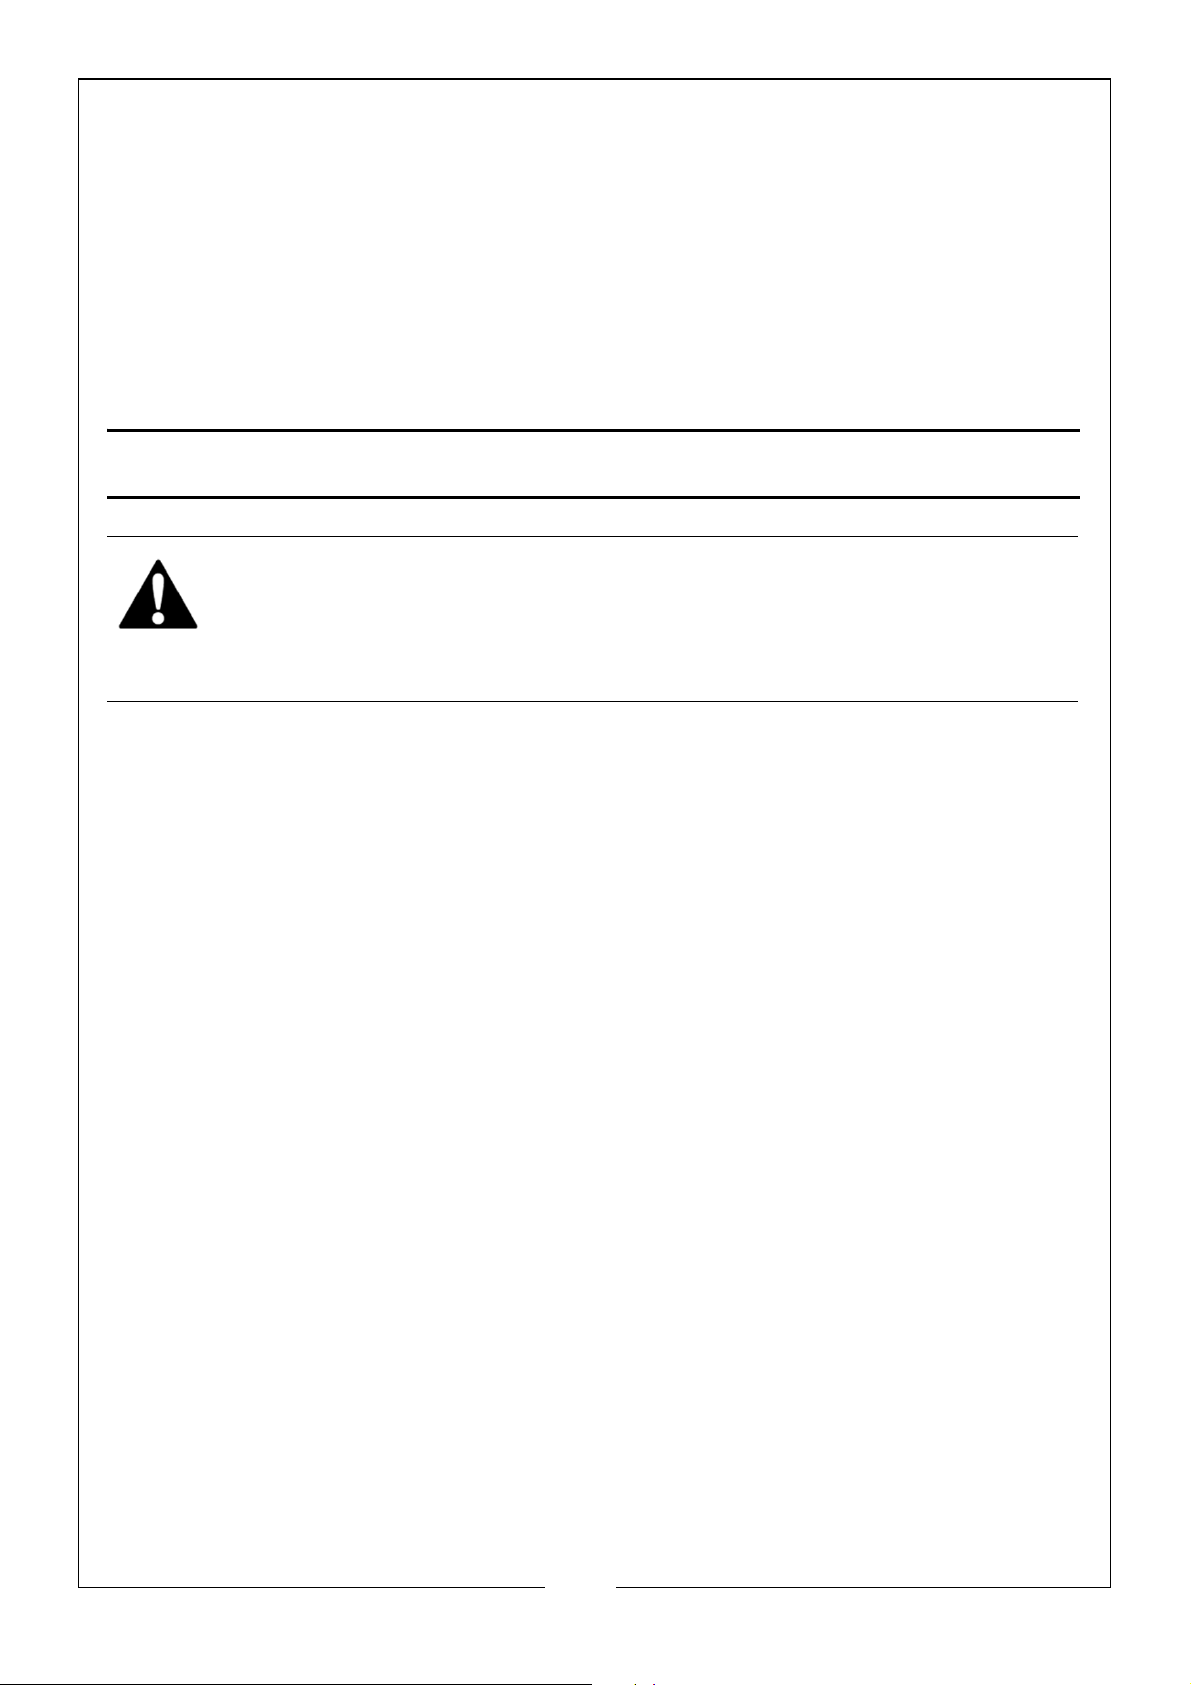
• When fully charged the battery status indicator light will show a
constant stable green light and charging will automatically shut off.
NOTE: After charging is completed and the charger is not disconnected
from the power source, the charging mode will automatically
restart if the battery voltage drops to 12 volts.
NOTE: It is recommended to recharge the Jumpstarter every 3-4 months
to maintain the efficiency and prolong the service life of the
internal battery even if the unit has not been used.
VEHICLE STARTING FUNCTION
WARNING: When connecting the jumpstarter leads to a battery, ensure
the ON/OFF switch is OFF, and ALWAYS connect the RED, (positive’+’)
output conductor to the UNEARTHED (+) battery terminal FIRST, then
connect the BLACK, (negative’-’) conductor to a suitable earthing
point on the chassis, well away from any fuel lines.
Always carry out the following preliminary checks before connecting the
jumpstarter to the car battery:
• Make sure that the vehicle ignition and all ancillary equipment -
lighting, radio etc, is switched off.
• Make sure that the vehicle battery is rated at 12V or 24V and is not
damaged in any way.
• Make sure that the battery terminals are clean and the clamps are
firm and secure.
• If fitted, remove any vehicle battery filler plugs and check the
electrolyte level. If necessary, top up with distilled water.
• Make sure that the area is well ventilated.
• Take great care not to touch the red positive (+) clamp against the
black negative (-) clamp.
1. Push the On/Off button to check the jumpstarter battery capacity, making
sure the battery capacity is above 50% (Yellow or Green Light).
2. Connect the red (Positive ‘+’) clamp to the positive (Red ‘+’) terminal of
the vehicle battery.
3. Connect the black (negative ‘-’) clamp to the metal part of the engine or
negative ground (consult the vehicle handbook for exact location) or the
negative (Black ‘-’) terminal of the vehicle battery.
4. After the connections are complete, if the vehicle battery voltage is
between 3.0V and 15.5V, the jumpstarter will automatically set to the 12V
7
Parts & Service: 020 8988 7400 / E-mail: [email protected] or [email protected]
Page 8
starting stage and the 12V LED indicator will be stable green and the
starting/connection indicator will flash green. When the vehicle battery
voltage is detected between 15.5V and 30V, the jumpstarter will
automatically set to the 24V starting stage and the 24V LED indicator will
be a stable green and the starting/connection indicator will flash green.
5. When the connection indicator starts flashing, press the On/Off button, this
will turn the indicator to a stable solid green and the system will be ready
for use.
NOTE: If you do not achieve the above, consult the chart below.
STARTING/CONNECTION INDICTOR CHART
Green
LED
Red
LED
Sound Description
1 On Off Off Correct connections, jumpstarting enabled
2 Flashing Off Off Correct connections, ready for jumpstart by
pressing the On/Off button
3Off Fast
Flashing
4Off Slow
Flashing
5Slow
Off On Override is activated for jumpstarting
On Wrong connection (Reverse Polarity),
reconnect clamps correctly
On Vehicle battery over voltage, not suitable for
jumpstarting
Flashing
6 Off On On Short circuit connection, warning under
override
6. Attempt the vehicle ignition sequence. Duration of ignition should not
exceed 5 seconds to avoid overheating.
7. If the vehicle does not start successfully, wait 3 minutes before trying again.
8. If the vehicle starts, push the On/Off button to turn the jumpstarter off and
disconnect the clamps, with the black clamp removed first.
9. Recharge the jumpstarter after each use.
10. If ignition waiting time exceeds 3 minutes, the jumpstarter will automatically
turn itself off. Push the On/Off button or reconnect the clamps for the next
jumpstart.
8
Parts & Service: 020 8988 7400 / E-mail: [email protected] or [email protected]
Page 9
TEMPERATURE INDICTOR CHART
Red
LED
1Off Off Normal
2On On Over Temperature,
Sound Description
Temperature,
enabled for
jumpstarting
DO NOT USE for
jumpstarting
OVERRIDE JUMPSTARTING
A battery with some charge must be connected to the vehicle circuit in order
for the jumpstarter to select a start voltage. If the terminals are bad/loose fit on
the battery, or the battery is so low as not to register a voltage then the
jumpstarter will not select or provide a voltage. To override this issue carry out
the following:
1. Tighten all connections and terminations on the vehicle battery.
2. Ensure the clamps are correctly connected to the battery terminals.
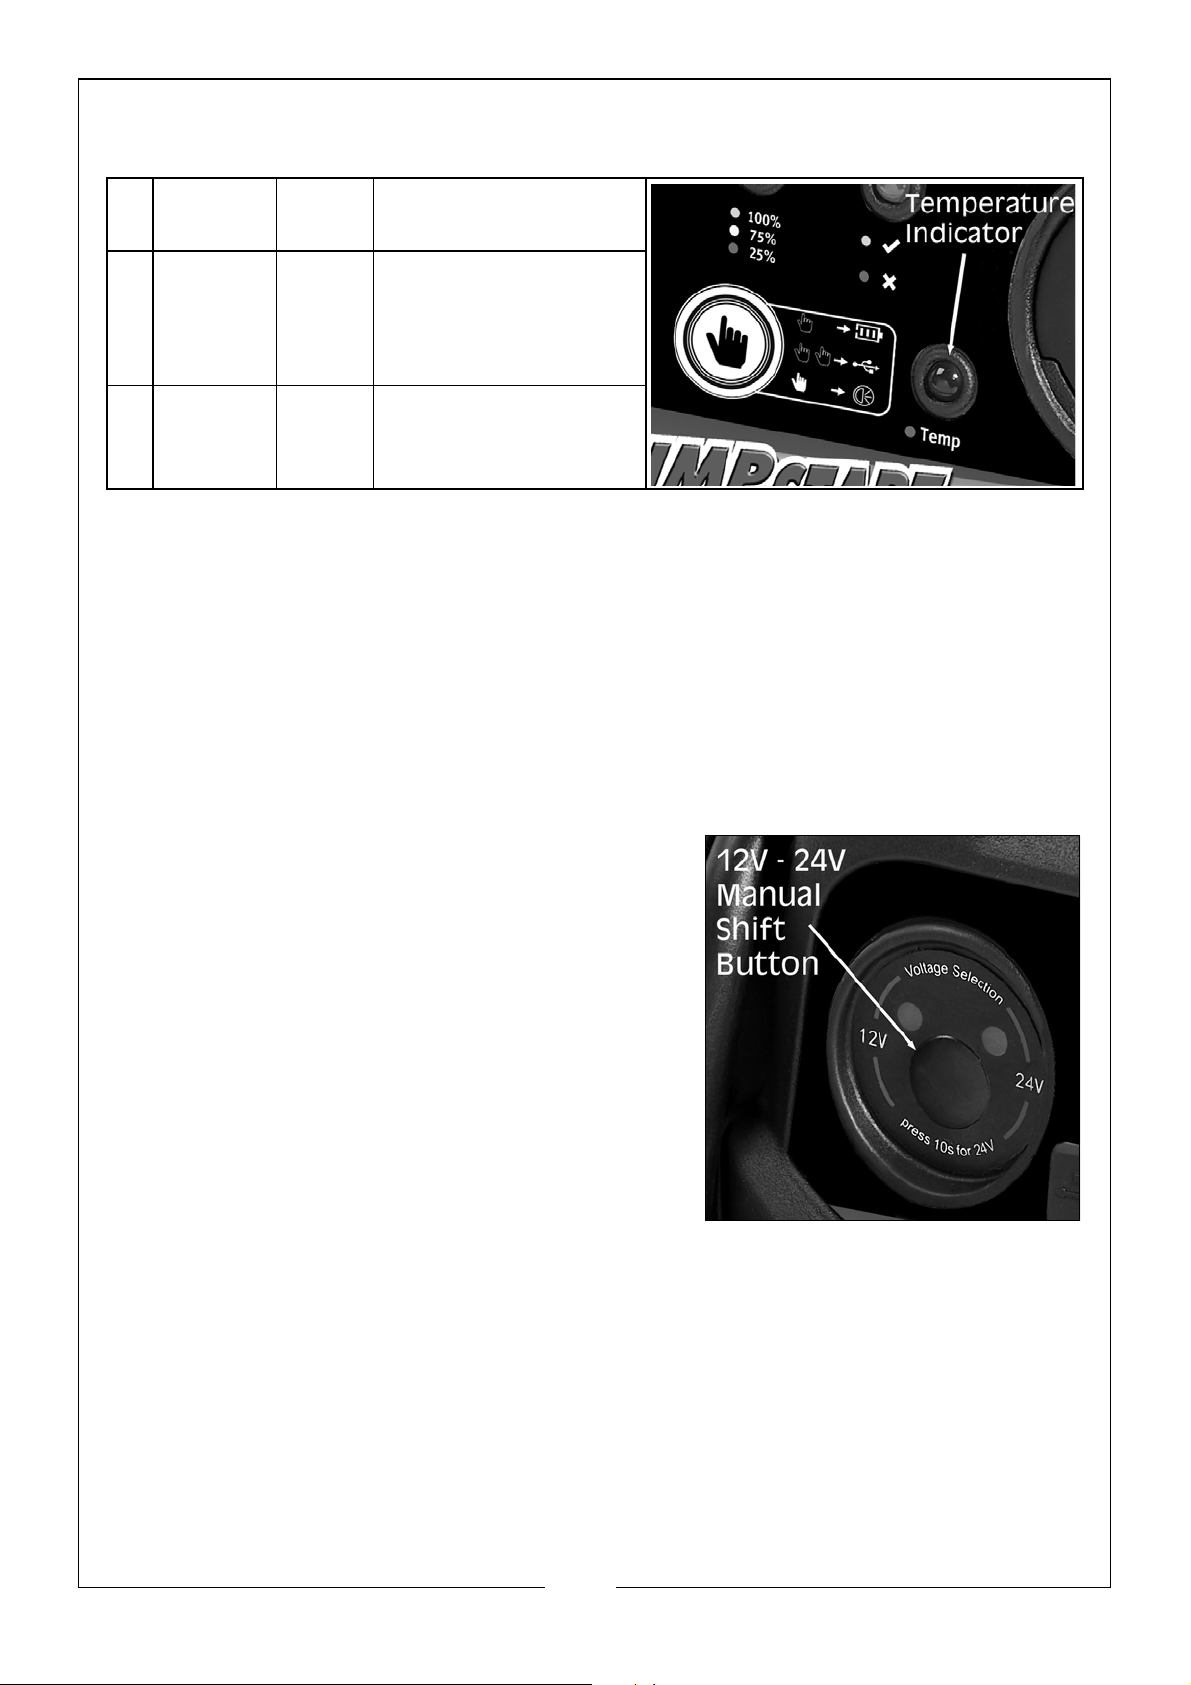
3. Press the On/Off button for 10 seconds, the
start/connection indicator will flash and
there will be a warning sound. This will put
the jumpstarter into the override start
mode.
NOTE: Override for 24V Battery. When a 24V
battery is lower than 15.5V, the
jumpstarter will only activate on 12V
mode. To turn the jumpstarter to 24V
mode, press the 24V Manual Shift
Button for 10 seconds.
4. Attempt the vehicle ignition sequence.
Duration of ignition should not exceed 5
seconds to avoid overheating.
5. If the vehicle does not start successfully, wait 3 minutes before trying again.
6. If the vehicle starts, push the On/Off button to turn the jumpstarter off and
disconnect the clamps, with the black clamp removed first.
7. Recharge the jumpstarter after each use.
9
Parts & Service: 020 8988 7400 / E-mail: [email protected] or [email protected]
Page 10
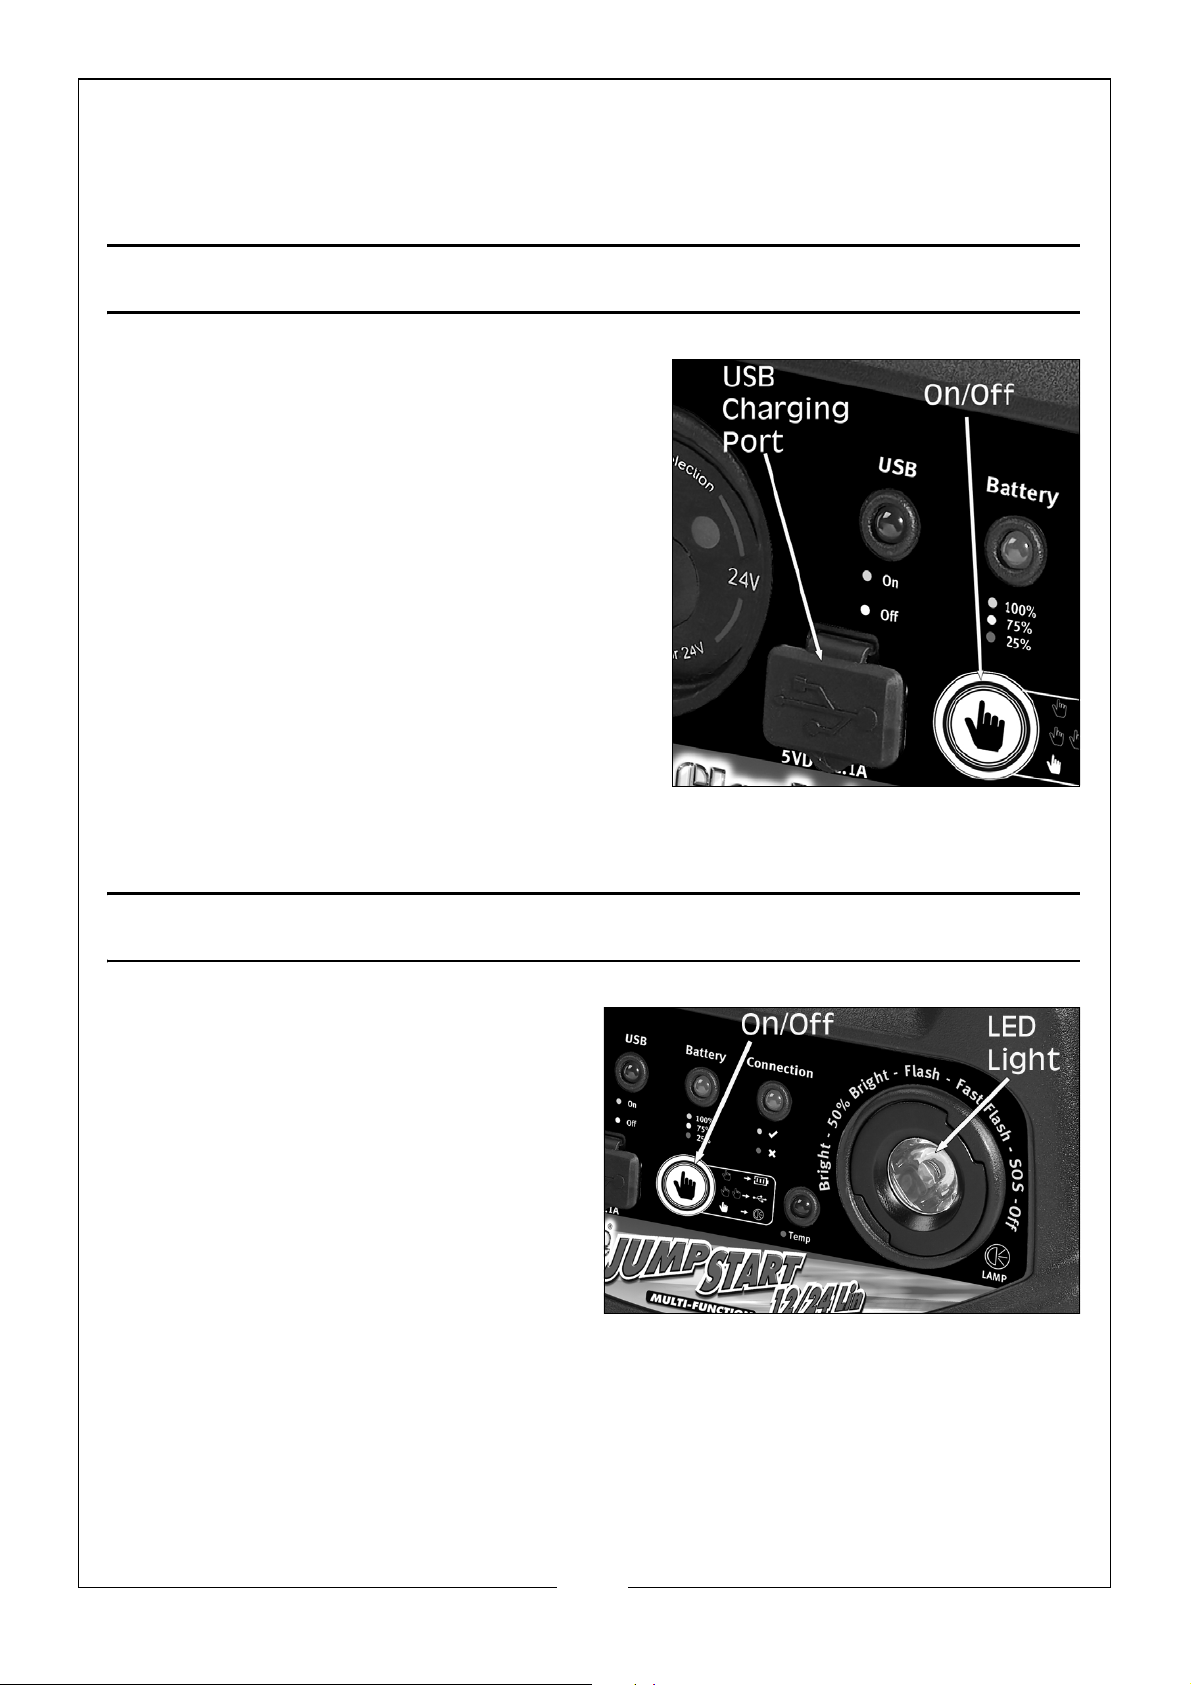
8. If ignition waiting time exceeds 3 minutes, the jumpstarter will automatically
turn itself off. Push the On/Off button or reconnect the clamps for the next
jumpstart.
RUNNING/CHARGING USB DEVICES
1. Connect a USB cable to the jumpstarters
USB charging port
2. Double click the On/Off button, which
will provide 5V/2.1A charging power.
3. Plug the appropriate connector on the
USB cable into the device that requires
charging.
NOTE: When a loading current of over
2.4A is detected, the jumpstarter
will shut down the USB charging
port.
4. Double click the On/Off button to turn
off the USB charging port. If the port is
unused for 10 seconds the jumpstarter will automatically turn the port off.
USING THE LED WORK LIGHT
1. Press and hold the On/Off button
for about 3 seconds to turn the
light on.
2. To rotate through the light working
modes, press the On/Off button
as follows:
• Turning On: 100% Brightness
• 1st Short Press: 50% Dim Light
• 2nd Short Press: Slow Flash
• 3rd Short Press: Fast Flash
• 4th Short Press: SOS
• 5th Short Press: Turn Light Off
3. After continuing to work for more than 5 seconds in any working mode,
short press the On/Off button to turn the light off.
10
Parts & Service: 020 8988 7400 / E-mail: [email protected] or [email protected]
Page 11

DAILY CARE
Always ensure the cables & clamps are in good condition and the clamps are
clean and corrosion free. If damaged they should be replaced. Keep the unit
clean by wiping with a dry cloth. DO NOT use solvents as a cleaning agent.
Keep the unit fully charged at all times.
Always turn the jumpstarter OFF during storage and store in an upright position,
away from direct sunlight, moisture or sources of extreme heat or cold.
NEVER attempt any repair unless your are a qualified technician. Your CLARKE
jumpstarter has been designed to give long and trouble free service. If,
however, having followed the instructions in this booklet carefully, you
encounter problems, take the unit to your local CLARKE dealer.
Q&A / TROUBLESHOOTING
Question Answer
Why didn’t my
Jumpstarter start my
vehicle?
How do I turn off the
jumpstarter?
There could be a number of reasons why the
Jumpstarter didn’t start your vehicle.
a) Ensure the Jumpstarter battery is fully charged
b) Ensure you have followed the correct operat-
c) Ensure the vehicle operates on 12V DC or 24V
d) When the car battery voltage is less than 2.5V,
e) Ensure the vehicle is not over 10 litres in size.
The jumpstarter has intelligent detection function. If
there is no load, or the starter is charged for a long
time, it will automatically fall into ‘sleep mode’ and
save the energy.
ing procedures and the clamps are well connected.
DC.
ensure that the clamps are well connected,
then press the On/Off button for 5 seconds, the
device will detect the connection with a warning sound, when pressed for 10 seconds the
device will be activated for starting.
How long do I have to
charge the
jumpstarter for?
Parts & Service: 020 8988 7400 / E-mail: [email protected] or [email protected]
Usually 6 - 8 hours. It will automatically stop charging
after the starter is fully charged.
11
Page 12

How many times can I
charge my mobile
device?
Between 2 - 6 times, depending on the capacity and
size of the device.
How long can I leave
the jumpstarter once
charged?
How many starts can I
get from a fully
charged starter?
What are the
protection features of
this product?
There should be no problem storing for 6 - 12 months,
but in order to prolong the service life, it is
recommended to fully charge the starter once every
3 - 4 months.
Depends on the displacement, the number of starts
can vary.For example, if it is a 3 litre vehicle, it could
have 20+ starts.
There are 10 protections, as follows:
a) Reverse Polarity Protection: Prevents harm if
clamps are reversed.
b) 12/24V Wrong Connection Protection: In case
of wrong selection of voltage between 12V and
24V
c) Overcurrent Protection: Prevents damage to
the product caused by excessive input charging
current
d) Short Circuit Protection: Prevents the clamps
from shorting between the positive and negative
poles
e) Overcharge Protection: When fully charged or
external input voltage is too high, the device will
not accept charge
f) Reverse Charge Protection: Stops any reverse
charging from the vehicle after jump starting
g) Over Discharge Protection: Keeps the device
from discharging when the battery is too low
h) Over Temperature Protection: Automatically
stops working when the temperature gets too
high during charging, lighting and USB interface
use
i) Over Time Protection: Device will automatically
turn off when not being used
j) Spark Proof Protection: Prevents sparks when
clamps are connecting to vehicle battery
12
Parts & Service: 020 8988 7400 / E-mail: [email protected] or [email protected]
Page 13
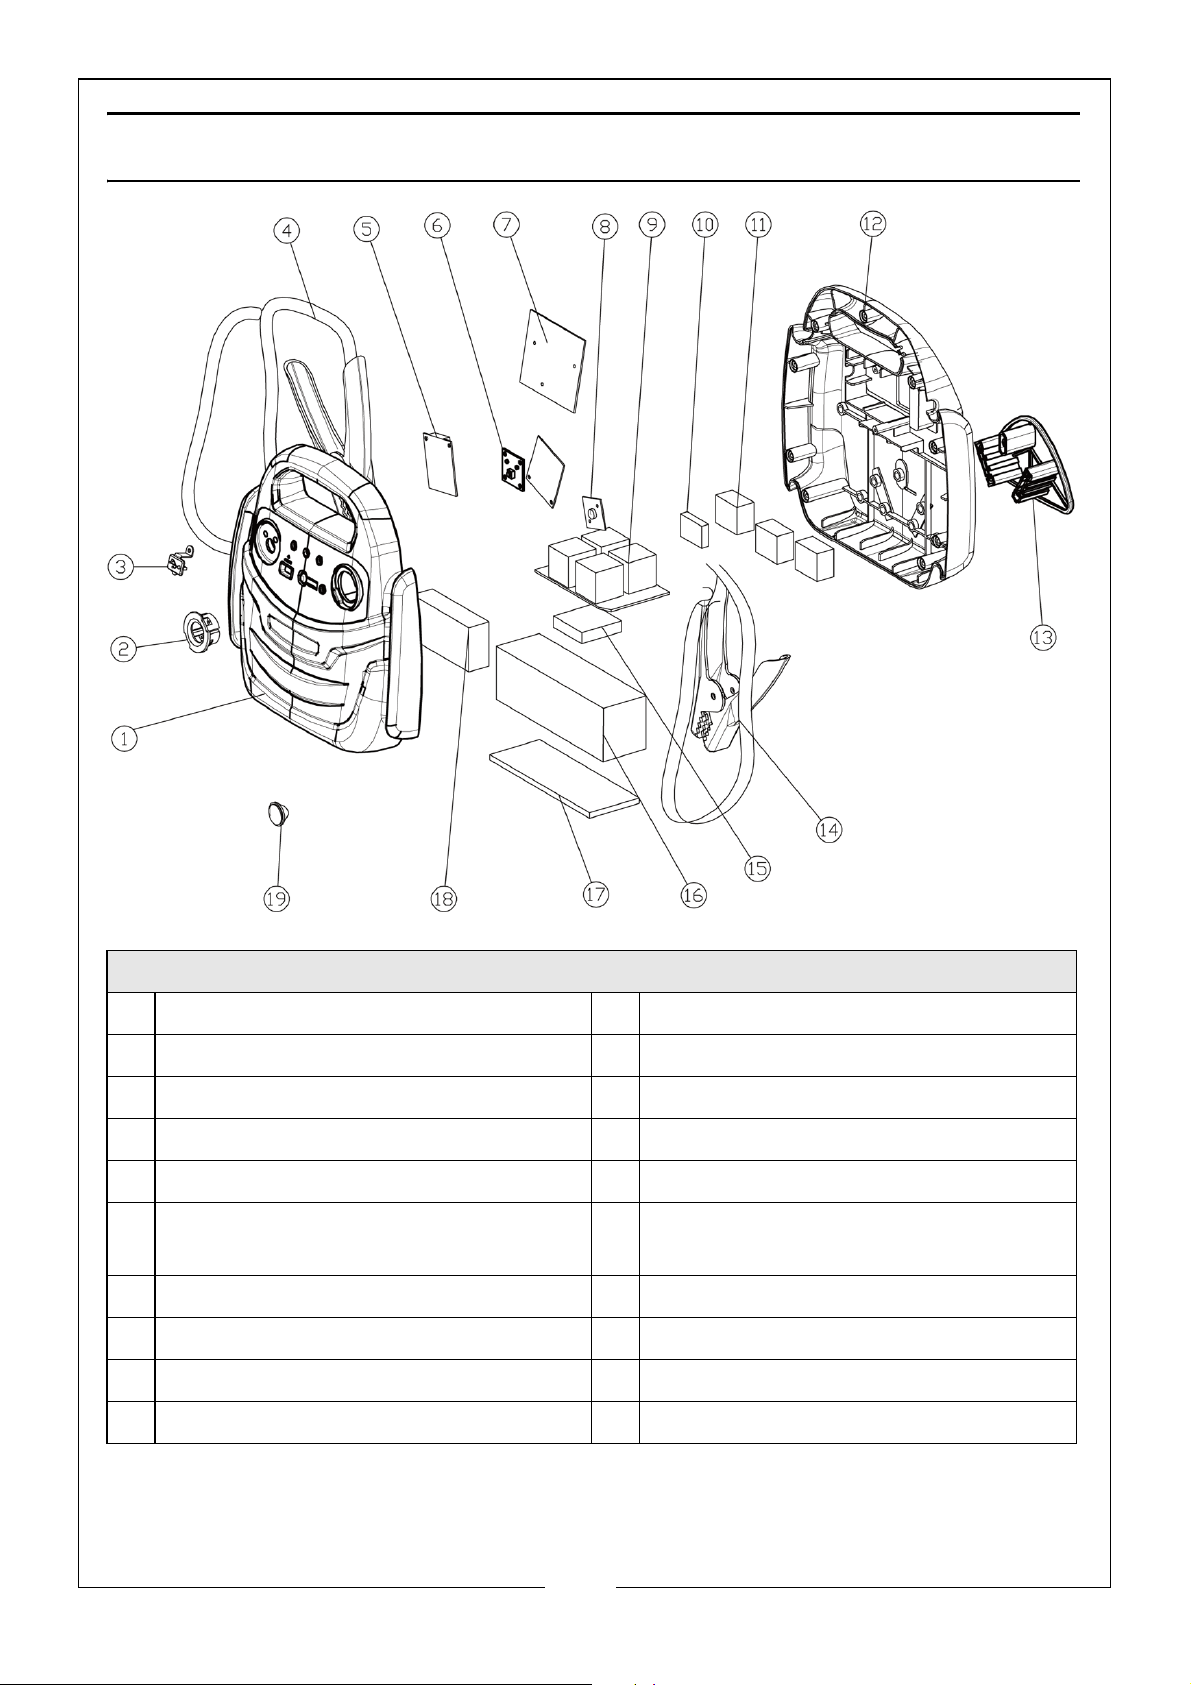
SPARE PARTS
Spare Parts List
1 Front Housing 11 Battery Pad - 2B
2 Light Cover Bracket 12 Back Housing
3 USB Protective Cover 13 Clamps Board (Black)
4 Booster Cable with Clamp (Red) 14 Booster Cable with Clamp (Black)
5 PCBA for BMS (Serial Connected) 15 Battery Pad - 3C
6 PCBA for Voltage Selection &
Indicator
7 PCBA Main Board 17 Battery Pad - 4D
8 PCBA for Working Light 18 Battery Pad - 5E
9 PCBA with Relays 19 Transparent Light Bowl
10 Battery Pad - 1A
16 Battery Pack
13
Parts & Service: 020 8988 7400 / E-mail: [email protected] or [email protected]
Page 14

DECLARATION OF CONFORMITY - UKCA
14
Parts & Service: 020 8988 7400 / E-mail: [email protected] or [email protected]
Page 15
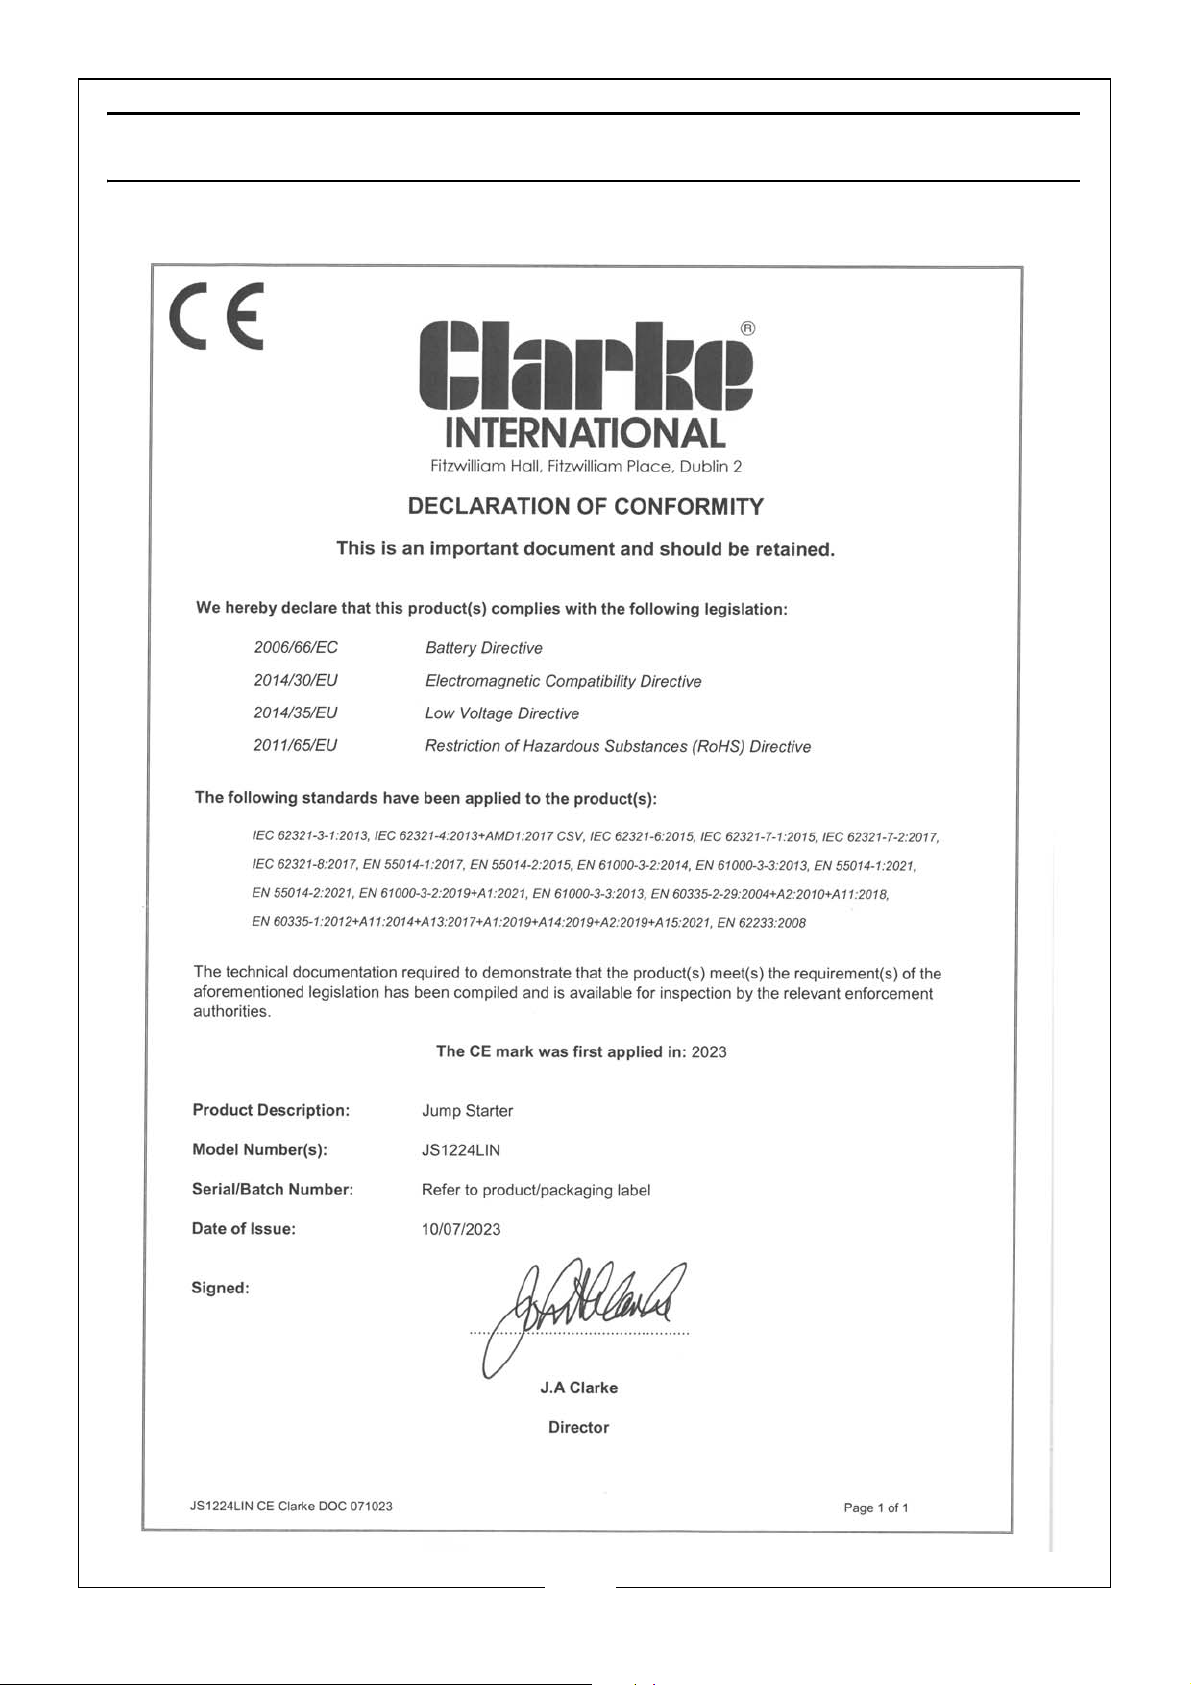
DECLARATION OF CONFORMITY - CE
15
Parts & Service: 020 8988 7400 / E-mail: [email protected] or [email protected]
Page 16

 Loading...