

Page 1
USER INSTRUCTIONS
Model Nos FP6B & FP12
Part Nos: 3500320 & 3500325
GC0210
FRUIT PRESS
Page 2
2
INTRODUCTION
Thank you for purchasing this CLARKE Fruit Press.
Please read this manual thoroughly and follow the instructions carefully and
follow the instructions given. In doing so you will ensure the safety of yourself
and that of others around you, and you can look forward to the product
giving you long and satisfactory service.
Please keep these instructions in a safe place for future reference.
GUARANTEE
This product is guaranteed against faulty manufacture for a period of 12
months from the date of purchase. Please keep your receipt which will be
required as proof of purchase.
This guarantee is invalid if the product is found to have been abused or
tampered with in any way, or not used for the purpose for which it was
intended.
Faulty goods should be returned to their place of purchase, no product can
be returned to us without prior permission.
This guarantee does not effect your statutory rights.
ENVIRONMENTAL PROTECTION
Do not dispose of this product with general household waste at the
end of its life. This product contains valuable raw materials and should
be disposed of appropriately at a recognised disposal facility.
PRODUCT HYGIENE
IMPORTANT!
Before use, ALL components must be scrupulously clean and all traces
of old oil removed to avoid the possibility of contamination of the
produce. Rinse thoroughly in clean water.
SPARE PARTS
For spare parts please quote ref: SDCFP6B01-12 (6 litre press) or ref:
SDCFP1201-12 (12 litre press).
Page 3
3
ASSEMBLY AND USE
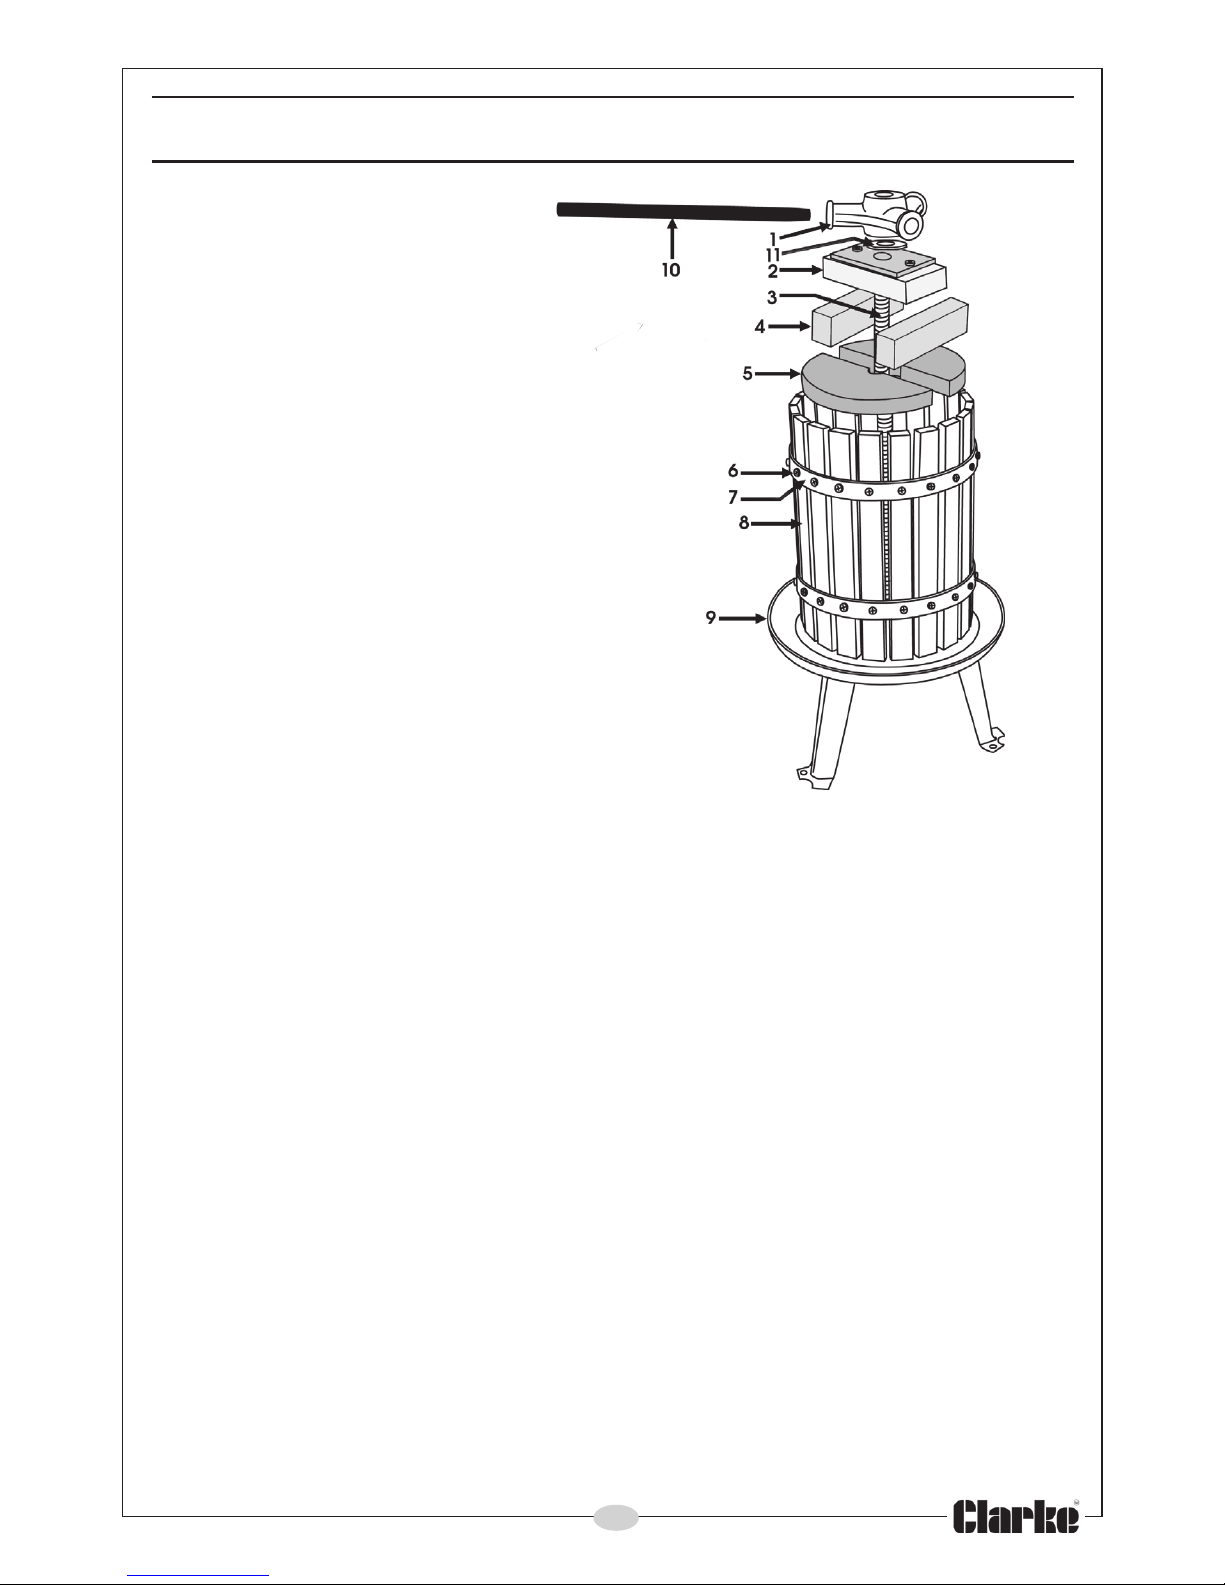
No. Description
1 Trunnion
2 Pressure Plate
3 Threaded Rod
4 Wooden Blocks (2 x Pairs)
5 Collar
6 Screw
7 Steel Band
8 Cage Slat
9 Base
10 Handle
11 Nylon Washer
12 Mesh Sack (Not Shown)
The base of the unit should be bolted or
screwed to a firm, solid base, using the holes in the feet. (bolts not supplied)
Put the mesh sack, containing the fruit, into the cage, and hanging over the
sides. Press down the fruit by hand. Harder fruits - apple, pear etc., should be
cut into small pieces and ideally crushed using a mallet or shredder before
placing in the sack.
Place the collars (5) on top of the fruit, ensuring they are central within the
cage, then add the wooden blocks (4), (if there is sufficient room) followed
by the pressure plate (2) on top of these, as shown in the illustration. Place a
container beneath the outlet spout in the base (9) ready to collect the juice.
Screw on the trunnion (1) and rotate the handle (10) to press the fruit down
into the cage. Never use an extension bar on the handle. The second pair of
blocks provided may be inserted when space allows, to force the collar as
near the base of the press as possible. If the blocks (4) were not used for the
first pressing, unscrew the trunnion, sufficient for more blocks to be inserted,
then screw down again.
After use, the complete press must be thoroughly washed in a mild
detergent, rinsed in clean water and dried.
If left unused for prolonged periods, coat all metal components with a thin
film of vegetable oil and store in a clean, dry environment. Check the press’s
condition before using again and if mould is apparent, wash thoroughly,
rinse, dry and apply a film of fresh vegetable oil to its metal components.
Page 4
 Loading...