

Page 1
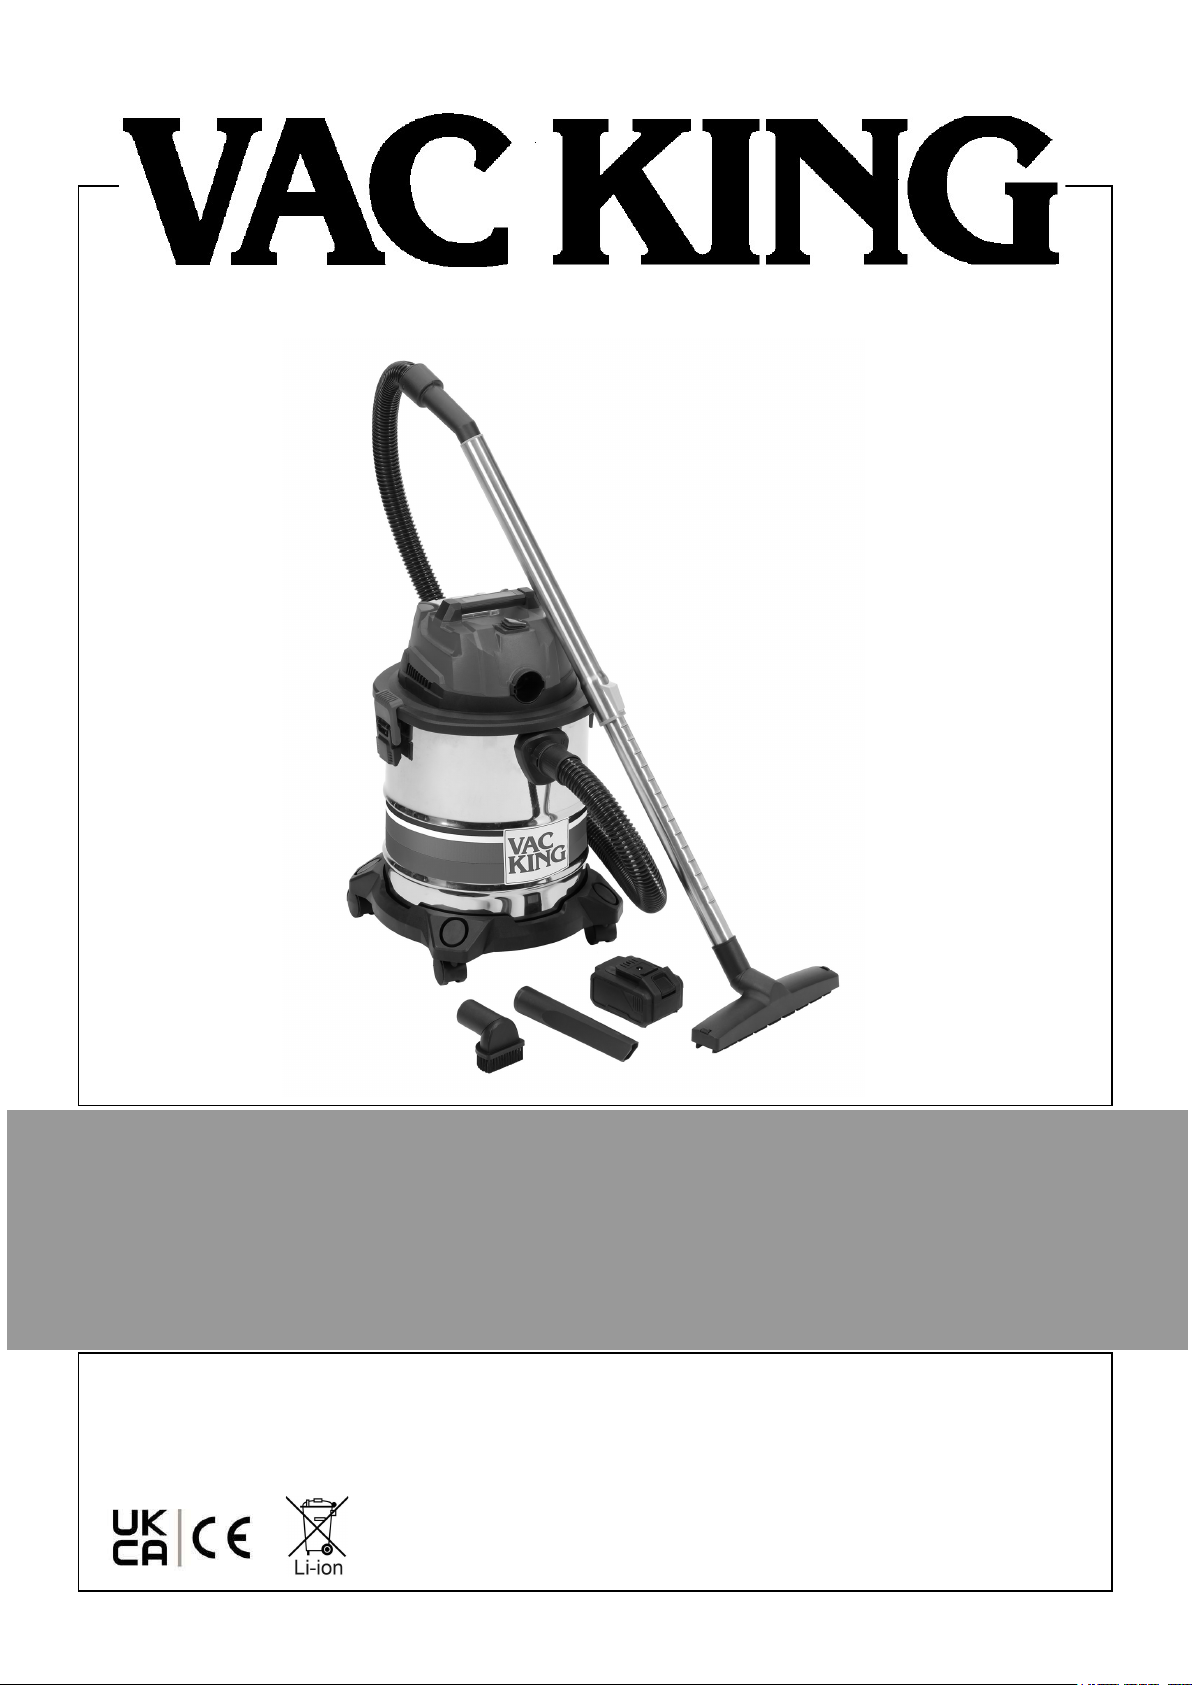
20V 20LITRE WET/DRY CORDLESS
VACUUM CLEANER
MODEL NO: CVAC18V20
PART NO: 6471104
OPERATING & MAINTENANCE
INSTRUCTIONS
ORIGINAL INSTRUCTIONS DL1025 REV 2
Page 2
INTRODUCTION
Thank you for selecting this Vac King 20 Volt Vacuum Cleaner, which will provide you
with a clean and safe working environment.
Before attempting to operate the cleaner, it is essential that you read this manual
thoroughly and carefully follow all instructions given. In doing so you will ensure the
safety of yourself and that of others around you, and you can also look forward to the
cleaner giving you long and satisfactory service.
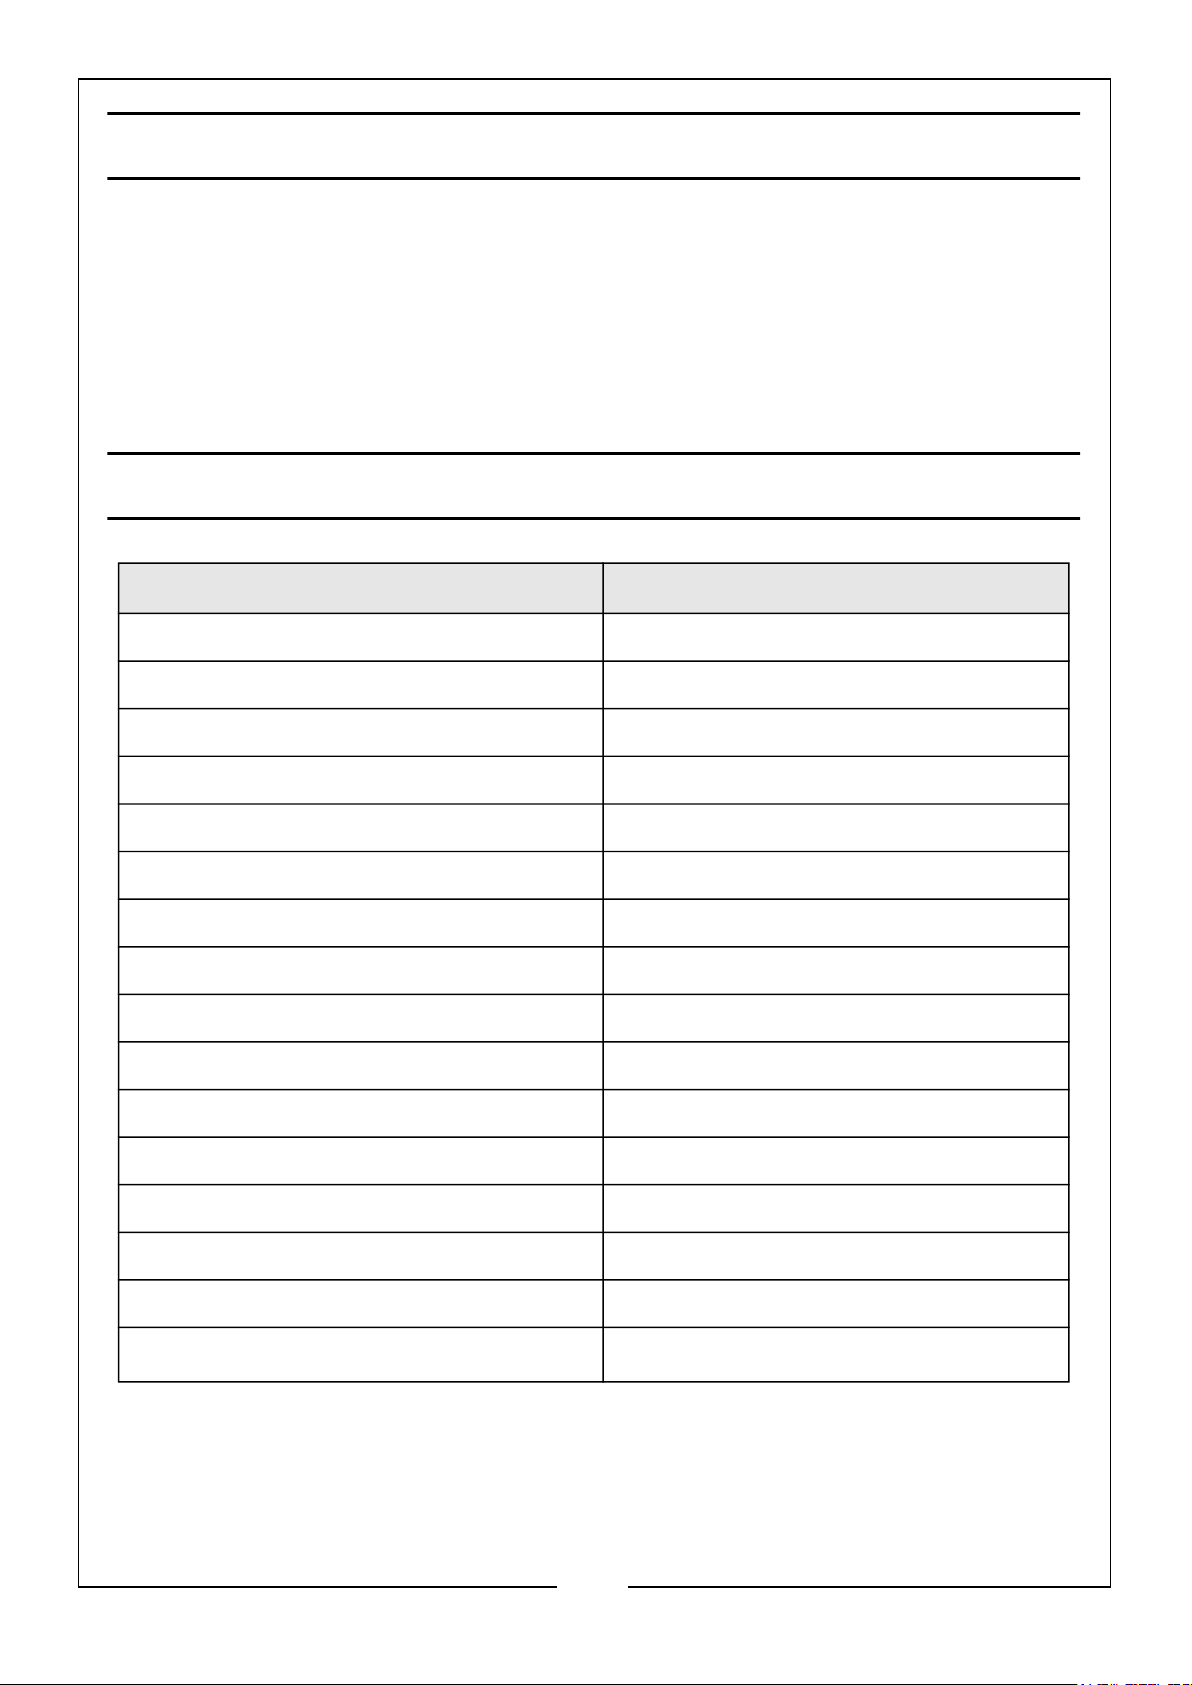
SPECIFICATION
MODEL
Part No 6471104
Weight 5 kg
Dimensions (D x W x H) 330mm x 330mm x 520mm
Drum Capacity 20 Litres
Water Capacity 15 Litres
Dust Capacity 13 Litres
Hose Dimensions (Length x Diameter) 1500mm x 32mm
Max Airflow 1.2 m3/min
Duty Cycle S1 (continuous)
Battery Charger Power Supply 230 V/50Hz/1ph
Battery Voltage 20V
Battery Charging Time Approx. 100 mins.
CVAC18V20
Discharge (Usage) Time Approx. 21 mins
Motor Rated Input 180W
Vacuum IP Rating IPX4
Operating Temperature
Please note that the details and specifications contained herein, are correct at the
time of going to print. However, CLARKE International reserve the right to change
specifications at any time without prior notice.
Parts & Service: 020 8988 7400 / E-mail: [email protected] or [email protected]
0 - 30oC
2
Page 3

SAFETY PRECAUTIONS
GENERAL SAFETY
1. Prior to use, all users should become familiar with this instruction booklet.
2. This cleaner can be used by children aged from 8 years and above and persons
with reduced physical, sensory or mental capabilities or lack of experience and
knowledge if they have been given supervision or instruction concerning the use
of the cleaner in a safe way and understand the hazards involved.
3. DO NOT let children play with this cleaner, supervise children using or
maintaining the cleaner.
4. AVOID operating in the presence of flammable liquids or gases. The motor may
produce sparks during operation. DO NOT use in enclosed areas where
flammable, explosive or toxic vapours are given off.
5. ALWAYS stay alert, watch what you are doing and use common sense when
operating. DO NOT use the machine while you are tired or under the influence of
medication, drugs or alcohol. A moment of inattention can result in personal
injury.
6. NEVER over-reach. Keep your proper footing and balance at all times to enable
better control of the machine in unexpected situations. Take extra care when
cleaning stairs.
7. DO NOT block the cleaners openings or hinder air flow. Keep openings free of
objects including dust, lint, clothing and all body parts.
GENERAL MACHINE USE AND CARE
8. ALWAYS maintain the cleaner with care and keep it clean for best / safest
performance.
9. NEVER use this cleaner if any part is damaged. Have it inspected and repaired by
your CLARKE dealer. DO NOT use if the battery or the cleaner itself, is in poor
condition..
10. ALWAYS take care when a long hose is required in the work area as it presents a
trip hazard. Tidy the hose away when the job is finished.
11. NEVER pick up burning cigarettes or other hot or smoking substances.
12. NEVER abuse the cleaner by standing on it.
13. ALWAYS transport the cleaner by lifting it by the handle.
14. When not in use, turn off by the On/Off switch on top of the cleaner and remove
the battery.
3
Parts & Service: 020 8988 7400 / E-mail: [email protected] or [email protected]
Page 4

15. DO NOT change filters or carry out any cleaning or servicing, without first
removing the battery.
16. Keep the external surfaces clean. AVOID impact damage and DO NOT allow the
cleaner, charger or battery to come into contact with abrasive or corrosive
materials.
17. DO NOT use solvents, thinners or alcohol to clean the cleaner, charger or battery,
as these chemicals will damage the finish. With the cleaners battery unplugged
from the battery compartment, use a dry cloth to wipe over the plastic casing.
18. When not in use the cleaner and battery should be stored in a secure, dry place,
out of the reach of children. DO NOT leave it exposed to the elements and avoid
direct sunlight, direct heat, rain/moisture etc.
19. Only use parts and accessories recommended in this manual. The use of
unauthorised accessories or attachments may result in personal injury or damage
to the machine.
20. DO NOT attempt to repair or modify the cleaner charger or battery. DO NOT
attempt any electrical repair yourself. Consult a qualified electrician or the CLARKE
Service Department on 020 8988 7400.
BATTERY SAFETY
1. Only use batteries and charger supplied with the cleaner.
2. If the battery or charger are damaged in anyway, DO NOT attempt to repair
them. They should be replaced and the damaged item should be disposed of in
accordance with local regulations.
3. DO NOT incinerate the batteries or expose to high temperatures, as they may
explode.
4. Liquid ejected from the battery may cause irritation or burns. Leaks from the
battery cells can occur under extreme conditions. DO NOT touch any liquid that
leaks from the battery. If any liquid gets on the skin, wash immediately with soap
and water. If liquid gets into the eyes, flush them immediately with water for a
minimum of 10 minutes and seek medical attention. wear gloves to handle the
battery and dispose of immediately in accordance with local regulations.
5. Keep the battery away from all metal objects such as paper clips, coins, keys, nails
or screws. Shorting the battery terminals increases the risk of fire or burns.
4
Parts & Service: 020 8988 7400 / E-mail: [email protected] or [email protected]
Page 5
INVENTORY OF COMPONENTS
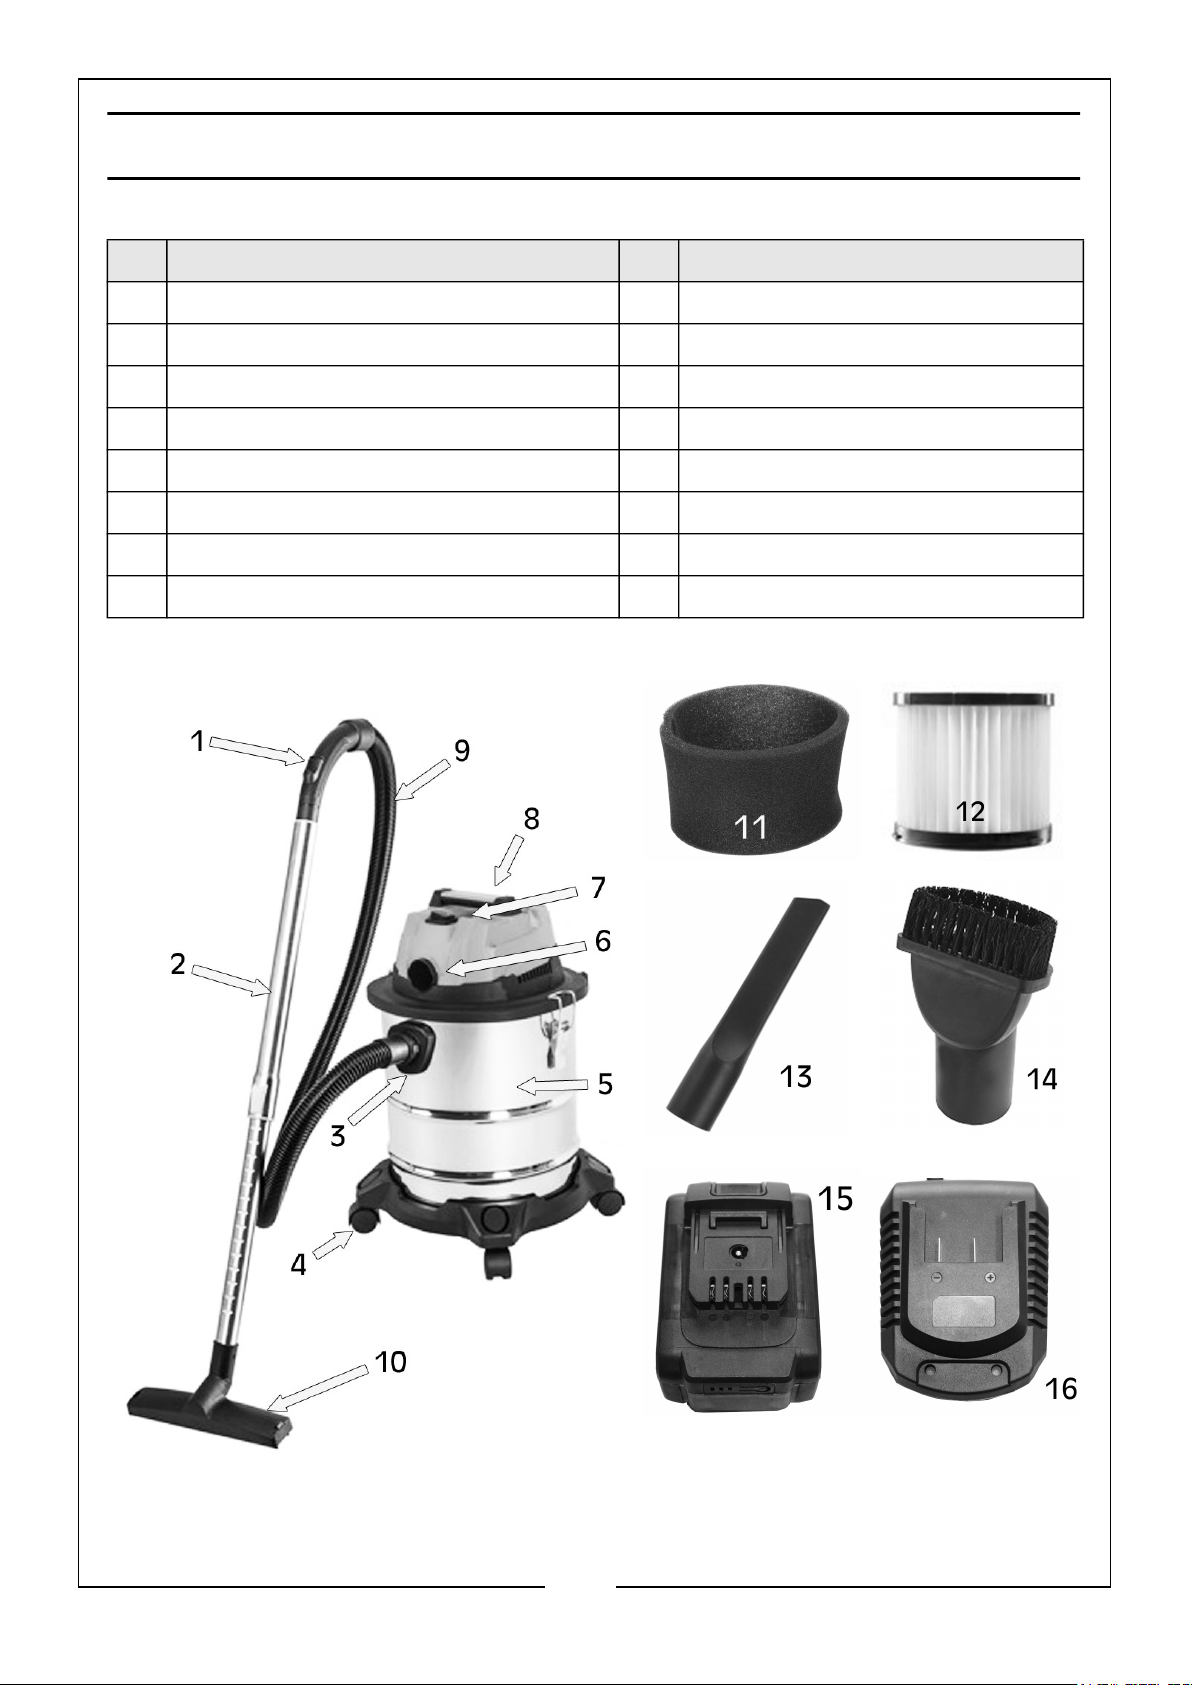
No Description No Description
1 Handle with Airflow Adjustment 9 Plastic Hose
2 Metal Telescopic Tube 10 Wet & Dry Brush
3 Suction Port 11 Washable Sponge Filter
4. Wheels & Detachable Base 12 Washable HEPA Filter
5 Stainless Steel Tank 13 Long Crevice Nozzle
6 Blower Port 14 Round Brush Nozzle
7 Power Switch 15 4Ah Battery
8 Battery Compartment 16 Battery Charger
5
Parts & Service: 020 8988 7400 / E-mail: [email protected] or [email protected]
Page 6
BATTERY CHARGER ELECTRICAL CONNEC-
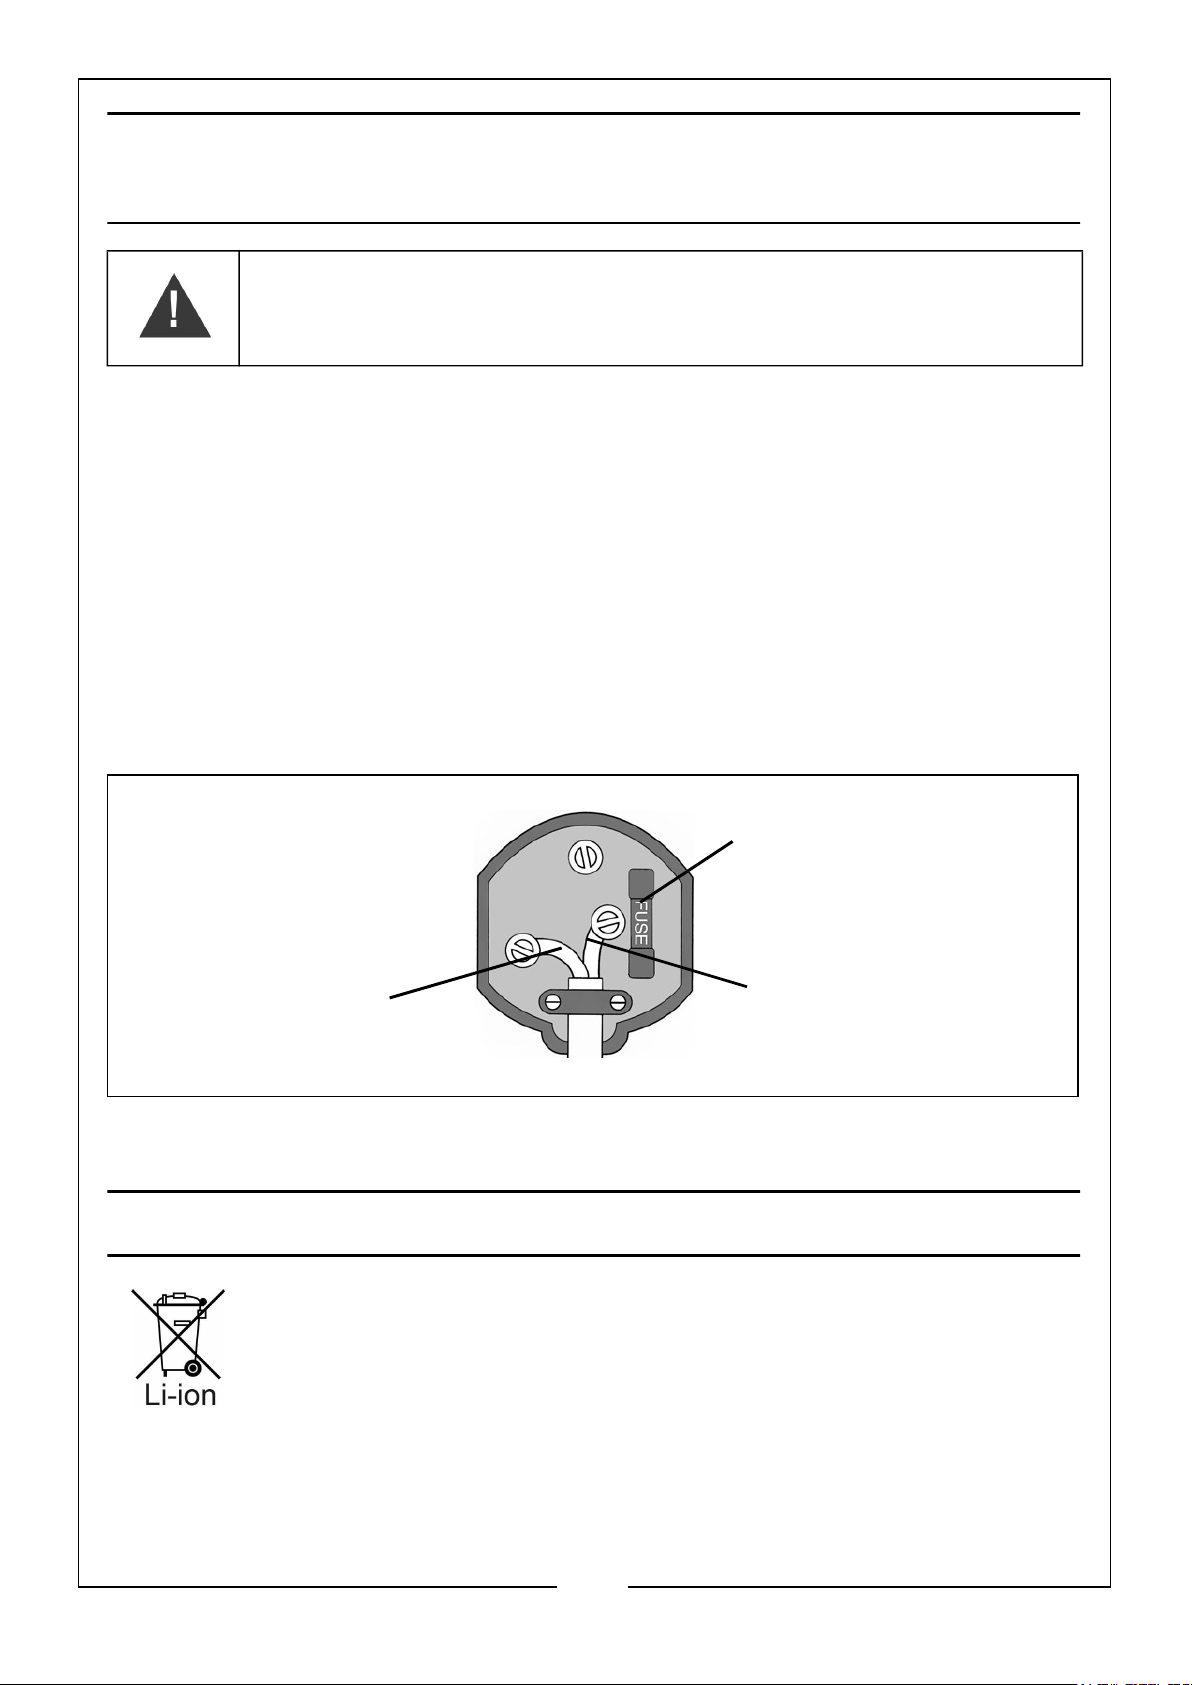
Plug must be BS1363/A approved.
TIONS
WARNING! READ THESE ELECTRICAL SAFETY INSTRUCTIONS
THOROUGHLY BEFORE CONNECTING THE PRODUCT TO THE
MAINS SUPPLY.
Before switching the battery charger on, make sure that the voltage of your electricity
supply is the same as that indicated on the rating plate. This battery charger is
designed to operate on 230VAC 50Hz. Connecting it to any other power source may
cause damage.
This battery charger may be fitted with a non-rewireable plug. If it is necessary to
change the fuse in the plug, the fuse cover must be refitted. If the fuse cover
becomes lost or damaged, the plug must not be used until a suitable replacement is
obtained.
If the plug has to be changed because it is not suitable for your socket, or due to
damage, it should be cut off and a replacement fitted, following the wiring
instructions shown below. The old plug must be disposed of safely, as insertion into a
mains socket could cause an electrical hazard.
Always fit a 3 Amp fuse
Neutral
(Blue)
Ensure that the outer sheath of the cable is firmly held by the clamp
If in any doubt, consult a qualified electrician. DO NOT attempt any repairs yourself.
Live
(Brown)
ENVIRONMENTAL PROTECTION
By purchasing this product, the customer is taking on the obligation to
deal with its safe disposal in accordance with the Waste Electrical and
Electronic Equipment regulations (WEEE).
In effect, this means that this product must not be disposed of with
general household waste. It must be disposed of according to the laws governing
Waste Electrical and Electronic Equipment (WEEE) at a recognised disposal facility.
Parts & Service: 020 8988 7400 / E-mail: [email protected] or [email protected]
6
Page 7
PREPARATION FOR USE
WARNING: BEFORE USING THE VACUUM CLEANER, MAKE SURE
THAT YOU HAVE READ AND UNDERSTOOD THE SAFETY
INSTRUCTIONS
UNPACKING & ASSEMBLY
With the vacuum cleaner removed from the packaging, remove the components from
within the tank. Lay them out and check for shortages and that no damage was
suffered in transit.
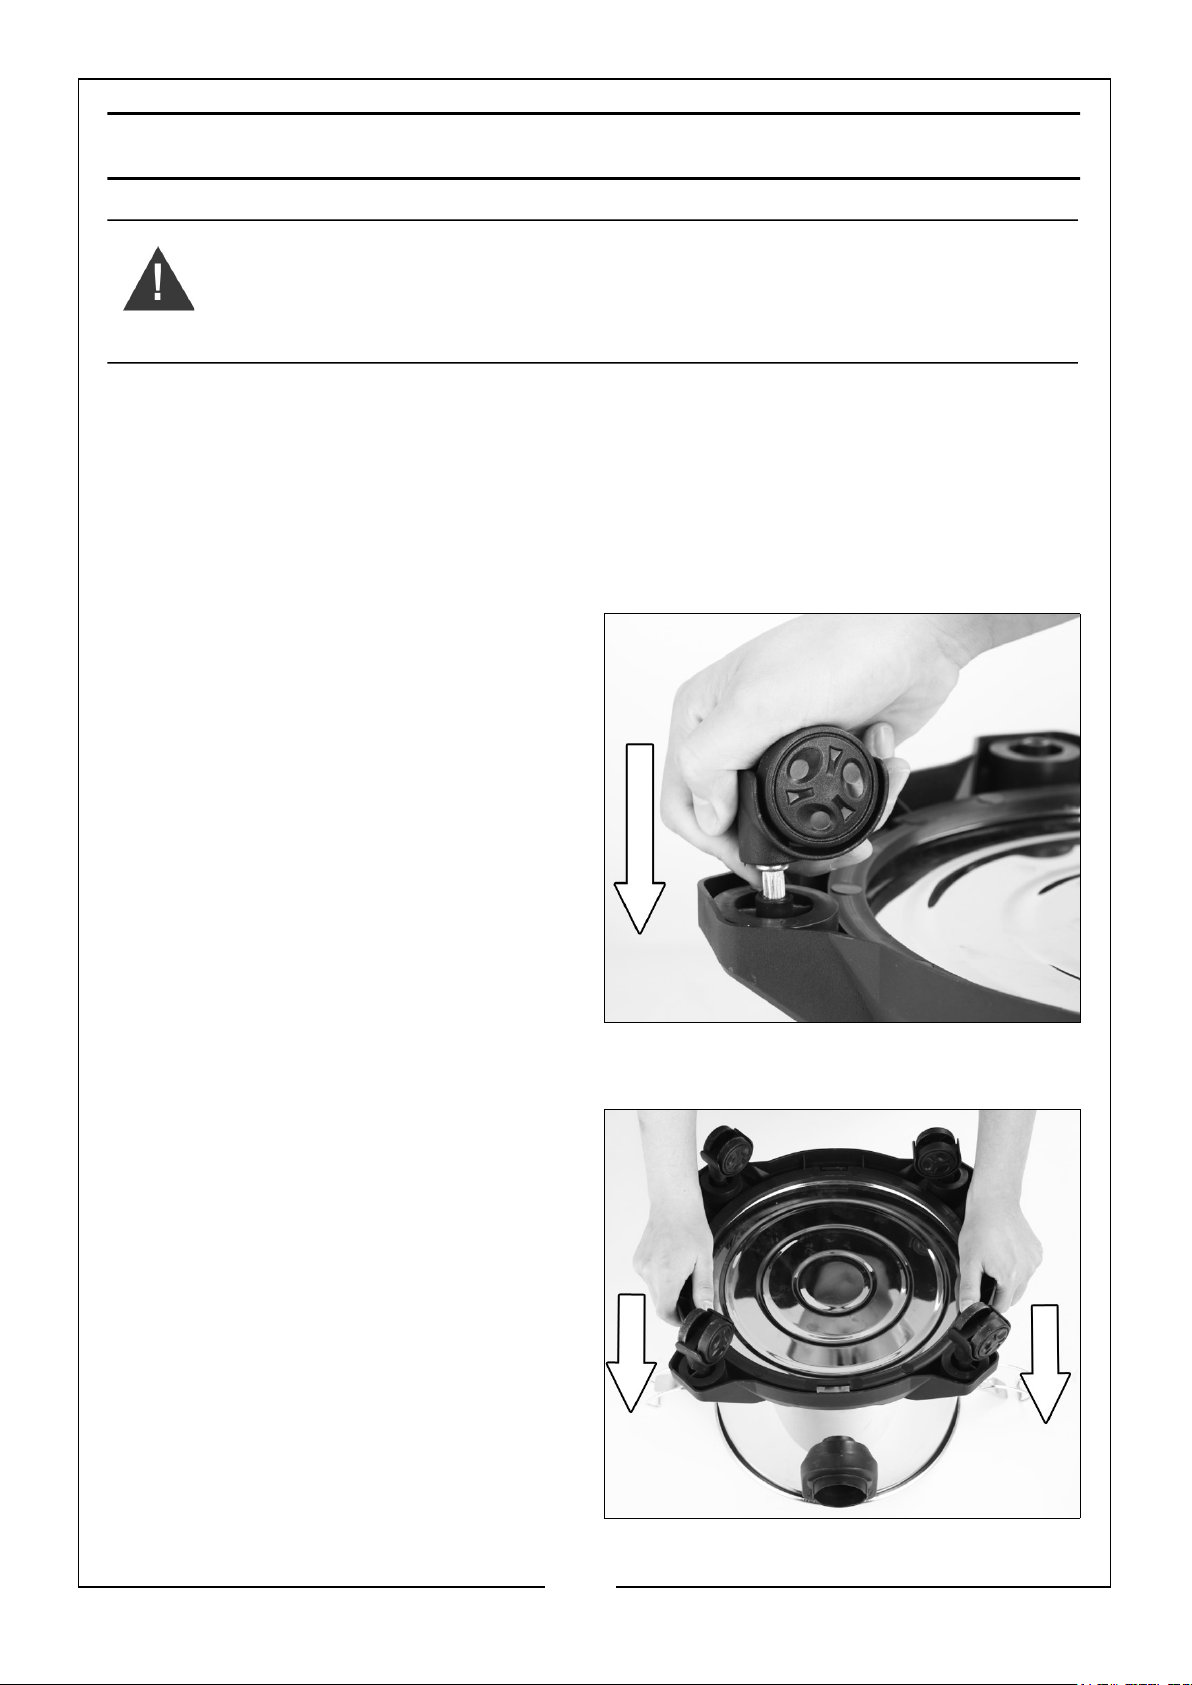
FITTING THE WHEELS
1. Press the 4 wheels into the holes on
each corner of the detachable base
unit as shown.
FITTING DETACHABLE BASE
1. Fit the base to the bottom of the tank,
as shown.
7
Parts & Service: 020 8988 7400 / E-mail: [email protected] or [email protected]
Page 8
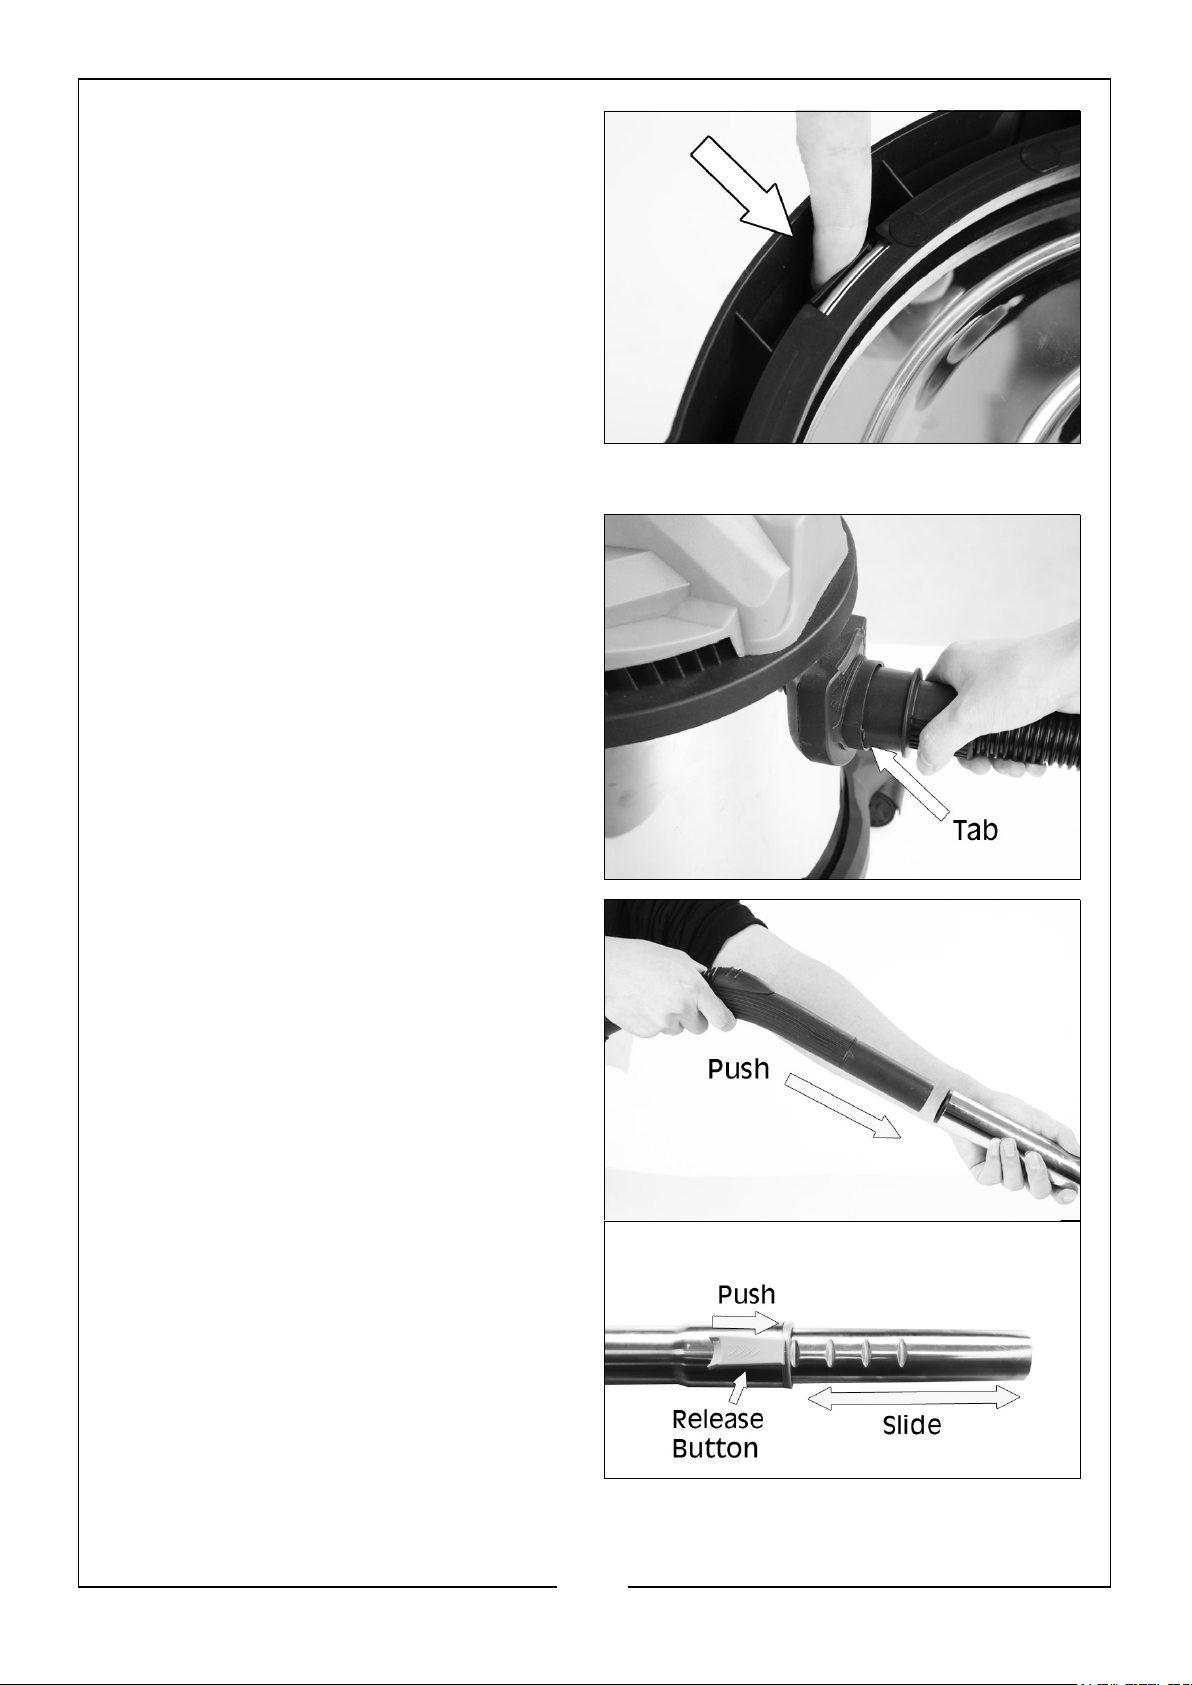
2. Press the 4 connecting tabs inwards,
as shown.
ASSEMBLING THE HOSE
1. Push the plastic hose end into the
suction port, making sure the 2 tabs
on the hose end align with the
grooves in the suction port.
2. Twist the hose clockwise to lock in
place.
3. Insert the plastic hose handle into the
wider end of the metal telescopic tube
and push in until it is a tight fit.
4. Adjust the telescopic tube to the
required length by pushing the release
button forward and sliding the bottom
tube out.
8
Parts & Service: 020 8988 7400 / E-mail: [email protected] or [email protected]
Page 9
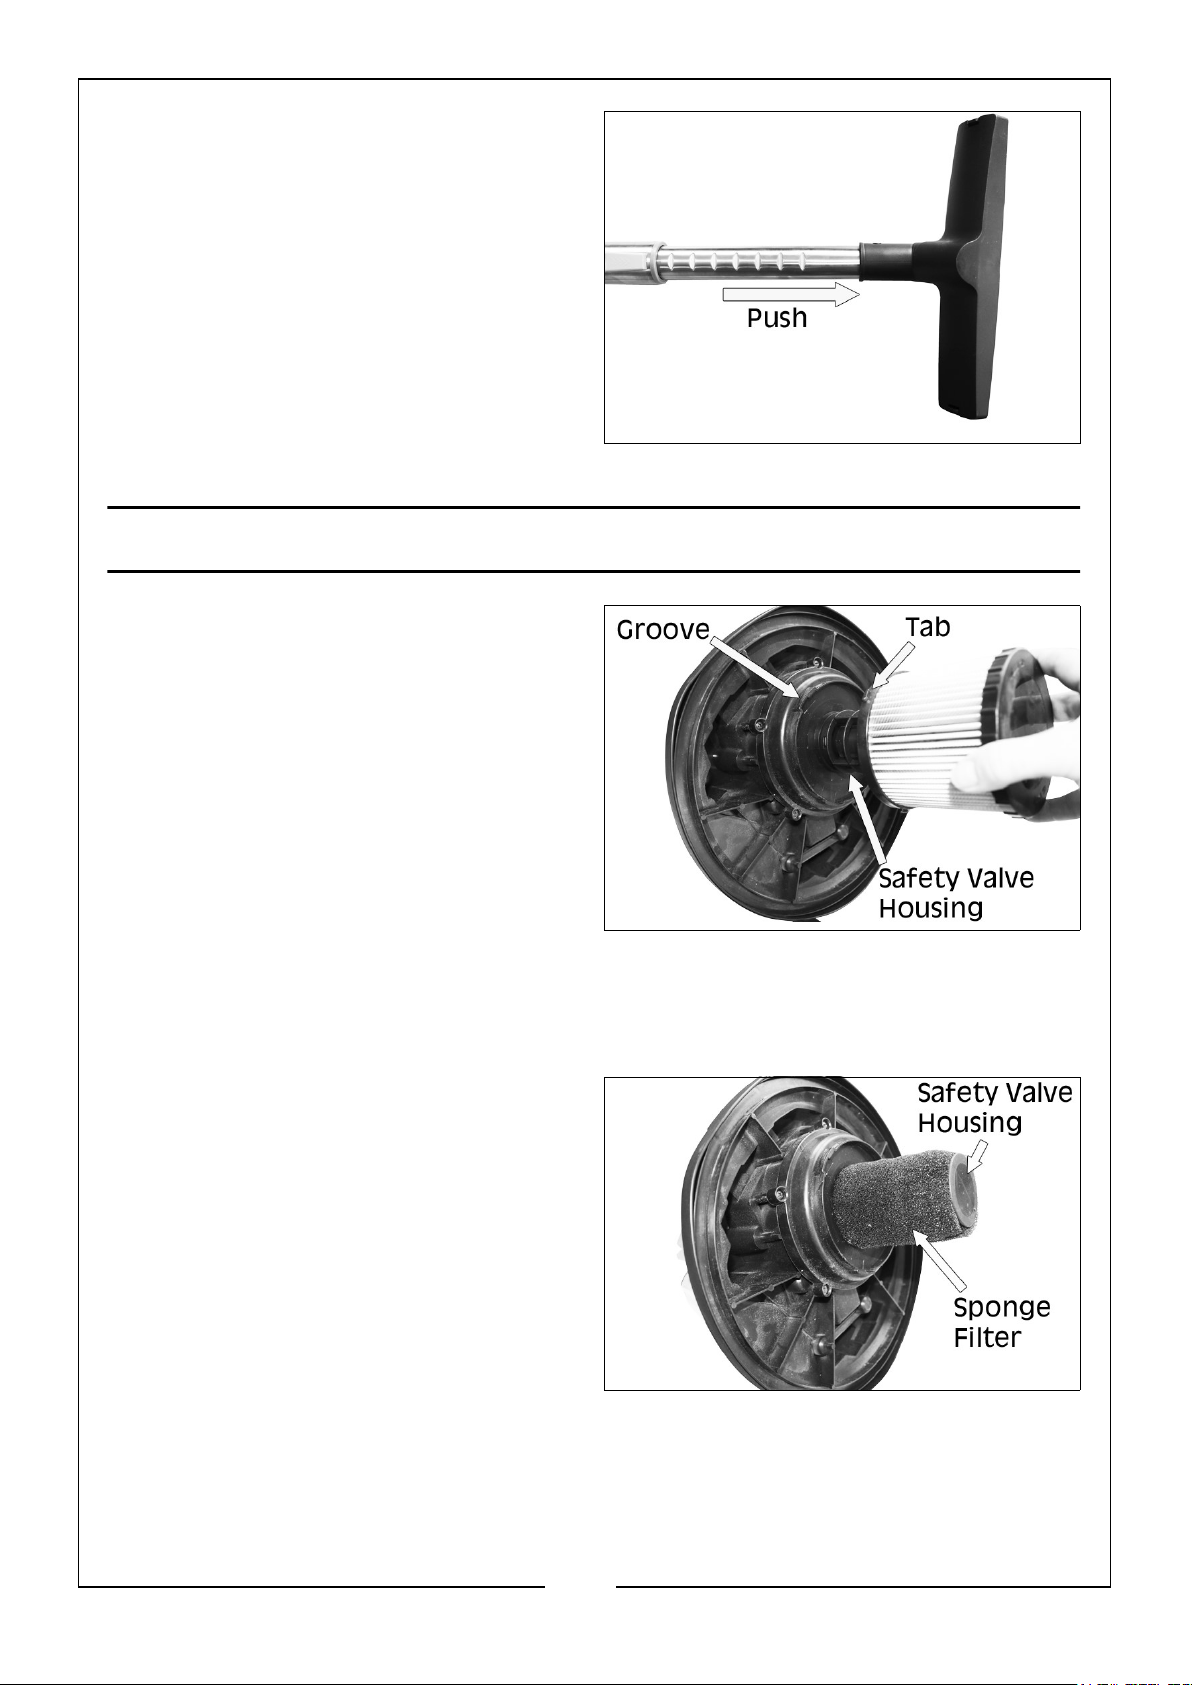
5. Insert the telescopic tube into the
required brush or nozzle and push in
until it is a tight fit, wet & dry brush
shown
FITTING/CHANGING THE FILTERS
Filters are essential to ensure that dust or
foreign matter does not enter the motor
compartment which would reduce motor
efficiency and eventually cause serious
damage.
HEPA FILTER FOR DRY CLEANING
1. Fit the HEPA filter over the top of the
safety flotation valve housing, as
shown.
2. Line up the 3 tabs on the filter with the 3 grooves in the motor unit and turn the
filter clockwise to lock in place.
SPONGE FILTER FOR WET CLEANING
1. Place the sponge filter over the safety
flotation valve housing, making sure it
covers the whole housing, as shown.
9
Parts & Service: 020 8988 7400 / E-mail: [email protected] or [email protected]
Page 10
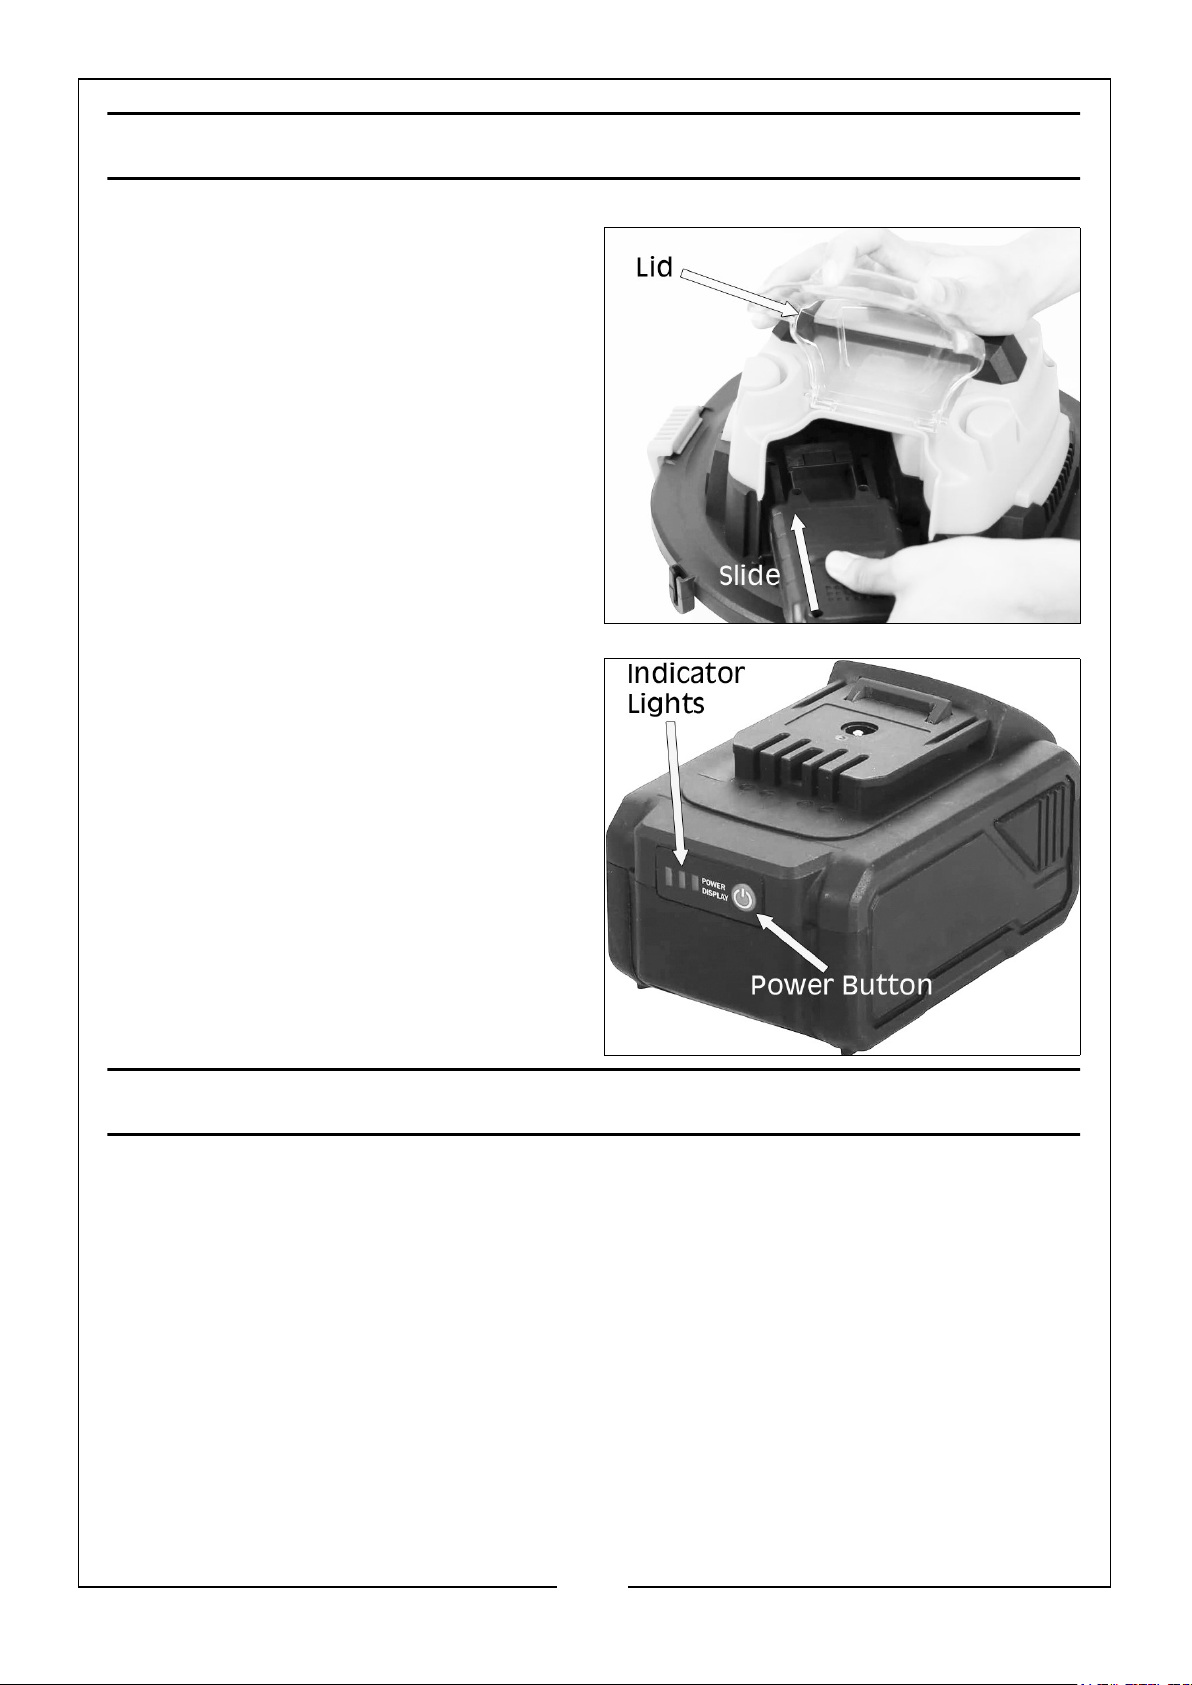
BATTERY INSTALLATION
1. Lift the battery compartment lid.
2. Slide the battery into the
compartment, with the release clip on
the outside.
3. Before use, make sure the
compartment lid is firmly clipped
down in place.
4. To check how much power is in the
battery, press the power indicator
button on the end of the battery. The
following lights will indicate how much
power is in the battery.
• 1 Light: 33% power
• 2 Lights: 66% power
• 3 Lights: 100% power
OPERATION
SUCTION
1. Before operating the cleaner, make sure that the appropriate filter is fitted
correctly (see pages 8-9) for the job in hand, as follows:
• Dry Vacuum Cleaning, use the HEPA filter.
• Wet Vacuum Cleaning, use the sponge filter.
• Mixture of material and liquid, use both filters, fitting the sponge filter first
then the HEPA filter over the top.
2. Choose the appropriate brush/nozzle and fit to the end of the metal tube (see
page 8)
10
Parts & Service: 020 8988 7400 / E-mail: [email protected] or [email protected]
Page 11
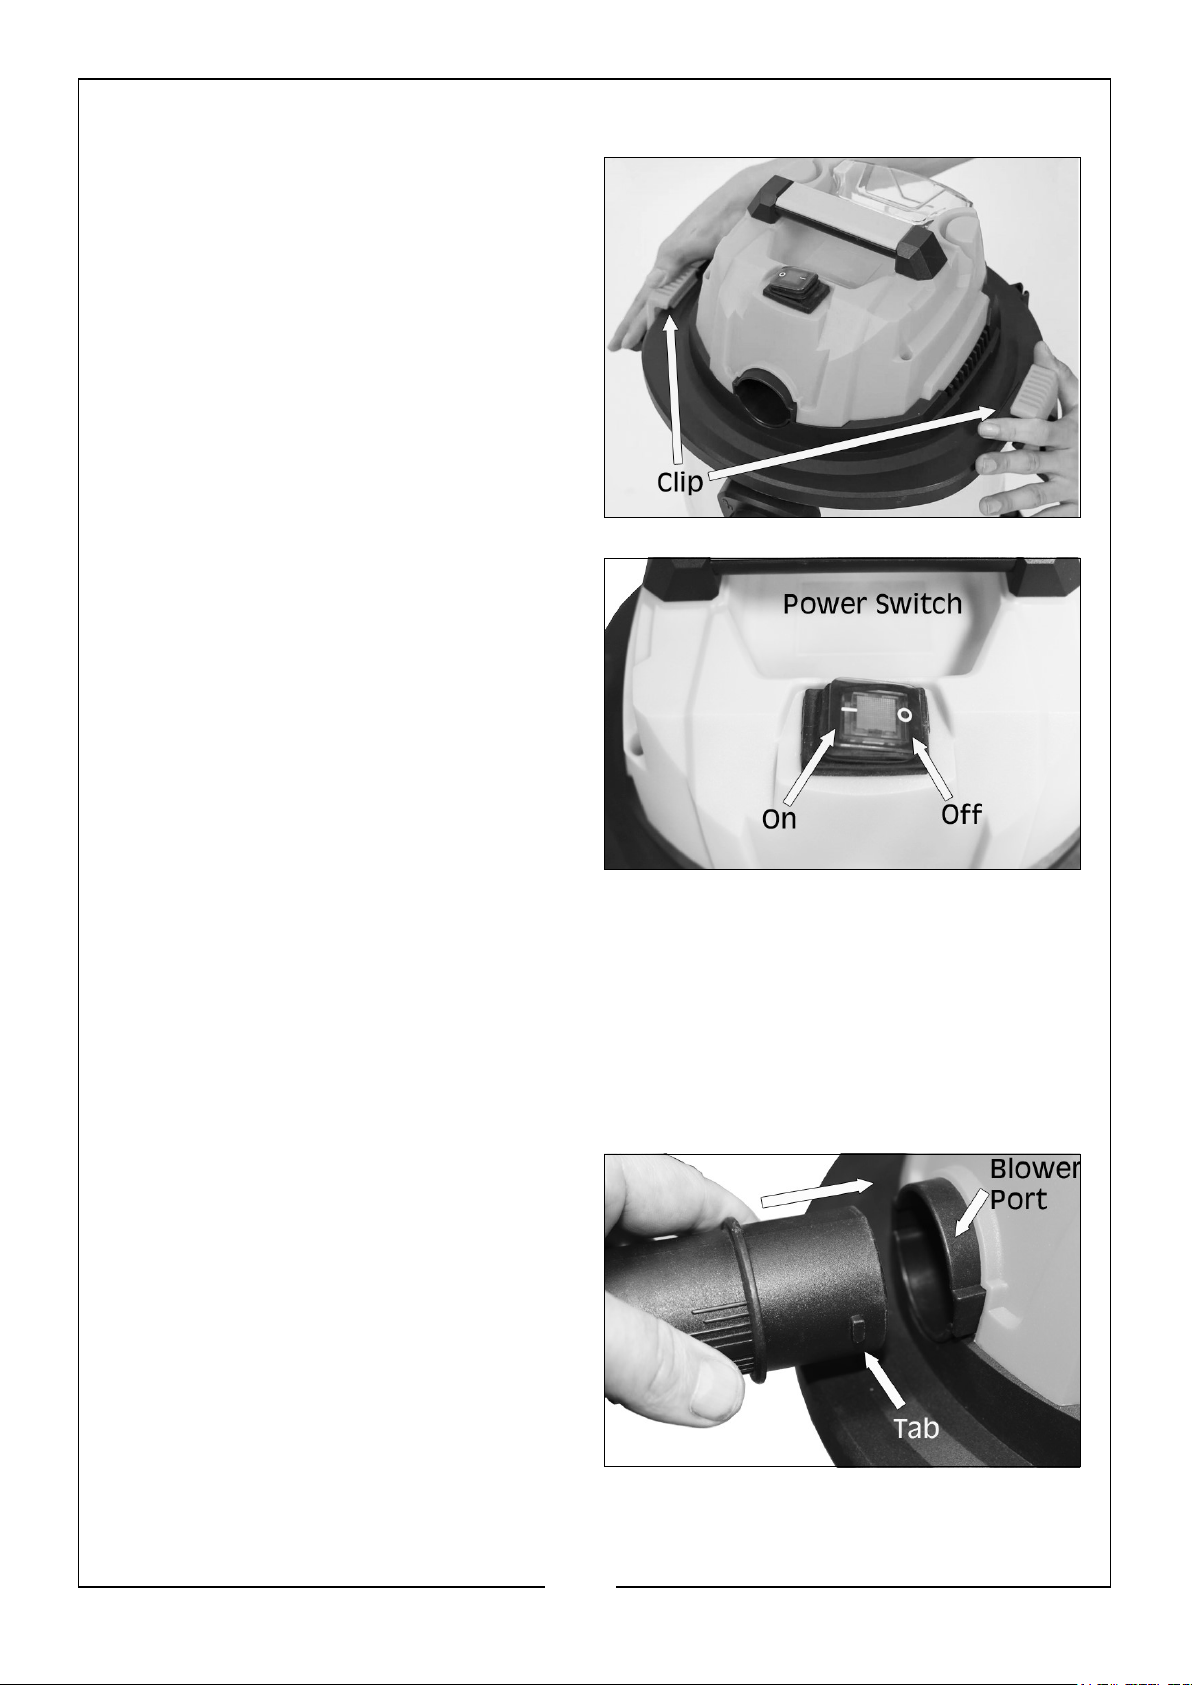
3. Fix the hose to the suction port (see page 7)
4. Make sure that the motor housing is
seated on top of the tank and the clips
are locked in place.
5. Switch on and start work.
NOTE: The cleaner should be
positioned on a firm, level
surface, specially when using for
wet cleaning.
NOTE: The tank will hold
approximately 14 litres of liquid
before the safety flotation valve
shuts off the vacuum flow. This
can be recognised by a change
in the noise of the motor. Once this happens, switch off the cleaner and
empty the tank of all liquid.
BLOWER
This vacuum has a blower function, as follows:
1. Before starting the blower function, make sure the tank is empty of all liquid and
dirt.
2. Push the plastic hose end into the
blower port, making sure the 2 tabs
on the hose end align with the
grooves in the blower port.
3. Twist the hose clockwise to lock in
place.
11
Parts & Service: 020 8988 7400 / E-mail: [email protected] or [email protected]
Page 12
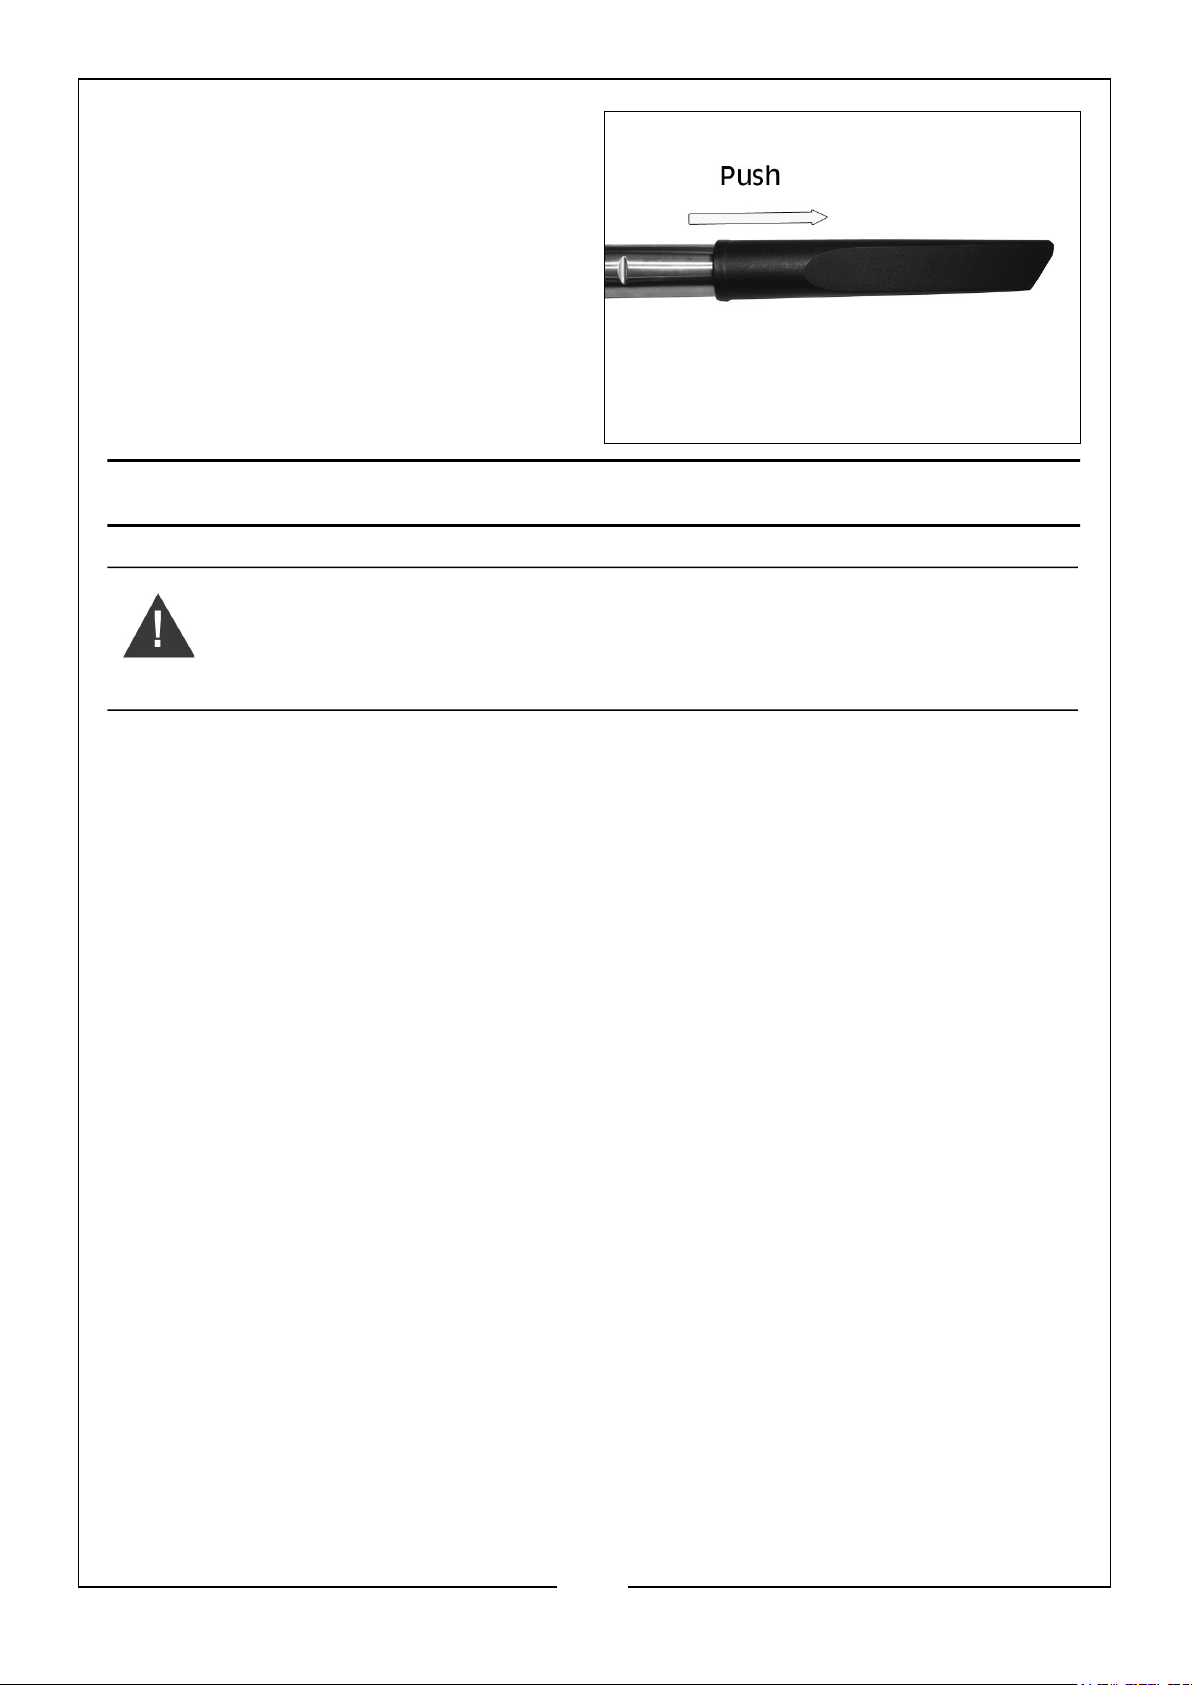
4. Insert the telescopic tube into the
crevice nozzle and push in until it is a
tight fit, this will give you a stronger
airflow.
5. Switch on and start work.
MAINTENANCE
WARNING: TAKE OUT THE BATTERY BEFORE DOING ANY
MAINTENANCE WORK. IF PROPER CARE IS TAKEN TO MAINTAIN
YOUR CLEANER, MOTOR MAINTENANCE IS UNNECESSARY.
CLEANING YOUR FILTERS
1. Take the filter off the cleaner (see pages 8-9)
2. Gently wash the filters (avoid brushing them) with water only, at 40c max.
3. Dry the filters for at least 24 hours before reusing them.
CLEANING YOUR ACCESSORIES
1. Wash the hose, tube and brush/nozzles regularly to reduce build up of dirt, using
water at a 40c max.
2. Shake the water off from inside, and make sure that they dry for 24 hours before
reuse.
CLEANING THE TANK
1. Clean out any liquid from inside the tank.
2. Wipe down the inside with a duster cloth.
12
Parts & Service: 020 8988 7400 / E-mail: [email protected] or [email protected]
Page 13
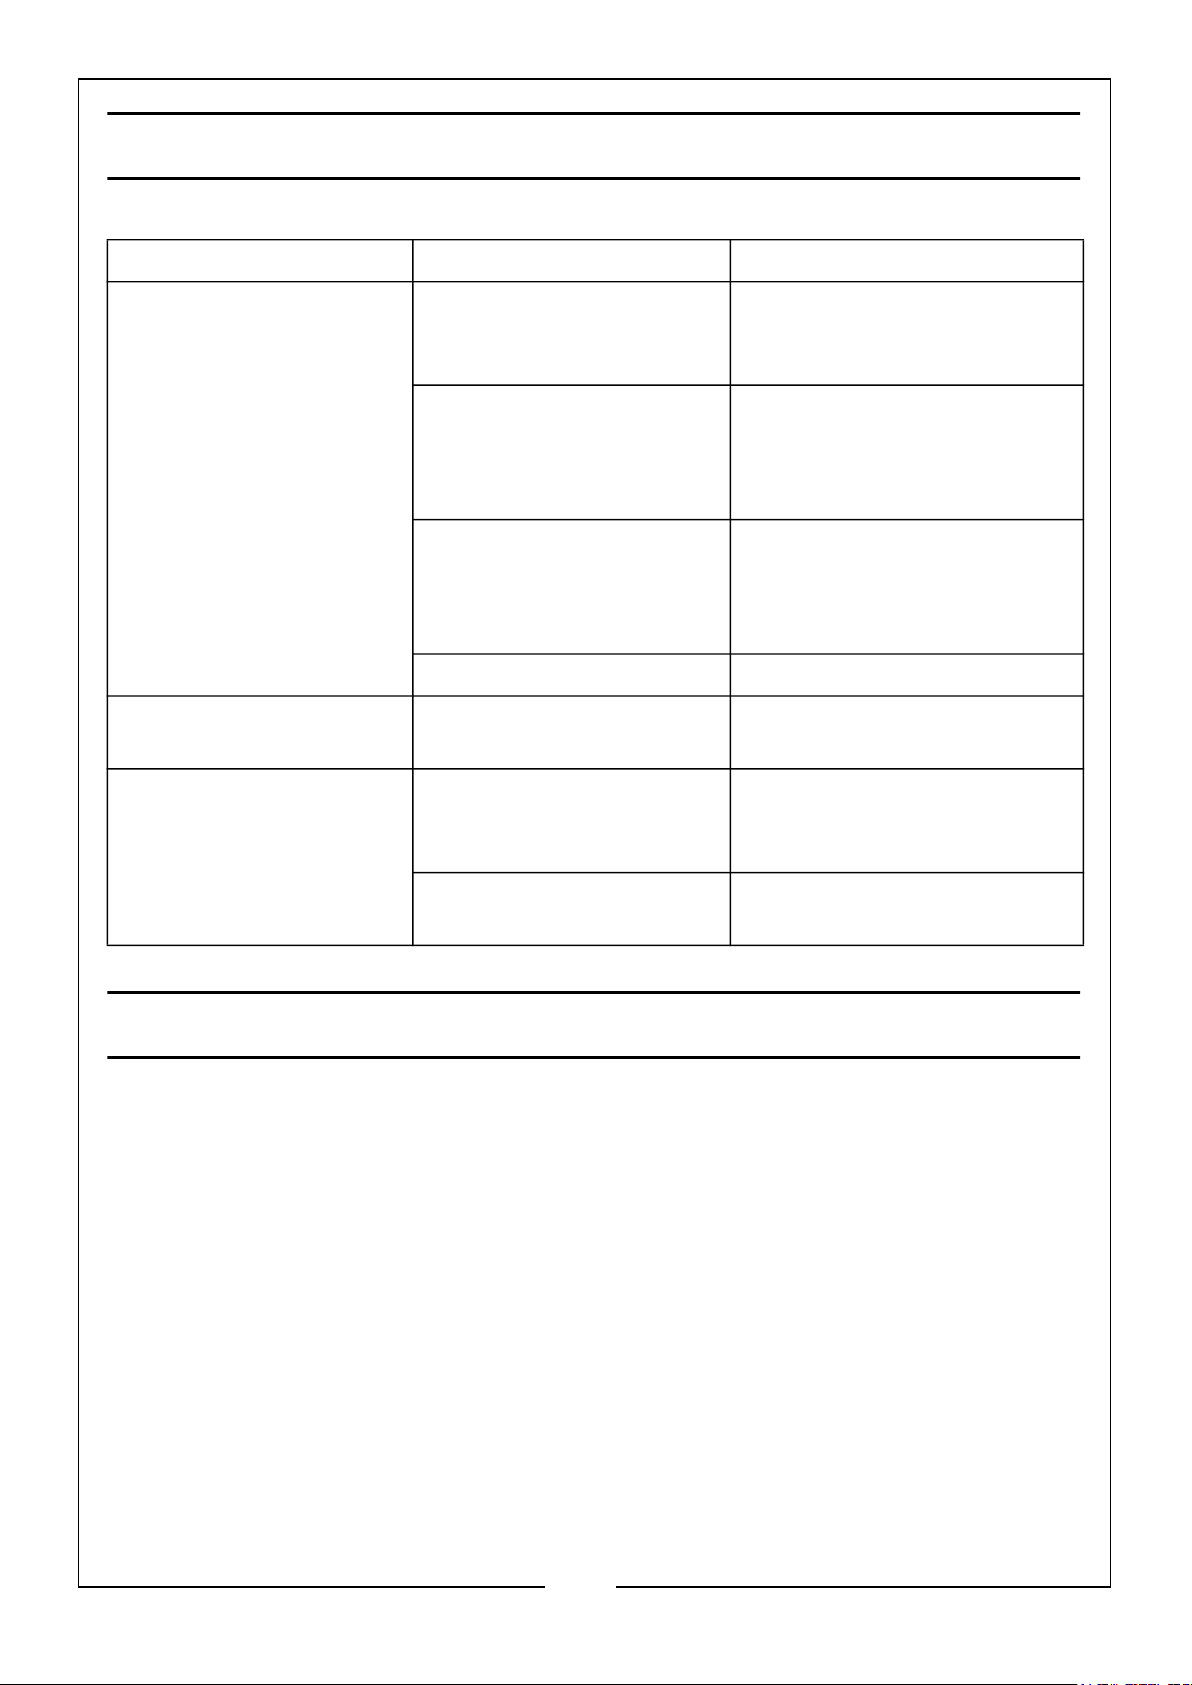
TROUBLESHOOTING
Symptom Possible Cause Corrective action
Suction weakens Clogged filter Clean dirt from filter. If
condition continues, change
filter.
Air leak Check the connection of all
the accessories (hose, brush/
nozzle, etc). Check that clips
are fastened properly.
Obstruction in hose or
brush/nozzle
Saturated filter Replace saturated filter.
Dust leakage Filter is not fitted well Check if the filter is fitted in
Cleaner doesn’t work Battery is not well charged Check if there is any power
Motor breakdown Send the cleaner to your
Check hose and
brush/nozzle for
obstructions and remove if
present.
the right position.
left in the battery; or charge
battery.
CLARKE dealer for repair.
GUARANTEE
This CLARKE product is guaranteed against faulty manufacture for a period of 12
months from the date of purchase. Please keep your receipt as proof of purchase.
This guarantee is invalid if the product is found to have been abused or tampered
with in any way, or not used for its intended purpose.
Faulty goods should be returned to their place of purchase, no product can be
returned to us without prior permission.
This guarantee does not effect your statutory rights.
13
Parts & Service: 020 8988 7400 / E-mail: [email protected] or [email protected]
Page 14
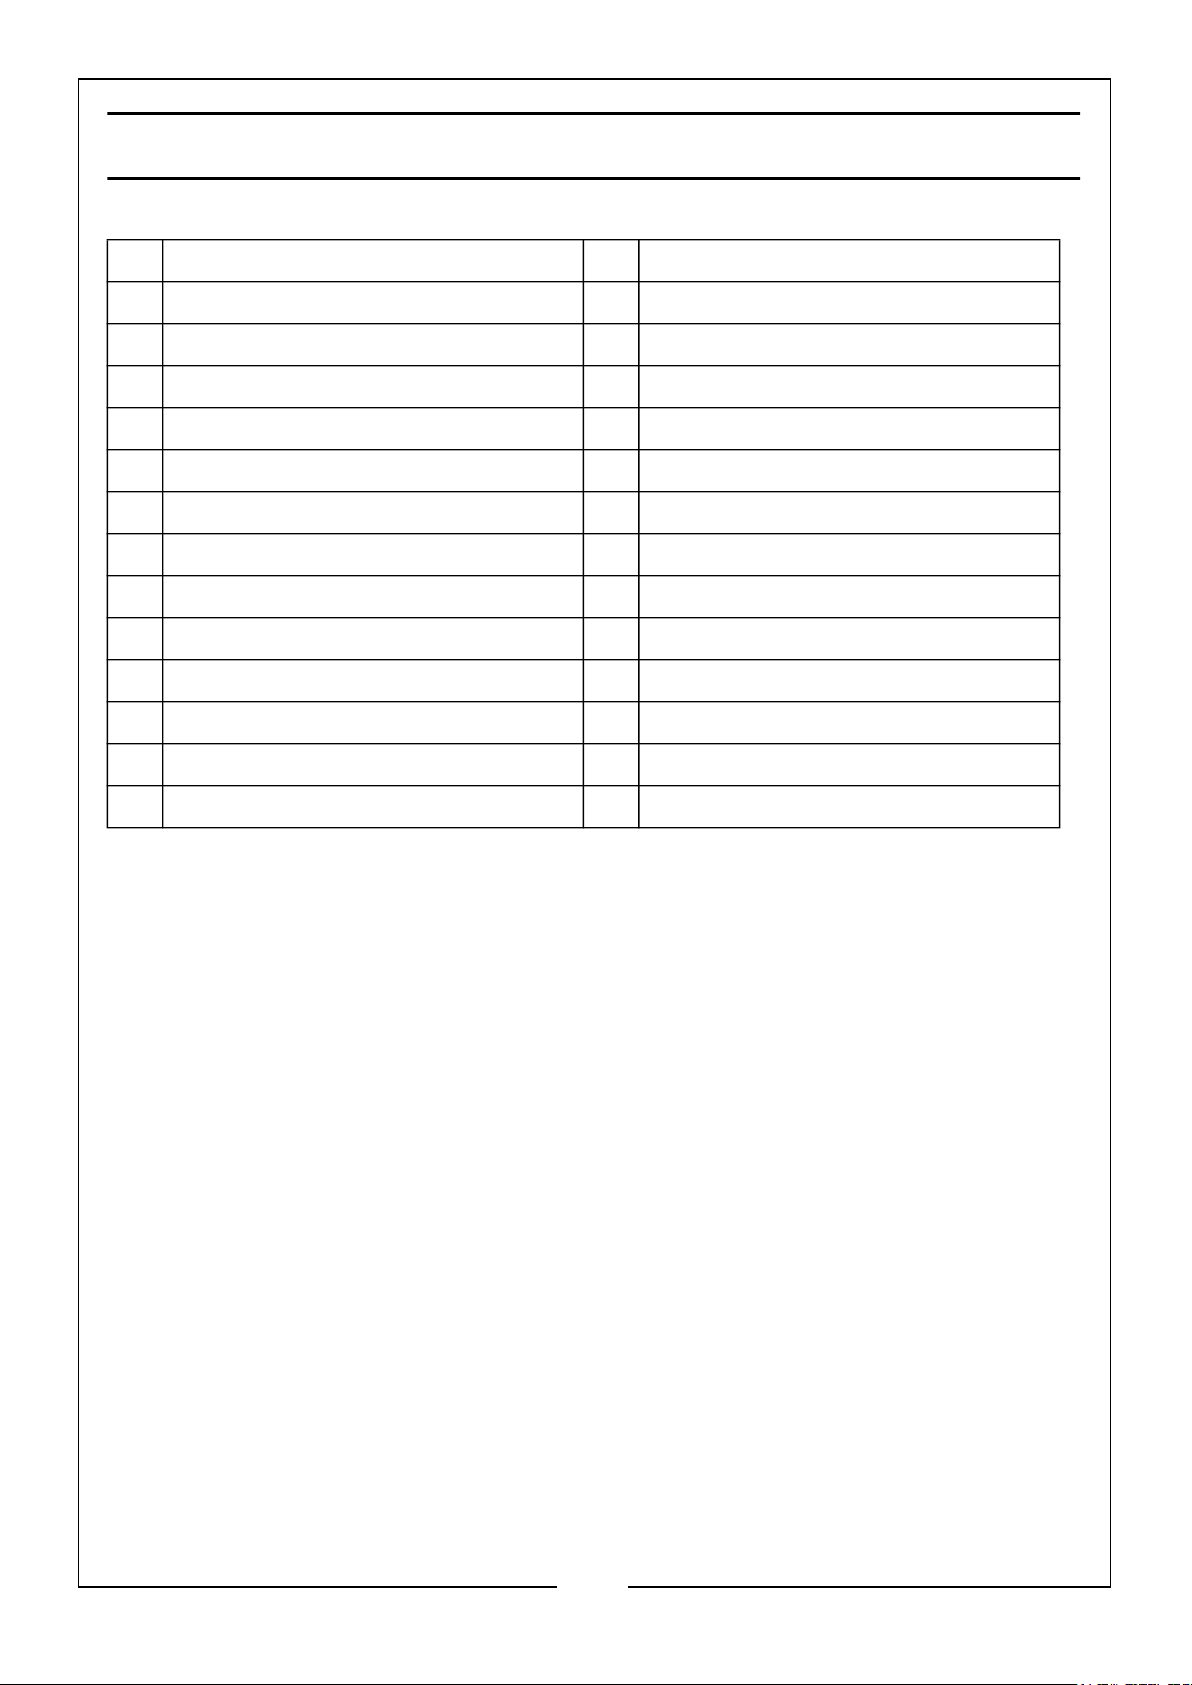
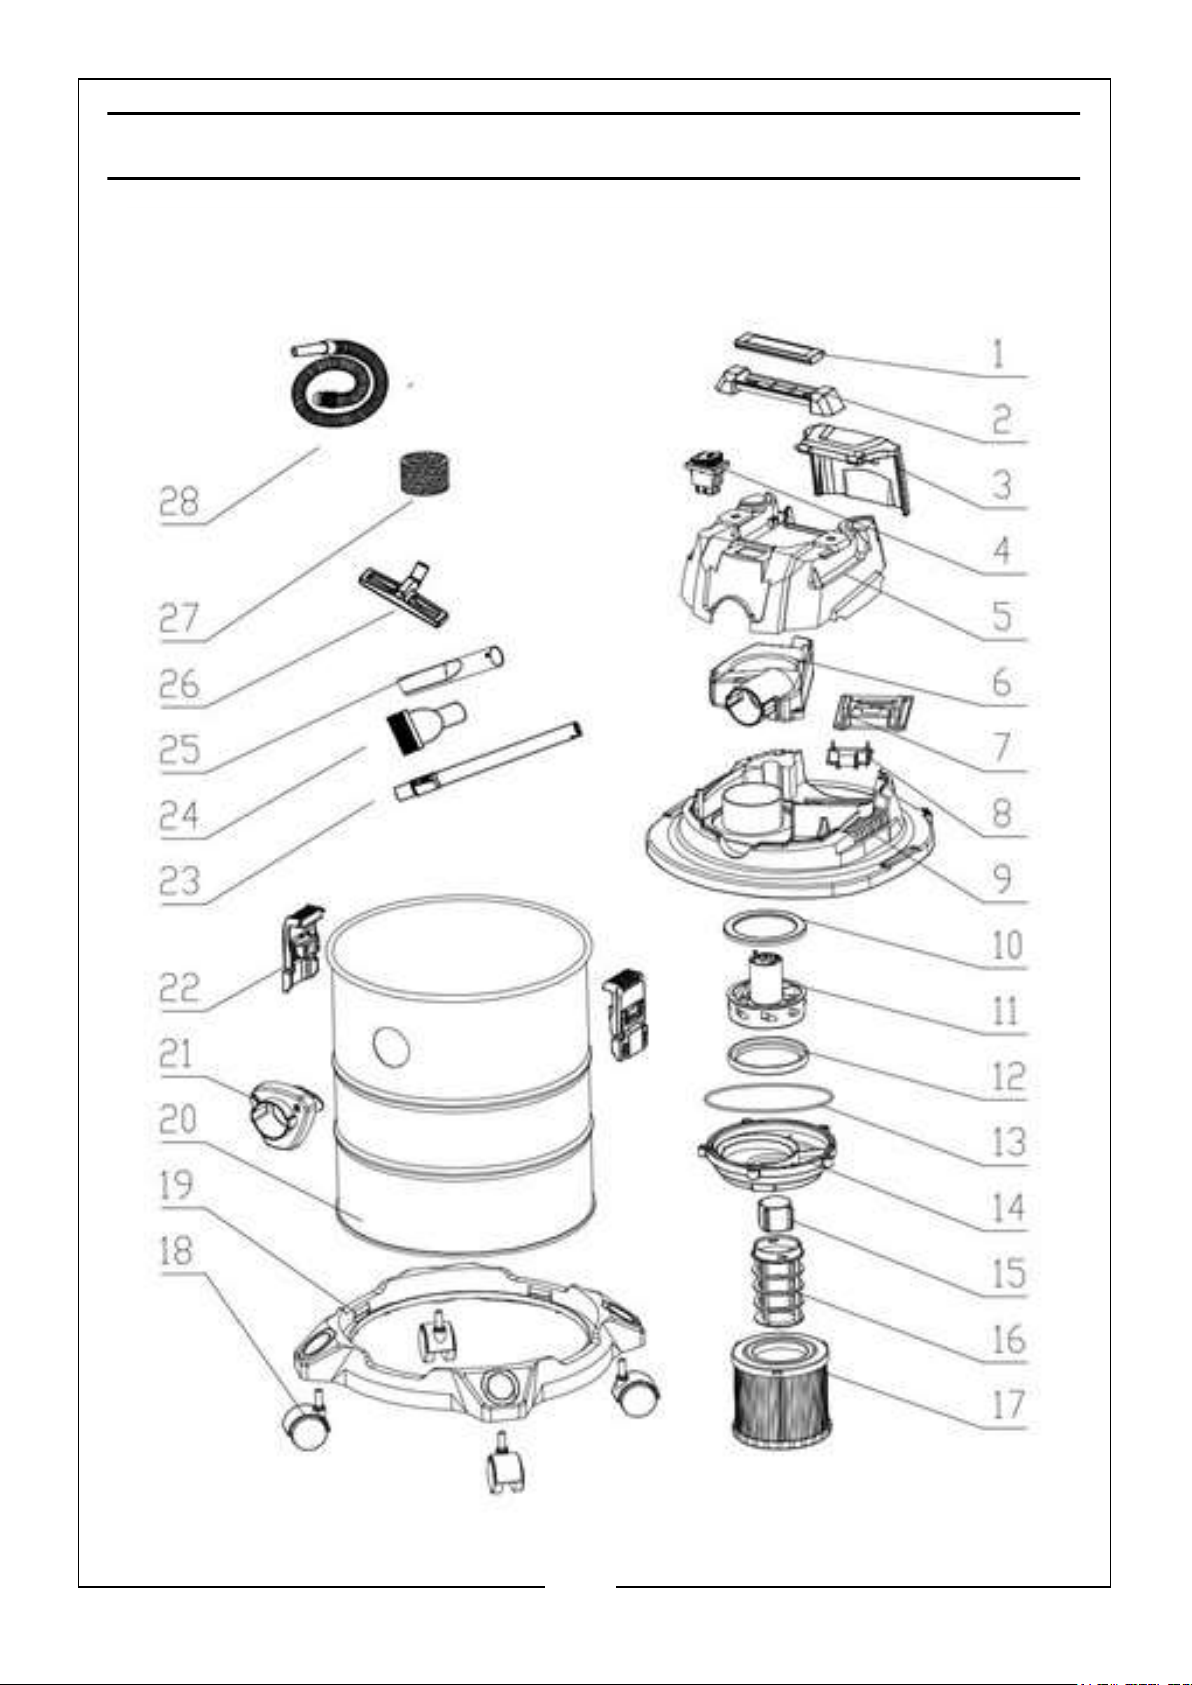
PARTS LIST
1 Handle Cover 15 Safety Flotation Valve
2 Fixed Handle 16 Bracket
3 Battery Compartment Cover 17 HEPA Filter
4 Power Switch 18 Wheel
5 Top Cover 19 Base
6 Motor Top Cover 20 Stainless Steel Tank
7 Battery Platform 21 Suction Mouth
8 Battery Connector 22 Clip
9 Barrel Cap 23 Metal Telescopic Tube
10 Motor Top Seal Ring 24 Round Brush
11 Motor 25 Crevice Nozzle
12 Motor Bottom Seal Ring 26 Wet & Dry Floor Brush
13 Motor Cover Seal 27 Sponge Filter
14 Motor Base 28 Plastic Hose
14
Parts & Service: 020 8988 7400 / E-mail: [email protected] or [email protected]
Page 15
Page 16
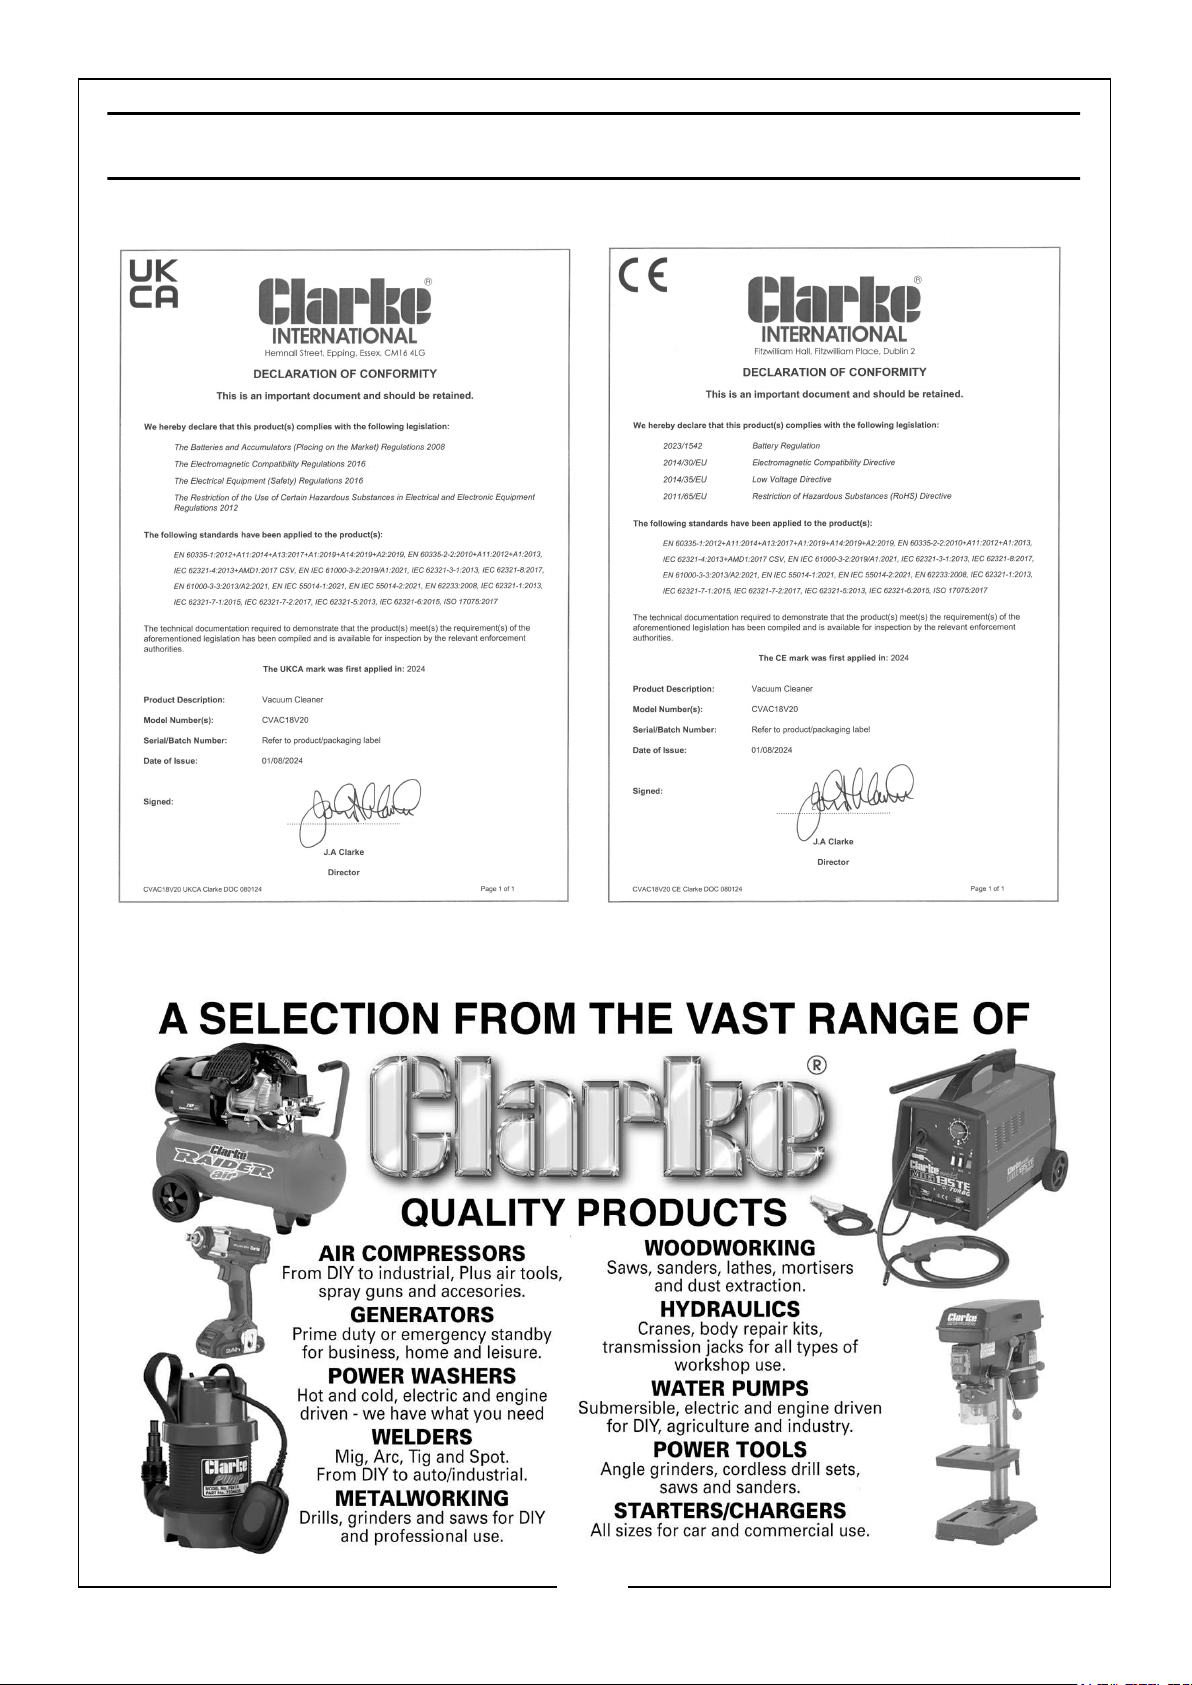
DECLARATION OF CONFORMITY
16
Parts & Service: 020 8988 7400 / E-mail: [email protected] or [email protected]
 Loading...