

Page 1

10” TABLE SAW
0900
©
Model CTS10C
Part Number 6500750
Operating & Maintenance
Instructions
PRODUCT SERIAL/BATCH NO............................
Page 2

1
30
Page 3
Thank you for purchasing your new CLARKE 10” TABLE SAW, which is designed for DIY, and
hobby use ONLY.
Before attempting to operate this machine, please read this instruction manual thoroughly
and follow all directions carefully. In doing so you will ensure the safety of both yourself and
others around you, and, at the same time, you should look forward to it providing long and
trouble free service.
GUARANTEE
This product is guaranteed against faults in manufacture for 12 months from purchase date.
Keep your receipt as proof of purchase. This guarantee is invalid if the product has been
found to have been abused in any way, or not used for the purpose for which it was intended,
or to have been tampered with in any way. The reason for return must be clearly stated. This
guarantee does not affect your statutory rights.
CONTENTS
Specifications ............................................................................................. 3
General Safety Rules .................................................................................. 4
Additional Safety Rules for Table Saws .................................................... 5
Electrical Connections ...............................................................................6
Features .......................................................................................................7
Glossary of Terms........................................................................................ 8
Unpacking and Checking Contents ........................................................9
Assembly Instructions .............................................................................. 10
Mounting the Saw ..................................................................................... 12
Important Checks before Starting ..........................................................13
Operating Instructions ............................................................................. 15
Starting & Stopping .................................................................... 15
Rip Cutting .................................................................................. 15
Cross Cutting .............................................................................. 18
Repetitive Cutting ...................................................................... 19
Mitre Cutting ...............................................................................20
Bevel Cross Cutting .................................................................... 20
Compound Mitre Cutting ..........................................................21
Maintenance ............................................................................................ 21
Changing the Saw Blade .......................................................... 22
Saw Blade Adjustments ............................................................. 22
Trouble Shooting .......................................................................................24
Parts Lists and Diagrams .................................................................... 25-27
29
2
Page 4
SPECIFICATIONS
Model No .............................................. CTS10C
Part No. .................................................. 6500750
Motor ..................................................... 230V~ 50Hz 1ph
Power rating ..............................1.4Kw
Speed ........................................ 4800 rpm
Fuse rating ................................. 13Amps
Saw Blade ............................................. 10” dia. - 5/8” bore (254x16mm) TCT
Maximum depth of cut ........................ 75mm
Weight ................................................... 20.5KG
Noise level at operating position ........99dB LWA (Cutting 50mm soft wood)
Table dimensions ..................................660x430mm (26”x17”)
Use of machine
This machine is designed to rip and cross cut wood exclusively, up to a maximum thickness
of 75mm.
For correct operation it must be fixed and operated as laid down in this manual.
This saw is intended for DIY, and hobby use ONLY.
Restrictions of use
NOTES
This saw is NOT suitable for cutting:
• Timber greater than 75mm in thickness.
• Metal, Stone, Rubber, Plastic, Bones, Etc.
• Logs or round timber.
DO NOT use to rebate, tenon, mould or groove.
DO NOT fit any other tool or combination of blades.
DO NOT use as a free standing machine or as a hand held machine.
DO NOT modify the machine or its guards/controls in any way.
DO NOT use with any covers/guards removed.
3
28
Page 5
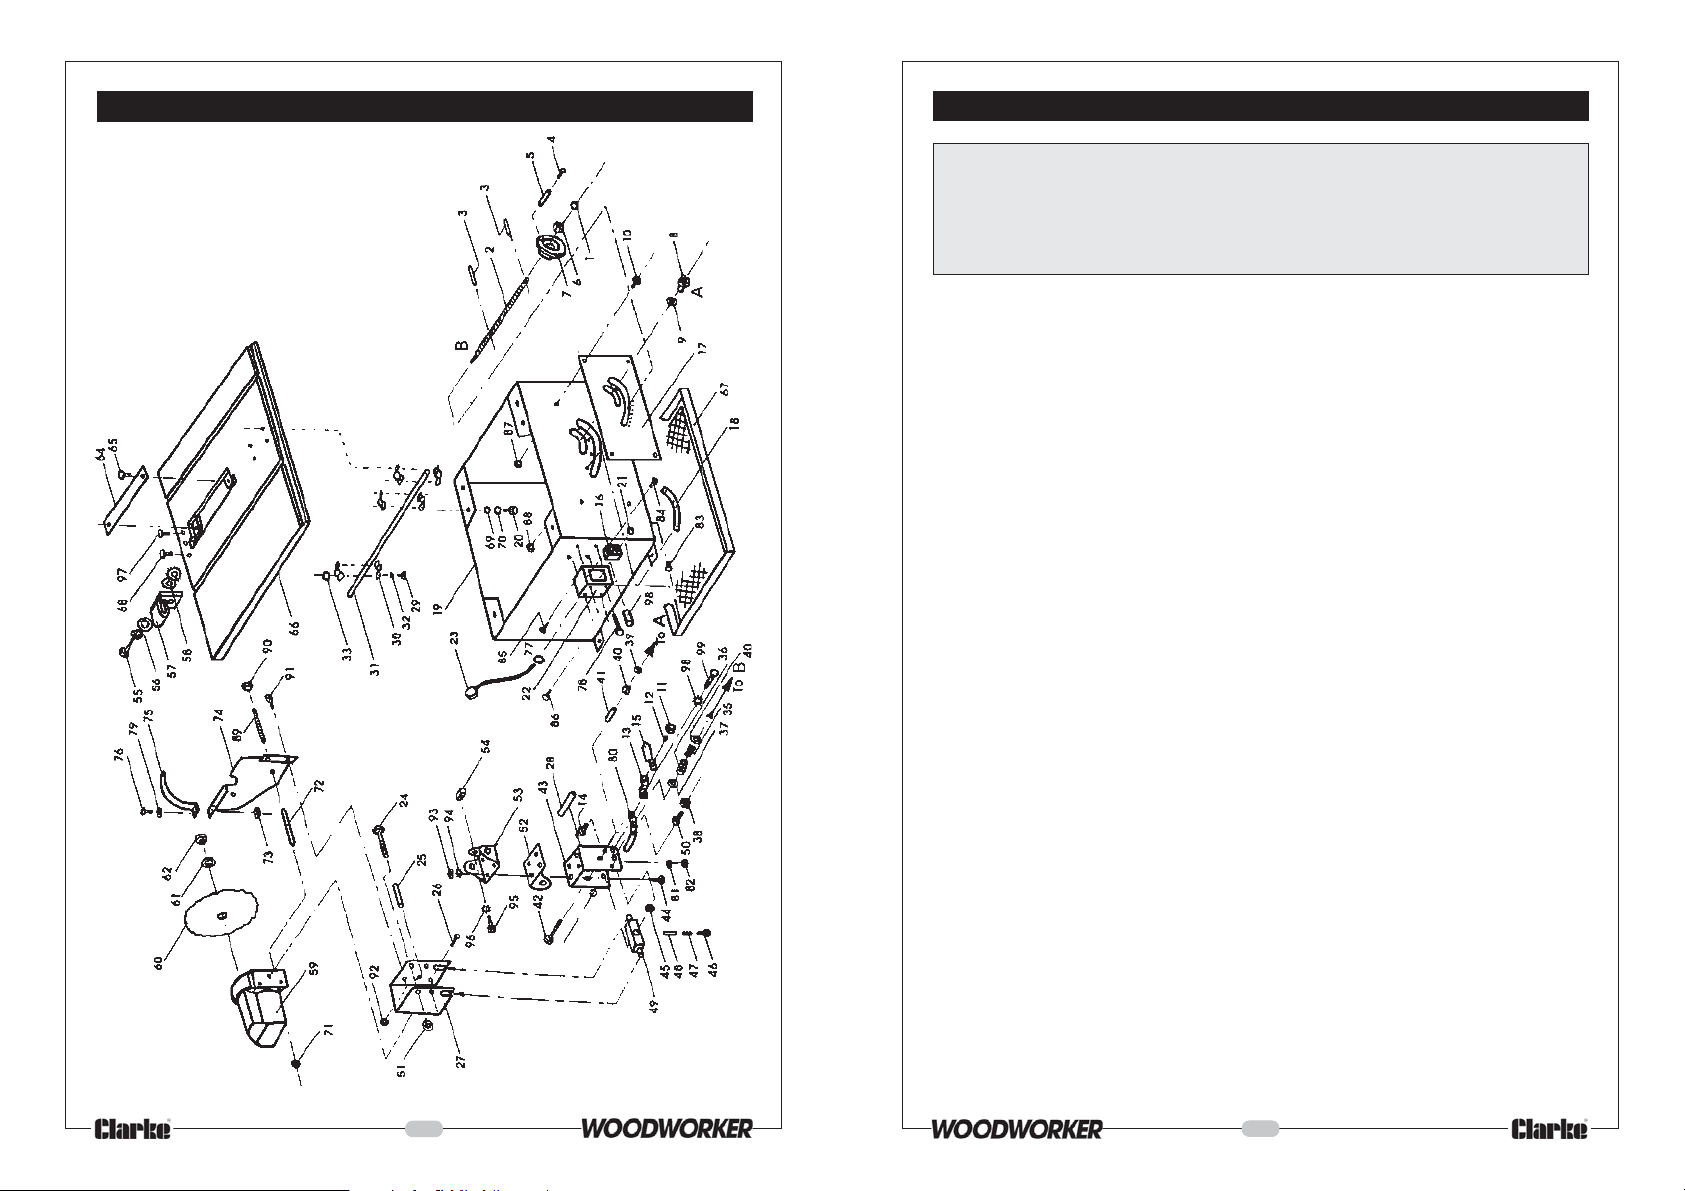
PARTS DIAGRAM
GENERAL SAFETY RULES
WAR NI NG!
As with all machinery, there are certain hazards involved with their operation
and use. Exercising respect and caution will considerably lessen the risk of
personal injury. However, if normal safety precautions are overlooked or
ignored, personal injury to the operator or damage to property may result.
1. READ AND BECOME FAMILIAR with the entire operating manual. Learn the machine’s
applications and limitations as well as the specific potential hazards peculiar to it.
2. CHECK DAMAGED PARTS. Before using the machine, check to ensure that a guard or
other damaged part, will operate properly and perform its intended function. Check
for alignment of moving parts, breakage of parts, mountings, or any other conditions
that may affect its operation. A guard or other part that is damaged should be properly
repaired or replaced.
3. REMOVE TOOLS BEFORE SERVICING and when changing accessories such as blades,
fences etc.
4. ALWAYS KEEP GUARDS in place and in working order.
5. ALWAYS USE SAFETY GOGGLES. Also use face or dust mask if cutting operation is dusty.
REMEMBER, everyday eyeglasses do not have impact resistant lenses, they are NOT
safety glasses.
6. KEEP WORK AREA CLEAN. Cluttered areas and benches invite accidents.
7. WEAR EAR PROTECTORS/DEFENDERS.
8. DO NOT FORCE THE MACHINE. It will do a better and safer job at the rate for which it
was designed.
9. REMOVE ADJUSTING KEYS AND SPANNERS. Form the habit of checking to see that keys
and adjusting spanners etc., are removed from machine before turning it on.
10. ALWAYS feed the work into the blade against direction of rotation only.
11. DRUGS, ALCOHOL, MEDICATION. Do not operate machine whilst under the influence of
drugs, alcohol or any medication.
12. USE RECOMMENDED ACCESSORIES. The use of improper accessories could be hazardous.
13. NEVER STAND ON THE MACHINE. Injury could occur from a fall.
14. NEVER LEAVE MACHINE RUNNING UNATTENDED. Turn power OFF. Don’t leave machine
until it comes to a complete stop.
15. ALWAYS DISCONNECT THE PLUG from electrical outlet when adjusting, changing parts
or working on the machine.
16. AVOID DANGEROUS ENVIRONMENT. Don’t use power tools in damp or wet locations or
expose them to rain. Keep your work area well illuminated. DO NOT USE in explosive
atmosphere (around paint, flammable liquids etc.).
17. KEEP CHILDREN AWAY. All visitors should be kept a safe distance from work area,
especially whilst operating the machine.
18. MAINTAIN BLADE and ACCESSORIES IN TOP CONDITION. Keep blade sharp and clean
for best and safest performance. Follow instructions for lubricating and changing
accessories.
27
4
Page 6
19. SECURE THE WORK. Use clamps to hold accessories when practical. It’s safer than using
your hand.
20. DON’T OVERREACH. Keep your proper footing and balance at all times. For best footing
wear rubber soled shoes or boots. Keep the floor clear of oil, scrap wood, etc.
21. WEAR PROPER APPAREL. Loose clothing or jewellery may get caught in moving parts.
Wear protective hair covering to contain long hair.
22. MAKE WORKSHOP CHILDPROOF. Lock the saw away, or cover securely when not in use.
ADDITIONAL SAFETY RULES FOR TABLE SAWS
✔ ALWAYS use saw Blade Guard, Riving Knife and Antikickback Pawls for every operation.
✔ ALWAYS hold the work firmly against the mitre gauge or fence.
✔ ALWAYS use a push-stick when required. Always use a push-stick for ripping narrow stock.
Refer to ripping applications in instruction manual where push-stick is covered in detail.
✔ ALWAYS use in a well ventilated area. Remove sawdust frequently. Clean out sawdust
from the interior of the saw to prevent a potential fire hazard.
✔ ALWAYS move the rip fence out of the way when crosscutting.
✔ ALWAYS switch off and disconnect from supply before removing off cuts of wood from
the machine
ALWAYS provide adequate support to the rear and sides of the saw table for wide or
long workpieces.
✔ ALWAYS keep the blade sharp, the rip fence parallel to the saw blade, the Riving Knife,
anti-kickback pawls and guard in place to avoid kickbacks (work thrown back toward
you). Do not release work before it is pushed all the way past the saw guide along the
fence.
✔ ALWAYS avoid awkward operations and hand positions where a sudden slip could cause
your hand to move into the cutting tool.
✔ PERMANENTLY mount your table saw before performing any cutting operations.
Refer to ‘Mounting the Saw’ on page 12.
✘ NEVER stand or have any part of your body in line with the path of the saw blade.
Keep your hands out of the line of the saw blade.
✘ NEVER reach behind or over the blade for any reason.
✘ NEVER use the fence as a cutoff gauge when crosscutting.
✘ NEVER attempt to free a stalled saw blade without first turning the saw OFF. Turn off
power switch immediately to prevent motor damage.
✘ NEVER use solvents to clean plastic parts. Solvents could possibly dissolve or otherwise
damage the material. Only a soft damp cloth should be used to clean plastic parts.
✘ NEVER force feed the work into the blade. A light pressure ONLY is required
✘ NEVER cut metals or materials which may make hazardous dust.
✘ NEVER perform any operation ‘freehand’ which means using your hands to support or
guide the work piece. Always use either the fence or the mitre gauge to position and
guide the work.
No. Description Part No Qty
1 Label n/a 1
2 Screw Rod 1510021 1
3 Spring Pin n/a 1
4 Screw n/a 1
5 Handle 14008302 1
6Nut Hex n/a 1
7 Hand Wheel 14900601 1
8 Knob 15100801 1
9 Flat Washer n/a 1
10 Screw n/a 1
11 Nut Hex n/a 1
12 Flat Washer n/a 1
13 Pointer Bracket 15101301 1
14 Screw n/a 1
15 Pointer 15101501 1
16 NVR Switch 2898D05G04 1
17 Label n/a 1
18 Segment Gear n/a 1
19 Base 15102001 1
20 Bolt GB5780-88 4
21 Circuit Breaker 1853U55502 1
22 Switch Box 15102501 1
23 Power Cable 2807BB0601 1
24 Bolt GB5780-88 1
25 Spring Pin GB879-86 1
26 Bolt GB5780-88 3
27 Bracket 15103201 1
28 Spacer 14920301 1
29 Screw GB5780-88 6
30 Strap 14921402 3
31 Rod 14921302 1
32 Spring Washer GB93-87 6
33 Nut Hex GB6170-86 6
34 Flat Washer GB972-85 1
35 Spring 14922201 1
36 Spring 14922101 1
37 Flat Washer GB972-85 1
38 Nut Hex GB6170-86 1
39 Flat Washer GB972-85 1
40 Nut Hex GB6170-86 1
41 Spacer 14922901 1
42 Bolt n/a 1
43 Bracket 15104901 1
44 Bolt GB5780-88 4
45 Nut Hex GB6172-86 2
46 Set Screw Hex GB77-85 1
47 Spring 14901302 1
48 Detent Pin 14901202 1
49 Bracket 15105501 1
50 Bolt Hex GB5780-88 1
51 Nut Hex BG6170-86 1
No. Description Part No Qty
52 Bracket 15106101 1
53 Bracket 15106201 1
54 Saddle 14921001 1
55 Hex Bolt M6 x 55mm n/a 1
56 Int Tooth Washer n/a 1
57 Guard Support n/a 1
58 Flat Washer n/a 2
59 Motor 8397029004 1
60 Saw Blade 29000011 1
61 Arbour Collar 14930101 1
62 Nut 14930001 1
63 Warning Label 14902902 1
64 Insert 15109661 1
65 Screw n/a 2
66 Table 15109801 1
67 Bottom Cover 1006 1
68 Screw n/a 6
69 Flat Washer n/a 6
70 Spring Washer n/a 6
71 Hex Nut n/a 6
72 Short Spacer 9003 2
73 Hex Nut n/a 2
74 Riving Knife Base 9001 1
75 Riving Knife n/a 1
76 Bolt Hex n/a 2
77 Cable Grommet 9004 1
78 Bolt n/a 4
79 Spring Washer n/a 4
80 Fender 2023 1
81 Nut n/a 1
82 Hex Nut n/a 1
83 Cable Grommet n/a 1
84 Bolt n/a 2
85 Nut n/a 2
86 Screw n/a 4
87 Hex Nut n/a 8
88 Nut n/a 4
89 Double Hex Rod n/a 2
90 Nut n/a 2
91 Bolt n/a 2
92 Nut n/a 2
93 Hex Nut n/a 3
95 Screw n/a 1
96 Ext Lockwasher n/a 1
97 Screw n/a 1
98 Capacitor RF n/a 1
Additional Items
1. Arbour Spanner Page 9, Item G 15106401 1
2. Blade Nut Spanner Page 9, Item H 14014801 1
3. Push Stick Page 9, Item F 11001 1
5
26
Page 7
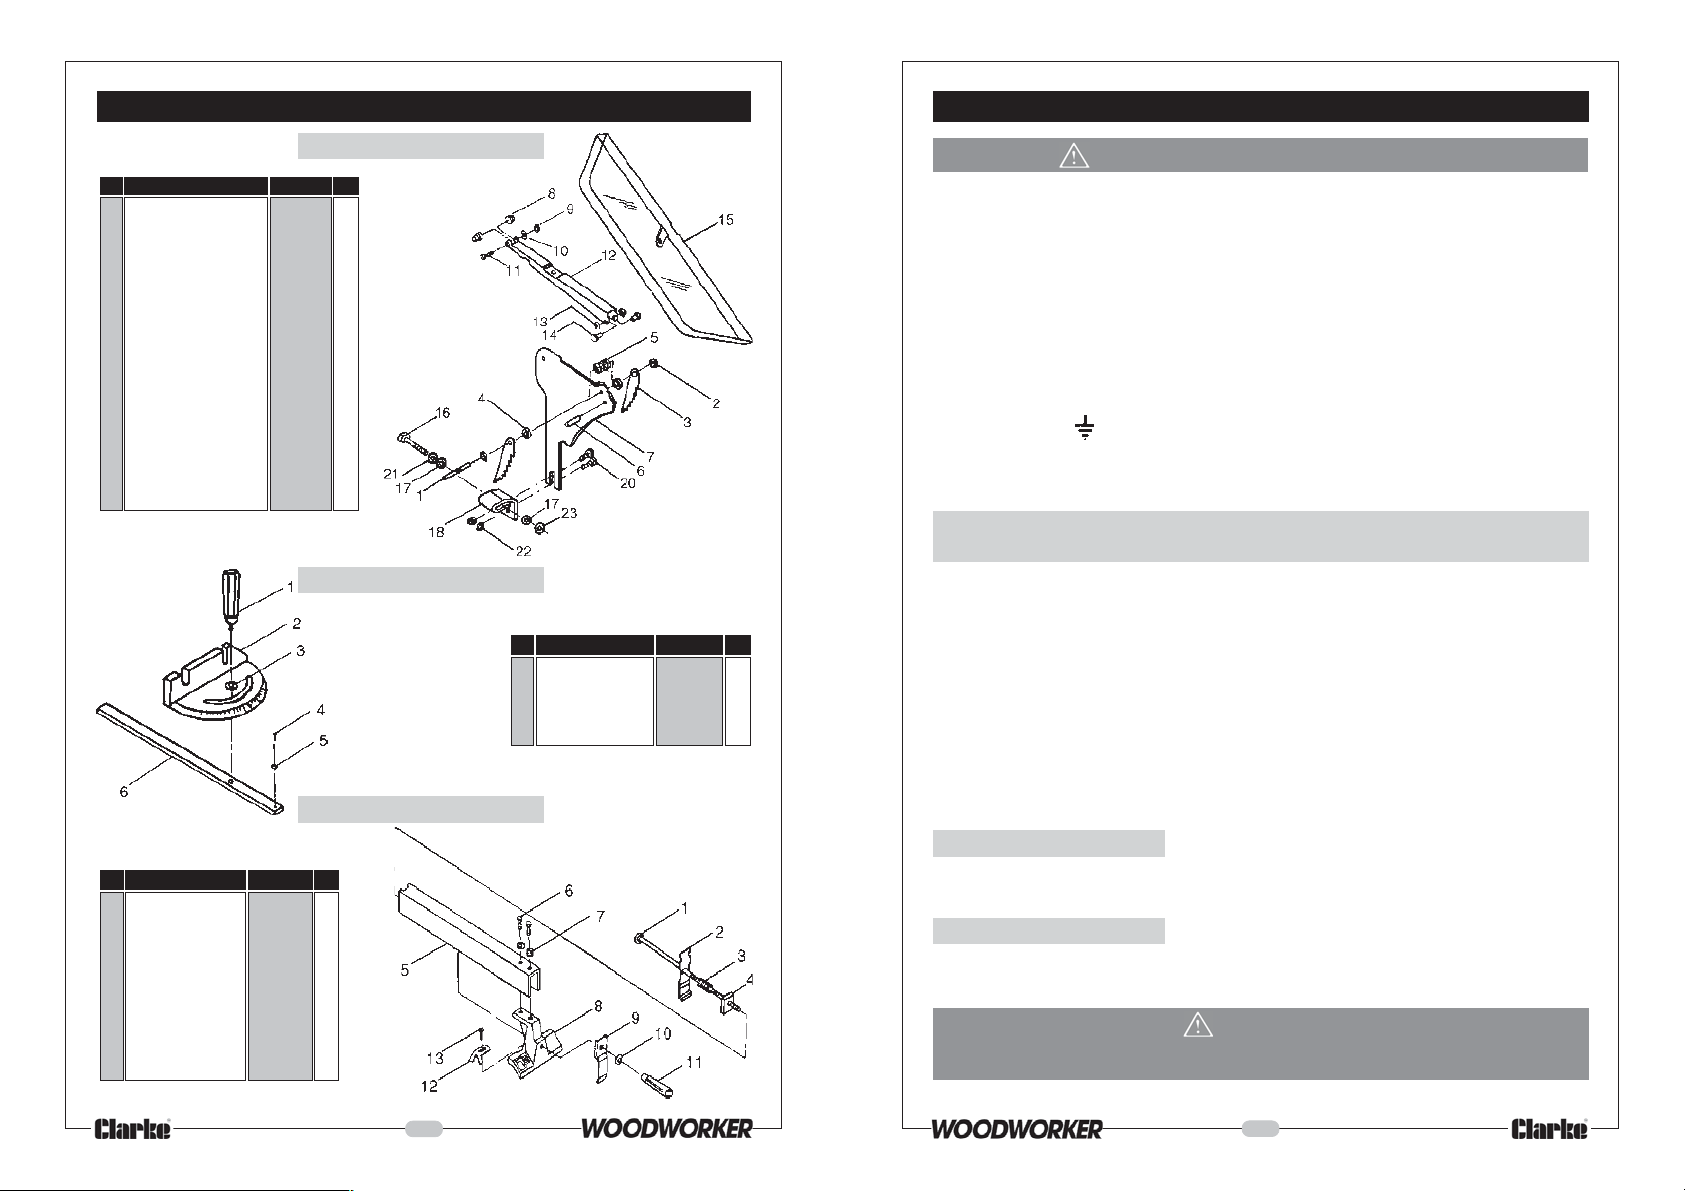
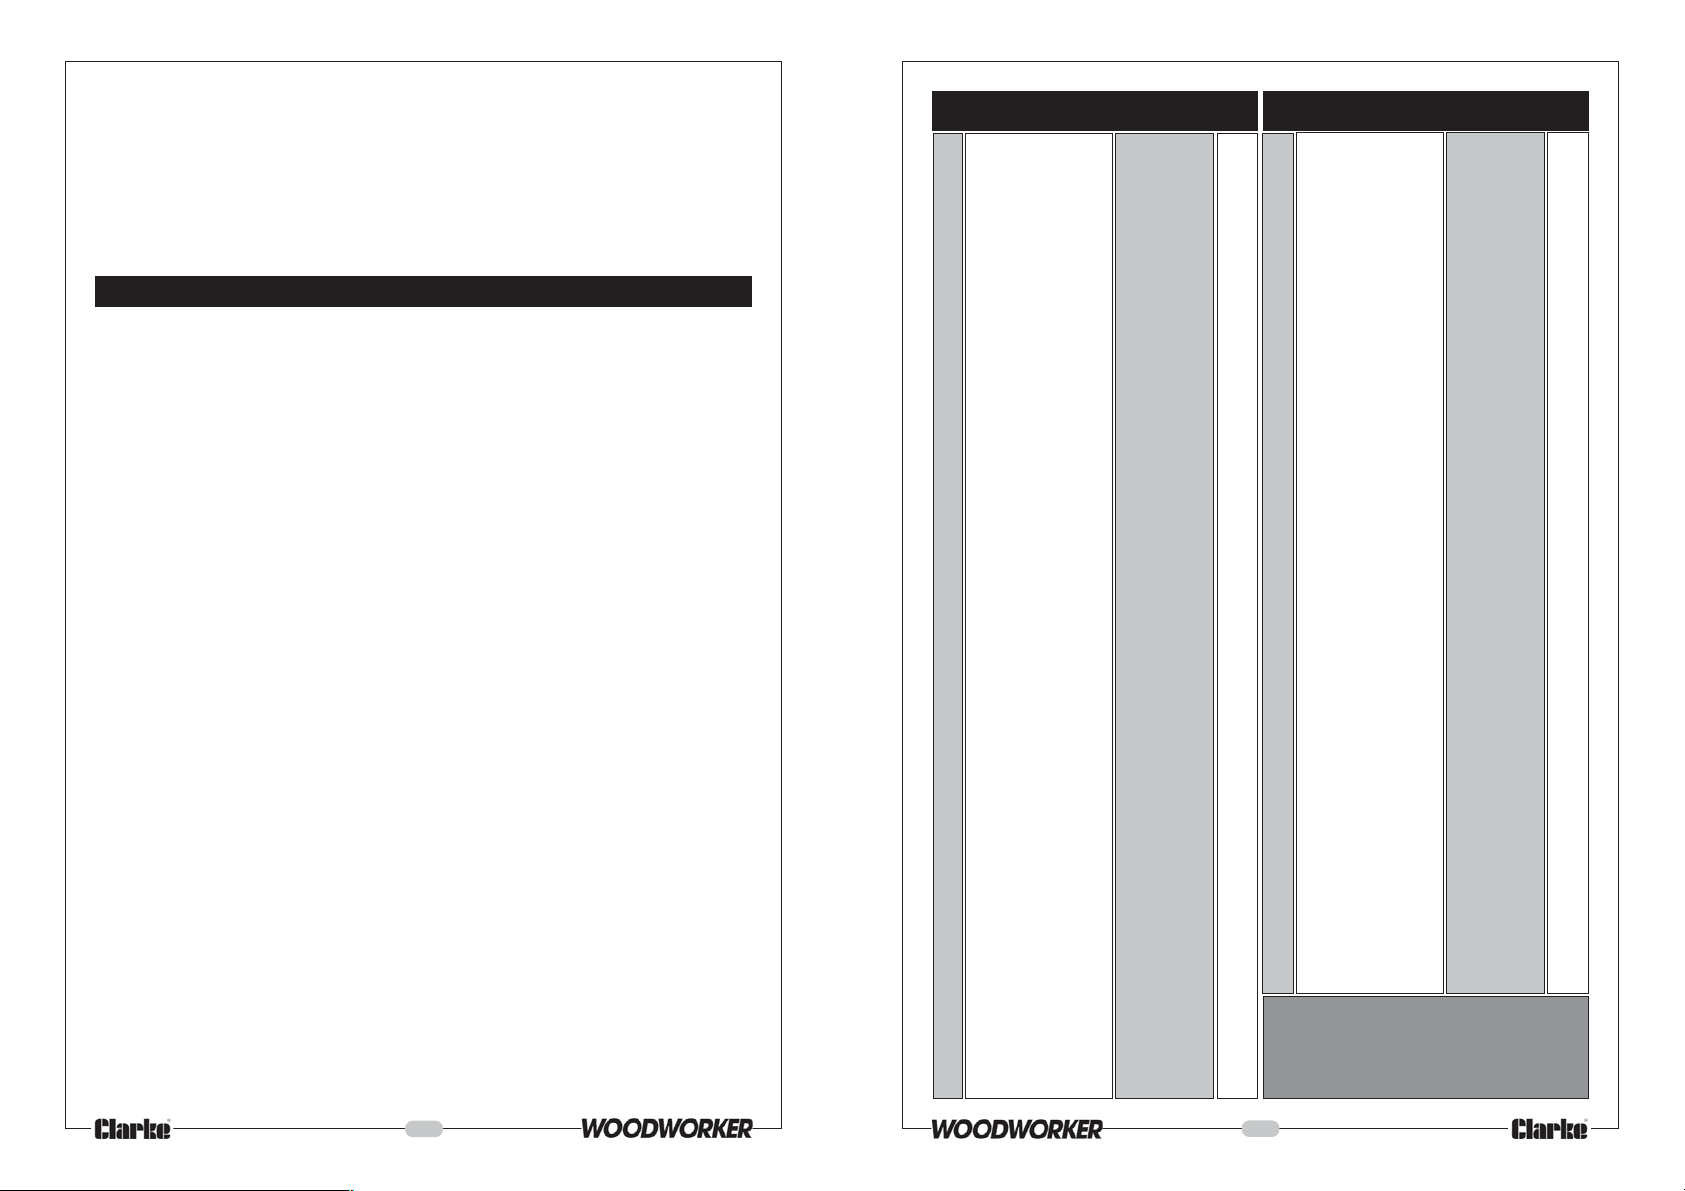
PARTS LISTS
ELECTRICAL CONNECTIONS
Blade Guard Assembly
No. Description Part No Qty
1 Pin 14913301 1
2 Push Nut n/a 2
3 Anti-Kickback Pawl 14913101 2
4 Spacer 14913201 2
5 Spring 14913401 1
6 Roll Pin n/a 1
7 Guard 14912901 1
8 Spacer 14912801 2
9Hex Nut n/a 1
10 Flat Washer n/a 1
11 Hex Screw n/a 1
12 Guard Arm 14912301 1
13 Push Nut n/a 2
14 Bushing n/a 2
15 Blade Guard 149122021 1
16 Bolt M6 x 55mm n/a 1
17 Flat Washer 6mm n/a 2
18 Guard Support n/a 1
20 Bolt n/a 4
21 Int. Shak eproof W asher n/a 1
22 Hex Nut n/a 2
23 Ext. Shakeproof Washer n/a 1
Mitre Gauge Assembly
Rip Fence Assembly
No. Description Part No Qty
1 Clamp Rod 15109901 1
2 Rear Clamp 15110001 1
3 Spring 14910301 1
4 Washer n/a 1
5 Fence 15110601 1
6 Screw n/a 2
7
Ext T ooth Lock Washer n/a 2
8 F ront Block 15110701 1
9 F ront Clamp 15110801 1
10 Flat Washer n/a 1
11 Handle 15111001 1
12 Pointer 14910701 1
13 Pan Head Screw n/a 1
No. Description Part No Qty
1 Knob 15111101 1
2 Mitre Gauge Body 15111301 1
3 Flat Washer n/a 1
4 P anhead Screw n/a 1
5 Pointer 145111801 1
6 Bar 15111501 1
WARNING! THIS APPLIANCE MUST BE EARTHED.
Connect the mains lead to a 230 volt (50Hz) domestic electrical supply via a standard 13
amp BS 1363 plug fitted with a 13 amp fuse, or a suitably fused isolator switch.
IMPORTANT: The wires in the mains lead are coloured in accordance with the following code:
Green & Yellow - Earth
Blue - Neutral
Brown - Live
As the colours of the flexible cord of this appliance may not correspond with the coloured
markings identifying terminals in your plug, proceed as follows:
Connect GREEN & YELLOW coloured cord to plug terminal marked with a letter “E” or
Earth symbol “ ”, or coloured GREEN or GREEN & YELLOW.
Connect BROWN coloured cord to plug terminal marked letter “L” or coloured RED.
Connect BLUE coloured cord to plug terminal marked letter “N” or coloured BLACK.
We strongly recommend that this unit is connected to the mains supply via a Residual
Current Device (RCD).
IMPORTANT!
If this appliance is fitted with a plug which is moulded onto the electric cable (i.e. non- rewirable) please note:
1. The plug must be thrown away if it is cut from the electric cable. There is a danger of
electric shock if it is subsequently inserted into a socket outlet.
2. Never use the plug without the fuse cover fitted.
3. Should you wish to replace a detachable fuse carrier, ensure that the correct replacement
is used (as indicated by marking or colour code).
4. Replacement fuse covers can be obtained from your local dealer or most electrical
stockists.
Fuse Rating
The fuse in the plug must be replaced with one of the same rating (13 amps) and this
replacement must be ASTA approved to BS1362.
Extension Cable
If an extension cable is fitted, ensure the minimum cross section of the conductor is 1 .5mm
for up to 15 metres in length, and 2.5mm2 for up to 25 metres.
WARNING:
If the power cable is worn or cut, or damaged in any way, have it
replaced immediately to avoid shock or fire hazard.
2
25
6
Page 8
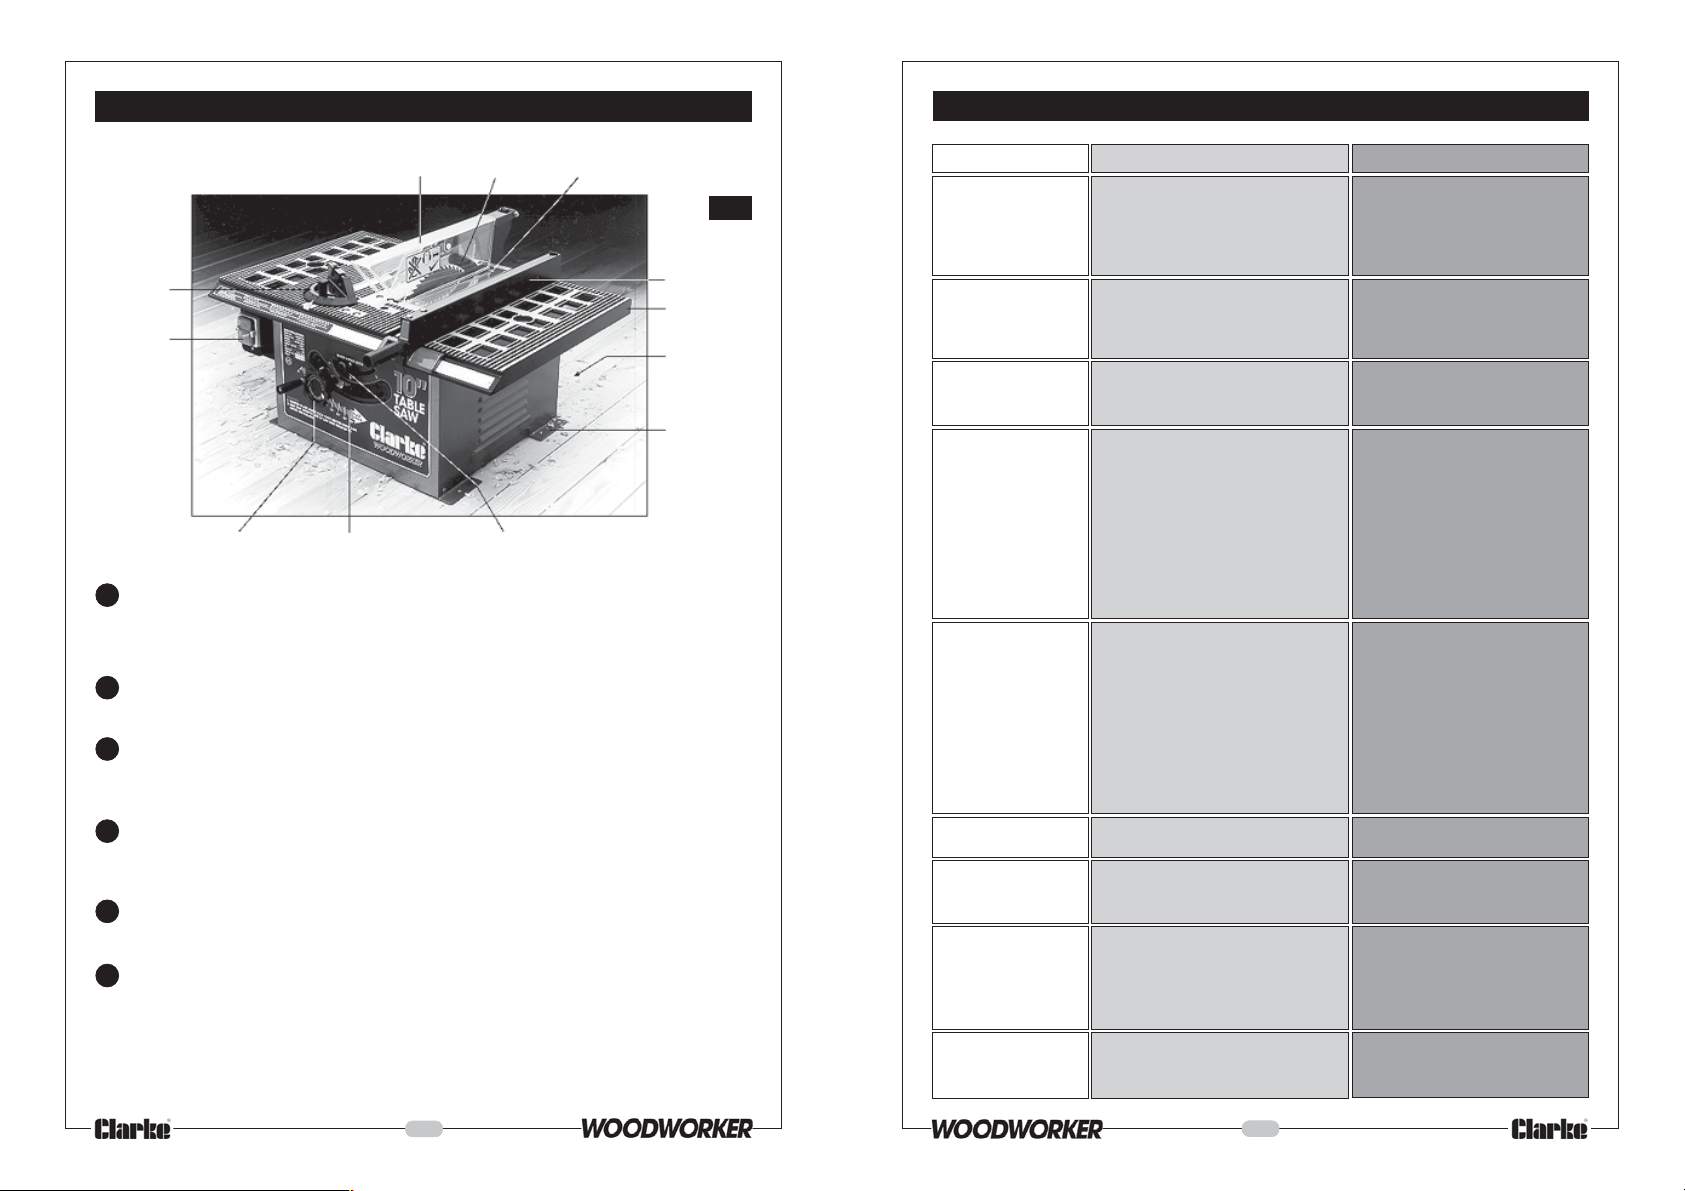
FEATURES
TROUBLE SHOOTING
T able InsertRiving KnifeBlade Guard
Fig.1
Mitre Gauge
Switch Panel
Blade height
Adj Wheel
Blade Tilt Locking KnobBlade tilt Scale
Rip Fence
Table
Dust Extraction
Outlet
Mounting Hole
1. The switch panel incorporates the ON and OFF switches, and an overload reset button.
Your saw also features an Overload Protection device, so that if the motor is overloaded
(due to feed pressure being too great, dull blade or low voltage), the Overload Relay
will intervene, and the motor will automatically cut out.
2. A Dust Extraction Outlet is provided at the rear of the machine. A vacuum extractor
with a suitable flexible hose (40mm dia.), may be connected and used either
permanently or intermittently as required.
3. The Table is provided with two slots, one each side of the saw blade, running across its
entire depth. These slots are for use with the Mitre Gauge when cross cutting, either
square or mitres, and is explained under ‘Operation’. A scale on the Mitre Gauge
indicates the angle at which the workpiece is being mitred.
4. Four holes are provided in the base so that the saw may be bolted to a workbench or
stand. Please note that the machine MUST be firmly secured to either a workbench or a
support to ensure its complete stability. This is explained in detail under ‘Mounting the
Saw on page 12.
5. The Blade Height Adjuster Wheel raises or lowers the blade. Additionally, when pushed
IN against spring pressure, and the Blade Tilt Locking Handle is released, it may be turned
to tilt the blade to any desired angle (see below).
6. The Blade Tilt Locking Knob, when slackened, allows the saw blade to be tilted to any
desired angle from 0
O
to 45O , as shown on the Blade Tilt Scale. This may be done manually,
by grasping the Locking Knob, when it is slackened, and carefully moving the blade
assembly, or by pushing the Blade Height Adjuster Wheel IN against spring pressure, so
that a set of gear teeth engage, and then turning the wheel to power the blade to
your desired angle.
The Blade is locked in position by tightening the Blade Tilt Locking Knob.
7
TROUBLE PROBABLE CAUSE REMEDY
Saw will not start 1. Saw not plugged in 1. Plug in the machine
2. Fuse blown or circuit breaker 2. Replace fuse or reset circuit
tripped breaker
3. Power cable damaged 3. Have cable replaced by
Does not make 1. Positive stop not adjusted 1. Check blade with square and
accurate 45
Rip Cuts 2. T ilt angle pointer not set 2. Check blade with square
Material Pinches 1. Rip fence not aligned with blade 1. Check and adjust rip fence
Blade When Ripping 2. Warped wood, edge against 2. Select another piece of wood
Material binds on 1. Riving knife not aligned correctly 1. Check and align riving knife with
Riving Knife with blade blade
Saw makes 1. Dull blade 1. Replace blade
unsatisfactory cuts 2. Blade mounted backwards 2. Turn blade around
Material kicked back 1. Rip fence out of alignment 1. Align rip fence with blade
from blade slot 2. Riving knife not aligned with blade 2. Align riving knife with blade
Blade does not raise 1. Sawdust and dirt in raising and 1. Brush or blow out loose dust
or tilt freely tilting mechanism and dirt
Blade does not come 1. Extension cable too light or too 1. Replace with adequate size
up to speed long cable
Machine vibrates 1. Saw not mounted securely to 1. T ighten all mounting hardware
Does not make 1. Mitre gauge out of adjustment 1. Adjust mitre gauge
accurate 45
90
O
crosscuts
O
and 90
O
and
O
accurately and adjust pointer to zero
fence not straight
3. Gum or pitch on blade 3. Remove blade and clean with
4. Incorrect blade for work 4. Change the blade
5. Gum or pitch on table causing 5. Clean table with turpentine and
erratic feed steel wool and apply wax
3. Feeding stock without rip fence 3. Install and use rip fence
4. Riving knife not in place 4. Install and use riving knife with
5. Letting go of material before it is 5. Push material all the way past
all the way past the saw blade blade before releasing work
6. Dull blade 6. Replace blade
7. Mitre angle lock knob is not tight 7. Tighten knob
2. Low voltage 2. Contact your electric company
Stand or work bench
2. Stand or bench on uneven floor 2. Reposition on flat level surface
3. Damaged saw blade 3. Replace blade
24
authorised service centre
correctly adjust positive stop
turpentine and coarse steel wool
guard
Fasten to floor if necessary
Page 9
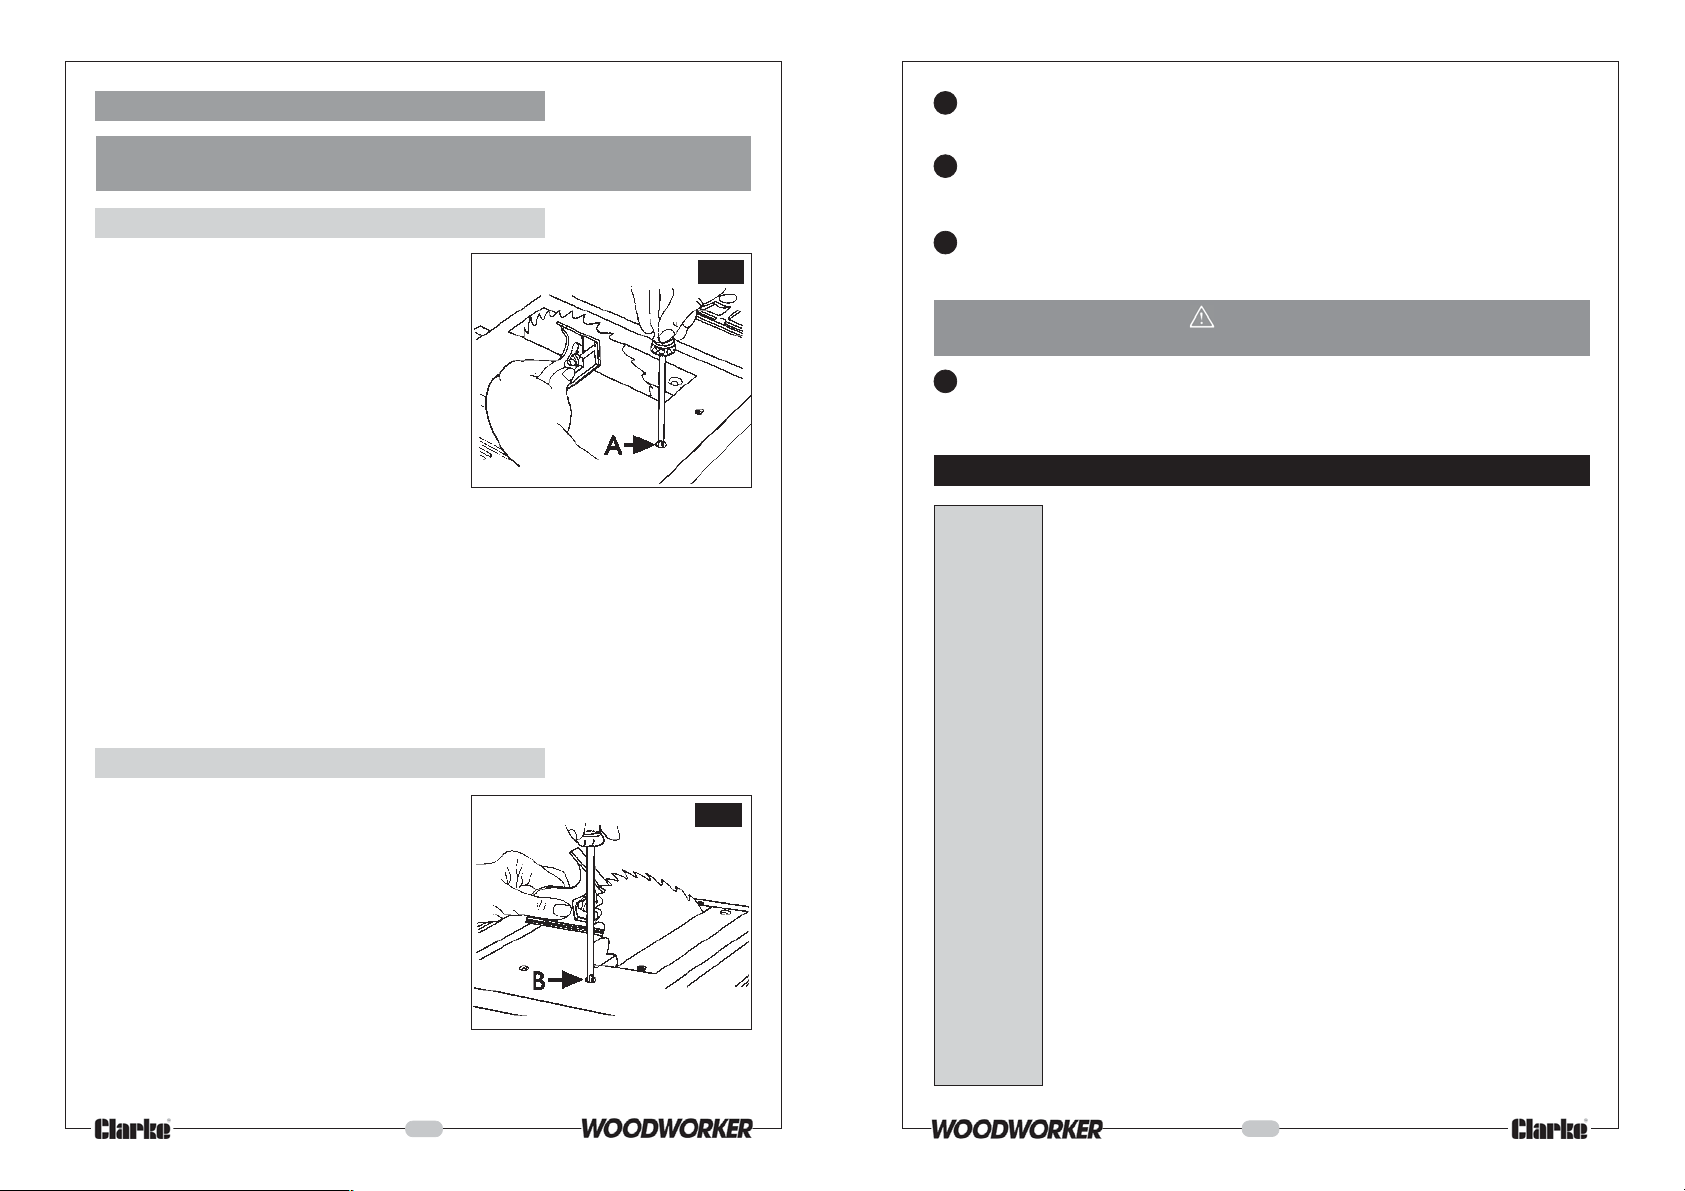
4. Adjusting 90 and 45 Degree Positive Stops
WARNING!
ENSURE THE PLUG IS DISCONNECTED FROM THE POWER SUPPLY BEFORE PROCEEDING
4A. Adjusting Positive Stop at 90 Degrees
(i) Raise the blade to maximum height.
(ii) Loosen the blade tilt lock handle,
push the elevation wheel to the left
as far as possible and tighten the
blade tilt locking knob.
(iii) Place a combination square on the
table with one end of square against
the blade as shown (Fig.26), and
check to see if the blade is 90
table.
If the blade is not 90
O
proceed as follows:
(a) If the machine is permanently mounted, remove the mounting bolts then
turn the machine on to its back.
(b) Remove the Bottom Plate secured by four screws - one in each corner.
(c) Slacken the nut securing the stop screw ‘A’ Fig 26, from beneath.
(d) Slacken the blade tilt locking knob, then screw the adjuster screw in or out,
as necessary, whilst constantly checking the angle of the blade with the
square. When you are satisfied that the blade is at 90
screw locknut.
NOTE: BEFORE replacing the bottom cover, it is prudent to check the blades’ 45
necessary adjustments as described below.
4B. Adjusting Positive Stop at 45 Degrees.
The procedure is the same as that
above, but using a 45
blade held firmly against the 45
O
The 45
adjuster screw is shown at ‘B’,
Fig. 27.
When adjustments are complete, replace the bottom cover securely.
O
gauge, with the
O
to the
to the table,
O
stop.
O,
tighten the adjuster
O.
setting and make any
Fig.26
Fig.27
7. The Rip Fence is for use when rip cutting timber. It can be easily moved or locked in
place by screwing IN the locking handle. Take care NOT to overtighten the locking
handle.
8. The Blade Guard protects the operator and must ALWAYS be in place and working
properly.
IMPORTANT: This machine IS NOT designed for ‘non-through cutting’ operations
9. Anti-Kickback Pawls are attached to the blade guard bracket, which, when properly
maintained, are designed to stop the workpiece from being kicked back at the operator
during operation.
WARNING!
NEVER USE MACHINE WITH THE BLADE GUARD REMOVED.
10. The Table Insert is removable to facilitate the installation or removal of the saw blade,
and must ALWAYS be in place.
GLOSSARY OF TERMS
Arbor The shaft on which a cutting tool is mounted.
Crosscut A cutting or shaping operation made across the width of the workpiece -
across the grain.
Featherboard A device which can help guide workpieces during rip type operation.
Freehand Performing a cut without a fence, mitre gauge, fixture, hold down or other
proper device to keep the workpiece from twisting during the cut.
Heel Misalignment of the blade.
Kerf The amount of material removed by the blade in a through cut.
Kickback An uncontrolled grabbing, and throwing of the workpiece back toward
the front of the saw during a rip type operation.
Leading End The end of the workpiece which, during a rip type operation, is pushed
into the cutting tool first.
Push Stick A device used to feed the workpiece through the saw during narrow
ripping type operation and which helps keep the operator’s hands well
away from the blade.
Push Block A device used for ripping type operations too narrow to allow use of a
push stick.
Rabbet A notch in the edge of a workpiece.
Resin A sticky, sap base substance that has hardened.
Ripping A cutting operation along the length of the workpiece - in the direction of
the grain.
Riving Knife Positioned behind the saw blade to prevent wood closing and jamming
after being cut.
23
8
Page 10
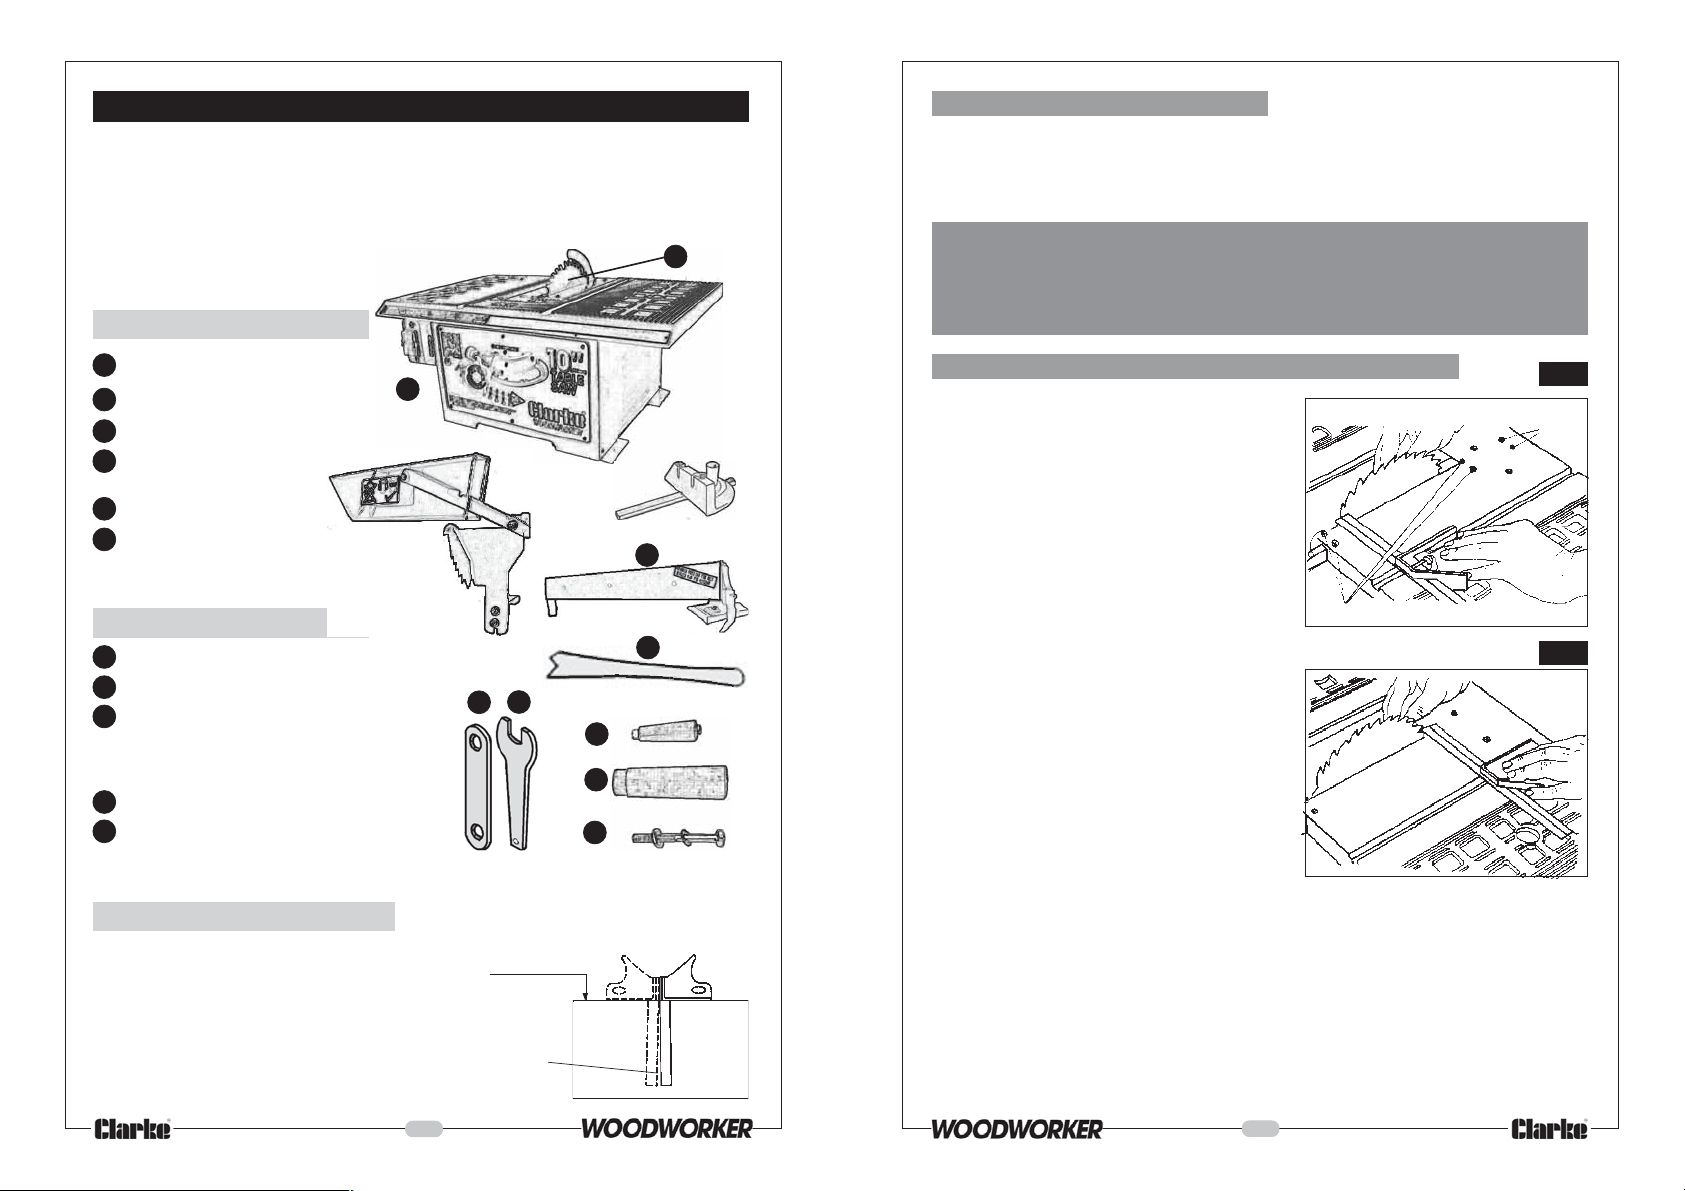
UN-PACKING AND CHECKING CONTENTS
The Table Saw is shipped complete in one carton.
Separate all parts from the packing materials and check to ensure that all components are
accounted for, according to the following list, before discarding any packing material.
Should any component be missing or damaged in transit, please contact your CLARKE dealer
immediately, or CLARKE Customer Service Department on 020 8556 4443.
B
Table of parts
2. Changing the Blade
This procedure is explained on page 10 under ‘Assembly’.
IMPORTANT: 1. Use only Clarke Blade, Part No. 6503125.
2. Replace the blade when teeth become damaged or dull.
WARNING!
1. TO PREVENT PERSONAL INJURY, ALWAYS DISCONNECT PLUG FROM POWER SOURCE
BEFORE CHANGING BLADES.
2. TAKE GREAT CARE WHEN HANDLING SAW BLADES - THE TEETH ARE EXTREMELY
SHARP, AND CARELESSNESS CAN CAUSE SERIOUS PERSONAL INJURY
A Table Saw Assembly.
B Saw Blade.
C Mitre Gauge Assy.
D Blade Guard Assy., c/w bracket
and anti-kickback pawls.
E Rip Fence (Without Handle).
F Push Stick.
A
D
Loose parts in bags
G Arbor Spanner.
H Saw Blade Securing Nut Spanner
I Handle (for Blade Height Adjuster Wheel)
complete with
M6 x55mm Cross Head Screw
and M6 Hex Nut
J Handle (Rip Fence)
K Hex Bolt M6x55mm, Flat Washer and
Lockwasher (External Shakeproof)
Tools Needed for Assembly
1. Combination Square - Must Be True
(Check as shown opposite)
2. Phillips Screwdriver
3. Medium Screwdriver
4. 10mm Spanner
H
G
Straight edge of board
19mm (3/4”) thick, this
edge must be perfectly
straight.
Should be no gap or
overlap here when
square is flipped over
in dotted position.
C
E
F
I
B
K
Checking
Straight Edge with
Comb. Square
3. Adjusting Blade Parallel to the Mitre Gauge Slots
This adjustment must be maintained to ensure
accuracy and help prevent kickback. It is
factory set prior to shipping, but should be
checked periodically to guarantee the
performance of your machine. To check and
adjust, you should proceed a follows:
3.1. Raise blade as high as it will go.
3.2. Select a tooth on the rear of saw blade
that is set to the left when viewing blade
from the front of saw, and mark this
tooth with a pencil.
3.3 Place the base of a combination
square against the edge of the mitre
gauge slot, and extend the sliding rule
of the square so it just touches the
marked tooth (Fig.24).
3.4. Rotate blade and check the same
marked blade tooth at the front of the
saw table (Fig.25).
3.5. If measurements front and back are not
identical, proceed as follows:
a) If the machine is permanently
mounted, remove the mounting bolts
then turn the machine on to its back.
(b) Remove the Bottom Plate secured by four screws - one in each corner.
(c) Slacken the screws directly beneath the points marked at ‘A’ Fig 24, sufficient to
move the saw blade. With the machine back on its feet, align the blade so that
it is parallel to the mitre gauge slot.
(d) When the blade is correctly aligned, very carefully turn the machine on to its
back again and tighten the screws previously slackened.
If adjustment cannot be achieved by loosening the four alignment screws (A), loosen the
two secondary alignment screws located directly beneath the points marked at B, Fig. 24,
but only if it is absolutely necessary to make this adjustment.
Alignment screws (A)
alignment screws (B)
Fig.24
Secondary
Fig.25
9
22
Page 11
8. Compound Mitre Cutting
ASSEMBLY
Compound mitre cutting is a combination of mitre cutting and bevel crosscutting. The cut is
made at an angle other than 90
O
to both the edge and the flat side of the wood.
Adjust the mitre gauge and the blade to the desired angle, and ensure the mitre gauge
body is locked.
WARNING!
WHEN MITRE CUTTING, AN AREA OF BLADE IS EXPOSED.
GREAT CARE MUST BE TAKEN WHEN USING THE MACHINE FOR THIS OPERATION.
MAINTENANCE
FOR YOUR OWN SAFETY, SWITCH MACHINE OFF AND REMOVE PLUG FROM POWER SOURCE
BEFORE ADJUSTING, MAINTAINING OR LUBRICATING YOUR SAW.
Do not allow sawdust to accumulate inside the saw. Use a dust extractor if possible, if not,
frequently blow out any dust that may accumulate inside the saw cabinet and the motor.
Inspect the power cable frequently. If it is worn or cut, or damaged in any way, have it
replaced immediately.
NOTE: Certain cleaning agents and solvents can damage plastic parts. Some of these are: gasoline,
carbon tetrachloride, chlorinated cleaning solvents, ammonia and household detergents which contain
ammonia. Avoiding the use of these and other types of cleaning agents will minimise the possibility of
damage.
A coat of wax applied to the table will help to keep the surface clean and allow workpieces
to slide more freely.
1. Anti-kickback pawls
Make sure the teeth of the ANTI-KICKBACK pawls
are always sharp. They may be sharpened as
follows:
1.1 Remove blade guard.
1.2 Rotate pawl toward rear of blade guard bracket
so that teeth are above the top of it.
1.3 Hold blade guard bracket with left hand and
place pawl over corner of workbench as shown.
1.4 Using a small half round file (Smooth Cut), sharpen
the teeth.
WARNING!
Fig.23
Before the machine can be used, the loose parts must first be assembled to it, and certain
adjustments carried out. Please proceed as follows:
A. The Saw Blade
EXERCISE EXTREME CARE WHEN HANDLING THE SAW BLADE.
THE TEETH ARE EXTREMELY SHARP AND CARELESSNESS COULD CAUSE SEVERE
1. Turn Blade height adjuster handwheel anticlockwise until the arbor is up as high as it
will go, remove the two Table Insert screws and lift the table insert out of the recess in the table.
2. Place the open end arbor spanner on the flats on the inner flange to prevent the
arbor from rotating, and remove the blade securing nut using the spanner provided.
Remove the outer flange.
3. Manoeuvre the blade gently through the slot in the table, so as not to damage the
teeth, and mount it on the arbor, ensuring the TEETH OF THE BLADE ARE POINTING
DOWN AT THE FRONT OF THE TABLE.
4. Replace the outer flange, followed by the blade securing nut, and tighten securely.
5. Replace the table insert, in the recess in the table, and secure in place. Ensure the
blade rotates truly and freely - by hand.
B. Blade Guard and Bracket Assembly
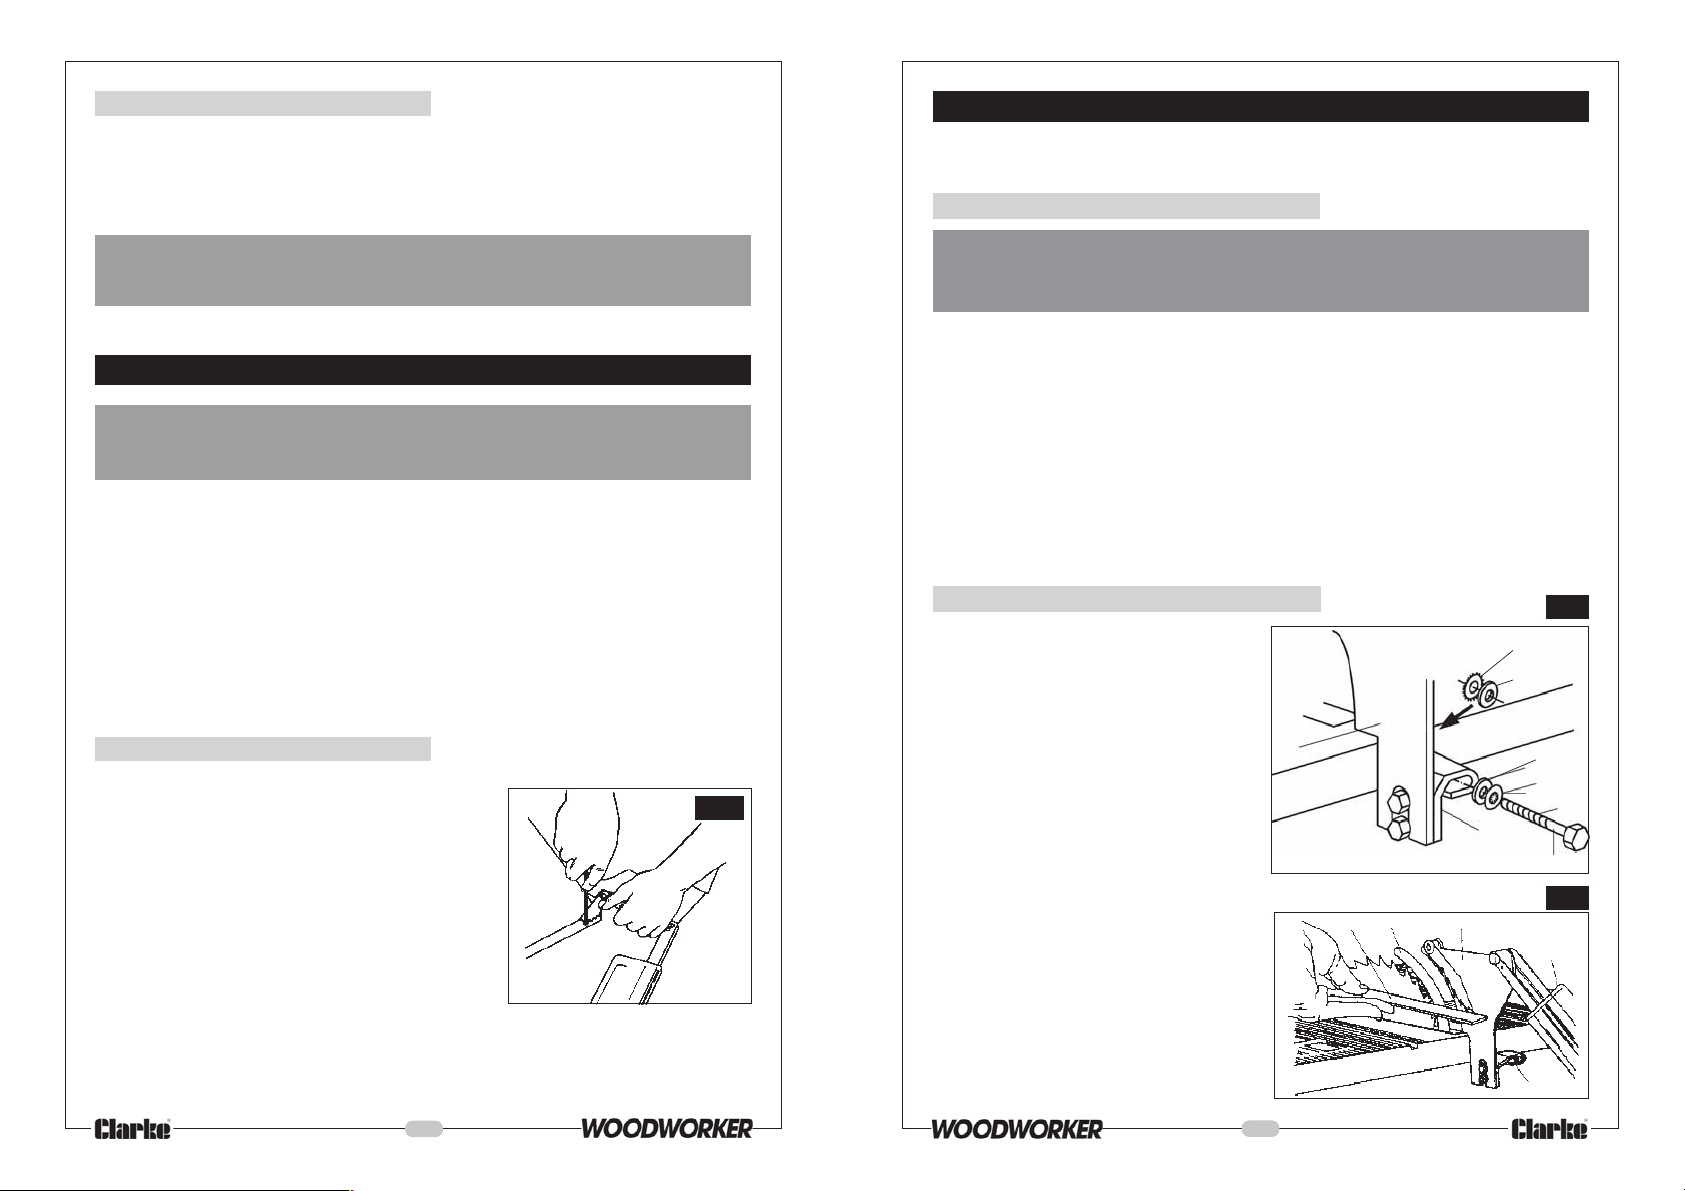
1. From among the loose parts, locate
the following:
1.1 1 x Hex bolt (M6x55mm)
1.2 2 x Flat washers (6mm)
1.3 2 x Lockwashers (1 x external
shakeproof and 1 x internal
shakeproof - 6mm)
1.4 1 x Blade Guard Support Bracket
complete with Blade Guard and
anti-Kickback Pawls.
2. The mounting for the Blade Guard
Bracket is at the rear centre of the table.
Thread the bolt with the flat and shake- proof
washers in place, as shown opposite, through
the slotted hole in the bracket support, and
into the mounting hole (Fig.2).
3. Using a straight edge, check to ensure the
Guard bracket is correctly aligned with the
saw blade (Fig.3). If an adjustment is
necessary, the guard bracket can be moved
left or right, and rotated. When you are certain
it is properly aligned with the e saw blade,
tighten the securing bolt fully.
WARNING!
PERSONAL INJURY.
Blade
Guard
Bracket
Straight
edge
Riving Knife
Blade Guard
Bracket Support
Blade Guard
bracket
External
shakeproof
washer
Flat washer
washer
Internal
shakeproof
washer
Blade Guard
Blade Guard
Support
Fig.2
Flat
Bolt
Fig.3
21
10
Page 12
NEVER START THE MACHINE WITH THE BLADE GUARD REMOVED.
WARNING!
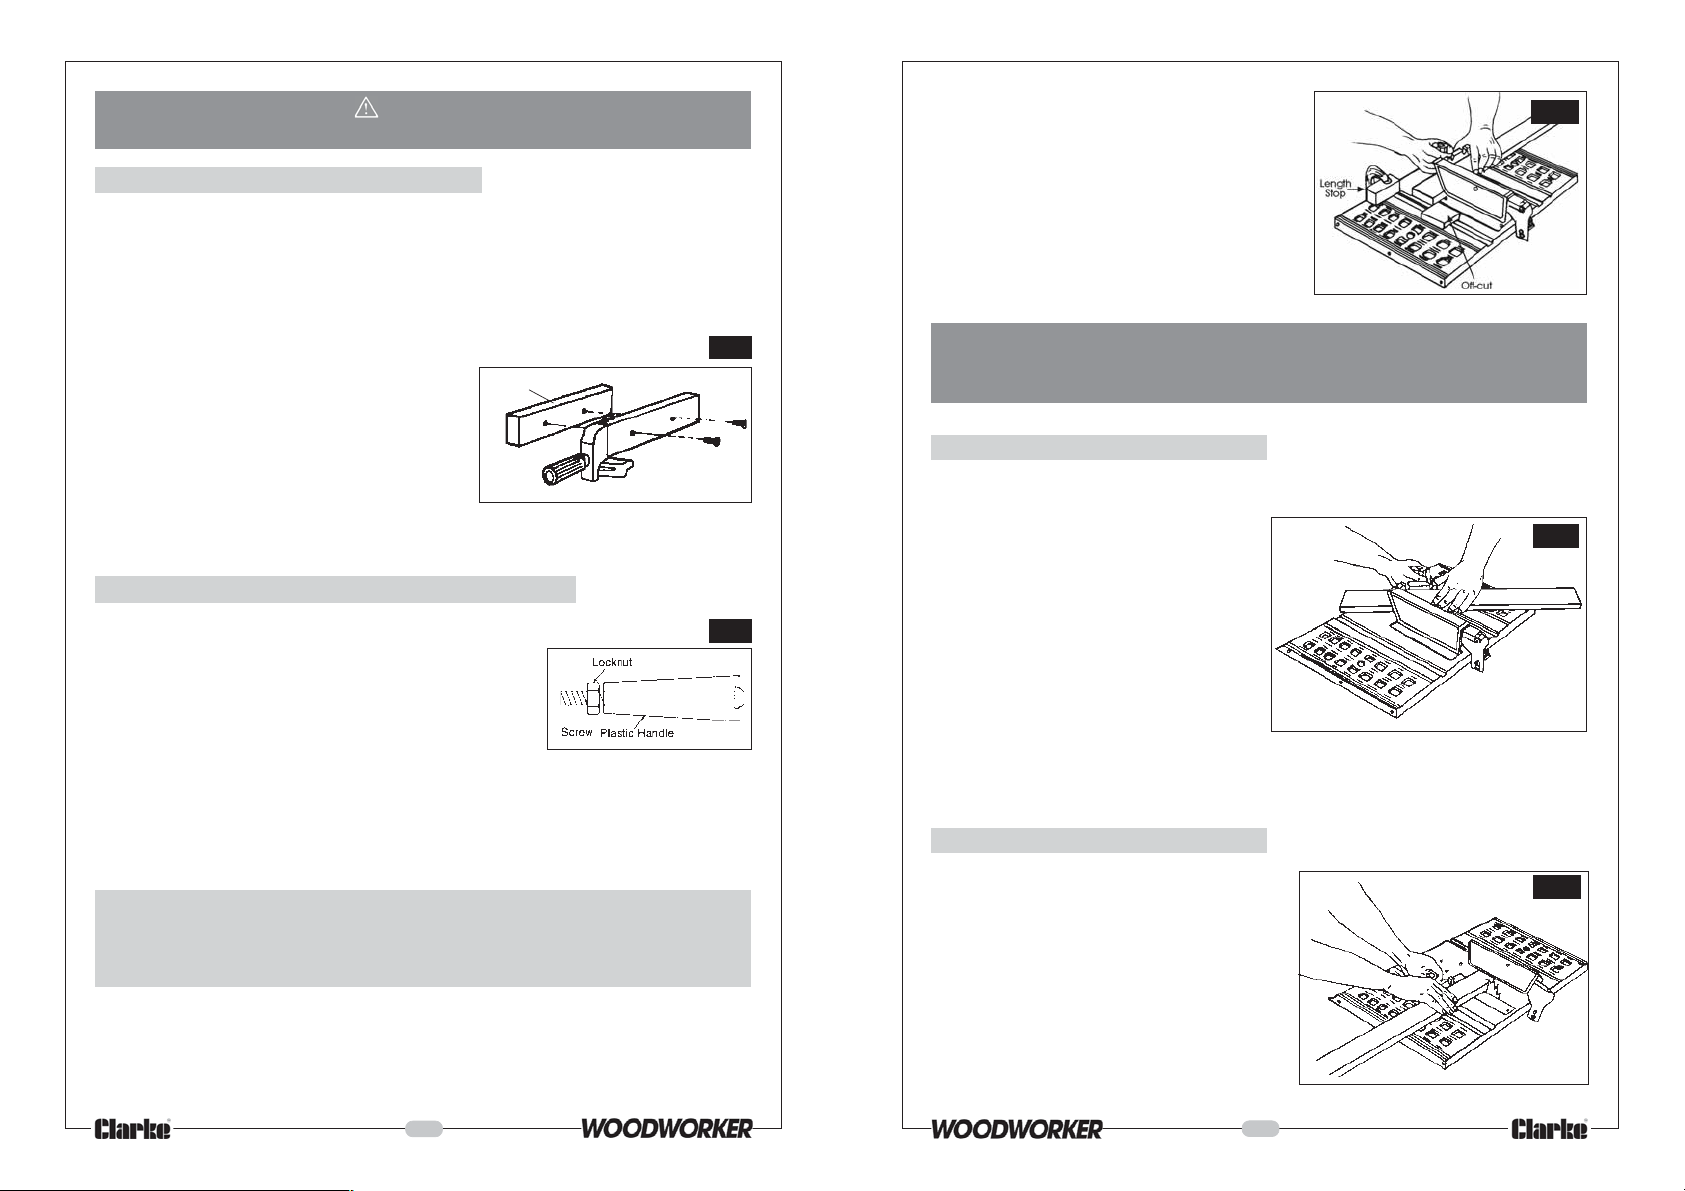
C. Rip Fence
1. Remove and discard the shipping nut from the threaded rod on the front end of the
fence clamp bracket and thread the fence locking handle on to the threaded rod.
2. Place the fence on the table. Hold the plastic casting, on front of the rip fence, firmly
against the front edge of the table and tighten the lock handle securely.
DO NOT overtighten the handle, as this will damage the plastic front block.
NOTE: Holes are provided in the rip fence for attaching a wood facing if required.
Select a piece of smooth straight wood, approx.
19mm (
3
/4”) thick and the same size as the rip
Wood facing
Fig.4
fence. Attach it to the fence with two round head
No.10 wood screws 40mm long.
If you are making a rip type cut in thinner materials,
the facing should be attached to the fence so
that the bottom edge touches the top surface of
the table.
Screw IN lock handle to secure Rip Fence
In this situation, the facing must be lower than the fence, i.e. flush with the table. This will
prevent thin material from sliding under the rip fence.
D. Handle (to Blade Height Adjuster Handwheel)
1. Locate the following loose parts:
1 x M6 x 55mm Cross Head Screw
1 x 6mm nut
1 x Small Plastic handle
2. Thread the screw through the hole running through the
handle and screw on the locknut as far as it will go, as
shown in the diagram.
Then screw the assembly into the rim of the Blade Height Adjuster handwheel until the
plastic handle tightens. Back off the screw slightly and unscrew the nut until it is tight
against the rim of the handwheel, thereby locking the screw in that position.
When properly assembled, the handle will rotate freely about the screw, with minimal
end play.
Your Table Saw is now fully assembled. However, before it can be used, you must ensure
that it is securely and correctly mounted, and checks MUST be made to ensure that all
necessary adjustments are correct, and that parts are properly aligned.
These details are covered in the following paragraphs.
Fig.5
2. Slide the workpiece along the mitre gauge
until it touches the block, hold it securely.
When cutting long workpieces, make sure the
end is supported - from the floor.
3. Make the cut, pull the workpiece back and
push the cut-off piece off the table with a long
push stick,
DO NOT ATTEMPT TO PICK IT UP AS THIS COULD
Repetitive cutting
ENDANGER YOUR HANDS
WARNING!
NEVER USE THE RIP FENCE AS A LENGTH STOP BECAUSE THE CUT-OFF PIECE COULD BIND
BETWEEN THE FENCE AND THE BLADE CAUSING A KICKBACK.
6. Mitre Cutting
Mitre cutting is the term used for cutting at
an angle other than 90
wood.
Follow the same procedure as you would for
crosscutting.
Adjust the mitre gauge to the desired angle,
and lock it.
The mitre gauge may be used in either of
the grooves in the table.
When using the mitre gauge in the LEFT hand
groove, hold the workpiece firmly against the
mitre gauge head with your LEFT HAND, and
grip the lock knob with your right.
When using the RIGHT hand groove, hold the
workpiece with your RIGHT HAND and the
lock knob with your left hand.
O
to the edge of the
7. Bevel Crosscutting
Bevel crosscutting is the same as crosscutting
except that the wood is also cut at an angle,
other than 90 degrees with the flat side of the
wood.
Adjust the blade to the desired height and angle.
Use the Mitre Gauge in the groove to the RIGHT
of the blade. It cannot be used in the groove to
the LEFT because the blade guard will interfere.
Hold the workpiece with your right hand and the
lock knob with your left hand.
Fig.20
Fig.21
Fig.22
11
20
Page 13
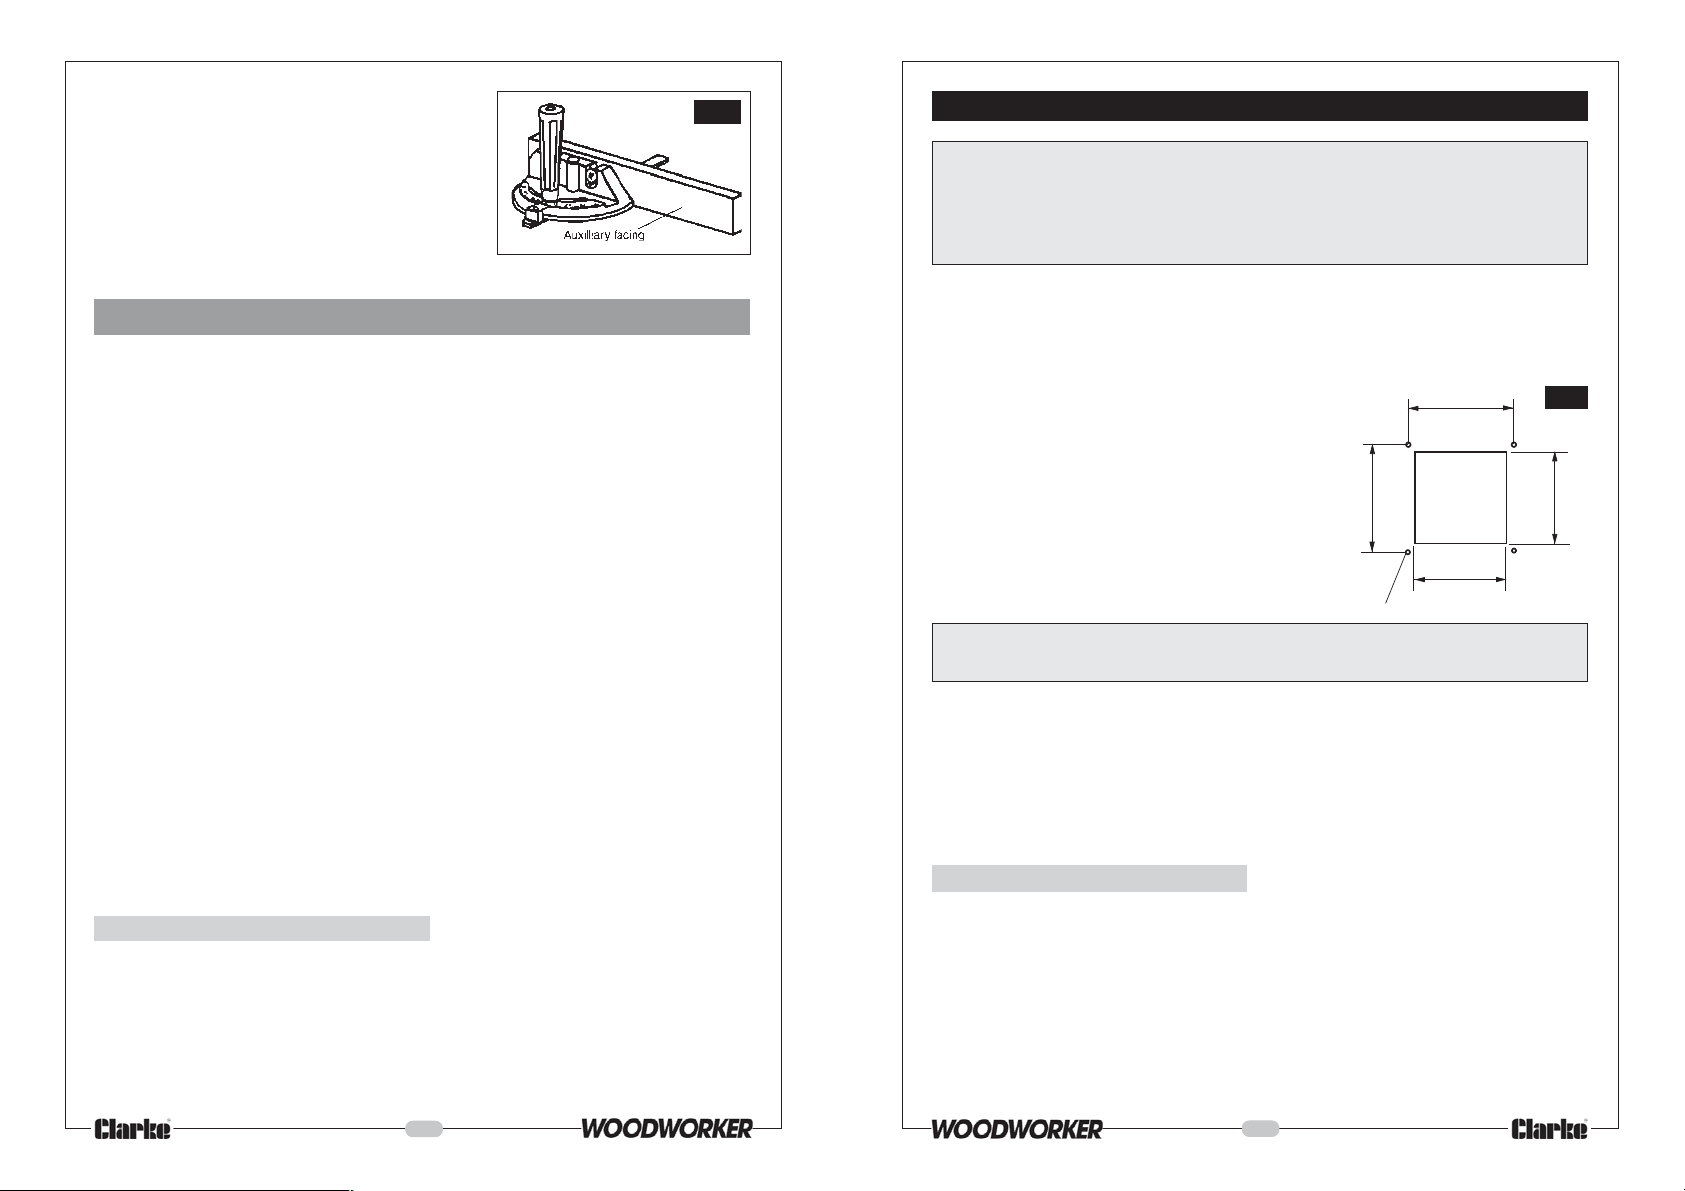
Notches are provided in the mitre gauge head for
attaching an AUXILIARY FACING to make it easier to
Fig.19
cut longer pieces. Ensure the facing does not extend
so far as to interfere with the proper operation of the
Saw Blade Guard.
Select a suitable piece of smooth straight wood, drill
two holes through it and attach it with screws.
HINT: Glue a piece of sandpaper to the face of the
mitre gauge head or auxiliary facing. This will help
prevent the workpiece from creeping whilst being cut.
When crosscutting, you should ALWAYS abide by the following rules:
1. Never make these cuts freehand (without using the mitre gauge or other auxiliary device)
because the blade could bind in the cut and cause a kickback or cause your fingers or
hand to slip into the blade.
2. Always lock the mitre gauge securely when in use.
3. Remove rip fence from table during any operations which utilise the mitre gauge.
4. Make sure blade guard is installed (for all sawing operations).
5. Set the saw blade height to the thickness of the wood plus 2-3mm. Additional blade
exposure would increase the hazard potential.
6. Do not stand directly in front of the blade in case of a throwback (small cutoff piece
caught by the back of the blade and thrown toward the operator). Always stand to
one side of the blade.
7. Keep your hands clear, and out of the path of, the blade.
8. If blade stalls or stops while cutting, switch the machine OFF and disconnect from the
mains supply, before attempting to free the blade.
9. Do not reach over or behind the blade to pull the workpiece through the cut, to support
long or heavy workpieces, to remove cutoff pieces of material, or for any other reason.
10. Do not pick up small pieces of cutoff material from the table. Remove them by pushing
them off the table with a long stick. Otherwise they could be thrown back at you by the
rear of the blade.
11. Do not remove small pieces of cutoff material that may become trapped inside the
blade guard while the saw is running. This could endanger your hands or cause a
kickback. Turn the saw off. After the blade has stopped turning, lift the guard and remove
the trapped piece.
12. If workpiece is warped, place the concave side down. This will prevent it from rocking
while it is being cut.
5. Repetitive Cutting
Repetitive cutting is the term used when cutting a quantity of pieces of the same length
without having to mark each piece.
When making repetitive cuts from a long workpiece, make sure it is supported.
1. When making repetitive cuts, clamp a block of wood 75mm (3”) long to the table at
the desired length to act as a length stop.
NOTE: When clamping the block, make sure that the end of the block is well in front of the saw blade. Be
sure it is clamped securely.
MOUNTING THE SAW
IMPORTANT
If the saw is to be a permanent fixture, ensure it is sited in an area with adequate
DO NOT place it where you will be working in your own shadow, or where extension
cables are required - these are hazardous in a workshop environment.
If the table saw is to be used in a permanent location, it should be fastened securely to a
firm supporting surface such as a stand or workbench, using the four mounting holes in the
base.
A Floor Stand, specially designed for your CTS10C Table Saw
Holes should be drilled through the supporting
surface of the workbench using the dimensions
illustrated and the machine should be bolted
down firmly.
If a VACUUM DUST EXTRACTION device is NOT to be
used, an opening MUST also be made in the
workbench, the same size as the opening in the
bottom of the saw. (which houses the Bottom Grid).
This is in order to allow the saw dust to drop through.
Dimensions of the opening are shown in Fig.6.
Ensure the Bottom Grid is in place when bolting the machine to the workbench.
1. Each of the four mounting holes should be bolted securely using 8mm bolts (not
included) which should be 12mm longer than the thickness of the bench top.
2. Locate and mark where the saw is to be mounted.
3. Drill four (4) 10mm diameter holes through workbench.
4. Place table saw on workbench aligning the holes in the base with the holes drilled in
the workbench.
5. Insert four (4) 8mm bolts and tighten.
Mounting to Plywood
An alternative method of securing your table saw is to fasten the saw base to a mounting
board, 600x600mm minimum size, to prevent the saw from tipping whilst in use. A good
grade of plywood with a minimum thickness of 19mm is recommended.
1. Follow the instructions for mounting to a workbench, substituting a plywood board with
a minimum size of 600x600mm.
The opening in the board should be the same as that shown in the diagram above.
To secure the table saw to the plywood board use 8mm countersunk screws with lock
washers and hex nuts (not included). Screw length must be at least 12mm more than
the thickness of the mounting board.
illumination and power supply.
is available from your CLARKE dealer .
419mm (16.5”)
Mounting Holes
IMPORTANT
286mm (11.25”)
opening
in bottom
of saw
305mm (12”)
Fig.6
330mm (13”)
19
12
Page 14
NOTE: For proper stability, holes must be counter sunk on the underside of the plywood so that screw
heads are flush with the bottom surface of the mounting board.
IMPORTANT
Ensure the Bottom Grid is in place when bolting the machine to the workbench.
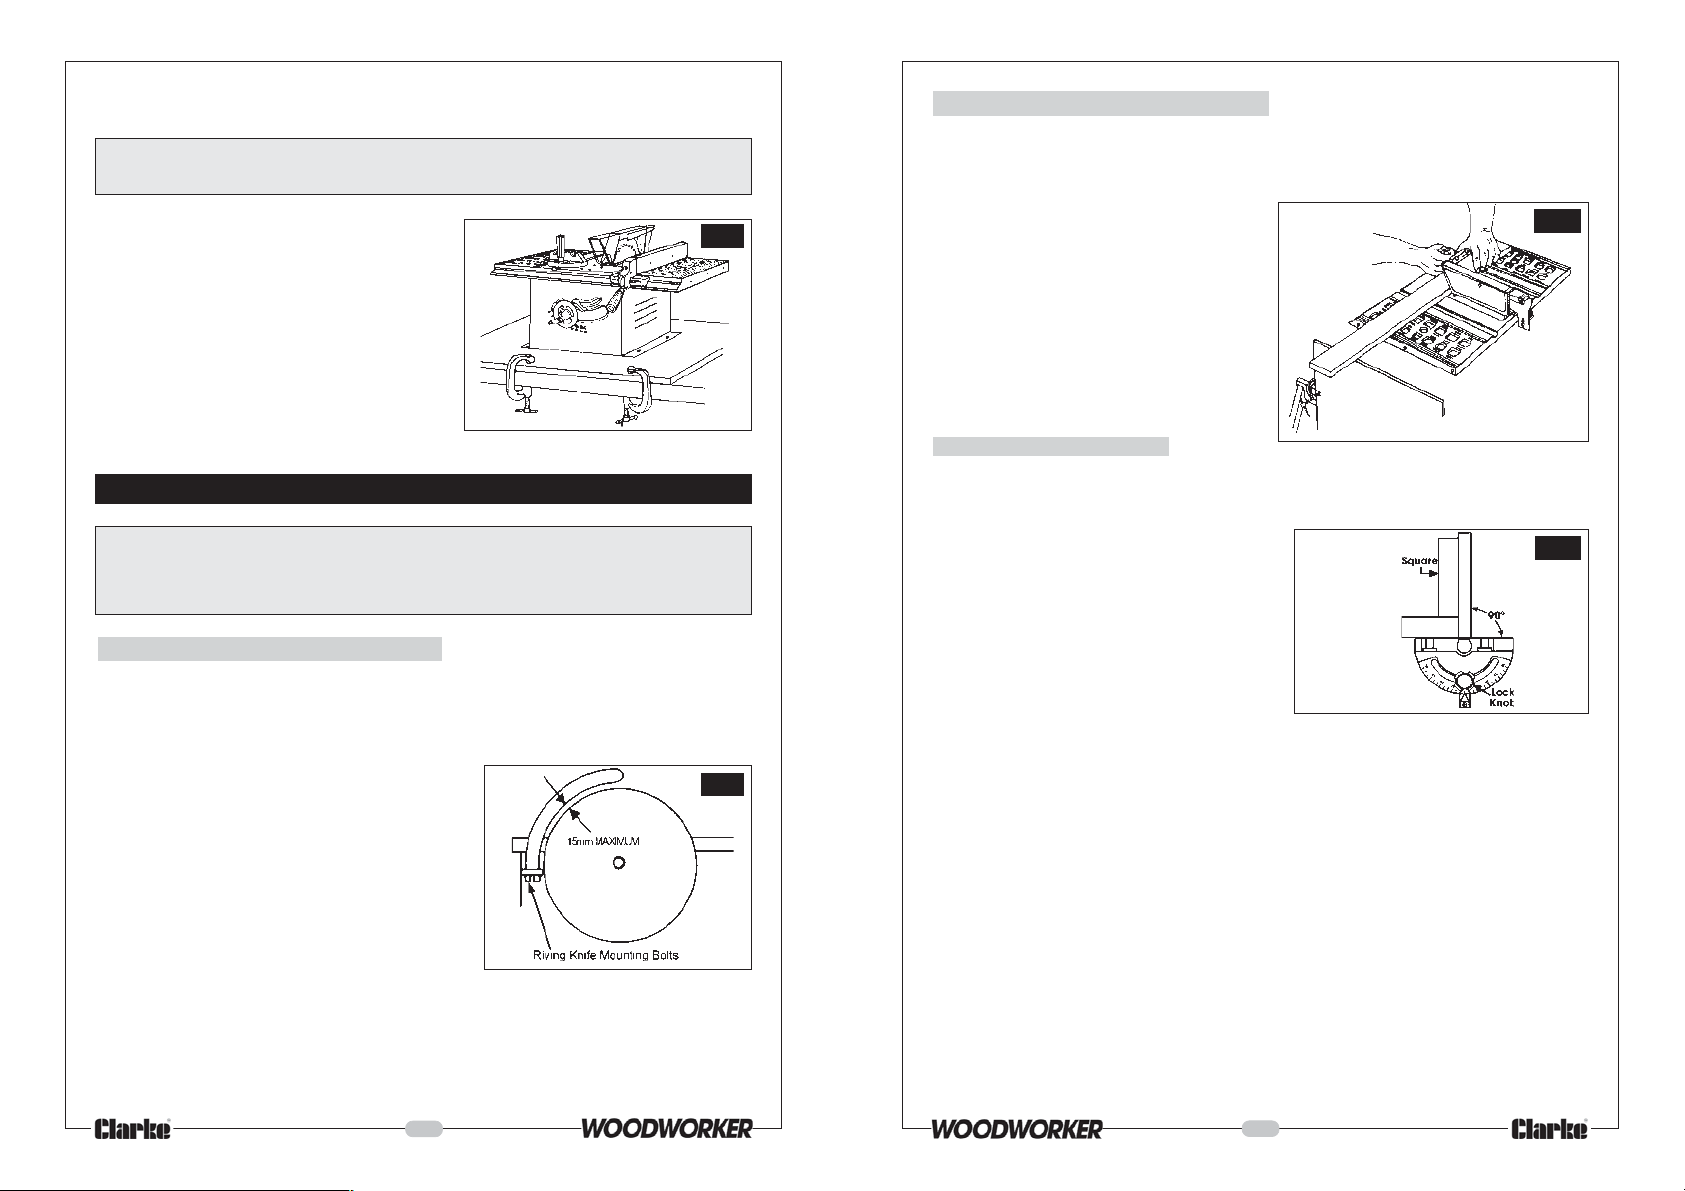
2. Securely clamp the board to a workbench
using two or more “G” clamps, as illustrated
Fig.7
in Fig. 7.
The supporting surface, where saw is to be
mounted, should be examined carefully
after mounting to ensure that no movement
can occur during use. If any tipping or
creeping is noted, it should be investigated
and rectified. The mounting surface must be
flat and even.
IMPORTANT CHECKS - BEFORE STARTING
IMPORTANT:
Before attempting to use the machine, it is necessary to ensure the various
components are correctly adjusted, and checked for security.
1. The Riving Knife
The Riving Knife is essential in producing a good clean cut without chattering or binding
taking place. This adjustment is critical and must ALWAYS be checked before starting your
machine.
To adjust the riving knife remove the Bottom Cover
to give access to the riving knife mounting bolts.
(The Bottom cover is secured with four self tapping
screws, one in each corner).
Slacken off the Riving Knife mounting bolts and
adjust the knife so that a MAX. clearance of 15mm
is maintained around the entire length of the knife,
as shown in Fig.8.
Check to ensure the riving knife is straight and
directly in line with the blade, and in the middle of
the cut (KERF) made by the saw blade, as shown
in Fig .9 on page 14.
NOTE: The riving knife is thinner than the width of the KERF.
Should the Riving Knife become out of shape or misaligned, it must be gently eased back
into line, or if the damage is more severe, it must be removed and bent back into shape
accordingly, or replaced.
Fig.8
4. Crosscutting.
Crosscutting is the term used to describe cuts made in timber across the grain. This type of
cut requires the use of the MITRE GAUGE. This includes bevel cutting, mitre cutting and
compound mitre cutting (described later in this paragraph).
To perform a cross cutting operation, the
work is firmly held against the mitre gauge
head as shown in the diagram, with the mitre
gauge bar located in either the left or right
hand groove in the table. With the timber
carefully lined up with the saw blade, the
mitre gauge is gently moved along the
groove, past the saw blade, producing the
desired cut. Long workpieces should be
supported. A simple arrangement is to clamp
a piece of plywood to a sawhorse as shown
in Fig. 17
Cross cutting, with support
Mitre Gauge Adjustment
To produce an accurate cut at 90O you
should check the gauge as follows:
1. Loosen the lock knob and set mitre
gauge body so the pointer is at the 0
mark, then tighten the lock knob.
2. Make a cut on a piece of scrap wood.
Check it with a square to see if the piece
of wood was cut at 90 degrees.
If the piece of wood was not cut 90
degree, adjust the mitre gauge body,
tighten lock knob and make additional
cuts until you are certain you have
made a 90
O
cut.
3. Finally, slacken off the pointer securing
screw and zero the pointer.
The graduations on the mitre gauge provide accuracy for average woodworking. In some
cases where extreme accuracy is required, when making angle cuts for example, make a
trial cut and then recheck it with an accurate square or protractor.
For maximum accuracy when using the mitre gauge, always favour one side of the groove
in the table. In other words, don’t move the mitre gauge from side to side while cutting but
keep one side of the bar riding against one side of the groove.
When using the left hand groove, hold the workpiece firmly against the mitre gauge head
with your left hand, and grip the lock knob and push with your right hand. When using the
right hand groove, hold the work piece with the right hand and grip the lock knob with the
left.
O
Mitre Gauge Adj.
Fig.17
Fig.18
13
18
Page 15
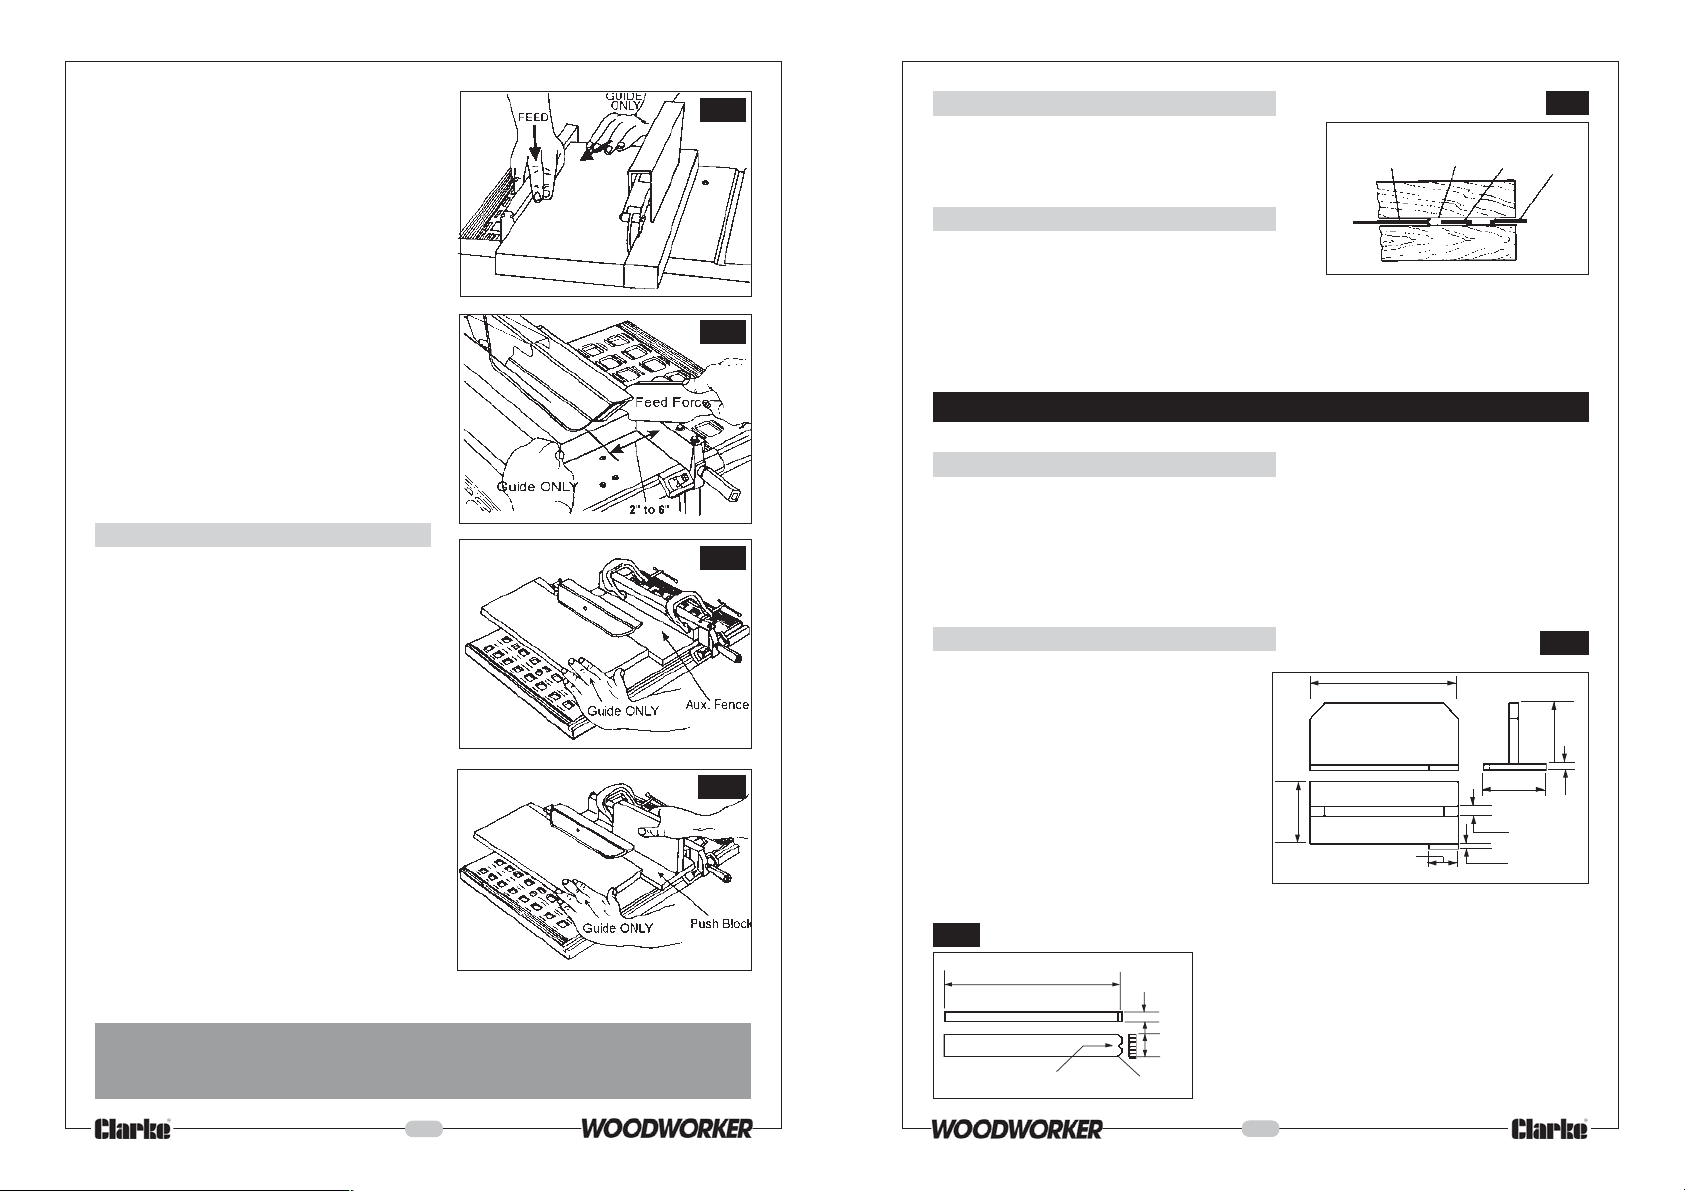
When the width of rip is 150mm (6”) and wider
use your RIGHT HAND to FEED the workpiece,
use LEFT HAND only to GUIDE the workpiece,
do not feed the workpiece with the left hand.
(Fig.13).
When width of rip is 50 - 150mm (2”- 6”) wide
use a push stick to feed the work. (Fig.14).
When width of rip is narrower than 50mm (2”),
the push stick cannot be used because the
guard will interfere. It is therefore necessary to
use the auxiliary fence, and push block together
as shown in fig. 16.
Attach auxiliary fence to rip fence with two ‘G’
clamps as shown in fig 15.
Feed the workpiece by hand until the end is
approximately 1” from the front edge of the
table. Continue to feed using the push block
on top of auxiliary fence until the cut is
complete.
3. Rip Cutting a Bevel.
By tilting the saw blade (by up to 45O), it is
possible to rip cut a bevel in your work. To do
this, set the blade angle by slackening off the
Blade Tilt Lock knob, and position the blade
using the angle gauge and pointer mounted
on the front of the machine. (If absolute
accuracy is required, check the blade angle
with a protractor).
When bevel ripping material 150mm (6”) or
narrower, use the fence on the RIGHT SIDE of
the blade ONLY. This will provide more space
between the fence and the saw blade for the
use of a push stick. If the fence is mounted to
the left, the saw blade guard may interfere with
proper use of a push stick.
NOTE: Your saw is equipped with positive stops for fast
and accurate positioning of the saw blade at 90 and
45 degrees to the table. Should these stops become
out of alignment, they may be readjusted according
to the instructions given under ‘Maintenance’
Fig.13
Fig.14
Fig.15
Fig.16
2. The Saw Blade
Check to ensure the blade is sound. If teeth
are chipped, or cracks are apparent, it must
be renewed.
Blade
Kerf
Riving Knife
Fig.9
Blade
Guard
Bracket
3. The Blade Guard
Ensure the Blade Guard is in place, pivots
freely, and falls under its own weight.
No further adjustments should be necessary, but before you proceed to use the machine, it
is recommended that you apply a coat of paste wax to the table to reduce friction when
pushing the workpiece across the table. Wipe the table thoroughly with a clean dry cloth.
HELPFUL HINTS
Work Helpers
Before cutting any wood on your saw, study all of the Basic Saw Operations.
Notice that in order to make some of the cuts, it is necessary to use certain devices, -’Work
Helpers’, such as the Push Stick, the Push Block and the Auxiliary Fence, all of which you can
make yourself.
After you have made a few practice cuts, make up these ‘helpers’ before starting any
projects.
Push Stick and Push Block
Make the Push Block using pieces of 10mm
plywood and 19mm hardwood as shown
in Fig.10.
The small piece of wood 10x10x64mm
should be GLUED to the plywood. DO NOT
USE NAILS or SCREWS. This is to prevent
damaging the saw blade in the event you
mistakenly cut into the push block.
Position the handle in the centre of the
plywood and fasten together with glue and
wood screws screwed in from below.
(Ensure the screw holes are countersunk.
The screw heads must not be proud).
Fig.11
304mm
120mm
64mm
130mm
19mm
10mm
Fig.10
127mm
10mm
WARNING!
TO PREVENT PERSONAL INJURY, ALWAYS DISCONNECT PLUG FROM POWER SOURCE
WHEN MAKING ADJUSTMENTS.
17
380mm
45° x 45° notch
19mm
Replacement Push Sticks can be made using a
suitable piece of timber as shown in Fig. 11.
40mm
6 x 6mm
14
Page 16
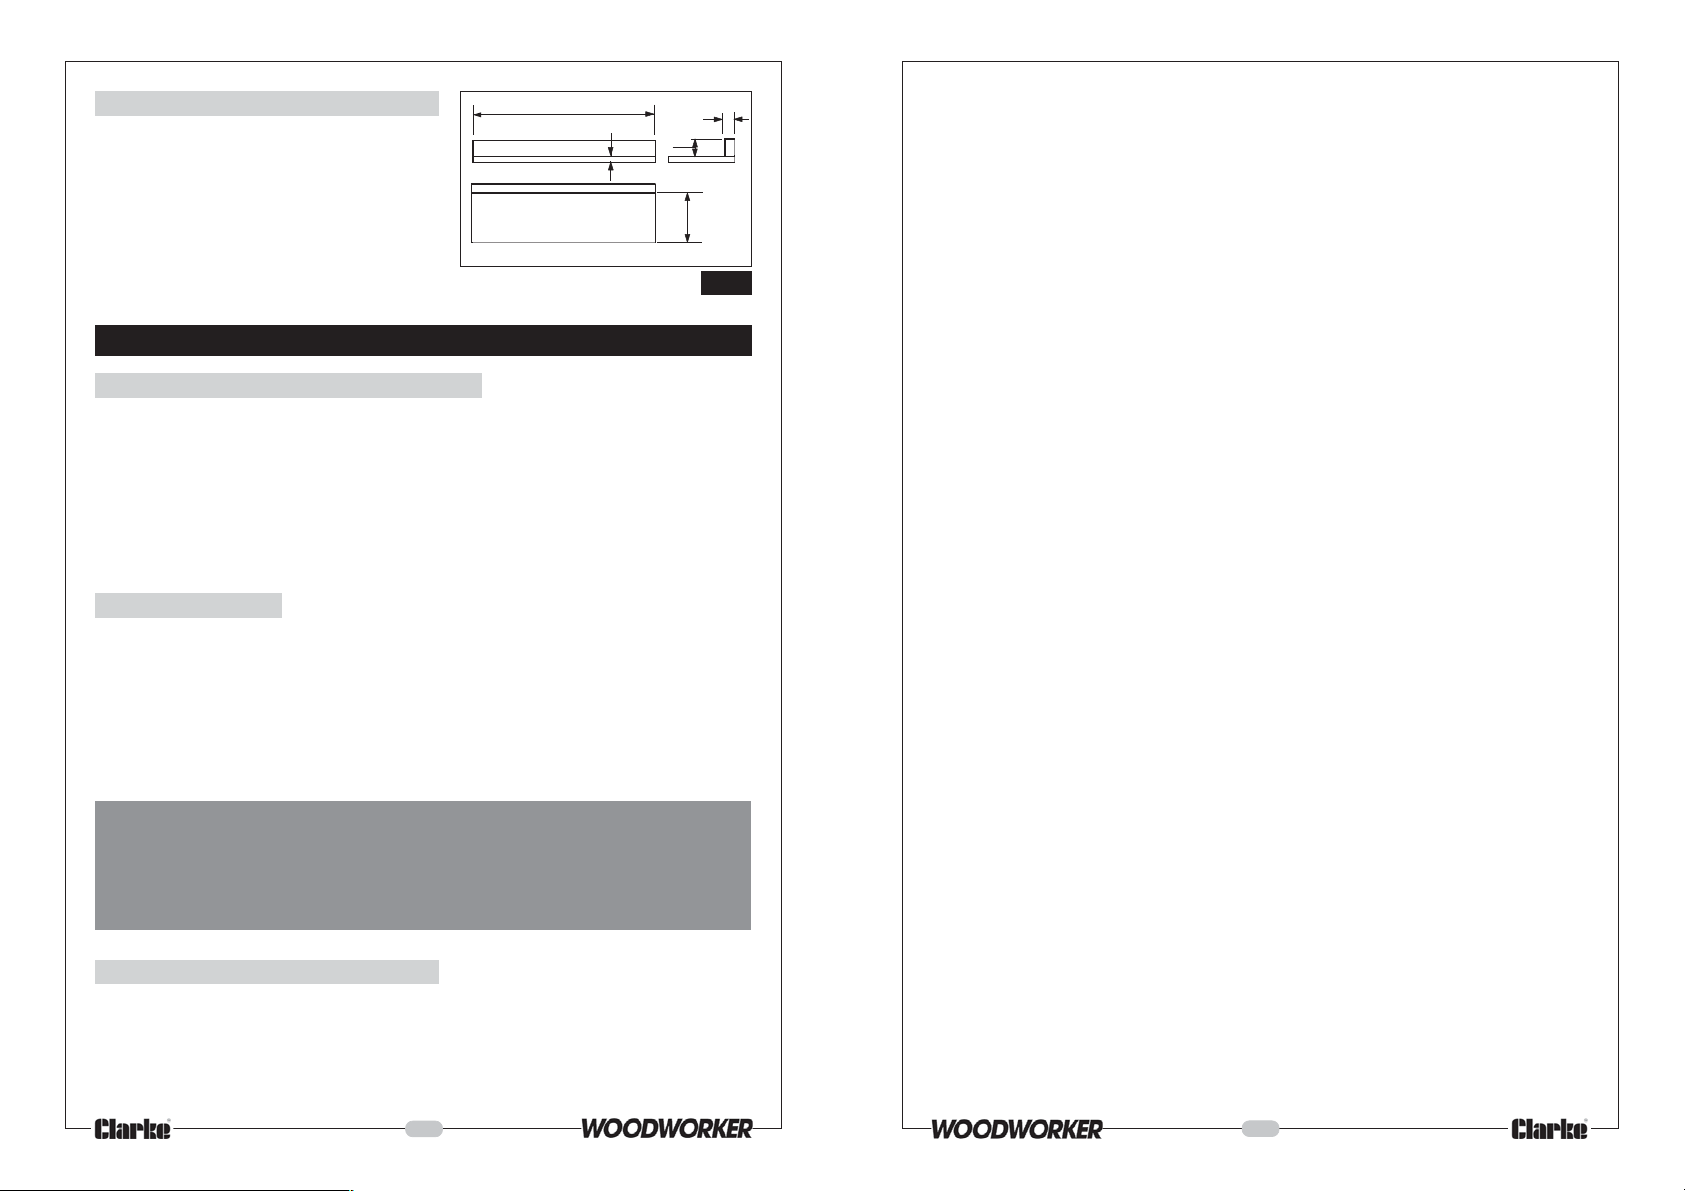
Auxiliary Fence
Make one using pieces of 10mm plywood and
19mm hardwood. Fasten together with glue
and wood screws. Dimensions are shown in Fig.
12.
NOTE:
Since the Push Block is used with the Auxiliary Fence,
the 120mm dimensions must be held identical on both
the pieces.
445mm
10mm
Auxiliary Fence
19mm
44mm
120mm
Fig.12
OPERATION
1. Starting and Stopping the Machine
The ON and OFF switches are located on the front left of the machine.
The upper, GREEN switch is the ON switch and is marked with an ‘I’ symbol.
The lower, RED switch is the OFF switch. It is raised and marked with the symbol ‘O’.
For additional safety, the ON switch is a ‘NO VOLT RELEASE’ type. This means that if the
power is interrupted for whatever reason whilst the machine is switched ON, the no volt
release will automatically trip, setting the machine to the OFF position, thereby preventing it
from starting again when the power is restored. The machine may then be restarted by
pressing the ON switch.
OVERLOAD CUT-OUT
Your machine also features an OVERLOAD CUTOUT device, so that if the machine is
overloaded (due to feed pressure being too great, a dull blade or low voltage etc.), the
overload relay will intervene and the motor will automatically cut out. In this event:
a. Press the OFF button and disconnect from the mains supply.
b. Allow the motor to cool for three to five minutes.
b. Push the reset button, which resets the overload device.
c. Plug the machine back into the mains supply, and switch the saw back on.
WARNING!
THE MACHINE MUST BE IN THE OFF POSITION, AND THE PLUG REMOVED FROM THE POWER
SOURCE WHILE THE COOL DOWN TAKES PLACE. THIS PREVENTS ACCIDENTAL STARTING
WHEN THE RESET BUTTON IS PUSHED, AS THE NO VOLT RELEASE WILL NOT HAVE TRIPPED
UNLESS THIS PROCEDURE IS ADOPTED.
2.Ripping or Rip Cutting
This is the term used for cutting timber in the same direction as the grain, i.e usually lengthwise.
To assist in producing a straight, true cut, a RIP FENCE is used. This is positioned to the right
of the saw blade, and may be adjusted to suit the width of cut required, and firmly
secured in place, ensuring it is parallel to the blade, by screwing in the rip fence handle.
DO NOT overtighten the handle as this will seriously damage the rip fence fittings.
Additionally, when positioning the fence for maximum rip, make sure it is fully clamped,
and does not extend beyond the edge of the table. Do not rip or cut mouldings with the
fence beyond this position, because it cannot be locked.
When ripping, you should ALWAYS abide by the following rules:
1. Never make these cuts FREEHAND (without using the rip fence or auxiliary devices when
required) because the blade could bind in the cut and cause a KICKBACK.
2. Always lock the rip fence securely when in use.
3. Remove the mitre gauge from table during any operations which utilise the rip fence.
4. Make sure the blade guard is installed for all sawing.
Frequently check the action of the Anti-kickback pawls by passing the workpiece
alongside of the blade guard bracket while saw is OFF. Pull the workpiece toward you.
If the pawls do not dig into the workpiece and hold it, the pawls must be
replaced.
5. Set the blade height to the thickness of the workpiece plus 2-3mm. Additional blade
exposure would increase the hazard potential.
6. Do not stand directly in front of the blade in case of a kickback. Stand to either side of
the blade.
7. Keep your hands clear and out of the path of the blade.
8. If the blade stalls or stops while cutting, switch machine OFF and disconnect from the
mains supply BEFORE attempting to free the blade.
9. Do not reach over or behind the blade to pull the workpiece through the cut, to support
long or heavy workpieces, to remove small cutoff pieces of material or for any other
reason.
10. NEVER pick up small pieces of cutoff material from the table. Remove them by pushing
them off the table with a long stick.
11. NEVER remove small pieces of cutoff material that may become trapped inside the
blade guard while the saw is running. This could endanger your hands or cause a
kickback. Turn the saw off and disconnect from the mains supply. After the blade has
stopped turning, lift the guard and remove the piece.
12. If workpiece is warped, place the concave side down. This will prevent it from rocking
while it is being ripped.
13. Do not force the work - a gentle pressure is all that is required.
The feed force should always be applied between the saw blade and the fence and
down on to the table, NOT on the section that will become the cutoff piece.
14. Always use a push stick when the end of the work approaches the blade, or for short
work or work less than 6" wide.
15. Before starting to rip, be sure:
A. Rip Fence is parallel to saw blade.
B. Riving Knife is properly aligned with saw blade.
C.Anti-kickback pawls are functioning properly.
16. When ripping LONG BOARDS or LARGE PANELS, always use a work support. A simple
one can be made by clamping a piece of plywood to a sawhorse.
15
16
 Loading...