

1.8 TONNE ALUMINIUM RACING JACK
MODEL NO: CTJ1800AB
PART NO: 7623201
OPERATION & MAINTENANCE
INSTRUCTIONS
ORIGINAL INSTRUCTIONS DL0322 Rev 1
INTRODUCTION
Thank you for purchasing this CLARKE 1.8 Tonne aluminium racing jack.
Before attempting to use this product, please read this manual thoroughly and
follow the instructions carefully. In doing so you will ensure the safety of yourself
and that of others around you, and you can look forward to your purchase
giving you long and satisfactory service.
SPECIFICATIONS
Model number CTJ1800AB
Part number 7623201
Length (not including handle) 640 mm
Width (not including wheels) 300 mm
Height 230 mm
Height of saddle (minimum) 85 mm
Height of saddle (maximum) 465 mm
Weight 19 kg
Rated Load 1.8 tonne(1800kg)
Cup diameter 115mm
Pump oil capacity 190ml
Distance per pump action 80mm
Pump actions to max height 5
GUARANTEE
This product is guaranteed against faulty manufacture for a period of 12
months from the date of purchase. Please keep your receipt which will be
required as proof of purchase.
This guarantee is invalid if the product is found to have been abused or
tampered with in any way, or not used for the purpose for which it was
intended.
Faulty goods should be returned to their place of purchase, no product can
be returned to us without prior permission.
This guarantee does not effect your statutory rights.
2
Parts & Service: 020 8988 7400 / E-mail: Parts@clarkeinternational.com or Service@clarkeinternational.com

SAFETY PRECAUTIONS
1. Read Instruction manual before use.
2. Only trained persons should operate this lifting equipment.
3. ALWAYS ensure that sufficient light is provided and that the work area is
kept clear of unrelated items.
4. ALWAYS inspect the jack before use. Make sure that all parts are in good
condition and operating smoothly and that no cracks or distortion is
apparent. If in doubt DO NOT use. Have the damaged parts replaced or
consult your CLARKE dealer.
5. The jack must be maintained and repaired by suitably qualified persons.
6. DO NOT make any modifications to this jack or adjust any valves.
7. DO NOT use the jack if an oil leak is apparent. Consult your CLARKE dealer.
8. DO NOT use to lift people and ensure that no-one is in the vehicle during
lifting.
9. NEVER exceed the rated load for the jack See “Specifications” on page ..
Overloading can cause the jack to fail resulting in personal injury.
10. Make sure that the jack is on a hard level surface, and there is no possibility
of it slipping when under load.
11. Only use the jack on solid ground, preferably concrete. Avoid tarmac as
the jack could sink in.
12. Make sure the load is taken by the full saddle and that the lifting point on
the load is of sufficient strength to support the weight.
13. ALWAYS use axle stands to stabilise the load once lifted.
14. Consult the vehicle handbook to determine the correct lifting points.
15. Ensure the load is chocked and the handbrake applied before lifting.
16. NEVER work on or under a load unless it is fully and adequately supported.
17. NEVER rely upon the jack to hold the load in position.
18. NEVER push a load off the jack.
19. Ensure that all personnel are well clear of a load being raised or lowered.
20. Take care not to trap fingers within the moving parts.
21. Use only as a lifting device, do not use as a dolly to move a load.
3
Parts & Service: 020 8988 7400 / E-mail: Parts@clarkeinternational.com or Service@clarkeinternational.com
UNPACKING AND ASSEMBLY
ASSEMBLY
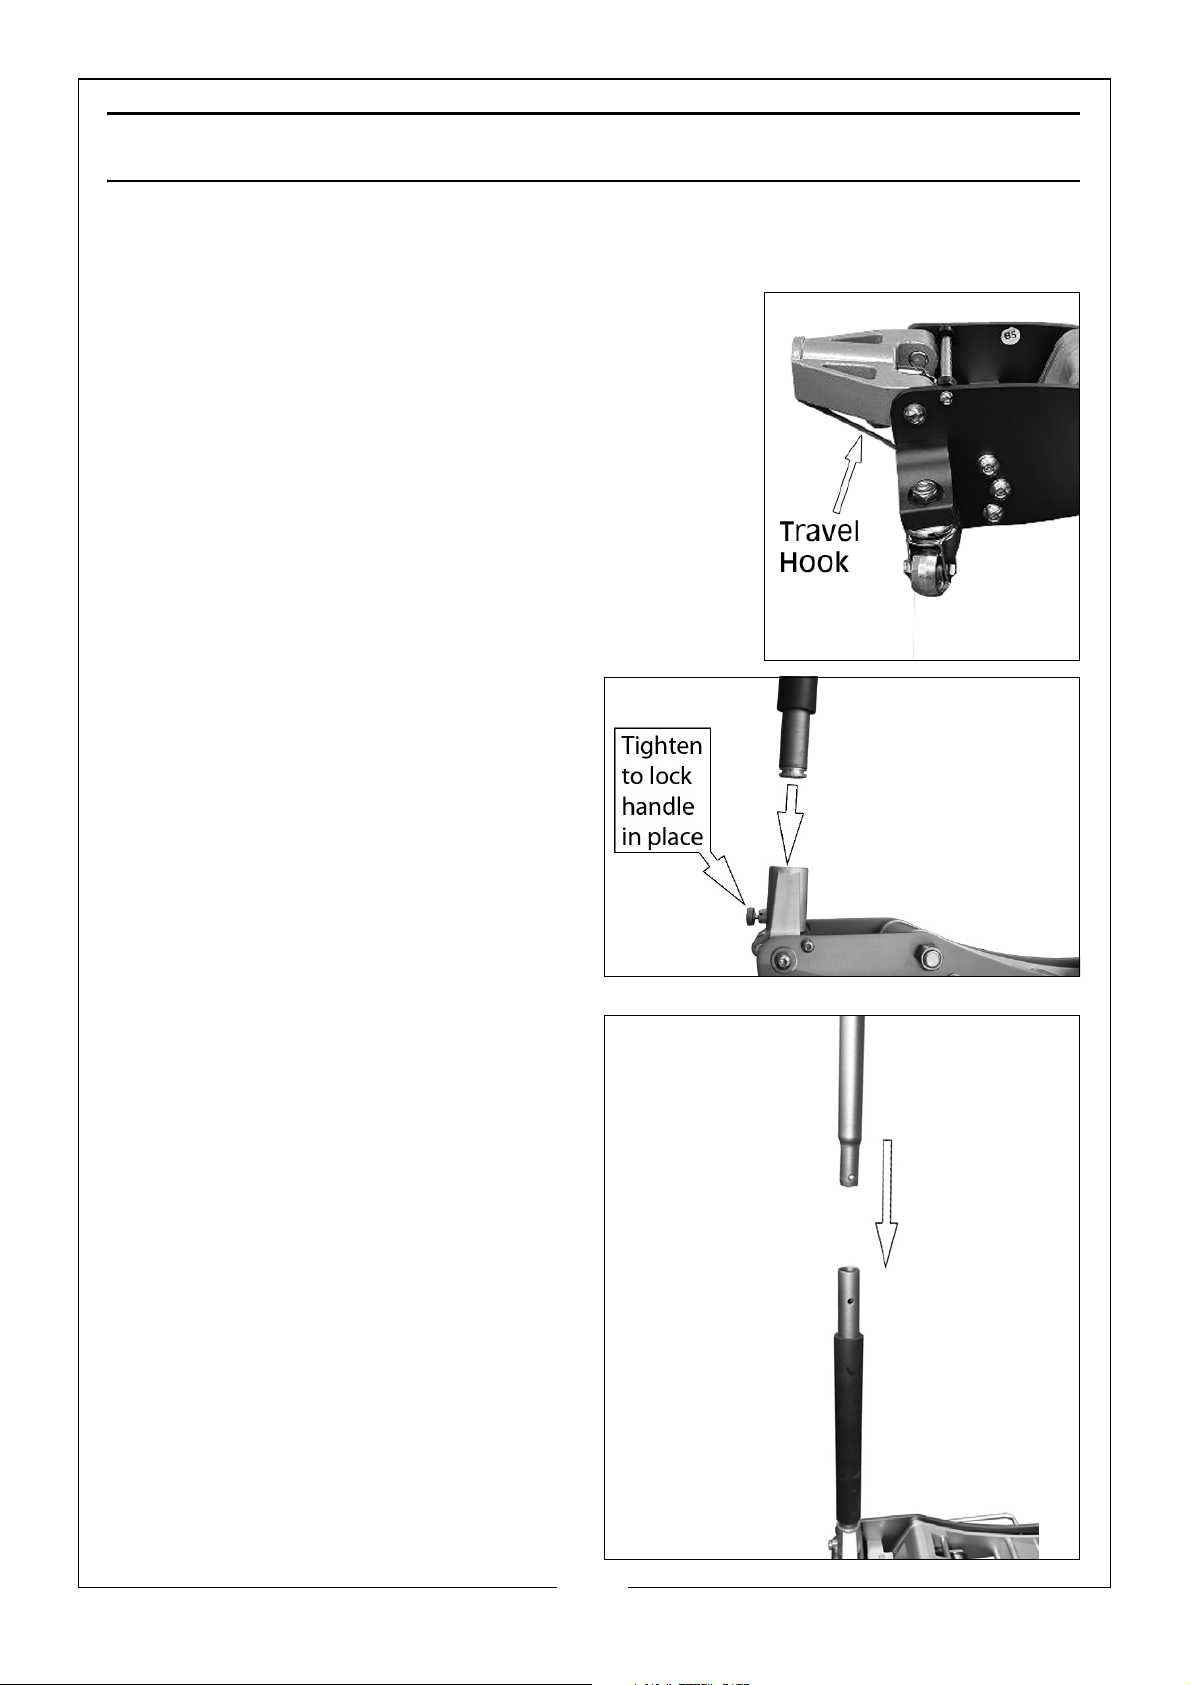
1. IRemove the travel retaining hook by pressing
the handle yoke downwards and unclipping
the hook.
• Take care not to trap fingers while doing this.
2. Insert the lower half of the jack
handle into position as shown.
• Make sure that the square bar
inside the handle yoke
engages with the hole in the
jack handle.
3. Secure the handle by tightening
the thumbscrew shown.
4. Fit the upper jack handle to the
lower jack handle as shown.
• Make sure that the ball clip
engages with the hole in the
lower jack handle.
4
Parts & Service: 020 8988 7400 / E-mail: Parts@clarkeinternational.com or Service@clarkeinternational.com

OPERATION
POSITIONING
Ensure the vehicle is chocked and stable and on firm level ground.
1. Turn the jack handle counterclockwise, to lower the lifting ram.
2. Position the jack so that the saddle is directly beneath the lifting point and
that there are no obstacles to prevent a clean lift, also, make sure that all
personnel are well away from the area, before raising the vehicle.
LIFTING
1. Close the release valve by turning the jack handle clockwise firmly.
2. Operate the jack by pumping the jack handle.
• Make sure that the saddle is in full contact with the vehicle lifting
point and that there are no obstacles to prevent a clean lift.
3. Place axle stands beneath the vehicle.
• Make sure that the axle stands are centred under the vehicle
support points and are perfectly stable before full weight is taken.
• Make sure that the axle stands are in good condition and capable
of supporting the load.
• Make sure that the axle stands cannot move when supporting the
load and that they are on a firm level surface.
• DO NOT jerk the handle, ensure it lowers slowly and under complete
control on to the axle stands which must be correctly positioned and
take the weight evenly.
NOTE: The jack may move slightly during operation. It is therefore
important that the immediate vicinity is clean and completely
free from clutter.
LOWERING
1. Lift the vehicle slightly to remove the weight from any supports.
2. Remove any supports from beneath the vehicle.
3. Slowly turn the jack handle counterclockwise to open the release valve.
NOTE: make sure that this operation is carried out under complete
control. DO NOT allow the load to drop suddenly as this could
damage internal components.
4. Remove the jack from beneath the vehicle.
5
Parts & Service: 020 8988 7400 / E-mail: Parts@clarkeinternational.com or Service@clarkeinternational.com
MAINTENANCE
1. When the jack is not in use, keep the saddle lowered and the release valve
closed (jack handle turned fully clockwise).
2. Keep the jack clean and apply lubricating oil to all pivoting sections every
three months, or more often when it is used in a dusty work environment.
3. Check the pump piston and piston rod periodically for signs of rust or
corrosion. Clean exposed area with clean oiled cloth.
4. Change the oil once a year or as required, See page 7.
STORAGE
Store in a dry place, with the ram fully retracted. If stored for long periods,
inspect at least once a year, clean and re-oil. For servicing, contact your
CLARKE dealer or CLARKE International Service Department.
BLEEDING THE HYDRAULIC SYSTEM
1. Put the jack on horizontal ground.
2. Open the release valve by
SLOWLY turning the jack handle
counterclockwise and then pump
the handle up and down several
times.
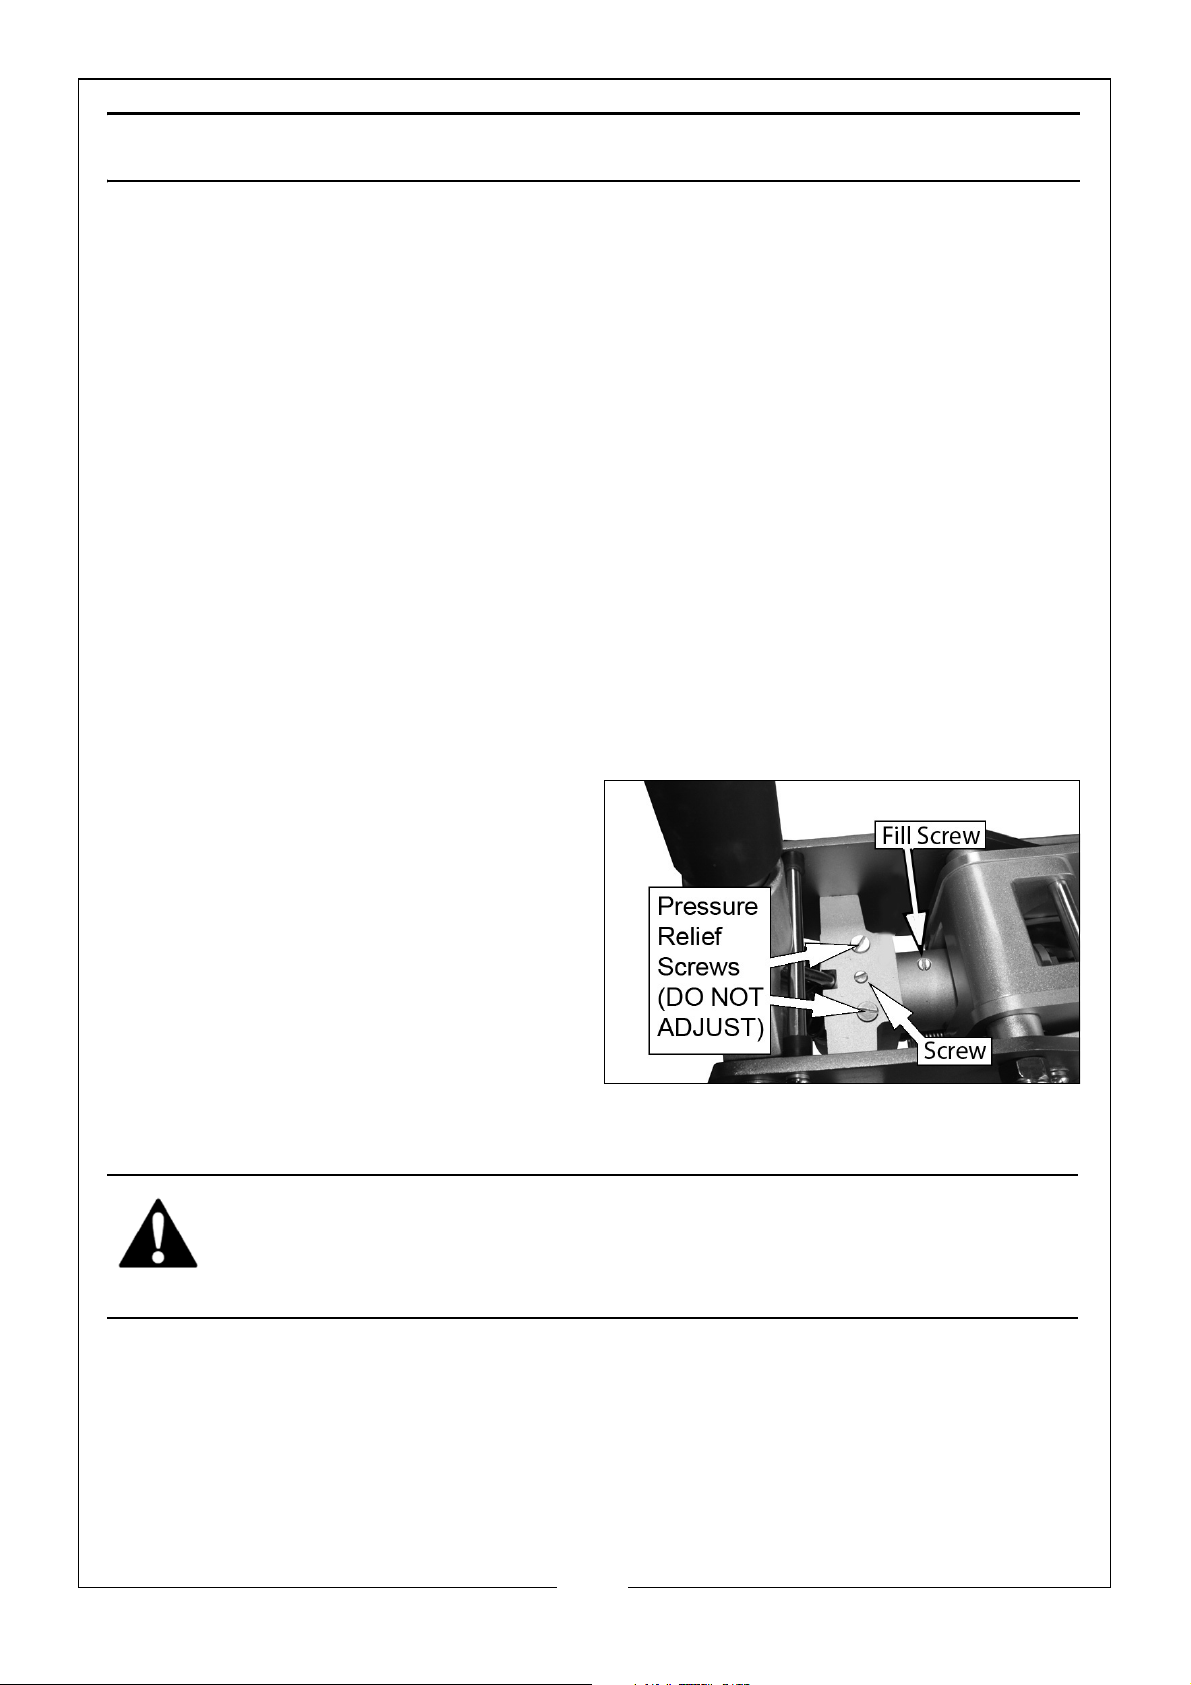
3. Loosen the fill screw.
4. Pump the jack handle up and
down slowly several times to
purge the air from the hydraulic
system.
5. Tighten the fill screw.
WARNING: DO NOT ADJUST THE PRESSURE RELIEF SCREWS UNDER ANY
CIRCUMSTANCES
6
Parts & Service: 020 8988 7400 / E-mail: Parts@clarkeinternational.com or Service@clarkeinternational.com
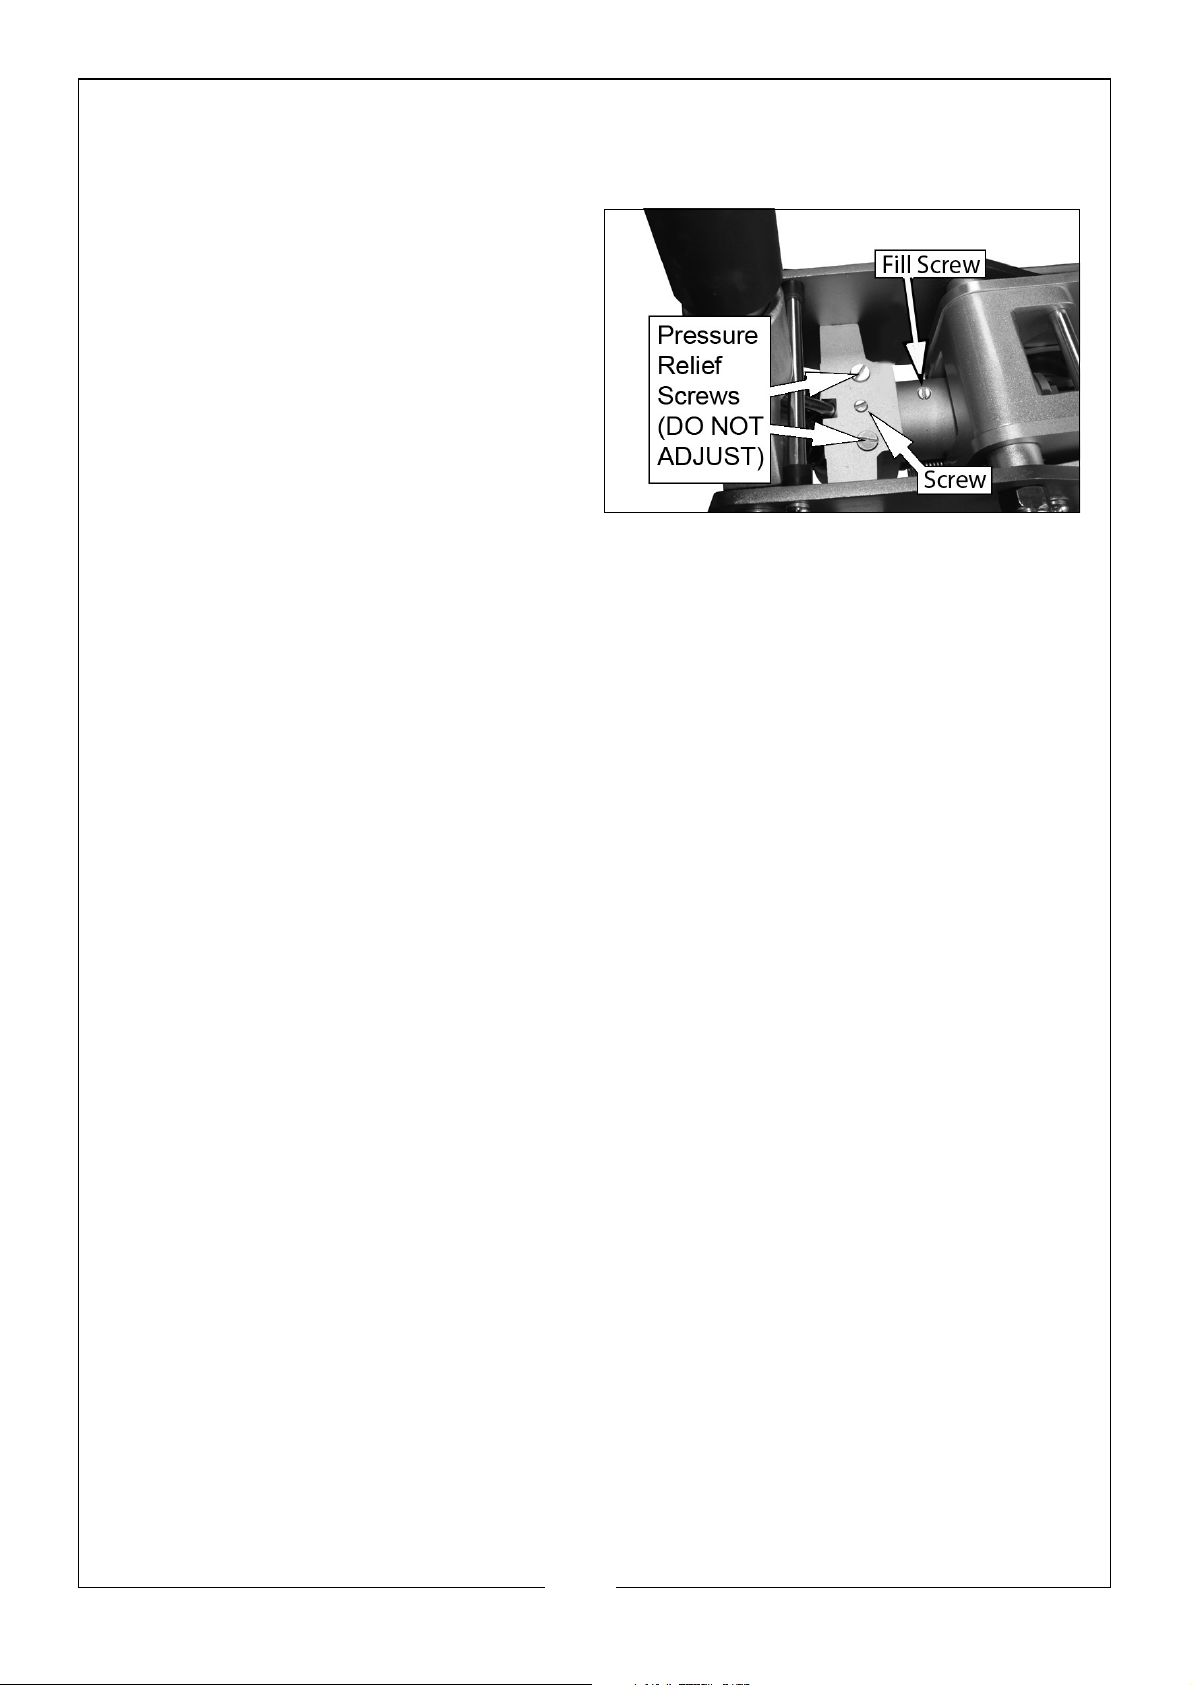
TOPPING UP OR CHANGING THE OIL
1. Lower the saddle as far as possible.
2. Remove ONLY the filling screw as
shown on the right.
3. Turn the jack over and drain the
oil into a suitable container.
• Dispose of the oil in
accordance with government
regulations.
4. Fill with CLARKE hydraulic oil into
the fill screw hole slowly until the
oil reaches the bottom of the thread in the oil fill hole.
• CLARKE Hydraulic oil is available from your local CLARKE dealer.
NOTE: Do not touch the assembled handle when adding the hydraulic
oil.
5. Replace the filling screw.
7
Parts & Service: 020 8988 7400 / E-mail: Parts@clarkeinternational.com or Service@clarkeinternational.com

TROUBLESHOOTING
PROBLEM CAUSE SOLUTION
Jack will not lift the
rated load
Jack lowers when
under load
Pump feels spongy Low oil level See “Topping up or Changing the oil”
Handle raises or
flies back under
load
Jack will not lift full
height
Low oil level See “Topping up or Changing the oil”
on page 7.
Release valve not
closed
Release valve not
closed
Air in the hydraulic
system
Air in the hydraulic
system
Air in the hydraulic
system
Low oil level See “Topping up or Changing the oil”
Turn the jacking handle fully
clockwise.
Turn the jacking handle fully
clockwise.
Bleed the system. See page 6.
on page 7.
Bleed the system. See page 6.
Bleed the system. See page 6.
on page 7.
Air in the hydraulic
system
If any of these remedies fail to restore your jack, consult your CLARKE dealer.
Bleed the system. See page 6.
8
Parts & Service: 020 8988 7400 / E-mail: Parts@clarkeinternational.com or Service@clarkeinternational.com
DECLARATIONS OF CONFORMITY
9
Parts & Service: 020 8988 7400 / E-mail: Parts@clarkeinternational.com or Service@clarkeinternational.com

COMPONENT PARTS - (GENERAL ASSEMBLY)
No Description No Description
1 Saddle Pad 29 Screw
2 Saddle Screw 30 Washer
3 Saddle 31 Screw
4 Saddle Base 32 Rear Caster
5 Hinge Pin 33 Rear Caster Base
6 Circlip 34 Washer
7 Front Axle 35 Spring Clip
8 Side Plate 36 Spring
9 Front Wheel Bush 37 Circlip
10 Front Wheel 38 Trunnion Arm
11 Front Wheel Washer 39 Hydraulic Unit
12 Nut 40 Handle Sleeve
13 Side Carrying Handle 41 Upper Handle
14 Screw 42 Lower Handle
15 Washer 43 Handle Set Screw
16 Screw 44 Circlip
17 Support Pivot Bar 45 Roller
18 Screw 46 Roller Pin
19 Arm Stop Bar 47 Handle Yoke
20 Saddle Base Pin 48 Handle Yoke Pivot Pin
21 Spacer 49 Tie Rod
22 Arm Side Plate 50 Lift Arm Pivot Rod
23 Screw 51 Rubber Bumper
24 Washer 52 Split Pin
25 Split Washer 53 Trunnion Block
26 Screw 54 Hinge Bush
27 Nut 55 Connection Block
28 Screw M10X35 56 Hinge Pin
10
Parts & Service: 020 8988 7400 / E-mail: Parts@clarkeinternational.com or Service@clarkeinternational.com

COMPONENT PARTS -(GENERAL ASSEMBLY)
11
Parts & Service: 020 8988 7400 / E-mail: Parts@clarkeinternational.com or Service@clarkeinternational.com

 Loading...