

Page 1
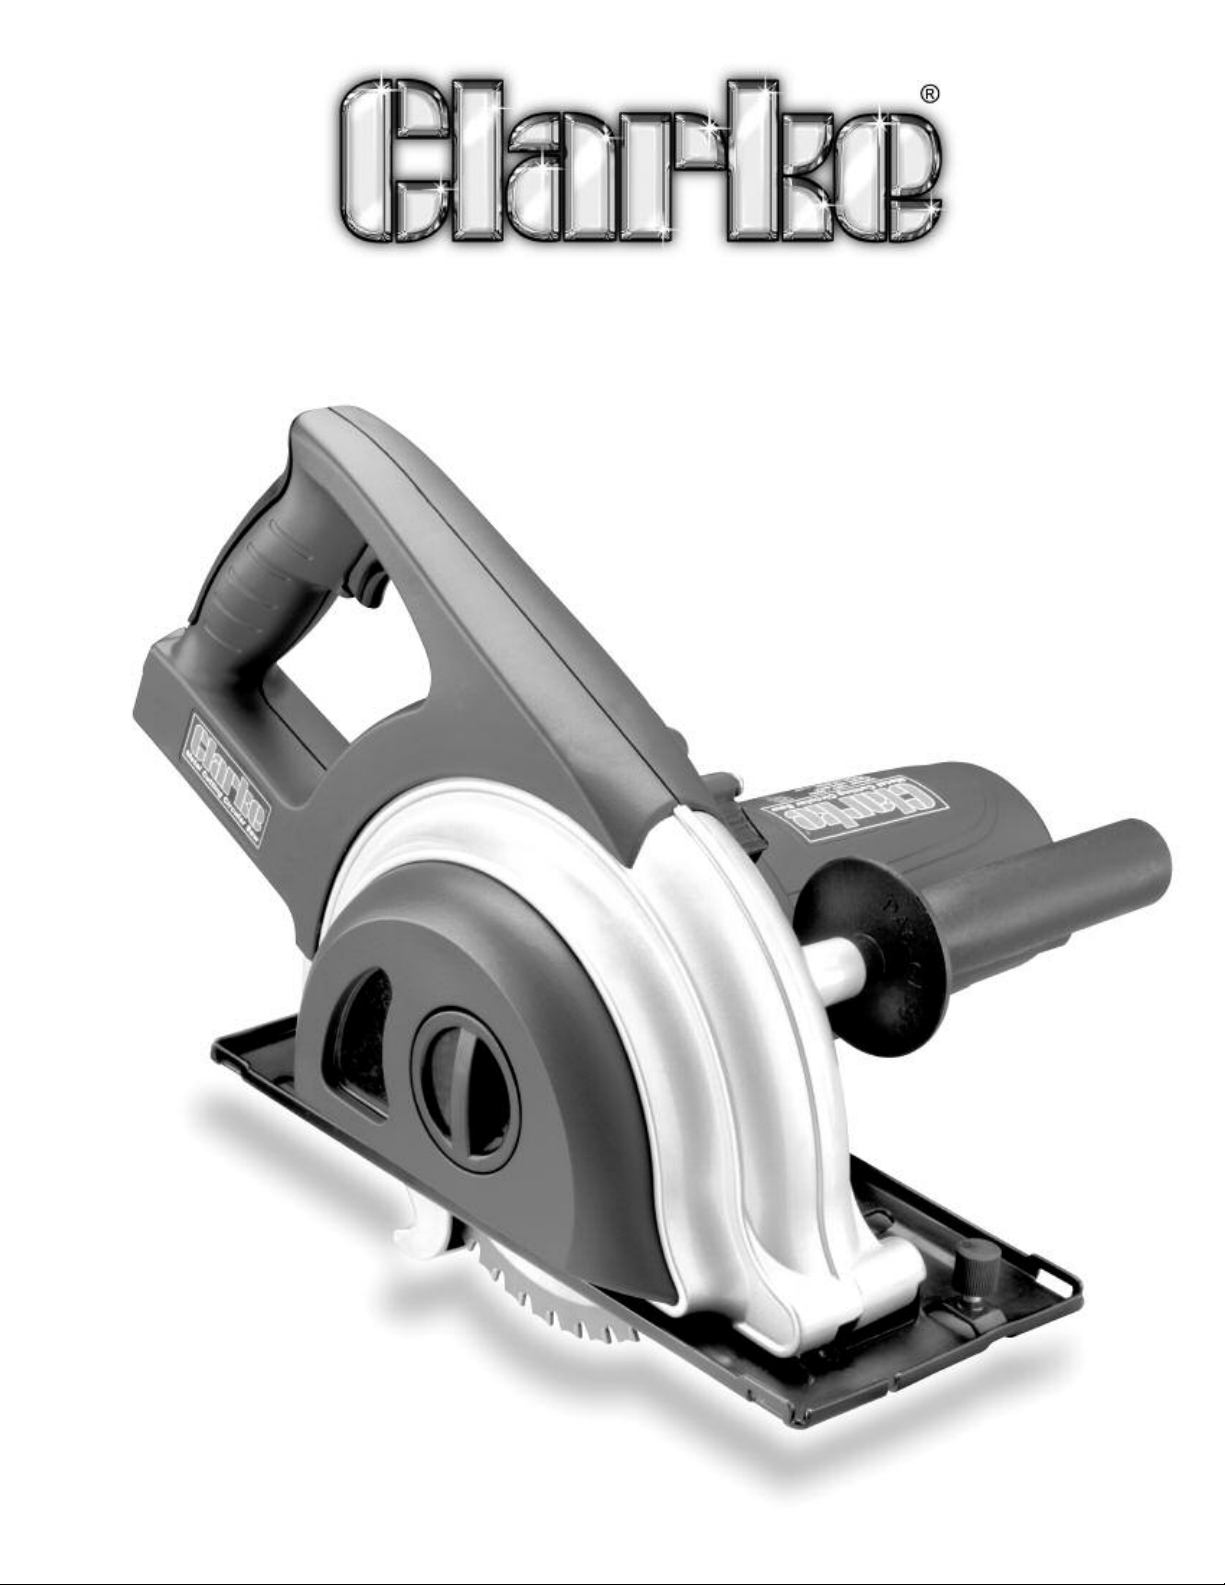
CT4014 - METAL CUTTING CIRCULAR SAW
OPERATING MANUAL
Model # CT4014
UPC: 0-52249-01375-4
Tel # 800-227-9603 or (419) 930-2299 • Fax # 877-354-0740
28740 Glenwood Rd., Perrysburg, OH 43551
www.clarkeusa.com • E-mail:[email protected]
Clarke Power Products Inc.
Page 2

ARRANTY
W
This product has a one year warranty
overing any manufacturing defects. Even
c
though we have strict quality control during
ur manufacturing process, sometimes a
o
product gets shipped that does not meet our
specifications. If you have a product that does
not work correctly within 30 days of your
purchase, take the product and the original
receipt to the store for credit or replacement.
If you have a product that does not work
correctly when it is more than 30 days after
your purchase, then you must return the
product to the following address—postage or
UPS paid. After 30 days, please do not return
the product to the store. This will only delay
the repair process. Consumable items such
as motor brushes, blades, bulbs etc. are not
covered under warranty.
Before returning any product, you must
contact Clarke Power Products at
1-800-227-9603 to acquire a Return
Authorization Number.
READ ALL INSTRUCTIONS
BEFORE OPERATING
SAVE THESE INSTRUCTIONS
Thank you for purchasing your Clarke CT4014
Metal Cutting Circular Saw. Before attempting to
operate your new Circular Saw please read these
instructions thoroughly. You will need these
instructions for the safety warnings, precautions,
assembly, operation, maintenance procedures,
parts list and diagrams. Keep your invoice with
these instructions. Write the invoice number on the
inside of front cover. Keep the instructions and
invoice in a safe, dry place for future reference.
WARNING: The warnings, cautions and
instructions discussed in this instruction manual
cannot cover all possible conditions or situations
that could occur. It must be understood by the
operator that common sense and caution are
factors which cannot be built into this product, but
must be supplied by the operator.
TABLE OF CONTENTS
When sending your product you must include:
1. A copy of the dated store receipt showing
the original purchase,
2. Name of store and town where product
was purchased,
3. Your full name, street address and
telephone number.
Please ship to:
Clarke Power Products Inc.
28740 Glenwood Road
Perrysburg, OH 43551
TTN: W
A
e will examine the product. If the problem is
W
due to a manufacturing defect, we will repair
or replace the product at no charge and return
it to you postage or UPS paid. If the problem
is due to misuse, abuse, the product has
been modified or out of warranty, we will
contact you with a repair estimate and ask for
a credit card number for payment. After the
product has been repaired, it will be returned
postage or UPS paid.
arranty Return
Description Page #
Warranty...............................................1
Specifications........................................1
Safety rules ..........................................2
Getting Started .....................................3
Operating Your CT4014 ....................3-4
Maintenance.........................................4
Parts List and Diagram.........................5
SPECIFICATIONS
Motor . . . . . . . . . . . .120V – 60Hz – 10 Amp
Motor Speed . . . . . .3500 RPM
Weight . . . . . . . . . . .24 lbs
Max Cutting Depth . .2
Max Cutting
UL Listed . . . . . . . . .
Thickness . .1/4
1
/4"
"
1
Page 3

SAFETY RULES
1. Know your machine. Read this manual carefully.
earn the machine’s applications and limitations,
L
as well as specific potential hazards peculiar
to it.
2. Ground all machines. This machine is “Double
Insulated,” meaning that all outside metal parts
are insulated from electrical power. Double
Insulated tools are equipped with a polarized
plug. This plug will fit in a polarized outlet only
one way. If the plug does not fit fully in the
outlet, reverse the plug. If it still does not fit,
contact a qualified electrician to install a
polarized outlet. Do not attempt to circumvent
this safety feature.
3. Avoid body contact with grounded surfaces such
as pipes, radiators, ranges, and refrigerators.
There is an increased risk of electric shock if
your body is grounded.
4. Do not expose tool to moisture. Don’t use this
machinery in damp or wet locations. Keep
out of rain.
5. Do not abuse cord. Never use the cord to carry
tools or pull the plug from an outlet. Keep cord
away from heat, sharp edges or moving parts.
Replace damaged cords immediately. Damaged
cords increase the risk of electric shock.
6. Remove adjusting keys or wrenches before
turning the tool on. A wrench or key that is left
attached to a moving part of the tool may result
in personal injury.
7. Keep work area clean and well lit. Cluttered or
dark work areas invite accidents.
8. Keep children away. All children should be kept
away from the work area. Never let a child
handle a tool without strict adult supervision.
Do not operate this tool if under the influence of
9.
alcohol or drugs. Read warning labels on
prescriptions to determine if your judgment or
reflexes are impaired while taking drugs. If there
is any doubt, do not attempt to operate.
10. Use safety equipment. Eye protection should be
worn at all times when operating this machine.
Use ANSI approved safety glasses. Everyday
eyeglasses only have impact resistant lenses.
They are NOT
skid safety shoes, hard hat, or hearing
protection should be used in appropriate
conditions.
Wear proper apparel. Loose clothing, gloves,
1.
1
neckties, rings, bracelets, or other jewelry may
present a potential hazard when operating this
machine. Please keep all apparel clear of
the machine.
safety glasses. Dust mask, non-
2. Don’t overreach. Keep proper footing and
1
alance at all times when operating this product.
b
13. Always disconnect the machine before making
any adjustments, storing, servicing, or changing
accessories. Such preventative safety measures
reduce the risk of starting the tool accidentally.
14. Use clamps or other practical means to secure
and support the work piece to a stable platform.
Holding the work by hand or against your body
may lead to a loss of control.
15. Do not force tool. Use the correct tool for your
application. The correct tool will do the job better
and safer at the rate for which it was designed.
16. Do not use the tool if the switch does not turn it
on and off. Any tool that cannot be controlled
with the switch is dangerous and must
be repaired.
17. Check for damage. Check your tool regularly. If
part of the tool is damaged it should be carefully
inspected to make sure that it can perform its’
intended function correctly. If in doubt, the part
should be repaired. Refer all servicing to a
qualified technician. Consult your dealer
for advice.
18. Keep away from flammables. Do not attempt to
operate this tool near flammable materials or
combustibles. Failure to comply may cause
serious injury or death.
19. Do not start tool while tool is in contact with
work materials. Always turn tool on BEFORE
coming in contact with material surface.
20. Do not set tool down until it has come to a
complete stop.
21. Always check to make sure that trigger is not
engaged before plugging tool in. Tool may
cause damage to property or person if plugged
in while on.
22. Keep hands clear of blades.
23. Store idle tools out of the reach of children and
untrained persons. Tools may be dangerous in
the hands of untrained users.
24. Maintain tools with care. Keep tools sharp and
clean. Properly maintained tools, with sharp
cutting edges, are less likely to bind and are
easier to control.
25. Hold tool by insulated gripping surfaces when
performing an operation where the tool may
contact hidden wiring or its own cord. Contact
with a live wire will make exposed metal parts of
the tool “live” and could shock the operator
.
2
Page 4
ADDITIONAL SAFETY RULES
FOR METAL CUTTING
CIRCULAR SAW
. Do not use saw blades that are damaged or
1
deformed.
2. Use only saw blades recommended by the
manufacturer.
3. Select saw blades in relation to the material to
be cut.
4. Hold this saw firmly during operation.
5. Secure the workpiece firmly before operating.
6. Do not start the tool with a person in line with
the blade.
7. Allow cut off parts to cool before handling.
8. Do not move the machine backward until the
running blade has completely stopped.
9. When the chip compartment is completely full,
clean out when cool.
10. Do not use this tool in the presence of
flammable liquid, gasses and materials.
11. Do not use cooling oil.
12. Use the saw blade guard.
WARNING: Noise can be a health hazard. When
the noise level exceeds 85dB, be sure to wear ear
protection.
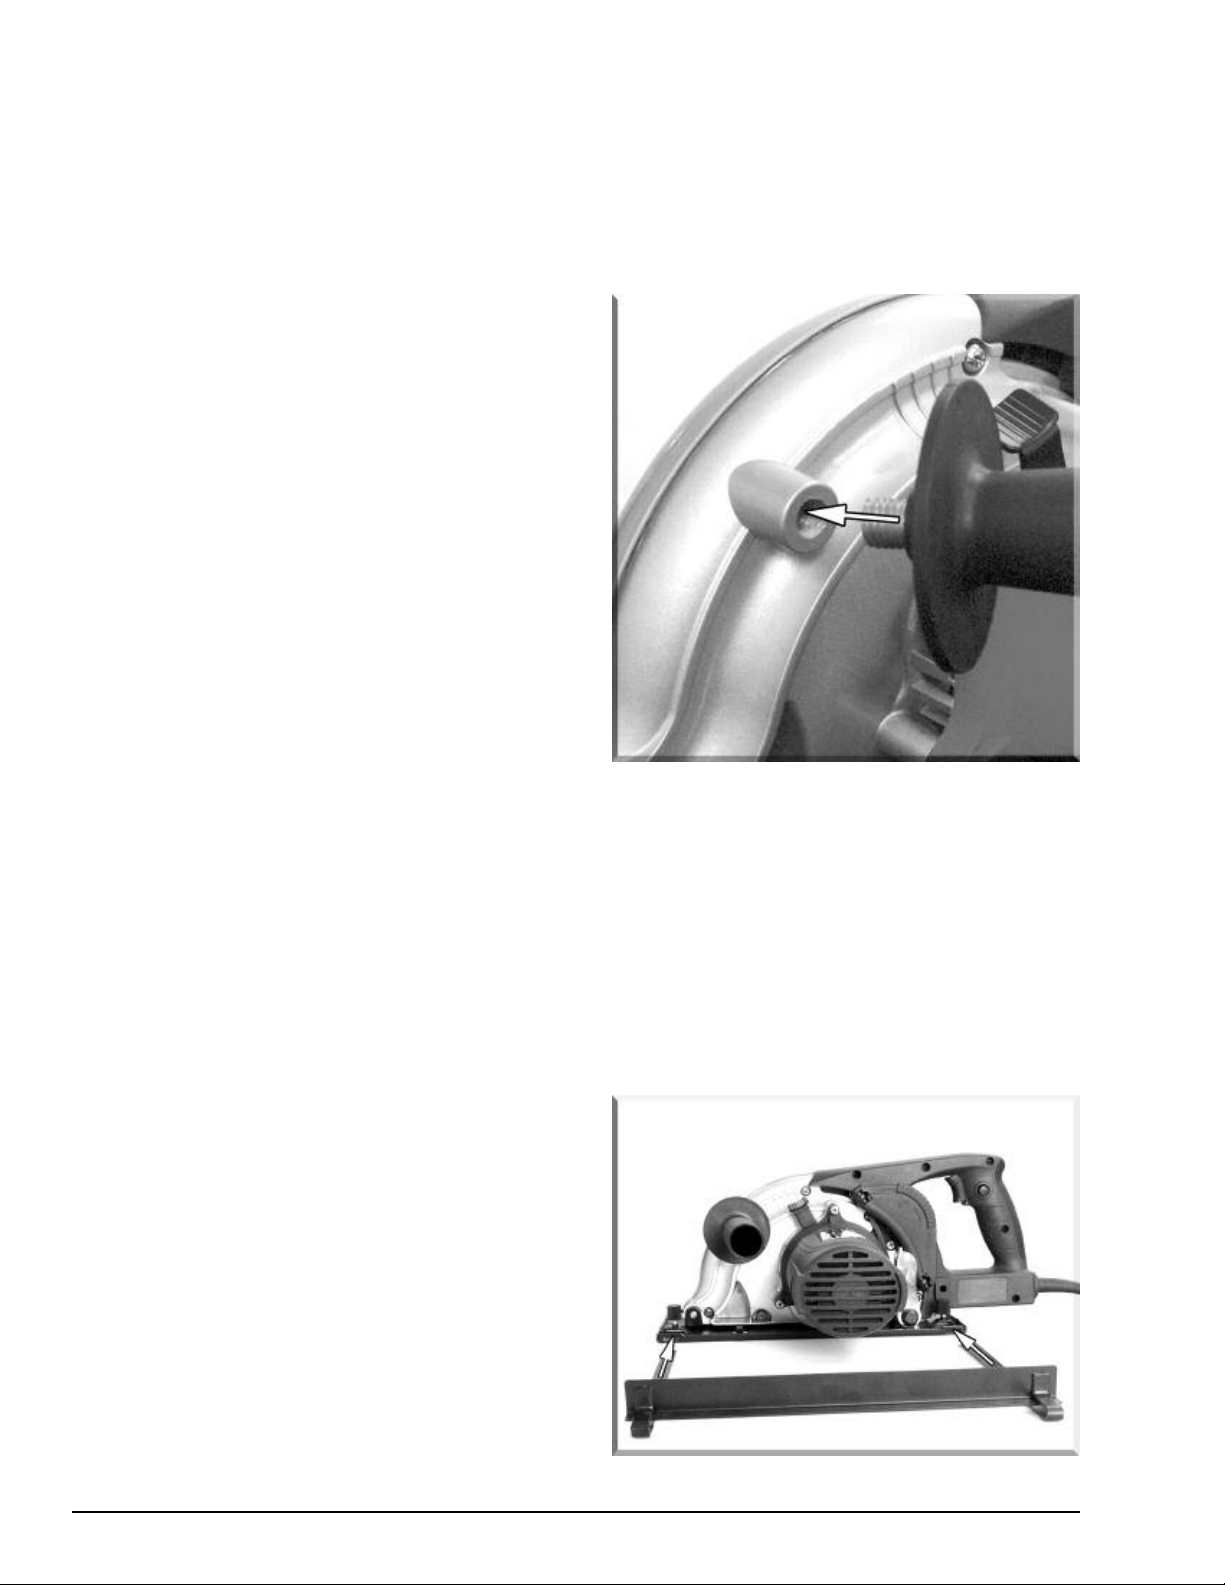
INSTALLING THE SIDE
HANDLE
1. Insert the side handle into the left side of the
Metal Cutting Saw.
2. Tighten handle securely.
FIGURE 1
GETTING STARTED
Before operating your Metal Cutting Circular Saw ,
check the contents of the box to make sure you
have everything you will need.
Items included in the box:
1 Operating Manual
CT4014 Metal Cutting Circular Saw
1
1 Side Handle
Rip Cut Fence
1
Multi-Purpose
1
1. Make sure the blade is securely in place.
ighten any loose fasteners with the included
T
adjustment wrench.
2. Check the plug to make sure polarized feature is
in tact.
way
feature
Once you have completed steps 1 and 2 of this
section you are ready to proceed.
The plug should fit into outlet only one
. Do not attempt to circumvent this safety
Adjustment W
rench
INSTALLING THE OPTIONAL
RIP CUT FENCE
1. Loosen the two wing nuts, one at front and
another at back.
2. Insert the rip cut fence into the base.
3. Tighten the two wing nuts, one at front and
another at back.
NOTE: This optional width bracket is for the ease of
controlling the width of cutting from the edge of the
workpiece.
3
Page 5
OPERATING YOUR SAW
Your new Metal Cutting Circular Saw is equipped
ith a number of special features. Please familiarize
w
yourself with these features before proceeding.
. Clean out the metal chip compartment when it is
8
ull. You can check this through the window of
f
the cover. (See EMPTYING CHIP
COMPARTMENT Section.)
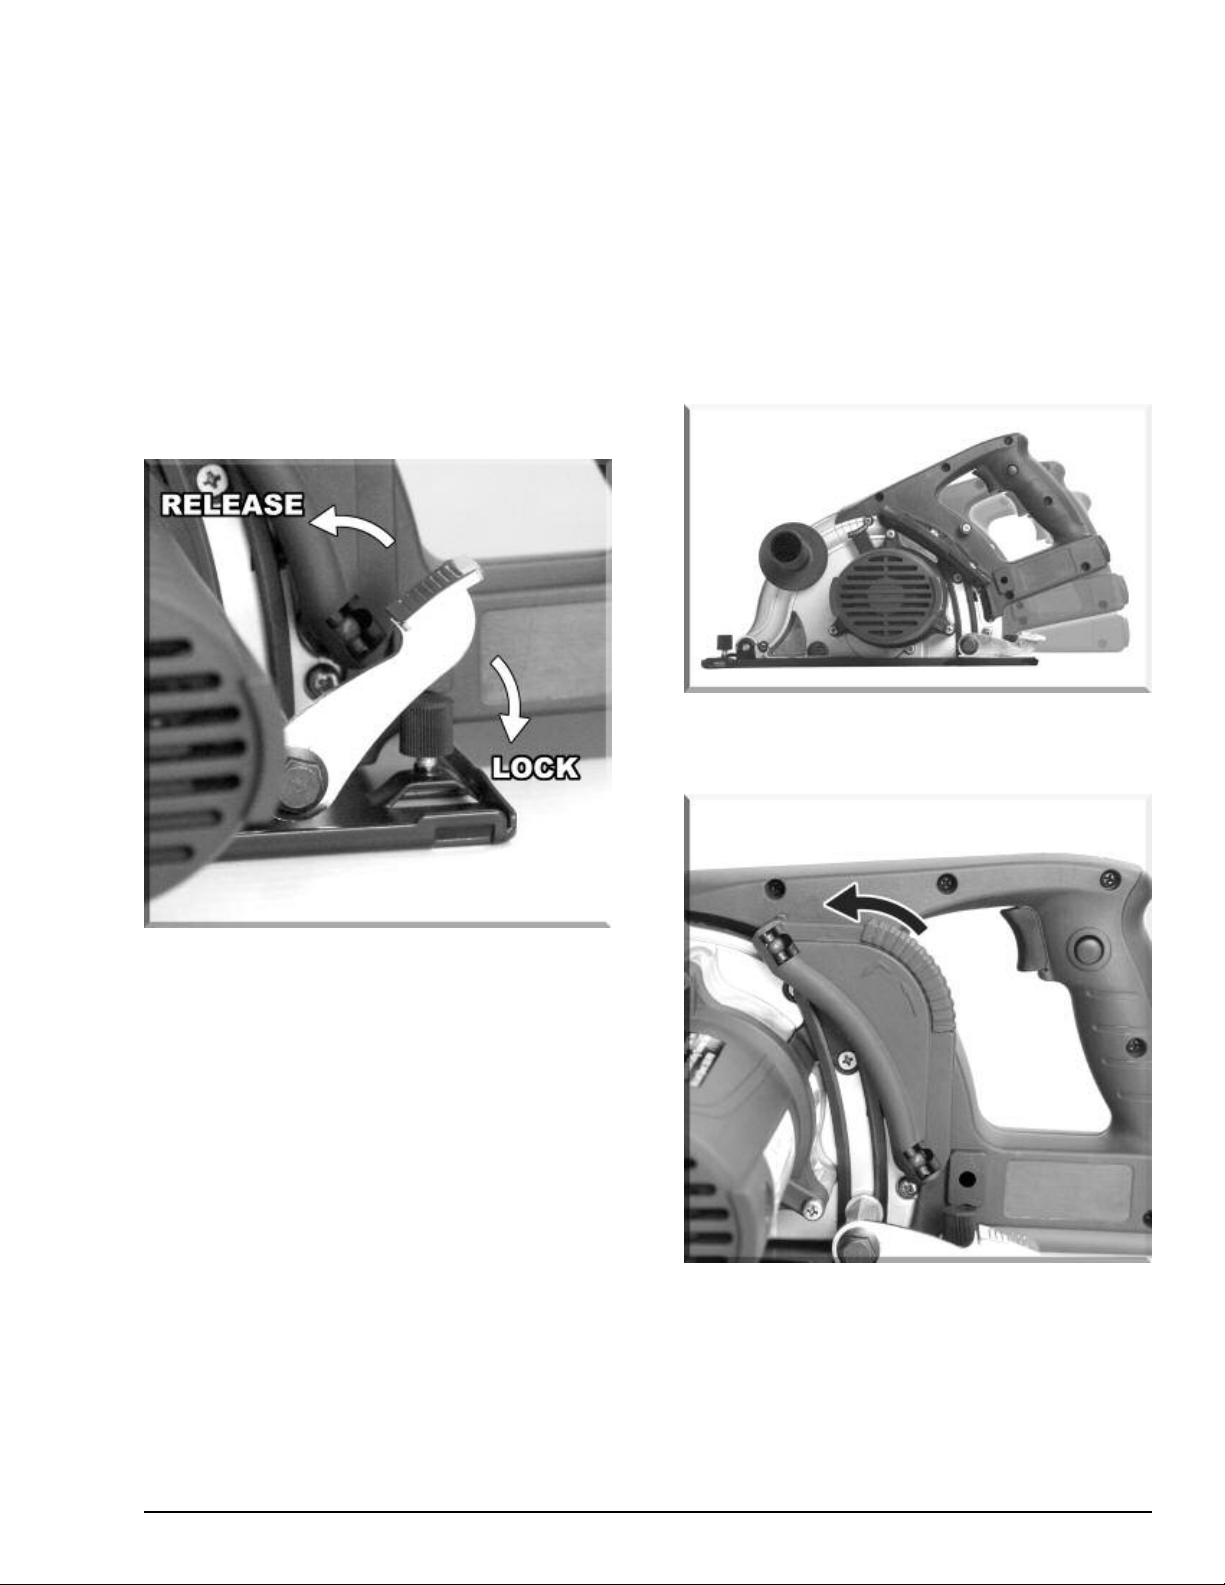
ADJUSTING THE DEPTH OF CUT
1. Lift up the Tightening Wrench to loosen the base
plate.
2. Adjust the base plate until blade is set at
desired depth.
3. Lower the Tightening Wrench to lock base plate
in place.
ADJUSTMENT OF THE BACK
HANDLE
Set the rear handle to a position that is most
comfortable for you, prior to use.
1. Push the vice-lock plate upward, and turn over
the main-lock plate to the side of the machine
shell. (see Figure below)
NOTE: The saw blade height is recommended at
about 1/8" below the bottom of the workpiece.
BASIC OPERATIONS
1. Adjust the depth of cut corresponding to the
workpiece.
2. The front notch of the base shows the center
position of the blade. The hole in the base under
the side handle shows the front edge of the
blade.
3. To start the saw, press the lock-off button
located on the left side of the handle and pull
the trigger switch.*** Release the trigger switch
to turn off the saw. ***
4. Let the blade run to its full speed before
proceeding with the cutting.
5. Hold the saw firmly and put the base against the
surface of the workpiece when cutting.
6. Use the width control bracket to cut specific
widths along the edge of the workpiece. Push
the side of bracket to the edge of the workpiece.
7. If cutting off a large piece, ensure that the
original and the cut off piece are secured.
Hold the front handle with left hand. Hold the
2.
back handle with right hand and adjust the back
handle to the proper position.
Return the main-lock plate to the side of the
3.
back handle until the vice-lock plate is hooked.
4
Page 6
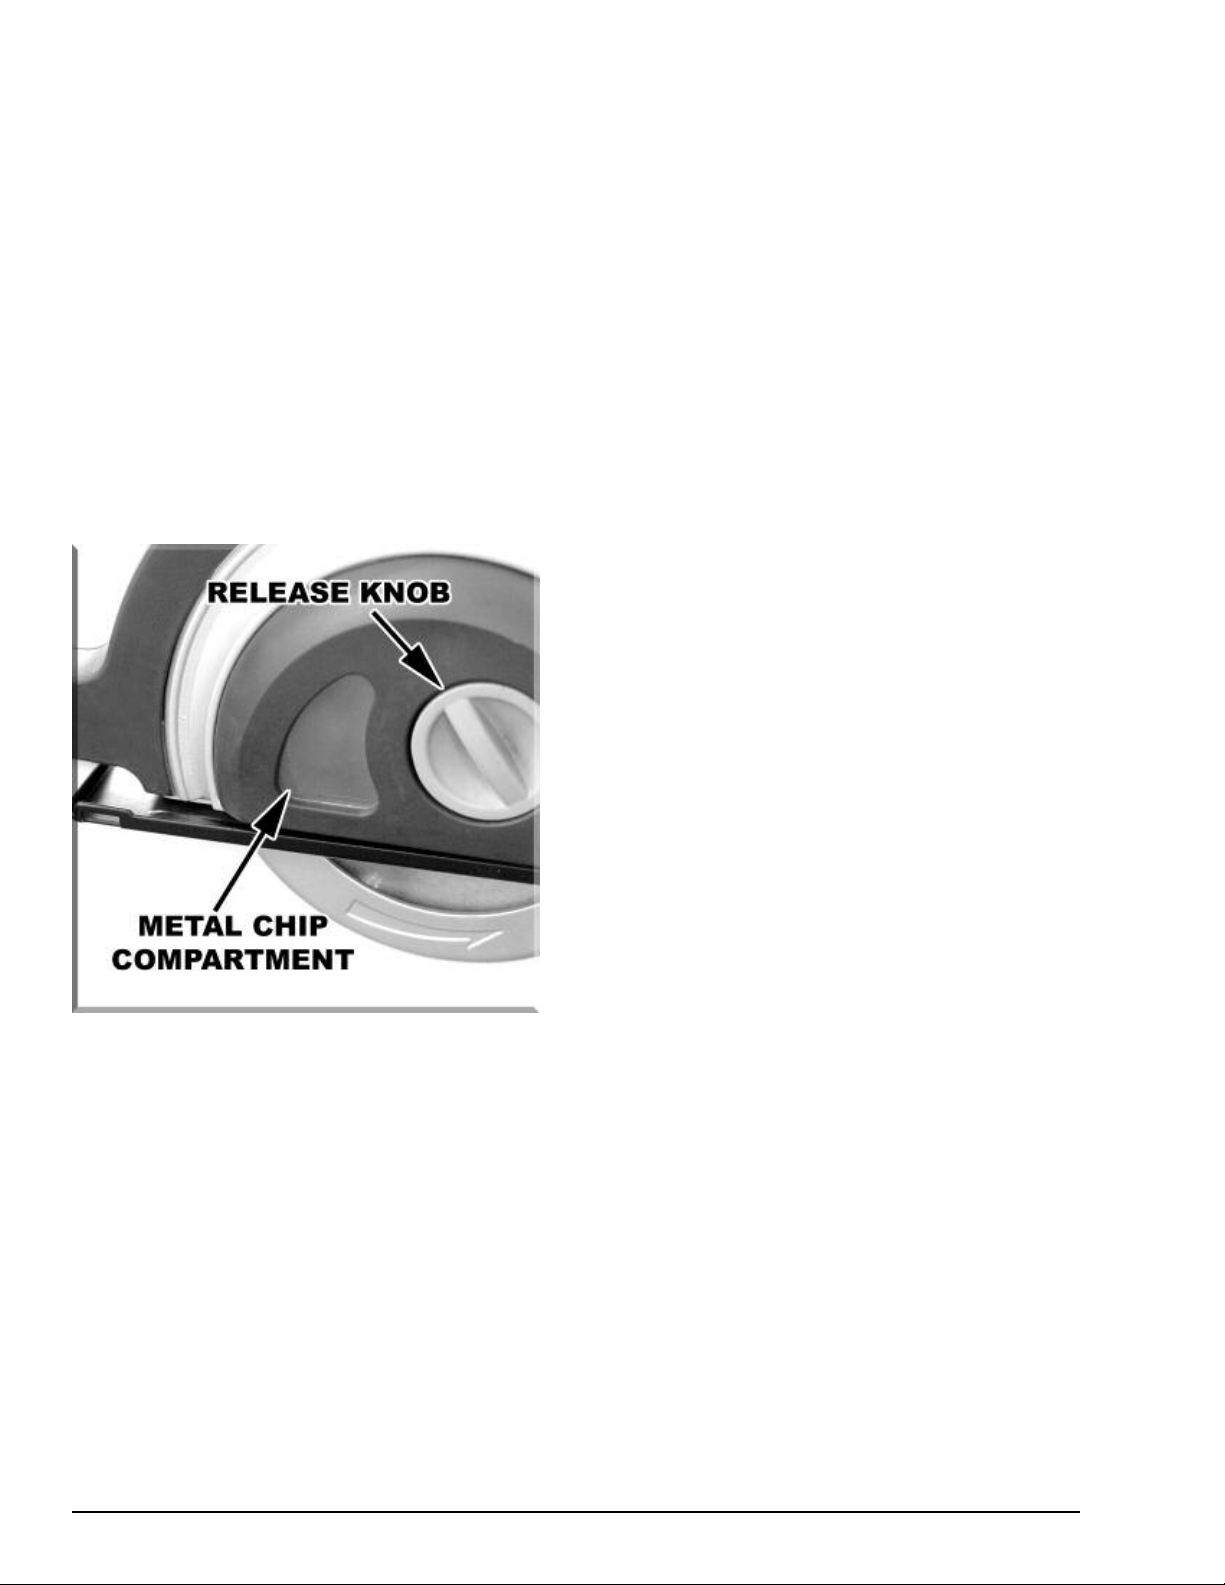
EMPTYING CHIP COMPARTMENT
1. Clean out the metal chip compartment when it is
full.
. Adjust the back handle to the horizontal line.
2
. Turn the Release Knob counter-clockwise (press
3
down the Release Knob and rotate it to the
horizontal position).
4. Push the entire chip compartment to the right
and remove it.
5. Clean out the chips.
6. Replace chip compartment.
7. Turn the Release Knob clockwise (press down
the Release Knob and rotate it to the vertical
position).
WARNING: Metal chips should only be removed
once they have cooled.
ARNING: Always follow rotational directions when
W
nstalling new blades. Blade spins COUNTER
i
CLOCKWISE. Failure to properly mount
replacement blades may result in injury.
MAINTENANCE
Keep your tool in good condition by adopting a
regular maintenance program. Before use, examine
the general condition of your tool. Inspect blades,
switches, tool cord and extension cord for damage.
Check for loose screws, misalignment, binding of
moving parts, improper mounting, broken parts, and
any other condition that may affect its’ safe
operation. If abnormal noise or vibration occurs,
turn the tool off immediately and have the problem
corrected before further use. Do not use a damaged
tool.
WARNING: To reduce the risk of injury, always
unplug your tool before performing any
maintenance. Never disassemble the tool or try to
do any rewiring on the tool’s electrical system.
Contact Clarke Power Products for all repairs.
CHANGING THE BLADE
Remove metal chip compartment (Follow
1.
directions in EMPTYING CHIP COMPARTMENT
Section)
On the back of the machine remove the three
2.
screws on the blade cover with screwdriver.
3. Remove the blade cover.
Hold the spindle lock of motor and loosen and
4.
remove the bolt ( turn it counter-clockwise) with
the wrench supplied.
5. Take out the bolt, washer, flange and the blade.
Install the new blade and replace the flange,
6.
washer and the bolt. Hold the spindle lock of
motor, tighten the bolt clockwise with the
wrench.
7. Replace the blade guard, and tighten the screw.
8. Replace the metal chip compartment.
Clean dust and debris from vents. Keep the tool
handles clean, dry and free of oil or grease. Use
only mild soap and damp cloth to clean your tool
since certain cleaning agents and solvents are
harmful to plastics and other insulated parts. Some
of these harmful solvents include: gasoline,
turpentine, lacquer thinner, paint thinner, chlorinated
cleaning solvents, ammonia, and household
detergents containing ammonia. Never use
flammable or combustible solvents around tools.
WARNING: To reduce the risk of injury, electric
shock and damage to the tool, never immerse your
tool in liquid or allow liquid to flow inside the tool.
ARNING! Should further maintenance be required
W
it is recommended that all repairs or replacement of
parts be performed by a qualified service
technician.
1. Keep the blade clean at all times.
2. Never use any caustic agents to clean any
plastic parts.
Check the carbon brushes in the event of
3.
excessive sparking. If brushes are worn,
contact your authorized Clarke dealer or
Clarke Power Products customer service to
order replacement parts.
4. If you ever discover any damage, consult the
exploded drawing and parts list to determine
exactly which parts you need to order from
customer service.
5
Page 7
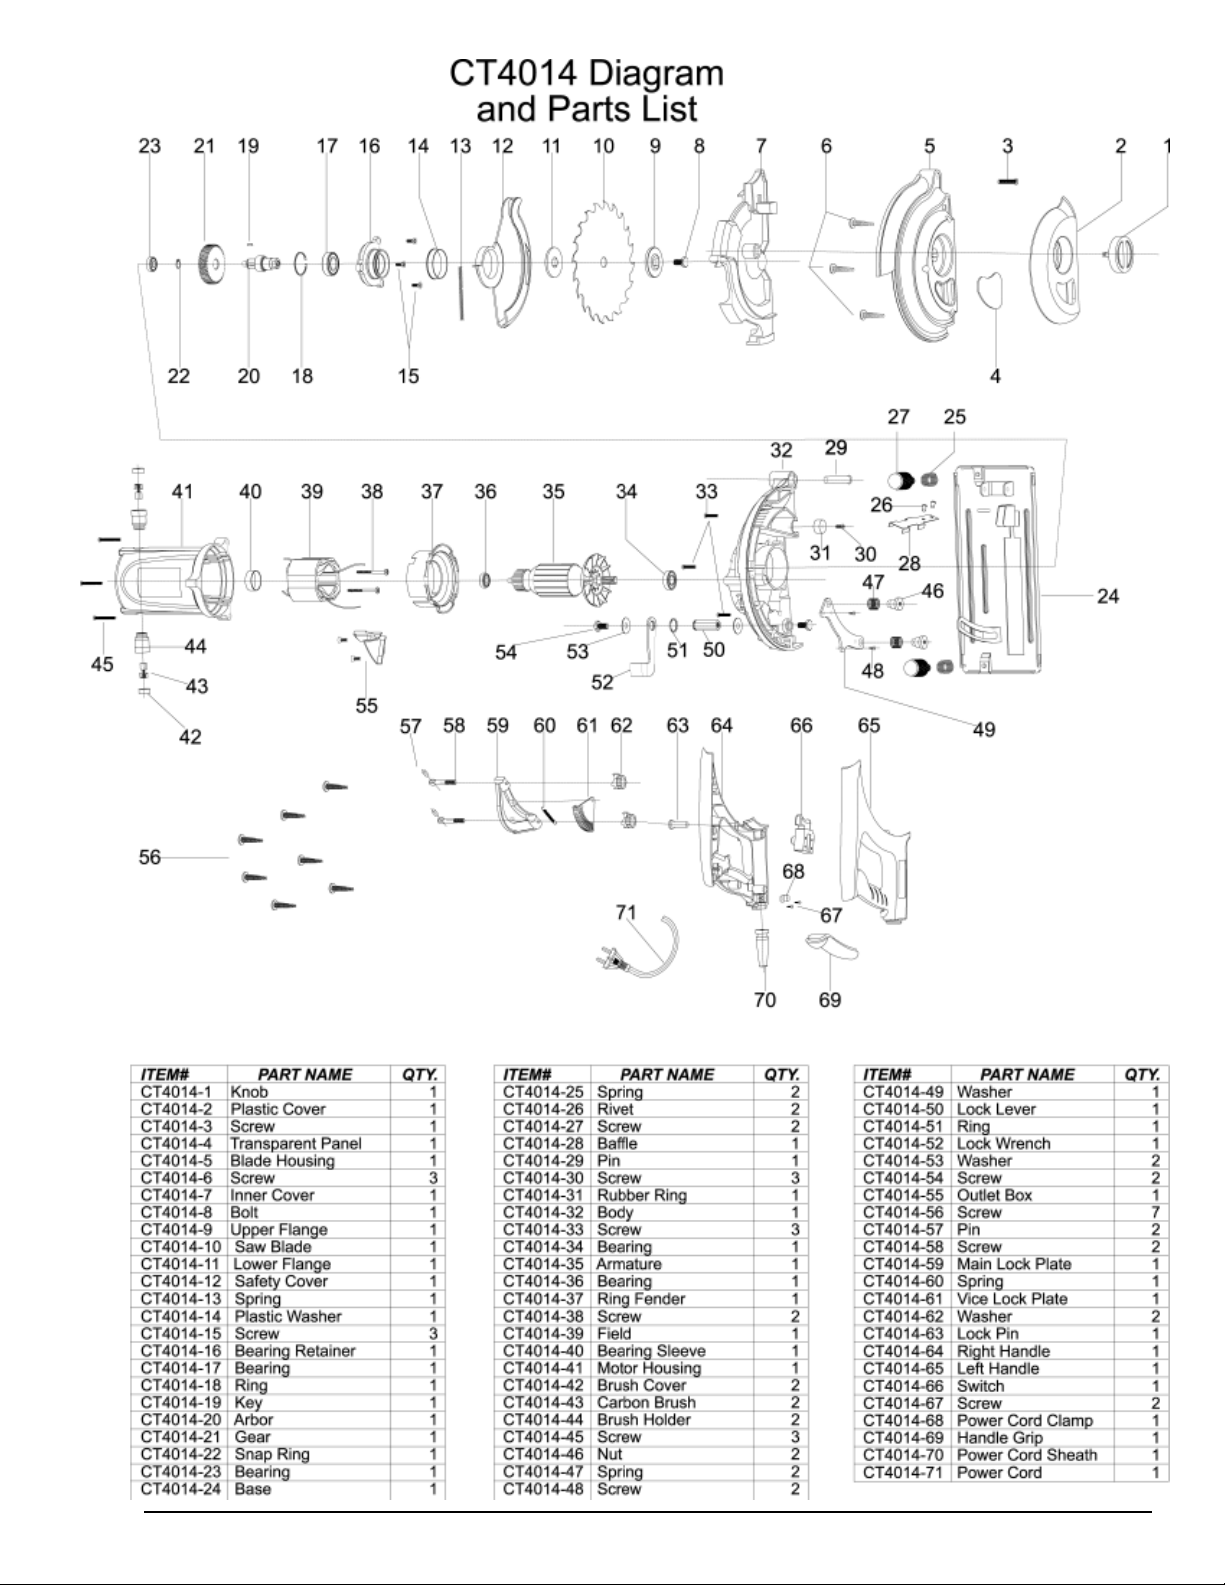
THIS PARTS LIST AND
LINE DRAWING ARE
FOR REFERENCE ONLY.
THIS TOOL CAN ONLY
BE SERVICED AT AN
AUTHORIZED CLARKE
REP
AIR F
ACILITY
.
6
Page 8
CT4014 - METAL CUTTING CIRCULAR SAW
OPERATING MANUAL
CT4014-M002 0705
 Loading...