


SCROLL SAW
MODEL NO: CSS400D
PART NO: 6462153
OPERATION & MAINTENANCE
INSTRUCTIONS
ORIGINAL INSTRUCTIONS
GC0621 rev 1
INTRODUCTION
Thank you for selecting this Clarke scroll saw.
The scroll saw is designed for cutting wood up to a maximum thickness of
50mm. It may also be used to cut other materials, including plastic and
composite boards.
IMPORTANT
Read all instructions carefully before you use this scroll saw. Pay attention to all
sections of this User Guide that display warning symbols and notices.
WARNING: THIS SYMBOL IS USED THROUGHOUT THE USER GUIDE
WHEN THERE IS A RISK OF PERSONAL INJURY. MAKE SURE THAT THESE
WARNINGS ARE READ AND UNDERSTOOD AT ALL TIMES.
CAUTION: THIS SYMBOL IS USED THROUGHOUT THE USER GUIDE
WHEN THERE IS A RISK OF DAMAGING YOUR SCROLL SAW. MAKE
SURE THAT THESE CAUTIONS ARE READ AND UNDERSTOOD AT ALL
TIMES.
GUARANTEE
The scroll saw is guaranteed against faulty manufacture for a period of 12
months from the date of purchase. Your receipt is required as proof of
purchase.
This guarantee is invalid if the scroll saw is found to have been abused,
tampered with, or not used for the purpose for which it was intended.
Faulty goods must be returned to their place of purchase, it must not be
returned to us without prior permission.
This guarantee does not effect your statutory rights.
2
Parts & Service: 020 8988 7400 / E-mail: Parts@clarkeinternational.com or Service@clarkeinternational.com

GENERAL SAFETY INSTRUCTIONS
1) WORK AREA
1. Keep the work area clean and well lit. Cluttered and dark areas invite
accidents.
2. DO NOT operate power tools in explosive atmospheres, such as in the
presence of flammable liquids, gases or dust. Power tools create sparks
which can ignite the dust or fumes.
3. Keep children and bystanders away while operating a power tool.
Distractions can cause you to lose control.
2) ELECTRICAL SAFETY
1. Power tool plugs must match the outlet. NEVER modify the plug in any way.
Do not use adapter plugs with earthed (grounded) power tools. Unmodified
plugs and matching outlets will reduce the risk of electric shock.
2. DO NOT expose power tools to rain or wet conditions. Water entering a
power tool will increase the risk of electric shock.
3. DO NOT abuse the cable. NEVER use the cable for carrying, pulling or
unplugging the power tool. Keep the cable away from heat, oil, sharp
edges or moving parts. Damaged or entangled cords increase the risk of
electric shock.
4. When operating a power tool outdoors, use an extension cable suitable for
outdoor use. Use of a cable suitable for outdoor use reduces the risk of
electric shock.
3) PERSONAL SAFETY
1. Stay alert, watch what you are doing and use common sense when
operating a power tool. DO NOT use a power tool while you are tired or
under the influence of drugs, alcohol or medication. A moment of
inattention while operating power tools can result in personal injury.
2. Use safety equipment. Always wear eye protection. Safety equipment such
as dust mask, non-skid safety shoes, hard hat, or hearing protection used
for appropriate conditions will reduce personal injuries.
3. Avoid accidental starting. Ensure the switch is in the off position before
plugging in. Carrying power tools with your finger on the switch or plugging
in power tools that have the switch on invites accidents.
4. Remove any adjusting key or wrench before turning the power tool on. A
wrench or a key left attached to a rotating part of the power tool can
result in personal injury.
3
Parts & Service: 020 8988 7400 / E-mail: Parts@clarkeinternational.com or Service@clarkeinternational.com

5. DO NOT overreach. Keep proper footing and balance at all times. This
enables better control of the power tool in unexpected situations.
6. Dress properly. DO NOT wear loose clothing or jewellery. Keep your hair,
clothing and gloves away from moving parts. Loose clothes, jewellery or
long hair can be caught in moving parts.
4) POWER TOOL USE AND CARE
1. DO NOT force the power tool. Use the correct power tool for your
application. The correct power tool will do the job better and safer at the
rate which it was designed.
2. DO NOT use the power tool if the switch does not turn it on and off. Any
power tool that cannot be controlled with the switch is dangerous and
must be repaired.
3. Disconnect the plug from the power source before making any
adjustments, changing accessories, or storing power tools. Such preventive
safety measures reduce the risk of starting the power tool accidentally.
4. Store idle tools out of the reach of children and DO NOT allow persons
unfamiliar with the power tool or these instructions to operate the power
tool. Power tools are dangerous in the hands of untrained users.
5. Maintain power tools. Check for misalignment or binding of moving parts,
breakage of parts and any other condition that can affect the power tools
operation. If damaged, have the power tool repaired before use. Many
accidents are caused by poorly maintained power tools.
6. Keep cutting tools sharp and clean. Well maintained cutting tools with
sharp cutting edges are less likely to bind and are easier to control.
7. Use the power tool, accessories and tool bits etc., in accordance with
these instructions and in the manner intended for the particular type of
power tool, taking into account the working conditions and the work to be
performed. Use of the power tool for operations different from intended
could result in a hazardous situation.
5) SERVICE
1. Have your power tool serviced by qualified service personnel using only
identical replacement parts. This will ensure that the safety of the power
tool is maintained.
4
Parts & Service: 020 8988 7400 / E-mail: Parts@clarkeinternational.com or Service@clarkeinternational.com

SCROLL SAW SAFETY INSTRUCTIONS
1. Wear safety goggles as protection against flying wood chips and sawdust.
2. A dust mask is recommended to keep sawdust out of your lungs.
3. This scroll saw is for indoor use only.
4. DO NOT cut pieces of material which are too small to be held by hand.
5. Clear the work table of all objects except the work piece (tools, scraps,
rulers etc.) before turning the saw on.
6. Make sure the blades’ teeth are pointing down, toward the table, and that
the blade tension is correct.
7. When cutting a large piece of material, support it at the height of the
table.
8. DO NOT feed the work piece through the blade too fast. Feed only as fast
as the blade will cut.
9. Keep your fingers away from the blade. Use a push stick as you near the
end of the cut.
10. Take care when cutting a work piece which is irregular in cross section.
Mouldings for example must lie flat, and not ‘rock’ on the table while being
cut. A suitable support must be used.
11. Switch off the saw and make sure the blade has come to a complete stop
before clearing sawdust or off-cuts from the table.
12. Make sure there are no nails or foreign objects in the part of the work piece
to be sawn.
13. Be extra cautious with very large or small, or irregularly shaped work pieces.
14. Set up the machine and make all adjustments with the power OFF, and
disconnected from the supply.
15. DO NOT operate the machine with the covers off. They must all be in place
and securely fastened when performing any operation.
16. Be sure to use the correct blade size and type.
17. Use approved replacement saw blades. Contact your local CLARKE
supplier for advice. The use of inferior blades can increase the risk of injury.
5
Parts & Service: 020 8988 7400 / E-mail: Parts@clarkeinternational.com or Service@clarkeinternational.com

ELECTRICAL CONNECTIONS
Plug must be BS1363/A approved.
Always fit
make sure that the outer sheath of
Neutral
(Blue)
Live
(Brown)
Earth
(Green and
a 5 Amp
the cable is firmly held by the clamp
fuse.
Yellow)
WARNING: READ THESE ELECTRICAL SAFETY INSTRUCTIONS FULLY
BEFORE CONNECTING THE SCROLL SAW TO THE MAINS SUPPLY.
This scroll saw is provided with a standard 230 volt (50Hz), BS 1363 plug, for
connection to a standard, domestic electrical supply. Should the plug need
changing, make sure that a plug of identical specification is used.
WARNING: THE WIRES IN THE CABLE ARE COLOURED AS FOLLOWS:
BLUE = NEUTRAL BROWN = LIVE YELLOW AND GREEN = EARTH
If the colours of the wires in the power cable do not correspond with the
markings on the terminals of your plug, proceed as follows.
• Connect the blue
wire to the
terminal which is
marked N.
• Connect the
brown wire to the
terminal which is
marked L.
• Connect the
yellow and green
wire to the
terminal which is
marked E or .
AN APPROVED RESIDUAL CURRENT DEVICE (RCD) WHICH HAS A TRIPPING
CURRENT OF LESS THAN 30mA MUST BE USED.
If you are not sure, consult a qualified electrician. DO NOT try to do any
repairs.
Parts & Service: 020 8988 7400 / E-mail: Parts@clarkeinternational.com or Service@clarkeinternational.com
6
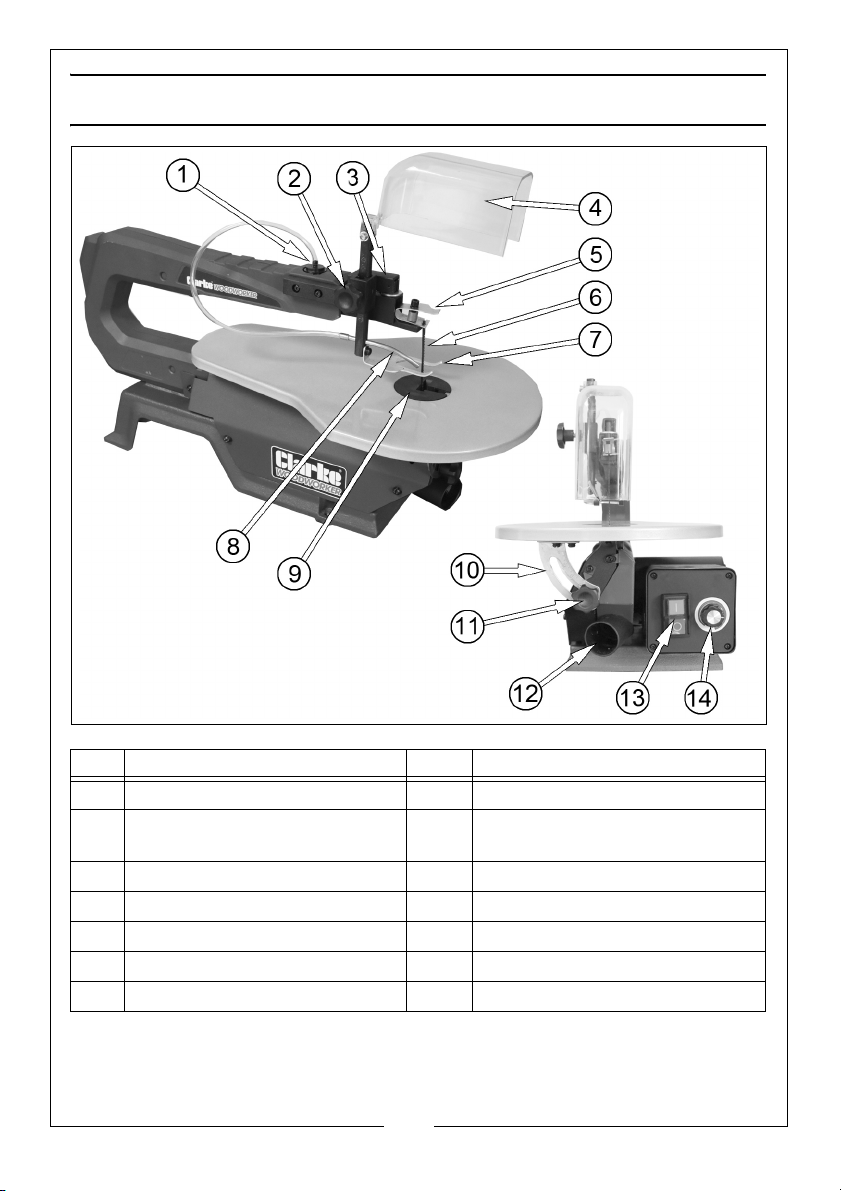
OVERVIEW
NO DESCRIPTION NO DESCRIPTION
1 Sawdust blower output hose 8 Blower nozzle
2 Pressure plate height
adjustment knob
3 Blade tension release lever 10 Angle adjustment scale
4 Blade guard 11 Table tilt lock knob
5 Top blade holder 12 Dust extraction outlet
6 Blade 13 On/Off switch
7 Work piece pressure plate 14 Blade speed regulator
Parts & Service: 020 8988 7400 / E-mail: Parts@clarkeinternational.com or Service@clarkeinternational.com
9 Table insert
7

INVENTORY
1 x Scroll Saw 1 x Blade Guard
2 x Hexagon Keys 1 x Fixings Pack
2 x Blades - (one is installed)
ASSEMBLY
ATTACHING THE FEET
1. Use the bolts and flat washers
supplied to attach the feet to the
scroll saw.
• Alternatively you can use
suitable nuts and bolts (not
supplied), to attach the scroll
saw directly to a workbench.
• To decrease vibration and
noise, install a fine ribbed
rubber mat 3-13 mm thick (not
supplied) between the workbench and scroll saw.
• Rubber mats are available from your Clarke supplier.
NOTE: DO NOT over tighten the bolts.
8
Parts & Service: 020 8988 7400 / E-mail: Parts@clarkeinternational.com or Service@clarkeinternational.com
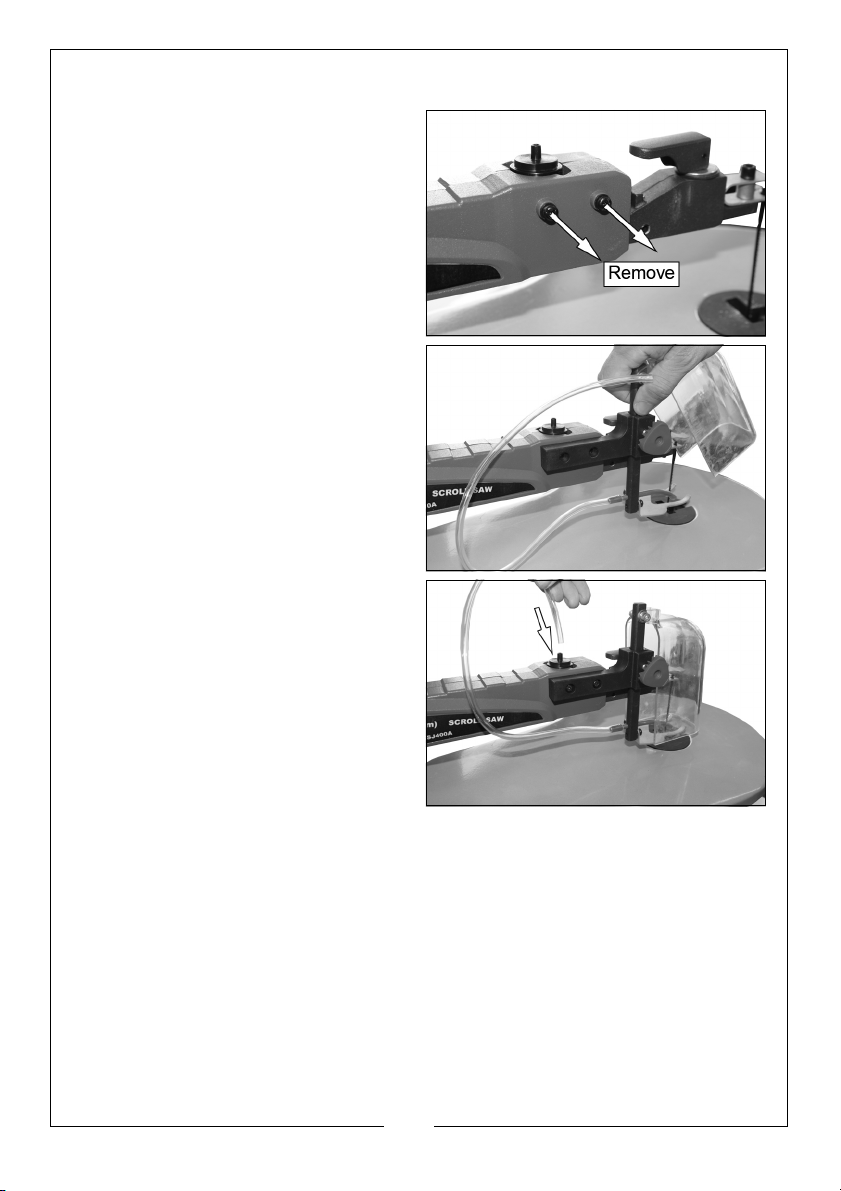
ATTACH THE BLADE GUARD ASSEMBLY
1. Remove the screws shown in the
picture.
2. Attach the blade guard support
arm and replace the screws
removed in step 1.
3. Connect the plastic tube to the
dust outlet on top of the scroll
saw.
9
Parts & Service: 020 8988 7400 / E-mail: Parts@clarkeinternational.com or Service@clarkeinternational.com

CHANGING THE BLADES
1. Disconnect the saw from the power supply.
2. Remove the table insert.
3. Raise the blade tension lever to
remove the tension from the saw
blade.
4. Push down the upper arm and
remove the blade.
• Blades are available from your
Clarke supplier.
• 10TPI (Part No: 6468050)
• 18TPI (Part No: 6468052)
• 25TPI (Part No: 6468054)
• Hook the new blade onto the
blade holder.
• The blade holder has two slots.
•Use slot
upper arm.
•Use slot
to the upper arm.
5. Push the blade tension lever down
to re-tension the blade.
6. Replace the table insert.
Parts & Service: 020 8988 7400 / E-mail: Parts@clarkeinternational.com or Service@clarkeinternational.com
1 to cut in line with the
2 to cut at right angles
10

BLADE TENSION
1. Raise the blade tension lever.
2. Rotate the blade tension lever:
• Clockwise to increase the
blade tension
• Anti-clockwise to decrease the
blade tension.
3. Lower the blade tension lever
NOTE: Too much tension will
decrease the life of the
blade.
NOTE: Not enough tension can cause the blade to bend or break.
11
Parts & Service: 020 8988 7400 / E-mail: Parts@clarkeinternational.com or Service@clarkeinternational.com

USING THE SCROLL SAW
Before you start, turn the saw on and listen to the sound it makes. If you notice
excessive vibration or an unusual noise, stop the saw immediately and unplug
it. Do not start the saw until you have corrected the problem.
• It is possible that some blades will break whilst you learn how to use
and adjust the blade tension correctly.
• Hold the workpiece tightly against the saw table.
• Use light pressure and two hands when feeding the work piece into
the blade.
• Feed the work piece slowly towards the blade.
• Avoid awkward hand positions where a sudden slip can cause you
to touch the blade.
• DO NOT put your hands close to the blade.
• When cutting an irregularly shaped workpiece, plan your cut so the
work piece will not pinch the blade.
WARNING: BEFORE REMOVING OFFCUTS FROM THE TABLE, TURN THE SAW
OFF AND WAIT FOR THE BLADE TO COME TO A FULL STOP.
THE CONTROLS
ON / OFF SWITCH
• To start the saw, push the ON
button.
• To stop, push the OFF button.
NOTE: The scroll saw switches off
automatically if power is lost.
SPEED CONTROL
The speed control lets you select the correct blade speed for the material
being cut.
The speed range is 400 to 1,600 Strokes Per Minute.
• To increase the speed, turn the speed control clockwise.
• To decrease the speed, turn the speed control counterclockwise.
12
Parts & Service: 020 8988 7400 / E-mail: Parts@clarkeinternational.com or Service@clarkeinternational.com

CARRYING OUT INTERNAL CUTS
A scroll saw can be used to make scroll cuts within a work piece without
breaking or cutting through the edge or perimeter of the work piece.
1. Drill a 6.3 mm (1/4”) hole inside the boundary of the aperture to be cut
from the work piece.
2. Remove the blade.
3. Place the work piece on the saw table with the drilled hole above the
blade access hole.
4. Install the blade through the hole in the work piece and adjust the blade
tension.
5. When you have completed the internal cut, remove the blade from the
blade holders and take the work piece off the table.
STACK CUTTING
WARNING: TO PREVENT INJURY, DO NOT CUT A STACK OF WORK PIECES
UNLESS THEY ARE PROPERLY ATTACHED TO EACH OTHER.
Stack cutting can be used when several identical shapes need to be cut.
Several work pieces can be stacked one on top of the other and secured to
each other before cutting.
Pieces of wood can be joined together by placing double sided tape
between each piece or by wrapping tape around the corners or ends of the
stacked wood.
The stacked pieces must be attached to each other in such a way that they
can be handled on the table as a single work piece.
SAWDUST BLOWER
The sawdust blower is designed to
direct air to the most effective point
on the cutting line. Make sure the
pressure plate is adjusted to secure
the work piece and direct air at the
cutting surface.
13
Parts & Service: 020 8988 7400 / E-mail: Parts@clarkeinternational.com or Service@clarkeinternational.com

WHAT TO DO IF THE SAW BLADE JAMS IN THE WORK PIECE
When withdrawing the work piece, the blade can bind in the kerf (cut). This is
usually caused by sawdust clogging the kerf or by the blade coming out of
the blade holders. If this happens:
1. Push the OFF button.
2. Wait until the saw has stopped and unplug it from the power source.
3. Remove the blade and the work piece.
4. Wedge the kerf open with a small flat screwdriver or wooden wedge then
remove the blade from the work piece.
ADJUSTMENTS
TILTING THE SAW TABLE
1. Loosen the table locking knob.
2. Set the table to the necessary
angle then tighten the table lock
knob to secure.
IMPORTANT: For accurate work you
must first do a trial cut and then readjust the angle as necessary.
SQUARING THE SAW TABLE TO THE BLADE
WARNING: TO AVOID ACCIDENTAL STARTING WHICH COULD RESULT IN
SERIOUS INJURY, TURN THE SAW OFF, AND UNPLUG THE SAW FROM THE
POWER SOURCE.
1. Loosen the pressure plate
adjustment knob.
2. Raise the pressure plate and lock
it in the raised position.
14
Parts & Service: 020 8988 7400 / E-mail: Parts@clarkeinternational.com or Service@clarkeinternational.com

3. Loosen the table locking knob
and tilt the table until it is
approximately at right angles to
the blade.
4. Place a small set square on the
saw table next to blade and lock
the table at 90° to square.
5. Retighten the table lock knob.
SETTING THE SCALE INDICATOR
1. Loosen the securing screw holding the scale indicator. Move the indicator
to the 0° mark and securely tighten the screw.
• Remember, the scale is a guide only and should not be relied upon
for precision.
• Make practice cuts on scrap material to ensure your angle setting is
correct.
2. Lower the pressure plate so it just rests on top of the work piece and lock in
place.
15
Parts & Service: 020 8988 7400 / E-mail: Parts@clarkeinternational.com or Service@clarkeinternational.com

MAINTENANCE
WARNING: SWITCH OFF AND DISCONNECT THE PLUG FROM THE POWER
SUPPLY BEFORE YOU PERFORM MAINTENANCE WORK ON YOUR SCROLL
SAW.
• Keep your scroll saw clean.
• If the power cable is worn, cut, or damaged, have it replaced
immediately by a qualified service technician. Failure to do so can
result in serious injury.
• Clean your scroll saw with a dry cloth. Do not use water or chemical
cleaners to clean your scroll saw.
• Keep your scroll saw in a dry place.
• Keep all controls free of dust.
16
Parts & Service: 020 8988 7400 / E-mail: Parts@clarkeinternational.com or Service@clarkeinternational.com

SPECIFICATIONS
Model Number CSS400D
Rated Voltage (V) 230V
Input Power 120W
Maximum Cutting Width (throat) 406 mm
o
Maximum Cutting Depth @0
Maximum Cutting Depth @45
50 mm
o
18 mm
Speed 400 - 1600 strokes per minute
Stroke Length 14 mm
Blade Length 132 mm
Table Size 410 x 254 mm
Table Tilt Angle
0-45
o
Duty Cycle S2 (10 min.)
Sound Power (L
wa dB) 103.1 dB
Dimensions (L x W x H) 615 x 290 x 400 mm
Weight 9 kg
ENVIRONMENTAL PROTECTION
Through purchase of this scroll saw, the customer is taking on the
obligation to deal with the WEEE in accordance with the WEEE
regulations in relation to the treatment, recycling & recovery and
environmentally sound disposal of the WEEE.
In effect, this means that this scroll saw must not be discarded with general
waste. Refer to the laws governing Waste Electrical and Electronic Equipment
(WEEE) at a recognised disposal facility.
17
Parts & Service: 020 8988 7400 / E-mail: Parts@clarkeinternational.com or Service@clarkeinternational.com

DECLARATION OF CONFORMITY-UK
18
Parts & Service: 020 8988 7400 / E-mail: Parts@clarkeinternational.com or Service@clarkeinternational.com

DECLARATION OF CONFORMITY
19
Parts & Service: 020 8988 7400 / E-mail: Parts@clarkeinternational.com or Service@clarkeinternational.com

 Loading...