

3-Way Staple Gun
Model No: CSG10
Part No: 1800200
FEATURES
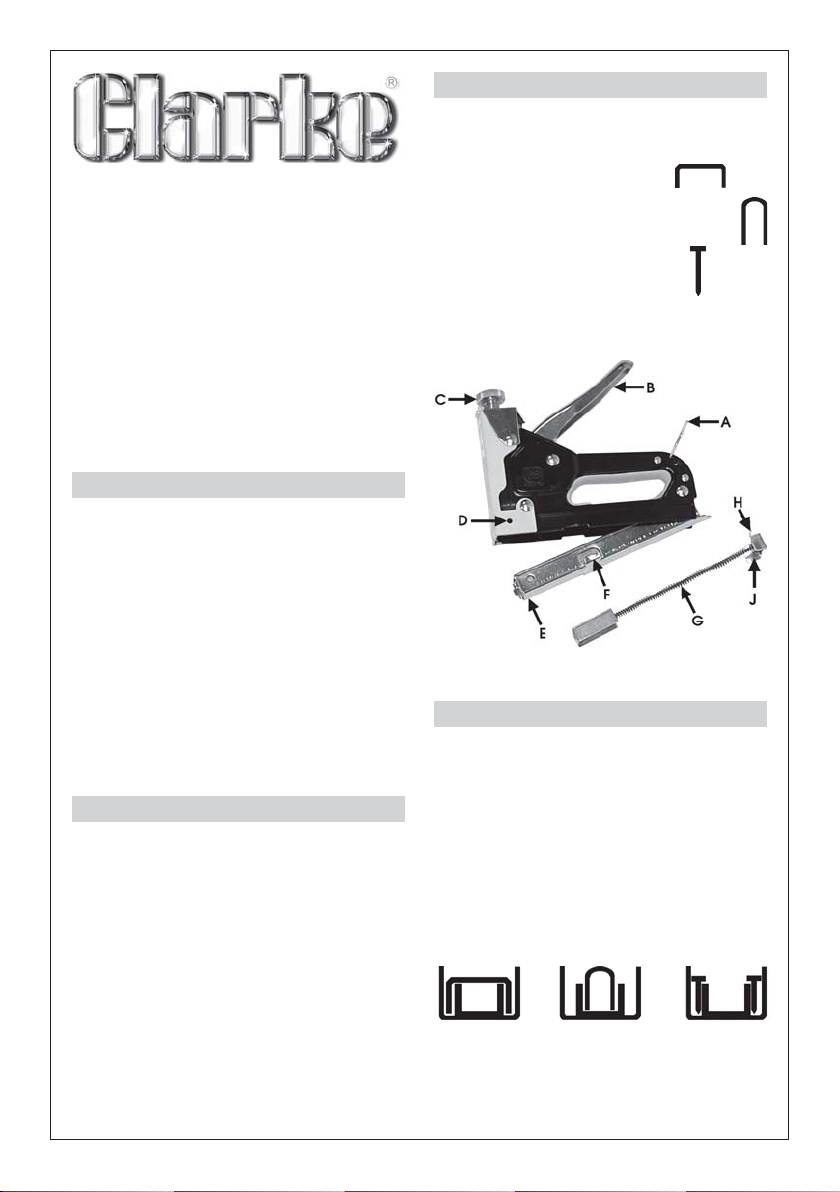
This staple gun is capable of accepting the following;
• Staples ....................................
• ‘U’ shaped Staples ................................
• Nails ........................................
OPERATION
Thank you for purchasing this CLARKE 3-WAY Staple
Gun.
Please read this leaflet thoroughly and follow the
instructions carefully. In doing so you will ensure the
safety of yourself and that of others around you and
you can look forward to the Staple Gun giving you
long and satisfactory service.
GUARANTEE
This CLARKE product is guaranteed against faulty
manufacture for a period of 12 months from the
date of purchase. Your receipt is required as proof
of purchase.
This guarantee is invalid if the product is found to have
been abused or tampered with in any way, or not
used for the purpose for which it was intended.
Faulty goods should be returned to their place of
purchase, no product can be returned to us
without prior permission.
This guarantee in no way effects your statutory rights
under common law.
SAFETY PRECAUTIONS
Extreme care should be exercised when using the
Staple Gun.
• Never point it at anyone.
• Do not allow children to use the gun.
• When not in use, you should always remove
any staples or nails remaining in the gun
and secure the handle with the safety
catch (A).
Take extra care when stapling into walls.
The danger of coming in to contact with
electric cables or plastic water pipes should
not be overlooked.
WARNING: Do not staple cables carrying
electric current.
See ‘Accessories’ on reverse
1. Loading the Gun
(a) Press in the plate (J), against spring pressure,
dislocating the tab (H) from its slot, and with
slight downwards movement, remove the
pressure rod and spring assembly (G) from
the back of the gun.
(b) Ensure there are no old or disfigured staples
or nails in the gun, as these could cause it to
jam (see Maintenance section). Slide the
appropriate staples into the carriage as
shown below
(c) Replace the pressure rod assembly against
spring pressure ensuring the end plate tab
(H) is correctly located in the slot in the gun
body.

2. Operating the Gun
The gun is operated by first placing it directly over
the point to be stapled and holding down firmly with
the palm of one hand, on the pressure screw (C) whilst
pressing down firmly and progressively on the handle
(B), until the gun ‘fires’ and the staple or nail is inserted.
To assist in positioning the staple correctly, the front
face of the gun has a notch at its base, to indicate the
place at which stapling will occur. The notch should
be centered over the point to be stapled.
If you are using nails, then the edge of the notch is
similarly placed over the point to be nailed, (which
side, depends upon which carriage rail the nails are
located).
The pressure screw (C) may be adjusted so that it will
apply the appropriate force to the staple or nail,
depending upon the material being stapled.
Note: The softer the material, the less force will be
required to drive in the staple or nail. Excessive
force may damage the material being stapled.
It is advised therefore, that where necessary, you
should slacken off the pressure screw and test its
action, progressively increasing the pressure by
turning the screw until you determine the pressure
required to correctly staple the material without it
being damaged.
If you are stapling fabric, take care not to use too
great a pressure as this may cause the staple to go
right through, tearing the fabric.
NOTE: A hole is provided in the body, shown at
‘D’, through which the staples may be viewed. By
keeping an eye on this,it is possible to determine
when a reload is required.
MAINTENANCE
In the event the gun jams, and/or staples become
enmeshed within the gun, proceed as follows:
(a) Remove the pressure rod and spring assembly
(G).
(b) The carriage (E) is held in place by two lugs on
its front end, which locate into two slots in the front
edge of the gun. Holding the gun firmly, pull back the
carriage against spring pressure, using the finger grips
(F), on its sides. This will dislocate the lugs from their
slots. Apply a downwards pressure on the carriage
and release it, allowing it to swing on its hinge as
illustrated.
NOTE: If difficulty is encountered in pulling back
on the lugs, it may be necessary to use a tool (e.g.
plyers) to grasp the open end of the carriage and
pull back in order to dislocate the lugs.
Any damaged material may now be carefully
removed using a pair of pliers or similar.
When replacing the carriage, ensure it is completely
forward and the lugs are fully engaged in their
slots. Failure to comply with this rule may cause
the gun to jam.
IMPORTANT: Always remove the Pressure Rod
and Spring Assembly BEFORE dislocating the
carriage. Failure to follow this rule could
result in personal injury.
When you have finished using the gun, always remove
any unused staples or nails, and relieve the pressure
on the spring by unscrewing the pressure screw (C).
Secure the handle with the safety catch (A).
ACCESSORIES
A range of replacement staples and nails are
available from your CLARKE dealer, including the
following:
Item Part No.
Square Staples 6mm 1800240
Square Staples 8mm 1800245
Square Staples 10mm 1800250
Square Staples 12mm 1800255
Square Staples 14mm 1800260
Round Staples 12mm 1800230
SPARE PARTS
Item Description Part No.
G Rod Assembly KL18004
C Adjuster Screw KL18002
For sales and service, contact your Clarke
dealer. For details of your nearest dealer
contact:
CLARKE International on 01992 565300
or e-mail:
Sales@clarkeinternational.com
Hemnall Street, Epping, Essex CM16 4LG
 Loading...