

Page 1
• Battery Replacement
To fit new batteries, open the safe, the battery compartment is found on the back of
the door. Slide the cover off in direction indicated, replace batteries observing correct
polarity Fig. 1, refit cover and test before closing door.
• Reset Button
To restore the factory preset code, open the safe door and press the reset button for
two seconds. The reset button is found on the back of the door just below the battery
compartment.
• Setting Date & Time
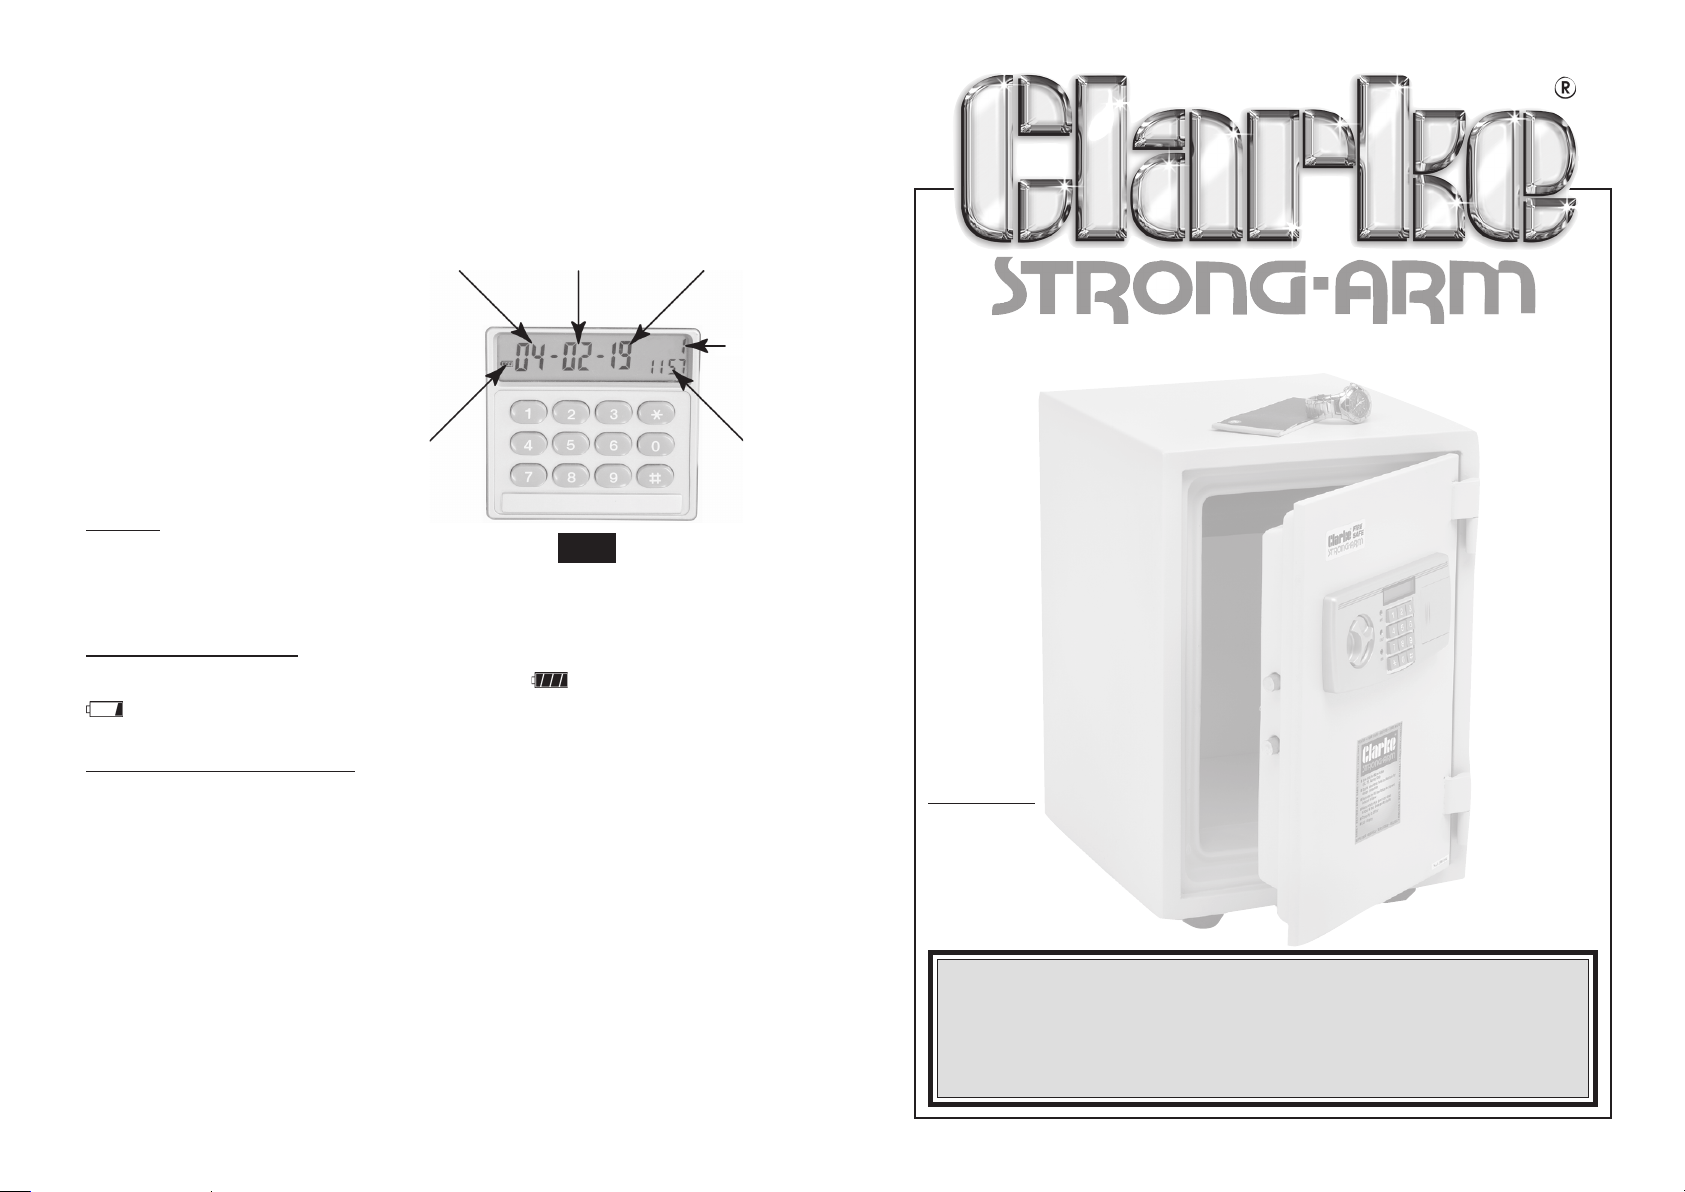
In stand-by, press the * key and the Year
indicator will flash. If the ‘#’ key in now
pressed, the Month key will flash. Each
depression of the ‘#’ key will scroll through
Day, Hours, Minutes and the Week, then
back to Year etc.
Whilst the relevant indicator is flashing it
is possible to change it by pressing ”8” to
increase or “0” to decrease the value.
Year
Battery
Level
Month
Day
Week
Time
Alarm
If an incorrect code is entered 3 times
consecutively, the alarm will sound for 60
seconds. To cancel the alarm, simply enter the correct opening code.
Fig. 2
Battery Condition
The battery level indicator shows the current status, i.e.: Batteries fully charged.
Batteries low, it is recommended to replace the batteries ASAP.
Door Opening Record
Each time the door is opened, the time and date is recorded in memory, this can be
read out as follows.
Enter the correct door opening code, press “0” once when “OPEN” disappears from
the display, and the background light remains on.
The display now shows the last time the door was opened (year, month and date
followed by hour and minute).
“PASS1” confirms the safe was opened using the user pass code in the normal way.
NOTE:
Opening the door with the emergency key is not recorded.
When “PASS1” is displayed, press ”0” again, the display will now show the previous time
it was opened. Each time “PASS1” is displayed, press ”0”, the last 14 door openings
may be tracked this way. This method of recording is known as “LIFO”, (last in first out),
i.e. the most recent 14 openings are recorded
Please note that the details and specifications contained herein are correct at the time of going to print. However CLARKE International
reserve the right to change specifications at any time without prior notice.
Fireproof Safe
CS500F
Part Number: 7710165
Model Dimensions HxWxD Capacity Net Weight
CS500-F 525x355x410mm 0.02m³ 50kg
This digital lock safe provides your valuables with fire protection for up to 1 hour.
Features include, pry resistant recessed doors with heavy duty Steel hinges.
Easy to read LCD. Dual locking protection, digital electronic lock and key. Includes
pull-out storage tray.
Before permanently securing the safe, check carefully that the keys supplied,
are the correct ones for your safe, also check the electronic lock, any defects
should be reported to the Clarke dealer where the safe was originally purchased
as soon as possible.
IMPORTANT
Store the spare keys safely, make a note of the key serial number in case new
keys need to be ordered.
Replacement lock and keys are available from Clarke International. When
ordering, please quote the safe model and serial number.
PARTS & SERVICE TEL: 020 8988 7400
or e-mail as follows:
PARTS: [email protected]
SERVICE: [email protected]
Page 2
Thank you for purchasing the CLARKE Fireproof Safe, which if used as described in
these instructions, will give you long and reliable service.
CLARKE GUARANTEE
This CLARKE product is guaranteed against faulty manufacture for a period of 12
months from the date of purchase. Please keep your receipt as proof of purchase.
This guarantee is invalid if the product is found to have been abused or tampered
with in any way, or not used for the purpose for which it was intended.
Faulty goods should be returned to their place of purchase, no product can be
returned to us without prior permission.
This guarantee does not effect your statutory rights.
Battery Installation
Open the safe, using one of the override keys supplied. To do so proceed as follows:
• Remove the override cover by inserting a ball point pen
or similar into the hole just to the left of the 6 volt DC
backup jack, push the pen upwards to release the
cover, once removed the key lock is exposed.
• Fully insert the key into the lock and turn fully
anticlockwise, hold key in position, and turn the knob
anticlockwise, the door will now open.
• Open the battery compartment on the back of the door.
• Install four 1.5 volt batteries, observing the correct polarity
Fig. 1, It is recommended to use Alkaline batteries, DO
NOT use rechargeable batteries.
Fig. 1
Operation
• Close Safe
To close the safe, simply close the door and rotate the knob clockwise, the door locks
automatically, test the lock by attempting to turn the knob anticlockwise.
• Change Entry Code
To change the entry code: Enter the current code, i.e. #1234#, the display reads OPEN,
press * within 7 seconds, the display will now read “........”, the first dash will be flashing.
Again within 7 seconds, enter the new code (maximum 8 digits), and confirm by
pressing “#”. The display will return to stand-by mode after a couple of seconds.
Test the new code by opening in the normal way, using the new code.
• Emergency Opening
In the event of battery or electronic failure, the safe can be opened
in two ways, either by using one of the three keys supplied, or
connecting the emergency battery backup pack ( Fig. 2).
Fig. 2
Key
Remove the override cover by inserting a ball point pen or similar
into the hole just to the left of the 6 volt DC backup jack, push the
pen upwards to release the cover, once removed the key lock is
exposed. Fully insert the key and rotate fully anticlockwise, hold
key in position, now rotate the knob anticlockwise to open as
before. The door can be locked again by reversing the procedure.
Backup Pack
Install batteries into the backup pack, observing correct polarity Fig. 2, to install the
batteries (4 x 1.5v AA) as follows.
Open the pack by sliding the cover in direction indicated, install batteries and refit
cover.
Connect the backup pack to the keypad, the display will go through a test cycle,
wait for the display to remain stationary, the door can now be opened in the normal
way.
IMPORTANT: Never leave the keys inside the safe
Fig. 3
Digital
Display
Override
Key Cover
• Open Safe (Numeric key Pad)
NOTE: each time a button is pressed an audible beep will sound.
The entry code (“1234”) is factory set. To open the safe, enter #1234# on the numeric
keypad, the display will illuminate blue and read OPEN, followed by two beeps, the
knob can be rotated anticlockwise to release the bolts. The door can now be opened.
If an incorrect code is entered, the display will remain amber and the read-out will
display ERROR, followed by three beeps.
The code can be entered, and made invisible to others for security purposes. Press “#”
followed with “*” then continue as normal with the code and final “#”.
This function is cancelled as soon as the door is opened, therefore it is necessary to
repeat this facility, the above procedure must be used each time the door is opened.
LockUnlock
Knob
6 volt DC Backup Jack
Numeric Key Pad
 Loading...