

Please complete this Security Details form for your safe and store in a safe place
away from your safe. Ensure that you complete the Safe Registration Form and return
to Clarke Customer Service department. Have his form to hand when making enquires
about your safe.
Registration Number
Registration Number
Note : The Registration Number will be issued to you, by post, on receipt of your
Model Number
Model Number
CS 1058
Purchase Details
Purchase Details
Date Purchased
Purchased From
Town of Purchase
Receipt Number
Security Details
Security Details
Serial Number
Key Number
completed Registration Form :
CS 1062
Combination
Number
CS 1118
Parts and Service
For Spare Parts and Servicing, please contact your local dealer, or
Clarke International on one of the following Numbers:
Parts and Service Tel: 020 8988 7400
Fax: 020 8558 3622
or email as follows:
Parts: Parts@clarkeinternational.com
Service: Service@clarkeinternational.com
© Copyright Clarke International 2000. All rights reserved.
1200
Fire Resistant Digital Safes
Models: CS1058 - CS1062 - CS1118
Part Numbers 7710110 - 7710100 - 7710120
Operating Instructions
Thank you for purchasing this Clarke STRONG-ARM Digital Electronic Safe which is designed to provide
you with security and fire protection for your valuables and cherished possessions.
Please read this information booklet thoroughly in order that you may familiarize yourself with all aspects
of the safe including its installation and operation.
For security reasons, it is of the utmost importance that you let your combination be known to as few people as
possible.
We strongly advise that you DO NOT store any medicines, to which you may require quick access, in the
safe. In the event of fire, this safe is NOT suitable for electronic media such as floppy discs.
LIMITED WARRANTY
If your Clarke STRONG-ARM safe fails to operate due
to manufacturers defect at any time within one
year of purchase, we will, at our discretion, repair
or replace the unit at no charge to the original
owner. Goods should be returned, postage paid,
to CLARKE International, at the address given in the
Warranty Registration form.
Please retain your receipt as proof of date of purchase.
This warranty shall be void if the product has been
damaged by improper installation, neglect,
accident, misuse, exposure to extreme heat or
humidity, or as a result of service or modification
not authorized by CLARKE International.
All costs of removal and reinstallation of the product
are the owners responsibility.
No other expressed warranty is given. Repair or
replacement of the product is our only liability. .
In no event shall CLARKE International be liable for
consequential or incidental damages.
This does not effect your statutory rights.
OPENING THE SAFE
The safe has been supplied with three keys. The
master key has a square top and can be used to
open the safe if you forget your security code, lose
your other keys or if the batteries which operate
the digital keypad lose power.
The master key should be stored in a secure place.
The other two keys can be used in conjunction with
the security code for day-to-day use.
The Safe is opened by entering the combination
on the digital keypad, then turning the key in the
safe door. The digital key pad is battery operated.
To open the door of the safe for the first time, press
the * Key, then enter 7777 and press the # key. An
audible tone will sound as each key is pressed. Turn
the key in the lock to open the safe.
NOTE: Once you commence entering the combination
on the keypad, or during subsequent re-programming,
you have 10 seconds to complete the sequence,
otherwise the keypad will shut down and you must
restart the sequence.
PROGRAMMING AND OPENING
THE SAFE
Your new safe has been preset with a security code,
*7777# We recommend you immediately change this
code thus:
1. With the safe door closed, clear the existing
code by pressing the # key, followed by the
number code 7777 and #. (i.e: # 7777 #)
2. Write down the numbers you decide for your
combination (max. 6 digits) and enter them
carefully, followed by # (Example: 123456 #)
File your combination away from the safe.
3. To open the safe subsequently, press the *
key, enter the combination and then press #.
(Example: *123456#) You can now open the
safe by turning the key in the lock.
Note:
1. After entering the combination,you have five
seconds to open, before the mechanism re-locks.
If this occurs simply reenter your combination.
2. For security...If four consecutive incorrect groups
of numbers are entered (i.e. four incorrect sets),
the keypad will shut down for 5 mins
ALTERNA TIVELY...with the safe door open...
1. Locate the hole on the back of the door and insert
a rod/pen tip etc., Press on the button and listen
for the tone.
2. Now enter your code and procede as in 2 above.
BA TTERY REPLACEMENT WARNING
If the batteries are low, the L-BA TT signal will appear
on the LCD window. The batteries must be
replaced in order for the digital keypad to work
properly.
Battery Replacements - 4 x AA type.
CHANGING THE BATTERIES
The battery compartment is located on the safe
door to the right of the key pad. Remove the sliding
cover to reveal the batteries. Replace the batteries
ensuring correct polarity according to the symbols
within the cover.
INSTALLING THE SAFE
The safe has four mounting holes at its underside
for mounting horizontally to a shelf/furniture etc. It
is supplied with four bolts that can be used to fix
the safe.
Note: Your safe is only as secure as its mountings.
The weight of the safe itself may not deter an intruder
from carrying it off to open at leisure.
Plan the installation carefully, and if necessary, seek
expert advice.
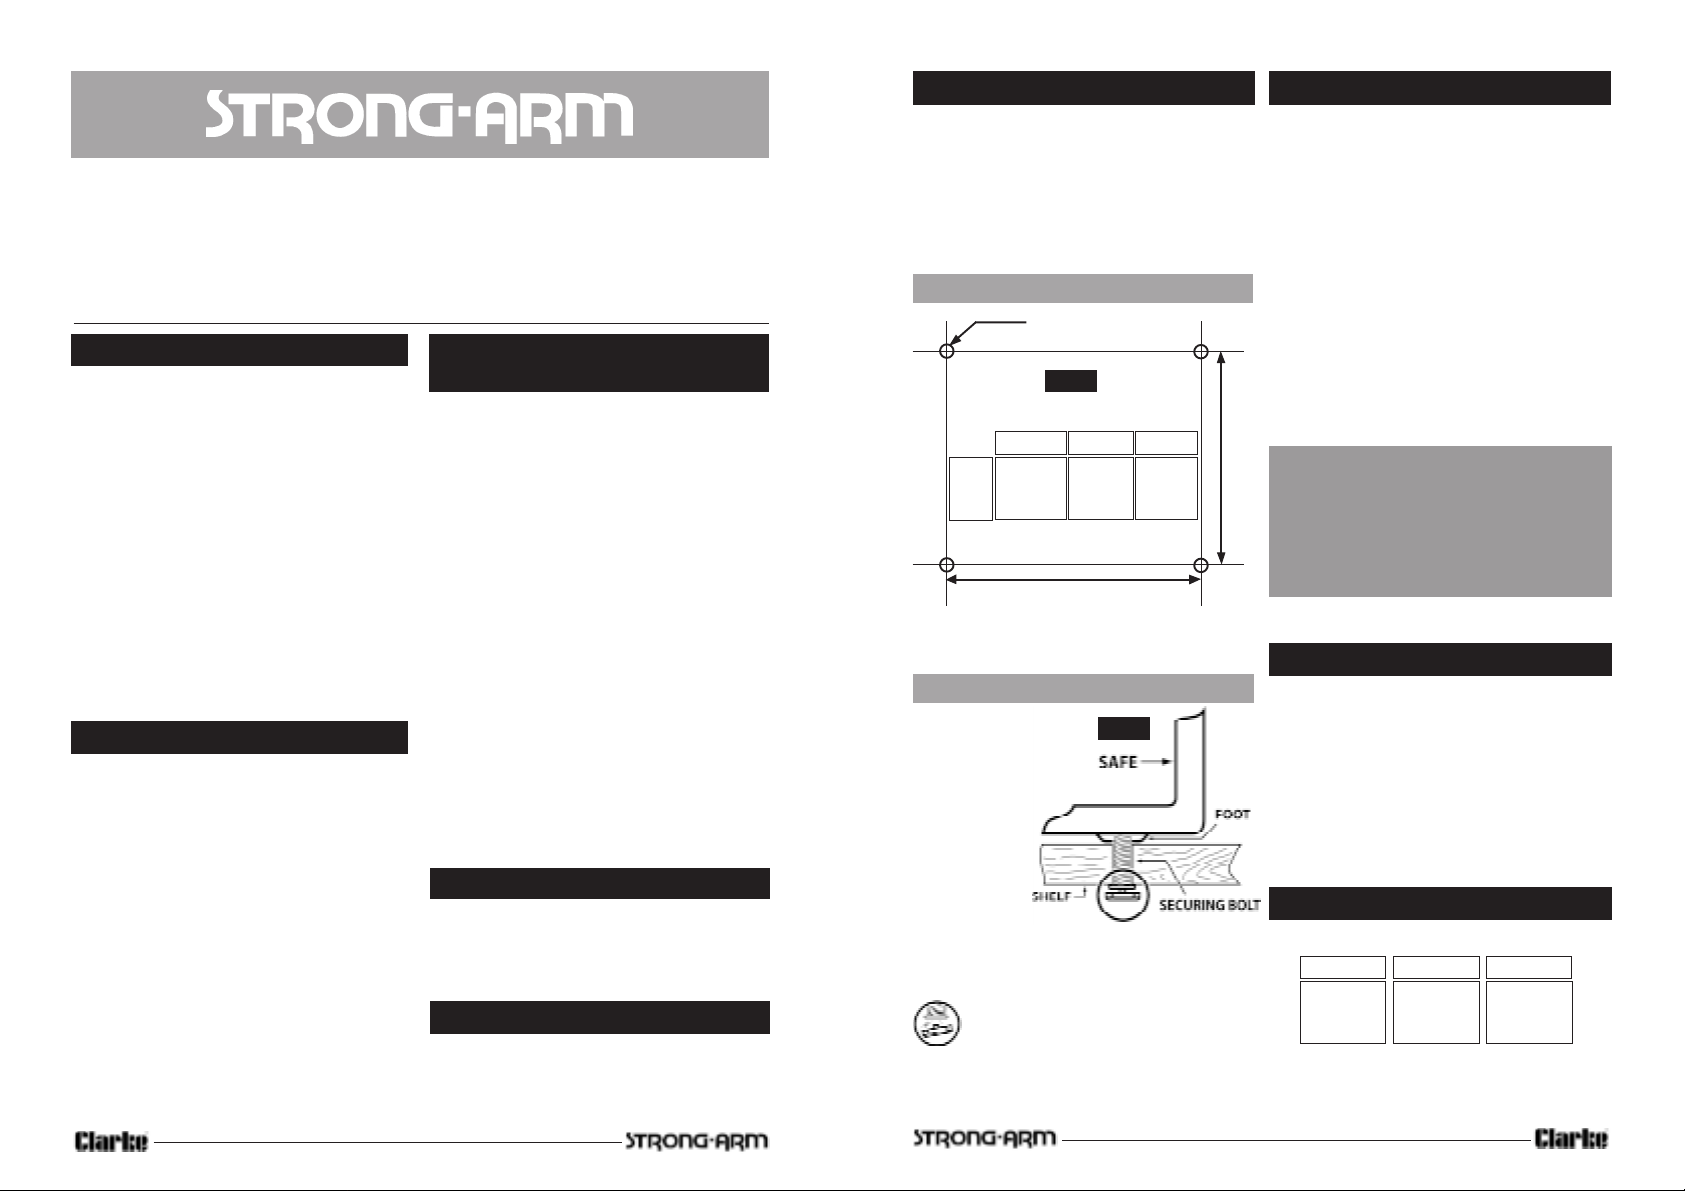
Mounting Hole detail
8mm DIA
Fig. 1.
Dimensions (mm)
CS1058 CS1062 CS1118
A
A 227 220 349
B 303 256 323
B
NOTE: When positioning the safe, ensure there is
room for the door to open fully...do not locate it
too close to a wall for example.
Mounting to a shelf/furniture
1. Choose a suitable
location for your
safe ensuring the
mounting surface is
solid enough to
hold the weight of
the safe.
2. Mark out four
pilot holes as
detailed in
fig. 1 and drill
through with
an 8mm drill.
3. Position the safe over the holes, locating onto
the bolts. Fit the bolts supplied up through the
mounting surface into the feet of the safe and
tighten slowly and progressively.
Note : The bolt head will break away
as it is tightened.
IMPORTANT:
length, so that they do not ‘bottom out’ in the threaded
holes, when tightened. The bolts are deliberately long
to cater for various shelf thicknesses.
The fixing bolts MUST be cut to a suitable
Fig. 2.
REGISTERING YOUR SAFE
1. Select your combination number and record it.
2. Complete the Security Form on the back of
this manual and file away in a safe
place......NOT in the safe.
3. Complete the Registration Form and return to
Clarke Customer Registration Department.
Note : this must be returned to the address
shown within 7 days of purchase.
4. Y ou will receive a registration number (within
seven days of receipt of the completed form).
Transfer this number to your security details
form.
Please have this manual (with the completed
security details) to hand when contacting
Clarke Customer Registration Department.
IMPORTANT !
If you fail to register and subsequently
lose your key, we will be unable to
provide you with replacement. It is
therefore in your own interest to
register.
TERMS AND CONDITIONS
You must complete and return the registration form
within 7 days to obtain customer services support
for this safe. The registration is not transferable so if
you sell or otherwise dispose of the safe a separate
registration will be required from the new owner.
All registrations will be acknowledged with a
registration number sent by first class post. If you
do not receive this within seven days, please
contact our Registration Department .
Please remember that no support will be given if you
have not registered.
SPECIFICATIONS
Capacities
CS1058 CS1062 CS1118
1cuft 0.6cuft 1.5cuft
0.028M30.017M30.042M
These safes are capable of providing fire protection for
1 hour at temperatures up to 925oC (1700oF). However,
it should be remembered that magnetic media will be
destroyed at this temperature.
3
 Loading...