

Page 1
OPERATING & MAINTENANCE
INSTRUCTIONS
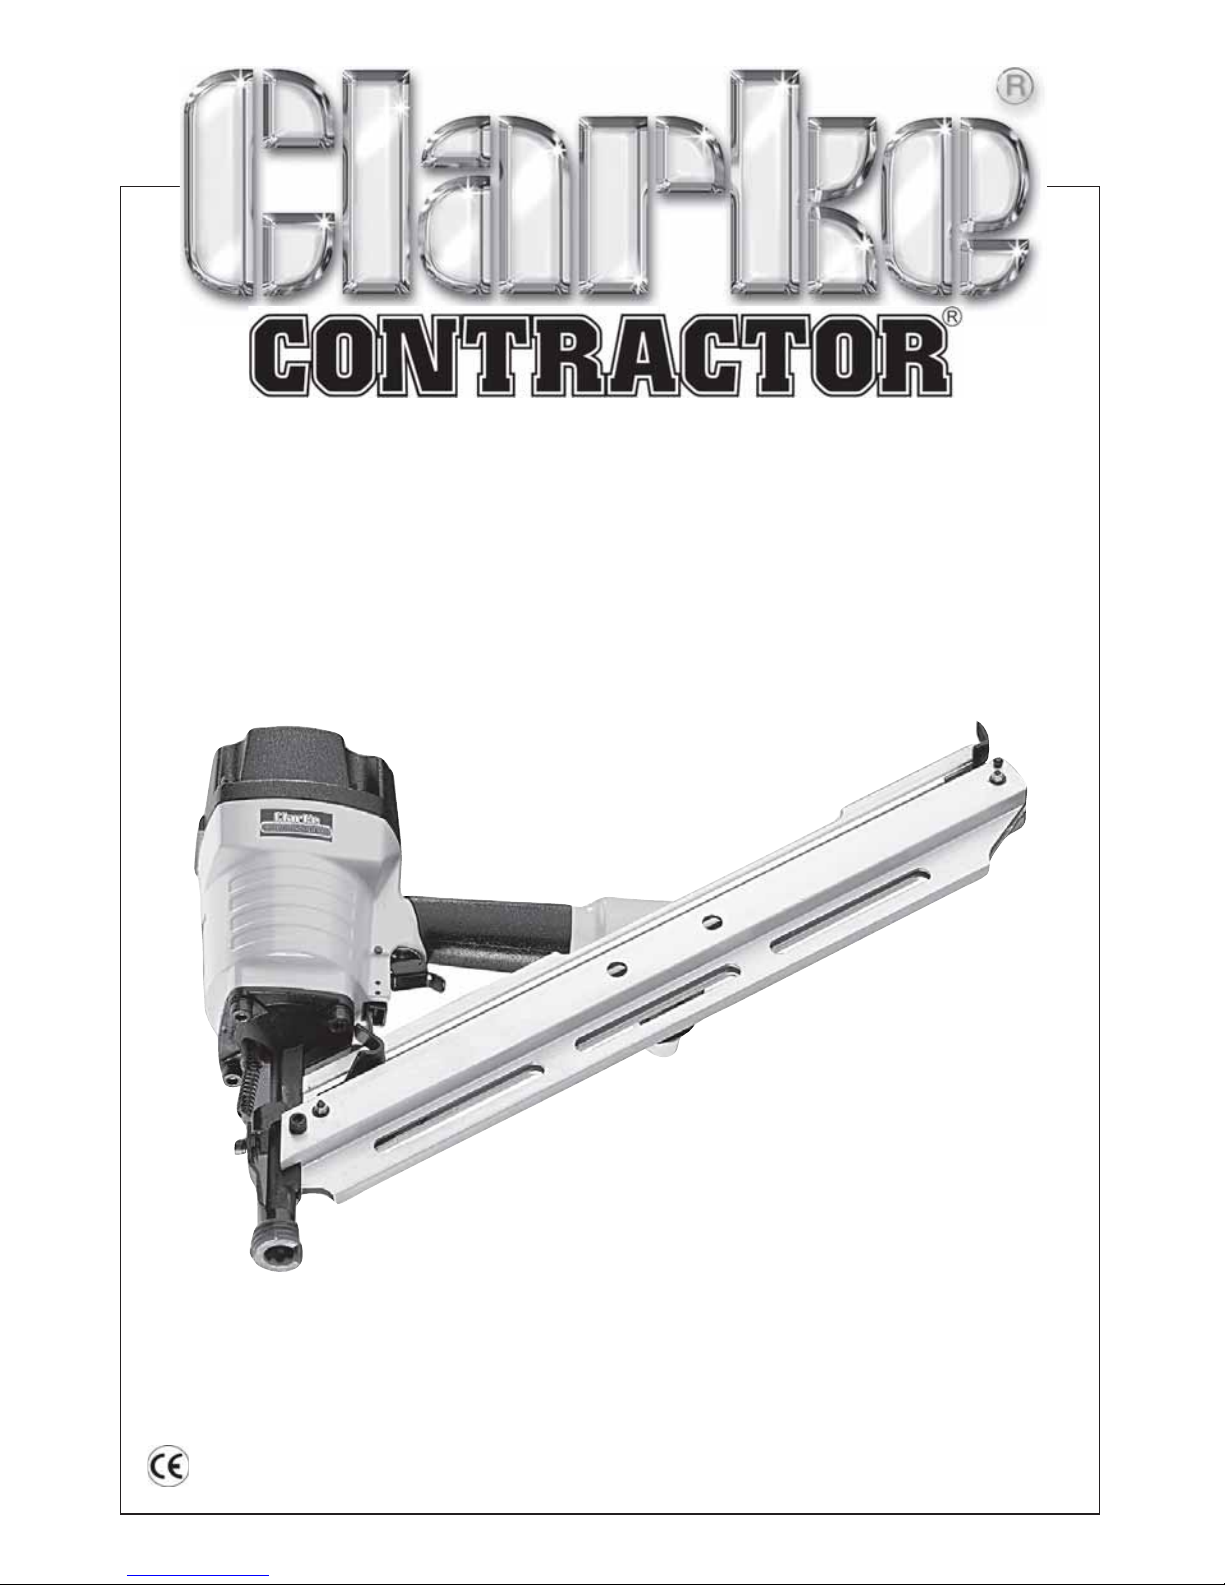
34o Clipped Head
Air Frame Nailer
MODEL: CFN34
Part No. 3110397
OPERATING & MAINTENANCE
INSTRUCTIONS
1207
Page 2

2
SPECIFICATIONS
Min. Hose Size (ID) ....................................6 mm (1/4”)
Ave. Air Consumption..............................14.8 cfm
Operating Pressure ..................................5.51 - 7.58bar (80 - 110psi)
Air Pressure Max .......................................8.27 bar (120 psi)
Nail Size......................................................5 0 - 9 0 m m
Magazine Capacity ................................80
Drive Speed ..............................................60 Shots/min
Sound Power Level ..................................112.5dBL
WA
Weight .......................................................4 kg
Dimensions LxWxH ....................................500 x 120 x 378 mm
Part No.......................................................3110397
Please note that the details and specifications contained herein, are correct at the time of
going to print. However CLARKE International reserves the right to change specifications at
any time without prior notice. Always consult the machine’s data plate
FEATURES
This Nail Gun is suitable for use on materials such as:
• Soft wood, Hardwood • MDF • Plywood • Hardboard • Fibreboard
• Corkboard • Flexible Plastics • Leather, Fabrics • PVC, Polythene sheet
This Nail Gun is NOT suitable for use on materials such as:
• Hard Laminates • Brittle Plastics • Metals (other than light foils)
PACK CONTENTS
• 1 x Nailer
• 1 x Oil Bottle
• 4 x Hexagonal Keys (3, 4, 5 & 6 mm)
• 1 x Instruction Manual
• 1x Moulded Carry Case
Page 3
3
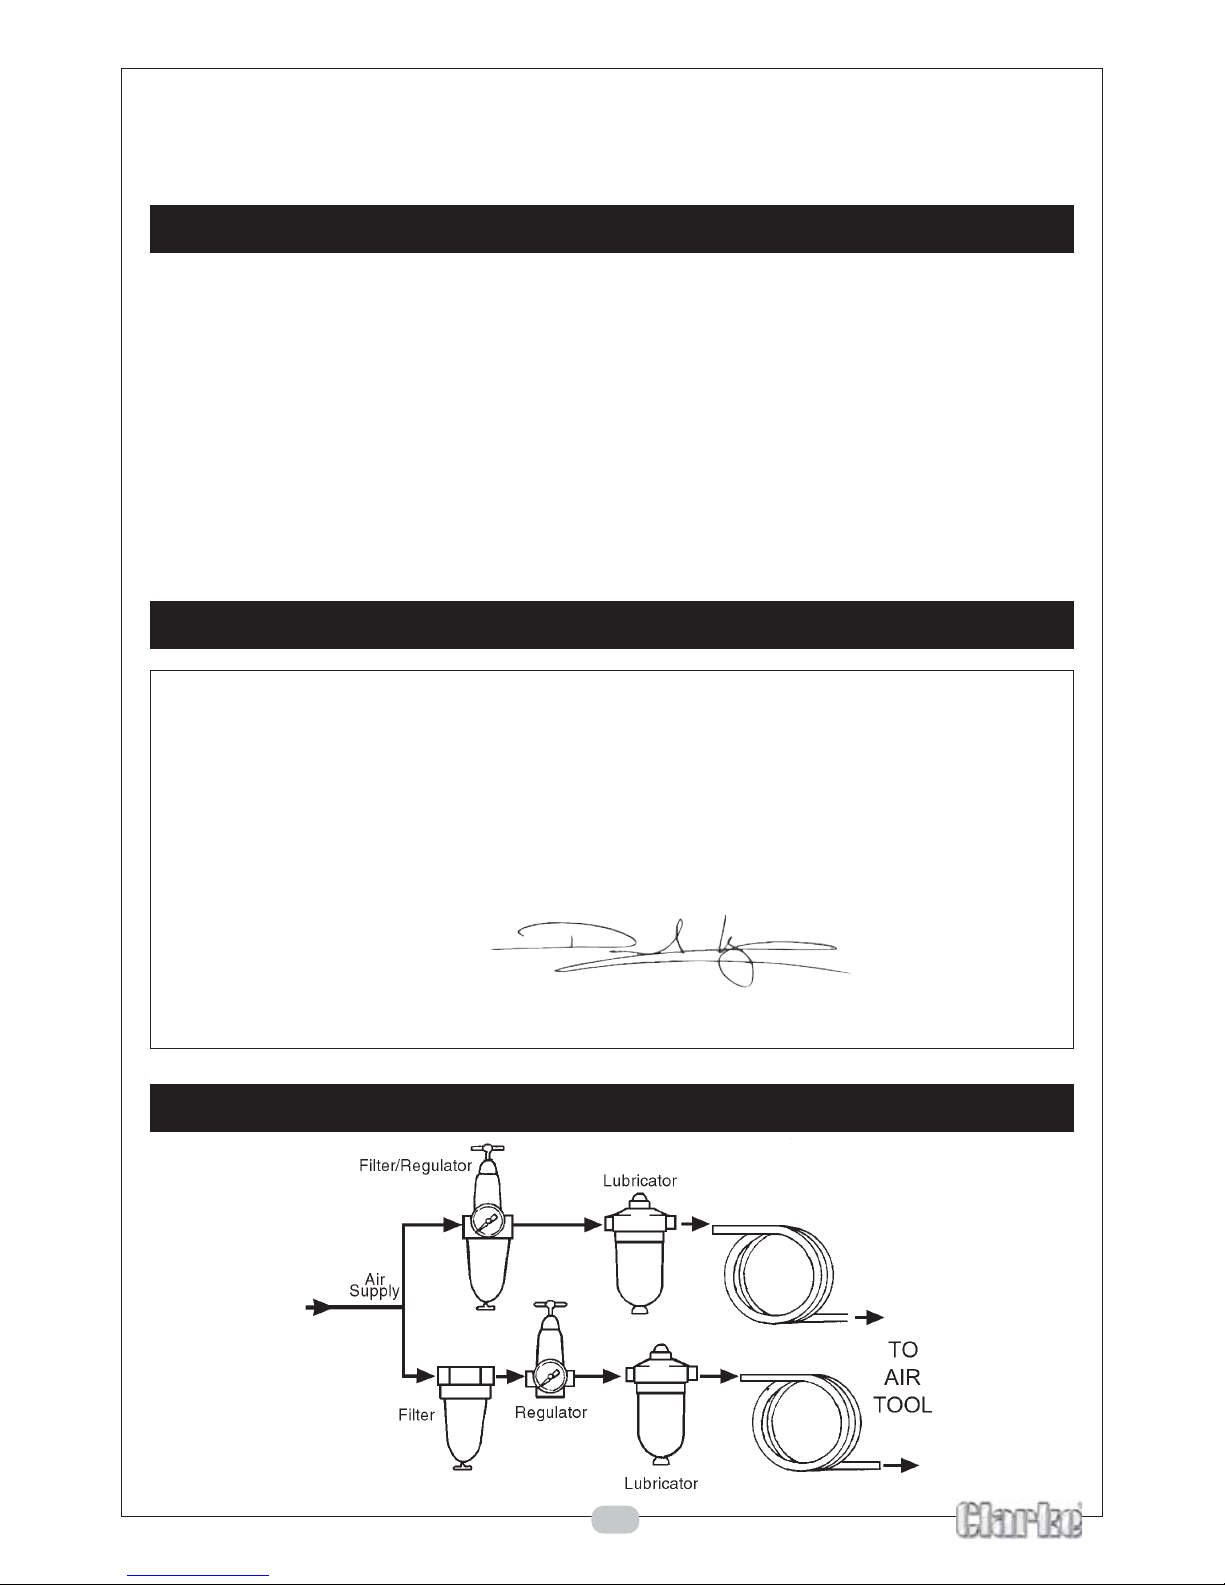
RECOMMENDED AIR SUPPLY CONNECTION
GUARANTEE
This CLARKE product is guaranteed against faulty manufacture for a period of 12 months
from the date of purchase. Please keep your receipt as proof of purchase.
This guarantee is invalid if the product is found to have been abused or tampered with in
any way, or not used for the purpose for which it was intended.
Faulty goods should be returned to their place of purchase, no product can be returned
to us without prior permission.
This guarantee does not effect your statutory rights.
We declare that this product complies with the following standard.
• BS EN 792-13: 2000
Model No: CFN34
Serial or Batch number: See product data plate
signature:
D. Kemp
ENGINEERING MANAGER
DECLARATION OF CONFORMITY
Thank you for purchasing this Clarke Frame Nailer. Please read these instructions carefully
before attempting to use the tool, to ensure the safety of yourself and others that may be
in the vicinity, and also to ensure the tool provides you with years of satisfactory service.
Page 4
4
SAFETY PRECAUTIONS
WARNING
COMPRESSED AIR CAN BE DANGEROUS. ENSURE THAT YOU ARE THOROUGHLY
FAMILIAR WITH ALL PRECAUTIONS RELATING TO THE USE OF COMPRESSORS AND
COMPRESSED AIR SUPPLY.
FAILURE TO FOLLOW THESE PRECAUTIONS COULD RESULT IN PERSONAL INJURY,
AND/OR DAMAGE TO PROPERTY.
• Keep the work area clean and tidy.
• Keep children and visitors away - Do not let children handle the nailer. Make sure
that any other persons in the work area are dressed suitably and are wearing eye
and ear protectors.
• Do not operate the nailer where there are flammable liquids or gases.
• Keep the air supply hose away from heat, oil and sharp edges.
• Dress appropriately - Do not wear loose clothing or jewellery. Tie long hair out of
the way.
• Stay alert and use common sense - Do not operate the nailer when you are tired
or under the influence of alcohol, drugs or medication.
• Always wear eye protectors when using the nailer - Eye protectors must provide
protection from flying particles from the front and the side.
• Always wear ear protectors when using the nailer.
• Do not overreach - Keep proper footing and balance at all times.
• Never use any type of bottled gas as a source of power for the nailer.
• Do not connect the air supply hose with your finger on the trigger of the nailer.
• Do not exceed the maximum pressure for the nailer: 8.27 bar (120 psi).
• Never point the nailer at yourself or any other person.
• Never actuate the nailer into free space - This will avoid any hazard caused by
free flying nails and excessive strain on the nailer.
• Place the nailer properly on the workpiece - Do not fire nails while holding the
nailer at an acute angle. Do not fire nails on top of other nails.
• Do not use on thin boards, corners or edges - There is a risk of firing through the
workpiece and injuring others.
• Check for the presence of live electric cables, water pipes etc., before use and
avoid.
• Do not use the nailer for any other purpose than that described in this book.
• Do not carry out any alterations or modifications to the nailer.
• Use ONLY replacement parts and accessories provided by CLARKE International.
The use of other parts may invalidate your guarantee.
Page 5
5
SAFETY PRECAUTIONS cont.:
• Always disconnect from the air supply when:
a) Performing any maintenance such as clearing a jammed nail.
b) The nailer is not in use.
c) The nailer will be left unattended.
d) Moving to another work area.
e) Passing the nailer to another person.
• Use only the nails, parts and accessories described in this book.
• Only carry out the maintenance recommended in this booklet. For replacement
of parts or repair, return the nail gun to the place of purchase.
TRANSPORTATION
• Always disconnect from the air supply before moving from one work area to another.
• Always disconnect from the air supply before passing the nailer to another person.
• Never carry the nailer by the air supply hose.
• Never carry the nailer with your finger on the trigger.
STORAGE
• When not in use the nailer must be disconnected from the air supply and stored in
a dry place out of the reach of children (preferably in a locked cabinet).
• Remove any nails from the nailer magazine while in storage.
• Avoid storing the nailer in environments where the temperature can fall to below
0oC.
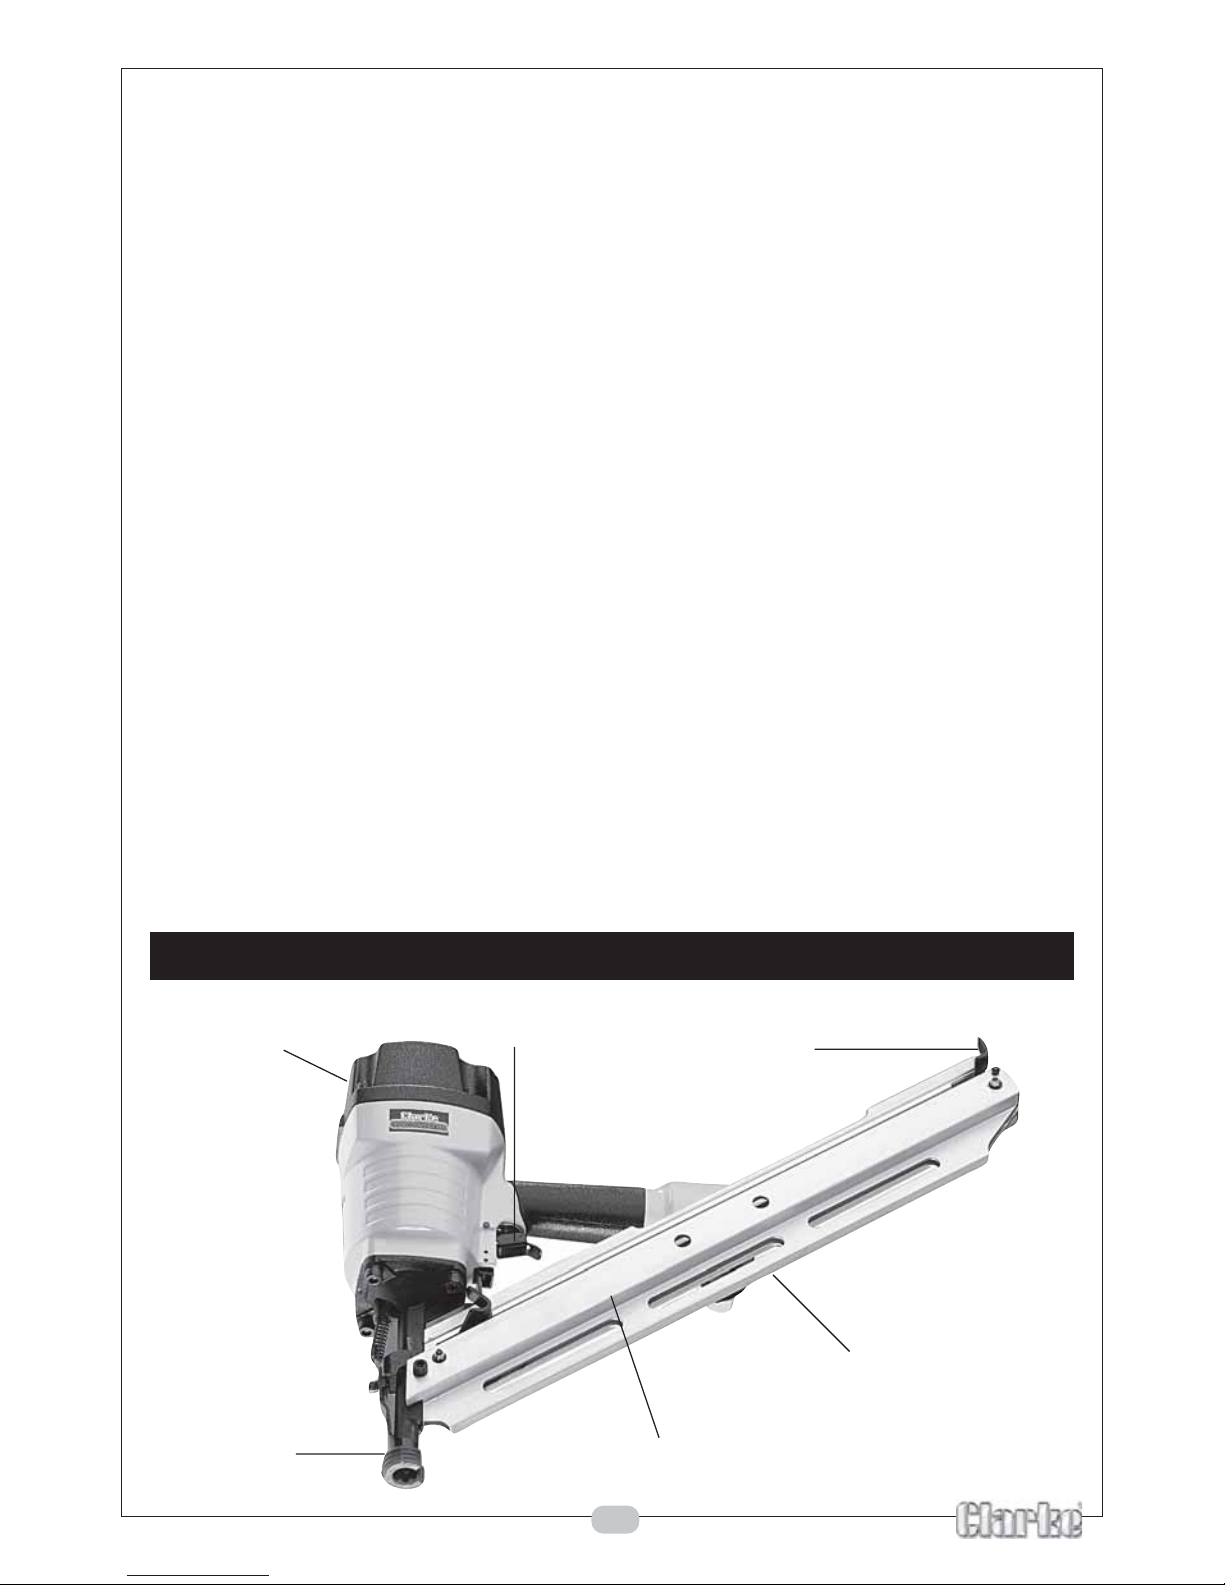
PARTS
Air
Deflector
Trigger
Magazine
Striker
Cover
Quick Fit Coupling
Magazine
Release
Catch
Page 6
6
Preliminary checks
Make sure that the air supply is not connected to the nailer. Do not put any nails in the air
nail gun until directed to do so in the following procedure.
1. It is essential that the air nail gun is lubricated before each use. Use the CLARKE Air Line
Oil provided with your nailer to lubricate the safety yoke and trigger mechanism. Do
not use detergent oils or any oil that contains artificial additives these may cause the
nail gun to malfunction.
2. Place 2 or 3 drops of oil in to the air intake twice a day when the nailer is being used.
3. Check all of the nailers screws for tightness.
Connecting the air supply to the nailer
Make sure that you are wearing eye protectors before connecting the air supply.
4. Push the hose from the compressor on to the nailer. The collar on the hose connector
will slide forward and click in place.
5. Refer to the air compressor instruction book for the starting procedures of the compressor .
Set the compressor output to 5.5 Bar (80 psi).
6. Check that the nailer does not leak air.
Checking the safety mechanism
7. Hold the nailer in mid-air pointing downwards, and pull the trigger.
• The nailer should not operate. If it does the safety mechanism is faulty. Do not use
the nailer. Return it for repair to the place of purchase
8. Release the trigger and with your finger off the trigger, press the safety yoke against a
scrap piece of timber.
• The nailer should not operate. If it does the safety mechanism is faulty. Do not use
the nailer. Return it for repair to the place of purchase.
Checking operation of the nailer
9. Press the safety yoke against a piece of scrap timber and pull the trigger. The nailer
should operate. If it does not return it for repair to the place of purchase.
With the air nail gun off the work piece, pull the trigger and then press the safety yoke
against the workpiece.
• The air nail gun should NOT operate. If it does return for repair to the place of
purchase.
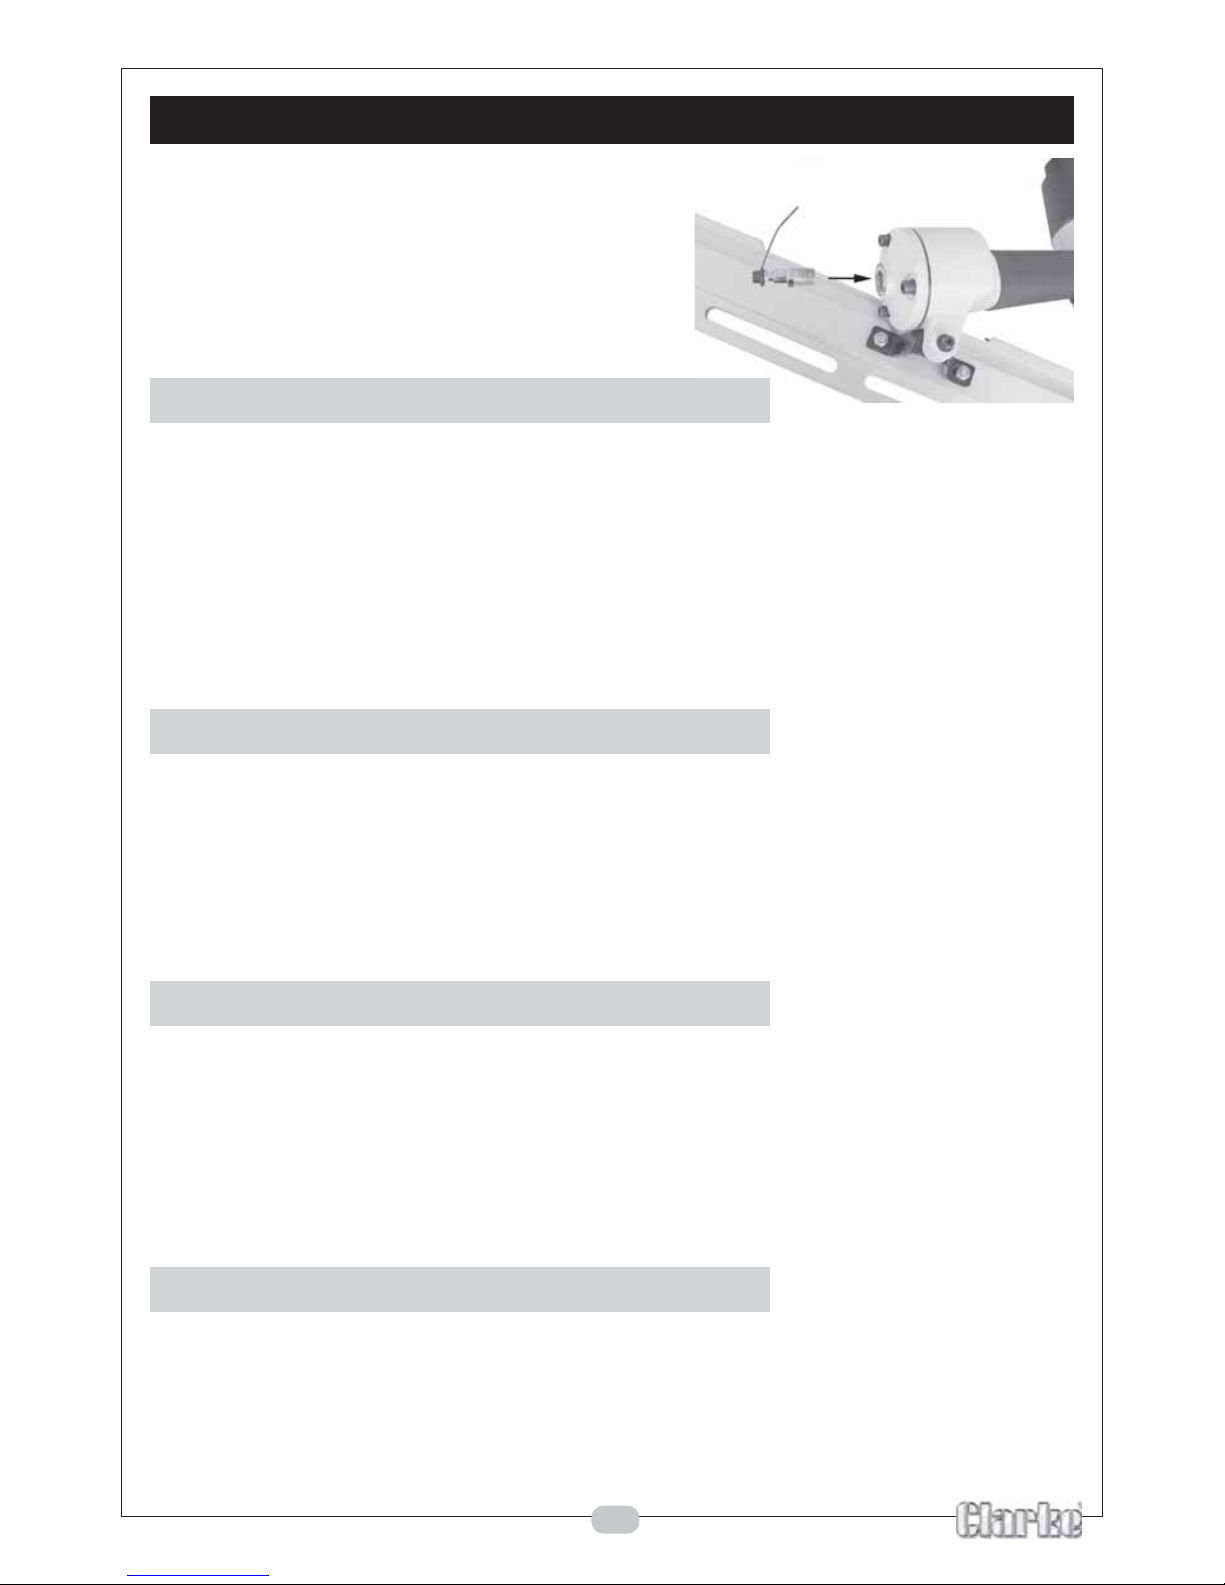
PREPARATION FOR USE
Screw the quick fit air intake coupling to the
nailer as shown on the right.
Page 7
7
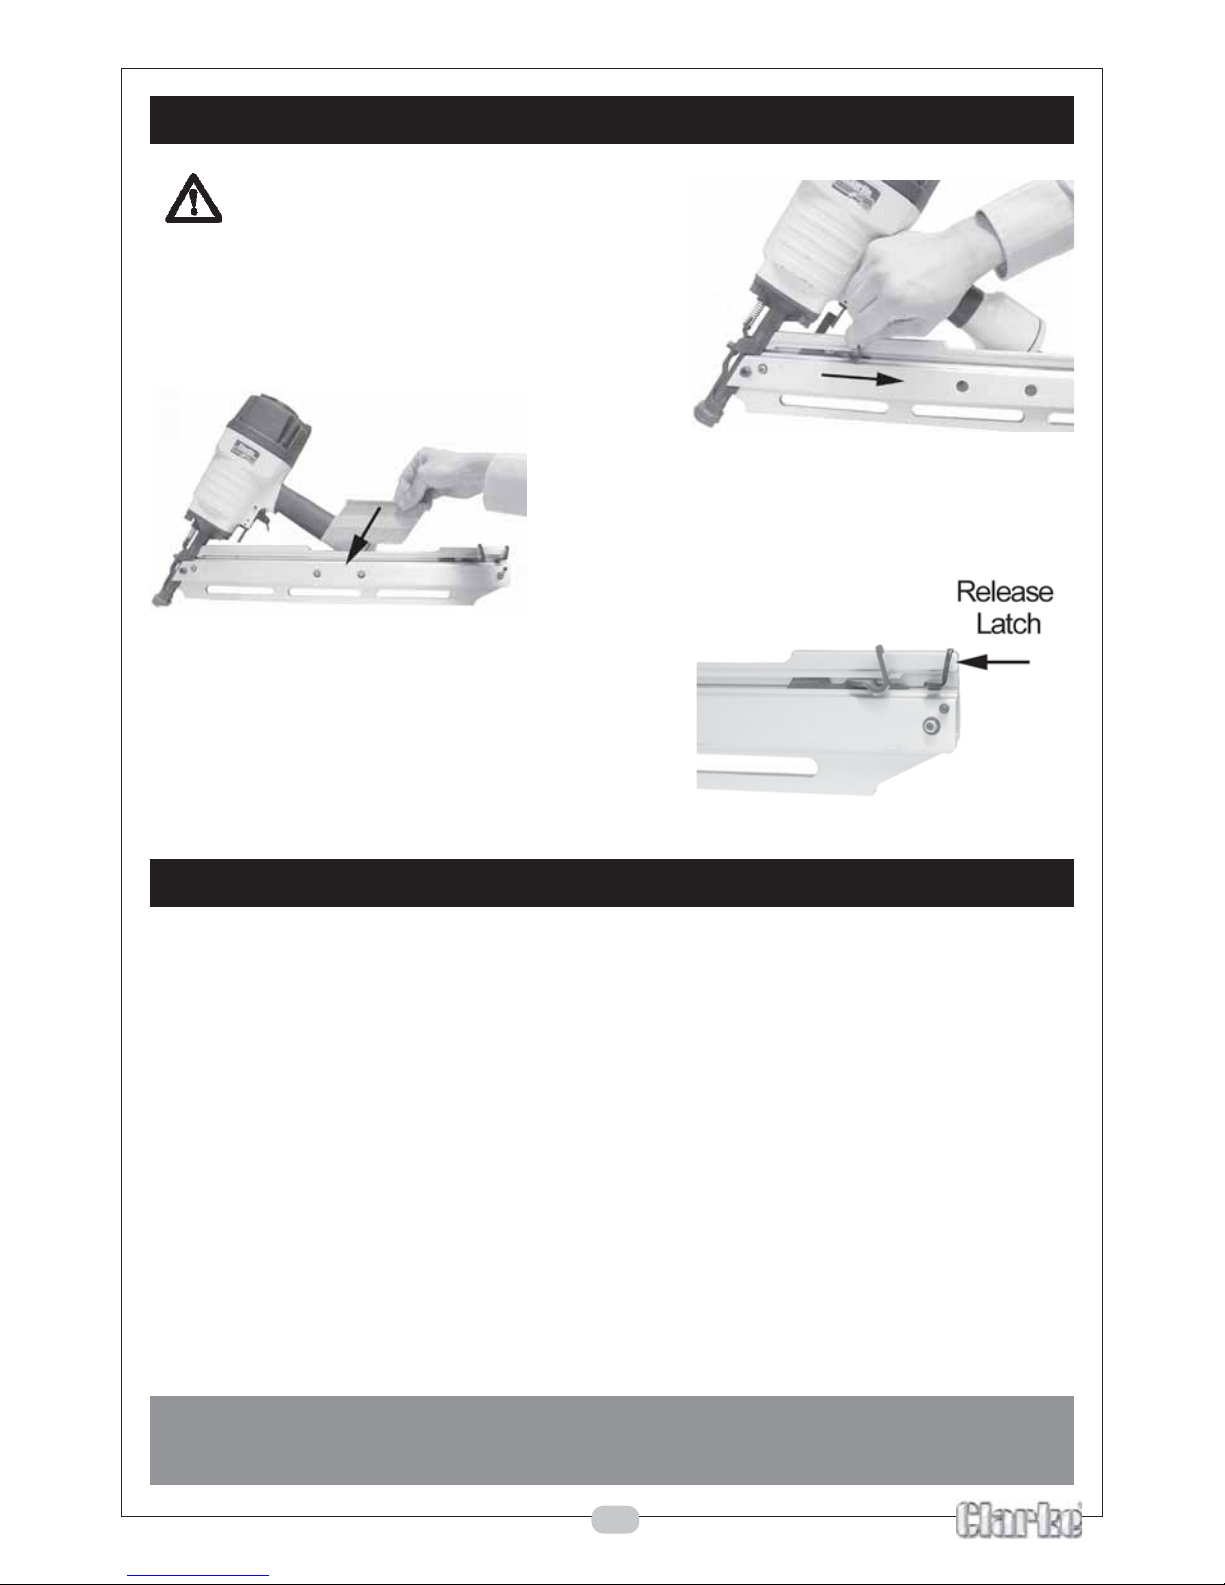
LOADING NAILS
Always disconnect the nailer from the air supply
before loading nails.
1. Pull the nail pusher back as far as possible
until the catch clicks into place.
2. Slide the nails through the loading slot into
the magazine as shown.
3. Press the release latch on the rear of the
magazine and slide the nail pusher forward.
• Your nailer is now ready to use.
OPERATION
1. Turn ON the air supply, and check for air leaks.
• If any are apparent, rectify before proceeding.
2. Ensure the operating pressure is set to between 5.51 - 7.58 bar (80 - 110 psi),
depending upon the size of nail used and type of material being worked.
• Harder material, or bigger nails will mean a higher pressure is required.
3. Hold the nailer firmly with the safety yoke flat against the workpiece, and at 90o to it.
4. Squeeze the trigger to drive the nail.
5. Each squeeze of the trigger will drive one nail only.
• If the nail is driven in too deep, reduce the air pressure in increments of 0.5 bar (7
psi), checking the result after each adjustment. You should aim, to work with the
lowest possible air pressure. This will save energy, produce less noise and reduce
tool wear.
• If the nail is not driven in sufficiently, increase the air pressure in increments of 0.5
bar (7 psi), checking the result after each adjustment.
WARNING! DO NOT EXCEED THE MAXIMUM OPERATING PRESSURE OF THE TOOL;
8.27 BAR (120 PSI).
Page 8
8
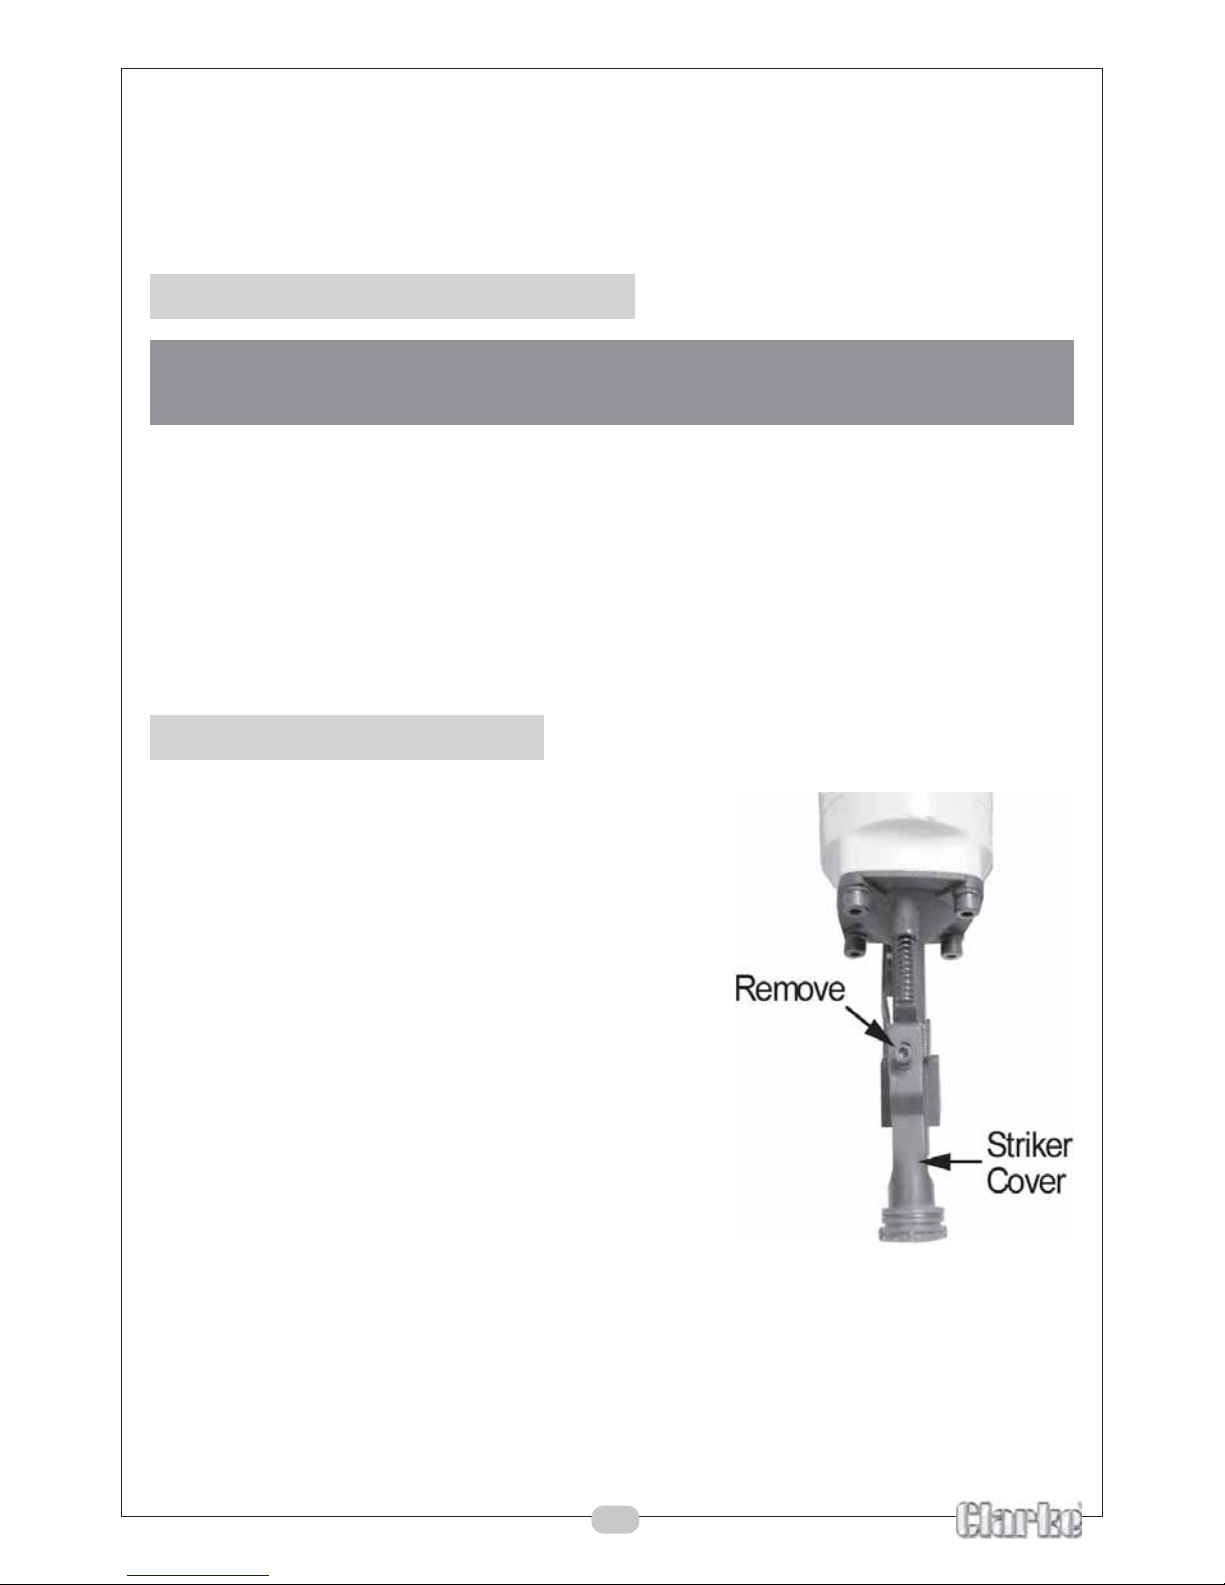
Clearing a jam
To clear a jammed nail, proceed as follows:
1. Follow the compressor procedure to switch off
and release the air pressure.
2. Disconnect the air supply hose.
3. Pull the nail pusher back as far as possible until
the catch clicks into place.
4. Remove the nails from the magazine.
• The jammed nail should then release. If the
jammed nail does not release, proceed as
follows.
5. Remove the bolt indicated using the hexagonal
key supplied.
6. Remove the striker cover.
7. Remove the jammed nail using pliers or similar tool.
8. Replace the striker cover.
Avoid triggering the nailer when the nail magazine is empty. If the nailer operates
improperly or is defective, disconnect from the air supply and have the tool inspected by
a qualified service technician.
In the event of long breaks in work or at the end of the working session, disconnect the
tool from the air supply and empty the nail magazine.
Disconnecting the air supply
WARNING! NEVER DISCONNECT THE AIR SUPPLY HOSE UNTIL THE COMPRESSOR
HAS BEEN SHUT DOWN AND THE COMPRESSED AIR RELEASED.
1. Refer to the compressor instruction book for the procedures to shut down and
release the compressed air.
2. Once the pressure has been released, disconnect the air supply hose from the nail
gun. Slide the collar on the hose connector away from the nailer. The hose will
release and spring backwards.
3. Remove any nails remaining in the magazine of the nailer .
4. Store the nailer safely in its box in a dry, secure environment
Page 9
9
MAINTENANCE
WARNING! MAKE SURE THAT THE AIR NAIL GUN IS DISCONNECTED FROM THE AIR SUPPLY
BEFORE STARTING ANY CLEANING, OR MAINTENANCE PROCEDURES.
LUBRICATION
• Only use the oil provided to lubricate the air nail gun.
• Lubricate the moving parts of the safety yoke and trigger mechanism before
using the nailer.
• Do not use detergent oils or any oil that contains artificial additives as these may
cause the nailer to malfunction.
• Place 2 or 3 drops of lubricating oil into the air intake hose connection point twice
a day when the nailer is being used. A bottle of CLARKE Air Line Oil** is supplied
with the kit.
CLEANING
• Keep the body of the nailer clean and free from debris.
• Make sure that the magazine release lever and the trigger are kept clean and in
good working order.
• Clean the magazine and nail pusher by blowing with compressed air.
SERVICE AND REPAIR
• All servicing and repair must be carried out by qualified service technicians.
NOTES
Be aware that factors other than the tool may effect its operation and efficiency such as
reduced compressor output, excessive drain on the airline, moisture or restrictions in the
line, or the use of connectors of improper size or poor condition which will reduce air
supply.
**Clarke Air Line Oil is available from your CLARKE dealer part no. 3050825.
Page 10

10
PAR TS DIAGRAM
Page 11
11
PARTS LIST
No. Description Part No.
No. Description Part No.
9
PARTS & SERVICE TEL: 020 8988 7400
or e-mail as follows:
P ARTS: [email protected]
SERVICE: [email protected]
1 Bolt M8X30 HTCFN34001
2 Air deflector HTCFN34002
3 Deflector rubber HTCFN34003
4 Spring HTCFN34004
5 Spring wire HTCFN34005
6 Bolt M6X30 HTCFN34006
7 Spring washer HTCFN34007
8 Flat washer HTCFN34008
9 Cylinder core HTCFN34009
10 Bolt M5X5 HTCFN34010
11 Cylinder cover HTCFN34011
12 O-ring 41.7x3 HTCFN34012
13 O-ring 56x3.1 HTCFN34013
14 Head valve Piston HTCFN34014
15 Spring seat HTCFN34015
16 Compressed spring HTCFN34016
17 Spring washer HTCFN34017
18 Collar HTCFN34018
19 O-ring 42.3x5 HTCFN34019
20 Main Piston HTCFN34020
21 O-ring 57.5x3 HTCFN34021
22 O-ring 88x3 HTCFN34022
23 Fixed ring HTCFN34023
24 Sealing ring HTCFN34024
25 Cylinder HTCFN34025
26 Bumper HTCFN34026
27 Cylinder washer HTCFN34027
28 Gun body HTCFN34028
29 Rubber washer HTCFN34029
30 Trigger valve seat HTCFN34030
31 O-ring 15x2.65 HTCFN34031
32 O-ring 17x1.5 HTCFN34032
33 Trigger valve guide HTCFN34033
34 O-ring 6.1x1.8 HTCFN34034
35 O-ring 6.4x2 HTCFN34035
36 O-ring 9x1.8 HTCFN34036
37 Switch spring HTCFN34037
38 Switch pipe HTCFN34038
39 O-ring 2.5x1.5 HTCFN34039
40 O-ring 20.3x2.3 HTCFN34040
41 Switch seat HTCFN34041
42 Trigger Pin HTCFN34042
43 Trigger HTCFN34043
44 O-ring 1.7x2 HTCFN34044
45 Safety spacer HTCFN34045
46 Pin 3x16 HTCFN34046
47 Safety guide HTCFN34047
48 Pin 3x25 HTCFN34048
49 Compressed spring HTCFN34049
50 Bolt M5x8 HTCFN34050
51 Flat washer HTCFN34051
52 Spring washer HTCFN34052
53 Adjust nut HTCFN34053
54 Safety yoke HTCFN34054
55 Safety Nose HTCFN34055
56 Copper collar HTCFN34056
57 Safety nose case HTCFN34057
58 O-ring 59x1.8 HTCFN34058
59 Driver guide HTCFN34059
60 Spring washer HTCFN34060
61 Bolt M8X25 HTCFN34061
62 Bolt M6X12 HTCFN34062
63 Magazine HTCFN34063
64 Drive nail bar HTCFN34064
65 Bolt M4x8 HTCFN34065
66 Nut M4 HTCFN34066
67 Flat washer HTCFN34067
68 Bolt M4x40 HTCFN34068
69 Safety pipe HTCFN34069
70 Safety pipe case HTCFN34070
71 Pin case HTCFN34071
72 Spring Pin HTCFN34072
73 Bolt M6X12 HTCFN34073
74 Pusher HTCFN34074
75 Spring pin 3X20 HTCFN34075
76 Spring pin 5X20 HTCFN34076
77 Bolt M3X14 HTCFN34077
78 Nut M3 HTCFN34078
79 Pin B4X30 HTCFN34079
80 Spring HTCFN34080
81 Spring core HTCFN34081
82 Pin B5X12 HTCFN34082
83 Release latch HTCFN34083
84 Block HTCFN34084
85 Spring HTCFN34085
86 Bolt M5X25 HTCFN34086
87 Fixed seat HTCFN34087
88 Nut M6 HTCFN34088
89 Nut M5 HTCFN34089
90 Rubber handle case HTCFN34090
91 End cap washer HTCFN34091
92 End cap HTCFN34092
93 Flat washer HTCFN34093
94 Bolt M5x20 HTCFN34094
95 Air plug HTCFN34095
96 Air plug case HTCFN34096
 Loading...