

Page 1

OPERATING & MAINTENANCE
INSTRUCTIONS
GC0111
MULTI PURPOSE CIRCULAR SAW
Model No: CMSF110
Part No: 6462162
Page 2
2
INTRODUCTION
Thank you for purchasing this CLARKE multi purpose circular saw. The saw can
be used for cutting almost any material up to a thickness of 35 mm, including
ferrous and non-ferrous metals, timber, plywood man made boards, bakelite
and plastics etc.
Before attempting to operate the saw, it is essential that you read this manual
thoroughly and carefully follow all instructions given. In doing so you will
ensure the safety of yourself and that of others around you, and you can also
look forward to the saw giving you long and satisfactory service.
GUARANTEE
This CLARKE product is guaranteed against faulty manufacture for a period of
12 months from the date of purchase. Please keep your receipt as proof of
purchase.
This guarantee is invalid if the product is found to have been abused or
tampered with in any way, or not used for the purpose for which it was
intended.
Faulty goods should be returned to their place of purchase, no product can
be returned to us without prior permission.
This guarantee does not effect your statutory rights.
ENVIRONMENTAL PROTECTION
Do not dispose of this product with general household waste. All tools,
accessories and packaging should be sorted, taken to a recycling
centre and disposed of appropriately.
PARTS & SERVICE
For parts & Servicing, please contact your nearest dealer, or
CLARKE International, on one of the following numbers.
PARTS & SERVICE TEL: 020 8988 7400
PARTS & SERVICE FAX: 020 8558 3622
or e-mail as follows:
PARTS: [email protected]
SERVICE: [email protected]
Page 3

3
CONTENTS
Introduction ............................................................................................ 2
Guarantee .............................................................................................. 2
Environmental Protection ...................................................................... 2
Parts & Service ....................................................................................... 2
Table of Contents ................................................................................... 3
General Safety Precautions .................................................................. 4
Electrical Connections .......................................................................... 7
Introduction ............................................................................................ 8
Preparation for Use ................................................................................ 9
Operation ............................................................................................. 10
Changing the Blade ............................................................................ 12
Maintenance ........................................................................................ 13
Troubleshooting.................................................................................... 13
Technical Specification....................................................................... 14
Parts Lists and Diagrams ..................................................................... 15
Accessories .......................................................................................... 17
Declaration of Conformity .................................................................. 19
Page 4
4
GENERAL SAFETY PRECAUTIONS
Important Note: Although the operation manual contains extensive instruction
on safe working with power tools, every power tool involves a certain residual
risk which cannot be completely excluded. Power tools must therefore
always be operated with caution.
WORK AREA SAFETY
1. Keep work area clean and well lit. Cluttered or dark areas invite
accidents.
2. Do not operate power tools in explosive atmospheres, such as In the
presence of flammable liquids, gases or dust. Power tools create sparks
which may Ignite the dust or fumes.
3. Keep children and bystanders away while operating a power tool.
Distractions can cause you to lose control.
ELECTRICAL SAFETY
1. Power tool plugs must match the outlet. Never modify the plug in any
way. Do not use any adaptor plugs with earthed (grounded) power tools.
Unmodified plugs and matching outlets will reduce risk of electric shock.
2. Avoid body contact with earthed or grounded surfaces, such as pipes,
radiators, ranges and refrigerators. There is an increased risk of electric
shock if your body is earthed or grounded.
3. Do not expose power tools to rain or wet conditions. Water entering a
power tool will increase the risk of electric shock.
4. Do not abuse the cable. Never use the cable for pulling or unplugging the
power tool. Keep cable away from heat, oil, sharp edges or moving parts.
Damaged or entangled cables increase the risk of electric shock.
5. If operating a power tool in a damp location is unavoidable, use a
residual current device (RCD) protected supply. Use of an RCD reduces
the risk of electric shock.
PERSONAL SAFETY
1. Stay alert, watch what you are doing and use common sense when
operating a power tool. Do not use a power tool while you are tired or
under the influence of drugs, alcohol or medication. A moment of
inattention may result in serious personal injury.
2. Use personal protective equipment. Always wear eye protection.
Protective equipment such as dust mask or non-skid safety shoes used in
appropriate conditions will reduce personal injuries.
3. Prevent unintentional starting. Ensure the switch is in the OFF position
before connecting to power source and/or battery pack, picking up or
carrying the tool.
Page 5

5
4. Remove any adjusting key or wrench before turning the power tool on. A
wrench or a key left attached to a rotating part of the power tool may
result in personal injury.
5. Do not overreach. Keep proper footing and balance at all times. This
enables better control of the power tool in unexpected situations.
6. Dress properly. Do not wear loose clothing or jewellery. Keep your hair,
clothing and gloves away from moving parts. Loose clothes, jewellery or
long hair can be caught in moving parts.
POWER TOOL USE AND CARE
1. Do not force the power tool. Use the correct power tool for your
application. The correct power tool will do the job better and safer at the
rate for which it was designed.
2. Do not use the power tool if the switch does not turn it on and off. Any
power tool that cannot be controlled with the switch Is dangerous and
must be repaired.
3. Disconnect the plug from the power source, when changing accessories
or storing power tools. Such preventive safety measures reduce the risk of
starting the power tool accidentally.
4. Store power tools out of the reach of children and do not allow persons
unfamiliar with the power tool or these instructions to operate the power
tool. Power tools are dangerous in the hands of untrained users.
5. Maintain power tools. Check for misalignment or binding of moving parts,
breakage of parts and any other condition that may affect the power
tool’s operation. If damaged, have the power tool repaired before use.
Many accidents are caused by poorly maintained power tools.
6. Keep cutting tools sharp and clean. Properly maintained cutting tools with
sharp cutting edges are less likely to bind and are easier to control.
7. Use the power tool, accessories and tool bits etc in accordance with
these instructions, taking into account the working conditions and the
work to be performed. Use of the power tool for operations different from
those intended could result in a hazardous situation.
8. Never abuse the power cable. Never pull on the cable when removing
the plug from the socket, or lift the compressor by the power cable.
9. Only use extension leads that are of an appropriate power rating and
suitable for the work environment. Extension leads must have an earth
connection. Inspect the extension lead regularly and replace if damaged.
SERVICE
1. Have your power tool serviced by a qualified repair person using only
identical replacement parts. This will ensure that the safety of the power
tool is maintained.
Page 6

6
PRECAUTIONS SPECIFIC TO CIRCULAR SAWS
1. ALWAYS wear ear protectors/defenders during continuous use as the noise
level of this machine can exceed 85dB (A). The use of safety glasses and
a respiratory mask as protection from airborne particles is recommended.
2. ALWAYS keep the mains cable well away from the saw blade and ensure
an adequate electrical supply is close at hand so that the operation is not
restricted by the length of the cable.
3. ALWAYS switch the machine OFF immediately the task is completed.
4. ALWAYS allow sufficient clearance beneath the work to ensure the blade
does not come into contact with the work bench etc.
5. ALWAYS use only the correct blade for this saw and ensure the blade is
fully tightened before use.
6. ALWAYS let the saw stop completely before putting down.
7. ALWAYS check blade guard has closed before putting the saw down.
8. ALWAYS hold the workpiece securely when cutting. The workpiece should
always be fixed to a stable platform to avoid loss of control.
9. NEVER operate the saw when the blade guard is not working properly.
Guard should be checked for correct operation before each use.
10. NEVER start the saw when the blade is in contact with the work.
11. DO NOT use the saw if the electric cable, plug or motor is in poor
condition.
12. NEVER reach underneath the workpiece while the saw is running. The
guard will be withdrawn and giving no protection while cutting is in
progress.
13. ALWAYS hold the saw with both hands to keep them away from the blade.
14. NEVER touch the saw blade or cut line immediately after cutting in case
the surface remains hot.
15. NEVER try to override the trigger safety switch by securing it in the poweron position.
Note: The guard is operating correctly when it moves freely and readily
returns to closed position.
Please keep these instructions in a safe place for future reference.
Page 7
7
ELECTRICAL CONNECTIONS
WARNING! Read these electrical safety instructions thoroughly
before connecting the product to the mains supply.
Before switching the machine on, make sure that the voltage of your
electricity supply is the same as that indicated on the rating plate. This
product is designed to operate using 230 VAC mains power. Connecting it to
any other power source may cause damage.
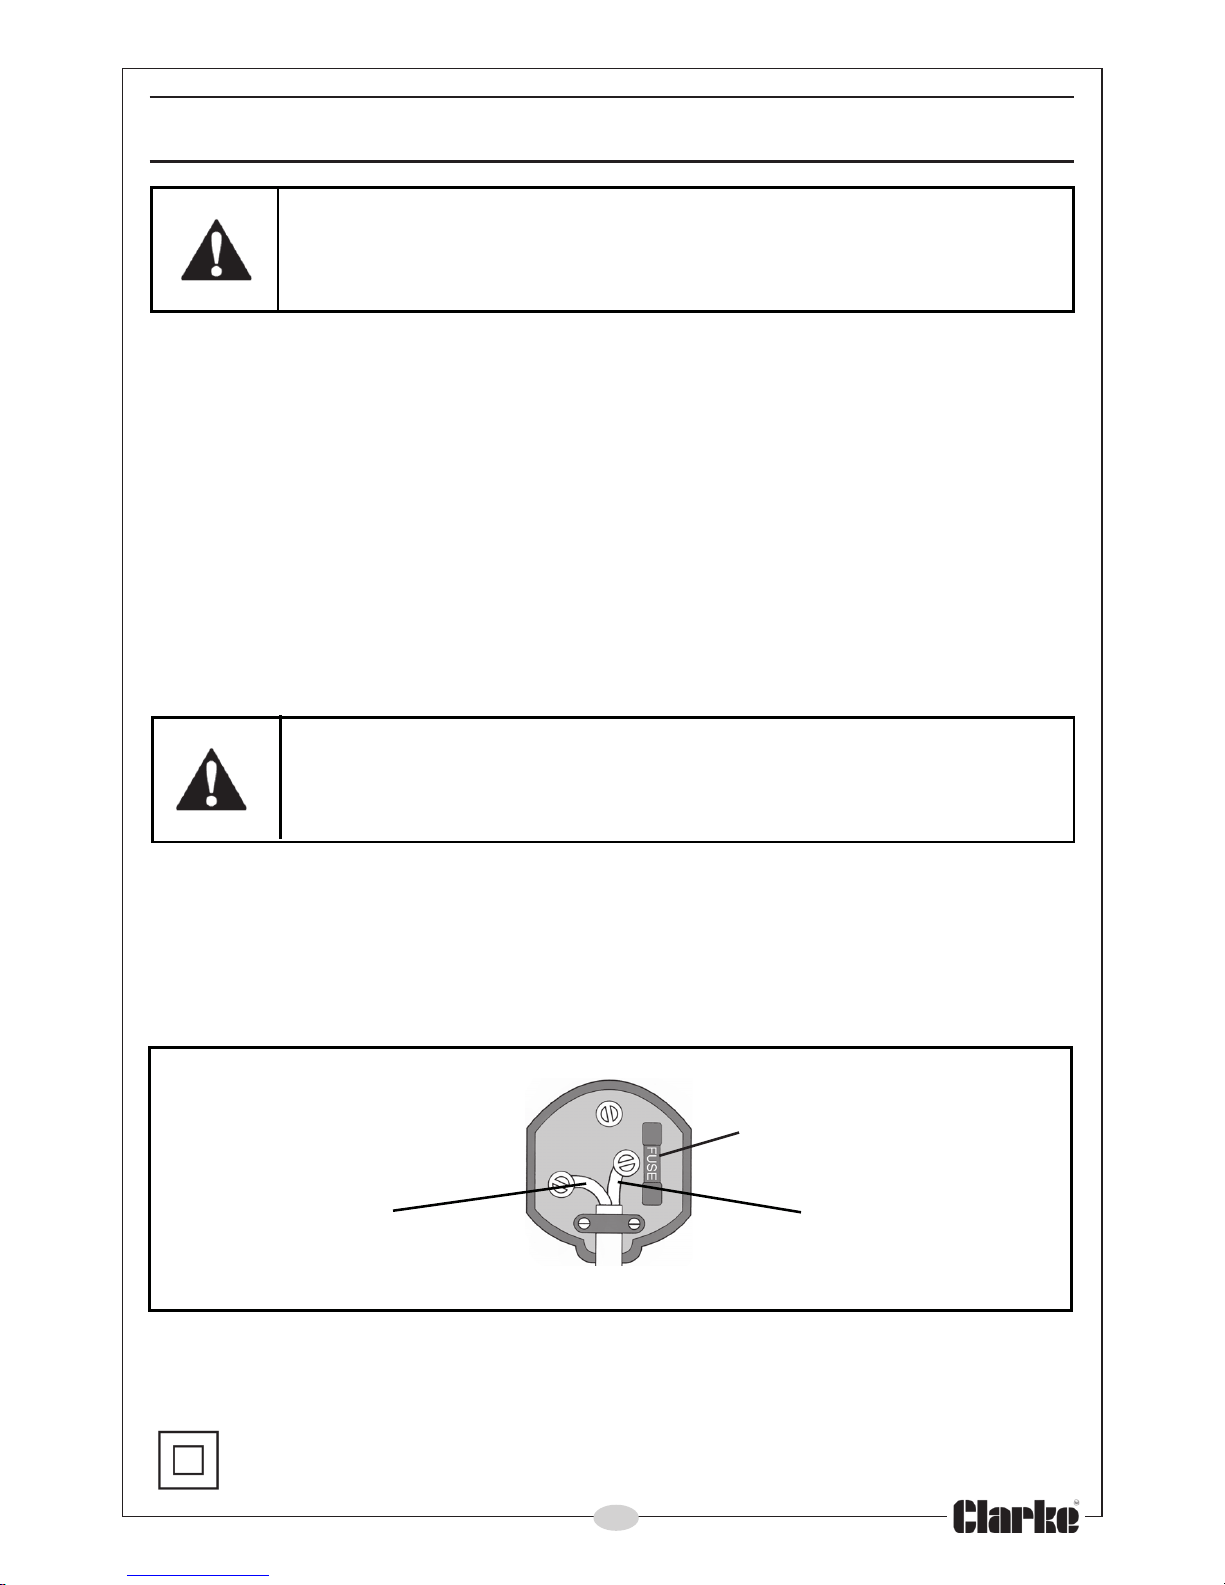
This product may be fitted with a non-rewireable plug. If it is necessary to
change the fuse in the plug, the fuse cover must be refitted. If the fuse cover
becomes lost or damaged, the plug must not be used until a suitable
replacement is obtained.
If the plug has to be changed because it is not suitable for your socket, or
due to damage, it should be cut off and a replacement fitted, following the
wiring instructions shown below. The old plug must be disposed of safely, as
insertion into a mains socket could cause an electrical hazard.
WARNING! The wires in the power cable of this product are
coloured in accordance with the following code:
Blue = Neutral Brown = Live
If the colours of the wires in the power cable of this product do not
correspond with the terminal markings of your plug, proceed as follows.
• The wire which is coloured Blue must be connected to the terminal
which is marked N or coloured Black.
• The wire which is coloured Brown must be connected to the
terminal which is marked L or coloured Red.
Plug must be BS1363/A approved
Always fit a 13 Amp fuse.
Neutral Live
(Blue) (Brown)
Ensure that the outer sheath of the cable is firmly held by the clamp
We strongly recommend that this machine is connected to the mains supply
via a Residual Current Device (RCD).
If in doubt, consult a qualified electrician. DO NOT attempt repairs yourself.
This symbol indicates that thisis a Class II product and does not require
an earth connection.
Page 8
8
INTRODUCTION
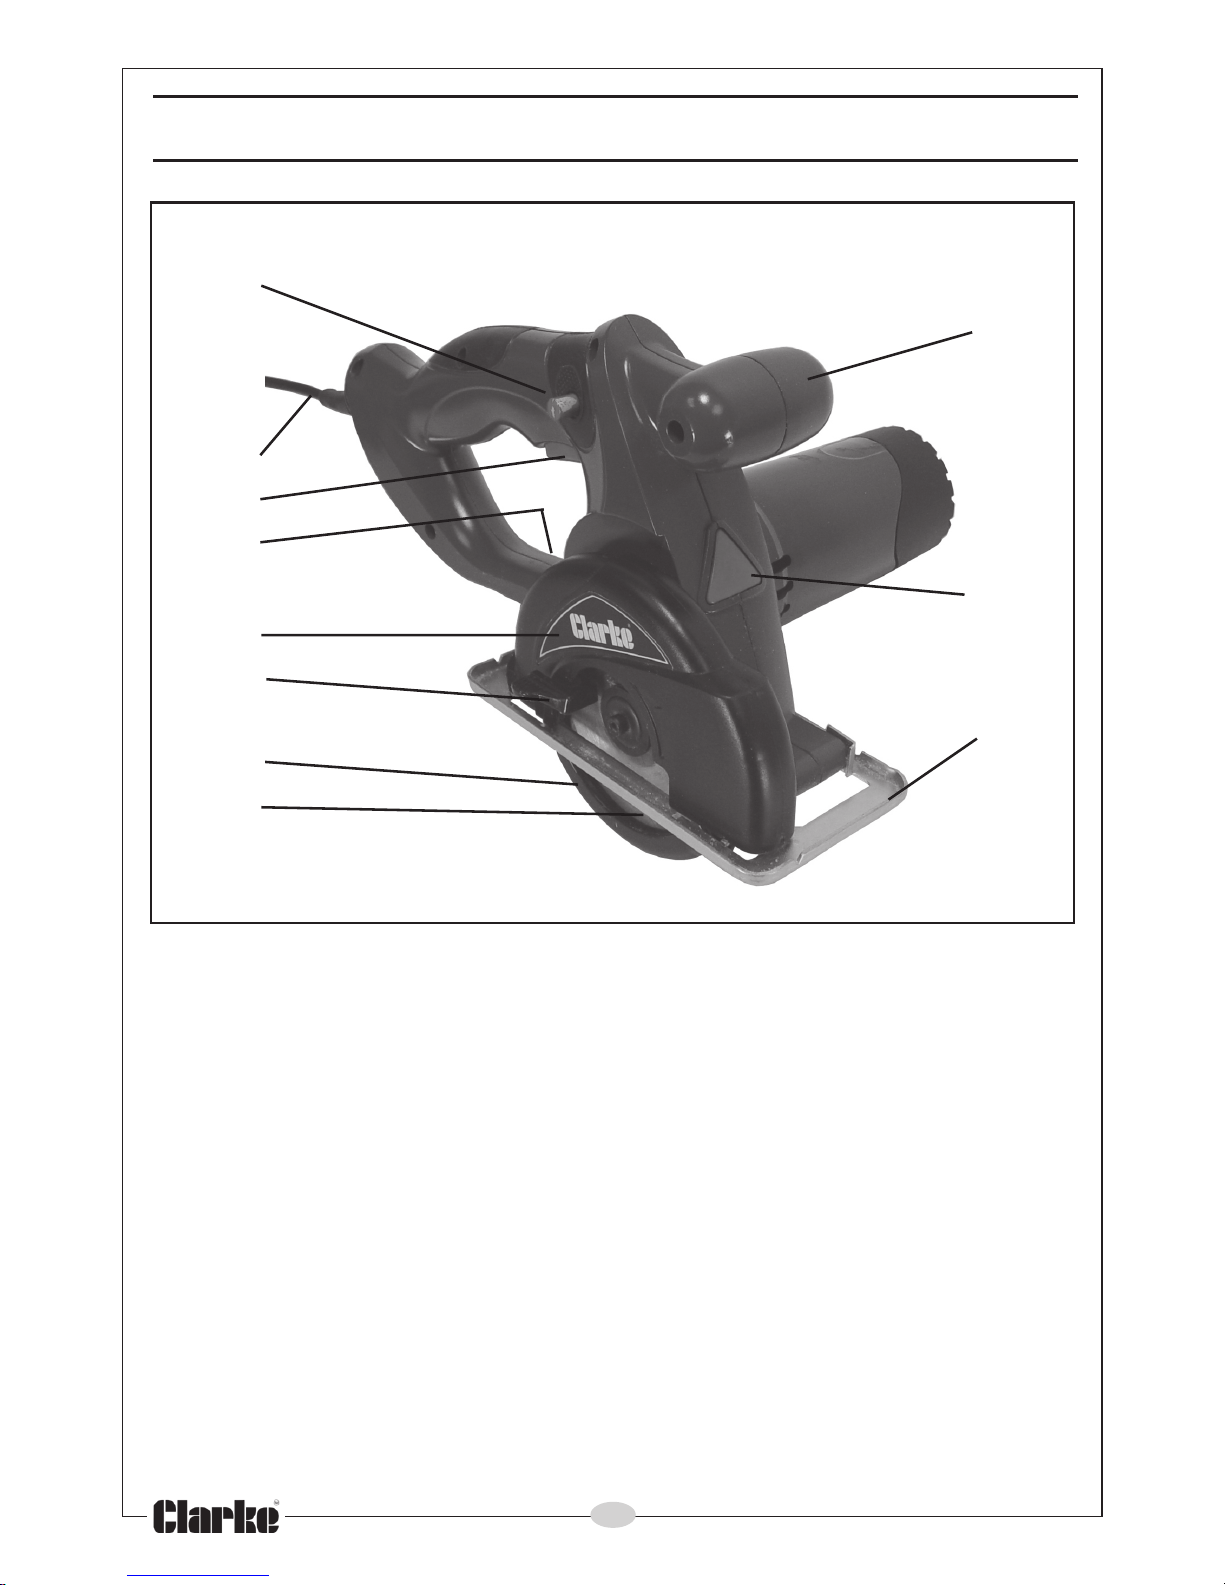
C
D
A
B
K
E
F
J
G
H
I
CONTENTS
1 x Multi-Purpose Circular Saw
1 x 110 mm dia Blade (fitted)
1 x 4.0 mm Hexagon Key (in storage socket)
1 x Instruction Manual
A Power Cable G Sole Plate
B Trigger H Lower Blade Guard
C Trigger Safety Button I Saw Blade
D Front Handle J Lower Guard Lever
E Spindle Lock K Hex Key Storage Socket
F Upper Blade Guard
Page 9
9
WARNING! THIS APPLIANCE SHOULD NOT BE USED BY ANYONE NOT
EXPERIENCED IN THE USE AND OPERATION OF POWER TOOLS
BEFORE STARTING WORK
IMPORTANT! Before use, ensure the workpiece is perfectly secure, and there is
sufficient clearance BENEATH the workpiece so that there is no possibility of
the saw blade coming into contact with any other object.
1. Check that all parts are secure, including the saw blade.
2. Ensure the power cable is well away from the saw blade and not looped
under the workpiece, then plug into the mains supply.
3. Always support work as near as possible to the cut.
4. Support the work so that the off-cut will be on your right hand side.
5. Clamp the workpiece so that it will not move during the cut.
6. Support large panels to minimise the risk of the blade being pinched in the
cut if the panel should sag during cutting. Place the supports as close to
the cut as possible.
7. The side of the workpiece on which, the finished appearance is seen,
should be face down while cutting.
8. Always ensure that the blade you are about to use is sharp.
9. Always check that the lower saw guard moves freely and closes instantly
before starting work.
PREPARATION FOR USE
Page 10
10
OPERATION
STARTING A CUT
1. Place the leading edge of the sole plate on the top face of the
workpiece, ensuring the saw blade is NOT making contact.
2. Push IN and hold the trigger
safety button on the side of
handle to either the left or right
side. At the same time squeeze
the trigger and keep it depressed
to start the saw.
3. When the motor has reached
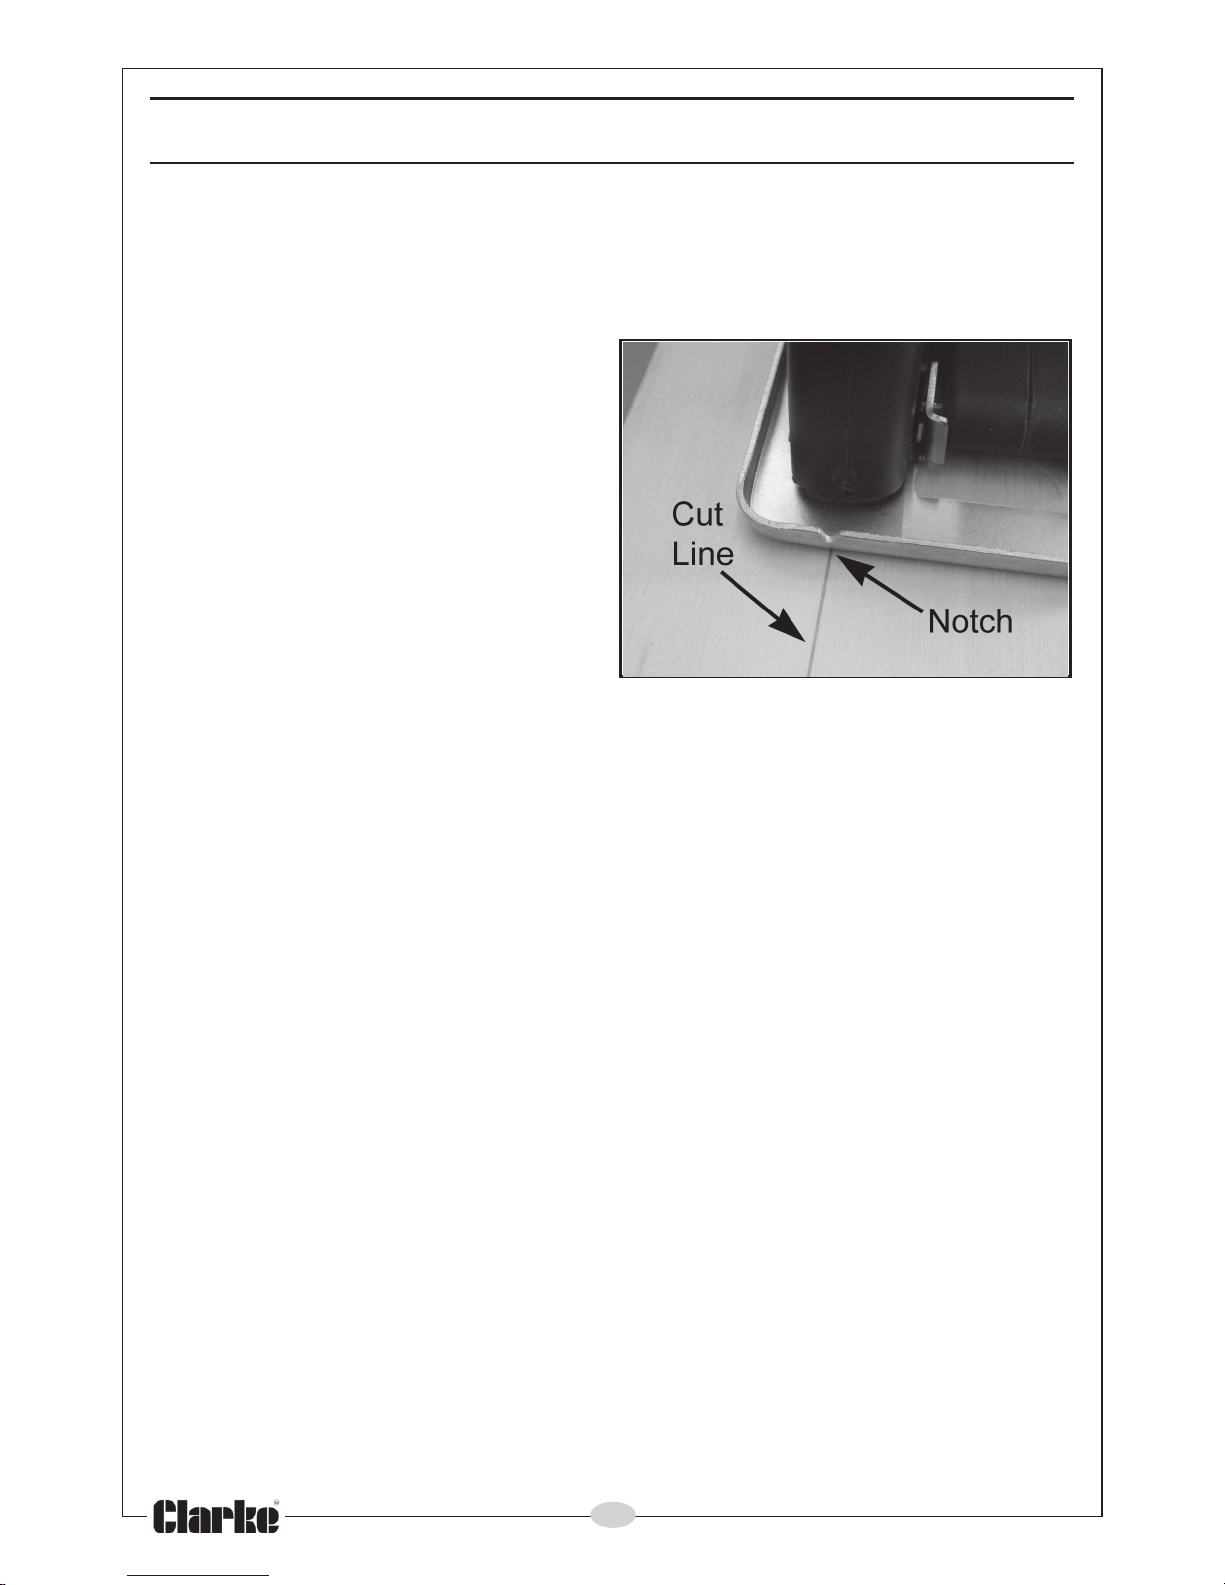
maximum speed, line up the
notch on the cutting line as
shown in fig 1. Then move the
saw slowly forward.
• There is a second notch in the
rear of the sole plate which also
aligns with the cutting blade.
4. Always cut in forward direction and feed the saw into the work firmly and
at a slow rate. Do not force the saw and keep it in a straight line while
cutting. Always use the saw by holding it firmly with both hands.
5. Be aware that dust or sparks will be emitted depending on the material
being cut, and suitable precautions should be taken to protect the
operator from airborne particles.
FINISHING THE CUT
1. Release the trigger and allow the saw blade to stop completely before
withdrawing the saw from the cut.
2. NEVER attempt to remove the saw with the blade rotating and NEVER
attempt to stop the blade by lateral pressure.
CONTROLLING THE SAW
Kickback can occur when the blade stalls suddenly and the saw is driven
back towards you. Blade stalling is caused by any action which pinches the
blade into the material being cut.
Kickback could cause you to lose control of the saw and could result in
personal injury. Release the trigger immediately if blade binds or stalls.
COMMON CAUSES OF KICKBACK
a. Twisting the blade while making cut.
b. Sawing with a dull, gummed up, or improperly set blade.
Fig 1
Page 11
11
c. Not supporting the workpiece securely.
d. Cutting warped or wet timber.
e. Forcing the saw through the cut.
f. Failure to fit the saw blade correctly.
g. Using the wrong saw blade.
To reduce the possibility of kickback occurring, always maintain a firm grip on
the saw and position yourself to resist kickback forces. Using a fence or
straight edge guide will improve accuracy and reduce the chance of
binding and kickback.
If a cut is to be interrupted, release the switch to stop the saw but do not
remove it from the workpiece. Investigate the cause of binding or kickback
before continuing.
When re-starting, ensure that the saw is in the centre of the cut line and
check that the saw teeth are not engaged into the material. If the saw is
binding in this way, it may kick back or try to climb out of the workpiece when
being restarted.
Always stop cutting if the saw becomes hot, and investigate the cause
before continuing.
USING A FENCE OR GUIDE
MARKING OUT
1. Before beginning work, draw a
guide line along the desired line
of cut.
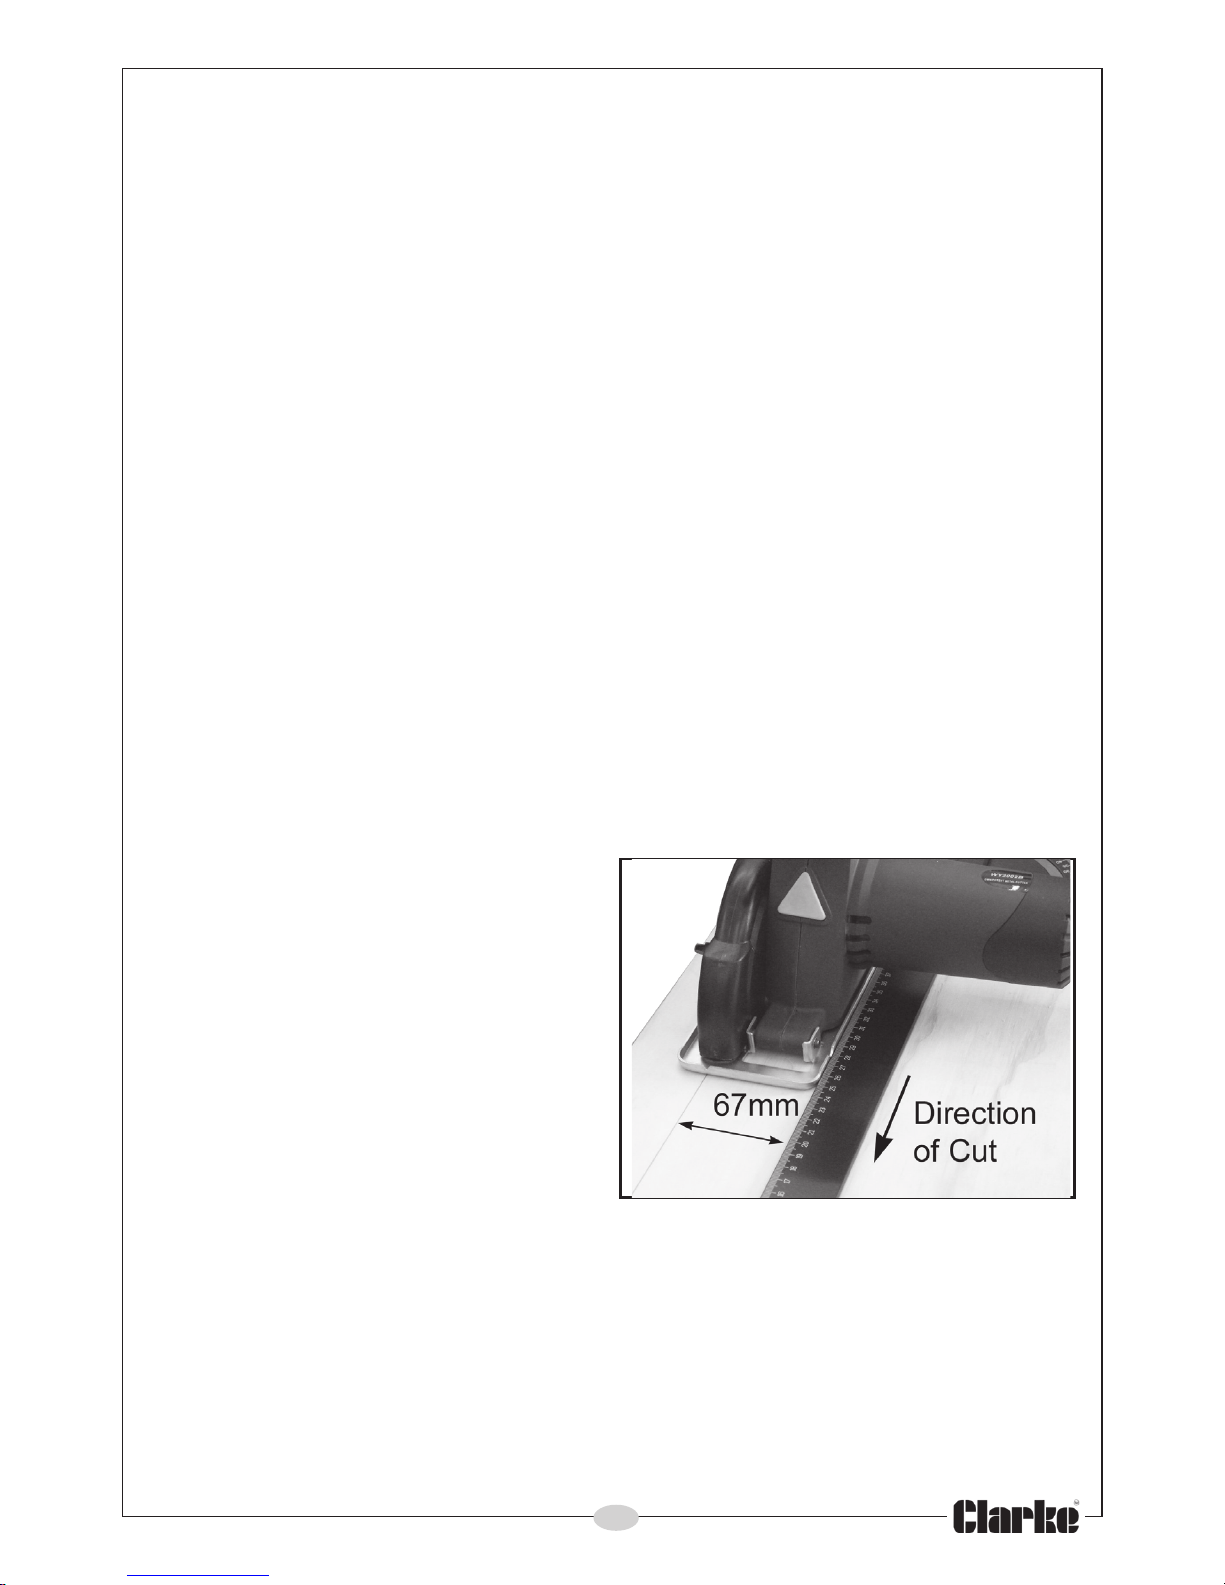
A low profile cutting guide can be
used, suitably positioned
approximately 67mm to the left of
the cut line (assuming that the
‘waste side’ is to the right). This will
allow the left-hand edge of the sole
plate to run against the guides’
straight edge and so ensure a
straight cut at the required position
(as shown in Fig 2).
The height of the guide should not exceed 15mm, to allow sufficient
clearance below the motor housing.
IMPORTANT! When marking your guideline, you must take into account the
thickness of the saw blade. This must be added to your desired width.
Always test on a scrap piece of material first to determine how much, if any,
the guideline must be offset to produce your desired width.
Fig 2
Page 12
12
CHANGING THE BLADE
REMOVING THE BLADE
1. Ensure the power cable is
disconnected from the power
supply.
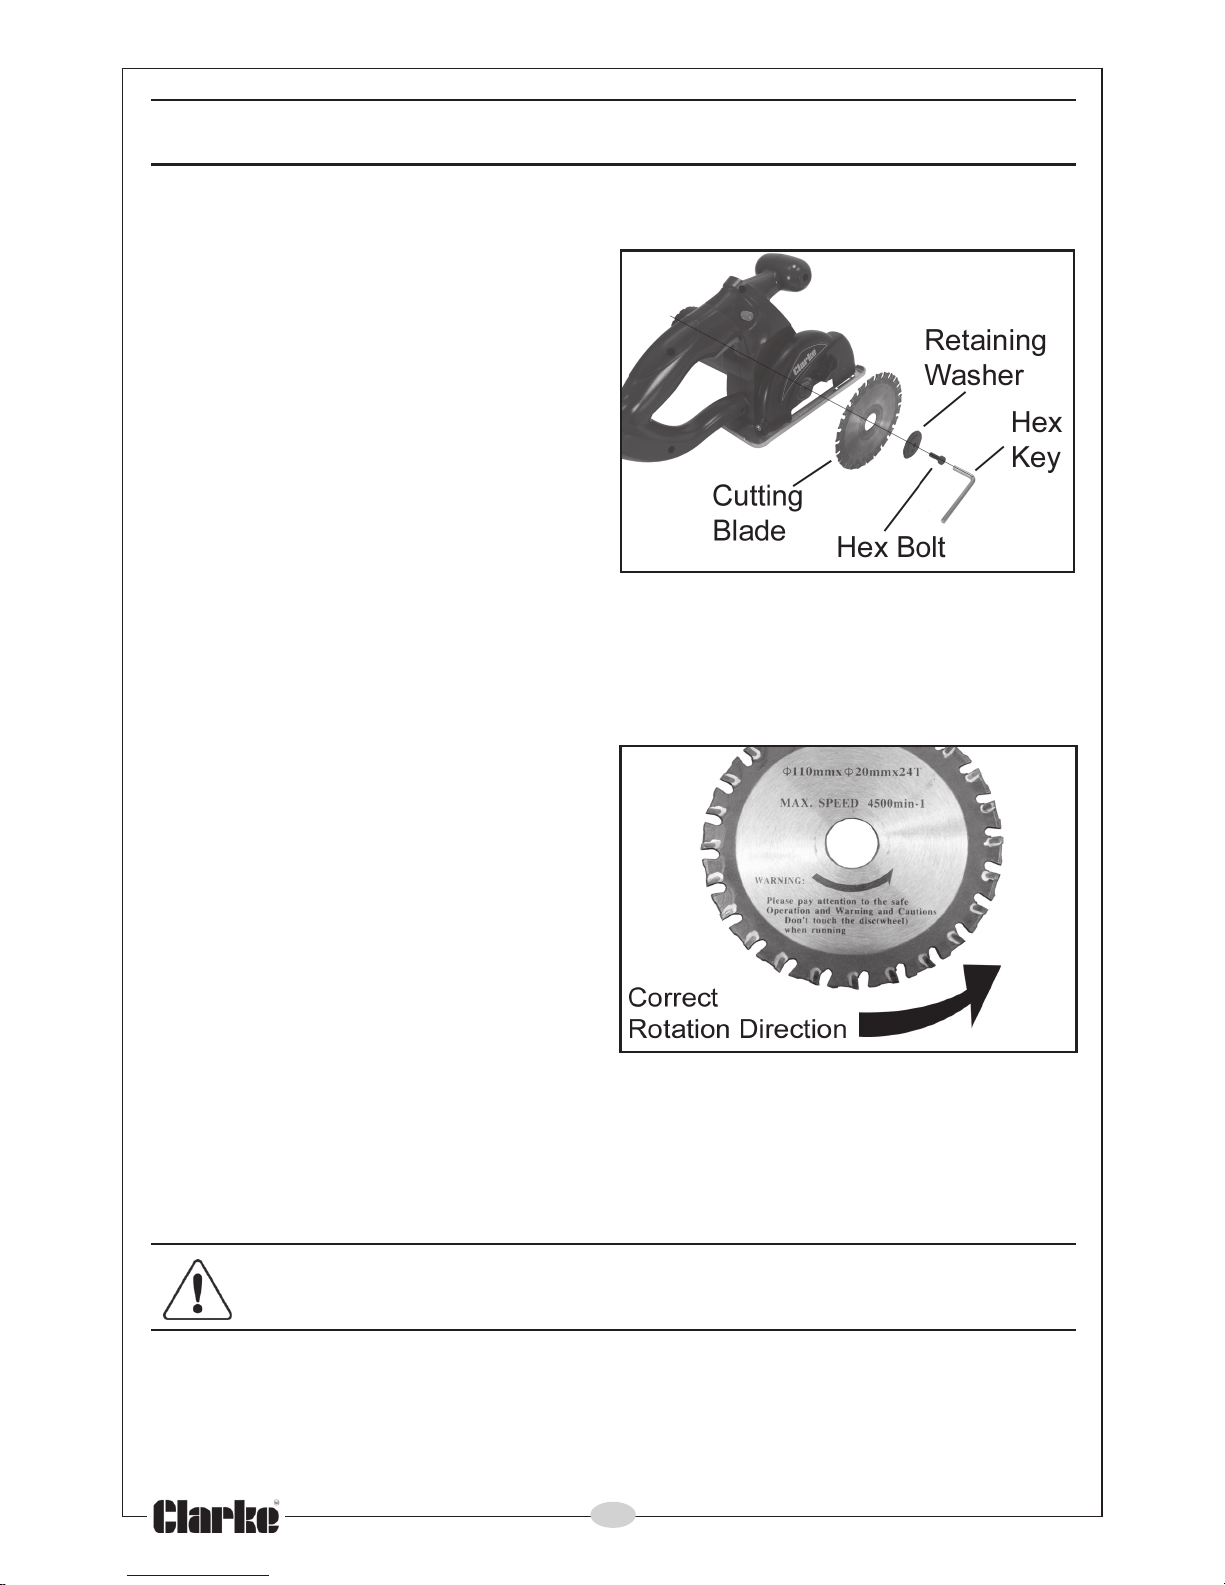
2. Press the spindle lock to prevent
movement of the saw blade.
3. Loosen the hex bolt using the hex
key.
4. Remove the hex bolt and outer
retaining washer.
5. Hinge away the lower guard and
remove the blade.
INSTALLING THE BLADE
1. Ensure the power cable is disconnected from the power supply.
2. Press the spindle lock to prevent
movement of the saw blade.
3. Install the blade in the orientation
shown in fig 4 when viewed from
the right hand side of the saw. Do
not use a blade with no markings
but if they have become worn
away during previous use, inspect
the blade and note the position
of the cutting teeth. The teeth
must face in the direction of
rotation as shown by the arrow
on the blade in fig 4 when viewed from the right-hand side of the saw.
4. Install the retaining washer and hex bolt.
5. Tighten the hex bolt using the hex key. Return the hex key to its storage
socket in the saw body.
CAUTION; INSTALLING THE BLADE THE WRONG WAY ROUND MAY
RESULT IN DAMAGE TO THE BLADE.
Note: Replacement blades are available from your CLARKE dealer; part
no 6462168.
Fig 3
Fig 4
Page 13
13
MAINTENANCE
For any problems requiring the dismantling and overhaul of the saw, contact
your CLARKE International Service Department on 020-8988-7400.
Always inspect the saw before use and ensure it is in top condition.
Ensure all air vents are clear of debris, (use compressed air to clean the
machine where possible). Ensure that the lower guard can spring freely back
to its closed position and clean out any debris lodged behind it.
Check the power cable to ensure it is sound and free from cracks, bare wires
etc. Avoid using solvents when cleaning plastic parts, most plastics are
susceptible to damage from various types of commercial solvents.
Check the operation of the lower guard, ensuring it springs freely to and fro.
All bearings etc, in this tool are lubricated with a sufficient amount of high
grade lubricant for the tools lifetime under normal operating conditions,
therefore no further lubrication is required.
STORAGE
Store in a clean, dry environment protected from the weather.
TROUBLESHOOTING
SAW OVERHEATS
Clean the motor ventilation holes, and blow out with compressed air or clean
with a dry cloth.
Overloading the machine will also cause overheating. Do not use for heavy
duty work and do not apply excessive pressure.
EXCESSIVE SPARKING OCCURS
This indicates worn brushes which can be easily replaced by your CLARKE
dealer.
SAW DOES NOT OPERATE WHEN SWITCHED ON
Check to ensure the fuse is sound and replace if necessary. If the fuse is
sound or blows repeatedly, consult your CLARKE dealer.
Page 14
14
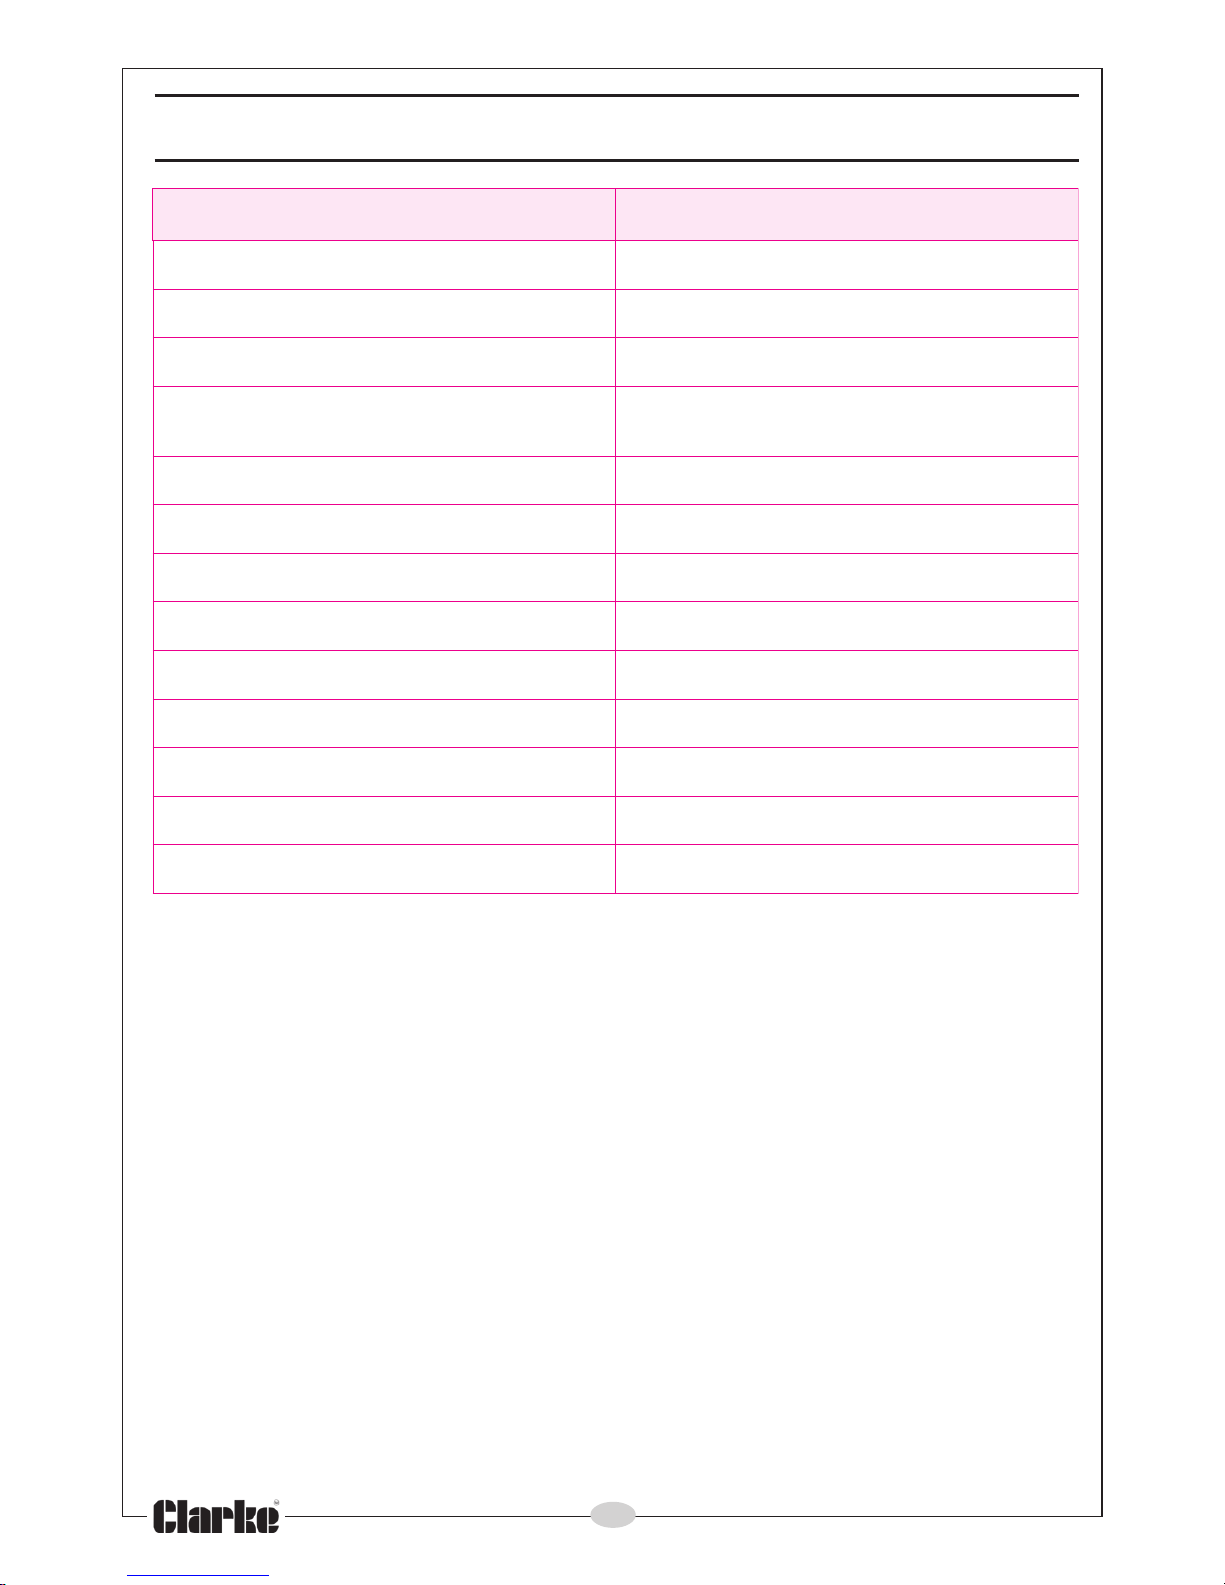
TECHNICAL SPECIFICATION
erutaeF noitacificepS
thgieWgk4.2
)HxWxL(snoisnemiD mm012x222x363
htpeDgnittuCxaMmm53
gnittucrofelbatiusslairetaM
,sc
itsalP,slateMsuorrefnoN/suorreF
cteetilekaB,sdraoBedam-naM,rebmiT
retemaiDedalBgnittuCmm011
deepSedalBdao
LoNmpr0054
hteeTforebmuNTCT42
leveLerusserPdnuoS ApLBd8.78
leveLrewoPdnuoS AwLBd8.89
rewoPdnuoSdeetnarauGAwLBd
59
eulaVytniatrecnUBd3AwL
elcyCytuD )suounitnoc(1S
ylppuSrewoPgnitarepO zH05@V032
Please note that the details and specifications contained herein, are correct at the
time of going to print. However, CLARKE International reserve the right to change
specifications at any time without prior notice.
Page 15

15
ACCESSORIES
Replacement Cutting Blade Part No: 6462168
The use of parts other than genuine Clarke replacement parts may result in
possible safety hazards or decreased machine performance, and will
invalidate your warranty. Contact your Clarke dealer for further information.
Page 16
16
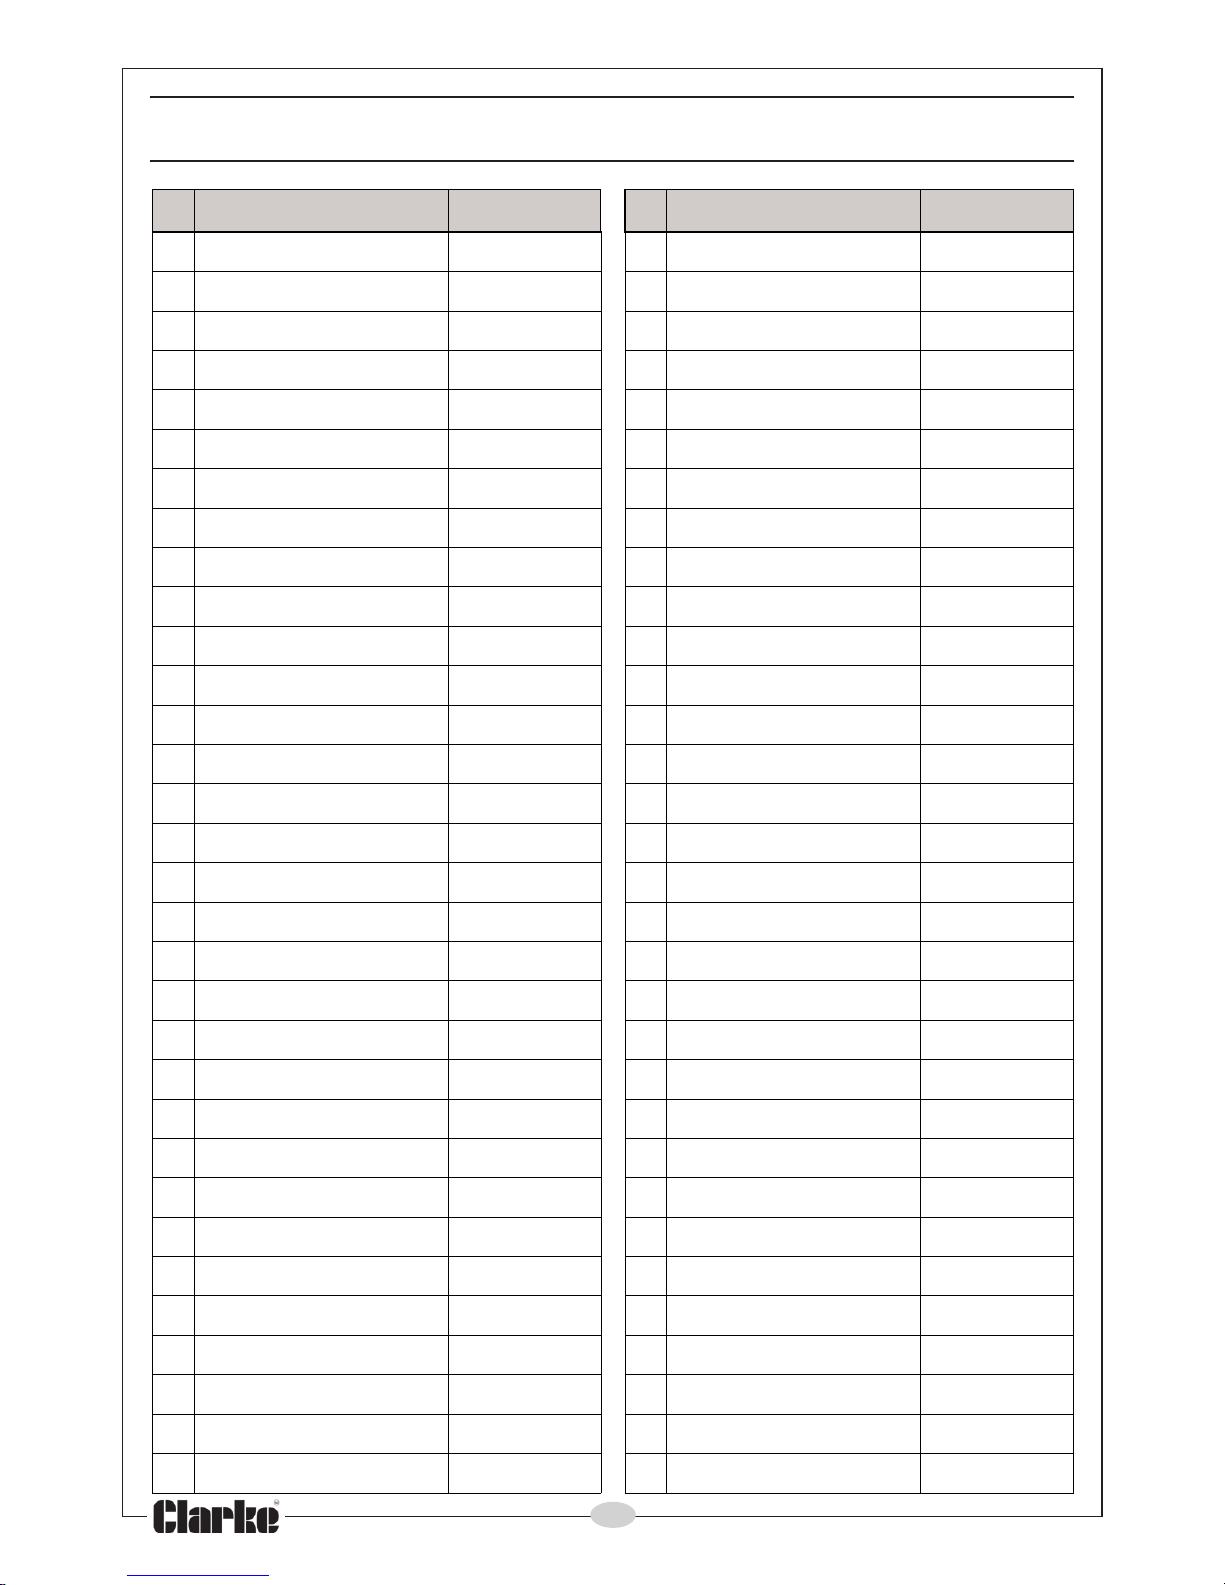
PARTS LIST
oN noitpircseD oNtraP oN noitpircseD oNtraP
141x2.4TSwercS10011FSMC33H/L-revoCxobraeG33011FSMC
2revoCraeR20011FSMC4301x4MwercS43011FSMC
3gnirpShsurB30011
FSMC53gnirpSnoisserpmoC53011FSMC
4redloHhsurB40011FSMC63niP63011FSMC
5hsurBnobraC50011FSMC73nottuBkcoLeldnipS73011FS
MC
6etalPeloS60011FSMC838x4MwercS83011FSMC
7gnisuoHevirD70011FSMC9341x2.4TSwercS93011FSMC
8niPgnikcoLhctiwS80011FSMC0
4H/R-revoCxobraeG04011FSMC
9doR90011FSMC14hctiwSrewoP14011FSMC
01reveLgnikcoLhctiwS01011FSMC24pilCelbaC24011FSMC
11gn
irpS11011FSMC3441x2.4TSwercS34011FSMC
2170?6gniraeB21011FSMC44yrtnEelbaC44011FSMC
31rotoRrotoM31011FSMC54elbaCrewoP54
011FSMC
41rotatSrotoM41011FSMC64gnisaCtfeL64011FSMC
51gniRgniruceS51011FSMC74pilcriC74011FSMC
611086gniraeB61011FSMC8
4drauGedalBdexiF84011FSMC
7106x2.4TSwercS71011FSMC9403x2.4TSwercS94011FSMC
81revoClartneC81011FSMC05drauGedalBrewo
L05011FSMC
91mm7rehsaW91011FSMC15pilcriC15011FSMC
02mm7gniraeBetiliO02011FSMC25edalb-waS8612646
12mm7rehsaW12011FSMC35r
ehsaWgniniateR35011FSMC
22raeGyramirP22011FSMC4521x5MtloBtekcoS45011FSMC
32llaBmm332011FSMC5504x2.4TSwercS55011FSM
C
42tfahSyradnoceS42011FSMC65hsuBreppotS65011FSMC
52mm7gniraeBetiliO52011FSMC75kcolBgnitacoL75011FSMC
62eldnipS62011
FSMC85revoCgnitacoL85011FSMC
721096gniraeB72011FSMC95gnirpSgnisolCdrauG95011FSMC
82mm3llaB82011FSMC0621x5MwercS06011
FSMC
92gniRgnirpS92011FSMC16tfahSgnikcoL16011FSMC
03raeGyradnoceS03011FSMC26gnirpS26011FSMC
13mm8rehsaW13011FSMC36niPl
loR36011FSMC
23mm8gniraeBetiliO23011FSMC4641x2.4TSwercS46011FSMC
Page 17
17
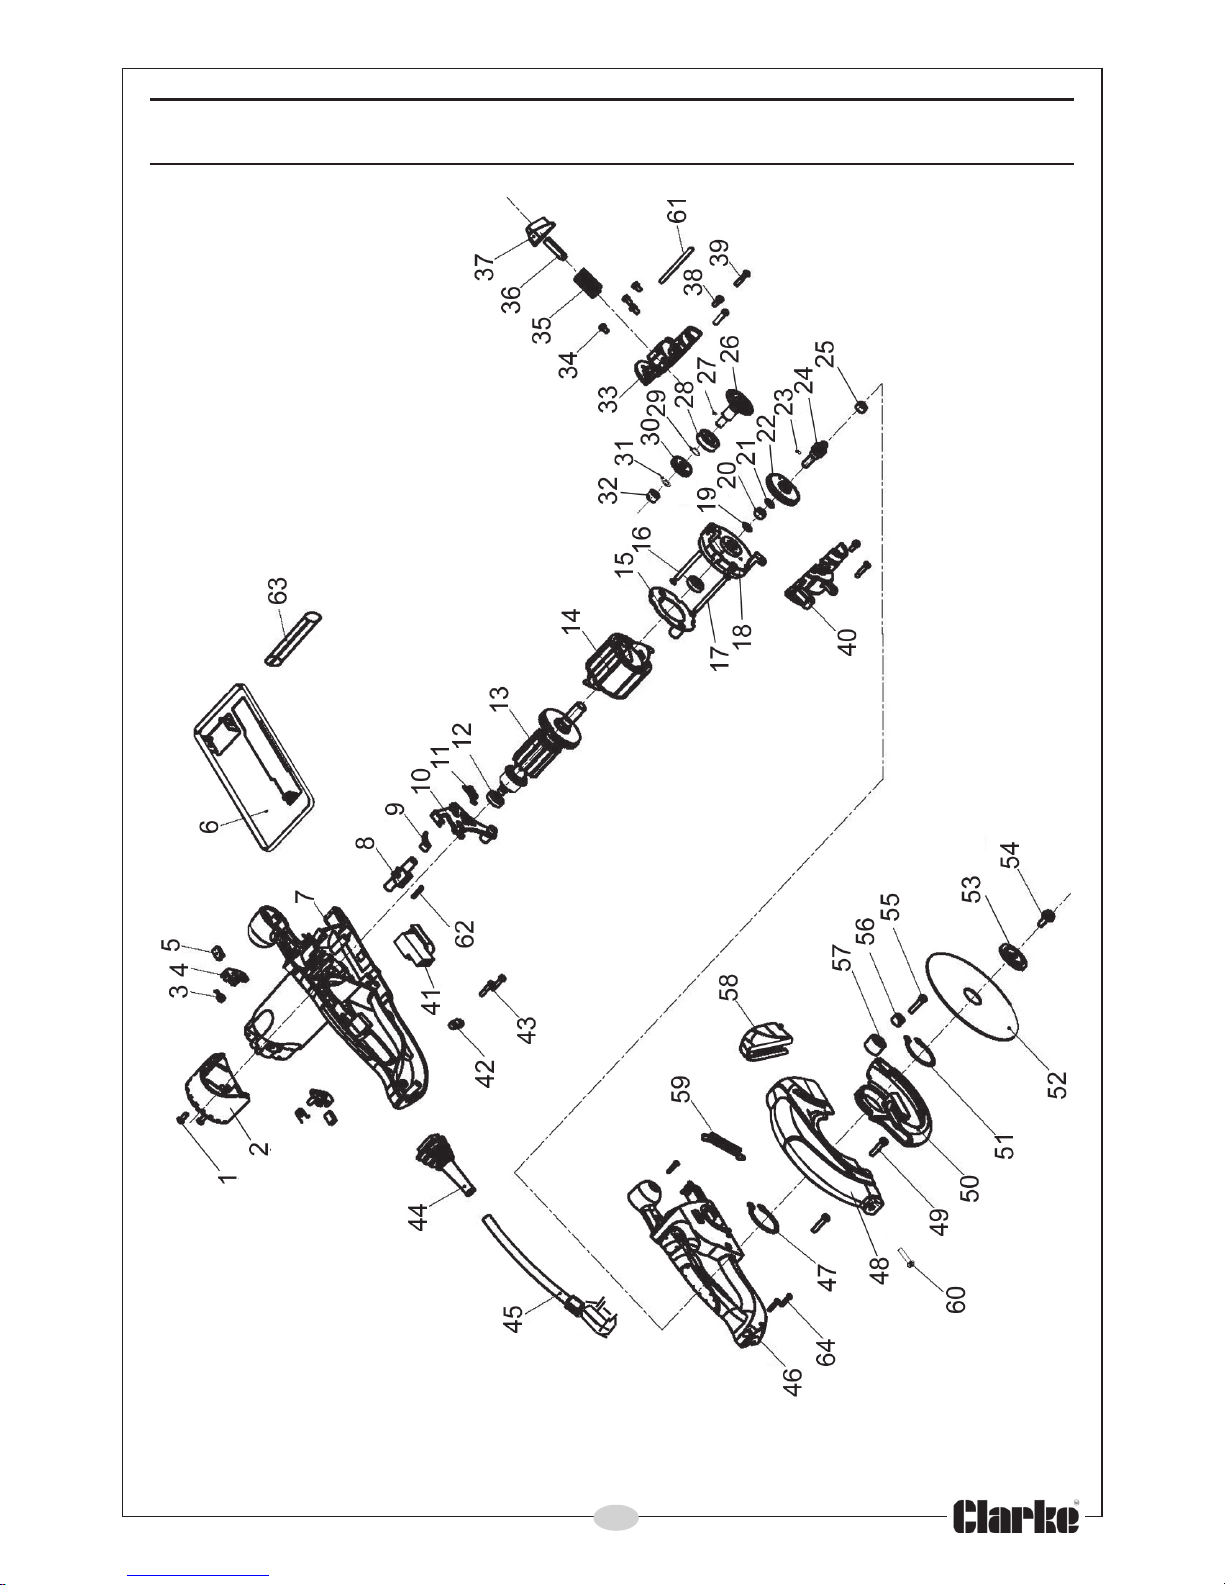
When ordering spare parts for this product, please quote the prefix TMC
ahead of the part number listed above.
PARTS DIAGRAM
Page 18

18
DECLARATION OF CONFORMITY
Page 19

19
NOTES
_________________________________________________________________________
_________________________________________________________________________
_________________________________________________________________________
_________________________________________________________________________
_________________________________________________________________________
_________________________________________________________________________
_________________________________________________________________________
_________________________________________________________________________
_________________________________________________________________________
_________________________________________________________________________
_________________________________________________________________________
_________________________________________________________________________
_________________________________________________________________________
_________________________________________________________________________
Page 20

 Loading...