

Page 1

MULTI FUNCTION WORKBENCH
MODEL No: CMPW1
Part No: 6500124
ASSEMBLY
INSTRUCTIONS
LS1009
Page 2

INTRODUCTION
Thank you for purchasing this CLARKE Multi Function Workbench
Before using the workbench, please read this instruction manual thoroughly
and carefully follow all directions given. This is for your own safety and for
that of others around you, and will also help you achieve long and trouble
free service from your workbench.
GUARANTEE
• This product is guaranteed against faulty manufacture for a period
of 12 months. Please keep your receipt as proof of purchase.
• This guarantee is invalid if the product is found to have been
abused or tampered with in any way, or not used for the purpose
for which it was intended.
• Faulty goods should be returned to their place of purchase, no
product can be returned to us without prior permission.
• This guarantee does not effect your statutory rights.
SPECIFICATION
Max Load Trestle 200 kg
Roller and Ball bearings 100 kg
V style rollers 45 kg
Dimensions (DxWxH) 495 x 752 x 780 – 1350 mm
Weight 12 kg
2
Page 3

PARTS LIST
ONNOITPIRCSEDYTQ
1daeHrelloR1
2rebmeMssorC2
3eltserT1
4
5sgeL2
6mm04tloB8M8
7rehsaWmm861
8tuNmm318
9mm73wercS8
thgieH
2
sraBtnemtsujdA
TRAP
REBMUN
ONNOITPIRCSEDYTQ
01rehsaWmm78
10WPMHY
11tuNmm018
20WPMHY
21seldnaH2
30WPMHY
31nipgniruceS2
40WPMHY
41tooFrebbuR4
50WPMHY
51rehsaW8M2
60WPMHY
61tloB8M1
70WPMHY
71tuN61x8M1
80WPMHY
TRAP
REBMUN
01WPMHY
11WPMHY
21WPMHY
31WPMHY
41WPMHY
51WPMHY
61WPMHY
71WPMHY
90WPMHY
3
Page 4

ASSEMBLY
1. Open both sets of legs (5) and
fix the cross-member (2) into
position using 4 screws (9) 4
washers (10) and 4 nuts (11)
supplied.
2. Fit the second cross member (2)
to the rear of the legs as shown.
3. Place a rubber foot (14) onto
the end of each leg.
4. Connect the two height
adjustment bars (4) to the roller
head (1) and fix in place using 4
bolts (6) 8 washers (7) and 4 nuts
(8) supplied.
4
Page 5
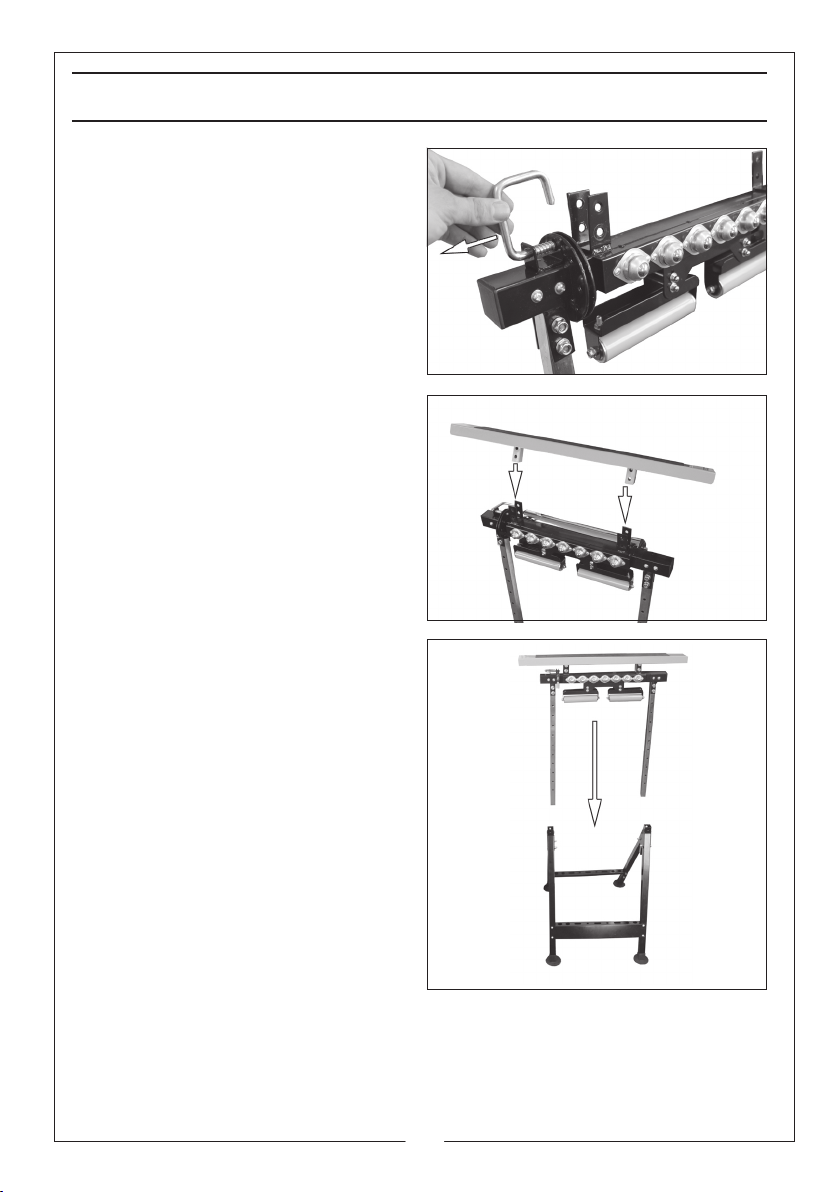
ASSEMBLY
5. Pull the roller release pin and
rotate the roller head until it is in
the position shown.
6. Fit the trestle (3) onto the roller
head and secure using 4 bolts
(6) 8 washers (7) and 4 nuts (8)
supplied.
7. Slide the roller assembly into the
legs.
5
Page 6

ASSEMBLY
8. Screw in the handles as shown.
9. Insert the securing pin as shown.
You may need to raise the roller
assembly slightly.
10. Rotate the handle clockwise to
lock the roller into position.
ADJUSTMENTS
ADJUSTING THE HEIGHT
1. Rotate the handle anticlockwise until it is loose.
2. Remove the securing pins.
3. Lift the roller head to the desired height.
• Minimum height is 780 mm
• Maximum height is 1350 mm
4. Insert the securing pins.
5. Rotate the handle clockwise to lock the roller into position.
6
Page 7

ROLLER ADJUSTMENT
There are 4 configurations that you can use this multi function workbench.
1. Pull the roller release pin and
rotate the roller head until it is in
the required position.
V style rollers
Trestle Roller
2. If required, you can lock the
roller into one position using the
bolt (16), 2 washers (15) and nut
(17) supplied.
Note If you do this step, you will
not be able to change the
‘mode’ of the workbench,
quickly, you will need to
remove the bolt before any
roller adjustments.
Ball bearings
7
Page 8

 Loading...