


MILLING/DRILLING MACHINE
MILLING/DRILLING MACHINE
MODEL No. CMD1225C
Part No. 6500302
OPERATING AND MAINTENANCE
INSTRUCTIONS
0707

When disposing of this product, do not dispose of with general waste. It must be disposed of according to the laws
governing Waste Electrical and Electronic equipment, at a recognised disposal facility.
-1-
-22-

Item Part No Description Qty
137 CC1225137 Bolt 2
138 CC1225138 Protection Board 1
139 CC1225139 Screw 2
140 CC1225140 Protection Board Strip 1
141 CC1225141 Base 1
142 CC1225142 Screw 1
143 CC1225143 Guide Screw Nut 1
144 CC1225144 Guide Screw 2
145 CC1225145 Ball Bearing 1
146 CC1225146 Guide Screw Support 1
147 CC1225147 Oil Cup 1
148 CC1225148 Pin 2
149 CC1225149 Screw 2
150 CC1225150 Graduation Plate 1
151 CC1225151 Screw 1
152 CC1225152 Pin 1
153 CC1225153 Dial Clutch 1
154 CC1225154 Hand Wheel 1
155 CC1225155 Slip Saddle 1
156 CC1225156 Steel Ball 2
157 CC1225157 Lock Handle 2
158 CC1225158 Bolt 2
159 CC1225159 Centre Stop 1
160 CC1225160 Gib Strip Screw 2
161 CC1225161 Screw 2
162 CC1225162 Gib Strip 1
163 CC1225163 Screw 1
164 CC1225164 Left Flange 1
165 CC1225165 Guide Screw Nut 1
166 CC1225166 Guide Screw 1
167 CC1225167 Table 1
168 CC1225168 Ladder Nut 2
169 CC1225169 Stop 2
170 CC1225170 Screw 2
171 CC1225171 Oil Cup 2
172 CC1225172 Drill Chuck 1
173 CC1225173 Face Milling Cutter 1
175 CC1225175 Offset Wrench 1
176a CC1225176a Allen Key 4mm 1
176b CC1225176b Allen Key 5mm 1
176c CC1225176c Allen Key 6mm 1
178 CC1225178 MT2 to MT3 Sleeve 1
180 CC1225180 Angle Vice 1
Before proceeding with the installation, check contents and advise the Clarke dealer where
the machine was purchased, immediately of any damage and or shortages.
Contents
1. Milling Machine.
2. Operating & Instruction Manual.
3. Angle Vice.
4. Hand Wheels X 3.
5. 17 / 18mm Ring Spanner.
6. 16mm Drill Chuck & Chuck Key.
7. Column Lid.
8. 63mm Face Milling Cutter.
9. Small Hand Wheel.
10. Drift.
11. Handle Rod X 3.
12. Handle Knobs X 3.
13. Allen Keys, 1 X 4mm, 1 X 5mm & 1 X 6mm.
14. Draw Bolt.
15. MT3 to MT2 Sleeve.
-21-
-2-

Please read these instructions carefully before operating the tool
Thank you for purchasing this CLARKE Milling/Drilling Machine.
Before using the device, please read this manual thoroughly and carefully follow all
instructions given. This is for your own safety and that of others around you, and is also to
help you achieve a long and trouble free service from your new machine.
CLARKE GUARANTEE
This CLARKE product is guaranteed against faulty manufacture for a period
of 12 months from the date of purchase. Please keep your receipt as proof
of purchase.
This guarantee is invalid if the product is found to have been abused or
tampered with in any way, or not used for the purpose for which it was
intended.
Faulty goods should be returned to their place of purchase, no product
can be returned to us without prior permission.
This guarantee does not affect your statutory rights.
PARTS & SERVICE TEL: 020 8988 7400
or e-mail as follows:
PARTS: Parts@clarkeinternational.com
SERVICE: Service@clarkeinternational.com
Please note that the details and specifications contained herein are correct at the time of going to
print. However CLARKE International reserve the right to change specifications at any time without
prior notice. Always consult the machines data plate.
Item Part No Description Qty
91 CC1225091 Bolt 2
92 CC1225092 Graduation Plate 1
93 CC1225093 Screw 1
94 CC1225094 Screw 1
95 CC1225095 Small Handle Wheel 1
96 CC1225096 Nut 1
97 CC1225097 Graduation Plate 1
98 CC1225098 Washer 1
99 CC1225099 Feed Base 1
100 CC1225100 Nut 1
101 CC1225101 Washer 1
102 CC1225102 Ball Bearing 1
103 CC1225103 Retaining Ring 1
104 CC1225104 Bolt 1
105 CC1225105 Washer 1
106 CC1225106 Hexagon Nut 1
107 CC1225107 Spindle Sleeve 1
108 CC1225108 Drift 1
109 CC1225109 Ball Bearing 1
110 CC1225110 Spindle 1
111 CC1225111 Ball Bearing 1
112 CC1225112 Micro Switch Base 1
113 CC1225113 Screw 4
114 CC1225114 Nut 2
115 CC1225115 Micro Switch 1
116 CC1225116 Screw 2
117 CC1225117 Screw 4
118 CC1225118 Link 1
119 CC1225119 Nut 1
120 CC1225120 Screw 2
121 CC1225121 Fixed Link 1
122 CC1225122 Screw 2
123 CC1225123 Shaft 1
124 CC1225124 Sleeve 1
125 CC1225125 Protecting Cover 1
126 CC1225126 Protecting Plate 1
127 CC1225127 Guide Screw 1
128 CC1225128 Screw 1
129 CC1225129 Column Lid 1
130 CC1225130 Screw 1
131 CC1225131 Link 2
132 CC1225132 Column 2
133 CC1225133 Ladder Rack 1
134 CC1225134 Bolt 4
135 CC1225135 Washer 4
136 CC1225136 Protection Board Strip 1
-3-
-20-

Item Part No Description Qty
45 CC1225045 Nut 2
46 CC1225046 Locking Screw 1
47 CC1225047 Head Box 1
48 CC1225048 Head Body Fixing Bolt 2
49 CC1225049 Worm 1
50 CC1225050 Gear 1
51 CC1225051 Shaft 1
52 CC1225052 Bracket 1
53 CC1225053 Screw 3
54 CC1225054 Head Handle 1
55 CC1225055 Screw 1
56 CC1225056 Grip 1
57 CC1225057 Screw 2
58 CC1225058 Switch 1
59 CC1225059 Screw 2
60 CC1225060 Electric Box 1
61 CC1225061 Knob. 1
62 CC1225062 Washer 1
63 CC1225063 Washer 1
64 CC1225064 Spring Cap 1
65 CC1225065 Spindle Return Spring 1
66 CC1225066 Cross Recess Round Head Screw 4
67 CC1225067 Rivet 4
68 CC1225068 Key 1
69 CC1225069 Pin 1
70 CC1225070 Screw 1
71 CC1225071 Nut 1
72 CC1225072 Spindle Lock lever 1
73 CC1225073 Fixed Collar 1
74 CC1225074 Name Plate 1
75 CC1225075 Screw 4
76 CC1225076 Fixed Collar 1
77 CC1225077 Screw 1
78 CC1225078 Gear Shaft 1
79 CC1225079 Key 1
80 CC1225080 Feed Casting 1
81 CC1225081 Turbine 1
82 CC1225082 Spring 1
83 CC1225083 Handle Body 1
84 CC1225084 Handle Rod 3
85 CC1225085 Handle Ball 3
86 CC1225086 Feed Knob 1
87 CC1225087 Feed Shaft 1
88 CC1225088 Ball Bearing 1
89 CC1225089 Separating Ring 1
90 CC1225090 End Lid 1
Contents Page
Guarantee ..................................................................................................... 3
Specifications ................................................................................................ 4
Safety Precautions .....................................................................................5/6
Electrical Connections ................................................................................. 7
Installation ................................................................................................... 8/9
Operating Instructions ................................................................. 9/10/11/12
Maintenance ............................................................................................... 13
Fault Finding ................................................................................................. 14
Parts List & Diagrams ....................................................... 15/16/17/18/19/20
Specifications
Model : ......................................................................................... CMD1225C
Part No : ............................................................................................. 6500302
Voltage : .............................................................................................. 230vac
Motor : .................................................................................. 750W (1400rpm)
Fuse Rating : ........................................................................................ 13amp
Weight : ................................................................................................. 167Kg
Operating Temperature : ..................................................................... 0°-40°
Noise : ............................................................................................... 80 dB (A)
Max Drill Capacity : ............................................................................. 25mm
End Mill Capacity : ............................................................................... 13mm
Face Mill Capacity : ............................................................................ 63mm
Spindle Taper : .......................................................................................... MT3
Table Effective Size : .......................................................... 585mm x 190mm
Table Cross Travel :............................................................................. 145mm
Table Longitudinal Travel : ................................................................ 370mm
Throat : ................................................................................................. 202mm
Dimensions LxWxH : .........................................................940 x 900 x 940mm
Spindle Speeds :100, 170, 200, 250, 280, 360, 600, 700, 950, 1290, 1590, & 2150
Accessories Qty
Drill Arbor ................................ MT.3-B18 ..................................................... 1
Drill Chuck............................... 16mm ......................................................... 1
Face Milling Cutter ................ 63mm ......................................................... 1
Offset Wrench ........................17 ~ 18mm ................................................. 1
Allen Key ................................. 4,5, & 6mm...................................... 1 each
Drift ................................................................................................................ 1
Angle Vice ................................................................................................... 1
MT3 - MT2 taper Sleeve .............................................................................. 1
-19-
-4-

General Safety Precautions
WARNING:
As with all machinery, there are certain hazards involved with their operation
and use. Exercising respect and caution will considerably lessen the risk of
personal injury. However, if normal safety precautions are overlooked or
ignored, personal injury to the operator or damage to property, may result.
1. ALWAYS Learn the machines’ applications, limitations and the specific potential
hazards peculiar to it. Read and become familiar with the entire
operating manual.
2. ALWAYS use a face or dust mask if operation is particularly dusty.
3. ALWAYS check for damage. Before using the machine, any
damaged part, should be checked to ensure that it will operate
properly, and perform its intended function. Check for alignment of
moving parts, breakage of parts, mountings, and any other condition
that may affect the machines’ operation. Any damage should be properly repaired
or the part replaced. If in doubt, DO NOT use the machine. Consult your local dealer.
4. ALWAYS disconnect the tool/machine from the power supply before servicing and
when changing accessories.
5. ALWAYS wear safety goggles, manufactured to the latest European Safety Standards.
Everyday eyeglasses do not have impact resistant lenses, they are not safety glasses.
6. ALWAYS keep work area clean. Cluttered areas and benches
invite accidents.
7. ALWAYS ensure that adequate lighting is available. A
minimum intensity of 300 lux should be provided. Ensure
that lighting is placed so that you will not be working in your
own shadow.
8. ALWAYS keep children away. All visitors should be kept a
safe distance from the work area, especially whilst operating
the machine.
9. ALWAYS maintain machine in top condition. Keep tools/machines
clean for the best and safest performance. Follow maintenance
instructions.
10. ALWAYS handle with extreme care do not carry the tool/machine
by its’ electric cable, or yank the cable to disconnect it from the
power supply .
11. ALWAYS ensure the switch is off before plugging in to mains. Avoid accidental starting.
12. ALWAYS concentrate on the job in hand, no matter how trivial it may
seem. Be aware that accidents are caused by carelessness due to
familiarity.
13. ALWAYS keep your proper footing and balance at all
times, don’t overreach. For best footing, wear rubber
soled footwear. Keep floor clear of oil, scrap wood, etc.
Parts List
Item Part No Description Qty
1 CC1225001 Protective Cap 1
2 CC1225002 Upper Cover 1
3 CC1225003 Link 1
4 CC1225004 Draw Bolt 1
5 CC1225005 Nut 1
6 CC1225006 Spindle Pulley 1
7 CC1225007 Spindle Sleeve 1
8 CC1225008 Ball Bearing 2
9 CC1225009 Separating Ring 1
10 CC1225010 ‘O’ Ring 1
11 CC1225011 Bolt 1
12 CC1225012 Washer 1
13 CC1225013 Lower Cover 1
14 CC1225014 Catch 2
15 CC1225015 Lock 1
16 CC1225016 Pulley Support 1
17 CC1225017 Washer 1
18 CC1225018 Bolt 1
19 CC1225019 Link 1
20 CC1225020 Bolt 1
21 CC1225021 V-Belt 1
22 CC1225022 Nut 1
23 CC1225023 Retaining Ring 1
24 CC1225024 Ball Bearing 2
25 CC1225025 Middle Pulley 1
26 CC1225026 Middle Pulley Shaft 1
27 CC1225027 Washer 1
28 CC1225028 Nut 1
29 CC1225029 V-Belt 1
30 CC1225030 Motor Pulley 1
31 CC1225031 Screw 1
32 CC1225032 Key 1
33 CC1225033 Motor 1
34 CC1225034 Hexagon Nut 4
35 CC1225035 Washer 4
36 CC1225036 Nut 2
37 CC1225037 Washer 2
38 CC1225038 Washer 2
39 CC1225039 Hexagon Head Screw 4
40 CC1225040 Motor Mount 1
41 CC1225041 Balata Collar 1
42 CC1225042 Tension Pin 1
43 CC1225043 Spring 1
44 CC1225044 Washer 2
-5-
-18-

14. ALWAY S wear proper apparel. Loose clothing or jewellery
may get caught in moving parts. Wear protective hair
covering to contain long hair.
15. ALWAY S use recommended accessories, the use of improper
accessories could be hazardous.
16. ALWAY S remove plug from electrical outlet when adjusting,
changing parts, or working on the machine.
17. NEVER operate machine while under the influence of drugs, alcohol or any medication.
18. NEVER leave machine running unattended. turn power off.
Do not leave the machine until it comes to a complete stop.
19. NEVER force the machine, it will do a better and safer job at
the rate for which it was designed.
20. NEVER use power tools in damp or wet locations or expose
them to rain. Keep your work area well illuminated.
21. DO NOT use in explosive atmosphere (around paint,
flammable liquids etc). Avoid dangerous environment.
Additional Precautions For Power Tools
1. ALWAYS use the appropriate cutter for the material being cut.
2. ALWAY S ensure the cutter is secured fully before use.
3. ALWAY S switch the machine OFF immediately the task is completed.
4. ALWAY S ensure safety guards etc are in place and working correctly, if not DO NOT
use the machine until rectified.
5. DO NOT use the machine if the electric cable, plug or motor is in poor condition.
6. DO NOT allow the ventilation slots in the machine to become blocked.
7. DO NOT touch the cutter immediately after use, allow time for it to cool.
8. NEVER leave chuck keys in situ, Always remove and store safely when finished
tightening or loosening the chuck.
9. NEVER change from high to low speed and vice versa whilst the machine is still
running, always ensure the machine has come to a complete stop before doing so.
10. NEVER change from forward to reverse and vice versa whilst the machine is still
running, always ensure the machine has come to a full stop before doing so.
11. NEVER leave machine running unattended, ALWAY S ensure the m/c is switched off
and come to a complete stop before leaving it.
12. AVOID accidental starting, by switching m/c off and isolating from the main electrical
supply by removing the plug from the socket.
Additionally, please keep these instructions in a safe place for future reference.
-16-
-6-

Electrical Connections
This product is provided with a standard 13 amp, 230 volt (50Hz), BS 1363 plug, for connection
to a standard, domestic electrical supply. Should the plug need changing at any time,
ensure that a plug of identical specification is used.
WARNING ! THIS APPLIANCE MUST BE EARTHED
This machine must be wired up in accordance with the following colour code:
BLUE - NEUTRAL
BROWN - LIVE
GREEN/YELLOW - EARTH
• Connect the BLUE coloured cord to the plug terminal marked “N”
• Connect the BROWN coloured cord to the plug terminal marked “L”
• Connect the GREEN/YELLOW coloured cord to the plug terminal marked “E”
If this appliance is fitted with a plug which is moulded on to
the electric cable (i.e. non-rewireable) please note:
1. The plug must be thrown away if it is cut from the
electric cable. There is a danger of electric shock if it is
subsequently inserted into a socket outlet.
2. Never use the plug without the fuse cover fitted.
3. Should you wish to replace a detachable fuse carrier, ensure that the correct
replacement is used (as indicated by marking or colour code).
4. Replacement fuse covers can be obtained from your local dealer or most electrical
stockists.
Parts Diagram
Fuse Rating
The fuse in the plug must be replaced with one of the same rating (13 amps) and this
replacement must be approved to BS1362.
If in doubt, consult a qualified electrician. Do not attempt any electrical repairs yourself.
Cable Extension
Always use an approved cable extension suitable for the power rating of this tool (see
specifications), the conductor size should also be at least the same size as that on the
machine, or larger. When using a cable reel, always unwind the cable completely.
IMPORTANT:
If a cable extension is needed, it is essential to comply with the following data.
Voltage Extension length Cable section
230v Up to 20m 2.5mm
230v From 20 to 50m 4mm
-7-
2
2
-16-
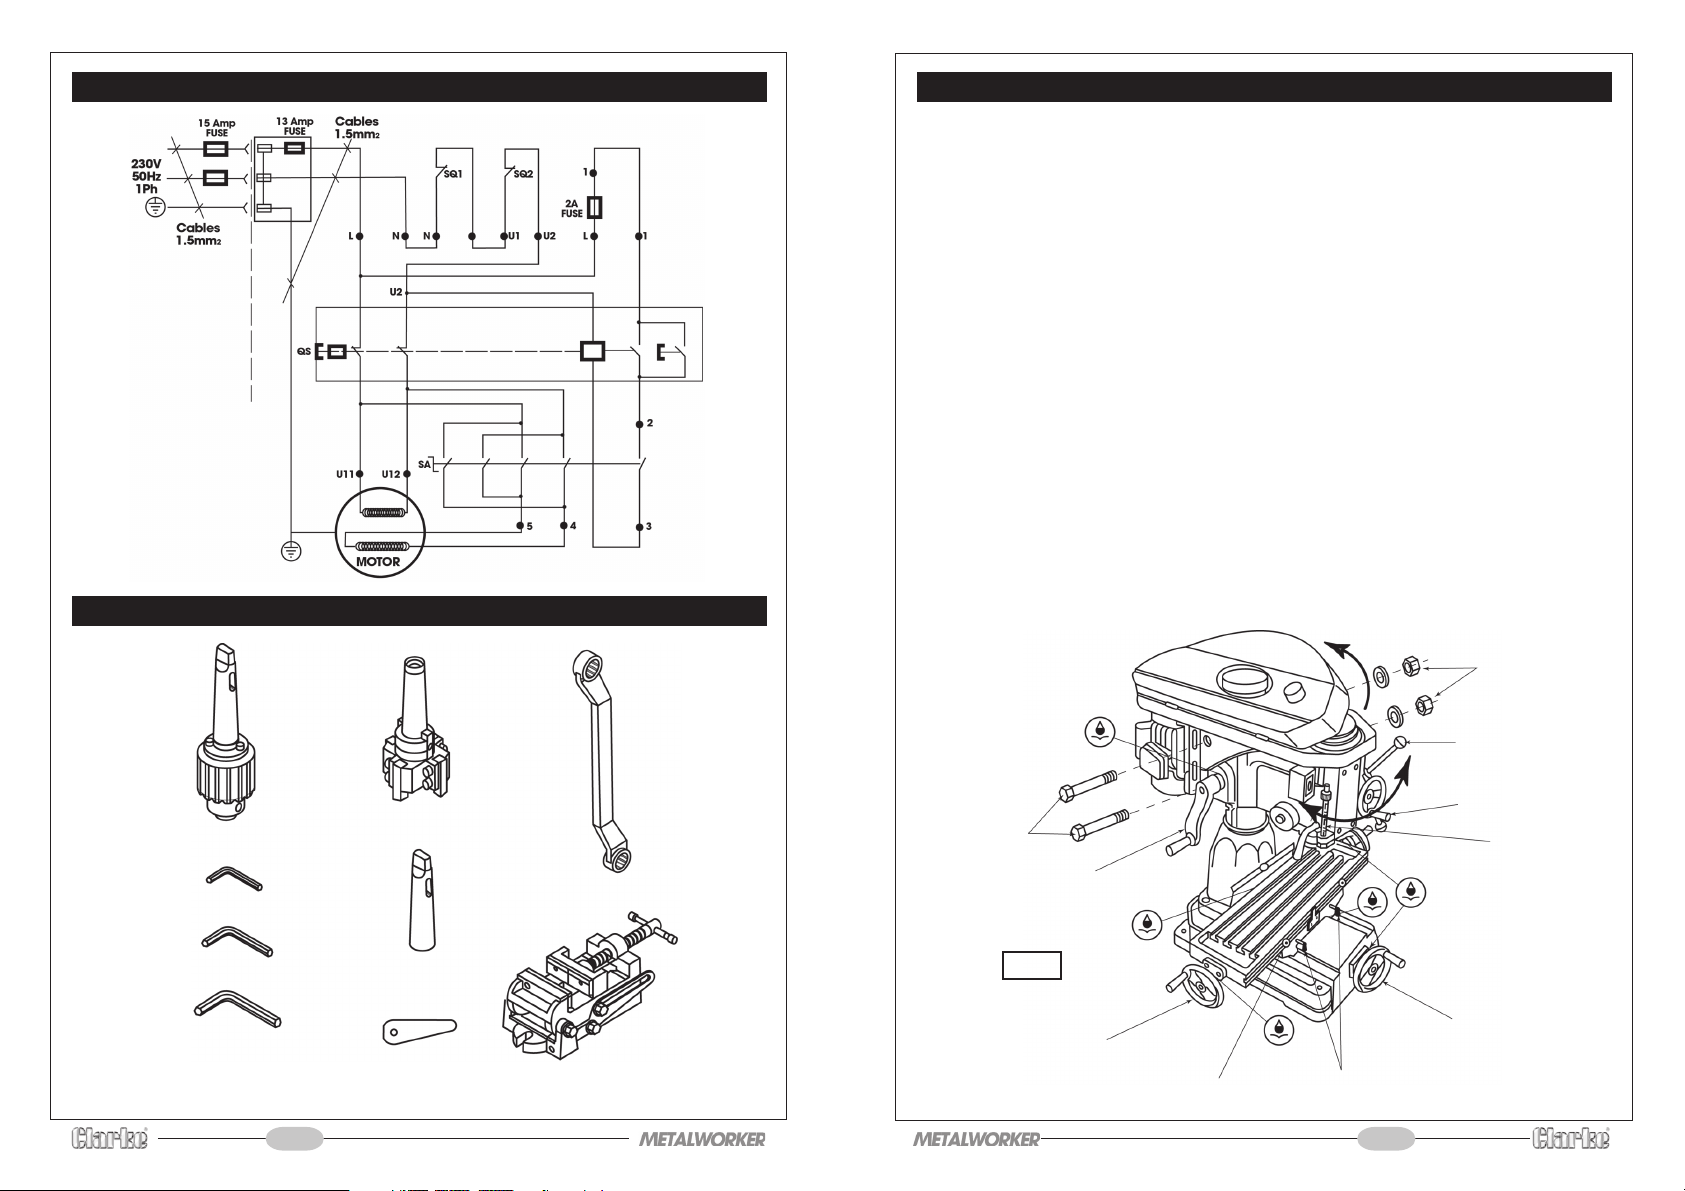
Schematic 230v single phase
Accessories
Installation (Figures in brackets refer to Parts list)
IMPORTANT: Careful consideration is required when choosing the location for the
machine, special attention should be paid to the operation, i.e. the X & Y axis, electric
powerpoint etc, also the workbench where the machine is to be installed should be firm flat
and level. Avoid installing in direct sunshine, damp or very dusty location.
Your new machine is delivered assembled in a wooden case and bolted onto a board using
four bolts. all accessories are packed inside the case in a wooden box.
To remove the machine from the case, it is necessary to dismantle the case first. Once
dismantled ensure all nails etc are removed, safely dispose of the case materials unless you
intend to move the machine at a later date, in that case, store safely away.
Given the machines weight, a suitable hoist etc will be required to lift the machine into
position.
Before lifting, you must ensure that you have given explicit instructions, including who gives
the command to lift etc. Also before lifting, place the machine as near as possible to the
location where the machine is to be sited.
NOTE: when lifting, take care as the machine is top heavy.
1. Unbolt the machine from the board, and carefully lift into position,
2. Before drilling the bench, ensure full longitudinal travel is possible, also ensure the
head can be rotated through 360º without fouling etc, anything less could impair
the maximum use of the machine.
3. Once satisfied, drill four corresponding holes with the ones in the machine base, and
bolt machine securely onto the workbench, using suitable nuts bolts and washers,
(not supplied).
Head Lock Nuts
172
173
175
178
176a
176b
176c
108
180
-14-
A wide range of tools and accessories are available from your nearest CLARKE dealer, for
further information, contact your nearest dealer, or telephone CLARKE International Sales
department on 01992 565300.
-15-
Head fixing
bolts
Fig. 1
Longitudinal feed
hand wheel
Head Handle
Table stops
Handle for rapid
drilling
360°
Handwheel for fine
feed drilling
Depth stop
Cross Feed Hand Wheel
Longitudinal travel table Locks
-8-

4. Loosen the two nuts and bolts (45 & 48), turn the head handle (54/56), clockwise to
raise the head, remove the wooden transport bracket, retighten nuts and bolts.
5. Your machine has been coated with rust protection to protect it in shipping, all
traces of this must be removed before attempting to use the machine. Commercial
degreaser, kerosene or similar solvent may be used to remove this protection, care
must be taken to avoid getting solvent into the motor and electrical parts i.e.
switches etc, also observe the cleaner manufactures instructions.
6. After cleaning, lightly coat all bright (non painted) surfaces, with a light machine oil,
lightly lubricate all moving parts, i.e. handwheel threads etc (Fig. 1).
7. Before using the machine for the first time, check all functions: refer to Fig.1.
a. Turn the cross feed hand wheel clockwise to move the table inwards, and
anticlockwise to move the table outwards. Tighten the cross feed table lock (157)
DO NOT OVERTIGHTEN, attempt to turn the hand wheel, the table should not move.
b. Turn the longitudinal hand wheel clockwise to move table to the left, and
anticlockwise to move it to the right. Tighten the two longitudinal locks (157) DO
NOT OVERTIGHTEN, attempt to turn the hand wheel, the table should not move.
c. Loosen the head locknuts and turn the head hand wheel clockwise to raise the
head and anticlockwise to lower it. tighten the locknuts.
The Head may be rotated 360°, adjust to the desired angle, then tighten the
locknuts.
d. Loosen spindle lock (72), by turning anti-
clockwise, loosen the feed knob (86) by
turning clockwise, pull handle for rapid
speed drilling (84 & 85), spindle should
travel downwards, push handle in
opposite direction, spindle should
return back up.
e. Tighten the feed knob by turning anti-
clockwise, turn the fine feed hand
wheel clockwise, the spindle should
travel downwards, turn handle in
opposite direction the spindle should
return back up. Tighten the spindle lock
and attempt to turn the hand wheel,
the spindle should not move.
IMPORTANT: before plugging in and switching ON,
Fig. 3
ensure all
items such as
chuck keys and drifts
etc are removed and
stored safely.
Ensure the work area is clean and tidy before
switching the machine on. Plug the machine into
the electric supply, ensuring the correct supply is
available, and switch the power ON.
The ON/OFF switch is located on the left hand side of
the machine, this switch box also incorporates the
forward/reverse switch (Fig. 2). Before switching ON,
select either forward or reverse, it is important to
switch the machine OFF and wait for it stop rotating
before changing direction.
Fig. 2
strip adjusting screw for the axis that requires adjusting, at the same time slowly turn
the handwheel for the same, the correct adjustment is reached when a slight resistance
is felt on the handwheel.
If necessary repeat the above procedure for the other axis.
Stops
Gib Strip
Gib Strip
Table Lock X 2
Saddle Lock
Gib Strip Adj Screw
Gib Strip Adj Screw
CROSS FEED (X AXIS)
Fig. 7
LONGITUDINAL FEED (Y AXIS)
Fault Finding
FAULT CAUSE REMEDY
1. Machine does not
run.
2. Motor overheats.
3. Spindle gets hot.
4. Spindle stops whilst
cutting.
5. Micro feed not
smooth.
Fuse blown.
Faulty switch.
Incorrect voltage.
Feed speed too fast.
Faulty motor.
Insufficient lubrication.
Spindle bearing too tight.
Running high speed for long
periods.
V Belt too tight.
Loose V belt.
Motor burnt out.
Cutting too deep.
Clutch loose.
Worm & worm shaft worn
Replace Fuse.
Replace Switch.
Adjust to Correct Voltage.
Reduce Feed Speed.
Replace Motor.
Fill with grease.
Adjust or replace bearing.
Switch OFF and allow to cool
down.
Adjust V belt tension.
Adjust V belt tension.
Replace motor.
Reduce depth of cut.
Adjust tension.
Replace
-9-
-14-

Chuck Guard
NEVER operate the machine without first ensuring that the chuck guard is in place and is
functioning correctly, when guard is opened, the machine stops automatically.
To position the chuck guard where it gives maximum protection from flying swarf etc, loosen
the two knurled thumb screws, shown in Fig. 6, raise or lower the guard to required position.
Fig. 6
Maintenance (Figures in brackets refer to Parts list)
The amount of maintenance depends on the amount of use the machine gets, however it
is important to carry out routine maintenance to prevent premature wear and shortening
the life of the machine.
1. Inspect and clean all non painted surfaces, lubricate using a light machine oil, Do
Not over lubricate, oil can be applied to the worktable and column etc, using a soft
oil soaked cloth.
2. Inspect and clean all moving parts, Lubricate using machine oil, check for smooth
operation.
3. Inspect the machine for signs of wear or damage, any faults should be rectified
before continuing.
4. Check all bolts etc are tight, i.e. the bolts (134) securing the column (132) to the base
(141) etc.
5. With use, play may develop in the cross and longitudinal slides, this can be adjusted
out as follows.
Before making any adjustments, clean all friction surfaces, it is necessary to move the
table and cross slide to both extremes to carry out the cleaning process correctly.
When finished cleaning, re-lubricate using a light machine oil.
6. Return both the table and cross slide to their central positions.
7. Adjust Gib strip screws, (160) (see Fig. 7). Using suitable screwdriver, slowly turn the gib
-13-
To switch the machine ON, press the switch cover (fig. 3) in, slide in direction of arrow and lift
up, this will expose the ON/OFF buttons. Push the ON button, (green button ‘I’). DO NOT
close the cover as this will switch the machine OFF again.
NOTE : in case of emergency, close the switch cover quickly, the cover will latch down and
the motor will be switched OFF. To switch OFF normally, press the OFF button, (red button
‘O’), always close cover to prevent accidental starting. always allow the motor to reach full
speed before attempting to start machining, check that there is no adverse vibration or
noises etc. If any are apparent, switch the machine OFF and disconnect from the main
supply by turning OFF the power and removing the plug from the socket. Rectify any faults
before attempting to turn the machine back ON again.
Once any problems are rectified and the machine is running smoothly, the machine is now
ready for use.
Operating Instructions (Figures in brackets refer to Parts list)
NOTE: these instructions are not a definitive tutorial. they are to be used for guide purposes
only and are not intended to teach you all there is to know about milling and drilling.
Always keep the work area clean and tidy. especially in the close proximity of the machine.
PREPARATION
• Secure work piece onto the worktable, using the appropriate method, e.g, ‘T’ bolts
and clamps not supplied) or vice etc.
• Insert the cutter to be used into the chuck (not supplied) or directly into the spindle
etc and ensuring it is tightly secured. Only use good quality cutters with the correct
form and sharpness etc.
• Ensure the chuck guard is in place and securely fixed.
• For added accuracy, if for instance you are only using the cross feed when cutting,
ensure all other axis are locked, (vertical and horizontal).
• Select the correct cutting speed for the size of cutter and material being machined.
SPINDLE SPEEDS
A-1 100 B-4 600
B-1 170 C-3 700
A-2 200 C-4 950
A-3 250 D-2 1290
C-1 280 D-3 1590
B-2 360 D-4 2150
-10-
Fig. 4
A good rule of thumb is, the smaller the hole or depth of cut, and the softer the
material to be machined etc, the faster the speed. To adjust the speed proceed as
follows. 12 Speeds are possible, (see Fig. 4)
1. Turn the machine OFF and isolate from the main supply to prevent accidental starting.
2. Loosen screw (130) and remove the pillar cap (129), store safely.
3. Raise the milling head until the pillar (132) is flush with the top cover (2).
4. Open the belt drive cover by releasing the two catches (14), and lift open the cover.
(safety switch should operate to prevent accidental starting).
5. Loosen the locking screw (46), pull the motor (33) inwards to slacken the ‘V’ belt (29),
remove the belt and store safely.
6. ‘V’ belt (21) can now be repositioned to desired location.
7. Refit ‘V’ belt (29), refer to table Fig. 4 for correct position.
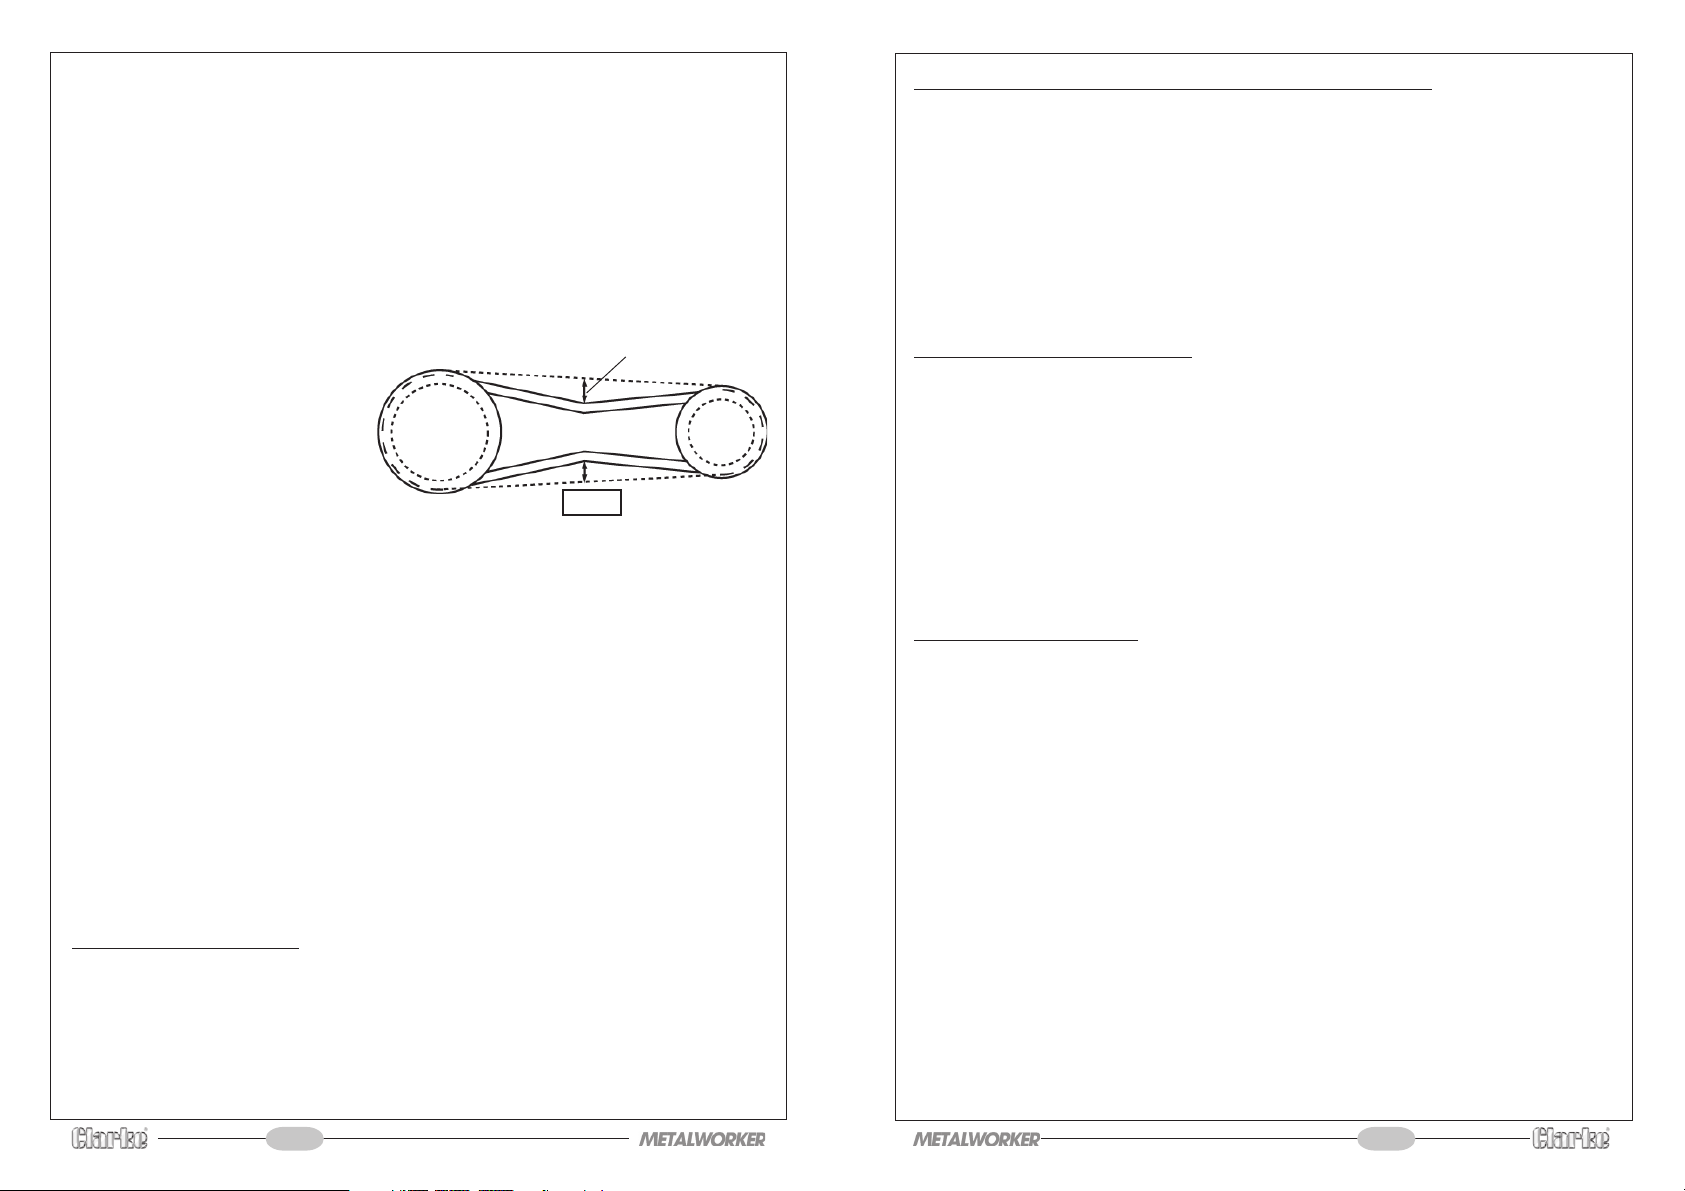
8. Tension ‘V’ belts by pushing motor
outwards, if necessary, a
screwdriver or similar can be
used as a lever between the
head box (47), and the motor
mount (40).
DO NOT apply excessive pressure.
See Fig. 5 for correct adjustment.
9. Close the top cover and secure with latches.
Ensure the cutter is not making contact with the work piece, turn the machine ON.
½” Max Movement
Fig. 5
NOTES:
•
Slowly bring the cutter into contact with the work piece and start machining.
•
DO NOT attempt to make too bigger cuts than the cutter and machine are capable
of, it is much better and safer to make several small passes.
•
Always use an appropriate cutting/cooling fluid whilst machining, which can be
applied with a small brush etc, NOT FINGERS.
•
DO NOT allow swarf to build up in the cutting area. Stop the machine and remove
using a suitable implement, (brush etc).
•
When finished turn the machine OFF, return the cutter to the uppermost position and
allow it to come to a complete stop before attempting to remove the work piece or
tool etc. Also to prevent accidental starting, isolate the machine from the power
supply by turning off at the wall socket and removing the plug from the socket.
•
Always finish by cleaning the machine down and storing all tools etc away safely.
COURSE and FINE FEEDS
To use the course feeds, loosen the feed knob (86) and operate by pulling the handle (84 &
85) at the desired rate.
For fine feed, tighten the feed knob, and operate the fine feed wheel (95) at the desired
rate.
IMPORTANT When milling, ONLY the fine feed option may be used.
CHUCK & OR MILLING CUTTER REMOVAL/REPLACEMENT
1. Ensure the machine is switched OFF and isolated from the main electric supply.
2. Open the top cover as for speed changing.
3. Hold the chuck/cutter firmly using industrial work gloves or similar.
4. Loosen and unscrew the draw bolt (4) approx two full turns.
5. Firmly strike the top of the draw bolt with a soft faced mallet, (NOT Hammer). The
Chuck/cutter should drop slightly, holding the chuck/cutter with one hand unscrew
fully the draw bolt with the other hand and remove the chuck/cutter.
Fit replacement in reverse order.
TO FIT MT3 - MT2 DRILL SLEEVE
The draw bolt must be removed completely and stored safely.
Fit arbor by inserting the taper shank into the spindle, turn the arbor whilst doing so to locate
the drive key into the slot.
To remove it when finished, lower the spindle by either operating the course drilling handles
or by turning the fine feed handwheel to lower the spindle and expose the drift slots.
Turn the spindle etc to locate the slots in the spindle and arbor.
Insert the drift (108) into the slot, again apply a firm but swift blow to the drift, using a
hammer.
Using suitable hand protection, catch the arbor as it falls, remove the drift and store safely.
SPINDLE RETURN SPRING
It shouldn’t normally be necessary to make adjustments to the return spring pressure, in the
event it does become necessary EXTREME CAUTION should be observed.
To carry out this adjustment proceed as follows:
1. Ensure the spindle is as high as it will go, lock in position with the spindle locking lever (72)
2. Loosen the Knob (61) three or four full turns, DO NOT remove completely.
3. Firmly grip the spring cap (64), preferably wearing heavy duty work gloves, carefully
take up the tension by turning very slightly anticlockwise, pull the cap away from the
mill head to disengage the locating pawls, DO NOT let go as the spring will unwind at
speed and force causing damage and or personal injury.
4. Turn the cap anticlockwise to increase the spring tension, when the required tension
is reached, push the cap back towards the head and relocate the pawls.
5. Whilst continuing to hold the cap in position, tighten the knob (61).
6. Test the action of the spindle return, and repeat the above if more tension is required.
NOTE: Check periodically the knob (61) is always tight, if it does become loose during normal
use, carefully remove the knob, taking care not to allow the spring cap to move, apply
thread lock to the knob thread and refit to machine.
-11-
12-
-
 Loading...