

Page 1
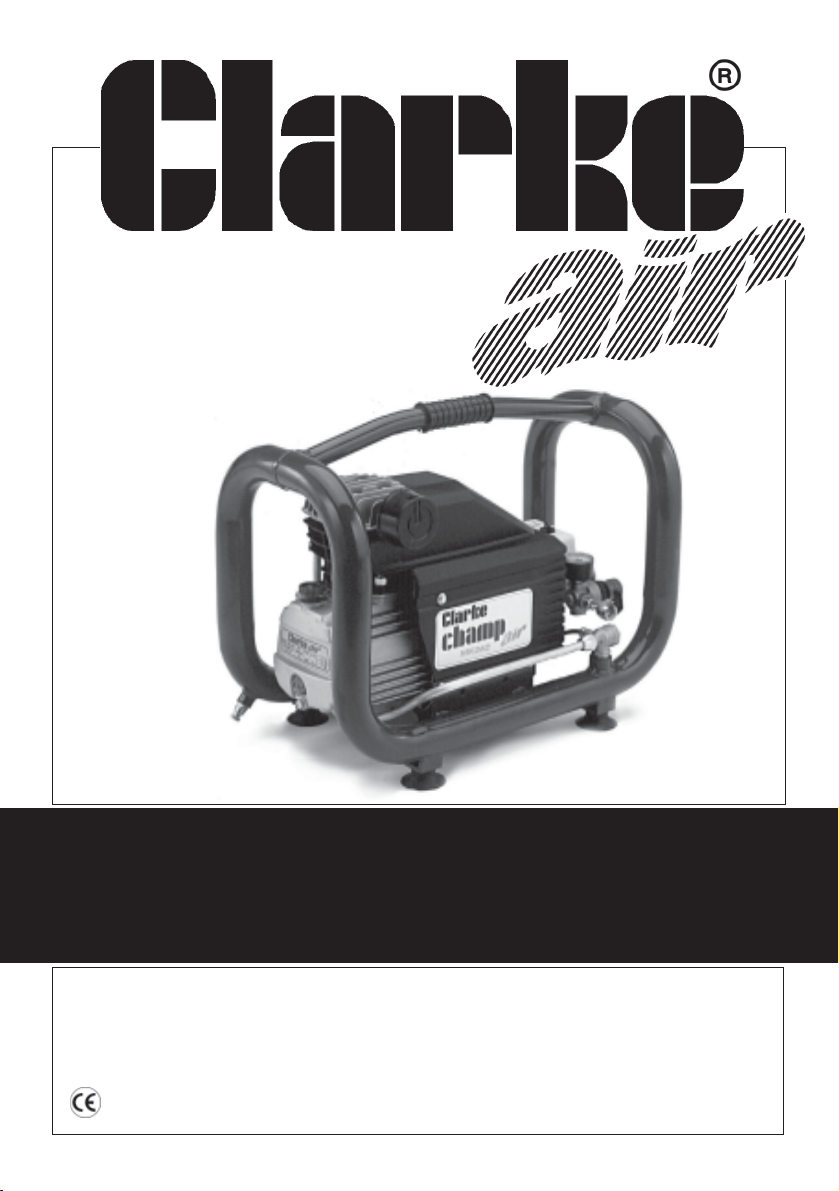
CHAMP
CHAMP
AIR COMPRESSOR
AIR COMPRESSOR
(262)
OPERATING & MAINTENANCE
INSTRUCTIONS
0903
Page 2
CHAMP AIR COMPRESSOR
Thank you for purchasing this Clarke Champ Air Compressor. Before
attempting to operate the machine, please read this instruction manual
thoroughly and carefully follow all directions given. This is for your own
safety and that of others around you, and also to help you achieve long
and trouble free service from your compressor.
Guarantee
This product is guaranteed against faults in manufacture for 12 months
from purchase date. Please keep your receipt as proof of purchase.This
guarantee is invalid if the product has been abused or tampered with in
any way, or not used for the purpose for which it is intended. The reason
for return must be clearly stated. This guarantee does not affect your
statutory rights.
Contents Page
Safety Precautions ................................................................ 3
Electrical Connections ......................................................... 4
General Arrangement ......................................................... 5
Technical data...................................................................... 5
Installation ............................................................................. 6
Starting the compressor ....................................................... 6
Adjusting the air pressure..................................................... 7
Stopping the compressor .................................................... 7
Maintenance ........................................................................ 8
Fault finding ........................................................................... 9
Parts Lists & Diagrams ................................................ 10 & 11
Parts & Service Contacts ................................................... 11
2
Page 3
Safety Precautions
WARNING!
Compressed air can be dangerous.
Follow these safety instructions carefully.
• Never direct a jet of compressed air at people or animals, or spray
paint towards people or animals.
• Use appropriate protective equipment, such as Clarke
safetygoggles or glasses, dust masks, ear defenders etc. when
using compressed air tools.
• Air compressors work at high pressure. Inspect equipment and hoses
regularly, checking for any damage or leaks. Have any damage
properly repaired before using the machine again.
• Do not operate the compressor with any guards removed.
• Do not adjust or tamper with the safety valve in any way. The maximum
working pressure (115 psi - approximately approximately 8 bar) is clearly
marked on the compressor and air receiver.
• The compressor will become hot during operation. Do not touch the
cylinder head or discharge pipe while the compressor is in use.
• Always close the air outlet valve and release any pressure from the air
hose (by operating the tool briefly) before disconnecting any hoses
or tools.
When paint spraying:
• Always wear a suitably approved breathing mask when paint
spraying, to protect against inhalation of paint spray or fumes.
An airfeed mask may be required when spraying some types of paint.
If in doubt, check the paint manufacturers instructions.
• Make sure there is adequate ventilation. Do not spray in confined or
enclosed areas.
• Many paints are flammable. Do not smoke while spraying or preparing
paints, or spray near a naked flame or heat source.
3
Page 4
Electrical Connections
230 Volt models:
Connect the mains lead to a standard 230 Volt (50Hz) electrical supply through
an approved BS1363, 13amp plug or a suitably fused isolator switch.
110 Volt models:
Connect the mains lead to a suitable 110 Volt (50Hz) electrical supply through an
approved plug or a suitably fused isolator switch. If using a portable 110 Volt
transformer make sure it has a rated capacity sufficient to take the load of the
compressor (4.5kVA).
All models:
We recommend that the compressor is connected to the mains supply through a
Residual Current Device (RCD).
WARNING! THIS APPLIANCE MUST BE EARTHED
IMPORTANT: The wires in the mains lead are coloured in accordance with the
following code:
Green & Yellow - Earth
Blue - Neutral
Brown - Live
As the colours of the flexible cord of this appliance may not correspond with the
coloured markings identifying terminals in your plug proceed as follows:
• Connect GREEN & YELLOW cord to terminal marked with a letter “E” or Earth
symbol “ ” or coloured GREEN or GREEN & YELLOW.
• Connect BROWN cord to terminal marked with a letter ‘L’ or coloured RED
• Connect BLUE cord to terminal marked with a letter ’N’ or coloured BLACK
230 Volt models:
If this appliance is fitted with a plug which is moulded onto the electric cable (i.e.
non- rewirable) please note:
1. The plug must be thrown away if cut from the electric cable.There is a danger
of electric shock if it is subsequently inserted into a socket.
2. Never use the plug without the fuse cover fitted.
3. Should you wish to replace a detachable fuse carrier, ensure that the correct
replacement is used (as indicated by marking or colour code).
4. Replacement fuse covers can be obtained from your local dealer or most
electrical stockists.
5. The fuse in the plug must be replaced with one of the same rating (13amps)
and this replacement must be ASTA approved to BS1362.
If in doubt, consult a qualified electrician....DO NOT attempt repairs yourself
4
Page 5
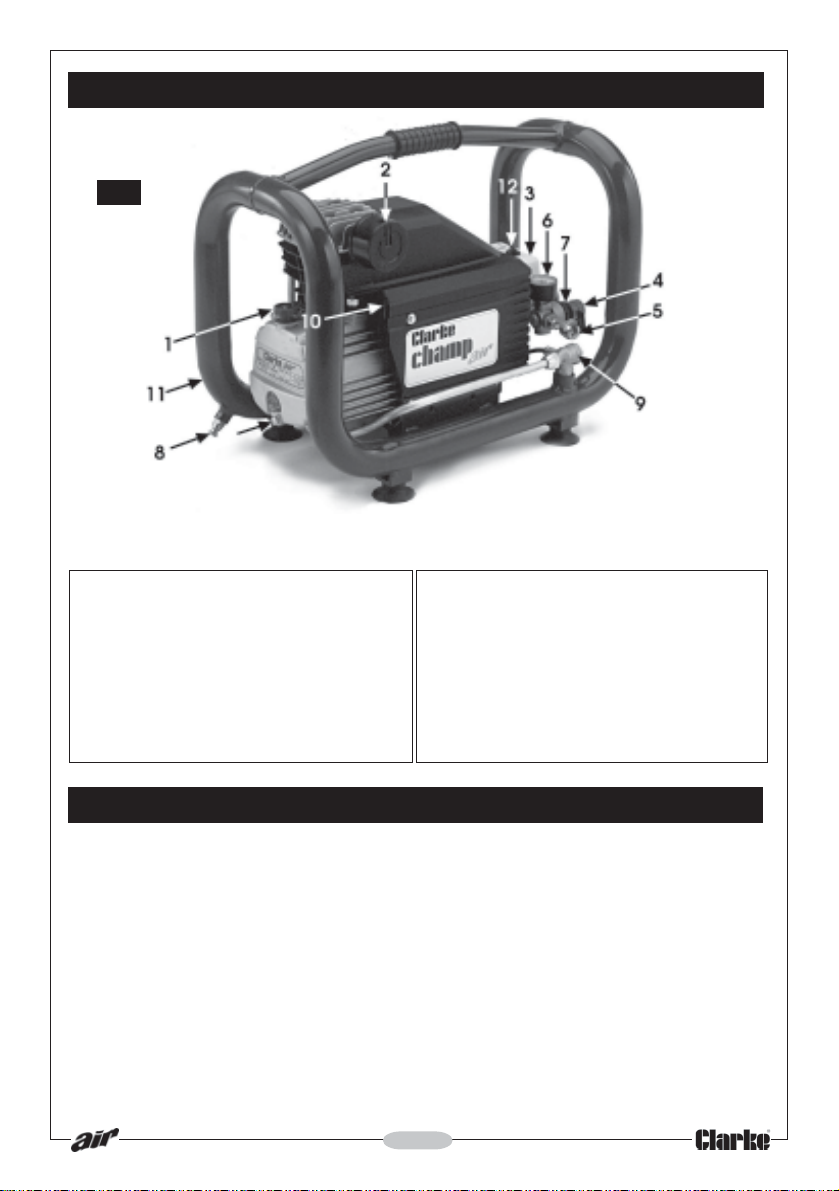
General Arrangement
Fig.1
NOTE: There may be minor cosmetic differences between marques, but the general
arrangement is similar.
1. Oil Filler/Dipstick
2. Air filter
3. Pressure switch
4. Pressure regulator
5. Outlet valve
6. Outlet pressure gauge
7. Air receiver pressure gauge
8. Air receiver drain cock
9. Non return valve
10. Overload trip reset
11. Air Receiver
12. ON/OFF Switch
Technical Data
Electric motor .............................. 230 or 110 Volt, 50 Hz, 1phase
Power Rating............................... 2 HP (approx. 1.5kW)
Motor Speed ............................... 2850 rpm
Air displacement ........................ 247litres/min (8.7 cfm approx.)
Receiver ...................................... 2.7 Litres
Max air pressure 110V ............ 8 bar (116 psi approx.)
230V ............ 10bar (145 psi approx)
Weight net ................................... 18kg
Duty Cycle .................................. S1 at 7bar
Please note that the details and specifications contained herein, are correct at the time of going to
print. However, CLARKE International reserve the right to change specifications at any time without
prior notice. Always consult the machine’s data plate
5
Page 6
Installation
CAUTION
Your compressor is heavy,take care when moving or transporting it.
• Locate the compressor on a firm, flat, level surface, in a dry and dust free
area. Do not use the compressor in a damp or wet environment.
• The compressor must have adequate ventilation to allow a fresh air intake to
the compressor and cooling air to the motor.
• Ensure that the air available to the compressor is as clean as possible.
Dusty or damp air at the inlet will reduce the compressor’s performance and
affect the quality of air supplied to your tools.
• Do not place any strain on electrical cables or air hoses connected to the
compressor.
Starting the compressor
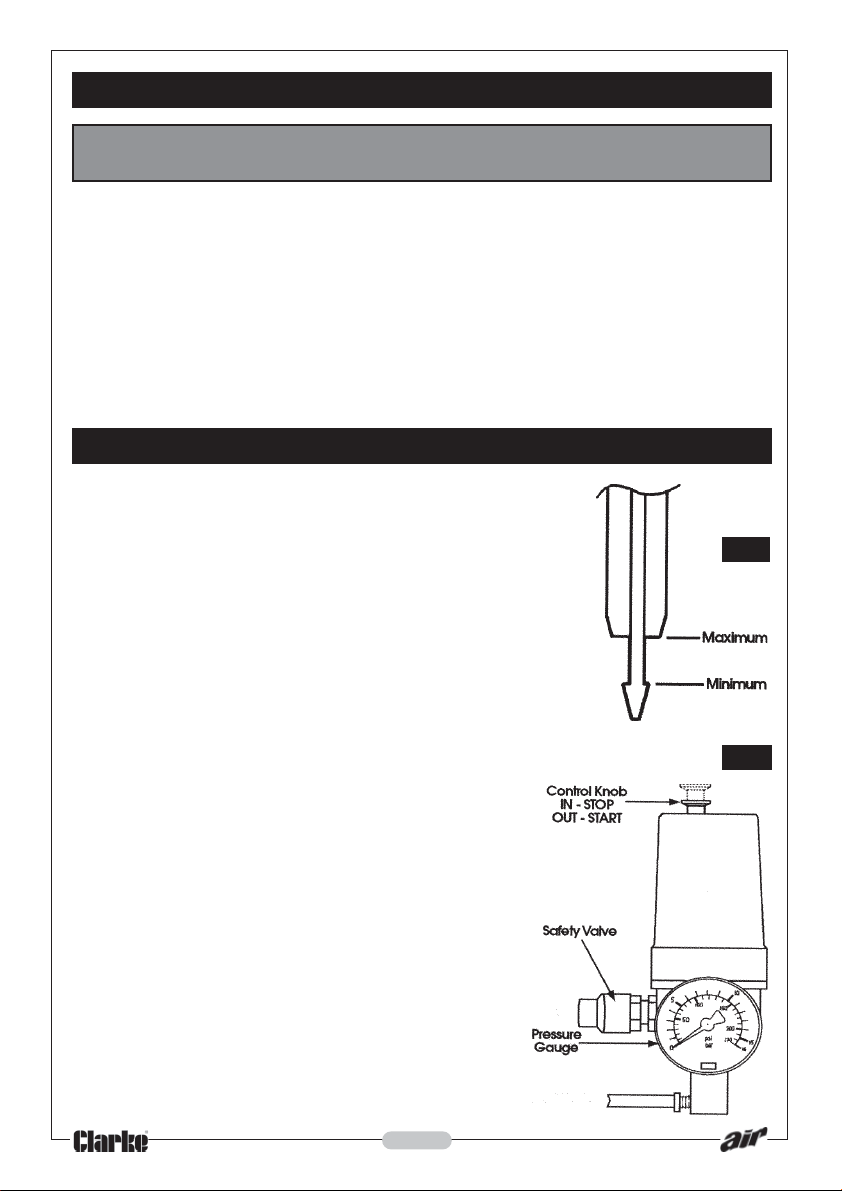
Before starting the compressor, check the oil level, and
top up if necessary with Clarke SAE 40 compressor oil.
The oil level should be between the minimum and
maximum marks on the dipstick (see figure 2).
Note: The compressor has an automatic pressure switch
which will start the compressor when the air pressure in
the receiver is low, and stop the compressor when the
air receiver is at its maximum pressure. This switch also
controls a breather valve which vents the compressor
outlet when the compresor stops, to prevent overloading
the motor when restarting.
Never switch the compressor on or off using the mains switch.
Always use the control knob on the automatic pressure switch.
1. Make sure the control knob on the automatic
pressure switch is in the OFF (‘0’) position (control
knob pushed in - see figure 3).
2. Switch on the mains supply.
3. Lift the control knob on the automatic pressure
switch to the ON (‘I’) position. The motor should
start immediately. If it does not, it may be
because the air receiver is already up to
pressure. Check the tank pressure gauge and
release some air by opening the outlet valve if
necessary.
4. Run the compressor with the outlet valve open
for a few moments. This allows the compressor
lubricating oil to circulate before the compressor
is placed under load.
6
Fig.2
Fig.3
Page 7
5. Close the outlet valve, and allow the pressure in the receiver to rise before
connecting your air hose and tools to the compressor.
Note: The compressor should start and stop automatically as air is used from the receiver. If
the compressor runs continuously it may be because the compressor is too small for your
application. Consult your dealer for advice.
Adjusting the air pressure
CAUTION!
Always follow the air tool manufacturer’s guidelines on the maximum
operating pressure for their equipment.
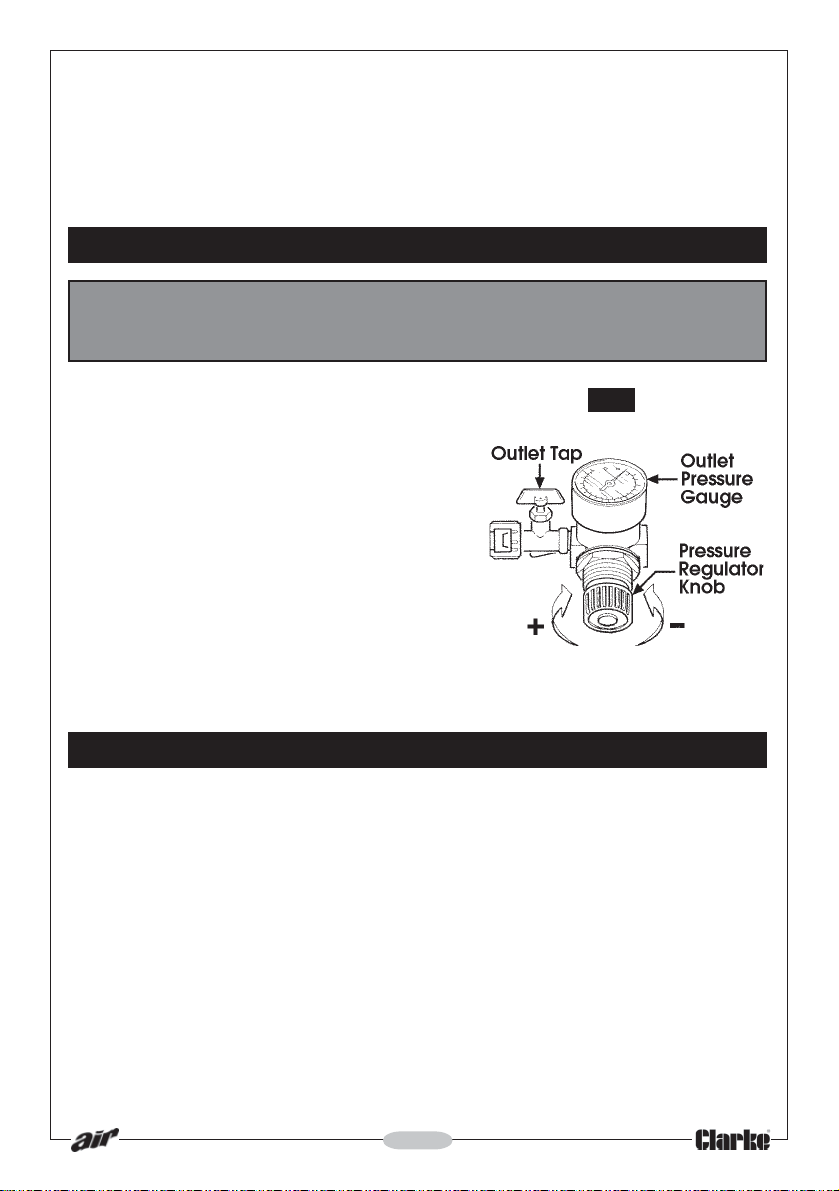
The pressure in the air receiver is controlled by
the automatic pressure switch. You can control
the pressure supplied to your air hose and tools
by adjusting the outlet pressure regulator (see
figure 4). Turn the pressure regulator knob
clockwise to increase the pressure and anticlockwise to decrease.
As a rough guide to operating pressure, Clarke
paint spray guns typically operate at between
30 and 60 psi (approximately 2 to 4 bar). Most
Clarke air tools operate at around 90 psi
(approximately 6 bar), but if in any doubt about
operating pressure consult the equipment
manufacturer.
Fig.4
Stopping the compressor
1. Push in the control knob on the automatic pressure switch, to the OFF(‘0’)
position. This will open the breather valve and stop the compressor. You may
hear a release of air as the breather valve opens.
2. Switch off and unplug from the mains supply.
If the compressor is not going to be used for some time, for example overnight,
or if you are transporting the compressor, drain the air from the receiver.
7
Page 8
Maintenance
CAUTION!
Always disconnect the compressor from the electrical supply and completely
drain the air from the receiver before any maintenance or repair.
Simple routine maintenance will improve the performance of your compressor,
and help to prolong its life.
After the first 5 hours of operation, check the cylinder head and motor bolts, and
tighten any which may be loose.
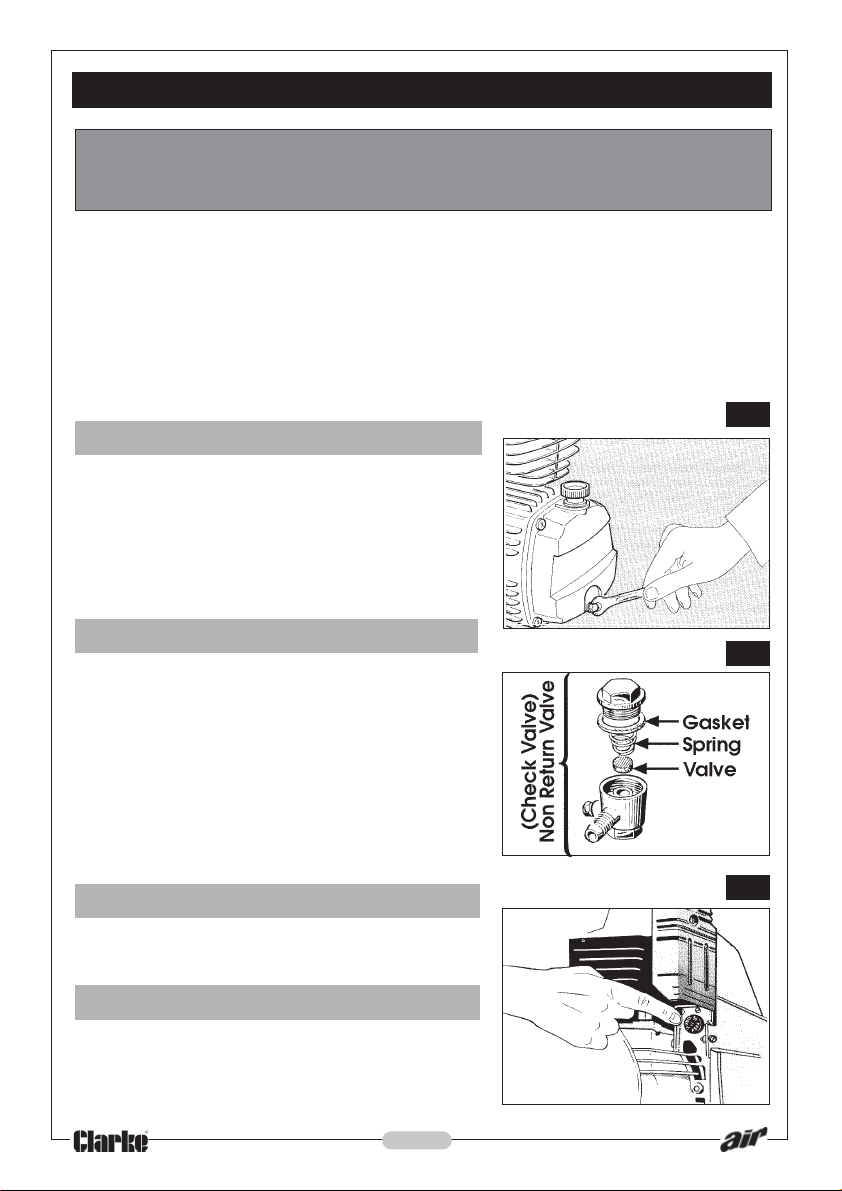
After the first 100 hours of operation, change the crankcase oil. Drain the oil by
unscrewing the crankcase drain plug (see figure 5). Refill to the maximum mark
on the dipstick with Clarke SAE 40 compressor oil.
Fig.5
Daily
Check the oil level and top up if necessary with
Clarke SAE 40 compressor oil. The oil level should
be between the minimum and maximum marks
on the dipstick (see figure 2).
Drain any water from the air receiver by
unscrewing the drain cock under the receiver.
Every 50 hours
Clean the air filter after every 50 hours of
operation (more frequently if the compressor is
used in a dusty environment). Unscrew the filter
and clean it by carefully blowing through with
compressed air against the normal direction of
air flow. Replacement air filters are available
from our Spares Department.
Clean the outside of the compressor, particularly
around 3the motor, to allow proper cooling.
Every 500 hours (approx. 6 monthly)
Change the crankcase oil (as above). Check
and clean the non-return valve (see figure 6).
Air Receiver Safety Valve
Do not attempt to adjust or overhaul the air
receiver safety valve. If the valve becomes faulty,
a replacement safety valve must be fitted.
Contact our Spares Department for advice.
8
Fig.6
Fig.7
Page 9
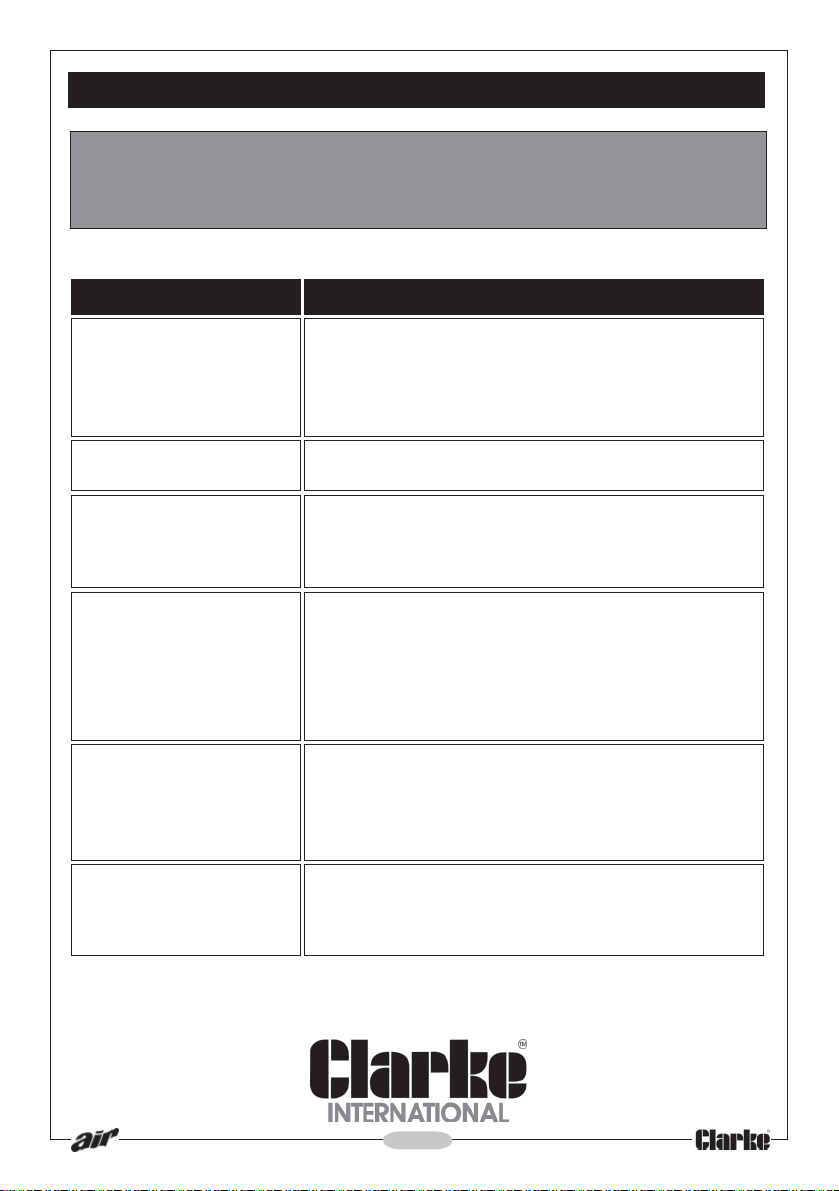
Fault Finding
WARNING!
Always disconnect the compressor from the electrical supply and
Problem
Compressor stops and
will not restart.
Unable to adjust air
outlet pressure.
Air leaking from pressure
switch when the
compressor is not
running.
Compressor will not start
or stop automatically
Compressor runs
continuously, will not
reach pressure.
Compressor overheats.
Compressor noisy.
Probable cause
Compressor overloaded and thermal overload
protection has operated - remedy the cause of the
overload, then reset the overload trip (see figure 7).
Fuse blown - check and replace. If the fuse blows
repeatedly have the compressor checked.
Pressure regulator faulty - check and replace if
necessary.
Non-return valve leaking - disassemble non-return
valve, clean or replace if necessary.
Defective automatic pressure switch - have the
pressure switch checked and replaced if necessary.
Air filter blocked - clean filter.
Air leaks - check hoses and couplings.
Valves dirty or blocked - have compressor serviced.
Compressor may be too small for your application.
Air filter blocked - clean filter.
Insufficient ventilation - relocate compressor.
Low oil level - check oil.
Motor cooling fins dirty - clean compressor exterior.
Valves dirty or blocked - have compressor serviced.
Loose bolts - tighten.
Valve broken - have compressor serviced.
Bearings worn - have the bearings checked and
replaced if necessary.
9
Page 10
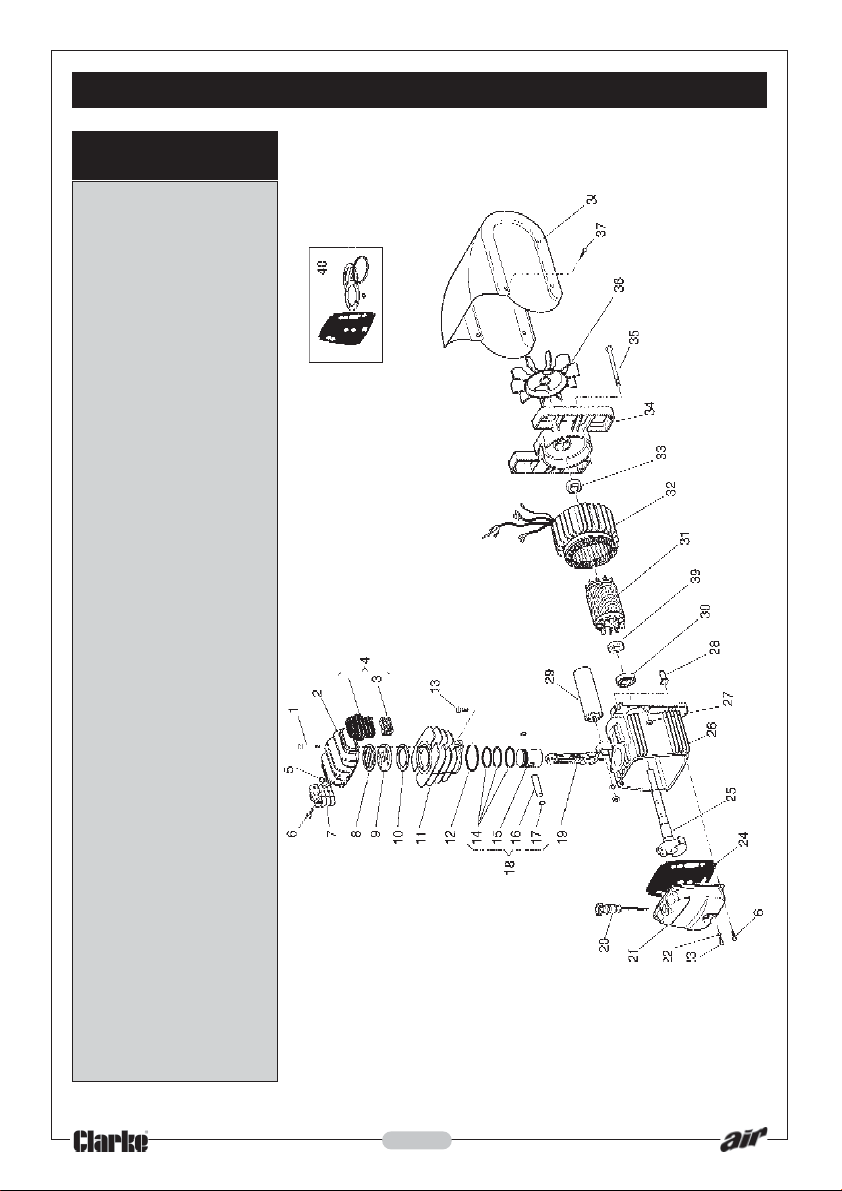
Parts List and Diagram (262)
Item Qty Part No.
1 4 FN014002021
2 1 FN016055040
3 1 FN116055043
4 1 FN317050000
5 1 FN010102000
6 6 FN014013021
7 1 FN116117020
8 1 FN116117002
9 1 FN116022100
10 1 FN116022010
11 1 FN116093002
12 1 FN010127000
13 2 FN014011064
14 1 FN216022002
15 1 FN116022004
16 1 FN116022040
17 2 FN015001000
18 1 FN416022004
19 1 FN116091021
20 1 FN012043000
21 1 FN016091002
22 1 FN010072000
23 1 FN014013024
24 1 FN116091011
25 1 FN116093003
26 1 FN116091001
27 2 FN014003002
28 1 FN008030000
29 1 FN009200035
30 1 FN033027000
31 1 FN116093005
32 1 FN416093601
33 1 FN033005000
34 1 FN116011002
35 2 FN116011038
36 1 FN116001003
37 2 FN014006121
38 1 FN116117015
39 1 FN010029000
40 1 FN216HZ0001
10
Page 11
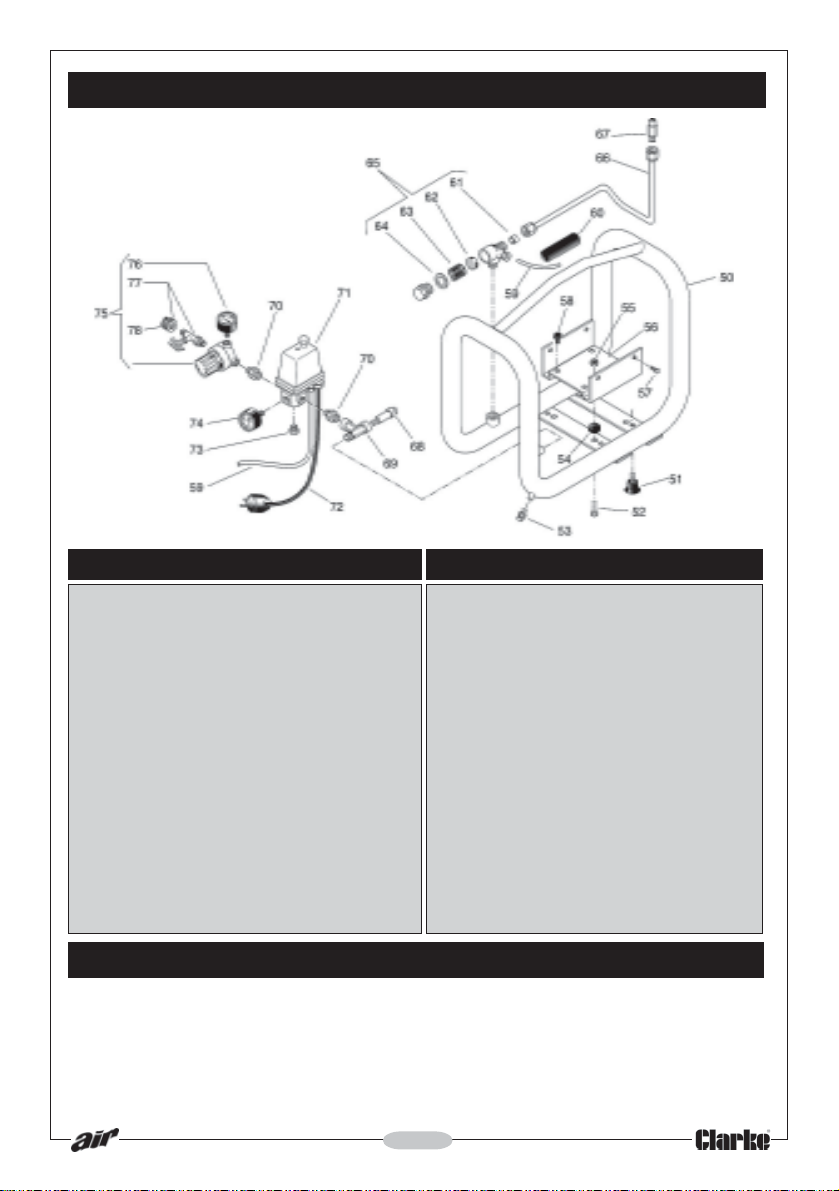
Parts List & Diagram (262)
No.Description Qty Part Number
50 Frame/Receiver 1 FN104HN0001V
51 Feet 4 FN020186000
52 Screw M6x20 4 FN014001023
53 Drain Valve 1 FN022020000
54 Antivibration Pads 4 FN169GQ0025
55 Nut M6 4 FN014004002
56 Support Plate 1 FN104HN0012
57 Screw M5x15 4 FN014013042
58 Antivibration Pads 4 FN199575000
59 Tube Rilsan 1 FN046001000
60 Grip 1 FN116022015
61 Seat 1 FN011117000
62 Valve 1 FN047159002
63 Spring 1 FN047159001
64 Washer 1 FN010113000
No. Description Qty Part Number
65 Non-Return Valve 1 FN347072000
66 Steel Tube 1 FN104HZ0010
67 Connector 1 FN011248000
68 Safety Valve 1 FN347022000
69 Adapter 1 FN011147000
70 Connector 2 FN011017000
71 Pressure Switch 1 FN321053000
72 Power Cable 1 FN172P05200
73 Plug 1 FN111001000
74 Pressure Gauge 1 FN330004000
75 Pressure Regulator 1 FN319013000
76 Output Press. Gauge 1 FN330006000
77 Outlet Tap w/QF Nut 1 FN322007000
78 Quick Fit Nut 1 FN116011065
Parts and Service Contacts
Please contact your nearest dealer, or CLARKE International, on one of the following numbers.
PARTS & SERVICE TEL: 020 8988 7400
PARTS & SERVICE FAX: 020 8558 3622
or e-mail as follows:
PARTS: [email protected]
SERVICE: [email protected]
11
Page 12
 Loading...