

Page 1
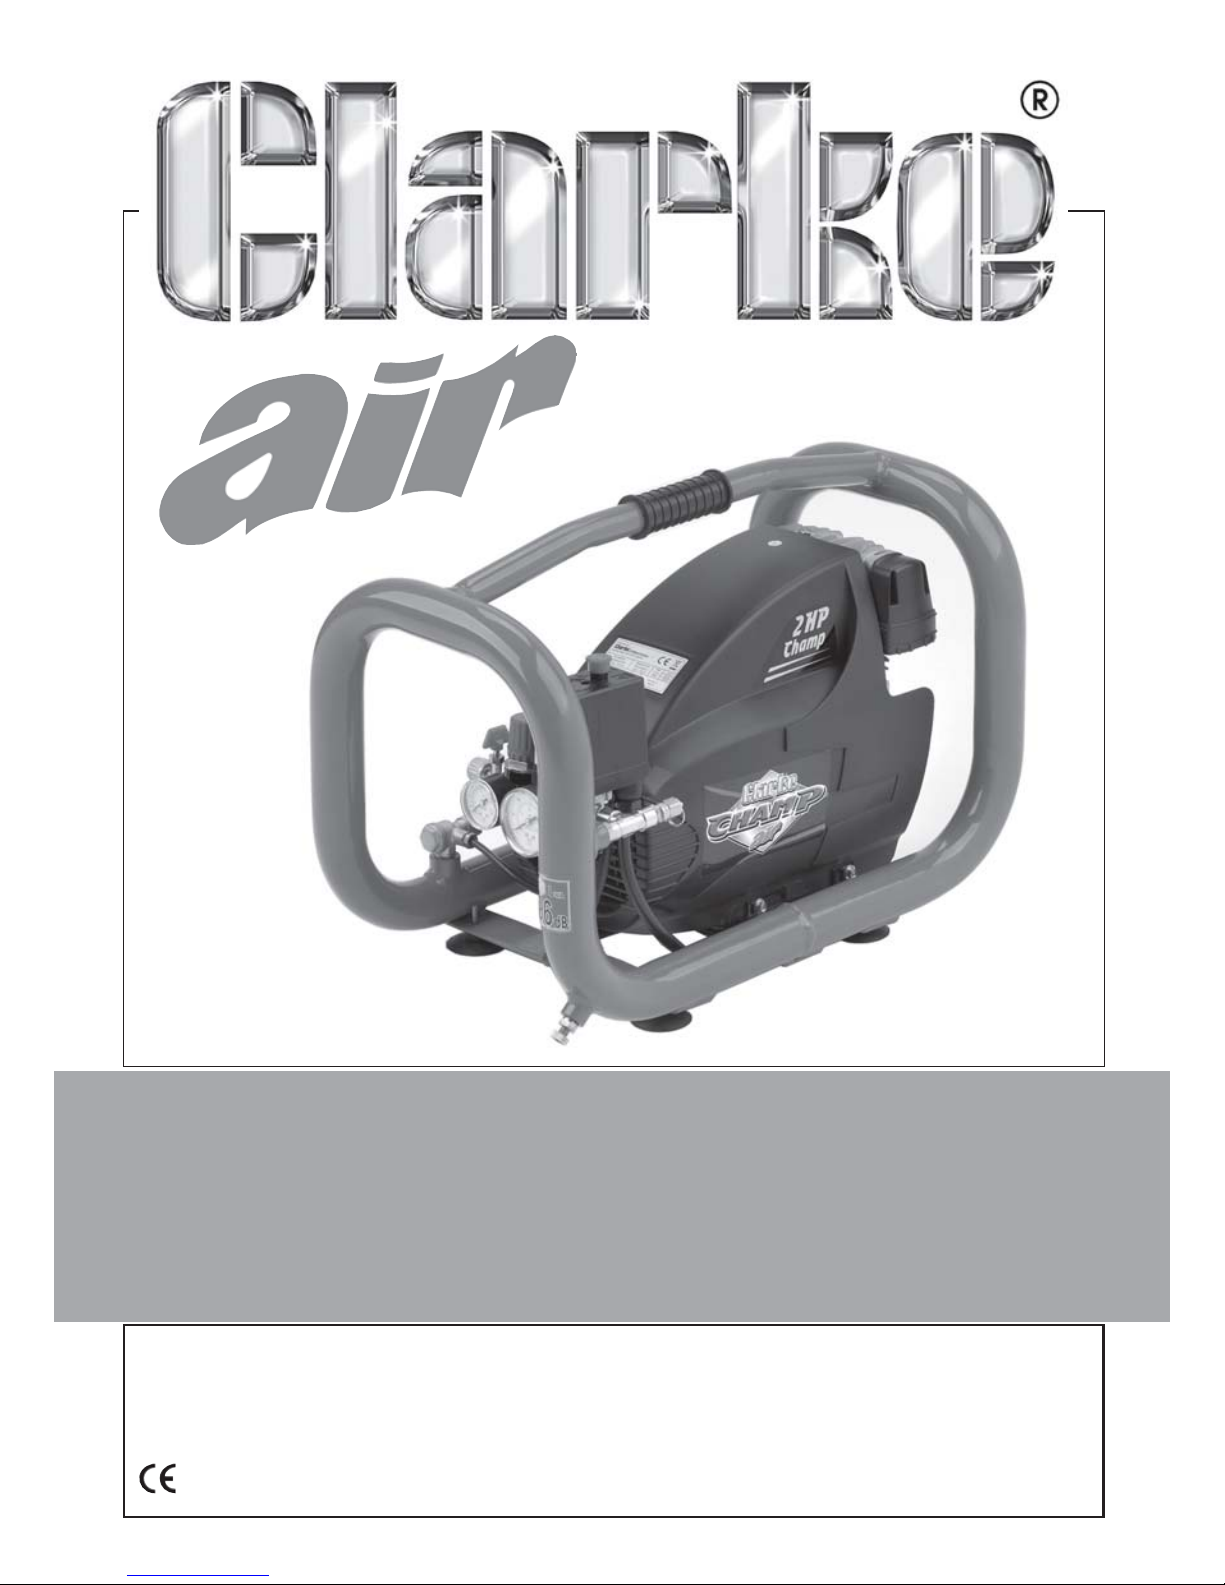
OPERATING & MAINTENANCE
INSTRUCTIONS
GC0611
AIR COMPRESSOR
Model: CHAMP
Part No: 2225220 (110V) & 2225215 (230V)
Page 2
2
INTRODUCTION
Thank you for purchasing this CLARKE compressor.
Before attempting to operate the compressor, it is essential that you read this
manual thoroughly and carefully follow all instructions given. In doing so you
will ensure the safety of yourself and that of others around you, and you can
also look forward to the compressor giving you long and satisfactory service.
GUARANTEE
This CLARKE product is guaranteed against faulty manufacture for a period of
12 months from the date of purchase. Please keep your receipt as proof of
purchase.
This guarantee is invalid if the product is found to have been abused or
tampered with in any way, or not used for the purpose for which it was
intended.
Faulty goods should be returned to their place of purchase, no product can
be returned to us without prior permission.
This guarantee does not effect your statutory rights.
ENVIRONMENTAL PROTECTION
Do not dispose of this product with general household waste. It must be
disposed of according to the laws governing Waste Electrical and
Electronic Equipment at a recognised disposal facility.
PARTS & SERVICE
For parts & Servicing, please contact your nearest dealer, or
CLARKE International, on one of the following numbers.
PARTS & SERVICE TEL: 020 8988 7400
PARTS & SERVICE FAX: 020 8558 3622
or e-mail as follows:
PARTS: [email protected]
SERVICE: [email protected]
Page 3

3
CONTENTS
Introduction ............................................................................................ 2
Guarantee .............................................................................................. 2
Environmental Protection ...................................................................... 2
Parts & Service ....................................................................................... 2
Accessories & Consumables ................................................................ 3
Table of Contents ................................................................................... 3
Accessories & Consumables ................................................................ 3
General Safety Precautions .................................................................. 4
Electrical Connections .......................................................................... 8
Safety Symbols ....................................................................................... 9
Overview .............................................................................................. 10
Preparation for Use .............................................................................. 11
Operating Instructions ......................................................................... 14
Maintenance ........................................................................................16
Troubleshooting .................................................................................... 18
Technical Specification ....................................................................... 19
Parts Lists and Diagrams ..................................................................... 20
Declaration of Conformity .................................................................. 23
ACCESSORIES & CONSUMABLES
A wide range of airline accessories is available, including Filter/Regulators.
Lubricators, High Pressure Hoses, Whip Hose etc. Contact your Clarke dealer
for further information.
IMPORTANT: The use of parts other than genuine Clarke replacement parts
may result in safety hazards, decreased tool performance, and will invalidate
your warranty.
Page 4

4
GENERAL SAFETY PRECAUTIONS
WORK AREA
1. Keep the work area clean and well lit. Floors should always be kept clear.
Cluttered or dark areas invite accidents.
2. Keep children and bystanders away while operating a power tool.
Distractions can cause loss of control.
3. The compressor should only be used in areas with adequate ventilation
and should not be exposed to heat or used near flammable substances.
PERSONAL SAFETY
1. ALWAYS stay alert, watch what you are doing and use common sense
when operating the compressor. Do not use the compressor while you are
tired or under the influence of medication, drugs or alcohol. A moment of
inattention can result in personal injury.
2. ALWAYS use eye protection when operating compressed air equipment,
and ensure that others in the work area are protected from flying particles
from the front and from the side.
3. ALWAYS protect yourself against electric shock. Never operate the
compressor in wet or damp locations.
4. NEVER over-reach. Keep your proper footing and balance at all times to
enable better control of the compressor in unexpected situations.
5. NEVER attempt any complex repairs yourself. If you have a technical
problem contact your local Clarke dealer.
6. ALWAYS store the compressor out of reach of children.
7. ALWAYS protect your hearing. Ear protection should be worn when
operating this compressor and it’s associated air driven power tools.
8. NEVER direct the air stream at people or animals, as injury may result.
Compressed air can cause soft tissue damage and propel dirt and other
particles at high speed.
9. NEVER touch hot surfaces. During operation, the motor, connections,
compressor body, cylinder head and tubes may get hot. Do not touch
these until the compressor has cooled down.
10. NEVER insert your fingers or other objects inside the motor housing. Never
operate the compressor without the cover in place.
GENERAL MACHINE USE AND CARE
1. Prior to use, all operators should become familiar with the instructions in
this booklet. In particular, become familiar with the ON/OFF control for
emergency stopping.
Page 5

5
2. ALWAYS maintain the compressor with care and keep it clean for best /
safest performance.
3. NEVER use this compressor if any part is damaged. Have it inspected and
repaired by your Clarke dealer.
4. NEVER attempt to modify the compressor or its components in any way.
Doing so will invalidate the guarantee and could result in personal injury.
5. NEVER abuse the power cable. Never pull on the cable when removing
the plug from the socket or lift the compressor by the power cable.
6. ONLY use extension leads that are of an appropriate power rating and
suitable for the work environment. Extension leads must have an earth
connection. Inspect the extension lead regularly and replace if damaged.
7. ONLY USE RECOMMENDED PARTS: To avoid the risk of bursting, only hoses
with a rated pressure of 10 bar, or more should be used. Never attempt to
repair damaged hoses.
8. NEVER abuse the compressor by standing on it.
AIRLINE HOSES
1. ALWAYS ensure that equipment or power tools used in conjunction with the
compressor have a safe working pressure exceeding that of the machine.
2. ALWAYS keep the air hose away from any attached power tools and
ensure that the operator is not restricted by the length of the hose.
3. ALWAYS take care when a long air hose is required in the work area as it
presents a trip hazard. Coil the hose away as soon as the job is finished.
4. ALWAYS avoid kinking or trapping the air hose. Always replace faulty hoses
- never attempt a repair if a leak is detected.
5. NEVER abuse hoses or connectors. NEVER carry an air tool by the hose, or
yank it to disconnect from the air supply. Keep hoses away from heat, oil
and sharp edges. Check hoses for leaks or worn condition before use, and
ensure that all connections are secure.
6. ALWAYS ensure the air supply is turned off at the machine outlet and any
air pressure vented from within the compressor and any attached
equipment when disconnecting air hoses or other equipment.
Page 6

6
AIR COMPRESSOR SAFETY INSTRUCTIONS
1. ONLY USE WITHIN THE RECOMMENDED OPERATING TEMPERATURE RANGE:
This compressor should only be used in an ambient temperature of
between +5OC and +40OC (never at, or below freezing temperatures).
2. NEVER USE AN AIR COMPRESSOR WHICH APPEARS DEFECTIVE OR IS
OPERATING ABNORMALLY: If the compressor operates unusually or makes
strange noises, switch off immediately and purge the air reservoir. Arrange
repairs with your nearest Clarke dealer.
3. BREATHING QUALITY AIR: This compressor should not be used to supply
breathing quality air.
4. SAFETY VALVE: Never remove or attempt to adjust the safety valve. The
maximum pressure is factory set. Keep the safety valve free from paint
and other accumulations.
5. AVOID UNINTENTIONAL STARTING: Do not move the air compressor when it
is connected to the mains power supply. When connecting the
compressor to the power supply make sure the red button on top of the
compressor control box is in the OFF (down) position.
6. BEFORE EACH USE CHECK THE COMPRESSOR AND HOSE FOR DAMAGED
PARTS: Never use the compressor if it has been damaged in any way.
Have the compressor repaired by a qualified service engineer. Do not use
the compressor if the On/Off switch does not operate correctly.
7. KEEP THE MOTOR AIR VENT CLEAR: Keep the motor vents clear and free
from dust. Wipe regularly to maintain an adequate supply of clean air to
the compressor. Avoid using in dusty conditions.
8. OPERATE THE COMPRESSOR AT THE CORRECT VOLTAGE: Make sure that the
mains supply voltage is the same as the voltage shown on the label.
9. DRAIN AIR RESERVOIR: Drain the air reservoir routinely. Switch off and slowly
open the drain valve to release the air then tilt the compressor to empty
any condensed water.
10. ALWAYS adjust the pressure regulator to the recommended setting for the
particular spray gun or air tool being used.
11. WHEN USING THE COMPRESSOR FOR PAINTING:
• Do not work in enclosed areas or near naked flames.
• Ensure that the area in which you are working has good ventilation.
• Protect your nose and mouth with a suitable face mask.
• Always check the safety data sheets for substances being sprayed
& ensure manufacturers instructions are followed.
12. DO NOT USE THIS COMPRESSOR TO INFLATE SMALL, LOW-PRESSURE OBJECTS:
Items such as children's toys or footballs can explode if over-inflated.
13. NEVER STOP THE COMPRESSOR BY REMOVING THE PLUG OR SWITCHING OFF
AT THE MAINS SUPPLY: Always use the On/Off switch on the compressor.
Page 7

7
SERVICING & STORAGE
1. TURN OFF THE COMPRESSOR WHEN NOT IN USE: When not in use, turn off by
depressing the On/Off switch, then remove the plug from the mains
supply. Slowly undo the drain valve to release the pressure from the
reservoir. Close the drain valve before storage and ensure it is fully
tightened before use.
2. MOVING THE COMPRESSOR: Always transport the compressor by lifting it by
the handle.
3. CLEANLINESS AND CONDITION OF THE COMPRESSOR: Keep the external
surfaces of the reservoir clean. Avoid impact damage and do not allow
the reservoir to come into contact with abrasive or corrosive materials.
4. DO NOT WIPE THE PLASTIC PARTS WITH SOLVENT: Do not use solvents or
thinners such as petrol, benzene, carbon tetrachloride or alcohol to clean
the compressor, as these chemicals will damage the finish. With the
compressor unplugged from the supply, use a dry cloth to wipe over the
plastic casing.
5. STORE THE COMPRESSOR PROPERLY: When not in use the compressor
should be stored in a secure, dry place, out of the reach of children.
Always lock the storage area. DO NOT leave it exposed to the elements
and avoid direct sunlight, direct heat, rain/moisture etc.
6. ONLY USE PARTS AND ACCESSORIES RECOMMENDED IN THIS MANUAL: The
use of unauthorised accessories or attachments is not permitted and may
result in personal injury or damage to the compressor. Do not attempt to
repair or modify the compressor.
Page 8
8
ELECTRICAL CONNECTIONS
WARNING! Read these electrical safety instructions thoroughly
before connecting the product to the mains supply.
Before switching the machine on, ensure that the voltage of your electricity
supply is the same as that indicated on the rating plate. Connecting to any
other power source may cause damage.
• Model 2225220 requires an earthed 110Vac 50Hz power supply.
• Model 2225215 requires a domestic 230Vac 50Hz power supply.
This product may be fitted with a non-rewireable plug. If it is necessary to
change the fuse in the plug, the fuse cover must be refitted. If the fuse cover
becomes lost or damaged, the plug must not be used until a suitable
replacement is obtained.
If the plug has to be changed because it is not suitable for your socket, or
due to damage, it should be cut off and a replacement fitted, following the
wiring instructions shown below. The old plug must be disposed of safely, as
insertion into a mains socket could cause an electrical hazard.
WARNING! The wires in the power cable of this product are
coloured in accordance with the following code:
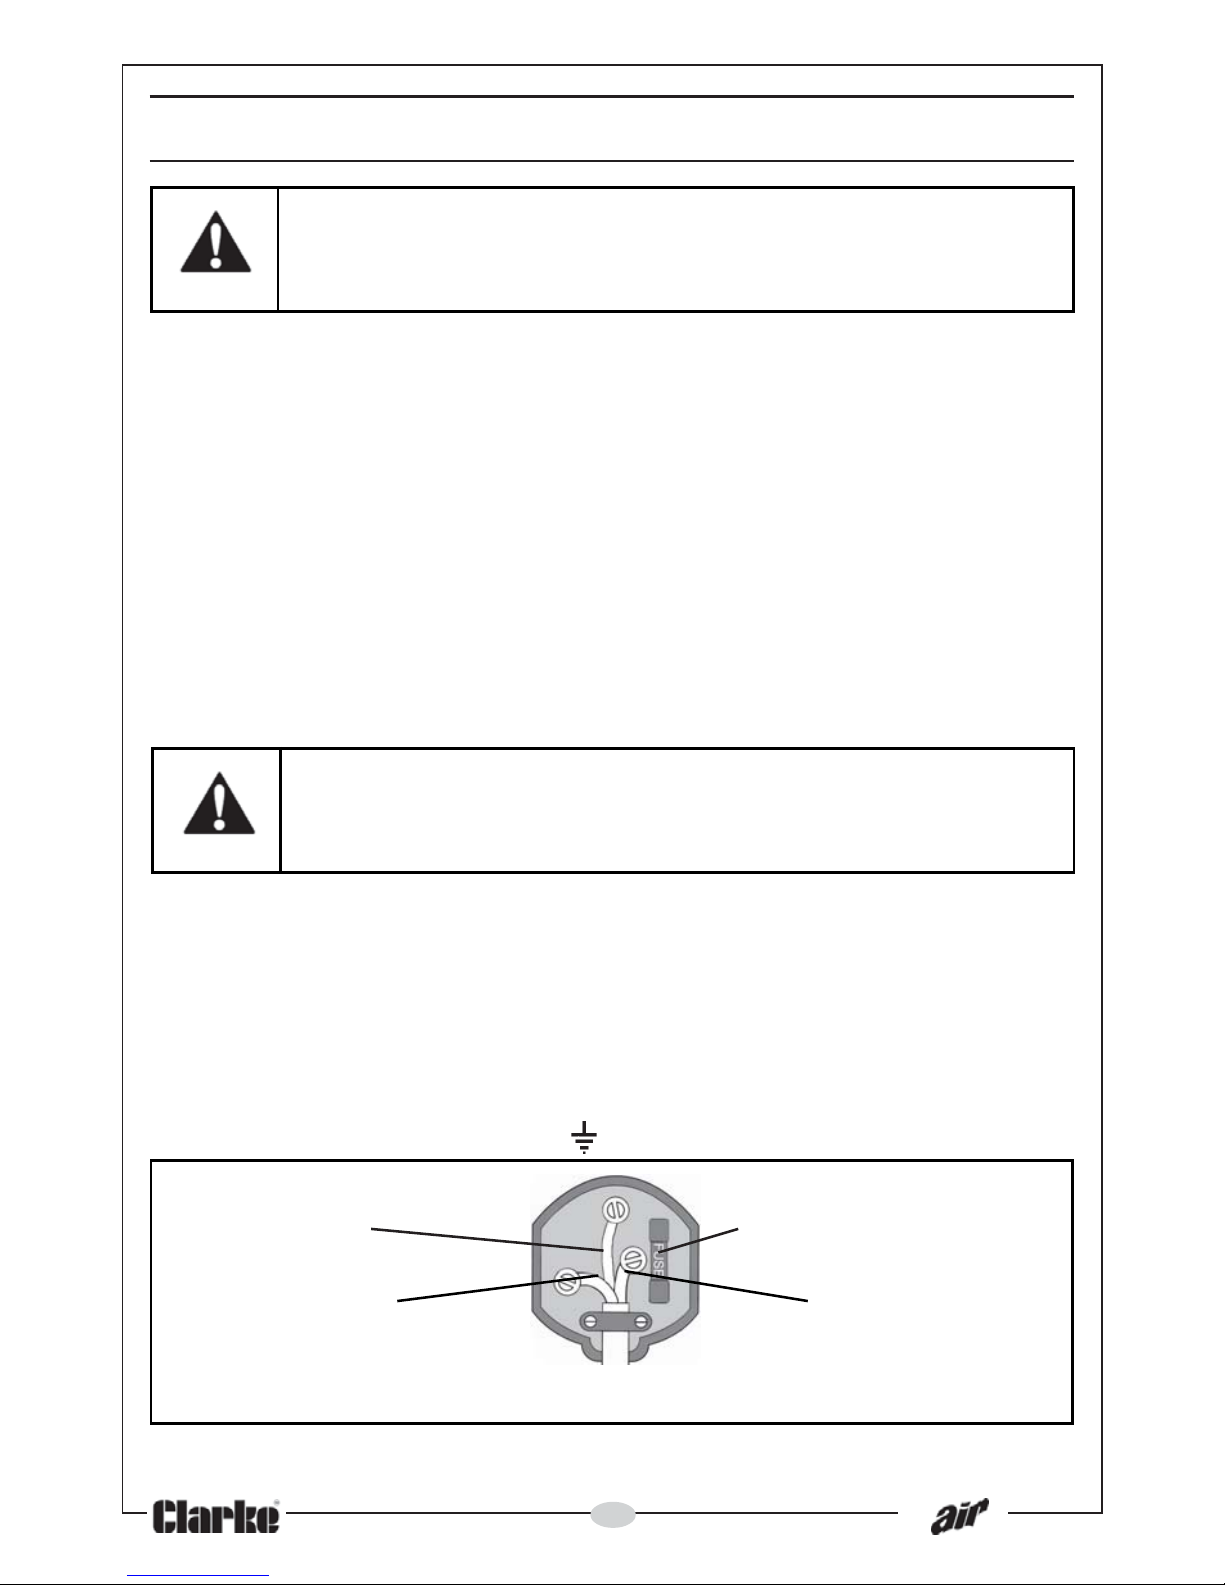
Blue = Neutral Brown = Live Yellow and Green = Earth
If the colours of the wires in the power cable of this product do not
correspond with the terminal markings of your plug, proceed as follows.
The wire which is coloured Blue must be connected to the terminal which
is marked N or coloured Black.
• The wire which is coloured Brown must be connected to the terminal
which is marked L or coloured Red.
• The wire which is coloured Yellow and Green must be connected to the
terminal which is marked E or or coloured Green.
Plug must be BS1363/A approved
Earth Always fit a 13 Amp fuse.
(Green and Yellow)
Neutral Live
(Blue) (Brown)
Ensure that the outer sheath of the cable is firmly held by the clamp
We strongly recommend that this machine is connected to the mains supply
via a Residual Current Device (RCD).
Page 9
9
In the case of model 2225220, connect the mains lead to a suitable 110V
(50Hz) electrical supply through an approved plug or suitably fused isolator
switch. If using a portable 110V transformer, make sure it has a rated capacity
sufficient to take the load of the compressor.
If in doubt, consult a qualified electrician. DO NOT attempt repairs yourself.
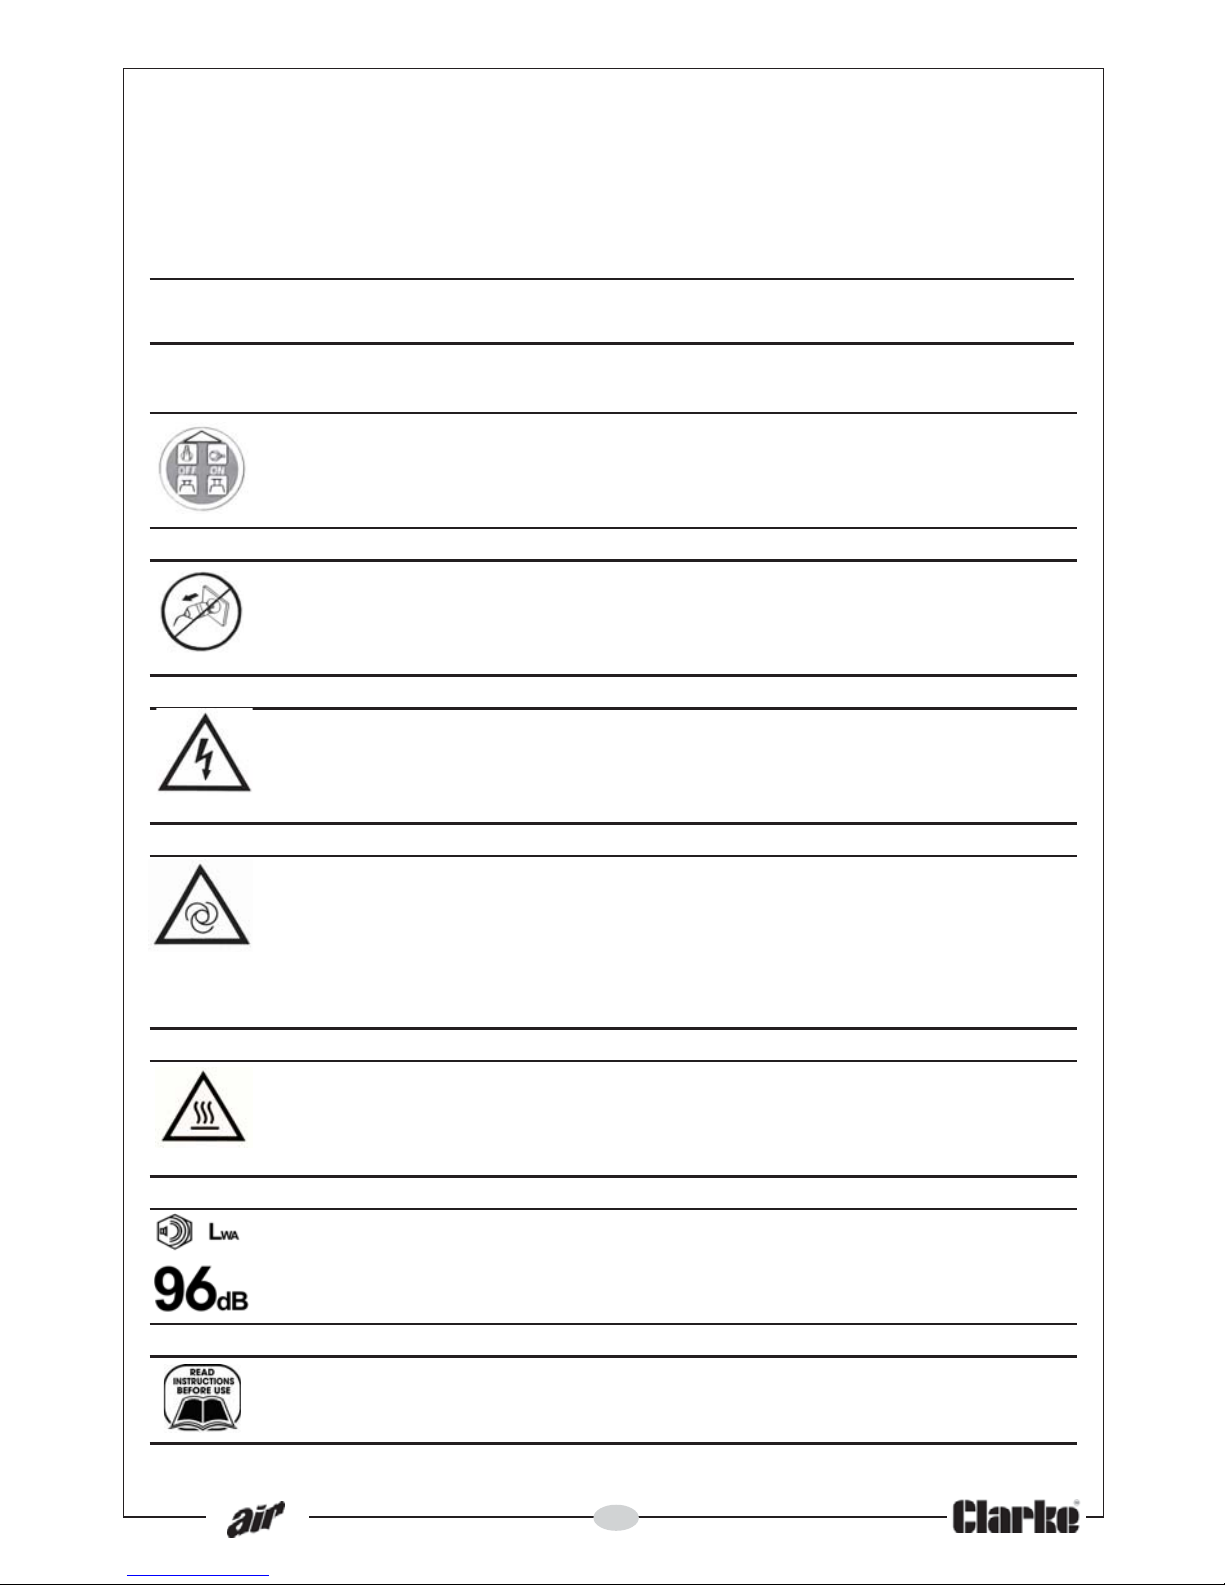
SAFETY SYMBOLS
The following safety symbols are present on the machine:
THIS COMPRESSOR SHOULD ALWAYS BE STARTED OR STOPPED BY MEANS
OF THE START/STOP BUTTON LOCATED ON THE CONTROL BOX. THIS
REDUCES THE RISK OF ACCIDENTAL START-UP.
THIS COMPRESSOR SHOULD NEVER BE STOPPED SUDDENLY BY
UNPLUGGING FROM THE MAINS SUPPLY. THIS INCREASES THE RISK OF
ACCIDENTAL START-UP. NEVER ABUSE THE POWER CABLE
RISK OF ELECTRIC SHOCK. THE COMPRESSOR MUST BE DISCONNECTED
FROM THE MAINS SUPPLY BEFORE REMOVING ANY COVERS. DO NOT
USE IN A DAMP ENVIRONMENT.
RISK OF ACCIDENTAL START-UP. THE COMPRESSOR COULD START
AUTOMATICALLY IN THE EVENT OF A POWER CUT AND SUBSEQUENT
RESET. DO NOT CARRY THE COMPRESSOR WHILE IT IS CONNECTED TO
THE POWER SOURCE, OR WHEN THE TANK IS FILLED WITH COMPRESSED
AIR.
THIS COMPRESSOR INCORPORATES SURFACES WHICH MAY REACH A
HIGH TEMPERATURE DURING OPERATION. NEVER OPERATE WITH THE
MOTOR COVER REMOVED.
THIS COMPRESSOR MAY PRODUCE A HIGH SOUND LEVEL DURING
OPERATION. EAR PROTECTION SHOULD BE WORN.
READ THIS MANUAL BEFORE USE.
Page 10
10
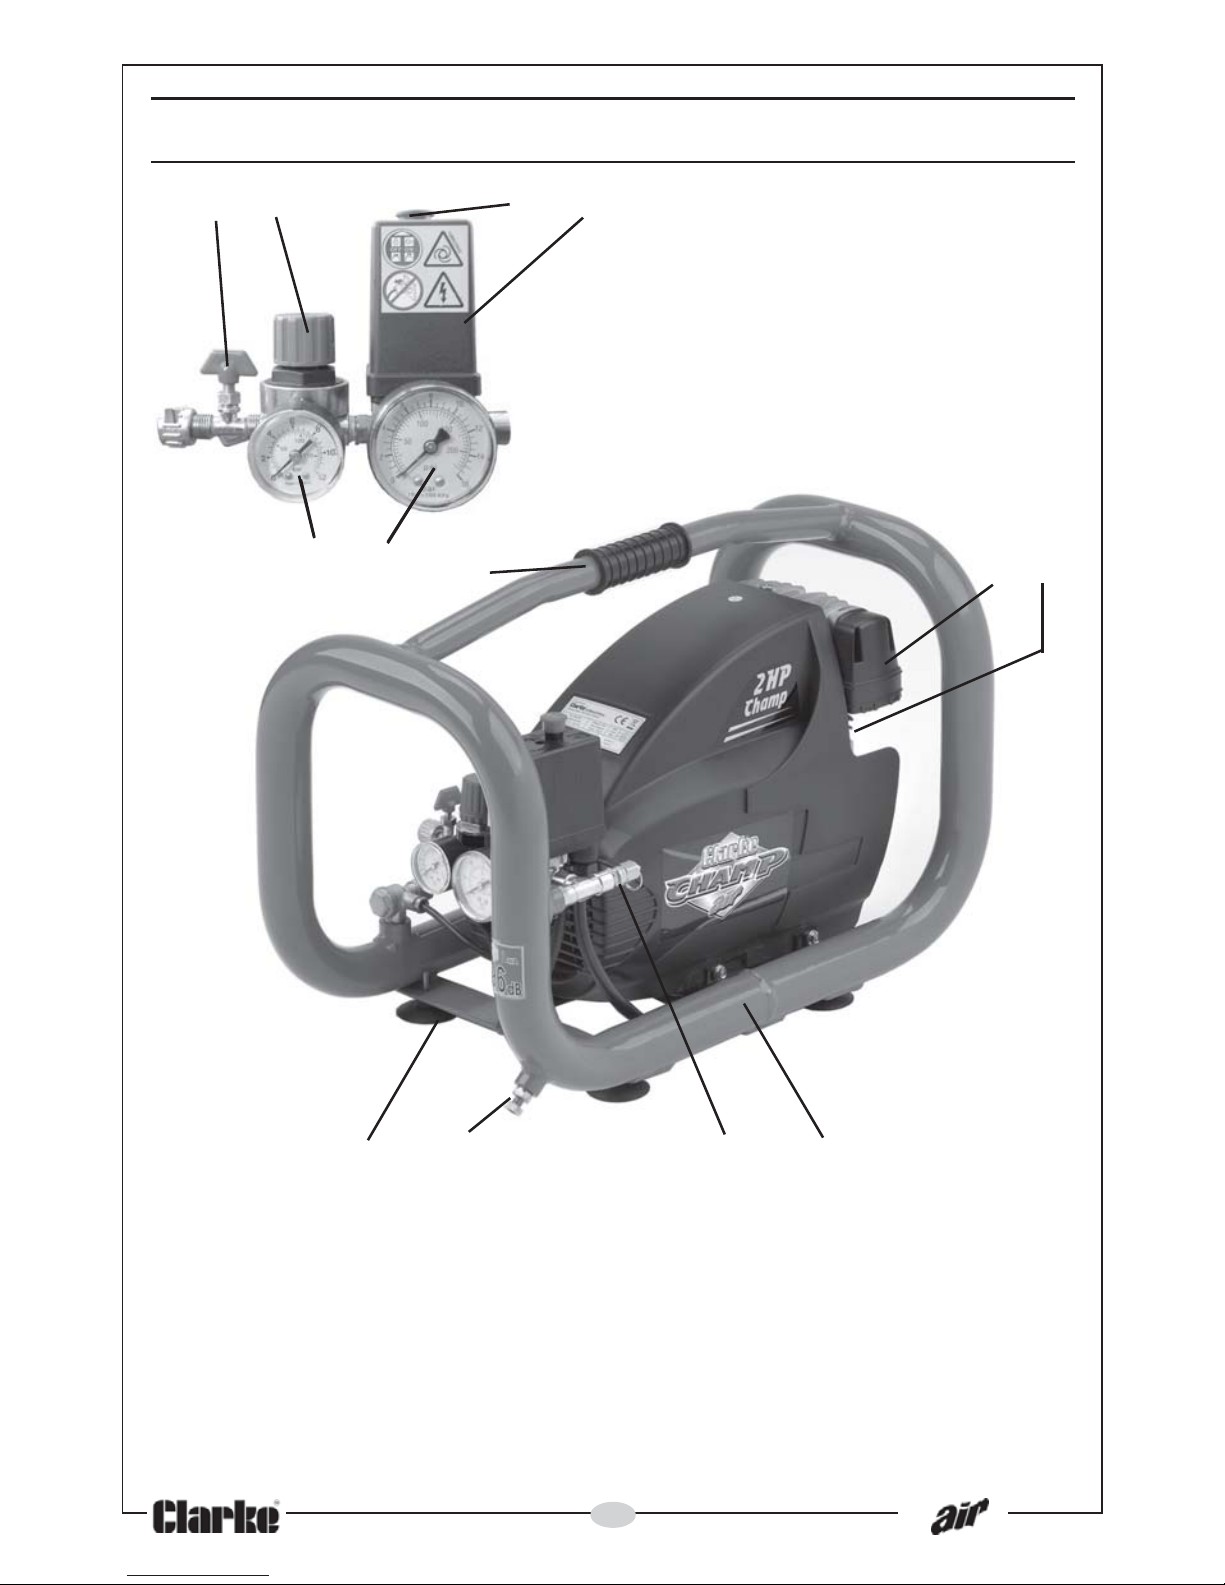
OVERVIEW
1 Shut-off valve 8. Oil filler/dipstick
2 Output pressure regulator 9. Anti-vibration feet
3. ON/OFF switch 10. Drain valve
4. Delivery pressure gauge 11. Compressed air reservoir
5. Reservoir pressure gauge 12. Pressure safety valve
6. Handle 13. Pressure control switch
7. Air filter
1 2 3 13
4 5 6 7 8
9 10 12 11
Page 11

11
PREPARATION FOR USE
WARNING: Before using the compressor, make sure that you have
read and understood the safety instructions.
UNPACKING
Take care when lifting the compressor from the packaging and get
assistance if necessary to avoid personal injury or damage to the machine.
Always lift using the handle and frame.
Caution! Never take the weight of the compressor by the regulator /pressure
control switch. Get assistance if necessary.
After removing the compressor from its packaging, check that it has not
been damaged in transit.
POSITIONING THE COMPRESSOR
This compressor should be positioned on a stable, flat surface.
Note: the compressor should not be operated on a steep slope or floor
angle of greater than 15O.
If the compressor is placed on a shelf or raised off the ground, it should be
secured appropriately to prevent it from falling off during use.
Do not cover the compressor. Always position it with good all-round air
ventilation.
MOVING THE COMPRESSOR
When moving the compressor;
• Always use the handle.
• Do not lift by (or place a strain on) the air regulator fittings, hose or
cables.
• Take care when moving the compressor to avoid damaging the
valves or fittings.
• Always switch it off and disconnect it from the mains power supply.
CONNECTION AND START UP
Before connecting your compressor to the mains supply, check the
following:-
• The supply voltage must be 110V (Champ 110 V - Part No; 2225220)
or 230V (Champ 230 V - Part No; 2225215).
• The ON/OFF switch is in the OFF (depressed) position.
Page 12
12
• The pressure regulator should
be set at its lowest setting, i.e.
turned fully anticlockwise. (- &
+ arrows are shown on the
knob)
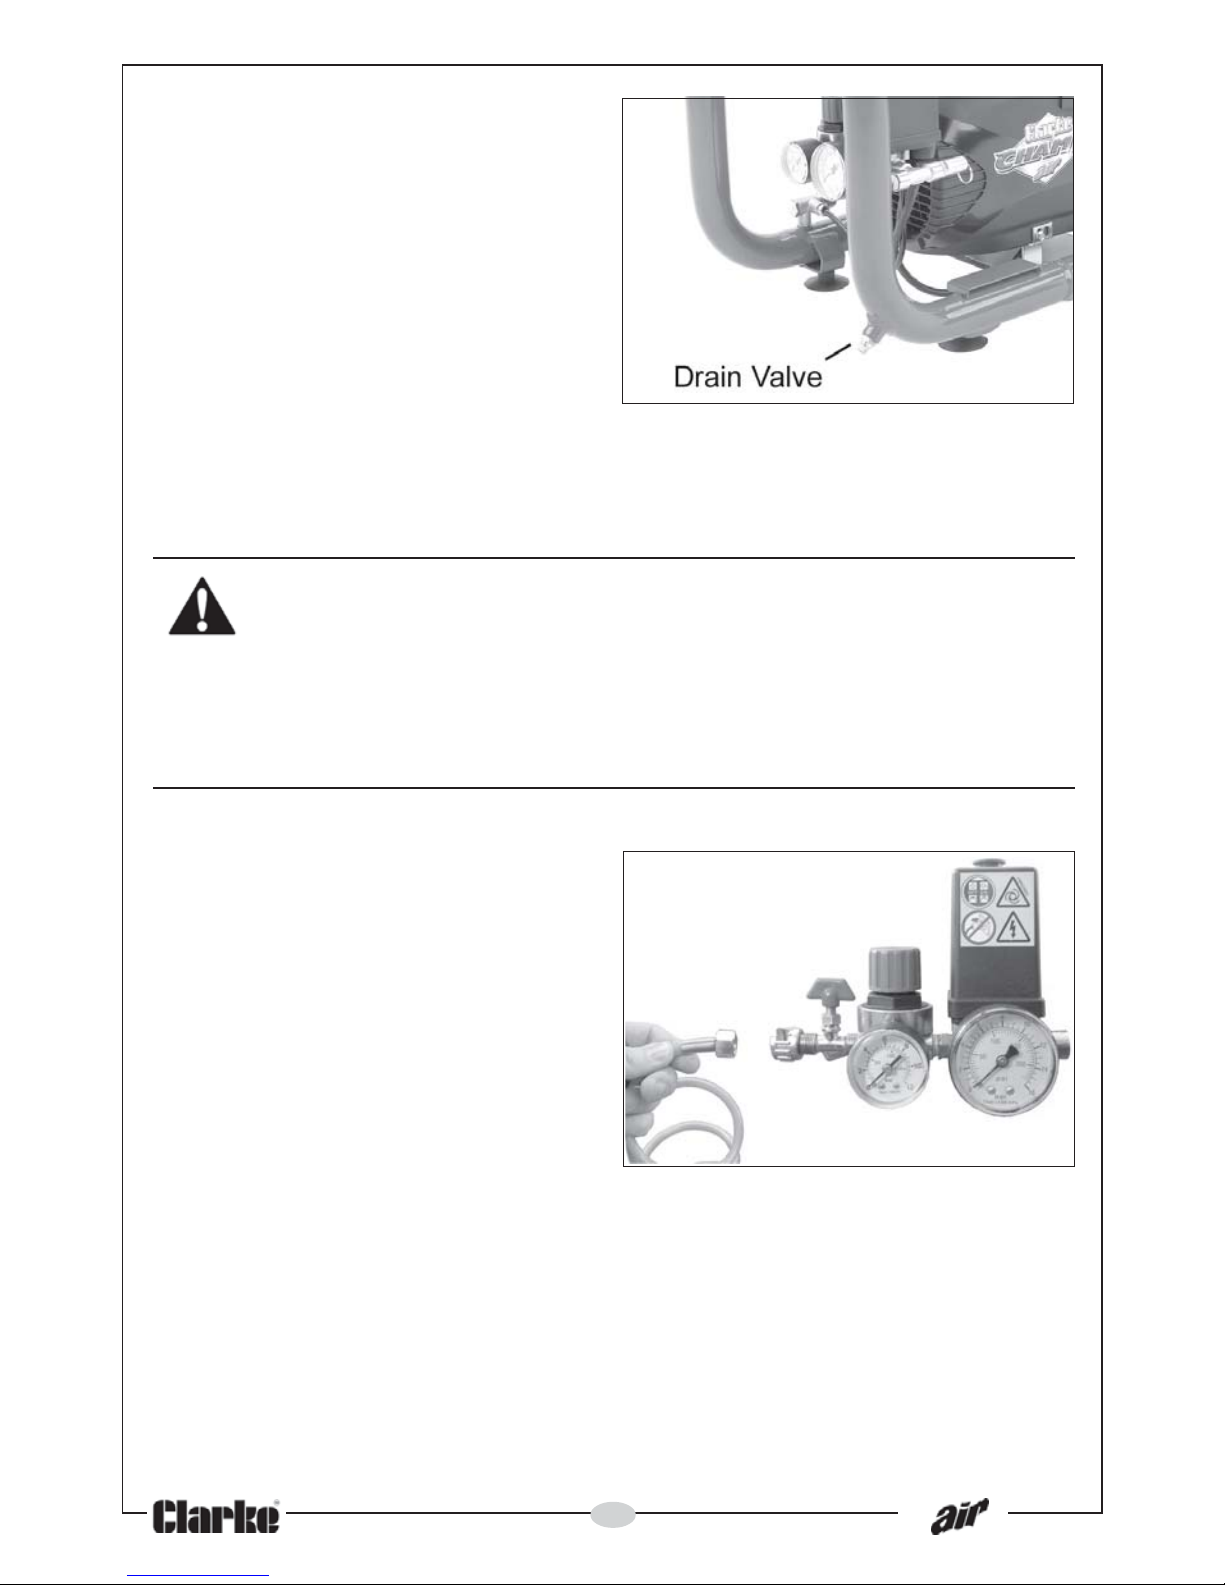
• If the compressor has not been
used recently, open the drain
valve shown in Fig 1 to drain
any condensate which may
have accumulated. When
clear, close the valve, finger
tight.
IMPORTANT: If the receiver is under pressure, keep your hands well away from
the air being expelled. Remember, compressed air is DANGEROUS!
WARNING! BEFORE CONNECTING ANY AIR TOOL, MAKE SURE YOU
HAVE READ AND FULLY UNDERSTOOD THE MANUFACTURER’S
INSTRUCTION BOOKLET FOR THE AIR TOOL BEING USED. ALSO ENSURE
THAT THE AIR TOOL IS COMPATIBLE WITH THE COMPRESSOR AND HOSE
SPECIFICATIONS.
IF THE PRESSURE RATING OF THE TOOL IS LESS THAN 10 BAR, THE
PRESSURE REGULATOR MUST BE USED TO ADJUST THE OUTPUT PRESSURE.
1 Connect a suitable air hose to the
compressor outlet and the other
end to the equipment to be used.
2. Attach the air hose to the air
outlet using the hose nut as shown
in Fig 2.
3. Ensure that the drain valve is
closed finger tight as above.
4. Ensure the ON/OFF switch is in the
OFF position, i.e. pushed down,
then plug in the machine and
switch ON at the mains supply.
Fig 1
Fig 2
Page 13
13
CHECKING THE OIL
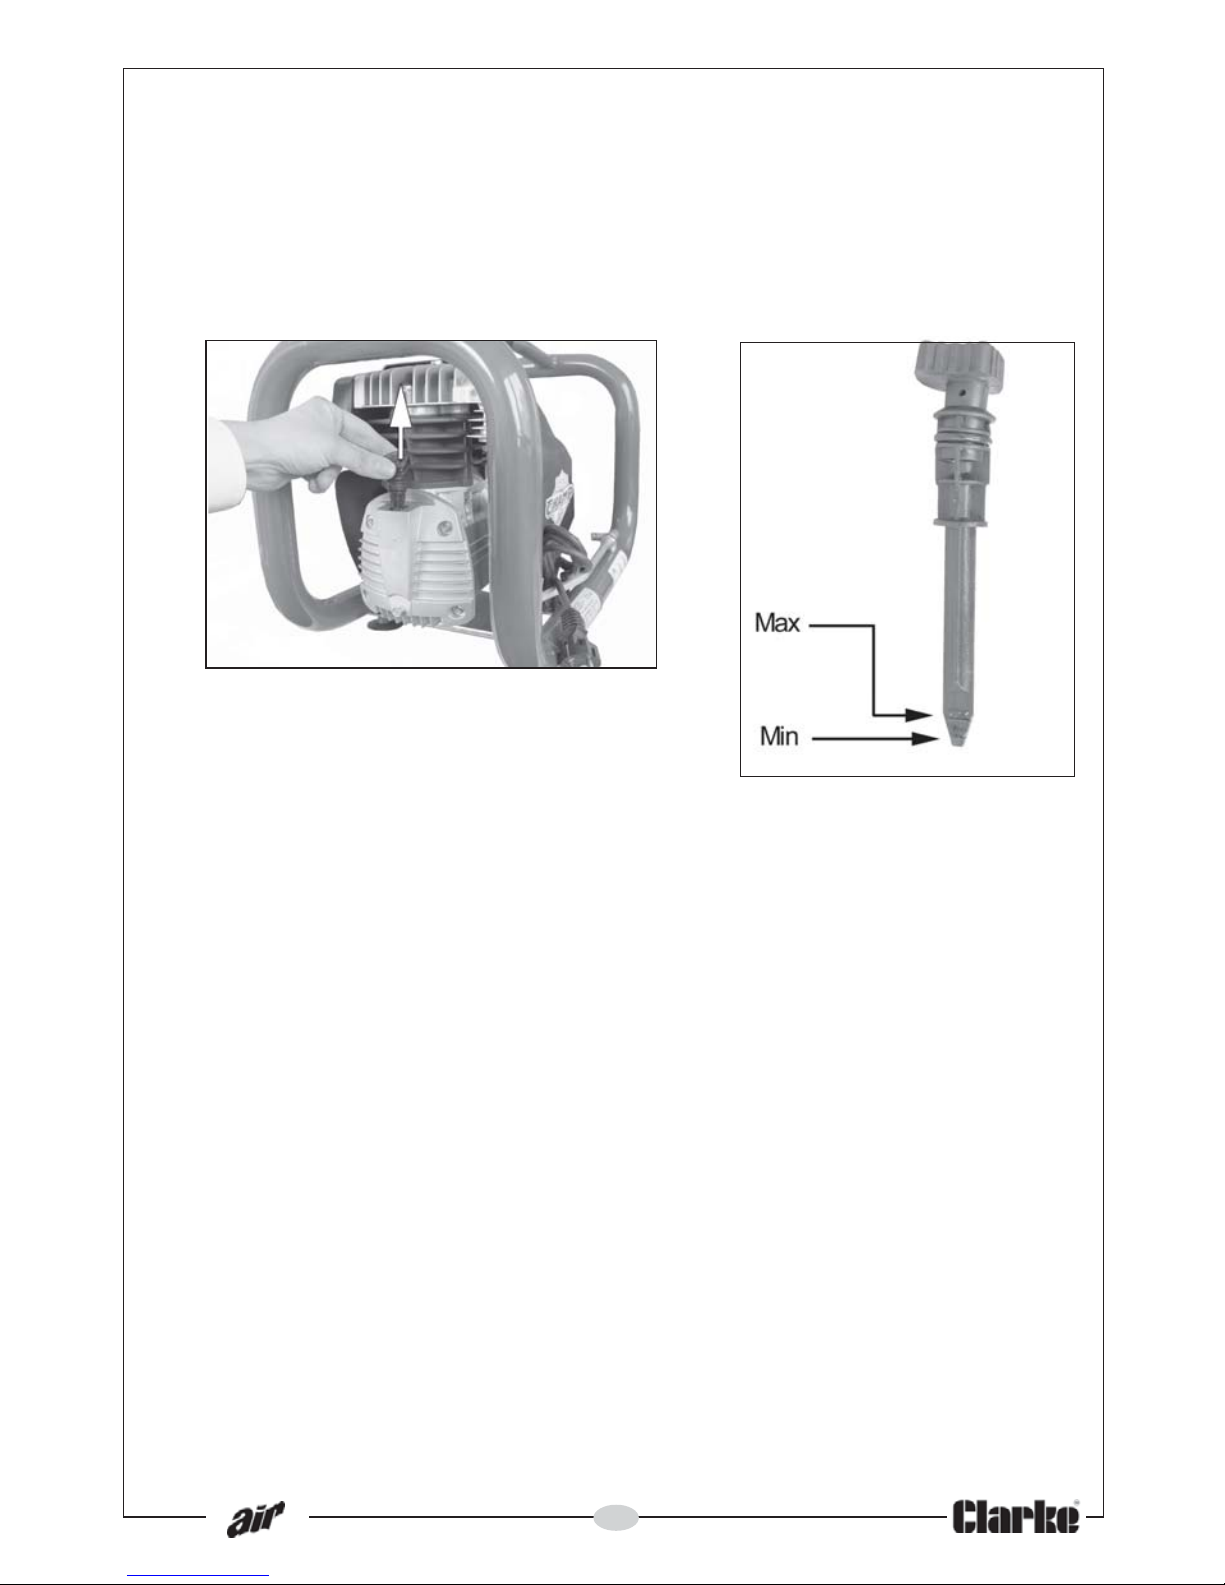
1. Remove dipstick as shown in Fig 3 and check the level of oil is between
the MAX and MIN marks as shown in Fig 4. If not, top up to the correct
level with Clarke SAE40 compressor oil available from your Clarke dealer.
2. After the first 5 working hours, replace the oil as described under
MAINTENANCE on page 16.
Fig 3
Fig 4
Page 14
14
OPERATING INSTRUCTIONS
STARTING THE COMPRESSOR
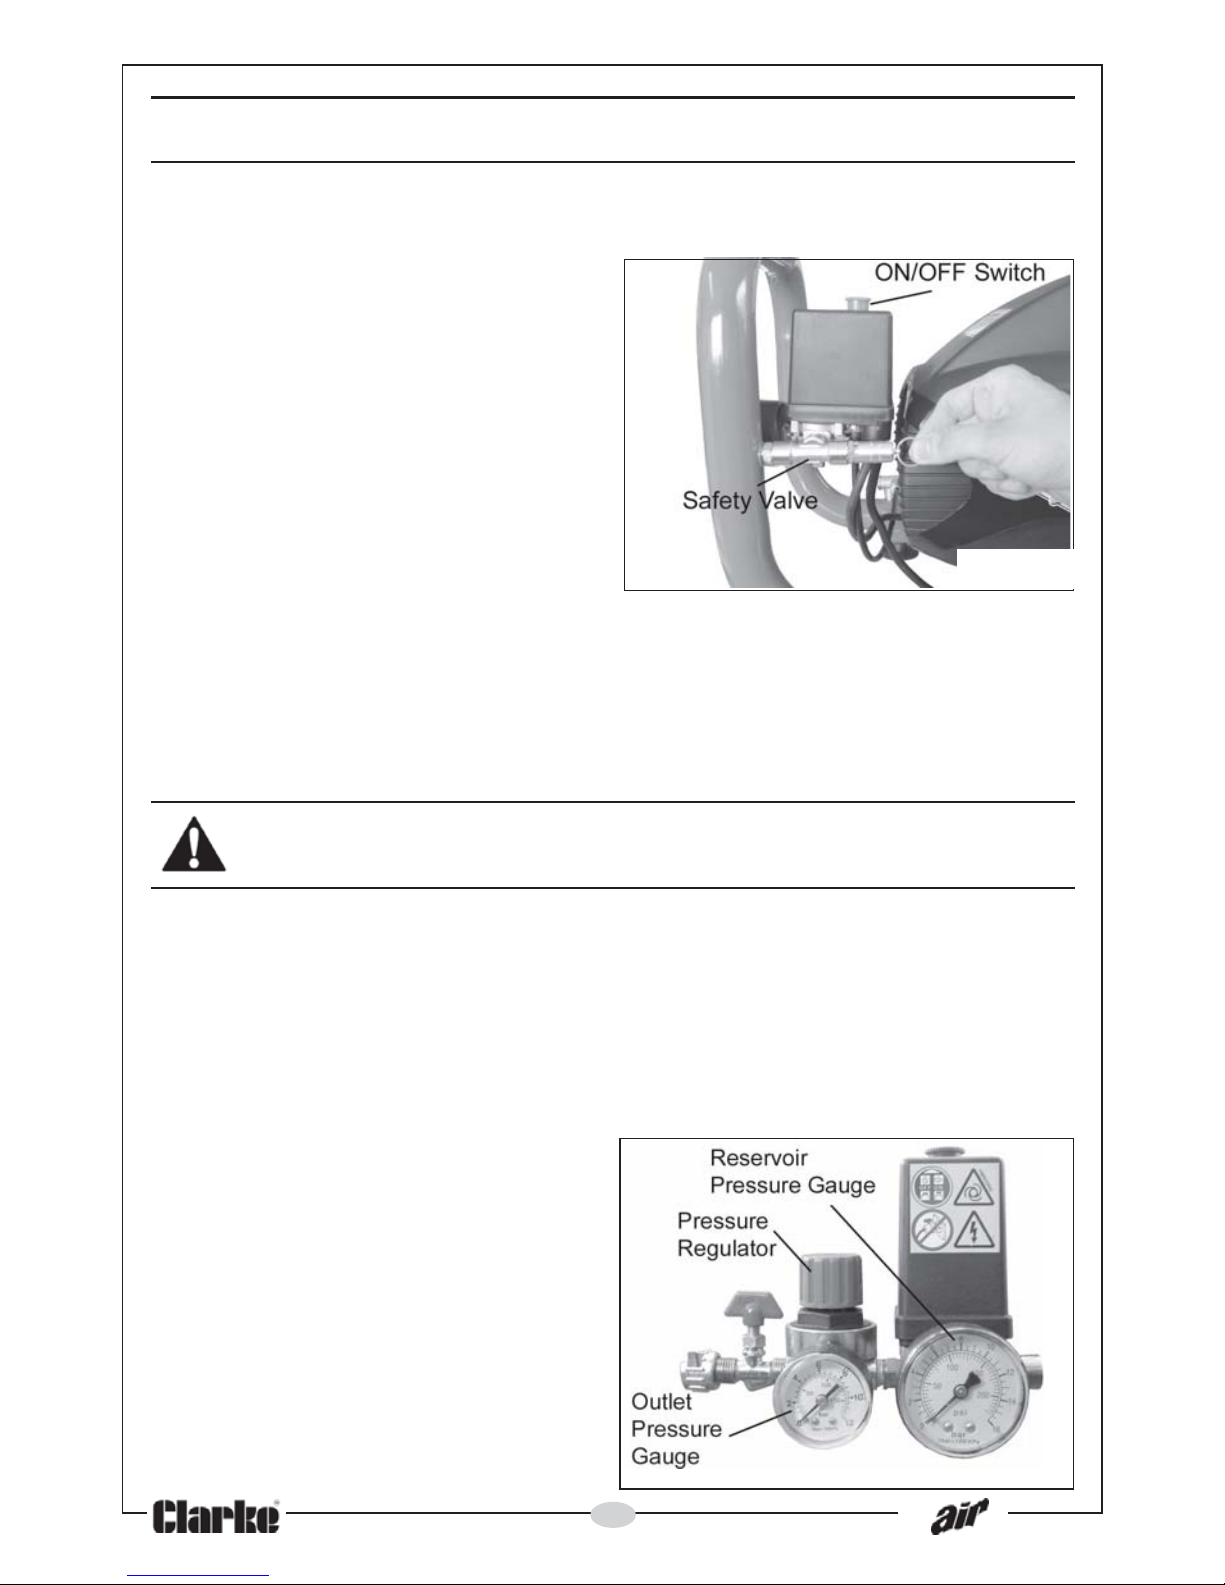
1. Pull the ON/OFF switch shown in
Fig 5, upwards to start the
compressor. The motor should
start immediately and run while
the reservoir is being pressurised.
2. When starting the compressor for
the first time and before
connecting it to the airline
equipment, leave it running for
about 10 minutes to permit a
good distribution of lubricating
oil.
3. Check the operation of the safety valve under pressure on a daily basis by
pulling the ring shown in Fig 5. Air should be released while the ring is
pulled and stop when the ring is released.
• If the valve does not operate as described, or is stuck, it must be
replaced by your Clarke dealer before the compressor is used.
WARNING: Never remove or attempt to adjust the safety valve.
• Observe that the compressor stops automatically when the
maximum pressure of 10 bar is reached. The pressure is indicated on
the reservoir pressure gauge shown in Fig 6.
WORKING PRESSURE ADJUSTMENT
Different air tools which can be powered by the compressor will require
different operating pressures to work efficiently.
1. Adjust the air pressure delivered
using the pressure regulator.
2 Turn the pressure regulator knob
clockwise to increase pressure &
anti-clockwise to decrease it.
• The pressure setting will be
displayed by the outlet pressure
gauge shown in Fig 6.
3. Use the regulator locking ring to
set the pressure.
Fig 5
Fig 6
Page 15
15
NORMAL RUNNING
The compressor is fitted with a combined ON/OFF pressure control switch
whose cut-in and cut-out pressures are factory set.
When the reservoir pressure falls below the minimum threshold setting, (about
2-bar lower than the maximum pressure) the compressor will re-start and will
cut out when the maximum reservoir pressure is achieved.
Note: If the machine pumps continuously without intermittently switching on
and off, the compressor is too small for the demand of the application/tool
being used and damage could result. Consult your Clarke dealer.
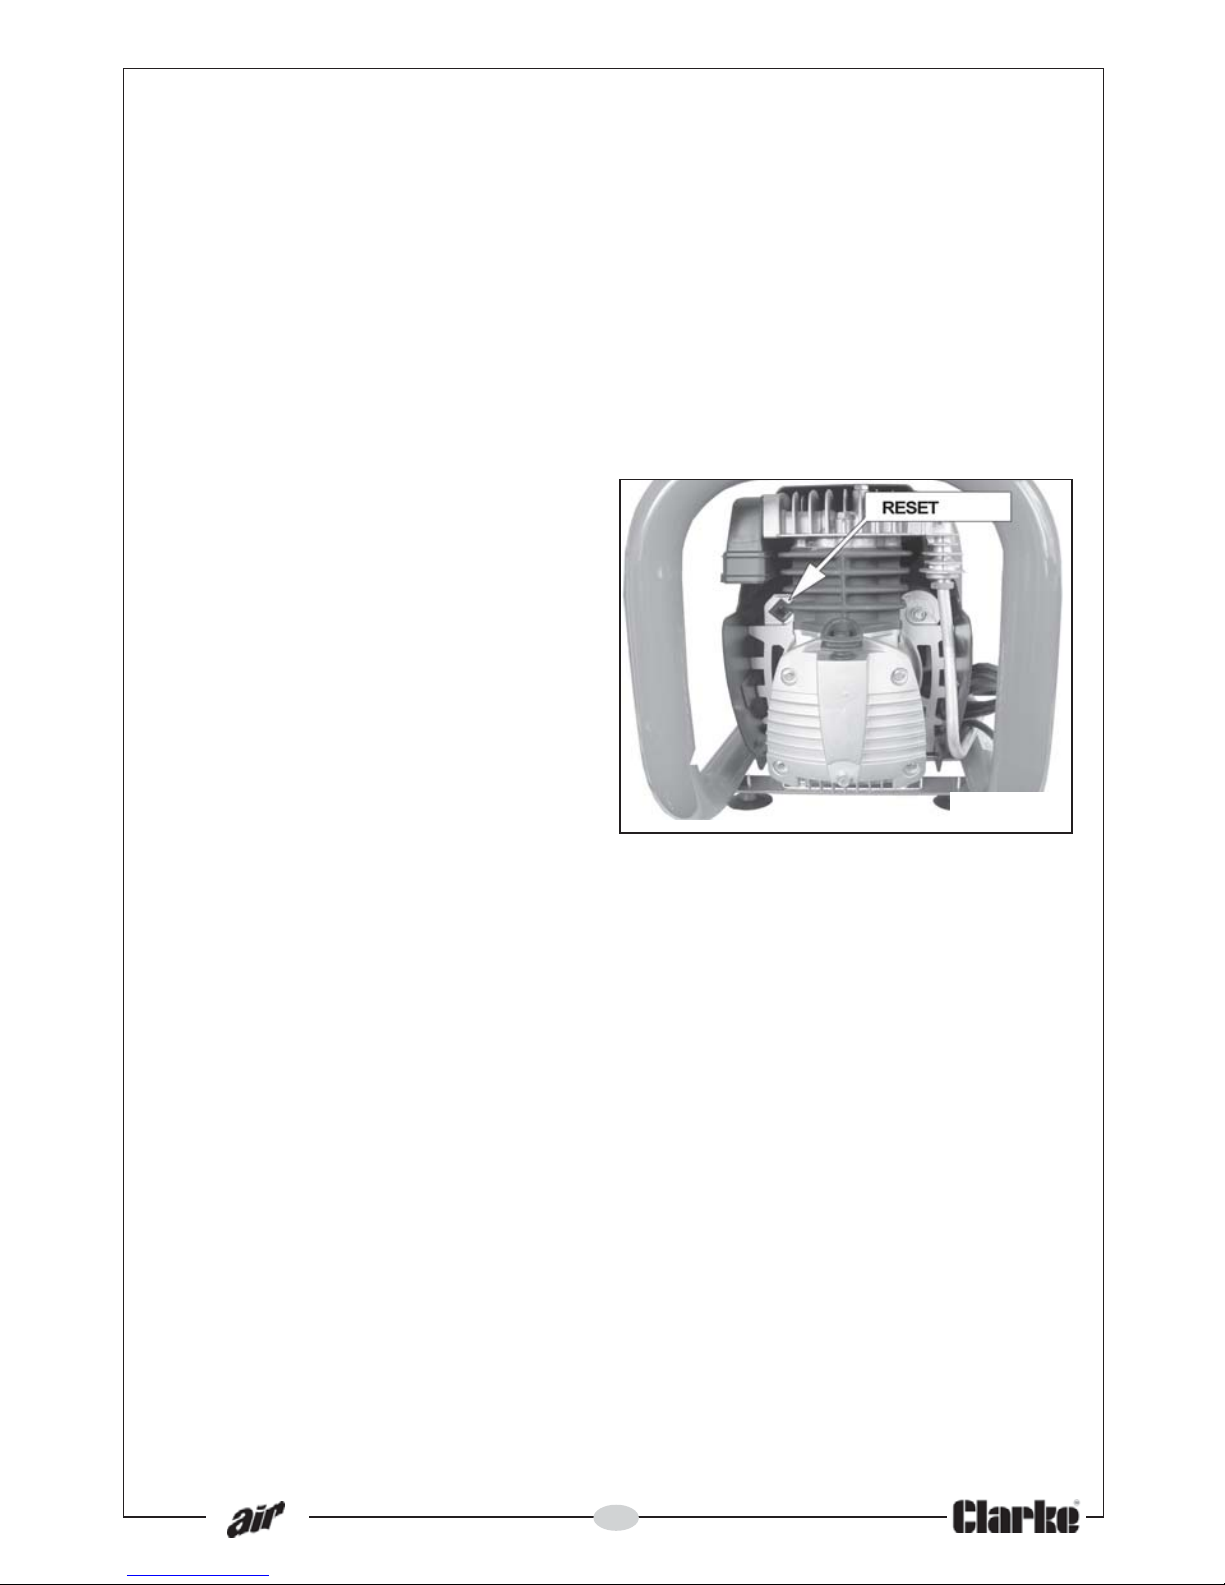
OVERLOAD CUT-OUT
The compressor is fitted with an
overload cutout to protect the
motor in the event of overheating.
If the device should trip out and
shut down the compressor, wait
around 5 minutes for the machine
to cool down before re-setting the
device by pressing the overload reset button shown in Fig 7.
If, having re-started the compressor,
the overload cutout trips again, set
the main switch to the OFF position,
unplug the machine and consult your Clarke dealer.
SHUTTING DOWN AND STORAGE
Press the red ON/OFF switch to shut off the compressor.
Never stop the compressor by unplugging it from the power supply. It should
be turned off as above.
After use, set the outlet pressure back to zero.
Trigger all equipment (tools, spraygun etc) to release any air pressure from the
air hose before disconnecting the hose from the compressor.
Before transporting or storing the compressor, release all air pressure from the
reservoir by opening the drain valve shown in Fig 1.
• It may be desirable to place a container beneath the compressor
to catch any condensate.
Avoid storing the compressor in an environment where the temperature is
likely to drop to or below freezing.
Fig 7
Page 16
16
MAINTENANCE
WARNING: Always vent the air receiver before carrying out any
adjustments, servicing or maintenance. Never unscrew a connection
whilst the air receiver is under pressure. Always ensure the receiver
has been vented.
DAILY / WEEKLY / BEFORE USE
1. Drain any condensate by opening the drain valve fitted to the receiver. As
soon as air starts to flow out, close the drain cock.
2. Inspect the compressor for damaged parts or for any loose screws or bolts.
3. Check the oil level is between the MAX & MIN marks on the dipstick & top
up if necessary. (Use Clarke SAE40 compressor oil). Ensure the oil does not
drop below the minimum level to avoid damage to the machine.
PERIODICALLY
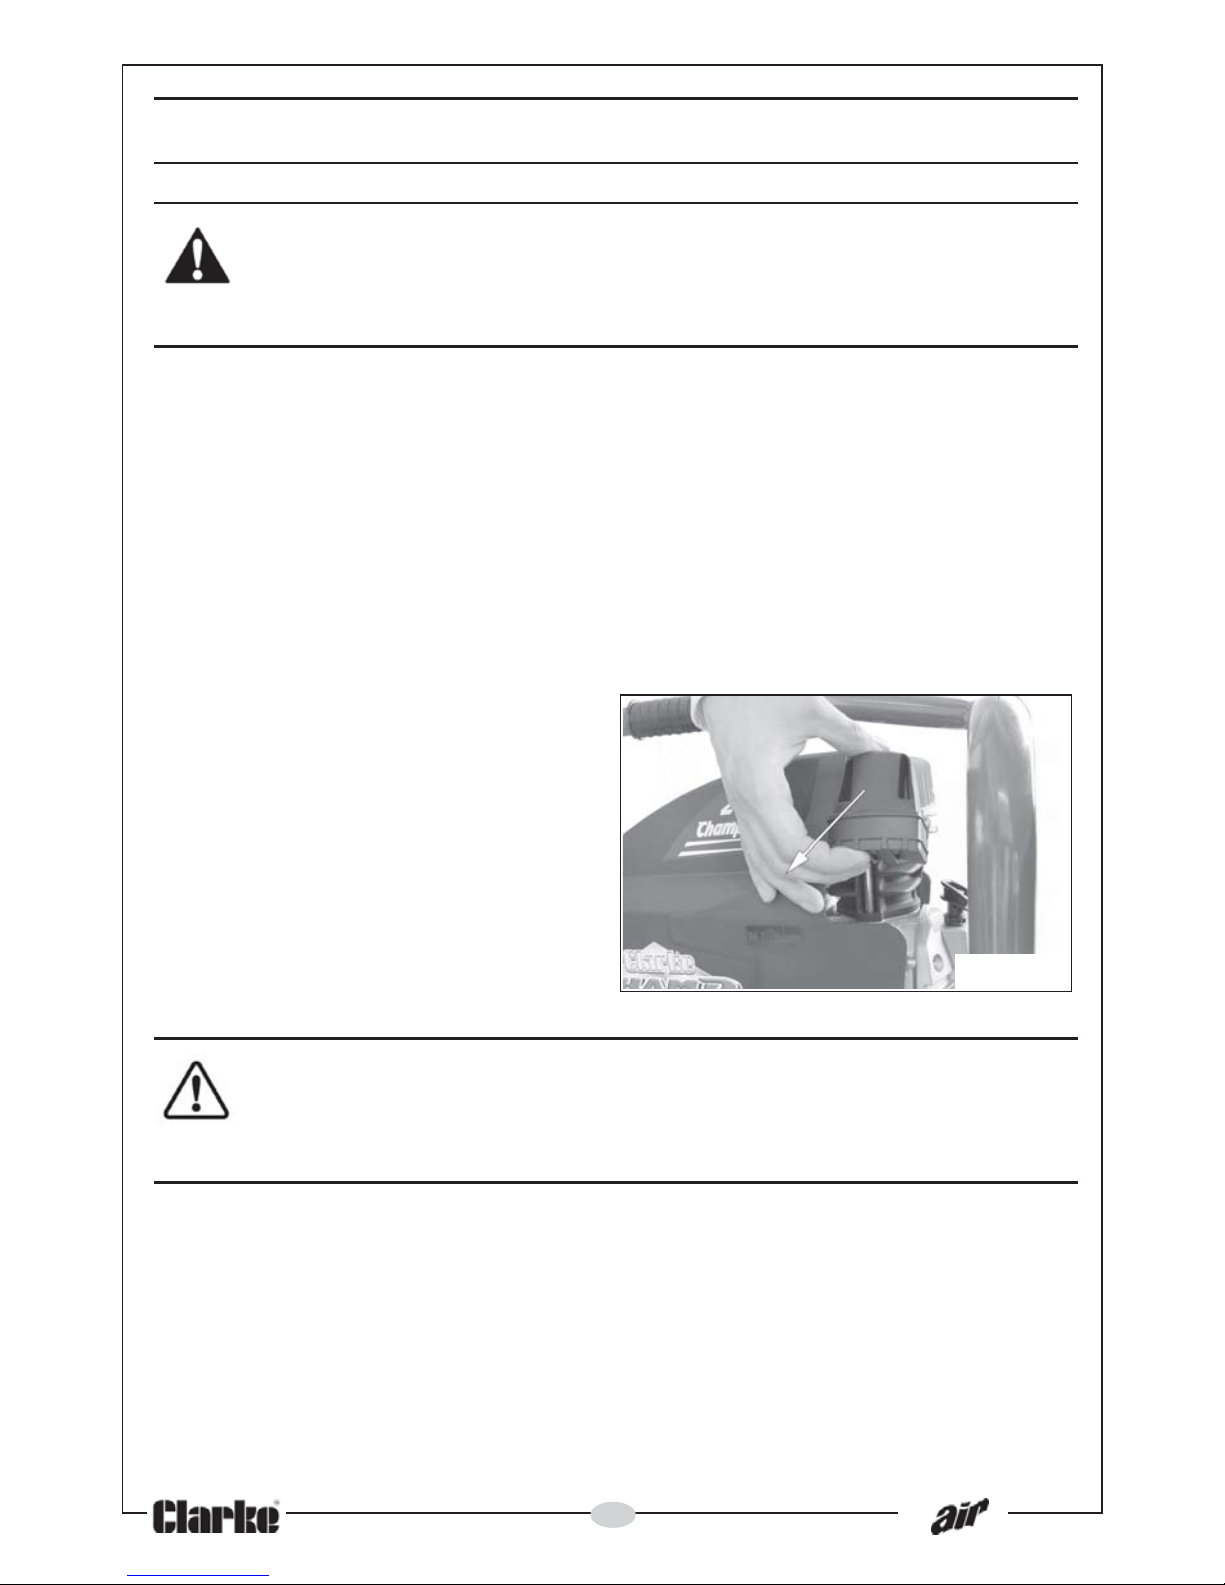
1. Check and clean, if necessary,
the sponge air inlet filter
element shown in Fig 8. The filter
may be removed from the
plastic cover and gently
washed in warm soapy water.
Rinse and allow to dry
thoroughly before re-fitting.
This should be done more
frequently if the compressor
operates in a very dusty area.)
CAUTION: NEVER OPERATE THE COMPRESSOR WITHOUT THE SPONGE
FILTER FITTED, AS FOREIGN MATTER COULD SERIOUSLY DAMAGE THE
INTERNAL COMPONENTS. IF DAMAGED, THE FILTER SHOULD BE
REPLACED.
2. Keep the cooling fins clear of dust if the machine is being used in a dirty
workplace.
6 MONTHLY/500 HOURS
If the oil has become contaminated it should be replaced as follows;
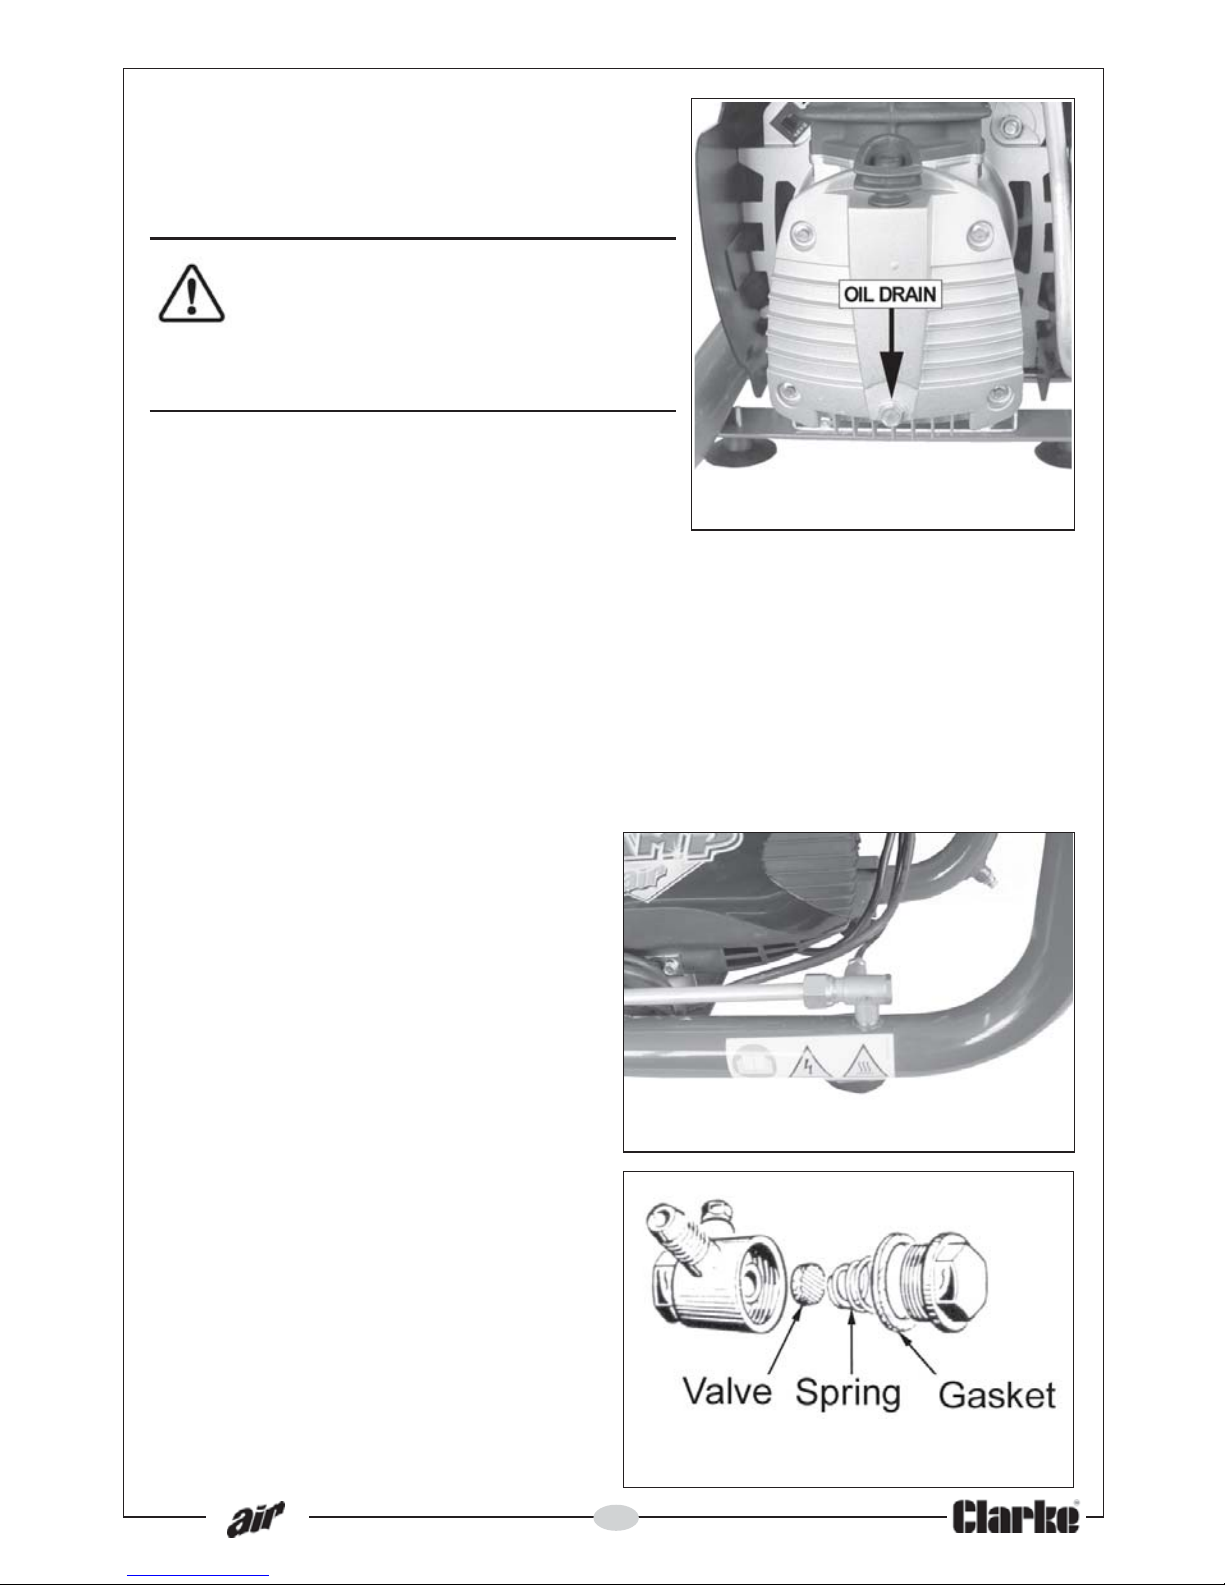
1. Remove the dipstick and unscrew the drain plug from the crankcase
cover as shown in Fig 9 and drain the oil into a container.
Note: This operation is best performed when the machine is warm so as to
encourage the oil to drain easily.
Fig 8
Page 17
17
2. Replace the drain plug and re-fill with
fresh oil up to the MAX level on the
dipstick using Clarke SAE40 compressor
oil.
CAUTION: PROLONGED EXPOSURE
TO USED OIL IS DANGEROUS,
ALWAYS WASH YOUR HANDS
THOROUGHLY AFTER HANDLING
USED OIL.
RECOMMENDED OILS
Any compressor oil can be used which is
suitable for use at room temperatures from
+5OC to +40OC.
Clarke SAE40 Compressor Oil (1 litre) is available from your Clarke dealer (part
no 3050810). See the Clarke catalogue for other consumables.
ENVIRONMENTAL PROTECTION
One of the most damaging sources of environmental pollution is oil. Do not
throw away used oil with domestic refuse or flush down a sink or drain. Collect
old oil in a leakproof container and take it to your local waste disposal site.
EVERY 2 YEARS
Check the non-return valve shown
in Fig 10, and if necessary, replace
the gasket (O-ring) in Fig 11.
IMPORTANT: The use of parts other
than Clarke replacement parts may
result in safely hazards, decreased
tool performance and will invalidate
your warranty.
Your Clarke compressor has been
designed to give long and trouble
free service. If, however, having
followed the instructions in this
booklet carefully, you encounter
problems, take the unit to your local
Clarke dealer.
Fig 11
Fig 10
Fig 9
Page 18
18
MOTPMYS MELBORP NOITULOS
ehtniporderusserP
.reviecer
.snoitcennoctaskaelriAotrosserpmocehtnuR
.erusserpmumixametaerc
ahsurb
dnaffotihctiwS
otnonoitulosretawypaos
kooL.snoitcennoclla
selbbubriarofylluferac
nethgiT.tuodecrofgnieb
er
ehwsnoitcennocyna
.neeseraselbbub
tcatnoc,stsisrepmelborpfI
.relaedekralCruoy
lliwdnaspotsrosserpmoC
.niag
atratston
.snoitcennoclacirtceledaB
.esufnwolB
hctiwstuo-tucdaolrevO
.deppirtsah
naelC.snoitcennockcehC
.yrassecensanethgitdna
.esufecalper/weneR
dnaenihcamffohctiwS
erofebsetunim5tiaw
.nottubtesergnisserp
hcaerot
sliafrosserpmoC
dnaerusserpteseht
.ylisaestaehrevo
teksagdaehrosserpmoC
.degamadevlavrodeliaf
dnarosserpmocehtpotS
ekralCruoytcatnoc
.relaed
.tratstonseodrosserpmoCydaerlariovreserriA
.degrahc
lepxeotkcocniardnepO
tratsdluohsrosserpmoC.ria
derotsehtnehwniaga
ehtspirterusserpriovreser
ta(hctiwslortnocerusserp
.)isp59xo
rppa
ehtmorfgnikaeldnuofriA
evlavhctiwserusserp
sirosserpmocehtnehw
.gninnurton
.evlavnruter-nonytluaFrevie
cerehttneV
evomeR.riafoyletelpmoc
,gulpdneevlaveht
evlavehtnaelcylluferac
neht,teksagdnataesdne
.11giFeeS.
elbmessa-er
skaelevlavhctiwserusserP
sahrosserpmocehtretfa
eromrofgninnurneeb
.etunimatuobanaht
trats-ytpm
eehtfoeruliaF
lortnocerusserpnievlav
.hctiws
erusserpehtecalpeR
.hctiwslortnoc
ebtonnacerusserpriA
.rotalug
erehttadetsujda
edisnimgarhpaidnekorB
.ydobrotalugereht
.rotalugerecalpeR
gninnurspeekrosserpmoC
erusserpm
umixamehtretfa
gnisuac,dehcaerneebsah
.etavitcaotevlavytefaseht
ehtfonoitarepotcerrocnI
.hctiwslortnocerusserp
ekralCruoytcatnoC
.relaed
eudnugnikamrosserpmoC
.esionlacinahcem
degamadsirosserpmoC
.luahrevosdeendn
a
dnarosserpmocehtpotS
ekralCruoytcatnoc
.relaed
.nurtonlliwrosserpmoC.tuotnrubgnidniwrotoMekralCruoytcatno
C
.relaed
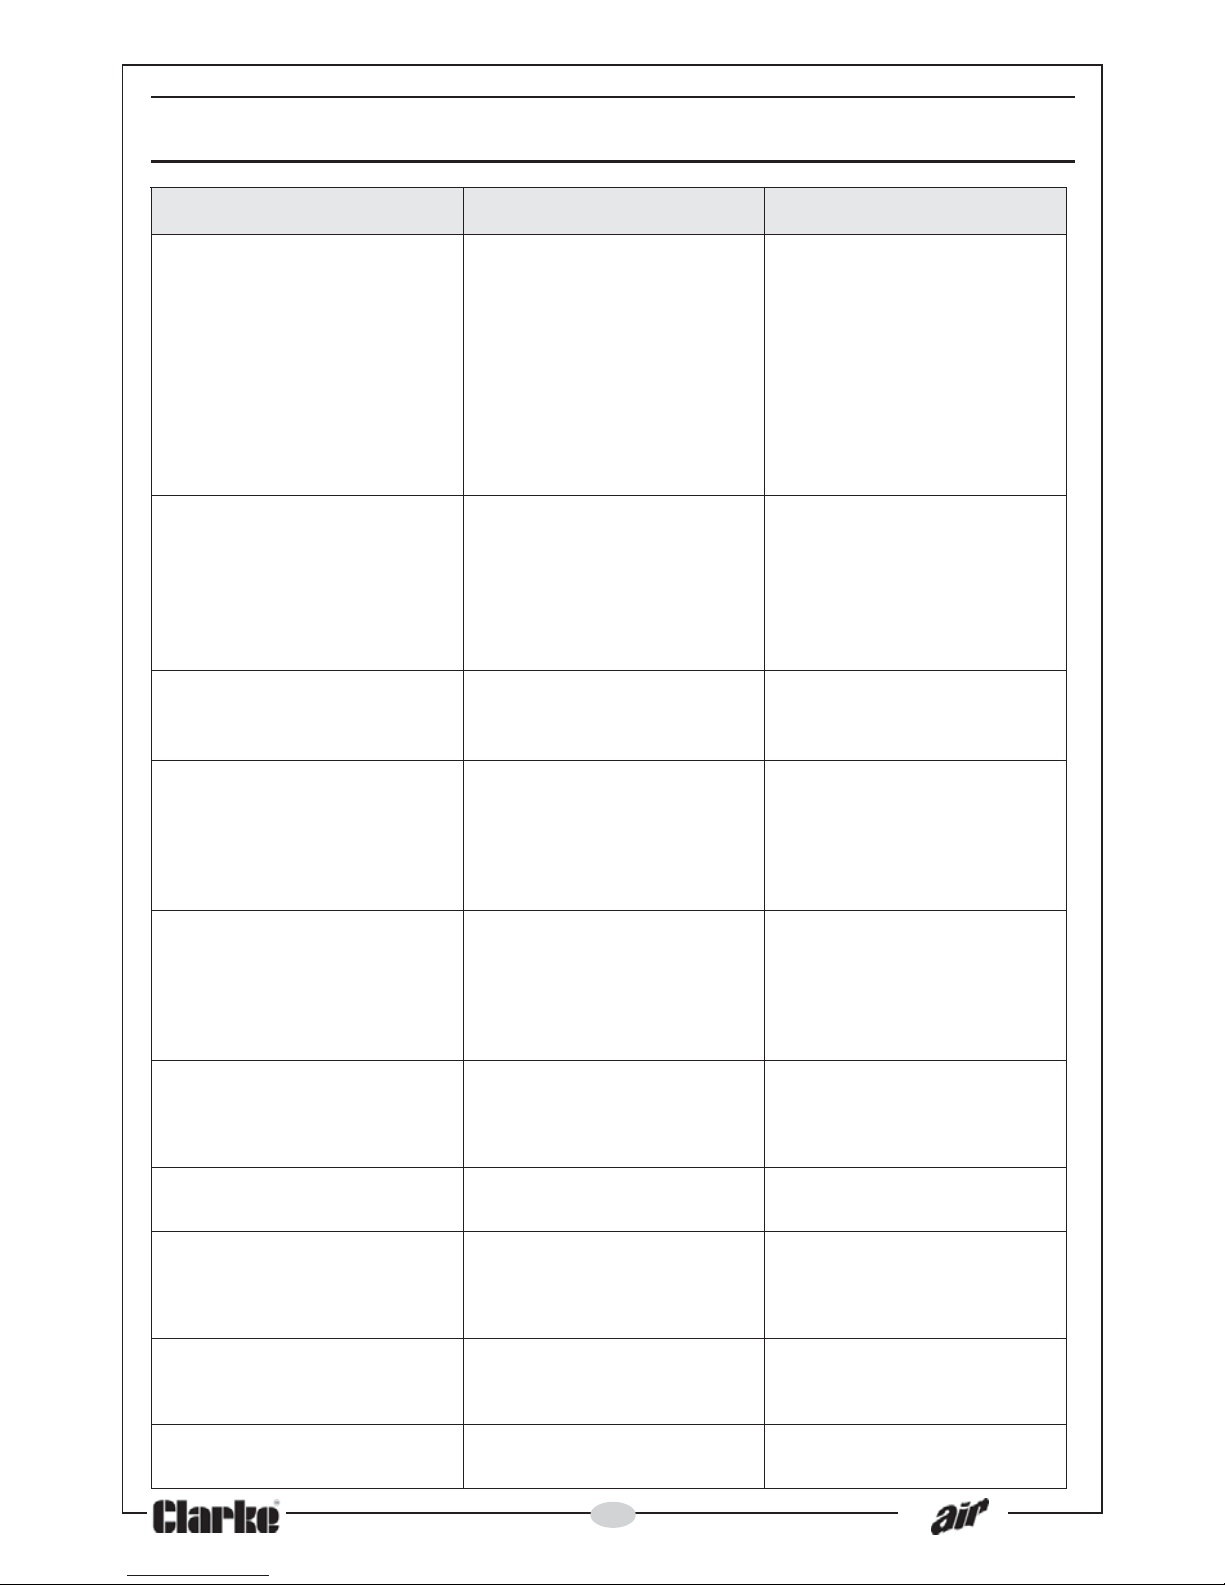
TROUBLESHOOTING
Page 19
19
In the event that any of the above situations arise, requiring the dismantling
and overhaul of the compressor, contact your Clarke International Service
Department on 020-8988-7400.
SPECIFICATION
oNtraP 0225222 5125222
thgieWgk2.32gk2.32
mm)HxWxL(snoisnemiD883x003x045883x003x045
ylppuSrewoPzH05@v011zH05@v032
gnitaResuFspm
a31spma31
yticapaCrevieceRriAsertil4.2sertil4.2
elcyCytuD)suounitnoc(1S)suounitnoc(1S
erusserPriAxaMisp541/raB
01isp541/raB01
etaRwolFxaM)nim/tf.uc6.7(niM/L712)nim/tf.uc6.7(niM/L712
erutarepmeTgnitarepOC°04+°5+C°04+°5+
l
eveLrewoPdnuoSAwLBd59AwLBd59
leveLrewoPdnuoSdeetnarauGAwLBd69AwLBd69
Please note that the details and specifications contained herein, are correct at the
time of going to print. However, Clarke International reserve the right to change
specifications at any time without prior notice.
Page 20
20
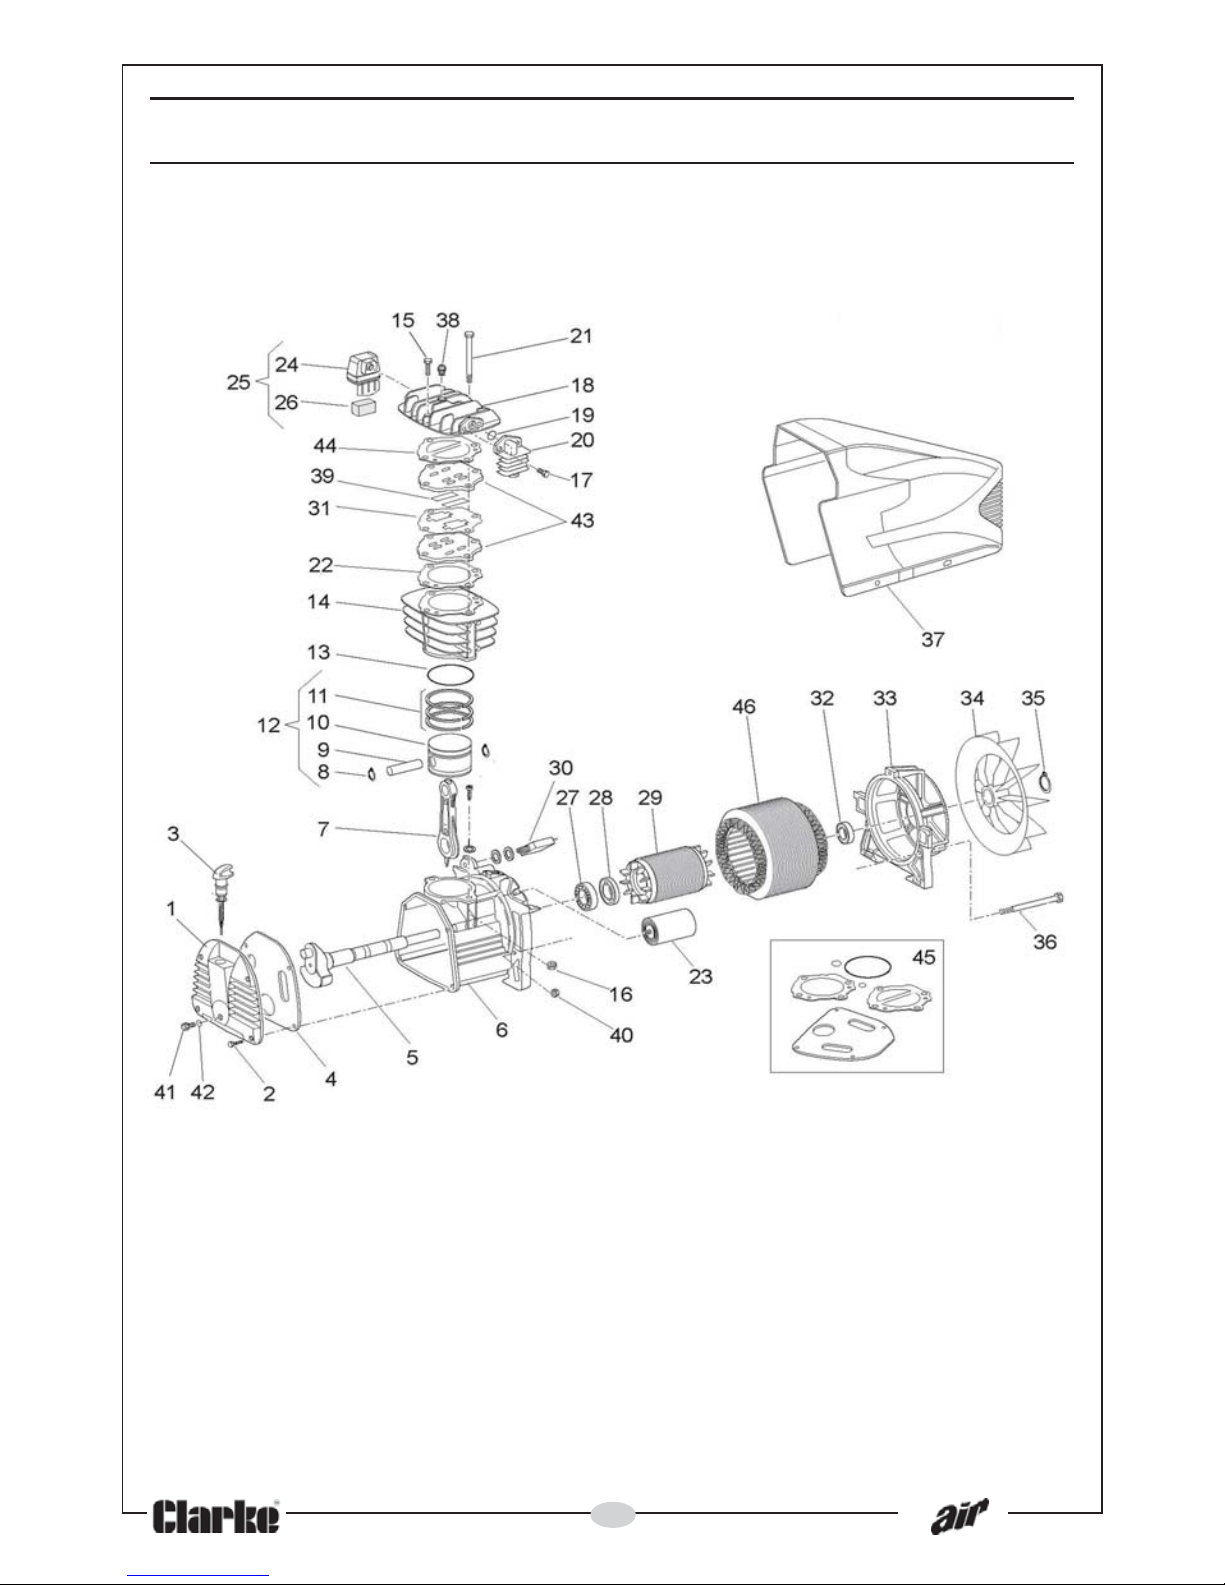
PARTS DIAGRAM - COMPRESSOR
Page 21
21
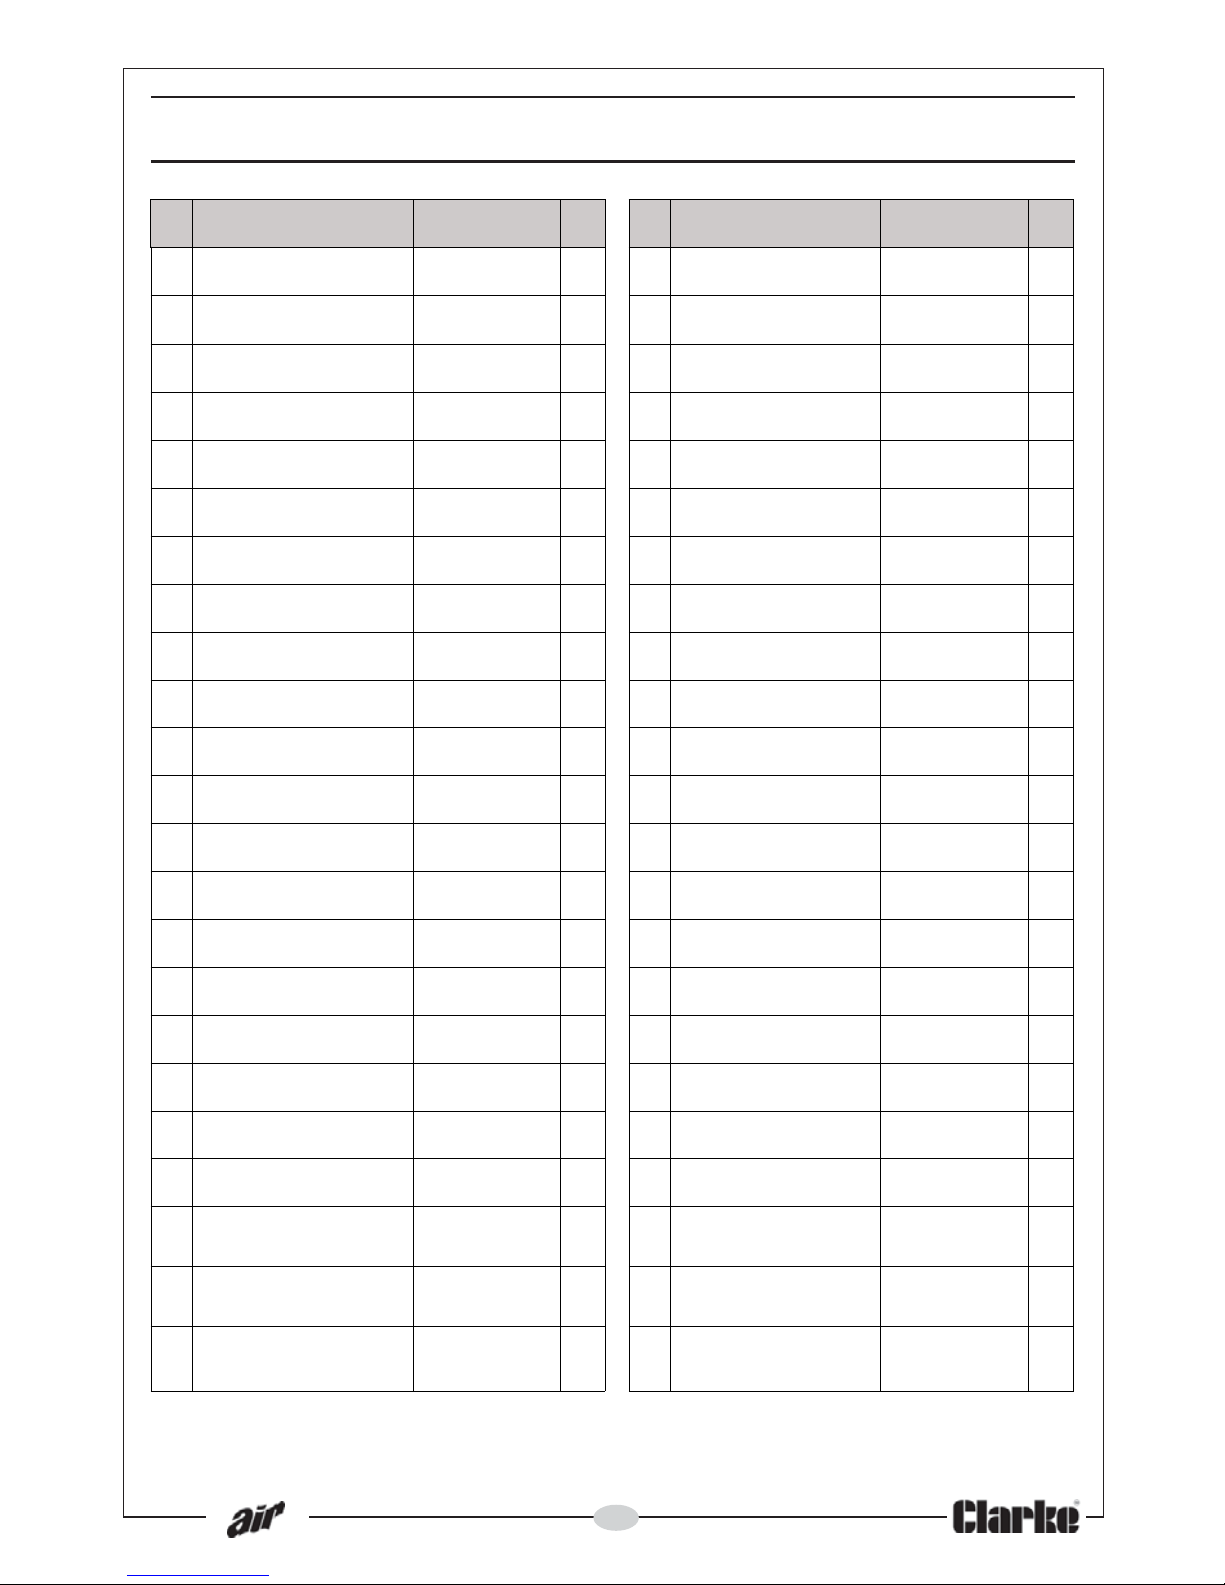
PARTS LIST - COMPRESSOR
oN noitpircseD oNtraP ytQ oN noitpircseD oNtraP ytQ
1REVOCDNE5200NC611NF142GNISUOHRETLIFRIA200280710NF1
2TLOB420600410NF452YSSARETLIFTELNI000280713NF1
3KCITSPID/GULPLIO000
980210NF162TNEMELERETLIF100280710NF1
4TEKSAGESACKNARC610021611NF172GNIRAEB000280330NF1
5TFAHSKNARC7100NC611NF182GNIRGNIL
AES000231010NF
1
6ESACKNARC600021611NF192ROTORROTOM500390611NF1
7DORGNITCENNOC500121611NF103TUOTUCDAOLREVO000550800NF1
8P
ILCRIC000100510NF113TEKSAGEVLAV1500NC611NF1
9NIPNOEGDUG040220611NF123GNIRAEB000500330NF1
01NOTSIP400220611NF 1 33REVOCRAE
R700021611NF1
11)TES(SGNIRNOTSIP200220612NF143NAF800021611NF1
21YLBMESSANOTSIP400220614NF153PILCRIC000380510NF1
31GNIR-O00
0331010NF163TLOBGNOL821200410NF3
41YDOBREDNILYC5100NC611NF173GNISUOH3000CN611NF1
51WERCS130310410NF283EVLAVYTEFAS38100011
0NF1
61TUN100300410NF293EDALBEVLAV830220611NF2
71WERCS120310410NF204TUN0010091161NF3
81DAEHREDNILYC3100NC611NF114WERCS4203104
10NF1
91GNIR-O000031010NF124GNIR-O000270010NF1
02DLOFINAM4001CN610NF234ETALPEVLAV0300NC611NF2
12TLOB570100410NF244
V011(TEKS
AGDAEH
V032(TEKSAGDAEH
410021611NF
0500NC611NF
1
1
22
)V032(TEKSAG.LYC
)V011(TEKSAG.LYC
2000TH611NF
6000CN611NF
1
1
54
)V011(TESTEKSAG
)V032(TESTEKSAG
2000NC612NF
1000NC612NF
1
1
32
DNOC)V032(RESNE
)V011(RESNEDNOC
510002900NF
5
30002900NF
1
1
64
)V032(ROTATS
)V011(ROTATS
5061NC613NF
1061NC613NF
1
1
Page 22
22
oN noitpircseD oNtraP ytQ oN noitpircseD oNtraP ytQ
74TOOF000681020NF495GNITTIF-T00077111NF1
84GULPNIARD000280220NF106EVLAVYTEFAS000602740NF1
94ETALPESAB1000BH401NF116ROTC
ENNOC00071011NF2
05ELDNAH510220611NF126GULP000100111NF1
15EBUTYREVILED2000NC401NF136EVLAVFFO-TUHS000700223NF1
25EVILO21053
5161NF146EBUTGNITCENNOC00010064NF1
35TUNKCOL1100PH611NF156HCTIWSERUSSERP000820123NF1
45GNIRPS10095174NF166EVLAVNRUTER-NO
N000270743NF1
55GNIR-O00031101NF176REVIECERRIA1000NH401NF1
65LAES20095174NF186RECUDERERUSSERP000711913NF1
75
EGUAGERUSSER
P
isp003-0
000700033NF196
)V011(ELBACREWOP
)V032(ELBACREWOP
00250P271NF
0020AG101NF
1
1
85
EGUAGERUSSERP
isp081-0
0
00600033NF1
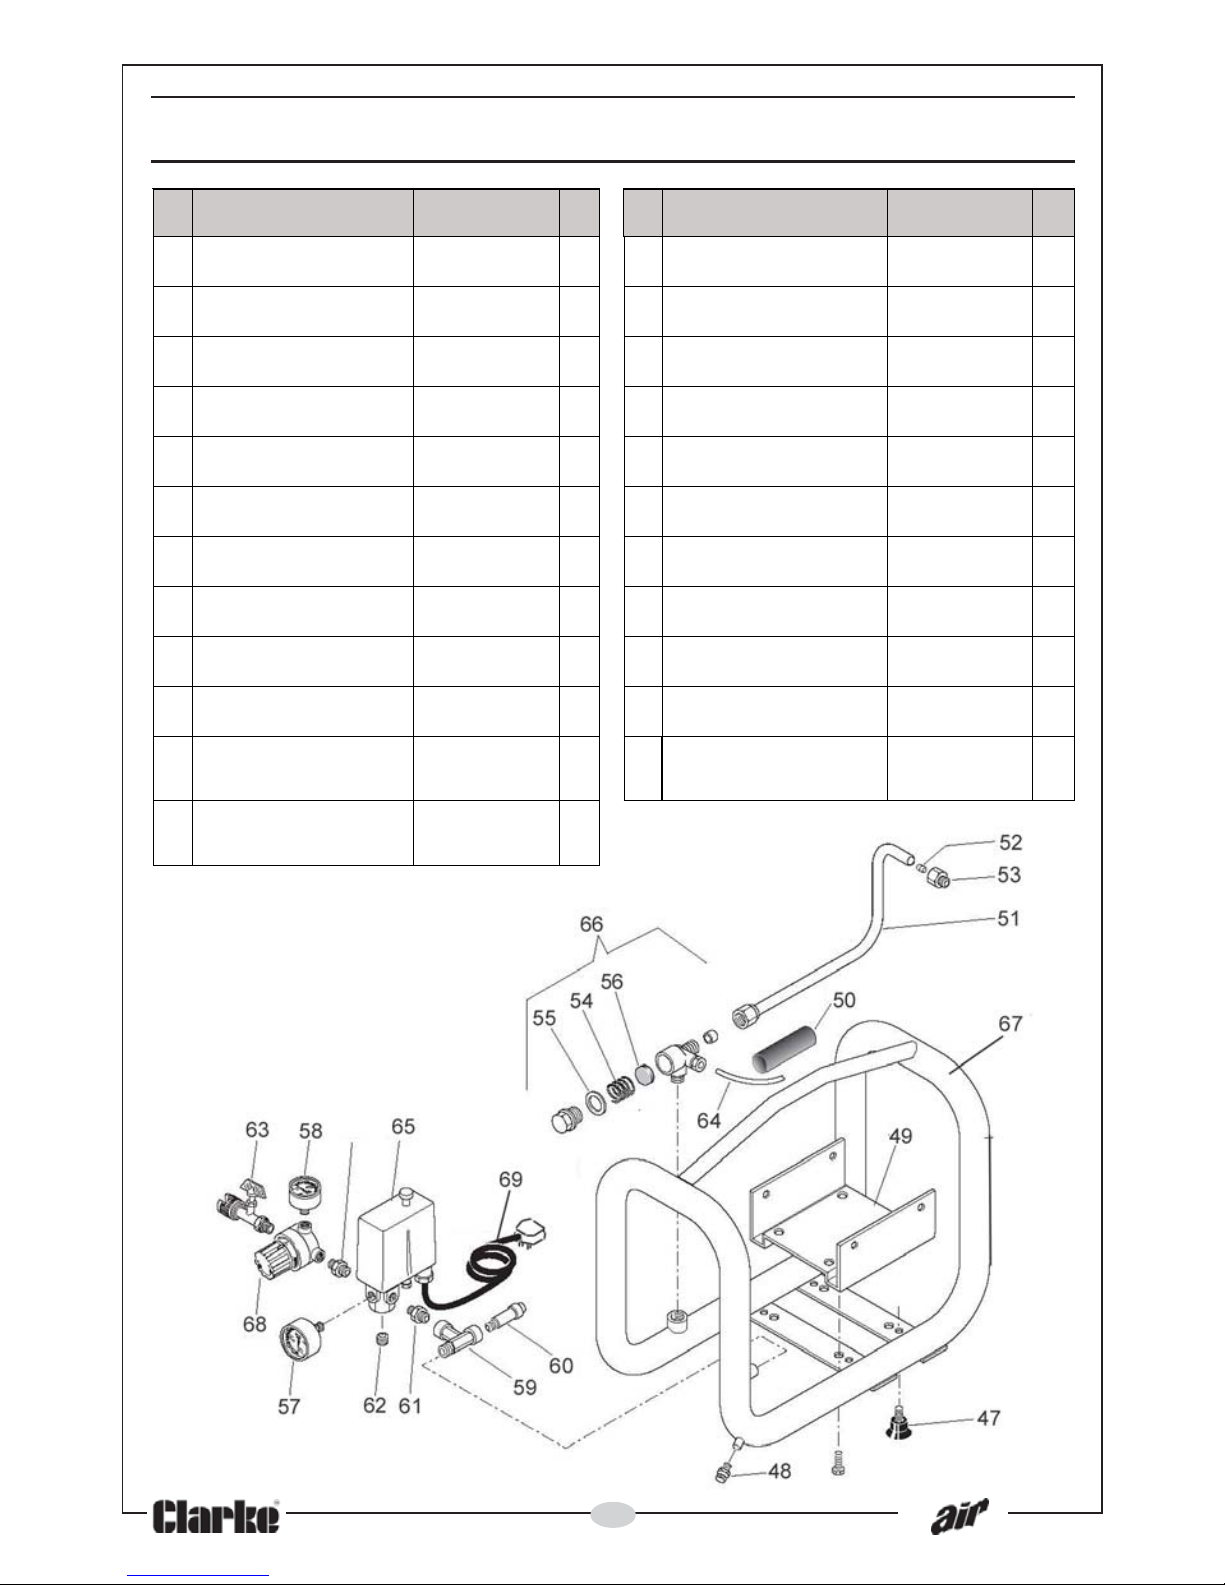
PARTS LIST - PNEUMATICS
Page 23
23
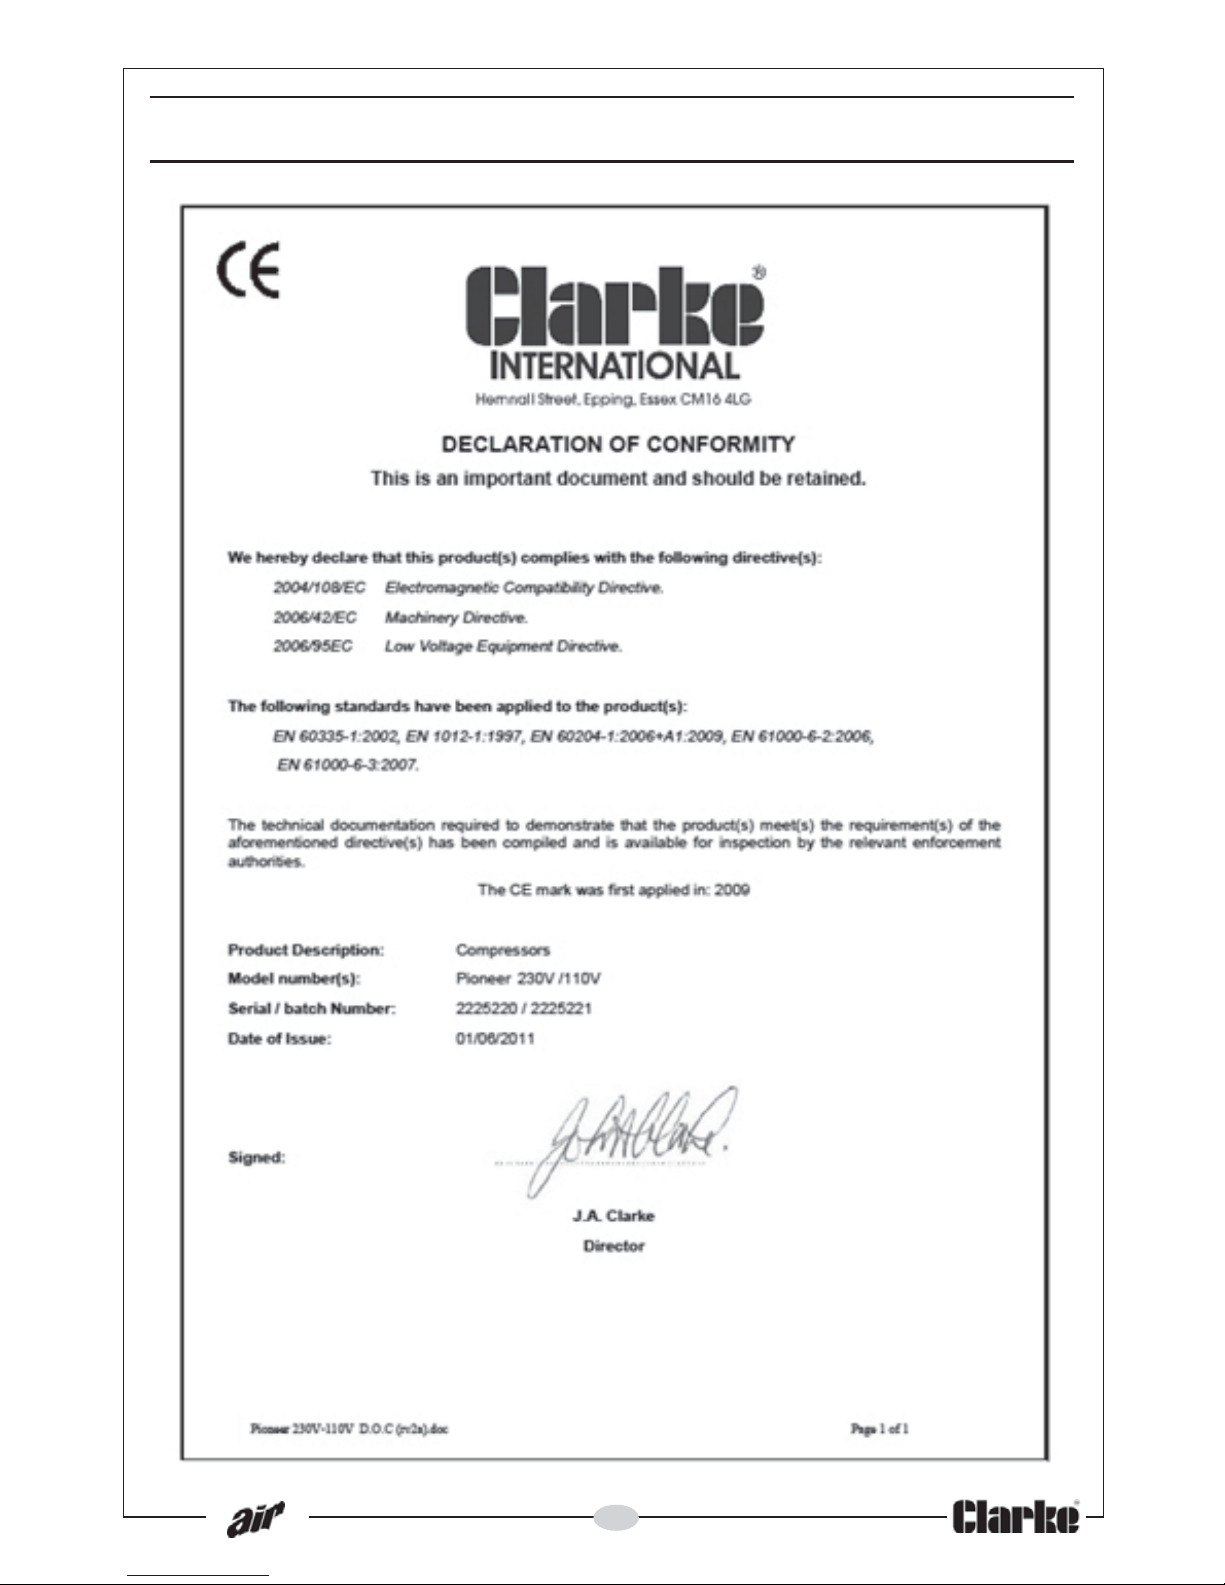
DECLARATION OF CONFORMITY
Page 24

 Loading...