

Page 1
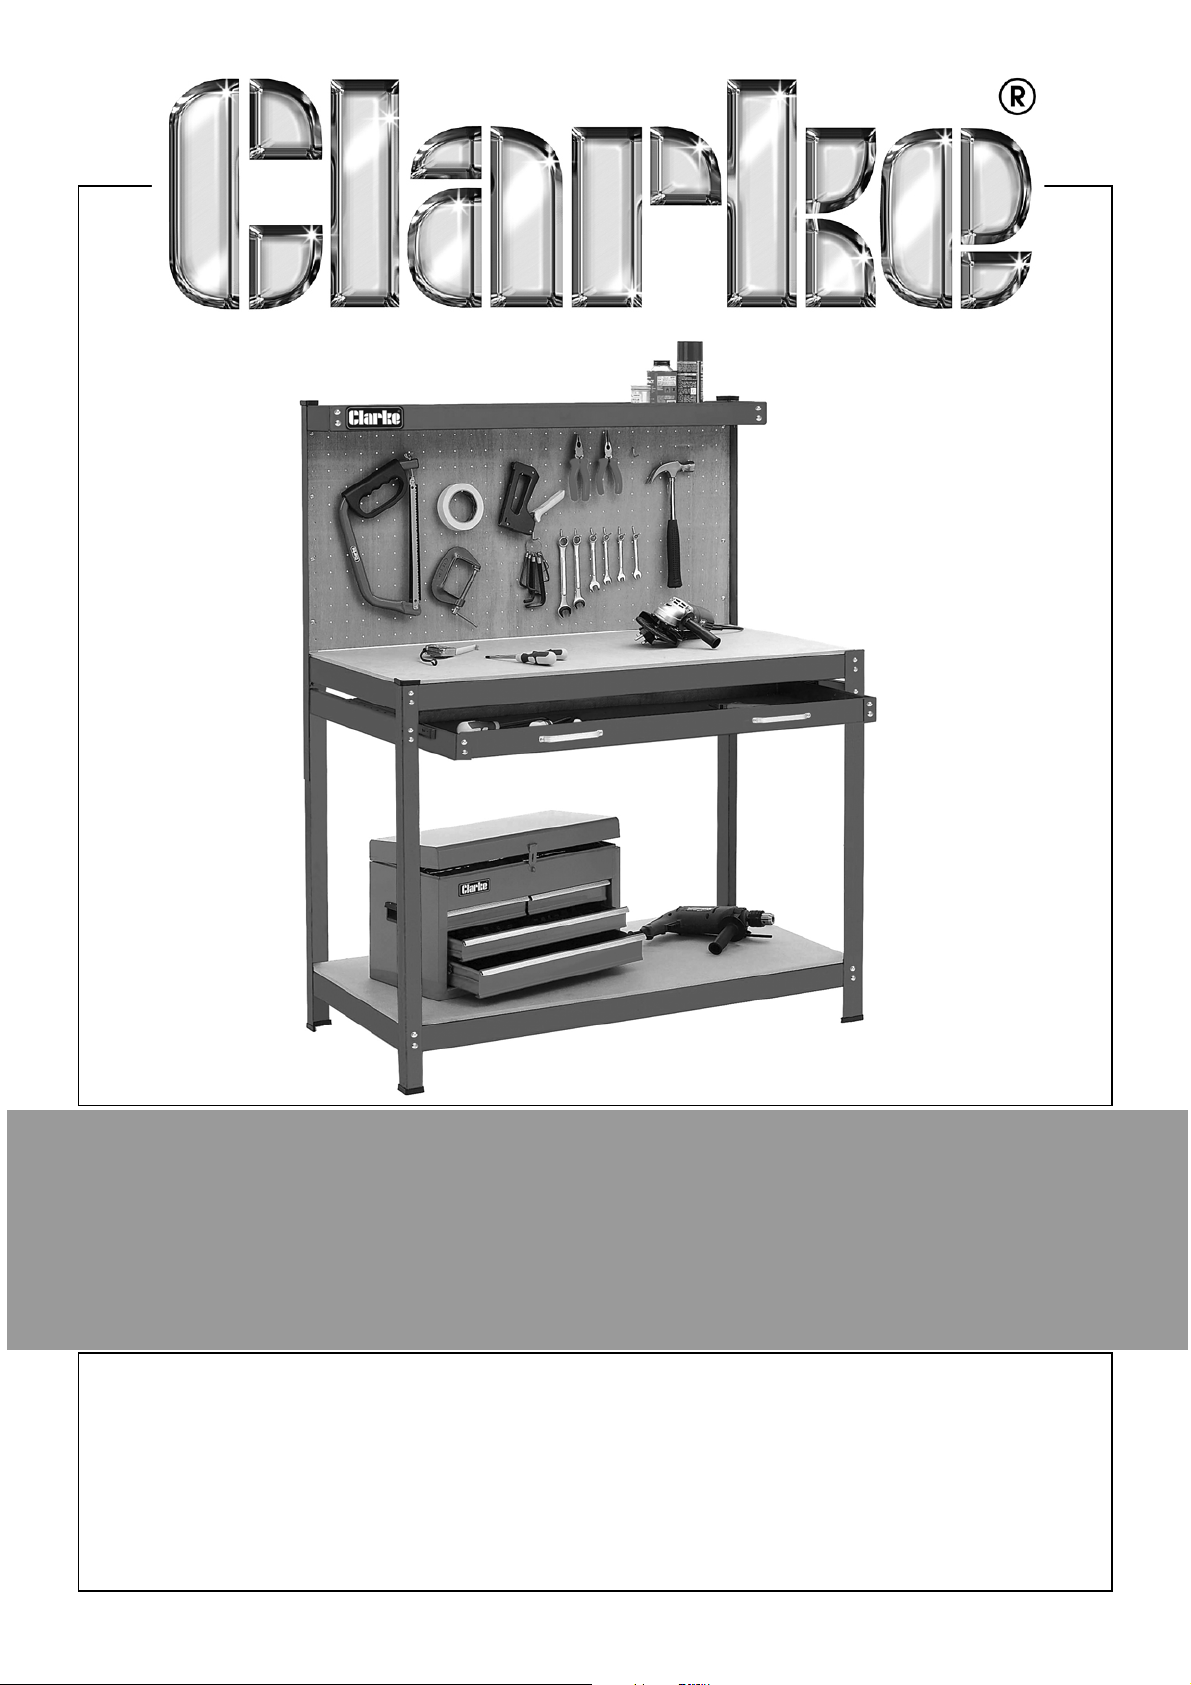
WORKBENCH WITH BACK PANEL &
DRAWER
MODEL NO: CWBR1B & CWBG1B
PART NO: 7637706 & 7637707
ASSEMBLY INSTRUCTIONS
ORIGINAL INSTRUCTIONS DL0822 - Rev 2
Page 2
INTRODUCTION
Thank you for purchasing this CLARKE workbench. CWBR1B (red) and CWBG1B
(galvanised).
Before attempting to use this product, please read and follow the instructions
carefully. In doing so you will ensure the safety of yourself and that of others
around you, and you can look forward to your purchase giving you long and
satisfactory service.
Please keep these instructions in a safe place for future reference.
GUARANTEE
This product is guaranteed against faulty manufacture for a period of 12
months from the date of purchase. Please keep your receipt which will be
required as proof of purchase.
This guarantee is invalid if the product is found to have been abused or
tampered with in any way, or not used for the purpose for which it was
intended.
Faulty goods should be returned to their place of purchase, no product can
be returned to us without prior permission. This guarantee does not effect your
statutory rights.
ENVIRONMENTAL PROTECTION
Do not dispose of old products or damaged parts with general
household waste. All tools, accessories and packaging no longer
required should be sorted, taken to a recycling centre and
disposed of appropriately.
UNPACKING
Open the carton and lay out the components carefully, identifying them
according to the component parts list. All components have identifying
stickers that correspond with the component parts list.
Should any part be damaged or missing, please contact your Clarke dealer
immediately for replacement.
2
Parts & Service: 020 8988 7400 / E-mail: [email protected] or [email protected]
Page 3
COMPONENT PARTS
Item Description
AFront Leg Post 2
BLeft Rear Post 1
C Right Rear Post 1
D Drawer Mounting Beam (Left) 1
E Drawer Mounting Beam (Right) 1
F Side Beam 4
G Long Beam (see note on page 5) 4
H Left Upper Post 1
I Right Upper Post 1
J Top Long Beam 2
K Top Left Side Beam 1
LTop Right Side Beam 1
M Drawer Front Panel 1
Qty
O Drawer Rear Panel 1
P Drawer Side Panel 2
Q Drawer Bottom Panel 1
RPegboard 1
S Bottom Shelf Panel 1
TWorkbench Panel 1
U Top Shelf Panel 1
V Pegboard Support Bracket 1
W Drawer Runner 2
Fixing Pack
Item Description
1 Bolt M6 x 12 8 6 Nut M6 68
2 Pegboard Hooks 30 7 Handle 2
3Screw M4 x 8 6 8Nut M4 16
Qty
Item Description
Qty
4 Bolt M4 x 10 16 9 Washer 68
5 Plastic Feet 4 10 Bolt M6 x 8 60
3
Parts & Service: 020 8988 7400 / E-mail: [email protected] or [email protected]
Page 4
ASSEMBLY
All fixing bolts should be entered from the outside and secured on the inside
by the washers and nuts provided.
Assembly should be carried out with all nuts finger tight only - DO NOT tighten
the nuts until the structure is fully assembled as described in the instructions.
Assembly may be easier with the help of a second person.
The assembly procedure is as follows:
TOOLS REQUIRED
• PH1 Cross Headed Screwdriver
• PH2 Cross Headed Screwdriver
• 7mm Spanner or Ratchet
• 10mm Spanner or Ratchet
• Pliers
ASSEMBLE THE FRAMEWORK
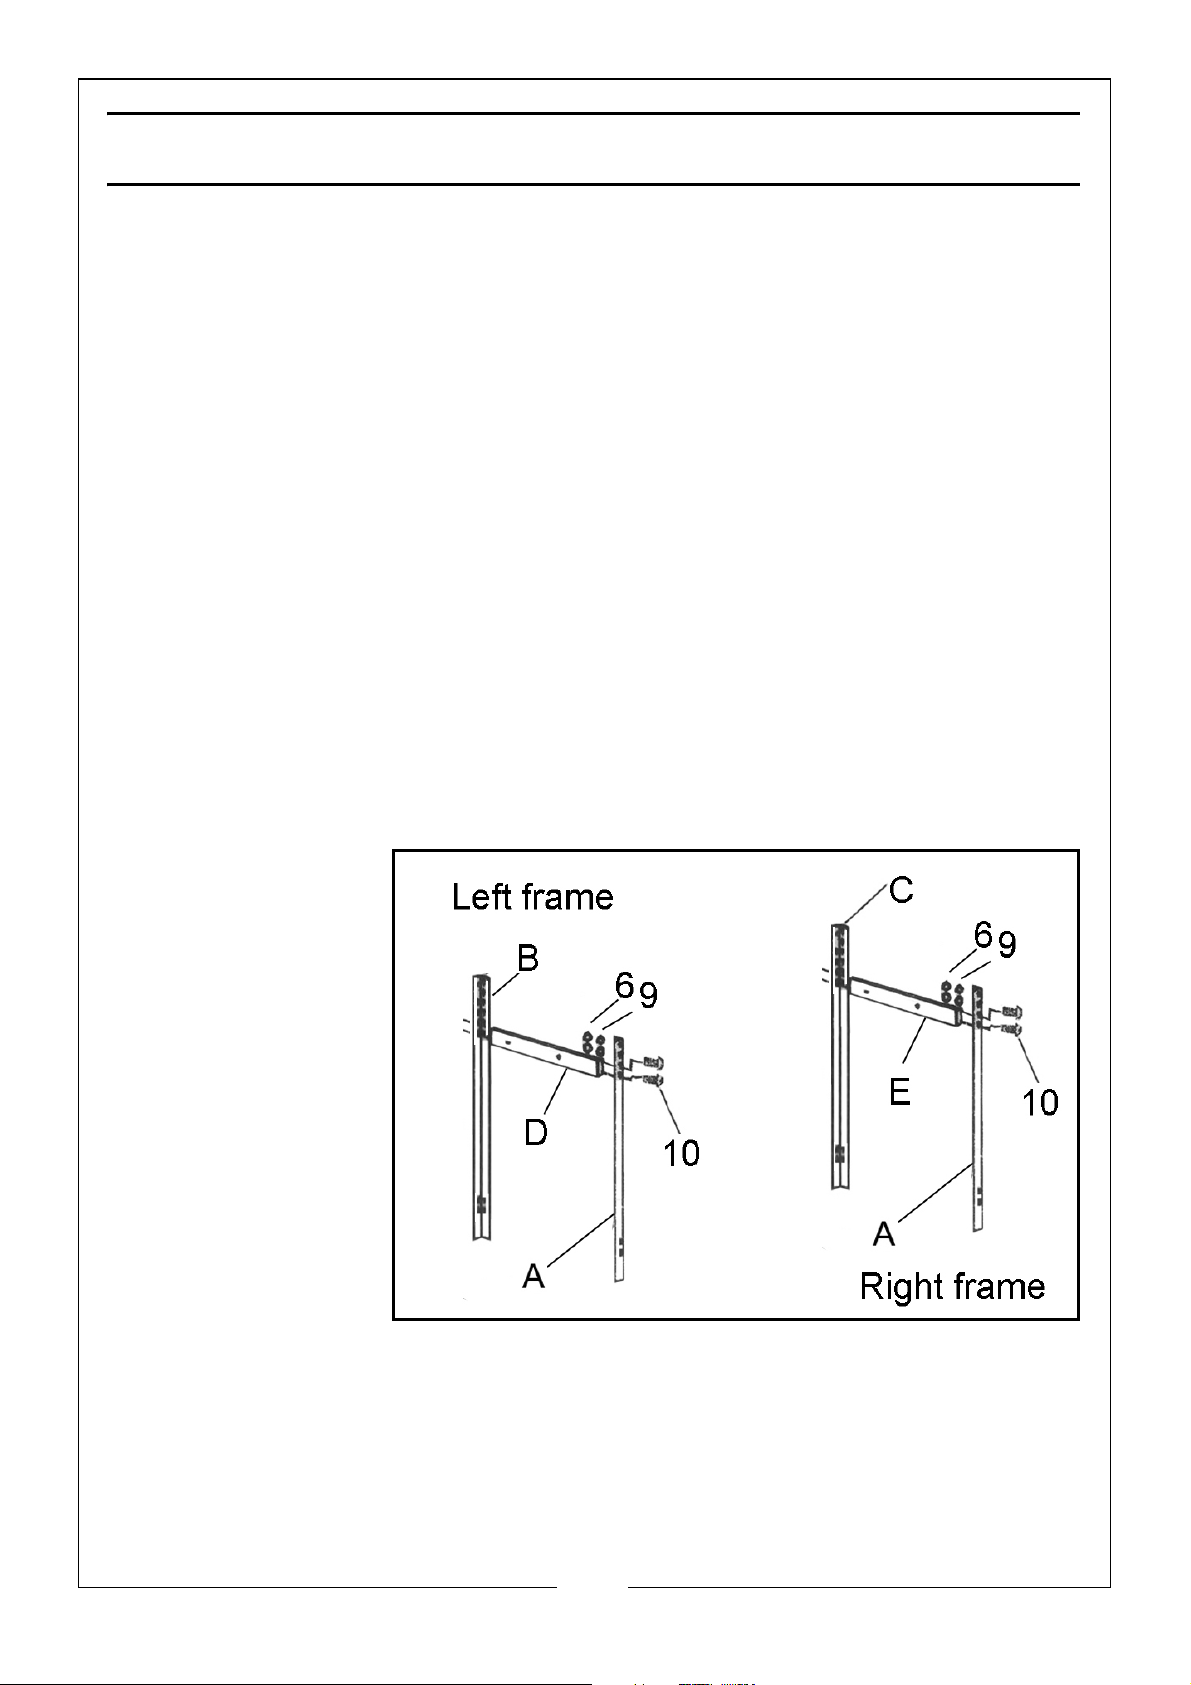
The frame comprises left and right-hand side assemblies.
1. Fit the drawer
mounting beam
(E) between a
front post (A)
and rear post
(C) to create
the right-hand
side assembly
using nuts(6),
bolts (10) &
washers (9).
• Use the lower set of bolt holes in the posts for this.
2. Repeat for the left-hand side assembly using the rear post (B), front post (A)
and drawer mounting beam (D).
4
Parts & Service: 020 8988 7400 / E-mail: [email protected] or [email protected]
Page 5
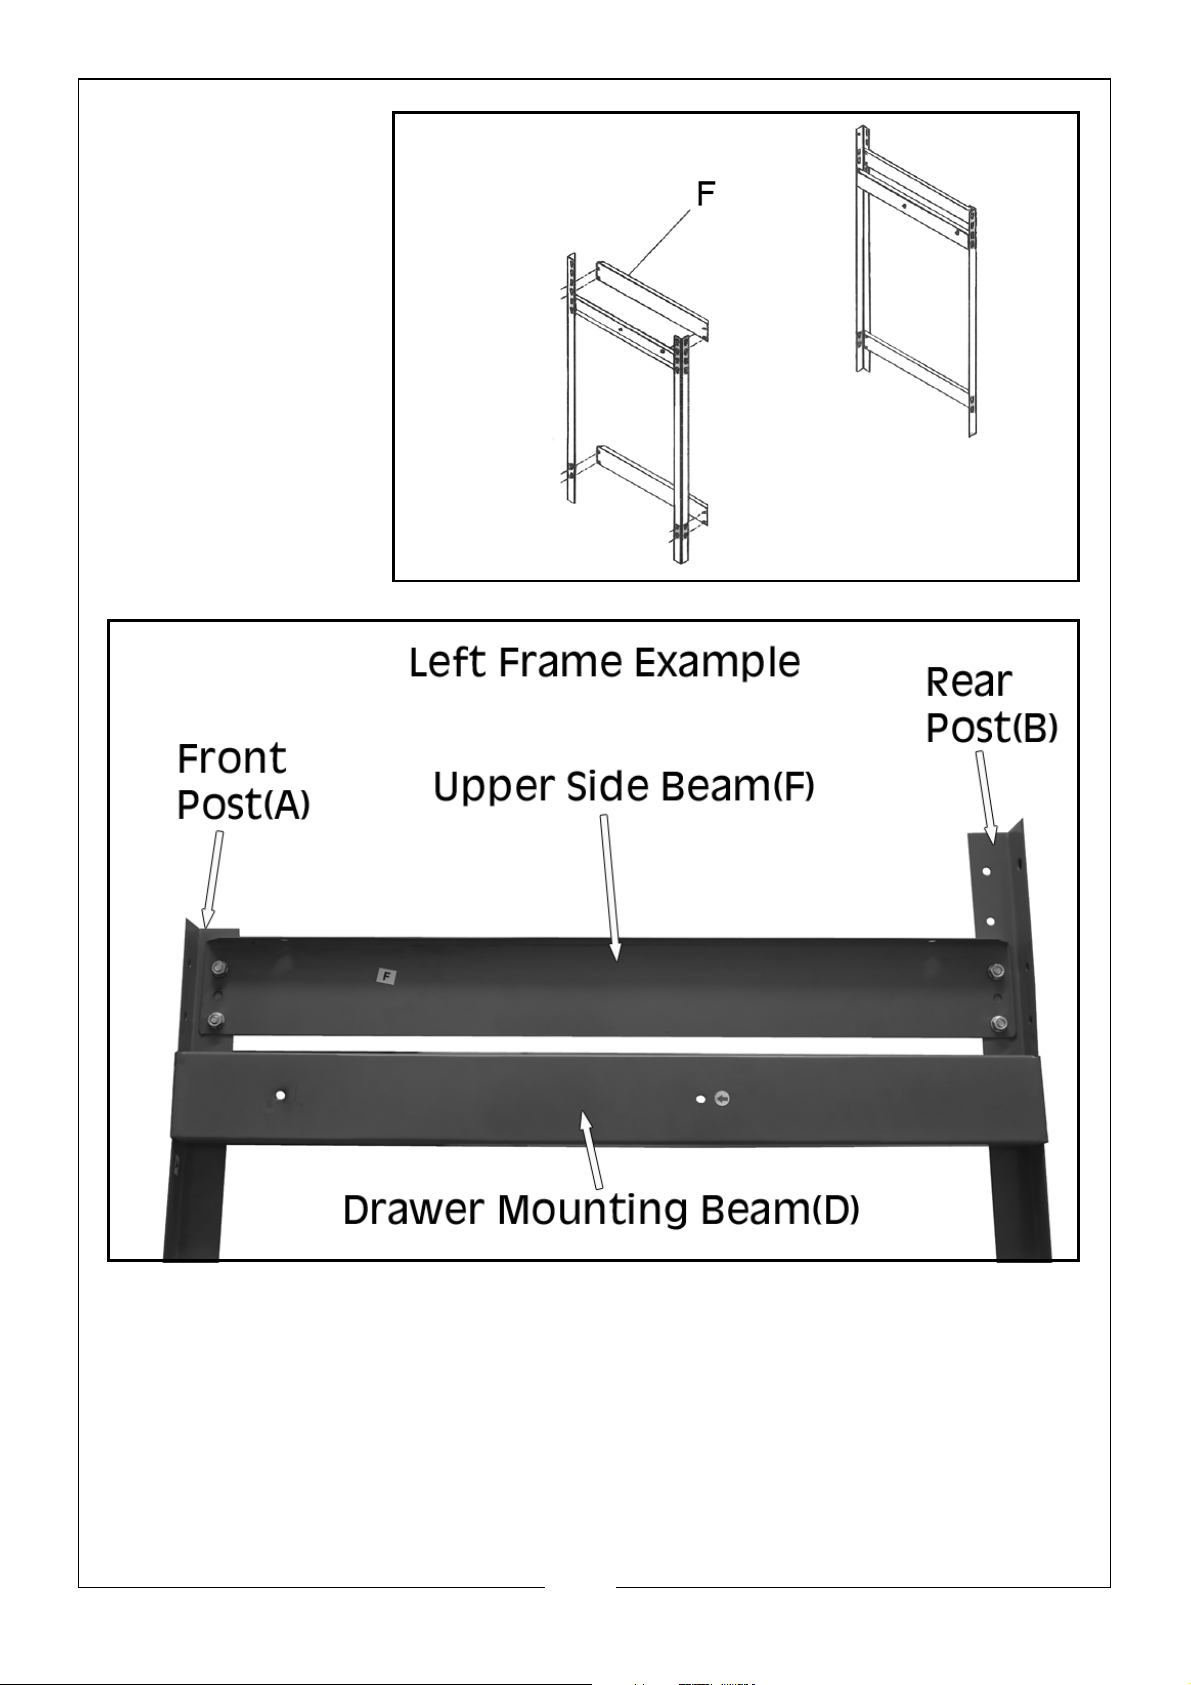
3. Fit the four side
beams (F) using
the higher bolt
holes to
complete the
two side
assemblies.
5
Parts & Service: 020 8988 7400 / E-mail: [email protected] or [email protected]
Page 6
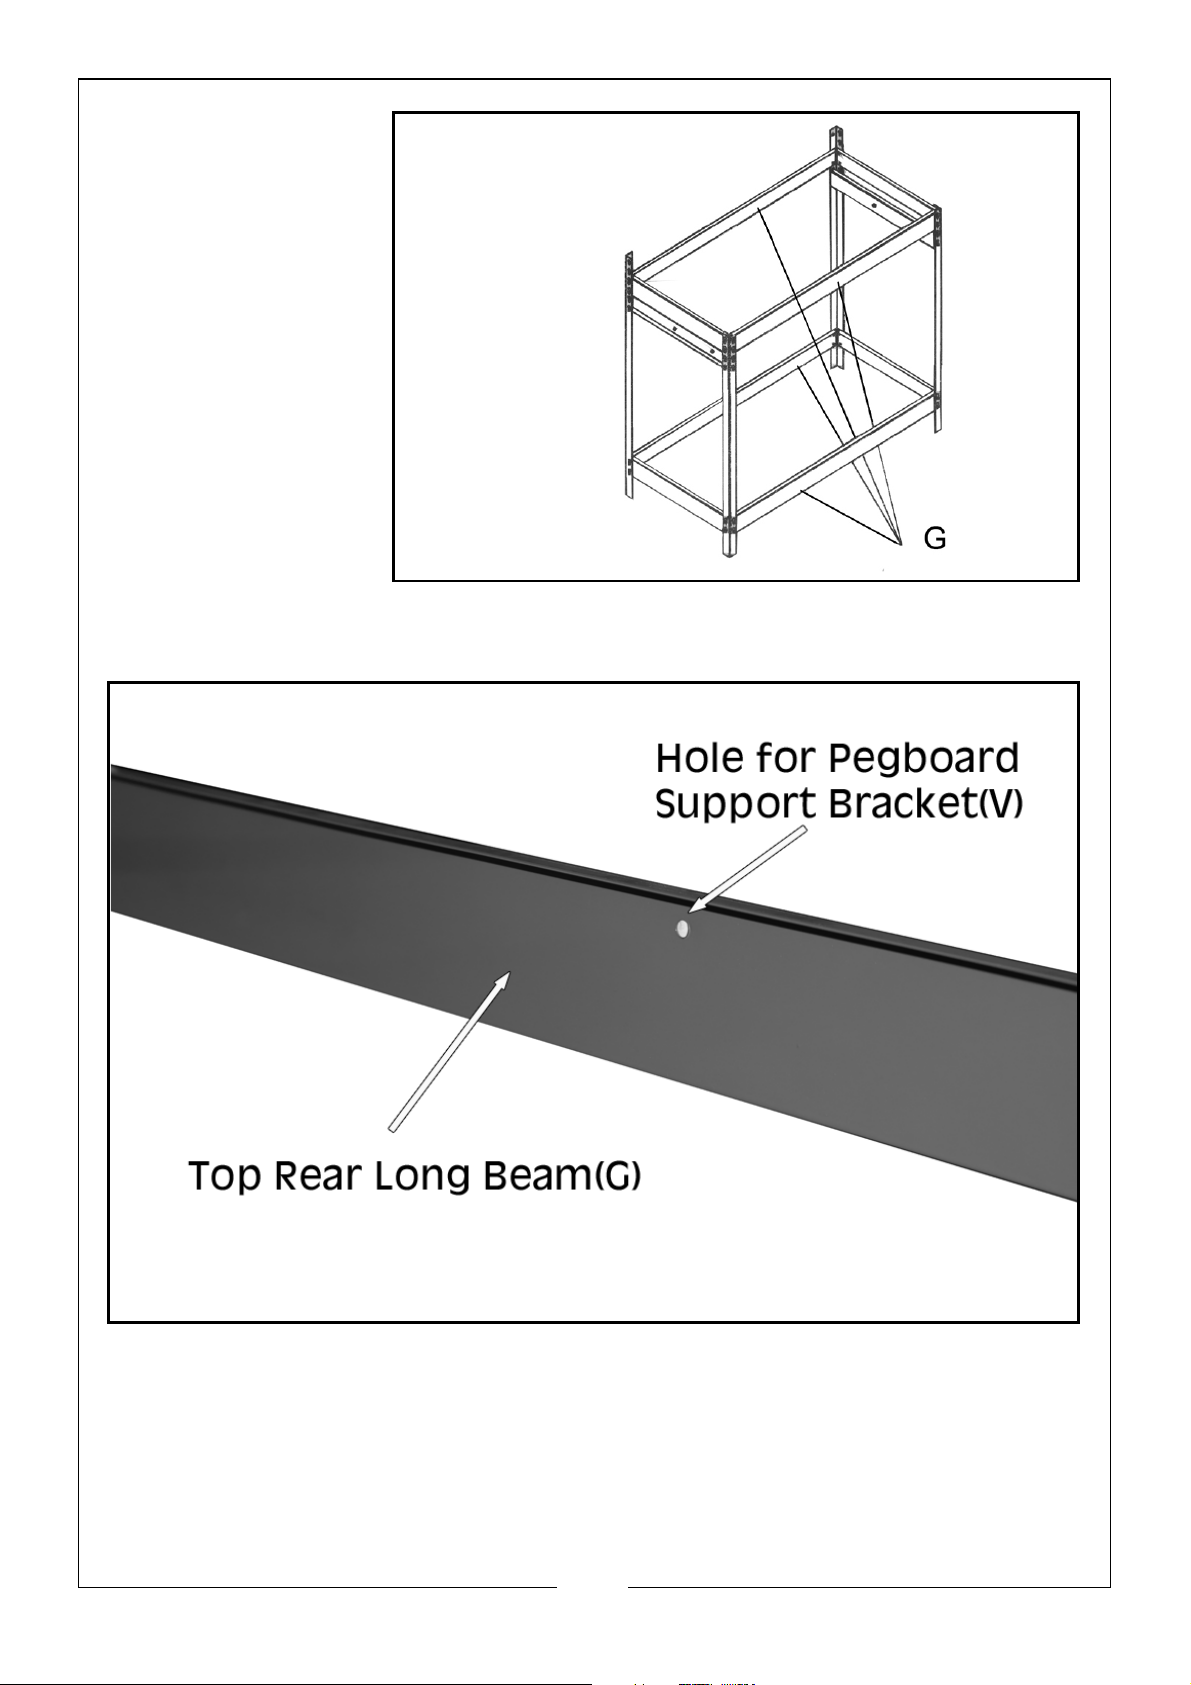
4. Identify the long
beams.
• The one for the
top rear has a
single hole in it
(for item V on
page 6). This is to
retain the
bottom of the
pegboard.
5. Fit the long
beams (G) at
the top of the
corner posts to
create the main
frame using further bolts, washers & nuts.
6
Parts & Service: 020 8988 7400 / E-mail: [email protected] or [email protected]
Page 7
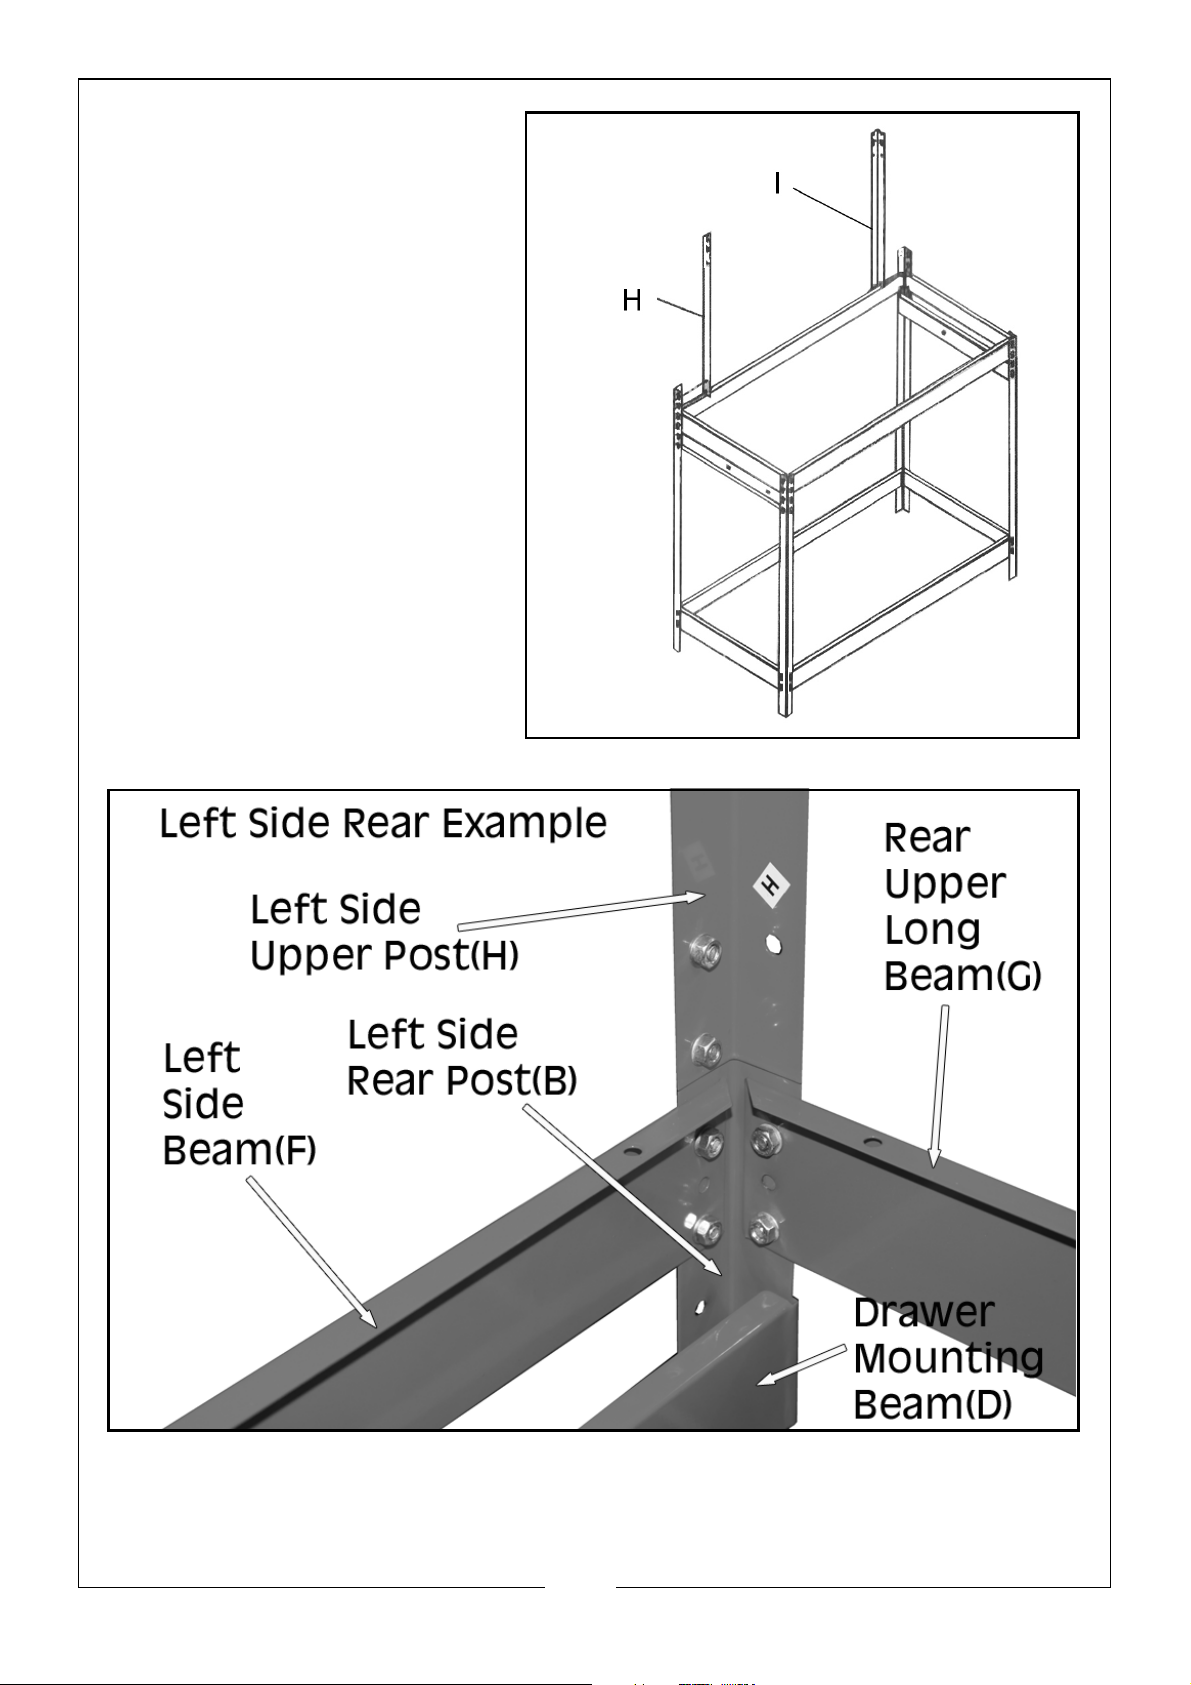
6. Identify the left/right
handed upper post (H & I).
Bolt them to the rear posts
as shown using further bolts,
washers & nuts
7
Parts & Service: 020 8988 7400 / E-mail: [email protected] or [email protected]
Page 8
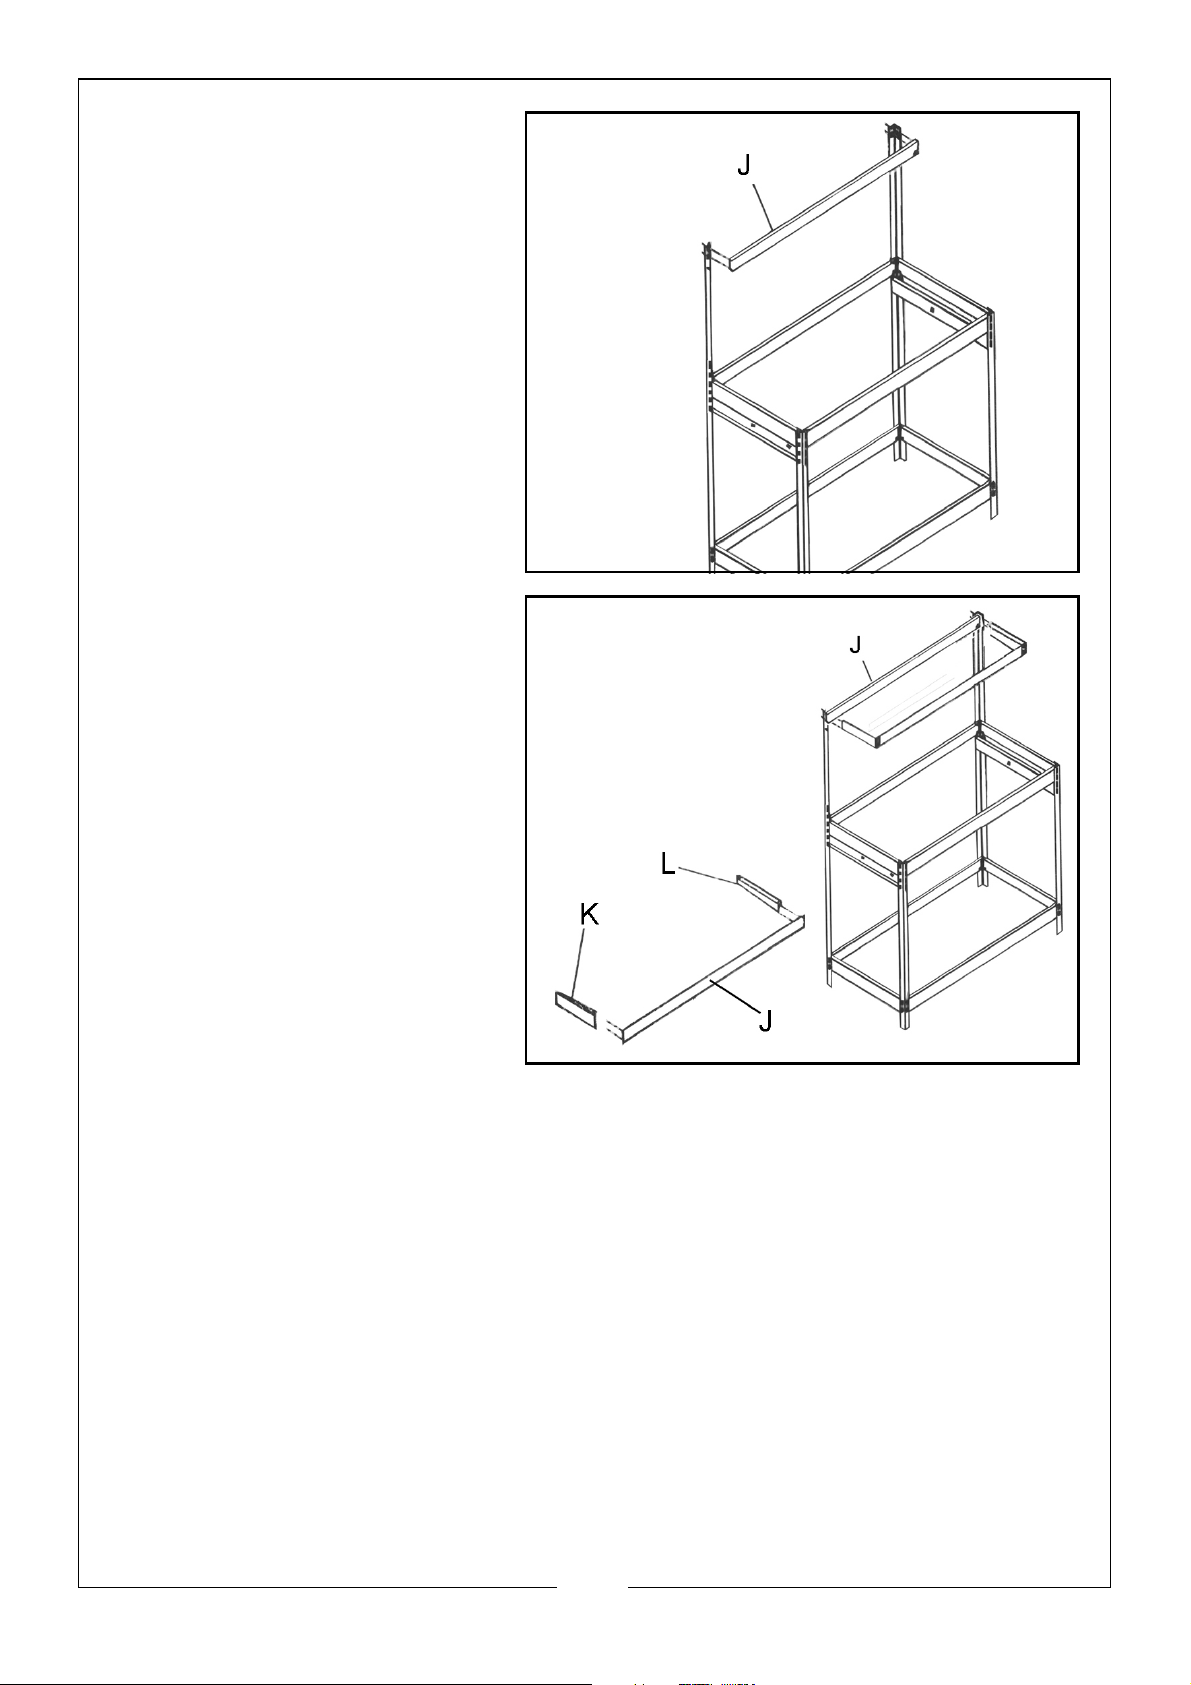
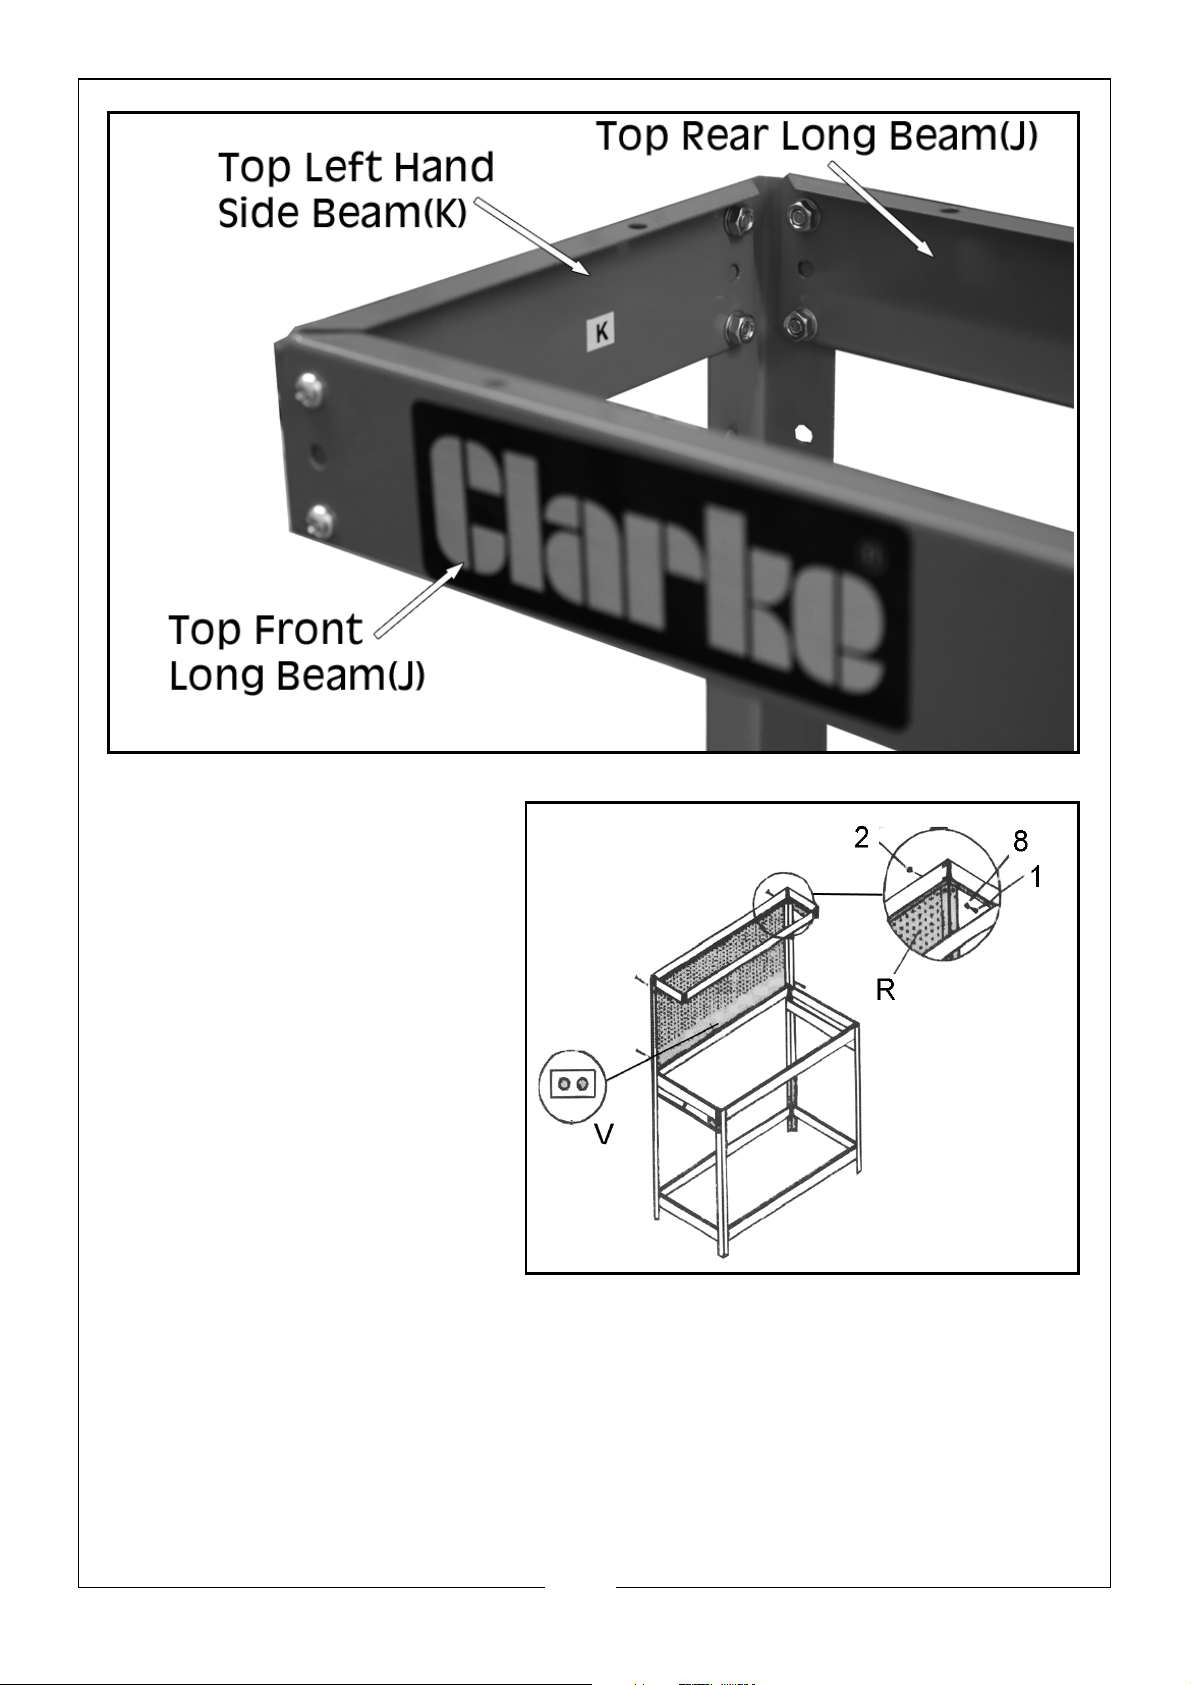
7. Attach one top long beam
(J) to the rear surface of
the post extensions using
further bolts, washers &
nuts.
8. Assemble the remaining
top long beam (J) to the
left/right top side beams (K/
L).
9. Bolt this assembly to the
side faces of the post
extensions complete the
frame.
8
Parts & Service: 020 8988 7400 / E-mail: [email protected] or [email protected]
Page 9
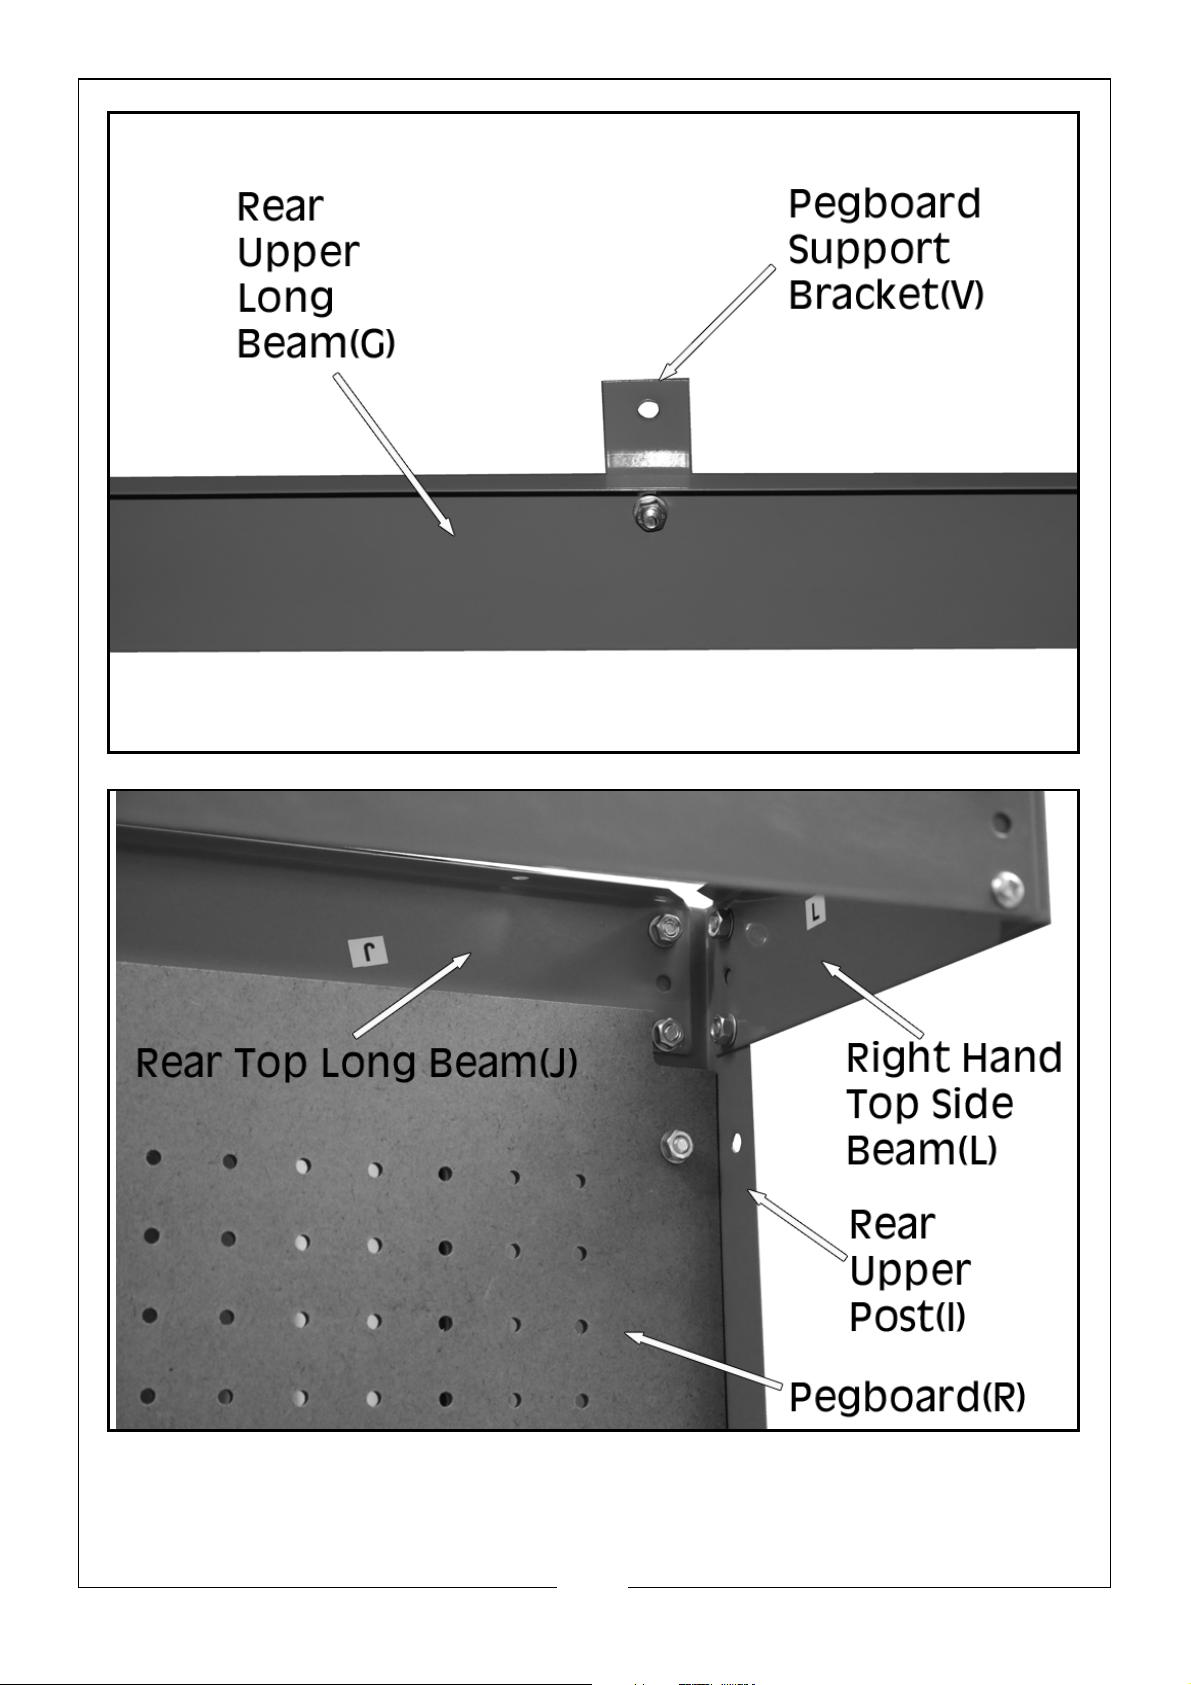
10. Attach the pegboard
supporting bracket to the
frame with two bolts/nuts/
washers as shown.
11. Fit the pegboard (R)
against the frame and
secure using bolts (1), nuts
(6) and washers (9) at the
top corners.
12. Fix the pegboard bottom
edge to the frame with the
support bracket (V).
9
Parts & Service: 020 8988 7400 / E-mail: [email protected] or [email protected]
Page 10
Page 11
ASSEMBLE & FIT THE DRAWER
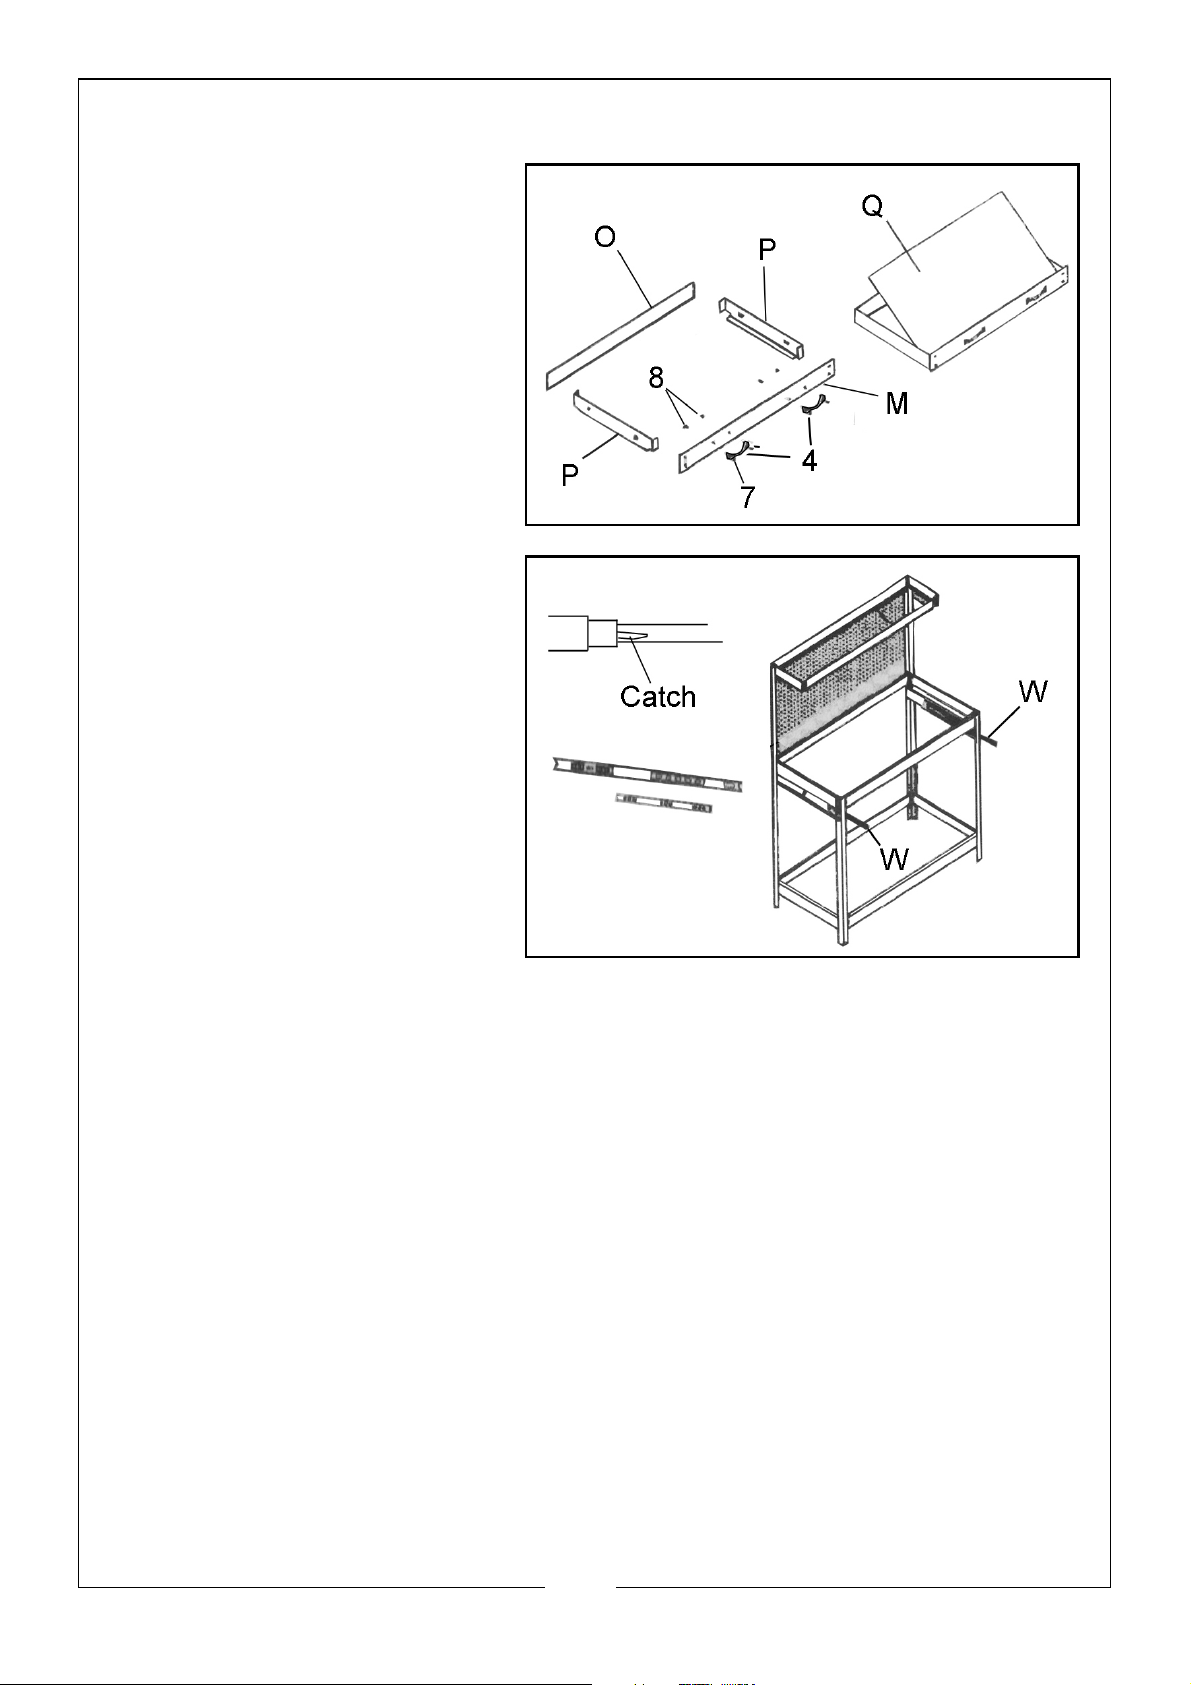
1. Assemble the side panels
(P), rear panel (O) and
front panel (M) of the
drawer using bolts, washers
and nuts as shown.
2. Rest the drawer bottom (Q)
into the drawer frame.
3. Attach the handles (7) to
the sliding drawer using four
bolts (4) and nuts (8).
4. Add the draw runners (W)
to the inside faces of the
drawer mounting bars using
bolts (4) and nuts (8) as
follows.
• The runners are in two parts.
• The wider part fits to the
frame and the narrow part
to the side of the drawer.
11
Parts & Service: 020 8988 7400 / E-mail: [email protected] or [email protected]
Page 12
Page 13
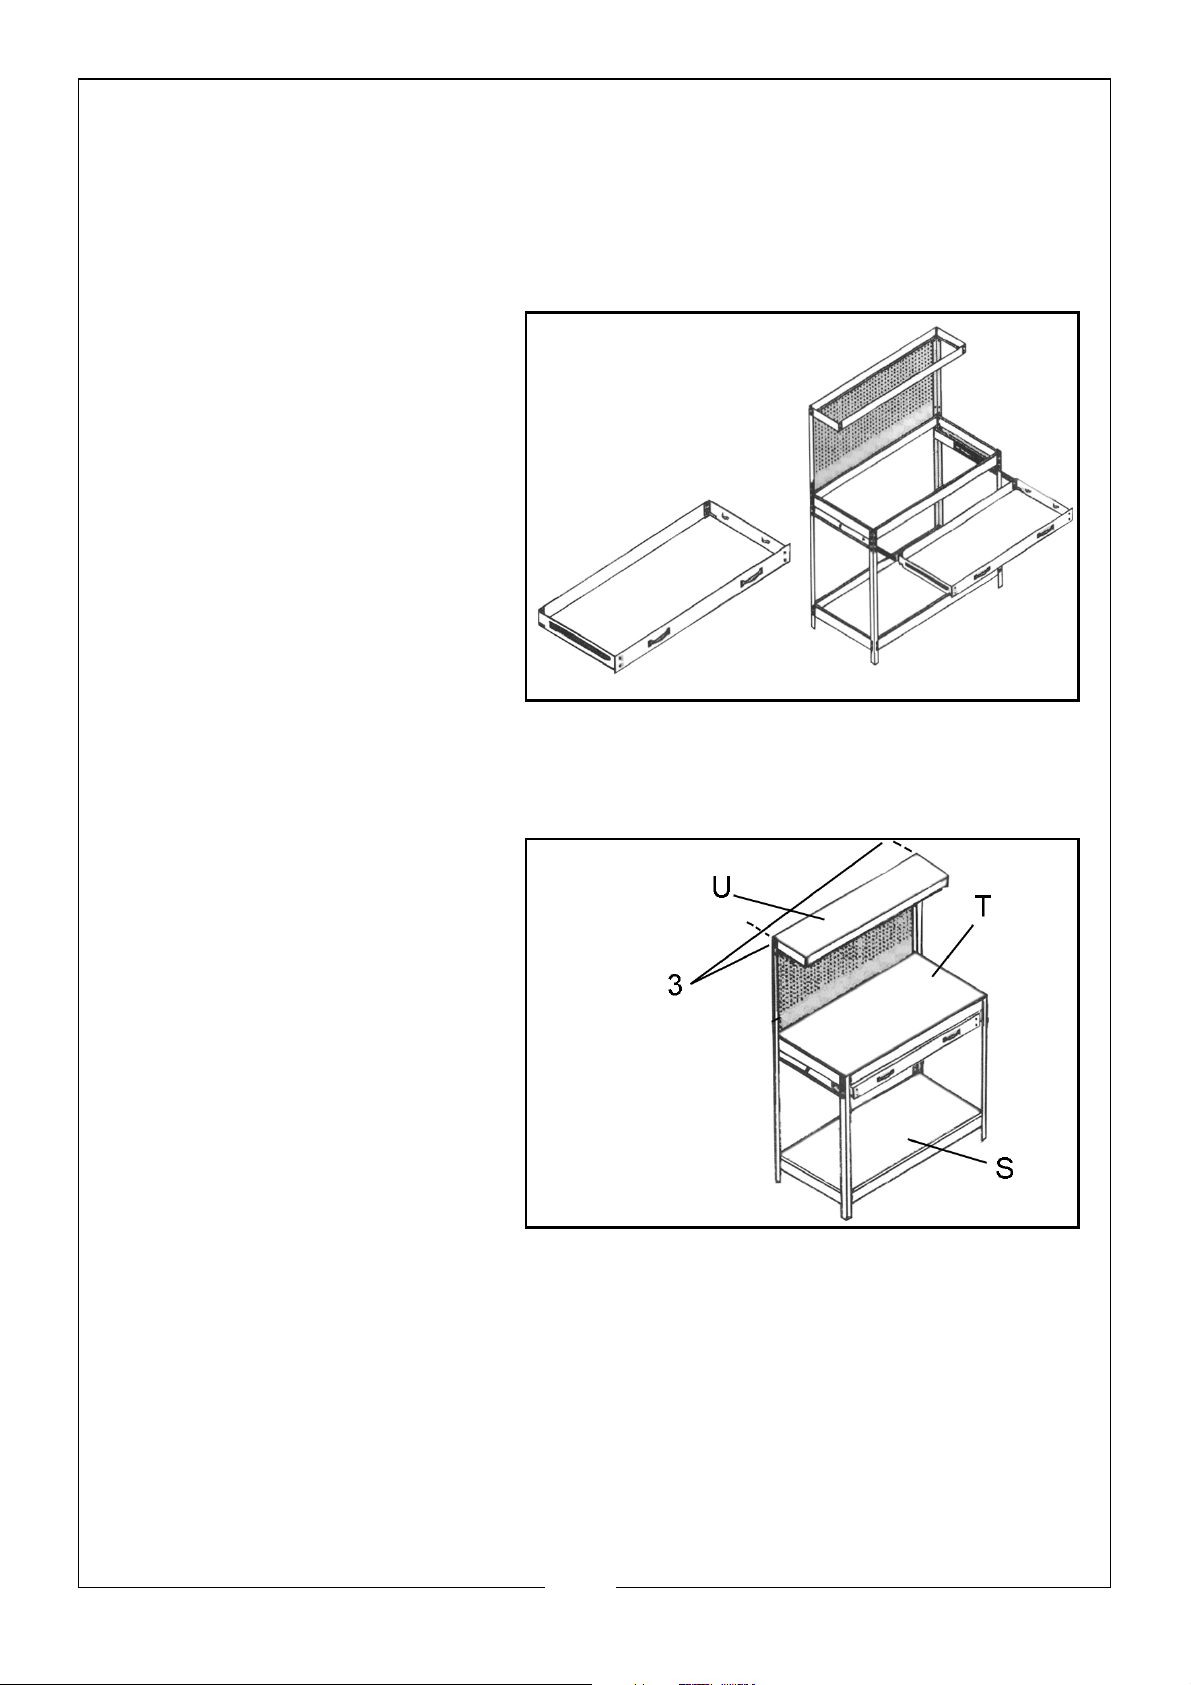
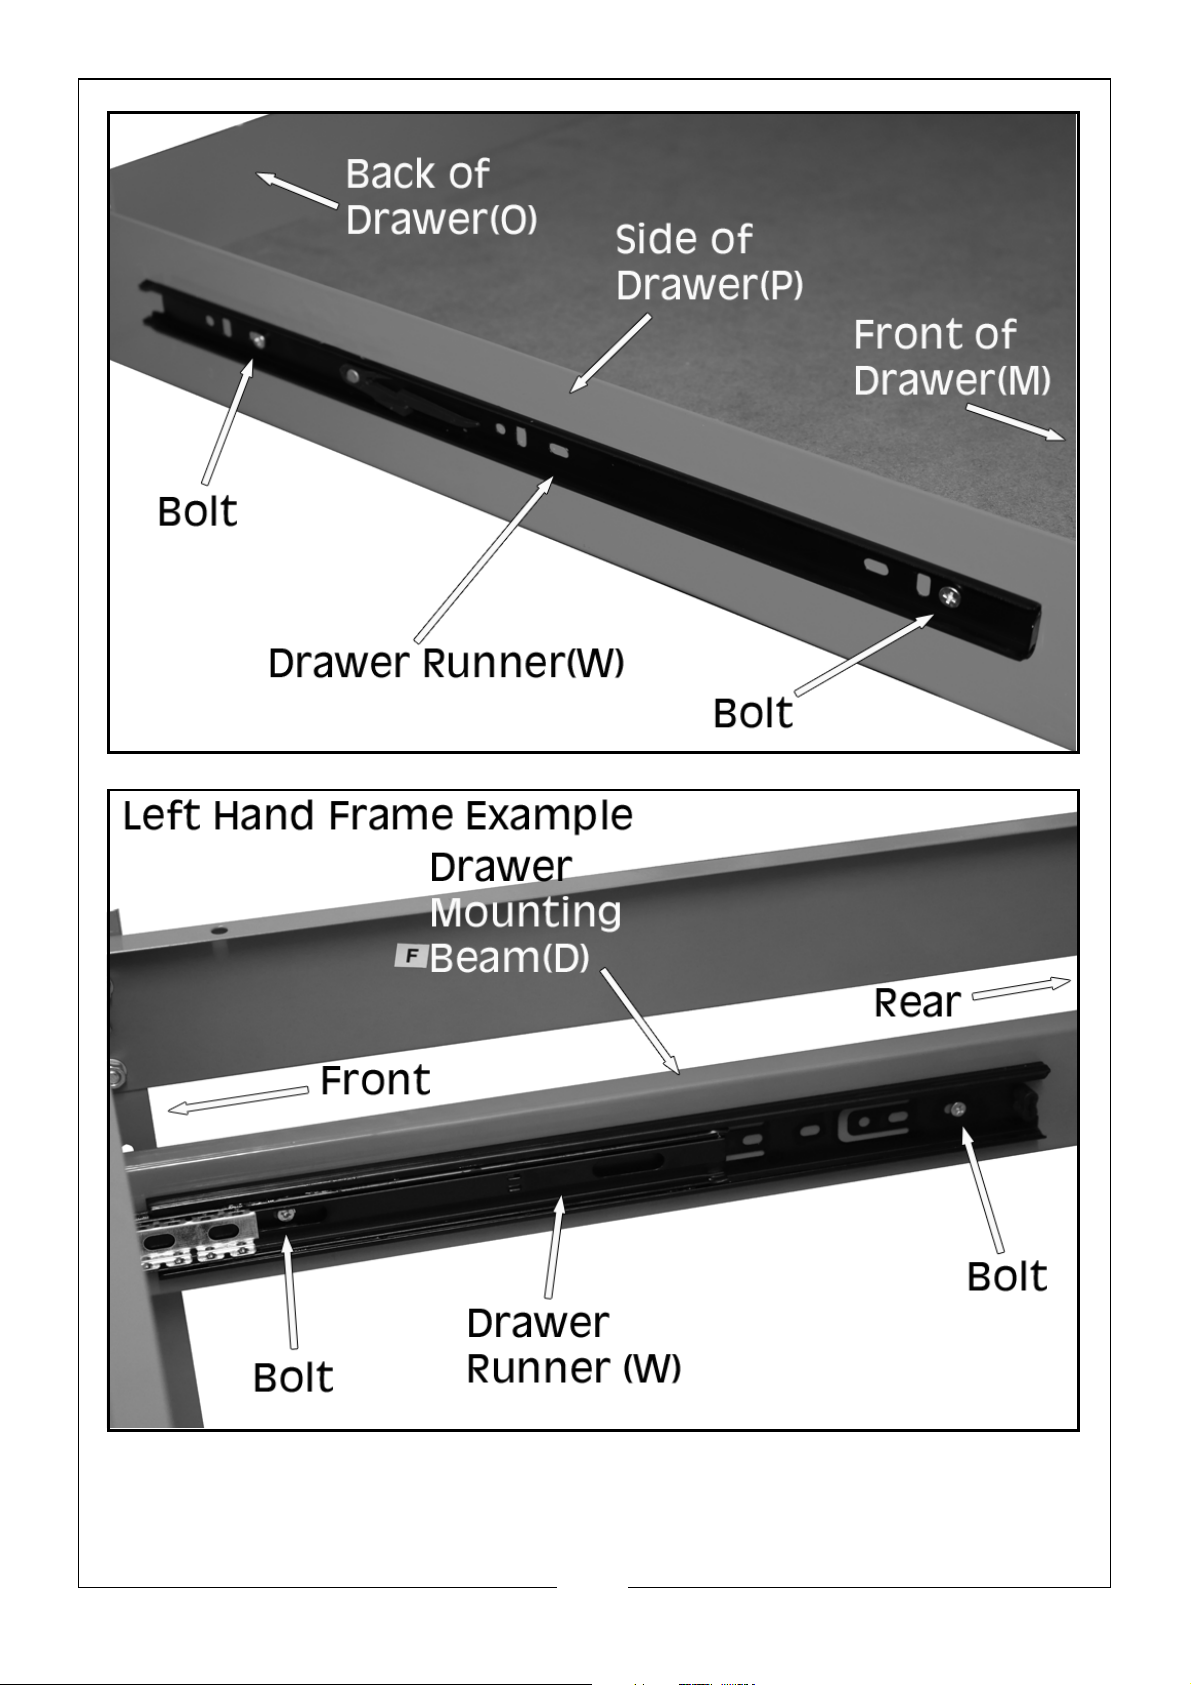
• The runner retaining bolts are inserted from inside to outside (with nuts
outside).
5. Separate the narrow part from the middle part by means of the spring
catch (just visible where the two parts meet).
6. Screw the wide parts to the
frame and the narrow parts
to the drawer sides.
7. Slide the drawer into
position by Iining up the
parts of the runners on the
frame with those on the
drawer and sliding the
draw into position.
• The catches will make a
slight click as they lock the
runner parts together.
FIT THE WORKTOP PANELS
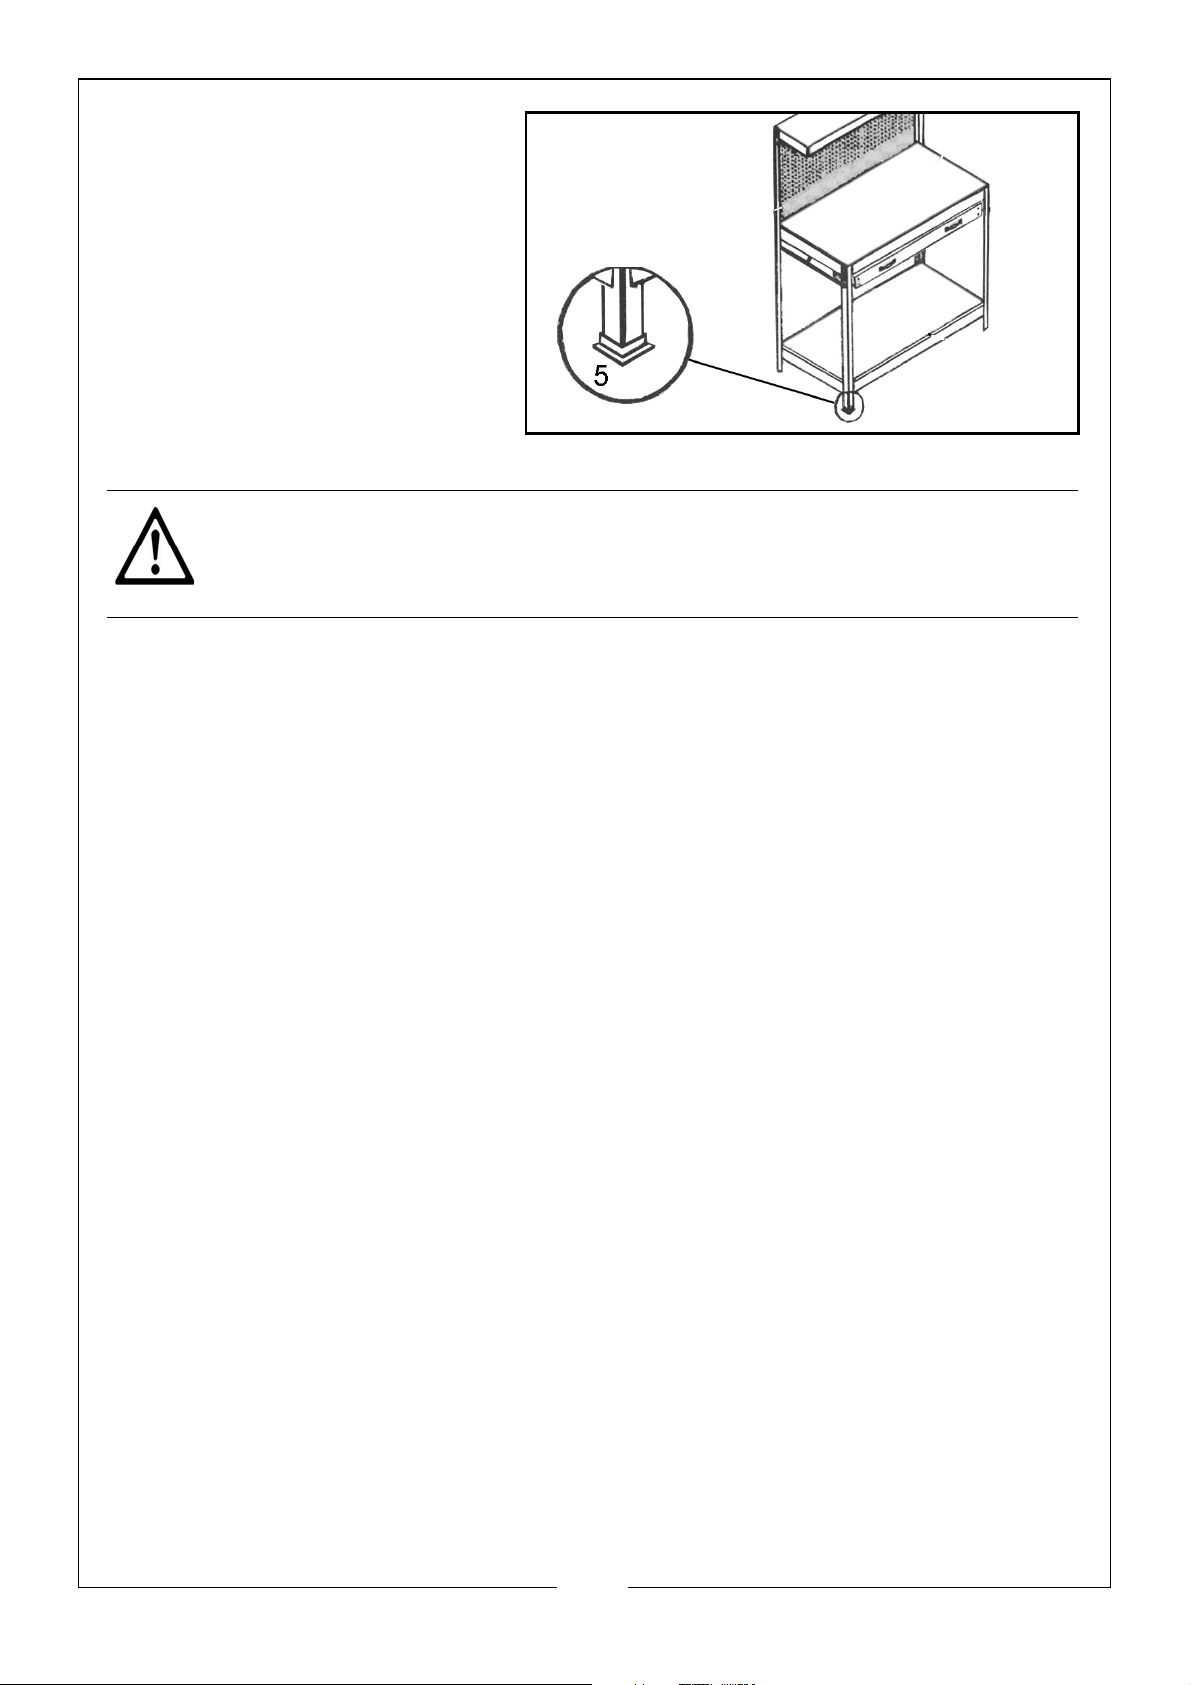
1. Fit the worktop panel (T) by
placing it onto the frame
and tapping it into position.
2. Fit the bottom shelf (S) by
sliding it in from the side at
an angle and resting it in
position.
3. Fit the top shelf (U) to the
frame and securing it with
small screws (3).
13
Parts & Service: 020 8988 7400 / E-mail: [email protected] or [email protected]
Page 14
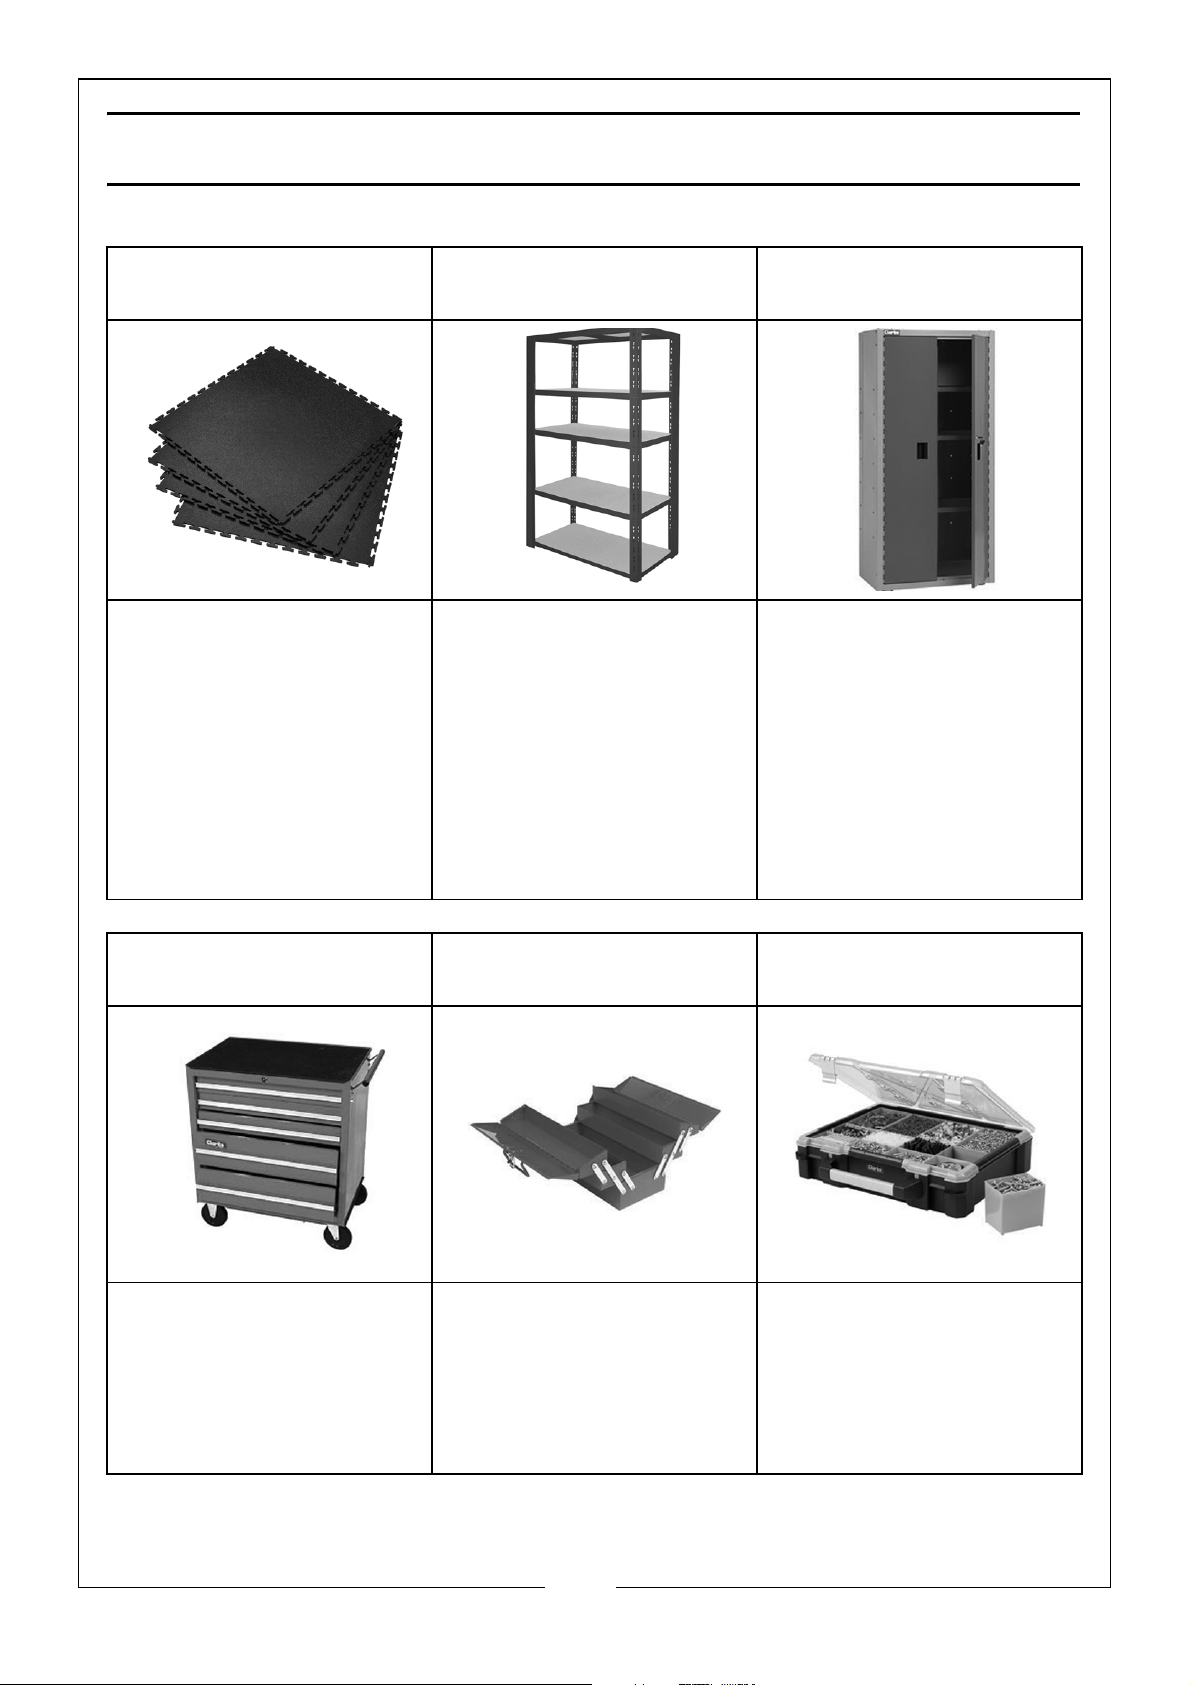
4. Add the feet (5) to each of
the corner posts.
5. Tighten all nuts & bolts to
secure the assembly.
The hooks can be attached to
the pegboard according to
the size & shape of the items to
be stored there.
CAUTION: DO NOT OVERLOAD THE DRAWER OR SHELF PANELS.
14
Parts & Service: 020 8988 7400 / E-mail: [email protected] or [email protected]
Page 15
ASSOCIATED PRODUCTS
Interlocking PVC Floor
Tiles
•Petrol, Oil, Grease &
Non-Corrosive
Chemical Resistant
•Available in Black &
Grey & Edging
•6mm x 450mm x
450mm
Heavy Duty Boltless
Shelving
•Can support weight
from 200kg - 1000kg
•Available in 9 Different
Colours & Sizes
•Part No. On
Application
2 Door Tall Locker
Cabinet- CC76
•Dimensions:762mm x
460mm x 1575mm
•Shelf Load Capacity:
24kg
•3 Adjustable Shelves
•Part No. 7642030
•Part No. 3608005
5 Drawer Mobile Tool
Trolley - CTC105
•Dimensions: 760mm x
465mm x 790mm
•Max. Drawer Load:
42kg
•Part No. 7633020
Heavy Duty Cantilever
Toolbox - CTB700B
•Dimensions: 453mm x
209mm x 250mm
•Weight: 5.5kg
•Part No. 7631031
12 Bin Organiser -
CHT643
•8 x Small Bins: 109mm x
79mm x 96mm
• 4 x Large Bins: 159mm
x 109mm x 96mm
•Part No. 1801643
15
Parts & Service: 020 8988 7400 / E-mail: [email protected] or [email protected]
Page 16

 Loading...