

Page 1
DEHUMIDIFIER
DEHUMIDIFIER
MODEL NO: CD1970
Part No: 6470627
USER INSTRUCTIONS
1206
©
Page 2
TROUBLE SHOOTING CONTINUED
PROBLEM: Unit is in dehumidifier mode and will not manually change to any
other mode.
CAUSE:
(This condition can occur when the ambient temperature is below 10°C or is
above 35°C).
When the ambient temperature is below 10°C a protection device in your
dehumidifier will operate. This engages the electronic defrost program.
The unit will now only operate in dehumidifier mode with the fan speed at
high level. The compressor will operate intermittently by switching on for 40
minutes and switching off for 10 minutes. The mode cannot be changed until
the ambient temperature rises above 10°C. This program will also come into
operation when the temperature rises above 35°C, in order to prevent the
compressor from overheating.
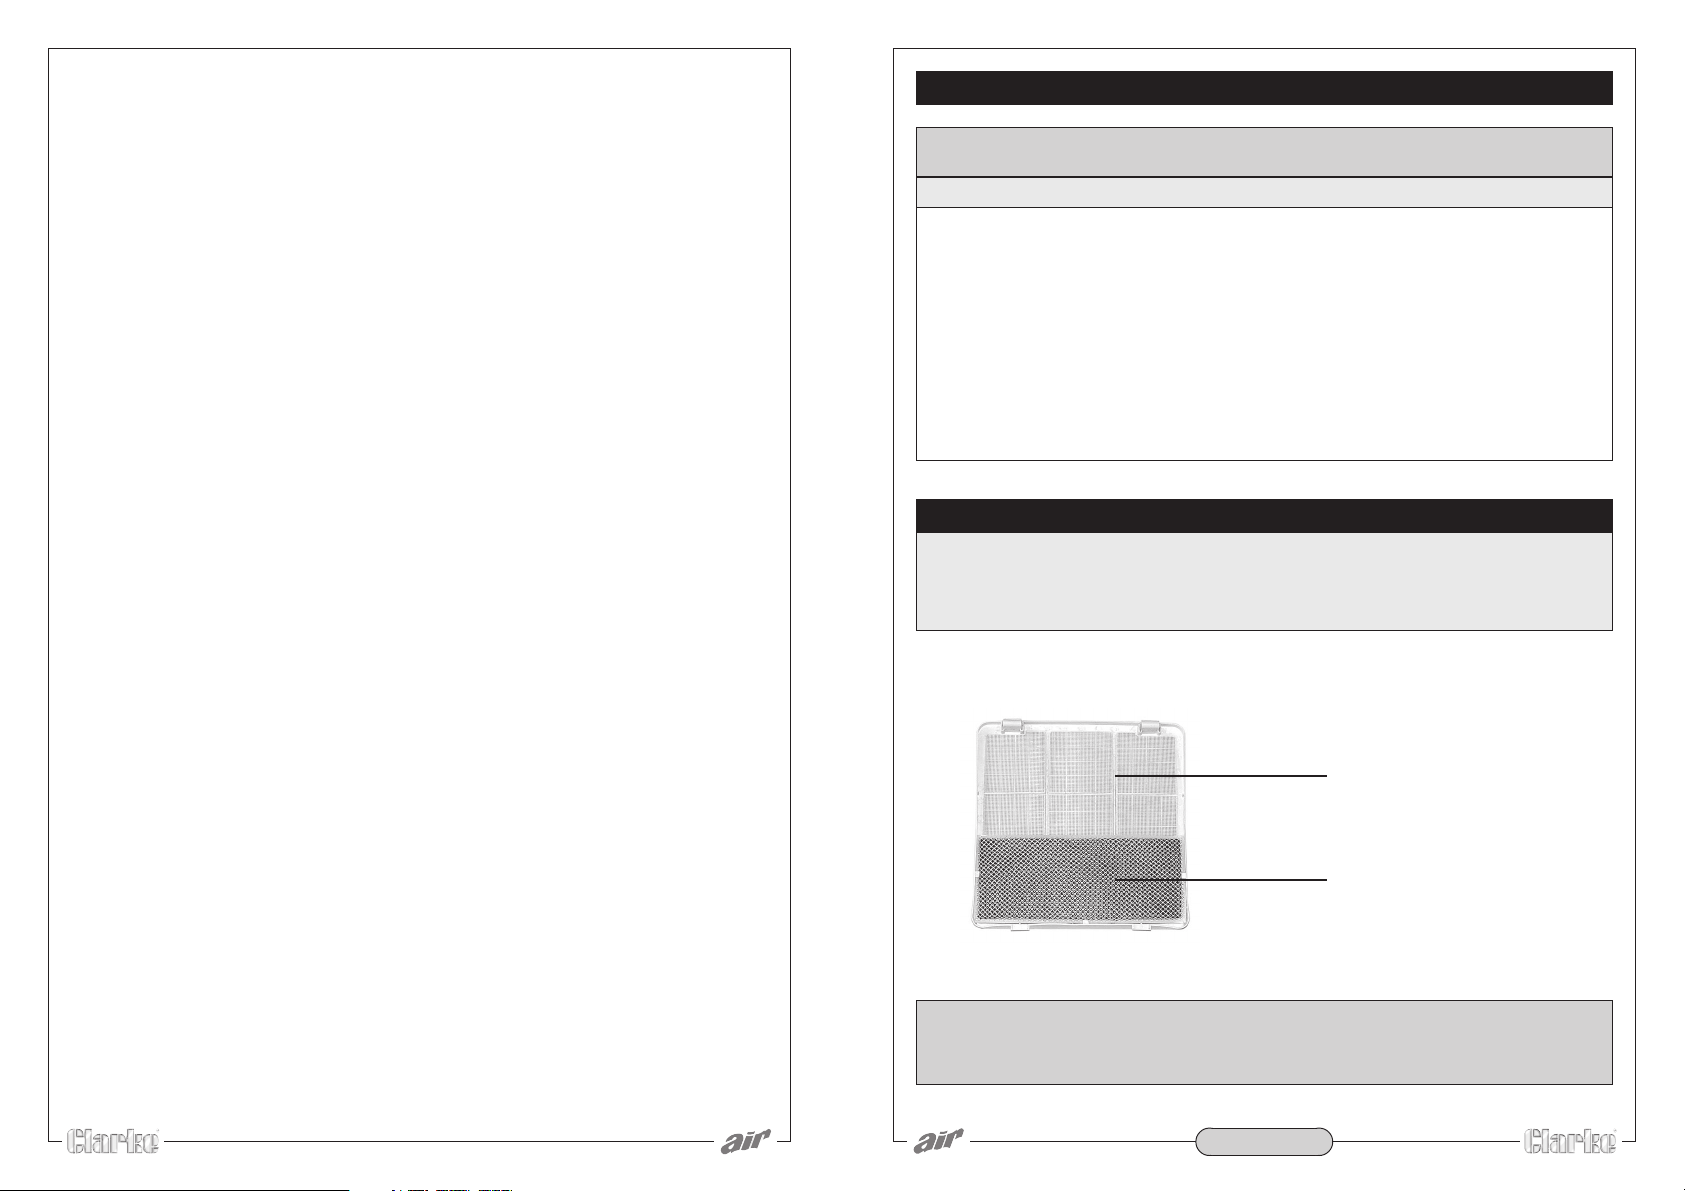
PARTS LIST
ITEM: DESCRIPTION: PART NO:
1. Air Filter .............................................................................. EH197001
2. Active Carbon Filter ........................................................ EH197002
Copyright: CLARKE International. May 2006. All rights breserved
1
2
WARNING: The use of spare parts or accessories, other than those supplied
by CLARKE international or one of its recognised dealers, may be
hazardous and could invalidate the guarantee.
- 13 -
Page 3
TROUBLE SHOOTING
PROBLEM: The unit does not turn ON.
CAUSE: TROUBLE SHOOTING:
Is the power cable disconnected?
Is the full indication light ON?
(the water tank is full, or the water
tank is not correctly installed).
Is the ambient temperature above
39°C or below 2°C.
Has the fuse in the mains plug blown?.
PROBLEM: The dehumidification is not functioning.
CAUSE: TROUBLE SHOOTING:
Is the air filter blocked?
Is the air outlet blocked?
Plug in the power cable correctly.
Empty the water tank and ensure that
it is correctly installed.
The built in protective device is in
operation, this prevents damage
occurring in adverse environmental
conditions. Do not use the unit in such
environments.
Replace the fuse with one of the same
rating.
Clean the air filter.
Remove the blocking material from
the air outlet.
Thank you for purchasing this CLARKE Dehumidifier, which is designed for use in a
domestic and small office environment only.
Please read this instruction leaflet thoroughly and follow the instructions carefully,
in doing so you will ensure the safety of yourself and that of others around you, this
will also ensure that the dehumidifier will give you long and satisfactory service.
Please keep these instructions in a safe place for future reference.
CLARKE GUARANTEE
This CLARKE product is guaranteed against faulty manufacture for a period
of 12 months from the date of purchase. Please keep your receipt as proof
of purchase.
This guarantee is invalid if the product is found to have been abused or
tampered with in any way, or not used for the purpose for which is was
intended.
Faulty goods should be returned to their place of purchase, no product
can be returned to us without prior permission.
This guarantee does not effect your statutory rights.
PROBLEM: No air is discharging from the unit.
CAUSE: TROUBLE SHOOTING:
Is the air filter blocked?
PROBLEM: Noisy operation.
CAUSE: TROUBLE SHOOTING:
Is the unit properly installed?
Is it tilted or unstable?
Is the air filter blocked?
PROBLEM: The fan motor runs but the compressor is not activated
CAUSE:
If the unit is switched on within 3 minutes after the power is turned off, the
protective device of the unit will operate. The compressor will be
automatically re-activated after a 3 minute delay.
Clean the air filter.
Place the unit on a firm base.
Clean the air filter.
- 12 -
CONTENTS
Guarantee ...................................................................................................... 1
Safety Precautions .......................................................................................... 2
Electrical Connections ................................................................................... 3
Technical Specification .................................................................................. 4
Parts Description ............................................................................................. 5
Setup & Operation ......................................................................................... 7
Maintenance ................................................................................................ 11
Trouble Shooting ........................................................................................... 12
Parts List ......................................................................................................... 13
Waste electrical products should not be disposed of with household waste. Please dispose of at your local
Please Note that details and specifications herein, are correct of time of going to print.
However CLARKE International reserve the right to change specifications at any time without prior notice.
Copyright CLARKE International All rights Reserved 03/2006.
recycling facility.
- 1 -
Page 4
SAFETY PRECAUTIONS
WARNING:
PLEASE READ ALL INSTRUCTIONS CAREFULLY BEFORE OPERATING
This appliance is intended for domestic and light office use ONLY. Any
other use is not recommended by the manufacturer and may cause fire,
electric shocks or other injury to person or property.
• ALWAYS keep the unit in an upright position to avoid damage to the cooling
system, locate on a flat stable surface.
• DO NOT place the unit close to curtains or other objects (see page 10).
• ALWAYS ensure that the air inlets and outlets are NOT blocked or covered.
• Operate this unit in an ambient temperature of between 2°C and 35°C.
• When operating in laundry mode keep clothing a safe distance from the
unit to prevent water from dropping in.
• NEVER place anything on top of the unit and DO NOT cover with any kind of
material while in use.
• This product is intended for domestic and small office use ONLY and NOT for
commercial, industrial or outside use.
• To protect against electric shocks, DO NOT immerse unit, plug or cord in
water or spray with liquids.
• DO NOT operate the unit if the cord or plug becomes damaged, return to
an authorised service facility for examination and repair.
• ALWAYS switch the unit OFF before unplugging from the mains supply, failure
to do so could cause damage to the electronics in the unit.
• ALWAYS empty the water tank before storing the unit away.
• ALWAYS unplug the unit from the supply when not in use, when emptying
the water tank, and when moving to a new location.
• NEVER pull the cord to disconnect the unit from the power supply, always
grip the power plug and pull from the socket.
• ALWAYS supervise children and pets when any appliance is present.
• DO NOT run the power cord under carpeting, or cover with rugs or runners.
Arrange the cord away from areas where it may be tripped over.
• NEVER operate or store the unit in direct sunlight.
• ALWAYS take the unit to a qualified service engineer for repair. Repairs
carried out by unqualified people may cause damage to the unit or injury
to persons or property and void the warranty.
MAINTENANCE
ALWAYS Turn the unit OFF and disconnect from the power supply before
proceeding with any cleaning or servicing.
To clean the unit use a soft cloth to wipe off any dust. If the unit is very dirty
use a damp cloth and wipe dry. DO NOT use any cleaning detergents ,
sprays or other chemicals as they will damage the unit.
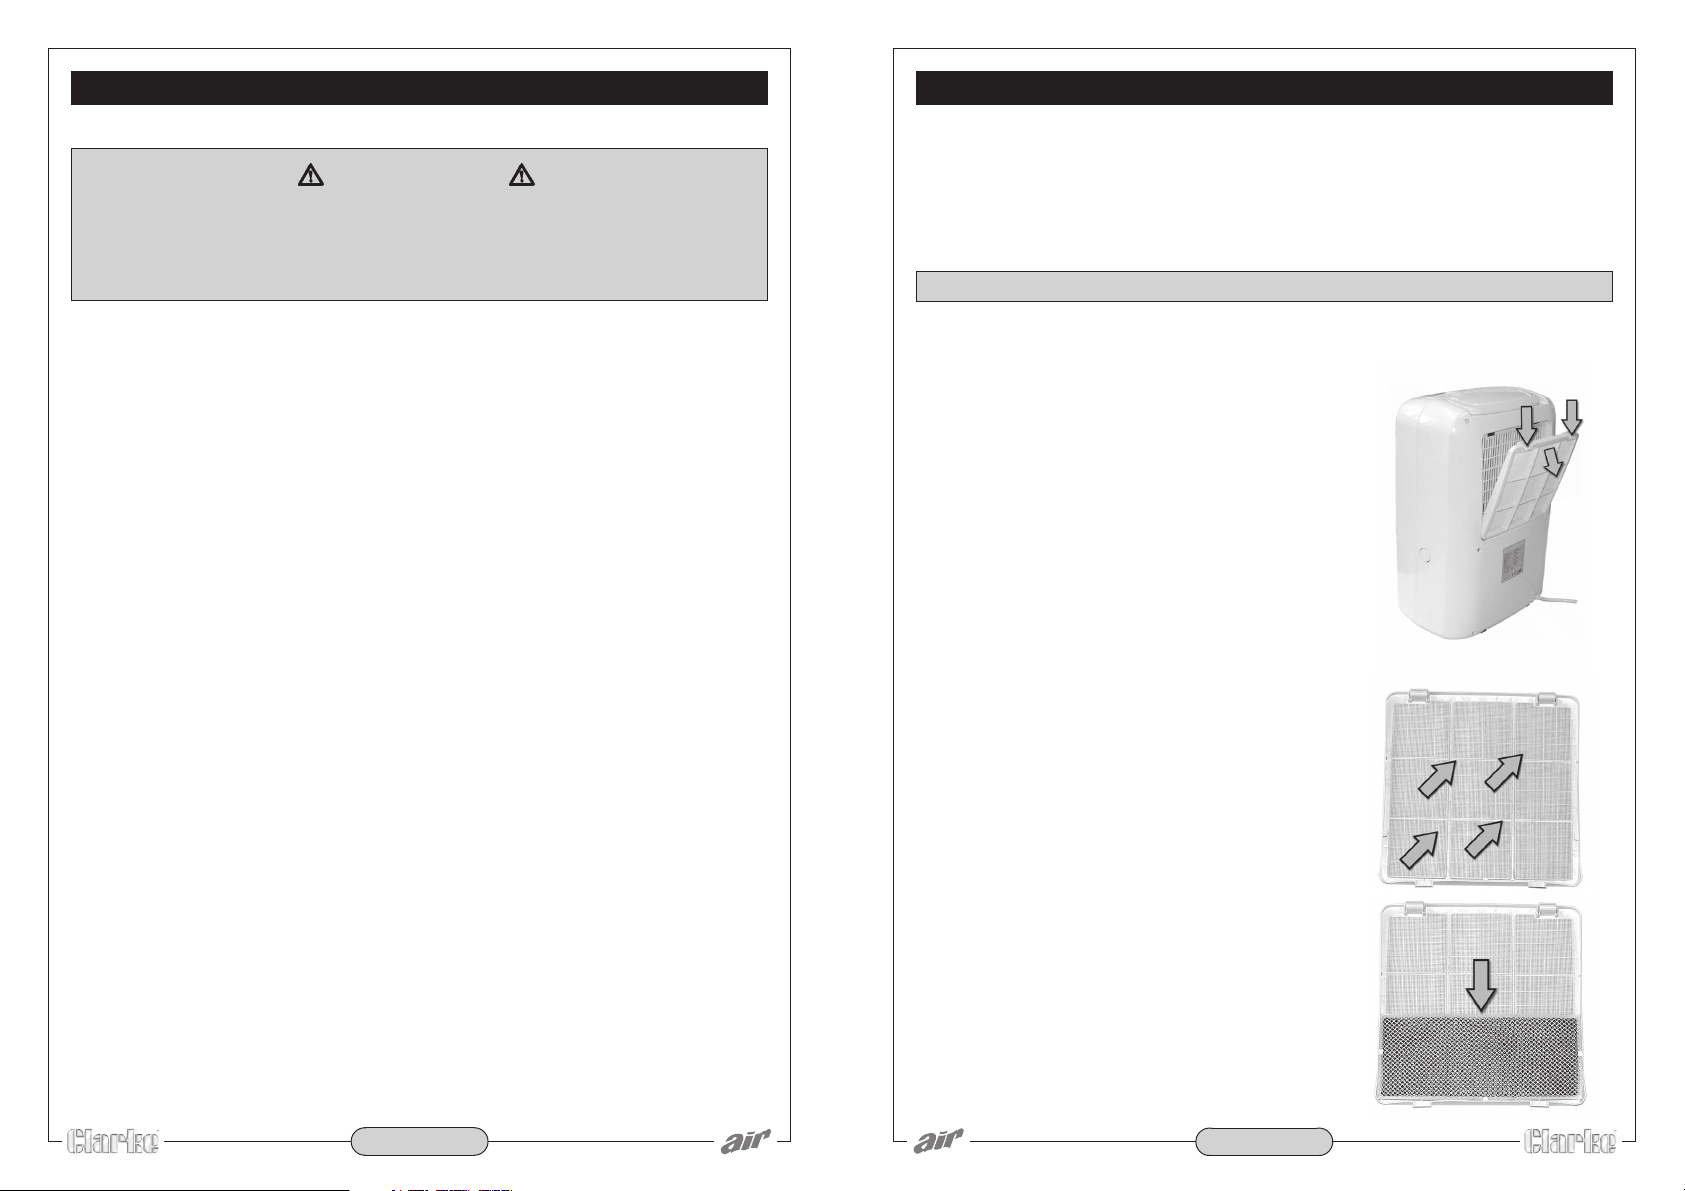
CLEANING THE AIR FILTER
The air filter should be cleaned once every two weeks.
1. Take off the air filter:
Press down the clips on the top of the air
filter to remove the air filter. There is an
active carbon filter screen attached
behind the air filter. Remove the active
carbon filter screen.
2. Clean the air filter
Use a vacuum cleaner hose attachment
to clean the dust off the surface of the
filter. If the filter is dirty you may use
lukewarm water or a neutral detergent
solution to clean it. After cleaning,
thoroughly dry the filter. The active
carbon screen cannot be cleaned.
You may replace as required.
3. Reinstall the air filter
Place the active carbon filter back into
its original position behind the air filter.
Locate the clips at the bottom of the air
filter back into the dehumidifier unit and
press the filter into position until the lugs
at the top clip back into their original
position.
- 2 -
- 11 -
Page 5
SETUP AND OPERATION CONTINUED
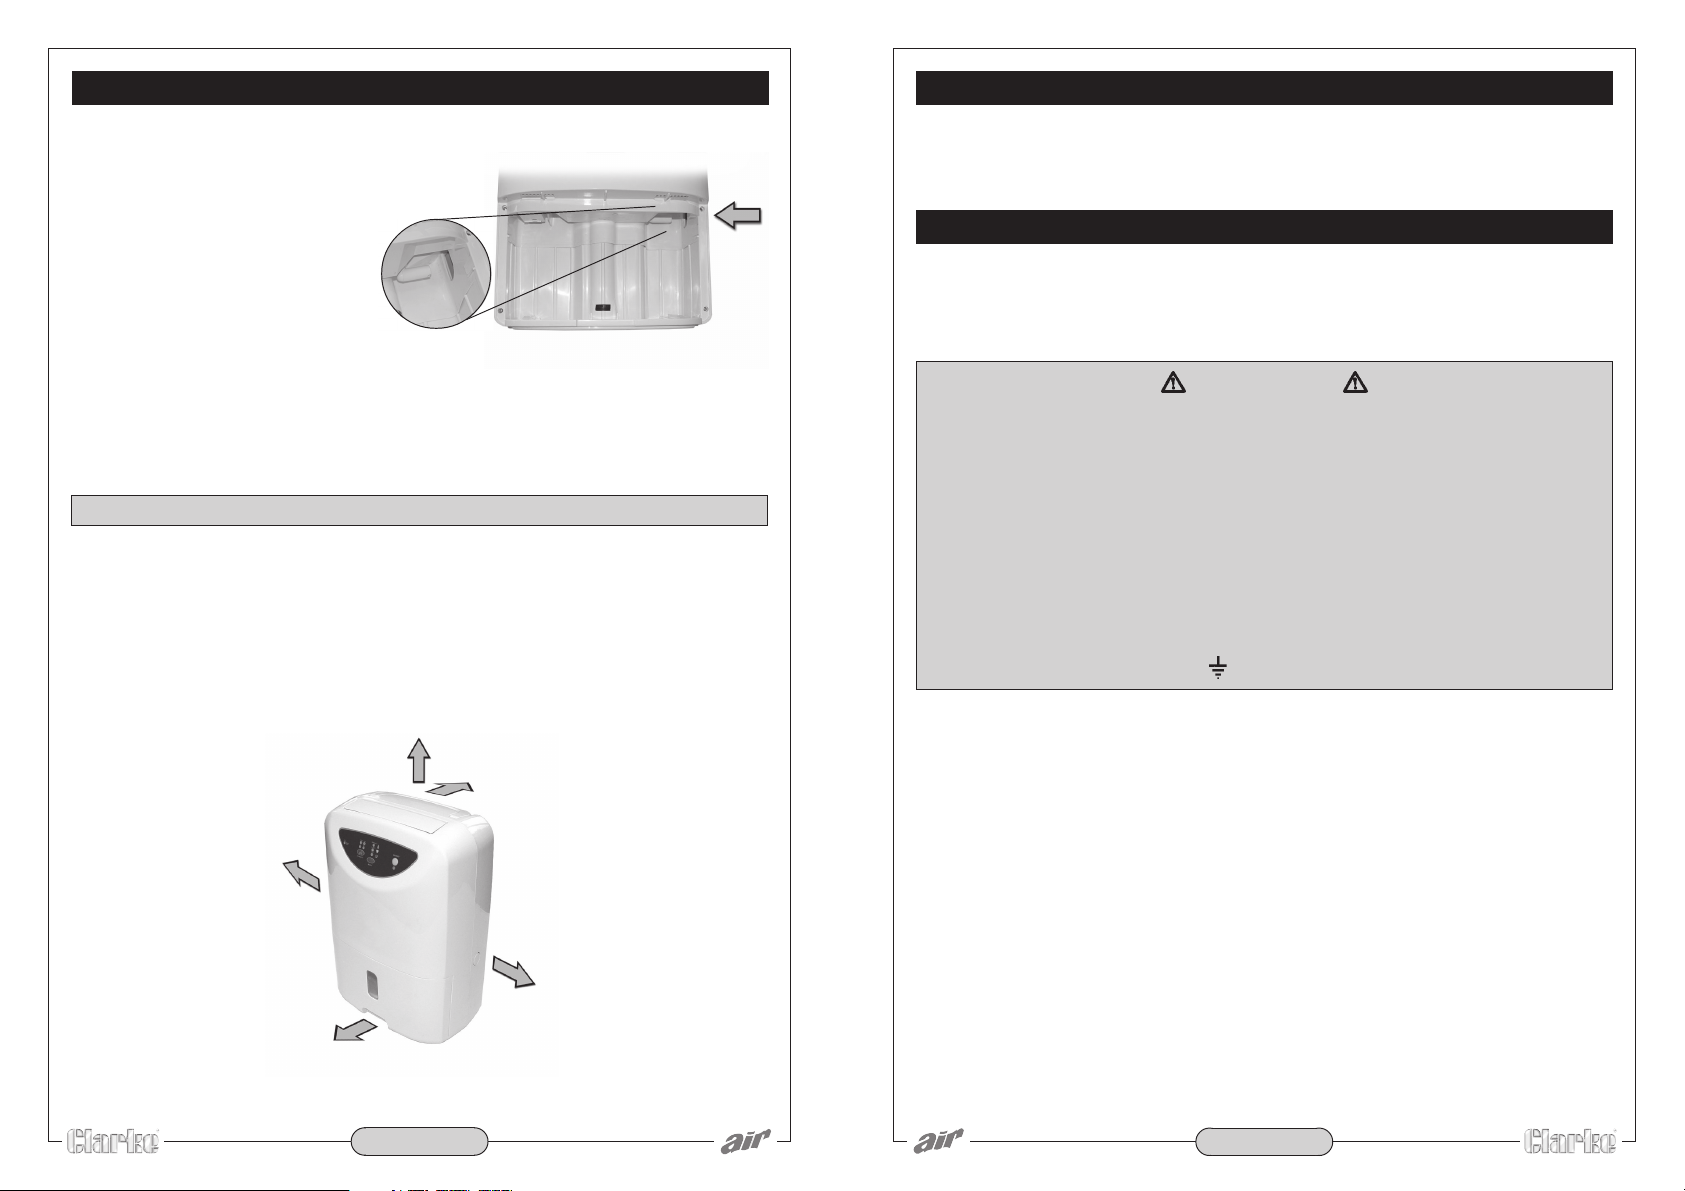
2. Insert the drain hose into the water
outlet opening. Pass the water
hose though the outlet
opening and firmly push it
into the water outlet of the
main unit. DO NOT block the
hose.
SAFETY PRECAUTIONS CONTINUED
• DO NOT use the unit without the AIR FILTER.
• Check the household voltage to ensure it matches the units rated
specification before operating.
ELECTRICAL CONNECTIONS
This product is provided with a standard 13 amp, 230 volt (50Hz) BS1363 plug, for
connection to a standard, domestic electrical supply. Should the plug need
replacing at any time, ensure that a plug of identical specification is used.
3. Place the water tank back in its original position. Make regular checks when
the hose is first installed to ensure that it is properly connected and there is
no blockage.
NOTE: Always position the angle of the hose downward.
MOVING THE DEHUMIDIFIER
Empty the water tank BEFORE moving the unit. Remember to leave adequate
room around the unit for ventilation. Lift the handle and tilt the unit so that it
can easily be moved on the rear wheels. Take care when rolling the
dehumidifier across floors where the wheels could cause damage i.e. thick
pile carpets, wooden floors etc. If in any doubt carry the dehumidifier by the
handle.
Min. 50cm
Min. 20cm
Min. 20cm
Min. 20cm
Min. 20cm
WARNING:
Should it ever be necessary to change the plug, the wires in the
mains lead should be wired according to the following colour code:
BLUE - NEUTRAL
BROWN - LIVE
GREEN & YELLOW - EARTH
• Connect the BLUE coloured wire to the plug terminal marked with a
letter ‘N’ or coloured BLACK.
•
Connect the BROWN coloured wire to the plug terminal marked with
a letter ‘L’ or coloured RED.
• Connect the GREEN & YELLOW coloured wire to the plug terminal
marked with a letter ‘E’ or ‘ ’ or coloured GREEN or GREEN & YELLOW.
IMPORTANT!:
If this appliance is fitted with a plug which is moulded on to the electrical cable
(i.e. non-rewireable) please note:
• The plug MUST be thrown away if it is cut from the electric cable. There is a
danger of electric shock if it is subsequently inserted into a socket outlet.
• NEVER use the plug without the fuse cover fitted.
• Should you wish to replace a detached fuse carrier, ensure that the correct
replacement is used (as indicated by marker or colour code).
• The fuse in the plug MUST be replaced with one of the same rating (13amps)
and this must be approved to BS1362.
IMPORTANT!:
If in any doubt, DO NOT attempt any electrical repair yourself. Consult a qualified
technician.
- 10 -
- 3 -
Page 6
TECHNICAL SPECIFICATION
Description:
Model No: ............................................................................................ CD1970
Part No: ................................................................................................ 6470627
Use: ............................................................................... Domestic/small office
Product Specification:
Operating Voltage: .................................................................................. 230V
Motor Wattage: ....................................................................................... 420W
Operating Temperature: ................................................................ 2°C - 35°C
Max Extraction Rate: .................................................................. 20 Litres/Day
Tank Capacity: ................................................................................... 4.6 Litres
Dimensions & Weights:
Product: (length x width x height) .................................. 262 x 374 x 544mm
Weight: ................................................................... 16Kg (gross) 14.2Kg (nett)
SETUP AND OPERATION CONTINUED
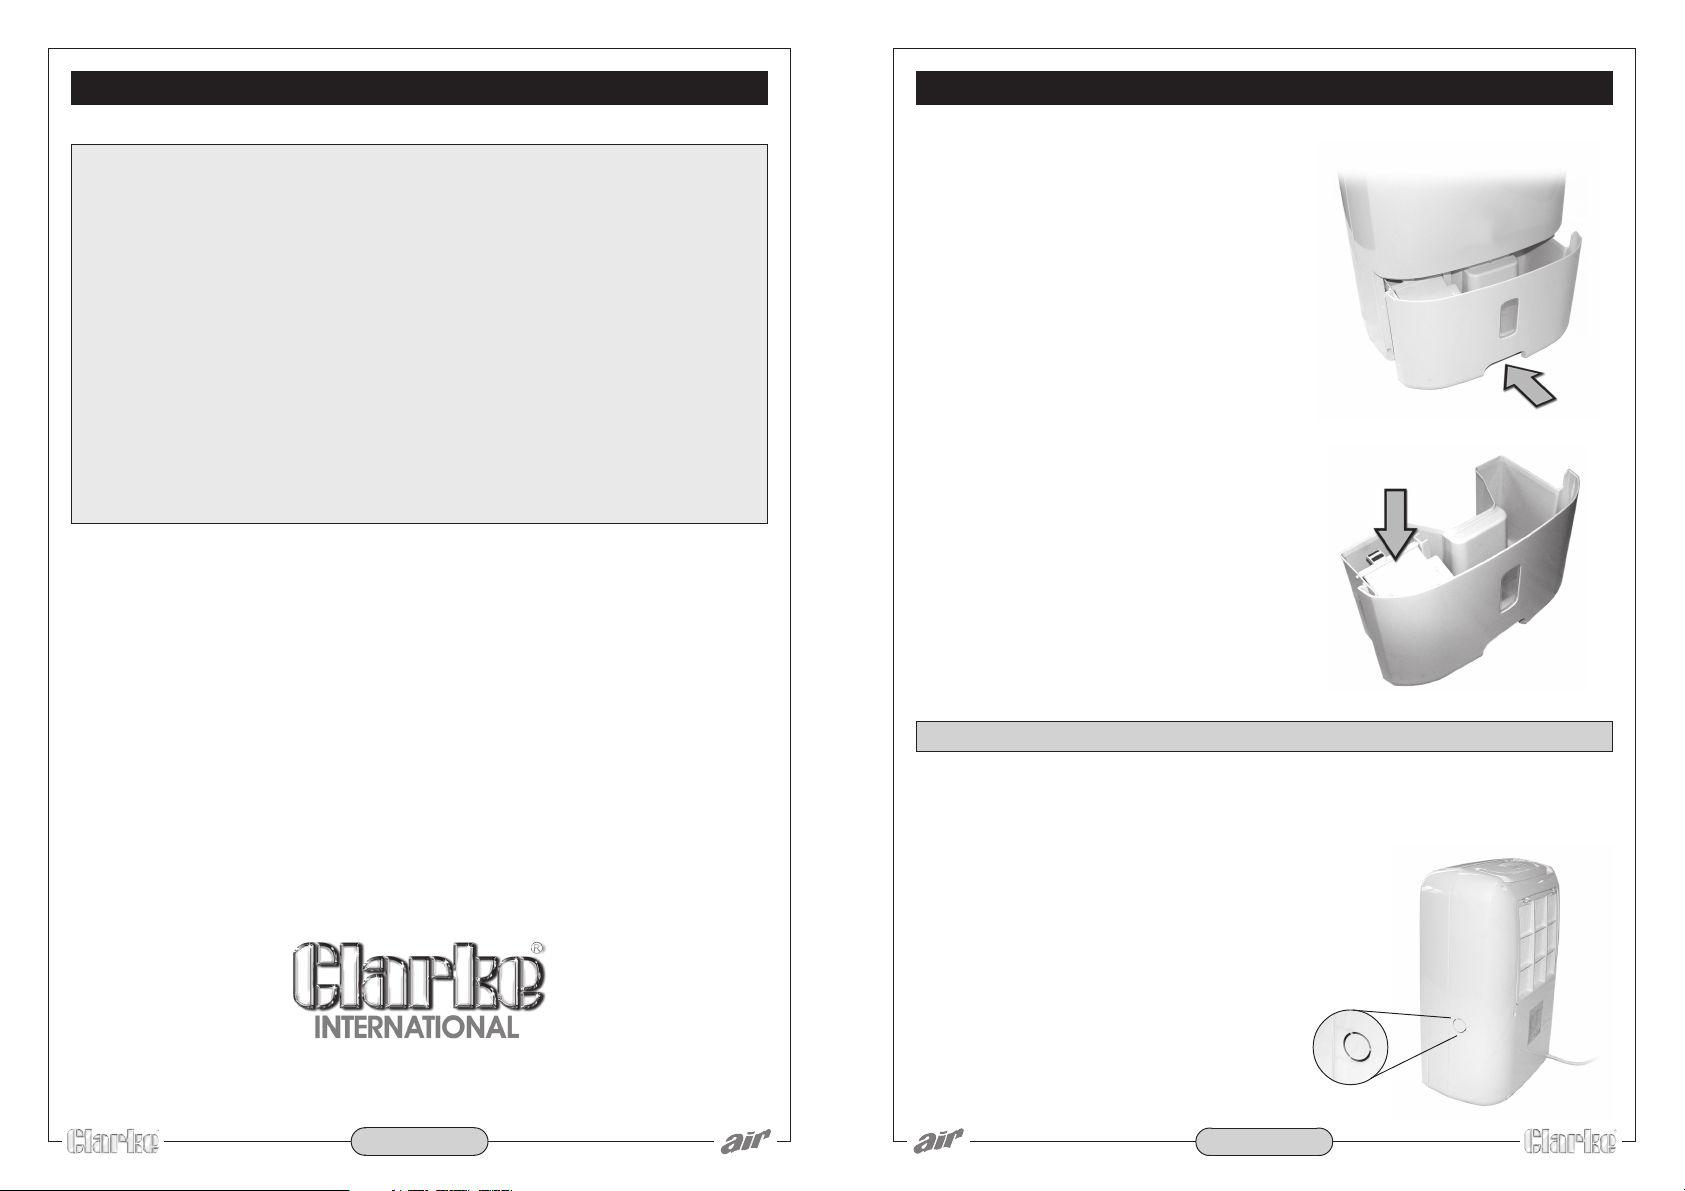
4. To reinstall the water tank push it back
to its original position.
NOTE: the unit will not function if the
tank is incorrectly installed.
5. DO NOT Remove the float or sensor in
the water tank, they are used to monitor
the water level.
Damage to the float or sensor may
cause the tank to overflow.
NOTE: If the water tank is dirty ONLY
clean it with cold or lukewarm water.
DO NOT use cleaning detergents, sprays
or other chemicals as they will damage
the tank and cause it to leak.
CONTINUOUS WATER DRAINAGE
This unit is equipped with a water outlet for continuous drainage. A tube with
an inner diameter of 16mm will need to be fitted for this purpose.
ALWAYS unplug the unit before attempting to install a drain.
1. Remove the water tank and open
the water outlet for continuous
drainage. Use a pair of cutters or a
similar tool to carefully cut open
the water outlet on the side of the
unit.
- 4 - - 9 -
Page 7
SETUP AND OPERATION CONTINUED
WATER TANK EMPTYING
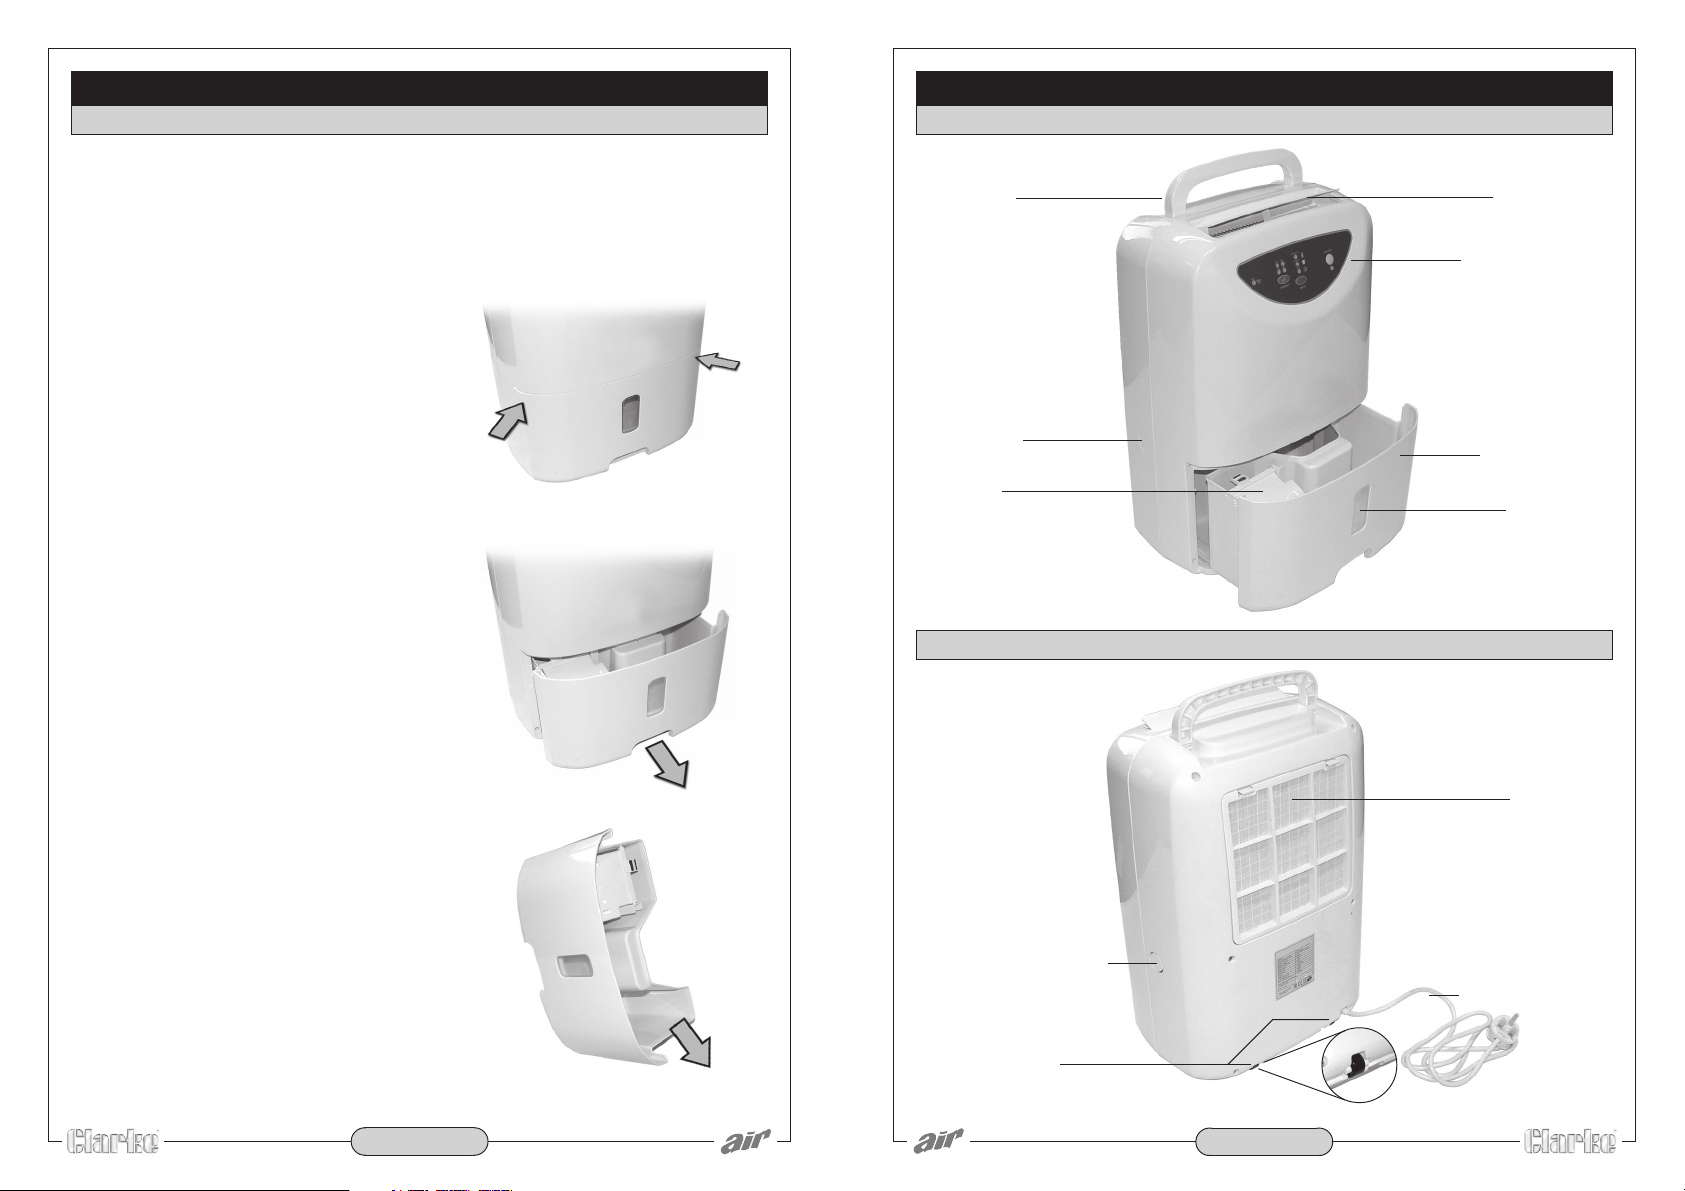
If the water tank is full (approx. 4.6 litres), the indicator light on the control
panel will be lit and the unit will automatically stop operating.
1. Switch the unit OFF on the control
panel and then switch it OFF at the
wall socket. Take out the water tank
by gently pressing the two top edges
inwards:
2. Hold the handle and carefully pull the
water tank out:
FRONT VIEW
Handle
Sensor
(DO NOT block)
Float
REAR VIEW
PARTS DESCRIPTION
Air Outlet
Control Panel
Water Tank
Window
3. Carefully empty the water from the
tank:
- 8 -
Continuous Water
Drainage Outlet
Rear Wheels
Air Inlet
(DO NOT block)
Power Cable
& Mains Plug
- 5 -
Page 8
PARTS DESCRIPTION CONTINUED
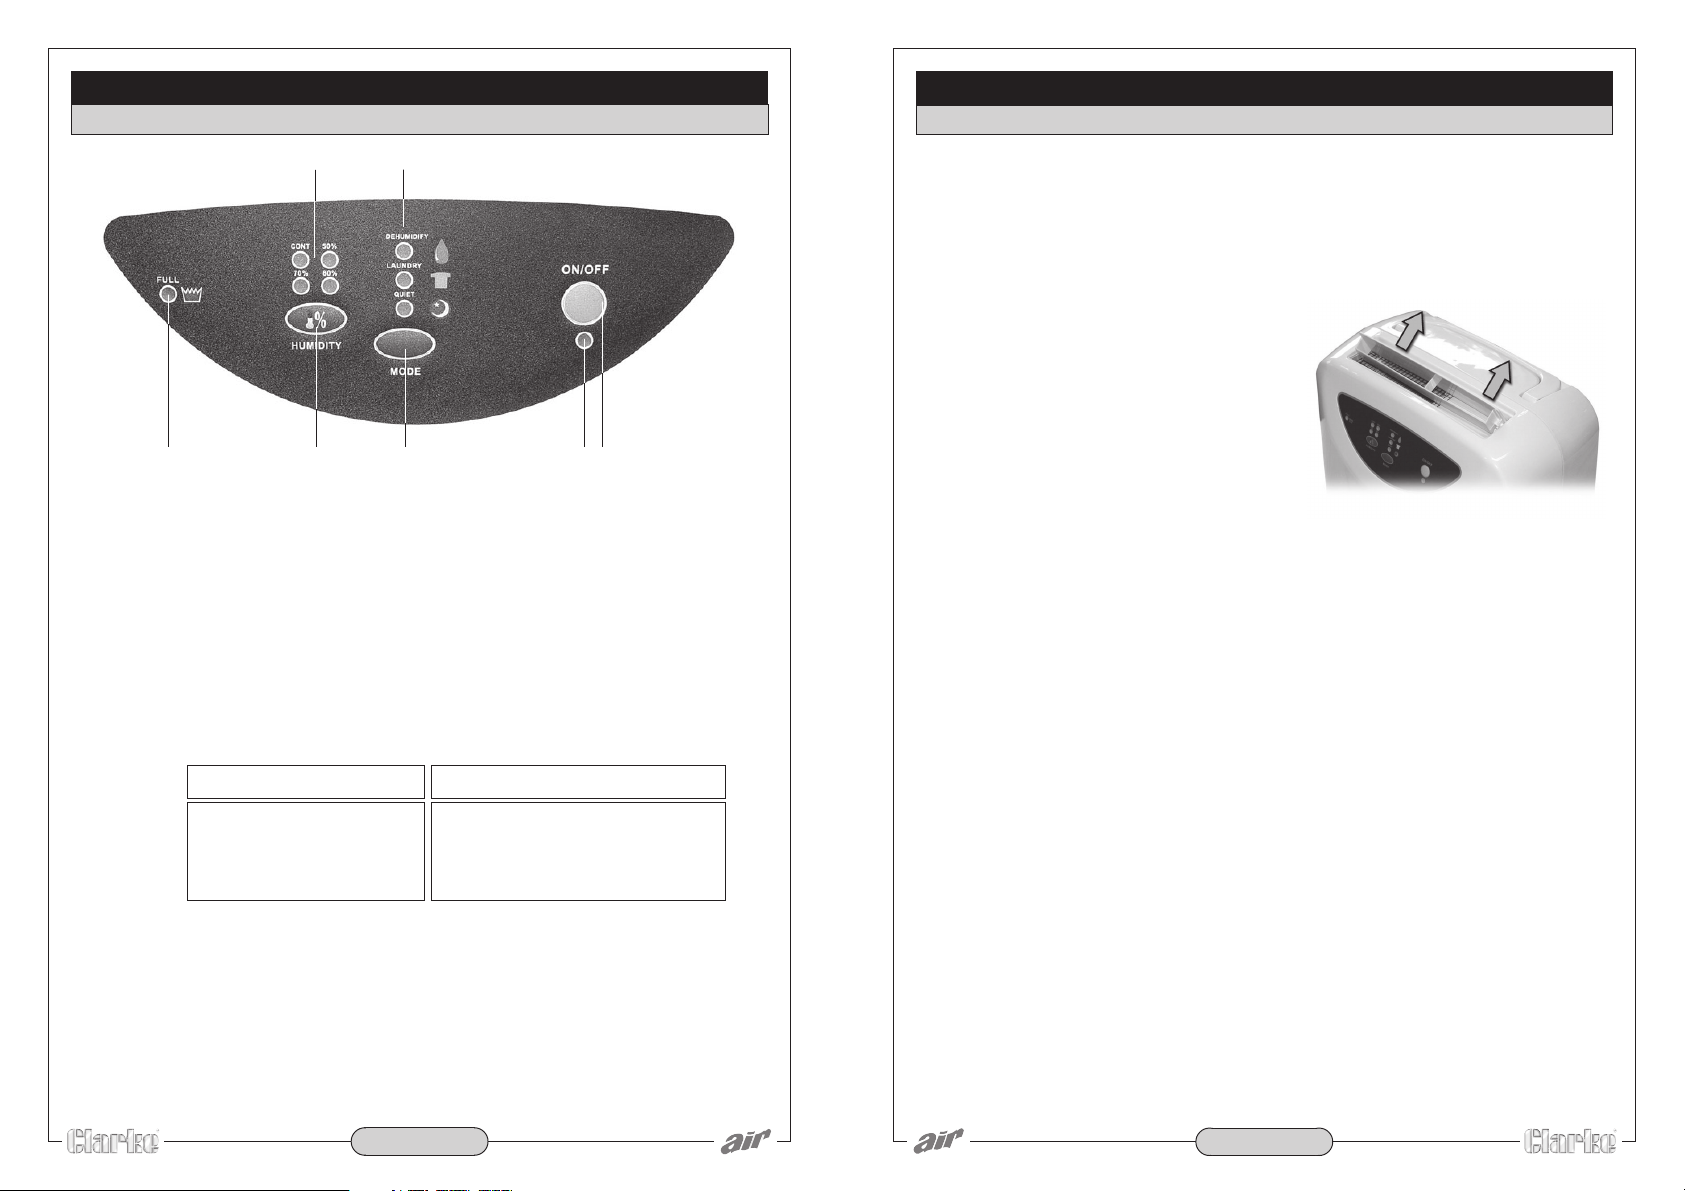
CONTROL PANEL
SETUP AND OPERATION
OPERATIONAL PROCEDURES
67
5
1. ON/OFF Button.
In stand-by mode, pressing the ON/OFF button will start the unit and pressing
the button again will switch it off.
2. MODE Button.
When the mode button is pressed the unit will cycle though the operational
modes: - Dehumidify - Laundry - Quiet. The corresponding indicator light will
illuminate (6).
3. HUMIDITY Button.
When the humidity button is pressed the humidity in the room can be
automatically set. Four choices are available: 50%, 60%, 70% and Continuous.
The corresponding relative humidity (RH) indicator light will illuminate to show
the current setting (7).
Humidity Indication Light Range of RH
When the unit is turned ON continuous dehumidifying is automatically
selected. In this mode the unit will automatically turn OFF when the water
tank is full or the power is turned OFF.
4. ON/OFF Power Indicator light.
When power to the unit is switched ON, this light will illuminate.
5. FULL Indicator light.
When this light flashes it indicates that the water tank is full or is incorrectly
installed. Pull the tank out and empty if it is full, or reinstall the tank if it has
been installed incorrectly.
3
50% Less than 60%
60% 60% and over, but less than 70%
70% Over 70%
- 6 -
142
1. Before Operating
If the unit has been stored/moved laying down, leave it to stand in an upright
position for two hours before operating.
2. Connect The Power
Insert the mains plug into the power socket and switch the socket ON. When
power is properly connected the power indicator light on the control panel
will illuminate.
3. Open the Air Outlet Manually
BEFORE the dehumidifier is switched ON
the air outlet MUST be opened. There
are six different angles to choose from.
4. Change the Operational Mode
Press the ON/OFF button and the unit will automatically start in continuous
dehumidifying mode.
DEHUMIDIFIER MODE: Press the mode button until the indication light for this
mode is lit. The unit will start dehumidifying and the air outlet volume will be
at the ‘moderate’ level.
LAUNDRY MODE: Press the mode button until the indication light for this
mode is lit. The unit will start dehumidifying and the air outlet volume will be
at ‘high’ level, which is suitable for high dehumidification or drying clothes
and other articles.
QUIET MODE: Press the mode button until the indication light for this mode is lit.
The unit will start dehumidifying and the air outlet volume will be at ‘low’ level,
which reduces the noise of the dehumidifier. (In high temperature and
humidity conditions this mode should not be used).
When the ambient temperature is below 10°C a protection device in
NOTE:
your dehumidifier will operate. This engages the electronic defrost program.
The unit will now only operate in dehumidifier mode with the fan speed at
high level. The compressor will operate intermittently by switching on for 40
minutes and switching off for 10 minutes. The mode cannot be changed
until the ambient temperature rises above 10°C. This program will also come
into operation when the temperature rises above 35°C, in order to prevent the
compressor from overheating.
5. Switch Off
While the dehumidifier is switched on, press the ON/OFF button. The
dehumidifier will stop operating.
NEVER unplug the dehumidifier without first switching it OFF at the control panel.
- 7 -
 Loading...