

Page 1
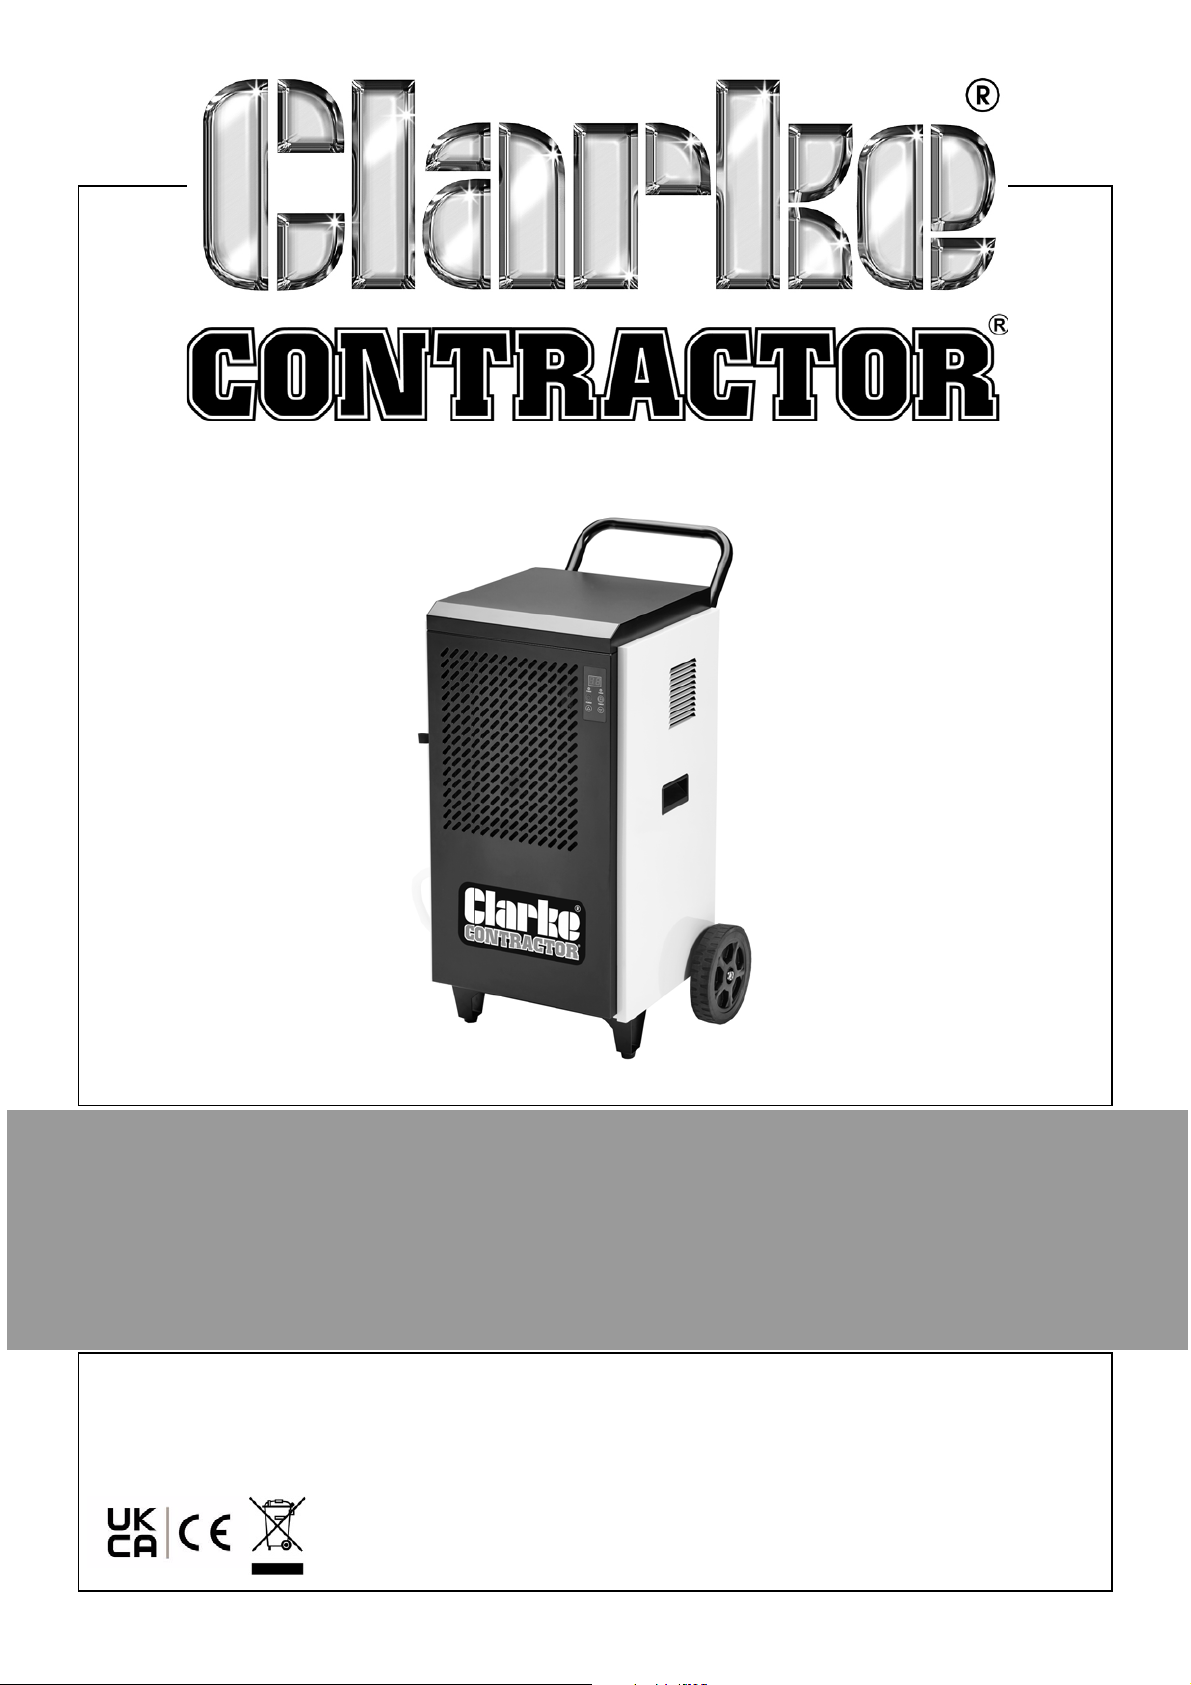
70L INDUSTRIAL DEHUMIDIFIER
MODEL NO: IDH70L
PART NO: 6470613
OPERATION & MAINTENANCE
INSTRUCTIONS
DL0522 Iss 1
Page 2
INTRODUCTION
Thank you for purchasing this CLARKE 70 Litre Industrial Dehumidifier.
Before attempting to use this product, please read this manual thoroughly and
follow the instructions carefully. In doing so you will ensure the safety of yourself
and that of others around you, and you can look forward to your purchase
giving you long and satisfactory service.
GUARANTEE
This product is guaranteed against faulty manufacture for a period of 12
months from the date of purchase. Please keep your receipt which will be
required as proof of purchase.
This guarantee is invalid if the product is found to have been abused or
tampered with in any way, or not used for the purpose for which it was
intended.
Faulty goods should be returned to their place of purchase, no product can
be returned to us without prior permission.
This guarantee does not effect your statutory rights.
ENVIRONMENTAL RECYCLING POLICY
Recycle unwanted materials instead of disposing of them as waste.
All unwanted accessories and packaging should be sorted and
taken to a recycling centre for disposal in a manner which is
compatible with the environment.
By purchasing this product, the customer is taking on the obligation
to deal with its safe disposal in accordance with the Waste Electrical
and Electronic Equipment regulations (WEEE).
In effect, this means that this product must not be disposed of with general
household waste. It must be disposed of according to the laws governing
Waste Electrical and Electronic Equipment (WEEE) at a recognised disposal
facility.
R290 is a refrigerant that complies with EEC environmental standards;
nonetheless, the refrigerant circuit on the machine should not be punctured.
At the end of its working life, consign the dehumidifier unit to a special
collection centre.
2
Parts & Service: 020 8988 7400 / E-mail: [email protected] or [email protected]
Page 3
ELECTRICAL CONNECTIONS
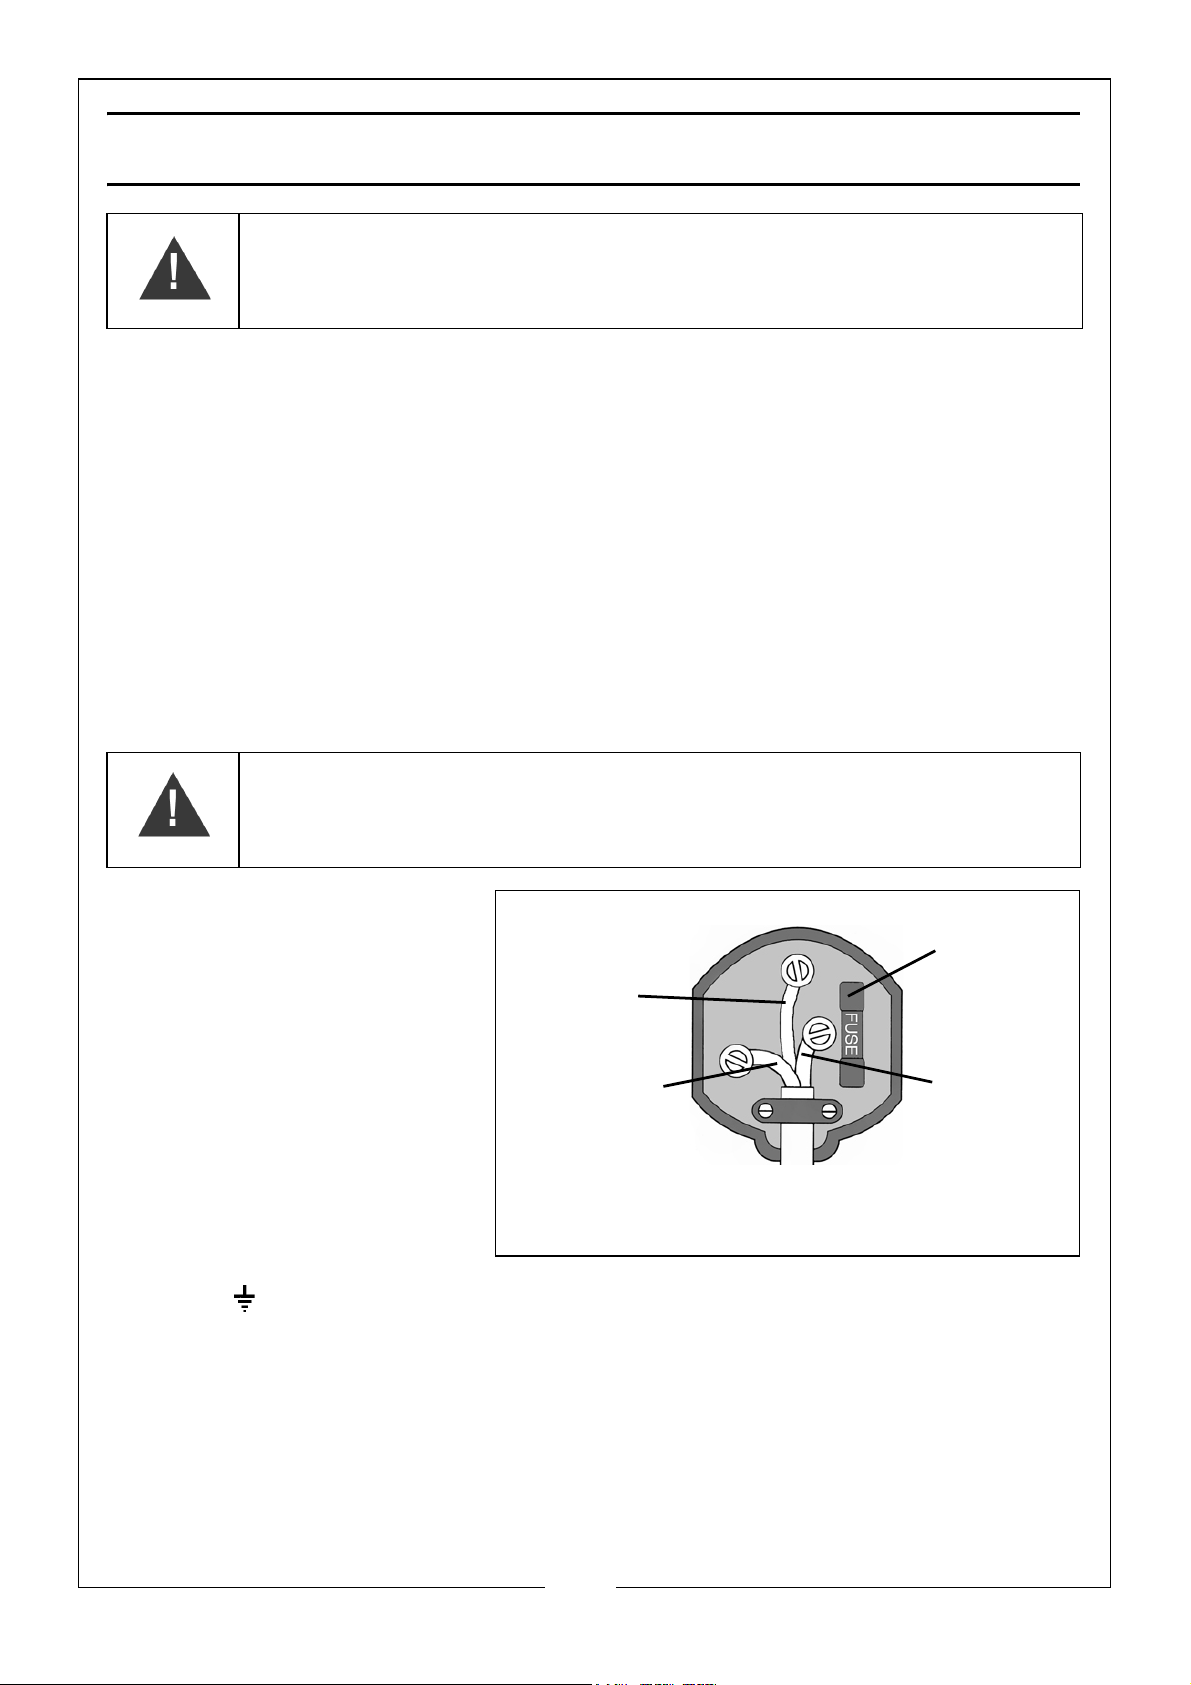
Plug must be BS1363/A approved.
Always fit
Ensure that the outer sheath of
Neutral
(Blue)
Live
(Brown)
Earth
(Green and
a 13 Amp
the cable is firmly held by the clamp
fuse.
Yellow)
WARNING! READ THESE ELECTRICAL SAFETY INSTRUCTIONS
THOROUGHLY BEFORE CONNECTING THE PRODUCT TO THE
MAINS SUPPLY.
Before switching the product on, make sure that the voltage of your electricity
supply is the same as that indicated on the rating plate. This product is
designed to operate on 230VAC 50Hz. Connecting it to any other power
source may cause damage.
This product may be fitted with a non-rewireable plug. If it is necessary to
change the fuse in the plug, the fuse cover must be refitted. If the fuse cover
becomes lost or damaged, the plug must not be used until a suitable
replacement is obtained.
If the plug has to be changed because it is not suitable for your socket, or due
to damage, it should be cut off and a replacement fitted, following the wiring
instructions shown below. The old plug must be disposed of safely, as insertion
we would emphasise the electrical hazard.
We strongly recommend that this machine is connected to the mains supply
via a Residual Current Device (RCD).
If in any doubt, consult a qualified electrician. DO NOT attempt any repairs
yourself.
WARNING: WIRES IN THE MAINS LEAD ARE COLOURED IN
ACCORDANCE WITH THE FOLLOWING CODE:
GREEN/YELLOW = EARTH, BLUE = NEUTRAL, BROWN = LIVE.
•The BLUE wire must be
connected to the
terminal marked N or
coloured black.
•The BROWN wire must
be connected to the
terminal marked L or
coloured red.
•The YELLOW AND
GREEN wire must be
connected to the
terminal marked E
or or coloured green.
3
Parts & Service: 020 8988 7400 / E-mail: [email protected] or [email protected]
Page 4
OVERVIEW
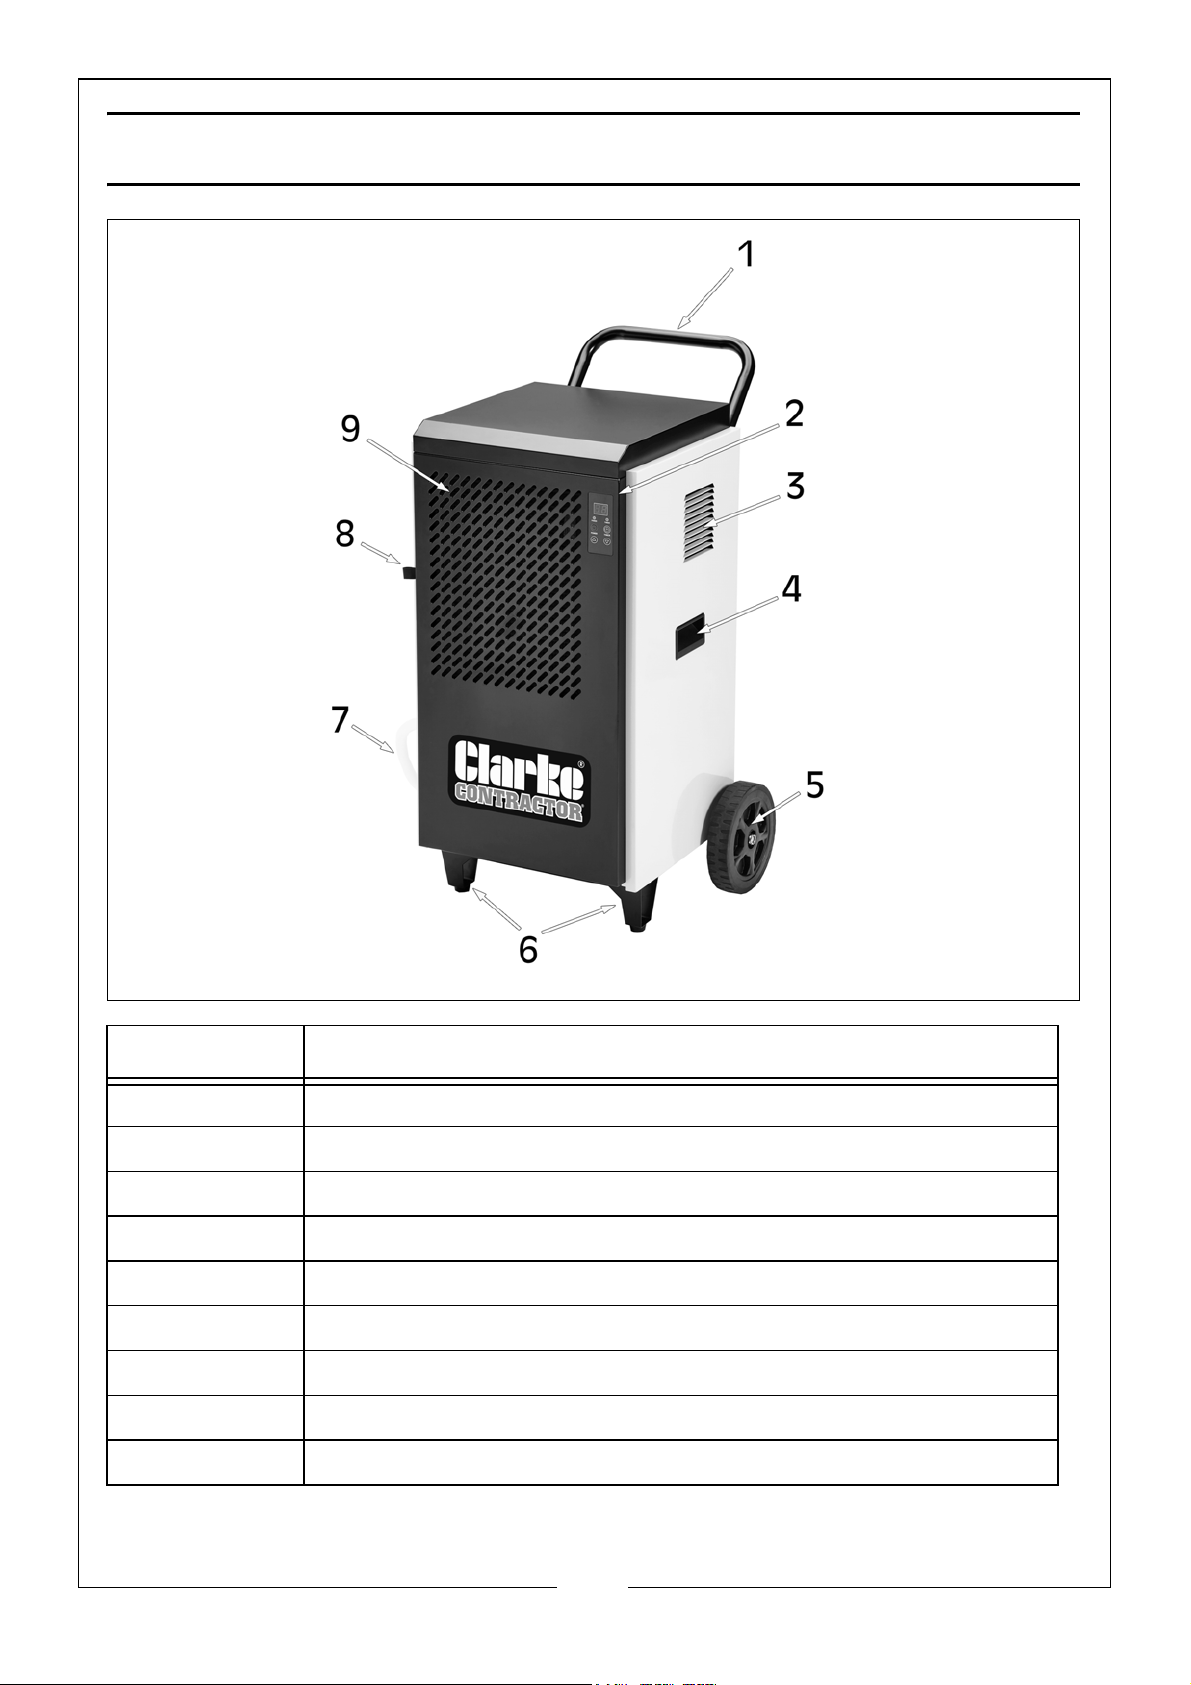
No. Description
1Handle
2 Control Panel
3Air Outlet
4 Lifting Handle
5 2 x Wheels
62 x Feet
7 16mm x 90cm Drainage Pipe
8 Air Filter Pull Tab
9 Air Inlet and Filter
4
Parts & Service: 020 8988 7400 / E-mail: [email protected] or [email protected]
Page 5
SAFETY WARNINGS
WARNING: IF THE SUPPLY CABLE IS DAMAGED, IT MUST BE REPLACED BY
THE MANUFACTURER, ITS SERVICE AGENT OR SIMILARLY QUALIFIED
PERSONS IN ORDER TO AVOID A HAZARD.
1. Please read these instructions carefully and retain for future reference.
2. Position the mains cable so that it cannot be inadvertently pulled or
pinched and where it does not cause a trip hazard.
3. This appliance is designed to dehumidify industrial environments and MUST
NOT be used for other purposes.
4. If the appliance requires repair, ALWAYS contact your CLARKE dealer.
ALWAYS insist on original spare parts. Repairs carried out by unauthorized
persons may be dangerous and invalidate the guarantee.
5. Children SHOULD NOT play with the appliance. Cleaning and user
maintenance SHOULD NOT be undertaken by children.
6. Before cleaning or maintenance operations, ALWAYS unplug the appliance
from the power supply.
7. DO NOT move the appliance by pulling the power cable.
8. DO NOT install the appliance in rooms containing gas, oil or fuel.
9. DO NOT install near sources of heat.
10. DO NOT use the appliance on inclined surfaces.
11. Keep the appliance away from inflammable substances (alcohol etc) or
pressurised containers (e.g. aerosol cans).
12. DO NOT rest heavy or hot objects on top of the appliance.
13. ALWAYS transport the appliance upright. Wait at least 1 hour after
transporting the appliance before using it to allow the refrigerant gasses to
settle.
14. DO NOT use the appliance outdoors.
15. DO NOT obstruct the air inlet or outlet.
16. DO NOT use means to accelerate the defrosting process or to clean, other
than those recommended in this manual.
17. DO NOT store in a room continuously operating ignition sources like open
flames, operating gas appliance or electric heater.
18. DO NOT cover the dehumidifier when in use. Place at least 50cm (100cm
from front) from walls, doors, windows or obstructions.
5
Parts & Service: 020 8988 7400 / E-mail: [email protected] or [email protected]
Page 6
WARNING: DO NOT USE OR STORE THE DEHUMIDIFIER NEAR A HEAT
SOURCE, AS THE UNIT CONTAINS PRESSURISED FLAMMABLE REFRIGERANT
GAS (R290-HYDROCARBON PROPANE)
R290 REFRIGERANT GAS (HYDROCARBON PROPANE)
H220: Extremely Flammable Gas.
H280: Contains Gas Under Pressure, May Explode if Heated.
R290 refrigerant gas complies with UK & European environmental
directives.
R290 has a low GWP (Global Warming Potential) of 3 and CO2
equivalent to 0.00084t.
The dehumidifier contains approximately 280g of R290 refrigerant
gas.The refrigerant system MUST NOT be perforated or punctured.
• DO NOT use or store in an unventilated space with an area smaller than
4m² per unit. The room must be such as to prevent stagnation of possible
leaks of refrigerant gas as there could be a danger of fire or explosion
hazard should the refrigerant come into contact with electric heaters,
stoves or other sources of ignition.
• Refrigerant gas may be odourless.
• DO NOT use the product and contact the retailer for advice if damage
has occurred to the unit which may have compromised the refrigerant
system.
• Any repairs or maintenance must only be carried out on the unit by a
suitably qualified engineer. Before opening and servicing the unit, the
authorized engineer must be in possession of a copy of the
manufacturer's service manual and must follow the safety information
contained within it to ensure all hazards are minimized.
6
Parts & Service: 020 8988 7400 / E-mail: [email protected] or [email protected]
Page 7
ASSEMBLY
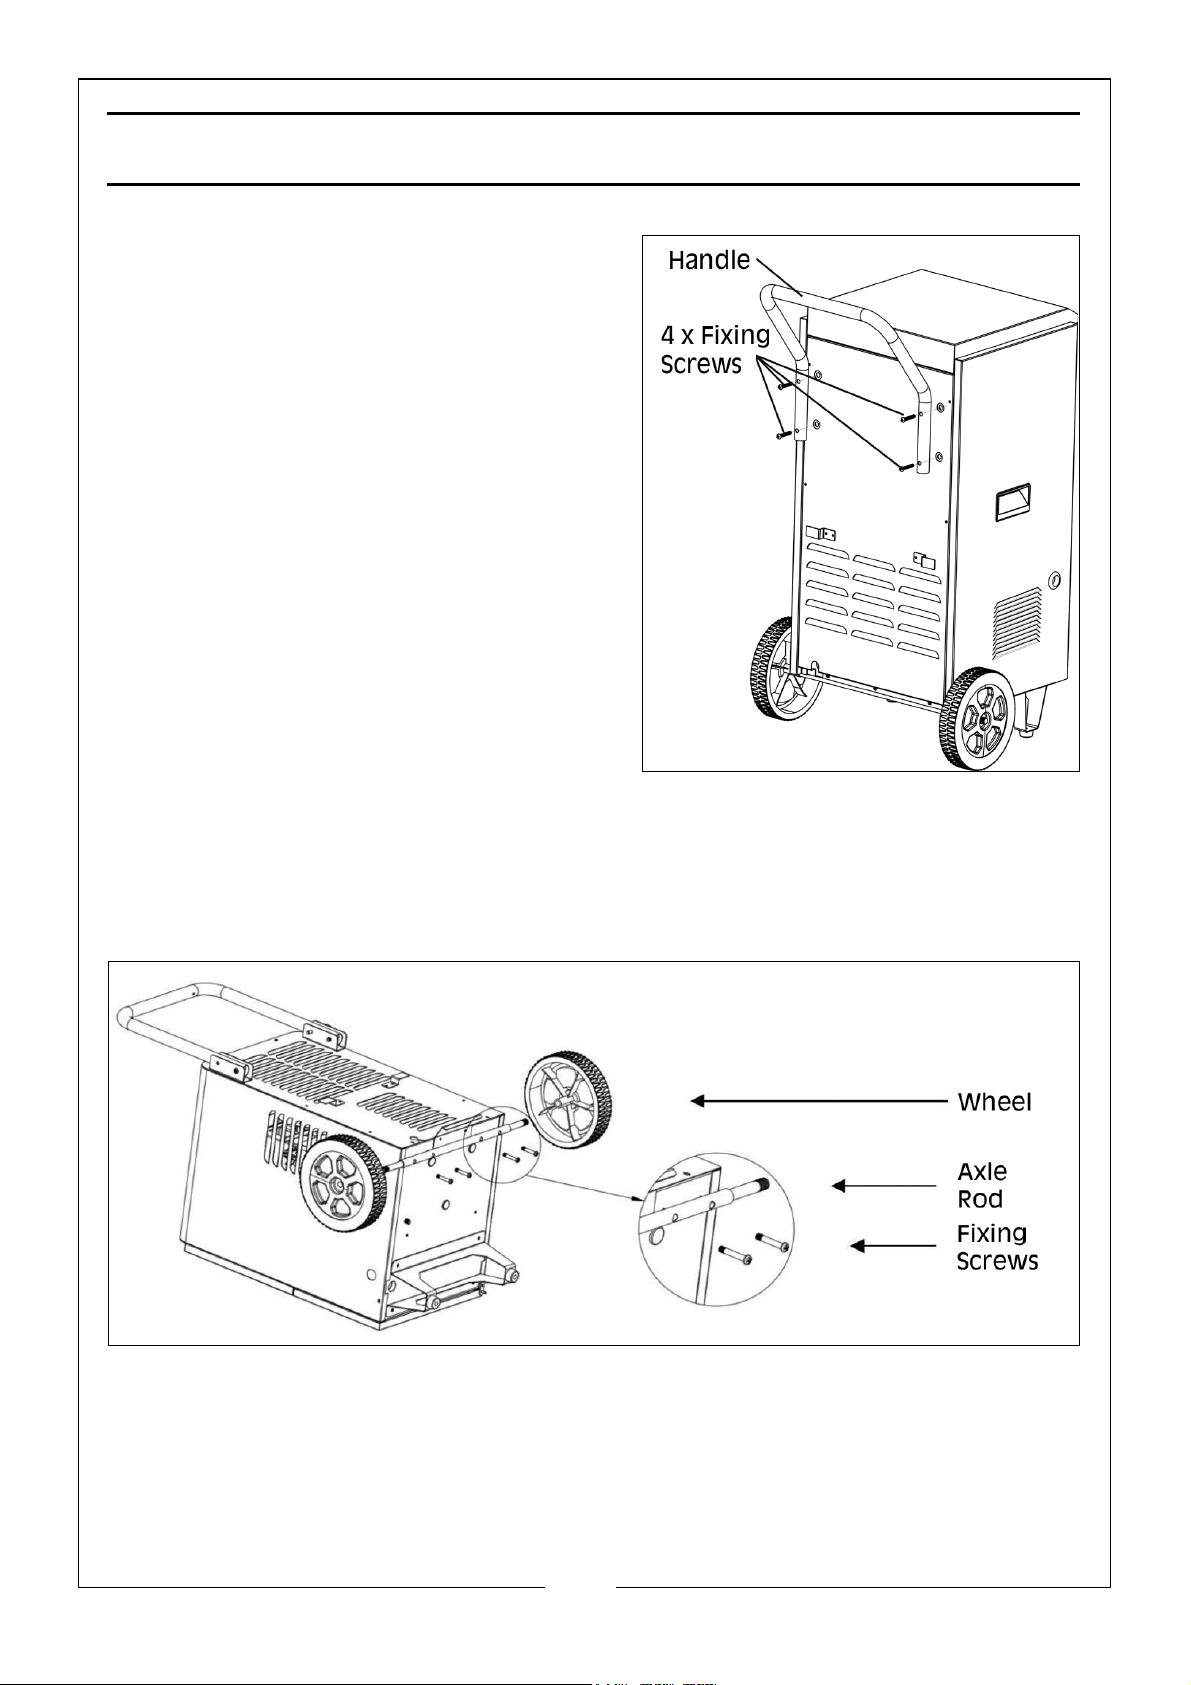
• Align the fixing holes of the tubular
handle with the holes on the rear
of the dehumidifier.
• Fix the handle to the dehumidifier
using the 4 fixing screws supplied,
as shown.
WHEELS
1. Incline the machine body, as shown, and fix the axle on the bottom of the
machine body using the 4 screws.
2. Using the nuts and washers, fix the wheels to the axle rod.
3. Once the wheels have been installed, place the machine in the upright
position.
NOTE: Once assembly is complete, leave the machine to stand for a
minimum of 1 hour, this is for the refrigeration gases to settle
before use.
7
Parts & Service: 020 8988 7400 / E-mail: [email protected] or [email protected]
Page 8
OPERATION
CONTROL PANEL
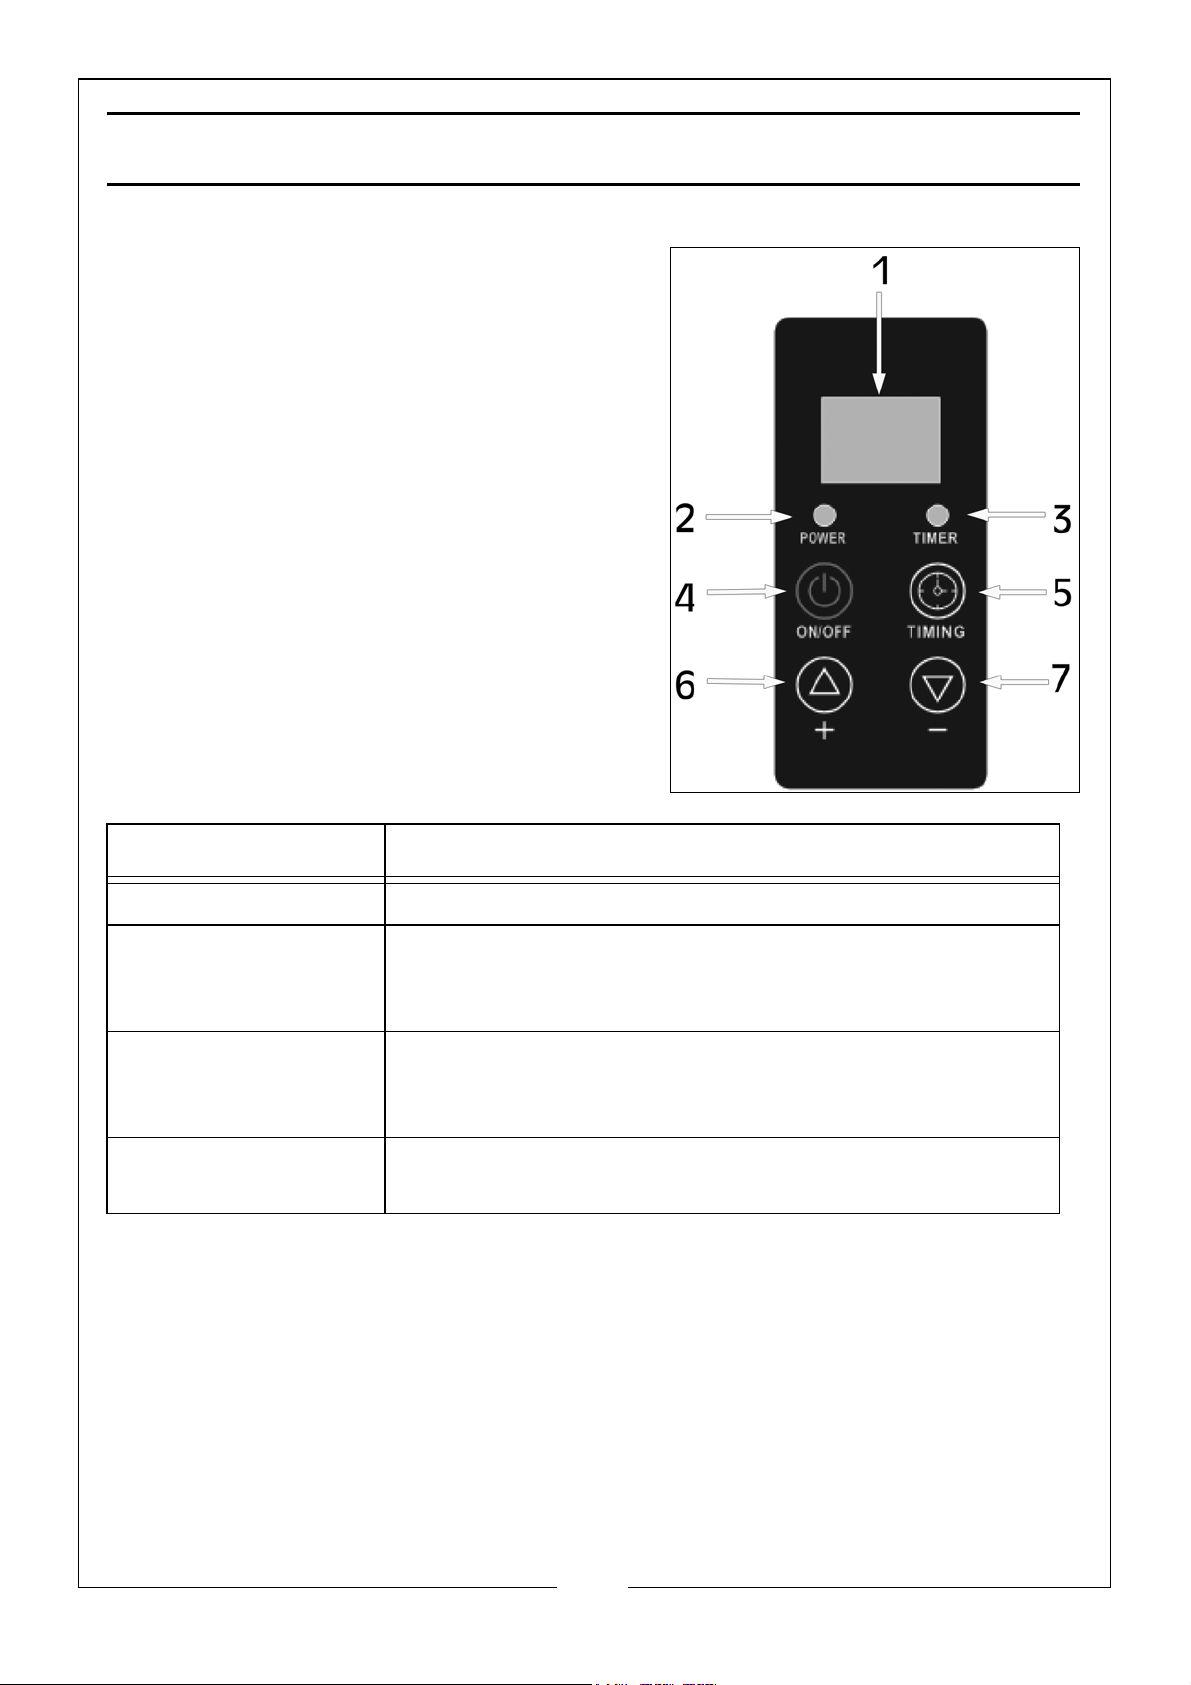
1 = DISPLAY SCREEN
2 = POWER INDICATOR LIGHT
3 = TIMER INDICATOR LIGHT
4 = ON/OFF BUTTON
5 = TIMER SET BUTTON
6 = INCREASE SET TIMER/HUMIDITY BUTTON
7 = DECREASE SET TIMER/HUMIDITY BUTTON
Button Operation Instructions
On/Off (Button 4) Switches the machine On and Off
+ (Button 6) Adjusts different set values in different states:
1: Increases the humidity value set (RH 10% to 95%)
2: Increases the timing (Hours) set (00 to 24)
- (Button 7) Adjusts different set values in different states:
1: Decreases the humidity value set (RH 10% to 95%)
2: Decreases the timing (Hours) set (00 to 24)
Timing (Button 5) Short press the button to launch a cycle to Off.
Set On/Off timer and exit
CONTINUOUS DRAINING
This dehumidifier does not contain an internal water tank. An external prefitted
drainage pipe enables continuous dehumidifying without having to empty a
water tank.
8
Parts & Service: 020 8988 7400 / E-mail: [email protected] or [email protected]
Page 9
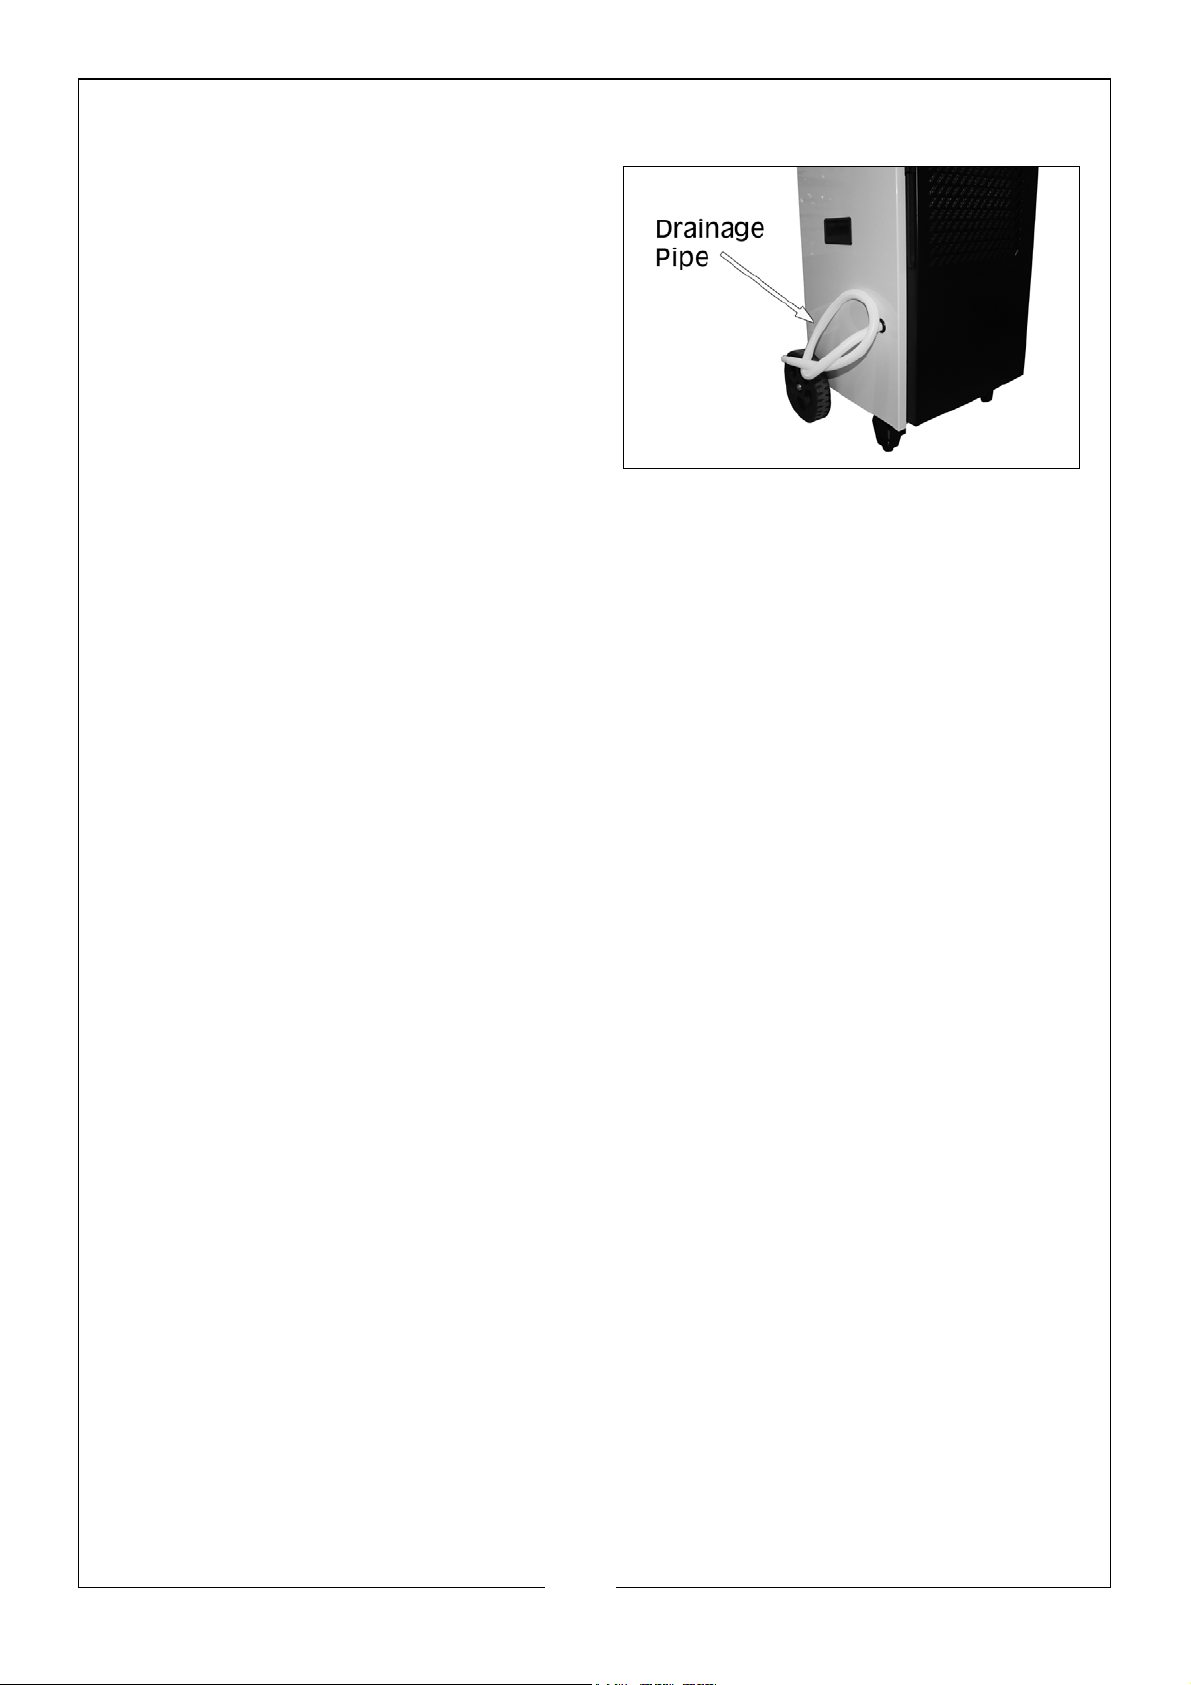
PREPARATION FOR CONTINUOUS DRAINING:
1. Locate the prefitted external
drainage pipe on the side of the
machine.
2. Place the pipe into a suitable
receptacle/drain ensuring that the
end of the pipe is below the level of
the outlet in the unit body.
NOTE: If using a receptacle, make
sure it is large enough as the
machine can produce up to
70 litres of water in a 24 hour period.
NOTE: The pipe has a diameter of 16mm and is 90cm long.
NOTE: DO NOT submerge the end of the pipe in water, as this may cause
water to be drawn back up into the machine.
TIMING AND ON/OFF FUNCTION
When the machine is powered on, you can set the timer to power off; and
when the machine is powered off, you can set the timer to power on. Setting
the timer for both powering on and off will initiate the cycle timer mode.
SETTING OF TIMER - POWER ON
1. When the machine is powered off, press the “Timing” button.
2. The “Timing On” icon will flicker and the time set will flicker on the display
screen.
3. Press the “+” or “-” buttons to adjust the timing. The dehumidifier will make
a sound once the button is pressed. The time set will increase or decrease
by “1”, holding the button for 2 seconds will continually increase or
decrease the time.
4. Once the required time is set, non-action of the buttons for 10 seconds the
dehumidifier will accept the new setting and the “Timing On” icon will
flicker (Ranging from 0 to 24 hours, and 0 hours as default).
SETTING OF TIMER - POWER OFF
1. When the machine is powered on, press the “Timing” button.
2. The “Timing Off” icon will flicker and the time set will flicker on the display
screen.
3. Press the “+” or “-” buttons to adjust the timing. The dehumidifier will make
a sound once the button is pressed. The time set will increase or decrease
9
Parts & Service: 020 8988 7400 / E-mail: [email protected] or [email protected]
Page 10
by “1”, holding the button for 2 seconds will continually increase or
decrease the time.
4. Once the required time is set, non-action of the buttons for 10 seconds the
dehumidifier will accept the new setting and the “Timing Off” icon will
flicker (Ranging from 0 to 24 hours, and 0 hours as default).
HUMIDITY CONTROL
• When the rooms humidity value is 3% lower than the set humidity on the
machine, the compressor will shut down, the fan will delay shut down for
3 minutes and then shut down; and when it is 3% higher than the
humidity value set on the machine, both the fan and compressor will
start to operate.
• When the humidity is set at the minimum value (10%), the machines
default will enter the continuous dehumidifying mode.
• When started, the compressor will start 3 seconds later and when it is
shut down, the fan will run for 3 seconds.
• If a fault of the humidity sensor occurs, the machine will turn to the
continuous dehumidifying mode.
• If a fault of the coil sensor occurs, the machine will turn to the timing
defrosting mode (See Defrosting Mode).
PROTECTION FUNCTION
• Once shut down, the compressor will take 3 minutes to restart. Quick
start is available for the first power-on.
• Power off memory: For abrupt power outage or accidental unplugging,
the machine will automatically return to the operating state right before
the ‘incident’, and continue at that state for the next power-on.
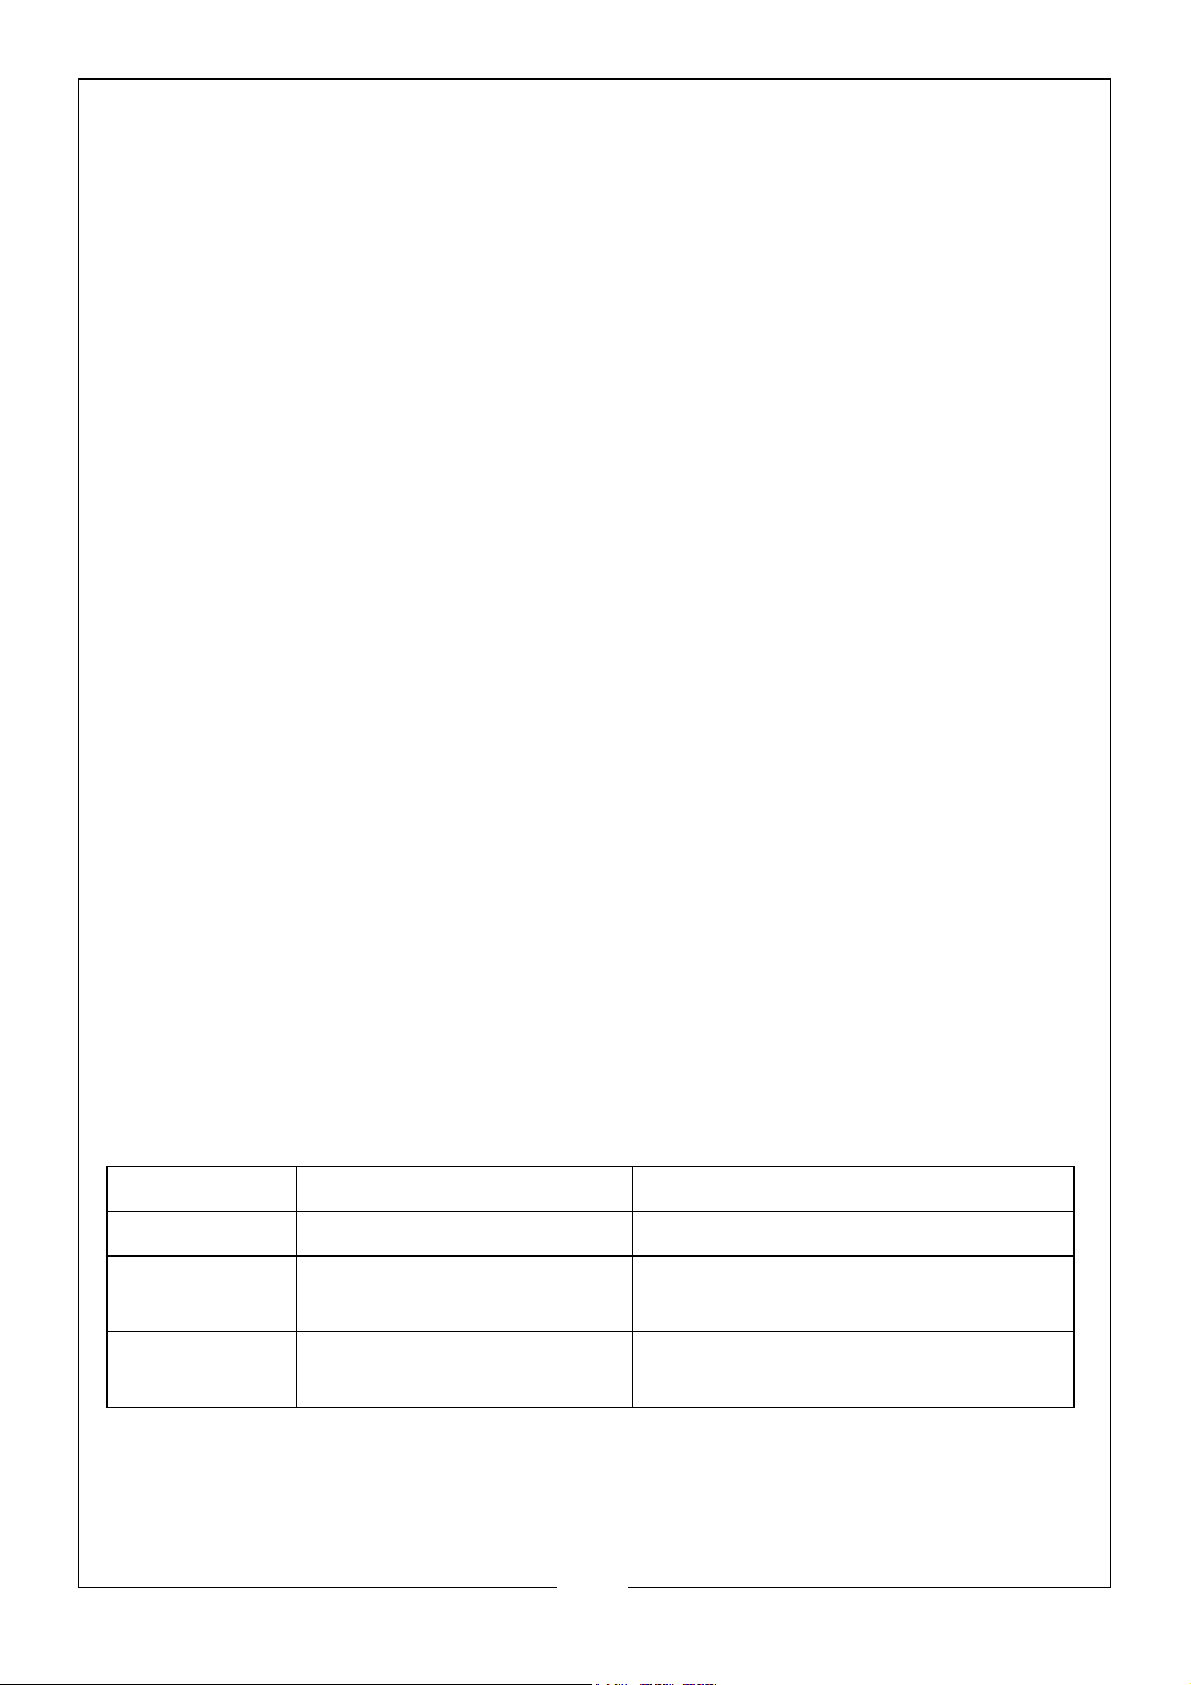
DISPLAY CODES
Display Code Instruction Action
E1 Fault with coil sensor See Defrosting Mode on Page 11.
E2/E3 Fault with humidity and/
or temperature sensor
Replace temperature and
humidity sensor.
EE Refrigerant leakage Turn off machine and contact
CLARKE service department.
10
Parts & Service: 020 8988 7400 / E-mail: [email protected] or [email protected]
Page 11
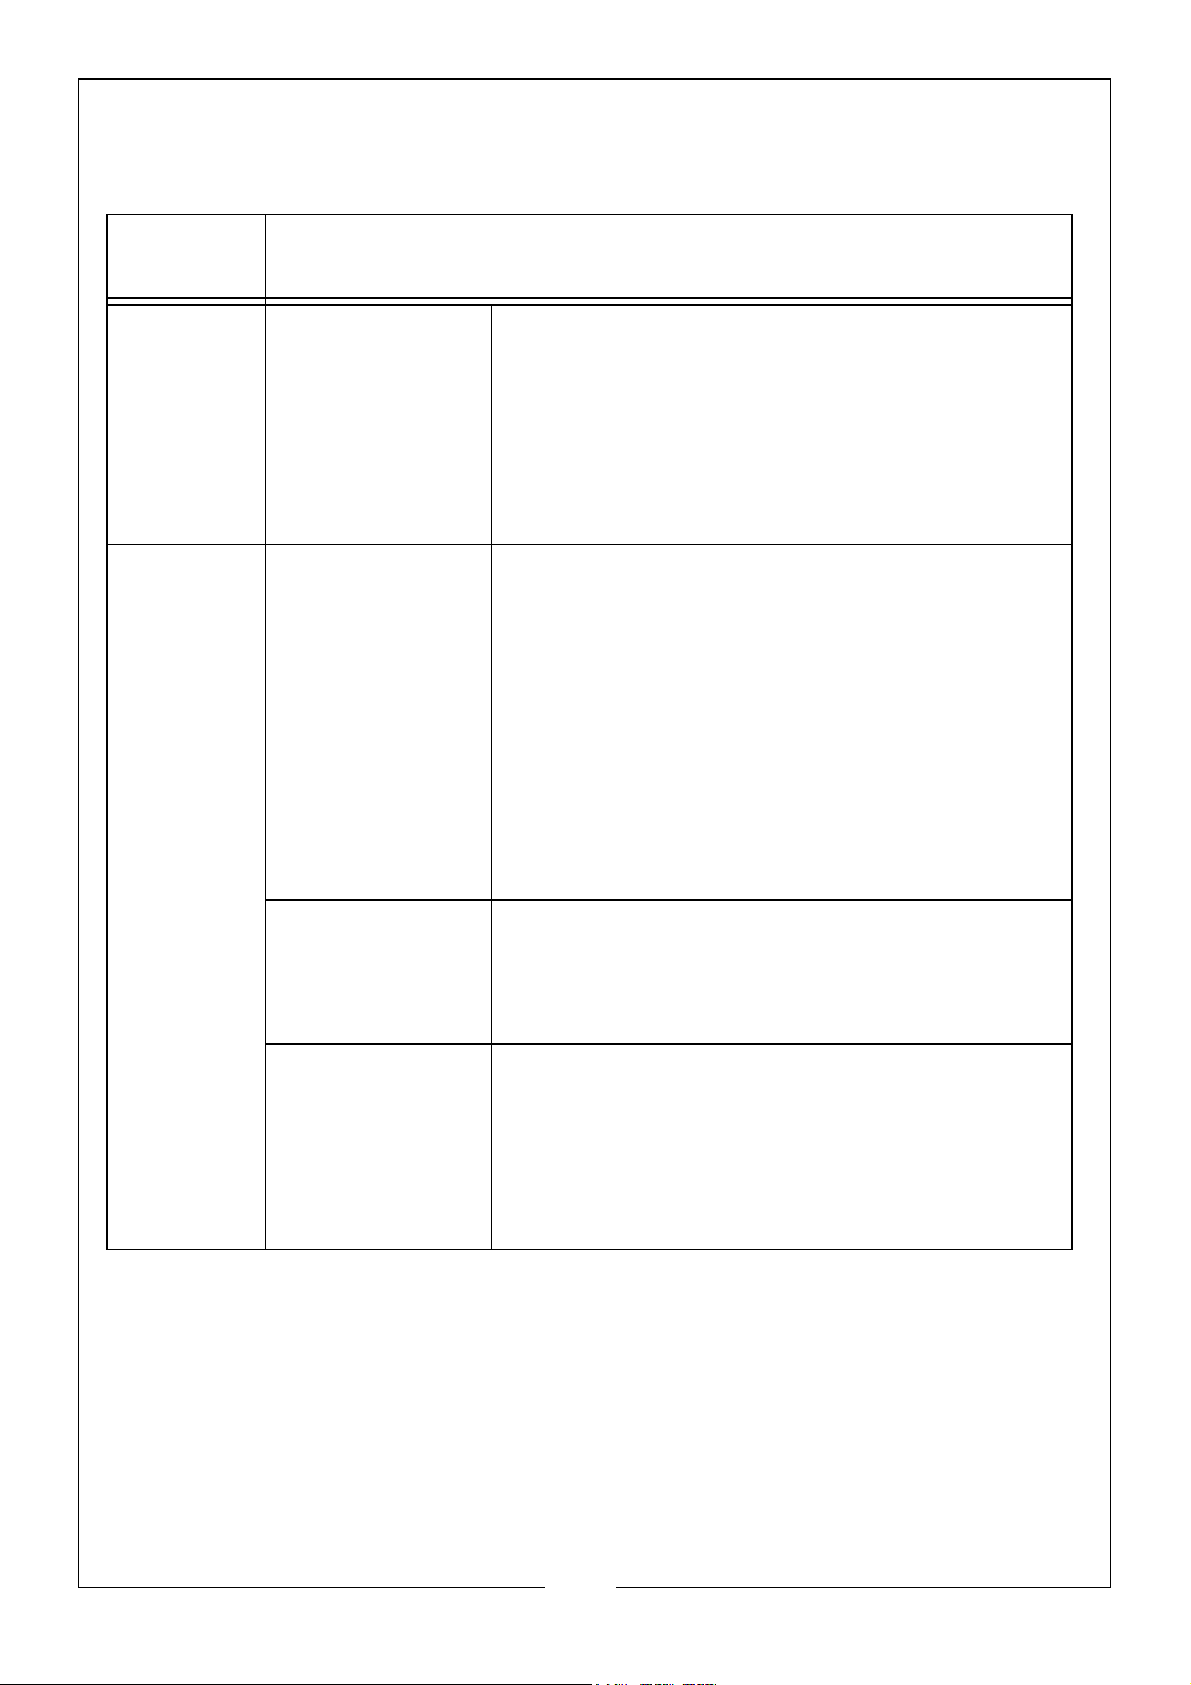
DEFROSTING MODE
Defrosting
Mode
Automatic
Defrosting
Defrosting
Faults
Description
Sensor at
Normal State
Coil Sensor Fault
(E1 displayed)
1: If the compressor constantly runs for over 20
minutes or if the coil temperature is below 0
o
C
constantly for over 30 minutes, it will start the
defrosting mode.
2: If the coil temperature is over 5
o
C for a 90
second period, or the defrosting time is over 8
minutes, it will stop the defrosting mode.
o
1: When ambient temperature is over 25
C it
will not start a defrosting cycle.
2: When ambient temperature is below 25
o
but higher than 15
C the compressor will run
o
C
constantly for 30 minutes, it will defrost for 10
minutes of the 30 minute period.
3: When ambient temperature is below 15
o
but higher than 4
C the compressor will run
o
C
constantly for 20 minutes, it will defrost for 12
minutes of the 20 minute period.
Temp-damp
Sensor Fault
Coil Sensor and
Temp-damp
Sensor Faults
If the compressor constantly runs for over 20
minutes or if the coil temperature is below 0
o
C
constantly for over 20 minutes, it will start the
defrosting mode.
1: The compressor will run constantly for 40
minutes, it will defrost for 10 minutes of the 40
minute period.
2: Coil temperature over 5
o
C for a 90 second
period, or defrosting time over 25 minutes, it
will stop the defrosting mode.
11
Parts & Service: 020 8988 7400 / E-mail: [email protected] or [email protected]
Page 12
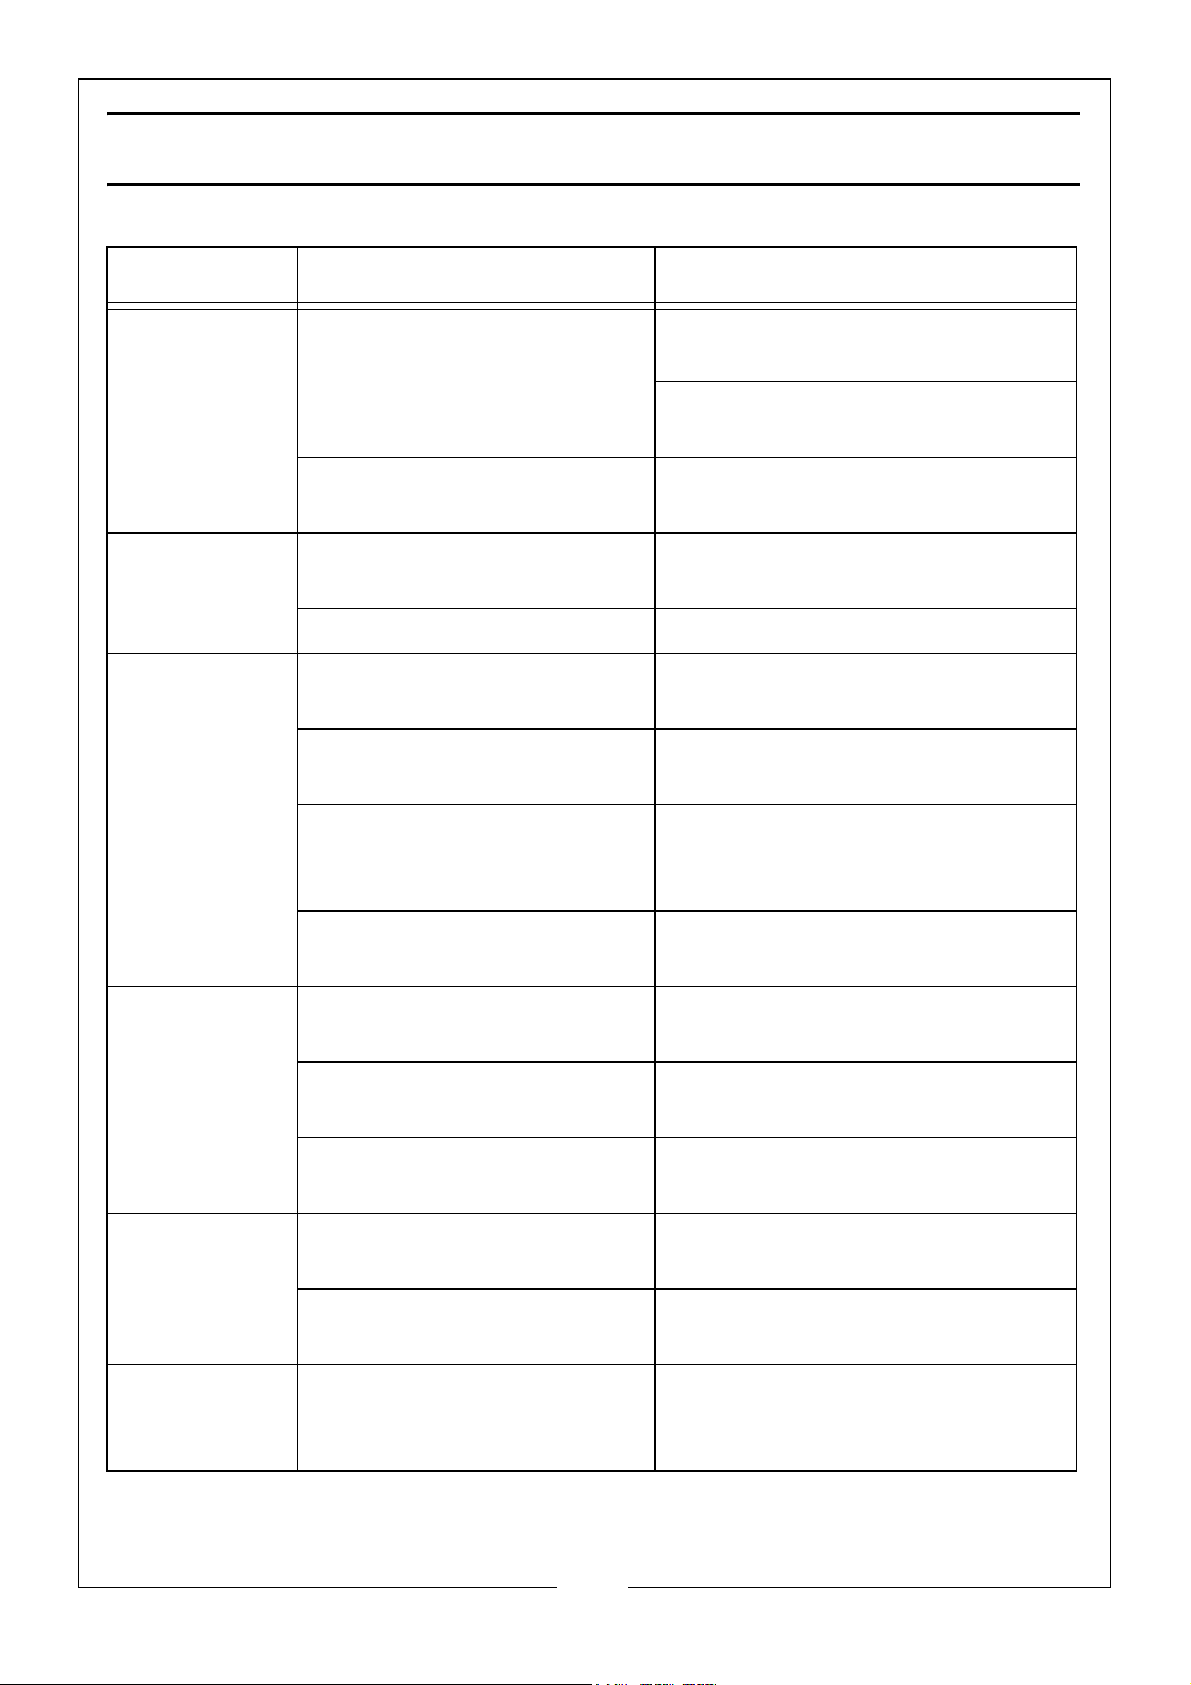
TROUBLESHOOTING
Cause Solution
No operation
(Shown as no
power)
No operation
(Shown as
power on)
Dehumidifier
function not
effective
Power outage Check if the power supply is in
working order.
Confirm the plug is correctly
inserted in the power socket.
Fuse in plug or fuse board
blown
Environmental humidity
lower than the set value
The machine is defrosting Wait for defrosting to complete.
If a door or window are
open
Room temperature is too
low
Room temperature too
high, humidity too low.
Replace the relevant fuse.
Reset humidity setting according
to the demand.
Close the door or window.
DO NOT use the dehumidifier.
In dry conditions the
dehumidification ability will
reduce.
Air filter blocked. Remove any dirt or obstruction
Noise is
abnormal
during
operation
Water Leak Connection of drainage
Frosting
Occurs
Dehumidifier is positioned
incorrectly.
Air filter blocked. Remove any dirt or obstruction
There is a ‘tittering’ sound. This is the flow of the refrigerant,
pipe become loose.
Drainage system is
blocked.
The ambient temperature is
low and the machine is
waiting for defrost.
from the air intake.
Check that dehumidifier is
placed on a flat level surface.
from the air intake.
which is a normal phenomenon.
Check pipe connection.
Remove obstacle and straighten
out drainage pipe.
This is a normal phenomenon
and the dehumidifier has an
automatic defrost function.
12
Parts & Service: 020 8988 7400 / E-mail: [email protected] or [email protected]
Page 13
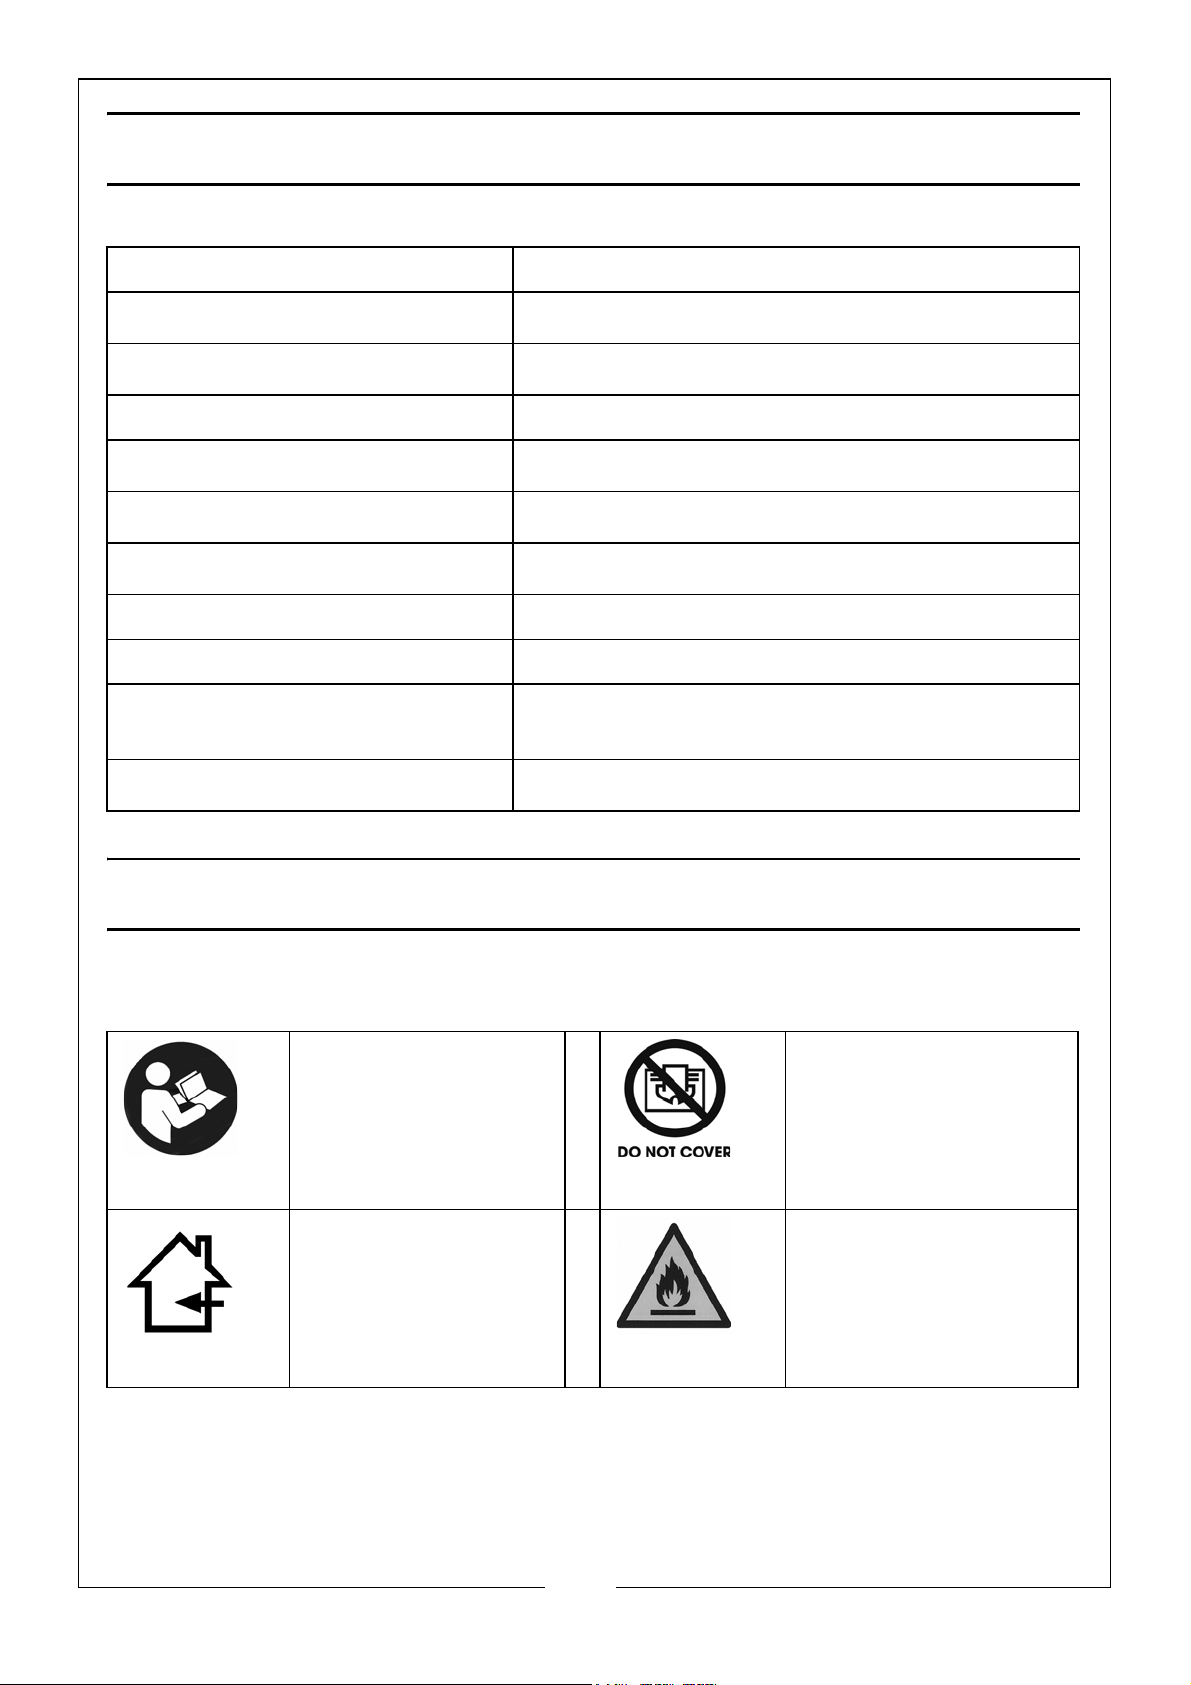
TECHNICAL SPECIFICATION
Power Source AC 220-240V 50Hz
Input Current @ Rated Load
Power
4.7A @ 27
950W @ 27
o
C RH 60%, 5.7A @ 30oC RH 80%
o
C RH 60%, 1300W @ 30oC RH 80%
IP Rating IP22
Dehumidifying Extraction Rate
Max. Air Flow Rate
Operating Temperature
70 litres/day @ 30
3
400m
o
5
/h
C - 35oC
o
C RH 80%
Refrigerant R290 (Hydrocarbon Propane), 280g
Weight 40.3kg
Dimensions (LxWxH) 545mm x 460mm x 870mm Handle Down
545mm x 460mm x 952mm Handle Up
Working Space
50 - 120m
2
SAFETY SYMBOLS
Read the manual
and safety
instructions before
use
Indoor use only Warning: Risk of Fire,
Do not cover when
in use
Flammable Gas
(R290)
13
Parts & Service: 020 8988 7400 / E-mail: [email protected] or [email protected]
Page 14
MAINTENANCE
WARNING: ALWAYS UNPLUG THE DEHUMIDIFIER BEFORE PERFORMING
ANY CLEANING OR MAINTENANCE OPERATIONS.
CLEANING THE CABINET
• Use a soft damp cloth to clean the exterior.
• Never use harsh chemicals or abrasive cleaning agents as these may
damage the casing finish.
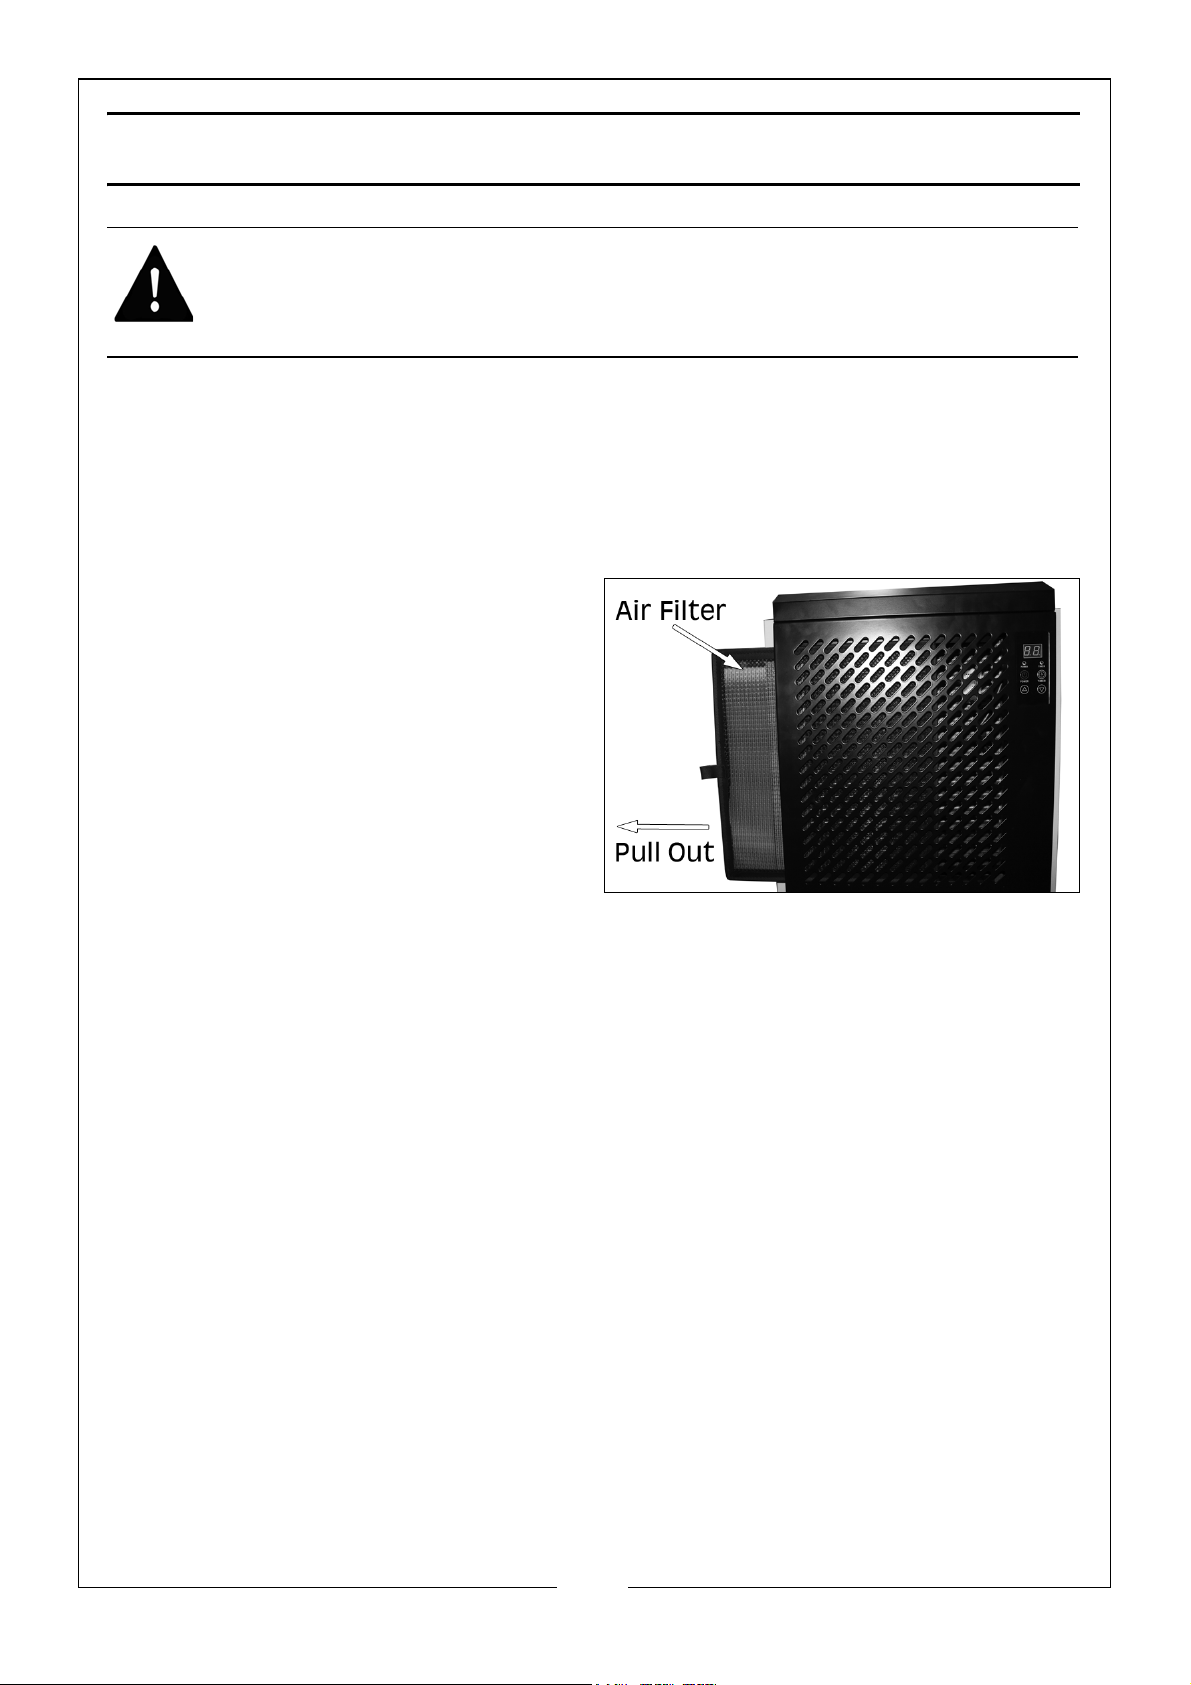
CLEANING THE AIR FILTER
1. At the front of the machine, pull
the filter out sideways, using the
tab.
2. Wash the filter under running water to remove any dust and dirt.
3. Allow the filter to dry naturally.
4. Refitting is the reverse process.
The frequency depends on the duration and the level of dust in the
environment. If the machine is being used regularly, it is recommended that
you clean the filter every 2 weeks.
STORAGE
• Unplug from the mains socket.
• Clean and reinstall the filter.
• Cover the dehumidifier to prevent dust getting into the workings.
14
Parts & Service: 020 8988 7400 / E-mail: [email protected] or [email protected]
Page 15
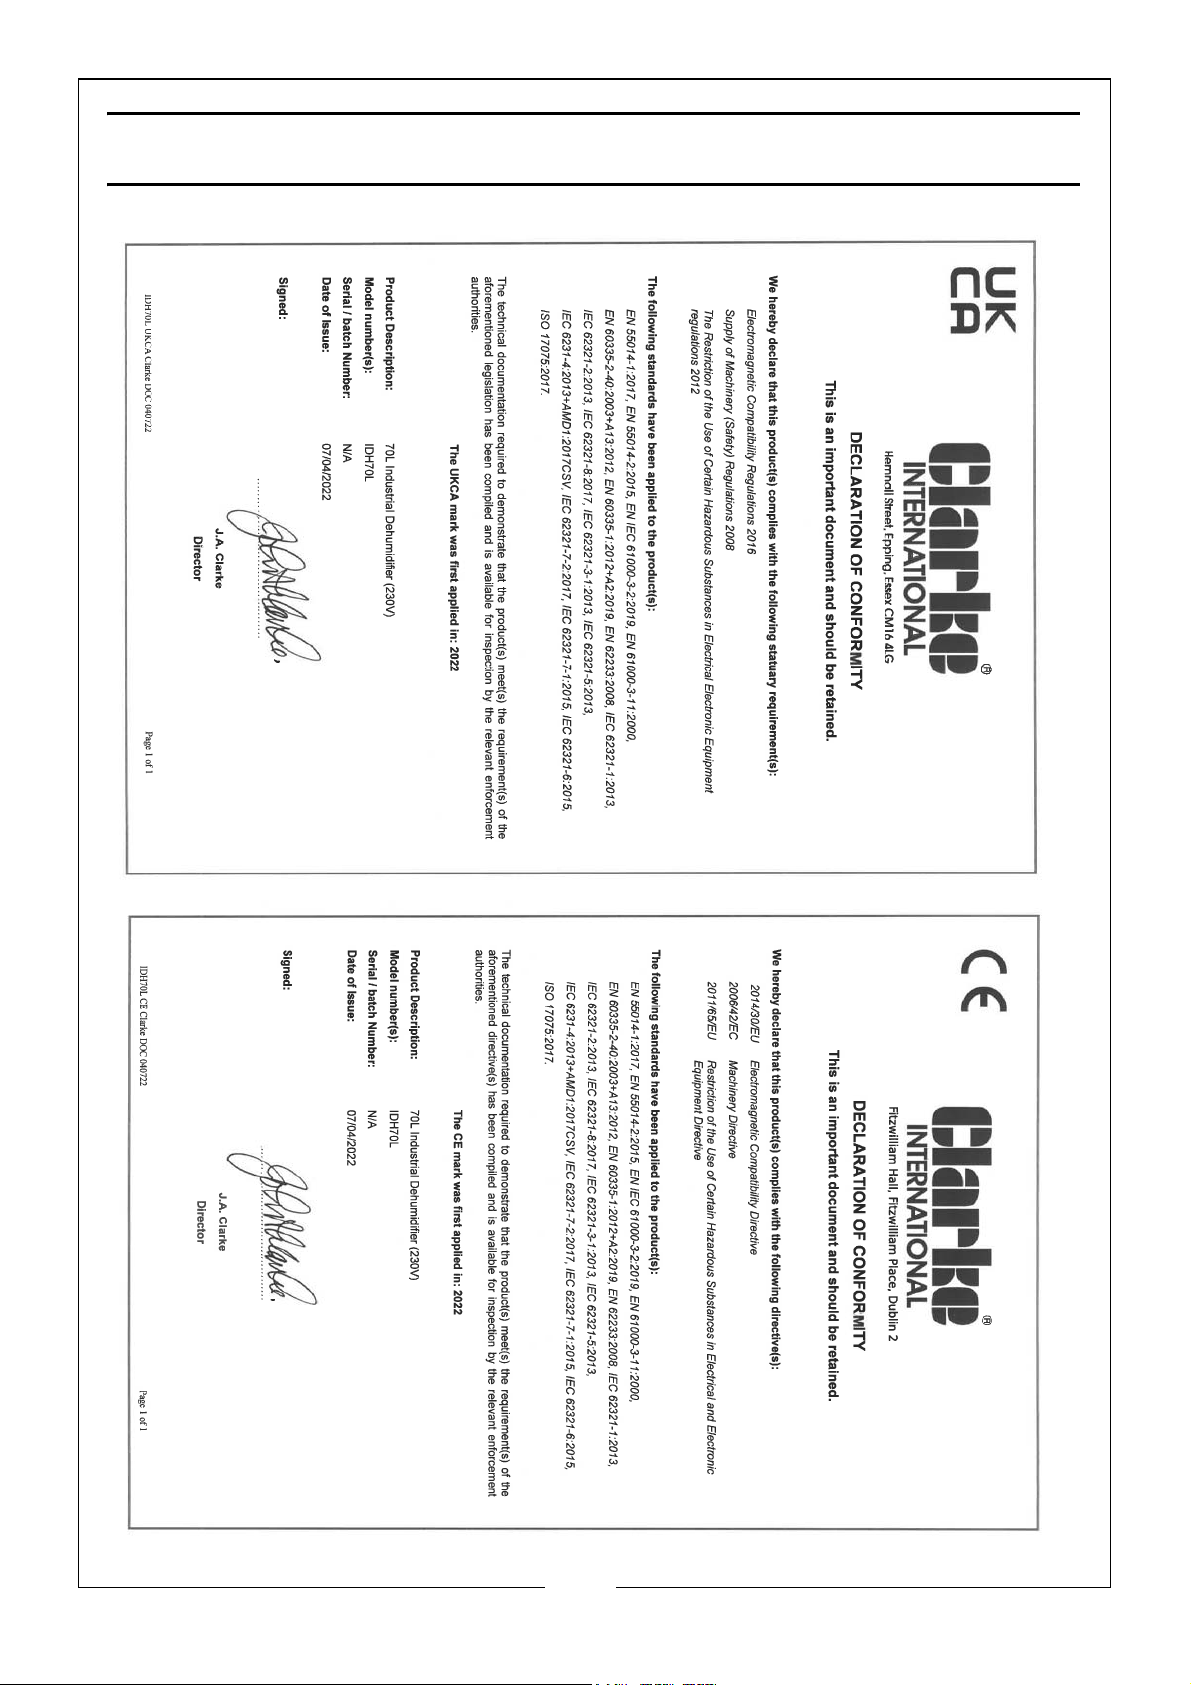
DECLARATION OF CONFORMITY - UKCA & CE
15
Parts & Service: 020 8988 7400 / E-mail: [email protected] or [email protected]
Page 16

 Loading...