

Page 1
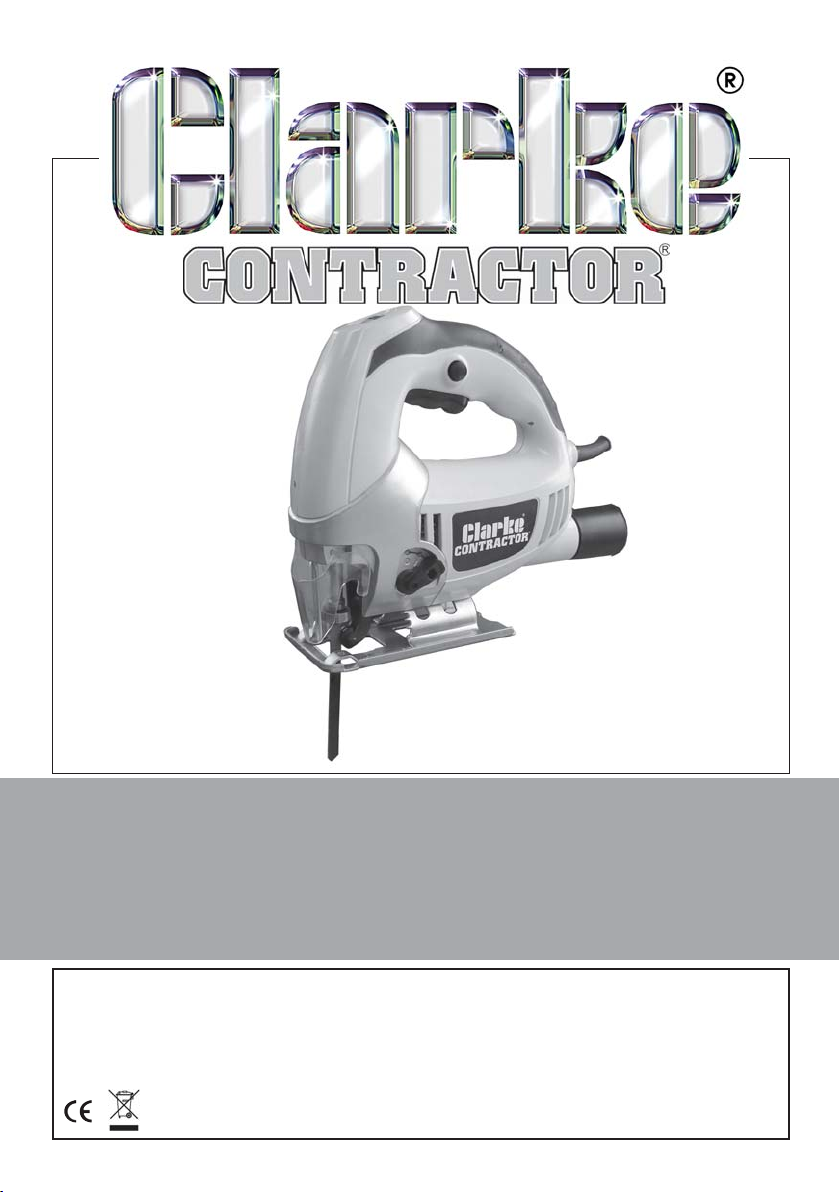
JIGSAW
Model No. CON750
PART NO: 6462180
OPERATING & MAINTENANCE
INSTRUCTIONS
GC0616
Page 2
INTRODUCTION
Thank you for purchasing this CLARKE Jigsaw.
Before attempting to use the machine, please read this manual thoroughly
and follow the instructions carefully. In doing so you will ensure the safety of
yourself and that of others around you, and you can look forward to your
purchase giving you long and satisfactory service.
GUARANTEE
This product is guaranteed against faulty manufacture for a period of 12
months from the date of purchase. Please keep your receipt which will be
required as proof of purchase.
This guarantee is invalid if the product is found to have been abused or
tampered with in any way, or not used for the purpose for which it was
intended.
Faulty goods should be returned to their place of purchase, no product can
be returned to us without prior permission.
This guarantee does not effect your statutory rights.
ENVIRONMENTAL PROTECTION
Do not dispose of this product with general household waste. It must be
disposed of according to the laws governing Waste Electrical and
Electronic Equipment at a recognised disposal facility.
Parts & Service: 020 8988 7400/E-mail:[email protected] or [email protected]
2
Page 3

TABLE OF CONTENTS
INTRODUCTION .................................................................................. 2
GUARANTEE ........................................................................................ 2
ENVIRONMENTAL PROTECTION ......................................................... 2
TABLE OF CONTENTS ..........................................................................3
SPARE PARTS .......................................................................................3
GENERAL SAFETY RULES .....................................................................4
JIGSAW SAFETY INSTRUCTIONS .........................................................6
ELECTRICAL CONNECTIONS .............................................................. 7
OVERVIEW .......................................................................................... 8
INSTALLING/CHANGING BLADES ...................................................... 9
OPERATION .........................................................................................9
MAINTENANCE ...................................................................................11
FAULT FINDING ................................................................................... 12
SPECIFICATION ...................................................................................13
COMPONENT PARTS ........................................................................... 14
CONSUMABLE SPARE PARTS ............................................................... 16
VIBRATION EMISSIONS .......................................................................17
DECLARATION OF CONFORMITY....................................................... 19
Parts & Service: 020 8988 7400/E-mail:[email protected] or [email protected]
3
Page 4

GENERAL SAFETY RULES
WORK AREA
1. Keep the work area clean and well lit. Cluttered and dark areas invite
accidents.
2. Do not operate power tools in explosive atmospheres such as in the
presence of flammable liquids, gasses or dust. Power tools create sparks
which may ignite dust or fumes.
3. Keep children and bystanders away while operating a power tool.
Distractions can cause you to lose control.
ELECTRICAL SAFETY
1. Power tools must match the power outlet. Never modify the plug in any
way. Do not use adaptor plugs with earthed (grounded) power tools.
Correct plugs and outlets will reduce the risk of electric shock.
2. Do not expose power tools to rain or wet conditions. Any water entering
power tools will increase the risk of electric shock.
3. Do not abuse the electrical cable. Never use the cord for pulling or
unplugging the power tool. Keep the cable away from sources of heat, oil,
sharp edges or moving parts. Damaged or tangled cables increase the
risk of electric shock.
4. When operating a power tool outdoors, use an extension cable suitable
for outdoor use. Using the correct cable reduces the risk of electric shock.
PERSONAL SAFETY
1. Stay alert, watch what you are doing and use common sense when you
are operating a power tool. Do not operate a power tool when you are
tired, ill or under the influence of alcohol, drugs or medication.
2. Wear personal protective equipment including eye protection. Safety
equipment such as a dust mask, non-skid shoes or hearing protection used
for appropriate conditions will reduce personal injuries. Use a face or dust
mask if operation is particularly dusty. Wear ear protectors/defenders as
the noise level of this machine can exceed 85dB (A).
3. Do not over-reach. Keep your proper footing and balance at all times. This
enables better control of the power tool in unexpected situations.
4. Avoid accidental starting of the machine. Ensure the switch is in the off
position and the locking button disengaged before plugging the machine
in to the power supply. Carrying power tools around with your finger on
the trigger or plugging in power tools that are switched on invites
accidents.
Parts & Service: 020 8988 7400/E-mail:[email protected] or [email protected]
4
Page 5

5. Dress properly. Do not wear loose clothing or jewellery which may get
caught in moving parts. Wear protective hair covering to contain long
hair. For best footing, wear rubber soled footwear. Keep floor clear of oil,
scrap wood, etc.
6. Concentrate on the job in hand, no matter how trivial it may seem. Be
aware that accidents are caused by carelessness due to familiarity.
7. Switch the machine OFF immediately after the task is completed.
POWER TOOL USE AND CARE
1. Do not force the machine. Use the correct power tool for your application.
It will do a better and safer job at the rate for which it was designed.
2. Do not use the power tool if the switch does not turn it on and off. Any
power tool that cannot be controlled with the switch is dangerous and
must be repaired.
3. Always disconnect the power tool from the power supply before making
any adjustments, changing blades or accessories, or storing the tool.
These measures will reduce the risk of the power tool starting accidentally.
4. Store power tools out of the reach of children and do not allow persons
unfamiliar with these instructions to operate the power tool. Power tools
are potentially dangerous in the hands of untrained users.
5. Maintain power tools in top condition. Keep tools/ machines clean for the
best and safest performance. Check for misalignment or binding of
moving parts, broken parts, or any condition that may affect the power
tool’s operation. If damaged, have the power tool repaired before use.
Many accidents are caused by poorly maintained power tools.
6. Use recommended accessories. The use of improper accessories could be
hazardous.
7. Machine cleanliness. Do not allow the ventilation slots in the machine to
become blocked with dust.
8. Check the power tool for damage before using the machine. Any
damaged part should be inspected to ensure that it will operate properly
and perform its intended function. Check for alignment of moving parts,
breakage of parts, mountings, and any other condition that may affect
the machine’s operation. Any damage should be properly repaired or
the part replaced. If in doubt, DO NOT use the machine. Consult your
local dealer.
SERVICE
1. When necessary, have your power tools serviced or repaired by a
qualified person using identical replacement parts. This will ensure that the
safety of the power tool is maintained.
Parts & Service: 020 8988 7400/E-mail:[email protected] or [email protected]
5
Page 6

JIGSAW SAFETY INSTRUCTIONS
1. Only use the jigsaw in the manner and for the functions described in these
instructions.
2. Using the correct blade. Use the appropriate saw blade for the material
being cut. Different blades are available from your Clarke dealer.
3. Use of the mains cable. Keep the mains cable well away from the
machine and ensure an adequate electrical supply is close at hand so
that the operation is not restricted by the length of the cable.
4. Working on the bench. Allow sufficient clearance beneath the work to
ensure the blade does not come into contact with the floor, table etc.
5. Switching off. Never place the saw on a table or bench if it has not
completely stopped. The saw blade will continue to reciprocate for a
short time after the trigger has been released to stop the saw.
6. Cutting of pipes. Do not cut hollow pipe and do not cut material above
the specified thickness.
7. Cutting into walls. Do not cut through walls or cavities before checking for
hidden electrical wires or water pipes etc.
8. Finishing cutting. Do not remove tool from work until the blade has
completely stopped. Do not touch the blade immediately after use, allow
time for it to cool.
9. Use outdoor extension leads. If working outdoors, always use an approved
cable extension suitable for the power rating of this tool (see
specifications), the conductor size should also be at least the same size as
that on the machine, or larger. When using a cable reel, always unwind
the cable completely. We strongly recommend that this machine is
connected to the mains supply via a Residual Current Device (RCD).
10. Cutting sheet materials. Do not cut work less than at least twice the pitch
of the saw blade. i.e. at least two teeth must be in contact with the work
at all times.
11. Always hold the saw by its insulated handle. The saws metal parts may
become conductive if the blade should come into contact with the
mains cable.
12. Beware of foreign objects. When cutting pre-used wood, ensure all nails
have been removed beforehand. Nails will damage the wood saw blade.
13. Cooling agents. When cutting metals, always use a cooling agent i.e.
cutting/soluble oil.
14. Changing the blade. Be careful during adjustment of the machine to
prevent trapping the fingers between a moving blade and fixed parts of
the machine. Ensure the blade is fully tightened before use.
Please keep these instructions in a safe place for future reference.
Parts & Service: 020 8988 7400/E-mail:[email protected] or [email protected]
6
Page 7
ELECTRICAL CONNECTIONS
WARNING! Read these electrical safety instructions thoroughly
before connecting the product to the mains supply.
Before switching the product on, make sure that the voltage of your electricity supply is the same as that indicated on the rating plate. This product is
designed to operate on 230VAC 50Hz. Do not connect it to any other power
source.
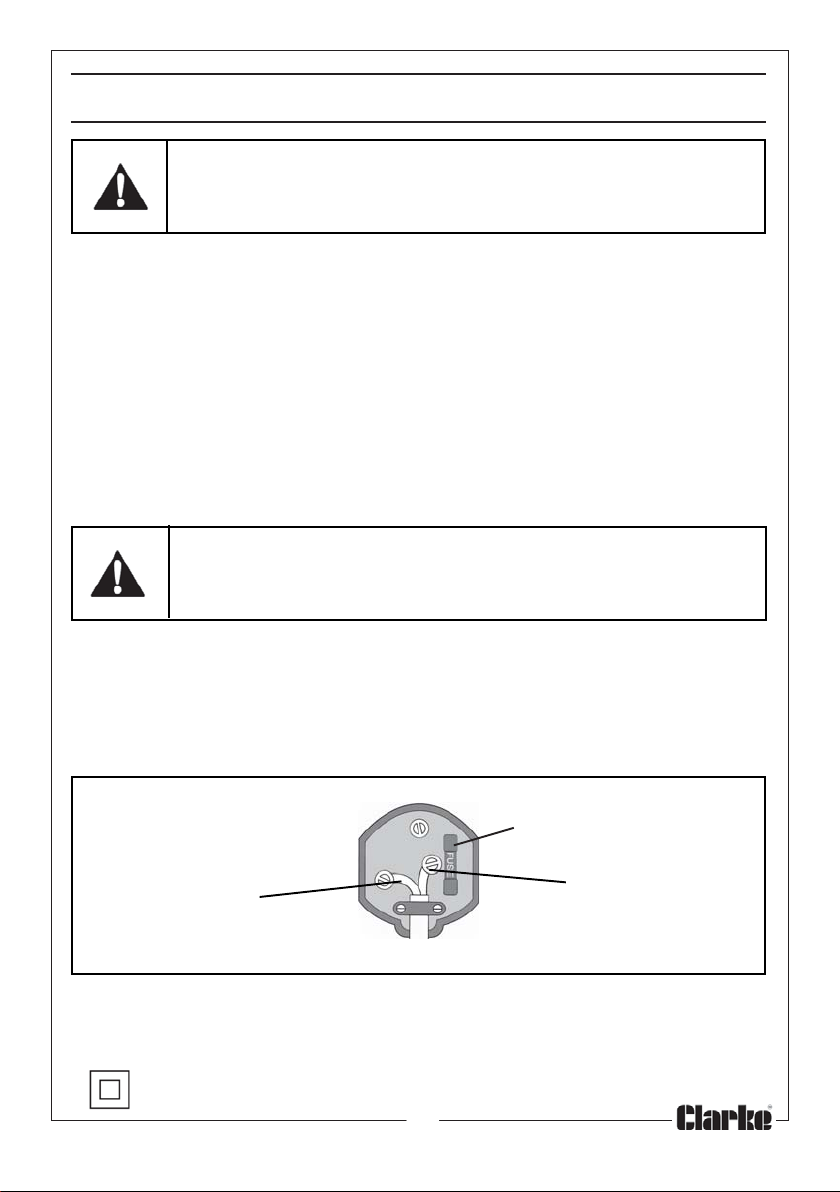
This product may be fitted with a non-rewireable plug. If it is necessary to
change the fuse in the plug, the fuse cover must be refitted. If the fuse cover
becomes lost or damaged, the plug must not be used until a suitable replacement is obtained.
If the plug has to be changed because it is not suitable for your socket, or
due to damage, it should be cut off and a replacement fitted, following the
wiring instructions shown below. The old plug must be disposed of safely, as
insertion into a mains socket could cause an electrical hazard.
WARNING! The wires in the power cable of this product are
coloured in accordance with the following code:
Blue = Neutral Brown = Live
If the colours of the wires in the power cable of this product do not correspond with the terminal markings of your plug, proceed as follows.
• The wire which is coloured Blue must be connected to the terminal which
is marked N or coloured Black.
• The wire which is coloured Brown must be connected to the terminal
which is marked L or coloured Red.
Plug must be BS1363/A approved.
Always fit a 13 Amp fuse.
Neutral Live
(Blue) (Brown)
Ensure that the outer sheath of the cable is firmly held by the clamp
We strongly recommend that this product is connected to the mains supply
via a Residual Current Device (RCD).
If in doubt, consult a qualified electrician. DO NOT attempt repairs yourself.
This symbol indicates that this is a Class II product and does not require
an earth connection.
Parts & Service: 020 8988 7400/E-mail:[email protected] or [email protected]
7
Page 8
OVERVIEW
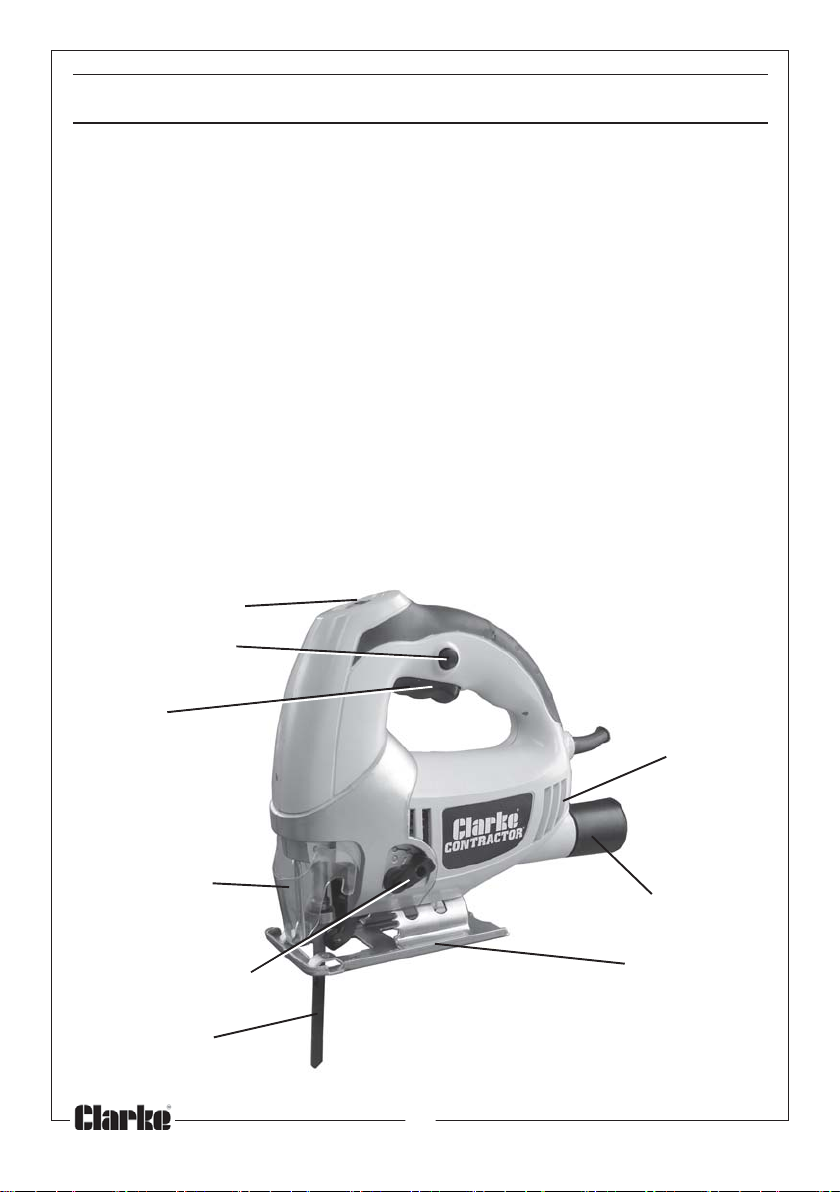
The CLARKE CON750 is a 750W variable-speed jigsaw fitted with a lock-on
button for continuous operation. It is fitted with a dust extract port for
connection to a vacuum system and is supplied with 1.8 metres of cable with
plug. The jigsaw is equipped with a T-shank SDS type quick-release blade
retention system for convenient replacement of saw blades.
When unpacking, check for damage or shortages etc. Any found should be
reported to your CLARKE dealer where the appliance was originally
purchased. This CON750 Jigsaw is supplied with the following components:
• 1 x Jigsaw
• 1 x Wood Cutting Blade
• 1 x Dust Extract Connector
• 1 x 3mm Hex Key
• 1 x Parallel Fence
• 1 x Instruction Manual (this document)
Speed Controller
Lock-on Button
Trigger
Ventilation Slots
Blade Guard
Dust Extract
Connector
Pendulum Switch Sole Plate
Jigsaw Blade
Parts & Service: 020 8988 7400/E-mail:[email protected] or [email protected]
8
Page 9
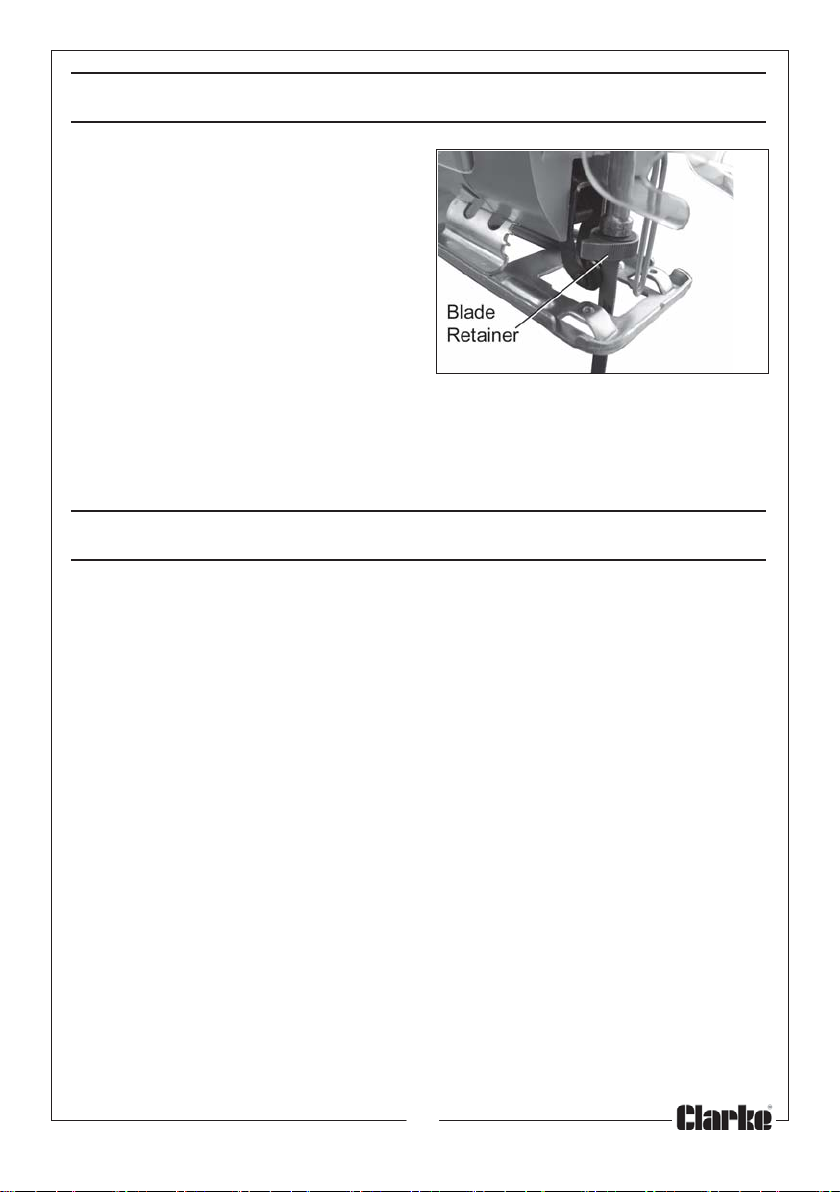
INSTALLING/CHANGING BLADES
1. Use only jigsaw blades with the
correct T-shank.
2. With the jigsaw disconnected from
the power supply, raise the blade
guard and press the blade retainer
to the right hand side.
3. Select the appropriate blade for
the job in hand, and insert it into
the blade holder as far as it will go,
with the teeth facing forwards.
4. Release the blade retainer, ensuring that the blade remains as far into the
retainer as it will go, pressing against the resistance of the internal spring.
5. Pull the blade to check that it is secure before restoring the power supply.
• Take care never to use cracked, blunt or damaged blades.
OPERATION
IMPORTANT: DO NOT plug in to the mains, unless you have ensured the jigsaw
is switched OFF. To do this, squeeze the trigger fully upwards, then release it.
The trigger is located under the grip.
1. Ensure that the workpiece being cut is securely held in place and that the
cut line is clearly marked.
2. Connect the vacuum extractor port to an extract system wherever
possible.
• The jigsaw is provided with a dust extract facility, where a vacuum
extractor may be connected to the rear of the machine. Please note
however, that this does not preclude the user from wearing a face mask
to prevent the inhalation of dust particles.
3. Place the sole-plate on the workpiece taking care that the blade is
vertical and correctly positioned in relation to the cut line without
touching it. Push the clear plastic blade guard down fully.
4. Ensure the blade is not striking on anything below the workpiece and that
the power cable is well away from the moving blade before starting the
saw.
• If cutting out an aperture, it will be necessary to drill a suitably sized hole in
the workpiece for use as a starting point.
• Note that the blade should emerge from the workpiece at every point of
the cut.
Parts & Service: 020 8988 7400/E-mail:[email protected] or [email protected]
9
Page 10
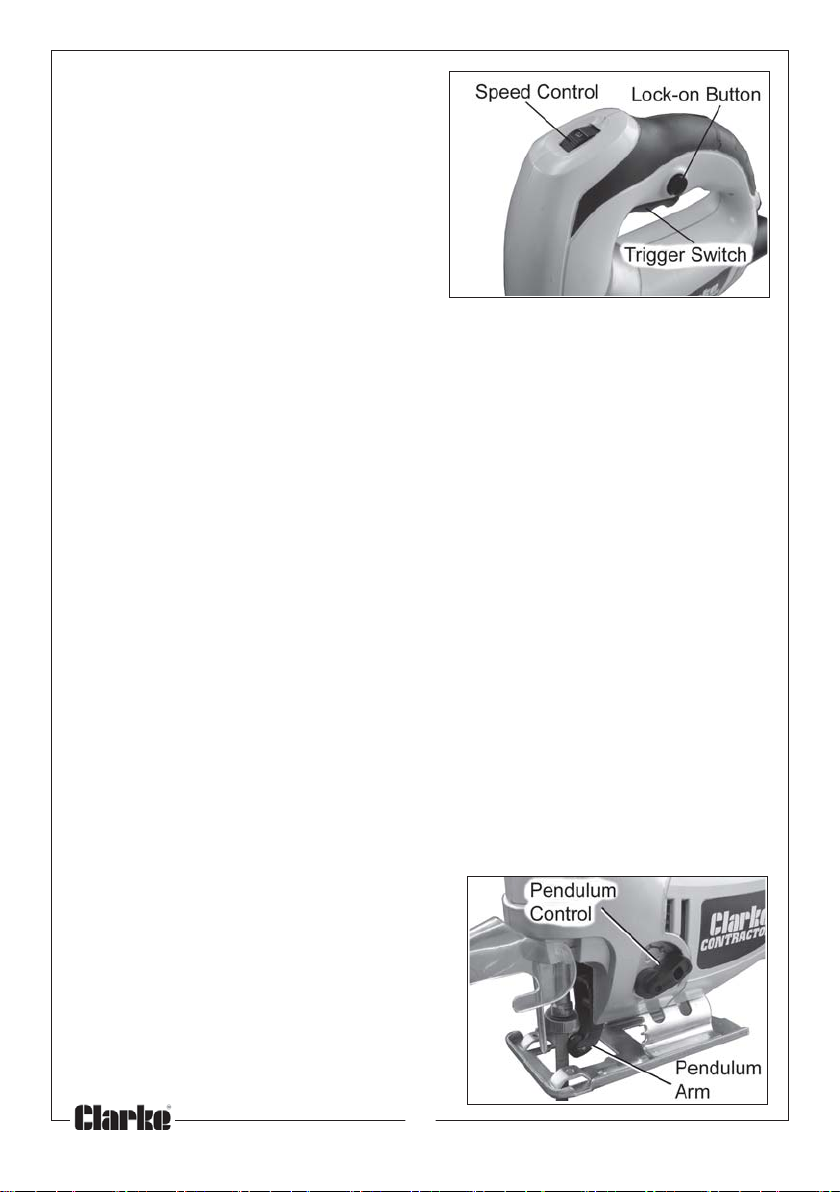
5. To start the jigsaw, squeeze the
trigger. Wait until the blade is running
at speed before attempting to cut
the workpiece.
6. Maintain the saw at constant speed
by pressing in the lock-on button.
• You can then release your finger
pressure on the trigger.
7. To stop the jigsaw if the lock-on
button is used, squeeze the trigger
fully in, then release it and the motor will stop.
USING THE JIGSAW
1. Place the sole-plate on the workpiece and squeeze the trigger to run the
jigsaw up to its working speed before letting the blade touch the cut line.
To make your cut, move the saw slowly forward along the cutting line.
2. Adjust the speed controller to suit the material being cut using the
following suggested settings as a starting point. However, the optimum
speed will be determined with practice.
Plastic 1 - 3
Steel 2 - 4
Hardboard 3 - 4
Ceramic, aluminium, non-ferrous metals 3 - 5
Timber, plywood & chipboard 4 - 5
4. Take extra care when cutting curves - move the blade slowly to avoid
stress on the blade.
5. When sawing, hold the jigsaw in front of you but do not put unnecessary
pressure on the blade and avoid applying lateral pressure.
6. Let the blade work through the workpiece, ensuring the sole plate is flush
with the workpiece.
ADJUSTING THE PENDULUM
The pendulum moves the blade away
from the cut on the down (non-cutting)
stroke. The pendulum can be particularly
useful when cutting thicker, denser
materials.
1. Adjust the control to suit the material
being worked, and try to balance its
use with adjustments to the speed of
the saw to achieve the optimum
setting for the job.
Parts & Service: 020 8988 7400/E-mail:[email protected] or [email protected]
10
Page 11
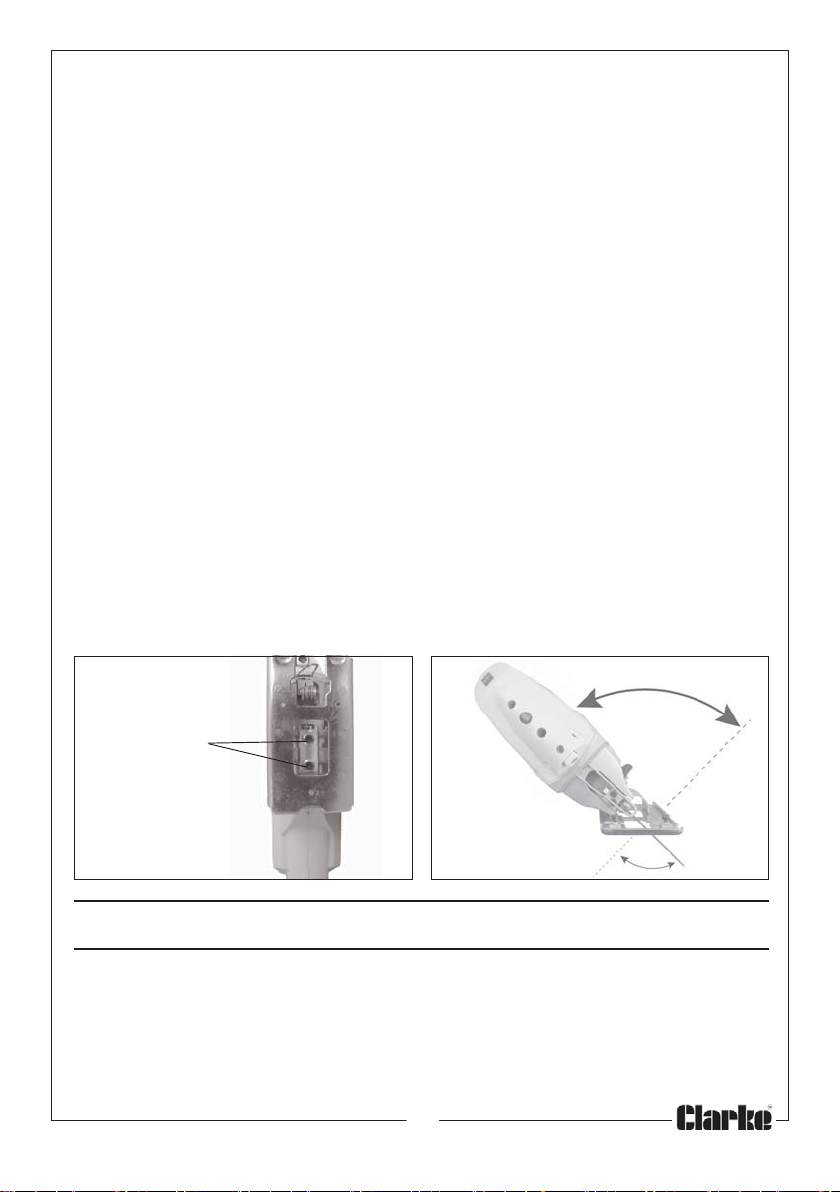
2. Adjust the pendulum control to suit the material being cut using the
following suggested settings as a starting point if required. Do not use the
pendulum action for cutting ceramics or metals.
Ceramics 0
Metal 0
Plywood, plastics 1 - 2
Timber, fibreboard & chipboard 1 - 3
CUTTING DIFFERENT MATERIALS
CUTTING WOOD
Check that any previously used timber being sawn does not contain any nails
or other metal objects which would damage the blade.
CUTTING METAL
Having chosen a suitable blade for cutting metal it is recommended to
lubricate the material and blade with cutting oil to prevent the tool from
overheating. Support the workpiece with wooden blocks on either side.
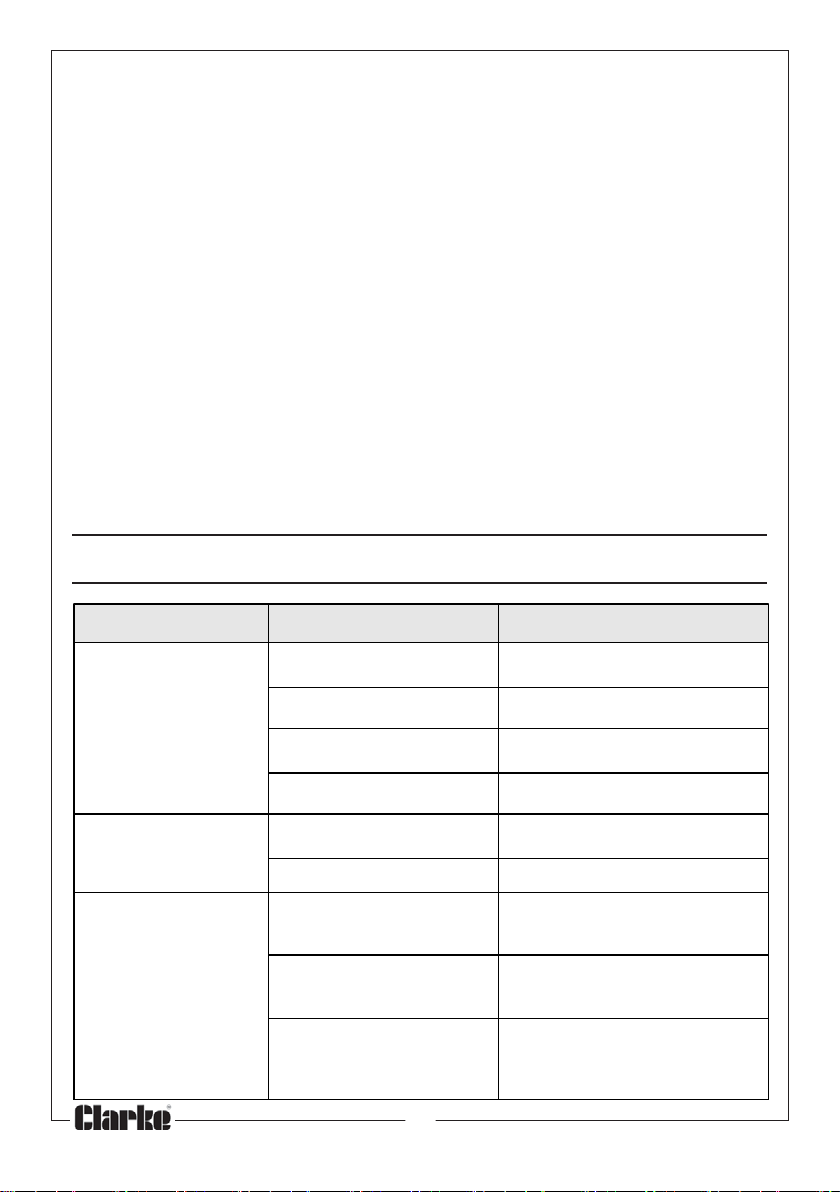
ADJUSTING THE SOLE PLATE
The sole-plate is adjustable so that bevels of up to 45° may be cut. Loosen the
two socket head screws under the sole-plate before adjusting it to the
desired angle and re-tightening the screws.
Socket head
screws
MAINTENANCE
CLEANING
1. To ensure constant air circulation, always keep air vents clear of
blockages, (use compressed air to clean the machine if possible).
2. After use, clean all dust and wood chippings from the jigsaw.
Parts & Service: 020 8988 7400/E-mail:[email protected] or [email protected]
11
Page 12
3. The blade locating clip and support roller should be kept clean and lightly
oiled at regular intervals.
4. Keep the handle clean and free from oil and grease.
5. Regularly clean the sole plate to prevent scratches and scores on the
surface.
GENERAL MAINTENANCE
1. Check the power cable to ensure it is sound and free from cracks, bare
wires etc. Avoid using solvents when cleaning plastic parts, most plastics
are susceptible to damage from the various types of commercial solvents.
2. Ensure all nuts, bolts and screws remain tight to ensure the jigsaw is in safe
working condition.
• All bearings etc, in this tool are lubricated with a sufficient amount
of high grade lubricant for the tools lifetime under normal
operating conditions, therefore no further lubrication is required.
• Only use the replacement blades specified for this product (consult
your CLARKE dealer).
• Refer to your CLARKE dealer if internal maintenance is required.
FAULT FINDING
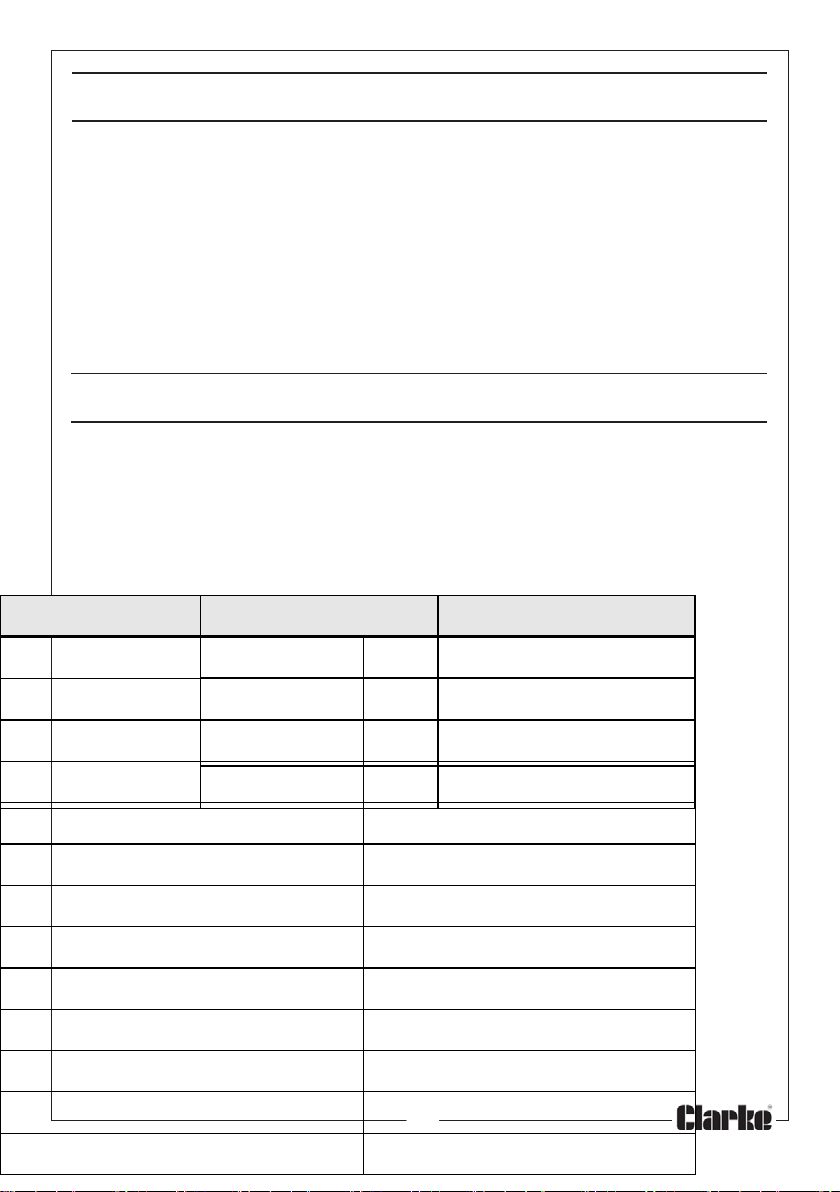
Problem Possible Cause Remedy
Tool will not operate. No power supply. Check supply and rectify as
Switch is faulty. Consult your Clarke dealer.
Fuse blown. Check and replace if
Motor is faulty. Consult your Clarke dealer.
Motor runs but blade
does not move.
Motor becomes hot. Unduly heavy use. Reduce the force applied to
Parts & Service: 020 8988 7400/E-mail:[email protected] or [email protected]
Blade fastening not tight. Secure blade.
Drive gear broken. Consult your Clarke dealer.
Air vents have become
blocked.
Low supply voltage. Ensure supply voltage is
12
necessary.
necessary.
the tool. Let the tool do the
work.
Clean out the air vents using
compressed air or clean with a
dry cloth.
correct. If an extension cable is
used, ensure it is of the correct
rating and is fully unwound.
Page 13
FAULT FINDING
SPECIFICATION
Problem Possible Cause Remedy
Item Specification
Heavy internal
Wei ght 2. 2 kg
sparking.
Dimensions (L x W x H) 218 x 67 x 217 mm
Excessive vibration. Blade not mounted
Voltage 230V / 50 Hz
Fuse Rating 13 Amp
Faulty motor. Consult your Clarke dealer.
Worn Brushes. Consult your Clarke dealer.
Check and rectify.
correctly.
Machine bearings worn. Consult your Clarke dealer.
Motor Power 750 W
Speed Control Type Variable
No-load Speed 0-3100 strokes/min
Max Depth of Cut Wood-80 mm, Metal 10 mm
Blade Change SDS 'quick release'
Dust Port Diameter 23.6 int / 35.8 ext
Sound Pressure Level 87.5 dB L
Sound Power Level 98.5 dB LWA
Vibration 6.6 m/s2 (wood) 7.2 m/s2 (steel)
Please note that the details and specifications contained herein, are correct
at the time of going to print. However, CLARKE International reserve the right
to change specifications at any time without prior notice.
Parts & Service: 020 8988 7400/E-mail:[email protected] or [email protected]
PA
13
Page 14
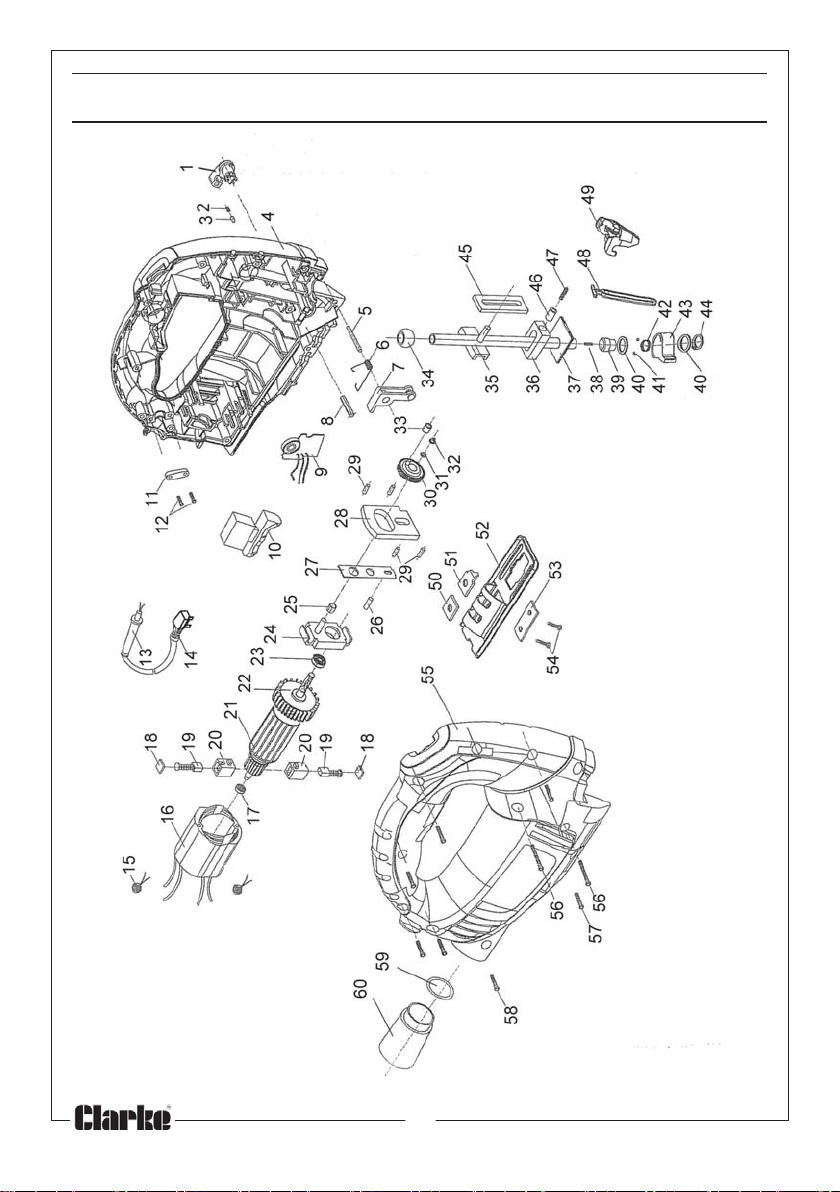
Page 15
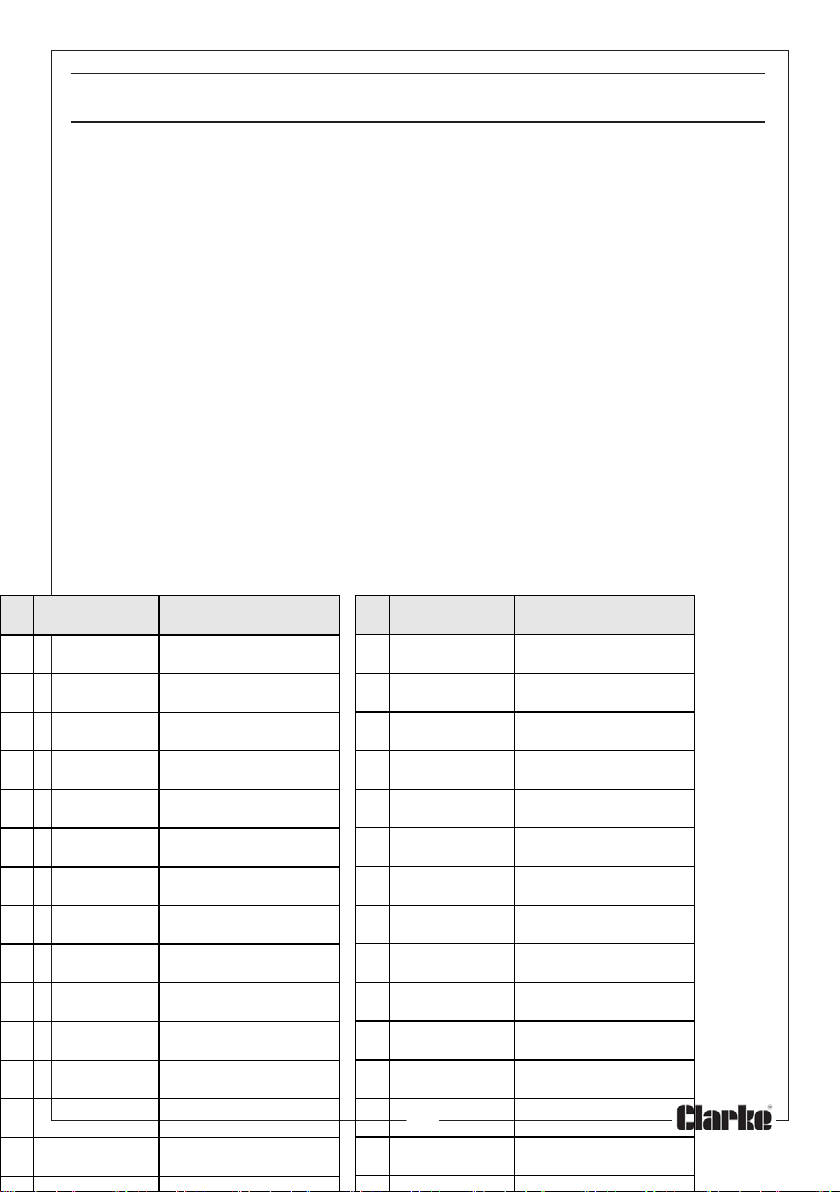
PARTS LIST
No Part No Description No Part No Description
1 WGCON75001 Pendulum Switch 25 WGCON75025 Bush
2 WGCON75002 Spring 26 WGCON75026 Pin
3 WGCON75003 Screw 27 WGCON75027 Actuating Plate
4 WGCON75004 Casing (LH) 28 WGCON75028 Drive Cage
5 WGCON75005 Hinge Pin 29 WGCON75029 Locator
6 WGCON75006 Spring 30 WGCON75030 Drive Spur
7 WGCON75007 Pendulum 31 WGCON75031 Washer
8 WGCON75008 Spiggot 32 WGCON75032 Circlip
9 WGCON75009 Speed Controller 33 WGCON75033 Drive Bush
10 WGCON75010 Trigger 34 WGCON75034 Hinge Ball
11 WGCON75011 Cable Clamp 35 WGCON75035 Blade Carrier
12 WGCON75012 Screw 36 WGCON75036 Guide Block
13 WGCON75013 Power Cable 37 WGCON75037 Base Plate
Parts & Service: 020 8988 7400/E-mail:[email protected] or [email protected]
14 WGCON75014 Mains Plug 38 WGCON75038 Spring
15
Page 16

PARTS LIST
CONSUMABLE SPARE PARTS
Replacement saw blades for wood and metal are available from your
CLARKE dealer.
Replacement Blades (10 per pack)
Wood:- Part no. 6462188
Metal:- Part no. 6462190
Parts & Service: 020 8988 7400/E-mail:[email protected] or [email protected]
16
Page 17
VIBRATION EMISSIONS
HAND-ARM VIBRATION
Employers are advised to refer to the HSE publication “Guide for Employers”.
All hand held power tools vibrate to some extent, and this vibration is
transmitted to the operator via the handle, or hand used to steady the tool.
Vibration from about 2 to 1500 Hertz is potentially damaging and is most
hazardous in the range from about 5 to 20 Hertz.
Operators who are regularly exposed to vibration may suffer from Hand Arm
Vibration Syndrome (HAVS), which includes ‘dead hand’, ‘dead finger’, and
‘white finger’. These are painful conditions and are widespread in industries
where vibrating tools are used.
The health risk depends upon the vibration level and the length of time of
exposure to it……in effect, a daily vibration dose.
Tools are tested using specialised equipment, to approximate the vibration
level generated under normal, acceptable operating conditions for the tool
in question. For example, a grinder used at 45° on mild steel plate, or a
sander on softwood in a horizontal plane etc.
a’
These tests produce a value‘
which represents the average vibration level of all tests taken, in three axes
where necessary, and a second figure ‘K’, which represents the uncertainty
factor, i.e. a value in excess of ‘a’, to which the tool could vibrate under
normal conditions. These values appear in the specification panel below.
, expressed in metres per second per second,
MODEL No: CON750
DESCRIPTION: JIGSAW
Declared vibration emission value in accordance
with EN12096
Measured vibration emission value -
a:
6.6m/s
2
Values determined according to EN28622-1
Parts & Service: 020 8988 7400/E-mail:[email protected] or [email protected]
17
Page 18
You will note that a third value is given in the specification - the highest
measured reading in a single plane. This is the maximum level of vibration
measured during testing in one of the axes, and this should also be taken into
account when making a risk assessment.
a
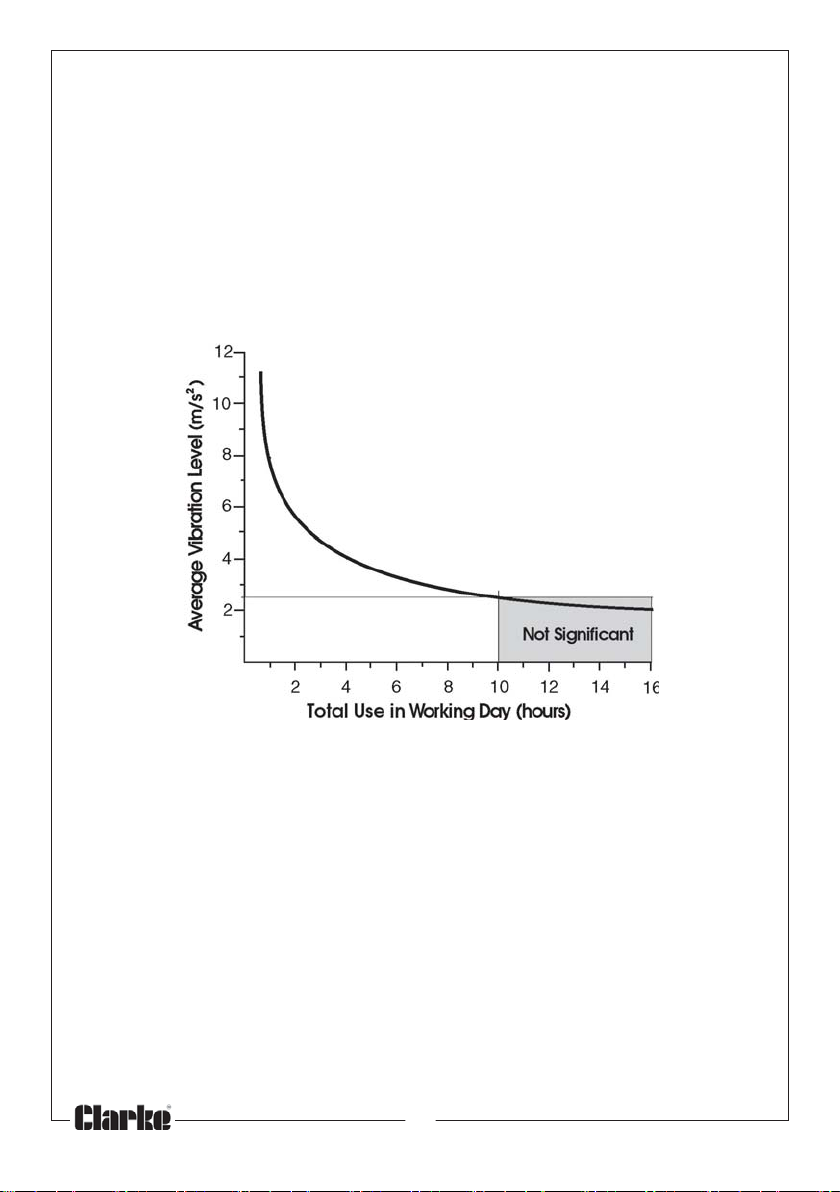
’ values in excess of 2.5 m/s2 are considered hazardous when used for
‘
prolonged periods. A tool with a vibration value of 2.8 m/s2 may be used for
up to 8 hours (cumulative) per day, whereas a tool with a value of 11.2 m/s
2
may be used for ½ hour per day only.
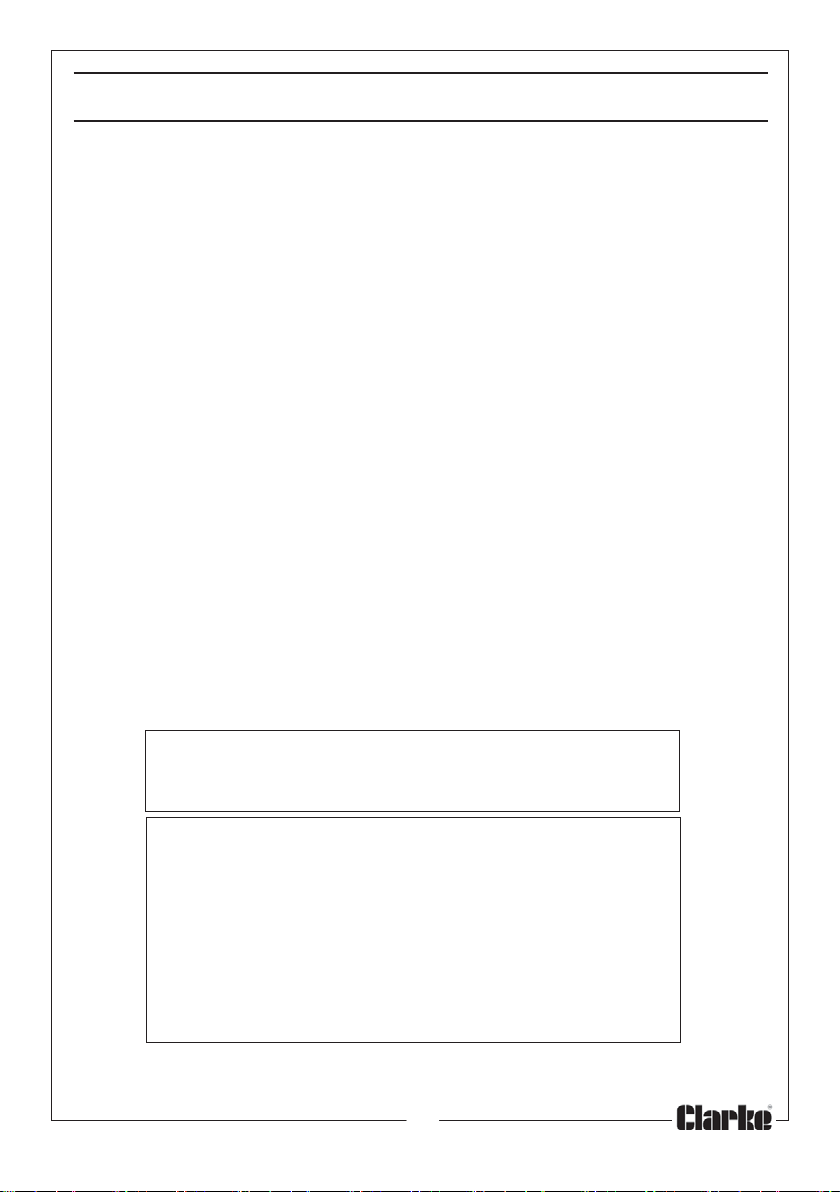
The graph below shows the vibration value against the maximum time the
respective tool may be used, per day.
The uncertainty factor should also be taken into account when assessing a
risk. The two figures ‘a’ and ‘K’may be added together and the resultant
value used to assess the risk.
It should be noted that if a tool is used under abnormal, or unusual conditions,
then the vibration level could possibly increase significantly. Users must always
take this into account and make their own risk assessment, using the graph
above as a reference.
Some tools with a high vibration value, such as impact wrenches, are
generally used for a few seconds at a time, therefore the cumulative time
may only be in the order of a few minutes per day. Nevertheless, the
cumulative effect, particularly when added to that of other hand held power
tools that may be used, must always be taken into account when the total
daily dose rate is determined.
Parts & Service: 020 8988 7400/E-mail:[email protected] or [email protected]
18
Page 19

DECLARATION OF CONFORMITY
Parts & Service: 020 8988 7400/E-mail:[email protected] or [email protected]
19
Page 20

 Loading...